. Enjoy your baking adventure! You’ve learned how to make cheesy garlic breadsticks from scratch. We covered essential ingredients, step-by-step instructions, and tips for perfecting your dish. Remember, experimenting with different cheeses and spices can enhance your flavors. Feel free to try gluten-free options if needed. Store leftovers properly and enjoy them later. Now, grab your ingredients, get cooking, and delight in the warm aroma of fresh breadsticks. You’ll impress everyone with your skills!](https://yumymoments.com/wp-content/uploads/2025/06/2fadc4d2-9652-4291-949f-4fd4311dfa6f-768x768.webp)
If you love breadsticks and cheese, you’re in for a treat! These Cheesy Garlic Breadsticks are easy to make and packed with flavor. In this post, I’ll share a simple recipe that will have your kitchen smelling amazing. You can enjoy these warm, cheesy bites as a snack or side dish. Let’s get started on making your new favorite appetizer!
Ingredients
List of Essential Ingredients
– 2 cups all-purpose flour
– 1 packet (2 ¼ teaspoons) instant yeast
– 1 teaspoon granulated sugar
– 1 teaspoon sea salt
– ¾ cup warm water (around 110°F)
– 2 tablespoons extra virgin olive oil
– 3 cloves of garlic, minced
– 1 teaspoon dried oregano
– 1 teaspoon dried parsley
– 1 cup shredded mozzarella cheese
– ¼ cup grated Parmesan cheese
– Additional olive oil for brushing
– Marinara sauce for dipping
To make cheesy garlic breadsticks, you need simple yet tasty ingredients. Each one adds to the breadsticks’ flavor and texture.
First, all-purpose flour is the base. It gives structure to the dough. Instant yeast helps it rise quickly. Sugar feeds the yeast, while salt adds flavor.
Warm water activates the yeast. Olive oil keeps the breadsticks moist. Minced garlic brings a bold flavor. Dried oregano and parsley add a nice herbal touch.
The cheeses create that gooey, cheesy goodness. Mozzarella gives stretch, while Parmesan adds a sharp taste. Finally, a bit of olive oil brushed on top enhances the flavor and helps with browning.
These ingredients come together to create an irresistible treat.Enjoy the process of making these delicious cheesy garlic breadsticks!
Step-by-Step Instructions
Preparation of Dough
First, gather your dry ingredients. You will need:
– 2 cups all-purpose flour
– 1 packet (2 ¼ teaspoons) instant yeast
– 1 teaspoon granulated sugar
– 1 teaspoon sea salt
In a large mixing bowl, mix these ingredients well. This step is key to a good rise. Next, add warm water and olive oil. Use ¾ cup of warm water, about 110°F. Stir until the dough starts to form.
Kneading the Dough
Now, it’s time to knead! Transfer the dough to a floured surface. Knead it for about 5-7 minutes until smooth. If the dough feels sticky, sprinkle in more flour. The right dough consistency is soft and elastic. You want it to bounce back when you poke it.
Rising the Dough
Once kneaded, place the dough in a greased bowl. Cover it with a clean kitchen towel. Let it rise in a warm spot for about 30 minutes. The dough should double in size. A warm, draft-free place is best for this.
Shaping and Baking
Preheat your oven to 425°F (220°C). After the dough has risen, punch it down gently. This releases air. Roll it out on a floured surface into a rectangle, about ½ inch thick.
Brush the surface with olive oil. Sprinkle minced garlic, dried oregano, and dried parsley on top. Then, add shredded mozzarella and grated Parmesan cheese. Cut the dough into strips, about 1 inch wide. Place them on a baking sheet lined with parchment paper.
Bake for 12-15 minutes, or until golden brown. The cheese should be bubbly and slightly browned. Enjoy the aroma as they bake! For an extra flavor boost, brush warm breadsticks with a little more olive oil after baking.
Tips & Tricks
Perfecting the Cheesy Garlic Breadsticks
To get the best texture and aroma, start with fresh ingredients. Use warm water around 110°F to activate the yeast. Knead the dough until it’s smooth and feels elastic. This step is key for a great rise and chew. When you shape the breadsticks, roll out the dough to about ½ inch thick. This thickness helps the breadsticks cook evenly.
For baking, I recommend using a preheated oven at 425°F. The hot oven creates that perfect golden crust. Bake until the cheese bubbles and the sticks turn golden brown, usually 12-15 minutes. This timing ensures a soft inside and a crispy outside.
Enhancing Flavors
To boost the flavor, think about adding herbs or spices. Fresh basil or thyme can add a nice touch. If you want a stronger garlic flavor, you can mix in garlic powder with the dry ingredients. A sprinkle of red pepper flakes can also give a kick to your breadsticks.
For a garlic lover’s twist, try adding roasted garlic. Simply mash some roasted garlic cloves and mix them into the dough. This will give your breadsticks a deep, rich flavor that garlic fans will love.
Serving Suggestions
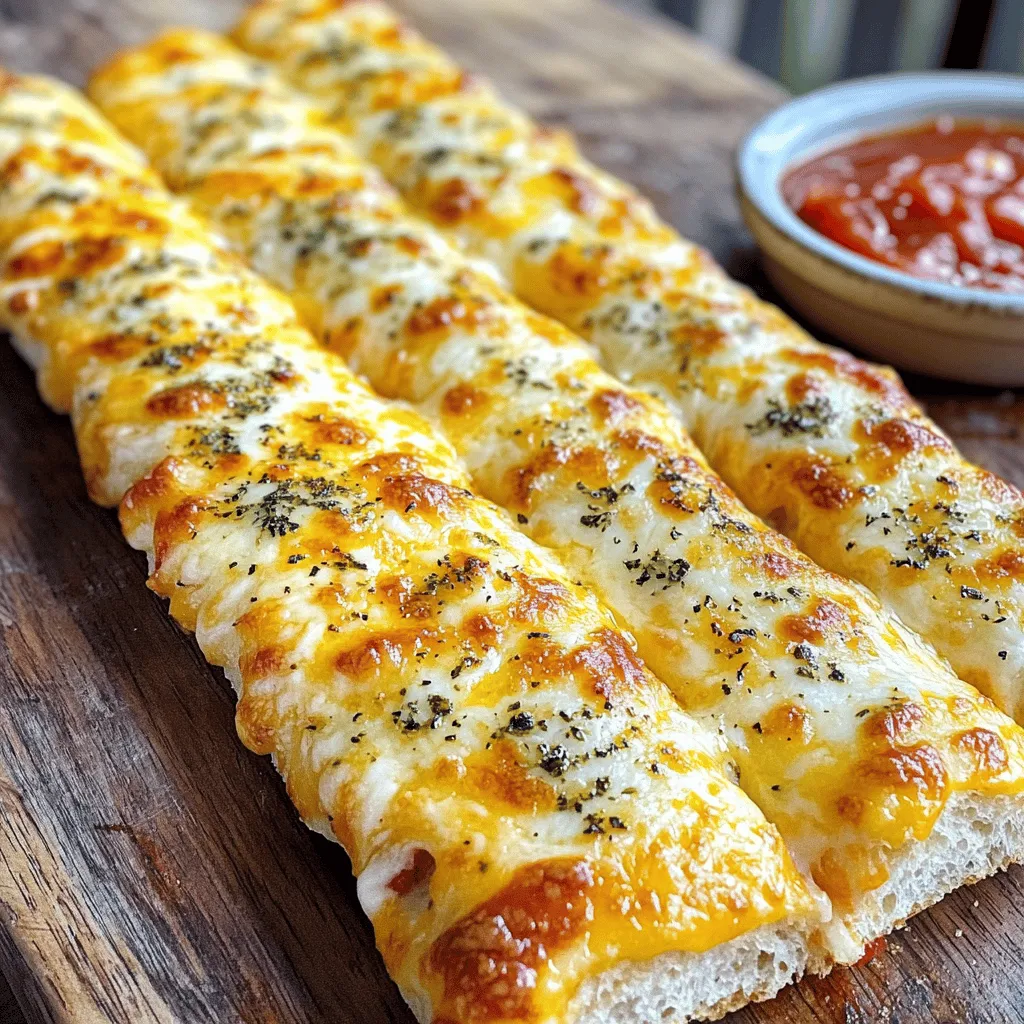
Presentation is key for any dish. Serve your warm cheesy garlic breadsticks on a rustic wooden board. Pair them with a vibrant bowl of marinara sauce for dipping. For a finishing touch, sprinkle fresh herbs or a bit of extra Parmesan on top.
You can also serve these breadsticks with pasta dishes or alongside salads. They pair well with a glass of red wine too. Enjoy experimenting with different meals or beverages to find your favorite match.
Variations
Cheese Alternatives
You can change the cheese to create new flavors. Mozzarella is great, but try cheddar or gouda for a twist. Mixing cheeses adds depth. Try half mozzarella and half cheddar for a rich taste. You might love the way it melts and tastes!
Herb and Spice Variations
Fresh herbs make a big difference. Use basil or thyme for a garden touch. Dried herbs work too and last longer. Red pepper flakes add heat. Italian seasoning gives a classic taste. Experiment with different herbs and spices to find your favorite mix!
Gluten-Free Options
If you need a gluten-free option, use gluten-free flour. Mix it well with the other ingredients. Make sure to follow the same steps in the recipe. The dough may feel different, but it should still rise. Bake until golden brown. Enjoy cheesy garlic breadsticks that fit your needs!
Storage Info
Storing Leftovers
To keep your cheesy garlic breadsticks fresh, store them in the fridge. Place them in an airtight container. This will keep them from drying out. Use a container that fits them snugly. You can also wrap them tightly in plastic wrap. This helps keep them soft and tasty.
Reheating Instructions
When you want to enjoy your breadsticks again, you can reheat them either in the oven or microwave. For the oven, preheat it to 350°F (175°C). Place the breadsticks on a baking sheet. Heat for 5-10 minutes until they are warm. This keeps the texture crisp. If you choose the microwave, heat them for 20-30 seconds. Watch them closely. They can get chewy if heated too long.
Freezing for Later
Freezing your cheesy garlic breadsticks is simple. First, let them cool completely after baking. Then, wrap each breadstick in plastic wrap. Place them in a freezer-safe bag or container. Make sure to remove as much air as possible. When you’re ready to eat, take them out. Thaw them in the fridge overnight. Reheat as usual to bring back that fresh taste. Enjoy your cheesy garlic breadsticks anytime!
FAQs
How can I make cheesy garlic breadsticks without yeast?
You can make quick cheesy garlic breadsticks using baking powder. This method skips the rise time. Just mix the dry ingredients, add milk, and stir until smooth. Spread the dough on a baking sheet, add garlic and cheese, and bake. You’ll get soft, cheesy breadsticks in no time.
What can I dip cheesy garlic breadsticks in besides marinara?
You can dip cheesy garlic breadsticks in many sauces. Consider ranch dressing for a creamy touch. Garlic butter adds a rich flavor. For a spicy kick, try sriracha mayo. You can also serve them with pesto for a fresh taste. Endless options make each bite exciting!
How do I know when the breadsticks are done baking?
Look for a golden-brown color on top. The cheese should be bubbly and slightly browned. If you tap the breadsticks, they should sound hollow. Use a toothpick to check the middle; it should come out clean. These signs mean your cheesy garlic breadsticks are perfectly baked.
Can I add toppings to my cheesy garlic breadsticks?
Absolutely! You can customize your cheesy garlic breadsticks with many toppings. Crumbled bacon adds a savory crunch. Sliced jalapeños give a spicy kick. Fresh herbs like basil or parsley enhance flavor. You can even sprinkle extra cheese for a gooey finish. Get creative and make them your own!Enjoy your baking adventure!
You’ve learned how to make cheesy garlic breadsticks from scratch. We covered essential ingredients, step-by-step instructions, and tips for perfecting your dish. Remember, experimenting with different cheeses and spices can enhance your flavors. Feel free to try gluten-free options if needed. Store leftovers properly and enjoy them later. Now, grab your ingredients, get cooking, and delight in the warm aroma of fresh breadsticks. You’ll impress everyone with your skills!
. Enjoy your baking adventure! You’ve learned how to make cheesy garlic breadsticks from scratch. We covered essential ingredients, step-by-step instructions, and tips for perfecting your dish. Remember, experimenting with different cheeses and spices can enhance your flavors. Feel free to try gluten-free options if needed. Store leftovers properly and enjoy them later. Now, grab your ingredients, get cooking, and delight in the warm aroma of fresh breadsticks. You’ll impress everyone with your skills!](https://yumymoments.com/wp-content/uploads/2025/06/2fadc4d2-9652-4291-949f-4fd4311dfa6f-250x250.webp)
