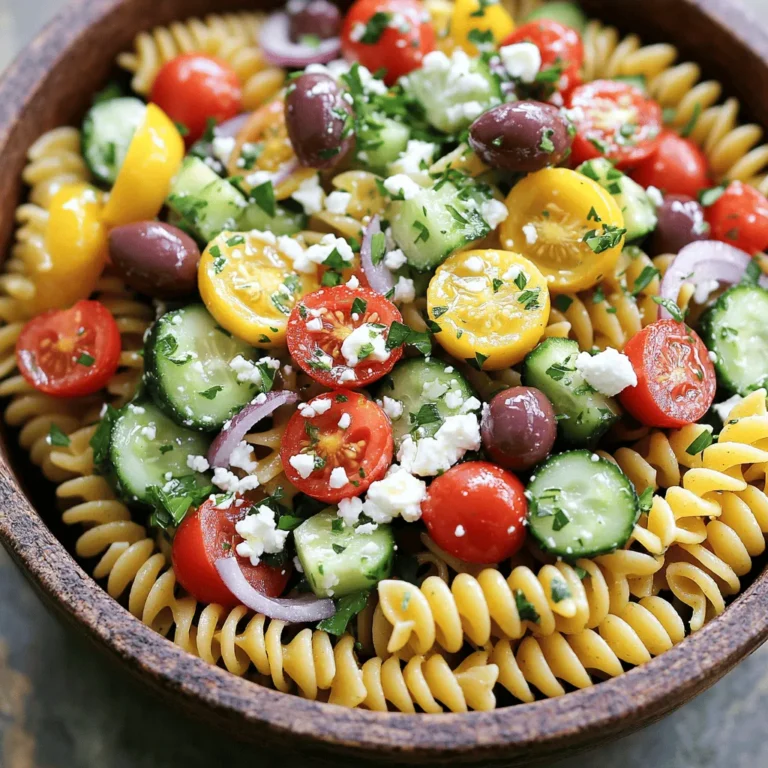
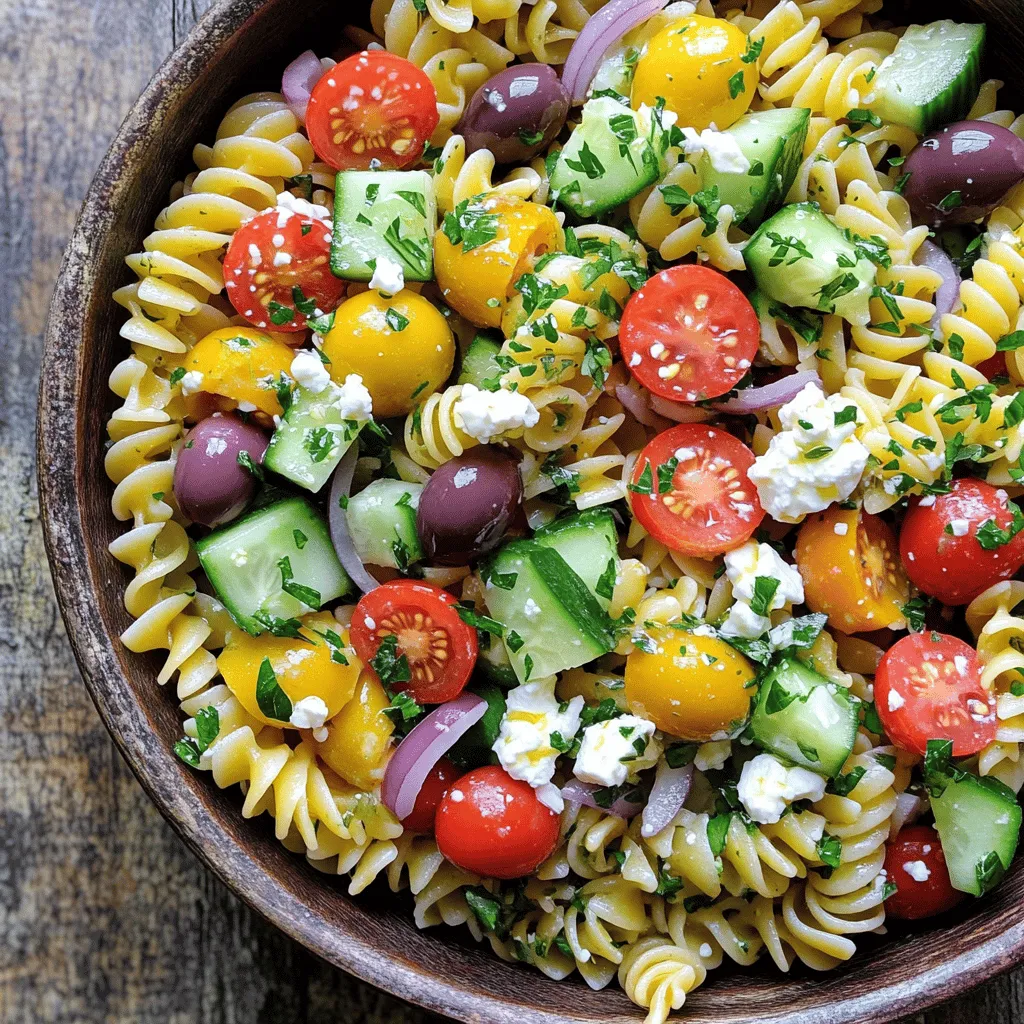
Looking for a quick, tasty dish? This Easy Greek Pasta Salad is just what you need! Full of vibrant veggies and bold flavors, it’s perfect for lunch, dinner, or a party. With simple steps and fresh ingredients, you’ll impress your friends and family. Plus, I’ll share tips to make it even better. Let’s dive into this refreshing recipe that will make your taste buds sing!
Ingredients
List of Ingredients
– 2 cups rotini pasta
– 1 cup cherry tomatoes, halved
– 1 cup cucumber, diced into bite-sized pieces
– 1/2 red onion, finely chopped
– 1/2 cup Kalamata olives, pitted and sliced
– 1/2 cup feta cheese, crumbled
– 1/4 cup extra-virgin olive oil
– 2 tablespoons red wine vinegar (or substitute with apple cider vinegar)
– 1 tablespoon freshly squeezed lemon juice
– 1 teaspoon dried oregano
– Salt and pepper to taste
– Fresh parsley, chopped, for garnish
Key Ingredient Highlights
Each ingredient brings its own flavor. Rotini pasta holds the dressing well. Cherry tomatoes add sweetness and color. Cucumbers offer a crisp texture. Red onion gives a sharp bite. Kalamata olives add briny notes. Feta cheese provides a creamy, tangy element. Olive oil and vinegar create a rich dressing. Lemon juice brightens every bite. Dried oregano adds a classic Greek touch. Fresh parsley makes the dish pop.
Tips for Choosing Fresh Produce
When picking tomatoes, look for bright colors and firm skins. Cucumbers should be firm with no soft spots. Choose red onions that feel heavy and have shiny skins. For olives, go for ones packed in brine for better flavor. Fresh herbs should be vibrant and fragrant. Always smell before buying to ensure freshness. Selecting high-quality ingredients makes your pasta salad stand out.
Step-by-Step Instructions
Cooking the Pasta
To start, bring a large pot of salted water to a boil. The salt adds flavor to the pasta. Once boiling, add 2 cups of rotini pasta. Cook it according to the package instructions until it is al dente. This means it should be firm when you bite into it. After cooking, drain the pasta in a colander. Rinse it under cold water. This stops the cooking and cools it down quickly.
Combining the Ingredients
In a big mixing bowl, combine the cooled pasta with the other ingredients. Add 1 cup of halved cherry tomatoes, 1 cup of diced cucumber, 1/2 finely chopped red onion, and 1/2 cup of sliced Kalamata olives. Next, add 1/2 cup of crumbled feta cheese. Mix everything gently so that all the ingredients are well distributed.
Making the Dressing
Now, let’s prepare the dressing. In a small bowl, whisk together 1/4 cup of extra-virgin olive oil, 2 tablespoons of red wine vinegar (or you can use apple cider vinegar), and 1 tablespoon of freshly squeezed lemon juice. Then add 1 teaspoon of dried oregano, salt, and pepper. Mix until everything is well blended.
Dressing the Salad
Drizzle the dressing over the pasta mixture in the big bowl. Toss everything together gently. You want to coat each ingredient with the dressing for the best flavor. Be careful not to break the pasta or feta cheese while tossing.
Final Touches
Taste the pasta salad and adjust the seasoning. You can add more salt or pepper if you like. Cover the bowl with plastic wrap or a lid. Place it in the refrigerator and let it chill for at least 30 minutes. This helps the flavors mix together nicely. Just before serving, sprinkle some chopped fresh parsley on top for a nice pop of color and flavor.
Tips & Tricks
Serving Suggestions
Serve your Greek pasta salad chilled. It makes a great side dish for grilled meats. You can also enjoy it as a light lunch. For a complete meal, add some grilled chicken or shrimp. If you want a vegetarian option, add chickpeas or avocado. This salad is perfect for picnics or potlucks. You can pack it in individual containers for easy sharing.
Flavor Enhancements
To boost the flavor, use fresh herbs like basil or dill. Fresh lemon zest adds a bright touch. You can also try different types of olives for variety. If you love spice, add a pinch of red pepper flakes. A sprinkle of toasted pine nuts or walnuts can add crunch. For a sweeter note, toss in some roasted red peppers.
Common Mistakes to Avoid
Do not skip rinsing the pasta after cooking. This stops the cooking process and cools it down. Avoid overcooking your pasta; it should be al dente. If you add too much dressing, the salad can become soggy. Always taste your salad before serving. This way, you can adjust the seasoning to your liking. Lastly, don’t forget to chill the salad for at least 30 minutes. This step helps all the flavors blend well.
Variations
Ingredient Substitutions
You can swap ingredients in your Greek pasta salad. If you don’t like olives, try artichokes. For cheese, goat cheese works great too. If you want a twist, add some sun-dried tomatoes or bell peppers. You can even use quinoa instead of pasta for a gluten-free option.
Dietary Modifications
Want to make it vegan? Skip the feta cheese or use a vegan cheese. For a gluten-free salad, choose gluten-free pasta or grains like rice. Many people enjoy adding chickpeas for protein. This makes your salad filling and delicious.
Regional Variations of Greek Pasta Salad
Different places in Greece have unique takes on pasta salad. In some areas, they mix in roasted peppers or capers. Others might add fresh herbs like dill or mint. Each region has its own flavors and ideas, making this dish fun to explore.
Storage Info
How to Store Leftovers
To store your Greek pasta salad, put it in an airtight container. Make sure the lid seals well to keep air out. You can also cover the bowl tightly with plastic wrap. This helps the salad stay fresh and tasty.
Shelf Life Guidelines
Your salad lasts about 3 to 5 days in the fridge. The veggies and pasta remain good during this time. However, the salad may become mushy if stored too long. Always check for any strange smells or colors before eating. If it looks off, throw it out.
Best Practices for Refreshing Chilled Salad
To refresh your chilled salad, give it a good stir before serving. If it looks dry, add a splash of olive oil or lemon juice. This helps revive the flavors. You can also add a bit more salt and pepper to taste. If you like, toss in some fresh herbs for extra zest.
FAQs
How can I make my Greek pasta salad more flavorful?
To make your Greek pasta salad more flavorful, add herbs and spices. Fresh basil or dill can enhance taste. You can also add roasted red peppers for sweetness. A pinch of garlic powder or some red pepper flakes will add a nice kick. Don’t forget to taste and adjust salt and pepper as you mix.
Can I prepare this salad in advance?
Yes, you can prepare this salad in advance. In fact, making it a day ahead can help the flavors blend better. Just store it in the fridge and cover it tightly. When you’re ready to serve, give it a quick toss to mix everything again.
What is the best pasta to use for Greek pasta salad?
Rotini pasta is the best choice for Greek pasta salad. Its shape holds onto the dressing and other ingredients well. You can also use penne or bowtie pasta if you prefer. Just make sure to cook it al dente for the best texture.
Is it necessary to chill the pasta salad before serving?
Chilling the pasta salad is not strictly necessary, but it helps the flavors meld. A cold salad is refreshing, especially on warm days. I suggest chilling it for at least 30 minutes before serving for the best taste.
Can I make the dressing ahead of time?
Yes, you can make the dressing ahead of time. Mix the olive oil, vinegar, and lemon juice in a jar. Store it in the fridge until ready to use. Just give it a good shake before pouring it over the salad. This way, you save time when you prepare your meal.
This blog post covered how to make a tasty Greek pasta salad. We went over the key ingredients and tips for choosing fresh ones. I provided step-by-step instructions for cooking and combining everything. You now have serving ideas and tricks to make flavors pop. Don’t forget about the variations to fit your needs. Lastly, I shared how to store leftovers for later. Enjoy creating your own twist on this dish!

