Craving a simple dessert that’s both tasty and impressive? You’re in the right place! My No Bake Oreo Cheesecake Bars are the perfect treat for any occasion. With just a handful of ingredients and no baking required, you can whip these delicious bars up in no time. Follow my easy steps, and you’ll have a sweet treat that everyone will love. Let’s get started on this delightful dessert!
Ingredients
To make No Bake Oreo Cheesecake Bars, you need to gather a few simple ingredients. Here’s the list:
– 24 Oreo cookies, finely crushed
– 5 tablespoons unsalted butter, melted
– 16 oz cream cheese, softened
– 1 cup powdered sugar
– 1 teaspoon pure vanilla extract
– 1 cup heavy whipping cream
– 10 Oreo cookies, coarsely chopped for garnish
These ingredients bring together rich flavors and a creamy texture. The crushed Oreos create a delicious crust that pairs perfectly with the smooth cheesecake filling. The heavy cream adds a lightness to the mixture. When you combine these, you get a treat that everyone will love.
Make sure your cream cheese is at room temperature. This helps it mix more easily with the other ingredients. You want a creamy and smooth filling, so avoid any lumps. If you follow this list closely, you’ll create a delightful dessert.
Step-by-Step Instructions
Making the Crust
To start, combine 24 crushed Oreo cookies with 5 tablespoons of melted butter. Mix well until it looks like wet sand. Next, press this mixture firmly into a 9×9-inch baking pan. Use the back of a measuring cup to ensure it’s even and compact.
Preparing the Cheesecake Filling
In a large bowl, beat 16 ounces of softened cream cheese until it’s smooth. This takes about two minutes. Gradually add 1 cup of powdered sugar and 1 teaspoon of vanilla extract. Keep mixing until it’s blended well.
Whipping the Heavy Cream
In a separate bowl, whip 1 cup of heavy cream with an electric mixer. Keep beating until you see stiff peaks, which usually takes 2-3 minutes. Gently fold this whipped cream into the cream cheese mixture with a spatula. Do this until there are no white streaks left.
Assembling the Bars
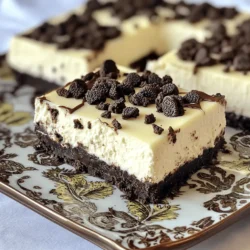
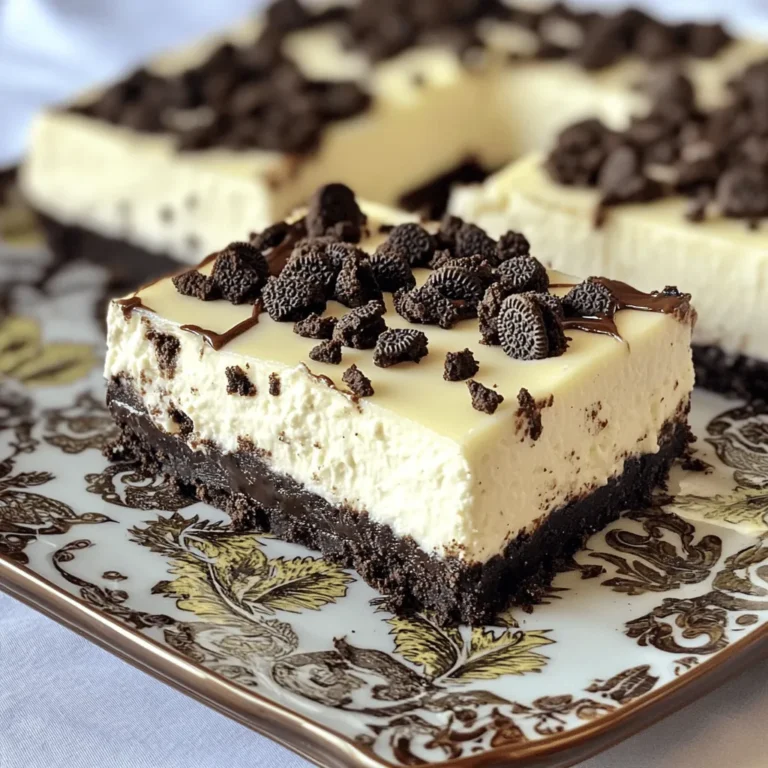
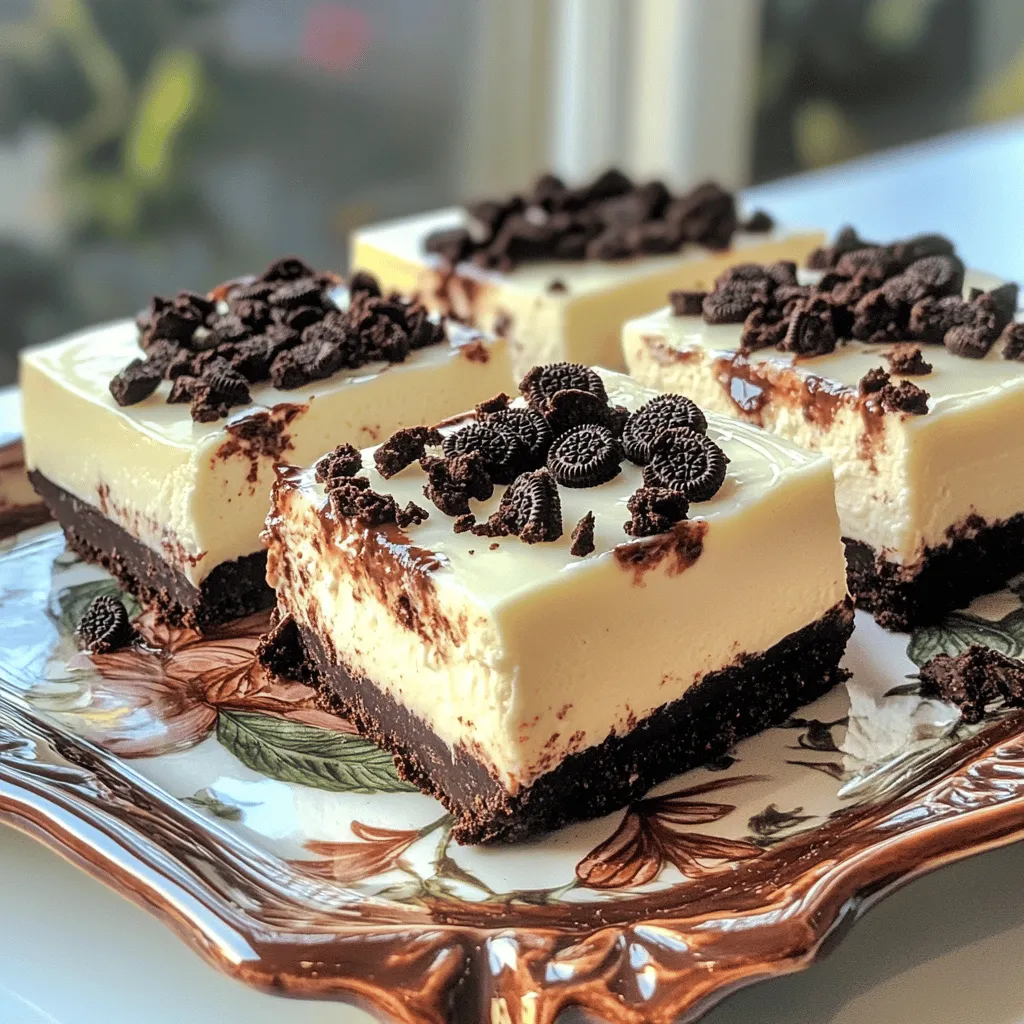
Now, pour the creamy filling over your crust in the baking pan. Use a spatula to spread it evenly, filling every corner. Sprinkle 10 coarsely chopped Oreo cookies on top for extra crunch.
Chilling the Cheesecake
Cover the pan tightly with plastic wrap. Place it in the fridge and let it chill for at least 4 hours. This helps the cheesecake set and firm up.
Serving Suggestions
Once it’s set, carefully remove the cheesecake from the pan. Slice it into 9 bars to serve. For a fun touch, you can drizzle chocolate sauce or add a dollop of whipped cream on top. Enjoy your No Bake Oreo Cheesecake Bars!
Tips & Tricks
Perfecting the Texture
To get the best texture in your No Bake Oreo Cheesecake Bars, start with cream cheese at room temperature. This will help it blend smoothly with the other ingredients. If you forget to take it out early, you can microwave it for about 10 seconds. Be careful not to overmix when you fold in the whipped cream. You want to keep that light and airy texture.
Presentation Tips
Presentation can make your cheesecake bars even more appealing. Use a decorative platter to serve them. It adds a nice touch. You can also drizzle chocolate sauce on top or add a dollop of whipped cream. For extra flair, try garnishing with a whole Oreo cookie or a sprinkle of cacao nibs.
Common Mistakes to Avoid
A few common mistakes can affect your cheesecake bars. One mistake is not pressing the crust firmly enough. Make sure it is compact, so it holds the filling well. Another mistake is skipping the chilling time. This step is crucial for the cheesecake to set properly. Be patient and let it chill for at least four hours, or longer if you can wait.
Variations
Flavor Additions
You can add a layer of chocolate ganache for a rich twist. Melt chocolate and mix with cream to create the ganache. Pour it over the cheesecake layer before chilling. It adds depth and a sweet touch. You can also add peanut butter for a fun flavor. Just mix in some peanut butter with the cream cheese. This gives a nutty taste that pairs well with Oreos.
Alternative Crust Options
If you want a different taste, try using graham cracker crumbs. Crush them finely and mix with melted butter like you do with Oreos. This will give your bars a unique flavor. You can also substitute with gluten-free Oreo cookies. This way, everyone can enjoy your treats, even those with dietary needs.
Dietary Modifications
To make these bars dairy-free, use dairy-free cream cheese. There are many brands available that taste great. You can also opt for sugar-free cookies and sweeteners. This way, you can enjoy the dessert without extra sugar. These options keep the recipe tasty while meeting different dietary needs.
Storage Info
Best Storage Practices
To keep your No Bake Oreo Cheesecake Bars fresh, store them in an airtight container. This helps prevent them from drying out. You can keep them in the refrigerator for up to 5 days. Just make sure to check for any signs of spoilage before serving.
Freezing Instructions
If you want to save some bars for later, freezing is a great option. Freeze the uncut bars for a longer shelf life. Wrap them tightly in plastic wrap or foil before placing them in the freezer. This helps keep them safe from freezer burn.
Thawing Tips
When you’re ready to enjoy your bars, take them out of the freezer. Allow them to thaw slowly in the refrigerator for a few hours. This keeps the texture smooth and creamy. Serve them chilled for the best flavor. You’ll love how refreshing they taste!
FAQs
How to make No Bake Oreo Cheesecake Bars?
To make these bars, follow these steps:
1. In a bowl, mix 24 crushed Oreo cookies with 5 tablespoons of melted butter.
2. Press the mixture into a 9×9-inch baking pan to form the crust.
3. Beat 16 oz of softened cream cheese until smooth in a large bowl.
4. Gradually add 1 cup of powdered sugar and 1 teaspoon of vanilla extract.
5. In another bowl, whip 1 cup of heavy cream until stiff peaks form.
6. Gently fold the whipped cream into the cream cheese mixture until smooth.
7. Pour this filling over the crust and spread it evenly.
8. Top with 10 coarsely chopped Oreo cookies for added crunch.
9. Cover the pan with plastic wrap and chill for at least 4 hours.
10. Slice into bars and serve chilled.
Can I use other cookies for the crust?
Yes, you can use other cookies! Here are some tasty options:
– Chocolate wafer cookies for a richer flavor
– Graham crackers for a classic taste
– Vanilla wafers for a lighter twist
Each cookie offers a unique taste and texture. Don’t be afraid to mix and match!
How long do No Bake Oreo Cheesecake Bars last?
These bars can last up to 5 days in the fridge. To keep them fresh:
– Store them in an airtight container.
– Make sure they are well covered to avoid drying out.
This way, you can enjoy them for a few days!
Can I make this recipe in advance?
Absolutely! You can make these bars a day ahead. Here’s how:
– Prepare the cheesecake and chill it for at least 4 hours.
– Keep it covered in the fridge until you’re ready to serve.
This makes it perfect for parties or family gatherings!
What can I use instead of cream cheese?
If you want a dairy-free or vegan option, try these alternatives:
– Use dairy-free cream cheese for a similar taste.
– Silken tofu blended until smooth works well too.
– Cashew cream is a great option for a nutty flavor.
These swaps let everyone enjoy this delicious treat!
You can create delicious No Bake Oreo Cheesecake Bars with just a few simple steps. We covered the key ingredients, easy instructions, and helpful tips for perfecting your bars. Remember to chill them well for the best taste and texture. Feel free to get creative with variations to suit your taste. With these pointers, you will make a treat everyone can enjoy, simple and easy. Enjoy your cheesecake bars!