Skip to content
DisclaimerTerms Of UseGDPR PolicyCookie Policy

yumymoments

  • Home
  • Drinks
  • Appetizers
  • Dinner
  • Dessert
  • About
  • Contact
  • Privacy Policy
DisclaimerTerms Of UseGDPR PolicyCookie Policy

Samantha

- 2 cups whole milk - 1 cup heavy cream - 1/2 cup powdered sugar - 1 teaspoon vanilla extract - 1 teaspoon ground nutmeg (plus extra for garnish) - 4 large eggs - 1/4 cup almond extract - Ice cubes (for serving) To make a creamy Eggnog Brandy Alexander, use the following measurements: - Combine 2 cups of whole milk with 1 cup of heavy cream. - Mix in 1/2 cup of powdered sugar. - Add 1 teaspoon each of vanilla and ground nutmeg. - Use 4 large eggs for richness. - Finally, include 1/4 cup of almond extract for flavor. - Ice cubes are optional but enhance the drink's chill. You can swap ingredients if needed: - Use low-fat milk instead of whole milk for a lighter drink. - Heavy cream can be replaced with coconut cream for a non-dairy option. - For sweetness, try honey or maple syrup in place of powdered sugar. - If you don’t have almond extract, vanilla extract works too. - For a warm drink, skip the ice cubes and serve it hot instead. These ingredients create a rich and creamy drink that is perfect for the holidays! {{ingredient_image_2}} Making Eggnog Brandy Alexander is fun and easy. You can prepare it in just a few steps. This drink is creamy and full of flavor. You will need a few basic tools: a saucepan, a mixing bowl, and a whisk. Let’s get started! 1. Combine Milk and Cream: In a medium-sized saucepan, pour in 2 cups of whole milk and 1 cup of heavy cream. Heat it over medium heat. Stir occasionally until it's warm, but do not let it boil. This keeps your drink creamy. 2. Mix Eggs and Sugar: In a separate bowl, crack 4 large eggs and add 1/2 cup of powdered sugar. Whisk them until the mixture is smooth and frothy. This adds air to make it light. 3. Temper the Eggs: To prevent the eggs from cooking, slowly add a few tablespoons of the warm milk mixture to the egg-sugar blend. Keep whisking to make it smooth. 4. Combine Mixtures: Once the egg mixture is ready, pour it back into the saucepan with the rest of the warm milk and cream. Stir continuously over low heat for about 5-7 minutes. You want the mixture to thicken slightly. 5. Add Flavor: When it thickens, remove the saucepan from heat. Stir in 1 teaspoon of vanilla extract, 1 teaspoon of ground nutmeg, and 1/4 cup of almond extract. Mix well to combine all the flavors. 6. Cool Down: Let the mixture cool to room temperature. Then, place it in the refrigerator. Chill for at least 2 hours to let the flavors blend. 7. Serve: When ready to serve, fill a glass with ice cubes. Pour the chilled mixture over the ice. 8. Garnish: Top your drink with a sprinkle of freshly grated nutmeg. This adds a lovely aroma and makes it look pretty! - Heat Control: Always keep the heat low when cooking. High heat can scramble the eggs. - Whisking: Whisking well helps create a light and frothy texture. Don't skip this step! - Chill Time: Allow enough time for chilling. The longer it sits, the better the flavors become. To get the best texture and flavor in your Eggnog Brandy Alexander, follow these tips: - Use whole milk and heavy cream for richness. - Warm the milk mixture gently. Avoid boiling it. - Whisk the eggs and sugar until frothy. This adds air for a light drink. - Temper the eggs slowly. This keeps them from scrambling. - Chill the mixture well. This helps the flavors blend nicely. Here are some common mistakes you should watch out for: - Boiling the milk and cream can ruin the texture. Always use medium heat. - Skipping the tempering step can lead to scrambled eggs. Take your time here. - Not chilling the mixture long enough can affect flavor. Give it at least two hours. - Forgetting to garnish can make it less appealing. A sprinkle of nutmeg makes a big difference. Presentation matters, especially during the holidays. Here are some garnishing ideas: - Use clear glasses to show off the creamy texture. - Add a sprinkle of freshly grated nutmeg on top for aroma. - A cinnamon stick in each glass adds spice and looks great. - Consider adding a thin slice of orange for a pop of color and flavor. These tips will help you create a delicious and visually stunning Eggnog Brandy Alexander. Enjoy making this holiday treat! Pro Tips Temperature Matters: Ensure that the milk and cream mixture is warm but not boiling. This will help maintain the creamy texture and prevent the eggs from scrambling when combined. Egg Tempering Technique: Gradually adding warm milk to the egg mixture while whisking helps to temper the eggs, preventing them from cooking too quickly. This step is crucial for a smooth final product. Chill Time: Allow the mixture to cool to room temperature before refrigerating. This enhances the flavors as they meld together, resulting in a more delicious drink. Garnish Wisely: A sprinkle of freshly grated nutmeg not only adds a beautiful finish but also enhances the aromatic experience of your creamy drink. Consider adding a cinnamon stick for an extra touch! {{image_4}} The classic Eggnog Brandy Alexander is rich and creamy. It has a smooth taste that many love. To spice things up, add cinnamon or cloves. These spices give it warmth and depth. You can also use spiced rum instead of brandy. This change creates a fun twist that many enjoy during the holidays. If you want a non-dairy version, don’t worry! You can swap the whole milk and cream for almond milk or coconut milk. Use full-fat coconut milk for creaminess. This keeps the drink rich without dairy. Choose a sweetener like maple syrup instead of powdered sugar. This adds a nice flavor while keeping it dairy-free. Fruit can add a fresh twist to your Eggnog Brandy Alexander. Try adding pureed fruits like peaches or cherries. These give your drink a fruity kick. You can even muddle some berries in the glass before pouring. This adds sweetness and color. Remember to garnish with fruit slices for a lovely look. Make your drink unique and fun! To store your Eggnog Brandy Alexander, place it in an airtight container. A glass jar works great for this. Make sure to seal it tightly to keep out air. This helps keep the flavor fresh. Store the eggnog in the fridge. It should be kept cold until you are ready to serve. Your eggnog will last about 3 to 5 days in the fridge. Always check for any off smells or changes in texture before drinking. If it looks or smells strange, it’s best to toss it. Remember, the eggs in your eggnog make it more perishable. Always keep it cold, and don’t leave it out for long. If you want to keep it longer, you can freeze the eggnog. Pour it into a freezer-safe container, leaving some space at the top. Liquids expand when frozen. It can last up to 6 months in the freezer. To use, thaw it overnight in the fridge. Give it a good stir before serving to mix any separated parts. Eggnog Brandy Alexander is a festive drink. It mixes creamy eggnog with brandy. This drink is perfect for holiday gatherings. The rich flavors make it feel warm and cozy. It has a hint of nutmeg and sweetness. You can easily impress your guests with this drink. Yes, you can make it without eggs. Use a vegan eggnog instead. Many brands offer a tasty egg-free version. You can also blend non-dairy milk with nutmeg and vanilla. This will keep the creamy texture. Serve Eggnog Brandy Alexander in tall, clear glasses. This shows off the creamy texture. Add ice cubes for a refreshing touch. Top each glass with fresh nutmeg for aroma. A cinnamon stick also adds charm. Enjoy this drink cold for the best experience! This post explored the delicious world of Eggnog Brandy Alexander. We covered all the key ingredients and their measurements, along with substitutions. I shared step-by-step cooking instructions and helpful tips for great texture. You learned about variations, storage methods, and answered common questions. Now, you can confidently make your own Eggnog Brandy Alexander. Enjoy the rich flavors and make it your own!

Eggnog Brandy Alexander Perfect Holiday Drink Recipe

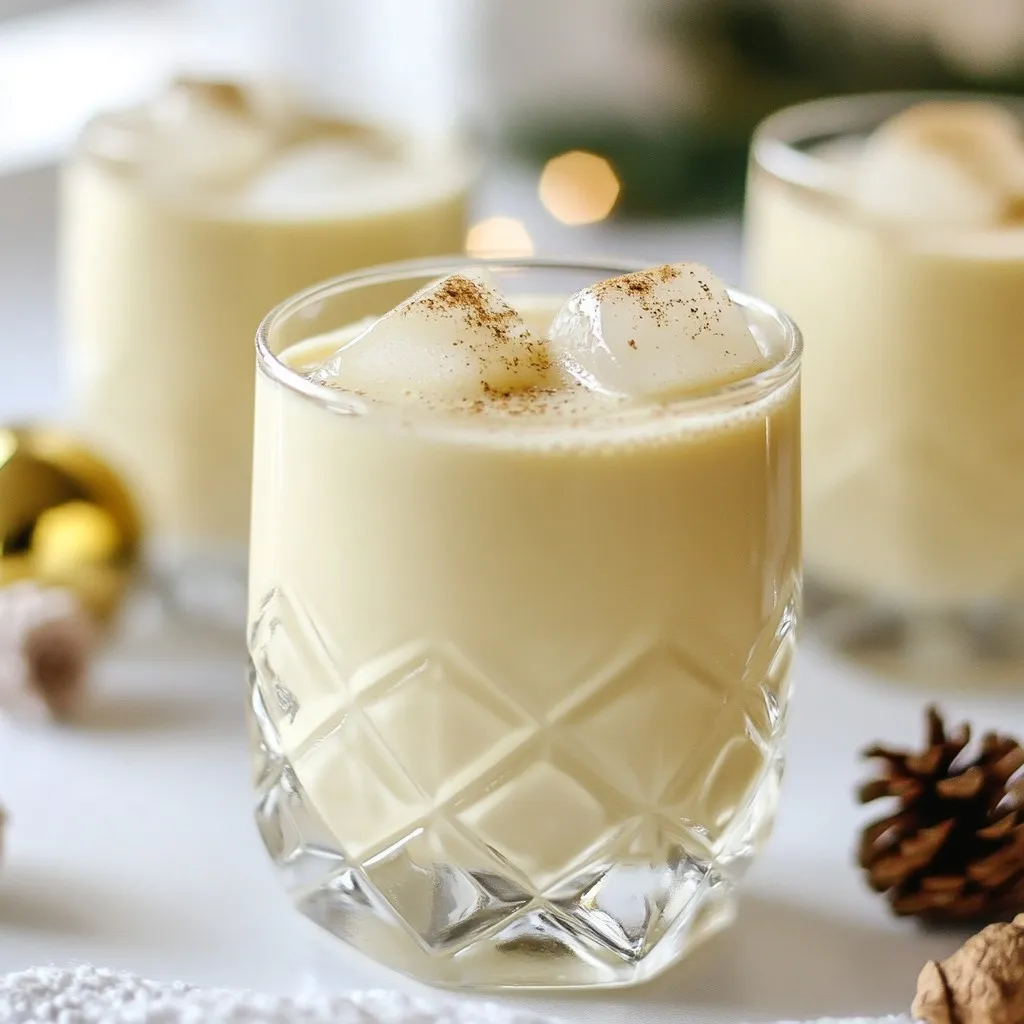
Get ready to impress your guests with the delicious Eggnog Brandy Alexander! This creamy drink blends festive eggnog with rich

- 1 cup all-purpose flour - 1 teaspoon baking powder - 1/2 teaspoon salt - 1/4 teaspoon ground nutmeg - 1/4 teaspoon ground cinnamon For this recipe, we start with the dry ingredients. The all-purpose flour gives the puffs their body. Baking powder helps them rise and stay fluffy. Salt adds flavor, while nutmeg and cinnamon bring warmth and depth. - 1/2 cup granulated sugar - 1/4 cup unsalted butter, melted - 1/2 cup milk (whole or 2% recommended) - 1 large egg - 1 teaspoon vanilla extract Next, we move to the wet ingredients. Granulated sugar sweetens the batter. Melted butter adds richness, while milk gives moisture. The egg binds everything together, and vanilla adds a lovely aroma. - 1/2 cup granulated sugar for cinnamon sugar - 1 tablespoon ground cinnamon - 1/4 cup powdered sugar for dusting Finally, we prepare the topping. The sugar and cinnamon mix creates a sweet, spiced coating. Powdered sugar adds a nice touch for presentation. This blend makes each puff irresistible and delightful to taste. {{ingredient_image_2}} - Preheat the oven to 350°F (175°C). - Grease a mini muffin pan or a standard muffin pan. - In a medium bowl, mix together: - 1 cup all-purpose flour - 1 teaspoon baking powder - 1/2 teaspoon salt - 1/4 teaspoon ground nutmeg - 1/4 teaspoon ground cinnamon - In a separate bowl, whisk together: - 1/4 cup unsalted butter, melted - 1/2 cup granulated sugar - 1/2 cup milk - 1 large egg - 1 teaspoon vanilla extract - Mix until smooth and creamy. - Gently fold the dry ingredients into the wet mixture. - Fill each muffin cup about two-thirds full with batter. - Bake for 12-15 minutes. - The puffs are ready when golden and a toothpick comes out clean. - While baking, mix together: - 1/2 cup granulated sugar - 1 tablespoon ground cinnamon - Remove puffs from the oven and cool in the pan for 5 minutes. - Brush each puff with melted butter, then roll in the cinnamon sugar. - Dust with powdered sugar before serving. Do not overmix the batter. Overmixing can make the puffs tough. Mix until just combined for a light texture. Baking time is key. Bake for 12-15 minutes. Check for doneness by inserting a toothpick. If it comes out clean, they are ready. You can prepare the batter in advance. Store it in the fridge for up to two hours. When ready, bake as usual. For reheating, warm them in the oven at 350°F for about 5-7 minutes. This helps keep them soft and fresh. Serve these puffs with coffee or tea for a delightful pairing. They look great on a platter dusted with powdered sugar. Add fresh berries or mint leaves for color. A simple touch makes your dish pop and impresses guests. Pro Tips Use Fresh Spices: Ensure your ground cinnamon and nutmeg are fresh for the best flavor. Spices lose their potency over time, so check the expiration dates. Don’t Overmix: When combining the wet and dry ingredients, mix until just combined. Overmixing can lead to dense puffs instead of light and fluffy ones. Coat While Warm: For a better cinnamon sugar coating, roll the puffs in the cinnamon sugar mixture while they are still warm. This allows the sugar to stick better. Experiment with Flavors: Feel free to add a pinch of cardamom or vanilla bean to the batter for an extra layer of flavor. You can also try using flavored extracts in place of vanilla. {{image_4}} You can change the flavors in your puffs to suit your taste. One fun idea is to add chocolate chips or nuts. Chocolate chips bring a sweet, rich taste. Nuts add crunch and flavor, making each bite exciting. You can also swap spices. Instead of cinnamon, try cardamom for a unique twist. Cardamom has a warm, sweet flavor that pairs well with sugar. These small changes can make your puffs feel new and special. If you have dietary needs, you can still enjoy these puffs. For a gluten-free option, use almond or coconut flour instead of all-purpose flour. Both will give you a light texture. If you want to make them vegan, replace the egg with a flax egg. Mix one tablespoon of ground flaxseed with three tablespoons of water. Let it sit for a few minutes to thicken. Also, use a non-dairy milk like almond or oat milk. These swaps let you enjoy the puffs while meeting your diet. You can serve your puffs in many fun ways. Try pairing them with different dips or spreads. A chocolate sauce or fruit jam can add a tasty touch. You can also use these puffs in dessert recipes. For example, cut them in half and fill them with whipped cream or ice cream. This turns a simple breakfast treat into a dessert that everyone will love. The options are endless, so get creative with your serving ideas! To keep your puffs fresh, place them in an airtight container. Store them in the fridge for up to three days. If you want to maintain their fluffy texture, avoid stacking them. Instead, use parchment paper between layers to prevent sticking. You can freeze the puffs to enjoy later. Place them in a freezer-safe bag or container. Make sure to remove as much air as possible. They can last in the freezer for about three months. To thaw, leave them in the fridge overnight. For a warm treat, you can reheat them in the oven at 350°F for about 5-7 minutes. At room temperature, the puffs will last about one day. Always check for freshness before eating. Signs of spoilage include an off smell or a change in texture. If they feel hard or dry, it's best to toss them. Enjoy your treats while they're fresh and tasty! Can I make Cinnamon Sugar French Breakfast Puffs in advance? Yes, you can make these puffs in advance. Prepare the batter, then store it in the fridge for up to 24 hours. When ready, bake them fresh. This keeps them fluffy and warm. Can these puffs be frozen and reheated? Absolutely! Freeze the baked puffs in a single layer. Once frozen, place them in a zip-top bag. To reheat, bake them at 350°F for about 10 minutes. They will taste nearly fresh! What can I substitute for milk in this recipe? You can use almond milk or oat milk as great alternatives. For a creamier texture, try using heavy cream or half-and-half. Each option will still keep your puffs tasty. What substitutes can I use for butter? If you need a butter substitute, try using coconut oil or vegetable oil. Applesauce can also work for a lower-fat option, though it may change the flavor a bit. How can I adjust the sweetness level? To adjust sweetness, simply use less sugar. You can also swap some granulated sugar for a natural sweetener, like honey or maple syrup, for a unique twist. Why are my puffs not rising? If your puffs are not rising, check your baking powder. It may be old or expired. Also, ensure you mix the batter gently; overmixing can lead to dense puffs. What do I do if the puffs come out dry? If the puffs are dry, you may have overbaked them. Make sure to check for doneness at 12 minutes. Keeping the batter moist by not overmixing also helps. In this post, we explored how to make delicious Cinnamon Sugar French Breakfast Puffs. We covered essential ingredients, clear steps, and helpful tips. You learned about variations to suit your taste and how to store them properly. Remember, these puffs are versatile, so experiment with flavors or dietary needs. With the right methods, you’ll create a tasty treat that everyone will enjoy. Happy baking!

Cinnamon Sugar French Breakfast Puffs Irresistible Treat

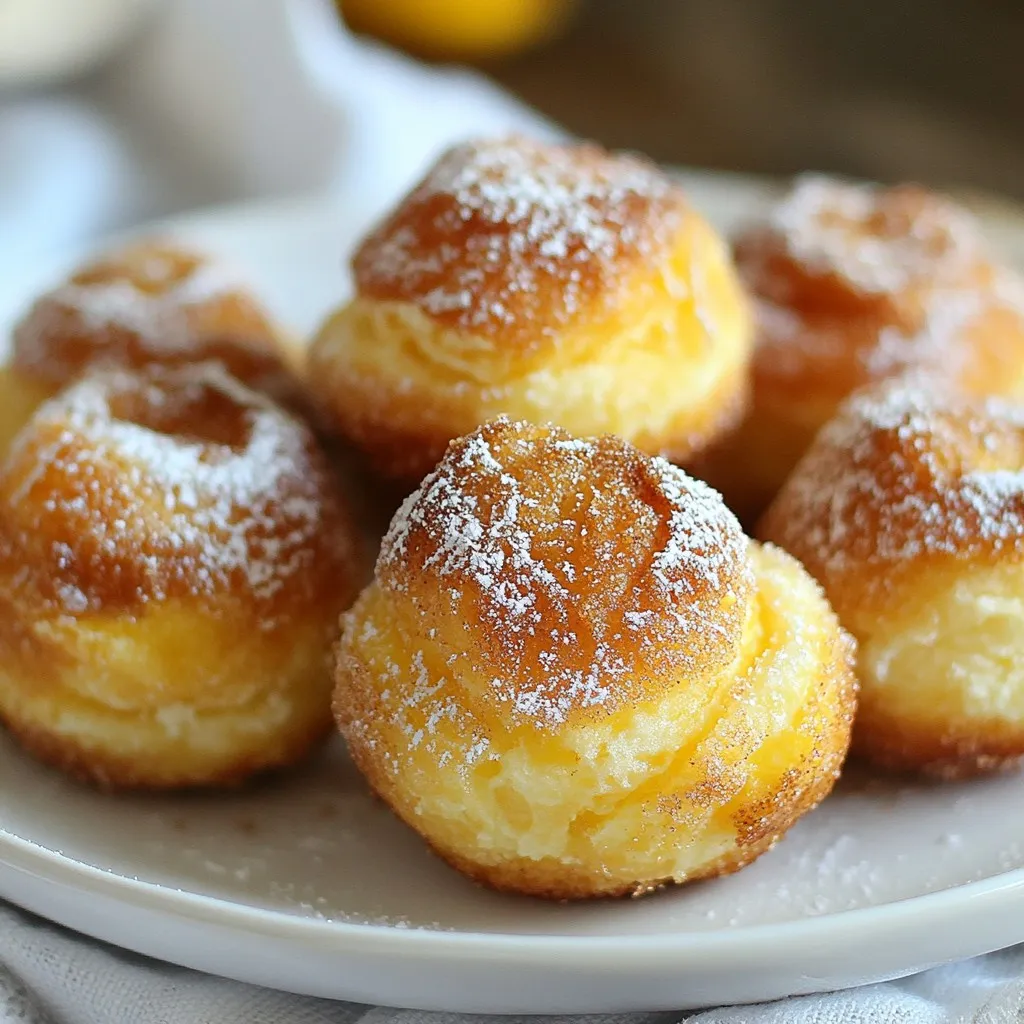
Welcome to a delicious way to start your day! Cinnamon Sugar French Breakfast Puffs are warm, soft, and coated in

- Dry Ingredients - 1 cup all-purpose flour - 1 teaspoon baking powder - 1 teaspoon baking soda - 1 teaspoon ground cinnamon - 1/2 teaspoon ground nutmeg - 1/2 teaspoon ground ginger - 1/4 teaspoon salt - Wet Ingredients - 3 large eggs - 1 cup granulated sugar - 1 cup pure pumpkin puree - 1 teaspoon vanilla extract - 8 oz cream cheese, softened - 1/2 cup powdered sugar - 1/2 teaspoon vanilla extract (for filling) - 1/4 teaspoon ground cinnamon (for filling) - Optional Garnishes - Chopped walnuts or pecans for garnish Each ingredient plays a key role in making this Pumpkin Spice Cream Cheese Roll delightful. The flour gives structure, while the eggs add moisture and fluffiness. Pumpkin puree brings a rich flavor and lovely color, making it perfect for fall. The spices create that cozy autumn aroma we all love. Lastly, the cream cheese filling adds a sweet and creamy touch, making every bite a treat. {{ingredient_image_2}} - Preheat the oven and prepare the pan: Start by preheating your oven to 350°F (175°C). Grease a 15x10-inch jelly roll pan. Line the bottom with parchment paper and grease it again. This helps the cake come out easily after baking. - Mix dry ingredients: In a medium bowl, mix together 1 cup of all-purpose flour, 1 teaspoon of baking powder, 1 teaspoon of baking soda, 1 teaspoon of ground cinnamon, 1/2 teaspoon of ground nutmeg, 1/2 teaspoon of ground ginger, and 1/4 teaspoon of salt. Whisk until combined, then set aside. - Beat eggs and sugar: In a large mixing bowl, beat 3 large eggs with 1 cup of granulated sugar. Use an electric mixer for about 2-3 minutes until the mix is light and fluffy. - Incorporate pumpkin and vanilla: Add 1 cup of pure pumpkin puree and 1 teaspoon of vanilla extract to the egg-sugar mix. Stir until everything is mixed well and smooth. - Combine wet and dry mixtures: Gradually fold the dry mixture into the wet mixture with a spatula. Mix until you no longer see dry flour. Be gentle to keep the cake light. - Spread batter in the pan: Pour the batter into the greased jelly roll pan. Use a spatula to spread it evenly. This helps the cake bake evenly. - Bake and check for doneness: Place the pan in the oven and bake for 12-15 minutes. Check doneness by inserting a toothpick in the center. If it comes out clean, the cake is ready. - Cool the cake: Once the cake is done, take it out of the oven. Let it cool in the pan for 5 minutes. Then, flip it onto a clean kitchen towel dusted with powdered sugar. Peel off the parchment paper. - Prepare cream cheese filling: While the cake cools, mix 8 oz of softened cream cheese with 1/2 cup of powdered sugar, 1/2 teaspoon of vanilla extract, and 1/4 teaspoon of ground cinnamon in a bowl. Beat until smooth and creamy. - Roll the cake with a towel: Starting from the short end of the towel, roll the cake tightly, using the towel to help. Let it cool completely in the towel for about 30 minutes. - Unroll and fill: Once cool, gently unroll the cake and remove the towel. Spread the cream cheese filling evenly over the cake. - Re-roll the cake: Carefully roll the cake back up without the towel. Make sure it is tightly rolled. Wrap the rolled cake in plastic wrap and refrigerate for at least 1 hour. - Refrigerate before serving: Chilling helps the filling set and makes slicing easier. - Serving suggestions: Before serving, slice the roll into neat pieces. You can sprinkle chopped walnuts or pecans on top for extra flavor and texture. To make a great Pumpkin Spice Cream Cheese Roll, avoid common mistakes. One mistake is overmixing the batter. This can make your cake tough and dry. Mix until you no longer see dry flour. Another issue is baking time. Check your cake at 12 minutes. If a toothpick comes out clean, it’s done. For even baking, spread the batter evenly in the pan. Use a spatula to smooth the top. This helps the cake rise evenly. Also, ensure your oven is preheated. A hot oven gives the best rise. For a smooth cream cheese filling, use softened cream cheese. Cold cream cheese can lead to lumps. Beat the cream cheese first before adding other ingredients. This helps it blend better. When mixing in powdered sugar, add it slowly. This will help avoid clumps. You want a creamy, smooth filling that spreads easily. Presentation can make your dessert shine. Serve the slices on a decorative plate. Lightly dust them with powdered sugar for flair. A sprinkle of cinnamon adds a nice touch too. You can also garnish with chopped walnuts or pecans. This adds crunch and flavor. For a festive look, arrange slices in a circle. This way, everyone can see the beautiful swirls inside the roll. Pro Tips Use Fresh Spices: For the best flavor, opt for fresh ground spices rather than pre-ground ones. This will enhance the aromatic profile of your Pumpkin Spice Cream Cheese Roll. Chill Before Slicing: Allow the rolled cake to chill in the refrigerator for at least an hour. This helps the filling set and makes slicing much easier without squishing the cake. Experiment with Fillings: Don't hesitate to customize your filling! Consider adding a touch of orange zest or a swirl of chocolate for a unique flavor twist. Presentation Matters: For an elegant presentation, dust the top of the roll with powdered sugar and sprinkle with chopped nuts or a pinch of cinnamon before serving. {{image_4}} If you want a gluten-free Pumpkin Spice Cream Cheese Roll, use gluten-free flour. This swap keeps the taste while making it safe for those with gluten issues. For healthier options, replace granulated sugar with maple syrup or honey. These natural sweeteners add flavor and cut down on processed sugars. You can also use low-fat cream cheese for a lighter filling. To add more spice, try mixing in a pinch of nutmeg or ginger. A drop of almond or maple extract can also boost the flavor. If you prefer different fillings, consider using mascarpone or ricotta cheese. You can also add chocolate chips or dried fruits for a new twist. Pair your Pumpkin Spice Cream Cheese Roll with coffee or spiced chai. These drinks enhance the flavors and make a cozy combo. For festive serving, arrange the slices on a fall-themed platter. Sprinkle some cinnamon or powdered sugar for a beautiful touch. You can even add fresh apple slices as a crunchy side. - Refrigeration tips: After making the Pumpkin Spice Cream Cheese Roll, wrap it tightly in plastic wrap. This keeps it fresh. Store it in the fridge if you plan to eat it within a few days. - Best container practices: Use an airtight container for added protection. This helps prevent it from drying out or picking up other smells. - Freezing instructions: If you want to save some for later, freeze the roll before cutting it. Wrap it in plastic wrap, then cover with aluminum foil. This keeps it safe from freezer burn. - Thawing guide: To thaw, move the roll from the freezer to the fridge. Let it sit overnight. This helps the texture stay nice. - How long can it be stored? The Pumpkin Spice Cream Cheese Roll lasts about 3-5 days in the fridge. In the freezer, it can last up to 3 months. - Signs of spoilage: Look for signs like mold, a sour smell, or a change in color. If you see any, it’s best to toss it. Always trust your senses when checking for spoilage. What can I substitute for pumpkin puree? You can use mashed sweet potatoes or butternut squash as a substitute. Both have a similar texture and flavor. You may also try using apple sauce for a different taste. Just keep in mind that the spices may need adjustment. Can I make this ahead of time? Yes, you can make this roll a day in advance. Just wrap it well in plastic wrap and store it in the fridge. This allows the flavors to blend nicely, making it even better the next day. Why is my cake cracking? Cake cracking usually happens if it bakes too long or at too high a temperature. Make sure to check it a few minutes before the end of the baking time. If you see cracks, don’t worry! You can always cover them with the cream cheese filling. How do I fix a soggy roll? A soggy roll may happen if the cake isn’t baked long enough. If you find this issue, try baking it a bit longer next time. For a quick fix, let it chill in the fridge uncovered for a bit to help it set. How to slice without damaging the roll? Use a sharp serrated knife to cut the roll. Start from the ends and work your way in. This helps keep the slices neat and avoids squishing the cake. Best ways to decorate for occasions? For decoration, you can dust the slices with powdered sugar or sprinkle chopped walnuts. You can also add a drizzle of caramel sauce for a festive touch. If it's a special event, consider using edible flowers to brighten the plate. You’ve learned how to make a delicious pumpkin roll cake from scratch. We covered the main ingredients, step-by-step instructions, useful tips, and storage info. Remember to avoid common mistakes and keep the filling smooth for the best results. With variations for different diets, there’s something here for everyone. Try pairing with a hot drink or a sweet treat for added joy. Enjoy the process and share your masterpiece with others. Happy baking!

Pumpkin Spice Cream Cheese Roll Delightful Fall Treat

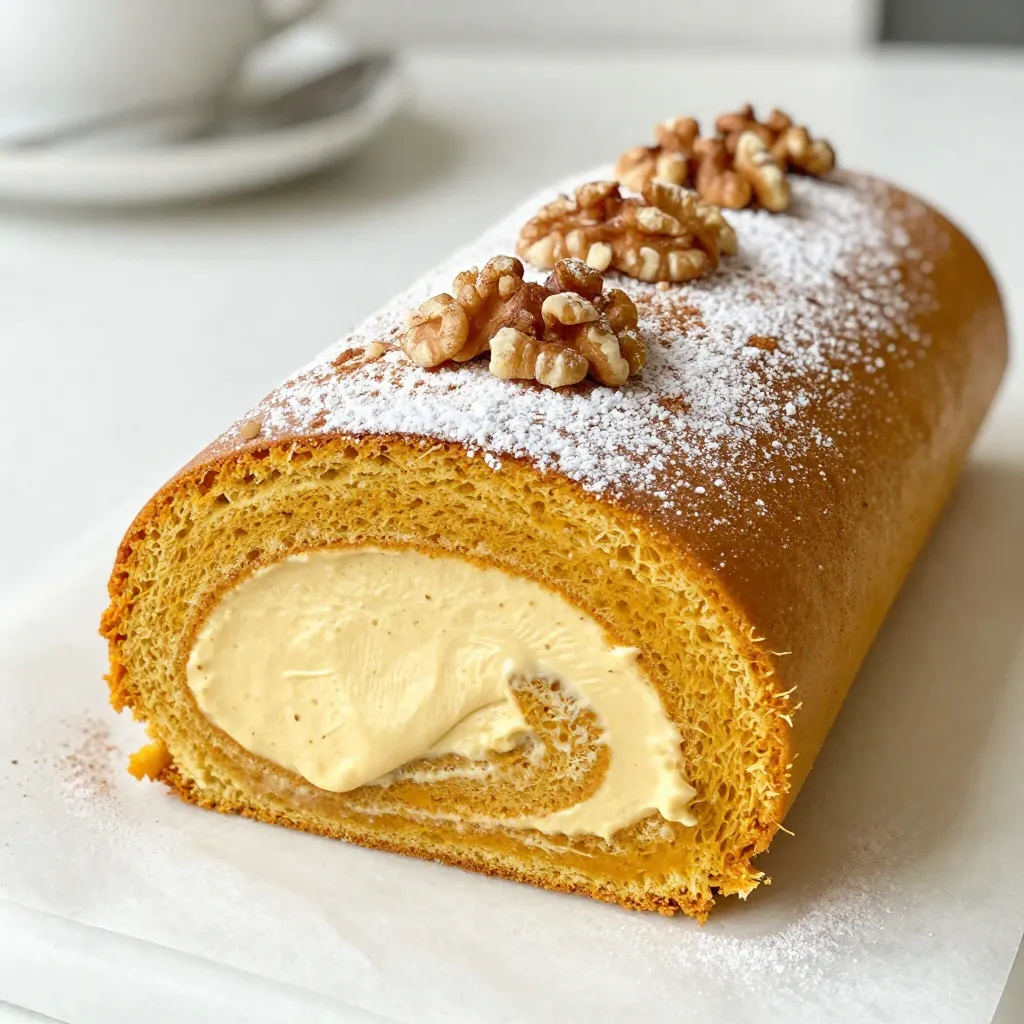
Ready to embrace fall’s delicious flavors? The Pumpkin Spice Cream Cheese Roll is your perfect cozy treat. With a soft,

- 2 boneless, skinless chicken breasts - 2 cups fresh broccoli florets - 4 cloves garlic, minced - 1/4 cup chicken broth (or vegetable broth for a vegetarian option) - 2 tablespoons soy sauce (or tamari for gluten-free) - 1 tablespoon honey - 1 tablespoon olive oil - 1 teaspoon cornstarch (optional, for thickening the sauce) - Red pepper flakes for garnish - Cooked brown rice or quinoa (for serving) The main ingredients bring the heart of this dish together. You need chicken breasts for protein. Broccoli adds great nutrients and color. Garlic gives a punch of flavor that everyone loves. For sauces and seasonings, chicken broth or vegetable broth adds depth. Soy sauce or tamari brings umami. Honey balances it all with sweetness. Olive oil adds richness to the sauce. If you want a thicker sauce, consider cornstarch. A sprinkle of red pepper flakes gives a nice kick. Serve the dish over cooked brown rice or quinoa for a filling meal. {{ingredient_image_2}} To start, make the marinade. In a medium bowl, whisk together 1 tablespoon of soy sauce, honey, a pinch of salt, and black pepper. This mix will add great flavor to your chicken. Place the chicken breasts in the bowl. Make sure each piece is well-coated. Cover the bowl and let it marinate in the fridge for 30 minutes. For more flavor, you can let it sit for up to 2 hours. Next, prepare the broccoli. Bring a pot of water to a boil. Once it’s boiling, add the broccoli florets. Blanch them for 2-3 minutes. You want them to be bright green and just tender. Quickly move the broccoli to a bowl of ice water. This stops the cooking. Drain the broccoli and set it aside. Now, let’s make the garlic sauce. In a medium saucepan, heat the olive oil over medium heat. Add the minced garlic. Sauté it for about 30 seconds. You want it fragrant but not brown. Stir in the chicken broth and the remaining tablespoon of soy sauce. If you want a thicker sauce, mix cornstarch with cold water to form a slurry. Add this to the saucepan. Let the sauce simmer for 2-3 minutes, stirring until it thickens slightly. Preheat your grill or grill pan over medium-high heat. Once it's hot, add the marinated chicken breasts. Grill the chicken for 6-7 minutes on each side. You want the chicken to reach an internal temperature of 165°F (75°C). After grilling, let the chicken rest for a few minutes. Then slice it into bite-sized pieces. To assemble, take each serving bowl and start with a base of cooked brown rice or quinoa. Lay the sliced grilled chicken on one side. Then arrange the blanched broccoli on the other side. Drizzle the warm garlic sauce generously over both the chicken and the broccoli. For a little spice, sprinkle red pepper flakes on top if you like. Serve the bowls warm. Enjoy this tasty and healthy meal! To make juicy grilled chicken, I recommend using a marinade. The marinade infuses flavor and helps keep the chicken moist. Always marinate the chicken for at least 30 minutes, but up to 2 hours is best. This extra time allows the flavors to soak in. When you grill the chicken, use medium-high heat. This helps get a nice sear on the outside while keeping the inside tender. Cook each side for about 6-7 minutes. Use a meat thermometer to check for doneness. The chicken should reach 165°F (75°C). Let the chicken rest for a few minutes after grilling. This allows the juices to settle, making every bite juicy. To boost flavor, consider adding spices like paprika or cumin. These spices add warmth without overpowering the dish. For a fresh twist, try adding lemon zest or lime juice in the marinade. This adds brightness and a zestier taste. If you want alternatives for the garlic sauce, try a tahini or yogurt-based sauce. These options give a creamy texture and unique taste. You could also use a store-bought sauce if you're short on time. Just choose one that suits your taste. Pair your bowls with a light drink like iced tea or sparkling water. If you want a heartier meal, serve a side salad with mixed greens. This adds crunch and freshness to the dish. To make it a complete meal, consider adding some nuts or seeds on top for added crunch and nutrition. A sprinkle of sesame seeds or sliced almonds can elevate the dish. Enjoy your vibrant, nutritious bowls! Pro Tips Marinade Timing: For the best flavor, marinate the chicken for at least 2 hours or overnight if possible. This allows the flavors to penetrate deeper into the meat. Blanching Broccoli: When blanching the broccoli, ensure you plunge it into ice water immediately after cooking to maintain its vibrant color and crisp texture. Grilling Tips: Make sure your grill is preheated properly to ensure a good sear on the chicken. This helps lock in the juices for a moist and flavorful result. Serving Suggestions: Feel free to customize your bowls with additional toppings such as sliced avocado, sesame seeds, or green onions for extra flavor and nutrition. {{image_4}} You can easily swap chicken for tofu or tempeh. Both options offer great protein. For tofu, use firm or extra-firm varieties. For tempeh, slice it thin for even cooking. When marinating, change the time. Tofu needs at least 30 minutes. Tempeh absorbs flavors well, so let it marinate for an hour or more. Use the same marinade, but feel free to add some ginger for extra zing. Feel free to mix in different veggies. Bell peppers, carrots, and snap peas work well. Try to keep the colors bright for a visual treat. You can also switch grains. Brown rice is great, but quinoa adds a nutty taste. Other options include farro and barley for a hearty base. Just cook them according to their instructions for best results. Explore new sauces to keep things fresh. Teriyaki brings sweetness, while spicy garlic adds a kick. You can also mix in some citrus, like lemon zest or lime juice. This will brighten the dish and add a refreshing twist. Experiment with your favorites to find the best flavor combo for you. Enjoy the journey of creating your perfect bowl! To store leftovers properly, let the bowls cool down. Place each bowl in an airtight container. This keeps the chicken, broccoli, and sauce fresh. They stay good in the fridge for about 3 to 4 days. Make sure to eat them within this time for the best taste. You can freeze the assembled bowls for later. First, let them cool completely. Then, wrap each bowl in plastic wrap and foil. This prevents freezer burn. They can last up to 3 months in the freezer. To thaw, move the bowl to the fridge overnight. For quick thawing, use the microwave on low power. To reheat without losing texture, use the oven when possible. Preheat the oven to 350°F (175°C) and place the bowl inside for about 15-20 minutes. Stir halfway through to heat evenly. If using a microwave, cover with a damp paper towel. Heat on medium for 2-3 minutes, checking every minute. This helps keep the chicken moist. You should marinate the chicken for at least 30 minutes. If you have time, let it sit for up to 2 hours. This helps the flavors soak in well. Trust me, the longer you marinate, the better it tastes! Yes, you can use frozen broccoli. Just make sure to thaw it first. Frozen broccoli cooks faster, so adjust your blanching time. Blanch it for about 2 minutes, just like fresh. It will still taste great and save you time! If you need a substitute for soy sauce, try tamari. It’s gluten-free and tastes similar. You can also use coconut aminos for a lower-sodium option. Both work well in the garlic sauce, keeping that savory flavor. Check the chicken’s internal temperature with a meat thermometer. It should reach 165°F (75°C). If you don’t have a thermometer, cut into the thickest part. The meat should be white, with no pink inside. This ensures your chicken is safe and juicy! In this post, we covered how to create a delicious chicken and broccoli bowl. We explored key ingredients, from marinating the chicken to preparing flavorful garlic sauce. I shared step-by-step instructions to ensure your dish turns out great every time. Finally, we discussed serving tips and tasty variations to fit your needs. Keep this guide handy to whip up a nutritious meal. You’ll impress your family and enjoy a tasty bowl, no matter your cooking skill!

Grilled Chicken Broccoli Garlic Sauce Bowls Delight

If you want a tasty, healthy meal, look no further than Grilled Chicken Broccoli Garlic Sauce Bowls. This dish combines

To make delicious carrot cake oatmeal cookies, gather these simple ingredients: - 1 cup rolled oats - 1 cup whole wheat flour - 1 teaspoon baking soda - 1 teaspoon ground cinnamon - 1/2 teaspoon ground nutmeg - 1/4 teaspoon salt - 1/2 cup brown sugar, packed - 1/4 cup granulated sugar - 1/2 cup unsweetened applesauce - 1/3 cup vegetable oil - 1 teaspoon vanilla extract - 1 cup grated carrots (about 2 medium carrots) - 1/2 cup raisins - 1/2 cup chopped walnuts (optional) - 1/4 cup shredded coconut (optional) Choosing the right ingredients makes a big difference. Here are some tips: - Rolled oats: Look for whole rolled oats. They should be thick and hearty. - Flour: Whole wheat flour adds fiber and flavor. Check the expiration date for freshness. - Spices: Use fresh spices for the best taste. Old spices lose their flavor quickly. - Sugars: Use packed brown sugar. It adds moisture and a hint of caramel flavor. - Carrots: Pick fresh carrots. They should be firm and bright in color. - Raisins: Choose plump raisins. They should not be hard or dry. You can swap some ingredients for different tastes or needs: - Flour: Use all-purpose flour instead of whole wheat if preferred. - Oil: Swap vegetable oil with melted coconut oil for a unique flavor. - Sweeteners: Replace brown sugar with maple syrup or honey. Adjust other liquids as needed. - Applesauce: Use mashed banana for a different twist. It adds a nice flavor. - Nuts: Omit walnuts if you want a nut-free version. - Coconut: Leave out shredded coconut if you don’t like it. {{ingredient_image_2}} Start by preheating your oven to 350°F (175°C). While it heats, line a baking sheet with parchment paper. This keeps the cookies from sticking. In a medium bowl, mix the rolled oats, whole wheat flour, baking soda, cinnamon, nutmeg, and salt. Stir these together until they are well blended. This step is key for a nice cookie texture. In a larger bowl, add the brown sugar and granulated sugar. Whisk until there are no lumps. Then add the applesauce, vegetable oil, and vanilla extract. Mix until it's smooth and creamy. Pour the dry ingredients into the wet ingredients. Stir gently until just combined. It’s okay if there are a few lumps. Overmixing can make the cookies tough. Now, fold in the grated carrots, raisins, walnuts, and coconut if you choose to use them. Gently mix until they are evenly spread through the dough. Use a tablespoon to scoop the dough onto the baking sheet. Space the dough balls about 2 inches apart. Bake for 12-15 minutes. Watch for light golden edges and set centers. After baking, cool the cookies on the sheet for 5 minutes. Then, move them to a wire rack to cool completely. Enjoy your delicious cookies! To keep your cookies moist, use unsweetened applesauce. It adds flavor and moisture. Mix it well into the wet ingredients. Avoid overbaking; check for a light golden edge. This ensures a soft center. If you want extra moisture, consider adding a little more applesauce. For the best texture, mix dry and wet ingredients gently. Overmixing will make cookies tough. Leave some lumps in the batter; they create a nice chewy bite. Use whole wheat flour for a heartier cookie. This flour adds fiber and a nutty taste. Make your cookies look great for serving. Use a colorful plate to display them. Dust with powdered sugar for a sweet touch. Arrange cookies in a stack or a circle. Consider adding edible flowers or fresh mint for color. This adds a nice pop and makes them more inviting. Pro Tips Use Fresh Carrots: For the best flavor and moisture, use freshly grated carrots instead of pre-packaged shredded carrots. Chill the Dough: If the dough feels too sticky, chill it in the refrigerator for 15-20 minutes before baking for easier handling. Experiment with Add-Ins: Feel free to customize your cookies by adding other mix-ins like chopped dried fruits, seeds, or different nuts for a unique twist. Storage Tips: Store the cookies in an airtight container at room temperature for up to a week, or freeze them for longer-lasting freshness. {{image_4}} To make these cookies nut-free, just skip the walnuts. You still get great flavor and texture. If you miss the crunch, try adding more oats or a bit of sunflower seeds. Both options keep the cookies tasty and fun. To make these cookies gluten-free, swap whole wheat flour with a gluten-free blend. Look for a mix that includes xantham gum for better texture. You can also use almond flour for a nutty twist. Just keep an eye on the baking time, as gluten-free cookies may bake faster. You can get creative with mix-ins! Try adding chocolate chips for a sweet surprise. Dried cranberries or apricots add a fruity touch. For a spiced kick, toss in some chopped ginger or a dash of cloves. You can even use pumpkin puree instead of applesauce for a fall flavor. The choices are endless, so feel free to experiment! To keep your carrot cake oatmeal cookies fresh, store them in an airtight container. This prevents air from making them dry. You can stack the cookies with parchment paper between layers. This way, they won’t stick together. Place the container in a cool, dry place, away from sunlight. If you want to save some cookies for later, freezing is a great option. First, let the cookies cool completely. Then, place them in a single layer on a baking sheet. Freeze them for about an hour. Once they are hard, transfer the cookies to a freezer-safe bag. Remove as much air as possible before sealing. They will stay fresh for up to three months. These cookies taste best within a week. After that, they may lose some moisture. If stored properly, they can last for up to two weeks at room temperature. To check for freshness, look for any signs of dryness or changes in texture. If they feel too hard, heat them in the microwave for a few seconds. This can help revive their softness. Yes, you can use quick oats. Quick oats will make the cookies softer. They blend into the batter more easily. If you want a chewier texture, stick with rolled oats. They hold their shape better during baking. To make these cookies vegan, replace the applesauce with mashed banana. You can also swap the vegetable oil with coconut oil. Use a vegan sugar to keep it plant-based. Lastly, check that your oats are certified vegan. You can use mashed banana or pureed pumpkin. Both options add moisture and sweetness. If you need a lower-sugar option, try unsweetened yogurt. This will also help bind your cookies well. To stop cookies from spreading too much, chill the dough before baking. This helps firm up the fat. Make sure your oven is preheated to the right temperature. Use parchment paper on your baking sheet to give the cookies a good base. Carrot cake oatmeal cookies combine good taste with simple steps. We covered key ingredients, tips for selecting quality items, and how to substitute them. Next, I shared step-by-step methods for mixing and baking. You also learned tips for moist and well-textured cookies, as well as fun variations. Lastly, I explained the best ways to store and freeze your cookies. By following this guide, you can enjoy delicious cookies anytime. Happy baking!

Carrot Cake Oatmeal Cookies Delightful and Easy Recipe

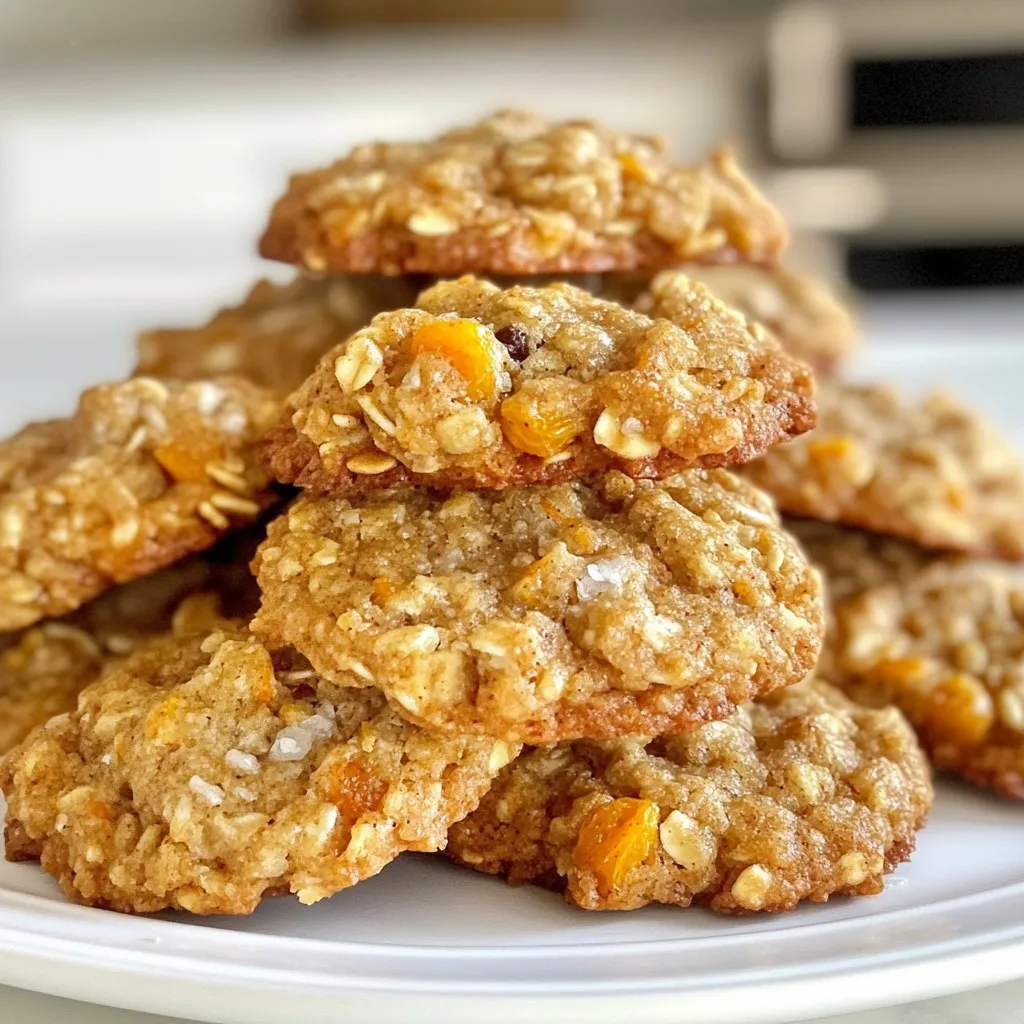
Are you ready to enjoy a delightful treat that combines the warmth of carrot cake with the goodness of oatmeal?

- 4 hard-boiled eggs, peeled and chopped into small pieces - 1 ripe avocado, thoroughly mashed until smooth - 2 tablespoons Greek yogurt for creaminess - 1 tablespoon Dijon mustard for a hint of tang - 1 tablespoon fresh lemon juice to brighten the flavors - 1 tablespoon fresh dill, finely chopped (or 1 teaspoon dried dill for convenience) - Salt and freshly cracked black pepper to taste - 8 large lettuce leaves (romaine or butter lettuce work beautifully) - Cherry tomatoes, halved, for colorful garnish - Optional: Sliced radishes or cucumber for an added crunchy texture Each ingredient plays a vital role in this dish. Hard-boiled eggs pack protein, great for energy. Avocados add healthy fats, which support heart health. Greek yogurt gives creaminess and probiotics for gut health. Dijon mustard adds flavor and helps digestion. Fresh lemon juice brightens the salad and adds vitamin C. Dill gives a fresh taste and has antioxidants. Lettuce keeps everything light and adds crunch. If you need to swap ingredients, you have options. Instead of Greek yogurt, try avocado for extra creaminess. You can use any mustard you like, such as yellow or spicy brown. If you don’t have dill, try parsley or chives. For a lighter wrap, use spinach leaves instead of lettuce. Cherry tomatoes can be replaced with diced bell peppers for a sweet touch. {{ingredient_image_2}} Start by gathering your ingredients. You will need: - 4 hard-boiled eggs, peeled and chopped into small pieces - 1 ripe avocado, thoroughly mashed until smooth - 2 tablespoons Greek yogurt for creaminess - 1 tablespoon Dijon mustard for a hint of tang - 1 tablespoon fresh lemon juice to brighten the flavors - 1 tablespoon fresh dill, finely chopped (or 1 teaspoon dried dill for convenience) - Salt and freshly cracked black pepper to taste - 8 large lettuce leaves (romaine or butter lettuce work beautifully) - Cherry tomatoes, halved, for colorful garnish - Optional: Sliced radishes or cucumber for an added crunchy texture Make sure to use fresh ingredients. Freshness makes a big difference in flavor. In a medium bowl, add your chopped hard-boiled eggs and mashed avocado. These two main ingredients create a creamy base. Next, add the Greek yogurt, Dijon mustard, lemon juice, and chopped dill. Sprinkle in salt and pepper to taste. Using a spatula or fork, gently fold the mixture together. Be careful not to over-mix. You want some egg chunks for texture. Now, rinse your lettuce leaves under cold water. Pat them dry with a paper towel. This keeps your wraps crisp. Take a generous scoop of the avocado egg salad. Place it in the center of each lettuce leaf. For extra crunch, add slices of radishes or cucumber on top. Finally, garnish each wrap with a halved cherry tomato. This adds color and flavor. To serve, fold the sides of the lettuce leaves around the filling. Enjoy your fresh and tasty wraps! When picking an avocado, look for one that feels slightly soft. It should yield gently to your touch. A dark skin color often means ripeness, but check for firmness. Avoid avocados with large dents or dark spots. If you find a perfect one, use it soon. If it’s not ripe, leave it at room temperature for a few days. You can speed up ripening by placing it in a paper bag with a banana. For the best egg salad, use fresh eggs. Boil them for about 10-12 minutes. After boiling, cool them in ice water. This makes peeling easier and keeps the texture nice. Chop the eggs into small pieces, but don’t turn them into mush. You want some chunks for a great contrast with the creamy avocado. Serve your avocado egg salad in crisp lettuce leaves for a healthy crunch. Add cherry tomatoes for color and flavor. You can also include sliced radishes or cucumber for extra texture. If you want more flavor, sprinkle some paprika or chili flakes on top. This adds a nice kick to every bite. Enjoy your wraps fresh for the best taste! Pro Tips Choose Ripe Avocados: Make sure your avocados are perfectly ripe for the best flavor and creaminess. They should yield slightly to gentle pressure when squeezed. Customize Your Greens: Experiment with different types of lettuce or even cabbage leaves for your wraps. Each will bring a unique flavor and texture to the dish. Chill for Flavor: Allow the avocado egg salad to chill in the refrigerator for 30 minutes before serving. This enhances the flavors and makes it even more refreshing. Perfect Portioning: Use an ice cream scoop for consistent portion sizes when filling your lettuce wraps. This ensures that each wrap has the same delicious amount of filling. {{image_4}} You can make this recipe vegan by omitting the eggs and yogurt. Replace them with chickpeas and vegan mayo. Chickpeas add protein and texture. For gluten-free options, use gluten-free wraps or lettuce. Leafy greens like romaine or butter lettuce work great here. These swaps keep the dish tasty and healthy. To boost the taste, add spices like paprika or cumin. They bring warmth and depth. Fresh herbs like cilantro or basil can add bright notes. If you want heat, a dash of cayenne or chili powder works well. Experiment with different flavors to find what you love best. If you run out of Greek yogurt, try using silken tofu for creaminess. You can swap Dijon mustard with yellow mustard for a milder taste. Instead of lemon juice, try lime juice for a twist. You can also use any leafy greens you have on hand as wraps. With these swaps, you can keep the salad fresh and exciting. After a meal, you may have some avocado egg salad left. You can keep it fresh and tasty. First, place the salad in an airtight container. This helps prevent air from making it brown. If you can, press a piece of plastic wrap directly onto the salad. This extra step keeps it even fresher. Choose a container that seals well. Glass containers work great since they do not stain. Plastic containers are also fine, but ensure they are BPA-free. If you have smaller amounts, use smaller containers for easy storage. The avocado egg salad stays fresh for about 2 to 3 days in the fridge. Check for any discoloration or off smells before eating. If it looks or smells strange, it is best to toss it. To keep it fresh, avoid adding any toppings until ready to serve. Yes, you can make this salad ahead of time. It tastes great after sitting for a bit. Just store it in an airtight container in the fridge. It will stay fresh for about two days. If you want to keep it fresh longer, add the avocado just before serving. This keeps it from turning brown. You can get creative with your wraps! Try adding: - Chopped bell peppers for crunch - Shredded carrots for sweetness - Sliced cucumbers for a refreshing bite - Spinach or arugula for extra greens These veggies add flavor and texture. Experiment to find your favorite mix! To make a dairy-free version, simply swap the Greek yogurt. Use mashed avocado instead. It adds creaminess without dairy. You can also use plant-based yogurt. This keeps the salad smooth and tasty while fitting your dietary needs. This blog post walked you through making a delicious avocado egg salad. We covered key ingredients and their health benefits, plus tasty alternatives. You learned the steps for preparation and mixing, along with tips for the best textures and flavors. We also shared variations to suit dietary needs and how to store leftovers safely. Always feel free to get creative with your ingredients. With these insights, you can enjoy your wrap to the fullest!

Avocado Egg Salad Lettuce Wraps Simple and Healthy

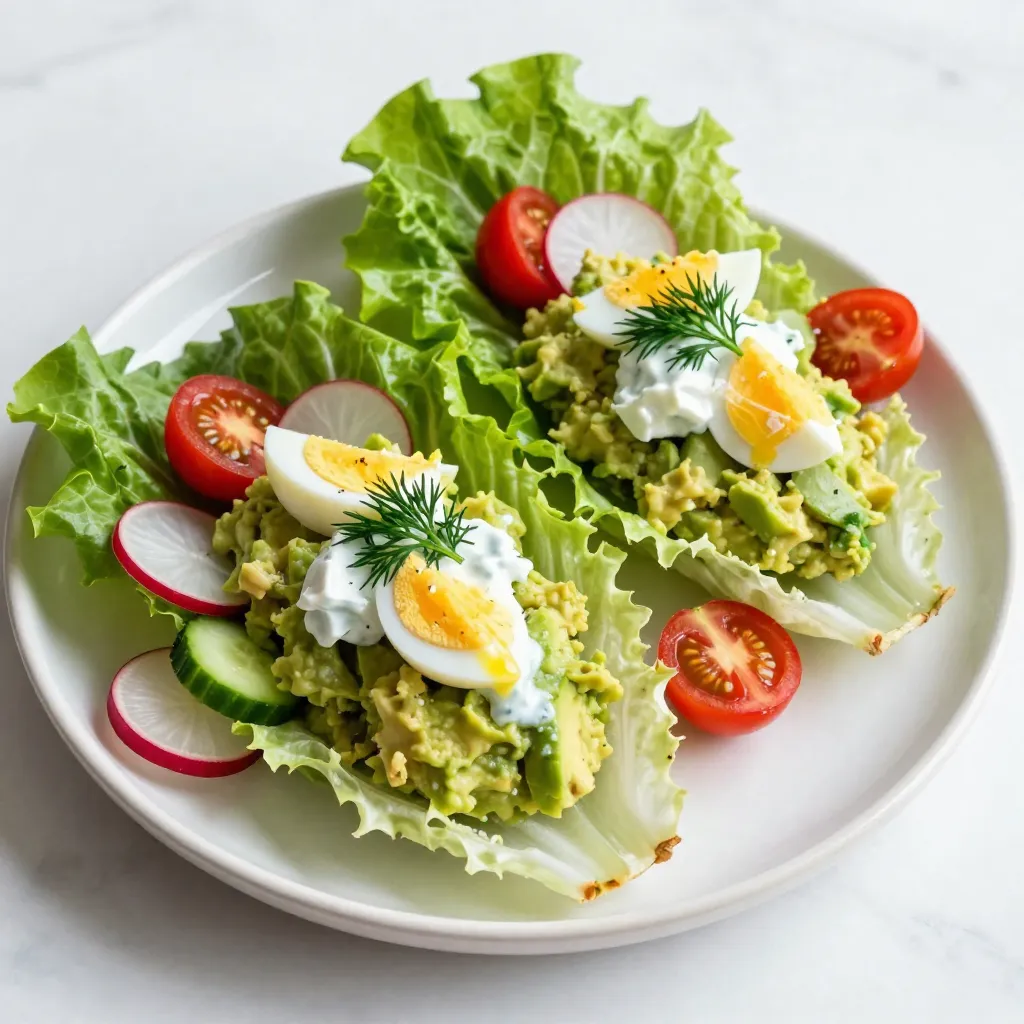
Looking for a quick and healthy lunch? Try my Avocado Egg Salad Lettuce Wraps! This dish packs all the creamy

For the Antipasto Wreath with Hot Honey Feta, you will need: - 1 large pizza dough (store-bought or homemade) - 1 cup cherry tomatoes, halved - 1 cup black olives, pitted and halved - 1 cup artichoke hearts, quartered - 1 cup sliced salami - 1 cup fresh mozzarella balls (bocconcini) - 1/2 cup roasted red peppers, sliced - 1/2 cup feta cheese, crumbled - 1/4 cup hot honey (or regular honey mixed with red pepper flakes) - 2 tablespoons olive oil - 1 tablespoon dried oregano - 1 teaspoon garlic powder - Salt and pepper to taste - Fresh basil leaves for garnish If you can't find a specific ingredient, here are some substitutes: - Pizza Dough: You can use puff pastry for a flakier texture. - Cherry Tomatoes: Grape tomatoes work well too. - Black Olives: Green olives can be used for a different flavor. - Artichoke Hearts: Canned or frozen artichokes are just fine. - Salami: Any cured meat like prosciutto or pepperoni can replace it. - Mozzarella Balls: Shredded mozzarella is a quick swap. - Feta Cheese: Goat cheese can give a similar tang. - Hot Honey: Regular honey with a pinch of cayenne adds heat. To make your Antipasto Wreath shine, focus on quality: - Pizza Dough: Look for fresh or high-quality frozen dough. - Cheeses: Use fresh mozzarella and high-quality feta for the best taste. - Tomatoes: Choose firm, ripe cherry tomatoes for sweetness. - Olives: Go for pitted olives in brine for flavor. - Salami: Select a well-seasoned salami for depth. - Honey: Pick pure honey for a rich flavor. These thoughtful choices will enhance your dish, making it more enjoyable for everyone! {{ingredient_image_2}} Start by preheating your oven to 400°F (200°C). While it heats, prepare your dough. If you're using store-bought pizza dough, take it out of the package. If you are making it from scratch, roll it out on a lightly floured surface. Aim for a large circle about 12-14 inches wide. This will be the base of your wreath. Once rolled, transfer the dough to a parchment-lined baking sheet. Now comes the fun part—filling the wreath! On one half of the dough, layer your ingredients. Begin with fresh mozzarella balls, then add halved cherry tomatoes, sliced salami, black olives, quartered artichoke hearts, sliced roasted red peppers, and crumbled feta cheese. Spread everything evenly, but leave the other half of the dough clean. Next, fold the empty half of the dough over the filling. Press the edges firmly to seal them. To make it look nice, use a fork to crimp the edges. This step makes sure the filling stays inside while baking. Now, brush the top of your wreath with olive oil. Sprinkle dried oregano, garlic powder, salt, and pepper over it. This helps create a nice, crispy crust. Place the baking sheet in your preheated oven. Bake for 20-25 minutes. Look for a golden-brown color and a puffy shape. Once baked, take it out and drizzle hot honey on top. You want it to soak into the cheese and crust for extra flavor. Let it cool for a few minutes. Then, slice it into wedges for serving. For a lovely finish, add fresh basil leaves just before you serve. Enjoy your delicious Antipasto Wreath with Hot Honey Feta! To achieve a crispy crust, start with good dough. Use store-bought or homemade pizza dough. Roll it out thinly, about 1/4 inch thick. Brush the top with olive oil before baking. This oil helps create that golden brown finish. Bake at 400°F for 20-25 minutes. Keep an eye on it. If the edges brown too fast, cover them with foil. Seasonings make all the difference. Use salt and pepper to taste. Dried oregano brings out the Italian flavors. Garlic powder adds a nice kick. For a sweeter touch, drizzle hot honey right after baking. Mix honey with red pepper flakes for extra heat. These bold flavors make each bite pop. For a stunning display, use a large wooden board. Place the Antipasto Wreath in the center. Surround it with marinated vegetables and olives. This adds color and variety. Drizzle more hot honey on top just before serving. It not only looks great but enhances the flavor too. Garnish with fresh basil leaves for a nice touch. Pro Tips Use Fresh Ingredients: Ensure that all your ingredients, especially the vegetables and cheeses, are fresh for the best flavor and texture in your wreath. Customize Your Fillings: Feel free to mix and match your favorite antipasto items, such as different meats, cheeses, or vegetables, to personalize the wreath to your taste. Experiment with Honey: If you prefer a different level of sweetness or heat, try infusing your honey with spices or herbs, like rosemary or thyme, for a unique twist. Serve Warm: For the best experience, serve the Antipasto Wreath warm right out of the oven, as this enhances the flavors and makes the cheese deliciously gooey. {{image_4}} You can easily make this wreath vegetarian. Swap out the salami for more veggies. Try bell peppers, zucchini, or even spinach. These add flavor without meat. Use more feta and mozzarella for a cheesy delight. You could also add marinated mushrooms for an extra twist. This keeps the dish colorful and tasty. If you love spice, add more heat! Use spicy salami instead of regular. You can also increase the hot honey. Drizzle more over the top after baking. Add sliced jalapeños inside the wreath for a kick. This spicy version will thrill anyone who enjoys bold flavors. Cheese makes everything better! If you're not a feta fan, try goat cheese. Its tanginess pairs well with other flavors. Cream cheese can also work for a unique taste. For a richer flavor, add cheddar or pepper jack. Mixing different cheeses creates a fun flavor party in each bite! To keep your Antipasto Wreath fresh, place any leftovers in an airtight container. Store it in the fridge for up to three days. Make sure to let it cool before sealing the container. This helps keep the crust crispy and the toppings flavorful. When you're ready to enjoy leftovers, preheat your oven to 350°F (175°C). Place the wreath on a baking sheet and heat for about 10-15 minutes. This method warms it up while keeping the crust nice and crunchy. You can also use a microwave, but the crust may get soft. If you want to save the Antipasto Wreath for later, freezing is a great option. Wrap it tightly in plastic wrap, then in aluminum foil. Freeze it for up to one month. When you're ready to eat, let it thaw in the fridge overnight. Then, reheat it in the oven for the best results. Yes, you can make the dough from scratch. Use flour, yeast, salt, and water. Mix until smooth and let it rise. This gives you fresh, warm dough. If you prefer, store-bought dough works just as well. It saves time and effort while still tasting great. You can serve the Antipasto Wreath with various items. Try fresh veggie sticks like carrots and cucumbers. A side of marinara sauce makes a tasty dip. You can also add a fresh salad or some crusty bread. These sides will make your meal more complete and fun. The Antipasto Wreath lasts about 3 to 5 days in the fridge. Store it in an airtight container to keep it fresh. When you're ready to eat, simply reheat it in the oven for a few minutes. This brings back its delicious flavors. This post covered everything you need for a great Antipasto Wreath. You learned about key ingredients, tips for preparation, and how to bake it perfectly. I shared ideas for different flavors, and storage tips to keep it fresh. With this guide, you can confidently make your own tasty wreath. Remember, cooking is fun, and trying new things makes it even better. Enjoy your cooking adventure and share your tasty results with others!

Antipasto Wreath with Hot Honey Feta Delight

Looking to impress your guests with a stunning appetizer? The Antipasto Wreath with Hot Honey Feta Delight is your answer!

- 2 cups heavy cream - 1 can (14 oz) sweetened condensed milk - 1 teaspoon vanilla extract - 1 cup crushed Oreo cookies (plus extra for topping) - A pinch of salt The main ingredients for this no-churn Oreo ice cream are simple and fun. Heavy cream gives the ice cream its creamy texture. Sweetened condensed milk adds sweetness and a rich flavor. Vanilla extract brings warmth to the ice cream. Crushed Oreo cookies provide that beloved cookies and cream taste. Don’t forget a pinch of salt to enhance all the flavors. - Additional crushed Oreos - Chocolate sauce - Whipped cream After making your ice cream, you can get creative with toppings. More crushed Oreos add a nice crunch. Drizzling chocolate sauce gives it a sweet touch. A dollop of whipped cream makes it look fancy and fun. These toppings will make your no-churn Oreo ice cream even more delightful! {{ingredient_image_2}} - Begin with 2 cups of heavy cream. - Pour the cream into a large mixing bowl. - Use an electric mixer on high speed. - Beat the cream for 3 to 5 minutes. - Watch closely until it forms stiff peaks. - Be careful not to over-whip the cream. - Over-whipped cream can turn grainy and lose fluffiness. - Grab another mixing bowl for the next step. - Add one can of sweetened condensed milk to the bowl. - Pour in 1 teaspoon of vanilla extract. - Add a pinch of salt to balance the sweetness. - Stir gently with a spatula until well mixed. - Take your whipped cream and fold it in slowly. - Use a spatula to keep the mixture light and airy. - Now, gently fold in 1 cup of crushed Oreo cookies. - Save some crushed Oreos for topping later. - Transfer the mixed ice cream into a loaf pan. - Smooth the top for an even finish. - Sprinkle the reserved Oreo crumbles on top. - Seal the container tightly with plastic wrap. - Place it in the freezer for at least 6 hours. - This will help it become firm and ready to scoop. To get a smooth ice cream, avoid ice crystals. Ice crystals form when the mixture freezes too fast. Here are tips to keep your ice cream creamy: - Chill your mixing bowls: Before you start, chill your bowls. Cold bowls help keep the cream cold while you whip. - Don’t over-whip: When whipping cream, stop as soon as you see stiff peaks. Over-whipped cream can turn grainy. Folding is key to keeping the mixture light. Use a spatula to gently mix the whipped cream and condensed milk. Move the spatula in a circular motion. Turn the bowl as you fold. This helps mix without losing air. You can make this ice cream your own! Try these fun ideas: - Different cookies: Swap Oreos for other cookies like chocolate chip or peanut butter. Each adds its own twist. - Flavor variations: Add flavors to the base. For a minty taste, mix in mint extract. For a nutty flavor, try peanut butter. Experimenting with these options can lead to new favorites. Serving your homemade ice cream can be fun and creative. Here are some ideas: - Pair with desserts: Serve it with brownies or pie for a perfect match. The rich flavors blend well. - Creative presentations: Use cones or fancy bowls. Top with extra crushed Oreos or a drizzle of chocolate sauce. This not only tastes great but looks stunning too! Make your ice cream special by adding your personal touch. Pro Tips Whipping Cream Perfectly: Make sure your mixing bowl and beaters are cold, as this helps the cream whip faster and achieve better volume. Flavor Variations: Experiment with different flavors by adding a tablespoon of peppermint extract or crushed candy canes for a seasonal twist. Serving Suggestions: Serve with fresh berries or a sprinkle of chopped nuts for added texture and flavor contrast. Storage Tips: For longer storage, wrap the ice cream with plastic wrap before sealing it in an airtight container to preserve its freshness. {{image_4}} You can make this treat gluten-free. Instead of regular Oreos, use gluten-free cookies. Brands like Glutino or Kto's offer great options. Check ingredient labels to ensure they fit your needs. You won't miss out on taste. For a dairy-free option, swap heavy cream with coconut cream. It adds a nice flavor. Use a plant-based sweetened condensed milk too. Brands like Nature’s Charm work well. - Alternative sweeteners: Use maple syrup or agave nectar instead of sweetened condensed milk. This keeps it vegan and adds a unique twist. You can mix things up with fun flavors. Adding fresh fruit like strawberries or bananas gives a refreshing taste. Slice them thin before folding into your ice cream. - Incorporating chocolate chips: Add mini chocolate chips for extra crunch. This makes the dessert even more exciting and delicious. You can also swirl in some peanut butter for a rich taste. Enjoy experimenting! To keep your ice cream fresh, use an airtight container. A loaf pan works well too. Make sure to cover it tightly with plastic wrap or a lid. This helps stop air from getting in. Air can cause freezer burn, which ruins the ice cream's taste. This ice cream stays good in the freezer for about 2 to 3 months. After that, it may lose flavor and texture. Look for signs of freezer burn, like ice crystals or a dry surface. If you see these, it might be time to toss it out. When it's time to serve, take the ice cream out of the freezer. Let it sit for about 5 to 10 minutes. This helps soften it, making it easier to scoop. Use a warm ice cream scoop for the best results. If you want it creamier, let it thaw for a few extra minutes. Yes, you can! Some great alternatives include: - Chocolate sandwich cookies - Vanilla wafers - Graham crackers Using these options can give your ice cream a new twist. You can even mix and match for fun flavors. Not at all! You can whip the cream by hand. However, an electric mixer saves time and effort. If you choose to hand-whip, be ready for a workout. Whipping by hand takes longer but can be fun. Just make sure to get those stiff peaks! It usually takes about 6 hours for the ice cream to set. For the best scoopable texture, let it freeze overnight. When ready, the ice cream should be firm but still creamy. If it feels too hard, let it sit for a few minutes before scooping. Enjoy those creamy bites! This no-churn Oreo ice cream is simple and fun to make. You need just five key ingredients and a few steps to whip up a creamy treat. Don't forget the optional toppings to add extra flavor. You can customize it with different cookies or flavors too. Storing your ice cream properly keeps it fresh and tasty. Remember to serve it just right for the best texture. Enjoy this sweet delight on any occasion!

No-Churn Oreo Ice Cream Delightful and Easy Recipe

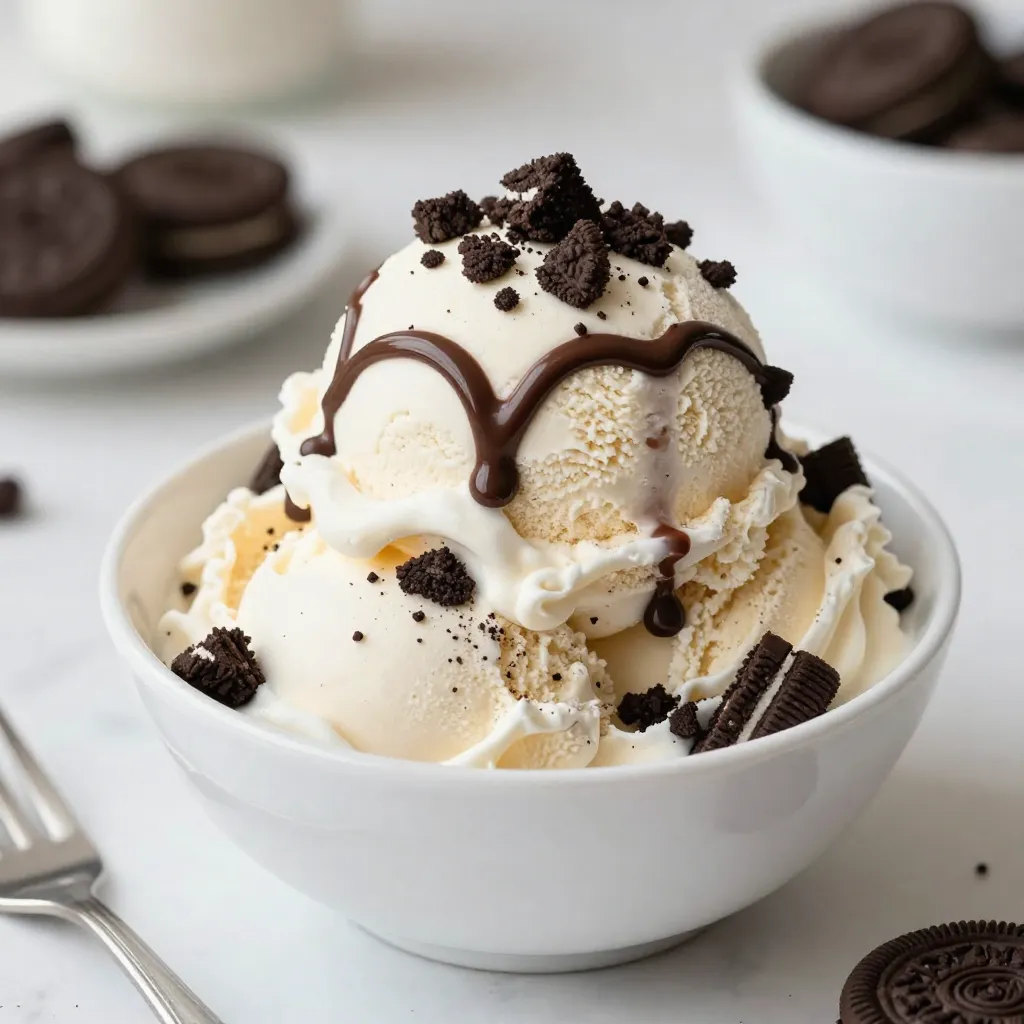
Craving a sweet treat? You’ll love my No-Churn Oreo Ice Cream! This simple dessert comes together without an ice cream

To make snickerdoodle blondies, you need: - 1 cup unsalted butter, melted - 1 cup packed brown sugar - 1/2 cup granulated sugar - 2 large eggs - 2 teaspoons vanilla extract - 2 cups all-purpose flour - 2 teaspoons baking powder - 1 teaspoon cream of tartar - 1/2 teaspoon salt - 3 tablespoons granulated sugar (for topping) - 1 tablespoon ground cinnamon (for topping) You can swap ingredients if needed. Use margarine instead of butter. Coconut sugar works well in place of brown sugar. For a vegan option, replace eggs with flax eggs or applesauce. Gluten-free flour can replace all-purpose flour for gluten-free blondies. Using fresh eggs gives the best rise. Make sure your butter is melted but not hot. This helps mix in the sugars well. Measure flour correctly by spooning it into the cup and leveling it off. This ensures the blondies don’t turn out too dense. Always mix gently when combining wet and dry ingredients. Overmixing can make them tough. Lastly, use high-quality vanilla extract for better flavor. {{ingredient_image_2}} First, you need to preheat your oven to 350°F (175°C). This step is key for even baking. While the oven warms up, grab a 9x13 inch baking dish. Lightly grease it to prevent sticking. Then, line it with parchment paper. Leave some paper hanging over the edges. This makes it easy to lift the blondies out later. Now, take a big mixing bowl. In it, combine 1 cup of melted butter, 1 cup of brown sugar, and 1/2 cup of granulated sugar. Use a whisk or spatula to mix them well. You want a smooth texture. Next, add 2 large eggs, one at a time. Beat well after each egg. Then, pour in 2 teaspoons of vanilla extract. Mix until it’s all combined. In another bowl, whisk together 2 cups of flour, 2 teaspoons of baking powder, 1 teaspoon of cream of tartar, and 1/2 teaspoon of salt. Mix them well to avoid lumps. Slowly add this dry mix to the wet ingredients. Stir gently. Be careful not to overmix; this keeps the blondies soft. Next, pour the batter into your prepared baking dish. Spread it evenly with a spatula. In a small bowl, mix 3 tablespoons of granulated sugar with 1 tablespoon of ground cinnamon. Sprinkle this mix over the top of the batter. Now, it’s time to bake! Place the dish in the oven and bake for 25-30 minutes. Check if they are done by inserting a toothpick in the center. It should come out with a few moist crumbs. Once they’re ready, cool the blondies in the pan for about 15 minutes. Use the parchment paper to lift them out onto a wire rack. Let them cool completely before slicing into squares. To get the best texture and flavor in your Snickerdoodle blondies, focus on a few key steps: - Use melted butter: This adds richness and helps create a soft bite. - Do not overmix: When you add the dry ingredients, mix just until combined. This keeps the blondies tender. - Check for doneness: Insert a toothpick in the center. If it comes out with moist crumbs, you’re set. Avoid these common pitfalls: - Skipping the cream of tartar: This ingredient gives the blondies that classic Snickerdoodle taste. - Overbaking: Blondies should be soft, not dry. Keep an eye on them during the last few minutes. - Not cooling before cutting: Let them cool fully. Cutting too soon can lead to messy squares. Having the right tools makes all the difference: - 9x13 inch baking dish: This size helps the blondies bake evenly. - Mixing bowls: Use one for wet ingredients and another for dry. - Parchment paper: Line your baking dish for easy removal and cleanup. - Whisk and spatula: A whisk helps blend the wet ingredients well, and a spatula is perfect for mixing. Pro Tips Use Room Temperature Ingredients: Ensure your eggs are at room temperature for better incorporation into the batter, leading to a more uniform texture. Do Not Overmix: When combining the wet and dry ingredients, mix just until combined. Overmixing can lead to dense blondies instead of the desired chewy texture. Adjust Baking Time: Keep an eye on the blondies as they bake; ovens can vary. Check for doneness a few minutes early to avoid overbaking. Add Extras: Consider folding in chocolate chips, nuts, or butterscotch chips to the batter for added flavor and texture variations. {{image_4}} You can add your favorite nuts or chocolate chips to the blondies. Chopped walnuts or pecans work great. Add about one cup of nuts or chips to the batter. This adds crunch and flavor to every bite. Mix them in right before you pour the batter into the pan. You can also use mini chocolate chips for a sweeter treat. Want to change the flavor? Try adding spices or extracts! Cinnamon is a classic choice. You can also use nutmeg or ginger for a fun twist. Add a teaspoon of any spice to the dry mix. For extracts, swap out vanilla for almond or maple. Just a teaspoon will do. These small changes can transform your blondies into something special. Making gluten-free blondies is simple. Swap all-purpose flour for a gluten-free blend. Make sure it includes xanthan gum for the best texture. Follow the same recipe, and you’ll get soft and chewy blondies. Always check labels to avoid gluten in other ingredients. With these tweaks, everyone can enjoy this sweet treat! To keep your snickerdoodle blondies fresh, store them in an airtight container. This helps maintain their soft texture. You can place a piece of parchment paper between layers to prevent sticking. Keep them at room temperature for up to four days. If you want them to last longer, consider freezing them. Freezing snickerdoodle blondies is easy. First, let them cool completely. Then, cut them into squares. Wrap each square tightly in plastic wrap. Place the wrapped squares in a freezer bag. They can freeze for up to three months. When you want one, simply take it out and let it thaw at room temperature. To bring back that fresh-baked taste, reheat your blondies. Preheat your oven to 350°F (175°C). Place the blondies on a baking sheet. Heat them for about 5-10 minutes. You can also use the microwave. Heat one square for about 10-15 seconds. This will make them warm and soft again. Enjoy your delicious treat! A Snickerdoodle Blondie has a soft, chewy texture. It combines the classic flavors of a Snickerdoodle cookie with blondie batter. You get the buttery taste from the brown sugar and a hint of cinnamon. The cream of tartar gives it a unique tang. This special blend makes it different from regular blondies. Yes, you can make Snickerdoodle Blondies without eggs. You can use substitutes like unsweetened applesauce or mashed banana. Each egg can be replaced with 1/4 cup of applesauce. This makes the blondies moist and keeps the texture nice. However, the flavor may change slightly. You can check if the blondies are done by inserting a toothpick into the center. If it comes out with a few moist crumbs, they are done. The edges will look set and slightly golden. If the toothpick comes out wet, bake them a bit longer. Yes, Snickerdoodle Blondies differ from traditional blondies. Traditional blondies are rich and buttery, with a vanilla flavor. Snickerdoodle Blondies add cinnamon and cream of tartar, giving them a unique taste. The addition of cinnamon sugar on top makes them even more special. We've covered the key elements to make perfect Snickerdoodle Blondies. From ingredient lists to baking steps, you have a clear path to success. I shared tips to improve flavor and texture, plus common mistakes to avoid. You can also explore fun variations and storage methods. Remember, the joy of baking comes from trying new things. With these insights, you'll create tasty treats every time. Enjoy making your blondies!

Snickerdoodle Blondies Easy Recipe for Baking Delight

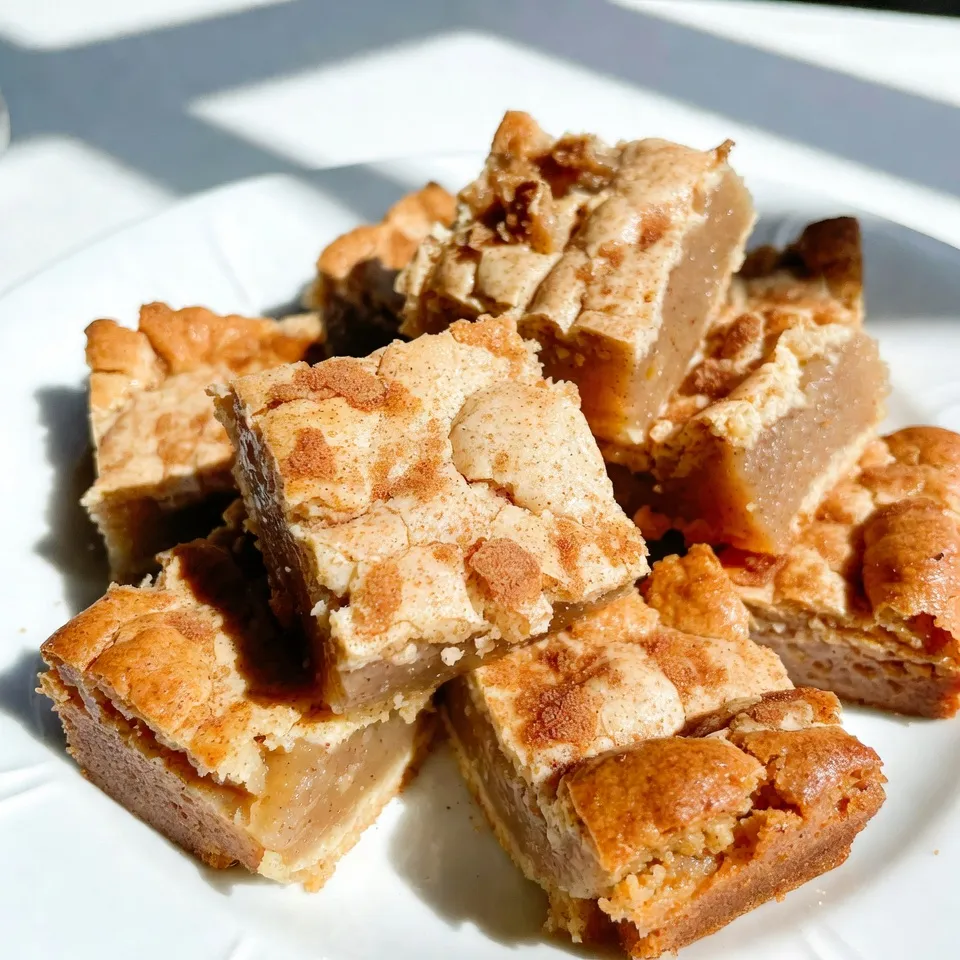
Welcome to my easy recipe for Snickerdoodle Blondies! If you love sweet treats, you’re in for a delight. These bars

- 1 lb baby carrots (or regular carrots, sliced) - 3 tablespoons pure maple syrup - 2 tablespoons unsalted butter - 1 teaspoon ground cinnamon - 1/2 teaspoon salt - 1/4 teaspoon freshly ground black pepper - Fresh parsley, for garnish Best types of carrots for glazing I prefer baby carrots for their sweet taste and tender texture. You can also use regular carrots. Just slice them evenly to ensure they cook well. Substitute options for dietary needs If you need a dairy-free option, use coconut oil instead of butter. You can swap maple syrup with agave syrup for a vegan choice. Quality of maple syrup and its importance Always choose pure maple syrup. This type has a rich flavor that enhances the carrots. Avoid artificial syrups, as they lack depth and taste. {{ingredient_image_2}} 1. Start by melting the butter in a large skillet. Set the heat to medium. 2. Watch the butter as it melts. Swirl it around to cover the skillet. 3. Once melted, add the baby carrots. If using regular carrots, slice them evenly. 4. Use a spatula to mix. Make sure all carrots are coated in butter. 1. Sprinkle the ground cinnamon, salt, and black pepper over the carrots. 2. Stir the spices in well. This gives the carrots a nice flavor. 3. Next, pour the pure maple syrup over the carrots. Mix everything together. 1. Lower the heat to low and cover the skillet. Cook for 10-12 minutes. 2. Stir occasionally, keeping the carrots tender yet crisp. 3. After that, remove the lid. Turn the heat back to medium-high. 4. Cook uncovered for 2-3 minutes. This helps the glaze thicken. 5. When done, take the skillet off the heat. 6. Transfer the carrots to a serving dish. 7. Top with chopped parsley for a fresh look before serving. To make the best glaze, you can adjust the sweetness and seasoning. If you want a sweeter taste, add a bit more maple syrup. If you prefer less sweetness, use less syrup. You can also add more salt or black pepper if you like a bolder flavor. To ensure your carrots are tender yet crisp, cook them gently. Start by covering the skillet. This helps them soften. Stir occasionally to cook evenly. After about 10-12 minutes, check for tenderness. They should be soft but still have a slight bite. When serving your maple glazed carrots, choose a bright and warm serving bowl. A colorful bowl can make your dish pop on the table. For a nice touch, add a few whole parsley leaves on top before serving. This adds a fresh look and a splash of color. You can also sprinkle extra cinnamon on top for visual appeal and flavor. Pro Tips Cut Uniformly: For even cooking, make sure your carrots are cut into uniform pieces, whether you use baby carrots or regular ones. Maple Syrup Quality: Use high-quality pure maple syrup for the best flavor; avoid imitation syrups as they can alter the taste significantly. Adjust Sweetness: Feel free to adjust the amount of maple syrup based on your sweetness preference; you can also add a splash of orange juice for a citrusy twist. Garnish Wisely: Fresh parsley not only adds color but also a fresh flavor that complements the sweetness of the glaze; make sure to chop it finely for a better presentation. {{image_4}} You can change up your maple glazed carrots by adding nuts or dried fruits. Nuts like walnuts or pecans add a nice crunch. They also bring healthy fats. Dried fruits like cranberries or raisins add sweetness and chewiness. This mix makes the dish more exciting. You can try adding these extras based on the season. Using different spices or herbs can also change the flavor. You might add nutmeg for warmth. Fresh thyme or rosemary can bring a savory touch. These flavors can really enhance the maple syrup, making the dish truly special. If you want a vegan option, you can swap out the butter. Try using coconut oil or vegan butter instead. Both options will keep the carrots rich and flavorful. You won’t miss the dairy at all. For those looking to cut sugar, there are sugar-free maple syrup options available. Look for brands that use natural sweeteners. This allows you to enjoy the sweet taste without the added sugar. You can still have soft, glazed carrots that everyone will love. To store leftover maple glazed carrots, place them in an airtight container. Make sure the container seals tightly. This helps keep the carrots fresh. You can store them in the fridge for up to three days. After that, they may lose their flavor and texture. For the best reheating, use the stovetop. Place the carrots in a skillet over medium heat. Add a splash of water or a little butter to help them heat evenly. Stir occasionally to prevent sticking. This method keeps the carrots tender and flavorful. Avoid using the microwave, as it can make them mushy. Always check to ensure they are heated through before serving. Can I use frozen carrots instead? Yes, you can use frozen carrots. They are convenient and save time. Just cook them a bit longer to get them tender. How do I know when carrots are done cooking? Carrots are done when they are tender but still slightly crisp. You can poke them with a fork to check. If they slide off easily, they are perfect! Can I double the recipe for a larger crowd? You can double the recipe easily. Just make sure you use a larger skillet. This way, the carrots will cook evenly. Overview of calories per serving Each serving of maple glazed carrots has about 120 calories. This makes it a healthy side dish option. Key vitamins and minerals in carrots Carrots are rich in vitamin A, which is good for your eyes. They also have fiber, which helps with digestion. Plus, they contain potassium, which is great for heart health. Best dishes to pair with maple glazed carrots Maple glazed carrots pair well with roasted chicken or grilled pork. They also go nicely with quinoa or wild rice for a veggie-friendly meal. How to incorporate into a holiday meal For holiday meals, serve these carrots alongside turkey or ham. Their sweet flavor adds balance to rich dishes, making them a festive favorite. In this post, we explored how to make tasty maple glazed carrots. We covered ingredients, cooking steps, tips for the perfect glaze, and variations to try. Remember, the right carrots and quality syrup make a big difference. Don't forget to store leftovers properly and reheat them for the best texture. Try these carrots at your next meal or celebration. They are sure to impress and delight! Enjoy your cooking adventure!

Maple Glazed Carrots Sweet and Simple Side Dish

Looking for a simple yet delightful side dish? Maple glazed carrots may just be your answer! This sweet and savory

Older posts
Newer posts
← Previous Page1 … Page115 Page116 Page117 … Page120 Next →

dsad

© 2026 yumymoments • Built with GeneratePress

Our Policies

  • Copyright Policy
  • Cookie Policy
  • GDPR Policy
  • Privacy Policy
  • Disclaimer
  • Terms Of Use

More Information

  • Home
  • About
  • Contact
  • Appetizers
  • Dessert
  • Dinner
  • Drinks
©2026, yumymoments About Back To Top