Skip to content
DisclaimerTerms Of UseGDPR PolicyCookie Policy

yumymoments

  • Home
  • Drinks
  • Appetizers
  • Dinner
  • Dessert
  • About
  • Contact
  • Privacy Policy
DisclaimerTerms Of UseGDPR PolicyCookie Policy

Samantha

For this Creamy Garlic Tuscan Chicken, gather the following ingredients: - 4 boneless, skinless chicken breasts - 3 tablespoons extra virgin olive oil - 4 cloves garlic, finely minced - 1 cup sun-dried tomatoes, roughly chopped - 1 cup heavy cream - 1 cup fresh spinach, coarsely chopped - 1 cup grated Parmigiano-Reggiano cheese - 1 teaspoon Italian seasoning blend - Sea salt and freshly cracked black pepper to taste - Fresh basil leaves for garnish You can swap some ingredients based on your taste: - Chicken: Use boneless thighs for extra flavor and moisture. - Olive oil: Substitute with avocado oil for a light taste. - Sun-dried tomatoes: Fresh tomatoes can work if you want a fresher taste. - Heavy cream: Use half-and-half for a lighter sauce. - Spinach: Kale or arugula can add a nice twist. Choosing the right ingredients is key for great flavor: - Chicken: Look for bright pink meat with no smell. - Olive oil: Choose extra virgin for rich flavor and health benefits. - Garlic: Fresh garlic should be firm and dry, not sprouted. - Tomatoes: Pick sun-dried tomatoes that are plump and not too dry. - Cheese: Go for fresh Parmigiano-Reggiano; it adds depth to the dish. {{ingredient_image_2}} 1. Heat 2 tablespoons of olive oil in a large skillet over medium-high heat. 2. Season both sides of the chicken breasts with sea salt and black pepper. 3. Place the seasoned chicken in the skillet. Sear for 6-7 minutes on each side. 4. Remove the chicken from the skillet and set it aside on a plate. 5. Add the remaining tablespoon of olive oil to the same skillet. 6. Add the minced garlic, cooking for about 1 minute until fragrant. 7. Stir in the chopped sun-dried tomatoes and Italian seasoning. Cook for 2 more minutes. 8. Lower the heat and pour in the heavy cream, stirring to combine. 9. Gradually add the grated cheese, stirring until melted and creamy. 10. Add the chopped spinach and stir until wilted. 11. Return the chicken to the skillet and spoon sauce over it. 12. Simmer for 3-5 minutes until heated through. 13. Taste the sauce and adjust seasoning if needed. - Prep Time: 10 minutes - Cook Time: 20 minutes - Total Time: 30 minutes - Use medium-high heat for searing chicken. This gives it a golden crust. - Lower heat when adding cream to prevent boiling. Always check the chicken’s internal temperature. It should reach 165°F. Cut into chicken at the thickest part. The juices should run clear, with no pink. This ensures your chicken is safe and tasty. To achieve a smooth sauce, always use fresh ingredients. Fresh garlic is key here. Mince it finely to release its full flavor. When cooking, lower the heat after adding garlic. This prevents burning and keeps the taste bright. Stir continuously when adding cream and cheese. This helps create a creamy, rich sauce. Don’t rush the melting process. Slow and steady is the way to go. Using the right tools makes cooking easier. Here’s what you need: - A heavy-bottomed skillet for even heat. - A sharp chef's knife for chopping. - A cutting board for prep. - Measuring spoons for accurate ingredient amounts. - A spatula for stirring and serving. These tools enhance your cooking experience. They help you create the best version of this dish. To boost the flavor, consider these tips: - Add a splash of white wine for depth. - Mix in fresh herbs like parsley or thyme for brightness. - If you like a bit of heat, sprinkle in some crushed red pepper flakes. - Adjust salt and pepper to taste. Start with a little and add more as needed. Experimenting with flavors keeps the dish exciting. Trust your taste buds, and enjoy the process! Pro Tips Perfectly Sear the Chicken: Ensure your skillet is hot enough before adding the chicken; this helps achieve a beautiful golden crust while keeping the inside juicy. Enhance the Garlic Flavor: Add minced garlic towards the end of cooking to maintain its pungent flavor. If you prefer a milder taste, sauté it longer before adding other ingredients. Cheese Alternatives: If Parmigiano-Reggiano isn’t available, consider using Pecorino Romano for a sharper flavor or a blend of mozzarella and parmesan for a creamier texture. Make it Your Own: Feel free to add other vegetables like bell peppers or mushrooms to the sauce for extra nutrition and flavor. Just sauté them along with the garlic. {{image_4}} You can easily change this dish to fit your taste. Here are some fun swaps: - Instead of sun-dried tomatoes, try roasted red peppers for a sweet touch. - Swap the heavy cream with coconut milk for a lighter, dairy-free version. - Use feta cheese instead of Parmigiano-Reggiano for a tangy twist. - Add olives for a briny flavor that pairs well with the cream. If you want to make this meal fit special diets, here are some ideas: - For a low-carb version, serve the chicken with zucchini noodles instead of pasta. - To make it dairy-free, use almond milk and a dairy-free cheese. - For a gluten-free option, ensure your chicken broth or stock is gluten-free if you choose to add it. - Vegans can replace chicken with grilled tofu or chickpeas and use plant-based cream. The right sides can make your meal shine. Consider these options: - Serve with a fresh green salad to balance the creaminess. - Garlic bread is perfect for dipping into the sauce. - Roasted veggies like asparagus or Brussels sprouts add color and crunch. - Pair it with a light pasta tossed in olive oil and herbs for a filling meal. After cooking, let the creamy garlic Tuscan chicken cool down to room temperature. Place it in an airtight container. Store it in the fridge for up to 3 days. This way, it stays fresh and tasty. When you're ready to eat, check for any off smells or changes in color. You can freeze leftovers for longer storage. First, let the dish cool completely. Then, place it in a freezer-safe container. Make sure to label it with the date. It will keep well for about 2 months. For best taste, try to eat it sooner than that. When ready to enjoy your creamy garlic Tuscan chicken, reheating is key. Thaw it in the fridge overnight if frozen. Then, heat it in a skillet over low heat. Stir often and add a splash of cream or broth to keep it moist. You can also microwave it in short bursts. Just make sure it heats evenly. Check that it reaches 165°F before serving. This keeps it safe and delicious! You can serve Creamy Garlic Tuscan Chicken with a variety of sides. Here are some great options: - Pasta: Cooked al dente. It soaks up the creamy sauce well. - Rice: Fluffy white or brown rice works nicely. - Bread: Crusty artisan bread is perfect for dipping. - Salad: A fresh green salad adds a nice crunch. - Vegetables: Roasted or steamed veggies can balance the meal. Each of these sides enhances the chicken's rich flavors. Yes, you can use fresh tomatoes. However, fresh tomatoes have more water. This can change the sauce's texture. To use fresh tomatoes: - Dice about 1 to 1.5 cups of ripe tomatoes. - Sauté them with garlic until soft. - Add them to the cream sauce just like sun-dried tomatoes. Fresh tomatoes will give a different taste. The sauce will be lighter and fresher. To add heat to Creamy Garlic Tuscan Chicken, try these tips: - Red Pepper Flakes: Add a pinch while cooking the garlic. - Hot Sauce: Stir in a splash when adding the cream. - Spicy Sausage: Use spicy Italian sausage instead of chicken. - Fresh Jalapeños: Chop and add them for a fresh kick. These options let you control the spice level to your liking. This blog post covered how to make a tasty Creamy Garlic Tuscan Chicken. We looked at the best ingredients, substitutes, and tips for choosing quality items. I shared the step-by-step cooking process, including checking the doneness of chicken. You learned useful cooking tips, tools, and ways to boost flavor. We also explored variations, storage tips, and answered common questions. Enjoy trying out this recipe, and have fun adding your twist to it! Cooking should be about joy and creativity.

Creamy Garlic Tuscan Chicken Easy Dinner Recipe

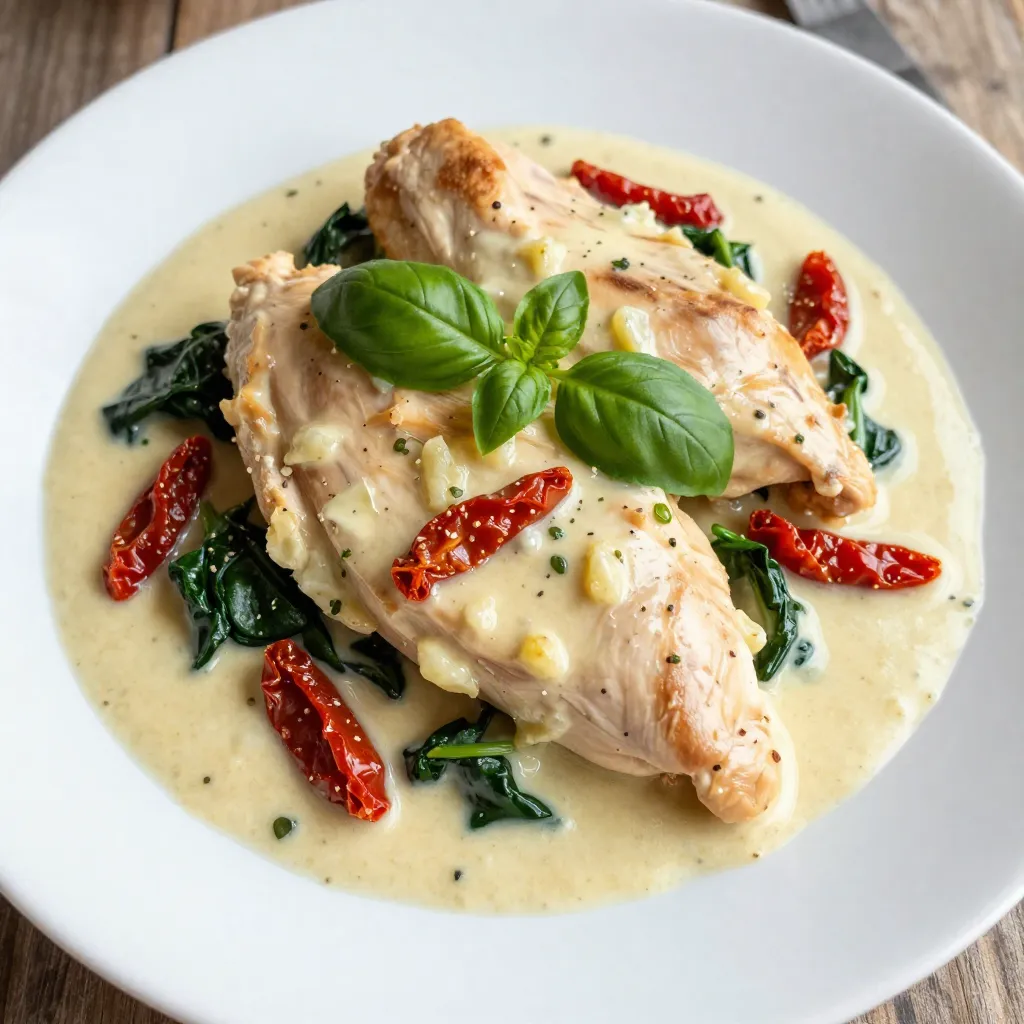
Are you ready to elevate your dinner game with a delicious Creamy Garlic Tuscan Chicken? This easy recipe is packed

- 2 boneless, skinless chicken breasts - 1 tablespoon olive oil - 4 cloves garlic, finely minced - 1 teaspoon smoked paprika - 1 teaspoon Italian seasoning blend - Sea salt and freshly cracked black pepper to taste The chicken breasts serve as the main protein. They add a juicy and tender bite. Olive oil helps cook the chicken and adds flavor. Garlic brings a strong, savory taste that you will love. Smoked paprika adds a nice, smoky depth. Italian seasoning ties all the flavors together. Salt and pepper enhance the overall taste. - 1 cup shredded mozzarella cheese - ½ cup cream cheese, softened at room temperature - 4 large flour tortillas (10-12 inch) Mozzarella cheese melts perfectly, making it gooey and delicious. Cream cheese adds richness and creaminess to the filling. Large flour tortillas hold all the tasty ingredients well. - Fresh baby spinach - Diced tomatoes - Sliced jalapeños - Fresh herbs like cilantro Fresh baby spinach adds a crisp texture and a pop of color. Diced tomatoes brighten the wrap with freshness. Sliced jalapeños give it a spicy kick. Fresh herbs like cilantro enhance the flavor profile. You can mix and match these toppings to suit your taste. {{ingredient_image_2}} 1. Preheat your oven to 375°F (190°C). This step makes sure your oven is hot. 2. Heat a medium skillet over medium heat. Add one tablespoon of olive oil. 3. Once the oil is hot, add four cloves of minced garlic. Sauté for about one minute. Stir often until the garlic smells great but doesn’t brown. 4. Season two boneless, skinless chicken breasts with one teaspoon of smoked paprika, one teaspoon of Italian seasoning, sea salt, and black pepper. 5. Place the chicken in the skillet. Cook for 6-7 minutes on each side. Make sure the chicken is golden brown and cooked to 165°F (75°C) inside. 1. After cooking, take the chicken out and let it rest for a few minutes. 2. Use two forks to shred the chicken into small, bite-sized pieces. 3. In a large bowl, mix the shredded chicken with one cup of shredded mozzarella and half a cup of softened cream cheese. Stir well until everything is creamy and combined. 1. Lay four large flour tortillas flat on a clean surface. 2. Spoon a nice amount of the chicken and cheese mix into the center of each tortilla. 3. Add a handful of fresh baby spinach leaves and any optional toppings, like diced tomatoes or sliced jalapeños. 4. Fold the sides of the tortilla over the filling. Then, roll it tightly from the bottom up. Make sure all the filling stays inside the wrap. 5. Place the wraps seam-side down on a baking sheet lined with parchment paper. 6. Bake in the preheated oven for 15-20 minutes. Look for crispy, golden tortillas and melted cheese. 7. Once baked, take the wraps out and let them cool for a couple of minutes. Slice each wrap in half diagonally for a nice look. - Ensuring proper seasoning: Always season your chicken well. Use smoked paprika, Italian seasoning, sea salt, and black pepper. This mix adds great taste. Make sure to rub the spices evenly on the chicken. - Tips for achieving the right internal temperature: Cook the chicken until it reaches 165°F (75°C). Use a meat thermometer to check. This ensures the chicken is safe to eat and juicy. - How to prevent tortilla tears: Warm the tortillas slightly before filling them. This makes them more flexible and less likely to tear. You can microwave them for about 10 seconds. - Techniques for a tight wrap: Start rolling from the bottom, folding the sides in first. This keeps the filling secure. Tightly roll it up to avoid spills. - Presentation tips with garnishing: Serve the wraps on a colorful plate. You can add fresh herbs like cilantro on top. This makes the dish look more inviting. - Recommended sides and dips: Pair the wraps with ranch or salsa for dipping. A side of mixed greens adds freshness and color. Enjoy the different flavors together! Pro Tips Perfectly Shredded Chicken: Allow the cooked chicken to rest before shredding. This helps retain moisture, making the chicken juicier and more flavorful. Customize Your Fillings: Feel free to experiment with different cheeses or add-ins like bell peppers or onions to tailor the wraps to your taste. Achieve Extra Crispiness: For even crispier wraps, spray the tops with a little cooking oil before baking. This promotes browning and enhances texture. Serve with Dipping Sauce: Pair your wraps with a delicious dipping sauce, like ranch or spicy salsa, to elevate the overall flavor experience. {{image_4}} You can change the chicken for other proteins. Turkey works well and keeps it light. If you want a plant-based option, try tofu. It soaks up flavors nicely. For cheese lovers, there are dairy-free cheese options. Look for brands made from nuts or soy. They melt well and taste great. Add some spice to your wraps! Hot sauce or pepper jack cheese can kick up the heat. If you enjoy Mediterranean flavors, try adding feta cheese and olives. They give a tangy taste that pairs well with chicken. You can also use fresh herbs like basil or oregano for added zest. You can turn these wraps into a Cheesy Garlic Chicken Salad. Simply chop the wraps into bite-sized pieces and toss with greens and dressing. If you love quesadillas, just fill two tortillas with the mix. Cook them in a skillet until golden brown. This gives you a crispy, cheesy delight. To store leftovers, let the wraps cool first. Place them in an airtight container. This keeps them fresh and tasty. You should eat them within three days for the best flavor. If you want to save space, slice the wraps in half before storing. This makes them easier to grab later. To freeze the wraps, wrap each one in foil or plastic wrap. This helps keep air out and prevents freezer burn. You can also use a freezer bag. Just squeeze out the air before sealing. These wraps can stay good for up to three months in the freezer. When you’re ready to eat, just thaw them in the fridge overnight. To reheat, preheat your oven to 350°F (175°C). Place the wraps on a baking sheet. Cover them with foil to keep them moist. Heat for about 15-20 minutes. The cheese should be melty, and the wrap should be warm and crispy. You can also use a microwave, but this may make the wrap soft. If you use a microwave, heat in short bursts, checking often. Enjoy your cheesy garlic chicken wraps just like they were fresh! If you want a gluten-free option, try using lettuce wraps. They are fresh, light, and give a nice crunch. You can also use rice paper or gluten-free tortillas. These options keep your meal tasty and enjoyable. Yes, you can prepare these wraps ahead of time! Make the chicken and cheese filling in advance. Wrap them tightly and store in the fridge. They will stay fresh for about two days. When ready to eat, just bake them until warm and crispy. To check if your chicken is done, use a meat thermometer. The chicken should reach an internal temperature of 165°F (75°C). If you don’t have a thermometer, cut into the thickest part. The meat should be white and the juices should run clear. This ensures your chicken is safe to eat. This post covered how to make tasty chicken wraps. We discussed the main ingredients, preparation steps, and assembly tips. You learned about ingredient variations and storage methods. Keep these tips in mind for perfect wraps every time. Remember, cooking should be fun and creative. Experiment with flavors that you love. With practice, you'll impress your family and friends with delicious meals. Enjoy your cooking journey!

Cheesy Garlic Chicken Wraps Flavorful and Simple Meal

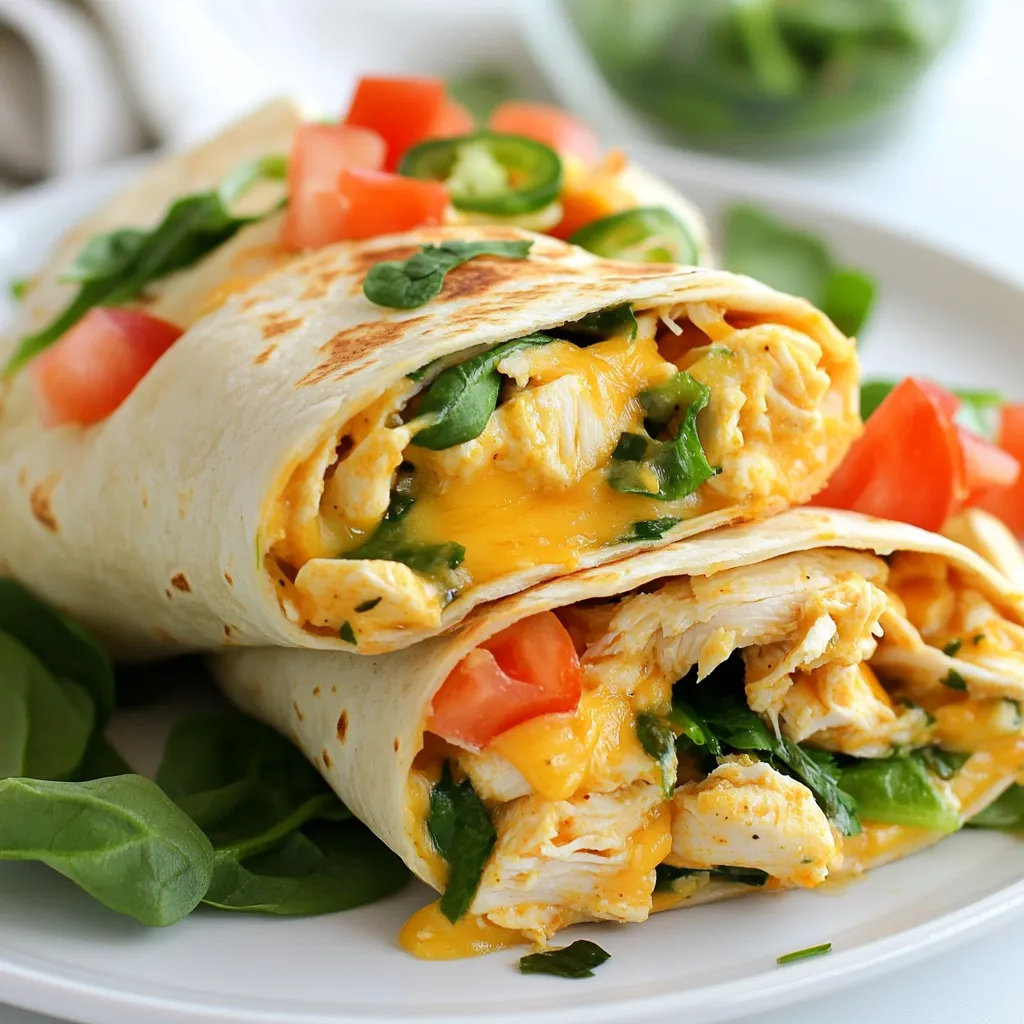
Are you ready for a meal that’s both cheesy and packed with flavor? These Cheesy Garlic Chicken Wraps are the

- 1 loaf of white bread (10-12 slices) - 4 large eggs - 1 cup milk (whole or almond) - 1 teaspoon vanilla extract - 2 teaspoons ground cinnamon - 1/4 cup granulated sugar - 1/4 cup cream cheese (softened) - 1/4 cup brown sugar - 1/2 cup powdered sugar (for drizzling) - A pinch of salt - Butter or cooking spray (for frying) You can swap white bread for whole wheat bread for a healthier choice. Almond milk works great if you're lactose intolerant. If you want less sugar, use a sugar substitute or reduce the amount of granulated and brown sugar. For a dairy-free option, use vegan cream cheese. - For 2 servings: Use 5-6 slices of bread, 2 eggs, and 1/2 cup milk. - For 6 servings: Use 15-18 slices of bread, 6 eggs, and 1 1/2 cups milk. - For 8 servings: Use 20-24 slices of bread, 8 eggs, and 2 cups milk. Adjust the other ingredients similarly to keep the flavors balanced. Enjoy customizing this recipe to fit your needs! {{ingredient_image_2}} Start by trimming the crusts off each slice of bread. This step helps the roll-ups stay soft. After that, use a rolling pin to flatten each slice. This makes it easier to roll them up later. In a small bowl, mix the softened cream cheese with the brown sugar and a pinch of cinnamon. Stir until smooth. This filling adds a sweet and creamy touch to your roll-ups. Take each flattened slice of bread. Spread about 1 tablespoon of the cream cheese mixture on one side. Roll the slice tightly from the side with the filling. Make sure the seam is on the bottom to keep it closed. In a shallow bowl, whisk together the eggs, milk, vanilla extract, the remaining ground cinnamon, and a pinch of salt. Mix well until everything is combined. This mixture gives the roll-ups a nice, rich flavor as they cook. Heat a large skillet over medium heat. Add 1 tablespoon of butter or spray the skillet with cooking spray. Dip each roll-up into the egg mixture, covering it well. Place them seam-side down in the skillet. Cook for about 2-3 minutes on each side, until golden brown. In a small bowl, mix powdered sugar with water or milk. Stir until smooth. This drizzle adds a sweet finish to your roll-ups, making them extra special. Serve these warm for the best taste. Arrange the roll-ups on a nice platter. You can sprinkle more cinnamon on top. Add fresh berries or a dusting of powdered sugar for a pretty touch. Enjoy this sweet treat! To make the best Cinnamon Roll French Toast Roll-Ups, start with fresh bread. Use white bread for a soft texture. Trim the crusts off each slice. Then, flatten each slice with a rolling pin. This helps the roll-ups stay tight and hold the filling. When mixing the egg mixture, whisk it well. I like to use a shallow bowl. This makes it easy to dip the roll-ups. Ensure each roll-up is covered evenly. This gives you a golden brown color when cooked. Heat your skillet to medium. If it’s too hot, the outside will burn while the inside stays raw. Use butter or cooking spray to prevent sticking. Cook each roll-up for 2-3 minutes on each side. Look for a nice golden color. One common mistake is not flattening the bread enough. If the slices are too thick, they won't roll well. Another mistake is overfilling. Use just a tablespoon of cream cheese mixture. Too much filling can cause a mess while cooking. Make sure to dip each roll-up fully. If you don’t soak them enough, they may dry out. Also, avoid crowding the skillet. Cook in batches if needed. This ensures even cooking. To add more flavor, mix some vanilla into the egg mixture. A splash can really enhance the taste. You can also add a pinch of nutmeg for warmth. For extra sweetness, drizzle more powdered sugar glaze on top. This makes them look great and taste even better. Consider serving with fresh berries. They add a nice touch and a pop of color. Lastly, try different toppings. Maple syrup, whipped cream, or chopped nuts can elevate your roll-ups. Get creative and enjoy the process! Pro Tips Use Fresh Bread: For the best texture and flavor, use fresh bread that is a day or two old. It will hold up better when rolled and dipped in the egg mixture. Customize the Filling: Feel free to add your favorite ingredients to the cream cheese filling, such as chocolate chips, nuts, or even a dash of nutmeg for extra flavor. Adjust Cooking Time: Keep an eye on the roll-ups while they cook, as cooking times may vary depending on your stovetop. Flip them when they are golden brown for the best results. Serve with Toppings: Enhance the flavor by serving with maple syrup, fresh fruit, or whipped cream. A sprinkle of cinnamon on top adds a nice finishing touch. {{image_4}} You can get creative with flavor in your Cinnamon Roll French Toast Roll-Ups. Adding fruits is a great way to change the taste. Try using sliced bananas, strawberries, or blueberries. Simply add a few pieces of fruit on top of the cream cheese before you roll it up. Chocolate lovers can add chocolate chips. Just sprinkle them on the cream cheese mixture. The melted chocolate will add a rich taste. You can also mix in some nut butter for extra flavor. If you have dietary needs, you can still enjoy these roll-ups. For a gluten-free option, use gluten-free bread. There are many brands that taste great. For dairy-free roll-ups, you can swap cream cheese with a dairy-free alternative. Almond or coconut milk can replace regular milk too. If you want to reduce sugar, use a sugar substitute. This will keep the sweetness without the extra calories. You can adjust the recipe to fit your needs easily. Presentation matters, especially for special events. To make your roll-ups look fancy, arrange them on a nice platter. Sprinkle extra cinnamon on top for color. Fresh berries add a pop of brightness. You can drizzle the sweet glaze over the roll-ups before serving. This gives them a nice shine. For a fun touch, add a few mint leaves for color contrast. These small details will impress your guests! To store leftover Cinnamon Roll French Toast Roll-Ups, first let them cool. Place them in an airtight container. You can keep them in the fridge for up to three days. Make sure they are sealed well to avoid drying out. If you have a lot, consider dividing them into smaller portions. This helps with quick access later. Reheating is easy! You can use a microwave or a skillet. If using a microwave, place the roll-ups on a microwave-safe plate. Heat them for about 20 to 30 seconds. Check to see if they are warm enough. For the skillet method, heat a small amount of butter over medium heat. Place the roll-ups in the skillet and cook for about 1-2 minutes on each side. This will make them crispy again. If you want to save some for later, freezing is a great option. First, let the roll-ups cool completely. Then, wrap each roll-up in plastic wrap. Place them in a freezer-safe bag or container. You can freeze them for up to two months. When ready to eat, thaw them in the fridge overnight. Then, follow the reheating instructions to enjoy them warm! Yes, you can use whole wheat bread. It adds a nice nutty flavor. The texture will change a bit, but it still works well. Just make sure to flatten the slices well before rolling. This helps keep the filling in place. You can prepare the roll-ups ahead of time. Assemble them and place them in a single layer in a dish. Cover them tightly with plastic wrap and store in the fridge. When you're ready to cook, just dip them in the egg mixture and fry as usual. If you want a different flavor, try mascarpone or ricotta cheese. You can also use a dairy-free cream cheese if you prefer. Just make sure it’s soft enough to spread easily. This helps the filling stay smooth and creamy. Yes, you can bake them! Preheat your oven to 375°F (190°C). Place the roll-ups seam side down on a greased baking sheet. Brush them lightly with melted butter. Bake for about 15-20 minutes, flipping halfway through, until golden brown. Baking gives them a nice texture too. This blog post covered how to create delicious roll-ups from start to finish. You learned the essential ingredients and how to prepare them. The step-by-step instructions guide you to make the bread, filling, and the perfect drizzle. I shared tips to avoid mistakes and enhance flavor. You also explored variations and how to store leftovers. With these insights, you can make tasty roll-ups that impress at any meal. Enjoy experimenting and have fun in the kitchen!

Cinnamon Roll French Toast Roll-Ups Tasty and Easy Treat

Craving a fun breakfast treat? Let’s whip up some Cinnamon Roll French Toast Roll-Ups! This simple and tasty recipe combines

- 2 large sweet potatoes - 1 can black beans - 1 cup corn kernels - 1 ripe avocado - Ground cumin - Smoked paprika - Chili powder - Salt and pepper - Sour cream - Salsa - Shredded cheese Sweet potato taco bowls are a fun and tasty dish. You can mix different flavors and colors. The main ingredients bring a lot of nutrition. Sweet potatoes are sweet and filling. Black beans add protein and fiber. Corn gives a nice crunch, while avocado adds creaminess. For spices, I love using ground cumin, smoked paprika, and chili powder. These spices give warmth and depth. Salt and pepper help to enhance the taste. You can adjust the spices based on your heat level. If you want to add more flavor, think of optional toppings. Sour cream makes it creamy and tangy. Salsa adds spice and freshness. Shredded cheese can make it rich and satisfying. These ingredients make your taco bowls colorful and healthy. You can enjoy them for lunch or dinner. They are easy to adapt and fun to make! {{ingredient_image_2}} - First, preheat the oven to 425°F (220°C). This helps the sweet potatoes cook evenly. - Next, peel and dice the sweet potatoes into 1-inch cubes. This size cooks well and gives great texture. - In a large bowl, mix the diced sweet potatoes with 1 tablespoon of extra virgin olive oil. Add 1 teaspoon of ground cumin, 1 teaspoon of smoked paprika, and 1/2 teaspoon of chili powder. Sprinkle in salt and black pepper to taste. Toss until all pieces are evenly coated. - Spread the seasoned sweet potatoes in a single layer on a baking sheet. Make sure they are not crowded. This helps them roast, not steam. - Roast in the preheated oven for 25-30 minutes. Flip them halfway through to ensure even cooking. You want them fork-tender with a nice caramel color. - While the sweet potatoes roast, prepare your toppings. In a medium bowl, combine 1 can of rinsed black beans, 1 cup of corn kernels, diced avocado, halved cherry tomatoes, chopped red onion, and fresh cilantro. - Squeeze the juice of 1 lime over the mixture. Season with salt and pepper to taste. Gently toss to mix, being careful not to mash the avocado. These simple steps will lead to a delicious dish that is colorful and full of flavor! You can easily make this dish vegetarian or vegan. Just skip the sour cream and cheese. You can add a tasty mix of toppings to make your bowls more exciting. Try fresh lime juice, chopped jalapeños, or pickled red onions. These additions give your taco bowls more zing. Roasting sweet potatoes is key to getting the best flavor. To ensure even cooking, spread the sweet potatoes in a single layer on the baking sheet. This helps them cook nicely without steaming. Flip them halfway through for a great caramelization. The high heat helps bring out their natural sweetness. Make your taco bowls look inviting. Serve them in clear bowls to show off the colors. Add a lime wedge on the side for a fresh burst of flavor. Top with chopped cilantro for a pop of green. For side dishes, consider serving with a light salad or tortilla chips for a crunchy contrast. Pro Tips Choose Sweet Potatoes Wisely: Select sweet potatoes that are firm and have smooth skin. Avoid any that have blemishes or soft spots for the best flavor and texture. Customize Your Spice Level: Adjust the chili powder according to your taste. For a milder bowl, reduce the amount or omit it altogether. Fresh Ingredients Matter: Use fresh corn and ripe avocados for the best taste. They add a vibrant flavor and texture to your taco bowls. Make It a Meal Prep Option: Prepare extra roasted sweet potatoes and the black bean mixture to enjoy these taco bowls throughout the week. They store well in the refrigerator for easy lunches or dinners. {{image_4}} You can add different proteins to your sweet potato taco bowls. Shredded chicken or beef works great. Just cook the meat first, then mix it with the beans and corn. You can also use tofu for a plant-based option. It adds protein and keeps the meal light. Using different beans can also change the flavor. Try pinto beans or chickpeas. They each bring a unique taste and texture. Rinsing and draining the beans before use helps keep the dish fresh. If you want to switch things up, try serving the taco bowls over quinoa or rice. Quinoa adds a nice nutty flavor and protein. Rice is soft and fills you up. Both options work well with the sweet potatoes and toppings. You can even explore cauliflower rice for a low-carb choice. It adds a light texture and absorbs flavors well. Just sauté the cauliflower rice with a bit of olive oil for a tasty base. Seasonal vegetables can make your bowls pop. In summer, add fresh zucchini or bell peppers. In fall, consider roasted Brussels sprouts or butternut squash. These veggies bring color and taste. Adapting to holiday flavors is fun too. For example, use cranberries and pecans for a festive touch. Adding spices like cinnamon can create a warm, seasonal vibe. It’s a great way to keep the dish exciting throughout the year. To store leftovers, place your sweet potato taco bowl in an airtight container. Make sure it is sealed well to keep out air. This will help the flavors stay fresh. Your leftovers will last in the fridge for about 3 to 5 days. You can freeze the sweet potato taco bowl but do it in parts. Freeze the roasted sweet potatoes, black beans, and corn mixture separately. This way, each part stays fresh. To reheat, take out your frozen items and let them thaw in the fridge overnight. For the best taste, reheat the sweet potatoes in the oven. Set the oven to 350°F (175°C) and bake for about 10-15 minutes. This keeps them from getting mushy. You can reheat the bean mixture in a skillet on low heat. Stir it often to keep it from sticking. This will help keep the flavors bright and fresh. Yes, you can make Sweet Potato Taco Bowls ahead of time. To do this, cook the sweet potatoes and toppings separately. Store each component in airtight containers in the fridge. When you are ready to eat, simply reheat the sweet potatoes in the oven or microwave. This keeps the flavors fresh and the texture nice. You can also pack meal prep bowls for easy lunches. Just layer the sweet potatoes and toppings in your container. This recipe is naturally gluten-free. The main ingredients, such as sweet potatoes, black beans, and corn, do not contain gluten. Always check labels on canned goods like beans and corn to ensure they are gluten-free. If you use any sauces or toppings, ensure they are also gluten-free. This way, you can enjoy your taco bowls without worry. Sweet Potato Taco Bowls are great on their own, but you can add sides. Consider serving with a simple green salad for extra crunch. You can also pair them with tortilla chips and salsa for a fun snack. Another idea is to serve with a side of guacamole. This adds more flavor and creaminess to your meal. Enjoy mixing and matching to find your favorite pairings! In this post, we explored how to create delicious sweet potato taco bowls. We covered key ingredients, spices, and step-by-step instructions for prep and roasting. I shared tips on customizing your bowl, proper cooking techniques, and serving suggestions. You can enhance your meal with different proteins or grains. Finally, I discussed storage and reheating to keep your dish fresh. These bowls are not just tasty; they are also fun to make and share. Enjoy experimenting with flavors and find your perfect combination!

Sweet Potato Taco Bowls Flavorful and Simple Delight

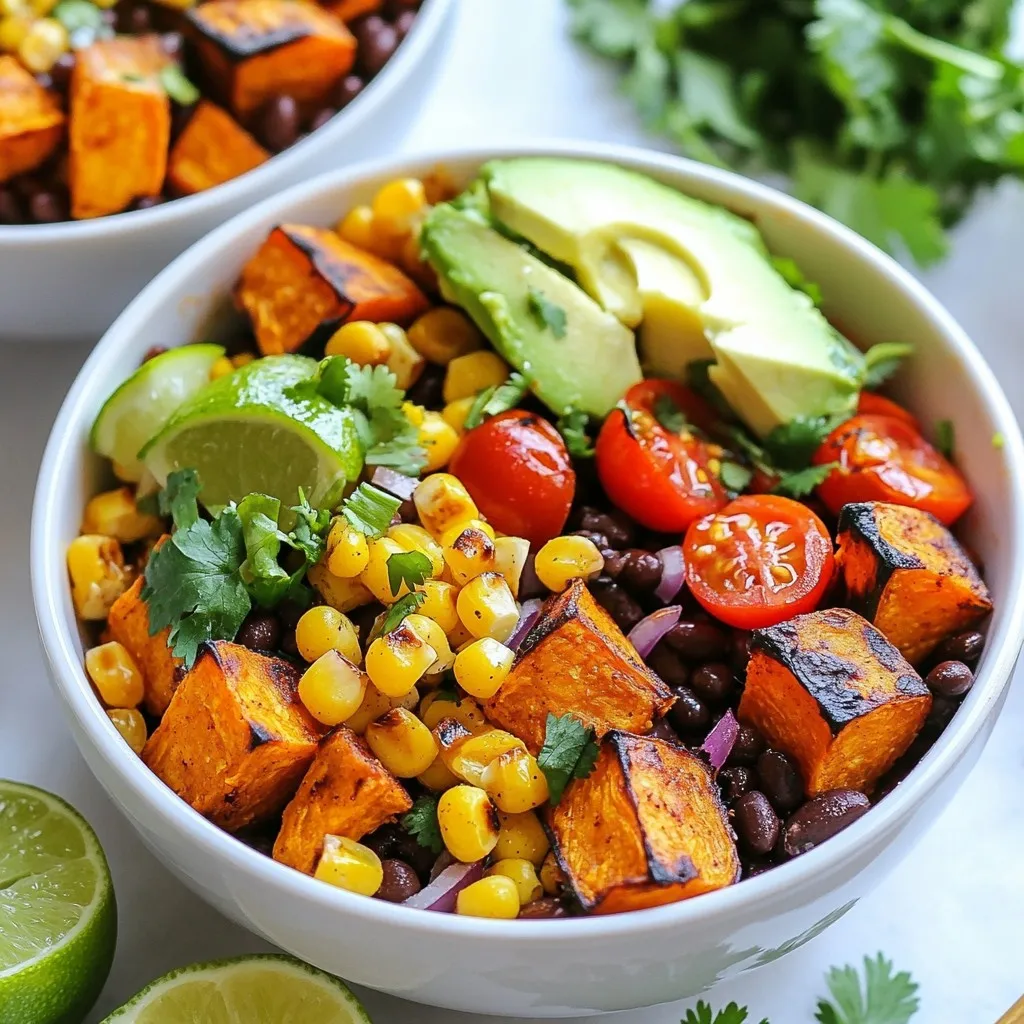
Looking for a tasty and easy meal? Sweet Potato Taco Bowls are your answer! With sweet, roasted potatoes, black beans,

To make these tasty protein Greek yogurt cookies, you need: - 1 cup plain, unsweetened Greek yogurt - 1 cup rolled oats - 1/2 cup almond flour - 1/2 cup vanilla or unflavored protein powder - 1/4 cup honey or maple syrup - 1/4 cup dark chocolate chips or your favorite dried fruit - 1 teaspoon baking soda - 1/2 teaspoon vanilla extract - 1/4 teaspoon salt These ingredients work together to create a soft and chewy cookie. Greek yogurt adds creaminess and protein. Rolled oats give texture and fiber. Almond flour adds moistness and a nutty flavor. If you need to swap out some ingredients, here are some great options: - Greek yogurt: Use non-dairy yogurt like coconut or almond yogurt. - Rolled oats: Quick oats work, but they may change the texture. - Almond flour: Try coconut flour, but use less because it's dense. - Protein powder: Any protein powder works, but check for flavor. - Honey or maple syrup: Agave syrup is a good alternative. - Dark chocolate chips: Use nuts or seeds for a different crunch. These swaps keep the cookies tasty while fitting your needs. These cookies are not just delicious; they’re also packed with nutrition. Each cookie provides: - High protein from Greek yogurt and protein powder. - Fiber from rolled oats, which helps digestion. - Healthy fats from almond flour, supporting heart health. - Natural sweetness from honey or maple syrup, offering energy without refined sugars. Making these cookies gives you a treat that fuels your body. Enjoy them as a snack or dessert while feeling good about what you eat! {{ingredient_image_2}} To start, preheat your oven to 350°F (175°C). This step is key for the best texture. While the oven heats, line a baking sheet with parchment paper. This makes cookie removal easy. In a large mixing bowl, combine 1 cup of plain, unsweetened Greek yogurt with 1/4 cup of honey or maple syrup. Add 1/2 teaspoon of vanilla extract. Whisk until the mix is smooth and creamy. The yogurt gives moisture and protein. In another bowl, mix together 1 cup of rolled oats, 1/2 cup of almond flour, 1/2 cup of protein powder, 1 teaspoon of baking soda, and 1/4 teaspoon of salt. Make sure these dry ingredients blend well. This ensures your cookies rise properly. Next, fold the dry mix into the wet ingredients. Stir gently until the dough is uniform. Be careful not to overmix. Now, fold in 1/4 cup of dark chocolate chips or your favorite dried fruit. This adds flavor and texture. Using a cookie scoop or a tablespoon, drop rounded dough portions onto the prepared baking sheet. Leave about 2 inches between each cookie. This space allows them to spread while baking. Now, place the baking sheet in the oven. Bake for 12-15 minutes. Your cookies will be done when the edges are lightly golden. The centers may look soft, but they will firm up as they cool. After baking, remove the sheet from the oven. Let the cookies cool on the sheet for about 5 minutes. Then, transfer them to a wire rack. This step helps them cool evenly. For serving, arrange the cookies in a clear glass jar or on a rustic wooden board. You can dust them with powdered sugar for a lovely touch. This simple step makes them look even more inviting! To get your cookies just right, start with fresh ingredients. Old ingredients can change the texture. Use plain, unsweetened Greek yogurt for moisture. This yogurt gives your cookies a nice, soft bite. Mix your dry ingredients well to avoid clumps. When combining wet and dry, fold gently. This keeps air in the dough, making the cookies light. One mistake is over-mixing the dough. This can make cookies tough. Another mistake is not measuring ingredients properly. Use measuring cups for accuracy. Also, don’t skip the cooling step. Cookies need time to set after baking. If you move them too soon, they may break apart. Want to mix it up? You can add spices like cinnamon or nutmeg for warmth. For a fruity twist, try adding dried fruit like cranberries or apricots. You can also swap out dark chocolate chips for white chocolate or peanut butter chips. Experiment with flavors to find your favorite combo. Each change can make the cookies feel fresh and exciting! Pro Tips Use the Right Yogurt: Opt for full-fat Greek yogurt for a creamier texture and richer flavor, while still keeping the cookies nutritious. Experiment with Flavors: Feel free to add spices like cinnamon or nutmeg to the dough for an extra flavor boost that complements the sweetness. Storage Tips: Store cookies in an airtight container at room temperature for up to a week, or freeze for longer preservation. Make it Your Own: Customize your cookies by swapping out chocolate chips for nuts, seeds, or different dried fruits based on your preference. {{image_4}} You can make these cookies your own! Try adding different flavors to mix it up. Here are some fun ideas: - Nuts: Toss in chopped walnuts or pecans for crunch. - Spices: Add a pinch of cinnamon or nutmeg for a warm touch. - Fruits: Use dried cranberries or chopped apricots for a fruity twist. - Citrus Zest: A little lemon or orange zest brightens the taste. These add-ins give your cookies a unique flavor. Experiment and see what you like best! You can easily adjust this recipe to fit different diets. Here’s how: - Vegan Version: Replace Greek yogurt with coconut yogurt. Use maple syrup instead of honey. Choose a plant-based protein powder. - Gluten-Free: Use certified gluten-free oats and almond flour. Always check labels to be safe. These changes keep the cookies yummy while meeting dietary needs. You have control over how big or thick your cookies are. Here are some tips: - Smaller Cookies: Use a teaspoon to scoop the dough. Bake for 10-12 minutes. - Larger Cookies: Use a large cookie scoop. Bake for 15-18 minutes. Adjust the baking time based on size. This helps you get the perfect cookie just right for you! To keep your Protein Greek Yogurt Cookies fresh, store them in an airtight container. This helps maintain their moisture and flavor. You can place a slice of bread in the container to keep them soft. Make sure to store them at room temperature. They will last about 3 to 5 days this way. If you want to save some cookies for later, freezing is a great option. First, cool the cookies completely. Then, wrap each cookie in plastic wrap. Place the wrapped cookies in a freezer-safe bag or container. They can stay frozen for up to 3 months. When you’re ready to enjoy, just take out as many as you want! To bring back that fresh-baked taste, reheat your cookies. Preheat your oven to 300°F (150°C). Place the cookies on a baking sheet. Heat them for about 5 to 10 minutes. This will make them warm and soft again, just like when they came out of the oven. Enjoy your delicious treat! Yes, you can use non-dairy yogurt. Look for a thick brand, like coconut or soy yogurt. This will give you a similar texture for your cookies. The flavor may change slightly, but they will still taste great! To adjust sweetness, change the amount of honey or maple syrup. If you want sweeter cookies, add more. If you prefer less sweetness, reduce the amount. You can also use a sugar substitute like stevia for a different taste. To keep your cookies soft, store them in an airtight container at room temperature. You can also add a slice of bread to the container. The bread helps keep the cookies moist. If you want them chewier, don’t overbake them. Take them out when they are just lightly golden around the edges. These protein Greek yogurt cookies are simple and fun to make. We covered key ingredients, substitutes, and nutritional benefits. You learned step-by-step how to prepare, bake, and cool them. With helpful tips, you can avoid common mistakes and enhance flavors. Plus, we explored variations for different tastes and dietary needs. Lastly, we shared storage methods to keep your cookies fresh. I hope you enjoy baking and sharing these tasty treats!

Protein Greek Yogurt Cookies Easy and Delicious Treat

Looking for a tasty treat that won’t ruin your diet? Try my Protein Greek Yogurt Cookies! These cookies are easy

- 1 lb fresh asparagus, trimmed - 3 tablespoons extra virgin olive oil - 4 cloves garlic, finely minced - Zest of 1 medium lemon - Juice of 1 medium lemon - Sea salt and freshly ground black pepper to taste - 1 teaspoon crushed red pepper flakes (optional for a spicy kick) - 2 tablespoons freshly grated Parmesan cheese (for garnish) - Alternative oils, like avocado oil, can work well. - Vegan cheese alternatives can replace Parmesan for a dairy-free option. - You can try different seasonings or herbs, like thyme or oregano, to mix things up. When I make lemon garlic roasted asparagus, I love using fresh asparagus. The bright green color and crisp texture really shine. Extra virgin olive oil brings a fruity flavor and helps the asparagus roast nicely. Garlic adds a punch, making it savory. The lemon zest and juice brighten the dish and balance the flavors. If you want to spice things up, crushed red pepper flakes offer a nice kick. Just a pinch can make a big difference. Lastly, the grated Parmesan cheese adds creaminess and depth. It melts beautifully on the hot asparagus. For those who prefer different oils, avocado oil is a great choice. It has a mild taste and works well in roasting. If you are avoiding dairy, try using a plant-based cheese. Many options taste great and melt nicely. Feel free to customize your dish with herbs or spices you enjoy. You can even switch out the asparagus for other vegetables like green beans or broccoli. This dish is flexible, and that’s what makes it fun! {{ingredient_image_2}} Start by trimming the asparagus. Hold each stalk and snap off the tough ends. This helps the asparagus stay tender. Next, preheat your oven to 425°F (220°C). A hot oven gives the asparagus a nice roasted flavor. In a big bowl, add the trimmed asparagus. Pour in 3 tablespoons of extra virgin olive oil. Add 4 cloves of minced garlic, the zest of one lemon, and the juice from that lemon. Sprinkle in sea salt and black pepper to taste. If you like heat, add 1 teaspoon of crushed red pepper flakes. Toss everything together until the asparagus is well-coated. Spread the seasoned asparagus on a baking sheet in a single layer. This helps them cook evenly. Place the baking sheet in the oven and roast for 15 to 20 minutes. Keep an eye on them. You want them tender with a slight crisp at the tips. Once the asparagus are done, take them out of the oven. Immediately sprinkle 2 tablespoons of grated Parmesan cheese on top. The heat will slightly melt the cheese. For an extra burst of flavor, drizzle more lemon juice over the asparagus right before serving. Enjoy the bright, zesty taste! - Avoiding overcooking: Keep an eye on the asparagus while roasting. Cook them for 15-20 minutes. You want them tender but still firm. If they bend easily, they are done. - How to achieve crispiness: Make sure to spread the asparagus in a single layer. This helps them cook evenly. You can also increase the heat to 450°F (232°C) for a few minutes at the end. This gives them a nice crisp. - Plating techniques: Arrange the roasted asparagus on a large platter. This makes it look appealing. Use a mix of height and color to catch the eye. - Garnishing ideas: Add lemon slices on top for color. Fresh herbs like parsley or basil add a nice touch. A sprinkle of extra Parmesan cheese boosts flavor and looks. - Suggested main dishes and sides: Lemon garlic roasted asparagus pairs well with grilled chicken or fish. It also complements pasta dishes. For a vegetarian option, serve it with quinoa or a fresh salad. Pro Tips Select Fresh Asparagus: Choose bright green asparagus with firm, straight stalks for the best flavor and texture. Don’t Overcrowd the Pan: Arrange the asparagus in a single layer to ensure even roasting and prevent steaming. Experiment with Zest: Try adding zest from other citrus fruits like lime or orange for a unique twist on the flavor. Garnish Creatively: Add toasted nuts or seeds for an extra crunch and flavor contrast when serving. {{image_4}} You can change the taste of lemon garlic roasted asparagus easily. Adding cheese can enhance the dish. Try using feta, goat cheese, or even a sharp cheddar. Each cheese brings a different flavor that pairs well with asparagus. You can also mix in other spices or herbs. For example, add thyme, rosemary, or dill. A sprinkle of smoked paprika can give a nice twist too. These variations keep the dish fresh and exciting. If you want a vegan version, you can skip the Parmesan. Use a vegan cheese that melts well instead. Nutritional yeast also works to add a cheesy flavor without dairy. For gluten-free options, you’re in luck! This recipe is already gluten-free. Just make sure any cheese you choose is also gluten-free. This makes it easy for those with dietary needs to enjoy. You can adapt this recipe by using different vegetables. Try roasting broccoli, green beans, or Brussels sprouts. Each veggie has its own unique flavor but works well with the same lemon garlic mix. This way, you can enjoy lemon garlic roasted veggies all year long! After enjoying your lemon garlic roasted asparagus, store any leftovers in an airtight container. This keeps the asparagus fresh longer. Place the container in the fridge. It will stay good for about 3 to 4 days. When storing, avoid stacking the asparagus too much to keep it from getting soggy. To reheat your asparagus, the oven is the best choice. Set it to 350°F (175°C). Spread the asparagus on a baking sheet. Heat for about 5-10 minutes. This helps keep the flavors and texture. You can also use a skillet. Heat it on medium. Add a little olive oil to avoid sticking. Cook for 3-5 minutes, stirring gently. You can freeze roasted asparagus if you want to save it for later. First, let it cool completely. Then, place it in a freezer-safe bag or container. Remove as much air as possible to prevent freezer burn. It can last up to 3 months. When ready to use, thaw it in the fridge overnight. Reheat it in the oven for the best taste. Roasting asparagus takes about 15 to 20 minutes. I usually set my timer for 15 minutes and check for tenderness. You want the tips to be slightly crispy and the stalks to be tender. If they need more time, just add a few minutes. You can use frozen asparagus, but fresh is better. Fresh asparagus has a nice crunch, while frozen can be softer. If you use frozen, thaw it first and pat it dry. This helps remove excess moisture, so it roasts better. Lemon garlic roasted asparagus pairs well with many dishes. Here are a few ideas: - Grilled chicken or fish for a healthy meal - Pasta with lemon sauce for a light dinner - Quinoa salad for a filling side - Steak or pork chops for a hearty option These combinations will make your meal bright and tasty. Enjoy the fresh flavors! Roasting asparagus is simple and rewarding. We covered the main ingredients, from fresh asparagus to garlic and lemon. Step-by-step, I showed how to prepare, season, and roast it for the perfect dish. You can even tweak it with optional ingredients and unique flavors. Remember to store leftovers properly and reheat them well. Use these tips for tasty sides or main dishes. Enjoy your culinary adventure with this easy recipe that suits everyone!

Lemon Garlic Roasted Asparagus Fresh and Flavorful Dish

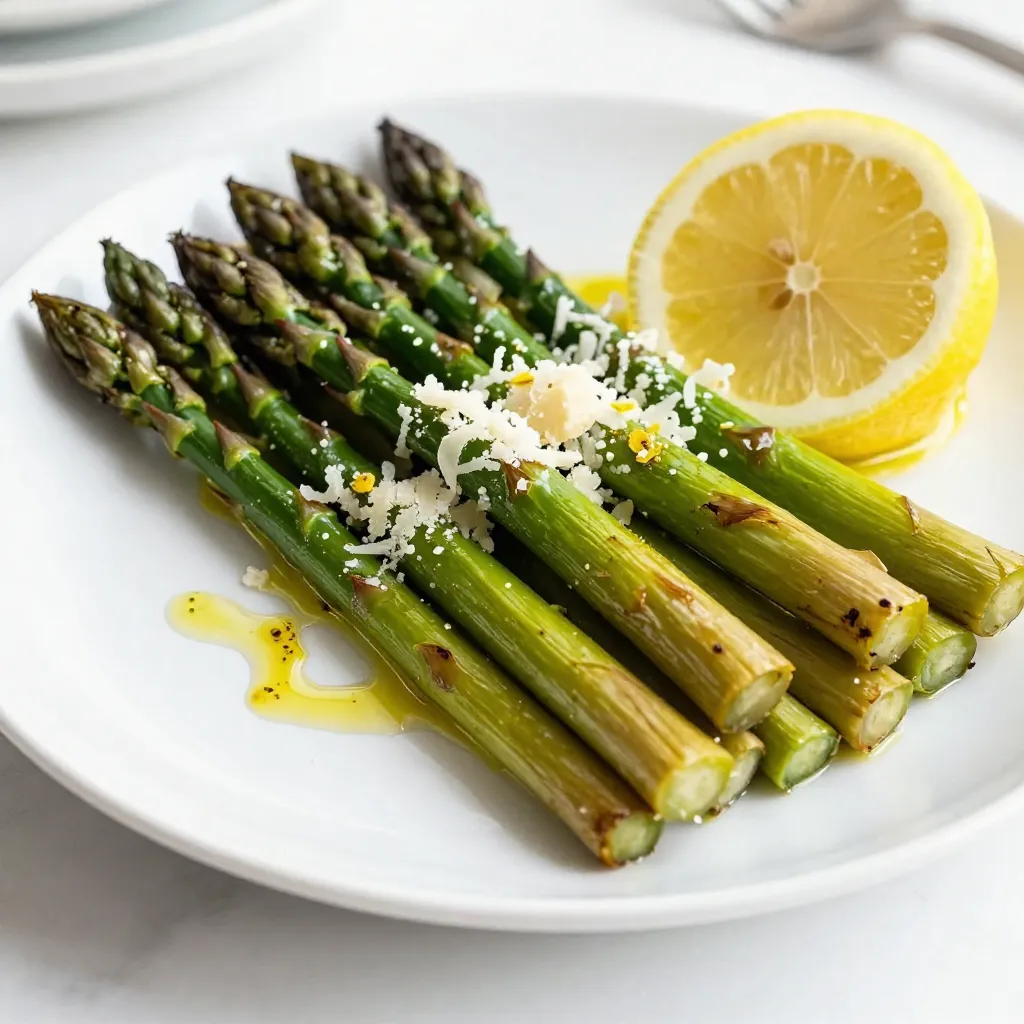
Are you ready to elevate your vegetable game? This Lemon Garlic Roasted Asparagus is fresh, flavorful, and super easy to

- 1 pound ground turkey or ground beef - 8 ounces penne pasta - 1 can (15 ounces) black beans, drained and rinsed The main ingredients form the heart of this dish. Ground turkey or beef gives the meal a rich, hearty base. I love using ground turkey for a leaner option. Penne pasta adds fun shapes that hold sauce well. Black beans boost protein and give a nice texture. This combo creates a filling and tasty meal. - Bell pepper variations - Types of cheese You can play with bell peppers to add color and flavor. Use green, red, or yellow for a twist. Cheese is also flexible. Cheddar, Monterey Jack, or Mexican blend all melt well. Choose your favorite to top off this dish. Both options let you customize the taste. - Olive oil - Taco seasoning - Canned tomatoes These pantry staples are key for flavor. Olive oil helps cook the veggies and meat. Taco seasoning packs a punch with spices. It ties all the flavors together. Canned tomatoes with green chilies add moisture and zest. Always keep these on hand for quick meals. {{ingredient_image_2}} - Sauté vegetables: In a large skillet, heat 1 tablespoon of olive oil over medium heat. Add 1 medium diced onion, 2 minced garlic cloves, and 1 diced bell pepper. Sauté for about 3-4 minutes until soft and fragrant. - Brown the meat: Next, add 1 pound of ground turkey or ground beef to the skillet. Use a spatula to break it apart. Cook the meat for 5-7 minutes. Stir occasionally until it is fully browned. - Add seasoning and liquids: Sprinkle 1 packet of taco seasoning over the meat. Stir well to mix the spices evenly. Then, add 1 cup of corn, 1 can of drained black beans, 1 can of diced tomatoes with green chilies, and 1 cup of beef or vegetable broth. Mix everything well. - Incorporate pasta: Bring the mixture to a gentle simmer. Add 8 ounces of penne pasta to the skillet. Stir to ensure the pasta is well mixed and submerged in the liquid. - Melt cheese and garnish: Cover the skillet with a lid. Let it cook for 12-15 minutes until the pasta is al dente. Once cooked, remove the skillet from heat. Sprinkle 1 cup of shredded cheese on top. Cover again and let it sit for 2-3 minutes until the cheese melts. - Serve warm: Garnish with freshly chopped cilantro. Season with salt and pepper to taste. Serve the dish warm in colorful bowls for a fun meal. - To ensure even cooking of pasta, stir it well in the skillet. - Use a timer to avoid overcooking the pasta. Test a piece to check doneness. - Adjust seasoning to taste. Start with less, then add more if needed. - Taste the mixture before serving to get the flavors just right. - Serve the taco pasta in colorful bowls. This makes it look fresh and fun. - Add an extra sprinkle of cheese and cilantro on top for a vibrant look. - Consider accompanying with tortilla chips or warm tortilla wraps. This adds to the fiesta feel. - For low-calorie substitutions, you can use ground turkey instead of beef. - Use whole wheat penne for added fiber and nutrition. - Try gluten-free pasta options if needed. This way, everyone can enjoy the dish. - Rinse and drain the black beans well to reduce sodium content. Pro Tips Use Lean Meat: Opt for lean ground turkey to reduce fat content without sacrificing flavor. Perfectly Cooked Pasta: Stir the pasta occasionally while it cooks to prevent sticking and ensure even cooking. Customize Your Spice Level: Adjust the amount of taco seasoning or add fresh jalapeños for a spicier kick. Make It Vegetarian: Substitute ground turkey with lentils or mushrooms for a delicious vegetarian option. {{image_4}} You can change the protein in this dish. Ground turkey works well, but ground beef adds rich flavor. For a lighter option, use ground chicken. If you want a vegetarian meal, swap meat for extra beans or lentils. You can also use crumbled tofu for a plant-based choice. To give your dish more flavor, add spices like cumin or smoked paprika. Fresh herbs like cilantro or parsley can brighten the dish. For extra crunch, mix in corn chips or nuts. You can also add diced jalapeños for some heat and texture. Try different pasta shapes like shells or rotini. These shapes hold sauce well and add fun to your meal. You can layer the pasta with tortilla chips for a crunchy topping. This adds a fiesta feel and makes each bite exciting. Enjoy your tasty dish in many ways! Store leftover Fiesta Taco Pasta Skillet in an airtight container. Keep it in the fridge. It stays fresh for up to three days. For longer storage, freeze portions in freezer bags. Remove as much air as possible. Label the bags with the date for easy tracking. To reheat, use the microwave or stovetop. For the microwave, heat in short bursts. Stir between intervals to ensure even heating. If using the stovetop, add a splash of broth to keep it moist. Heat on low and stir often. This keeps the pasta from getting too dry. In the fridge, the dish lasts about three days. Look for signs of spoilage like off smells or mold. If it develops a strange color or texture, it's best to toss it. For frozen portions, use within three months for the best taste. Can I make this vegetarian? Yes, you can make this dish vegetarian. Just replace the ground turkey or beef with a plant-based protein. Options like lentils, chickpeas, or a meat substitute work well. How do I make it spicier? To add heat, use spicy taco seasoning or add diced jalapeños. You can also sprinkle red pepper flakes for extra kick. What can I use instead of ground turkey? You can use ground beef, chicken, or any ground meat you prefer. For a vegetarian option, try mushrooms or tempeh for texture. Can I use a different type of pasta? Absolutely! Feel free to swap the penne pasta with any pasta shape you like. Bowtie, rotini, or even spaghetti work great. Can I bake this dish? Yes, you can bake it! After cooking the skillet mixture, transfer it to a baking dish. Top with cheese and bake at 350°F until bubbly. How do I adjust cook time for larger batches? If you make a larger batch, increase the cooking time slightly. Keep an eye on the pasta and stir more often to prevent sticking. This dish combines ground meat, pasta, and beans for a tasty meal. You learned how to sauté veggies, cook meat, and add pantry staples for flavor. Tips for presentation and making the dish healthier were shared. You can also try fun swaps and ways to serve. Remember, cooking is fun! Experiment and find your favorite variations. Enjoy your meal and the joy it brings.

Fiesta Taco Pasta Skillet Simple and Flavorful Meal

Are you ready for a quick, tasty dinner? The Fiesta Taco Pasta Skillet is just what you need! This dish

- 1 ½ cups graham cracker crumbs - 1/3 cup packed brown sugar - 1 teaspoon ground ginger - 1 teaspoon ground cinnamon - 1/4 teaspoon ground nutmeg - 1/2 cup unsalted butter, melted - 16 oz cream cheese, softened to room temperature - 1 cup granulated sugar - 2 large eggs, at room temperature - 1 teaspoon vanilla extract - 1/4 cup sour cream - 1/4 cup molasses - 1 tablespoon all-purpose flour - 1/2 teaspoon ground allspice These ingredients create a tasty blend. The graham cracker crumbs form the crust. Brown sugar adds sweetness and depth. The spices—ginger, cinnamon, nutmeg, and allspice—give that cozy holiday vibe. Cream cheese provides the creamy filling, while eggs help it set. Molasses adds a rich flavor that makes each bite delightful. - Alternative sweeteners: You can use maple syrup or coconut sugar instead of brown sugar. - Dairy-free options: Use vegan cream cheese and coconut yogurt to replace regular dairy. - Gluten-free substitutes: Swap graham crackers with gluten-free cookies or crushed nuts. These substitutions let everyone enjoy the bars. Adjusting these ingredients can make the recipe fit your needs. - Top brands for cream cheese: Look for Philadelphia or Kite Hill for vegan options. - Best graham cracker brands: Honey Maid and Schar offer great flavor and texture. Using quality brands makes a big difference. They ensure the best taste and texture in your bars. {{ingredient_image_2}} 1. First, preheat your oven to 350°F (175°C). This helps the bars bake evenly. 2. In a bowl, mix 1 ½ cups of graham cracker crumbs, 1/3 cup of brown sugar, 1 teaspoon of ground ginger, 1 teaspoon of ground cinnamon, and 1/4 teaspoon of nutmeg. 3. Pour in 1/2 cup of melted unsalted butter. Stir until it looks like wet sand. 4. Press this mixture evenly into the bottom of a greased 9x9-inch pan. This forms a solid crust. 5. Bake the crust for about 10 minutes. Let it cool slightly on a wire rack. 1. In a large bowl, beat 16 oz of softened cream cheese with 1 cup of granulated sugar. Mix until smooth and creamy. 2. Add 2 large eggs one at a time, mixing well after each. This ensures a rich texture. 3. Next, blend in 1 teaspoon of vanilla extract, 1/4 cup of sour cream, 1/4 cup of molasses, 1 tablespoon of flour, and 1/2 teaspoon of ground allspice. Mix until smooth. 1. Pour the cheesecake filling over the cooled crust. Spread it out evenly with a spatula. 2. Bake for 25-30 minutes. The edges should set while the center jiggles slightly. 3. Remove the bars from the oven and let them cool to room temperature. For the best taste, chill them in the fridge for at least 4 hours or overnight. 4. Once chilled, lift the bars using the parchment paper. Cut them into squares with a sharp knife. 5. Serve with powdered sugar or a drizzle of caramel for extra sweetness. Using room temperature ingredients is key. Cold cream cheese can cause lumps. Take the cream cheese and eggs out ahead of time. Let them sit for about 30 minutes. This simple step helps create a smooth batter. When mixing, beat the cream cheese and sugar well. Use medium speed on your mixer. Scrape the bowl often to avoid lumps. To avoid overbaking, watch the edges of your bars. They should be set, while the center has a slight jiggle. This means it's done! Place your pan on the middle rack in the oven. This helps with even baking and heat distribution. For garnishing, dust the bars with powdered sugar. Drizzle with caramel sauce for extra sweetness. Arrange the bars on a festive platter. You can also sprinkle crushed gingerbread cookies on top. This adds texture and looks great for holiday parties. Serve them chilled for the best taste! Pro Tips Chill Before Cutting: For clean and neat slices, make sure to chill the cheesecake bars for at least 4 hours or overnight before cutting. Use Room Temperature Ingredients: Ensure all your ingredients, especially cream cheese and eggs, are at room temperature for a smooth and creamy batter. Garnish Creatively: Consider adding festive touches like crushed gingerbread cookies or whipped cream to elevate the presentation and flavor. Monitor Baking Time: Keep an eye on the cheesecake while it bakes; the edges should be set but the center should still have a slight jiggle when you take it out. {{image_4}} You can change the flavors in gingerbread cheesecake bars for fun. For a twist, try pumpkin spice cheesecake bars. Just add pumpkin puree and pumpkin spice to the filling. This makes a creamy dessert that is perfect for fall. Another option is chocolate gingerbread cheesecake. Mix in melted chocolate or cocoa powder into the batter. This creates a rich and decadent treat that chocolate lovers will adore. If you need vegan options, you can make vegan gingerbread cheesecake bars. Use vegan cream cheese and replace eggs with flax eggs. This way, everyone can enjoy this sweet delight. For those on a low-carb diet, try keto-friendly options. Use almond flour in the crust and a sugar substitute in the filling. You will still enjoy all the great flavors without the carbs. Seasonal toppings can bring new life to your bars. Adding nuts or dried fruits like walnuts or cranberries can add a nice crunch and flavor boost. This can make your bars even more festive. You might also want to incorporate citrus flavors. A little lemon or orange zest can brighten the taste. This adds a fresh twist that pairs well with the warm spices in the bars. For best results, store your gingerbread cheesecake bars in the fridge. Place them in an airtight container. This keeps them fresh and tasty. You can also cover them tightly with plastic wrap. If you want to freeze them, cut the bars into squares first. Wrap each piece in plastic wrap and then in foil. This will help keep the flavor and texture. These bars last up to five days in the fridge. Place them in the coldest part of your fridge. If you freeze them, they can last up to three months. Look for signs of spoilage like a change in color or smell. If they seem dry or have an off odor, it’s best to toss them. To reheat, place the bars in a microwave-safe dish. Heat them for about 15 to 20 seconds. Keep an eye on them to avoid overheating. You can also warm them in the oven at 350°F for about 10 minutes. After thawing, serve the bars chilled or at room temperature. Dust them with powdered sugar or drizzle with caramel for a tasty treat. Yes, you can make gingerbread cheesecake bars ahead of time. They taste better after chilling. I suggest making them one day before serving. Just store them in the fridge. This will help the flavors blend nicely. To check if the bars are done, look at the edges. They should be set and firm. The center may jiggle a bit, but that is okay. It will firm up as it cools. Use a toothpick to check; it should come out clean when they are ready. You can use a different size pan, but the baking time may change. A larger pan will make the bars thinner and bake faster. A smaller pan will make them thicker and take longer to bake. Adjust the time based on the pan size. If you don't have molasses, you can use honey or maple syrup. Both will add sweetness and some flavor. You can also mix brown sugar with a bit of water for a quick substitute. Just keep in mind that the taste will change slightly. To boost the gingerbread flavor, add more ground ginger or cinnamon. You can also mix in some fresh ginger for a spicy kick. Pairing with warm spices like cloves or nutmeg can help too. A hint of vanilla also adds depth to the flavor. This blog post covered all you need to make delicious gingerbread cheesecake bars. We explored key ingredients, easy steps for baking, and tips for perfect texture and presentation. You found substitutions and variations for dietary needs too. Making these bars can be fun and rewarding. Don't hesitate to try different flavors or mix-ins. With the right approach, you will impress everyone with your treats. Happy baking!

Gingerbread Cheesecake Bars Delightfully Rich Treat

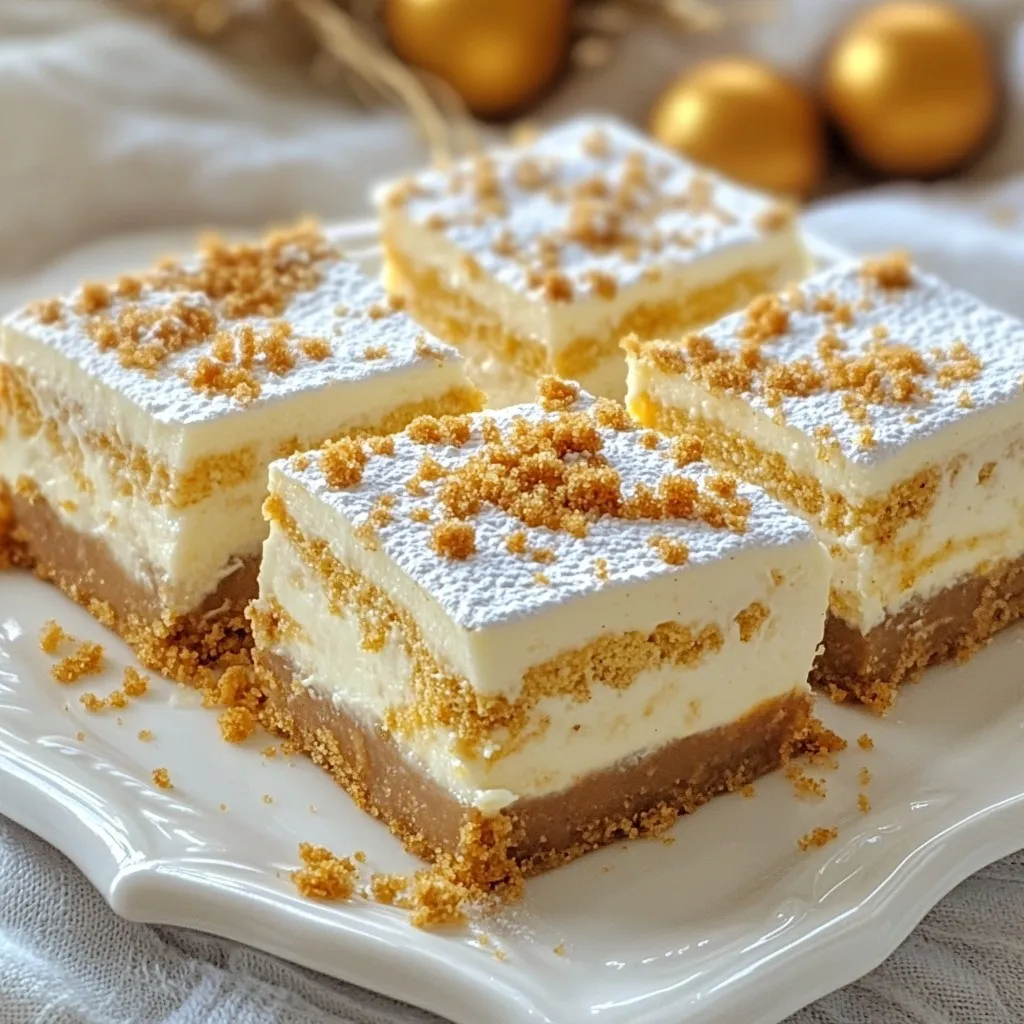
Are you ready to indulge in a dessert that’s both warm and rich? These Gingerbread Cheesecake Bars mix the classic

- 2 packets of instant ramen noodles (discard seasoning packets) - 1 tablespoon sesame oil - 1 medium onion, thinly sliced - 2 cloves of garlic, finely minced - 1-inch piece of fresh ginger, grated - 1 red bell pepper, cut into thin slices - 1 yellow bell pepper, cut into thin slices - 2 cups of fresh broccoli florets - 1 cup snap peas, trimmed - 1 tablespoon Sriracha sauce (adjust to your spice preference) - 2 tablespoons low-sodium soy sauce - 1 tablespoon rice vinegar - 1 tablespoon honey or agave syrup (for sweetness) - 2 green onions, chopped (for garnish) - A sprinkle of sesame seeds (for garnish) If you want to switch things up, you can use other noodles. Try udon or soba noodles instead of ramen. You can also swap the bell peppers for zucchini or carrots. If you like, replace honey with maple syrup for a vegan option. Use tamari instead of soy sauce for a gluten-free dish. Using fresh ingredients makes a big difference in taste. Fresh veggies give your stir-fry color and crunch. They also have more nutrients. When you choose good quality, your dish shines with flavor. Fresh garlic and ginger add a zesty punch, making your meal come alive. Always look for bright, firm vegetables for the best results. This attention to quality helps elevate your spicy ramen noodle stir-fry to a whole new level. {{ingredient_image_2}} First, grab your pot and fill it with water. Bring the water to a boil. Add the ramen noodles once the water bubbles. Cook them according to the package directions. However, take them off the heat about one minute early. This helps keep the noodles firm. After cooking, drain the noodles in a colander and set them aside for later. Next, heat a tablespoon of sesame oil in a big skillet or wok. Use medium-high heat until the oil shimmers. Add the thinly sliced onion first and sauté for one minute. Then, toss in the minced garlic and grated ginger. Keep stirring for two more minutes. You'll know it's ready when you smell those fragrant scents and see the onions soften. Now, introduce the sliced red and yellow bell peppers, broccoli florets, and snap peas to the skillet. Stir-fry these colorful veggies for about five to six minutes. You want them to be tender but still crisp. The bright colors will make your dish more inviting. In a small bowl, mix together the Sriracha sauce, soy sauce, rice vinegar, and honey or agave syrup. Stir it well to create a tasty sauce. Now, add the cooked ramen noodles to the skillet with the sautéed veggies. Pour the sauce over everything. Gently toss the noodles and vegetables together for two to three minutes. Make sure everything is well coated and heated through. Once combined, take the skillet off the heat. For a finishing touch, garnish with chopped green onions and a sprinkle of sesame seeds. This adds flavor and makes your dish look beautiful. Serve it in bowls and enjoy! To control heat, start with less Sriracha. You can add more later if you want. Mix a small amount of the sauce and taste it. If it’s too mild, add more Sriracha. If it’s too hot, balance it with honey or agave. This will tone down the spice. - Use a dash of extra honey for sweetness. - Serve with lime wedges for a fresh taste. Keep your veggies crisp by not overcooking them. Stir-fry them for about 5-6 minutes. They should still be bright and vibrant. Cut vegetables thinly so they cook evenly. - Start with onions and garlic for flavor. - Add peppers and broccoli next, as they take longer to cook. To make this a full meal, add protein. You can use chicken, shrimp, or tofu. Cook the protein in the skillet before adding the veggies. - For a vegetarian option, use firm tofu and cook until golden. - Serve with a side of fresh fruit or a light salad. These tips will help you create a delicious and balanced spicy ramen noodle stir-fry. Enjoy every bite! Pro Tips Perfect Noodle Texture: Cook the ramen noodles one minute less than the package instructions to ensure they remain firm and don't become mushy when stir-frying. Customize Your Spice Level: Adjust the amount of Sriracha sauce based on your heat preference. Start with less and add more if you like it spicier! Fresh Ingredients Matter: Using fresh vegetables not only enhances the flavor but also adds more nutrition to your dish. Opt for seasonal produce when possible. Garnish for Appeal: A sprinkle of sesame seeds and chopped green onions not only adds flavor but also makes your dish visually appealing. Don't skip this step! {{image_4}} You can customize your spicy ramen noodle stir-fry by adding protein. Chicken, tofu, or shrimp work great. - Chicken: Cut boneless chicken breast into thin strips. Sauté it before adding the vegetables. Cook until the chicken is no longer pink. - Tofu: Firm tofu is best. Press it to remove excess water, then cube it. Cook the tofu until it's golden brown for extra flavor. - Shrimp: Use peeled and deveined shrimp. Add them to the skillet after the onions and garlic. Cook until they turn pink. These options add taste and texture. They also make your meal more filling. Feel free to switch up the veggies in your stir-fry. Some great options include: - Carrots: Thinly slice or julienne for a sweet crunch. - Zucchini: Cut into half-moons for a fresh touch. - Mushrooms: Use shiitake or button mushrooms for extra umami. - Spinach: Add it at the end for a pop of color and nutrition. Mixing in different vegetables keeps the dish exciting and nutritious. Experimenting with sauces can change the flavor profile of your dish. Consider these: - Teriyaki Sauce: This adds a sweet and savory kick. - Chili Garlic Sauce: For an extra spicy punch. - Peanut Sauce: This creates a rich, nutty flavor. - Hoisin Sauce: Offers sweetness and depth. Try mixing and matching these sauces with your base sauce. It's a fun way to find your favorite flavor combination! To store your spicy ramen noodle stir-fry, let it cool down first. Once cool, place the stir-fry in an airtight container. This helps keep it fresh. Make sure to seal the container tightly. You can keep it in the fridge for up to three days. When you're ready to eat your leftovers, you can reheat them easily. Place the stir-fry in a microwave-safe bowl. Cover it with a damp paper towel to prevent it from drying out. Heat for one to two minutes, stirring halfway through. If you prefer, you can reheat it on the stovetop. Just add a splash of water to help steam it back to life. If you want to save the stir-fry for a longer time, freezing is a great option. After cooling, divide the stir-fry into smaller portions. Use freezer-safe bags or containers. Remember to remove as much air as possible. This helps prevent freezer burn. Your spicy ramen noodle stir-fry can last in the freezer for up to two months. When you want to enjoy it again, thaw it in the fridge overnight before reheating. Yes, you can make this dish gluten-free. Use gluten-free ramen noodles. Many stores carry them now. Check the label to ensure they are safe for your needs. You can also replace soy sauce with tamari. Tamari is a gluten-free sauce that tastes great. This dish takes about 20 minutes to make. You need 10 minutes to prep and 10 minutes to cook. It’s quick and easy, perfect for a busy day. You can enjoy a tasty meal in no time! You can serve this stir-fry with various sides. Some great options include: - Steamed edamame - A simple cucumber salad - Miso soup - Pickled ginger These sides add nice flavors and textures to your meal. Enjoy experimenting with what you like best! This blog post covered the basics of making a tasty ramen noodle stir-fry. We looked at fresh ingredients and key swaps that can boost your meal. I shared simple steps to cook noodles and blend them with your stir-fry. You found tips for adjusting spice and ensuring perfect veggies. There are many ways to customize your dish with proteins and sauces. Finally, I provided info on storing your leftovers. Now, you can create your unique stir-fry. Enjoy cooking and experimenting!

Spicy Ramen Noodle Stir-Fry Flavorful Easy Meal

Get ready to spice up your dinner routine with my easy Spicy Ramen Noodle Stir-Fry! This quick meal is a

To make Thai Peanut Chicken Lettuce Wraps, you will need: - 1 lb ground chicken - 1 tablespoon sesame oil - 1 red bell pepper, finely diced - 1 large carrot, grated - 2 green onions, finely chopped - 3 cloves garlic, minced - 1 tablespoon fresh ginger, grated - 1/4 cup creamy unsalted peanut butter - 2 tablespoons soy sauce - 1 tablespoon freshly squeezed lime juice - 1 tablespoon honey - 1 teaspoon sriracha (optional) - Salt and freshly ground black pepper to taste - 1 head of butter lettuce or romaine - Fresh cilantro, chopped (for garnish) - Crushed peanuts (for garnish) When you choose produce, look for vibrant colors and firm textures. - For bell peppers, choose ones without wrinkles. They should feel heavy for their size. - Carrots should be bright orange and smooth, with no soft spots. - Green onions should be green and crisp, not wilted or yellowing. - Fresh ginger has a smooth skin and feels firm, which shows it's fresh. If you need a substitute for peanut butter, consider these options: - Almond butter provides a similar texture and flavor. - Sunflower seed butter is a great nut-free choice. - Cashew butter has a mild taste and creamy texture. - If allergies are a concern, tahini works well too. It adds a nice nutty flavor. These alternatives can help you create a tasty meal while meeting your dietary needs. {{ingredient_image_2}} Start by heating a large skillet over medium heat. Add one tablespoon of sesame oil and let it shimmer. Then, add one pound of ground chicken to the skillet. Break it apart with a wooden spoon. Cook the chicken for about 5 to 7 minutes. Make sure it turns white and is fully cooked. Next, add three minced cloves of garlic, one tablespoon of grated ginger, one finely diced red bell pepper, and one grated carrot to the skillet. Stir everything together and cook for another 3 to 4 minutes. The veggies should soften but still have a nice crunch. In a small bowl, combine 1/4 cup of creamy peanut butter, 2 tablespoons of soy sauce, 1 tablespoon of freshly squeezed lime juice, 1 tablespoon of honey, and 1 teaspoon of sriracha if you like it spicy. Whisk these ingredients together until the sauce is smooth and creamy. This sauce brings a lot of flavor to your chicken mixture. Once your chicken mixture is ready, pour the peanut sauce over it. Stir well to coat everything evenly. Cook for another 2 to 3 minutes, allowing all the flavors to meld together. Now, take a head of butter lettuce or romaine and carefully separate the leaves. To serve, scoop a generous portion of the chicken mixture onto a lettuce leaf. Top it with chopped cilantro and crushed peanuts for extra crunch. Fold the sides of the leaf over the filling and enjoy your delicious wraps! To make your Thai Peanut Chicken Lettuce Wraps shine, focus on balance. The sweet and salty peanut sauce pairs perfectly with the crunchy veggies. Use fresh lime juice to brighten the flavors. If you like heat, add sriracha. Just a bit will make a big impact. You can also mix in fresh herbs like basil or mint for extra flavor. One common mistake is overcooking the chicken. This can make it dry. Cook it just until it is no longer pink. Another mistake is adding too much sauce at once. Start by adding half the sauce, then taste. You can always add more if needed. Lastly, don’t skip the garnishes. Crushed peanuts and cilantro give your wraps that extra pop. Presentation is key for these wraps. Use a colorful platter to display your filled lettuce wraps. Arrange them neatly, and consider garnishing with extra cilantro leaves and whole peanuts. This adds color and makes the dish inviting. You can even serve lime wedges on the side. This gives guests a chance to add more zest. Pro Tips Use Fresh Ingredients: Fresh vegetables and herbs elevate the flavor of your wraps. Look for vibrant, crisp produce to enhance the dish. Customize Your Heat: Adjust the amount of sriracha in the peanut sauce according to your spice preference. You can also replace it with chili flakes for a different flavor profile. Make Ahead: Prepare the chicken mixture and the peanut sauce ahead of time. Store them separately in the refrigerator, and assemble just before serving for the best texture. Experiment with Wraps: While butter lettuce is great, try other leafy greens like Swiss chard or collard greens for a unique twist and added nutrients. {{image_4}} You can make a tasty vegetarian version by using tofu instead of chicken. Start with firm tofu. Press it to remove water, then crumble it into small pieces. Cook it in sesame oil just like the chicken. Add garlic, ginger, red bell pepper, and carrot. Mix in the peanut sauce to coat the tofu. This version is rich in protein and perfect for vegetarians. If you want a low-carb option, swap lettuce for other greens. You can use cabbage leaves or collard greens. These greens are sturdy and can hold the filling well. They add a nice crunch and flavor. Just prepare the filling as you normally would and use the greens to wrap it up. Adding extra veggies boosts flavor and texture. Consider tossing in some shredded cabbage or julienned cucumbers. You can also try diced radishes or sliced bell peppers. These add color and a fresh crunch. Mix them into the chicken or tofu filling before serving. Your wraps will be even more exciting with these additions. After enjoying your Thai peanut chicken lettuce wraps, store any leftovers in an airtight container. Keep the chicken mixture separate from the lettuce leaves. This way, the lettuce stays crisp and fresh. Place the chicken mixture in the fridge. It will stay good for up to three days. Remember to let the chicken cool to room temperature before sealing it. When you're ready to eat the leftover chicken mixture, heat it in a skillet over medium heat. Stir it often so it warms evenly. This should take about five to seven minutes. You can also use a microwave. Just place the chicken in a microwave-safe bowl. Heat in 30-second bursts, stirring in between, until hot. Avoid reheating the lettuce. It’s best fresh! If you want to save the chicken mixture for later, freezing is a great option. Cool the mixture completely. Then, transfer it to a freezer-safe bag or container. Squeeze out the air to prevent freezer burn. It can last in the freezer for up to three months. When you're ready to use it, thaw it overnight in the fridge. Then, reheat as mentioned above. Enjoy your tasty wraps anytime! If you want a different protein, try ground turkey or beef. You can also use tofu for a vegetarian option. It gives a nice texture and absorbs the flavors well. To add heat, use more sriracha in the sauce. You can also add chopped fresh chili peppers or red pepper flakes. Adjust the spice to fit your taste. Yes, you can make the filling ahead of time. Just store it in an airtight container in the fridge for up to three days. This makes meal prep easy and quick. This article covered the key ingredients and steps to make tasty lettuce wraps. You learned how to choose fresh produce and alternatives for peanut butter. We explored tips for flavor and common mistakes to avoid, along with creative presentation ideas. You also saw variations for dietary needs, storage info, and FAQs. Making these wraps can be easy and fun. Enjoy your tasty creations and feel free to get creative!

Thai Peanut Chicken Lettuce Wraps Flavorful and Fresh

If you’re looking for a fresh and fun meal idea, try these Thai Peanut Chicken Lettuce Wraps. They burst with

Older posts
Newer posts
← Previous Page1 … Page116 Page117 Page118 … Page120 Next →

dsad

© 2026 yumymoments • Built with GeneratePress

Our Policies

  • Copyright Policy
  • Cookie Policy
  • GDPR Policy
  • Privacy Policy
  • Disclaimer
  • Terms Of Use

More Information

  • Home
  • About
  • Contact
  • Appetizers
  • Dessert
  • Dinner
  • Drinks
©2026, yumymoments About Back To Top