Skip to content
DisclaimerTerms Of UseGDPR PolicyCookie Policy

yumymoments

  • Home
  • Drinks
  • Appetizers
  • Dinner
  • Dessert
  • About
  • Contact
  • Privacy Policy
DisclaimerTerms Of UseGDPR PolicyCookie Policy

Samantha

To make a tasty Chocolate Eggnog Martini, gather these key ingredients: - 1 cup non-alcoholic eggnog - 1/4 cup rich chocolate syrup - 1 tablespoon pure vanilla extract - 1/2 teaspoon freshly grated ground nutmeg - Ice cubes These items create the base of your drink. The eggnog gives creaminess, while the chocolate syrup adds a sweet, rich flavor. Vanilla extract brings warmth, and nutmeg adds a hint of spice. To make your martini extra special, consider these garnishes: - Whipped cream (for a fluffy topping) - Dark chocolate shavings (for a luxurious garnish) - Cocoa powder (for rimming the glasses) Whipped cream makes the drink look festive. Dark chocolate shavings add elegance and taste. Rimming your glasses with cocoa powder gives a fun touch and enhances the flavor. If you want a non-alcoholic drink, you have options: - Use regular eggnog instead of non-alcoholic. - Skip the syrup for a lighter drink. These swaps keep your martini tasty while offering a lighter option. You can still enjoy the creamy, chocolate goodness without the added alcohol. {{ingredient_image_2}} Start by rimming your martini glasses. This step adds a fun touch. Grab a shallow plate and pour in some cocoa powder. Moisten the rims of your glasses with a bit of eggnog. Next, dip each rim into the cocoa powder. Make sure they are well coated. Set the glasses aside to dry. Now, let’s mix the cocktail. Take a cocktail shaker and pour in 1 cup of non-alcoholic eggnog. Add 1/4 cup of rich chocolate syrup for sweetness. Then, include 1 tablespoon of pure vanilla extract for flavor. Don’t forget 1/2 teaspoon of freshly grated nutmeg for that holiday spice. Fill the shaker halfway with ice cubes. This helps chill the drink nicely. Secure the lid on the shaker tightly. Shake it vigorously for about 15-20 seconds. This action blends the ingredients and chills them well. Now, carefully strain the mixture into your rimmed martini glasses. Pour slowly to avoid disturbing the cocoa on the rims. Finally, add a dollop of whipped cream on top of each drink. For a beautiful finish, sprinkle dark chocolate shavings over the whipped cream. Enjoy your festive treat! Finding the right mix of chocolate and eggnog is key. I recommend starting with 1/4 cup of chocolate syrup. This gives a rich taste without overpowering the eggnog. If you want more chocolate, add a bit more syrup. Just remember to keep the eggnog flavor strong too. Balance is vital for a delightful drink. When shaking, use a cocktail shaker. Fill it halfway with ice cubes. This keeps your drink cool. After adding the eggnog and chocolate, seal it tight. Shake it hard for 15-20 seconds. This mixes the flavors and chills the drink well. A good shake makes a smooth and creamy texture. For a fun touch, rim your glasses with cocoa powder. This adds a nice look and flavor. Pour the drink gently to keep the cocoa on the rim. Top with whipped cream for a fluffy finish. Dark chocolate shavings make it fancy. Serve right away for the best taste. Enjoy this festive treat with friends! Pro Tips Chill Your Ingredients: For an extra refreshing drink, chill your eggnog and glassware in advance. This helps maintain the drink's cool temperature longer. Experiment with Flavors: Feel free to play with different flavored syrups or extracts, such as peppermint or hazelnut, to create your unique version of this delightful treat. Make It a Mocktail: If you want a non-alcoholic option, this recipe is perfect as is! You can also add soda water for a fizzy twist. Presentation Matters: Consider using a chocolate drizzle inside the glasses for an eye-catching presentation that enhances the overall experience. {{image_4}} You can add a splash of spirits to your Chocolate Eggnog Martini for a kick. Try bourbon or rum for warmth. Just add 1 to 2 ounces to your shaker. This twist makes the drink bold and festive. Remember, always taste before serving to ensure balance. If you want a dairy-free drink, use almond or oat milk instead of eggnog. These milks give a nice creamy texture. You can also find non-dairy eggnog at stores. This way, you can enjoy the flavor without dairy. Make sure to check labels for added sugars. For a spiced twist, add cinnamon or allspice to the mix. Just a pinch can warm up the drink. If you love mint, use peppermint extract or mint chocolate syrup. Both variations make your cocktail special. Get creative and find what you enjoy most! If you have leftover chocolate eggnog mixture, store it in the fridge. Use an airtight container to keep it fresh. It will last for up to three days. Before serving, give it a good shake to remix. This will help restore its creamy texture. You can prepare the chocolate eggnog mixture ahead of time. Mix the eggnog, chocolate syrup, vanilla, and nutmeg. Store it in the fridge for up to 24 hours before serving. Just remember to add ice when you are ready to shake. This keeps the drink cold and frothy. Freezing is a great option if you want to save some for later. You can freeze the chocolate syrup and eggnog mixture in ice cube trays. Once frozen, place the cubes in a bag. This way, you can use them later in smoothies or other drinks. Just thaw the cubes in the fridge before use. Yes, you can prepare the mix ahead of time. Just combine the non-alcoholic eggnog, chocolate syrup, vanilla extract, and nutmeg in a pitcher. Store it in the fridge for up to two days. When ready to serve, shake it with ice to chill. Rim your glasses with cocoa powder right before pouring for a fresh look. This drink shines at holiday parties! Serve it in chilled martini glasses. Garnish with whipped cream on top. Sprinkle dark chocolate shavings for a gourmet touch. Pair it with festive snacks like gingerbread cookies or chocolate truffles. You can also offer a side of chocolate sauce for dipping! Yes, you can make a lighter version! Use low-calorie eggnog and a sugar-free chocolate syrup. You can also skip the whipped cream or use a light whipped topping. This way, you still enjoy the flavors without too many calories. Adjust the cocoa powder on the rim for a healthier twist. In this post, we explored how to make a Chocolate Eggnog Martini. We covered the key ingredients, steps to prepare, and helpful tips for a perfect drink. Remember, you can customize with different flavors or alcohol types. Storing tips ensure you can enjoy your creation later. Experiment with recipes to find your favorite version. Enjoy your Chocolate Eggnog Martini, and make it your own!

Chocolate Eggnog Martini Irresistible Holiday Treat

Get ready to elevate your holiday cheer with the Chocolate Eggnog Martini! This delicious drink blends rich chocolate and creamy

- 2 cups of eggnog (store-bought or homemade) - 1 cup of sparkling apple cider - 1/2 teaspoon of ground nutmeg - 1/4 teaspoon of ground cinnamon - Whipped cream (for garnish) - Cinnamon sticks (for garnish) - Grated nutmeg (for garnish) When creating this festive drink, I love the balance of flavors. Eggnog brings that creamy, sweet base. You can use store-bought eggnog or make it from scratch if you prefer. The sparkling apple cider adds a nice fizzy touch. Nutmeg and cinnamon are key spices in this drink. They both add warmth and depth. I use ground nutmeg and cinnamon because they blend well into the mix. Whipped cream is not just for looks; it adds a rich texture. A cinnamon stick makes a lovely garnish and gives a hint of spice with each sip. Finally, a sprinkle of grated nutmeg on top adds charm and a delightful aroma. This drink is perfect for gatherings. It combines classic holiday flavors with a fun twist. {{ingredient_image_2}} - Pour eggnog into a large pitcher. - Add sparkling apple cider and stir gently. - Incorporate ground nutmeg and ground cinnamon. - Taste and adjust seasonings if necessary. - Prepare serving glasses with whipped cream. - Pour eggnog mixture over whipped cream. - Garnish with grated nutmeg and cinnamon sticks. Start by pouring the eggnog into a large pitcher. This forms the base of your drink. Next, gently add the sparkling apple cider. Be careful while stirring; you want to keep the bubbles intact. This fizz adds a fun element to your drink. Next, you’ll add ground nutmeg and ground cinnamon. These spices bring warmth and depth to your eggnog. Stir them in well so they mix completely. Now, taste the mixture. If you want more spice, add a bit more nutmeg or cinnamon. Adjust it to fit your taste. Now it's time to prepare your glasses. Scoop a generous dollop of whipped cream into each glass. This will create a lovely surprise when you pour in the drink. Carefully pour the eggnog mixture over the whipped cream. Try to fill each glass about three-quarters full. This layering looks great and gives a flavor boost. To make it extra special, sprinkle each glass with grated nutmeg. This will enhance the aroma and make your drink look festive. Finally, add a cinnamon stick to each glass. It adds a nice touch and a hint of cinnamon flavor. Enjoy making this fun and festive holiday drink! - Best practices for maintaining fizz during mixing To keep your fizz, add the sparkling apple cider gently. Pour it slowly into the eggnog. Use a spoon to stir lightly. This will help keep those fun bubbles intact. - How to adjust spice levels to personal preference Start with the amounts given in the recipe. Taste your drink after mixing. If you want more spice, add a bit more nutmeg or cinnamon. Keep adjusting until it tastes just right for you. - Presentation tips for an elegant festive look Use clear glasses to show off your drink. Add whipped cream at the bottom for surprise. Top with grated nutmeg and a cinnamon stick. Serve on a festive tray with decorative straws. A small slice of apple or sprig of holly adds extra cheer! Pro Tips Chill Your Ingredients: Make sure to chill both the eggnog and sparkling apple cider before mixing. This ensures your Festive Eggnog Sparkler stays refreshing and cool for longer. Choose Quality Cider: Opt for a high-quality sparkling apple cider. This will enhance the flavor of your drink and make it even more enjoyable. Experiment with Garnishes: Feel free to get creative with your garnishes! Try using star anise, fresh mint, or even edible flowers for a unique twist on the presentation. Make It a Mocktail: For a non-alcoholic version, simply stick with the eggnog and sparkling cider. You can also add a splash of cranberry juice for a festive color and flavor. {{image_4}} You can switch things up in your Eggnog Champagne Fizz. Here are some fun ideas: - Sparkling Cider Substitute: Instead of sparkling apple cider, try champagne or prosecco. This change adds a touch of elegance and makes your drink more festive. The bubbles from champagne will elevate the fizz and flavor. - Flavored Eggnog: Experiment with different flavored eggnogs. You can find varieties like vanilla or pumpkin spice. Each option brings a unique twist to your drink. This is a great way to impress guests with new flavors. - Garnishing Options: You can get creative with garnishes. In addition to cinnamon sticks and grated nutmeg, consider adding a slice of orange or a few pomegranate seeds. These options boost the drink's presentation and add a pop of color. Feel free to mix and match these ideas. Each variation will make your Eggnog Champagne Fizz uniquely yours. Enjoy the process of creating something special for your holiday gatherings! If you have leftover Eggnog Champagne Fizz, store it in the fridge. Pour any extra drink into a sealed container. This helps keep the fizz fresh. You want to drink it within two days for the best taste. The eggnog and cider can lose their sparkle over time. For the eggnog, keep it in its original container. Make sure to seal it tight. It can last about a week in the fridge. If you make homemade eggnog, use it within three days. Spices like nutmeg and cinnamon don’t need special storage. Keep them in a cool, dry place. They stay good for months if sealed well. Whipped cream is best when fresh. If you have leftovers, store it in the fridge. Use it within two days for the best flavor. If it's been whipped, it won't last as long. Can I make Eggnog Champagne Fizz ahead of time? Yes, you can prepare the eggnog and cider mix ahead. Just mix the eggnog and sparkling cider, then chill it. However, wait to add whipped cream and spices until serving. This keeps the fizz fresh and fun. Is there a non-alcoholic version of this recipe? Absolutely! Use sparkling apple cider as your base. You can also replace eggnog with a creamy, non-alcoholic alternative. Look for non-dairy options or a custard-style drink perfect for everyone. What can I use as a substitute for eggnog? Try using sweetened condensed milk mixed with milk and spices. Another option is a vanilla-flavored drink or homemade custard. These substitutes will still give you that creamy texture. How can I enhance the flavor further? To boost the flavor, try adding a splash of vanilla extract. You can also mix in a bit of bourbon for a richer taste. Experiment with different spices, like cloves or allspice, to create your perfect drink. This blog post shows how to make a delicious Eggnog Champagne Fizz. You learned about the key ingredients, step-by-step directions, and how to make it even better. We shared tips for presenting your drink and ways to store leftovers. Plus, you discovered fun variations and answered common questions. Enjoy making this festive drink for your next gathering. It’s simple, tasty, and sure to impress your guests!

Eggnog Champagne Fizz Festive Holiday Drink Recipe

Get ready to lift your holiday spirits with my Eggnog Champagne Fizz! This festive drink is a fun twist on

- 2 ¾ cups all-purpose flour - 1 teaspoon baking soda - ½ teaspoon baking powder - 1 cup unsalted butter, softened - 1 ½ cups granulated sugar - 1 large egg - 1 teaspoon pure vanilla extract - 1 teaspoon almond extract - ¾ teaspoon salt - 3 tablespoons granulated sugar (for rolling) - Optional: colorful sprinkles or edible glitter When measuring flour, spoon it into a cup and level it off. This method avoids packing. For butter, let it sit at room temperature for easy creaming. Use a large egg from the fridge for best results. Measure granulated sugar by scooping and leveling it in your measuring cup. Colorful sprinkles or edible glitter add fun to your cookies. Choose your favorites to match the occasion. These can enhance the look and make your cookies festive. You can also skip these if you prefer simple cookies. {{ingredient_image_2}} Start by preheating your oven to 375°F (190°C). This step is key for even baking. While the oven warms up, get your baking sheets ready. Line them with parchment paper. This will help the cookies not to stick. In a medium bowl, whisk together the flour, baking soda, baking powder, and salt. Mix until everything is well combined. This dry mix adds structure to your cookies. Set it aside for later. In a large bowl, use an electric mixer to cream the softened butter with 1 ½ cups of granulated sugar. Mix for about 2-3 minutes. The mixture should be smooth and creamy. This step adds air, making your cookies light. Add the large egg to the creamed mixture. Then, pour in the vanilla and almond extracts. Beat everything together until it looks fluffy. This adds flavor and richness to your cookies. Gradually add the dry ingredients to the wet mixture. Mix slowly until everything is just combined. Stop mixing as soon as a dough forms. Overmixing can make the cookies tough. Scoop out portions of dough with a tablespoon. Roll each portion into a ball using your hands. Roll the balls in the extra granulated sugar for a sweet touch. This makes the cookies sparkly and sweet. Place the dough balls on the lined baking sheets. Space them about 2 inches apart. This gives them room to spread. You can flatten each ball gently with a fork for a nice pattern. Bake the cookies in your preheated oven for 8 to 10 minutes. Watch closely until the edges are lightly golden. The centers should stay soft. Let them cool on the baking sheet for about 5 minutes. Then, transfer them to wire racks to cool completely. To get the best sugar cookies, pay attention to the dough. Use softened butter, not melted. This keeps the cookies light and fluffy. Mix your dough just until it comes together. Overmixing makes tough cookies. Let the dough chill for at least 30 minutes. This helps the cookies hold their shape. One mistake is baking cookies too long. Watch for light golden edges, and keep the centers soft. Another pitfall is not spacing the dough balls enough. Leave about 2 inches between them for good spreading. Also, don’t skip the rolling in sugar. It gives a nice crunch and sweetness. Decorating can be fun and creative! Use colorful sprinkles or edible glitter before baking. You can also mix icing colors for more flair. Try a simple glaze with powdered sugar and milk. Dip the cooled cookies in the glaze for a glossy finish. Let the icing dry before stacking or serving. Pro Tips Chill the Dough: For thicker cookies, refrigerate the dough for at least 30 minutes before baking. This helps prevent spreading and keeps them soft in the center. Experiment with Extracts: Feel free to swap out almond extract for other flavors like lemon or coconut to create your own unique cookie variations! Use a Cookie Scoop: To ensure uniform cookie sizes, use a cookie scoop. This will help them bake evenly and look more professional. Storage Tips: Store cooled cookies in an airtight container at room temperature to maintain freshness for up to a week. For longer storage, freeze them in a single layer and transfer to a bag. {{image_4}} You can change the flavor of your sugar cookies easily. Try using different extracts. Instead of vanilla, use lemon or orange extract. This adds a fresh twist. You can also mix in spices like cinnamon or nutmeg for warmth. If you want a chocolate version, add cocoa powder. Replace some flour with cocoa to keep balance. These options make your cookies unique and fun! Decorating sugar cookies can be a fun activity. You can use colorful sprinkles or edible glitter for a festive feel. Try icing in different colors for designs. Use royal icing to create pretty patterns. You can also dip the tops in melted chocolate. Then sprinkle crushed nuts or coconut on top. These decorations make each cookie special and eye-catching! To make gluten-free sugar cookies, swap regular flour for gluten-free flour. Look for blends that work well for baking. Make sure to check for a good brand that gives you a nice texture. You can also add a bit of xanthan gum to help the dough hold together. This way, everyone can enjoy your delicious cookies! To keep your sugar cookies fresh, store them in an airtight container. This helps retain moisture and flavor. Place a piece of parchment paper between layers if stacking them. This prevents sticking and keeps the cookies intact. If you want added freshness, throw in a slice of bread. It adds moisture to the cookies. Freezing sugar cookies is a great way to enjoy them later. First, let the cookies cool completely. Next, place them in a single layer on a baking sheet. Freeze them for about an hour until firm. After that, transfer the cookies to a freezer bag. Remove as much air as possible and seal it tight. They can stay frozen for up to three months. Sugar cookies stay fresh at room temperature for about one week. If you store them in the fridge, they last a bit longer, up to two weeks. Always check for any signs of spoilage. If they look or smell off, it's best to toss them. Enjoying your cookies at their best is always the goal! Sugar cookies last about one week when stored at room temperature in an airtight container. If you keep them in a cool, dry place, they stay fresher longer. You can also freeze them for up to three months. To thaw, leave them on the counter for a few hours. Yes, you can use margarine or coconut oil instead of butter. This may change the flavor and texture a bit, but the cookies will still taste good. If you use margarine, make sure it is soft and spreadable. Cookies can spread too much if the dough is warm. Make sure to chill the dough for at least 30 minutes before baking. Another reason is too much butter in the mix. Stick to the correct measurements for best results. If your dough feels sticky, add a little more flour, about one tablespoon at a time. Mix well after each addition. Avoid adding too much flour, as it can make the cookies dry. Chilling the dough can also help make it easier to handle. You now have all the steps to make great sugar cookies. We covered ingredients, mixing, baking, and storage. Remember, practice makes perfect. Try different flavors and decorations to make them your own. Store cookies properly to keep them fresh longer. Don't shy away from asking questions if you face issues. Enjoy baking, and share your tasty results with friends and family!

Perfect Sugar Cookies Delightfully Simple Recipe

If you’re craving sweet, buttery bites of joy, you’re in the right place! I’ll show you how to make perfect

- 8 oz rotini pasta - 1 cup cherry tomatoes, halved - 1 cup fresh mozzarella balls, halved - 1/2 cup fresh basil leaves, torn into bite-sized pieces - 3 tablespoons extra-virgin olive oil - 2 tablespoons balsamic glaze - 1 clove garlic, finely minced - Sea salt and black pepper to taste To make this pasta salad, start with rotini pasta. This shape holds the dressing well. Next, you need ripe cherry tomatoes for sweetness. Fresh mozzarella balls add creaminess. Basil leaves give a fresh aroma. Olive oil makes the salad rich, while balsamic glaze adds tang. Garlic brings an extra kick, and salt and pepper enhance all the flavors. - Alternative pasta types - Variations in cheese options - Fresh herb alternatives You can use other pasta types like penne or fusilli. For cheese, try feta or goat cheese instead of mozzarella. If you want different herbs, consider parsley or arugula. These swaps keep the salad exciting and help you use what you have on hand. {{ingredient_image_2}} 1. Boiling water and salting: Fill a large pot with water. Add a generous pinch of sea salt. 2. Cooking rotini until al dente: Bring the water to a rolling boil. Add the rotini pasta and cook for 8 to 10 minutes. Check it often for doneness. 3. Rinsing and cooling the pasta: Once cooked, drain the pasta. Rinse it under cold water. This stops the cooking and cools the pasta quickly. 1. Mixing oil, glaze, garlic, and seasonings: In a small bowl, combine extra-virgin olive oil, balsamic glaze, minced garlic, salt, and black pepper. 2. Achieving a smooth dressing: Whisk the mixture until it is smooth and well blended. 1. Folding in tomatoes, mozzarella, and basil: In a large bowl, add the cooled rotini, halved cherry tomatoes, halved mozzarella balls, and torn basil leaves. 2. Drizzling and tossing with dressing: Pour the dressing over the salad. Use a large spoon to toss all the ingredients gently until they are well coated. 3. Adjusting seasoning to taste: Taste your pasta salad. Add more salt, pepper, or olive oil if needed. 1. Recommended chilling time: Cover the salad and place it in the fridge for at least 30 minutes. 2. Benefits of chilling before serving: Chilling allows the flavors to blend. This makes each bite even tastier. When serving your Caprese pasta salad, the right bowl makes a big difference. Choose a bright, large bowl to showcase the colorful ingredients. A white bowl also works well, as it lets the colors pop. For garnishing, fresh basil leaves add a vibrant touch. You can also drizzle extra balsamic glaze over the top for a beautiful finish. This adds gloss and flavor, making it even more appealing. To make your dish even tastier, think about adding spices. A sprinkle of red pepper flakes can bring heat. Freshly cracked black pepper adds a nice kick too. For a deeper flavor, try marinating your tomatoes. Let them soak in olive oil and balsamic for 15 minutes before mixing them in. This will enhance their sweetness and add layers of flavor. If you plan a gathering, you can prepare the salad in advance. This dish tastes great when chilled, so make it a few hours before you serve it. Just keep it in the fridge. The flavors will blend and improve as it sits. When storing, use an airtight container to keep it fresh. This way, your Caprese pasta salad stays delicious until you’re ready to enjoy it. Pro Tips Use Fresh Ingredients: The quality of your ingredients can make a significant difference in flavor. Opt for the freshest cherry tomatoes and basil for the best taste. Cook Pasta Perfectly: Be sure to salt your pasta water generously and cook the pasta just until al dente to maintain the right texture. Customize Your Dressing: Feel free to experiment with different types of vinegar or herbs in your dressing to give the salad a unique twist. Serve Chilled: Allowing the salad to chill for at least 30 minutes enhances the flavors, making it more delicious when served. {{image_4}} To give your Caprese pasta salad a Mediterranean twist, try adding olives and bell peppers. Black or green olives add a briny flavor. Chopped bell peppers bring in a sweet crunch. These ingredients pair well with the fresh taste of tomatoes and mozzarella. You can also incorporate feta cheese for a tangy kick. Feta crumbles add creaminess and depth. This twist makes the salad more colorful and exciting. Want more protein? You can add grilled chicken or shrimp. Grilled chicken gives a smoky flavor. Shrimp adds a touch of luxury. Both options make the salad hearty and filling. For a vegetarian take, consider adding chickpeas. Chickpeas add a nutty taste and boost protein levels. They blend well with the other ingredients and keep the salad light. Using seasonal vegetables can elevate your pasta salad. In spring, try adding asparagus or peas. In summer, fresh zucchini or corn work great. For fall, roasted butternut squash adds sweetness. Each season brings new flavors to explore. You can also adjust dressings based on what’s in season. For example, use a lemon dressing in summer for a bright taste. In winter, a heartier vinaigrette fits well. These changes keep your salad fresh and fun all year! To keep your Caprese pasta salad fresh, use airtight containers. Glass or plastic containers work well. Make sure the lid fits snugly to keep air out. This will help your salad last longer. Store the salad in the fridge. It will stay good for about three days. If you see any changes in color or smell, it’s time to toss it out. You can serve this pasta salad cold straight from the fridge. It tastes great that way! If you prefer it warm, gently reheat it in a pan on low heat. Add a splash of olive oil to keep it moist. When serving, consider adding fresh basil on top. This gives a nice touch. Drizzle a bit more balsamic glaze for extra flavor. Enjoy your fresh, delicious Caprese pasta salad! Caprese salad is a classic Italian dish. It uses fresh tomatoes, mozzarella cheese, basil, olive oil, and balsamic vinegar. This dish celebrates simple, fresh flavors. The name "Caprese" comes from the island of Capri in Italy. In a traditional Caprese salad, you slice fresh tomatoes and mozzarella. You then layer them with basil leaves. It’s usually served with a drizzle of olive oil and balsamic vinegar. The Caprese pasta salad adds rotini pasta to this mix. This twist makes it heartier and perfect for a meal. Yes, you can make this salad gluten-free. Look for gluten-free pasta made from rice or corn. Many grocery stores offer these options now. When you pick gluten-free pasta, check the ingredients to be safe. You can keep the other ingredients the same. Cherry tomatoes, mozzarella, and basil all fit in a gluten-free diet. Just ensure your dressing is also gluten-free. Most balsamic glazes are safe, but always read labels. You can store Caprese pasta salad in the fridge for about 3 days. Keep it in an airtight container to maintain freshness. Watch for signs of spoilage. If you notice a sour smell or slimy texture, it’s best to toss it. Fresh ingredients can lose their taste after a few days. Enjoy your salad soon for the best flavor! This blog post covered how to make a tasty Caprese pasta salad. You learned about the key ingredients, from rotini pasta to fresh basil. We explored easy steps for cooking and preparing the dressing. You discovered tips for presentation and flavor. In the end, this salad is perfect for gatherings or a quick meal. Try out the variations to keep it exciting. Enjoy your fresh, delicious salad, and share it with your friends!

Easy Caprese Pasta Salad Delightfully Fresh Recipe

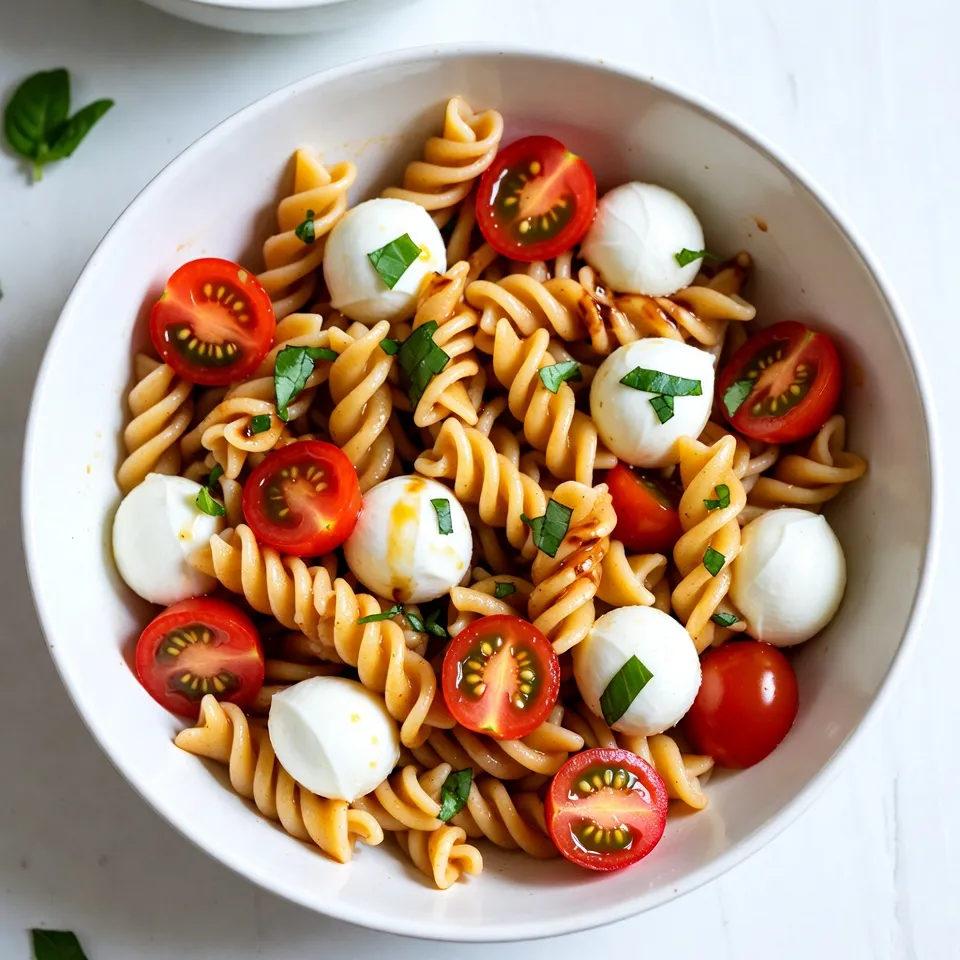
If you’re craving a fresh, simple dish that’s bursting with flavor, look no further! This Easy Caprese Pasta Salad combines

- 8 ounces cream cheese, softened - 1 tablespoon Dijon mustard - 1 teaspoon garlic powder - 1 teaspoon Italian seasoning - 8 large flour tortillas (10-inch) - 8 ounces sliced salami (mix of spicy and mild) - 1 cup shredded mozzarella cheese - 1 cup fresh spinach leaves - Fresh parsley, for garnish To make salami pinwheels, gather these simple ingredients. The cream cheese gives a rich base. Dijon mustard adds a tangy kick. Garlic powder brings depth. Italian seasoning ties in lovely herb notes. Use large flour tortillas for easy rolling. Select a mix of spicy and mild salami for balance. Shredded mozzarella adds gooey goodness. Fresh spinach leaves add crunch and color. Lastly, chopped parsley adds a pop of freshness. With these ingredients, you can create a snack that pleases a crowd. The flavors blend well, and the colors are fun. This dish is not just tasty; it also looks great on a platter. {{ingredient_image_2}} In a bowl, combine 8 ounces of softened cream cheese, 1 tablespoon of Dijon mustard, 1 teaspoon of garlic powder, and 1 teaspoon of Italian seasoning. Use a spatula to blend these ingredients until smooth and creamy. Make sure there are no lumps. This mixture adds a robust flavor to your pinwheels. Take a large flour tortilla and lay it flat on your board. Spread a generous layer of the cream cheese mixture over the tortilla, leaving a half-inch border. Next, layer 8 ounces of sliced salami evenly on top. Follow this with 1 cup of shredded mozzarella cheese and a handful of fresh spinach leaves. The spinach adds a nice crunch and a pop of color. Starting from one end, roll the tortilla tightly toward the other end. Press gently as you roll to keep everything secure. Once you finish, wrap each roll in plastic wrap. Chill the rolls in the refrigerator for 30 minutes. Chilling helps the cream cheese firm up, making it easier to slice. After chilling, remove the rolls from the plastic wrap. Using a sharp knife, slice each roll into 1-inch thick pinwheels. For clean cuts, wipe the knife with a damp cloth between slices. Arrange the colorful pinwheels on a platter. Garnish with freshly chopped parsley for a touch of elegance. Enjoy your tasty snack! To get beautiful pinwheels, roll them tightly. This helps to keep the filling inside. If you find it hard to slice, use a damp knife. This will give you clean, smooth cuts and keep the layers intact. You can change up the flavors by trying different cheeses or herbs. For a fun twist, add roasted red peppers or olives. These ingredients bring a new taste and make your pinwheels even more exciting. When serving, arrange your pinwheels on colorful platters. This adds a pop of color to your table. For a special touch, use garnishes like parsley or baby spinach. They make your dish look fresh and inviting. Pro Tips Use Room Temperature Cream Cheese: Make sure the cream cheese is at room temperature for easier mixing and spreading, ensuring a smooth and creamy filling. Experiment with Tortilla Flavors: Try using flavored tortillas, such as spinach or sun-dried tomato, to add an extra layer of taste to your pinwheels. Chill for Better Slicing: Allow the rolled pinwheels to chill in the refrigerator. This helps firm them up, making them easier to slice without squishing the filling. Customize Fillings: Feel free to mix and match fillings; adding ingredients like roasted red peppers, olives, or different cheeses can elevate the flavor profile. {{image_4}} You can easily make vegetarian pinwheels. Substitute salami with roasted vegetables. Roasting brings out great flavors in veggies. Try bell peppers, zucchini, or eggplant. Next, use hummus instead of cream cheese. Hummus adds a rich taste and keeps it creamy. This variation is great for veggie lovers. For a kick, try spicy pinwheels. Add jalapeños or pepper jack cheese for heat. These ingredients add both spice and flavor. You could also use spicy mustard or hot salami. This twist makes your snack bold and exciting. Perfect for those who enjoy a bit of fire! You can create a sweet and savory version too. Add a layer of fruit preserves or fig jam. This adds a nice sweetness that pairs well with the salty salami. Use flavored cream cheese varieties for more depth. Cream cheese with herbs or garlic enhances the taste. This variation surprises and delights your guests! To keep your salami pinwheels fresh, wrap them tightly in plastic wrap. This helps lock in all the flavors. After wrapping, store them in the refrigerator. This way, they stay cool and tasty until you're ready to eat them. Yes, you can freeze these pinwheels for later use! To freeze, wrap each pinwheel in plastic wrap. Then, place them in a freezer-safe bag. When you want to eat them, thaw them in the fridge overnight. For serving, slice them while still cold for neat pieces. Salami pinwheels last about 3 to 5 days in the fridge. Keeping them wrapped helps maintain their taste and texture. Always check for freshness before serving. If they smell off or look strange, it’s best to toss them. Yes, you can make Salami Pinwheels ahead of time. Prepare them up to one day before your event. After rolling, wrap each pinwheel tightly in plastic wrap. This keeps them fresh in the fridge. Chill them for at least 30 minutes. This gives the cream cheese time to set. For best taste, serve them within 24 hours. To slice pinwheels, use a sharp knife. Clean the knife with a damp cloth after each cut. This prevents sticking and gives clean edges. Cut each roll into 1-inch thick slices. This size is perfect for snacking. Start from the center and work towards the ends for even pieces. Absolutely! You can customize the filling to fit your taste. Try different meats or cheeses. Hummus, roasted veggies, or even cream cheese with herbs work well. You can mix in olives for a salty kick. For a sweet touch, add fruit preserves. The options are endless! Salami Pinwheels can be gluten-free. Use gluten-free tortillas to make them safe for everyone. Many brands offer tasty options. Check the label for hidden gluten in salami or cheese. Fresh veggies and spreads can also add flavor without gluten. Enjoying these pinwheels is easy, even with dietary needs! You learned how to make tasty salami pinwheels. The steps are simple, and the flavors shine. Remember, you can tweak the recipe to suit your taste. Whether you prefer spicy or vegetarian options, there’s room for creativity. Store your pinwheels properly to keep them fresh and delicious. Enjoy making these fun snacks for your next gathering. With practice and some experimentation, you’ll impress your friends and family. Happy rolling!

Salami Pinwheels Flavorful Snack for Any Occasion

Looking for a tasty snack that impresses? Salami pinwheels are your answer! These delicious bites blend cream cheese, salami, and

- 4 colorful bell peppers (red, yellow, and green), diced into bite-sized pieces - 1 medium onion, finely chopped - 3 cloves fresh garlic, minced - 1 lb ground turkey (or beef, based on preference) - 1 can (15 oz) of diced tomatoes (with juice) - 4 cups chicken or vegetable broth (low sodium for a healthier option) - 1 cup cooked rice (white or brown, your choice) - 1 tablespoon Italian seasoning blend - 1 teaspoon smoked paprika for a subtle smokiness - Salt and freshly ground black pepper to taste - 1 cup shredded cheese (cheddar for a sharp flavor or mozzarella for creaminess) - Fresh parsley or cilantro, chopped for garnishing When I make stuffed pepper soup, I focus on fresh ingredients. Bell peppers add color and flavor. They also bring a slight sweetness that balances well with the savory meat. I often use a mix of red, yellow, and green peppers for a vibrant look. Onions and garlic are essential. They create a flavorful base when sautéed. I usually chop the onion finely and mince the garlic to release their full taste. The choice of meat can change the soup's character. Ground turkey keeps it light, while beef adds richness. I like both, but turkey is my go-to for a healthier option. Diced tomatoes bring acidity and moisture. They blend beautifully with the broth. I always choose low-sodium broth to control the salt level. Cooked rice fills the soup and adds texture. You can use white or brown rice, depending on your preference. I often have brown rice on hand for its health benefits. Seasonings tie everything together. Italian seasoning brings warmth, while smoked paprika adds depth. Don't forget salt and pepper; they enhance all flavors. - Types of cheese & herbs - Suggested toppings & garnishes For a cheesy finish, I sprinkle shredded cheese on top. Cheddar gives a sharp kick, while mozzarella melts beautifully. Fresh herbs like parsley or cilantro brighten the dish and add freshness. You can get creative with toppings. Crushed tortilla chips or sour cream add texture and creaminess. Feel free to mix and match according to your taste! - Calories, protein, and fat content - Health benefits of key ingredients This soup is more than tasty; it's nutritious, too. Each serving has a good amount of protein from the meat. The bell peppers provide vitamins A and C, which are great for your immune system. Using low-sodium broth and lean meat keeps the fat content lower. The rice adds fiber, making the soup filling. With all these ingredients, each bowl offers a well-rounded meal. {{ingredient_image_2}} I start by heating a good splash of olive oil in a large pot over medium heat. Once the oil is warm, I add the finely chopped onion and minced garlic. I sauté them for about 3-4 minutes. I stir them often until the onion turns clear and smells nice. Next, I turn up the heat to medium-high. I carefully add 1 pound of ground turkey or beef to the pot. I use a wooden spoon to break up the meat while it cooks. I keep stirring for about 5-7 minutes until the meat is browned and cooked through. Now, it’s time to add the fun part! I mix in 4 diced bell peppers, stirring them for another 5 minutes. This softens the peppers and brightens the dish. Then, I pour in a 15-ounce can of diced tomatoes, along with their juice. I also add 4 cups of chicken or vegetable broth and 1 cup of cooked rice to the pot. Next, I sprinkle in a tablespoon of Italian seasoning blend and 1 teaspoon of smoked paprika. I season with salt and pepper to taste. I stir everything well to combine the flavors. I raise the heat to bring the soup to a gentle boil. Once it bubbles, I lower the heat, cover the pot, and let it simmer for 20-25 minutes. This helps the flavors mix and the peppers soften nicely. After simmering, I taste the soup. If it needs more flavor, I add a bit more salt or pepper. This step is key to perfecting the taste. Finally, I serve the hot soup in bowls. I top each bowl with a generous handful of shredded cheese and a sprinkle of fresh chopped parsley or cilantro. This adds color and flavor, making the dish even more inviting! To enhance flavors, I suggest using fresh herbs. They add great taste. Try adding a splash of lemon juice for brightness. It wakes up the soup. For preventing overcooking, keep an eye on the simmer. Stir occasionally to avoid sticking. This soup pairs well with crusty bread. A simple green salad makes a great side. For a fun twist, serve in bread bowls! You can also add a dollop of sour cream for creaminess. You need a large pot or Dutch oven for this soup. A wooden spoon will help mix the ingredients well. Use a sharp knife for quick chopping of peppers and onions. A ladle is perfect for serving! Pro Tips Use Fresh Ingredients: For the best flavor, opt for fresh bell peppers and high-quality ground meat. Fresh ingredients make a significant difference in the overall taste of your soup. Customize Your Spice Level: If you enjoy a bit of heat, consider adding diced jalapeños or a pinch of red pepper flakes to the soup for an extra kick! Experiment with Grains: Instead of using rice, try quinoa or farro for a unique texture and nutritional boost. These grains add a lovely chewiness to the soup. Make It Ahead: This soup tastes even better the next day, as the flavors have more time to meld. Consider making a big batch and storing leftovers in the fridge for an easy meal later! {{image_4}} You can swap ground turkey for ground chicken. This change gives a lighter feel. You can also try plant-based meat. These options make the soup tasty and healthy. For a vegetarian version, leave out the meat. Use more veggies, like mushrooms or lentils. They add a nice texture and protein. You still get a hearty meal from just the veggies. Adjust the spice levels to match your taste. If you like heat, add red pepper flakes. You can also mix in some cayenne for a stronger kick. Herbs can change the flavor, too. Add more Italian seasoning for a bolder taste. Fresh herbs like basil or oregano can brighten the soup. Experiment and find your favorite mix! You can use quinoa instead of rice for a protein boost. This swap keeps the soup gluten-free. You can even use cauliflower rice for a low-carb option. Using seasonal veggies is a great idea. Try zucchini or corn in summer. In fall, add butternut squash for a sweet touch. These swaps keep your soup fresh and fun! To keep your soup fresh, let it cool first. Then, pour it into an airtight container. This helps preserve flavor and quality. Store it in the fridge and use it within 3 to 4 days. If you want to save it longer, freezing is a great option. When freezing, use freezer-safe containers. Leave some space at the top, as the soup will expand. Label the container with the date. You can freeze it for up to 3 months. To reheat, take it out and let it thaw in the fridge overnight. For quick reheating, use a microwave or a pot on low heat. Stir often to ensure even heating. If you have soup left, get creative! You can use it as a sauce over pasta or rice. Mix it with scrambled eggs for a flavorful breakfast. You can also add it to a casserole for a hearty dish. Consider making stuffed peppers again by using the soup as a filling. This keeps it exciting and reduces waste! Yes, you can make this soup ahead of time. It tastes great after sitting for a day. Store it in the fridge in an airtight container. When you reheat it, the flavors will deepen, making it even tastier. To spice up your soup, add red pepper flakes or cayenne pepper. You can also use spicy sausage instead of ground turkey. For a fresh kick, try adding chopped jalapeños or a dash of hot sauce. Stuffed pepper soup pairs well with crusty bread or grilled cheese sandwiches. A simple green salad adds freshness. You could also serve it with a side of rice or quinoa for extra filling. Yes, you can make this soup in a slow cooker. Brown the meat first. Then, add all the ingredients to the slow cooker. Cook on low for 6-8 hours or high for 3-4 hours. It will be warm and ready for dinner. Absolutely! You can use any color of bell pepper you like. You can also try poblano or Anaheim peppers for a different flavor. Just remember that the type of pepper can change the soup's taste a bit. This blog covered how to make a delicious stuffed pepper soup. We explored the key ingredients like bell peppers, ground turkey, and tomatoes. I shared step-by-step instructions to prepare, cook, and season the soup. I also offered tips on storage and variations for a personal touch. Cooking is fun and rewarding. You can make this soup your own with simple changes. Enjoy trying new flavors and serving it to friends or family. Happy cooking!

Stuffed Pepper Soup Flavorful and Hearty Meal

Looking for a warm, filling meal that’s easy to make? Stuffed Pepper Soup is the answer! With vibrant bell peppers,

Here’s what you need to make roasted garlic tomato soup: - 6 large ripe tomatoes - 1 whole head of garlic - 1 medium onion, finely chopped - 2 cups vegetable broth - 2 teaspoons olive oil - 1 teaspoon dried basil - 1 teaspoon dried oregano - Salt and freshly ground black pepper - 1 tablespoon balsamic vinegar - Fresh basil leaves, for garnish - Crusty bread, for serving (optional) Each ingredient plays a key role. The tomatoes give the soup its base and sweetness. Roasting the garlic brings out its rich flavor and makes it sweet. A chopped onion adds depth and warmth to the soup. Vegetable broth adds more flavor without being too heavy. Olive oil helps everything blend together smoothly. Dried basil and oregano give that classic Italian taste. Salt and pepper enhance all the flavors. Balsamic vinegar adds a touch of tang. Fresh basil leaves on top make it look beautiful. Pairing with crusty bread makes it a filling meal. {{ingredient_image_2}} Set your oven to 400°F (200°C). This helps the tomatoes and garlic roast well. On a large baking sheet, arrange the halved tomatoes cut-side up. Drizzle them with 1 teaspoon of olive oil. Sprinkle salt, black pepper, dried basil, and oregano on top. This mix brings out the best flavors. For the garlic, slice off the top of the whole head. Drizzle a little olive oil over the exposed cloves. Wrap the garlic snugly in aluminum foil. Place it on the same baking sheet with the tomatoes. Roast both the tomatoes and garlic in the oven for 30-35 minutes. They should become soft and slightly caramelized. This step adds a rich flavor to your soup. After roasting, take the baking sheet out of the oven. Let it cool for a few minutes. Squeeze the roasted garlic cloves into a blender or pot. Add the roasted tomatoes, their juices, the chopped onion, vegetable broth, and balsamic vinegar. Blend until smooth. If you want some texture, pulse a few times. Transfer the blended mixture to a pot and heat it over medium heat. Allow it to simmer for about 10 minutes. This helps meld the flavors. Taste the soup and adjust the seasoning. You can add more salt and pepper if needed. To get the best roasted flavor, roast your tomatoes and garlic well. Use ripe tomatoes for deeper taste. Add a sprinkle of sugar to balance acidity if needed. You can also try spices like smoked paprika or red pepper flakes for a kick. These will add warmth and depth to your soup. You can choose between smooth and chunky soup. If you like smooth soup, blend it until silky. For a chunkier texture, pulse a few times with your blender. You can also use an immersion blender for control. Just blend less for more texture. Garnish your soup with fresh basil leaves. This adds color and a hint of freshness. A drizzle of high-quality olive oil gives a nice finish. You can also sprinkle some croutons for crunch. Serve with crusty bread for a filling meal. Pro Tips Choose Ripe Tomatoes: For the best flavor, select large, ripe tomatoes that are in season. They will provide the natural sweetness and rich flavor essential for a delicious soup. Roast Garlic for Depth: Roasting the garlic transforms its sharpness into a mellow sweetness, adding depth to the soup. Don’t skip this step for a more complex flavor profile. Adjust Consistency: If you prefer a creamier soup, consider adding a splash of heavy cream or coconut milk after blending. This will enhance the richness and smoothness of the soup. Experiment with Herbs: While basil and oregano are classic choices, feel free to experiment with other herbs like thyme or rosemary to personalize the flavor of your soup. {{image_4}} You can change the type of tomatoes in this recipe. Canned tomatoes work well if fresh ones are not available. Use whole canned tomatoes for a rich flavor. Crush them in your hands or with a spoon before adding to the pot. If it’s summer, use fresh heirloom tomatoes. They add a great taste and a lovely color to the soup. Want to make the soup heartier? You can add beans or lentils. Use canned beans for ease. Rinse and drain them before adding to the soup. If you like meat, shredded chicken or sausage can be great choices. Just cook them separately and stir them into the soup before serving. To keep this soup plant-based, use vegetable broth. You can also add coconut milk for creaminess. It adds a sweet flavor that pairs well with the tomatoes. For extra taste, add nutritional yeast or a splash of lemon juice. These help boost the flavor without using animal products. After enjoying your roasted garlic tomato soup, you might have some left. Store it in a sealed container in the fridge. It will stay fresh for about 3 to 4 days. Make sure it cools down before sealing it. If you want to keep it longer, freezing is a great option. Just pour the cooled soup into freezer-safe bags or containers. It can last up to 3 months in the freezer. When you want it later, just thaw it in the fridge overnight. To enjoy your soup again, you can reheat it easily. The best way is on the stovetop. This keeps all the flavors intact. Pour the soup into a pot and heat it over medium heat. Stir it often until it’s hot. If you’re short on time, you can use the microwave. Just pour the soup into a microwave-safe bowl and cover it. Heat it in 1-minute bursts, stirring in between, until hot. Either way, make sure the soup is steaming before serving. Enjoy your delicious soup again! Yes, you can use different onions. Sweet onions add a mild flavor. Yellow onions are strong and classic. Red onions give a nice color and sharper taste. Each type brings a unique twist to your soup. Experiment to find your favorite! Roasted garlic lasts about one week in the fridge. Store it in an airtight container. For longer storage, freeze it in small portions. This way, you can easily use it in future recipes. Roasting enhances its flavor, making it a great addition to many dishes. Pair your soup with crusty bread for a cozy meal. A simple side salad adds freshness. Grilled cheese sandwiches are another classic choice. For a fun twist, try a cheese toast. Each option makes the meal more delightful and filling. Yes, this recipe is gluten-free! Use gluten-free bread if you want a side. For thickening, you can use cornstarch or arrowroot powder. Always check labels to ensure no gluten sneaks in. Enjoy your delicious soup without worry! This blog post guided you through making a delicious roasted garlic tomato soup. You learned the key ingredients, from ripe tomatoes to fragrant garlic. The step-by-step instructions helped simplify the cooking process. We also explored tips to enhance flavors and variations for different diets. Storing leftovers and reheating methods ensure you enjoy this soup later. Remember, cooking is fun and creative. Don’t hesitate to experiment and make this recipe your own!

Roasted Garlic Tomato Soup Rich and Flavorful Recipe

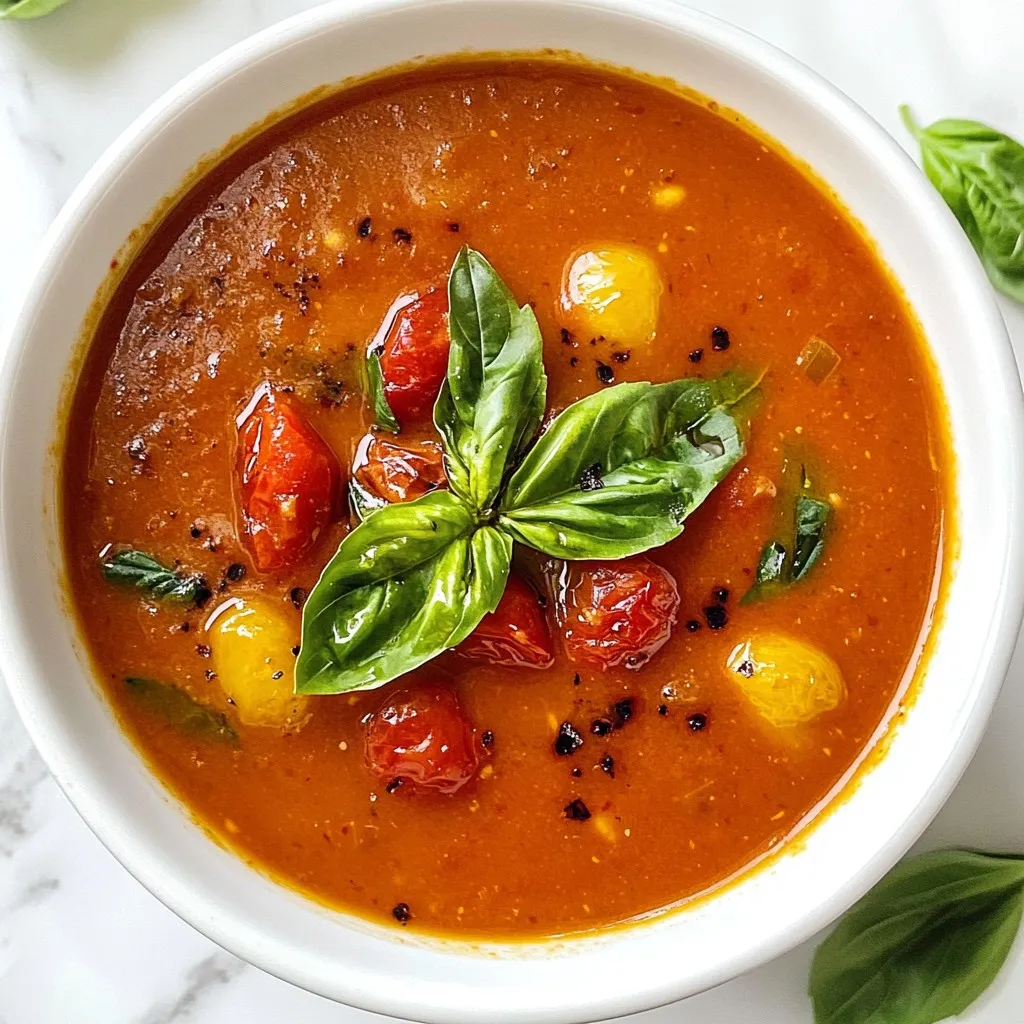
If you’re craving a warm, comforting bowl of soup, you’ve come to the right place. My Roasted Garlic Tomato Soup

- 2 cups pretzel crisps, crushed - 1/2 cup unsalted butter, melted - 1/4 cup granulated sugar - 8 oz cream cheese, softened - 1 cup powdered sugar - 1 cup whipped topping (like Cool Whip) - 2 cups fresh strawberries, sliced - 1 cup strawberry gelatin mix - 2 cups boiling water If you want to change things up, try these: - Use graham cracker crumbs instead of pretzel crisps for a sweeter base. - Swap unsalted butter with coconut oil for a different flavor. - Use a sugar substitute if you want to reduce sugar. - For a dairy-free option, use vegan cream cheese and coconut whipped topping. - Try other fruits like blueberries or raspberries for a twist. Pick strawberries that are bright red and firm. Look for: - Green caps: They should be fresh and leafy. - No blemishes: Avoid any with soft spots or dark patches. - Size: Choose medium-sized berries for even slicing. - Aroma: A sweet smell means they are ripe and ready to eat. Fresh strawberries are key to making this dish shine. {{ingredient_image_2}} Start by preheating your oven to 350°F (175°C). This step is key for baking the crust evenly. In a medium bowl, mix 2 cups of crushed pretzel crisps with 1/2 cup of melted unsalted butter and 1/4 cup of granulated sugar. Stir until every piece of pretzel is coated. This gives the crust flavor and crunch. In another bowl, beat 8 oz of softened cream cheese with 1 cup of powdered sugar. Use an electric mixer on medium speed. Mix until smooth and creamy. Then, gently fold in 1 cup of whipped topping until it is light and fluffy. In a small bowl, dissolve 1 cup of strawberry gelatin mix in 2 cups of boiling water. Stir until there are no lumps. Let this mixture cool for about 15 minutes. Stir it a few times to keep it from setting too soon. Once the gelatin is cool, fold in 2 cups of sliced fresh strawberries. Pour this mixture over the cream cheese layer in the baking dish. Spread it evenly. Refrigerate for at least 2 hours, or until it is set and firm. Serve it cold for a delightful treat! To get a crispy crust for your Strawberry Pretzel Salad, use fresh pretzel crisps. Crush them into small pieces but not too fine. Mix them well with melted butter and sugar. Press the mixture firmly in the pan. Bake it until it turns golden brown. This browning shows that the crust is ready. Let it cool completely before adding the next layer. To avoid lumps in your cream cheese mixture, make sure the cream cheese is at room temperature. This helps it blend smoothly. Use an electric mixer on medium speed to beat it with powdered sugar. Mix until you see no lumps. When adding whipped topping, fold it in gently. This keeps the mixture light and fluffy. Let the gelatin mixture cool for about 15 minutes after mixing it with boiling water. Stir it often to keep it from setting too quickly. After adding the strawberries, pour it over the cream cheese layer once it’s cool but not set. Refrigerate the whole dish for at least 2 hours. This time ensures the gelatin sets well, giving you that perfect slice. Pro Tips Crust Consistency: Ensure the pretzel crust is firmly packed into the baking dish for a sturdy base that won't crumble when serving. Cooling the Gelatin: Allow the gelatin to cool slightly before adding strawberries to prevent them from becoming mushy due to heat. Whipped Topping Alternatives: If you prefer, you can use homemade whipped cream instead of Cool Whip for a fresher taste and texture. Garnishing Tip: For an extra touch, drizzle some strawberry syrup or fresh mint over the top before serving for enhanced flavor and presentation. {{image_4}} You can change the flavor of the gelatin for fun twists. Try raspberry, peach, or cherry gelatin. Each one gives a new taste that pairs well with strawberries. The color also changes, making your dessert look unique. You can mix different fruits into your salad. Fresh blueberries or diced peaches add a nice touch. You can also use bananas, but add them just before serving. This keeps them from browning. Mixing fruits makes the dessert more exciting and colorful. For a gluten-free version, use gluten-free pretzel crisps. Many brands offer these now. This way, people with gluten allergies can enjoy this treat too. Check labels to ensure they are certified gluten-free for safety. To store leftover Strawberry Pretzel Salad, cover the dish tightly with plastic wrap or aluminum foil. This keeps the salad fresh and prevents it from absorbing other odors in the fridge. You can also transfer it to an airtight container. Store it in the refrigerator for up to three days. You can freeze this dessert, but it may change the texture. To freeze, cut the salad into squares. Wrap each piece in plastic wrap, then place them in a freezer-safe bag or container. This helps prevent freezer burn. You can freeze it for up to one month. When ready to enjoy, thaw it in the fridge overnight. Reheating Strawberry Pretzel Salad is not recommended. The texture of the cream cheese and the gelatin can change when heated. Instead, let it thaw in the fridge if frozen. Serve the salad cold for the best taste and texture. Enjoy the refreshing layers straight from the fridge! You can use whipped cream instead of Cool Whip. Beat heavy cream with sugar until stiff peaks form. This gives you a fresh taste. You can also use Greek yogurt for a healthier choice. It adds creaminess and tang. Strawberry Pretzel Salad lasts up to five days in the fridge. Keep it in an airtight container to keep it fresh. The layers stay tasty, but they may become a bit softer over time. Yes! You can make this dessert a day ahead. Just follow the steps and refrigerate it overnight. This helps the flavors blend well together. It will be ready when you need it. Yes, you can lower the sugar in this recipe. Use sugar substitutes like stevia or monk fruit. You can also use sugar-free gelatin for the topping. These swaps still keep the flavor nice. To cut, use a sharp knife or a pizza cutter. Dip it in hot water to make clean cuts. This helps keep the layers intact. Serve the squares on a nice platter with mint leaves for color. You now know how to make a delicious Strawberry Pretzel Salad. We covered the ingredients, steps, and helpful tips. You learned about fresh strawberries and alternatives. This dessert can have many fun variations. Remember to store it right to keep it fresh. Try these tips and enjoy a sweet treat that everyone will love! You can impress your friends with your skills in the kitchen. Happy cooking!

Strawberry Pretzel Salad Irresistible and Easy Recipe

Strawberry Pretzel Salad is a fun, sweet treat that everyone loves. It mixes salty pretzels with creamy layers and fresh

- 2 cups cooked chicken breast, shredded - 2 ears of fresh corn, husked and grilled (or 1 cup frozen corn, thawed) - 1 red bell pepper, diced - 1 ripe avocado, diced - 1 cup cherry tomatoes, halved - 1/4 cup red onion, finely chopped - 1/2 cup fresh cilantro, chopped - Crunchy tortilla strips (for garnish) The main ingredients create a lively mix of flavors and textures. The cooked chicken breast brings protein and heartiness. Fresh corn, grilled or thawed, adds a sweet taste. Diced red bell pepper offers color and crunch. Diced avocado brings creaminess. Cherry tomatoes add a burst of juiciness. Red onion gives a sharp bite, while cilantro adds freshness. The tortilla strips add the perfect crunch on top. - 1/2 cup creamy Greek yogurt - 1 tablespoon fresh lime juice - 1 teaspoon chili powder - Salt and pepper to taste The dressing plays a key role in tying all the flavors together. Creamy Greek yogurt provides a rich base. Fresh lime juice adds tanginess. Chili powder gives a mild kick. Finally, salt and pepper enhance the overall taste. This dressing makes the salad bright and flavorful. {{ingredient_image_2}} To start, you need to prepare the corn. If you have fresh corn, preheat your grill to medium-high heat. Grill the two ears of corn for about 10 minutes. Turn them often until they are lightly charred. After grilling, let them cool for a bit. Once cooled, cut the kernels off the cob. If you use frozen corn, it’s easy too! Heat a skillet over medium heat. Add one cup of thawed corn and cook for about 5 to 7 minutes. Sauté until it is warm and slightly caramelized. Allow the corn to cool completely before adding it to the salad. Now, let’s mix the dressing. In a small bowl, whisk together half a cup of creamy Greek yogurt, one tablespoon of fresh lime juice, and one teaspoon of chili powder. Add a good pinch of salt and pepper to taste. Mix well until everything is smooth and combined. Next, it’s time to combine the salad. In a large mixing bowl, add the following ingredients: 2 cups of shredded cooked chicken, the grilled corn kernels, one diced red bell pepper, one diced ripe avocado, one cup of halved cherry tomatoes, 1/4 cup of finely chopped red onion, and 1/2 cup of chopped fresh cilantro. Mix gently to combine all the ingredients without mashing the avocado. Finally, let’s dress the salad. Pour the dressing over the salad mixture. Using a spatula or large spoon, gently fold everything together. Make sure all the ingredients are coated in the dressing. Taste the salad and adjust the flavors as needed. You can add more salt, pepper, or lime juice if you like. When serving, transfer the salad to a decorative bowl or platter. Just before serving, sprinkle crunchy tortilla strips on top for a tasty crunch. Enjoy your fresh and flavorful street corn chicken salad! For great chicken, use cooked chicken breast. Shred it into bite-sized pieces. Season with salt and pepper. If you want more flavor, add garlic powder or smoked paprika. You can grill the chicken for extra taste. Just cook it until it reaches 165°F. This keeps it juicy and delicious. Balancing flavors is key. The sweetness of corn pairs well with the creamy yogurt. Use lime juice to add brightness. Add diced red bell pepper for crunch. The fresh cilantro brings a pop of flavor too. Taste as you mix. Adjust salt, pepper, or lime juice to suit your taste. You want every bite to make your taste buds happy. Make your salad look vibrant. Serve it on a large platter to impress. Top it with crunchy tortilla strips for a fun texture. Add more fresh cilantro and lime wedges around the edges. This not only looks great but also invites guests to add a squeeze of lime. A colorful salad is a tasty salad! Pro Tips Use Fresh Ingredients: Opt for fresh corn and ripe avocados for the best flavor and texture in your salad. Adjust the Spice Level: Feel free to increase or decrease the chili powder based on your spice preference. Make Ahead: Prepare the salad ingredients in advance, but add the dressing and tortilla strips just before serving to maintain freshness. Garnish Wisely: Use extra cilantro and lime wedges for garnishing to enhance the visual appeal and flavor profile of the salad. {{image_4}} You can change the protein in this salad to fit your taste. - Other meat options: Try grilled shrimp or diced turkey for a new twist. These meats will add different textures and flavors to the salad. You can also use rotisserie chicken for a quick option. - Vegetarian alternatives: If you want a veggie version, use black beans or chickpeas. These add protein and make the salad filling. You can also include tofu for a tasty choice. Spices can change how your salad tastes. - Adjusting spices and herbs: If you like it spicy, add more chili powder or diced jalapeños. You can also use smoked paprika for a deeper flavor. For a fresh taste, try adding lime zest or fresh mint. These small changes can make a big impact. Fresh ingredients can brighten your salad. - Incorporating fresh veggies or fruits: Depending on the season, you can add different veggies. In summer, try ripe peaches or cucumbers for sweetness. In fall, diced apples or roasted butternut squash will add warmth and flavor. Fresh herbs like basil or dill can make the salad taste vibrant and alive. These variations let you make the salad your own. Enjoy exploring new flavors and textures! To store your Street Corn Chicken Salad, place it in an airtight container. Make sure to cool the salad completely before sealing it. This helps keep the flavors fresh and prevents extra moisture. When properly stored, it can last in the fridge for about 3 days. Always check for any off smells or changes in texture before eating leftovers. If you want to freeze the salad, it’s best to store the dressing separately. This keeps the salad fresh when you thaw it. For freezing, place the salad in a freezer-safe container. It will last for about 2 months in the freezer. When you’re ready to eat it, thaw it overnight in the fridge. Reheat the chicken in a skillet or microwave, then mix it back into the salad. Street Corn Chicken Salad lasts about 3 days in the fridge. If stored properly, it can stay fresh for up to 2 months in the freezer. After this time, the quality may drop. Always check for any signs of spoilage before consuming. Yes, you can use canned corn. It's quick and easy. Just drain and rinse the corn. Canned corn has a softer texture. It may lack some of the fresh flavor. If you prefer a crunchier bite, fresh or frozen corn is better. Street corn chicken salad lasts about 3 to 5 days in the fridge. Store it in an airtight container. This keeps it fresh and safe to eat. If you notice any changes in smell or texture, it's best to toss it. You can add many tasty things! Here are some ideas: - Black beans for extra protein. - Jalapeños for a spicy kick. - Cotija cheese for a salty flavor. - Chopped green onions for a fresh taste. - Lime wedges for extra zing. These additions can make your salad even more exciting! This blog post covered how to make a delicious street corn chicken salad. We explored each step, from preparing corn to mixing the dressing and serving suggestions. You learned tips for perfecting flavors and presentation. We also discussed fun variations, storage info, and answered common questions. Remember, enjoy experimenting with different ingredients and flavors. Create your own unique twist on this salad. You’ll impress your friends and family every time!

Street Corn Chicken Salad Fresh and Flavorful Dish

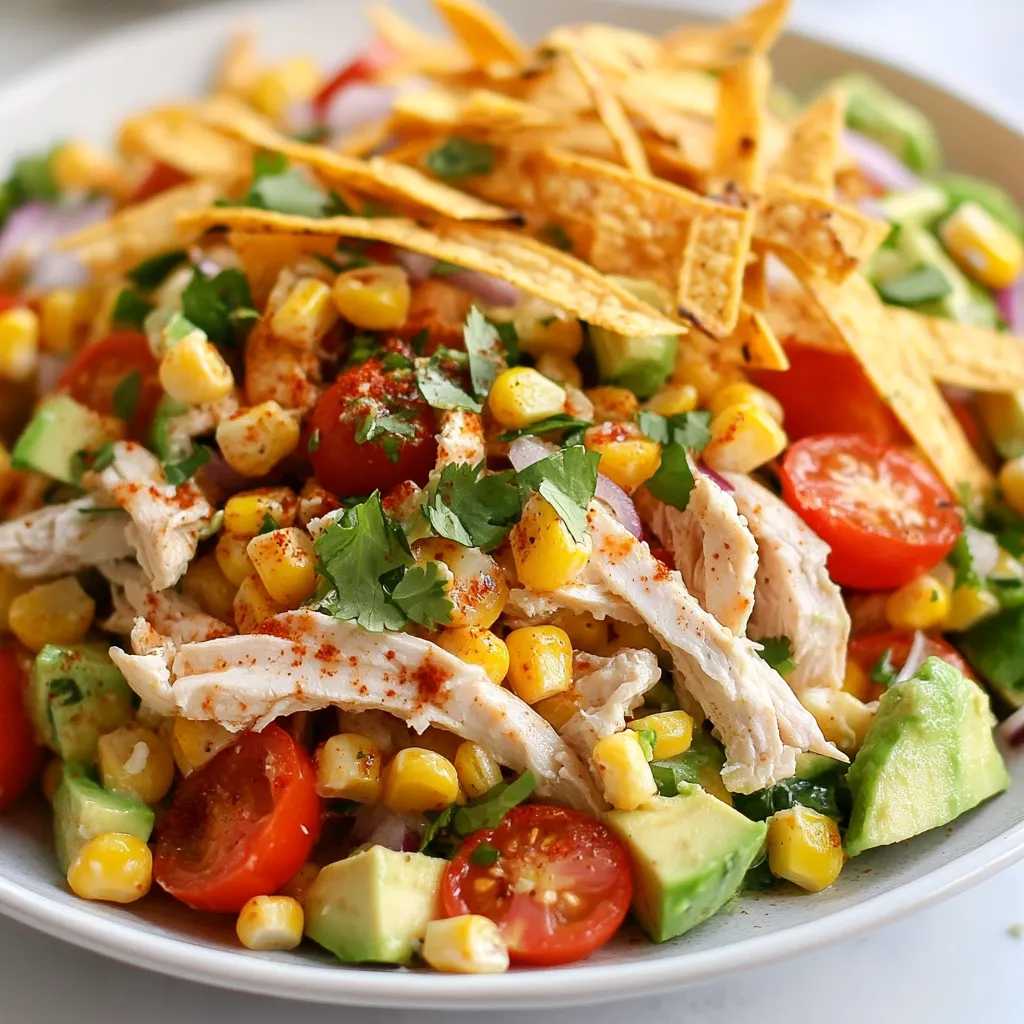
If you crave a refreshing dish that bursts with flavor, you’ll love my Street Corn Chicken Salad. This salad combines

To make this tasty drink, gather these key ingredients: - 1 cup eggnog (store-bought or homemade) - 2 tablespoons chocolate syrup, plus extra for drizzling - 1 tablespoon unsweetened cocoa powder - 1 teaspoon pure vanilla extract - Ice cubes These ingredients blend well to create a rich and creamy cocktail. The eggnog forms the base, while the chocolate syrup and cocoa add a sweet twist. The vanilla extract enhances the flavors nicely. You can make your martini even more special with these garnishes: - 1 tablespoon whipped cream (for garnish) - Freshly grated nutmeg or ground cinnamon (for garnish) Whipped cream gives a soft topping. The nutmeg or cinnamon adds warmth and spice, making your drink look and taste festive. To prepare your Minute Chocolate Eggnog Martini, you'll need: - A cocktail shaker - A martini glass - A strainer (if your shaker does not have one) These tools help you mix and serve your drink easily. The shaker ensures your cocktail is cold and well-blended, while the martini glass presents it beautifully. {{ingredient_image_2}} To start, grab your cocktail shaker. Add 1 cup of eggnog. Next, pour in 2 tablespoons of chocolate syrup. Then, add 1 tablespoon of unsweetened cocoa powder. Follow that with 1 teaspoon of pure vanilla extract. Toss in a handful of ice cubes. This mix creates a rich, chocolatey base. Now, secure the lid on your shaker. Shake it hard for about 30 seconds. You want it to mix well and chill nicely. Once done, grab a pre-chilled martini glass. Carefully strain the mixture into the glass. Leave some space at the top for the garnish. For a fun touch, drizzle some chocolate syrup along the inner rim of the glass. This looks great as it drips down. Now, add a dollop of whipped cream on top. To finish, lightly sprinkle freshly grated nutmeg or ground cinnamon. This adds a nice aroma and visual flair. Enjoy your tasty treat! To make the best Minute Chocolate Eggnog Martini, use cold eggnog. This keeps your drink refreshing. Shake your cocktail shaker well. A good shake mixes the ingredients and cools the drink fast. Strain the mix into a chilled glass for a smooth sip. Drizzle chocolate syrup on the rim for a sweet touch. Lastly, don’t skip the whipped cream. It adds a creamy layer that makes every sip special. If you want to make your own eggnog, it’s simple! Use eggs, sugar, and milk. You can add cream for richness. Whisk everything well and chill it. If you want a twist, try coconut milk or almond milk. These options keep the drink smooth while adding new flavors. If you lack time, store-bought eggnog works great too. Just check the label for quality. To make your martini stand out, think about extras. A pinch of cinnamon or nutmeg adds warmth. You can also mix in a splash of coffee liqueur for depth. Want a fun twist? Add peppermint syrup for a seasonal flair. If you like it sweeter, add more chocolate syrup. Experiment with flavors to find your favorite combo! Each twist makes the drink yours. Pro Tips Use High-Quality Eggnog: For the best flavor, choose a premium eggnog brand or make your own at home. Fresh, homemade eggnog enhances the overall taste of your martini. Chill Your Glass: Pre-chilling your martini glass helps keep your drink cold longer. Simply place the glass in the freezer for a few minutes before serving. Experiment with Garnishes: While whipped cream and nutmeg are classic, feel free to experiment with other garnishes like crushed peppermint or chocolate shavings for a unique twist. Adjust Sweetness to Taste: Depending on your preference, you can adjust the amount of chocolate syrup. Start with less and add more if you like it sweeter. {{image_4}} You can change up your chocolate eggnog martini by using different spirits. Here are a few options: - Rum: Dark rum adds warmth and depth. - Vodka: Use vanilla vodka for a smooth taste. - Bourbon: It brings a rich, smoky flavor. - Irish Cream: This adds a creamy, sweet touch. Mix and match to find your favorite blend! You can enjoy this drink even if you're dairy-free or vegan. Swap out regular eggnog for plant-based options. Here are some ideas: - Almond Milk Eggnog: Light and nutty flavor. - Coconut Milk Eggnog: Adds a tropical twist. - Soy Eggnog: Creamy and delicious. Use vegan whipped cream for garnish. This drink stays tasty and festive! Make your chocolate eggnog martini unique with seasonal flavors. Here are a few fun twists: - Pumpkin Spice: Add pumpkin spice to the mix for fall vibes. - Peppermint: Use peppermint extract for a minty holiday treat. - Maple: Swap chocolate syrup for maple syrup for a sweet hint. These variations keep your drink fresh and exciting all year round! Store leftover eggnog in a sealed container. Keep it in the fridge. Use it within five days for the best taste. If you have extra chocolate syrup or cocoa powder, store them in a cool, dry place. They last a long time if kept sealed. If you have leftover cocktail mixture, you can save it. Store it in the fridge for one day. Shake it well before using again. The flavors may blend nicely overnight. Just remember to use fresh ice each time you serve. For easy serving, you can pre-make the drink. Mix the eggnog, chocolate syrup, cocoa powder, and vanilla. Store this mix in the fridge for up to 24 hours. When ready to serve, shake it with ice and strain it into your glass. This saves time and keeps the drink fresh. Yes, you can prepare the eggnog mixture ahead of time. Mix the eggnog, chocolate syrup, cocoa powder, and vanilla extract together. Store this blend in the fridge. When ready to serve, pour over ice and shake. This keeps the drink cold and fresh. Rum, bourbon, and brandy are great choices. Rum adds a sweet touch. Bourbon brings a warm flavor. Brandy offers a smooth finish. You can mix and match to find your favorite taste. To change the sweetness, add more or less chocolate syrup. If it’s too sweet, consider using less syrup. You can also add a splash of milk or cream to mellow the taste. Always taste your drink before serving. Adjust until it’s just right. This blog post covered everything you need to know about making a Chocolate Eggnog Martini. We explored the key ingredients, tips for perfecting your drink, and fun variations. You learned how to garnish and store your cocktails. Overall, this drink is a fun twist on tradition. Enjoy the process and get creative with flavors. Whether you share it at a party or savor it alone, a well-made Chocolate Eggnog Martini can bring joy to the season.

Minute Chocolate Eggnog Martini Simple and Tasty Drink

Ready for a festive twist on your favorite cocktail? The Minute Chocolate Eggnog Martini is a fun, creamy drink perfect

Older posts
Newer posts
← Previous Page1 … Page117 Page118 Page119 Page120 Next →

dsad

© 2026 yumymoments • Built with GeneratePress

Our Policies

  • Copyright Policy
  • Cookie Policy
  • GDPR Policy
  • Privacy Policy
  • Disclaimer
  • Terms Of Use

More Information

  • Home
  • About
  • Contact
  • Appetizers
  • Dessert
  • Dinner
  • Drinks
©2026, yumymoments About Back To Top