Skip to content
DisclaimerTerms Of UseGDPR PolicyCookie Policy

yumymoments

  • Home
  • Drinks
  • Appetizers
  • Dinner
  • Dessert
  • About
  • Contact
  • Privacy Policy
DisclaimerTerms Of UseGDPR PolicyCookie Policy

Samantha

To make a tasty Cheesy Ground Beef Melt, gather these items: - 1 lb (450g) ground beef - 1 medium onion, finely diced - 2 cloves garlic, minced - 1 cup shredded sharp cheddar cheese - 1 cup shredded mozzarella cheese - 1 tablespoon Worcestershire sauce - 1 teaspoon smoked paprika - Salt and freshly cracked black pepper to taste - 4 soft burger buns - 1 tablespoon extra virgin olive oil - Optional toppings: sliced jalapeños, crisp lettuce leaves, and ripe tomato slices You can swap ingredients based on what you have at home. Use ground turkey or chicken in place of beef. If you don't have Worcestershire sauce, soy sauce works too. For the cheeses, you can mix in gouda or pepper jack for a twist. If you need a gluten-free option, use gluten-free buns. Fresh herbs like parsley or cilantro can add a nice touch too. Cheddar and mozzarella are great choices for this melt. Cheddar gives a sharp bite, while mozzarella adds that stretchy texture. You can also use provolone or fontina for a richer flavor. Mixing cheeses can enhance taste and meltiness, making your dish more exciting. {{ingredient_image_2}} Start by heating the olive oil in a large skillet over medium heat. Add the finely diced onion and minced garlic. Sauté them for about 3-4 minutes. You want the onions to be translucent and smell great. This step adds a solid base of flavor to the dish. Next, add the ground beef to the skillet. Use a spatula to break the meat apart as it cooks. Keep stirring until the beef turns brown and no pink remains. This should take about 5-7 minutes. Drain any excess fat to keep the dish from being too greasy. Now, stir in the Worcestershire sauce and smoked paprika. Season the mixture with salt and freshly cracked black pepper. Cook for an additional 1-2 minutes to let the flavors blend well. This step is key for a tasty melt. Lower the heat to a gentle simmer. Sprinkle the shredded cheddar and mozzarella cheese evenly over the beef mixture. Cover the skillet with a lid. Allow the cheese to melt and become bubbly. This should take about 2-3 minutes. You’ll see the cheese get gooey, which is what you want! While the cheese melts, toast the burger buns. Use a separate skillet or griddle to lightly brown them until golden. This step adds a nice crunch and keeps the bun from getting soggy. Once the cheese is melted, take the bottom half of each toasted bun. Spoon a generous portion of the cheesy ground beef mixture onto it. Make sure to add a lot of filling for the best taste. For extra flavor, pile on optional toppings like sliced jalapeños, crisp lettuce, and ripe tomato slices. Place the top half of the bun over the filling to complete your melt. For a fun touch, cut each melt in half. Serve them warm right away for the best experience! To keep your ground beef tender, use medium heat. High heat can make it tough and dry. Cook it just until it turns brown. You don’t want to overcook it. Stir often to break up chunks. Drain any fat after browning, so it does not make the dish greasy. Adding Worcestershire sauce helps too. This sauce adds flavor and moisture. For the best cheese melt, use a lid. This traps steam and helps the cheese melt faster. Lower the heat to a gentle simmer before adding cheese. Sprinkle the cheese evenly for an even melt. Cheddar and mozzarella blend well together. They create a great texture and flavor. Wait for 2-3 minutes until bubbly and gooey. Serving makes a dish more appealing. Use a rustic wooden board or a clean white platter. This adds style to your meal. Cut each melt in half for easier eating. Place pickle spears on the side. They add color and crunch. You can also add fresh herbs for a pop of green. This makes your meal look restaurant-worthy! Pro Tips Use Fresh Ingredients: For the best flavor, always opt for fresh vegetables and high-quality ground beef. Fresh ingredients make a significant difference in the overall taste of your dish. Customize Your Cheese: While cheddar and mozzarella are great, feel free to mix in other cheeses like pepper jack or gouda for an extra flavor kick. Experimenting with different cheeses can elevate your melts! Don’t Rush the Cheese Melting: Allowing the cheese to melt slowly on low heat will give you that gooey, stretchy texture that everyone loves. Patience is key for the perfect melt! Serve with Dips: Enhance your cheesy melts by serving them with a side of your favorite dipping sauce, such as BBQ, ranch, or spicy sriracha. This adds an exciting flavor dimension to your meal! {{image_4}} You can switch up the bread for your Cheesy Ground Beef Melt. Try using: - Sourdough bread - Ciabatta rolls - Whole wheat buns - Pita bread Each type brings a new flavor and texture. Sourdough adds a tangy twist, while ciabatta gives a crunchy crust. Whole wheat is a healthy choice, and pita makes it fun to eat! If you want to mix it up, use different proteins. Ground turkey or chicken work great. They stay juicy and tasty. You can also try plant-based meat for a veggie option. This keeps the melt delicious while catering to different diets. Toppings can transform your Cheesy Ground Beef Melt. Here are some fun ideas: - Spicy jalapeños for heat - Creamy avocado slices - Crunchy pickles for tang - Fresh herbs like cilantro or parsley Feel free to get creative! The right toppings can add crunch, creaminess, or zest, making your melt even better. Enjoy exploring your options! To store leftovers, first let the cheesy ground beef melt cool down. Place it in an airtight container. You can keep it in the fridge for up to three days. If you plan to eat it later, you can store it safely. To reheat, you can use the microwave or the stove. If using a microwave, place the melt on a plate and cover it with a damp paper towel. Heat it for 1-2 minutes, checking to see if it's warm. For the stove, warm it in a skillet over low heat. Add a splash of water to create steam and cover the skillet. This keeps the bun from getting too hard. If you want to freeze your cheesy ground beef melt, wrap it tightly in plastic wrap. Then, place it in a freezer bag. It can stay frozen for up to three months. When you're ready to eat, thaw it in the fridge overnight. Reheat it as mentioned above for the best taste. Yes, you can make the cheesy ground beef mixture ahead of time. Cook the beef and cheese as usual, then cool and store it in the fridge. When you’re ready to eat, just reheat it and assemble your melts. This saves time during busy weeknights. Great side dishes for Cheesy Ground Beef Melt include: - Crispy French fries - Simple green salad - Coleslaw - Roasted vegetables - Potato wedges These sides add a tasty balance to your meal and bring out the flavors of the melt. To make this recipe gluten-free, choose gluten-free burger buns. Many brands offer tasty options. Check the labels to ensure they fit your diet. You can also serve the cheesy beef mixture over a salad for a gluten-free twist. Yes, you can use different meats! Ground turkey or chicken works well as lighter options. For a richer flavor, try ground lamb. Just adjust the cooking time as needed, aiming for a nice brown color. You can mix and match cheeses for a unique flavor. Here are some tasty options: - Pepper jack for a spicy kick - Gouda for a smoky taste - Provolone for a creamy texture - Swiss for a nutty flavor Feel free to experiment with your favorite cheeses! To keep the buns from getting soggy, toast them well before adding the filling. A light layer of butter can add flavor and help with crispiness. Serving the melts right away also helps prevent sogginess. In this post, we explored the key ingredients for a Cheesy Ground Beef Melt. We covered options for substitutions, the best cheeses, and detailed step-by-step cooking instructions. I shared helpful tips for tender meat and perfect cheese melting. You also learned about variations, storage, and common questions. Remember, experimenting with ingredients can lead to delicious discoveries in your kitchen. Enjoy creating this cheesy delight and make it your own!

Cheesy Ground Beef Melt Quick and Flavorful Recipe

Craving a quick and tasty meal? Look no further than my Cheesy Ground Beef Melt! This dish brings together juicy

- 3 cups all-purpose flour - 2 tablespoons granulated sugar - 1 packet instant yeast (2 ¼ teaspoons) - 1 teaspoon fine salt - 1 cup warm milk (about 110°F or 43°C) - 1/4 cup unsalted butter, melted - 1 large egg, at room temperature - 4 cloves garlic, finely minced - 1/4 cup fresh parsley, finely chopped - 1/4 cup unsalted butter (for brushing on top) The main ingredients create the rolls’ fluffy texture. The flour gives structure, while sugar helps yeast work. Yeast makes the dough rise, and salt adds flavor. Warm milk makes the dough soft. Butter adds richness and helps with browning. The egg helps bind everything together. - Grated Parmesan cheese - Dried oregano - Red pepper flakes You can add Parmesan for a cheesy kick. Oregano brings an Italian flavor. Red pepper flakes add heat. Feel free to mix and match these options for your taste. - Mixing bowls - Wooden spoon or spatula - Clean kitchen towel - Rolling pin - Baking sheet - Oven These tools make the process easy. A mixing bowl helps combine ingredients. A wooden spoon is great for stirring. A clean towel keeps the dough warm. A rolling pin is handy if you want to shape the dough. A baking sheet is needed for baking. An oven ensures perfect rolls. Getting these ingredients and tools ready sets you up for success. Enjoy the process! {{ingredient_image_2}} First, grab a big bowl. Pour in 1 cup of warm milk, about 110°F. Add 2 tablespoons of sugar and 1 packet of instant yeast. Stir gently and let it sit for 5 minutes. The yeast should get bubbly and frothy. This shows it’s alive and ready to work. Next, add 1/4 cup of melted unsalted butter and 1 large egg to the yeast mix. Mix well until everything is blended. In another bowl, whisk together 3 cups of all-purpose flour and 1 teaspoon of fine salt. Slowly add this flour mix to the wet ingredients. Stir with a wooden spoon until a shaggy dough forms. Now, it’s time to knead! Lightly flour your surface. Turn the dough out and knead it for 5 to 7 minutes. You want it smooth and elastic. This step is important for light and fluffy rolls. Once kneaded, place the dough in a greased bowl. Cover it with a clean towel. Let it rise in a warm spot for about 1 hour, or until it doubles in size. When it’s ready, gently punch it down to release the air. Add 4 cloves of minced garlic and 1/4 cup of chopped parsley. Mix until they are evenly spread throughout the dough. Next, divide the dough into 12 equal pieces. Shape each piece into a smooth ball. Arrange them on a greased baking sheet, leaving a little space between each one. Cover them with a towel again. Let them rise for another 30 minutes. They should look light and puffy. While the rolls rise, preheat your oven to 350°F (175°C). After the second rise, brush the tops with melted butter. This adds great flavor! Bake them for 20 to 25 minutes. You want the tops to be golden brown and the rolls to be fully baked. Once done, remove the rolls from the oven. Let them cool slightly on the baking sheet. For extra taste, brush the tops with more melted butter before serving. Enjoy your soft garlic bread rolls! To get soft and fluffy garlic bread rolls, use warm milk. The milk should be about 110°F (43°C). This warmth helps the yeast grow. Let the yeast mixture sit for five minutes. It should become bubbly. This means the yeast is ready. Knead the dough well. This helps build gluten. Gluten makes the rolls rise. Knead until the dough feels smooth and elastic. It should spring back when you poke it. When you shape the rolls, keep them uniform in size. This helps them bake evenly. Place them close together on the baking sheet. They will expand and touch as they rise and bake. One common mistake is not letting the dough rise enough. Always let it double in size. If you skip this step, your rolls will be dense. Another mistake is using cold ingredients. Cold milk or eggs can slow down yeast growth. Always use room temperature ingredients for best results. Avoid over-kneading the dough. This can make it tough. Knead just until it feels smooth and elastic. Kneading should take about five to seven minutes. Use a lightly floured surface. Make sure to fold the dough and push it away. This motion builds gluten. For rising, find a warm spot in your kitchen. You can use an oven that’s turned off but still warm. Cover the bowl with a clean towel. This keeps the dough warm and moist. After the first rise, punch the dough down gently. This releases air bubbles. Then knead in the garlic and parsley. It adds flavor without losing fluffiness. Let the shaped rolls rise a second time for about 30 minutes. This final rise is key to achieving the perfect fluffy texture. Pro Tips Check Yeast Freshness: Always verify the expiration date of your yeast before use. If in doubt, activate it with warm water and sugar to ensure it bubbles up properly. Optimal Dough Rising: For the best rise, place your dough in a warm, draft-free area. You can create a warm environment by turning on your oven to the lowest setting for a few minutes, then turning it off and placing the dough inside. Uniform Size Rolls: To achieve evenly baked rolls, use a kitchen scale to measure each portion of dough. This ensures all rolls are the same size, promoting even baking. Finishing Touch: For an extra flavor boost, add herbs or spices to the melted butter before brushing it on the rolls. Consider using garlic powder, Italian seasoning, or a pinch of sea salt. {{image_4}} You can make soft garlic bread rolls even more fun. Try adding different herbs. Rosemary, thyme, or basil can bring new flavors. Mix in 1 tablespoon of dried herbs when you add the flour. Cheese also works great! Shredded mozzarella or cheddar adds a tasty twist. Add about 1 cup of cheese when you knead in the garlic and parsley. You can even sprinkle some on top before baking for a cheesy crust. If you need gluten-free rolls, use a gluten-free flour mix. Look for one that works for bread. You can find these at most stores. The rest of the recipe stays the same. Just remember to check the ingredients. Some mixes need extra binding agents, like xanthan gum. Follow the package instructions for the best results. Want to try something sweet? Make sweet garlic rolls! Keep the garlic but add sugar. Use about 3 tablespoons of sugar instead of 2. You can also add a teaspoon of vanilla extract for extra flavor. For a nice touch, top the rolls with a sweet glaze after baking. Mix powdered sugar with milk and drizzle it on top. This sweet twist will surprise your taste buds! To keep your soft garlic bread rolls fresh, store them in an airtight container. This helps keep moisture in and prevents them from getting dry. You can also wrap them in plastic wrap or aluminum foil. If you want to enjoy them later, this is the best method. To reheat your rolls, preheat your oven to 350°F (175°C). Place the rolls on a baking sheet and cover them with foil to keep them soft. Heat for about 10-12 minutes. You can also microwave them for 15-20 seconds. The oven method gives a better texture, while the microwave is faster. If you want to freeze your rolls, let them cool completely first. Wrap each roll in plastic wrap, then place them in a freezer bag. This keeps them from getting freezer burn. They can last up to three months in the freezer. To enjoy, simply thaw them overnight in the fridge and reheat as mentioned. You can tell the rolls are fully baked by checking their color. They should be golden brown on top. You can also tap the bottom of a roll. If it sounds hollow, it’s ready. The internal temperature should reach about 190°F (88°C). This ensures they are cooked through but still soft. Yes, you can make the dough ahead of time. Prepare the dough and let it rise as usual. After the first rise, you can cover it tightly and chill it in the fridge. This slows down the yeast. When you are ready to bake, take it out and let it warm up. Then shape and let it rise again before baking. If your rolls are too dense, it may be due to under-kneading. Make sure to knead until smooth and elastic. It could also be that the dough did not rise enough. Make sure to give it enough time to double in size. If you used old yeast, it may not have worked well. Always check the yeast's freshness before starting. You learned how to make soft garlic bread rolls from scratch. We covered key ingredients and step-by-step instructions. I shared tips to ensure fluffiness and fun variations to try. You also found storage tips to keep your rolls fresh. Now you can impress anyone with your baking skills. Baking can be fun, and each step helps you learn. Enjoy making these rolls and share them with your friends!

Soft Garlic Bread Rolls Scrumptious and Fluffy Treat

Indulge in the delight of homemade Soft Garlic Bread Rolls! These scrumptious and fluffy treats will elevate any meal. With

- 1 pound beef tenderloin - 1 cup fresh spinach, finely chopped - 1/2 cup cream cheese, softened - 1/4 cup feta cheese, crumbled - 2 cloves garlic, minced - 1 tablespoon fresh rosemary, minced - 1 tablespoon fresh thyme, minced - Salt and black pepper to taste - 2 tablespoons extra virgin olive oil - 1 tablespoon balsamic vinegar Choosing the right ingredients makes a big difference. Look for fresh spinach. It should be bright green and crisp. The beef tenderloin needs to be bright red with good marbling. Quality cream cheese should be smooth and creamy. For feta, select a block over crumbles for better flavor. Fresh herbs like rosemary and thyme should smell strong and aromatic. You can swap some ingredients if needed. Use ricotta or goat cheese instead of cream cheese. This gives a different flavor. If you don't have feta, try blue cheese for a bolder taste. Fresh herbs can be replaced with dried ones. Use one-third of the amount since dried herbs are more potent. If spinach is not available, kale or Swiss chard works well, too. {{ingredient_image_2}} First, preheat your oven to 400°F (200°C). This helps cook the beef evenly later. While the oven heats, prepare your stuffing. In a medium bowl, mix together: - 1 cup fresh spinach, finely chopped - 1/2 cup cream cheese, softened - 1/4 cup feta cheese, crumbled - 2 cloves garlic, minced - 1 tablespoon fresh rosemary, minced - 1 tablespoon fresh thyme, minced - Salt and pepper to taste Stir until all ingredients blend well. This creates a creamy, herb-filled stuffing. Next, take your beef tenderloin. Use a sharp knife to cut a pocket along the center. Be careful not to cut all the way through. You want to make a pouch for the stuffing. Fill this pocket with the herb stuffing, pressing gently to distribute it. Now it's time to cook! In an oven-safe skillet, heat 2 tablespoons of extra virgin olive oil over medium-high heat. Once the oil shimmers, add the stuffed tenderloin. Sear the beef for about 2-3 minutes on each side. This step creates a nice brown crust, adding flavor. After searing, drizzle 1 tablespoon of balsamic vinegar over the beef. This adds depth to the flavor. Then, carefully place the skillet in your preheated oven. Roast the tenderloin for about 15-20 minutes. Use a meat thermometer to check the internal temperature. For medium-rare, aim for 145°F (63°C). Once cooked, take the skillet out of the oven. Let the tenderloin rest for 5-10 minutes. This lets the juices settle, ensuring a tender slice. When making quick stuffed beef tenderloin, avoid these common pitfalls: - Cutting too deep: Don’t cut all the way through the tenderloin. This will let the stuffing leak out. - Underseasoning: Make sure to add enough salt and pepper to the stuffing. It enhances the flavors. - Skipping the resting time: Let the beef rest after cooking. This helps keep it juicy. To get that perfect sear on your beef tenderloin, follow these steps: - Use a hot skillet: Heat your skillet before adding the oil. A hot skillet gives a nice crust. - Don’t overcrowd the pan: If you have more than one tenderloin, sear them in batches. This keeps the heat high. - Flip only once: Let each side brown well before flipping. This creates a better crust. Pair your stuffed beef tenderloin with these sides for a complete meal: - Roasted vegetables: Carrots, asparagus, or Brussels sprouts work great. - Creamy mashed potatoes: They balance the beef's richness. - Fresh salad: A light salad adds a nice contrast to the meal. Drizzle any pan juices over the beef for extra flavor. Enjoy your meal! Pro Tips Resting the Beef: Allow the tenderloin to rest after cooking to let the juices redistribute, ensuring every slice is juicy and tender. Choosing the Right Cut: Opt for a high-quality beef tenderloin for the best flavor and tenderness; look for bright red color and minimal marbling. Experiment with Herbs: Feel free to customize the herb stuffing by adding other fresh herbs like parsley or sage for a unique flavor profile. Searing Technique: Make sure the skillet is hot enough before searing the beef to achieve a beautiful crust and lock in flavors. {{image_4}} You can change the stuffing to suit your taste. For a vegetarian option, use mushrooms and bell peppers. They add great flavor and texture. You can also try using ricotta cheese instead of cream cheese. It brings a lighter taste. For those who love cheese, mix in more feta or add mozzarella. Both options will create a creamy and rich filling. If you want to grill the beef tenderloin, season it well. Preheat your grill to medium heat. Sear the tenderloin on all sides. Then, move it to a cooler part of the grill to cook through. This gives it a nice smoky flavor. You can also slow cook the stuffed tenderloin. Simply put it in a slow cooker with some broth. Cook on low for about 6 hours. This method makes the meat super tender. Herbs and spices can boost the flavor of your dish. Consider adding crushed red pepper flakes for a bit of heat. If you like a fresh taste, try adding fresh basil to the stuffing. You can also use dried oregano or thyme for a warm, earthy flavor. Experiment with different combinations to find your perfect mix. Don't be afraid to get creative! After enjoying your delicious stuffed beef tenderloin, let it cool. Wrap the leftovers in plastic wrap or foil. Place them in an airtight container. Store them in the fridge for up to three days. This keeps the beef tender and tasty for later meals. To reheat the beef, preheat your oven to 350°F (175°C). Place the leftover slices in a baking dish. Cover the dish with foil to keep moisture in. Heat for about 15-20 minutes or until warm. You can also use a microwave. Heat in short bursts of 30 seconds, checking often to avoid drying it out. If you have extra stuffed beef, freezing is a great option. Wrap each piece tightly in plastic wrap. Then place them in a freezer-safe bag or container. Label it with the date. You can freeze the beef for up to three months. To thaw, move it to the fridge overnight. This keeps the flavors fresh for a future meal. You can tell when the beef tenderloin is done by checking its internal temperature. Use a meat thermometer to check it at the thickest part of the meat. For medium-rare, aim for 145°F (63°C). This gives you a juicy and tender result. If you like it medium, go for 160°F (71°C). Remember, the meat will continue to cook a bit after you take it out of the oven. Yes, you can prepare the beef tenderloin ahead of time. You can make the stuffing a day before and store it in the fridge. Just stuff the tenderloin and sear it when you are ready to cook. You can also season the meat and stuff it the night before. Just be sure to let it sit at room temperature for about 30 minutes before cooking. This helps it cook evenly. Stuffed beef tenderloin tastes great with several sides! Here are some of my favorites: - Roasted vegetables like carrots, potatoes, or asparagus - Creamy mashed potatoes or garlic mashed potatoes - A fresh green salad with vinaigrette - Garlic bread or a crusty loaf - Steamed green beans or broccoli These sides add color, flavor, and balance to the meal. Enjoy your cooking! We covered key ingredients for stuffed beef tenderloin, tips for quality, and substitutions. I detailed step-by-step cooking methods, timing, and common mistakes to avoid. You learned about variations, storage, and reheating leftovers effectively. Cooking is about learning through practice. Use these tips and feel free to experiment. Enjoy making this dish your own! Happy cooking!

Quick Stuffed Beef Tenderloin Flavorful and Simple Dish

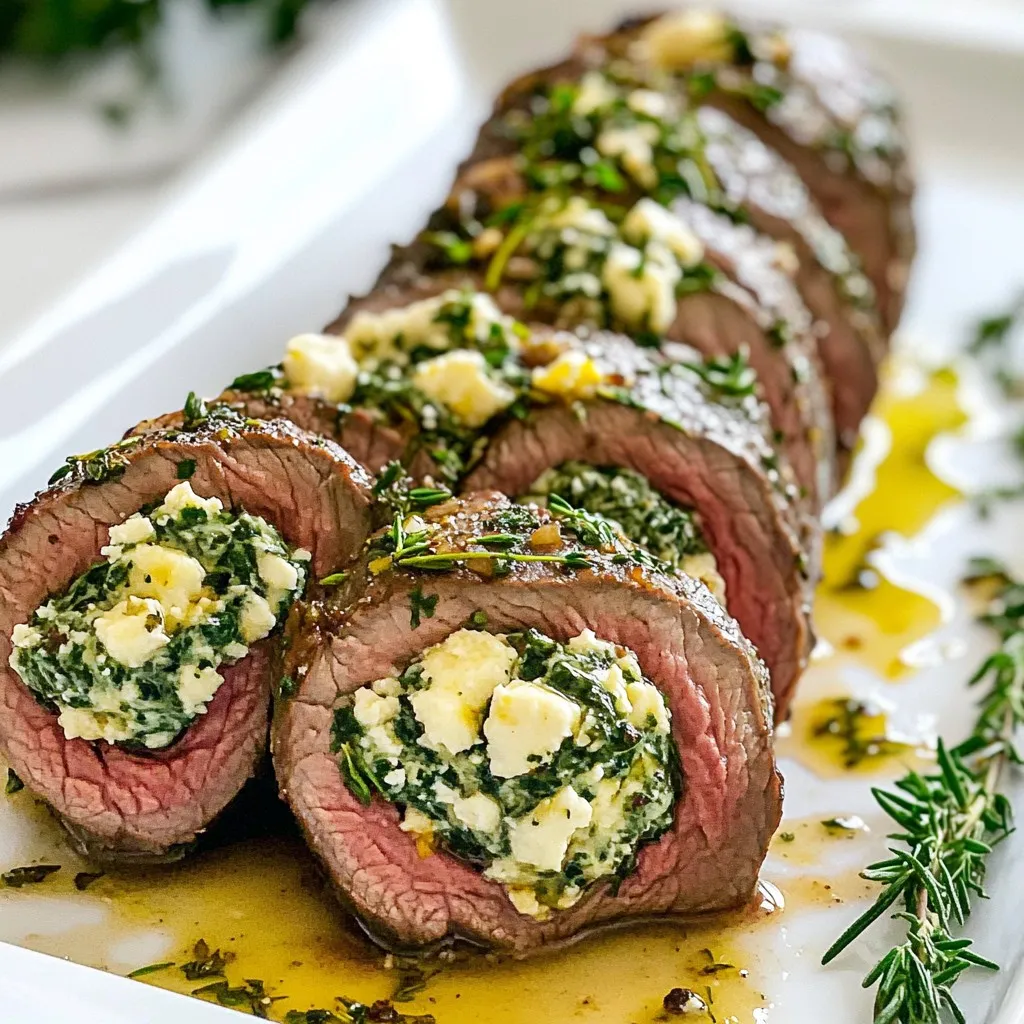
Looking for a tasty dish that impresses without stress? You’ll love this Quick Stuffed Beef Tenderloin recipe. It’s packed with

- Vegetables and Broth - 2 tablespoons olive oil - 1 medium onion, diced - 3 cloves garlic, minced - 1 medium carrot, diced - 1 medium zucchini, diced - 1 bell pepper, diced - 1 can (14 oz) fire-roasted diced tomatoes - 4 cups vegetable broth - Seasonings and Spices - 1 teaspoon ground cumin - 1 teaspoon chili powder - 1 teaspoon smoked paprika - Salt and pepper to taste - Pasta and Beans - 1 cup fideo pasta (or thin spaghetti) - 1 can (15 oz) black beans, drained and rinsed - Garnishes and Serving Suggestions - Fresh cilantro, finely chopped - Lime wedges Each ingredient brings its own flavor to the soup. The olive oil helps sauté the veggies, while the broth gives a rich base. Fire-roasted tomatoes add depth, and the spices give warmth. Fideo pasta adds a nice texture, and black beans make it filling. Don't forget the cilantro and lime! These garnishes freshen up each bowl. This soup is not just a dish; it’s a warm hug in a bowl. {{ingredient_image_2}} - Sautéing Onion and Garlic Start by heating 2 tablespoons of olive oil in a large pot over medium heat. When the oil is hot, add 1 medium onion that you diced. Sauté it for about 5 minutes until it turns soft and clear. Then, add 3 cloves of minced garlic. Stir for one more minute to release great flavors. - Adding Vegetables Next, add 1 medium carrot, diced, 1 medium zucchini, diced, and 1 bell pepper (any color), diced. Cook these veggies for 5-7 minutes. Stir them often until they start to soften. This adds great texture to the soup. - Incorporating Tomatoes and Broth Pour in 1 can (14 oz) of fire-roasted diced tomatoes with all the juices. Then add 4 cups of vegetable broth. Sprinkle in 1 teaspoon of ground cumin, 1 teaspoon of chili powder, and 1 teaspoon of smoked paprika. Stir well to mix all the flavors together. - Seasoning the Mixture Increase the heat until the soup starts to boil gently. Once it’s boiling, reduce the heat and let it simmer uncovered for about 10 minutes. This process lets the flavors blend perfectly. - Cooking Time for Fideo Now, add 1 cup of fideo pasta or broken thin spaghetti, along with 1 can (15 oz) of black beans that you drained and rinsed. Cook for another 5-7 minutes, stirring occasionally. This helps the pasta become tender without sticking. - Final Adjustments Taste the soup and add salt and pepper to your liking. Once it’s ready, take it off the heat and let it rest for a few minutes. This final step helps all the flavors settle in beautifully. To make your fideo soup shine, adjust your seasonings. If you like it spicy, add more chili powder. For a deeper flavor, increase the smoked paprika. Don’t forget to taste as you go. This soup should feel warm and comforting, not bland. To prevent overcooking the fideo pasta, add it in the last few minutes of cooking. Stir it well to keep it from clumping. For even-cooked veggies, cut them into similar sizes. This way, they all soften at the same time. Serve this fideo soup in large, inviting bowls. Top it with fresh cilantro for color and flavor. A lime wedge on the side adds a fresh pop. For crunch, sprinkle some crushed tortilla chips on top. This makes the dish look great and taste even better. Pro Tips Use Fresh Ingredients: Fresh vegetables and herbs will enhance the flavor of your soup, making it more vibrant and delicious. Adjust the Spiciness: If you prefer a spicier kick, feel free to add some diced jalapeños or a dash of hot sauce to the soup. Make it Creamy: For a creamier texture, stir in a splash of coconut milk or a dollop of sour cream just before serving. Storage Tips: This soup can be stored in the fridge for up to 3 days. Reheat gently on the stove, adding a little water if the pasta absorbs too much liquid. {{image_4}} Using Different Beans You can swap black beans for other types. Pinto or kidney beans work well too. Each type adds its unique taste and texture. Chickpeas also make a great choice for a twist. They add more protein and fiber. Alternative Pasta Options While fideo pasta is traditional, you can use thin spaghetti. Break it into smaller pieces for the same effect. Other small pasta shapes, like orzo or ditalini, can also fit nicely in the soup. These options vary the texture and keep it fun. Mild vs. Spicy Versions If you prefer a milder soup, reduce the chili powder. You can also skip the smoked paprika. For those who love heat, double the chili powder or add hot sauce. You can adjust it based on your taste. Adding Heat with Peppers Fresh peppers can spice up your soup. Jalapeños add a kick, while poblano peppers give a rich flavor. Dice them finely and sauté them with the onions for depth. You can control the heat by removing the seeds. Ensuring a Plant-Based Recipe This soup is already vegetarian, but you can make it vegan. Just ensure the vegetable broth has no animal products. Most store-bought broths are vegan-friendly, but it’s good to check. Dairy-Free Garnishes Instead of sour cream, use avocado slices for creaminess. You can also add a sprinkle of nutritional yeast to give it a cheesy flavor. Fresh herbs like cilantro or green onions add brightness without dairy. After you enjoy your cozy Mexican fideo soup, store any leftovers properly. Let the soup cool down to room temperature before putting it in the fridge. Use an airtight container to keep it fresh. This way, you can enjoy the flavors later. - How to Store Leftovers - Allow soup to cool down. - Transfer to an airtight container. - Refrigerate for up to 3 days. - Reheating Guidelines - Pour soup into a pot. - Heat on medium until warmed through. - Stir occasionally to prevent sticking. Freezing is a great way to keep your fideo soup for longer. It can last for months in the freezer. Just follow some easy steps to keep the taste fresh. - Best Practices for Freezing - Cool the soup before freezing. - Use freezer-safe containers or bags. - Leave space for expansion, as soup can swell. - Thawing and Reheating Recommendations - Thaw in the fridge overnight. - For quick thawing, use the microwave. - Reheat on the stove, stirring often until hot. Yes, you can make Fideo Soup ahead of time. This soup tastes even better after its flavors meld overnight. Just store it in the fridge in an airtight container. When you’re ready to serve, heat it on the stove until warm. You can serve many tasty sides with Fideo Soup. Here are a few ideas: - Warm tortilla chips - Crispy quesadillas - Fresh guacamole - A simple green salad - Cornbread These sides add flavor and texture to your meal. Yes, this recipe is kid-friendly! The soup is mild and packed with veggies. Kids usually love the soft pasta and beans. You can also adjust the spices to suit their taste. Fideo Soup lasts about 3 to 4 days in the fridge. Store it in an airtight container to keep it fresh. If you notice any off smells or changes in color, it's best to throw it away. In this post, we covered how to make Cozy Mexican Fideo Soup. We discussed ingredients like vegetables, spices, and pasta. You learned step-by-step instructions, along with handy tips for perfect flavor. Plus, we explored fun variations to suit your taste. In summary, this soup is easy to make and adaptable. It’s a dish that warms the heart. With the right techniques, you can create your own delicious version. Enjoy crafting this comfort food and share it with loved ones.

Cozy Mexican Fideo Soup Flavorful and Comforting Dish

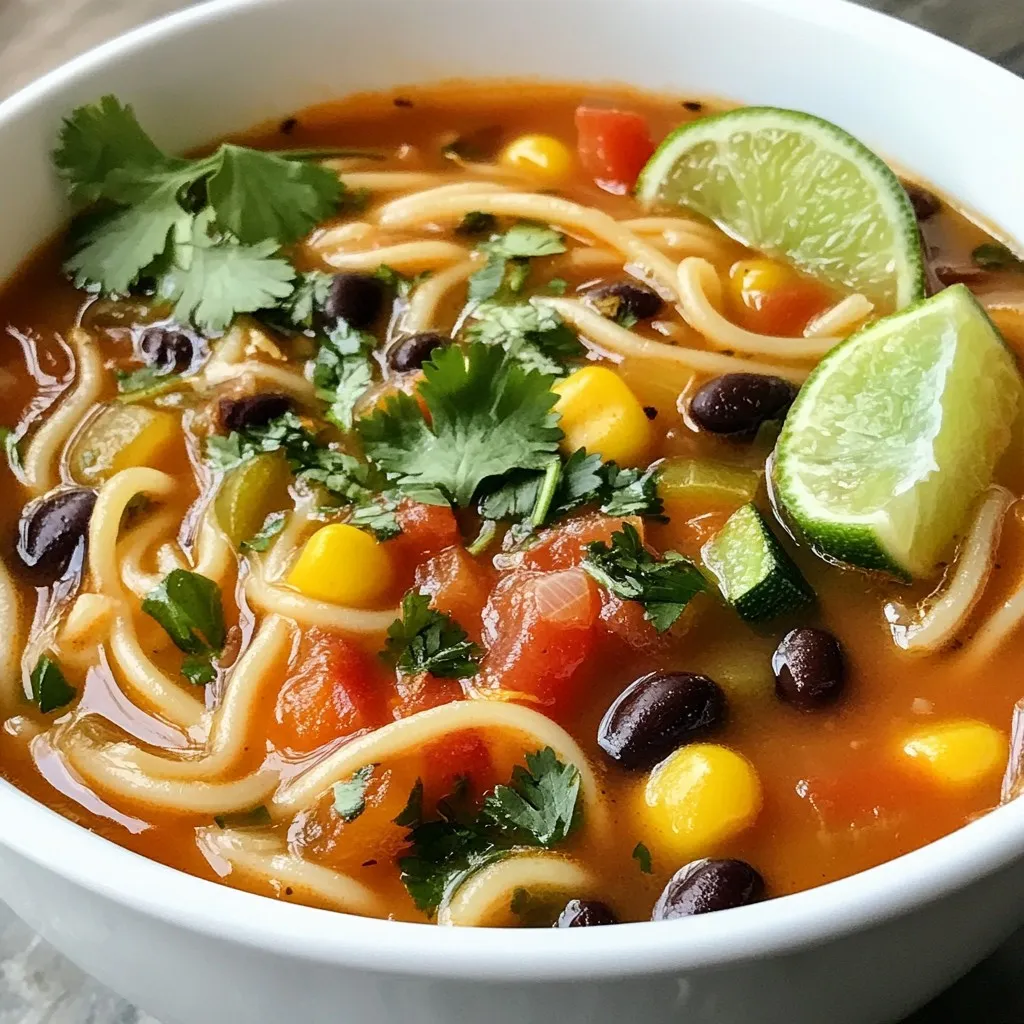
If you’re searching for a warm and tasty meal that hugs you from the inside, look no further than Cozy

- Apples: I like Honeycrisp or Fuji apples. They are sweet and crunchy. You can choose other types, but these work best. - Coconut oil: This oil gives a nice flavor. You can use olive oil or butter if you prefer. - Sweeteners: I use coconut sugar. It has a rich taste. Brown sugar is a good alternative. - Other flavor enhancers: I add vanilla extract for warmth. A pinch of sea salt boosts the taste. You can add almond flour for extra crunch. {{ingredient_image_2}} Start by gathering your ingredients. In a medium mixing bowl, add the melted coconut oil, coconut sugar, ground cinnamon, vanilla extract, and sea salt. Use a whisk to mix everything together well. You want a smooth blend with no lumps. This step is key for making sure every bite is full of flavor. Next, take your apple wedges and add them to the bowl. Gently toss the wedges in the cinnamon sugar mixture. It's important to coat each wedge evenly. This ensures that every bite has that sweet and spicy flavor. You can use your hands or a spatula to help with this step. If you want extra crunch, now is the time to sprinkle the almond flour over the coated wedges. Toss gently again to make sure the flour sticks to the apples. This will give your bites a nice texture. Before you start cooking, preheat your air fryer to 350°F (175°C). This takes about 3-5 minutes. A hot air fryer cooks the apples evenly. Once preheated, arrange the apple wedges in the basket in a single layer. Make sure they are not crowded. This allows hot air to circulate well around each piece. Next, air fry the apple wedges for 10-12 minutes. Halfway through, pause and shake the basket. This helps the apples cook evenly. When they are done, the apples should feel tender and have a slight crunch. Let them cool for a couple of minutes before serving. To get the perfect crispy texture, pay attention to cooking times and temperature. I recommend setting your air fryer to 350°F (175°C). Preheat it for 3-5 minutes before adding your apple wedges. This helps them cook evenly. Cook the apple bites for 10-12 minutes. Halfway through, shake the basket gently. This ensures all sides get that nice crunch. Presentation matters! Serve your apple bites on a nice platter. You can add a small bowl of Greek yogurt or honey for dipping. This adds a creamy touch. For a pretty finish, sprinkle a little extra cinnamon on top. This makes your bites even more enticing. Want to up the flavor? You can add more spices like nutmeg or cardamom. These warm spices pair well with apples. Try different sugars too! Coconut sugar gives a caramel-like taste, while brown sugar adds a rich, sweet flavor. Don’t be afraid to experiment and find your favorite combination! Pro Tips Choose the Right Apples: Selecting crisp and sweet apples like Honeycrisp or Fuji will enhance the flavor and texture of your apple bites. Even Coating: Make sure to toss the apple wedges gently but thoroughly to ensure every piece is evenly coated with the cinnamon sugar mixture for maximum flavor. Don’t Overcrowd the Basket: Cooking the apple bites in a single layer allows for better air circulation, resulting in perfectly cooked and crispy bites. Serve Warm: For the best experience, serve the apple bites warm with a side of yogurt or honey, enhancing their deliciousness. {{image_4}} You can change the apples for other fruits. Pears or peaches work well too. They bring fresh flavors to the bites. If you want a different oil, try olive oil or avocado oil. These oils add healthy fats and taste great. Mix in seasonal spices. For fall, add nutmeg for a warm flavor. During winter, sprinkle in some ginger for a festive twist. You can make these bites special for holidays by using fun shapes or colors. If you need a gluten-free option, use gluten-free flour instead of almond flour. This keeps the bites tasty and safe for everyone. For a vegan twist, swap the honey for maple syrup. This will keep your bites sweet and perfect for all diets. To keep your cinnamon sugar air fryer bites fresh, use airtight containers. Glass or plastic containers work well. Make sure the bites are cool before sealing them. Store them in a cool, dry place or in the fridge. This helps to keep the flavors intact. For the best texture, reheat the bites in the air fryer. Set it to 350°F (175°C) and cook for about 3-5 minutes. This method keeps them crispy. You can also use a toaster oven if you don’t have an air fryer. Avoid using the microwave, as it can make the bites soggy. These bites can stay fresh for about 3-4 days when stored properly. Check for signs like a mushy texture or off smell. If they seem too soft or smell bad, it’s best to throw them away. Enjoy them while they are fresh for the best taste! Yes, you can use other fruits. Pears and peaches work well. Just make sure they are firm. You want the fruit to hold its shape during cooking. Cut them into similar wedges for even cooking. If you don't have coconut sugar, brown sugar is a good choice. You can also use regular white sugar. Just keep in mind that it may change the flavor slightly. Adjust the amount based on your taste. To make your bites crunchier, add almond flour. This gives a nice texture. You can also cook them a little longer. Just check often so they don’t burn. Shaking the basket halfway through helps too. Yes, you can prepare them ahead of time. Coat the apple wedges and store them in the fridge. They stay fresh for a day. Just remember to air fry them when you are ready to serve. Each serving has about 150 calories. You get around 3 grams of fiber. The bites also have healthy fats from coconut oil. This makes them a tasty yet guilt-free treat! This blog post covered how to make tasty apple bites with step-by-step guidance. We explored ingredients, preparation, cooking tips, and variations to suit your taste. Keep in mind, the right texture and flavor come from using the best ingredients and following each step. Try experimenting with different fruits or spices for fun twists. Store leftovers properly to enjoy them longer. Make sure to check answers to common questions for extra help. Enjoy your cooking adventure and delight in these delicious bites!

Healthy Cinnamon Sugar Air Fryer Bites Recipe

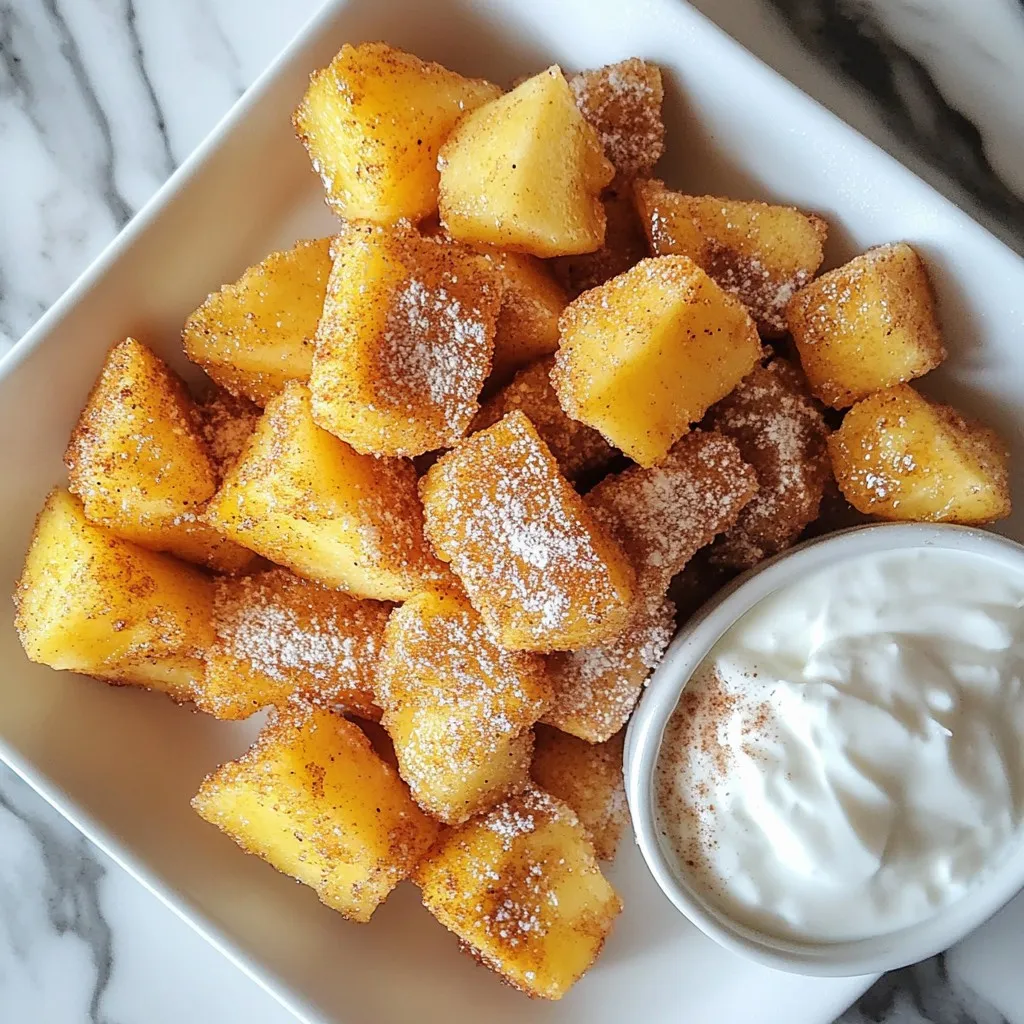
Looking for a fun and healthier snack? Try my Healthy Cinnamon Sugar Air Fryer Bites! These tasty treats combine the

- 1 pound ground beef or turkey - 1/4 cup finely grated Parmesan cheese - 1/4 cup seasoned breadcrumbs - 1 large egg - 1 cup heavy cream - 4 cups low-sodium chicken broth I love using ground beef for its rich flavor, but turkey works well too. The grated Parmesan cheese adds a nice depth to the meatballs. Seasoned breadcrumbs help bind the meatballs, while the egg gives them a tender texture. Heavy cream makes the soup creamy and dreamy. Low-sodium chicken broth keeps the soup light and flavorful. - 1 medium onion, finely diced - 2 medium carrots, peeled and diced - 2 celery stalks, diced - 2 cloves garlic, minced The onion, carrots, and celery form a classic base. These veggies add sweetness and depth. Minced garlic gives a punch of flavor. Sautéing these together brings out their natural sweetness, making the soup even more comforting. - 1 teaspoon dried Italian seasoning - Salt and freshly ground black pepper, to taste - Fresh basil leaves, torn, for garnish Italian seasoning brings a blend of herbs that adds warmth. Salt and pepper enhance all the flavors. Fresh basil is the final touch, adding color and a fresh aroma. It makes each bowl feel special. {{ingredient_image_2}} - In a large bowl, mix the ground beef or turkey, Parmesan cheese, breadcrumbs, egg, minced garlic, Italian seasoning, salt, and pepper. - Use your hands to combine the ingredients. Don’t overmix; this helps keep the meatballs tender. - Next, shape the mixture into small meatballs, about 1 inch wide. Place them on a plate or baking sheet and set aside. - Heat olive oil in a large pot over medium heat. - Add diced onion, carrots, and celery. Cook them for 5 to 7 minutes until soft and clear. Stir often so they cook evenly. - Carefully add the meatballs to the pot in a single layer. Brown them gently, turning occasionally for about 5 to 6 minutes. - Pour in the diced tomatoes with their juice and the chicken broth. - Bring the soup to a gentle simmer. Let it cook uncovered for 15 minutes to blend the flavors. - Add your small pasta to the pot. Cook it according to package directions until it is al dente. Stir to avoid sticking. - Lower the heat and slowly mix in the heavy cream. Heat for another 5 minutes, stirring gently. - Taste your soup and add more salt and pepper if needed. - Remove it from the heat and let it sit for a few minutes. This helps thicken the soup. - Serve the soup hot in bowls, and don’t forget to add torn fresh basil on top for a lovely touch. To make great meatballs, avoid overmixing. Mix the meat and other ingredients just enough to combine. Overmixing makes them tough. For browning, use medium heat. Heat your pan with olive oil first. Add meatballs in a single layer. Turn them gently to brown all sides. This gives great flavor and color. Adjust your seasonings to suit your taste. Start with salt and pepper, then add more if needed. Fresh herbs like basil add a bright touch. Torn basil leaves make a lovely garnish. Cook your pasta according to the package instructions for perfect texture. Add it to the soup at the right time. If you add it too early, it can get mushy. When adding cream, lower the heat. Stir it in slowly and gently. This helps keep the soup creamy and delicious. Pro Tips Use Fresh Ingredients: Fresh herbs and vegetables can significantly elevate the flavor of your soup. Consider using fresh garlic and basil for a richer taste. Adjusting Creaminess: For a lighter soup, reduce the amount of heavy cream or substitute with half-and-half. This will still give you a creamy texture without being too rich. Meatball Variations: Experiment with different types of ground meat or even plant-based alternatives for a unique twist on this classic soup! Perfect Pasta Cooking: To prevent the pasta from becoming mushy, add it to the soup towards the end of the cooking process and ensure it's cooked al dente. {{image_4}} You can switch up the meat in this recipe. Ground turkey or chicken works well. These options offer a lighter feel while keeping the flavor rich. If you want to skip meat altogether, try plant-based meat. It mimics ground beef and still tastes great. This soup is flexible with pasta. You can use small types like orzo or ditalini. If you need gluten-free options, there are many small gluten-free pasta brands out there. They cook well and keep the soup hearty. You can jazz up your soup with Mediterranean flavors. Adding olives or capers gives it a nice twist. You can also play with spices. A pinch of red pepper flakes can add heat. Or, try fresh herbs like thyme or oregano for a burst of freshness. To keep your creamy Italian meatball soup fresh, you need to store it right. After the meal, let the soup cool to room temperature. Then, pour the leftovers into an airtight container. Place it in the fridge if you plan to eat it within three days. If you want to keep it longer, freezing is the best option. For freezing, use freezer-safe containers or bags. Make sure to leave some space for the soup to expand. You can freeze it for up to three months. When you're ready to enjoy it again, just thaw it in the fridge overnight before reheating. When you’re ready to enjoy the soup, there are a few easy ways to reheat it. The best method is using the stovetop. Simply pour the soup into a pot over medium heat. Stir it often to heat evenly. This method helps keep the soup creamy and delicious. You can also microwave it. Place the soup in a microwave-safe bowl. Heat it in short bursts, stirring in between. This will help warm it without losing that creamy texture. If the soup looks too thick, add a splash of broth or cream to bring it back to life. For refrigerated soup, aim to eat it within three days. If you see any signs of spoilage, like an off smell or mold, it’s best to throw it away. When stored in the freezer, the soup can last for about three months. After that, it may lose flavor and texture. Always trust your senses; if something seems off, it’s safer to toss it. Yes, you can prepare this soup ahead of time. Make the soup as usual, but stop before adding the cream and pasta. Cool it down, then store it in the fridge for up to three days. When you're ready to serve, heat the soup and add the cream and pasta. This keeps the pasta from getting mushy. This soup pairs well with several tasty sides. Here are some ideas: - Crusty Italian bread for dipping - A fresh green salad with vinaigrette - Garlic breadsticks for a fun twist - A sprinkle of extra Parmesan cheese on top These sides enhance the meal and make it more filling. Yes, there are alternatives to heavy cream. Here are some options: - Whole milk gives a lighter touch - Half-and-half for a creamier feel - Coconut milk for a dairy-free choice - Cream cheese can add a rich taste Each option provides its own twist on the soup's flavor while keeping it creamy. This blog covered how to make Creamy Italian Meatball Soup with rich flavors. We discussed the main ingredients like ground beef, vegetables, and spices. You learned step-by-step instructions for preparing the meatballs and building the soup. I shared tips for perfecting your dish and creative variations to try. Finally, we covered storage and reheating for leftovers. Enjoy making this tasty soup, and remember, cooking is about fun and creativity!

Creamy Italian Meatball Soup Comforting and Rich Dish

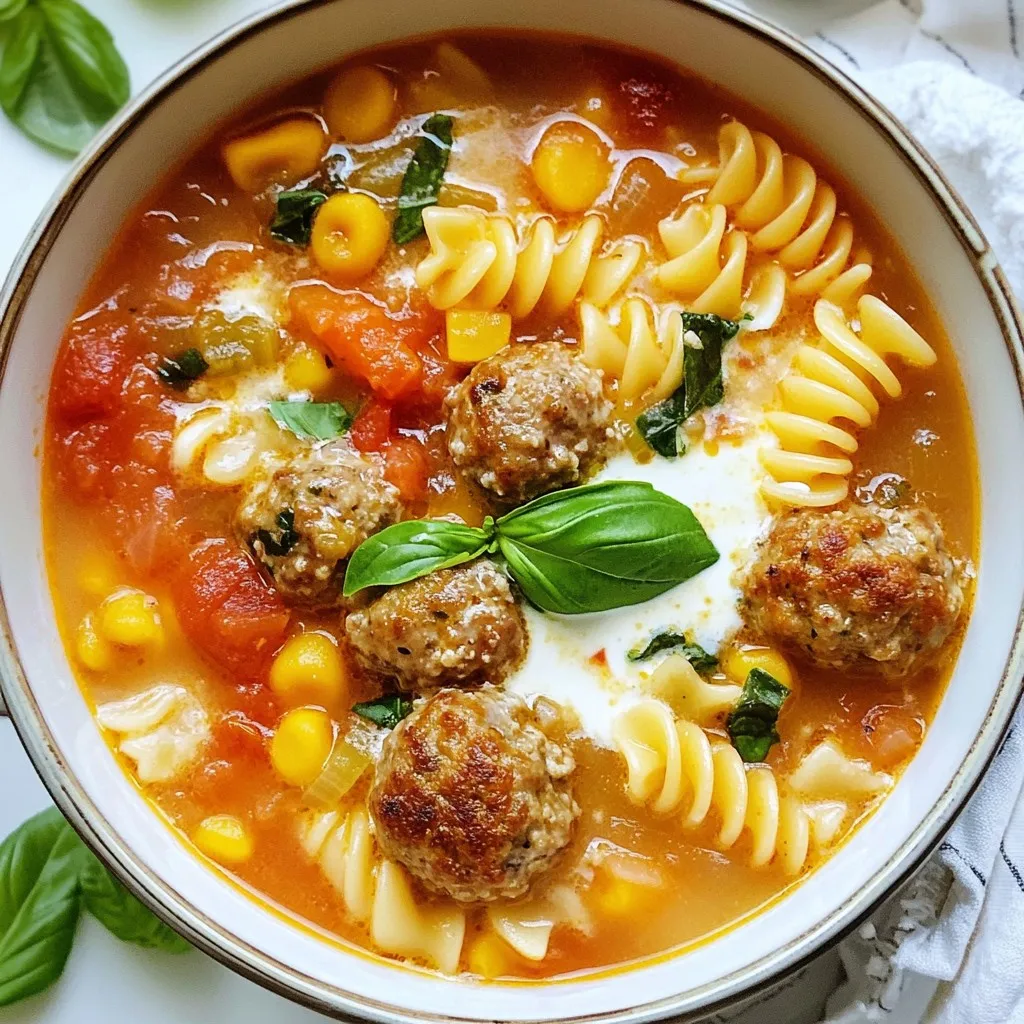
If you’re craving a warm, hearty meal, look no further than this Creamy Italian Meatball Soup! Packed with tender meatballs,

- 1 lb boneless chicken breast - 1 cup pineapple chunks - 1 bell pepper (red or yellow) - 1 medium onion - 1 cup sugar snap peas - 3 tablespoons soy sauce - 4 tablespoons apple cider vinegar - 1 tablespoon ketchup - 1 tablespoon honey - 1 tablespoon cornstarch - Olive oil - Salt and pepper - Sesame seeds When I make sweet and sour chicken, I always start with fresh, quality ingredients. The chicken breast is my main protein. It gives a nice texture. I chop it into bite-sized pieces. For sweetness, I use pineapple chunks. They can be fresh or canned, but I drain canned ones. Next, I pick a bell pepper. Red or yellow works best. They add color and sweetness. I also slice a medium onion. It adds flavor and aroma. For crunch, I add sugar snap peas. They keep their snap when cooked. Now, for the sauce, I mix soy sauce, apple cider vinegar, ketchup, honey, and cornstarch in a bowl. This blend creates the perfect tangy flavor. I make sure to whisk it well. I also keep olive oil handy for cooking. A pinch of salt and pepper brings out all the flavors. Finally, I top it all with sesame seeds for a nice finish. These ingredients are simple yet flavorful. They make sweet and sour chicken a hit at dinner! {{ingredient_image_2}} - In a medium bowl, whisk together: - 3 tablespoons soy sauce - 4 tablespoons apple cider vinegar - 1 tablespoon ketchup - 1 tablespoon honey - 1 tablespoon cornstarch - A pinch of salt and pepper This mix creates a tangy sauce. Set it aside for later. - Heat 2 tablespoons of olive oil in a large skillet over medium-high heat. - Once hot, add 1 pound of diced chicken breast. - Cook for about 5-7 minutes. Stir often until the chicken turns golden brown. - Add 1 sliced medium onion and 1 diced bell pepper to the skillet. - Cook for 3-4 minutes. Stir frequently until the veggies soften and smell great. - Now, add 1 cup of pineapple chunks and 1 cup of trimmed sugar snap peas. - Stir gently to combine. Cook for another 2 minutes. This helps the flavors mix. - Pour the sweet and sour sauce over the chicken and veggies. - Stir well to coat everything. Cook for an additional 2-3 minutes until the sauce thickens. - Plate the sweet and sour chicken over cooked jasmine rice. - Finish with a sprinkle of sesame seeds for a nice crunch and look. - Cook the chicken for 5-7 minutes. - Ensure it turns golden brown and is fully cooked. - Use a meat thermometer; it should reach 165°F (74°C). Cooking time matters. If cooked too long, the chicken can dry out. If undercooked, it can be unsafe to eat. Always cut a piece to check for doneness. The meat should be white, with no pink remaining. - Adjust the sweetness by adding more honey. - Balance acidity with apple cider vinegar. - Taste the sauce before adding it to the dish. Each ingredient plays a role in flavor. Sweetness from honey and tang from vinegar create a great balance. Taste as you go. You can add a bit of salt for depth or more honey for sweetness. - Serve the dish in a large bowl to show its colors. - Use lime wedges for a fresh touch. - Garnish with sesame seeds for crunch. Visual appeal matters. A colorful dish invites the eye. Garnishes like green onions add flair and flavor. Always think about how the food looks on the plate. Pro Tips Use Fresh Ingredients: Fresh chicken, vegetables, and pineapple will elevate the flavor of your dish, making it more vibrant and delicious. Adjust the Sweetness: Tailor the amount of honey in the sauce to your preference for sweetness; you can make it sweeter or tangier based on your taste. Thicken the Sauce: For a thicker sauce, let it simmer a bit longer after adding it to the skillet, stirring frequently to prevent sticking. Serving Suggestions: Serve this dish with lime wedges on the side for an extra zesty kick, and consider toping with sliced green onions for added freshness. {{image_4}} For a vegetarian sweet and sour dish, you can swap chicken for tofu or tempeh. Tofu absorbs flavors well and offers a nice texture. Tempeh adds a nutty taste, which many enjoy. When cooking, first press the tofu to remove excess water. Cut it into bite-sized pieces. Heat your skillet and add olive oil. Cook the tofu until golden brown, similar to how you would cook chicken. Then follow the same steps as in the original recipe. The sauce will still shine through and make the dish tasty. Different cultures have their own sweet and sour styles. Chinese sweet and sour chicken is popular, but many countries have their twist. In Thailand, you might find more tropical fruits, like mango. In Vietnam, they use fish sauce for depth. Each region can change the flavors using local ingredients. This can include different types of vinegar, like rice vinegar, or unique spices. Exploring these variations can make your dinner even more exciting! Using seasonal ingredients can make your sweet and sour dish fresh and vibrant. In summer, consider adding zucchini, bell peppers, or fresh corn. These vegetables add crunch and color. In fall, you might try using squash or apples for a twist. The sweetness from these fruits can enhance the dish's flavor. Always think about what is fresh in your area. Adjusting your recipe with seasonal produce can create a delightful meal every time! To keep your sweet and sour chicken fresh, use airtight containers. Glass or plastic containers work great. Store the leftovers in the fridge. They stay good for about three days. Reheat your sweet and sour chicken in the microwave or on the stove. If using the microwave, cover the dish to keep moisture in. On the stove, use low heat. Stir often to avoid burning. This keeps the chicken juicy and prevents sogginess. You can freeze sweet and sour chicken for later. Pack it in freezer-safe bags or containers. Make sure you remove as much air as possible. This helps prevent freezer burn. To defrost, place it in the fridge overnight. You can also use the microwave if you're in a hurry. Heat it gently to keep the flavors intact. You can serve this dish with tasty sides. Here are some great options: - Steamed Jasmine Rice: It soaks up the sauce well and is a classic choice. - Fried Rice: A flavorful twist that pairs nicely with the sweet and sour flavors. - Noodles: Try egg noodles or rice noodles for a fun texture. - Vegetable Stir-Fry: This adds color and nutrition to your meal. Yes, you can prep this dish ahead of time. Here are some tips: - Meal Prep: Cook the chicken and veggies, then store them separately. - Storing: Keep the chicken and sauce in an airtight container in the fridge. - Reheating: Warm it in a pan over low heat. Add a splash of water to keep it moist. You can easily make this gluten-free. Here’s how: - Substituting Soy Sauce: Use tamari instead of regular soy sauce. Tamari is gluten-free. - Other Options: Coconut aminos is another tasty, gluten-free substitute. If you want to add some heat, here are my suggestions: - Adding Spice Elements: Mix in red pepper flakes or chili paste into the sauce. - Recommendations for Heat Levels: Start with a small amount, then taste. Add more as needed. This recipe shows how to make sweet and sour chicken with ease. You start with fresh ingredients like chicken, pineapple, and veggies. The simple sauce ties it all together. Remember to cook the chicken well and adjust flavors to your liking. You can even switch to tofu for a vegetarian version. Enjoy this dish with your favorite sides. It's easy to store and reheat. I hope you feel inspired to try it out! Cooking should be fun and rewarding.

Sweet and Sour Chicken Tasty Recipe for Your Dinner

Craving a dish that balances sweet and tangy flavors? Sweet and sour chicken is the answer! This recipe features tender

- 4 boneless, skinless chicken thighs - 2 tablespoons olive oil - 1 medium onion, sliced - 3 cloves garlic, minced - 1 bell pepper (preferably red or yellow), chopped - 1 medium zucchini, diced - 1 cup cherry tomatoes, halved - 1 teaspoon dried oregano - 1 teaspoon smoked paprika - ½ teaspoon salt - ¼ teaspoon freshly ground black pepper - ½ cup Kalamata olives, pitted and halved - ¼ cup feta cheese, crumbled - Fresh parsley, roughly chopped (for garnish) - Lemon wedges (for serving) In this dish, I focus on fresh ingredients. The chicken thighs give a juicy flavor. The vegetables add color and nutrients. Cherry tomatoes burst with sweetness, while olives offer a salty touch. Feta cheese adds creaminess, making it a delightful mix. For garnish, I love using parsley. It brightens the dish and adds a fresh taste. The lemon wedges are for squeezing over the meal. This adds a zesty finish that brightens all the flavors. You can adjust the ingredients to your taste. Try adding more veggies or herbs to make it your own! {{ingredient_image_2}} 1. First, grab a large skillet. Add 2 tablespoons of olive oil and heat over medium until it shimmers. This is key for a good sear. 2. While the oil warms, season 4 boneless, skinless chicken thighs on both sides with salt, black pepper, dried oregano, and smoked paprika. Use about ½ teaspoon of salt and ¼ teaspoon of black pepper. 3. Carefully place the chicken in the hot skillet. Cook for 5-7 minutes on each side. The chicken should turn golden brown and be fully cooked. Check the internal temperature; it must reach 165°F for safety. 4. Once cooked, remove the chicken and set it aside on a plate. 5. In the same skillet, add 1 medium sliced onion and 3 minced garlic cloves. Sauté for 2-3 minutes, stirring often, until the onions become soft and glossy. 6. Next, add 1 chopped bell pepper and 1 diced zucchini. Cook for 5 minutes, stirring occasionally. This helps the veggies stay vibrant and tender. 7. Toss in 1 cup of halved cherry tomatoes and ½ cup of pitted Kalamata olives. Cook for another 3 minutes. The tomatoes will start to soften and release their juices. 8. Return the chicken thighs to the skillet. Nestle them among the veggies and heat for about 2 minutes. This allows all the flavors to blend. 9. Sprinkle ¼ cup of crumbled feta cheese over the skillet. Remove it from heat to keep the cheese from melting too much. 10. For a fresh touch, garnish with roughly chopped parsley and serve with lemon wedges. Squeeze fresh juice over the dish before enjoying. - Total cooking time is about 30 minutes. - Ensure chicken reaches an internal temperature of 165°F for safety. - Use a meat thermometer for best results. - The chicken should no longer be pink inside. - Juices should run clear when cut. To get a perfect sear on chicken, start with a hot skillet. Heat your olive oil until it shimmers. Next, season your chicken thighs well with salt, pepper, oregano, and smoked paprika. This adds flavor and helps form a nice crust. When placing the chicken in the skillet, do not overcrowd. Give each piece space to brown. Cook for 5-7 minutes on each side. Check that the internal temperature hits 165°F. This ensures juicy and safe chicken. For sautéing vegetables, chop them evenly. This way, they cook at the same rate. Start with onions and garlic in the hot oil to build flavor. Stir them frequently until soft and glossy. Then, add bell peppers and zucchini. Cook these for about 5 minutes. They should be tender but still colorful. Finally, toss in cherry tomatoes and olives. Cook for just a few minutes until the tomatoes soften. This helps release their sweet juices. To boost flavor, consider adding fresh herbs like basil or thyme. Fresh herbs bring brightness to your dish. You might also try a pinch of red pepper flakes for heat. A dash of lemon zest can add a nice zing, too. For marinating chicken, use olive oil, lemon juice, and herbs. Let it sit for at least 30 minutes before cooking. This helps the chicken absorb the flavors, making it even tastier. You can also add yogurt for a creamy touch. Just remember not to marinate too long, as the acid can change the meat's texture. Pro Tips Perfectly Cooked Chicken: Use a meat thermometer to ensure your chicken thighs reach an internal temperature of 165°F for safe and juicy results. Vegetable Freshness: For the best texture and flavor, use fresh vegetables. If you can, choose seasonal produce to enhance the dish's taste. Feta Cheese Tips: To prevent the feta from melting too much, add it at the end of cooking. This way, it stays crumbly and adds a lovely creaminess. Serving Suggestion: Serve the dish straight from the skillet for a rustic presentation. Garnish with extra parsley and lemon wedges for a pop of color. {{image_4}} You can switch chicken thighs for other meats. Chicken breasts work well too. If you want a plant-based option, use tofu. It absorbs flavors nicely. You can also change up the veggies. Try adding spinach or artichokes. Eggplant or mushrooms provide different textures. Feel free to mix and match to suit your taste. For gluten-free meals, this recipe is already safe. Just ensure all ingredients are gluten-free. You can also make it low-carb. Skip the feta cheese and use more veggies instead. If you want a vegan dish, swap chicken for chickpeas or lentils. They are protein-rich and filling. Use a vegan feta for added creaminess. These changes keep the meal tasty and satisfying. To keep your Mediterranean Chicken Skillet fresh, let it cool first. Then, place it in an airtight container. This will help keep flavors strong. You can refrigerate the dish for up to three days. If you want to store it longer, freeze it. Use freezer-safe containers or heavy-duty foil. This way, it can last for up to three months. When you're ready to enjoy your leftovers, reheating is key. I recommend using a skillet on low heat. This method helps maintain the texture of the chicken and veggies. You can add a splash of water or broth to prevent drying out. If you're short on time, a microwave works too. Heat in short bursts, stirring in between. This keeps everything warm and tasty. The oven is another great option. Preheat to 350°F and cover the skillet with foil. This traps moisture and keeps the meal delicious. Enjoy your tasty dish again! You can serve Mediterranean Chicken Skillet with many sides. I recommend: - Rice or quinoa for a hearty base. - A fresh green salad with lemon vinaigrette. - Crusty bread to soak up the juices. - Roasted vegetables for extra flavor. These sides add balance and make the meal feel complete. Yes, you can prepare this dish ahead. Here are some tips: - Cook the chicken and vegetables, then store them in the fridge. - Keep the feta cheese and parsley separate until serving. - Reheat in a skillet over low heat before serving. This way, you save time and enjoy a quick meal later. Cooking chicken on the skillet takes about 10-14 minutes. Here’s the breakdown: - Sear each side for 5-7 minutes until golden brown. - Check that the internal temperature reaches 165°F. This ensures your chicken is safe to eat and full of flavor. This blog post guided you through making a delicious Mediterranean Chicken Skillet. We covered the ingredients, preparation steps, and key tips for flavor and texture. I shared possible variations and dietary swaps, ensuring this dish suits everyone. Lastly, I explained how to store and reheat leftovers to keep them tasty. You now have all the tools to enjoy this easy and healthy meal. Happy cooking!

Mediterranean Chicken Skillet Tasty One-Pan Meal

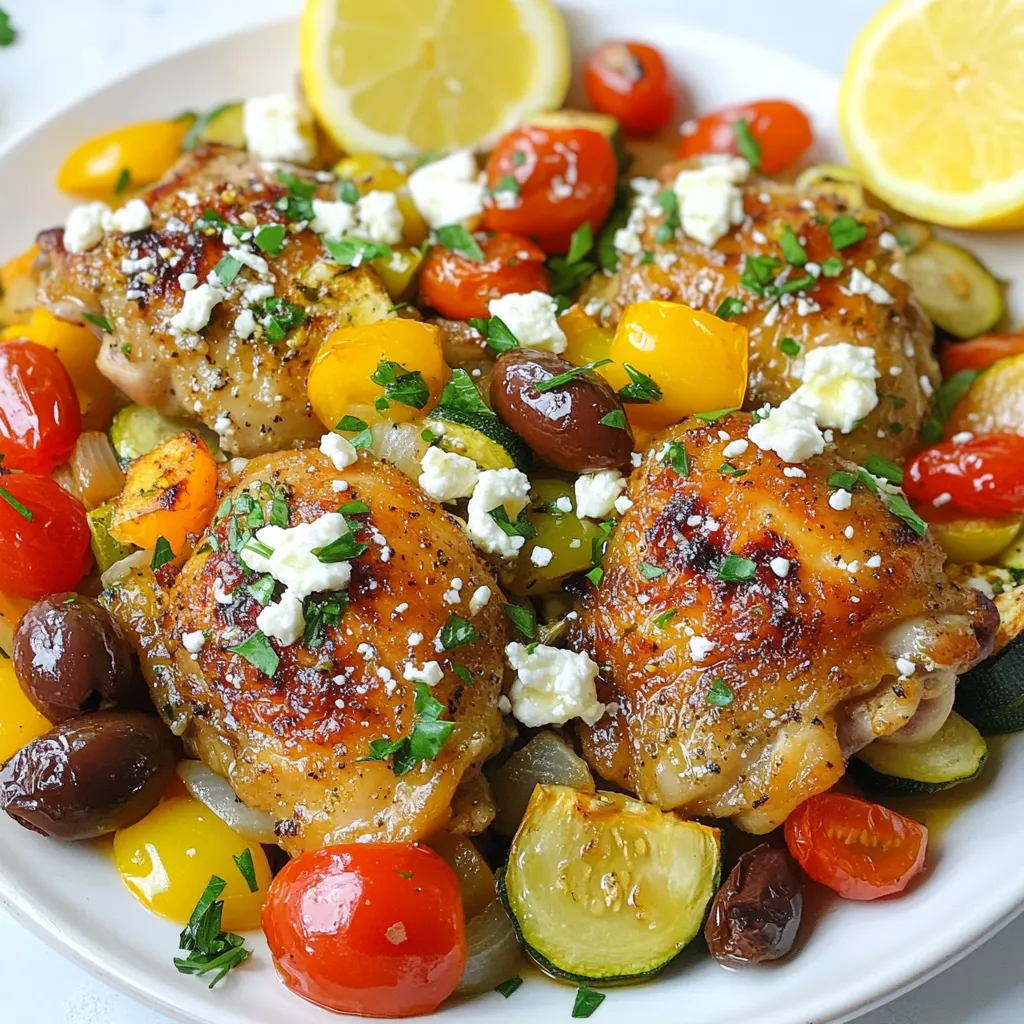
Are you ready to brighten up your dinner table? The Mediterranean Chicken Skillet is a one-pan meal packed with flavor,

For chicken street tacos, you need fresh and tasty items. Here’s what to gather: - 1 lb boneless, skinless chicken thighs - 8 small corn tortillas - 1 cup fresh cilantro, finely chopped - 1/2 cup red onion, diced - 1 lime, cut into wedges - 1 ripe avocado, sliced These ingredients create a great base for your tacos. The chicken thighs bring the right amount of juiciness and flavor. The corn tortillas add a nice texture. The right seasonings make your chicken sing. Here’s what you’ll need: - 2 tablespoons olive oil - 1 tablespoon chili powder - 1 teaspoon ground cumin - 1 teaspoon smoked paprika - 1/2 teaspoon garlic powder - 1/2 teaspoon onion powder - Salt and black pepper to taste Mix these ingredients for a zesty marinade. It gives the chicken a bold flavor. Marinating adds depth and makes every bite a delight. Toppings enhance the taste and look of your tacos. Consider these options: - Diced jalapeños for some heat - Extra chopped cilantro for freshness - Sliced radishes for crunch These toppings add color and flavor. Feel free to mix and match based on your taste. The key is to have fun and enjoy each bite! {{ingredient_image_2}} To start, grab a medium bowl. Add 2 tablespoons of olive oil. Next, mix in 1 tablespoon of chili powder. Then, add 1 teaspoon each of ground cumin and smoked paprika. Follow this with 1/2 teaspoon of garlic powder and 1/2 teaspoon of onion powder. Finally, sprinkle in salt and black pepper to taste. Stir the mixture well until it is fully combined. This is your tasty marinade. Take 1 pound of boneless, skinless chicken thighs. Place them in the bowl with the marinade. Make sure each piece gets a nice coat of that flavorful mix. Cover the bowl with plastic wrap. Let the chicken sit for at least 30 minutes at room temperature, or refrigerate it overnight for the best flavor. Now, heat your grill or a non-stick skillet over medium-high heat. Once it’s hot, take the chicken out of the marinade. Let any extra marinade drip off. Place the chicken on the grill or skillet. Cook it for about 6-7 minutes on each side. You want it to reach an internal temperature of 165°F (75°C). Once it’s cooked through, move the chicken to a cutting board and let it rest for about 5 minutes. While the chicken rests, warm up 8 small corn tortillas in a dry pan over medium heat. Heat them for about 30 seconds on each side until they are soft. Now, slice the cooked chicken into bite-sized pieces. Lay some chicken on each warm tortilla. Top it with a generous amount of chopped cilantro, diced red onion, and sliced avocado. If you like heat, sprinkle on some diced jalapeños. Squeeze fresh lime juice over the tacos just before serving for a burst of flavor. Enjoy! To get juicy chicken, use boneless thighs. They stay moist and tender. Marinade your chicken for at least 30 minutes. This adds deep flavor. Use a grill or a non-stick skillet for cooking. Heat it to medium-high. Cook the chicken for about 6-7 minutes on each side. Check the temperature; it should be 165°F (75°C). Let the chicken rest for 5 minutes after cooking. This keeps the juices inside and makes it even tastier. Warm tortillas make your tacos better. You can heat them in a dry pan. Cook each side for about 30 seconds. Watch for them to get warm and soft. You can also wrap them in foil and place them in the oven at 350°F for 10 minutes. This way, they get nice and warm without burning. Soft tortillas hold all the yummy fillings well. Add fresh lime juice just before serving. It gives a zesty kick. Try topping your tacos with diced jalapeños for heat. You can also add sliced radishes for crunch. If you want more flavor, drizzle some hot sauce on top. Fresh cilantro and red onion add brightness too. Don't forget, you can mix and match toppings. This way, everyone can make their taco just how they like it. Pro Tips Marinate Longer for Flavor: For an even deeper flavor, marinate the chicken overnight in the refrigerator. This allows the spices to penetrate the meat more thoroughly. Adjust Spice Levels: If you prefer your tacos with a bit more heat, add more chili powder or some diced jalapeños to the marinade for an extra kick. Warm Tortillas Properly: When heating the tortillas, wrap them in a clean kitchen towel after warming to keep them warm and pliable until serving. Garnish Creatively: Enhance the presentation of your tacos by adding colorful toppings like diced tomatoes, radishes, or crumbled queso fresco for a fresh twist. {{image_4}} You can use various cuts of chicken for street tacos. Chicken thighs are juicy and flavorful. They stay tender even when cooked longer. I love using thighs for this recipe. They soak up the marinade well. You can also use chicken breasts. They cook faster and have a milder taste. If you prefer a leaner option, chicken breasts are a good choice. Just be careful not to overcook them, or they can dry out quickly. The marinade for your chicken can change the flavor. You can switch spices based on your taste. For a smoky flavor, add more smoked paprika. If you like heat, try more chili powder or add cayenne pepper. For a fresh twist, mix in lime zest or fresh herbs like oregano. You can even try a sweet touch with some honey or brown sugar. Each change gives your tacos a new spin. If you want a vegetarian option, you can skip the chicken. Try using portobello mushrooms or jackfruit instead. Portobello mushrooms have a meaty texture and soak up flavors well. Marinate them the same way as chicken. Jackfruit has a unique texture and can mimic pulled chicken. Cook it until tender, then shred it for tacos. Add the same toppings for a fresh and tasty meal. Store leftover tacos in an airtight container. Keep them in the fridge for up to three days. If you have extra chicken, store it separately. This keeps the tortillas from getting soggy. To reheat, warm the chicken in a pan on low heat. This keeps it juicy. For tortillas, heat them in a dry pan for about 30 seconds on each side. This brings back their soft texture. Meal prepping makes weeknight dinners easier. Marinate the chicken and store it in the fridge for up to 24 hours. You can also chop the toppings ahead of time. Keep them in separate containers. This way, you can quickly assemble your tacos when you’re ready to eat. The best chicken cut for street tacos is boneless, skinless chicken thighs. Thighs stay juicy and tender after cooking. They also soak up flavors well from marinades. This makes them perfect for street tacos. Yes, you can make chicken street tacos ahead of time. You can marinate the chicken the night before. This gives it more flavor. Cooked chicken can be stored in the fridge for up to three days. Just reheat it before serving. The best toppings for chicken street tacos include: - Fresh cilantro, finely chopped - Diced red onion - Sliced avocado - Lime wedges - Diced jalapeños for heat These toppings add flavor and crunch to your tacos. Chicken street tacos can be mild or spicy, depending on your taste. The spice mainly comes from the optional jalapeños. If you want less heat, skip the jalapeños and use less chili powder. You can also add more lime juice to balance flavors. Yes, you can substitute corn tortillas with flour tortillas. Flour tortillas are softer and bigger. They can hold more filling. You can also use lettuce wraps for a low-carb option. Just choose what you like best! In this post, we covered how to make tasty chicken street tacos. We discussed key ingredients, step-by-step cooking, and tips for the best flavor. I shared different chicken cuts and how to store leftovers. You can add your twist with optional toppings and variations. Now, it's time for you to try these tacos at home. Enjoy the fun of making and sharing them!

Chicken Street Tacos Flavorful and Easy Recipe Guide

If you want a tasty and simple meal, look no further than chicken street tacos! In this guide, I’ll share

- 1 lb ground chicken - 1 small onion, finely chopped - 2 cloves garlic, minced - 1 red bell pepper, diced - 1/2 cup ketchup - 2 tablespoons Worcestershire sauce - 1 tablespoon apple cider vinegar - 2 teaspoons brown sugar - 1 teaspoon smoked paprika - 1/2 teaspoon cumin - Salt and freshly ground black pepper to taste - 4 hamburger buns Ground chicken is lean and cooks fast. It gives these Sloppy Joes a light taste. The onion and garlic add depth. The red bell pepper brings a sweet crunch. Ketchup is key for sweetness and tang. Worcestershire sauce adds umami. Apple cider vinegar gives it a nice zing. Brown sugar balances the flavors. Smoked paprika and cumin add warmth and depth. - Fresh cilantro leaves for garnish (optional) Cilantro adds a fresh touch and brightens the dish. You can also try adding sliced jalapeños for heat. Avocado slices give creaminess. Cheese can add richness too. - Large skillet - Wooden spoon - Mixing bowl - Whisk - Toaster or separate pan (for toasting buns) Having the right tools makes cooking easy. The skillet is where all the magic happens. A wooden spoon helps break up the chicken. A mixing bowl and whisk are great for the sauce. Toasting buns adds a nice crunch. {{ingredient_image_2}} To make these Ground Chicken Sloppy Joes, start by gathering your ingredients. You will need: - 1 lb ground chicken - 1 small onion, finely chopped - 2 cloves garlic, minced - 1 red bell pepper, diced - 1/2 cup ketchup - 2 tablespoons Worcestershire sauce - 1 tablespoon apple cider vinegar - 2 teaspoons brown sugar - 1 teaspoon smoked paprika - 1/2 teaspoon cumin - Salt and freshly ground black pepper to taste - 4 hamburger buns - Fresh cilantro leaves for garnish (optional) First, heat 1 tablespoon of olive oil in a large skillet over medium heat. Add the chopped onion and diced bell pepper. Sauté these for 3-4 minutes. Stir them often until they get tender and fragrant. Next, add the minced garlic and cook for another 1-2 minutes. You want the garlic to turn golden and smell amazing. Now, increase the heat to medium-high. Add the ground chicken to the skillet. Use a wooden spoon to break it apart. Cook it for about 5-6 minutes. Make sure the chicken is browned and no longer pink. While the chicken cooks, it’s time to make the sauce. In a mixing bowl, combine the ketchup, Worcestershire sauce, apple cider vinegar, brown sugar, smoked paprika, cumin, and a pinch of salt and pepper. Whisk these ingredients until they blend smoothly. Pour the sauce over the cooked chicken and vegetables in the skillet. Stir well to coat everything evenly. Let it simmer for about 5 minutes. This helps the sauce thicken and the flavors mix together nicely. To add a nice touch, toast your hamburger buns. You can do this in a separate pan or a toaster. Toast them until they turn golden brown. Once they are ready, slice the buns in half. Now, it’s time to assemble your Sloppy Joes. Spoon a generous amount of the zesty chicken mix onto the bottom half of each bun. If you like, sprinkle fresh cilantro leaves on top for extra flavor. Serve them right away, with the top half of the bun on the side. Enjoy your tasty meal! To make your Sloppy Joes pop, use the right seasonings. Smoked paprika adds depth. Cumin gives warmth. Brown sugar balances the tangy ketchup and vinegar. Always taste as you go. Adjust salt and pepper to your liking. If you want heat, add a pinch of cayenne. Fresh herbs, like cilantro, can brighten the dish. Cooking ground chicken can be tricky. Start with medium heat to avoid drying it out. Break the meat apart with a wooden spoon. Cook until it turns brown, about 5-6 minutes. If it seems dry, add a splash of water or broth. This helps keep the chicken juicy and tender. Stir often to ensure even cooking. A great meal looks as good as it tastes. Serve Sloppy Joes on toasted buns for a nice crunch. Use a colorful plate to make it pop. Garnish with fresh cilantro leaves for a vibrant touch. Pair them with sweet potato fries or a garden salad for color and texture. This makes your meal more inviting and fun. Pro Tips Chop Vegetables Uniformly: Ensuring your onion and bell pepper are chopped to a similar size helps them cook evenly and blend seamlessly into the filling. Customize the Heat: If you enjoy some spice, add diced jalapeños or a splash of hot sauce to the chicken mixture for an extra kick. Use Fresh Herbs: Fresh cilantro not only adds color but also enhances the flavor. Consider adding other herbs like parsley or green onions for variety. Let It Rest: After cooking, allow the mixture to sit for a few minutes before serving. This resting time lets the flavors meld together beautifully. {{image_4}} You can easily change some ingredients to fit your diet. If you need a leaner option, use turkey instead of ground chicken. For a gluten-free version, choose gluten-free buns. You can also swap the Worcestershire sauce with coconut aminos for a soy-free choice. If you want to cut back on sugar, use a sugar substitute or skip the brown sugar altogether. These small changes can keep the dish tasty while fitting your needs. If you love heat, add diced jalapeños or a dash of hot sauce to the mix. You can also sprinkle in some red pepper flakes while cooking. For a sweeter version, try adding a bit more brown sugar or a splash of maple syrup. Another option is to mix in some barbecue sauce for a tangy twist. These ideas will create a fun spin on the classic Sloppy Joe flavor. To make a vegetarian version, use lentils or black beans instead of chicken. Cook them with the same veggies and spices. For a vegan option, replace the Worcestershire sauce with a vegan version and use plant-based buns. You can also add mushrooms for a meaty texture. With these swaps, you can enjoy Sloppy Joes without meat, while keeping the flavor bold and tasty. After you enjoy your Ground Chicken Sloppy Joes, store any leftovers in an airtight container. Make sure to let the mixture cool down first. This helps keep it fresh. Place the container in the fridge. Your Sloppy Joes will stay good for about 3-4 days. When you're ready to eat again, simply reheat the chicken mixture. You can use the stovetop or microwave. If using the stovetop, add a splash of water to help it heat evenly. Stir it often until it's hot. If you use the microwave, heat in short bursts, stirring in between. This prevents hot spots and keeps it tasty. Freezing is a great option if you want to keep your Sloppy Joes longer. Allow the mixture to cool completely, then transfer it to a freezer-safe bag or container. Press out any air before sealing. Your Sloppy Joes can last up to 3 months in the freezer. When you're ready to eat, thaw it overnight in the fridge. Reheat as mentioned above, and enjoy a quick meal later! You can serve these Sloppy Joes with easy sides. I like crispy sweet potato fries. They add a nice crunch. A fresh garden salad is also great. The cool veggies balance the warm sandwich. You might try coleslaw for extra texture and flavor. Baked beans are a classic choice too. They pair well with the savory chicken mix. The chicken is done when it turns white and no longer pink. Use a meat thermometer for best results. The internal temperature should reach 165°F (75°C). When you break apart the meat, the juices should run clear. This means the chicken is safe to eat. Always check in the thickest part of the meat for accuracy. Yes, you can make Sloppy Joes ahead of time. Cook the chicken mixture and let it cool. Then, store it in an airtight container. It lasts in the fridge for up to three days. When ready to eat, reheat it on the stove or in the microwave. This makes dinner quick and easy on busy nights. In this post, I covered the essentials of making Ground Chicken Sloppy Joes. You learned about key ingredients, kitchen tools, and step-by-step cooking. I shared tips to enhance flavors and suggested delicious variations. Storing leftovers and answering common questions helped wrap it all up. Ground chicken Sloppy Joes are tasty, easy, and fun to make. Enjoy creating your own twist on this classic dish!

Ground Chicken Sloppy Joes Flavorful and Fast Meal

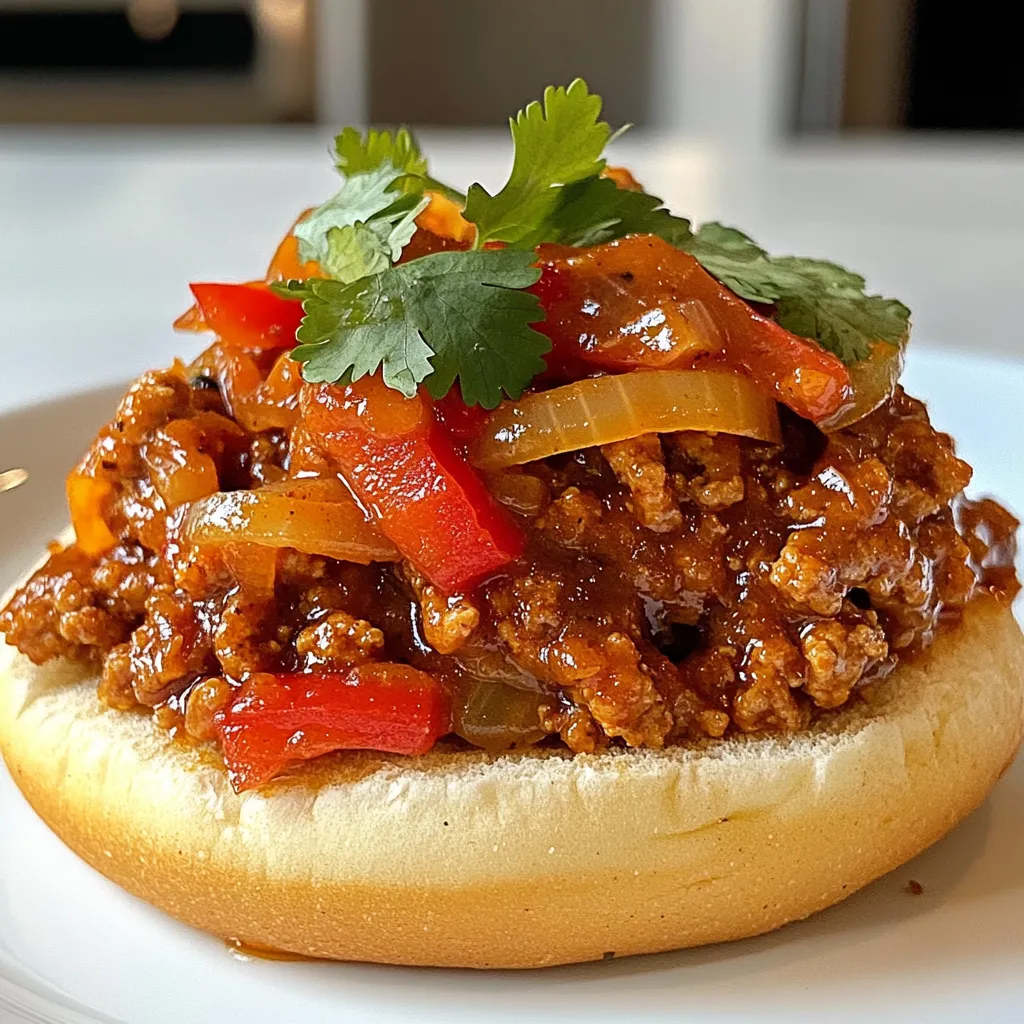
Are you ready to whip up a quick and tasty meal? Ground Chicken Sloppy Joes are the answer! They’re packed

Older posts
Newer posts
← Previous Page1 … Page118 Page119 Page120 Next →

dsad

© 2026 yumymoments • Built with GeneratePress

Our Policies

  • Copyright Policy
  • Cookie Policy
  • GDPR Policy
  • Privacy Policy
  • Disclaimer
  • Terms Of Use

More Information

  • Home
  • About
  • Contact
  • Appetizers
  • Dessert
  • Dinner
  • Drinks
©2026, yumymoments About Back To Top