Skip to content
DisclaimerTerms Of UseGDPR PolicyCookie Policy

yumymoments

  • Home
  • Drinks
  • Appetizers
  • Dinner
  • Dessert
  • About
  • Contact
  • Privacy Policy
DisclaimerTerms Of UseGDPR PolicyCookie Policy

Samantha

- 4 boneless, skinless chicken breasts - 1 cup panko breadcrumbs - 1 cup grated Parmesan cheese - 2 teaspoons garlic powder - 1 teaspoon paprika - 1 teaspoon dried Italian herbs (oregano, basil, thyme blend) - Salt and pepper to taste - 2 large eggs, beaten - ¼ cup all-purpose flour - ½ cup olive oil (for frying) To make the chicken crispy and flavorful, you need panko breadcrumbs and Parmesan cheese. The garlic powder and herbs add depth. - 6 cloves garlic, minced - 1 tablespoon unsalted butter - 1 teaspoon crushed red pepper flakes (optional, for heat) - ½ cup chicken broth - 2 tablespoons fresh parsley, chopped (for garnish) The garlic sauce is rich and savory. Fresh garlic gives it a strong flavor. The butter adds richness, while the chicken broth adds depth. - Large skillet - Baking sheet - Parchment paper - Three shallow bowls for dredging - Small saucepan Using the right tools helps make the cooking process smooth. A large skillet ensures even cooking, while parchment paper makes cleanup easy. {{ingredient_image_2}} Start by preheating your oven to 400°F (200°C). This helps the chicken cook evenly. Line a baking sheet with parchment paper for easy cleanup. In a shallow bowl, mix the panko breadcrumbs, grated Parmesan cheese, garlic powder, paprika, dried Italian herbs, salt, and pepper. Stir well to blend all the flavors. Next, set up your dredging station. You need three shallow bowls: one for the beaten eggs, one for the flour, and one for the breadcrumb mix. Take a chicken breast, dip it in the flour first. Shake off any extra flour. Then, dip it into the beaten eggs, letting any excess drip off. Finally, coat it in the panko-Parmesan mix. Press down gently to make sure it sticks well. Repeat this for all the chicken breasts. In a large skillet, heat the olive oil over medium heat. You want the oil hot, but not smoking. Carefully place your coated chicken breasts in the hot oil. Cook each piece for about 3-4 minutes on one side. Flip and cook for another 3-4 minutes, until they turn golden brown. If your skillet is small, cook the chicken in batches. This helps them crisp up nicely. Once browned, transfer the chicken to your prepared baking sheet. Bake the chicken in the oven for 15-20 minutes. Use a meat thermometer to check the inside. It should reach 165°F (75°C) for safe eating. While the chicken bakes, let’s make the garlic sauce. In a small saucepan, melt the unsalted butter over medium heat. Add the minced garlic and sauté for 1-2 minutes. Watch closely so it doesn’t burn. When the garlic smells good and looks golden, pour in the chicken broth. Let it simmer gently for 3-5 minutes. If you like it spicy, stir in crushed red pepper flakes now. Once the chicken is done baking, drizzle the garlic sauce over the top. This adds a rich flavor and makes the dish shine. Finish with fresh parsley for a pop of color. Enjoy your Crispy Parmesan Chicken with Garlic Sauce! To get that perfect crispy texture, follow these steps: - Use panko breadcrumbs. They are lighter and crispier than regular breadcrumbs. - Make sure to press the breadcrumb mixture firmly onto the chicken. This helps it stick better. - Fry in hot oil. Heat the olive oil until it shimmers before adding the chicken. - Avoid overcrowding the skillet. This keeps the oil hot and helps the chicken fry evenly. Cooking at the right temperatures is key for crispy chicken: - Start by frying the chicken on medium heat. This browns the outside without burning it. - After frying, bake the chicken at 400°F (200°C). This ensures it cooks through while keeping it crispy. - Always check the oil temperature. It should be around 350°F (175°C) for frying. Checking if your chicken is done is easy and important: - Use a meat thermometer. The internal temperature should reach 165°F (75°C). - If you don't have a thermometer, cut into the thickest part of the chicken. The juices should run clear, not pink. - Let the chicken rest for a few minutes after baking. This keeps it juicy and flavorful. Pro Tips Use Fresh Ingredients: Always opt for fresh garlic and high-quality chicken for the best flavor and texture in your dish. Double-Dip for Extra Crunch: For an even crispier crust, consider double-dipping the chicken in the egg and breadcrumb mixture. Let It Rest: After frying, let the chicken rest for a few minutes before serving to allow the juices to redistribute. Adjust Spice Level: Modify the amount of crushed red pepper flakes in the garlic sauce based on your preference for heat. {{image_4}} You can switch up the breading for your chicken. Instead of panko, try crushed cornflakes for a crunchier bite. You could also use regular breadcrumbs if that’s what you have on hand. For a nutty flavor, coat the chicken with finely ground almonds or walnuts. Each option gives the chicken a unique taste and texture. You can make the garlic sauce even more special. Add lemon juice for brightness and a fresh taste. For a richer flavor, try adding cream to the sauce. You can also mix in fresh herbs like thyme or rosemary for extra aroma. If you love spicy food, add more red pepper flakes or a dash of hot sauce. Don’t worry if you don’t have chicken breasts. You can use chicken thighs, which stay juicy and full of flavor. If you want a lighter option, try using turkey cutlets. For a vegetarian twist, use thick slices of eggplant or zucchini. Just adjust the cooking time as needed for different proteins or veggies. To keep your crispy Parmesan chicken fresh, let it cool down first. Place the chicken in an airtight container. Store it in the fridge for up to three days. If you want to enjoy it later, keep the garlic sauce separate. This helps to keep the chicken crispy. When you're ready to eat the leftovers, preheat your oven to 350°F (175°C). Place the chicken on a baking sheet lined with foil. Heat it for about 10-15 minutes. This method keeps the chicken crispy. You can also reheat the garlic sauce in a small pot over low heat. Stir frequently to prevent burning. To freeze the chicken, wrap each piece well in plastic wrap. Then, place them in a freezer bag. You can freeze it for up to three months. When you're ready to eat, thaw it in the fridge overnight. Reheat as mentioned above for the best results. Yes, you can make this recipe gluten-free. Use gluten-free panko breadcrumbs instead of regular ones. You can also swap all-purpose flour for a gluten-free flour blend. This way, you keep the crispy texture without gluten. Make sure to check all labels for hidden gluten in other ingredients. Crispy Parmesan Chicken pairs well with many sides. Here are some ideas: - Roasted vegetables like carrots or broccoli - A fresh green salad with lemon vinaigrette - Garlic mashed potatoes for a creamy contrast - Quinoa or rice for a hearty option These sides will make your meal more complete and tasty. To adjust the spice level, you can add or reduce crushed red pepper flakes. Start with a small amount if you want mild heat. If you like it spicy, add more to taste. You can also add a pinch of black pepper for an extra kick. Just remember to taste as you go! This blog post covered how to make crispy Parmesan chicken with a tasty garlic sauce. We explored main ingredients, step-by-step instructions, and key tips for success. I also shared variations, storage info, and answers to common questions. Enjoy your cooking! With these tips, you can create a delicious meal that impresses everyone. Dive in and enjoy the flavors you create!

Crispy Parmesan Chicken with Garlic Sauce Delight

Are you ready to whip up a delicious dish that will impress everyone? My Crispy Parmesan Chicken with Garlic Sauce

To make a delicious tender crockpot beef stew, you need some simple ingredients. Here’s what you will need: - 2 pounds beef chuck, cut into 1-inch cubes - 4 medium carrots, sliced into rounds - 3 large potatoes, peeled and cut into 1-inch cubes - 1 large onion, finely diced - 3 cloves garlic, minced - 4 cups beef broth, preferably low-sodium - 2 tablespoons tomato paste - 2 teaspoons Worcestershire sauce - 1 teaspoon dried thyme - 1 teaspoon dried parsley - Salt and freshly ground black pepper to taste - 2 tablespoons olive oil - 1 bay leaf Each ingredient plays a role in building flavor and texture. The beef chuck is key; it becomes tender and juicy after slow cooking. The carrots and potatoes add sweetness and heartiness. Onion and garlic enhance the stew's aroma and depth. Beef broth is the base of your stew, giving it richness. Tomato paste adds a nice touch of acidity, while Worcestershire sauce gives it a complex flavor. Thyme and parsley provide earthy notes. Don’t forget to season with salt and pepper! This dish is all about balance. Using quality ingredients makes a big difference in taste. So, gather these items, and you’re ready to create a comforting and hearty meal. {{ingredient_image_2}} To start, we need to sear the beef. Searing adds great flavor. Use 2 pounds of beef chuck. Cut it into 1-inch cubes. Season the beef well with salt and black pepper. In a large skillet, heat 2 tablespoons of olive oil over medium-high heat. When the oil shines, add the beef in batches. Brown each side for about 5 minutes. Remove the beef and set it aside. Next, we will sauté the onions and garlic. In the same skillet, add 1 large diced onion and 3 minced garlic cloves. Cook for around 3 minutes. The onion should look soft and clear. Now, it's time to combine everything in the crockpot. Add the seared beef, carrots, potatoes, beef broth, tomato paste, Worcestershire sauce, dried thyme, dried parsley, and 1 bay leaf. Mix well. Now, let's talk about cooking time. You can choose between two settings. For a low and slow cook, set the crockpot to low for 8 hours. If you're in a hurry, use the high setting for 4 hours. To check for tenderness, poke the beef with a fork. It should break apart easily. About 30 minutes before serving, taste the stew. Adjust the salt and pepper as needed. For a thicker stew, mix 2 tablespoons of cornstarch with 2 tablespoons of cold water. Stir it in and cook for another 30 minutes. Enjoy your hearty meal! To get tender beef, marinate it in a mix of spices and olive oil. This adds flavor and helps break down the meat. Let it sit for at least an hour, or overnight if you can. Searing is also key. Sear the beef in hot oil for a few minutes. This browns the meat and locks in juices. It gives you a rich flavor that makes your stew shine. Herbs and spices can take your stew from good to great. Adding dried thyme and parsley gives your stew depth. You can also try adding bay leaves for a fragrant touch. For broth, use low-sodium beef broth. It brings out the beef flavor without overwhelming it. You can also mix in some red wine for added richness. If you like a thicker stew, use a cornstarch slurry. Mix equal parts cornstarch and cold water in a bowl. Stir it into the stew about 30 minutes before serving. This will help it thicken nicely. If you don't have cornstarch, you can use mashed potatoes or flour as alternatives. Just make sure to mix them in well to avoid clumps. Pro Tips Choose the Right Cut: Using beef chuck is ideal for stews as it becomes tender and flavorful during the long cooking process. Layer Flavors: Searing the beef and sautéing the onions and garlic enhances the overall flavor of the stew, so don’t skip these steps! Customize Your Veggies: Feel free to add other vegetables like peas, green beans, or parsnips based on your preference for added texture and flavor. Make It Ahead: This stew tastes even better the next day! Consider making it a day in advance and reheating it for a richer flavor. {{image_4}} You can switch up your veggies in this stew. Not a fan of carrots? Try parsnips or sweet potatoes instead. You can even add green beans or peas for some color. When seasons change, use what’s fresh. In spring, toss in asparagus or snap peas. In the fall, butternut squash adds a nice touch. Beef chuck is great, but other cuts work too. Use brisket for a richer taste, or flank steak for a leaner option. Not into beef? Go for pork shoulder or chicken thighs. Both will cook nicely and soak up those savory flavors. Want to make the stew gluten-free? Use gluten-free broth and check your Worcestershire sauce for gluten. If you need a low-sodium option, choose low-sodium broth and cut back on added salt. This way, you can enjoy the stew without worry. To store leftover stew, let it cool first. Place it in airtight containers. Glass or BPA-free plastic containers work well. Label each container with the date. This way, you keep track of how long it stays fresh. To freeze your stew, use freezer-safe containers or heavy-duty freezer bags. Leave some space at the top for expansion. Seal tightly to avoid air. For thawing, move the stew to the fridge overnight. Reheat in a pot or microwave until hot. Stir occasionally for even heating. In the fridge, beef stew lasts about 3 to 4 days. If you freeze it, it can last up to 3 months. Check for spoilage signs like off-smells or mold. If it looks strange or smells bad, don't eat it. Always trust your senses! Beef typically takes about 8 hours on low or 4 hours on high to become tender. The slow cooking allows the flavors to blend and the meat to break down. This method is key for a rich and hearty stew. You want the beef to be fork-tender. Yes, you can skip searing the beef. However, searing adds depth of flavor and a nice color. If you choose not to sear, just add the beef directly to the crockpot with the other ingredients. The stew will still taste good, but it may lack some of the rich flavor that comes from the browning. You can use vegetable broth or chicken broth as a substitute. If you want a richer taste, mix water with bouillon cubes. This will give you a similar flavor. Just remember to adjust the salt, as some broths are saltier than others. Yes, you can prepare the night before. Chop the vegetables and beef, and store them in the fridge. This makes morning cooking easier. Just remember to keep everything in airtight containers to stay fresh. - Tips for prepping in advance: - Cut vegetables into even pieces to ensure they cook evenly. - Season the beef ahead of time for better flavor. - Store all ingredients together in your crockpot insert if it fits in the fridge. This makes for a quick setup in the morning. You now have a complete guide to making a delicious beef stew. You learned about the key ingredients, step-by-step cooking methods, and ways to enhance flavor. We talked about variations and how to store leftovers too. With these tips, your stew can be a warm, hearty meal every time. Enjoy trying new ingredients and techniques. Your kitchen will be the best place for comfort food! Happy cooking!

Tender Crockpot Beef Stew Hearty and Flavorful Meal

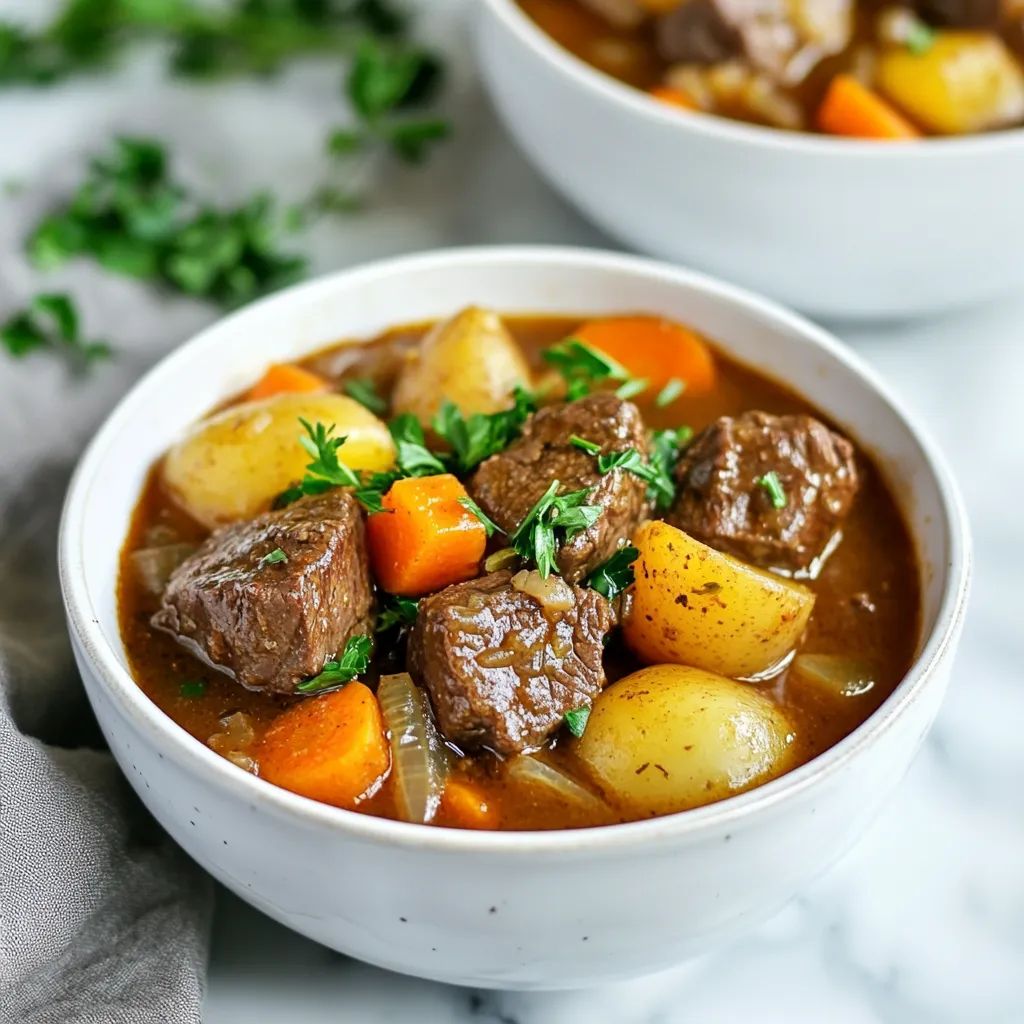
Are you ready to make a cozy dish that warms your heart? My Tender Crockpot Beef Stew is packed with

To create a tasty Creamy Chicken Enchilada Soup, you will need the following ingredients: - 1 lb boneless, skinless chicken breasts - 1 medium onion, finely diced - 3 cloves garlic, minced - 1 red bell pepper, finely diced - 1 green bell pepper, finely diced - 1 can (10 oz) diced tomatoes with green chiles - 4 cups chicken broth (low sodium recommended) - 1 can (15 oz) black beans, rinsed and drained - 1 cup corn (frozen or canned) - 1 cup heavy cream - 2 cups shredded cheddar cheese (plus extra for topping, if desired) - 2 teaspoons ground cumin - 1 teaspoon chili powder - Salt and pepper, to taste - Fresh cilantro, roughly chopped, for garnish - Lime wedges, for serving For the best flavor, I suggest using specific brands: - Chicken Broth: Look for low-sodium options like Swanson or Kitchen Basics. - Diced Tomatoes: Hunt's or Ro-Tel offer great taste with green chiles. - Cheese: Use sharp cheddar from Tillamook or Cabot for a rich flavor. You can easily swap ingredients to fit your needs: - Chicken: Use turkey or cooked rotisserie chicken instead. - Black Beans: Try pinto beans or kidney beans if you prefer. - Heavy Cream: Substitute with half-and-half or coconut cream for a lighter soup. - Cheese: For a twist, use Monterey Jack or pepper jack for added spice. {{ingredient_image_2}} To make this creamy chicken enchilada soup, gather your ingredients first. You will need chicken, veggies, and spices. Make sure you have everything ready before you start cooking. This helps keep the process smooth and fun. 1. Combine Ingredients: In a large pot, add the chicken, diced onion, minced garlic, and both bell peppers. Mix in the canned tomatoes and chicken broth. Season with cumin, chili powder, salt, and pepper. 2. Heat the Pot: Set the pot on medium-high heat. Bring the mix to a boil. Once it boils, lower the heat to simmer. Cover the pot and let it cook for about 20 minutes. You want the chicken to be fully cooked. 3. Shred Chicken: After 20 minutes, take the chicken out and place it on a cutting board. Use two forks to shred it into small pieces. Return the shredded chicken to the pot. 4. Add Remaining Ingredients: Stir in the black beans, corn, and heavy cream. Mix well. Bring the soup back to a gentle simmer. 5. Melt the Cheese: Gradually add the shredded cheddar cheese. Stir non-stop until the cheese melts and the soup becomes creamy. Taste it and add more salt and pepper if needed. 6. Final Simmer: Let the soup simmer for another 5-10 minutes. This helps the flavors mix well. 7. Serve: Ladle the soup into bowls. Top with extra cheddar cheese and fresh cilantro. Serve with lime wedges for a zesty touch. Shredding chicken can be quick and easy. After cooking, let the chicken cool for a minute. Use two forks and pull the chicken apart. Hold one fork steady and use the other to shred. This method is fast and gives you nice, bite-sized pieces. If you have a stand mixer, you can also use it. Just place the chicken in the bowl and mix on low speed. It will shred in seconds! To make the best creamy chicken enchilada soup, you want to start with good techniques. Use a heavy pot for even heat. This helps avoid burning. When you cook the chicken, let it simmer gently. This keeps the meat tender and juicy. Shredding the chicken after cooking makes it easy to blend back into the soup. If you like your soup spicy, add more chili powder. You can also use diced jalapeños or hot sauce. For a milder flavor, use less chili powder. You can also skip the diced tomatoes with green chiles. These small changes help you control the heat. Always taste as you go, so you find the right balance. To kick up the flavor, try adding a splash of lime juice. It brightens the soup and gives it a fresh taste. A dash of smoked paprika adds a nice depth. Fresh cilantro is also a great addition. It gives a burst of freshness. You can even mix in some avocado or tortilla strips for extra texture. Pro Tips Use Rotisserie Chicken: For a quicker option, swap the raw chicken for shredded rotisserie chicken. Just add it in during the last few minutes of simmering to warm through. Adjust the Spice Level: If you prefer a milder soup, use regular diced tomatoes instead of those with green chiles. You can also omit the chili powder or use a milder variety. Make It Ahead: This soup stores well in the refrigerator for up to three days. Reheat gently on the stove, adding a splash of chicken broth if it thickens too much. Garnish Creatively: Enhance the presentation with avocado slices, crumbled tortilla chips, or a dollop of sour cream for added flavor and texture. {{image_4}} You can easily make this soup vegetarian or vegan. For a vegetarian option, use vegetable broth instead of chicken broth. Swap the chicken with hearty vegetables like zucchini, mushrooms, or even chickpeas. If you want a vegan version, replace the heavy cream with coconut milk or cashew cream. Both options give the soup a creamy texture. Use nutritional yeast to add a cheesy flavor without dairy. Feel free to get creative with mix-ins. You can toss in some spinach or kale for a healthy touch. Adding avocado gives a nice, creamy bite. If you like spice, try adding jalapeños or hot sauce. For a touch of sweetness, mix in diced sweet potatoes. These additions not only enhance flavor but also boost the nutrition of your soup. Cheese is key to a rich, creamy soup. While cheddar is great, you can try different types. Monterey Jack brings a mild taste and melts beautifully. Pepper Jack adds a kick with its spices. For a gourmet twist, use crumbled queso fresco or fresh mozzarella. Each cheese offers a unique flavor, making your soup special every time. To keep your soup fresh, let it cool first. Then, pour it into an airtight container. Make sure to leave some space at the top, as the soup may expand when frozen. Store it in the fridge for up to 3 days. If you plan to eat it later, freezing is a great option. To freeze the soup, use freezer-safe containers or bags. Divide it into smaller portions. This way, you can thaw just what you need later. Label each container with the date, so you won’t forget when you made it. The soup can stay frozen for up to 3 months. When ready to eat, simply thaw it in the fridge overnight. When reheating, use a pot on the stove over low heat. Stir it often to avoid sticking. If the soup seems thick, add a splash of chicken broth or water to get the right texture. You can also microwave it in a bowl. Heat in short bursts and stir between each one to ensure even warming. Enjoy your creamy chicken enchilada soup just like it was fresh! Yes, you can make this soup in a slow cooker. To do this, combine the chicken, onion, garlic, red bell pepper, green bell pepper, diced tomatoes, and broth in the slow cooker. Season it with cumin, chili powder, salt, and pepper. Cook on low for 6-8 hours or high for 3-4 hours. Once the chicken is cooked, shred it and add the black beans, corn, heavy cream, and cheese. Let it cook for another 30 minutes. This method gives the soup a great flavor. To make this soup gluten-free, check your canned ingredients. Many canned tomatoes and beans are gluten-free, but always read the labels. Use gluten-free chicken broth. The rest of the ingredients, like chicken, vegetables, and cheese, are naturally gluten-free. This way, you can enjoy the soup without worry. This soup pairs well with many sides. Here are some ideas: - Tortilla chips for crunch. - Fresh lime wedges for extra zest. - A side salad for freshness. - Cornbread for a hearty touch. These sides enhance the meal and make it more enjoyable. This article explored how to make a delicious Creamy Chicken Enchilada Soup. We looked at key ingredients, clever replacements, and cooking steps. I shared tips for the best flavor and techniques for every cook. You learned about fun variations, storage, and reheating. Remember, cooking should be fun and easy. With practice, you can master this soup. Don't hesitate to try new flavors or tweak the recipe. Trust your taste buds and enjoy your meals!

Creamy Chicken Enchilada Soup Delicious and Easy Recipe

Are you ready for a meal that warms your soul? Creamy Chicken Enchilada Soup is simple to make and packed

Newer posts
← Previous Page1 … Page119 Page120

dsad

© 2026 yumymoments • Built with GeneratePress

Our Policies

  • Copyright Policy
  • Cookie Policy
  • GDPR Policy
  • Privacy Policy
  • Disclaimer
  • Terms Of Use

More Information

  • Home
  • About
  • Contact
  • Appetizers
  • Dessert
  • Dinner
  • Drinks
©2026, yumymoments About Back To Top