Skip to content
DisclaimerTerms Of UseGDPR PolicyCookie Policy

yumymoments

  • Home
  • Drinks
  • Appetizers
  • Dinner
  • Dessert
  • About
  • Contact
  • Privacy Policy
DisclaimerTerms Of UseGDPR PolicyCookie Policy

Samantha

To make No-Bake Peanut Butter Oatmeal Bars, you need simple ingredients. Here’s what you will use: - 2 cups rolled oats - 1 cup natural creamy peanut butter - 1/3 cup honey or maple syrup - 1/2 cup chocolate chips (dark or semi-sweet) - 1/4 cup ground flaxseed (optional) - 1/2 teaspoon vanilla extract - Pinch of salt These ingredients create a sweet and nutty treat. The oats give you fiber, while peanut butter adds protein. Honey or maple syrup sweetens the bars and keeps them moist. Chocolate chips make every bite fun! If you want extra nutrition, use the ground flaxseed. It adds omega-3 fatty acids and fiber without changing the flavor much. Make sure to use natural peanut butter. This type has no added sugar or oils, making the bars healthier. The vanilla extract adds a nice touch, while the salt brings out all the flavors. Each ingredient plays an important role in making this easy and tasty treat. {{ingredient_image_2}} - Combine 2 cups of rolled oats, 1/4 cup of ground flaxseed, and a pinch of salt in a large bowl. - Stir well with a spoon or spatula until everything is well mixed. - In a small saucepan, heat 1 cup of natural creamy peanut butter and 1/3 cup of honey over low heat. - Stir until the mixture is smooth. Then, add 1/2 teaspoon of vanilla extract and mix well. - Pour the warm peanut butter mixture over the oat base. - Mix thoroughly with a spatula, coating all the oats. Then, gently fold in 1/2 cup of chocolate chips. - Prepare an 8x8-inch baking dish by lining it with parchment paper. - Press the mixture firmly into the dish with your hands or a spatula. - Refrigerate for 2 hours to set. Once firm, lift the bars out and cut into 12 equal pieces. To make your bars hold together well, you must compact the mixture tightly. When you press it down in the baking dish, use your hands or a spatula to ensure it's even and firm. This step keeps the bars from falling apart when you cut them. After they set, store them in an airtight container. This keeps them fresh and chewy for a week. For a fun twist, drizzle melted chocolate over the bars before serving. This adds a rich touch that everyone loves. You can also sprinkle extra oats or crushed nuts on top. This not only makes them look nicer but also adds a crunchy texture. If you want a different sweetener, try using maple syrup instead of honey. This option is great for a vegan version. For those with nut allergies, use sunflower seed butter instead of peanut butter. It gives a similar taste and texture without the nuts. Pro Tips Chill for Better Texture: Allow the bars to chill in the refrigerator for at least two hours. This helps them set properly, resulting in a firmer, more enjoyable texture. Nut Butter Variations: Experiment with different nut butters such as almond or cashew for a unique flavor twist. Just ensure they are creamy for the best consistency. Add More Nutrition: Incorporate seeds like chia or sunflower seeds along with the flaxseed for added crunch and a boost in nutrients. Customize Your Sweetness: Adjust the amount of honey or maple syrup to suit your taste. You can also use a sugar substitute if you're looking for a lower-calorie option. {{image_4}} You can change up your bars by adding nuts. Try almonds or walnuts for a crunchy bite. Mix in different nut butters too. A blend of peanut and almond butter tastes great together. This adds flavor and texture while giving you more nutrition. Dried fruits make a tasty addition. You can use raisins, cranberries, or coconut flakes. A half cup of dried fruit works well. Mix and match to find your favorite combo. This adds sweetness and a fun chewiness to each bite. Want a protein boost? Add a scoop of protein powder to the mix. This helps make the bars more filling. You can also replace some oats with seeds like chia or hemp. These seeds pack a punch of protein and healthy fats. To keep your no-bake peanut butter oatmeal bars fresh, use an airtight container. Glass or plastic containers work well. Make sure the bars cool completely before sealing them up. Store the bars in the fridge. This keeps them chewy and tasty. These bars last about one week in the fridge. For long-term storage, you can freeze them. Wrap each bar tightly in plastic wrap, then place them in a freezer bag. They can stay fresh for up to three months in the freezer. Just thaw them in the fridge before eating. Check for any off smells or changes in color. If the bars feel dry or crumbly, they may have gone bad. When in doubt, it's best to toss them. Always follow safe food practices and enjoy your treats fresh! Yes, you can easily make these bars vegan. Simply replace the honey with maple syrup. Both ingredients provide sweetness. The texture will remain similar, and the taste will still be great. These bars last about one week in the fridge. Keep them in an airtight container to maintain freshness. If you want to store them longer, you can freeze them for up to three months. Just thaw them in the fridge before eating. You can use old-fashioned oats, but the texture will change. Old-fashioned oats are thicker and chewier. This may make the bars less soft. If you prefer a firmer bite, then they are a great option. Yes, these bars can be gluten-free. Ensure you use certified gluten-free oats. Regular oats may be processed in facilities with gluten. This can lead to cross-contamination, so always check the label. Adding protein powder is a good idea. You can mix in about a scoop. This will help boost the protein level without changing the taste much. Just make sure you adjust the liquid slightly, as protein powder can absorb moisture. These no-bake bars are easy, tasty, and healthy. We started with the basic ingredients, like oats and peanut butter, then mixed and pressed them together. I shared tips for the best texture and storage. You can even try fun variations like adding nuts or dried fruit. Remember to check for spoilage! These bars are perfect for snacks or a quick breakfast. Get creative with your ingredients and enjoy the process!

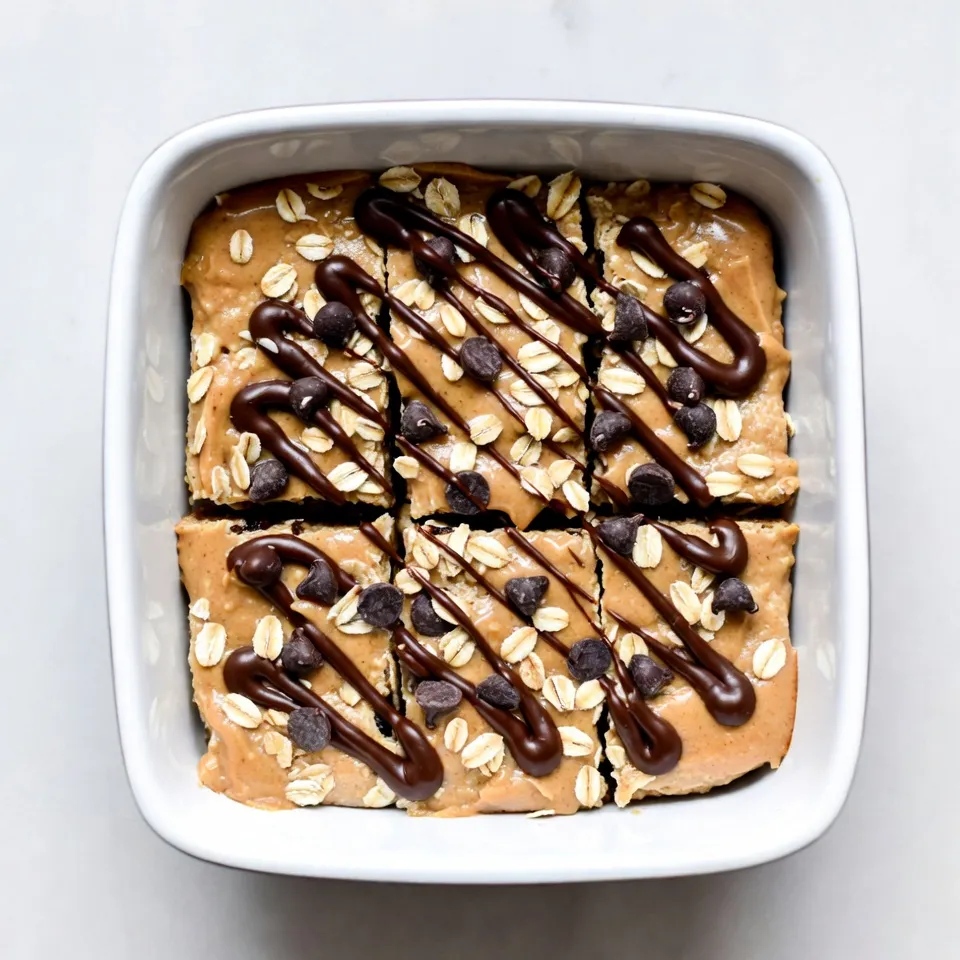
No-Bake Peanut Butter Oatmeal Bars Easy and Tasty Treat

Craving a tasty treat that’s simple to make? Look no further! My No-Bake Peanut Butter Oatmeal Bars are the perfect

- 1 lb ground turkey - 1/4 cup low sodium soy sauce - 2 tablespoons honey - 1 tablespoon rice vinegar - 2 teaspoons sesame oil - 1 tablespoon minced fresh ginger - 2 cloves garlic, minced - 1 cup broccoli florets - 1 red bell pepper, thinly sliced - 1 large carrot, julienned - 1 cup cooked brown rice or quinoa - 2 green onions, chopped - 1 tablespoon sesame seeds - Salt and pepper, to taste Gathering these ingredients is the first step to making a delicious Teriyaki Ground Turkey Bowl. Each item plays a key role in creating the rich flavor that defines this dish. Ground turkey is lean and packed with protein. It absorbs the sweet and salty teriyaki sauce well. Using low sodium soy sauce helps control the salt level. Honey adds a nice sweetness and helps the sauce stick to the turkey. Rice vinegar gives a slight tang, and sesame oil adds depth. Fresh ginger and garlic bring warmth and aroma to the dish. Broccoli, red bell pepper, and carrots not only add color but also give a crunchy texture. These veggies cook quickly and maintain their bite. You can serve this over brown rice or quinoa, both of which are healthy grains. Green onions and sesame seeds are perfect for garnishing. They add a fresh finish and a bit of crunch. With these ingredients, you’ll create a meal that is not only tasty but also nutritious. {{ingredient_image_2}} - Combine 1/4 cup low sodium soy sauce, 2 tablespoons honey, 1 tablespoon rice vinegar, 2 teaspoons sesame oil, 1 tablespoon minced fresh ginger, and 2 cloves minced garlic in a small bowl. - Whisk these ingredients until they form a cohesive teriyaki sauce. This sauce adds depth and flavor to the dish. - Heat a large skillet over medium heat. - Add 1 lb of ground turkey. Season it with salt and pepper. - Cook the turkey for about 5-7 minutes. Stir occasionally, breaking it into smaller pieces. Cook until it is browned and fully cooked. - Once the turkey is done, pour in the prepared teriyaki sauce. Stir well to coat the meat. Let it simmer for 3-4 minutes. This helps the sauce thicken. - Stir in 1 cup of broccoli florets, 1 thinly sliced red bell pepper, and 1 julienned carrot. - Cook for another 5 minutes. Stir often until the vegetables are tender-crisp. - To assemble your bowls, start with 1 cup of cooked brown rice or quinoa. - Top each bowl with the teriyaki ground turkey and vegetable mix. - Garnish with 2 chopped green onions and 1 tablespoon of sesame seeds. For a fun touch, add a lime wedge on the side. Enjoy your colorful and nutritious meal! How do you adjust sweetness and saltiness? To balance flavors, add honey for sweetness or more soy sauce for saltiness. Taste as you mix, and keep adjusting until you find the right level for your liking. How can you make homemade teriyaki sauce? Combine these ingredients in a small bowl: 1/4 cup low sodium soy sauce, 2 tablespoons honey, 1 tablespoon rice vinegar, 2 teaspoons sesame oil, 1 tablespoon minced fresh ginger, and 2 cloves minced garlic. Whisk until smooth. This sauce is a game changer! What are the best practices for browning ground turkey? Start with a hot skillet over medium heat. Break the turkey apart with a spatula as it cooks. This helps it brown evenly. Season it well with salt and pepper to enhance flavor. How can you avoid dry turkey? Don't overcook it! Aim for 5-7 minutes of cooking. Stir often and monitor the heat. Adding the teriyaki sauce at the right time helps keep the moisture in. What are some ideas for garnishing? Fresh green onions and sesame seeds make great toppings. They add color and crunch. You can also add a lime wedge for a fresh twist! What are some suggestions for colorful bowl layering? Start with a base of brown rice or quinoa. Pile the teriyaki turkey and veggies on top. Use bright vegetables like red bell pepper and broccoli. This will make the dish pop! Pro Tips Use Fresh Ingredients: Fresh vegetables and herbs enhance the flavor of the dish. Opt for seasonal produce for the best taste and texture. Adjust Sweetness: Depending on your taste preference, you can adjust the amount of honey in the teriyaki sauce to achieve your desired level of sweetness. Cook Rice Ahead: For a quicker meal, prepare the brown rice or quinoa in advance. This allows for faster assembly during busy weeknights. Experiment with Proteins: While ground turkey is delicious, feel free to substitute with ground chicken, beef, or even plant-based protein for variety. {{image_4}} You can switch out ground turkey for other proteins. Ground beef works well. It adds a rich flavor. If you want something lighter, use ground chicken. For a plant-based option, try crumbled tofu or tempeh. Just remember to adjust cooking times based on your choice. Feel free to get creative with your veggies. Snap peas or green beans add crunch. You can also use zucchini or mushrooms for a different taste. Bell peppers can be swapped for yellow or orange varieties. Just pick what you love, and your bowl will still taste great. You have a few options for cooking this bowl. Stir-frying is quick and easy. Just heat your skillet and cook as directed. If you prefer, you can bake the turkey and veggies in a dish at 400°F for 25 minutes. Slow cooking is another choice. Combine everything in a slow cooker on low for 4-6 hours. Each method gives you a tasty meal! To keep your Teriyaki Ground Turkey Bowl fresh, store leftovers in an airtight container. Place it in the fridge within two hours of cooking. This helps keep the flavors intact. Try to eat the leftovers within three to four days for the best taste. When you want to enjoy it again, simply reheat in a skillet or microwave until hot. Freezing is a great option if you want to save some for later. First, let the dish cool completely. Then, scoop portions into freezer-safe bags or containers. Squeeze out as much air as you can to prevent freezer burn. Label and date the bags to keep track. When you are ready to eat, thaw in the fridge overnight. Reheat on the stove for the best texture. In the fridge, your Teriyaki Ground Turkey Bowl lasts about three to four days. If you freeze it, you can enjoy it for up to three months. Just remember, the sooner you eat it, the fresher it will taste. Always check for any signs of spoilage before eating, like off smells or changes in color. To make a gluten-free Teriyaki Ground Turkey Bowl, swap the soy sauce. Use tamari instead. Tamari is a gluten-free soy sauce alternative. It tastes similar and works well in this dish. You can also try coconut aminos. This option is sweeter and has less sodium. Both choices keep the flavor strong without gluten. Yes, you can meal prep this dish easily. Start by cooking the turkey and veggies as directed. Once cooked, let them cool. Divide the turkey and veggies into meal prep containers. Add your cooked brown rice or quinoa. Store them in the fridge. This meal stays fresh for up to four days. Reheat before serving and enjoy a quick, tasty meal. Many sides fit well with a Teriyaki Ground Turkey Bowl. Here are some great options: - Steamed edamame: This adds protein and fiber. - Cucumber salad: A light and refreshing side. - Miso soup: Warm and comforting, it complements the bowl nicely. - Roasted sweet potatoes: Their sweetness balances the savory flavors. Feel free to mix and match these sides to your liking! This blog post covers a tasty Teriyaki Ground Turkey Bowl. You learned about its simple ingredients, how to prepare the sauce, and cook the turkey and veggies. We also shared tips for perfecting the dish, as well as fun variations and storage info. This recipe is not only tasty but also customizable. You can swap proteins and veggies easily. Try meal prepping for a quick and healthy option. Enjoy making this dish and sharing it with others!

Teriyaki Ground Turkey Bowl Flavorful and Nutritious Meal

Are you looking for a meal that’s both tasty and healthy? I’ve got you covered with my Teriyaki Ground Turkey

- 1 ½ cups all-purpose flour - 1 cup plain full-fat Greek yogurt - 1 cup granulated sugar - 3 large eggs, at room temperature - 1/3 cup vegetable oil - Zest of 2 medium lemons - 1/4 cup freshly squeezed lemon juice - 1 teaspoon baking soda - 1 teaspoon baking powder - 1/2 teaspoon sea salt - Optional: 1/2 cup poppy seeds To make the perfect Greek yogurt lemon loaf, you need quality ingredients. Each item plays a key role in creating a moist and zesty loaf. All-purpose flour gives the loaf structure. Use fresh flour for the best results. Greek yogurt adds moisture and tang. It makes the loaf rich without being heavy. Granulated sugar balances the tartness of the lemon and adds sweetness. Large eggs help bind everything together. They also add richness. Vegetable oil keeps the loaf moist. It works better than butter for this recipe. Lemon zest and juice are the stars of this dish. They pack in bright flavor and aroma. Baking powder and baking soda help the loaf rise. They ensure a light texture. Sea salt enhances the flavors, making the loaf taste even better. If you want a twist, consider adding poppy seeds. They add a fun crunch and look pretty too. Gather these ingredients before you start. This way, you’ll have everything ready for your delicious Greek yogurt lemon loaf. {{ingredient_image_2}} First, set your oven to 350°F (175°C). This step is key for even baking. Next, take a loaf pan and grease it well. Line the bottom with parchment paper. This makes it easy to lift the loaf out later. In a medium bowl, whisk together the following: - 1 ½ cups all-purpose flour - 1 teaspoon baking soda - 1 teaspoon baking powder - 1/2 teaspoon sea salt Make sure they blend well. If you want to add poppy seeds, fold in 1/2 cup now. This adds a nice crunch. In a large bowl, use an electric mixer. Cream together these two ingredients until smooth: - 1 cup granulated sugar - 1 cup plain full-fat Greek yogurt Add the eggs one at a time. Mix well after each egg. After adding all three large eggs, blend in: - 1/3 cup vegetable oil - Zest from 2 medium lemons - 1/4 cup freshly squeezed lemon juice This mixture should be fluffy and bright. Now, slowly add the dry mix to the wet mix. Do this in batches. Stir gently until just combined. It’s okay if the batter is a bit lumpy. Overmixing can make the loaf tough. Pour the batter into your prepared loaf pan. Smooth the top with a spatula for an even bake. Place the pan in your preheated oven. Bake for about 50-60 minutes. To check if it’s done, insert a toothpick in the center. It should come out clean or with a few crumbs. Once baked, remove the loaf from the oven. Let it sit in the pan for about 10 minutes. After that, gently transfer it to a wire rack. This helps it cool completely. Enjoy the delightful aromas as it cools! To start, check your oven temperature. An oven thermometer helps you know if it’s accurate. An oven that is too hot or too cold can change your loaf. Next, use room temperature ingredients. When your eggs and yogurt are at room temp, they blend better. This helps your loaf rise and gives it a nice texture. You can add herbs or spices to change the taste. For example, a pinch of cardamom gives a warm touch. You can also add a bit of thyme for a fresh twist. Consider using a glaze or topping. A simple lemon glaze made from lemon juice and powdered sugar adds sweetness. You can also top your loaf with a mix of nuts for a crunchy bite. Make your loaf look lovely by dusting it with powdered sugar. This gives it a sweet, elegant look. Serve your lemon loaf with fresh berries or a dollop of Greek yogurt. Berries add color and flavor, while yogurt makes it creamy. Enjoy this fresh and flavorful treat! Pro Tips Use Room Temperature Ingredients: Ensuring your eggs and yogurt are at room temperature helps create a smoother batter and results in a more even bake. Don’t Overmix: Mixing the batter just until combined will keep the loaf tender and prevent it from becoming dense. A few lumps are perfectly fine! Add a Lemon Glaze: For an extra zesty kick, consider drizzling a simple lemon glaze over the cooled loaf made from powdered sugar and lemon juice. Store Properly: To keep your loaf fresh, wrap it in plastic wrap or store it in an airtight container at room temperature for up to 3 days. {{image_4}} You can easily switch up the flavor of your Greek yogurt lemon loaf. Here are two fun ideas: - Blueberry lemon loaf: Add 1 cup of fresh or frozen blueberries to the batter. The burst of berries adds a sweet twist and pairs well with lemon. - Almond lemon loaf variation: Mix in 1 teaspoon of almond extract instead of vanilla. This brings a nice nutty flavor that complements the lemon. If you need a gluten-free loaf, it’s simple. Just swap the all-purpose flour for a gluten-free flour blend. Make sure the blend works well in baking. This way, you can enjoy the loaf without gluten! To make this loaf vegan, you can replace the eggs and dairy. Use 1/4 cup of unsweetened applesauce for each egg. For the yogurt, try a plant-based yogurt. This keeps the loaf moist and tasty while being fully vegan. To keep your Greek yogurt lemon loaf fresh, store it correctly. You can keep it at room temperature for up to two days. Just place it in a cool, dry spot. Wrap it tightly in plastic wrap. This helps keep it moist. For longer storage, move it to the refrigerator. Use an airtight container or wrap it in foil. This keeps it fresh for up to a week. Just remember, the fridge can dry it out a bit, so enjoy it soon! Freezing your lemon loaf is a great way to save it for later. To do this, first, let the loaf cool completely. Then, wrap it tightly in plastic wrap. Make sure it's well sealed. You can also place it in a freezer-safe bag. When you're ready to eat it, thaw it in the fridge overnight. For a quick thaw, leave it on the counter for a few hours. Enjoy your delicious lemon loaf when it's soft and ready! To keep your lemon loaf moist, use full-fat Greek yogurt. This yogurt adds creaminess and helps with moisture. Do not overmix the batter. Stir until just combined to keep the loaf tender. Also, avoid opening the oven door too often while baking. This helps maintain a steady temperature. Yes, you can use low-fat Greek yogurt. However, the loaf may be less rich and moist. Full-fat yogurt creates a soft and fluffy texture. If you choose low-fat, consider adding a bit more oil or lemon juice for moisture. The lemon loaf stays fresh for about 3 to 4 days at room temperature. Keep it in an airtight container to prevent drying out. If you see any mold or smell something off, it is best to throw it away. For egg substitutes, use unsweetened applesauce or mashed bananas. About 1/4 cup of applesauce replaces one egg. You can also use flaxseed meal. Mix 1 tablespoon of flaxseed meal with 2.5 tablespoons of water and let it sit for a few minutes. Yes, you can adjust this recipe for a lemon loaf cake. Use a round cake pan instead of a loaf pan. You may need to reduce the baking time to about 30-40 minutes. Test doneness with a toothpick. The cake is done when the toothpick comes out clean. This blog post covered how to create a delicious Greek Yogurt Lemon Loaf from scratch. You learned about the key ingredients, along with step-by-step instructions, tips for perfecting the loaf, and variations to try. Remember, baking is an art that requires practice and patience. Embrace your creativity while experimenting with flavors. Whether you enjoy it fresh or store it for later, this loaf will impress anyone who tastes it. Happy baking!

Greek Yogurt Lemon Loaf Fresh and Flavorful Delight

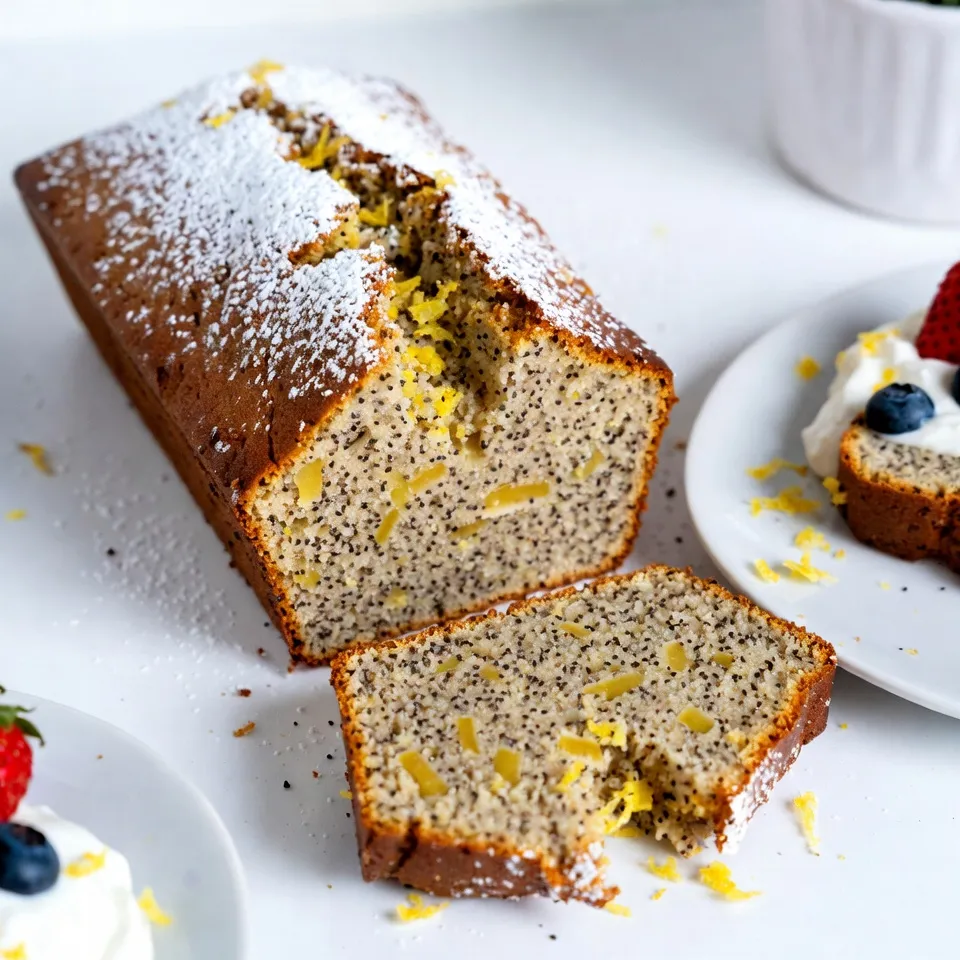
Are you ready to elevate your baking game? This Greek Yogurt Lemon Loaf is vibrant, moist, and bursting with flavor.

To make Classic Chicken Noodle Soup, you will need: - 1 tablespoon olive oil - 1 medium onion, finely diced - 2 cloves garlic, minced - 3 carrots, peeled and sliced into rounds - 2 celery stalks, sliced - 1 teaspoon dried thyme - 1 teaspoon dried oregano - Salt and freshly ground black pepper to taste - 8 cups low-sodium chicken broth - 2 cups shredded cooked chicken (store-bought rotisserie chicken works beautifully) - 2 cups egg noodles - 2 bay leaves - Fresh parsley, roughly chopped (for garnish) You can easily swap some ingredients if you have dietary needs. Here are a few ideas: - Olive oil can be replaced with avocado oil for a different flavor. - If you're short on time, use pre-chopped veggies. - For a vegetarian version, replace chicken broth with vegetable broth and skip the chicken. - Use gluten-free egg noodles if you need a gluten-free option. - Fresh herbs can replace dried herbs for a brighter taste. Selecting good ingredients makes a big difference. Here are some tips: - Choose fresh vegetables. Look for bright colors and firm textures. - Use low-sodium chicken broth. It helps control the salt level. - Opt for a rotisserie chicken that looks juicy and tender. - Fresh parsley should be vibrant and aromatic. Avoid wilted leaves. - Select high-quality egg noodles. They should feel firm and not too soft. These tips ensure your soup tastes great and is full of flavor. Use the freshest ingredients you can find for the best results. To start, grab a large pot. Heat 1 tablespoon of olive oil over medium heat. Once the oil shimmers, add the finely diced onion. Sauté the onion for about 4-5 minutes. You want it to turn translucent and smell great. Next, add 2 minced garlic cloves. Stir in 3 sliced carrots and 2 sliced celery stalks. Cook these veggies for another 3-4 minutes. They should start to soften but still hold their shape. After your veggies soften, it’s time to add flavor. Sprinkle in 1 teaspoon of dried thyme and 1 teaspoon of dried oregano. Add a good pinch of salt and freshly ground black pepper too. Stir well and let the spices cook for about 1 minute. This step brings out their best flavors and scents. Now, pour in 8 cups of low-sodium chicken broth. Toss in 2 bay leaves for extra depth. Raise the heat until the soup boils. Once it’s bubbling, reduce the heat to low. Cover the pot and let it simmer for 15 minutes. This lets all the flavors mix nicely. After that, stir in 2 cups of shredded cooked chicken. Add 2 cups of egg noodles next. Cover the pot again and cook for 8-10 minutes. You want the noodles tender and cooked through. Remember to remove the bay leaves before serving. Taste the soup and adjust the seasoning if needed. Finally, ladle the soup into bowls and garnish with fresh parsley. Enjoy! To boost the flavor, use fresh herbs. Add thyme and oregano while cooking. You can also squeeze in lemon juice for brightness. A splash of soy sauce adds depth and umami. Consider adding a dash of hot sauce for a little kick. Cook egg noodles separately for best results. Boil them in salted water until tender but firm. Drain and rinse them under cold water to stop cooking. This way, they won’t soak up all the broth. Add them to the soup just before serving. Always taste your soup before serving. Use salt and black pepper to balance the flavors. If it tastes flat, add more herbs or a pinch of garlic powder. For a richer flavor, consider adding a bit of chicken bouillon. Adjust slowly, as you can always add more. {{image_4}} You can make chicken noodle soup healthier by using low-sodium broth. This helps cut down on salt without losing flavor. Add more veggies like spinach, kale, or zucchini. They add color and nutrients. You can also swap in whole-grain egg noodles for extra fiber. This makes the soup heartier and boosts its health benefits. For a creamy twist, add some milk or cream. Stir it in after you cook the noodles. This gives the soup a rich, smooth texture. You can also use a blend of cream cheese and broth for a lighter option. This version feels cozy and comforting, perfect for chilly days. If you need gluten-free noodles, look for rice noodles or gluten-free pasta. They work well in this soup, too. Just be sure to adjust the cooking time. You want them to be tender, but not mushy. This way, everyone can enjoy the soup, no matter their diet. After you enjoy your soup, let it cool. Pour any leftovers into an airtight container. Seal the container tightly. Store it in the fridge. It keeps well for about three to four days. If you want to keep it longer, freezing is a great choice. Use freezer-safe containers or bags. Leave some space at the top for expansion. Label the container with the date. Your soup can last up to three months in the freezer. To reheat, take the soup out of the fridge or freezer. If frozen, let it thaw in the fridge overnight. Heat the soup in a pot over medium heat. Stir it often to warm it evenly. Check the temperature and enjoy! Yes, you can use store-bought chicken for your soup. A rotisserie chicken works great. Just shred the meat and add it to the pot. This saves time and still gives you tasty soup. If you don’t have egg noodles, you can use other types of pasta. Try small shapes like elbows or shells. You can also use rice or quinoa for a different twist. Just adjust the cooking time as needed. Chicken noodle soup lasts about three to four days in the fridge. Store it in a covered container. If you want to keep it longer, freeze it for up to three months. Always reheat it until it's hot. This blog post covered all you need for classic chicken noodle soup. We discussed key ingredients, so you can adapt for dietary needs. I shared step-by-step instructions to make your soup easy and tasty. You learned tips to boost flavor and explore fun variations. Lastly, I provided storage and reheating advice to keep leftovers fresh. In conclusion, cooking chicken noodle soup is simple and rewarding. Enjoy making it your way!

Classic Chicken Noodle Soup Simple and Hearty Recipe

Warm, comforting, and packed with flavor, Classic Chicken Noodle Soup is a dish everyone loves. In this simple and hearty

- 1.5 lbs of beef sirloin, cut into bite-sized pieces - 1/2 cup unsalted butter - 6 cloves garlic, minced - 2 tablespoons soy sauce - 1 tablespoon Worcestershire sauce - 1 teaspoon dried thyme - 1 teaspoon freshly ground black pepper - 1 teaspoon smoked paprika - 1 tablespoon fresh parsley, finely chopped (for garnish) When I make Crockpot Garlic Butter Beef Bites, I focus on quality ingredients. Beef sirloin is my top choice. It’s tender and has great flavor. Cutting it into bite-sized pieces helps it cook evenly. Using unsalted butter lets me control the salt. I love the rich taste it adds. Garlic is a must for this dish. Fresh minced garlic gives it that amazing aroma. For the marinade, I use soy sauce and Worcestershire sauce. These add depth and umami. Dried thyme is my go-to herb. It pairs perfectly with beef. I also add black pepper and smoked paprika for a bit of heat and smokiness. Garnishing with fresh parsley adds a nice touch. It brightens the dish and makes it look appealing. Each ingredient plays an important role in building flavor. Together, they create a tasty and satisfying meal. - Melting the butter: Start by heating a skillet on medium heat. Add 1/2 cup of unsalted butter. Watch it melt slowly. - Sautéing the garlic: Once the butter is melted, add 6 minced garlic cloves. Stir for about a minute. You want the garlic to smell great but not turn brown. - Mixing ingredients together: In a big bowl, combine 1.5 lbs of beef sirloin, 2 tablespoons of soy sauce, 1 tablespoon of Worcestershire sauce, 1 teaspoon of dried thyme, 1 teaspoon of black pepper, 1 teaspoon of smoked paprika, and 1/2 teaspoon of salt. - Ensuring even coating: Use your hands or a spatula to mix well. Make sure each beef piece is coated with the marinade. - Transferring to the crockpot: Pour the marinated beef into your crockpot. Then, drizzle the melted garlic butter over it. - Setting the cooking temperature and time: Cover the crockpot. You can cook on low for 6 hours or high for 3 hours. The beef should be tender when done. Marinating beef is key. Aim for at least 30 minutes, but longer is better. This time allows flavors to soak in. You can even marinate overnight for a deeper taste. Fresh herbs, like parsley or thyme, always add a brighter flavor. Dried herbs work too, but they lack that fresh zing. To avoid tough beef, check your cooking time. For tender bites, cook on low for 6 hours. High heat cooks faster but can dry meat. Use beef sirloin for the best texture. This cut is tender and flavorful. Cheaper cuts may work, but they can be chewier. When serving, arrange the beef bites on a large platter. This makes it easy for guests to grab some. Use toothpicks for a fun touch. Don’t forget a small bowl for the rich juices. This adds flavor and keeps the bites moist. A sprinkle of fresh parsley on top adds a nice pop of color. {{image_4}} You can change the cut of beef to suit your taste. Try flank steak or chuck roast. These cuts are often more tender after slow cooking. You can also swap unsalted butter for olive oil. This keeps the dish lighter and adds a different flavor. Adding vegetables can give this dish a fresh twist. Consider bell peppers, onions, or mushrooms. Toss in some carrots for a hint of sweetness. You can also adjust the seasonings to add spice. A pinch of red pepper flakes or cayenne can elevate the heat. For a gluten-free option, use tamari instead of soy sauce. This keeps the flavor while making it safe for gluten-free diets. If you want to cut sodium, opt for low-sodium soy sauce. This way, you can enjoy the rich taste without the extra salt. After enjoying your Crockpot Garlic Butter Beef Bites, store leftovers right away. Use air-tight containers to keep the beef fresh. Make sure the beef is cooled before sealing. This helps prevent moisture loss. I recommend using glass containers for easy reheating and cleaning. To reheat, avoid drying out the beef. Use a microwave or a stovetop. For the microwave, place the beef in a bowl with a splash of broth or water. Cover it with a damp paper towel. Heat in short bursts, stirring in between. On the stovetop, use low heat and add a little broth. Stir often until it’s warm. You can freeze your beef bites for later use. First, let them cool completely. Then, place them in a freezer-safe bag. Try to remove as much air as possible. Label the bag with the date. When ready to eat, thaw in the fridge overnight. Reheat them using the stovetop or microwave methods mentioned above. Crockpot Garlic Butter Beef Bites can last in the fridge for about 3 to 4 days. Store them in an airtight container to keep the flavor fresh. If you want to enjoy them later, consider freezing them. This way, they can last for up to 3 months. Just remember to thaw them in the fridge before reheating. Yes, you can cook this recipe on high heat. If you choose this option, set your crockpot to high for about 3 hours. The beef will still turn out tender and full of flavor. Just be sure to check it a little earlier to avoid overcooking. The key is to ensure the beef is tender and easily shredded. - Side dish recommendations - Mashed potatoes: The creamy texture pairs well with the beef. - Rice: White or brown rice absorbs the delicious garlic butter sauce. - Steamed vegetables: Broccoli or green beans add color and nutrition. - Bread: A crusty baguette is great for soaking up the sauce. - Complementary sauces or dips - Horseradish sauce: It adds a spicy kick that contrasts well with the beef. - BBQ sauce: For a sweet and tangy flavor. - Garlic aioli: This creamy dip enhances the garlic flavor in the beef. This blog post covered all you need for Garlic Butter Beef Bites. We discussed key ingredients like beef sirloin, garlic, and marinades. Following our step-by-step guide makes cooking easy and delicious. Don’t forget the tips for the best flavor and texture. You can even try variations to suit your taste. Proper storage ensures your leftovers stay fresh. With these insights, you’ll impress friends and family at your next meal. Enjoy cooking and sharing this tasty dish!

Crockpot Garlic Butter Beef Bites Tasty Dinner Recipe

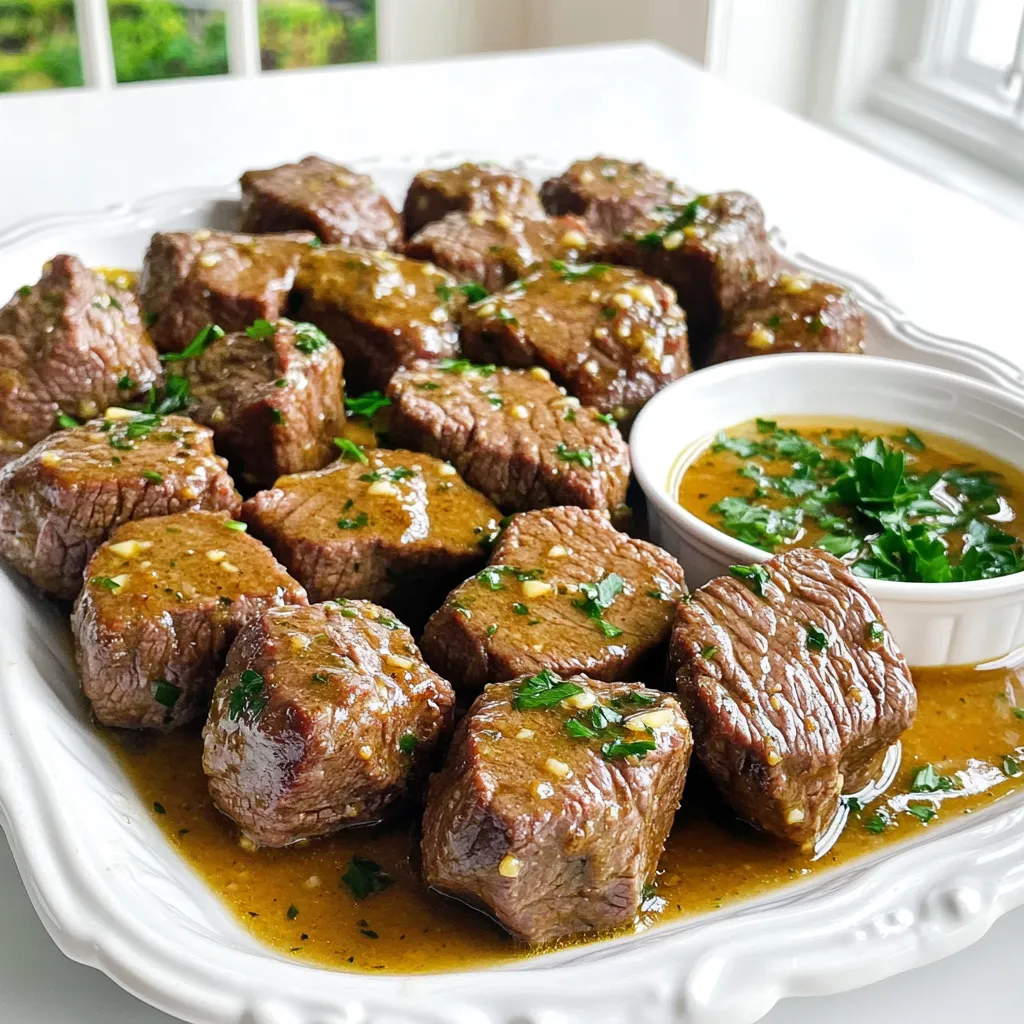
If you’re craving a hearty and scrumptious dinner, look no further! My Crockpot Garlic Butter Beef Bites recipe is an

Here’s what you need for a warm bowl of slow cooker loaded potato soup: - 6 medium russet potatoes, peeled and cut into 1-inch dice - 1 medium onion, finely chopped - 3 cloves garlic, minced - 4 cups vegetable broth - 1 cup heavy cream - 1 cup sharp cheddar cheese, shredded - 1/2 cup crispy turkey bacon, crumbled - 1/2 cup sour cream - 2 green onions, thinly sliced - 1 teaspoon smoked paprika - Salt and freshly ground black pepper, to taste These ingredients work together to create a rich and creamy soup. The russet potatoes give a hearty base. The onion and garlic add a depth of flavor. Vegetable broth brings everything together, while heavy cream and cheddar cheese make it smooth and indulgent. Turkey bacon adds a crunchy texture, and green onions give a fresh finish. Don't forget to season with salt, pepper, and smoked paprika for that extra kick! To start, gather your ingredients. You will need six medium russet potatoes. First, peel them and cut them into 1-inch dice. This size helps the potatoes cook evenly. Next, chop one medium onion finely. This adds flavor to the soup. Mince three cloves of garlic. The garlic gives a nice, rich taste. Now, layer the ingredients in the slow cooker. Place the diced potatoes, chopped onion, and minced garlic at the bottom. Pour in four cups of vegetable broth. Ensure all the ingredients are covered with the broth. Stir gently to mix everything well. Next, add one teaspoon of smoked paprika for a warm flavor. Season with salt and freshly ground black pepper to taste. Cover the slow cooker. Set it to cook on low for 6 to 8 hours or on high for 4 hours. You know it's ready when the potatoes are fork-tender. Once the cooking time is up, mash some of the potatoes in the slow cooker. This will make the soup creamier. If you want a smooth texture, use an immersion blender to blend it all together. Gradually stir in one cup of heavy cream and one cup of shredded sharp cheddar cheese. Mix until the cheese melts and blends well. Taste the soup. Adjust the seasoning with more salt or pepper if needed. Just before serving, fold in half a cup of crumbled turkey bacon and half a cup of sour cream. Mix gently to keep the texture nice. Now, ladle the loaded potato soup into bowls while it's hot. You can garnish each bowl with slices of green onion and extra cheddar cheese for a lovely finish. Enjoy your hearty comfort dish! To get the right texture in your soup, you can either mash or blend the potatoes. Mashing gives a chunky feel, while blending makes it smooth. I often mash some potatoes for a mix of both. If you want a creamier soup, add more heavy cream. Taste it after adding cream. You can always add a bit more if you like. For best flavor, balance your seasonings well. Start with the salt and pepper. I usually add a bit, then taste to see if it needs more. You can always add more, but it’s hard to take away. The smoked paprika adds depth, so don’t skip it. Adjust the seasoning at the end for the best results. Serving is as fun as cooking. Use wide bowls for your soup. Top each bowl with extra cheddar cheese and a dollop of sour cream. Green onions add a nice touch and some color. To complete the meal, serve with warm crusty bread. It makes the soup feel even more cozy and comforting. {{image_4}} You can easily make this soup vegetarian. Instead of crispy turkey bacon, try using plant-based bacon. This swap keeps the smoky flavor but makes it meat-free. For a creamier soup without dairy, use coconut milk or almond milk instead of heavy cream. You can also find dairy-free cheese options that melt well. To make your soup even tastier, think about adding spices. A pinch of cayenne or some garlic powder can bring more warmth. If you want more veggies, add carrots or celery. These add nutrients and crunch. You can also throw in some corn for sweetness. In winter, add flavors that warm you up. Try using roasted garlic or fresh herbs like rosemary. For summer, use fresh corn and diced tomatoes. These ingredients keep the soup light and bright. You can switch it up based on what you have on hand. To keep your loaded potato soup fresh, store it in an airtight container. Let it cool first before sealing. This soup lasts in the fridge for about 3 to 4 days. Always check for any signs of spoilage before eating. You can freeze your potato soup for up to 3 months. To do this, let the soup cool completely. Then, pour it into freezer-safe bags or containers. Make sure to leave some space at the top for expansion. When you want to eat it, thaw it overnight in the fridge. For the best taste, reheat the soup on the stove over medium heat. Stir it often to keep it from burning. You can also use the microwave, heating it in short bursts. This helps to warm it evenly. To keep the texture creamy, add a splash of milk or cream while reheating. Yes, you can prepare this soup ahead of time. I recommend cooking the soup fully and then storing it in the fridge. Let it cool before you put it in an airtight container. It will stay fresh for about three days. When you are ready to serve, just reheat it on low heat. Stir it gently to keep the texture nice. If you want, you can also make the soup base without the cream and cheese. Then add those last for a fresh taste. If you want a lighter version, you can use half-and-half or whole milk instead of heavy cream. For a dairy-free option, try coconut milk or almond milk. These will still give you a creamy texture. Just keep in mind that the flavor may change a bit. Make sure to taste it and adjust the seasoning if needed. You can also add a bit more cheese to keep that rich taste. Yes, you can easily make this soup gluten-free! The main concern is the broth. Make sure to use a gluten-free vegetable broth. Most brands offer this option. Also, check the labels on the cheese and bacon you use. Most are gluten-free, but it’s always good to double-check. By making these simple swaps, you can enjoy a tasty bowl of loaded potato soup without any gluten worries. We covered the key steps to make a tasty potato soup. You learned about ingredients, cooking methods, and variations. Remember to adjust flavors and textures to your liking. Use the tips for storage to keep your soup fresh. Whether you prefer it creamy or chunky, this recipe fits right in. Enjoy creating and sharing this comforting dish. Happy cooking!

Slow Cooker Loaded Potato Soup Hearty Comfort Dish

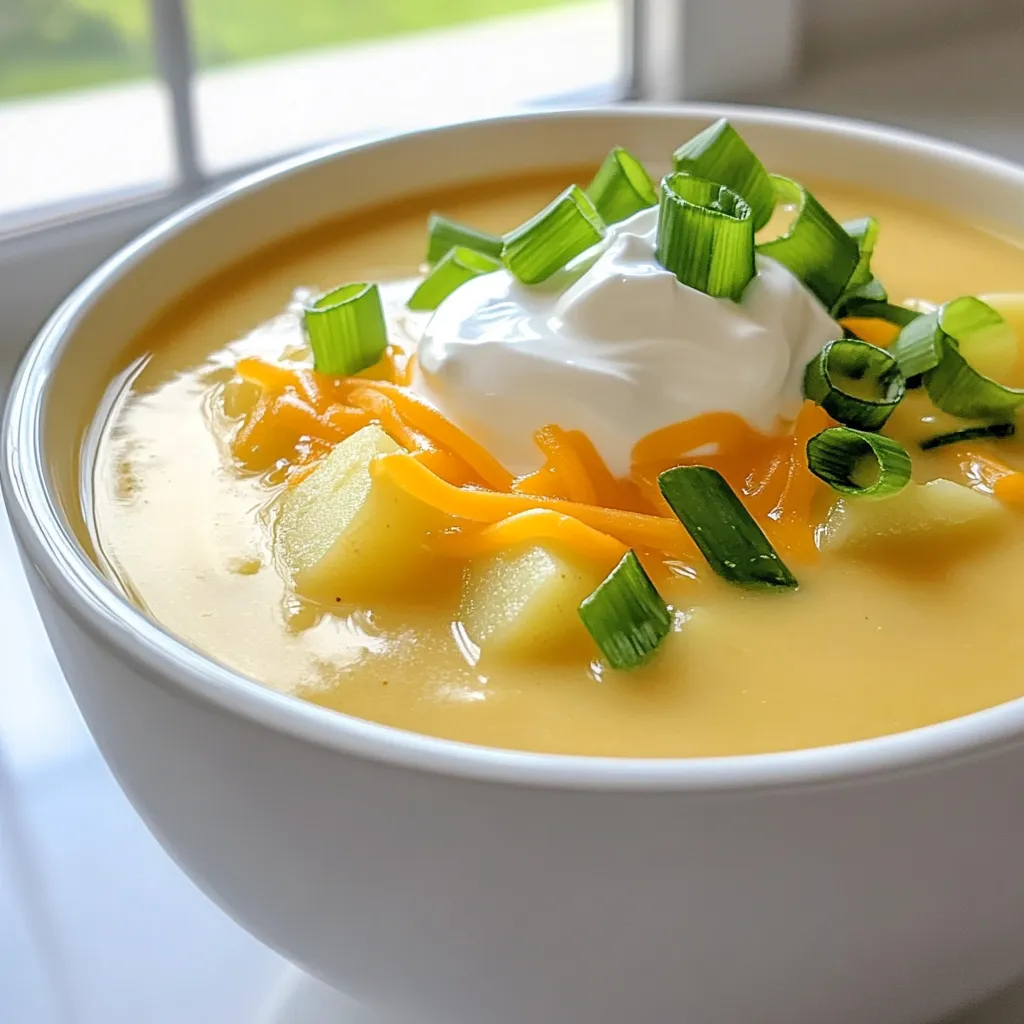
Looking for a warm and filling meal that’s easy to prepare? My Slow Cooker Loaded Potato Soup is your answer!

- 1.5 lbs boneless, skinless chicken thighs - 1 cup teriyaki sauce (store-bought or homemade) - 2 cups broccoli florets - 1 red bell pepper, sliced into strips - 1 cup carrots, peeled and julienned - 1 tablespoon olive oil - 1 teaspoon sesame oil - 2 cloves garlic, finely minced - 1 teaspoon fresh ginger, grated - Sesame seeds and green onions for garnish - Salt and freshly ground black pepper to taste When preparing sheet pan teriyaki chicken and veggies, you want fresh and vibrant ingredients. Start with 1.5 pounds of boneless, skinless chicken thighs. They cook evenly and stay juicy. You can also use chicken breasts, but thighs add more flavor. Teriyaki sauce is key for this dish. You can buy it or make your own. A homemade sauce often tastes fresher and has more depth. Your veggies should consist of 2 cups of broccoli florets, 1 sliced red bell pepper, and 1 cup of julienned carrots. The colors not only look good but also give a range of flavors and textures. For the marinade, you need olive oil, sesame oil, minced garlic, and grated ginger. These ingredients enhance the chicken's taste and aroma. Finally, don't forget salt and black pepper to bring all the flavors together. Finish with sesame seeds and sliced green onions for garnish. They add crunch and a fresh touch. - Preheat the oven to 400°F (200°C). - In a bowl, mix teriyaki sauce, garlic, ginger, olive oil, and sesame oil. Set aside one-third of the marinade for later. - Place chicken thighs in a dish or bag. - Pour the marinade over the chicken, ensuring it’s well coated. - Let it marinate for at least 30 minutes, but two hours is best. - Wash and cut the broccoli, bell pepper, and carrots. - Spread the veggies on the sheet pan. Drizzle with olive oil, then add salt and pepper. Toss gently to coat. - Take the marinated chicken out and place it on the veggies. - Make sure the chicken and vegetables are spread out evenly. - Put the sheet pan in the oven and roast for 25-30 minutes. - Check that the chicken reaches 165°F (75°C) and that veggies are tender. - In the last five minutes, brush the reserved marinade onto the chicken for extra flavor. - Once done, sprinkle sesame seeds and sliced green onions before serving. - Best practices for marinating chicken: Always marinate the chicken for at least 30 minutes. For the best flavor, I suggest marinating it for up to 2 hours. Use a ziplock bag or a shallow dish. Make sure the chicken is well coated in the marinade. This helps the flavors soak in. - How to enhance the teriyaki flavor: To boost the teriyaki taste, add minced garlic and fresh ginger to the marinade. These ingredients add depth. A sprinkle of sesame seeds on top after baking gives a nutty finish. - Ensuring even cooking of chicken and veggies: Spread the chicken and veggies in a single layer on the sheet pan. This allows heat to circulate. It helps everything cook evenly. Check the chicken's internal temperature; it should hit 165°F (75°C). - Using parchment paper for easy cleanup: Line your sheet pan with parchment paper before you start. This makes cleanup simple. You can just lift the parchment and toss it after serving. - Presentation tips for serving the dish: Serve directly from the sheet pan for a casual feel. For a fancier touch, plate individual servings. Garnish with extra sesame seeds and a wedge of lime. This adds color and freshness. - Pairing ideas with sides or beverages: This dish pairs well with steamed rice or quinoa. A light salad with a citrus vinaigrette complements the flavors nicely. For drinks, try iced green tea or a light white wine. {{image_4}} You can switch up the protein in this dish. Chicken thighs are great, but chicken breasts work too. Just ensure they are cooked to 165°F. If you want a meatless option, try tofu. Firm tofu soaks up the marinade well. For a seafood twist, shrimp is a fun choice. It cooks quickly and adds a nice flavor. Many vegetables fit well in this dish. You can use snap peas, zucchini, or asparagus. These add crunch and color. You can also use seasonal veggies. In spring, add peas or radishes. In fall, try butternut squash or Brussels sprouts. Fresh veggies make the meal pop. While teriyaki sauce is tasty, other options can change the flavor. Try a sweet chili sauce for a kick. For a spicy touch, add sriracha to the marinade. You can also go for a honey garlic sauce. Just mix honey, soy sauce, and garlic for a quick dip. This dish is fun to customize with sauces. To store your Sheet Pan Teriyaki Chicken and Veggies, let it cool first. Place it in an airtight container. This dish lasts about 3 to 4 days in the fridge. Ensure you keep it at a safe temperature below 40°F (4°C). This way, you can enjoy leftovers without worry. If you want to save it for later, freezing is a great option. After cooling, transfer the chicken and veggies to freezer-safe bags or containers. It will stay fresh for about 2 to 3 months. When you’re ready to eat, thaw it in the fridge overnight. You can also use the microwave for quicker thawing. Just be careful not to cook it in the microwave. To reheat your dish, the oven works best. Preheat it to 350°F (175°C). Place the chicken and veggies on a baking sheet. Heat for about 15 to 20 minutes, or until warm. You can also use the microwave, but this may change the texture. If you want to keep the flavor and crispness, the oven is your best friend. Yes, you can use frozen chicken. However, it will change the marination and cooking times. First, thaw the chicken completely. This may take a few hours in the fridge. Once thawed, you can marinate it as usual. Be aware that cooking time may increase by 5 to 10 minutes. Always check that the chicken reaches 165°F (75°C) to ensure it is safe to eat. Yes, making your own teriyaki sauce is easy. Just mix these ingredients in a bowl: - 1 cup soy sauce - 1/2 cup honey or brown sugar - 1/4 cup rice vinegar - 2 cloves minced garlic - 1 teaspoon grated ginger Heat the mixture in a saucepan until it thickens slightly. You can also find many recipes online for homemade teriyaki sauce. You can serve this dish with many sides. Here are some great options: - Steamed rice or jasmine rice - Quinoa for a healthier choice - A fresh green salad - Noodles tossed in sesame oil These sides will complement the flavors of the teriyaki chicken and veggies well. Yes, this recipe is great for meal prep. You can make it ahead of time and store it. After cooking, let the chicken and veggies cool completely. Then, put them in airtight containers. They will last about 3-4 days in the fridge. Reheat in the oven or microwave when ready to enjoy. This makes for easy and delicious lunches or dinners! This recipe for sheet pan teriyaki chicken is an easy and tasty choice. You learn about main ingredients, including chicken, veggies, and sauces. I shared steps for marinating, baking, and serving this dish. You can adapt it with different proteins and veggies. For the best flavor, use fresh ingredients and try different sauces. Enjoy this dish as a meal prep option or a quick dinner. With simple steps, you can create a delicious meal your whole family will love!

Sheet Pan Teriyaki Chicken & Veggies Easy Dinner

Looking for a quick and delicious dinner idea? Try my Sheet Pan Teriyaki Chicken & Veggies! This easy dish is

- Cauliflower florets - All-purpose flour or chickpea flour - Almond milk or plant-based milk To make these bites, start with fresh cauliflower. Cut it into bite-sized florets. You want them small enough to cook well but big enough to hold sauce. Next, choose your flour. All-purpose flour works well, but chickpea flour is a great gluten-free option. Finally, grab some almond milk or any plant-based milk. This will help create a smooth batter to coat the florets. - Garlic powder - Onion powder - Smoked paprika - Hot sauce and vegan butter Don't forget the seasonings! Garlic powder adds depth, while onion powder gives a nice flavor kick. Smoked paprika brings a warm, smoky taste that pairs well with buffalo sauce. For the sauce, you need hot sauce, like Frank's RedHot, and vegan butter. Mixing these two gives you that classic buffalo flavor everyone loves. - Fresh parsley - Chives For a fresh touch, consider garnishing with chopped parsley or chives. They not only add color but also enhance the taste. These simple additions make your bites look great and taste even better. {{ingredient_image_2}} - Preheat to 450°F (230°C). - Line a baking sheet with parchment paper. This helps keep things clean and makes the bites crispier. - In a big bowl, whisk together 1 cup of flour and 1 cup of almond milk. - Add 1 teaspoon of garlic powder, 1 teaspoon of onion powder, 1 teaspoon of smoked paprika, 1 teaspoon of salt, and 1/2 teaspoon of black pepper. - Mix well until you get a thick batter. It should coat the cauliflower well without dripping too much. - Take your cauliflower florets and dip each one into the batter. - Make sure each floret is fully covered. Let the extra batter drip off before placing them on the baking sheet. - Bake in the preheated oven for 20-25 minutes. Halfway through, turn them over. They should look golden brown and crispy when done. - In a separate bowl, combine 1 cup of hot sauce with 2 tablespoons of melted vegan butter. - Mix until the sauce is smooth and well blended. This sauce will give your bites that spicy kick. - Once the cauliflower is baked, take it out and drizzle or toss it in the buffalo sauce. - Make sure every floret is coated evenly. This step is key for getting that bold flavor. - Place the coated cauliflower back in the oven for another 5-10 minutes. This helps set the sauce and adds more flavor. - After baking, let them cool for a minute. Then, transfer the bites to a serving platter and garnish with fresh parsley or chives. This adds a nice touch and boosts flavor. To get your vegan buffalo cauliflower bites crispy, focus on the batter's consistency. The batter needs to be thick enough to stick to the cauliflower but not too thick that it clumps. I suggest whisking the flour and almond milk until smooth. You want a coating that clings well. Baking time matters too. Bake your florets at 450°F (230°C) for 20-25 minutes. Turn them halfway through so they brown evenly. Look for a golden brown color to know they are perfectly crispy. To boost the flavor of your bites, add more spices or herbs to the batter. You can try adding a pinch of cayenne for heat or some dried oregano for an herbal touch. If you love garlic, add an extra teaspoon of garlic powder for a punch. When making the buffalo sauce, feel free to adjust the hot sauce to your taste. If you prefer it milder, mix in more melted vegan butter. This balances the heat and adds a rich flavor. Using the right pans can make a big difference. I recommend using a sturdy baking sheet. It should be large enough to hold all the florets without crowding them. This helps them crisp up better. For mixing the batter, a large mixing bowl is best. A whisk works well for getting a smooth consistency. If you have a spatula, it will help coat the cauliflower evenly. Pro Tips Choose the Right Cauliflower: Opt for a fresh, firm head of cauliflower without any brown spots for the best texture and flavor. Adjust the Spice Level: Feel free to customize the hot sauce by mixing it with your favorite spices or adding more or less to suit your heat preference. Perfectly Crispy Bites: For extra crispiness, consider double-coating the cauliflower by dipping it back into the batter after the first bake. Storage Tips: Leftovers can be stored in an airtight container in the fridge for up to 3 days, but reheating in the oven will help retain their crispiness. {{image_4}} To make these bites gluten-free, use chickpea flour instead of all-purpose flour. Chickpea flour adds a nutty taste and a crispy texture. For the milk, almond milk works well, but you can try oat milk or soy milk too. These choices keep the bites tasty and plant-based. You can adjust the heat of your buffalo sauce. For a milder flavor, choose a less spicy sauce. Many brands offer options with lower heat. If you want more fire, add cayenne pepper or crushed red pepper flakes to your batter. This gives your bites an extra kick. Feel free to get creative with your seasonings. Try adding smoked paprika for a smoky taste or nutritional yeast for a cheesy flavor. You can also sprinkle in dried herbs like oregano or thyme for a unique twist. If you want a cheesy touch without using dairy, consider adding vegan cheese alternatives to your batter. These add creaminess and richness to your bites. To keep your Vegan Buffalo Cauliflower Bites fresh, store them in the fridge. Place leftovers in airtight containers. This helps maintain their flavor and texture. Let them cool down before sealing. They will stay good for about 3-4 days. If you want to save some bites for later, freezing works great! First, let them cool completely. Then, spread them out on a baking sheet. Freeze them until solid, about an hour. After that, transfer the bites to a freezer-safe bag or container. They can last for up to 2-3 months in the freezer. When ready to eat, thaw them in the fridge overnight. To enjoy your bites again, reheating is key to keeping them crispy. The oven is the best method. Preheat your oven to 400°F (200°C). Place the bites on a baking sheet and heat for about 10-15 minutes. This will help them regain their crunch. If you use a microwave, they might get soft. Aim for the oven to keep that tasty crispiness intact. You can easily make these bites gluten-free. Just swap all-purpose flour with chickpea flour. This flour gives a nice texture and flavor. You can also use almond flour or gluten-free all-purpose flour. Both options work well. Yes, you can use various sauces. Try a teriyaki sauce for a sweet twist. A barbecue sauce will also give them a smoky flavor. For a kick, use a spicy chili sauce. Each sauce will change the taste, so pick what you love. To store leftovers, let them cool first. Place them in an airtight container. Keep them in the fridge for up to three days. For longer storage, freeze them. Wrap them well in plastic wrap, then place in a freezer bag. They can last for up to three months. Absolutely! For the air fryer, preheat it to 400°F (200°C). Coat the cauliflower in batter as usual. Place the bites in a single layer in the air fryer basket. Cook for about 15 minutes, shaking halfway through. They should be crispy and golden. These bites pair well with many dips. Vegan ranch or blue cheese dressing works great. You can also serve them with celery sticks or carrot sticks. They make a fun snack for parties or game day. This blog post covered how to make Vegan Buffalo Cauliflower Bites step by step. We explored the key ingredients, including cauliflower, flour, and spices. I shared tips on achieving maximum crispiness and variations for special diets. Storing leftovers properly also ensures you enjoy these bites later. Remember, you can customize flavors and adjust spice levels to fit your taste. Now, you’re ready to create a delicious batch and impress your friends! Enjoy every crispy, spicy bite!

Vegan Buffalo Cauliflower Bites Crispy and Flavorful

Crispy and flavorful, Vegan Buffalo Cauliflower Bites are your new favorite snack. With just a few simple ingredients, you’ll create

To make Chocolate Peppermint Bark Brownies, gather these key items: - 1 cup unsalted butter - 2 cups granulated sugar - 4 large eggs - 1 teaspoon pure vanilla extract - 1 cup all-purpose flour - 1 cup unsweetened cocoa powder - 1/2 teaspoon salt - 1 cup semi-sweet chocolate chips - 1/2 cup crushed peppermint candies or crushed candy canes - 1/2 cup white chocolate chips You can switch things up with these fun additions: - Dark chocolate chips for a richer taste - Milk chocolate chips for a sweeter flavor - Different nuts like walnuts or pecans for crunch - A dash of espresso powder to enhance the chocolate flavor If you need to swap ingredients, here are some ideas: - Use coconut oil instead of butter for a dairy-free option. - Replace all-purpose flour with a gluten-free blend if needed. - Try using maple syrup instead of granulated sugar for a natural sweetener. - If you don’t have peppermint candies, use vanilla or almond extract for a different flavor. These ingredients set the base for rich and festive brownies. Experiment with them to find your perfect mix! {{ingredient_image_2}} 1. First, preheat your oven to 350°F (175°C). This step is key for even baking. 2. Next, prepare a 9x13-inch baking pan. Grease it lightly and line it with parchment paper. Leave some paper hanging over the sides. This helps you lift the brownies out later. 3. Now, melt 1 cup of unsalted butter in a medium saucepan over low heat. Stir it often to prevent burning. 4. Once melted, take the pan off the heat. Stir in 2 cups of granulated sugar until smooth. This mixture should feel glossy and rich. 5. Allow the mixture to cool a bit. Then add 4 large eggs, one at a time. Whisk well after each egg. Stir in 1 teaspoon of pure vanilla extract until combined. 6. In a separate bowl, mix 1 cup of all-purpose flour, 1 cup of unsweetened cocoa powder, and 1/2 teaspoon of salt. Sifting these ingredients helps avoid lumps. 7. Gradually fold this dry mix into the wet mixture. Stir gently until just combined. Do not overmix; this keeps your brownies soft. 8. Next, fold in 1 cup of semi-sweet chocolate chips and half of the 1/2 cup of crushed peppermint candies. This adds fun texture and flavor. 9. Pour the batter into the prepared pan. Spread it evenly with a spatula. Bake for 25-30 minutes. To check if they are done, insert a toothpick into the center. A few moist crumbs should stick to it. 10. While the brownies bake, melt 1/2 cup of white chocolate chips in a microwave-safe bowl. Heat in 20-second intervals, stirring until smooth. 11. Once your brownies are baked, remove them from the oven. Drizzle the melted white chocolate over the surface for a beautiful swirl. 12. Sprinkle the remaining crushed peppermint candies over the white chocolate for a festive touch. 13. Let the brownies cool in the pan for at least 30 minutes. After cooling, lift them out using the parchment paper. 14. Place the brownies on a cutting board and cut them into squares or rectangles. Serve them on a festive platter for a cheerful presentation. To make the best brownies, start with good ingredients. Use fresh eggs and high-quality cocoa powder. Measure your flour and cocoa powder correctly. Too much flour makes brownies dry. Always sift the dry ingredients together to mix them well. Preheating your oven to 350°F is key. This helps the brownies bake evenly. Use a light-colored pan for the best results. Dark pans can cause the edges to cook too fast. One common mistake is overmixing the batter. This can make your brownies tough. Mix until just combined. Another mistake is not letting the brownies cool enough. Cutting them too soon can lead to a messy result. Also, don’t skip the parchment paper. It helps in lifting out the brownies easily. Lastly, watch the baking time closely. Every oven is different, so check for doneness a few minutes early. For fudgy brownies, use more fat and less flour. The butter in this recipe adds richness. Use semi-sweet chocolate chips for a nice melt. This gives your brownies a dense and moist texture. Letting the brownies cool fully helps them set. You can also chill them in the fridge for extra firmness. For a fun touch, swirl the melted white chocolate on top. This adds both flavor and a lovely look! Pro Tips Use Room Temperature Eggs: For the best incorporation into your batter, ensure your eggs are at room temperature. This helps create a smoother and richer brownie texture. Don’t Overmix the Batter: To achieve fudgy brownies, mix the batter just until the dry ingredients are incorporated. Overmixing can lead to a cake-like texture. Experiment with Chocolate: Feel free to mix and match different types of chocolate chips, such as dark or milk chocolate, for a unique flavor twist. Let Them Cool Completely: For cleaner cuts and easier serving, allow the brownies to cool completely in the pan before slicing into squares. {{image_4}} You can change the flavor of your brownies easily. Try adding orange zest for a citrus twist. This brightens up the rich chocolate flavor. Almond extract can also work well. Just swap out half the vanilla with almond. For a spiced touch, add a pinch of cinnamon or nutmeg to the batter. Each of these options gives the brownies a unique taste. Making brownies gluten-free is simple. Use a gluten-free flour blend in place of all-purpose flour. Make sure it has xanthan gum for better texture. For dairy-free brownies, swap the butter for coconut oil or a dairy-free margarine. You can also use dairy-free chocolate chips for a full dairy-free treat. These changes keep the rich taste and texture. During the holidays, you can enhance your brownies for festive fun. For Christmas, add in dried cranberries or chopped nuts. They add color and crunch. For Halloween, try swirling in some orange food coloring along with the white chocolate. You can also top with candy corn for a spooky touch. Each holiday offers a new way to enjoy these brownies. To keep your chocolate peppermint bark brownies fresh, store them in an airtight container. Use parchment paper between layers to avoid sticking. Brownies are best kept at room temperature for up to four days. If you want them to last longer, refrigerate them. Just remember to let them come back to room temp before serving. Freezing brownies is a breeze. First, let them cool completely. Then, cut them into squares. Wrap each piece tightly in plastic wrap. Place the wrapped brownies in a freezer-safe bag or container. They can last in the freezer for up to three months. When you're ready to enjoy them, just take them out and let them thaw at room temperature. If you want warm brownies, preheat your oven to 350°F (175°C). Place the brownies on a baking sheet. Cover them with foil to avoid drying out. Heat for about 10 to 15 minutes. You can also use the microwave. Place a brownie on a plate and heat it for 10 to 15 seconds. Enjoy the melted chocolate taste! You can test the brownies by using a toothpick. Insert it into the center of the brownies. If it comes out with a few moist crumbs, they are done. If there is wet batter on the toothpick, bake them a bit longer. The edges should look set and slightly pull away from the pan. Keep an eye on the time; baking takes about 25-30 minutes at 350°F. Yes, you can use different types of chocolate in these brownies. Dark chocolate will give a rich flavor. Milk chocolate adds sweetness. You can even mix chocolates for a unique taste. Just make sure to adjust the sugar if you use very sweet chocolate. Be creative and enjoy the process! If you don’t have peppermint, try using other flavors. Almond or orange extract can work well. You can also use a splash of vanilla for a simple twist. For a fruity touch, consider adding crushed berries or citrus zest. Experiment and find what you like best! In this post, I covered essential ingredients, baking steps, and tips for perfect brownies. You learned how to customize flavors and avoid common mistakes. I shared ideas for storing and reheating leftover brownies. Remember, each batch is a chance to improve your skills. Keep experimenting to find your favorite version. Enjoy the journey of baking and sharing delicious treats with others. Your sweet creations will surely impress everyone!

Chocolate Peppermint Bark Brownies Rich and Simple Treat

Craving a sweet, festive treat? Let’s dive into Chocolate Peppermint Bark Brownies! These rich, easy brownies blend chocolate and peppermint

- 1 cup quinoa, rinsed - 2 cups vegetable broth - 1 cup kale, chopped - 1 cup roasted sweet potatoes, diced - 1/2 cup chickpeas, drained and rinsed - 1/4 cup walnuts, roughly chopped - 1/4 avocado, sliced - 2 tablespoons tahini - 1 tablespoon freshly squeezed lemon juice - 1 teaspoon ground turmeric - 1/2 teaspoon ground ginger - 1/2 teaspoon ground cumin - Salt and black pepper to taste - Fresh cilantro sprigs for garnish Quinoa is a complete protein. It has all nine essential amino acids. This makes it great for muscle repair. Kale is a super green packed with vitamins A, C, and K. It helps boost your immune system. Sweet potatoes are rich in fiber and beta-carotene. These nutrients help improve digestion and vision. Chickpeas add protein and help keep you full. They also support heart health. Walnuts are full of healthy fats. They help lower bad cholesterol and reduce inflammation. Turmeric is famous for its anti-inflammatory properties. It may help ease joint pain. Ginger aids digestion and can soothe nausea. Lastly, tahini is a creamy delight full of healthy fats and protein. You can replace quinoa with brown rice or farro. Both offer great texture and nutrition. If you want a nut-free option, use sunflower seeds instead of walnuts. Spinach or Swiss chard can be a tasty swap for kale. For a creamy dressing, try using Greek yogurt instead of tahini. You can also use lime juice instead of lemon for a different twist. If you do not have chickpeas, black beans work well too. Just adjust the seasoning to your taste. {{ingredient_image_2}} Start by rinsing 1 cup of quinoa under cold water. This step helps remove any bitter taste. Next, add the rinsed quinoa and 2 cups of vegetable broth to a medium-sized saucepan. Heat this mixture over medium-high heat until it boils. Once it reaches a boil, lower the heat to low, cover it, and let it simmer. Cook for about 15 minutes or until the quinoa is fluffy and the liquid is gone. After cooking, fluff the quinoa with a fork for a light texture. While the quinoa cooks, preheat your oven to 400°F (200°C). Take 1 cup of diced sweet potatoes and spread them out on a baking sheet in a single layer. Drizzle with olive oil and sprinkle with salt, black pepper, and half of the ground turmeric. Roast these sweet potatoes for 25-30 minutes. Turn them halfway through for even cooking. They should come out tender and slightly caramelized. In a skillet over medium heat, add 1 cup of chopped kale. Toss in the remaining ground turmeric, ground ginger, and ground cumin. Sauté the kale for 3-5 minutes until it wilts down. Be sure to season it lightly with salt and black pepper. This adds a nice flavor to the greens. Grab a small mixing bowl and whisk together 2 tablespoons of tahini and 1 tablespoon of freshly squeezed lemon juice. If the dressing is too thick, add a splash of water to thin it out. Keep mixing until you reach a creamy consistency. Adjust with more water if needed for your desired thickness. Now it’s time to bring everything together! Divide the cooked quinoa evenly into serving bowls. On top of the quinoa, layer the sautéed kale, roasted sweet potatoes, and 1/2 cup of drained chickpeas. Drizzle the tahini dressing generously over each bowl. Finish by adding slices of avocado, a handful of chopped walnuts, and fresh cilantro sprigs for a bright touch. This makes your glow bowl not only healthy but also visually appealing. To cook quinoa just right, rinse it first. This removes bitter coating. Use a medium-sized pot. Combine one cup of rinsed quinoa with two cups of vegetable broth. Heat the pot over medium-high heat until it boils. Then, lower the heat to a simmer. Cover the pot and let it cook for about 15 minutes. The quinoa will absorb the broth and become fluffy. Use a fork to fluff it after cooking. This method ensures tasty, perfect quinoa every time. Roasting brings out the sweet flavor of vegetables. For sweet potatoes, preheat your oven to 400°F (200°C). Cut the sweet potatoes into small cubes for even cooking. Spread them on a baking sheet in a single layer. Drizzle with olive oil and sprinkle with salt and black pepper. Add half of the ground turmeric for extra flavor. Roast for 25 to 30 minutes. Turn them halfway for even browning. They should be tender and slightly caramelized when done. Seasonings make your bowl pop with flavor. Use fresh ingredients for the best taste. Add ground turmeric, ginger, and cumin to your sautéed kale. These spices add warmth and depth. A little salt and black pepper will enhance all the flavors. For the tahini dressing, mix tahini with lemon juice. This adds a nice tang. You can adjust the thickness with water. Taste as you go, and feel free to add more of your favorite spices. Presentation matters when serving your glow bowl. Use wide bowls to show off all the vibrant colors. Layer each ingredient in clusters for a beautiful display. Start with quinoa at the base, then add sautéed kale, roasted sweet potatoes, and chickpeas. Drizzle the tahini dressing over the top. Finish with avocado slices, walnuts, and fresh cilantro sprigs. This adds freshness and visual appeal. A well-presented dish makes every bite more enjoyable. Pro Tips Use Fresh Ingredients: The fresher your vegetables and herbs, the more vibrant the flavors will be. Opt for organic produce when possible for the best taste and nutritional benefits. Prep Ahead: You can prepare the quinoa and roast the sweet potatoes in advance. Store them in the refrigerator to save time during meal prep! Customize Your Bowl: Feel free to add other vegetables or proteins to your glow bowl, such as bell peppers, roasted broccoli, or grilled chicken, to suit your taste preferences. Perfect Tahini Dressing: Adjust the consistency of your tahini dressing by adding more or less water. For a stronger flavor, add a pinch of garlic powder or a dash of cayenne pepper. {{image_4}} You can easily boost the protein in your Anti-Inflammatory Glow Bowl. Chicken or tofu works well. For chicken, grill or bake it until it’s cooked through. Cut it into bite-sized pieces and add it on top of your bowl. If you prefer tofu, press it to remove excess water. Then sauté or bake it until golden. This adds protein and keeps the bowl filling. Feel free to mix up your toppings. You can add seeds like pumpkin or sunflower for crunch. These seeds give healthy fats and protein. You might also want to try other vegetables like bell peppers or broccoli. Just roast or sauté them like you did with the sweet potatoes and kale. This adds color and flavor to your meal. Use seasonal veggies for variety and freshness. In spring, add asparagus or peas for a fresh taste. During summer, cherry tomatoes or zucchini brighten the bowl. In fall, consider adding Brussels sprouts or butternut squash. Winter greens like Swiss chard or spinach can keep your bowl vibrant all year. Adjust based on what you find at your local market for the best flavors. To store your Anti-Inflammatory Glow Bowl, let it cool first. Place it in an airtight container. You can keep it in the fridge for up to three days. Keep the tahini dressing separate to avoid sogginess. When you're ready to enjoy your leftovers, reheat the quinoa and veggies. Use a microwave or a skillet on low heat. If using a microwave, heat in short bursts. Stir in between until everything is warm. If the quinoa seems dry, add a splash of water. I recommend glass containers for storage. They keep food fresh and are easy to clean. If you want to save space, use stackable containers. Make sure they have a good seal to prevent spills. Turmeric is great for reducing inflammation. It has a compound called curcumin. This compound helps fight pain and supports joint health. Turmeric can also boost your immune system. It may even improve brain function. Many people use it for better digestion. Yes, this recipe is already vegan! It does not use any animal products. The tahini adds flavor and creaminess. You can enjoy this glow bowl without any worries about meat or dairy. The glow bowl stays fresh for about three days in the fridge. Store it in an airtight container. Make sure to keep the tahini dressing separate until you are ready to eat. This keeps the ingredients fresh and tasty. If you don’t have tahini, you can use almond butter or sunflower seed butter. These alternatives provide a similar creamy texture. You can also try yogurt for a different flavor. Just mix it with lemon juice for a tangy taste. Yes, this recipe is gluten-free. Quinoa is a great gluten-free grain. All the other ingredients are also safe for those with gluten sensitivities. Enjoy this healthy meal without any gluten concerns! This post covered the main steps to create a delicious glow bowl. We explored the key ingredients and their health benefits. I shared simple instructions for prepping quinoa, sweet potatoes, and kale. You learned about flavor tricks and ways to add variety. Plus, I offered tips for storage and reheating. Embrace your creativity and make this recipe yours. Enjoy healthy meals that taste great and nourish.

Anti Inflammatory Glow Bowl Healthy Power Meal

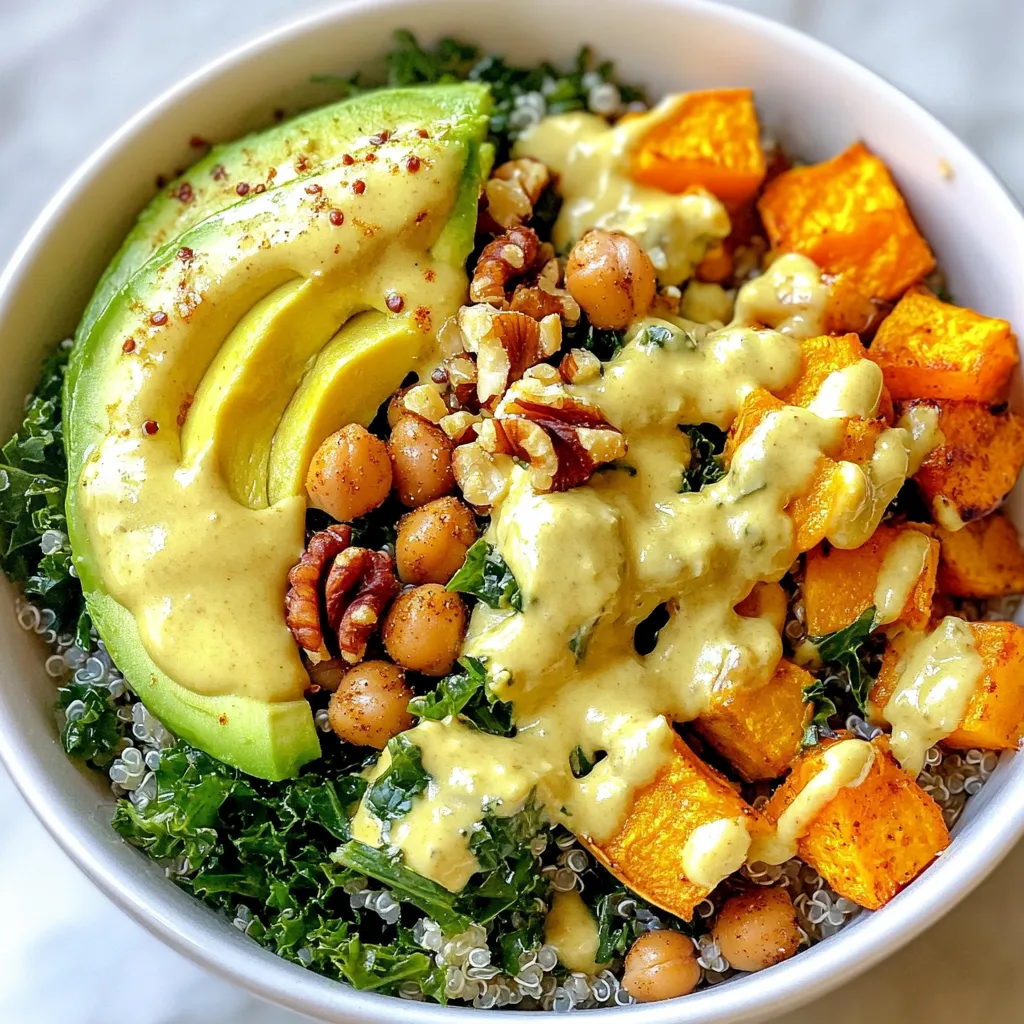
Are you ready to fuel your body with a meal that boosts health and brings joy? The Anti Inflammatory Glow

Older posts
Newer posts
← Previous Page1 … Page5 Page6 Page7 … Page120 Next →

dsad

© 2026 yumymoments • Built with GeneratePress

Our Policies

  • Copyright Policy
  • Cookie Policy
  • GDPR Policy
  • Privacy Policy
  • Disclaimer
  • Terms Of Use

More Information

  • Home
  • About
  • Contact
  • Appetizers
  • Dessert
  • Dinner
  • Drinks
©2026, yumymoments About Back To Top