Skip to content
DisclaimerTerms Of UseGDPR PolicyCookie Policy

yumymoments

  • Home
  • Drinks
  • Appetizers
  • Dinner
  • Dessert
  • About
  • Contact
  • Privacy Policy
DisclaimerTerms Of UseGDPR PolicyCookie Policy

Samantha

- 4 boneless, skinless chicken breasts - 1/4 cup extra virgin olive oil - 2 fresh lemons (juice and zest) - 3 cloves garlic, finely minced - 2 teaspoons dried oregano - 2 teaspoons fresh thyme leaves (or 1 teaspoon dried thyme) - 1 teaspoon smoked paprika - Salt and freshly ground black pepper, to taste - Fresh parsley, chopped, for garnish - Lemon wedges, for serving The main star here is chicken. It’s a great source of protein and keeps you full. Olive oil adds healthy fats and flavor. Fresh lemons bring a bright taste and vitamin C. Garlic not only adds zest but also boosts your immune health. Herbs like oregano and thyme give the dish depth and aroma. Smoked paprika adds a lovely smoky flavor, making every bite exciting. Fresh herbs taste vibrant and aromatic. They can brighten any dish. I suggest using fresh thyme if you can find it. Dried herbs are more convenient and still pack flavor. If you use dried, just remember to use less. A good rule is to use one-third of the amount. This way, you keep the taste right without overpowering the dish. This recipe is simple and rewarding. First, you make a tasty marinade. Next, you coat the chicken in that marinade. After letting it sit, you grill the chicken to perfection. This method gives you juicy, flavorful chicken every time. To make the marinade, gather the following items: - 1/4 cup extra virgin olive oil - 2 fresh lemons (juice and zest) - 3 cloves garlic, finely minced - 2 teaspoons dried oregano - 2 teaspoons fresh thyme leaves (or 1 teaspoon dried thyme) - 1 teaspoon smoked paprika - Salt and freshly ground black pepper, to taste In a large bowl, add the olive oil, lemon juice, and zest. Then, mix in the minced garlic, oregano, thyme, smoked paprika, salt, and pepper. Use a whisk to blend everything well. This mix will soak into the chicken and make it burst with flavor. Once your chicken has marinaded, it’s time to grill. Here’s how: 1. Preheat your grill to medium-high, aiming for 375°F to 400°F. This heat is best for a tasty char. 2. Take the chicken out of the marinade and let any extra drip off. 3. Place the chicken on the grill. Cook for 6-7 minutes on each side. You want it to reach 165°F inside. Check the thickest part to avoid any pink. 4. After grilling, move the chicken to a plate. Cover it loosely with foil and let it rest for 5-10 minutes. This helps the juices stay in the chicken, making it extra juicy. Now, slice and enjoy! For a beautiful touch, sprinkle fresh parsley on top. Serve with lemon wedges for a zesty kick. If you want more details, check out the Full Recipe for Lemon Herb Grilled Chicken. To get the best taste, marinate your chicken right. I recommend marinating it for at least 30 minutes. If you can, marinate for up to 4 hours. This time lets the flavors soak in deeply. Use a bowl with a lid or cover it with plastic wrap. Make sure the chicken is coated well in the marinade. Flip it halfway through to ensure all sides are flavorful. Grill temperature matters a lot for perfect chicken. Aim for medium-high heat, which is about 375°F to 400°F. This range helps the chicken cook through without drying it out. Grill each side for about 6-7 minutes. Timing may differ based on your grill, so keep an eye on it. Checking if your chicken is done is simple. Use a meat thermometer to check the thickest part. It should read 165°F. If you don’t have a thermometer, cut into the chicken. There should be no pink inside. Once done, let it rest for 5-10 minutes before slicing. This makes it juicy and keeps the flavors locked in. For the complete cooking method, check the Full Recipe link. {{image_4}} You can switch up the flavors in your Lemon Herb Grilled Chicken. Try using different herbs like rosemary or basil. These herbs can bring a unique taste. You can also add a spoonful of honey for a touch of sweetness. For a spicy kick, mix in some red pepper flakes. If you want a different acid, swap lemon for lime. Each change can make the dish new and exciting. You don’t have to grill to enjoy this dish. You can cook it in the oven. Preheat your oven to 400°F. Place the marinated chicken on a baking sheet. Bake for about 20-25 minutes, or until cooked through. You can also use a skillet on the stove. Heat some olive oil over medium heat in the pan. Cook each side for about 6-7 minutes. Both methods keep the chicken juicy and full of flavor. Pair Lemon Herb Grilled Chicken with fresh sides. A garden salad brightens up the meal. Roasted vegetables like zucchini and bell peppers add color. You can also serve it with rice or quinoa for a filling option. For a refreshing touch, add a yogurt sauce or tzatziki on the side. This will bring coolness against the chicken's warm spices. Explore different combinations to find your favorite! To keep leftover grilled chicken fresh, place it in an airtight container. This helps prevent drying. You can store it in the fridge for up to 3 days. Always let the chicken cool to room temperature before sealing it. This way, it stays juicy and tasty. When reheating, the goal is to keep the chicken moist. You can use a microwave, oven, or stovetop. In the microwave, cover the chicken with a damp paper towel. Heat in short bursts of 30 seconds. If using the oven, set it to 350°F. Bake for about 10-15 minutes, covered with foil. This method keeps it from drying out. The stovetop is great too; just add a splash of water and cover the pan. Freezing is a fantastic way to keep grilled chicken longer. Wrap each piece tightly in plastic wrap. Then place them in a freezer-safe bag or container. You can freeze it for up to 3 months. When ready to eat, thaw in the fridge overnight. For quick meals, you can take out pieces and use them in salads or wraps. Just remember to reheat thoroughly! You should marinate chicken for at least 30 minutes. This helps the chicken soak up all the flavors. For the best taste, marinate it for up to 4 hours. Longer marinating times can make the chicken even juicier and more tasty. Yes, you can use bone-in chicken for this recipe. Bone-in chicken adds more flavor and keeps the meat moist. Just remember to adjust the cooking time. Bone-in pieces usually take longer to cook than boneless ones. Lemon Herb Grilled Chicken is a healthy choice. Each serving has about 220 calories. You get around 30 grams of protein. It also has healthy fats from olive oil. The herbs add vitamins and minerals, making it a well-rounded meal. Yes, you can make this recipe in advance. You can marinate the chicken the night before. Just store it in the fridge until you're ready to grill. Grilled chicken also keeps well in the fridge for up to 3 days. Enjoy it in salads or sandwiches! For the complete guide, check the Full Recipe. Lemon Herb Grilled Chicken is a simple and tasty dish. We covered the key ingredients and their benefits. Fresh herbs can add zest, while dried herbs work too. I shared step-by-step instructions for marinating and grilling. Tips helped you master flavors and cooking times. You can customize this dish and choose your cooking method. Storing leftovers is easy and can extend your meals. I hope you feel ready to try this recipe. Enjoy grilling and adding your twist!

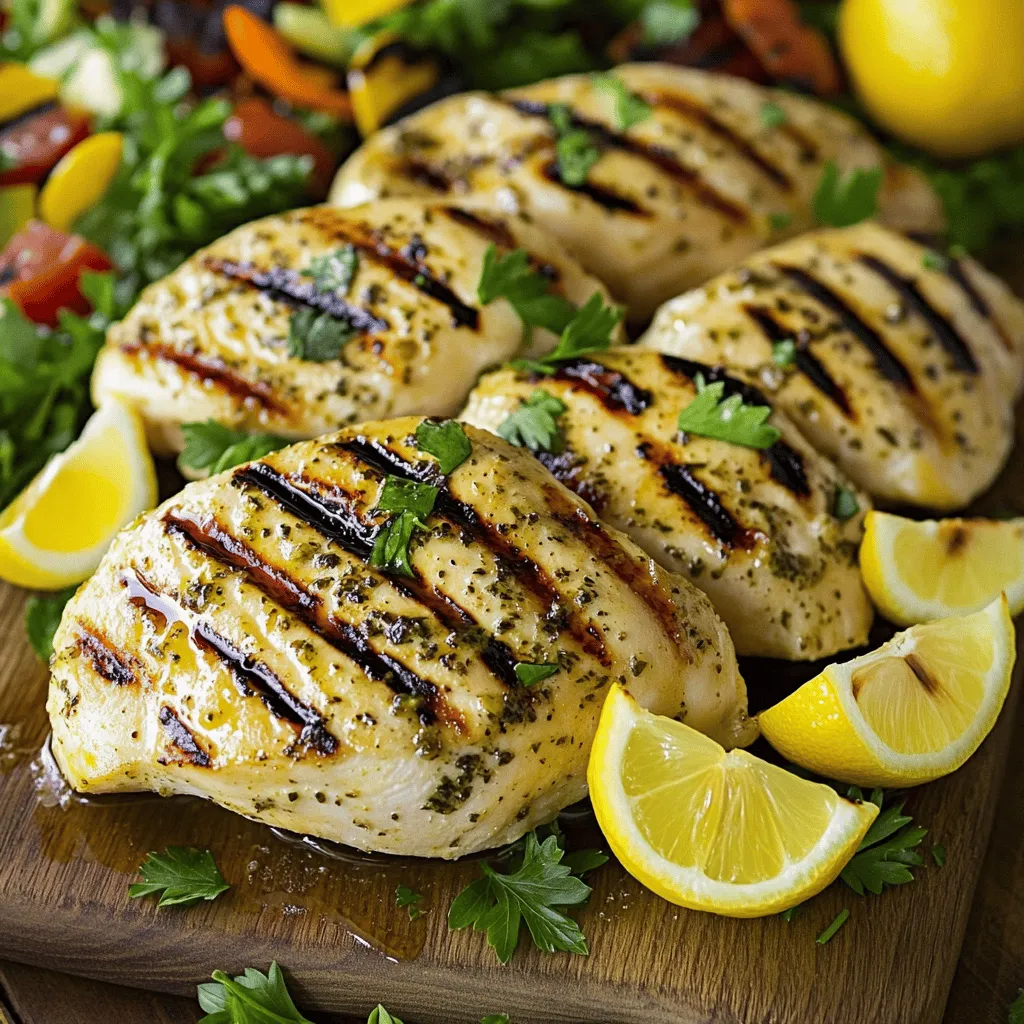
Lemon Herb Grilled Chicken Recipe for Tasty Meals

If you’re craving a bright, flavorful meal, this Lemon Herb Grilled Chicken recipe is for you! I’ll guide you through

- 1 cup rolled oats - 1 ½ cups almond milk (or your preferred milk) - 1 medium apple, peeled and diced - 1 tablespoon chia seeds The main ingredients make this breakfast filling and tasty. Rolled oats are the base. They provide fiber and help keep you full. Almond milk adds creaminess and a nutty flavor. You can use any milk you like. Diced apples bring sweetness and crunch. Chia seeds add a boost of nutrition and help thicken the oats. - 1 tablespoon maple syrup (or honey) - 1 teaspoon ground cinnamon - ½ teaspoon vanilla extract - A pinch of salt - 2 tablespoons chopped pecans (optional) - Fresh apple slices and an extra sprinkle of cinnamon for topping You can customize your oats to fit your taste. Maple syrup or honey offers extra sweetness. Ground cinnamon gives warmth and spice. Vanilla adds a lovely aroma. Salt enhances all the flavors. Chopped pecans give a crunchy texture. Fresh apple slices on top look nice and taste great too. - Caloric content per serving: about 300 calories - Health benefits of ingredients: oats are high in fiber, apples provide vitamins, chia seeds are rich in omega-3s - Dietary considerations: This recipe is vegan and gluten-free if you use gluten-free oats Each serving of these overnight oats packs a nutritious punch. The oats give you energy to start your day. Apples are full of vitamins and antioxidants. Chia seeds are small but mighty, adding healthy fats. This meal fits many diets, making it easy for everyone to enjoy. For the full recipe, check out the details provided above. To start, gather your ingredients. In a medium mixing bowl, combine the following: - 1 cup rolled oats - 1 ½ cups almond milk (or your preferred milk) - 1 tablespoon chia seeds - 1 tablespoon maple syrup (or honey) - 1 teaspoon ground cinnamon - ½ teaspoon vanilla extract - A pinch of salt Now, whisk or stir them together. Make sure everything blends well. This mixing is key for a smooth texture. I like to use a fork for easy stirring. It helps break up any clumps. Next, it's time to fold in the diced apples. Take your peeled and diced apple and gently add it to the mixture. - Make sure to mix it slowly. This way, you keep the apple pieces whole. They add crunch and flavor. Aim for even distribution. You want bites of apple in every spoonful. After mixing everything, transfer it to a mason jar or an airtight container. I like to add a layer of diced apples on top for a nice look. Then, seal the container tightly. Place it in the fridge to chill overnight. This soaking process is important. It helps the oats absorb the liquid. The oats will soften and become creamy. In the morning, just give it a stir. If it seems thick, add a splash of milk. Enjoy your Apple Cinnamon Overnight Oats, a simple and tasty recipe! To get the best texture for your apple cinnamon overnight oats, adjust the liquid based on your taste. If you like creamier oats, add a bit more almond milk. For thicker oats, use less. Before you serve, give the mixture a good stir. This helps mix in any ingredients that settled at the bottom. Serving your oats in jars looks great! Clear glass jars let you show off the lovely layers. For a fun touch, garnish with chopped pecans and a sprig of fresh mint. This adds both flavor and a pop of color to your dish. If mornings are busy, consider batch preparation. You can make several jars at once. Pre-dicing your apples also saves time. Prepare your oats in advance, and you’ll have a quick breakfast ready to go! {{image_4}} You can make your apple cinnamon overnight oats even tastier by adding other fruits. Try sliced bananas or fresh berries. Bananas add a creamy texture, while berries give a burst of flavor. Both options mix well with the oats. You can also play with spices. Nutmeg and allspice bring warmth and depth. A pinch of nutmeg can enhance the apple flavor. Allspice can add a cozy, spiced note. Feel free to experiment until you find your favorite blend! If you want dairy-free options, choose coconut or oat milk. Both are creamy and delicious. They help make the dish rich without using cow’s milk. When it comes to sweeteners, maple syrup and honey work great. Maple syrup gives a unique flavor. Honey adds a floral sweetness. You can adjust the amount based on your taste. Just remember, less is more if you want a healthier option. In fall, add pumpkin puree or dried cranberries to your oats. Pumpkin gives a smooth texture and a fun twist. Cranberries add a tart flavor that plays well with sweet apples. During summer, use fresh fruits like peaches or strawberries. They brighten up the dish and add freshness. You can even mix in some coconut flakes for a tropical vibe. The options are endless, so have fun with seasonal flavors! To keep your Apple Cinnamon Overnight Oats fresh, use an airtight container or a mason jar. Both work well, but mason jars offer a fun look. Seal them tightly to prevent air from spoiling the oats. Store them in the fridge for up to five days. This way, you always have a quick breakfast ready. If you want to save your oats for later, freezing is a great option. Pour the mixture into a freezer-safe container. Leave some space at the top for expansion. You can freeze them for up to three months. When ready to eat, thaw them overnight in the fridge. Reheat them in the microwave for about 1-2 minutes. Add a splash of milk to get the right texture again. Always check your oats before eating. If they smell sour or look discolored, it's time to toss them. Fresh oats should smell sweet and cinnamon-like. If you see mold, do not eat them. Dispose of them safely in your compost bin or trash. Keeping an eye on freshness helps you enjoy tasty oats every time. Yes, you can prep Apple Cinnamon Overnight Oats ahead of time. It’s best to store them in the fridge for up to five days. This makes it easy to grab a quick breakfast. To make oats for the whole week, simply double or triple the recipe. Use separate jars for easy servings. If you don’t have chia seeds, you can use flaxseeds or ground nuts. Flaxseeds add a nutty flavor, while nuts give a nice crunch. Both options will change the texture a bit. You may find the mixture less creamy but still tasty. You can make Apple Cinnamon Overnight Oats healthier by reducing the sugar. You might also add a scoop of protein powder. Incorporating superfoods like nuts or seeds boosts the nutrients. These changes keep the oats delicious while making them better for you. Apple cinnamon overnight oats are a simple, tasty meal. You learned the key ingredients, like rolled oats and diced apples, and tips for perfecting the recipe. I shared flavor ideas, storage advice, and ways to customize this dish to fit your needs. Remember, you can prep your oats ahead for busy mornings. Enjoy experimenting with flavors, textures, and seasonal ingredients. With these tips, you can create a nutritious breakfast that fuels your day. Dive in and make your own delicious version today!

Apple Cinnamon Overnight Oats Simple and Tasty Recipe

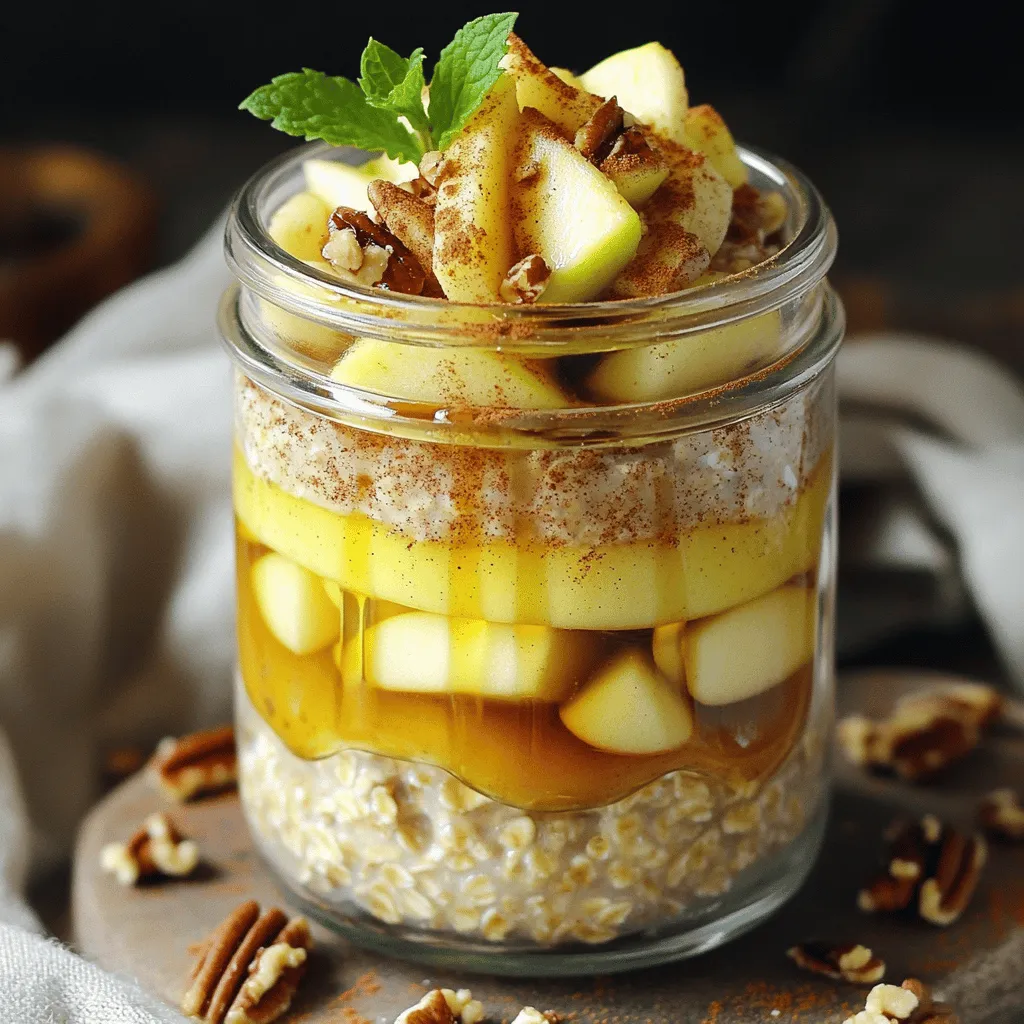
Wake up to a tasty breakfast with my Apple Cinnamon Overnight Oats! This simple recipe blends rolled oats, milk, and

- 1 cup all-purpose flour - 2 tablespoons granulated sugar - 1 tablespoon baking powder - 1/2 teaspoon baking soda - 1/4 teaspoon fine salt - 1 cup buttermilk (or milk with lemon juice) - 1 large egg - 2 tablespoons unsalted butter - 1 teaspoon pure vanilla extract - 1/2 cup semi-sweet chocolate chips - Optional toppings: whipped cream, fresh berries When I make chocolate chip pancakes, I love to use fresh ingredients. The all-purpose flour gives the pancakes a nice texture. The granulated sugar adds a hint of sweetness, which is so lovely with the chocolate chips. Baking powder and baking soda help the pancakes rise and become fluffy. Buttermilk makes the pancakes tender and moist. If you don't have buttermilk, you can mix regular milk with lemon juice. The egg binds everything together, while melted butter adds richness. The pure vanilla extract brings warmth and flavor. Finally, the semi-sweet chocolate chips melt into gooey goodness. Feel free to add toppings like whipped cream and fresh berries. They make the pancakes even more delightful. For a full recipe, check out the details I shared above. - Sift together: - 1 cup all-purpose flour - 2 tablespoons granulated sugar - 1 tablespoon baking powder - 1/2 teaspoon baking soda - 1/4 teaspoon fine salt - Mix well to ensure even distribution. This helps every bite taste great. - In a separate bowl, combine: - 1 cup buttermilk (or milk with 1 tablespoon lemon juice) - 1 large egg - 2 tablespoons melted unsalted butter - 1 teaspoon pure vanilla extract - Whisk until smooth. A good mix makes for fluffy pancakes. - Create a well in the center of the dry mix. - Pour in the wet mix. - Gently fold in: - 1/2 cup semi-sweet chocolate chips - Mix until just combined. A few lumps are okay. Overmixing can lead to flat pancakes. - Preheat your griddle over medium heat. - Lightly grease it with cooking spray or butter if needed. - For each pancake, pour about 1/4 cup of batter onto the griddle. - Cook for 2-3 minutes. Look for bubbles on top and edges that set. - Flip gently with a spatula. Cook for another 1-2 minutes. - The pancakes should be golden brown. - Keep cooked pancakes warm on a plate while you finish the batter. For the full recipe, check the earlier section. To make the best chocolate chip pancakes, avoid overmixing the batter. When you mix, stop as soon as you see no dry flour. A few lumps are fine. This keeps the pancakes fluffy and light. For fluffy pancakes, use room-temperature ingredients. Cold eggs or milk can make the batter thick. Also, let the batter sit for a few minutes before cooking. This helps it rise better while cooking. When serving your pancakes, think about toppings. Pure maple syrup is a classic choice. You can also add a dollop of whipped cream. Fresh berries like strawberries or blueberries add color and taste. For a fun twist, stack pancakes high and drizzle chocolate sauce on top. You could even sprinkle some extra chocolate chips for a treat. Make your pancakes look fancy and inviting! For making these pancakes, you need some basic tools. A large mixing bowl is great for the batter. A whisk helps mix wet ingredients well. Use a non-stick griddle or frying pan for cooking. You will also need a spatula to flip the pancakes. A measuring cup helps with pouring the right amount of batter. With these tools, you’ll be ready to create delicious pancakes! For the complete recipe, check out the [Full Recipe]. {{image_4}} You can easily make gluten-free chocolate chip pancakes. For this, substitute the all-purpose flour with gluten-free flour. You can use almond flour, coconut flour, or a gluten-free baking mix. Each option gives a unique flavor and texture. When you substitute the flour, you might need to adjust the liquid. Gluten-free flours often absorb more liquid. Start with the same amount of buttermilk. Then, add more as needed until the batter is thick but pourable. To make vegan chocolate chip pancakes, replace the egg and dairy. Use flaxseed meal or applesauce in place of the egg. For the buttermilk, swap in almond milk or soy milk with a splash of lemon juice. This keeps the pancakes moist and fluffy. Be mindful of texture when using these substitutes. Mix the batter gently to avoid toughness. Let the batter rest for a few minutes to help it thicken. Want to change up the flavor? Consider adding spices like cinnamon or nutmeg. A dash can elevate the taste. You can also mix in fruits, such as mashed bananas or blueberries. Nuts like walnuts or pecans add a nice crunch. Incorporate these additions during the mixing stage. Fold them in gently so the pancakes stay fluffy. Enjoy experimenting with flavors to find your favorite twist on classic chocolate chip pancakes! For a complete recipe, check the Full Recipe section above. To keep your leftover chocolate chip pancakes fresh, follow these steps: - Cool Them Down: Allow the pancakes to cool to room temperature first. - Use Airtight Containers: Place them in a container that seals tightly. This prevents air from making them dry. - Refrigerate: Store them in the fridge. They will stay fresh for up to 3 days. If you want to keep them longer, consider freezing them. Pancakes can last in the freezer for 2 months when wrapped well. Reheating pancakes properly helps keep their fluffy texture. Here are some methods: - Microwave: Place pancakes on a plate and cover with a damp paper towel. Heat for about 20-30 seconds. This keeps them moist. - Toaster: You can pop them in the toaster for a quick reheat. This method adds a nice crispness. - Skillet: Heat a skillet over low heat and warm pancakes for a minute on each side. This method works well for larger batches. By using these tips, you can enjoy your chocolate chip pancakes even after the first serving! Yes, you can use regular milk. To mimic buttermilk, add 1 tablespoon of lemon juice to 1 cup of milk. Let it sit for about 5 minutes. This mixture will work well in the recipe. Look for bubbles on the surface. When you see bubbles, the pancakes are ready to flip. The edges should also look set and dry. After flipping, cook until both sides are golden brown. Absolutely! You can mix the batter and store it in the fridge. Just cover it well. Use it within 24 hours for the best results. Stir gently before cooking; it may thicken a bit. For the full recipe, refer to the earlier section. This blog post covered how to make delicious chocolate chip pancakes. We looked at the ingredients, step-by-step instructions, and useful tips. I shared variations like gluten-free and vegan options. You can store leftovers and reheat them easily. Making pancakes can be fun and tasty. Try out these tips, and enjoy fluffy pancakes any day. Your breakfast will be more enjoyable with them on the table!

Chocolate Chip Pancakes Delightful Breakfast Treat

Do you crave a breakfast that feels like a treat? Chocolate chip pancakes are the perfect solution! With their fluffy

- 4 salmon fillets (each 6 ounces) - 2 tablespoons extra virgin olive oil - Zest and juice of 1 large lemon - 2 cloves garlic, finely minced - 1 tablespoon fresh dill, finely chopped - 1 tablespoon fresh parsley, finely chopped - 1 teaspoon sea salt - ½ teaspoon freshly ground black pepper The main ingredients are all about simple flavors. Salmon is rich and tasty, making it great for grilling. The herbs add freshness, while the lemon gives a bright kick. Olive oil keeps everything moist and adds depth. - Lemon slices - Fresh dill sprigs Garnishes are not just for looks. Lemon slices add a nice touch and enhance flavor. Fresh dill sprigs bring a pop of color and aroma. They make your dish look and taste better, so don’t skip them! For the full recipe, you can check out my detailed instructions. Enjoy making this flavorful dish! To make the marinade, gather a mixing bowl. In that bowl, add: - 2 tablespoons extra virgin olive oil - Zest and juice of 1 large lemon - 2 cloves garlic, finely minced - 1 tablespoon fresh dill, finely chopped - 1 tablespoon fresh parsley, finely chopped - 1 teaspoon sea salt - ½ teaspoon freshly ground black pepper Whisk these ingredients well. This mix smells great and packs a punch of flavor. Next, rinse the salmon fillets under cold water. Pat them dry using paper towels. This step helps the marinade stick better. Place the salmon in a shallow dish or a resealable plastic bag. Pour the marinade over the salmon. Make sure each fillet gets a good coat. Cover the dish or seal the bag. Let it marinate in the fridge for at least 30 minutes. This lets the flavors soak into the fish. While the salmon marinates, preheat your grill to medium-high heat. This means the grill should be hot but not too hot. To stop the salmon from sticking, use a paper towel dipped in vegetable oil to lightly oil the grill grates. Once the grill is ready, carefully place the salmon on it, skin-side down. Grill the fish for about 4 to 5 minutes. Do not move the fillets during this time. After that, use a spatula to flip the salmon. Grill for another 4 to 5 minutes. You will know the fish is done when it flakes easily with a fork. The internal temperature should reach 145°F (63°C). After grilling, take the salmon off the grill and let it rest for a few minutes. This keeps it juicy. For a lovely presentation, serve the grilled salmon on a bed of mixed greens. You can also pair it with grilled vegetables. Just before serving, add fresh lemon slices and sprigs of dill on top. This makes the dish look even more appealing. For extra flavor, drizzle a little lemon juice over the top before serving. For the full recipe, check out the details above. Enjoy your delicious Lemon Herb Grilled Salmon! To get those perfect grill marks, start by heating your grill to medium-high. This high temperature sears the salmon skin and gives it a nice char. When placing salmon on the grill, do not rush to flip it. Let it cook for about 4 to 5 minutes before turning. This helps create a crust that prevents sticking. After the first side is done, use a spatula to flip it gently. This will keep your salmon intact and looking great. Always remember to let your salmon rest after grilling. This resting time is key to keeping it juicy. Place the salmon on a plate and cover it lightly with foil for a few minutes. Also, avoid overcooking. Salmon cooks quickly, so watch it closely. The best sign it's ready is when it flakes easily with a fork and reaches 145°F. While the lemon herb marinade is fantastic, feel free to add more herbs. Fresh thyme or basil can really boost flavor. You can also swap the marinade for a teriyaki sauce for a sweet twist. If you want to try something new, use spices like paprika or chili powder. These can add a fun kick to your dish. Explore different flavors to find your favorite! For the full recipe, check out the Lemon Herb Grilled Salmon recipe. {{image_4}} You have options for cooking your lemon herb grilled salmon. Grilling gives it a smoky flavor and nice grill marks. Baking is another great choice. It cooks evenly and is simple. Just place the salmon in a baking dish and bake at 375°F for about 15-20 minutes. You can also pan-sear the salmon. Heat oil in a skillet over medium heat, place the salmon skin-side down, and cook for 4-5 minutes per side. Feel free to switch up the herbs in your marinade. Try using basil or thyme instead of dill and parsley. You can also add a touch of honey or maple syrup. This creates a sweet and savory blend that enhances the salmon's flavor. Another option is to mix in some chili flakes for a spicy kick. These small changes can make your dish unique every time. This recipe can fit many diets. It is naturally gluten-free. Just ensure your marinade ingredients are gluten-free. If you are on a low-carb diet, this dish is perfect. Salmon is rich in healthy fats and protein. Pair it with a side of grilled vegetables or a fresh salad for a complete meal that aligns with your diet. You can enjoy this delicious salmon without worry! For the full recipe, check out the Lemon Herb Grilled Salmon section. Store leftover lemon herb grilled salmon in an airtight container. This keeps the fish fresh. It’s best to eat the salmon within three days. To avoid spoilage, always cool it to room temperature before sealing. If you have extra marinade, it can add flavor when reheating. You can freeze salmon if you need to store it longer. Wrap each fillet in plastic wrap, then place them in a freezer bag. This prevents freezer burn. It’s best to use frozen salmon within three months for the best taste. For thawing, place it in the fridge overnight. If you’re in a hurry, you can use cold water in a sealed bag. When reheating, aim to keep the salmon moist. The best method is to use a skillet on low heat. Add a splash of water or broth to the pan. Cover it and heat slowly. Avoid using high heat as it can dry out the fish. You can also use the microwave, but do so with caution. Heat in short bursts and check often to keep the salmon tender. The best way to grill salmon is to start with a clean, hot grill. Preheat your grill to medium-high heat. This helps the fish cook evenly and gives it nice grill marks. - Use a little oil on the grill grates. This prevents sticking. - Place the salmon skin-side down on the grill. - Cook it undisturbed for 4 to 5 minutes. - Carefully flip the fillets and grill for another 4 to 5 minutes. - Look for the salmon to flake easily with a fork. It should reach 145°F (63°C) inside. Using these steps helps ensure a juicy, flavorful meal. For the best flavor, you should marinate the salmon for at least 30 minutes. This time lets the herbs and lemon sink into the fish. - If you have more time, you can marinate for up to 2 hours. - Avoid marinating longer than 2 hours. The acid in the lemon can make the fish mushy. Marinating is key to making your salmon burst with flavor. Yes, you can use frozen salmon for this recipe. Just remember to thaw it first. - The best way to thaw salmon is overnight in the fridge. - If you need it faster, you can place it in a sealed bag and run cold water over it. Using frozen salmon can be handy and still taste great when cooked right. Just make sure it is dry before you marinate it. In this post, we explored how to grill salmon perfectly. We covered the main ingredients, like fresh salmon and herbs, along with optional garnishes. You learned step-by-step instructions for marinating and grilling. I shared useful tips for great grill marks and how to keep salmon moist. We also discussed cooking variations and how to store leftover salmon. Cooking salmon can be simple and fun. With practice, you can make a tasty meal every time.

Lemon Herb Grilled Salmon Packed with Fresh Flavor

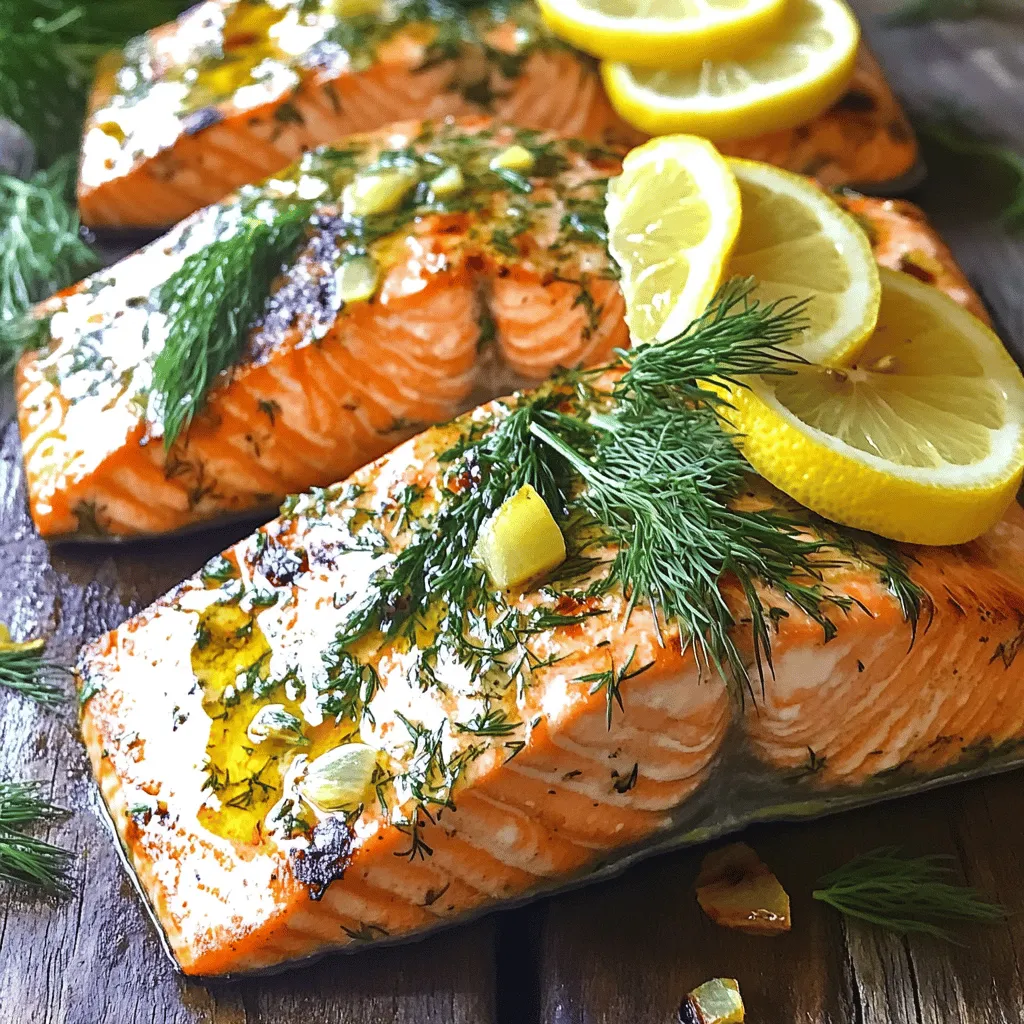
If you crave a dish that bursts with flavor, you’re in the right place! My Lemon Herb Grilled Salmon recipe

Here is what you will need to make maple glazed carrots: - 1 pound baby carrots (or regular carrots, sliced into 1/4-inch rounds) - 3 tablespoons pure maple syrup - 2 tablespoons unsalted butter - 1 teaspoon ground cinnamon - 1/4 teaspoon ground nutmeg - Salt and freshly ground black pepper to taste - 1 tablespoon fresh parsley, finely chopped (for garnish) These ingredients come together to create a dish that is both sweet and savory. The maple syrup brings a rich flavor to the carrots. Butter adds a creamy touch, while spices like cinnamon and nutmeg warm up the dish. Fresh parsley adds a pop of color and a nice herbal note. Using fresh ingredients makes this dish even better. You can find the full recipe in the section above. Enjoy making these delicious maple glazed carrots! - Rinse baby carrots or prepare regular carrots - Melt butter in a medium skillet Start by rinsing the baby carrots under cool water. If you use regular carrots, peel them first. Cut them into slices about 1/4-inch thick. This helps them cook evenly. Next, place the unsalted butter in a medium skillet. Heat it over medium heat until it melts. You want it to coat the bottom of the skillet. - Sauté carrots until slightly softened - Add maple syrup, cinnamon, and nutmeg Now, add the prepared carrots to the skillet. Sauté them for about 3-5 minutes. Stir them occasionally so they cook evenly. You want them to start softening. After that, pour the pure maple syrup over the carrots. Then, sprinkle in the ground cinnamon and nutmeg. Toss everything well. Make sure all the carrots are coated in the sweet glaze and spices. - Simmer until fork-tender - Thicken the glaze and season to taste Lower the heat to a gentle simmer and cover the skillet with a lid. Let the carrots cook for about 10-12 minutes. Stir them from time to time to prevent sticking. Once they are fork-tender, uncover the skillet. Let them cook for another 2-3 minutes. This helps the glaze thicken. Stir gently and season with salt and freshly ground black pepper to taste. Finally, transfer the glazed carrots to a serving dish. Enjoy this dish warm! If you want, check out the Full Recipe for more tips. To achieve the best glaze, start with fresh carrots. Baby carrots work great, but regular carrots are fine too. Cut them into even pieces. This helps them cook at the same rate. The key to a perfect glaze is patience. Pour the maple syrup over the carrots once they soften. This allows the flavors to meld well. Stirring frequently is very important. It keeps the carrots from sticking to the skillet. Stir every few minutes while they simmer. This helps the glaze coat each carrot piece evenly. If you don’t stir, the glaze can burn and taste bitter. Maple glazed carrots pair well with many dishes. They make a great side for roasted chicken or pork. You can also serve them with a hearty stew. The sweet flavor complements savory meals nicely. For presentation, use a large serving dish. Arrange the carrots neatly and sprinkle with parsley. This adds color and freshness. Serve them warm for the best taste and texture. For more details on making this dish, check the Full Recipe. {{image_4}} To enhance your maple glazed carrots, try adding different spices. Ginger adds warmth, while allspice offers a unique twist. These spices bring more depth to the sweet glaze. You might also explore using different syrups. Honey can provide a floral note, while agave syrup offers a milder sweetness. Each syrup changes the flavor a bit, so feel free to experiment! If you're vegan, you can swap out the butter for plant-based butter. This keeps the dish creamy without using dairy. For gluten-free diets, this recipe is already safe. The ingredients are free from gluten, making it a great side for everyone. Enjoy the freedom to adjust these elements to meet your needs while still making the dish delicious! To keep your maple glazed carrots fresh, place them in an airtight container. Let them cool down before sealing. This helps prevent moisture build-up, which can make them soggy. Store them in the fridge for up to three days. If you want to keep them longer, consider freezing them. Use freezer-safe bags or containers, removing as much air as possible. Label them with the date for easy tracking. When it’s time to enjoy leftover glazed carrots, reheating them gently is key. You can use a skillet over low heat. Add a splash of water or broth to help the glaze stay smooth. Stir often to avoid burning. If you prefer the microwave, use a microwave-safe dish. Cover it to keep moisture in, and heat in short bursts, stirring in between. This helps retain the rich flavor without losing the glaze’s shine. Yes, you can use frozen carrots. They save time and are still tasty. Just remember to thaw them before cooking. This way, they will cook evenly with the glaze. Cook them for a few extra minutes if needed. You can prepare the carrots and glaze them earlier in the day. Cook them as instructed. Let them cool, then store them in the fridge. When you're ready to serve, just reheat them in a skillet. Add a splash of water to help the glaze. You can switch up the spices to suit your taste. Try adding ginger or allspice for a new flavor. If you want a sweeter taste, increase the maple syrup a bit. For a smoky twist, add a touch of smoked paprika. These small changes can make a big difference! For the full recipe, check out the recipe section. Glazed carrots are simple and tasty. You learned about the key ingredients and steps to make them. I shared tips on achieving the perfect glaze and serving ideas. You can explore variations with different flavors and diets. Storing leftovers is easy, and reheating preserves their taste. This dish fits well with many meals and is sure to impress. Enjoy making these glazed carrots your way! They are a fun and delicious side.

Maple Glazed Carrots Delightful and Simple Recipe

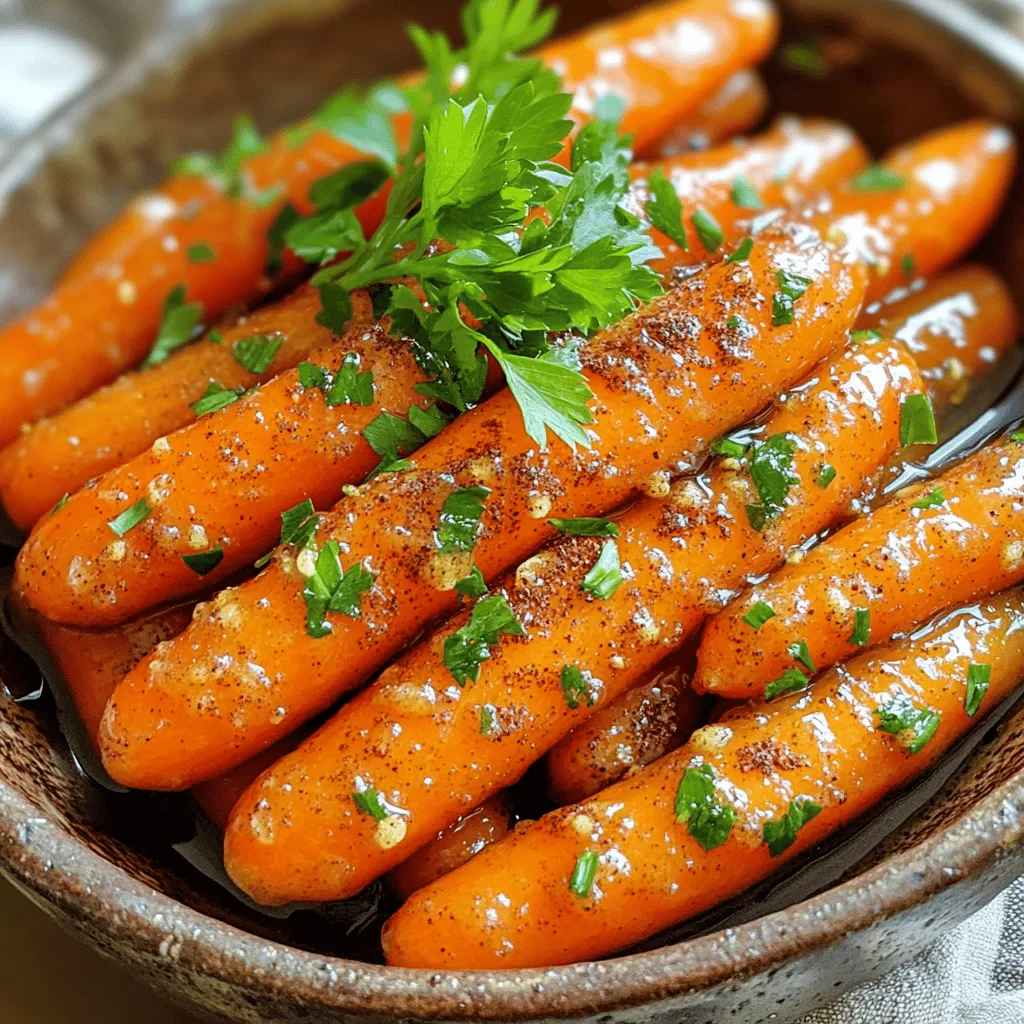
If you want a side dish that impresses without a fuss, Maple Glazed Carrots are perfect. This sweet and savory

To make delicious cinnamon sugar churros, you need a few key ingredients. Here is what you will need: - 1 cup water - 1/2 cup unsalted butter, cut into cubes - 1 tablespoon granulated sugar - 1/4 teaspoon salt - 1 cup all-purpose flour, sifted - 2 large eggs - 1 teaspoon vanilla extract - Oil for frying (such as vegetable or canola, enough for about 2 inches deep) - 1 cup granulated sugar (for coating) - 2 teaspoons ground cinnamon These ingredients blend together to create a dough that is rich and flavorful. The butter and vanilla add depth to your churros, making them extra special. Having the right tools makes the process smooth. Here’s what you will need: - Medium saucepan - Wooden spoon - Piping bag with a large star tip - Deep skillet or fryer - Cooking thermometer - Slotted spoon - Shallow bowl These items help you cook the churros evenly and with ease. A piping bag is key for shaping your churros just right. You can customize your churros with a few optional ingredients. Here are some ideas: - Dark chocolate or white chocolate for dipping - Nutmeg for extra warmth - Lemon zest for a citrusy twist - Almond extract instead of vanilla These additions can add a unique flavor to your churros. Feel free to experiment and find your favorite combo! For the full recipe, check out the [Full Recipe]. To make cinnamon sugar churros, you start with a simple dough. First, gather your ingredients: water, butter, sugar, salt, flour, eggs, and vanilla. In a medium pot, mix water, butter, sugar, and salt. Heat this over medium until it boils. Stir often to avoid burning. When it boils, take it off the heat. Then, mix in the sifted flour quickly. You want a smooth dough with no dry bits. Let it rest for 5 minutes. This helps cool it down. After resting, add eggs one by one. Mix until smooth after each egg. Finally, stir in vanilla. Now, your dough is ready! Frying is where the magic happens! Heat oil in a deep skillet to 350°F (175°C). Use a thermometer for accuracy. While the oil heats, put the churro dough in a piping bag with a star tip. Pipe 6-inch strips of dough into the hot oil. Use scissors to cut the dough. Fry them for 2-3 minutes on each side. Look for a golden brown color. This means they are done. Use a slotted spoon to take them out. Let any extra oil drip back into the skillet. Golden brown churros look tasty and inviting. To get this color, keep the oil at the right temperature. Too low, and they soak up oil. Too high, and they burn quickly. Fry them in small batches. This keeps the oil hot and helps them cook evenly. Watch them closely while frying. Remove them when they are golden brown all over. This step is key to making churros that are both crunchy and light. For the full recipe, check out the detailed instructions! When making cinnamon sugar churros, avoid these common errors: - Not Measuring Ingredients: Always measure your ingredients. This helps the dough mix well. - Overheating the Oil: Too hot oil can burn your churros. Use a thermometer to check the oil's temperature. - Skipping the Rest Time: Letting the dough rest for five minutes is key. It makes the dough easier to handle. To get the right texture for your churros, follow these tips: - Mix Well: Stir the dough until it is smooth and shiny. This helps create a fluffy churro. - Don’t Overmix: Adding eggs too fast can make the dough heavy. Add them one by one, mixing well each time. - Pipe Quickly: Pipe the churros into the hot oil right after mixing. This keeps them fresh and airy. Coating churros in cinnamon sugar makes them extra tasty. Here’s how to do it right: - Use Warm Churros: Roll the churros in cinnamon sugar while they are warm. This helps the sugar stick better. - Mix Well: Combine the sugar and cinnamon in a bowl. Make sure they are evenly mixed for a balanced flavor. - Don’t Be Shy: Roll them well! Make sure each churro is coated fully to enjoy that sweet crunch. For the full recipe, check out the detailed instructions above. Enjoy your churros! {{image_4}} You can make filled cinnamon sugar churros for a fun twist. Use your favorite filling. Chocolate, caramel, or cream cheese work great. To fill them, pipe the dough into hot oil like usual. After frying, use a long, thin tool to inject the filling inside. The warm filling melts slightly, making each bite a treat. This adds a surprise inside and makes the churros even more enjoyable. While cinnamon sugar is classic, you can get creative. Try different toppings like crushed nuts or sprinkles for added crunch. You can also dip churros in chocolate or caramel sauce after rolling them in cinnamon sugar. A drizzle of white chocolate adds a fun look and taste. The options are endless, so feel free to mix and match to find your favorite combination. Churros pair well with dips. A rich chocolate sauce is a favorite choice. It adds depth and sweetness. You can also serve them with warm caramel or dulce de leche. For a fruity touch, try a berry sauce. This adds freshness and tang. Present the churros in a tall glass or on a plate. Set the dips on the side for a fun and interactive dessert experience. Don't forget to check out the Full Recipe for more ideas! To keep your churros fresh, store them in an airtight container. Place parchment paper between layers to avoid sticking. This helps maintain their crunch. Store at room temperature for up to two days. If you leave them out too long, they may get soft. To reheat churros, use an oven or air fryer. Preheat the oven to 350°F (175°C). Place churros on a baking sheet and heat for about 5-7 minutes. This method makes them crispy again. Avoid using the microwave, as it can make them chewy and soggy. You can freeze churros for future snacks. Allow them to cool completely, then place them in a single layer on a baking sheet. Freeze until firm. Once frozen, transfer them to a freezer bag. They can last for up to three months. To enjoy, reheat directly from the freezer using the oven or air fryer. To make cinnamon sugar churros crispy, fry them at the right temperature. You want your oil to be around 350°F (175°C). This temp helps the churros cook quickly, creating a nice crust. Avoid overcrowding the pan to keep the oil hot. Fry them about 2-3 minutes on each side until they turn golden brown. Once cooked, roll them in cinnamon sugar while they're still warm. This adds flavor and helps with crunch. Yes, you can bake churros, but they won't be as crispy. Baking them may also change their texture. To bake, preheat your oven to 400°F (200°C). Pipe the churros onto a baking sheet lined with parchment paper. Spray them lightly with oil to help them crisp. Bake for about 15-20 minutes, or until golden. However, frying gives that classic churro texture we all love. Churros go well with many dips! Here are some favorites: - Chocolate sauce is a classic choice. - Caramel sauce adds a sweet touch. - Nutella offers a rich, creamy option. - A simple vanilla yogurt dip can be refreshing. Try these dips to elevate your churro experience! Cinnamon sugar churros are a delightful treat. You learned about key ingredients, tools, and various flavors. The step-by-step instructions guide you through preparation and frying for perfect churros. We covered tips to avoid common mistakes. Don’t forget to explore variations with fillings and dips. Store leftovers correctly for later enjoyment. Remember, crispy churros come with practice. Enjoy making this sweet snack, and have fun experimenting with unique flavors!

Cinnamon Sugar Churros Simple and Delightful Treat

Are you ready to indulge in a sweet treat that will brighten your day? Cinnamon Sugar Churros are simple to

- 1 cup rolled oats - 1/2 cup almond flour - 1/2 cup protein powder (chocolate or vanilla) - 1/4 cup unsweetened cocoa powder - 1/4 cup pure maple syrup - 1/4 cup almond butter (or alternative nut butter) - 1/2 cup unsweetened coconut milk (or preferred milk) - 1 tablespoon instant coffee granules - 1/2 teaspoon pure vanilla extract - 1/4 teaspoon sea salt - 1/2 cup dark chocolate chips - Optional: 1/4 cup walnuts or pecans, finely chopped The ingredients in these Mocha Chip Protein Bars give them great taste and nutrition. Each item plays a key role. The rolled oats provide fiber and energy. Almond flour adds healthy fats and helps bind the bars. The protein powder boosts the protein content, making them perfect for a post-workout snack. Cocoa powder and dark chocolate chips bring that rich chocolate flavor. The maple syrup and almond butter add sweetness and creaminess. Instant coffee granules give a nice mocha kick. Coconut milk keeps the bars moist, while vanilla extract enhances all the flavors. If you want a crunch, add chopped walnuts or pecans. This ingredient list is not just for flavor but also for health. It focuses on clean, wholesome ingredients. You can find the complete preparation steps in the Full Recipe section. 1. Preheat your oven to 350°F (175°C). Prepare an 8x8 inch baking dish with parchment paper. This helps with easy removal later. 2. In a large mixing bowl, add: - 1 cup rolled oats - 1/2 cup almond flour - 1/2 cup protein powder (chocolate or vanilla) - 1/4 cup unsweetened cocoa powder - 1/4 teaspoon sea salt Stir these dry ingredients until they mix well. 3. In another bowl, whisk together: - 1/4 cup pure maple syrup - 1/4 cup almond butter - 1/2 cup unsweetened coconut milk - 1 tablespoon instant coffee granules - 1/2 teaspoon pure vanilla extract Make sure it’s smooth and no lumps remain. 4. Gradually pour the wet mixture into the dry ingredients. Stir gently until combined. Don't fret if the batter looks thick; that’s normal! 5. Fold in: - 1/2 cup dark chocolate chips - Optional: 1/4 cup walnuts or pecans, finely chopped Ensure everything mixes evenly for great flavor in every bite. 6. Transfer the mixture to your prepared baking dish. Press it down firmly to create an even layer. 7. Bake for 20-25 minutes. Look for firm edges and a set center. Avoid overbaking for the best texture. 8. Once baked, let the bars cool in the pan for about 10 minutes. Use the parchment paper to lift them out. Place on a wire rack to cool completely. 9. After cooling, cut the bars into squares. Store them in an airtight container in the fridge. They stay fresh for up to a week. For even more flavor, drizzle melted chocolate on top before cutting! Enjoy your tasty and energizing snack! Check out the [Full Recipe] for more details! To achieve the right texture in your Mocha Chip Protein Bars, focus on moisture balance. You want a chewy texture, not dry. Use enough almond butter and maple syrup to keep the bars moist. If the mixture feels too dry, add a splash of coconut milk. Mixing ingredients can affect the final product. I recommend using a sturdy spatula for mixing. This helps blend everything without overworking the batter. When combining wet and dry ingredients, stir gently. You want to mix just until combined. Avoid common baking mistakes by watching your baking time. Overbaking can lead to dry bars. Keep an eye on the edges; they should be firm but not hard. If you're unsure, do a toothpick test. It should come out clean but not dry. For a gourmet look, drizzle melted chocolate over your bars. This adds a rich touch. You can also drizzle nut butter for added flavor. I love using almond butter for this. Garnish with a few coffee granules or sea salt flakes. These small touches can enhance the flavor and make your bars look fancy. Using protein powder boosts the protein content of your bars. This helps you stay full longer and supports muscle recovery. Choose a quality protein powder for the best results. Oats and almond flour are great for your health. Oats provide fiber, which is good for digestion. Almond flour has healthy fats and adds a nutty flavor. Nuts offer extra crunch and nutrition. Walnuts or pecans add healthy fats and protein. They also provide essential vitamins and minerals, making your bars even better for you. {{image_4}} You can easily switch up the taste of your mocha chip protein bars. Here are some fun ideas: - Spices: Try adding cinnamon for warmth or cayenne for heat. - Nut Butters: Use peanut or cashew butter in place of almond butter. - Chocolate Chips: Swap chocolate chips with dried fruits like raisins or cranberries for a fruity twist. These small changes can make a big impact on flavor. Experimenting is part of the fun! If you follow a special diet, you can still enjoy these bars. Here’s how to adapt them: - Gluten-Free: Use gluten-free oats and almond flour to keep it safe for those with gluten issues. - Vegan: Replace the almond butter with a nut-free option, and choose a plant-based protein powder. - Low-Sugar: Use natural sweeteners like stevia or monk fruit to cut back on sugar. These adjustments help make the bars fit your needs without losing taste. Want to boost the nutrition of your protein bars? Consider these add-ins: - Superfoods: Add chia seeds or flaxseeds for extra fiber and omega-3s. - Crunchy Additions: Toss in pumpkin seeds or granola chunks for a fun texture. These additions not only enhance nutrition but also add exciting new flavors. Enjoy making your bars uniquely yours! To keep your mocha chip protein bars fresh, store them in the refrigerator. Use an airtight container to keep moisture out. This method helps maintain the bars' texture and taste. If you want a longer shelf life, freezing is a great option. Wrap each bar in plastic wrap, then place them in a freezer-safe bag. This way, they stay fresh for months. Simply take a bar out the night before you want to enjoy it. Let it thaw in the fridge, and it will be ready to eat! Using the right container helps keep your bars fresh. Choose an airtight container or a resealable bag. This way, they won’t dry out or absorb other smells from the fridge. For on-the-go snacking, wrap each bar in parchment paper. This makes them easy to grab and eat. You can also use small boxes for a neat option. Just make sure they are tightly sealed to avoid any mess. In the fridge, your mocha chip protein bars can last up to one week. Just remember to keep them in an airtight container. Check them for any signs of spoilage before eating. If you freeze them, they can last up to three months. When ready to eat, remove a bar from the freezer. Let it sit in the fridge or at room temperature for a few hours to defrost. This way, they taste just as fresh as the day you made them. Enjoy your tasty and energizing snack! You can use other ingredients to boost protein. Options include nuts, seeds, and beans. For a homemade protein source, try using ground chickpeas or hemp seeds. They add protein without needing powder. You can also use nut butter, which adds protein and healthy fats. Yes, you can skip the coffee. However, it does add rich flavor. Without coffee, your bars may taste milder. You can replace it with a bit of extra cocoa powder or use a coffee alternative like chicory. This keeps the taste deep while avoiding caffeine. Enjoy these bars as a quick snack. They are great after workouts or as a mid-day boost. Pair them with a glass of milk or a cup of coffee for a perfect match. You can also crumble them over yogurt for a tasty treat. Try adding fresh fruit for extra flavor! In this blog post, we explored how to make tasty Mocha Chip Protein Bars. We covered the ingredient list, nutritional facts, and step-by-step instructions for baking. I shared tips for perfecting the recipe and ways to vary your bars to fit your taste. Lastly, we discussed storage options to keep them fresh. Remember, these bars are not just healthy but also easy to customize. Enjoy creating your own version and experimenting with flavors that excite you!

Mocha Chip Protein Bars Tasty and Energizing Snack

Looking for a delicious, energizing snack? Mocha Chip Protein Bars are the perfect solution! Packed with wholesome ingredients, they deliver

To make Garlic Parmesan Roasted Potatoes, you need the following ingredients: - 2 lbs baby potatoes, halved - 4 tablespoons extra virgin olive oil - 4 cloves of garlic, finely minced - 1 teaspoon dried rosemary - 1 teaspoon dried thyme - 1 cup freshly grated Parmesan cheese - Salt and freshly ground black pepper, to taste - Fresh parsley, finely chopped (for garnish) These simple ingredients come together to create a tasty side dish. The baby potatoes give a nice bite, while garlic adds bold flavor. Olive oil helps the seasonings stick and adds richness. The blend of rosemary and thyme gives a lovely herbal note. I always suggest using fresh garlic for the best taste. It enhances the overall flavor profile. The freshly grated Parmesan adds a nice cheesy crust that makes the dish irresistible. Feel free to adjust the seasoning to your liking. You can add more herbs or cheese based on your taste. For a more vibrant look, sprinkle extra parsley before serving. For the full recipe and more tips, check the recipe section above. - Preheat oven to 400°F (200°C). - In a large bowl, add 2 lbs of halved baby potatoes. - Drizzle 4 tablespoons of olive oil over the potatoes. - Toss gently until each potato is coated. - Add 4 cloves of minced garlic, 1 teaspoon dried rosemary, and 1 teaspoon dried thyme. - Season with salt and black pepper to taste. - Mix everything well to coat the potatoes. - Prepare a baking sheet with parchment paper or grease it lightly. - Spread the seasoned potatoes in a single layer on the sheet. - Place the baking sheet in the oven and roast for 25 minutes. - Check for a golden color on the potatoes. - Remove the baking sheet and sprinkle 1 cup of grated Parmesan cheese over the potatoes. - Make sure to cover them generously. - Return the baking sheet to the oven. - Roast for an additional 10-15 minutes until the cheese is golden and bubbly. - Remove the potatoes from the oven. - Let them cool for 2-3 minutes. - Garnish with fresh parsley for color and flavor. - Serve your Garlic Parmesan Roasted Potatoes warm and enjoy! For the complete recipe, check out the Full Recipe. How to achieve the perfect roast To get that crisp outside and soft inside, follow these steps: - Cut the potatoes into even halves. - Toss them well with olive oil and seasonings. - Spread them out on the baking sheet, leaving space between each potato. - Roast at 400°F (200°C) for about 25 minutes before adding cheese. Best type of potatoes for roasting I recommend using baby potatoes. They are small, tender, and have a great flavor. Red or Yukon Gold potatoes also work well. Their waxy texture helps them hold shape during roasting. Additional herbs and spices to consider You can boost flavor with different herbs. Try adding: - Fresh rosemary for a stronger flavor. - Paprika for a hint of smokiness. - A dash of cayenne for heat. Alternative cheese options If you're looking for a twist, use different cheeses. Here are some options: - Pecorino Romano adds a salty bite. - Gruyère brings a nutty flavor. - Vegan cheese can be used for a dairy-free option. Pairing with main dishes These roasted potatoes go great with many dishes. Serve them with: - Grilled chicken or fish for a complete meal. - A hearty steak for a cozy dinner. - Vegetarian dishes like stuffed peppers. Suggested dips or sauces For extra flavor, try these dips: - Garlic aioli for a creamy touch. - A tangy yogurt sauce with herbs. - Salsa verde for a fresh, zesty kick. You can find the full recipe for Garlic Parmesan Roasted Potatoes in the earlier sections. Enjoy! {{image_4}} You can change the flavor of your Garlic Parmesan Roasted Potatoes easily. Here are two tasty ideas: - Spicy Garlic Parmesan Roasted Potatoes: Add red pepper flakes to the garlic mix. This gives a nice kick. You can adjust the amount to suit your taste. Start with half a teaspoon and go from there. - Lemon Herb Garlic Parmesan Potatoes: Add lemon zest and juice for a fresh taste. Mix it in with the garlic and herbs. This brightens the dish and adds a zing. If you have dietary needs, you can still enjoy this dish: - Vegan alternative using nutritional yeast: Replace Parmesan cheese with nutritional yeast. This adds a cheesy flavor without dairy. Just sprinkle about half a cup over the potatoes. - Gluten-free adaptations: This recipe is already gluten-free. Just ensure your other ingredients are also gluten-free. Check labels for any hidden gluten. You can make this dish fit any season. Here’s how: - Using seasonal herbs or vegetables: In spring, use fresh chives or peas. In fall, add rosemary and thyme. You can even mix in sweet potatoes for a twist. This keeps the dish fresh and exciting all year. Explore these variations to make your Garlic Parmesan Roasted Potatoes even more fun! For the complete dish, check the Full Recipe. To keep leftover Garlic Parmesan Roasted Potatoes fresh, place them in an airtight container. Store them in the fridge. They last for about 3 to 4 days. When ready to eat, check for any off smells or dryness. If they seem fine, you can enjoy them again! For longer storage, you can freeze the potatoes. First, let them cool completely. Then, spread them on a baking sheet in a single layer. Freeze them for about 1 hour until firm. After that, transfer the potatoes to a freezer-safe bag. They can last up to 3 months in the freezer. When you're ready to enjoy them, thaw in the fridge overnight before reheating. To reheat Garlic Parmesan Roasted Potatoes, preheat your oven to 375°F (190°C). Spread the potatoes on a baking sheet. Bake them for about 15 to 20 minutes until they are hot and crispy again. You can also reheat them in a skillet over medium heat. Just add a splash of olive oil to help regain that crispy texture. Enjoy them warm! Can I use other types of potatoes? Yes, you can use other potatoes. Russet or Yukon Gold work well. They have good flavor and texture. Just cut them into bite-sized pieces for even cooking. How do I make these potatoes crispy? To get crispy potatoes, follow these tips: - Use enough olive oil to coat the potatoes well. - Spread them in a single layer on the baking sheet. - Avoid overcrowding, so they roast, not steam. - Finish with a high heat for a few minutes. What's the best way to reheat leftovers? Reheat leftovers in the oven at 350°F (175°C) for about 10-15 minutes. This keeps them crispy. You can also use an air fryer for a quick option. One serving of Garlic Parmesan Roasted Potatoes contains: - Calories: 320 - Total Fat: 18g - Saturated Fat: 6g - Cholesterol: 20mg - Sodium: 400mg - Total Carbohydrates: 36g - Dietary Fiber: 4g - Sugars: 1g - Protein: 8g How long should I roast if using larger potatoes? If you use larger potatoes, cut them into smaller pieces. Roast for 35-40 minutes instead of 25. Make sure they are golden and tender. Check with a fork for doneness. This blog post covered how to make Garlic Parmesan Roasted Potatoes. We discussed the ingredients, preparation steps, and roasting process. You also learned tips for flavor and serving. Variations exist for spices and dietary needs, giving you options for everyone. In conclusion, these roasted potatoes are easy and delicious. You can make them your own with simple changes. Whether for a main dish or a snack, they are sure to please. Enjoy cooking and sharing this tasty treat!

Garlic Parmesan Roasted Potatoes Tasty Side Dish

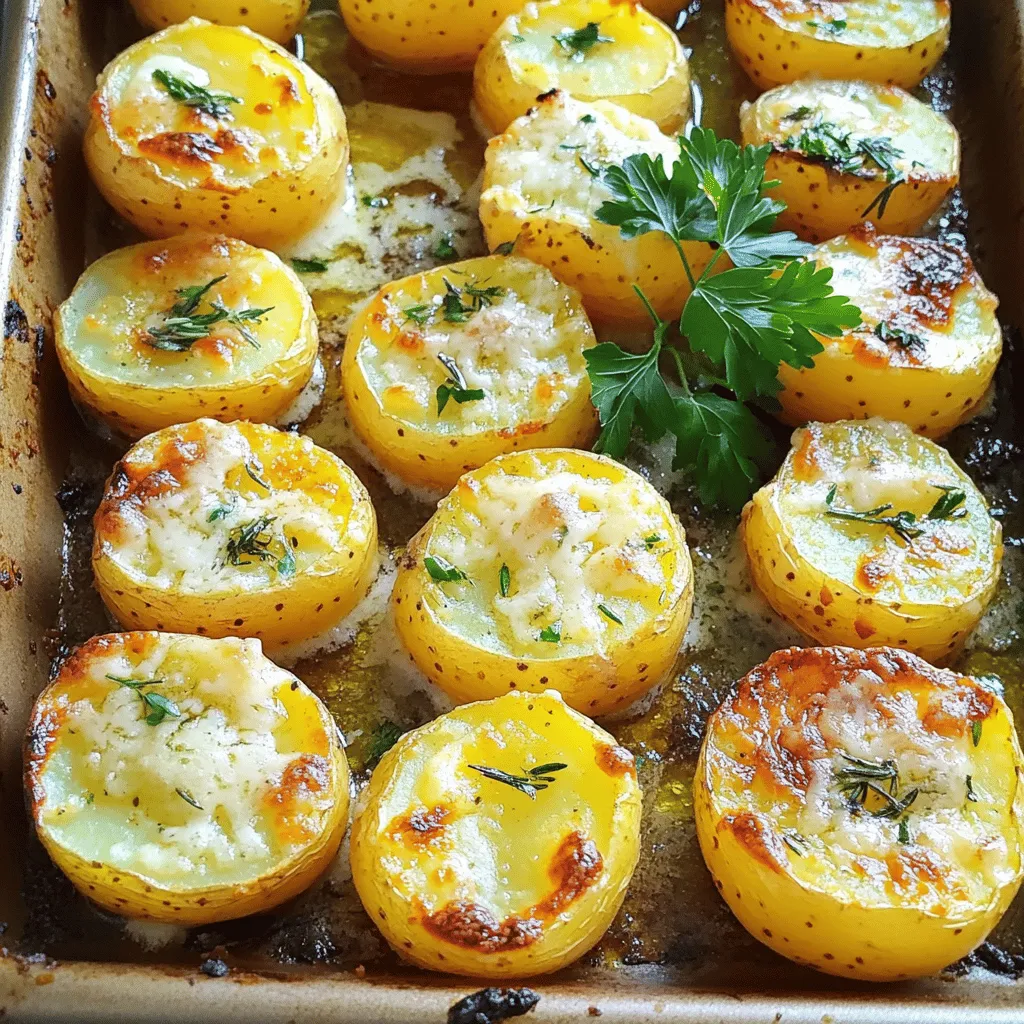
Looking for a side dish that steals the show? These Garlic Parmesan Roasted Potatoes are your solution! With crispy edges

- 8 oz bowtie pasta (or your choice of pasta shape) - 1 cup cherry tomatoes, halved - 1 cup fresh mozzarella balls (bocconcini) - 1 cup fresh basil leaves, torn into bite-sized pieces - 1/2 cup homemade or store-bought pesto - 1/4 cup extra virgin olive oil - 2 tablespoons balsamic glaze - Salt and pepper to taste - Optional: 1/4 cup pine nuts, toasted for garnish To create a vibrant Pesto Caprese Pasta Salad, start with these main ingredients. The bowtie pasta gives a fun shape. Cherry tomatoes add sweetness and color. Fresh mozzarella brings creaminess, while basil offers a burst of flavor. The pesto ties everything together with its rich taste. You can also add some extra depth with the additional ingredients. Extra virgin olive oil enhances the salad's richness. Balsamic glaze adds a tangy note. Salt and pepper will balance the flavors. If you like a crunch, toasted pine nuts make a great topping. For the full recipe, follow the steps I describe later. This salad is fresh and easy to make, perfect for any meal! - Bring salted water to a rolling boil. - Cook bowtie pasta according to package instructions until al dente. - Drain and rinse under cold water to halt cooking. Cooking pasta is simple, but you want it just right. If it's too soft, your salad may turn mushy. I love using bowtie pasta for its fun shape and ability to hold flavors. Make sure to taste it a minute before the time is up. It should be firm but not hard. Once you drain the pasta, rinse it well under cold water. This stops the cooking and keeps it from sticking together. - In a large mixing bowl, combine cherry tomatoes, mozzarella, and basil. - Add the cooled pasta to the bowl. Start with fresh, ripe cherry tomatoes. Their sweet taste brightens the salad. I like to cut them in half to release their juices. Next, add mozzarella balls. They give a creamy texture that pairs well with the tomatoes. Finally, add torn basil leaves for a fresh aroma. When you add the cooled pasta, be gentle to avoid breaking the pasta and mixing everything evenly. - Drizzle olive oil and pesto over the pasta mixture. - Gently toss until everything is evenly coated. - Season with salt and pepper to taste. Now comes the fun part! Drizzle good olive oil and your favorite pesto over the mixed ingredients. I suggest using homemade pesto if you can, but store-bought works too. Toss gently with a large spoon; you want everything coated but not squished. Then, add salt and pepper. Taste as you go. This helps you find the perfect balance of flavors. - Drizzle balsamic glaze over the top. - If using, sprinkle toasted pine nuts for added crunch. - Allow the salad to rest for flavors to meld. For an extra kick, add a drizzle of balsamic glaze. The sweetness pairs beautifully with the savory elements. If you like crunch, sprinkle some toasted pine nuts on top. They add a nice texture. After mixing, let the salad sit for about 15 minutes. This resting time lets the flavors blend together. You can even chill it for up to two hours before serving. This Pesto Caprese Pasta Salad is now ready to shine on your table. For the full recipe, check below! - Serve the salad chilled or at room temperature. - To impress, use whole basil leaves for garnish. - Drizzle extra balsamic glaze on top for a fancy touch. - Taste the salad and adjust seasoning as needed. - Let the salad rest for about 15 minutes. This helps the flavors mix well. - Homemade pesto tastes fresh but takes time to make. - Store-bought pesto is quick and easy, but it may lack depth. - To boost store-bought pesto, add fresh garlic or a squeeze of lemon juice. For the complete recipe, check out [Full Recipe]. {{image_4}} To make your Pesto Caprese Pasta Salad more filling, you can add proteins. Grilled chicken or shrimp works great. Simply season and grill them until cooked. Cut them into bite-sized pieces and toss them into the salad. If you prefer a vegetarian option, consider chickpeas or beans. They add protein and keep it hearty. Changing the cheese can give your salad a new twist. Try adding feta or goat cheese for different flavors. Both cheeses bring a tangy taste that pairs well with the pesto. You can also mix in seasonal vegetables. Fresh bell peppers, zucchini, or even corn can add crunch and brightness to each bite. Switching up the pasta shape can change the dish’s look and texture. Fusilli, penne, or even whole-grain pasta are great options. If you want a low-carb meal, zucchini noodles are a fun alternative. They absorb flavors well and keep the salad light. Try these ideas to personalize your Pesto Caprese Pasta Salad. Each variation brings something new, making it fun to enjoy again and again. For the complete recipe, check out the [Full Recipe]. To keep your Pesto Caprese Pasta Salad fresh, refrigerate it in an airtight container. This keeps the flavors intact and prevents drying out. The salad stays fresh for about three days in the fridge. However, the pasta may absorb some of the pesto over time. This can change the texture slightly but won’t affect taste much. Can you freeze Pesto Caprese Pasta Salad? It’s not the best choice for freezing. The fresh ingredients, like tomatoes and mozzarella, do not freeze well. If you want to freeze it, here’s how: 1. Prepare the salad but skip adding fresh mozzarella and tomatoes. 2. Place the pasta and pesto mix in a freezer-safe bag. 3. Remove as much air as possible before sealing. 4. When ready to eat, thaw the salad overnight in the fridge. 5. Add the fresh mozzarella and tomatoes before serving. This way, you keep the salad fresh and flavorful. Enjoy every bite of this delicious dish! To boost flavors, try adding fresh lemon juice. The zest brightens up the dish. You can also mix in some grated Parmesan cheese for a salty kick. Consider adding garlic for a nice depth. A sprinkle of red pepper flakes adds heat. Experimenting with herbs like oregano or thyme can create a unique twist. Yes, you can prepare this salad a few hours before serving. It tastes best when it sits for about 15 minutes, but chilling it for up to 2 hours enhances the flavors. If you make it a day ahead, keep the dressing separate until serving. This prevents the pasta from becoming soggy. You can swap bowtie pasta for any shape you like. Use grape tomatoes instead of cherry tomatoes if you prefer. For a dairy-free option, substitute mozzarella with avocado or vegan cheese. If you don’t have pesto, a mix of olive oil, garlic, and herbs works well. Feel free to add any seasonal vegetables you enjoy. Absolutely! This salad packs well for lunches or events. Store it in airtight containers to keep it fresh. Layer the ingredients to maintain texture. Keep the dressing on the side until you’re ready to eat. This way, your salad stays crisp and tasty. For the best results, use within three days. This blog post shows you how to make a tasty Pesto Caprese Pasta Salad. You learned about key ingredients, step-by-step instructions, and helpful tips. Remember, you can mix in proteins and adjust flavors to suit your taste. Enjoy it chilled or at room temperature for a refreshing meal. Keep leftovers in the fridge for a few days, or try freezing them. This salad is great for meal prep and gatherings. With these tips, you can create a dish that delights everyone!

Pesto Caprese Pasta Salad Fresh and Flavorful Delight

Are you ready to delight your taste buds with a bright and tasty dish? My Pesto Caprese Pasta Salad combines

To make delicious teriyaki chicken skewers, you need these main ingredients: - 1 pound boneless, skinless chicken thighs, cut into 1-inch cubes - 1/4 cup soy sauce (low sodium recommended for a balanced flavor) - 2 tablespoons brown sugar - 1 tablespoon rice vinegar - 1 tablespoon sesame oil - 2 cloves garlic, finely minced - 1 teaspoon fresh ginger, grated - 1 tablespoon cornstarch mixed with 2 tablespoons water (for thickening the sauce) - 1 bell pepper (red or yellow for sweetness), cut into 1-inch squares - 1 red onion, cut into 1-inch chunks - Bamboo skewers, soaked in water for 30 minutes to avoid burning during grilling These ingredients come together to create a tasty and sticky glaze that makes the chicken shine. You can add some fun garnishes to enhance your skewers. Consider these: - Sesame seeds - Finely chopped green onions These garnishes not only add flavor but also look great on your plate. If you need substitutes, here are some options: - Chicken thighs can be swapped for chicken breast. - You can use honey instead of brown sugar for a sweeter glaze. - If you want a gluten-free option, try coconut aminos instead of soy sauce. These substitutes will keep your dish tasty and suited to your needs. To start, grab a medium bowl. Add 1/4 cup of soy sauce, 2 tablespoons of brown sugar, 1 tablespoon of rice vinegar, and 1 tablespoon of sesame oil. Toss in 2 cloves of minced garlic and 1 teaspoon of grated ginger. Whisk it all together. Make sure the sugar dissolves completely. This marinade gives your chicken that sweet, salty kick. Next, take 1 pound of cut chicken thighs. Add them to the marinade, ensuring each piece gets coated. Cover the bowl with plastic wrap. Place it in the fridge for at least 30 minutes. If you want deeper flavor, let it marinate for up to 2 hours. The longer, the better! First, heat your grill over medium-high heat. This step is key for even cooking. While the grill heats, assemble your skewers. Thread the marinated chicken onto soaked bamboo skewers, alternating with colorful bell pepper and red onion pieces. Once the grill is hot, place the skewers on it. Cook for 10-12 minutes. Turn them often to ensure they cook evenly. You want them to reach 165°F inside. In the last 2 minutes, brush on the teriyaki sauce for an extra glaze. When done, let them rest for a bit. Garnish with sesame seeds and chopped green onions before serving. Enjoy your delicious Teriyaki Chicken Skewers! For the complete recipe, check out the Full Recipe section. Marinating chicken is key for great flavor. I find that marinating for at least 30 minutes works well. For even more flavor, you can marinate for up to 2 hours. The longer you marinate, the more the chicken absorbs the sauce. Just remember not to exceed 2 hours, as it can make the chicken too salty. To get those beautiful grill marks, heat your grill to medium-high. Place the skewers on the grill and let them sit without moving them for about 4-5 minutes. This gives them time to sear and form those nice lines. After that, turn the skewers a quarter turn for even marks. For a great teriyaki sauce, you want it thick but not too sticky. Start by boiling the remaining marinade. Then, mix cornstarch with water and add it in slowly. Stir it for about 2-3 minutes until it thickens. If it’s too thick, add a bit of water. If it’s too thin, cook it a little longer. This way, you’ll get the perfect glaze for your skewers. {{image_4}} You can easily make vegetarian teriyaki skewers. Replace chicken with hearty vegetables. Use mushrooms, zucchini, and bell peppers. These veggies soak up the teriyaki sauce well. You can also add tofu for extra protein. Firm tofu works best. Cut it into cubes and marinate just like the chicken. If you want a twist, try shrimp or pork. Shrimp cooks quickly and takes on flavors well. Just marinate them for about 15 minutes. For pork, use tender cuts like loin or belly. Cut it into cubes and follow the same marinating steps. Both options give a unique taste, keeping the meal exciting. You can play with flavors too! Want some heat? Add a pinch of red pepper flakes to the marinade. For a sweet touch, include a bit more brown sugar. Want a smoky twist? Add smoked paprika or grill over charcoal. Each variation makes your skewers special and keeps guests guessing. For the full recipe, check out the complete guide to teriyaki chicken skewers. To keep your leftover teriyaki chicken skewers fresh, let them cool completely. Once cooled, place them in an airtight container. Store the container in the fridge. They will last for up to three days. If you want to keep them longer, consider freezing. When ready to enjoy the leftovers, you can reheat the skewers easily. Preheat your oven to 350°F. Place the skewers on a baking tray covered with foil. Heat for about 10-15 minutes. You can also use a microwave. Heat in short bursts, about 30 seconds at a time. Check the temperature. The skewers should be hot all the way through. If you want to freeze your skewers, it’s best to do it before reheating. Wrap each skewer in plastic wrap or foil. Then place them in a freezer bag or airtight container. They can be frozen for up to three months. When you’re ready to eat, thaw them in the fridge overnight. Then reheat as described above. For a great meal, try the full recipe! The best chicken for skewers is boneless, skinless chicken thighs. They stay juicy and tender during grilling. Chicken breasts are also good, but they can dry out. Thighs have more fat, which adds flavor. When you cut the chicken into 1-inch cubes, it cooks quickly and evenly. Yes, you can use store-bought teriyaki sauce. It saves time and still tastes great. However, making your own gives you more control over flavors. You can adjust sweetness or add spices. This way, you create a unique taste that suits your palate. If you choose store-bought, look for low-sodium options. To check if the chicken is done, use a meat thermometer. The safe internal temperature is 165°F. You can also cut into a piece. If the meat is no longer pink and juices run clear, it is cooked. This ensures your meal is safe and delicious. Always let the skewers rest for a few minutes after grilling. This allows the juices to settle and improves the flavor. For the full recipe of Teriyaki Chicken Skewers, check the ingredients and instructions above. You learned how to make tasty teriyaki chicken skewers. We covered the main ingredients, marinade steps, and grilling tips. You also found variations and storage advice. Remember, using fresh ingredients and the right marinating time brings out the best flavor. Enjoy trying different proteins and spices for fun twists. With these tips, you'll serve up great skewers every time. Happy cooking!

Teriyaki Chicken Skewers Mouthwatering Grilled Delight

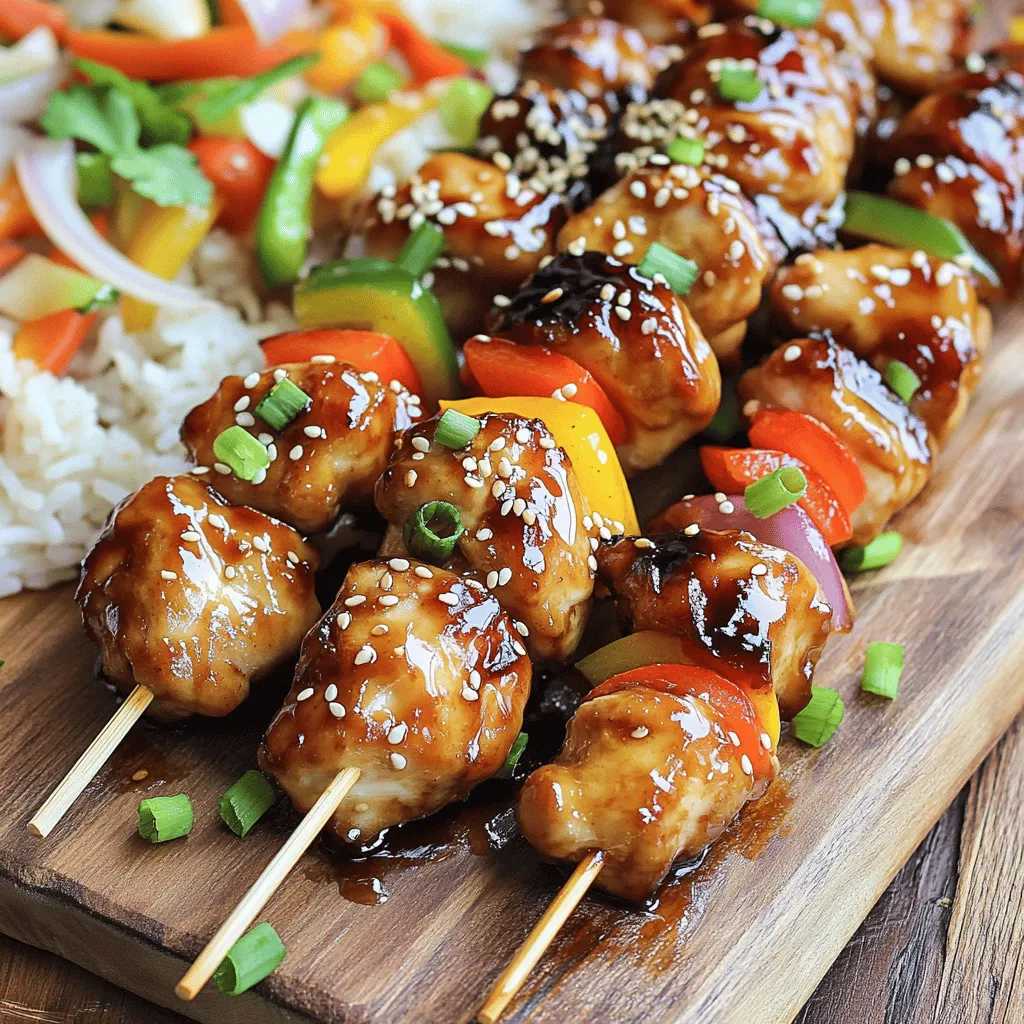
Get ready to fire up your grill with these irresistible Teriyaki Chicken Skewers! This dish combines juicy chicken and a

Older posts
Newer posts
← Previous Page1 … Page71 Page72 Page73 … Page75 Next →

dsad

© 2025 yumymoments • Built with GeneratePress

Our Policies

  • Copyright Policy
  • Cookie Policy
  • GDPR Policy
  • Privacy Policy
  • Disclaimer
  • Terms Of Use

More Information

  • Home
  • About
  • Contact
  • Appetizers
  • Dessert
  • Dinner
  • Drinks
©2025, yumymoments About Back To Top