
Spinach Artichoke Dip Bites Flavorful Party Snack
Are you ready to impress your guests with a fun and tasty treat? Spinach Artichoke Dip Bites are the perfect
Are you ready to impress your guests with a fun and tasty treat? Spinach Artichoke Dip Bites are the perfect
![- Assorted bell peppers - Fresh broccoli florets - Sugar snap peas - Carrot (julienned) - Zucchini - Soy sauce (or tamari) - Sesame oil - Fresh ginger - Garlic - Cornstarch (optional) - Sesame seeds - Salt and pepper - Optional: Fresh herbs like cilantro Gather these ingredients before you start. Fresh vegetables bring great taste and color to your dish. Assorted bell peppers add sweetness, while broccoli gives a nice crunch. Sugar snap peas offer a pop of freshness. Julienned carrots provide color and sweetness, and zucchini adds texture. For flavors, use soy sauce or tamari. Sesame oil gives a nutty taste that enhances the dish. Fresh ginger and garlic add warmth and depth. If you want a thicker sauce, mix cornstarch with water. Finally, garnishes like sesame seeds and herbs will make your stir fry look fancy. Salt and pepper will balance all the flavors. Follow the [Full Recipe] for a complete guide to creating this vibrant meal! Start by washing all your vegetables thoroughly. Use cold water to remove any dirt. Slice the bell peppers into strips. Cut the broccoli into bite-sized florets. Trim the ends of the snap peas. Julienning the carrot means cutting it into thin matchsticks. Slice the zucchini into half-moons. Make sure all pieces are uniform in size. This ensures even cooking and a nice look. In a large skillet or wok, add sesame oil. Heat it over medium-high heat until the oil shimmers. This will give your stir-fry a lovely nutty flavor. If the oil gets too hot, it can smoke and taste bitter. You want it hot, but not smoking. Now, add minced garlic and ginger to the hot oil. Stir-fry them for about 30 seconds. You want them to become fragrant but not brown. Over-browning can give a bitter taste to the dish. Stir quickly to keep them from burning. Add the sliced bell peppers, broccoli florets, snap peas, julienned carrots, and sliced zucchini. Stir-fry for about 5-7 minutes. Keep stirring continuously. This helps the vegetables stay tender but crisp. Don’t overcrowd the pan; work in batches if needed. Drizzle soy sauce over the vegetables. Add salt and freshly cracked black pepper to taste. For a thicker sauce, use the cornstarch mixture. Mix the cornstarch with water before adding it. Stir constantly until everything blends well. If you used the cornstarch mix, cook it for an extra 1-2 minutes. Stir regularly until the sauce thickens and coats the vegetables nicely. This makes your dish look and taste great. Serve it right away for the best flavor. Enjoy your quick and easy vegetable stir fry! For a tasty stir-fry, use fresh, seasonal veggies. Seasonal vegetables have more flavor and nutrients. Think about using bell peppers, broccoli, and snap peas in spring. In summer, zucchini and carrots shine. Don't worry if you can't find a vegetable. You can swap it for another. For example, use spinach instead of broccoli. Just keep the cooking time in mind. The right pan makes a big difference. I recommend a wok or a large skillet. A wok heats quickly and cooks evenly. If you don't have a wok, any large non-stick pan works too. Make sure it has high sides to keep the veggies in. Grab a wooden spatula for easy stirring. You also need a sharp knife for quick chopping. Pair your stir-fry with fluffy rice or quinoa. Both options soak up the sauce well. For added color, sprinkle sesame seeds on top. Fresh herbs, like cilantro or green onions, make a great garnish too. You can even add a slice of lime for a zesty touch. This way, you create a beautiful and tasty meal. Enjoy the vibrant colors and flavors on your plate! {{image_4}} You can add protein to your vegetable stir fry for more nutrition. Tofu, chicken, or shrimp work great. If you choose tofu, use firm or extra-firm for the best results. For chicken, cut it into small pieces. Shrimp should be peeled and deveined. When adding protein, adjust cooking times. Cook chicken pieces for about 5-7 minutes until they are no longer pink. Shrimp cooks faster, taking just 3-4 minutes. Tofu needs a few minutes to brown. Always cook protein first, then add vegetables. Boost the taste of your stir fry with sauces. Hoisin sauce adds sweetness, while oyster sauce gives depth. You can mix in soy sauce or tamari for a gluten-free option. For spice lovers, try chili paste or sriracha. Start with a small amount, like a teaspoon, and taste. You can always add more if you like it hot. These enhancements make your dish exciting and full of flavor. You can make your stir fry fit various diets. For gluten-free options, use tamari instead of soy sauce. Check labels on sauces and ingredients to avoid gluten. If you want a vegan dish, skip the shrimp and use tofu as your protein. You can also add nuts for crunch. These adjustments let you enjoy a tasty stir fry that fits your needs. To keep your leftover vegetable stir fry fresh, use airtight containers. Glass or BPA-free plastic containers work best. Store your stir fry in the fridge. It stays good for about 3 to 4 days. When you reheat your stir fry, aim for even heat. The best way is to use a skillet on medium heat. Stir gently as you warm it. This keeps the veggies from getting mushy. If you prefer the microwave, use a microwave-safe dish. Heat in short bursts, stirring in between. Yes, you can freeze vegetable stir fry! To do this, let it cool completely first. Then, place it in freezer bags or airtight containers. Remove as much air as possible. When ready to eat, thaw it in the fridge overnight. Reheat it on the stove for the best texture. This method helps keep the veggies crisp and tasty. Cooked vegetable stir fry lasts about 3 to 5 days in the fridge. Store it in an airtight container. This keeps it fresh for your next meal. Always check for any changes in smell or color before eating leftovers. Yes, you can use frozen vegetables. They are convenient and save prep time. However, frozen veggies may lose some crunch. Adjust cooking time to about 3 to 5 minutes less. This helps maintain a nice texture. The best sauce is often soy sauce or tamari. You can also try teriyaki or hoisin for sweetness. Each sauce adds a unique flavor. Experiment to find your favorite mix! A vegetable stir fry is very healthy. It is packed with nutrients and low in calories. You get vitamins from the veggies and healthy fats from the oil. This dish is also easy to customize for diets. To make your stir fry less oily, use less sesame oil. You can also steam veggies first and then stir fry them. This helps cut down on oil while keeping flavors. Another tip is to use a non-stick pan. The best pan for stir frying is a wok. It spreads heat evenly and has high sides. This helps you toss the veggies without spilling. A large skillet also works if you don’t have a wok. In this blog post, I covered how to make a tasty vegetable stir fry. You learned about fresh veggies, seasonings, and the best cooking methods. I shared tips for choosing the right tools and ways to store leftovers. Stir fry offers a lot of room for creativity. You can swap vegetables, proteins, and sauces to fit your taste. This dish is easy, quick, and full of flavor. Now, you can enjoy a healthy and delicious meal any day!](https://yumymoments.com/wp-content/uploads/2025/04/b3156a25-d49c-41e5-b09d-8466b713b8be.webp)
Are you looking for a quick meal that bursts with flavor? A vegetable stir fry is your answer! With fresh
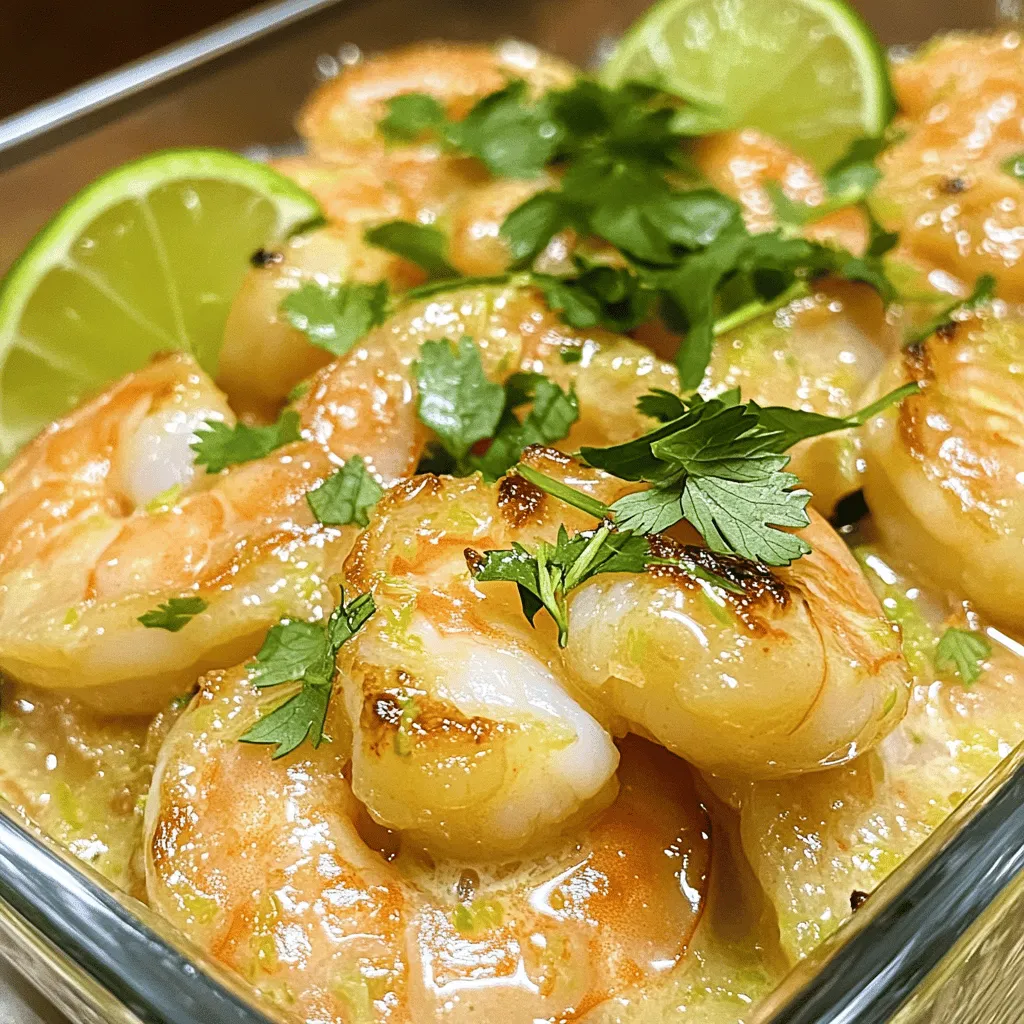
Are you ready for a dinner that’s bursting with flavor and takes just minutes to prepare? Coconut Lime Shrimp is
![- 2 cans of refrigerated cinnamon rolls (14 oz each) - 4 large eggs - 1 cup whole milk - 1 teaspoon pure vanilla extract - 1 teaspoon ground cinnamon - ¼ teaspoon ground nutmeg - ½ cup pure maple syrup - ¼ cup packed brown sugar - Powdered sugar, for dusting The main ingredients create a great base for your casserole. The cinnamon rolls give a nice, soft texture. Eggs add richness and help bind everything. Whole milk makes it creamy, while vanilla and spices bring warmth and flavor. Maple syrup and brown sugar add sweetness. - Additional spices (like cloves or ginger) - Fresh fruits (such as berries or bananas) - Nuts (like pecans or walnuts) You can customize your casserole with optional ingredients. Adding fruits like berries gives freshness. Nuts add crunch and flavor. Extra spices can make it unique. Feel free to mix and match what you like best. - 9x13-inch baking dish - Mixing bowls - Whisk - Sharp knife or kitchen scissors You will need some basic tools. A baking dish is a must for the oven. Mixing bowls help you blend the egg mixture easily. A whisk makes it simple to combine the ingredients. A sharp knife or scissors cuts the cinnamon rolls quickly. For the full recipe, check out [Full Recipe]. - Preheat the oven to 375°F (190°C). - Grease the baking dish with cooking spray or butter. This step sets the stage for baking. Preheating helps the casserole cook evenly. Greasing prevents sticking, so your delicious creation comes out easily. - Cut each cinnamon roll into quarters. - Arrange quartered rolls evenly in the baking dish. Cutting the rolls into quarters makes them bite-sized. Arranging them evenly helps each piece bake just right. You want to see those fluffy rolls when it’s done! - Whisk together eggs, milk, and remaining ingredients. - Pour the mixture over the cinnamon rolls. In a bowl, crack the eggs and whisk them well. Add in milk, vanilla, cinnamon, nutmeg, syrup, and brown sugar. This mixture adds richness to the casserole. When you pour it over the rolls, they soak up all that goodness. - Gently press down the rolls to absorb the egg mixture. - Bake in the preheated oven for 25-30 minutes. Before baking, press the rolls lightly. This helps them soak up the egg mix. When baking, watch for that golden brown color. The smell will fill your kitchen, making it hard to wait! For the full recipe, check out the details above and enjoy this easy comfort food! To know when the casserole is done, look for a golden top. The center should feel set and not jiggly. A toothpick test works well; insert it in the middle. If it comes out clean, you're good to go. For uniform baking, spread the cinnamon rolls evenly. This ensures every piece cooks at the same rate. Avoid crowding the dish, as that can lead to uneven cooking. Serve warm slices on individual plates for a cozy feel. You can drizzle with extra maple syrup for sweetness. A light sprinkle of cinnamon on top adds charm and flavor. For brunch or dessert, think outside the box. Place a scoop of vanilla ice cream on the warm casserole for a sweet twist. Fresh fruit, like berries, can brighten the plate and add color. To elevate the taste, consider adding spices. A pinch of nutmeg or a dash of ginger can add warmth. You could also try extracts like almond for a twist. For sweeter or richer variations, mix in chocolate chips or caramel sauce. These fun additions will make your casserole a standout dish. Each bite can surprise with new flavors and textures. {{image_4}} You can mix things up with different flavors. Try a chocolate chip cinnamon roll casserole. Just add chocolate chips to the egg mixture. The chocolate melts and blends with the rolls. This makes each bite rich and sweet. Another great option is pumpkin spice cinnamon roll casserole. Add pumpkin puree and pumpkin spice to your egg mix. This gives the dish a warm, cozy fall flavor. It's perfect for autumn mornings or any cozy day. If you need gluten-free options, use gluten-free cinnamon rolls. They work just like regular rolls. You still get that soft, fluffy texture and sweet taste. For a dairy-free version, swap out the milk and eggs. Use almond milk or oat milk in place of regular milk. You can use a flaxseed egg or applesauce instead of eggs. These substitutions keep the dish creamy and delicious. You can make holiday-themed casseroles too. Add cranberries and pecans for a festive touch. This gives your casserole a burst of color and flavor. In the summer, try a fruit-infused version. Add fresh berries like strawberries or blueberries. The fruit adds a bright taste and makes it feel light and refreshing. Each season brings new ideas to make this dish your own! Check out the Full Recipe for all the details and tips on making this dish. To store your cinnamon roll casserole, let it cool first. Once cool, cut it into pieces. Place the pieces in an airtight container. Store it in the fridge for up to 3 days. For longer storage, you can freeze the casserole. Wrap each piece tightly in plastic wrap. Then, place them in a freezer-safe bag. This way, you can enjoy it later! To reheat your casserole, preheat your oven to 350°F (175°C). Place the pieces in a baking dish. Cover it with foil to keep moisture in. Heat for about 15-20 minutes. This helps keep the texture nice and soft. You can also use the microwave. Heat on medium power for 30-second intervals until warm. Make sure to check often to avoid dryness. In the fridge, your casserole will last around 3 days. If you freeze it, it can last for up to 2 months. Always check for signs of spoilage. If the casserole smells off or shows mold, it is best to toss it. Freshness is key for enjoying this delicious dish! It takes about 10 minutes to prepare the casserole. Then, you bake it for 25 to 30 minutes. So, the total time is around 40 to 45 minutes. This makes it a great option for a quick breakfast or brunch dish. Yes, you can prepare it in advance! To do this, follow the steps to cut the cinnamon rolls and mix the egg mixture. Store them separately in the fridge. When you are ready, just pour the egg mixture over the rolls and bake. This method lets you save time when you are busy. You can pair it with fresh fruit like berries or bananas. A side of crispy bacon or sausage works well too. For drinks, try serving coffee, juice, or even a warm cup of tea. These choices make the meal feel more complete. Store any leftovers in an airtight container. Keep it in the fridge for up to three days. If you want to save it longer, freeze it for up to two months. To heat, just pop it in the oven or microwave until warm. Enjoy it just like the first time! In this blog post, I covered how to make a delicious cinnamon roll casserole. I shared the main and optional ingredients, plus equipment you’ll need. You learned how to prepare, assemble, and bake the casserole with simple steps. I also included useful tips, flavorful variations, and storage information. This dish is perfect for breakfast or dessert. With so many ways to personalize it, you can impress anyone. Enjoy the cooking process and delight in the great taste you create!](https://yumymoments.com/wp-content/uploads/2025/04/60bb4e7d-431e-448e-a7d2-2a38a2b33a9e.webp)
If you crave a warm, sweet treat that’s easy to make, you’ll love this Cinnamon Roll Casserole! This dish combines

Are you ready to wow your guests with a simple yet elegant dessert? This Easy No-Bake Tiramisu is your answer!

Looking for a refreshing summer treat? Mango sorbet delivers a burst of tropical flavor that’s both simple and satisfying. I’ll
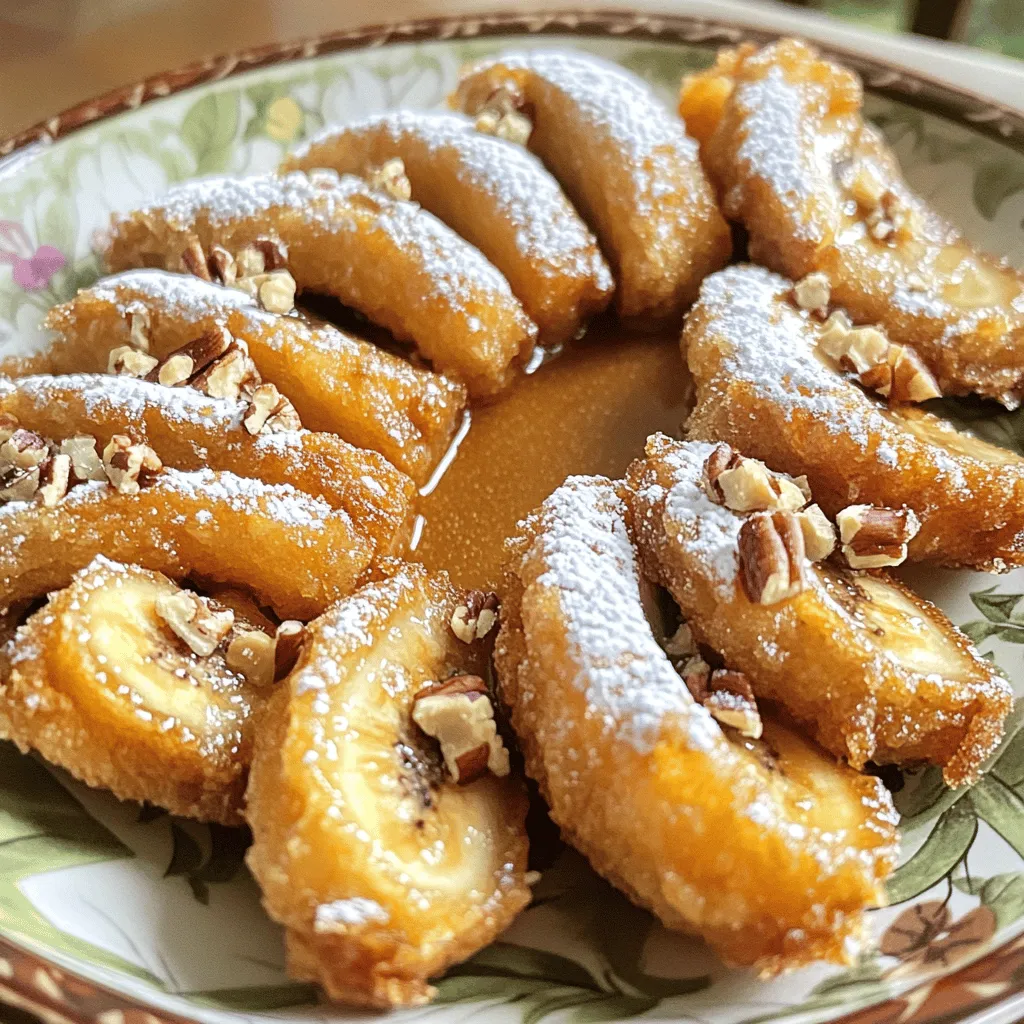
Are you ready for a sweet treat that’s simple to make? Fried bananas with brown sugar are a tasty dessert
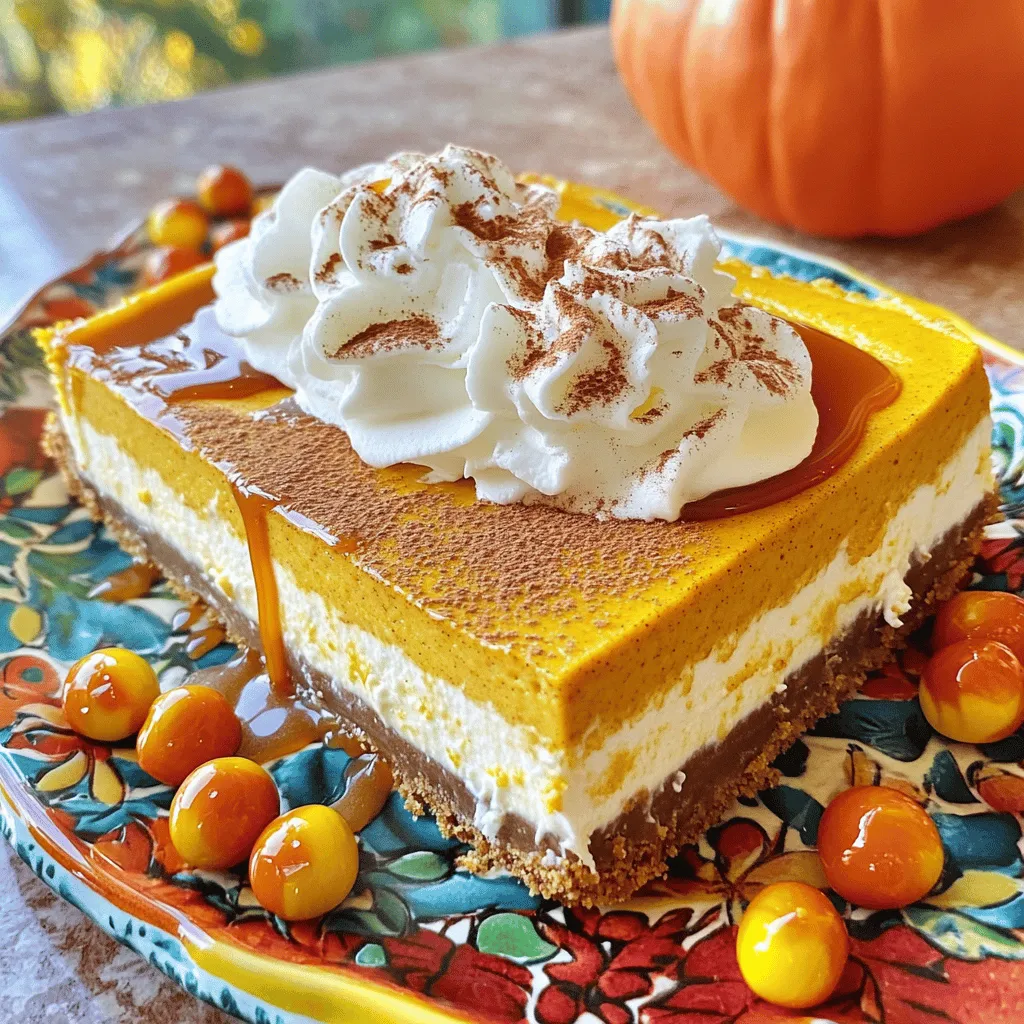
Looking for the ultimate fall dessert? This Best Pumpkin Cheesecake is creamy, delicious, and sure to impress everyone at your
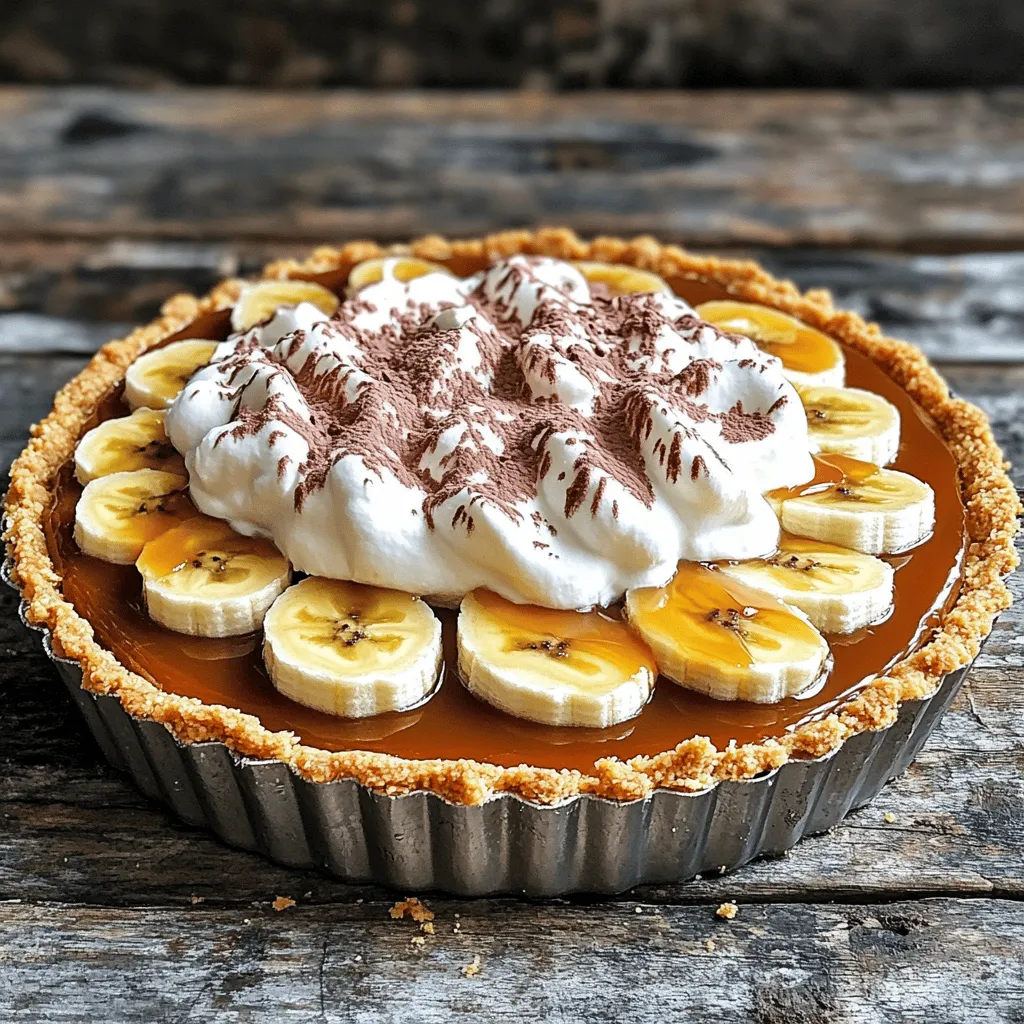
Craving a sweet treat that’s simple to make and full of flavor? Look no further! My Easy Banoffee Pie with

If you love cake that dazzles and delights, this Red Velvet Cake is for you! This simple recipe combines rich
