
Looking for a fun and tasty summer treat? You’ll love these Chocolate Dipped Strawberry Pops! They’re easy to make and perfect for warm days. With just a few simple ingredients and tools, you can create a delightful snack that kids and adults will enjoy. Let's dive into how to make these refreshing pops, and I’ll share tips to make them even more special! Your summer parties will never be the same!
Why I Love This Recipe
- Easy and Fun to Make: This recipe is simple enough for anyone to try, making it a perfect activity for kids and adults alike!
- Customizable: With options to add nuts or colorful sprinkles, you can easily tailor these pops to suit your taste or occasion.
- Perfect for Any Occasion: These Chocolate Dipped Strawberry Pops are great for parties, celebrations, or just a sweet treat at home.
- Delicious Flavor Combination: The contrast of sweet chocolate and fresh strawberries creates a delightful treat that's hard to resist!
Ingredients
Main Ingredients
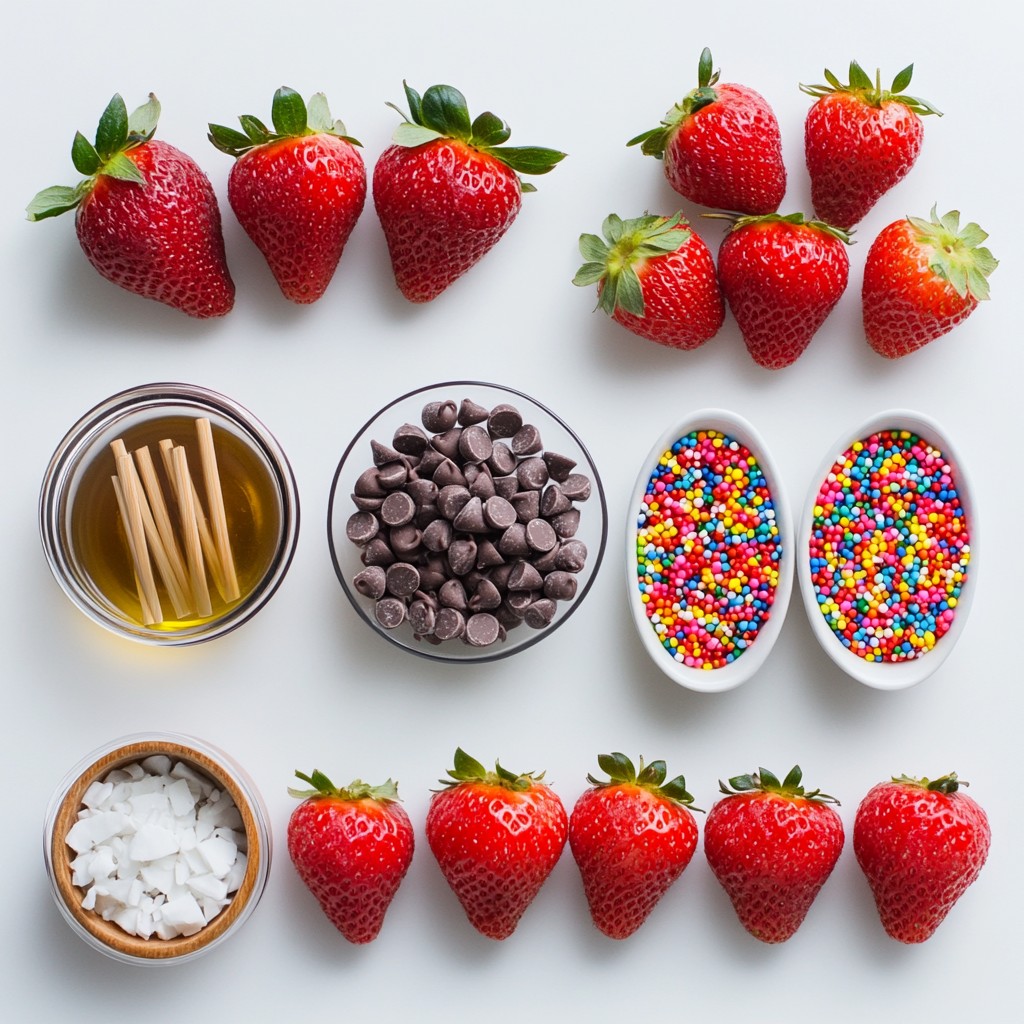
- 12 large fresh strawberries
- 1 cup semisweet chocolate chips
- 1 tablespoon coconut oil
Optional Ingredients
- 1/2 cup crushed nuts (almonds or hazelnuts)
- 1/4 cup colorful sprinkles
Tools Needed
- 12 wooden popsicle sticks
- Microwave-safe bowl
- Baking sheet
- Parchment paper
Gathering the right ingredients is key for making the best Chocolate Dipped Strawberry Pops. Start with fresh strawberries. They should be large, ripe, and washed well. The chocolate chips will give you that gooey, sweet coating. I love semisweet chocolate for its rich flavor. The coconut oil helps the chocolate melt evenly and stay shiny.
You can add crushed nuts or colorful sprinkles for fun. Both options add a nice crunch and a pop of color. Nuts like almonds and hazelnuts work well. They also give a nice flavor boost. Sprinkles are great for kids and festive occasions.
Make sure to have your tools ready. You need wooden popsicle sticks to hold the strawberries. A microwave-safe bowl is a must for melting the chocolate. A baking sheet lined with parchment paper will make cleanup easy.
With everything in place, you are set to create a delightful summer treat!
Step-by-Step Instructions
Preparing the Strawberries
To start, you must ensure your strawberries are dry. Moisture can stop the chocolate from sticking well. Wash your strawberries gently and dry them with a paper towel. Next, take the wooden popsicle sticks and insert them into the green stem end of each strawberry. This makes it easy to dip and eat.
Melting the Chocolate
Now, let’s melt the chocolate. In a microwave-safe bowl, combine 1 cup of semisweet chocolate chips with 1 tablespoon of coconut oil. The oil helps the chocolate melt smoothly. Microwave the bowl in 20-second intervals. After each interval, stir the chocolate well. Continue until it is fully melted and smooth. Be careful not to overheat.
Dipping and Decorating
Grab a strawberry by the stick and dip it into the melted chocolate. Make sure to cover it completely. Once dipped, lift it out and let any extra chocolate drip back into the bowl. While the chocolate is still warm, you can add toppings. Roll the strawberry in crushed nuts or sprinkle colorful sprinkles on top for extra fun!
Chilling the Pops
Next, arrange your chocolate-dipped strawberries on a baking sheet lined with parchment paper. Place the baking sheet in the refrigerator. Chill them for about 30 minutes or until the chocolate is firm. This step is key for that perfect bite!
Tips & Tricks
Perfecting the Chocolate Coating
To get a great chocolate coating, start with dry strawberries. Any moisture will cause the chocolate to slide off. Make sure to dry them well after washing. Next, avoid overheating the chocolate. Melt it in short bursts. Heat it in the microwave for 20 seconds, then stir. Repeat until smooth. If you overheat, the chocolate can become hard and clumpy.
Presentation Tips
Serving your pops on a decorative plate makes them look fancy. You can use colorful plates or a nice stand. For a fun touch, drizzle melted white chocolate on top. This adds flair and taste. Use a spoon to create a zig-zag pattern for a beautiful look.
Timing Tips
To enjoy your pops at their best, prepare them about 30 minutes before serving. This gives the chocolate enough time to set in the fridge. If you want them cold and fresh, chill them just before serving. This way, they taste amazing and look great!
Pro Tips
- Dry Your Strawberries: Make sure the strawberries are completely dry before dipping. Any moisture can prevent the chocolate from adhering properly.
- Use a Double Boiler: If you're concerned about melting chocolate in the microwave, consider using a double boiler for a more controlled melting process.
- Experiment with Flavors: Try adding a pinch of sea salt to the melted chocolate for a delightful contrast to the sweetness of the strawberries.
- Storage Tips: Keep the chocolate-dipped strawberries in the refrigerator and consume them within 24 hours for the best taste and texture.
Variations
Different Chocolate Options
You can switch up the chocolate for your pops. Here are two great choices:
- Dark chocolate: Dark chocolate gives a rich, bold flavor. It pairs well with the sweet strawberries.
- White chocolate: White chocolate adds a sweet and creamy touch. It looks pretty too!
Alternate Toppings
Toppings can make your pops even better. Here are some fun ideas:
- Coconut flakes: Add coconut flakes for a tropical twist. They add a nice crunch!
- Mini chocolate chips: Use mini chocolate chips for a sweet surprise. They melt in your mouth!
Flavor Add-Ins
You can enhance the chocolate's taste with simple add-ins:
- Infusing chocolate with vanilla: A splash of vanilla gives the chocolate a lovely aroma. It makes the flavor more complex.
- Adding a pinch of sea salt: A tiny pinch of sea salt balances the sweetness. It brings out the chocolate’s rich flavor.
Storage Info
Storing Chocolate Dipped Strawberry Pops
To keep your Chocolate Dipped Strawberry Pops fresh, place them in the refrigerator. Use an airtight container for best results. This helps keep the chocolate from getting soft. Ideally, enjoy them within three days for the best taste.
- Refrigeration Guidelines: Store them in a cool area, away from heat.
- Best Practices for Keeping Fresh: Avoid stacking the pops. Lay them flat to prevent any damage.
Freezing Options
If you want to save some for later, freezing is a great choice. It keeps the pops fresh for longer. Before freezing, wrap each pop in plastic wrap. Then put them in a freezer-safe bag or container. This prevents freezer burn.
- How to Freeze for Longer Storage: Wrap individually and place in a freezer-safe bag.
- Thawing Instructions After Freezing: To thaw, take them out and leave them in the fridge for a few hours. Enjoy the pops once they are soft and tasty!
FAQs
Can I use frozen strawberries?
You can use frozen strawberries, but fresh is best. Fresh strawberries taste better and stay firm. Frozen strawberries lose some water, making them mushy. If using frozen, let them thaw completely and dry well. This way, the chocolate will stick better.
How do I prevent the chocolate from seizing?
To keep chocolate smooth, avoid moisture. Always use dry bowls and utensils. When melting, do it slowly in 20-second bursts. Stir well between each burst. If chocolate gets too hot, it may clump. If that happens, add a little more coconut oil to help it smooth out.
What can I substitute for coconut oil?
If you don’t have coconut oil, you can use vegetable oil or canola oil. Both work well for melting chocolate. They help keep the chocolate smooth and shiny. Just remember to use a small amount, about one tablespoon, for best results.
How long do these pops stay fresh?
Chocolate dipped strawberry pops stay fresh for about three days in the fridge. Store them in a covered container. If you freeze them, they can last up to a month. To eat, just thaw them in the fridge for a few hours. Enjoy your sweet treat!
In this article, we explored how to make delicious chocolate-covered strawberry pops. I shared the key ingredients, tools, and step-by-step instructions to create these treats. Plus, I offered tips for perfecting your popping skills and variations for extra flavor.
Making these pops is fun and simple. Enjoy your tasty treats with friends or family. With proper storage, you'll ensure they stay fresh. So, gather your supplies and start dipping! You’ll impress everyone with your skills.


