If you dream of a warm, gooey chocolate center wrapped in a rich hazelnut shell, you’re in for a treat! Chocolate Hazelnut Lava Cakes are not just desserts; they’re a sweet experience that will wow your taste buds. In this guide, I’ll take you through step-by-step instructions, expert tips, and fun variations. Get ready to impress your family and friends with this delicious and decadent delight!
Why I Love This Recipe
- Irresistible Chocolatey Goodness: This recipe delivers a rich and gooey chocolate center that is simply divine, making it a perfect indulgence for any chocolate lover.
- Easy to Prepare: With just a few simple steps, you can whip up these decadent treats in no time, impressing your guests with minimal effort.
- Nutty Crunch: The addition of hazelnuts adds a delightful crunch and depth of flavor that perfectly complements the smooth chocolate.
- Perfect for Any Occasion: Whether it's a romantic dinner or a gathering with friends, these lava cakes are sure to impress and satisfy sweet cravings.
Ingredients
List of Ingredients
- ½ cup (115g) unsalted butter
- 1 cup (170g) semi-sweet chocolate chips
- 2 large eggs
- 2 large egg yolks
- ⅓ cup (40g) powdered sugar
- ¼ cup (30g) all-purpose flour
- 1 tablespoon unsweetened cocoa powder
- ¼ teaspoon salt
- ¼ cup (35g) chopped hazelnuts
- 2 tablespoons hazelnut spread (such as Nutella)
To make your chocolate hazelnut lava cakes even better, you can add a few optional ingredients. Consider using different types of chocolate, like dark or milk chocolate, for a unique twist. You can also mix in spices like cinnamon or vanilla extract for added flavor. If you want to try a different nut, walnuts or almonds work well too. Each change can give your dessert a new taste and texture.

Step-by-Step Instructions
Preparation Steps
- Start by preheating your oven to 425°F (220°C).
- Grease four ramekins with butter. Dust the insides with cocoa powder to help the cakes release.
- In a microwave-safe bowl, mix the unsalted butter and semi-sweet chocolate chips. Heat for 30 seconds, then stir. Repeat until the chocolate melts and is smooth.
- In a large bowl, whisk together two whole eggs, two egg yolks, and powdered sugar. Whisk until pale and slightly thick, about 2-3 minutes.
- Pour the warm chocolate mix into the egg mix. Stir until it forms a smooth batter.
- In a separate bowl, sift together all-purpose flour, cocoa powder, and salt. Gently fold these into the chocolate batter until no flour remains. Be careful not to overmix.
- Fold in chopped hazelnuts evenly throughout the batter for extra crunch.
Assembling Lava Cakes
- Spoon half of the chocolate batter into each ramekin.
- Add a teaspoon of hazelnut spread in the center of each ramekin.
- Cover the spread with the remaining batter. Make sure the spread is completely hidden.
Baking Instructions
- Place the filled ramekins on a baking sheet.
- Bake in the preheated oven for 12-14 minutes. The edges should be firm, while the centers stay soft and a little jiggly.
- After baking, let the ramekins cool for 1 minute.
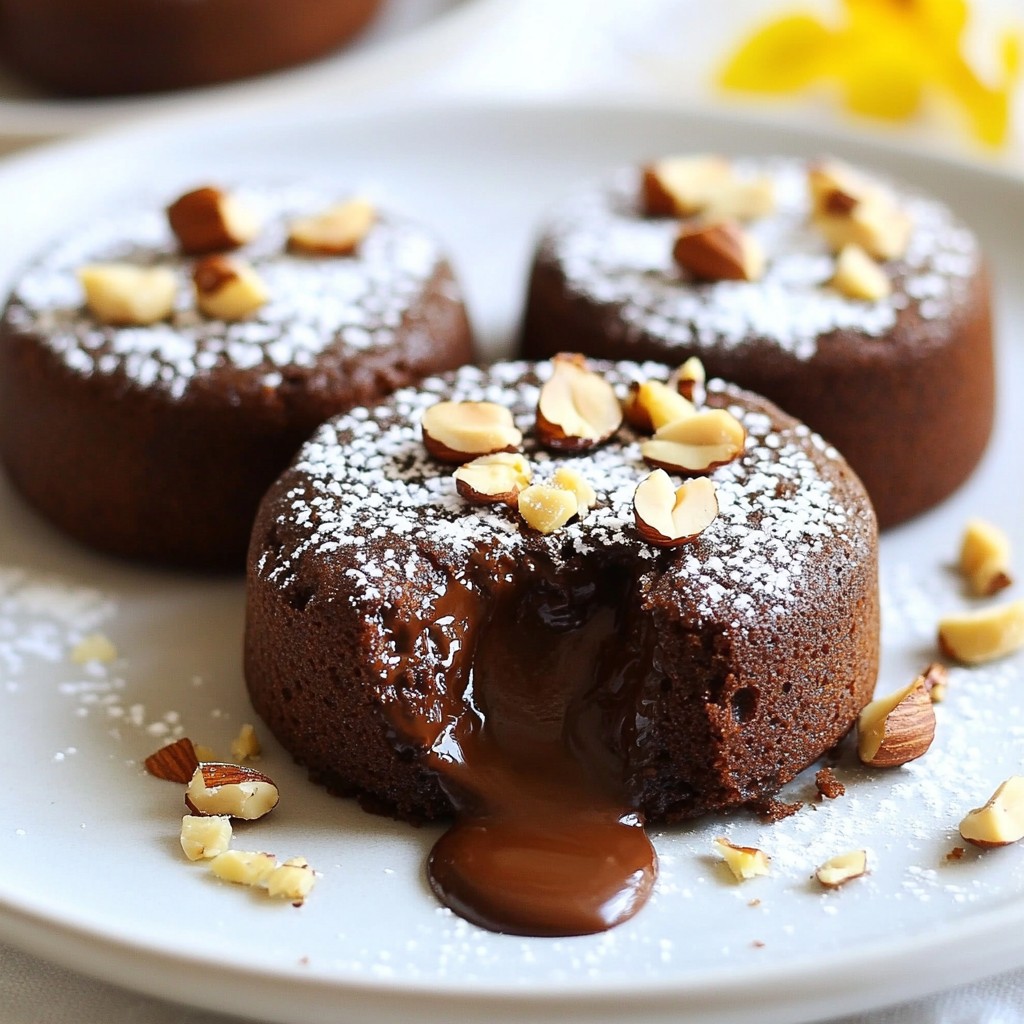
- Run a knife around the edges of each cake. Invert the ramekins onto plates to serve.
Tips & Tricks
Perfecting the Lava Center
To get that perfect molten center, timing is key. Bake your lava cakes for 12 to 14 minutes. Watch for the edges to be firm while the center jiggles. If you bake too long, you lose that gooey center. You want it warm but not fully set.
Use a kitchen timer to help keep track. This way, you can avoid opening the oven door too soon. The heat needs to stay in the oven. I recommend placing the ramekins on a baking sheet. This makes moving them in and out easier without spilling.
Common Mistakes to Avoid
Mixing is crucial in this recipe. Overmixing can make the cakes dense. You should mix just until the flour disappears. If you see dry bits, you’re good to go.
Also, be careful not to under-mix. This can leave lumps of flour that won’t bake properly. Pay attention to your batter for the best result.
When it comes to sticking, greasing your ramekins is a must. Use butter or cooking spray. After greasing, dust with cocoa powder. This prevents sticking and helps your cakes release cleanly. If you skip this step, your cakes might break apart when you flip them.
Pro Tips
- Use High-Quality Chocolate: For the best flavor, opt for high-quality semi-sweet chocolate. The taste of the chocolate is the star of this dessert, so choose one you truly enjoy.
- Don’t Overbake: Keep a close eye on the lava cakes while they bake. The centers should remain soft and gooey, so it’s better to take them out a minute early than to risk drying them out.
- Chill the Ramekins: If you are preparing the batter in advance, chill the filled ramekins in the refrigerator for about 30 minutes before baking. This helps to achieve a better lava effect.
- Experiment with Flavors: Feel free to play with the flavors by adding a splash of vanilla extract or a pinch of espresso powder to enhance the chocolate. It can elevate the overall taste of your lava cakes.
Variations
Flavor Variations
You can switch up flavors in your chocolate hazelnut lava cakes. Using different types of chocolate can change the taste. Try dark chocolate for a bold flavor or milk chocolate for a sweeter treat. Adding spices can also make your cakes unique. A pinch of cinnamon or a drop of vanilla extract can add warmth and depth.
Dietary Alternatives
If you need gluten-free options, you can use almond flour instead of all-purpose flour. This swap keeps the texture light and tasty. For dairy-free substitutions, choose dairy-free chocolate and coconut oil instead of butter. These changes make it easier for everyone to enjoy these delicious lava cakes.
Storage Info
How to Store Lava Cakes
First, let’s talk about storing your lava cakes. If you have leftovers, you can refrigerate them. Place them in an airtight container. This keeps them fresh for up to two days. If you want to save them longer, freezing is a great option. Wrap each cooled lava cake tightly in plastic wrap, then place them in a freezer-safe bag. They can last for about three months in the freezer.
Reheating Suggestions
When it comes to reheating, you want to keep that gooey center. The best way is to use the oven. Preheat your oven to 350°F (175°C). Place the lava cakes on a baking sheet. Heat for about 8-10 minutes. This warms them up nicely without drying them out. You can also use the microwave, but do it gently. Heat for 15-20 seconds at a time. Watch closely so they don’t overheat. Enjoy that warm, flowing chocolate!
FAQs
Common Questions
Can I make lava cakes ahead of time? Yes, you can prepare the batter in advance. Fill the ramekins, cover them, and chill them in the fridge. Bake them when you are ready. This lets you enjoy fresh lava cakes without the rush.
What if the lava cakes don’t flow? If the lava cakes don’t flow, they might be overbaked. Keep an eye on them in the oven. You want the edges firm but the center soft. If they set too much, they won’t have that gooey center.
Can I use other nuts instead of hazelnuts? Definitely! You can swap hazelnuts for walnuts or almonds. Each nut has a unique flavor. Just chop them up and add them in the same way.
Serving Suggestions
Best pairings for chocolate hazelnut lava cakes Serve these cakes warm with vanilla ice cream. The cold ice cream melts slightly on the hot cake. You can also pair them with fresh berries for a tart contrast.
Presentation ideas for serving Plate the lava cakes on a nice dessert plate. Dust with powdered sugar for a touch of elegance. Add a few extra chopped nuts on top to make it look fancy.
You learned how to make delicious chocolate hazelnut lava cakes. We covered each step, from gathering ingredients to baking the perfect treat. Remember the tips for a gooey center and avoid common mistakes like overmixing. You can also try different flavors or make it gluten-free. Proper storage and reheating keep your cakes fresh longer. With these tips, your dessert will impress anyone. Enjoy creating and sharing this sweet delight!


