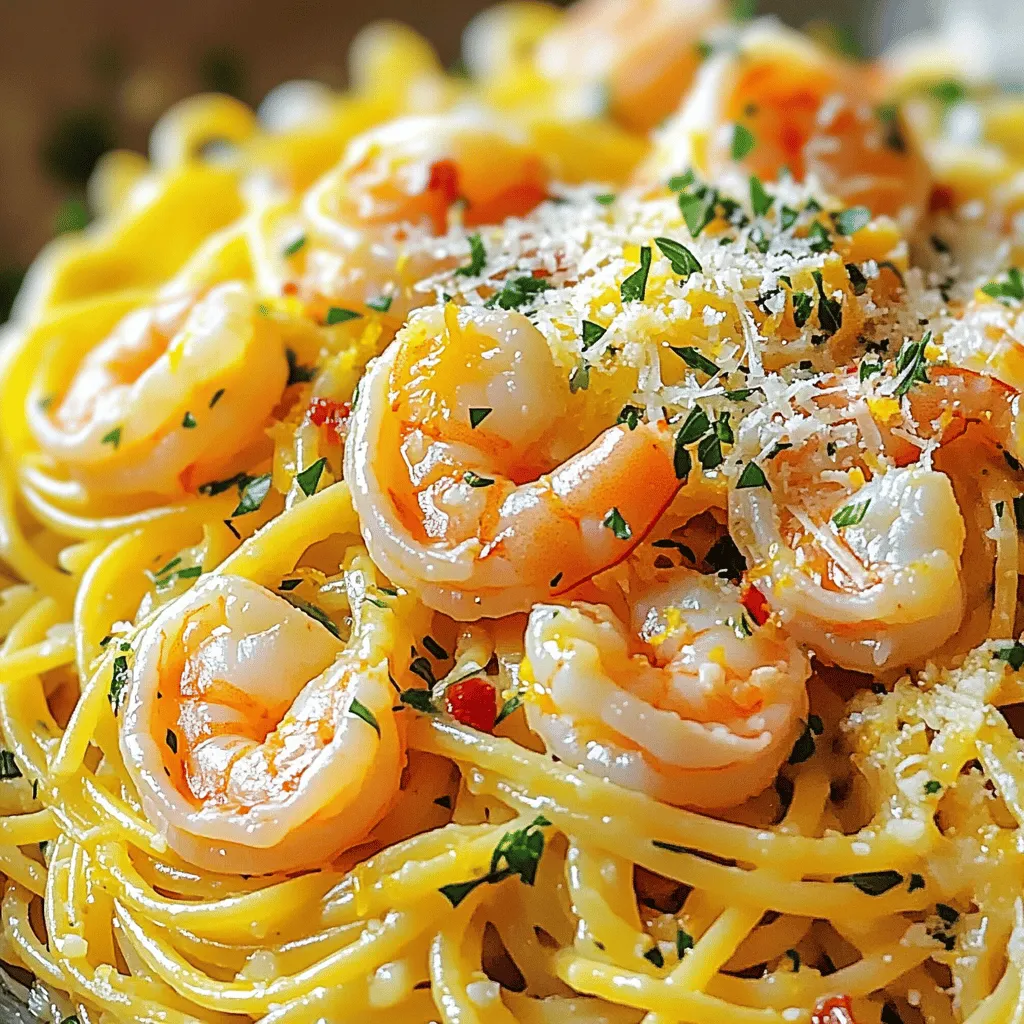
Are you ready for a quick and tasty meal? Lemon Garlic Shrimp Pasta is it! This dish packs bold flavors and is easy to make. In less than 30 minutes, you’ll enjoy a dish that pleases everyone. With just a few main ingredients, you can craft a meal that’s sure to impress. Let’s dive into how to whip this up in your own kitchen!
Ingredients
Main Ingredients Required
– 8 oz spaghetti or linguine
– 1 lb large shrimp, peeled and deveined
– 4 cloves garlic, minced
– 1/4 cup unsalted butter
– 3 tablespoons olive oil
For this dish, I use fresh large shrimp. They add a sweet flavor and a nice texture. Spaghetti or linguine are my favorite pasta choices. They hold the sauce well. The garlic brings a bold taste that pairs perfectly with the shrimp. Unsalted butter and olive oil create a rich base for cooking.
Seasonings and Garnishes
– 1 lemon, zested and juiced
– 1/2 teaspoon red pepper flakes (adjustable for spice preference)
– 1/4 cup fresh parsley, finely chopped
– Grated Parmesan cheese for serving (optional)
Lemon zest and juice brighten the dish. I love the zing it adds. Red pepper flakes give just the right amount of heat. You can adjust it to your taste. Fresh parsley adds a pop of color and freshness. If you want, sprinkle some Parmesan cheese on top for a creamy finish.
Serving Size and Cooking Equipment
– Servings: 4
– Essential kitchen tools: large pot, skillet, mixing bowl, and a colander
This recipe serves four people. It’s perfect for a family dinner or a cozy gathering. You need a large pot for boiling the pasta and a skillet for cooking shrimp. A mixing bowl helps combine all the ingredients nicely. A colander is handy for draining the pasta. This simple setup makes cooking easy and fun!
Step-by-Step Instructions
Cooking the Pasta
Start by boiling water in a large pot. Make sure to add salt to the water for flavor. Once the water is boiling, add 8 oz of spaghetti or linguine. Cook according to the package instructions, usually about 8 to 10 minutes. You want it just right—al dente. Before draining, reserve about 1 cup of pasta water. This water is starchy and will help your sauce later. After that, drain the pasta and set it aside in a large bowl.
Sautéing the Garlic and Shrimp
In a big skillet, melt 1/4 cup of unsalted butter with 3 tablespoons of olive oil over medium heat. Once the butter melts, add 4 cloves of minced garlic. Stir it for around 30 seconds until it smells great. Be careful not to let the garlic brown. Next, add 1 lb of peeled and deveined shrimp to the skillet. Season them with a pinch of salt, black pepper, and 1/2 teaspoon of red pepper flakes. Cook the shrimp for 2 to 3 minutes. They should turn pink and opaque when done.
Combining Ingredients for Flavor
Once the shrimp are cooked, pour in the juice of 1 lemon and sprinkle the lemon zest over the mixture. Stir everything well to coat the shrimp. If the sauce looks dry, add a splash of the reserved pasta water. This will make the sauce silky and smooth. Now, gently fold the drained pasta into the skillet. Toss it well so every strand gets coated in that tasty sauce. Enjoy the bright lemon flavor mixed with the shrimp!
Tips & Tricks
Perfecting the Pasta
To get the right al dente texture, cook your pasta just until it is firm to the bite. This usually takes about 8 to 10 minutes. Remember to check the package for specific times. To avoid sticky pasta, make sure to stir it while it cooks. Use plenty of water and salt. This helps keep the pasta separate and adds flavor.
Enhancing Flavor
You can adjust the spice level by adding more or fewer red pepper flakes. If you like it spicy, add more! For a creamier taste, sprinkle grated Parmesan cheese on top. Mix it in for a rich, cheesy flavor that pairs well with the lemon and shrimp.
Presentation Suggestions
Garnishing adds a nice touch. Try placing a lemon wedge on each plate. This gives a fresh look and extra zing. You can also sprinkle more parsley on top for color. Serve with crusty bread. It’s perfect for soaking up any leftover sauce.

Variations
Ingredient Swaps
You can switch up the pasta type to fit your taste. Try penne, fettuccine, or even whole wheat. Each option brings its unique texture. If you want a gluten-free meal, consider using brown rice pasta or chickpea pasta. These choices add flavor and keep the dish light.
If shrimp isn’t your thing, you have options. You can use chicken breast, scallops, or even tofu. Each of these proteins can soak up the lemon and garlic flavors well. Just be sure to adjust cooking times to ensure everything is cooked perfectly.
Dietary Adjustments
For those needing gluten-free options, many pasta brands offer delicious choices. Look for gluten-free spaghetti or linguine made from rice or lentils. These options cook similarly and still taste great.
Dairy-free variations are simple too. Skip the Parmesan cheese or use a dairy-free version instead. Nutritional yeast can also add a cheesy flavor without dairy. This keeps the dish rich and satisfying.
Additional Flavor Profiles
Want to add more veggies? You can toss in spinach, cherry tomatoes, or bell peppers. This not only boosts nutrition but also adds color to your plate. Cook them in the skillet for a few minutes before adding shrimp for a tasty mix.
Herbs and spices can change the whole dish. Add fresh basil or oregano for an Italian twist. A pinch of thyme or a splash of white wine can enhance the flavor too. Be creative and make this dish your own!
Storage Info
Refrigerating Leftovers
To store leftovers, place the pasta in an airtight container. Make sure it cools to room temperature first. Seal the container tightly. This helps keep it fresh. You can refrigerate it for up to three days. After that, the shrimp may lose flavor and texture.
Reheating Instructions
For reheating, I like to use a skillet. Heat it over medium-low heat. Add a splash of olive oil to prevent sticking. Then, add the pasta and shrimp. Stir gently until warmed through. You can also use a microwave. If you do, cover the dish to keep moisture in. This method works best if you add a bit of water to avoid drying out the pasta.
Freezing Options
You can freeze cooked pasta, but it changes texture. If you want to freeze it, let it cool first. Place it in a freezer-safe bag. Remove as much air as possible. It will last for about two months. For uncooked shrimp, freeze them in their original packaging. You can also place them in a freezer-safe bag. Remember to use them within three months for the best quality. To thaw, move it to the fridge overnight. This keeps the shrimp safe and fresh.
FAQs
How long does it take to make Lemon Garlic Shrimp Pasta?
Making Lemon Garlic Shrimp Pasta takes about 20 minutes. Here’s the breakdown:
– Prep Time: 10 minutes
– Cook Time: 10 minutes
This quick meal fits perfectly into a busy day.
Can I prepare this dish in advance?
Yes, you can prepare parts of this dish ahead of time. Here are some tips:
– Cook the pasta and store it in the fridge.
– Sauté the garlic and shrimp, then cool it before storing.
– Mix everything just before serving for the best taste.
What type of shrimp is best for this recipe?
I recommend using large, peeled, and deveined shrimp. Here’s why:
– Freshness: Look for shrimp that smell like the ocean.
– Sourcing: Buy shrimp from local markets or trusted stores.
This ensures great flavor and quality in your dish.
Is it possible to make Lemon Garlic Shrimp Pasta without gluten?
Yes, you can make this dish gluten-free. Here are some substitutes:
– Use gluten-free pasta made from rice or quinoa.
– Check sauces and butter for gluten-free labels.
This way, everyone can enjoy this tasty meal.
In this article, we covered how to make a tasty Lemon Garlic Shrimp Pasta. You learned about the key ingredients like shrimp, garlic, and lemon. We shared step-by-step cooking instructions and helpful tips to perfect your dish. You also found variations and storage tips for your leftovers.
Cooking can be fun and easy with the right guidance. Enjoy mastering this recipe, and don’t be afraid to make it your own!