Looking for a simple side dish that packs a flavor punch? Maple glazed carrots are just what you need! In this blog, I’ll share how to make this easy and tasty dish that brings sweetness and charm to any meal. Perfect for weekday dinners or festive gatherings, these carrots are sure to impress. Let’s dive into the ingredients and steps to create your new favorite side!
Why I Love This Recipe
- Deliciously Sweet: The combination of maple syrup and spices creates a rich, sweet glaze that elevates the natural sweetness of the carrots.
- Easy to Prepare: This recipe is straightforward and requires minimal prep, making it perfect for busy weeknights or special occasions.
- Healthy Side Dish: Carrots are packed with vitamins and nutrients, and this recipe offers a delicious way to enjoy them without compromising on taste.
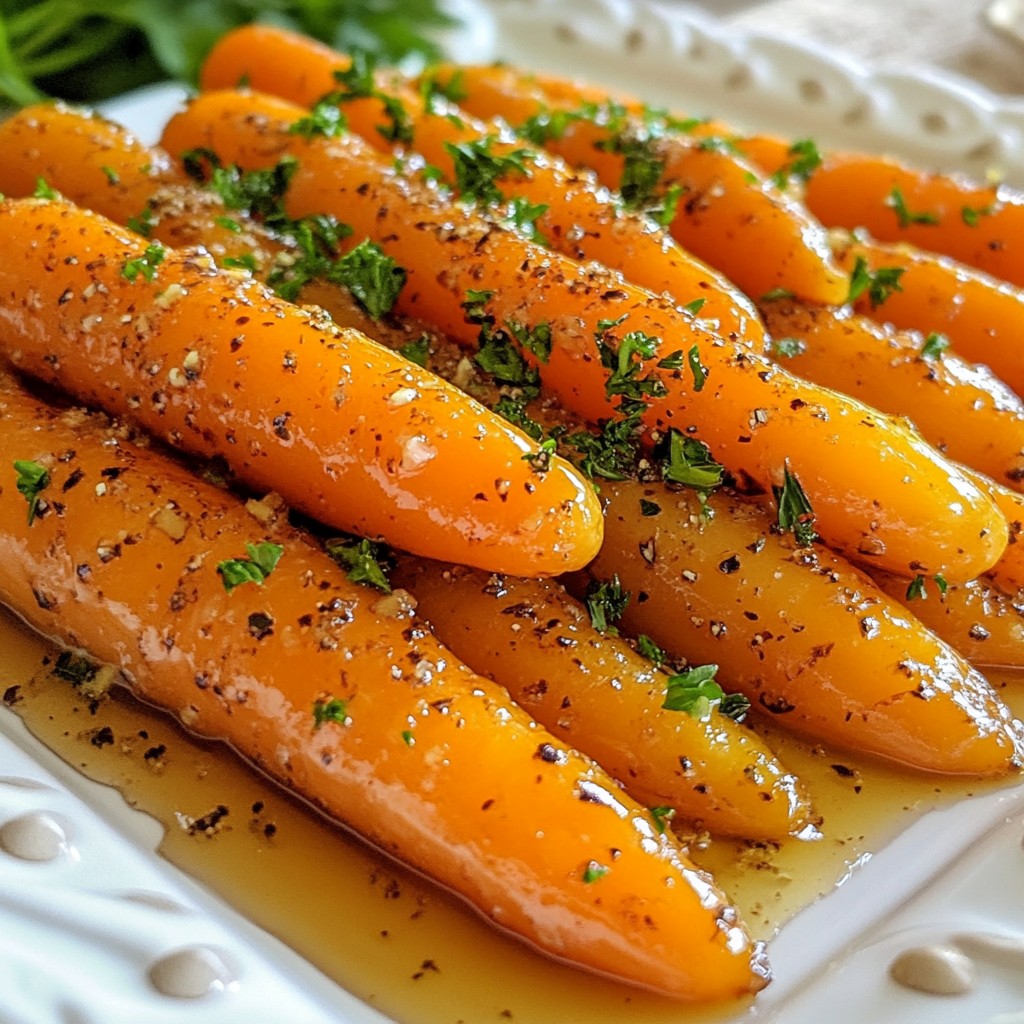
- Beautiful Presentation: The vibrant color of the glazed carrots, topped with fresh parsley, makes for an eye-catching addition to any meal.
Ingredients
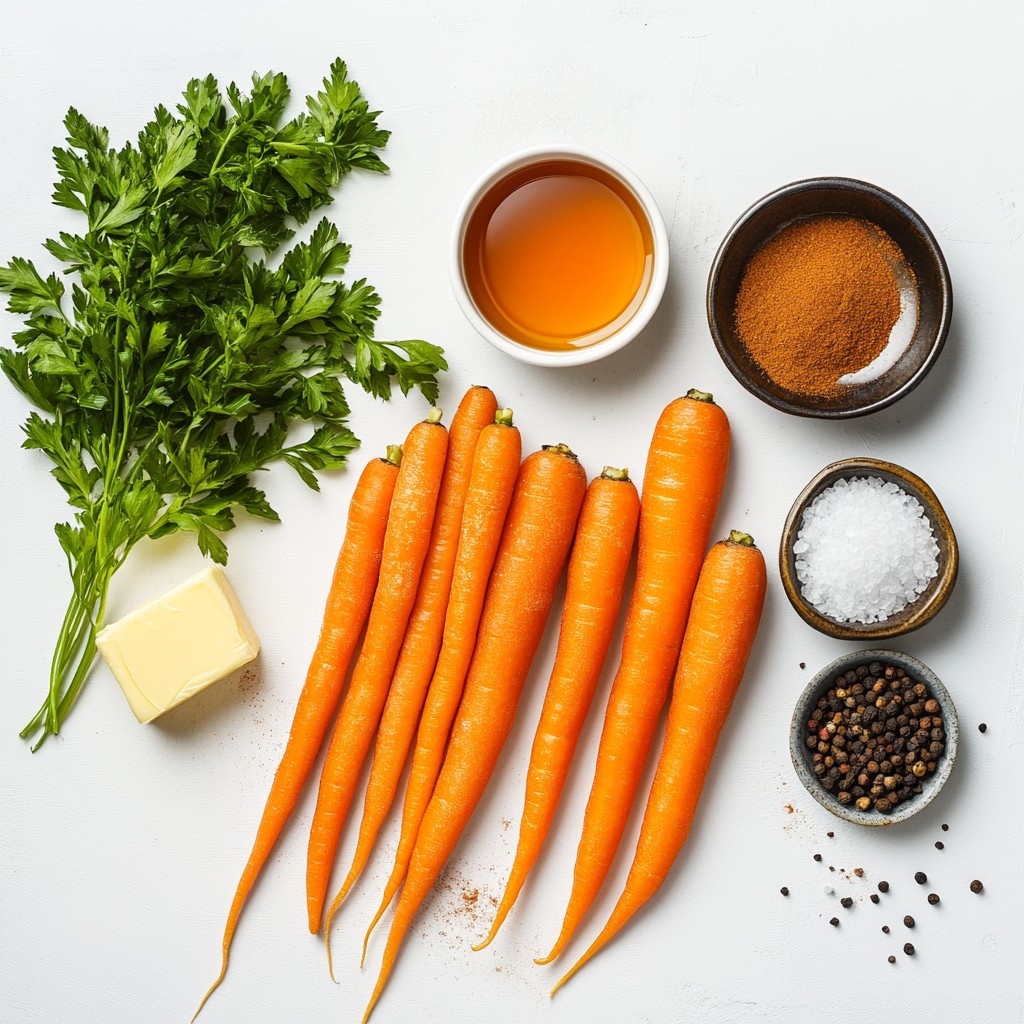
List of Ingredients
- 1 lb baby carrots, thoroughly peeled and trimmed
- 2 tablespoons unsalted butter
- 1/4 cup pure maple syrup
- 1 teaspoon ground cinnamon
- 1/4 teaspoon freshly grated nutmeg
- Salt, to taste
- Freshly cracked black pepper, to taste
- 1 tablespoon finely chopped fresh parsley (for garnish)
Key Ingredient Notes
Baby carrots are sweet and tender. They save time since they need no cutting. If you use whole carrots, slice them into 1-2 inch pieces for even cooking. The butter adds a rich flavor and helps the glaze stick. Pure maple syrup is the star here, giving a sweet and earthy tone. Ground cinnamon and nutmeg add warmth and depth to the dish.
Substitutions for Common Ingredients
If you don’t have baby carrots, use regular carrots. Just cut them into small pieces. For a dairy-free option, swap butter for olive oil or vegan butter. You can replace maple syrup with honey, but it will change the flavor. If you lack nutmeg, you can skip it or use allspice instead. Fresh parsley adds color, but feel free to use chives or cilantro for a twist.
Step-by-Step Instructions
Preparation of Carrots
Start with fresh baby carrots. If you have whole carrots, cut them into uniform pieces, about 1-2 inches long. This helps them cook evenly. If you prefer, you can leave baby carrots whole for ease. Make sure to peel them well and trim the ends. This step is important for a clean taste.
Cooking Process
Heat a large skillet over medium heat. Add 2 tablespoons of unsalted butter and let it melt. You want the butter to become frothy but not brown. Once melted, add the prepared carrots to the skillet. Sauté the carrots for about 5 minutes, stirring often. They should soften and turn a bit golden.
Next, pour in 1/4 cup of pure maple syrup. Add 1 teaspoon of ground cinnamon and 1/4 teaspoon of freshly grated nutmeg. Season with a pinch of salt and black pepper. Stir well to coat the carrots in the sweet glaze.
Reduce the heat to a gentle simmer. Cover the skillet and cook for 10-12 minutes. Stir occasionally to prevent sticking. The carrots will become fork-tender, and the syrup will thicken into a glaze.
Final Touch and Serving Recommendations
Taste the glaze and add more salt or pepper if needed. Once the carrots are ready, remove the skillet from the heat. Transfer the glazed carrots to a serving dish.
Just before serving, sprinkle 1 tablespoon of finely chopped fresh parsley on top. This adds color and freshness. For presentation, arrange the carrots in a circular pattern on a platter. Drizzle any leftover glaze over them for an appealing shine. Enjoy this tasty side dish with your meal!
Tips & Tricks
How to Achieve the Best Glaze
To get the best glaze, use pure maple syrup. It adds a rich flavor. Start with melted butter in a skillet. Then, add your carrots and sauté for 5 minutes. This helps them soften and caramelize. Next, pour in maple syrup, cinnamon, and nutmeg. Stir well to coat every carrot. Let the mix simmer gently. This will thicken the glaze and enhance the taste.
Adjusting Flavor Profiles
You can tweak the flavor to fit your taste. If you like sweeter carrots, add more maple syrup. For a spicier kick, try a pinch of cayenne pepper. You can also add more cinnamon for warmth or a dash of balsamic vinegar for tanginess. Always taste the glaze and adjust salt and pepper as needed. This step ensures every bite is just right.
Cooking Equipment Recommendations
A large skillet works best for this dish. A non-stick skillet helps prevent sticking and burning. Make sure your skillet has a lid for simmering. This helps keep the steam in, cooking the carrots evenly. Use a wooden spoon for stirring. It’s gentle on your cookware and helps mix the glaze well.
Pro Tips
- Use Fresh Carrots: Fresh baby carrots will have the best flavor and texture. Look for firm, vibrant-colored carrots for the tastiest results.
- Adjust Sweetness: Depending on your preference, you can add more or less maple syrup to the glaze. Taste as you go to achieve your desired sweetness level.
- Experiment with Spices: Feel free to add other spices like ginger or allspice to the glaze for a unique flavor twist that complements the sweetness of the maple syrup.
- Serve Warm: For the best experience, serve the glazed carrots warm. They can be made ahead of time and gently reheated before serving.
Variations
Alternative Sweeteners
You can swap maple syrup for honey. Honey gives a nice floral taste. You could also try agave nectar for a vegan option. Each sweetener changes the flavor slightly, so feel free to experiment.
Adding Fresh Herbs and Spices
Fresh herbs can really enhance your dish. Try adding thyme or rosemary for extra depth. They add a savory note that balances the sweetness. You can also add a pinch of cayenne pepper for a spicy kick.
Incorporating Other Vegetables
Mix in other veggies for a colorful twist. Sweet potatoes add heartiness and flavor. You can also use parsnips for a sweeter taste. Just remember to cut them to the same size as carrots for even cooking.
Storage Info
How to Store Leftovers
To store your maple glazed carrots, let them cool first. Then, place them in an airtight container. This keeps them fresh. Store the container in the fridge. They can last for about 3 to 5 days. If you want to keep them longer, freezing is a good option.
Reheating Instructions
When you're ready to eat leftovers, reheating is easy. You can use a microwave or a stovetop. For the microwave, place the carrots in a bowl. Heat them for 1 to 2 minutes. Stir halfway for even warming. If using the stovetop, add a splash of water to a pan. Heat on low until warm, stirring gently. This keeps them moist.
Freezing Maple Glazed Carrots
Freezing is a great way to save extra carrots. First, cool them completely. Then, spread them out on a baking sheet. Freeze until firm, about 1 to 2 hours. After that, transfer them to a freezer-safe bag. Label the bag with the date and store it in the freezer. They can last for up to 3 months. When you want to use them, thaw in the fridge overnight before reheating.
FAQs
Can I use regular carrots instead of baby carrots?
Yes, you can use regular carrots. Just slice them into 1-2 inch pieces. This helps them cook evenly. Baby carrots are convenient, but regular carrots add a nice touch. They often have a richer flavor too.
How long can I store maple glazed carrots?
You can store maple glazed carrots in the fridge for up to four days. Make sure to keep them in an airtight container. They taste great even after a few days. Just reheat them gently on the stove or in the microwave.
What dishes pair well with maple glazed carrots?
Maple glazed carrots pair well with many dishes. They complement roasted chicken or pork perfectly. Serve them alongside grilled fish for a fresh taste. You can also enjoy them with quinoa or rice for a hearty meal.
In this post, we covered the key ingredients and cooking steps for maple glazed carrots. You learned about the best ways to prepare, cook, and serve them. We also shared helpful tips, flavor tricks, and creative variations. Finally, we discussed storage and answered common questions.
Maple glazed carrots can be a delightful addition to your meals. Try these tips to make them your own and enjoy every bite.