Mini Cheesecake Bites Simple and Tasty Treats

Craving a delectable dessert that’s easy to make? Look no further! My Mini Cheesecake Bites are simple yet oh-so-tasty. They’re perfect for any occasion and will wow your friends and family. With just a few ingredients and straightforward steps, you can whip up these delightful treats in no time. Ready to satisfy your sweet tooth? Let’s get started on making these irresistible mini cheesecakes!

Ingredients

Main Ingredients for Mini Cheesecake Bites

To make mini cheesecake bites, you need a few simple ingredients. Each one plays a key role in creating that creamy, dreamy texture and flavor. Here’s what you’ll need:

– 1 cup graham cracker crumbs

– 1/4 cup unsalted butter, melted

– 2 tablespoons granulated sugar

– 1 (8 oz) package cream cheese, softened to room temperature

– 1/2 cup powdered sugar

– 1 teaspoon pure vanilla extract

– 1 large egg, at room temperature

– 1/3 cup sour cream

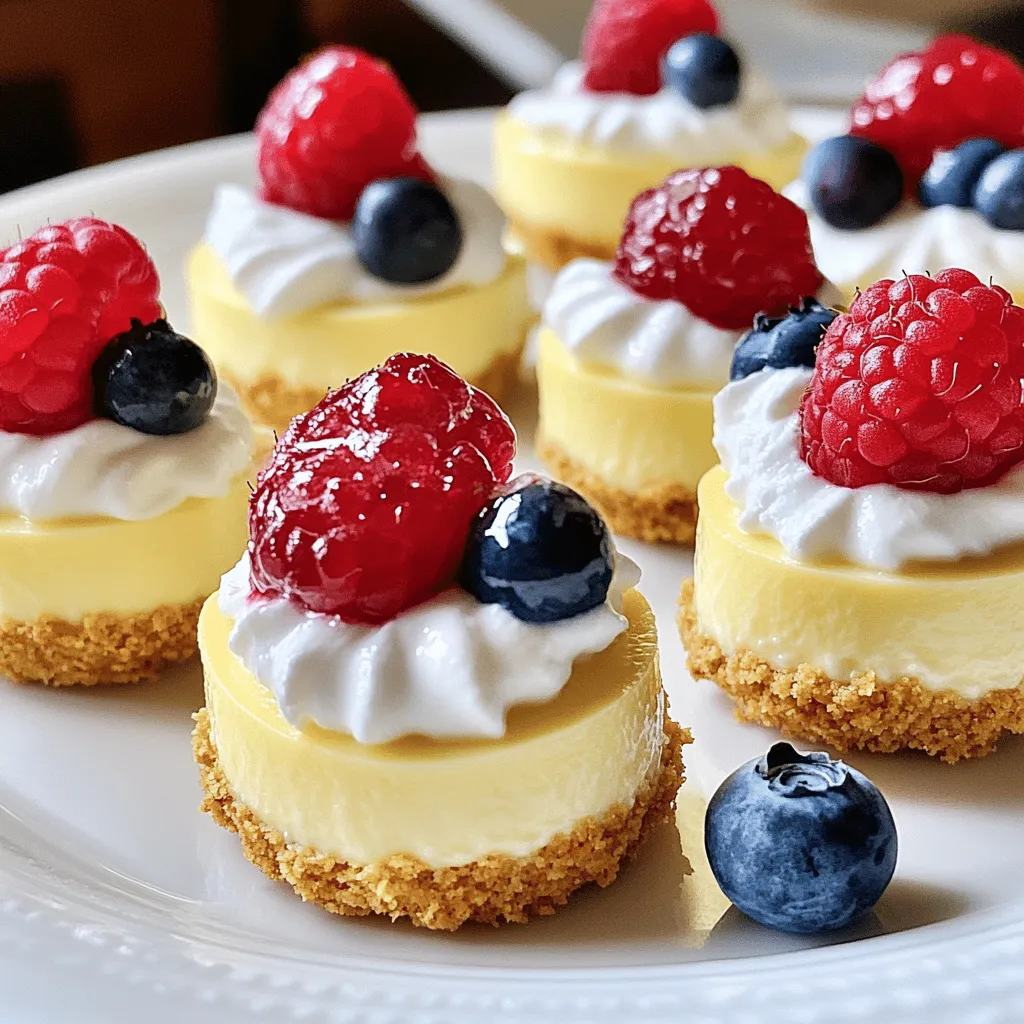
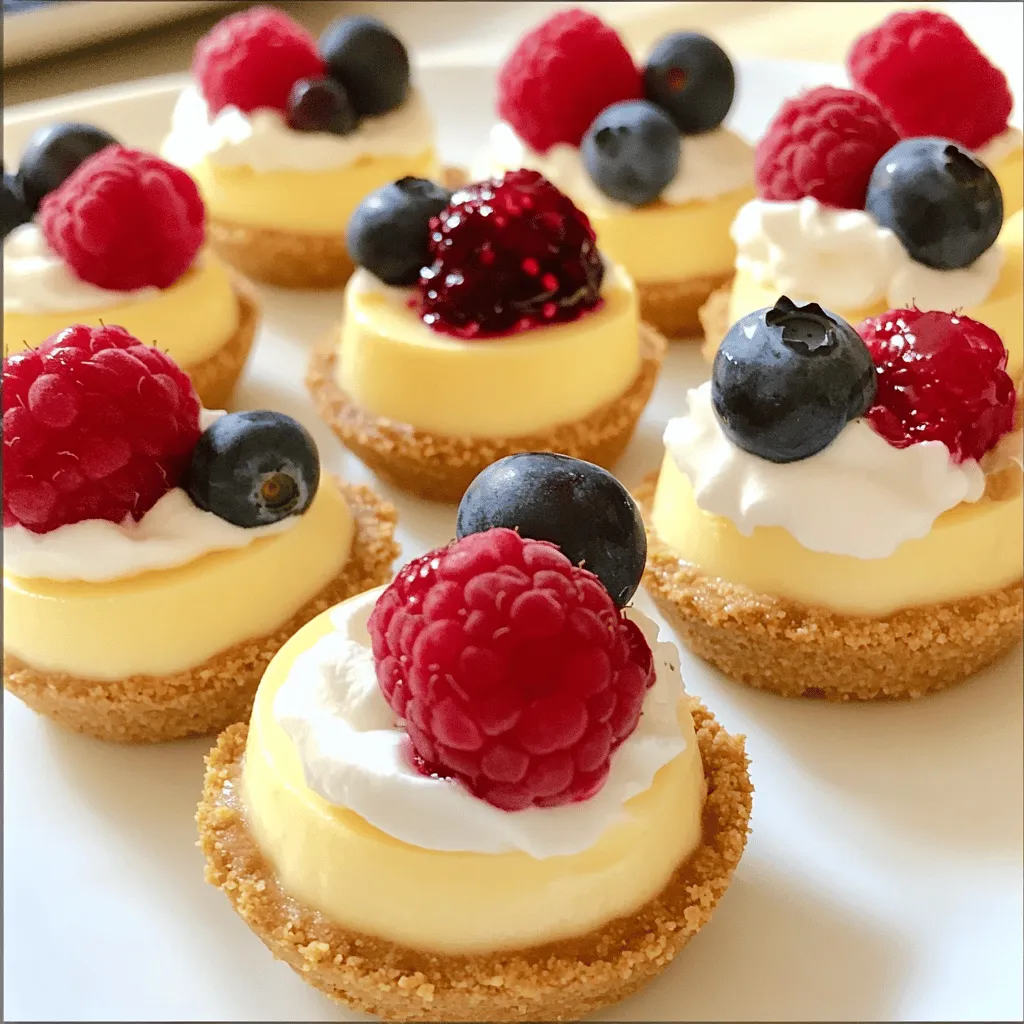
– Fresh berries (raspberries, blueberries, or strawberries) for topping

– Whipped cream, for garnish (optional)

The graham cracker crumbs serve as the base for your mini cheesecakes. They give a nice crunch and flavor. Melted unsalted butter helps bind the crumbs together. The granulated sugar sweetens the crust just right.

For the filling, softened cream cheese is a must. It creates that rich and creamy texture we all love. Powdered sugar adds sweetness without any grittiness. Pure vanilla extract gives a lovely aroma and enhances the flavor.

You’ll also need an egg to help set the filling. Sour cream adds creaminess and a slight tang, balancing the sweetness.

Don’t forget the toppings! Fresh berries bring brightness and color to the dessert. Whipped cream is optional but adds a nice touch of indulgence. For the full recipe, just check the details above.

Step-by-Step Instructions

Preparation Overview

1. Preheat the Oven: First, set your oven to 325°F (160°C). This heat will help cook the cheesecakes evenly. Line a mini muffin tin with mini cupcake liners. This step makes it easy to lift the bites out later.

2. Mixing the Crust Ingredients: In a medium bowl, mix together graham cracker crumbs, melted butter, and granulated sugar. Use a fork or your hands to combine. The mix should feel like wet sand when it’s ready.

3. Forming the Crust in the Muffin Tin: Take about one tablespoon of the crust mix. Place it into each cupcake liner. Press it down firmly with a spoon or your fingers. You want a compact base that holds together well.

Making the Cheesecake Filling

1. Combining Key Filling Ingredients: In another bowl, add the softened cream cheese, powdered sugar, and vanilla extract. With an electric mixer or whisk, beat until smooth. This step is key for a creamy filling without lumps.

2. Blending for a Smooth Consistency: Next, add the egg and sour cream to the cream cheese mix. Blend until everything is well combined and creamy. Scrape down the sides of the bowl to mix all ingredients evenly.

Baking and Cooling Process

1. Filling the Crusts: Carefully spoon the cheesecake filling over the crusts in the mini muffin tin. Fill each cup about 3/4 full. This leaves room for the filling to rise a bit while baking.

2. Baking Time and Texture Checks: Bake in the preheated oven for 15-18 minutes. The centers should be set but a little jiggly. This means they will firm up as they cool.

3. Cooling and Chilling Instructions: Once baked, let the cheesecakes cool in the pan for about 10 minutes. Carefully transfer them to a wire rack to cool completely. After that, refrigerate the mini cheesecakes for at least 2 hours. This step helps them firm up and chill, making them perfect for serving.

You can find the full recipe at the beginning of the article. Enjoy your delicious mini cheesecake bites!

Tips & Tricks

Best Practices for Perfect Mini Cheesecake Bites

To create a smooth cheesecake filling, start with softened cream cheese. Cold cream cheese can lead to lumps. Beat it well with powdered sugar and vanilla until creamy. Mix slowly to avoid air bubbles. These bubbles can cause cracks during baking.

For optimal baking, preheat your oven to 325°F (160°C). Bake the bites for 15-18 minutes. Check when the centers are set but still jiggle slightly. Overbaking can dry them out. Allow them to cool in the pan for about 10 minutes before moving them to a wire rack.

Presentation Tips

Plating matters! Arrange the cheesecake bites on a beautiful platter. Use mini cupcake liners for easy serving. Top each bite with fresh berries for color. A sprinkle of powdered sugar can add a touch of elegance.

Garnishing ideas include drizzling chocolate sauce or adding mint leaves. You can also use whipped cream for a lovely finish. These small details make your treats look gourmet.

Serving Suggestions

Pair your mini cheesecake bites with beverages like coffee, tea, or dessert wine. They are perfect for parties, birthdays, or family gatherings. You can also serve them at holiday events as a sweet treat.

These bites work well for potlucks too. They are easy to grab and enjoy. For a fun twist, offer different toppings for guests to choose from. Enjoy these mini cheesecake bites with your favorite drinks and share the joy!

For a detailed guide on making these delicious treats, check out the Full Recipe.

Variations

Flavor Variations for Cheesecake Filling

You can mix up your cheesecake filling in fun ways. Try adding chocolate for a rich taste. Melt some chocolate and blend it in. Lemon adds a nice zing. Just mix in some lemon juice and zest. You can also use fruit purees for a fruity twist. Swirling in these flavors can give a unique look and taste. Top with fresh fruit or chocolate shavings to wow your guests!

Crust Alternatives

If you want a gluten-free option, use almond flour instead of graham crackers. You can also use gluten-free cookies. They can add great flavor and texture. Try different cookies like Oreos or vanilla wafers to change your crust. A chocolate cookie crust can make a great base for your mini cheesecakes too.

Themed Mini Cheesecakes

Seasonal flavors can make your mini cheesecakes special. In fall, add pumpkin spice for a cozy treat. For summer, use fresh berries and mint. You can decorate them with fun toppings for holidays. For Halloween, use orange and black sprinkles. For birthdays, top them with colorful frosting or candles. These themed mini cheesecakes can be a hit at any event!

Storage Info

Proper Storage Techniques

To keep your mini cheesecake bites fresh, refrigerate them in an airtight container. This will protect them from drying out and absorbing odors from other foods. Just make sure to let them cool completely before placing them in the fridge. You can enjoy your bites for up to five days when stored this way.

If you want to save some for later, freezing works well too. Place the cheesecake bites on a baking sheet and freeze them until firm. After that, transfer them to a freezer-safe bag or container. They can last up to three months in the freezer. When you’re ready to eat them, let them thaw in the fridge overnight.

Shelf Life of Mini Cheesecake Bites

For the best taste, enjoy your mini cheesecake bites within the first few days. They taste best fresh but still hold up well in the fridge for a few days. If you have leftovers, remember to check for signs of spoilage. Look for changes in texture or color. If they smell sour or off, it’s best to toss them.

Keeping an eye on your bites will help you enjoy them at their best. Always label your containers with dates to track how long they’ve been stored. This way, you can savor each delicious bite without worry.

FAQs

Common Questions About Mini Cheesecake Bites

How do I know when mini cheesecakes are done?

You can check if mini cheesecakes are done by looking at the center. It should be set but still slightly jiggly. A good rule is to bake them for 15-18 minutes at 325°F (160°C). If they look too firm, you may have overbaked them.

Can I make mini cheesecakes ahead of time?

Yes, you can make mini cheesecakes ahead of time. After baking, allow them to cool completely. Then, refrigerate them for up to three days. This makes them perfect for parties or gatherings.

What’s the best way to garnish mini cheesecakes?

Garnishing mini cheesecakes is fun and easy! I love using fresh berries like raspberries, blueberries, or strawberries. They add color and flavor. You can also add a dollop of whipped cream on top for extra richness.

Ingredient Substitutions

Can I use lower-fat cream cheese?

Absolutely! You can use lower-fat cream cheese to make these bites lighter. The texture may be slightly different, but they will still taste great.

Alternatives for sour cream

If you don’t have sour cream, you can use plain yogurt as a substitute. Greek yogurt works well too and adds a nice tangy flavor.

Purchasing Pre-made Options

Where to buy mini cheesecake bites

You can find mini cheesecake bites at many grocery stores, bakeries, and dessert shops. Look in the bakery section or the frozen dessert aisle.

How to choose quality options from stores

When choosing pre-made mini cheesecakes, check the ingredients. Look for options with real cream cheese and minimal preservatives. Freshness is key, so always check the expiration date.

Making mini cheesecake bites is simple and fun. We explored ingredients, from crust to toppings. You learned how to prepare, bake, and chill them for the perfect treat. I shared tips for smooth filling and great presentation, plus tasty variations to try.

These mini desserts are great for any occasion. With the right storage, they’ll stay fresh and delicious. Enjoy customizing your cheesecakes! Your friends and family will love these delightful bites. Happy baking!

To make mini cheesecake bites, you need a few simple ingredients. Each one plays a key role in creating that creamy, dreamy texture and flavor. Here’s what you’ll need: - 1 cup graham cracker crumbs - 1/4 cup unsalted butter, melted - 2 tablespoons granulated sugar - 1 (8 oz) package cream cheese, softened to room temperature - 1/2 cup powdered sugar - 1 teaspoon pure vanilla extract - 1 large egg, at room temperature - 1/3 cup sour cream - Fresh berries (raspberries, blueberries, or strawberries) for topping - Whipped cream, for garnish (optional) The graham cracker crumbs serve as the base for your mini cheesecakes. They give a nice crunch and flavor. Melted unsalted butter helps bind the crumbs together. The granulated sugar sweetens the crust just right. For the filling, softened cream cheese is a must. It creates that rich and creamy texture we all love. Powdered sugar adds sweetness without any grittiness. Pure vanilla extract gives a lovely aroma and enhances the flavor. You’ll also need an egg to help set the filling. Sour cream adds creaminess and a slight tang, balancing the sweetness. Don't forget the toppings! Fresh berries bring brightness and color to the dessert. Whipped cream is optional but adds a nice touch of indulgence. For the full recipe, just check the details above. 1. Preheat the Oven: First, set your oven to 325°F (160°C). This heat will help cook the cheesecakes evenly. Line a mini muffin tin with mini cupcake liners. This step makes it easy to lift the bites out later. 2. Mixing the Crust Ingredients: In a medium bowl, mix together graham cracker crumbs, melted butter, and granulated sugar. Use a fork or your hands to combine. The mix should feel like wet sand when it’s ready. 3. Forming the Crust in the Muffin Tin: Take about one tablespoon of the crust mix. Place it into each cupcake liner. Press it down firmly with a spoon or your fingers. You want a compact base that holds together well. 1. Combining Key Filling Ingredients: In another bowl, add the softened cream cheese, powdered sugar, and vanilla extract. With an electric mixer or whisk, beat until smooth. This step is key for a creamy filling without lumps. 2. Blending for a Smooth Consistency: Next, add the egg and sour cream to the cream cheese mix. Blend until everything is well combined and creamy. Scrape down the sides of the bowl to mix all ingredients evenly. 1. Filling the Crusts: Carefully spoon the cheesecake filling over the crusts in the mini muffin tin. Fill each cup about 3/4 full. This leaves room for the filling to rise a bit while baking. 2. Baking Time and Texture Checks: Bake in the preheated oven for 15-18 minutes. The centers should be set but a little jiggly. This means they will firm up as they cool. 3. Cooling and Chilling Instructions: Once baked, let the cheesecakes cool in the pan for about 10 minutes. Carefully transfer them to a wire rack to cool completely. After that, refrigerate the mini cheesecakes for at least 2 hours. This step helps them firm up and chill, making them perfect for serving. You can find the full recipe at the beginning of the article. Enjoy your delicious mini cheesecake bites! To create a smooth cheesecake filling, start with softened cream cheese. Cold cream cheese can lead to lumps. Beat it well with powdered sugar and vanilla until creamy. Mix slowly to avoid air bubbles. These bubbles can cause cracks during baking. For optimal baking, preheat your oven to 325°F (160°C). Bake the bites for 15-18 minutes. Check when the centers are set but still jiggle slightly. Overbaking can dry them out. Allow them to cool in the pan for about 10 minutes before moving them to a wire rack. Plating matters! Arrange the cheesecake bites on a beautiful platter. Use mini cupcake liners for easy serving. Top each bite with fresh berries for color. A sprinkle of powdered sugar can add a touch of elegance. Garnishing ideas include drizzling chocolate sauce or adding mint leaves. You can also use whipped cream for a lovely finish. These small details make your treats look gourmet. Pair your mini cheesecake bites with beverages like coffee, tea, or dessert wine. They are perfect for parties, birthdays, or family gatherings. You can also serve them at holiday events as a sweet treat. These bites work well for potlucks too. They are easy to grab and enjoy. For a fun twist, offer different toppings for guests to choose from. Enjoy these mini cheesecake bites with your favorite drinks and share the joy! For a detailed guide on making these delicious treats, check out the Full Recipe. {{image_4}} You can mix up your cheesecake filling in fun ways. Try adding chocolate for a rich taste. Melt some chocolate and blend it in. Lemon adds a nice zing. Just mix in some lemon juice and zest. You can also use fruit purees for a fruity twist. Swirling in these flavors can give a unique look and taste. Top with fresh fruit or chocolate shavings to wow your guests! If you want a gluten-free option, use almond flour instead of graham crackers. You can also use gluten-free cookies. They can add great flavor and texture. Try different cookies like Oreos or vanilla wafers to change your crust. A chocolate cookie crust can make a great base for your mini cheesecakes too. Seasonal flavors can make your mini cheesecakes special. In fall, add pumpkin spice for a cozy treat. For summer, use fresh berries and mint. You can decorate them with fun toppings for holidays. For Halloween, use orange and black sprinkles. For birthdays, top them with colorful frosting or candles. These themed mini cheesecakes can be a hit at any event! To keep your mini cheesecake bites fresh, refrigerate them in an airtight container. This will protect them from drying out and absorbing odors from other foods. Just make sure to let them cool completely before placing them in the fridge. You can enjoy your bites for up to five days when stored this way. If you want to save some for later, freezing works well too. Place the cheesecake bites on a baking sheet and freeze them until firm. After that, transfer them to a freezer-safe bag or container. They can last up to three months in the freezer. When you're ready to eat them, let them thaw in the fridge overnight. For the best taste, enjoy your mini cheesecake bites within the first few days. They taste best fresh but still hold up well in the fridge for a few days. If you have leftovers, remember to check for signs of spoilage. Look for changes in texture or color. If they smell sour or off, it's best to toss them. Keeping an eye on your bites will help you enjoy them at their best. Always label your containers with dates to track how long they’ve been stored. This way, you can savor each delicious bite without worry. How do I know when mini cheesecakes are done? You can check if mini cheesecakes are done by looking at the center. It should be set but still slightly jiggly. A good rule is to bake them for 15-18 minutes at 325°F (160°C). If they look too firm, you may have overbaked them. Can I make mini cheesecakes ahead of time? Yes, you can make mini cheesecakes ahead of time. After baking, allow them to cool completely. Then, refrigerate them for up to three days. This makes them perfect for parties or gatherings. What's the best way to garnish mini cheesecakes? Garnishing mini cheesecakes is fun and easy! I love using fresh berries like raspberries, blueberries, or strawberries. They add color and flavor. You can also add a dollop of whipped cream on top for extra richness. Can I use lower-fat cream cheese? Absolutely! You can use lower-fat cream cheese to make these bites lighter. The texture may be slightly different, but they will still taste great. Alternatives for sour cream If you don't have sour cream, you can use plain yogurt as a substitute. Greek yogurt works well too and adds a nice tangy flavor. Where to buy mini cheesecake bites You can find mini cheesecake bites at many grocery stores, bakeries, and dessert shops. Look in the bakery section or the frozen dessert aisle. How to choose quality options from stores When choosing pre-made mini cheesecakes, check the ingredients. Look for options with real cream cheese and minimal preservatives. Freshness is key, so always check the expiration date. Making mini cheesecake bites is simple and fun. We explored ingredients, from crust to toppings. You learned how to prepare, bake, and chill them for the perfect treat. I shared tips for smooth filling and great presentation, plus tasty variations to try. These mini desserts are great for any occasion. With the right storage, they'll stay fresh and delicious. Enjoy customizing your cheesecakes! Your friends and family will love these delightful bites. Happy baking!

Mini Cheesecake Bites

Indulge in these delicious Mini Cheesecake Bites, the perfect treat for any occasion! With a graham cracker crust, creamy filling, and topped with fresh berries, these bites are a showstopper. Discover step-by-step instructions that make baking a breeze and impress your guests. Ready to take your dessert game up a notch? Click through for the full recipe and enjoy these delightful mini cheesecakes today!

Ingredients
  

1 cup graham cracker crumbs

1/4 cup unsalted butter, melted

2 tablespoons granulated sugar

1 (8 oz) package cream cheese, softened to room temperature

1/2 cup powdered sugar

1 teaspoon pure vanilla extract

1 large egg, at room temperature

1/3 cup sour cream

Fresh berries (raspberries, blueberries, or strawberries) for topping

Whipped cream, for garnish (optional)

Instructions
 

Preheat the Oven: Begin by preheating your oven to 325°F (160°C). Line a mini muffin tin with mini cupcake liners to ensure easy removal of the cheesecake bites after baking.

    Prepare the Crust: In a mixing bowl, combine the graham cracker crumbs, melted butter, and granulated sugar. Mix well using a fork or your hands until the crumbs are evenly moistened and resemble wet sand.

      Form the Crust: Take approximately one tablespoon of the crust mixture and place it into each mini cupcake liner. Press down firmly with the back of a spoon or your fingers to form an even, compact base that holds together.

        Make the Cheesecake Filling: In a separate bowl, add the softened cream cheese, powdered sugar, and vanilla extract. Use an electric mixer or a whisk to beat the mixture until it is smooth and creamy, ensuring there are no lumps.

          Add the Egg and Sour Cream: Incorporate the egg and sour cream into the cream cheese mixture. Blend until fully combined and creamy, scraping down the sides of the bowl to ensure all ingredients are well mixed.

            Fill the Cups: Carefully spoon the cheesecake filling over the prepared crusts in the mini muffin tin. Fill each cup about 3/4 full, leaving a little room for expansion while baking.

              Bake: Place the muffin tin in your preheated oven and bake for 15-18 minutes. The centers should be set but still slightly jiggly when you gently shake the tin.

                Cool: After baking, remove the mini cheesecakes from the oven and allow them to cool in the pan for about 10 minutes. Afterward, transfer them carefully to a wire rack to cool completely.

                  Chill: Once cooled, refrigerate the mini cheesecake bites for a minimum of 2 hours, allowing them to firm up and chill fully.

                    Serve: Just before serving, top each cheesecake bite with your choice of fresh berries and add a dollop of whipped cream if you like. Enjoy these delightful bites as a sweet treat!

                      Prep Time: 20 mins | Total Time: 2 hrs 40 mins | Servings: 24 bites

                        - Presentation Tips: Arrange the cheesecake bites on a beautiful platter and consider garnishing with additional berries and a sprinkle of powdered sugar for an elegant touch.

                          Leave a Comment

                          Recipe Rating