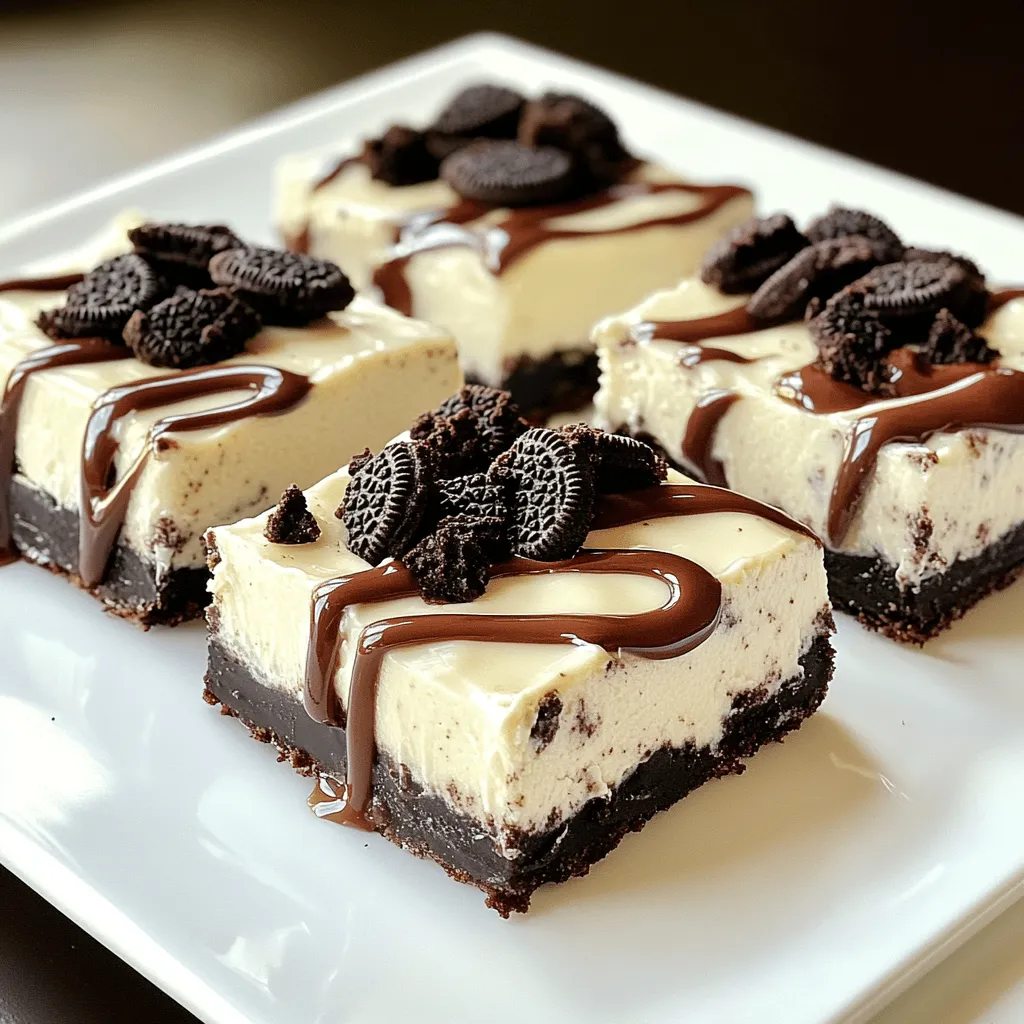
Craving a sweet treat that’s super easy to make? Look no further! This No-Bake Oreo Cheesecake Bars recipe packs all the creamy goodness you love, without needing an oven. With just a few simple steps, you can whip up a dessert that will impress anyone. Say goodbye to long cooking times and complicated methods. Let’s dive right into the delicious world of quick and easy dessert-making!
Ingredients
To make delicious no-bake Oreo cheesecake bars, gather these simple ingredients:
– 24 Oreo cookies, finely crushed
– 1/4 cup unsalted butter, melted
– 16 oz cream cheese, softened to room temperature
– 1 cup powdered sugar
– 2 teaspoons vanilla extract
– 1 cup whipped cream (store-bought or homemade)
– 8 Oreo cookies, coarsely chopped (for topping)
These ingredients come together to create a rich and creamy dessert. The crushed Oreos make a perfect crust, while the cream cheese and whipped cream form a smooth filling. I love using both fine crumbs and chunks of Oreos for that extra crunch! For the best flavor, let your cream cheese sit out until it’s soft. This ensures a creamy texture and a smooth mix when you combine it with the other ingredients.
Step-by-Step Instructions
Preparing the Crust
To start, gather your ingredients. You will need 24 Oreo cookies and 1/4 cup of melted butter. First, crush the Oreo cookies into fine crumbs. You can use a food processor or a plastic bag and a rolling pin. Mix the crumbs with the melted butter in a medium bowl. Stir until every crumb is coated in butter. This mixture should feel like wet sand. Next, press the crust into the bottom of a 9×9 inch baking dish. Make sure it is even and compact. Place this dish in the fridge for about 10 minutes. This helps the crust set well.
Making the Cheesecake Filling
Now, let’s make the creamy filling. In a large bowl, beat 16 ounces of softened cream cheese with an electric mixer. Mix until it is smooth and free of lumps. Slowly add 1 cup of powdered sugar and 2 teaspoons of vanilla extract. Keep mixing until the mixture is creamy and well blended. Now, gently fold in 1 cup of whipped cream using a spatula. This step is important. You want to keep the filling light and fluffy for the best texture.
Assembling the Bars
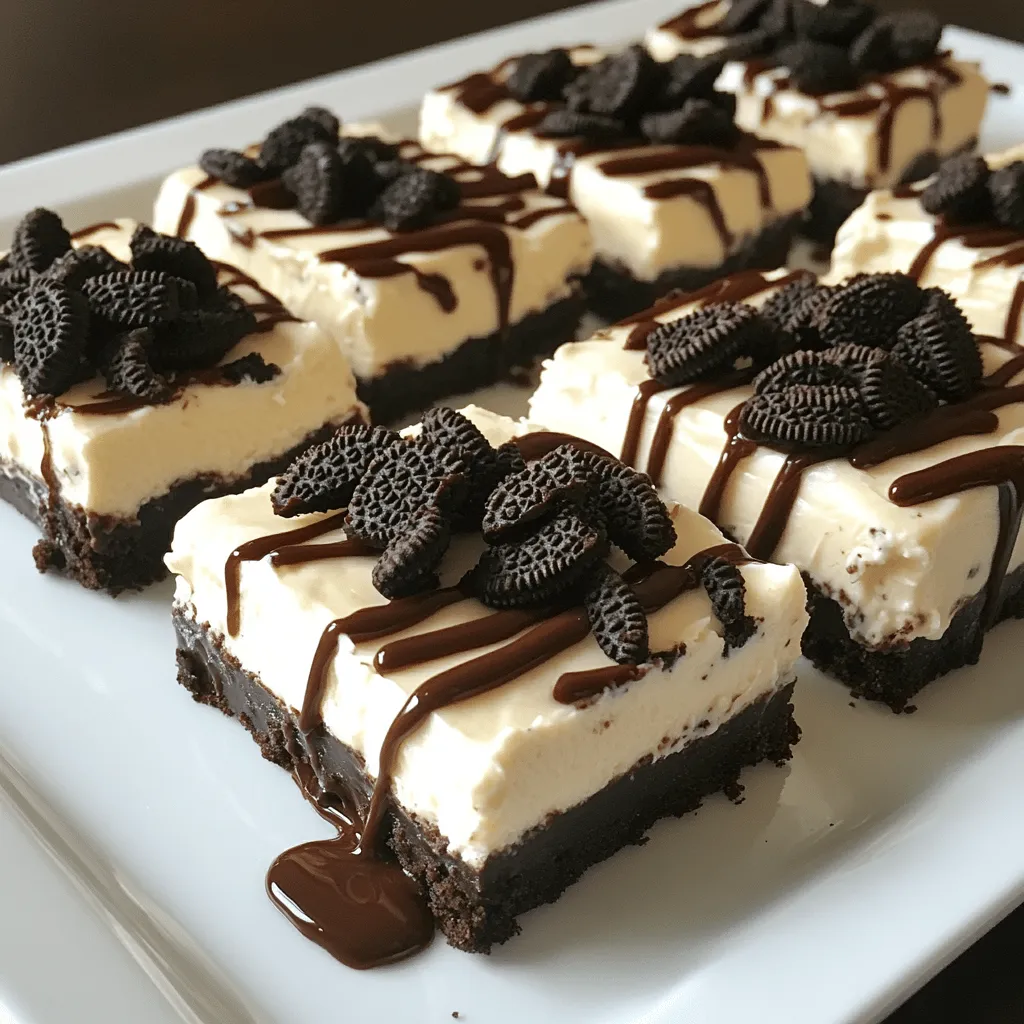
Now it’s time to assemble your bars. Pour the cheesecake filling over the chilled Oreo crust. Use a spatula to spread it evenly and smooth the top. Next, sprinkle 8 coarsely chopped Oreo cookies on top. This adds a crunchy texture and more chocolate flavor. Cover the dish tightly with plastic wrap. Refrigerate for a minimum of 4 hours. This allows the cheesecake to set properly. After that, you can cut the bars into neat squares. Enjoy them directly from the dish for a rustic look. For a more polished touch, serve on a white platter, and maybe drizzle some chocolate sauce on top.
Tips & Tricks
Common Mistakes to Avoid
– Overmixing the cheesecake batter: Mixing too much makes the cheesecake dense. You want it creamy, not heavy.
– Not chilling the crust long enough: If the crust is warm, the filling will not set well. Always chill it for at least 10 minutes.
Perfecting the Texture
– Importance of room temperature ingredients: Room temperature cream cheese mixes better. It helps create a smooth filling. Cold cream cheese can cause lumps.
– Tips for fluffy whipped cream: Use cold cream and a chilled bowl. Whip it until you see stiff peaks. This keeps your cheesecake light and airy.
Serving Suggestions
– Presentation tips for an elegant look: Serve the bars on a white plate. It makes the dark color pop. Drizzle chocolate sauce on top for extra flair.
– Suggested accompaniments: Fresh berries or a dollop of whipped cream pair well. You can also add a sprig of mint for a fresh touch.
Variations
Flavor Variations
You can easily switch up the flavors in your no-bake Oreo cheesecake bars. One fun idea is to add mint extract. This gives your dessert a refreshing mint Oreo twist. Just a few drops can transform the taste.
You can also try using other cookie flavors. Instead of Oreos, use chocolate chip cookies for a different base. The cream cheese filling pairs well with many types of cookies, so feel free to get creative!
Dietary Modifications
If you need gluten-free options, use gluten-free Oreos. They taste just as good, so you won’t miss the regular ones. This way, everyone can enjoy your bars without worry.
For those following a vegan diet, you can substitute the cream cheese with plant-based cream cheese. Choose a brand you like. You can still enjoy rich, creamy cheesecake bars without the dairy. These modifications help make your dessert inclusive for all diets.
Storage Info
Refrigeration Guidelines
The cheesecake bars last in the fridge for about 5 days. To keep them fresh, cover them tightly with plastic wrap or store them in an airtight container. This prevents them from drying out and helps maintain their creamy texture. Make sure to keep them chilled until you are ready to serve.
Freezing Recommendations
You can freeze the bars for later enjoyment. They freeze well for up to 2 months. To freeze, wrap each bar in plastic wrap and place them in a freezer bag. When you want to enjoy them, take the bars out and let them thaw in the fridge overnight. Serve them cold for the best taste and texture.
FAQs
What is the prep time for No-Bake Oreo Cheesecake Bars?
– Answer: 20 minutes
How long does it take for the cheesecake to set?
– Answer: A minimum of 4 hours
Can I use different cookies for the crust?
– Answer: Yes, other cookie varieties can be used.
How do I cut the bars neatly?
– Answer: Use a sharp knife and wipe it clean between cuts.
Making these cheesecake bars is fun and easy. You can get creative with the crust. If you want a twist, try using graham crackers or chocolate chip cookies. They all work well. Just make sure to crush them finely.
To cut the bars, grab a sharp knife. Wipe it clean with a damp cloth after each cut. This keeps the edges smooth and neat. A messy cut can make the bars look less appetizing.
Remember, these bars need time to set. After mixing, place them in the fridge. This helps them firm up. You can make them the night before a party. Then, just slice and serve. Trust me, everyone will love them.
This blog post covered how to make No-Bake Oreo Cheesecake Bars. You learned about the ingredients, step-by-step instructions, and tips for success. I shared ways to customize flavors and make it fit different diets. Proper storage tips help keep your bars fresh, too.
Now, you have all you need to create these tasty treats. Enjoy making and sharing them with friends and family!