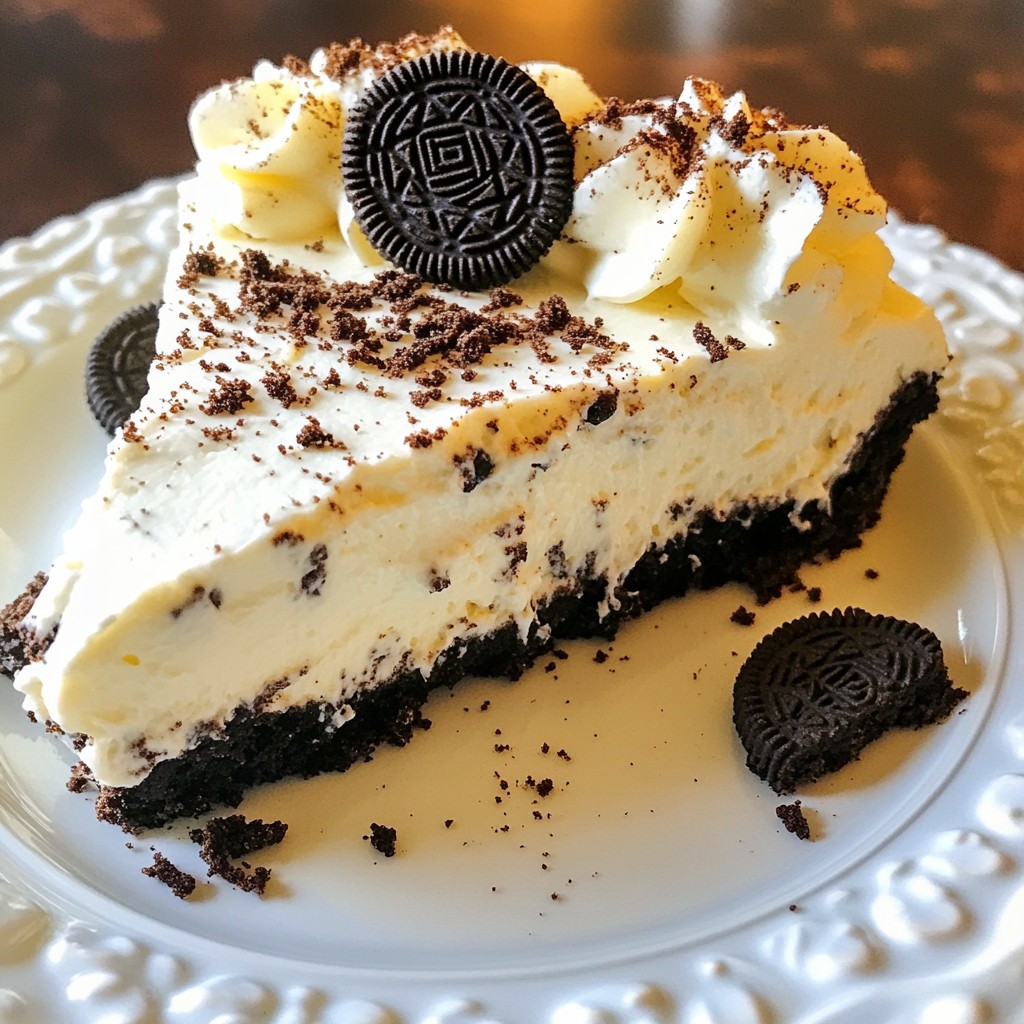
Are you craving a sweet treat that’s simple to make and full of flavor? Look no further than this No Bake Oreo Cheesecake! With just a handful of ingredients, you can whip up a creamy dessert that satisfies any sweet tooth. I’ll guide you through each easy step, from crafting the perfect Oreo crust to making an indulgent filling. Get ready to impress your friends and family with this delightful cheesecake!
Why I Love This Recipe
- Decadent Flavor: The combination of cream cheese, sour cream, and whipped cream creates a rich and creamy texture that melts in your mouth, perfectly complemented by the classic Oreo flavor.
- No Baking Required: This cheesecake is a breeze to make since it requires no baking, making it perfect for hot days or when you want a quick dessert without the oven.
- Customizable Topping: You can easily customize the topping with crushed Oreos, chocolate shavings, or fresh fruit, allowing for a personal touch that suits any occasion.
- Make Ahead Option: This cheesecake can be made a day ahead, allowing the flavors to deepen while saving you time on the day of your event or gathering.
Ingredients
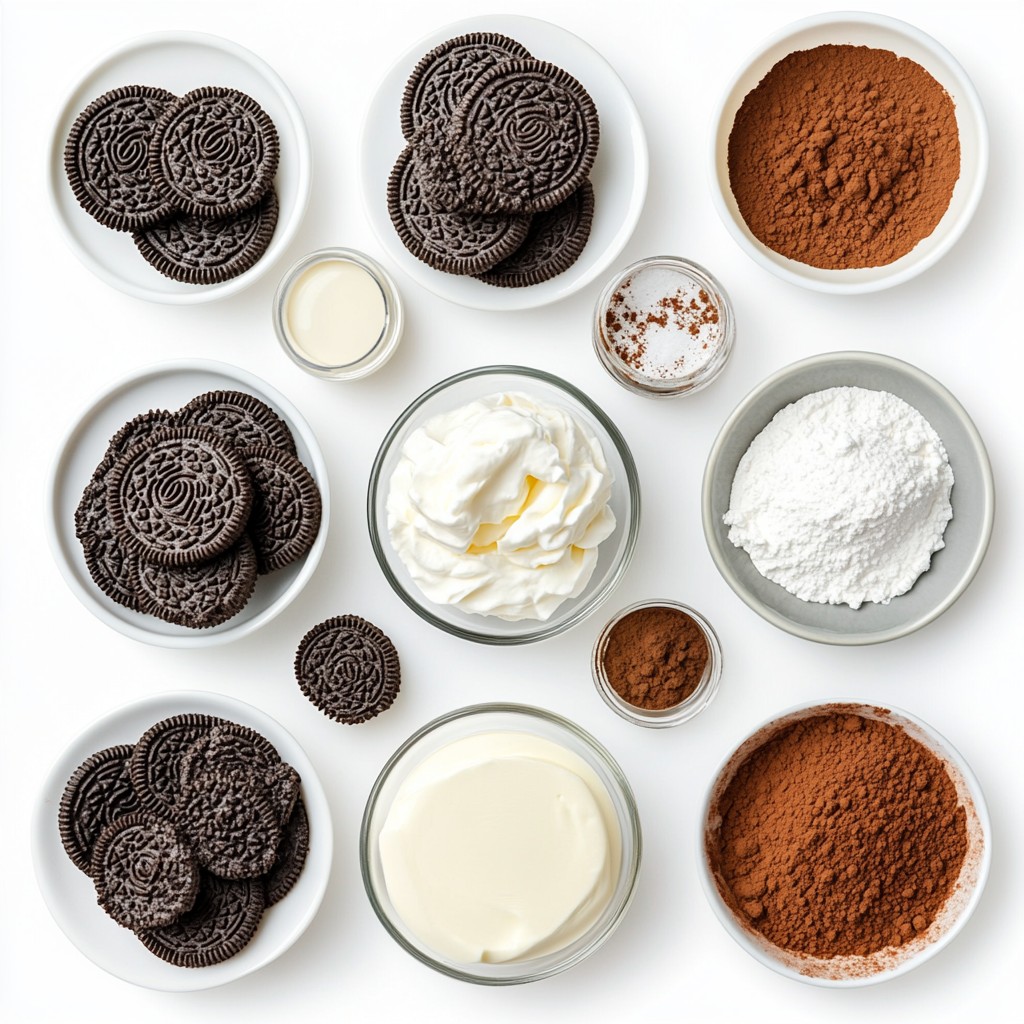
Main Ingredients for No Bake Oreo Cheesecake
- 24 Oreo cookies
- 1/2 cup unsalted butter
- 2 cups cream cheese
- 1 cup powdered sugar
- 1 teaspoon vanilla extract
- 1 cup heavy whipping cream
- 1 cup sour cream
- Cocoa powder for garnish
When making No Bake Oreo Cheesecake, it’s key to use the right ingredients. Each one plays a big role in taste and texture.
First, you need 24 Oreo cookies. These will form the delicious crust and add that classic Oreo flavor. Crush them into fine crumbs for a smooth base.
Next, melt 1/2 cup of unsalted butter. This helps bind the cookie crumbs together. Make sure it’s not too hot when mixing, or it might melt the cream cheese later.
Cream cheese is your star here. Use 2 cups of softened cream cheese for a rich, creamy filling. It should be at room temperature for easy mixing.
Add 1 cup of powdered sugar. This sweetens the cheesecake and keeps it smooth. Don’t skip this step!
A teaspoon of vanilla extract adds depth and flavor. It enhances the overall taste and makes it even more delightful.
Whip up 1 cup of heavy whipping cream. This creates a light, airy texture in your cheesecake. Cold cream whips better, so keep it chilled until use.
Finally, 1 cup of sour cream adds a nice tang. It balances the sweetness and makes each bite creamy.
For a finishing touch, sprinkle cocoa powder on top. This adds a nice, rich look and extra chocolate flavor.
Optional Toppings and Garnishes
- Extra Oreo cookies for topping
- Fresh whipped cream
- Chocolate shavings
Add some fun with optional toppings. You can crush extra Oreo cookies and sprinkle them over the cheesecake. This adds crunch and looks great!
Fresh whipped cream is a classic choice. A dollop on top makes each slice feel special.
Chocolate shavings can be a nice touch too. They add elegance and a boost of chocolate flavor.
Step-by-Step Instructions
Preparing the Oreo Crust
- First, crush 24 Oreo cookies in a bowl. You can use a food processor or a rolling pin.
- Next, melt 1/2 cup of unsalted butter. Pour it into the crushed cookies.
- Mix until it looks like wet sand.
- Now, take a 9-inch springform pan. Press the Oreo mixture firmly into the bottom.
- Use a measuring cup or glass to compact the crust evenly.
Making the Cheesecake Filling
- In another bowl, take 2 cups of softened cream cheese. Beat it with an electric mixer until smooth.
- Add 1 cup of powdered sugar and 1 teaspoon of vanilla extract. Mix until no lumps remain.
- In a separate chilled bowl, whip 1 cup of heavy cream. Beat until stiff peaks form.
- Gently fold the whipped cream into the cream cheese mixture. Be gentle to keep it light.
- Finally, add 1 cup of room-temperature sour cream. Fold it in until smooth.
Assembling the Cheesecake
- Pour the creamy filling over the Oreo crust in the springform pan.
- Spread it evenly with a spatula to smooth the top.
- Crush more Oreo cookies and sprinkle them on top for decoration.
- Cover the cheesecake with plastic wrap tightly.
- Refrigerate for at least 4 hours, but overnight is best.
Tips & Tricks
Tips for a Creamy Texture
- Ensure cream cheese is softened. This step helps mix it easily.
- Avoid over-mixing the whipped cream. Mix just enough for soft peaks.
A creamy texture makes your cheesecake shine. Soft cream cheese blends better. Take it out of the fridge ahead of time. Let it sit for about 30 minutes before use. This warmth helps it get smooth quickly.
When whipping cream, stop once you see stiff peaks. If you mix too long, it may turn grainy. Gently fold it into the cream cheese mix. This keeps it light and fluffy.
Storage and Serving Suggestions
- Best practices for refrigerating cheesecake include covering it well. Use plastic wrap or a lid.
- Recommended serving temperatures are cold but not frozen. Take it out about 10 minutes before serving.
Refrigerate your cheesecake for at least 4 hours. Overnight is even better. This helps the flavors blend and firm up. When ready to serve, slice it cold.
Enhancing Flavor and Presentation
- Suggestions for garnishing include crushed Oreo cookies on top. Add a sprinkle of cocoa powder too.
- Pairing options with desserts or beverages work well. Serve with coffee or a scoop of vanilla ice cream.
For a fun twist, add a dollop of whipped cream on each slice. You can also top with chocolate shavings. This makes each piece look fancy and inviting. A simple garnish changes everything!
Pro Tips
- Use Cold Ingredients: Ensure your heavy cream and sour cream are cold before whipping and mixing. This helps achieve a lighter, fluffier cheesecake filling.
- Let it Set Overnight: For the best flavor and texture, refrigerate the cheesecake overnight. This allows the flavors to meld beautifully and results in a firmer slice.
- Crush Oreos Finely: When preparing the crust, make sure to crush the Oreo cookies into fine crumbs. This ensures a smooth, even crust that holds together well.
- Garnish Creatively: Elevate your cheesecake presentation by adding toppings like chocolate shavings, fresh berries, or a drizzle of chocolate sauce for a delightful touch.
Variations
Flavor Variations
You can tweak the flavor of your No Bake Oreo Cheesecake to suit your taste. Adding fruit like raspberries or strawberries gives a fresh twist. These fruits add a pop of color and a tangy flavor. You can also make it extra rich by mixing in chocolate or caramel swirls in the filling. Just gently fold them in after making your cream cheese mix. This adds depth and sweetness to each slice.
Alternative Crust Options
While the Oreo crust is a classic choice, you have other options. Using graham crackers or chocolate cookies can change the taste a bit. For a gluten-free option, look for gluten-free cookies that match your favorite flavor. Just crush and mix them with melted butter. This way, everyone can enjoy this creamy dessert!
Dietary Adaptations
If you need to make dietary changes, you can still enjoy this cheesecake. For a dairy-free or vegan version, swap cream cheese for a vegan cream cheese. You can also use coconut cream instead of heavy whipping cream. For those watching sugar intake, use a low-sugar powdered sugar or a sugar substitute. These changes keep the cheesecake tasty while meeting different dietary needs.
Storage Info
How to Store
To keep your No Bake Oreo Cheesecake fresh, follow these tips:
- Cover the cheesecake tightly with plastic wrap.
- Store it in the refrigerator.
- Avoid placing it near strong-smelling foods.
This cheesecake stays fresh for about 5 days in the fridge.
Freezing Cheesecake
You can freeze leftover cheesecake for later enjoyment. Here’s how:
- Wrap the cheesecake tightly in plastic wrap, then in foil.
- Place it in the freezer.
To thaw, move it to the fridge overnight. Freezing may change its texture a bit, but the taste remains great!
Reusing Leftovers
Don't let leftover cheesecake go to waste! Here are fun ideas:
- Crumble it over ice cream for a tasty topping.
- Mix it into milkshakes for a creamy treat.
- Use it as a filling in cupcakes or brownies.
Get creative and enjoy your cheesecake in new ways!
FAQs
How long does it take to set?
The cheesecake needs at least 4 hours to set. For best results, chill overnight. This longer time helps the flavors blend well. The cheesecake becomes firm and easy to slice.
Can I make this ahead of time?
Yes, you can make this cheesecake a day ahead. Prepare it and let it chill overnight. This way, the flavors deepen and improve. Just remember to cover it tightly to keep it fresh.
What can I substitute for heavy whipping cream?
If you don’t have heavy cream, use whipped topping as a substitute. You can also use coconut cream for a dairy-free option. Both will still give a nice texture.
Can I use store-bought Oreo crust?
Using a store-bought crust can save time. It’s convenient but may not taste as fresh. Making your own crust gives more flavor and texture. I recommend trying both to see what you prefer!
In this post, we covered how to make a delicious No Bake Oreo Cheesecake. You learned about the key ingredients, easy steps, and helpful tips to ensure a creamy texture. We also explored fun variations and storage options. This dessert is perfect for any occasion and simple to make. With just a few ingredients and steps, you can impress your friends and family. Enjoy your cheesecake with your favorite toppings, and have fun creating your own twists!


