No-Bake Peanut Butter Bars Easy and Delicious Treat

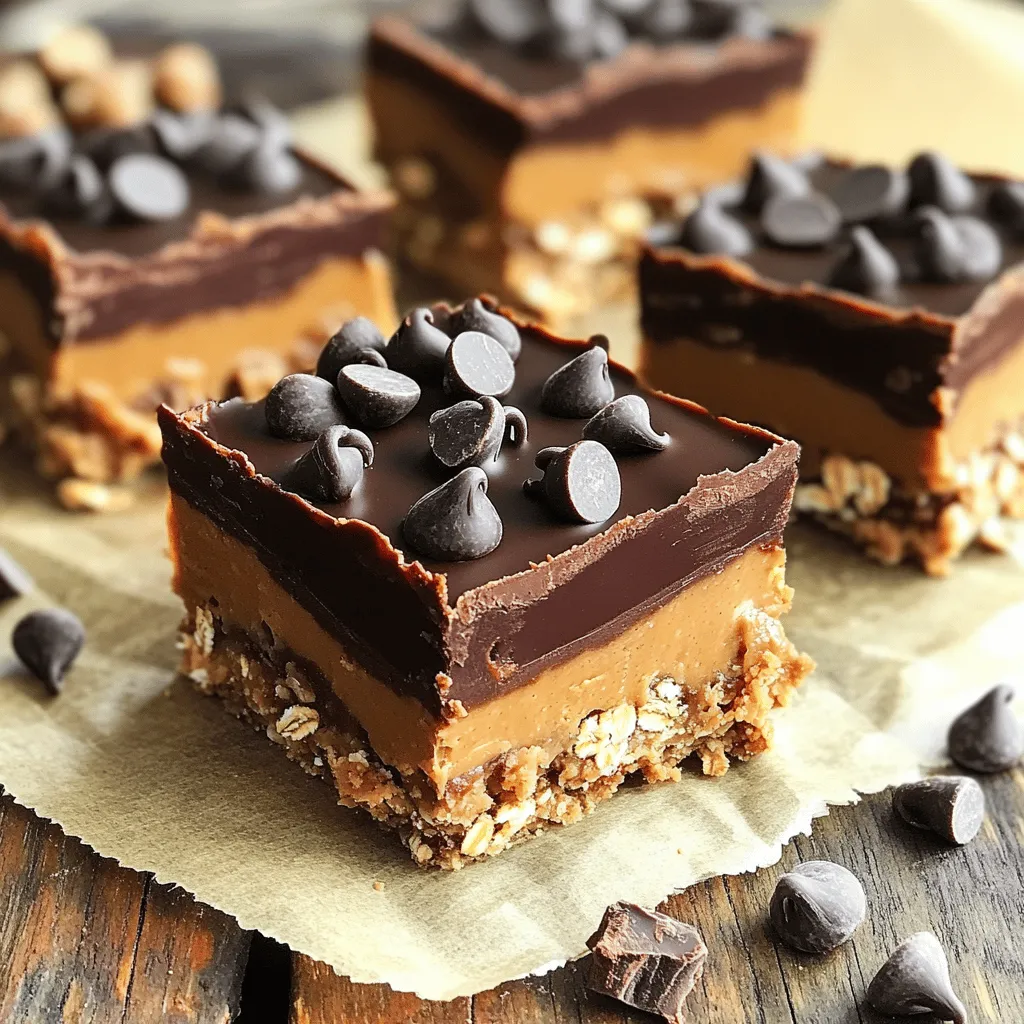
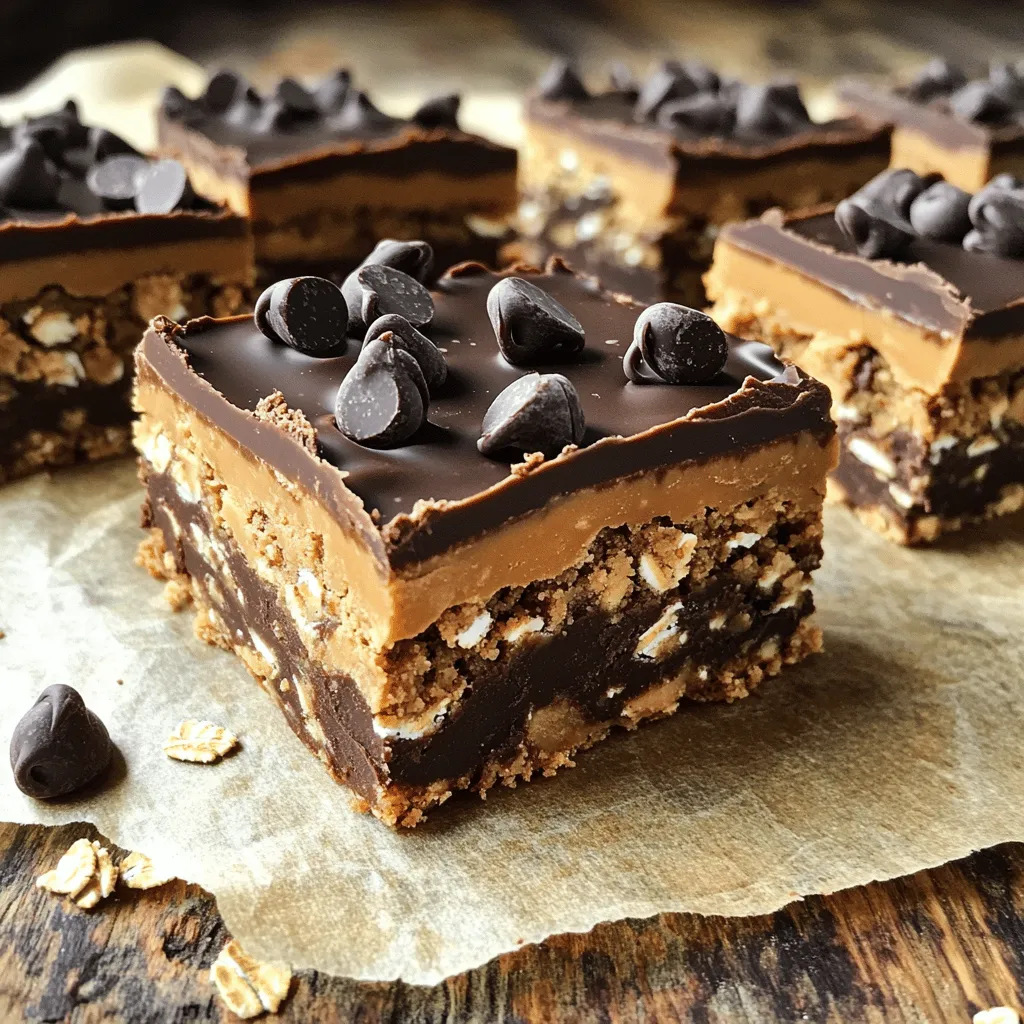
Craving a sweet treat that’s quick and easy? You’ll love these No-Bake Peanut Butter Bars! With just a few simple ingredients, you can whip up a delicious snack in no time. Imagine rich peanut butter, smooth chocolate, and a hint of honey all coming together. Whether you’re a busy parent, student, or just someone who loves a good dessert, this recipe fits right in. Let’s dive into how to make these tasty bars!

Ingredients

To make these no-bake peanut butter bars, you need some simple, tasty ingredients. Gather the following:

– 1 cup rolled oats

– 1 cup natural peanut butter (smooth or crunchy)

– 1/2 cup honey or maple syrup

– 1/2 cup chocolate chips (milk or dark)

– 1/4 cup unsweetened cocoa powder

– 1 teaspoon pure vanilla extract

– A pinch of salt

– Additional chocolate chips for garnish (optional)

These ingredients blend well to create a rich, satisfying treat. The rolled oats give the bars a hearty texture, while the peanut butter adds creaminess. Honey or maple syrup serves as the sweetener, making each bite delightful. Cocoa powder enriches the chocolate flavor, and vanilla extract brightens the taste. A pinch of salt balances the sweetness, enhancing every bite. If you want, sprinkle on extra chocolate chips for a nice touch. You can find the full recipe for these delicious bars in the earlier section.

Step-by-Step Instructions

Preparing the Mixture

Start by gathering your ingredients. You will need rolled oats, peanut butter, honey, cocoa powder, vanilla extract, and salt. In a large mixing bowl, combine all these ingredients. I like to use a spatula for this job. Mix until it becomes sticky and holds together well.

Once mixed, gently fold in the chocolate chips. This adds a nice surprise in every bite. Ensure that they spread evenly throughout the mixture. You want a delightful taste in every bar.

Assembling the Bars

Next, prepare your pan. I recommend using an 8×8 inch pan for the right size. Line it with parchment paper, leaving some paper hanging over the edges. This makes it easier to lift the bars out later.

Now, transfer the mixture into your lined pan. Use your hands or a spatula to press it down firmly. Aim for an even and compact layer. If you love chocolate, sprinkle some extra chocolate chips on top. Press them down lightly for a tasty finish.

Chilling and Serving

Now it’s time to chill the bars. Place the pan in the refrigerator for at least 2 hours. This helps the bars firm up nicely.

After chilling, remove the pan using the parchment overhang. Place it on a cutting board. Cut into 12 equal bars. To serve, you can place them on a nice platter. For a fun touch, pair them with fresh fruit or a drizzle of melted chocolate. Enjoy your delicious no-bake peanut butter bars! For the complete recipe, check out the Full Recipe.

Tips & Tricks

Ingredient Substitutions

You can make these bars even if you do not have peanut butter. Here are some alternatives:

– Almond butter

– Sunflower seed butter

– Cashew butter

For sweetening, honey works great, but you can also use:

– Maple syrup

– Agave nectar

– Coconut sugar

These options let you customize the flavor to your liking.

Texture Enhancements

Do you want a different texture? You can adjust the consistency of your bars. Here’s how:

– Add a bit more honey or nut butter for a softer bar.

– Use extra oats for a firmer texture.

Mix-ins can add great taste. Consider adding:

– Chopped nuts like almonds or walnuts

– Seeds such as chia or flaxseeds

– Dried fruit like cranberries or raisins

These options give your bars extra crunch and flavor.

Presentation Ideas

Serving your bars can be fun! Here are some creative ideas:

– Cut the bars into fun shapes using cookie cutters.

– Drizzle melted chocolate on top for a fancy look.

– Serve on a colorful plate with fresh fruit.

Pair your bars with drinks for a treat. Try these options:

– A glass of cold milk

– Hot coffee or tea

– Smoothies for a healthy combo

These tips will help make your no-bake peanut butter bars even more enjoyable. For the full recipe, check the recipe section.

Variations

Flavor Variations

You can spice up these bars with a few simple additions. Try adding a dash of cinnamon or nutmeg for a warm flavor. Just a pinch can elevate the taste. If you want a twist, incorporate other extracts like almond or coconut. These will give your bars a unique touch. You can mix and match according to your mood.

Dietary Adjustments

Want to make these bars vegan? Swap honey with maple syrup, and you’re good to go! For a gluten-free option, use certified gluten-free oats. This way, everyone can enjoy them without worry. These small changes keep the taste while meeting your diet needs.

Seasonal Versions

Seasonal ingredients can add fun flavors to your bars. In fall, try adding pumpkin puree and a sprinkle of pumpkin spice. For winter, crushed peppermint can bring a festive touch. These variations keep things fresh and exciting throughout the year. You can have a new treat every season!

Storage Info

Best Practices for Storing

To keep your no-bake peanut butter bars fresh, use airtight containers. Glass or plastic containers work well. Make sure they seal tightly to block air. You can layer parchment paper between bars to avoid sticking. This keeps them neat and easy to grab on the go. Store the bars in the fridge for the best flavor and texture. They’ll stay fresh longer there, especially if you plan to enjoy them over a few days.

Freezing Instructions

You can freeze these bars for later. To freeze, wrap each bar in plastic wrap first. Then place them in a freezer-safe bag or container. This keeps them from getting freezer burn. When you want to eat them, take out a bar and let it thaw in the fridge overnight. For a quick snack, you can leave it out at room temperature for about an hour. This helps keep the texture nice and creamy.

Shelf Life

In the fridge, these bars last about one week. If you freeze them, they can last up to three months. Just remember to check for any changes in color or smell. If they look or smell off, it’s best to toss them. Enjoy your no-bake peanut butter bars with peace of mind knowing they’re stored well! For the full recipe, check out the recipe section.

FAQs

How long do No-Bake Peanut Butter Bars last?

These bars can last about a week in the fridge. For best storage, keep them in an airtight container. This keeps them fresh and tasty. If you freeze them, they can last for three months. Just wrap them well in plastic wrap before placing them in a freezer bag.

Can I make these bars without chocolate?

Yes, you can skip the chocolate! Try adding dried fruit or nuts instead. You can also use more peanut butter for flavor. If you want some sweetness, add in some cinnamon or a splash of vanilla. This gives a nice twist to the bars.

What can I add for extra protein?

You can boost protein with a few simple additions. Try adding a scoop of protein powder to the mix. Chopped nuts like almonds or walnuts work well too. They add crunch and extra nutrients. You can even include seeds like chia or hemp for a nutritious punch.

Can I use natural sweeteners instead of honey?

Absolutely! You can use maple syrup or agave nectar as a sweetener. These options keep the bars moist and tasty. If you want to try a sugar-free option, consider stevia or monk fruit. Just remember to adjust the amount, as they can be sweeter than honey.

You learned how to make tasty no-bake peanut butter bars with simple steps. We covered ingredients, easy mixing, and chilling. Remember, you can switch flavors and make them fit your diet. These bars are fun to eat, share, and store. Try different spices or mixes to find your perfect combo. Enjoy creating your own version, and please share it with friends. With these tips, you can enjoy your bars longer and keep them fresh. Stay creative in your kitchen and enjoy every bite!

To make these no-bake peanut butter bars, you need some simple, tasty ingredients. Gather the following: - 1 cup rolled oats - 1 cup natural peanut butter (smooth or crunchy) - 1/2 cup honey or maple syrup - 1/2 cup chocolate chips (milk or dark) - 1/4 cup unsweetened cocoa powder - 1 teaspoon pure vanilla extract - A pinch of salt - Additional chocolate chips for garnish (optional) These ingredients blend well to create a rich, satisfying treat. The rolled oats give the bars a hearty texture, while the peanut butter adds creaminess. Honey or maple syrup serves as the sweetener, making each bite delightful. Cocoa powder enriches the chocolate flavor, and vanilla extract brightens the taste. A pinch of salt balances the sweetness, enhancing every bite. If you want, sprinkle on extra chocolate chips for a nice touch. You can find the full recipe for these delicious bars in the earlier section. Start by gathering your ingredients. You will need rolled oats, peanut butter, honey, cocoa powder, vanilla extract, and salt. In a large mixing bowl, combine all these ingredients. I like to use a spatula for this job. Mix until it becomes sticky and holds together well. Once mixed, gently fold in the chocolate chips. This adds a nice surprise in every bite. Ensure that they spread evenly throughout the mixture. You want a delightful taste in every bar. Next, prepare your pan. I recommend using an 8x8 inch pan for the right size. Line it with parchment paper, leaving some paper hanging over the edges. This makes it easier to lift the bars out later. Now, transfer the mixture into your lined pan. Use your hands or a spatula to press it down firmly. Aim for an even and compact layer. If you love chocolate, sprinkle some extra chocolate chips on top. Press them down lightly for a tasty finish. Now it's time to chill the bars. Place the pan in the refrigerator for at least 2 hours. This helps the bars firm up nicely. After chilling, remove the pan using the parchment overhang. Place it on a cutting board. Cut into 12 equal bars. To serve, you can place them on a nice platter. For a fun touch, pair them with fresh fruit or a drizzle of melted chocolate. Enjoy your delicious no-bake peanut butter bars! For the complete recipe, check out the Full Recipe. You can make these bars even if you do not have peanut butter. Here are some alternatives: - Almond butter - Sunflower seed butter - Cashew butter For sweetening, honey works great, but you can also use: - Maple syrup - Agave nectar - Coconut sugar These options let you customize the flavor to your liking. Do you want a different texture? You can adjust the consistency of your bars. Here’s how: - Add a bit more honey or nut butter for a softer bar. - Use extra oats for a firmer texture. Mix-ins can add great taste. Consider adding: - Chopped nuts like almonds or walnuts - Seeds such as chia or flaxseeds - Dried fruit like cranberries or raisins These options give your bars extra crunch and flavor. Serving your bars can be fun! Here are some creative ideas: - Cut the bars into fun shapes using cookie cutters. - Drizzle melted chocolate on top for a fancy look. - Serve on a colorful plate with fresh fruit. Pair your bars with drinks for a treat. Try these options: - A glass of cold milk - Hot coffee or tea - Smoothies for a healthy combo These tips will help make your no-bake peanut butter bars even more enjoyable. For the full recipe, check the recipe section. {{image_4}} You can spice up these bars with a few simple additions. Try adding a dash of cinnamon or nutmeg for a warm flavor. Just a pinch can elevate the taste. If you want a twist, incorporate other extracts like almond or coconut. These will give your bars a unique touch. You can mix and match according to your mood. Want to make these bars vegan? Swap honey with maple syrup, and you’re good to go! For a gluten-free option, use certified gluten-free oats. This way, everyone can enjoy them without worry. These small changes keep the taste while meeting your diet needs. Seasonal ingredients can add fun flavors to your bars. In fall, try adding pumpkin puree and a sprinkle of pumpkin spice. For winter, crushed peppermint can bring a festive touch. These variations keep things fresh and exciting throughout the year. You can have a new treat every season! To keep your no-bake peanut butter bars fresh, use airtight containers. Glass or plastic containers work well. Make sure they seal tightly to block air. You can layer parchment paper between bars to avoid sticking. This keeps them neat and easy to grab on the go. Store the bars in the fridge for the best flavor and texture. They’ll stay fresh longer there, especially if you plan to enjoy them over a few days. You can freeze these bars for later. To freeze, wrap each bar in plastic wrap first. Then place them in a freezer-safe bag or container. This keeps them from getting freezer burn. When you want to eat them, take out a bar and let it thaw in the fridge overnight. For a quick snack, you can leave it out at room temperature for about an hour. This helps keep the texture nice and creamy. In the fridge, these bars last about one week. If you freeze them, they can last up to three months. Just remember to check for any changes in color or smell. If they look or smell off, it’s best to toss them. Enjoy your no-bake peanut butter bars with peace of mind knowing they’re stored well! For the full recipe, check out the recipe section. These bars can last about a week in the fridge. For best storage, keep them in an airtight container. This keeps them fresh and tasty. If you freeze them, they can last for three months. Just wrap them well in plastic wrap before placing them in a freezer bag. Yes, you can skip the chocolate! Try adding dried fruit or nuts instead. You can also use more peanut butter for flavor. If you want some sweetness, add in some cinnamon or a splash of vanilla. This gives a nice twist to the bars. You can boost protein with a few simple additions. Try adding a scoop of protein powder to the mix. Chopped nuts like almonds or walnuts work well too. They add crunch and extra nutrients. You can even include seeds like chia or hemp for a nutritious punch. Absolutely! You can use maple syrup or agave nectar as a sweetener. These options keep the bars moist and tasty. If you want to try a sugar-free option, consider stevia or monk fruit. Just remember to adjust the amount, as they can be sweeter than honey. You learned how to make tasty no-bake peanut butter bars with simple steps. We covered ingredients, easy mixing, and chilling. Remember, you can switch flavors and make them fit your diet. These bars are fun to eat, share, and store. Try different spices or mixes to find your perfect combo. Enjoy creating your own version, and please share it with friends. With these tips, you can enjoy your bars longer and keep them fresh. Stay creative in your kitchen and enjoy every bite!

No-Bake Peanut Butter Bars

Indulge in these Decadent No-Bake Peanut Butter Chocolate Dream Bars that are not only easy to make but also deliciously satisfying! With just a few simple ingredients like rolled oats, natural peanut butter, and chocolate chips, you can whip up a sweet treat in no time. Perfect for dessert or a snack, these bars are sure to please everyone. Click through to explore the full recipe and elevate your dessert game today!

Ingredients
  

1 cup rolled oats

1 cup natural peanut butter (choose smooth or crunchy for texture)

1/2 cup honey or maple syrup (your choice for sweetness)

1/2 cup chocolate chips (opt for milk or dark based on your preference)

1/4 cup unsweetened cocoa powder

1 teaspoon pure vanilla extract

A pinch of salt

Additional chocolate chips for garnish (optional)

Instructions
 

In a large mixing bowl, combine the rolled oats, peanut butter, honey (or maple syrup), cocoa powder, vanilla extract, and a pinch of salt. Using a spatula or wooden spoon, mix the ingredients thoroughly until they form a sticky and cohesive dough.

    Gently fold in the 1/2 cup of chocolate chips, ensuring they are evenly distributed throughout the mixture.

      Prepare an 8x8 inch pan by lining it with parchment paper, allowing some overhang on the edges. This will facilitate easy removal of the bars later on.

        Transfer the prepared mixture into the lined pan. Using your hands or a spatula, press the mixture down firmly and evenly across the base of the pan, creating a compact layer.

          If you’re a chocolate lover, sprinkle some extra chocolate chips on top and lightly press them into the surface of the mixture for an appealing finish.

            Place the pan in the refrigerator and chill for at least 2 hours, or until the bars are firm to the touch.

              Once set, use the parchment overhang to lift the entire block out of the pan and place it on a cutting board. Cut into 12 equal bars.

                Store any leftovers in an airtight container in the refrigerator to keep them fresh and delicious.

                  Prep Time: 10 minutes | Total Time: 2 hours 10 minutes | Servings: 12 bars

                    - Presentation Tips: Serve the bars on a decorative platter, perhaps paired with fresh fruit or a drizzle of melted chocolate for an extra touch of indulgence.

                      Leave a Comment

                      Recipe Rating