Peanut Butter Bliss Balls Easy No-Bake Treat Recipe

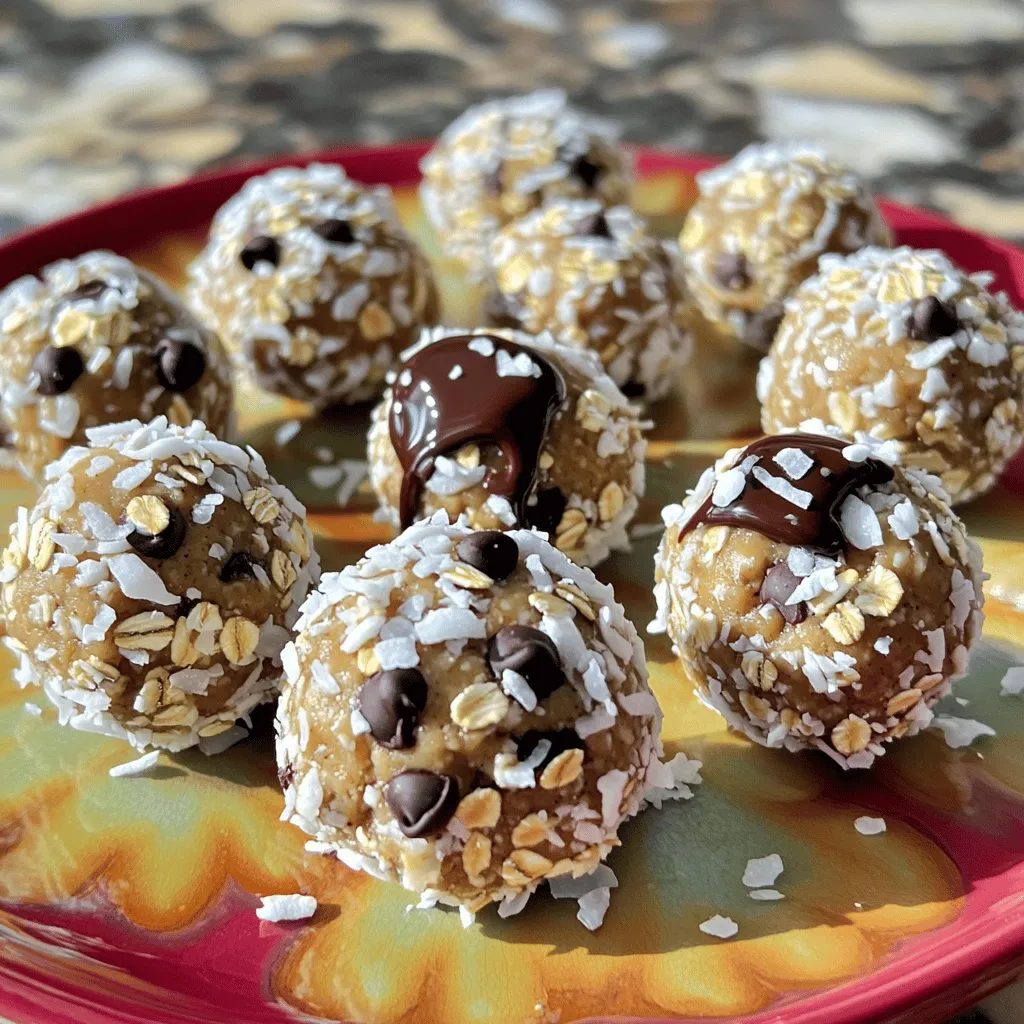
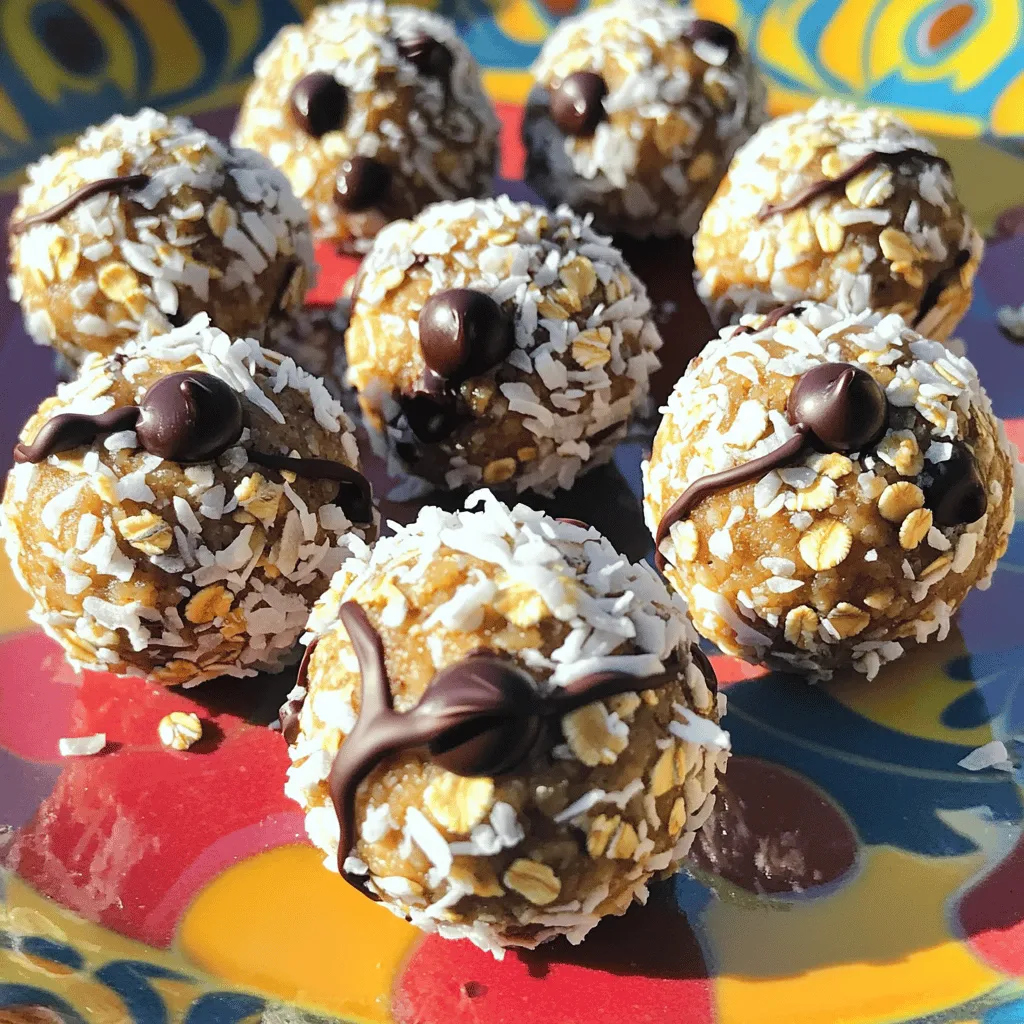
Craving a delicious treat that’s easy to make? Look no further! Peanut Butter Bliss Balls are the perfect no-bake snack. With only a few simple ingredients, you can whip up a batch in no time. They are tasty, healthy, and great for kids and adults alike. In this post, I’ll guide you step-by-step through the recipe, give you tips and tricks, and share fun variations. Let’s get started!

Ingredients

Detailed Ingredient List

– 1 cup natural peanut butter (creamy or crunchy)

– 1/2 cup rolled oats

– 1/4 cup honey or maple syrup

– 1/4 cup ground flaxseed

– 1/2 cup dark chocolate chips or cacao nibs

– 1/4 teaspoon sea salt

– 1 teaspoon vanilla extract

– Optional: 1/4 cup shredded coconut (for rolling)

To create these Peanut Butter Bliss Balls, I focus on simple, nutritious ingredients. The main star is natural peanut butter. It adds great flavor and creaminess. I suggest using either creamy or crunchy, based on your preference.

Next, rolled oats provide texture and help bind everything together. They bring fiber and a wholesome feel to the balls. Honey or maple syrup acts as a sweetener. Both options offer a touch of sweetness without being overpowering.

Ground flaxseed is rich in omega-3 fatty acids. It adds a nutty taste and boosts nutrition. Dark chocolate chips or cacao nibs give those bliss balls a delightful chocolatey flavor. I love the way they melt in your mouth!

A pinch of sea salt balances the sweetness. It highlights all the flavors nicely. Vanilla extract adds warmth and depth. For a fun twist, I sometimes roll the bliss balls in shredded coconut. This adds a lovely texture and tropical touch.

Ingredient Substitutions

If you want to switch things up, you have options. For sweeteners, try agave syrup or brown rice syrup instead of honey. Both work well and taste great.

You can also change the nut butter. Almond butter or cashew butter makes for tasty variations. If you want to add more texture, think about adding chia seeds, dried fruits, or chopped nuts. Each option brings its own flavor and crunch.

Step-by-Step Instructions

Preparation Steps

Mixing the peanut butter and sweetener

Start with a large mixing bowl. Add 1 cup of natural peanut butter and your choice of sweetener, either 1/4 cup of honey or maple syrup. Use a spatula or whisk to mix these until smooth and creamy. This step creates a rich base for your bliss balls.

Adding and combining dry ingredients

Next, add 1/2 cup of rolled oats, 1/4 cup of ground flaxseed, 1/4 teaspoon of sea salt, and 1 teaspoon of vanilla extract. Stir well until all dry ingredients blend evenly into the mixture. This ensures every bite bursts with flavor.

Forming the Bliss Balls

Rolling technique and portion sizes

With clean hands, scoop out about 1 tablespoon of the mixture. Roll it into a ball shape. Repeat this until you form all the mixture into bliss balls. Keep them roughly the same size for even bites.

Coating options: shredded coconut vs. no coating

If you want extra flavor and texture, roll each ball in 1/4 cup of shredded coconut. This adds a fun twist to the bliss balls, but feel free to skip it if you prefer. Both ways taste great!

Refrigeration Process

Importance of chilling for texture

Place the bliss balls on a parchment-lined baking sheet. Refrigerate them for at least 30 minutes. This step helps the balls firm up and lets the flavors mix well. The chilling process is key for a satisfying texture.

Tips for storing before serving

Store your bliss balls in an airtight container. They can stay in the fridge for up to a week. For longer storage, you can freeze them. Just make sure to separate them with parchment paper to prevent sticking.

Tips & Tricks

Time-Saving Tips

Using pre-measured ingredients helps speed up the process. You can buy rolled oats and flaxseed in bulk. This way, you have them ready when you want to make Peanut Butter Bliss Balls. The no-bake method makes this recipe quick and easy. You just mix and chill! Serve them right from the fridge for a cool treat.

Perfecting Texture and Flavor

Adjust the sweetness based on your taste. If you like it sweeter, add more honey or syrup. If you prefer a less sweet snack, use less. Adding sea salt helps balance the flavor. A pinch brings out the sweetness and makes each bite pop.

Serving Suggestions

These bliss balls pair well with fresh fruits or yogurt. You can add them to your lunchbox for a nutritious snack. They also work great as post-workout snacks. Their mix of protein and carbs gives you a nice energy boost. For a fun twist, drizzle some melted dark chocolate on top!

Variations

Flavor Variations

You can easily change the taste of your bliss balls. Try making Peanut Butter Chocolate Bliss Balls. Just add cocoa powder and more chocolate chips. This gives a rich, chocolatey flavor. If you want something lighter, go for Coconut Almond Bliss Balls. Use almond butter instead of peanut butter and add shredded coconut. This makes a sweet, tropical treat.

Dietary Variations

If you need gluten-free options, use certified gluten-free oats. This keeps your bliss balls safe for everyone. For vegan choices, swap honey for maple syrup. You can also use nut butters that fit your diet. Chia seeds or date paste can replace honey as binders.

Seasonal Themes

You can adapt bliss balls for the seasons, too! For holidays, add festive spices like cinnamon or nutmeg. These spices bring warmth and joy to your treats. You can also use themed colors. For example, use red and green for Christmas or pastel colors for Easter. This makes your bliss balls fun for any occasion.

Storage Info

Best Storage Practices

Store your peanut butter bliss balls in an airtight container. This keeps them fresh and safe. You can store them in the fridge or at room temperature. However, the fridge is best for longer freshness.

Shelf Life

In the refrigerator, these bliss balls stay fresh for about one week. If you want to keep them longer, freeze them. They can last up to three months in the freezer.

Avoiding Texture Issues

To avoid sogginess, make sure the bliss balls are cool before you store them. If they feel wet, let them air out a bit. When ready to eat frozen bliss balls, place them in the fridge overnight. This helps them thaw without losing their great texture. For quick thawing, leave them at room temperature for about 30 minutes. Enjoy your bliss balls anytime! For the full recipe, check out the original guide.

FAQs

What are Peanut Butter Bliss Balls?

Peanut Butter Bliss Balls are easy, no-bake treats made with simple ingredients. They mix creamy peanut butter with oats, honey, and chocolate chips for a sweet and satisfying snack. People love them for their taste and health benefits. These bliss balls are perfect for a quick energy boost or a healthy dessert option.

How long do Peanut Butter Bliss Balls last?

Peanut Butter Bliss Balls can last up to one week in the fridge. Store them in an airtight container to keep them fresh. You can also freeze them for up to three months. Just let them thaw before enjoying.

Can I customize the recipe?

Yes! You can add your favorite flavors or ingredients. Try using almond butter instead of peanut butter. You can also mix in dried fruits, nuts, or seeds. For a fun twist, use different types of chocolate chips or add spices like cinnamon.

Are Peanut Butter Bliss Balls healthy?

Peanut Butter Bliss Balls offer great nutrition. They provide protein from peanut butter and fiber from oats and flaxseed. They can give you energy without the sugar crash from candy. However, keep portion sizes in mind, as they are calorie-dense.

How do I make them vegan?

To make Peanut Butter Bliss Balls vegan, replace honey with maple syrup or agave nectar. Ensure your chocolate chips are dairy-free, or use cacao nibs. This way, you can still enjoy this tasty treat without any animal products.

For the full recipe, check out the complete guide to making these delightful snacks!

Peanut Butter Bliss Balls are a simple and tasty snack. We covered the key ingredients, steps, and tips for making them. You can customize these treats to match your tastes or dietary needs. Store them properly, and they will stay fresh for weeks. Enjoy these healthy bites any time you need a boost. Satisfy your cravings with a nutritious snack that’s easy to make and fun to enjoy!

- 1 cup natural peanut butter (creamy or crunchy) - 1/2 cup rolled oats - 1/4 cup honey or maple syrup - 1/4 cup ground flaxseed - 1/2 cup dark chocolate chips or cacao nibs - 1/4 teaspoon sea salt - 1 teaspoon vanilla extract - Optional: 1/4 cup shredded coconut (for rolling) To create these Peanut Butter Bliss Balls, I focus on simple, nutritious ingredients. The main star is natural peanut butter. It adds great flavor and creaminess. I suggest using either creamy or crunchy, based on your preference. Next, rolled oats provide texture and help bind everything together. They bring fiber and a wholesome feel to the balls. Honey or maple syrup acts as a sweetener. Both options offer a touch of sweetness without being overpowering. Ground flaxseed is rich in omega-3 fatty acids. It adds a nutty taste and boosts nutrition. Dark chocolate chips or cacao nibs give those bliss balls a delightful chocolatey flavor. I love the way they melt in your mouth! A pinch of sea salt balances the sweetness. It highlights all the flavors nicely. Vanilla extract adds warmth and depth. For a fun twist, I sometimes roll the bliss balls in shredded coconut. This adds a lovely texture and tropical touch. If you want to switch things up, you have options. For sweeteners, try agave syrup or brown rice syrup instead of honey. Both work well and taste great. You can also change the nut butter. Almond butter or cashew butter makes for tasty variations. If you want to add more texture, think about adding chia seeds, dried fruits, or chopped nuts. Each option brings its own flavor and crunch. - Mixing the peanut butter and sweetener Start with a large mixing bowl. Add 1 cup of natural peanut butter and your choice of sweetener, either 1/4 cup of honey or maple syrup. Use a spatula or whisk to mix these until smooth and creamy. This step creates a rich base for your bliss balls. - Adding and combining dry ingredients Next, add 1/2 cup of rolled oats, 1/4 cup of ground flaxseed, 1/4 teaspoon of sea salt, and 1 teaspoon of vanilla extract. Stir well until all dry ingredients blend evenly into the mixture. This ensures every bite bursts with flavor. - Rolling technique and portion sizes With clean hands, scoop out about 1 tablespoon of the mixture. Roll it into a ball shape. Repeat this until you form all the mixture into bliss balls. Keep them roughly the same size for even bites. - Coating options: shredded coconut vs. no coating If you want extra flavor and texture, roll each ball in 1/4 cup of shredded coconut. This adds a fun twist to the bliss balls, but feel free to skip it if you prefer. Both ways taste great! - Importance of chilling for texture Place the bliss balls on a parchment-lined baking sheet. Refrigerate them for at least 30 minutes. This step helps the balls firm up and lets the flavors mix well. The chilling process is key for a satisfying texture. - Tips for storing before serving Store your bliss balls in an airtight container. They can stay in the fridge for up to a week. For longer storage, you can freeze them. Just make sure to separate them with parchment paper to prevent sticking. Using pre-measured ingredients helps speed up the process. You can buy rolled oats and flaxseed in bulk. This way, you have them ready when you want to make Peanut Butter Bliss Balls. The no-bake method makes this recipe quick and easy. You just mix and chill! Serve them right from the fridge for a cool treat. Adjust the sweetness based on your taste. If you like it sweeter, add more honey or syrup. If you prefer a less sweet snack, use less. Adding sea salt helps balance the flavor. A pinch brings out the sweetness and makes each bite pop. These bliss balls pair well with fresh fruits or yogurt. You can add them to your lunchbox for a nutritious snack. They also work great as post-workout snacks. Their mix of protein and carbs gives you a nice energy boost. For a fun twist, drizzle some melted dark chocolate on top! {{image_4}} You can easily change the taste of your bliss balls. Try making Peanut Butter Chocolate Bliss Balls. Just add cocoa powder and more chocolate chips. This gives a rich, chocolatey flavor. If you want something lighter, go for Coconut Almond Bliss Balls. Use almond butter instead of peanut butter and add shredded coconut. This makes a sweet, tropical treat. If you need gluten-free options, use certified gluten-free oats. This keeps your bliss balls safe for everyone. For vegan choices, swap honey for maple syrup. You can also use nut butters that fit your diet. Chia seeds or date paste can replace honey as binders. You can adapt bliss balls for the seasons, too! For holidays, add festive spices like cinnamon or nutmeg. These spices bring warmth and joy to your treats. You can also use themed colors. For example, use red and green for Christmas or pastel colors for Easter. This makes your bliss balls fun for any occasion. Store your peanut butter bliss balls in an airtight container. This keeps them fresh and safe. You can store them in the fridge or at room temperature. However, the fridge is best for longer freshness. In the refrigerator, these bliss balls stay fresh for about one week. If you want to keep them longer, freeze them. They can last up to three months in the freezer. To avoid sogginess, make sure the bliss balls are cool before you store them. If they feel wet, let them air out a bit. When ready to eat frozen bliss balls, place them in the fridge overnight. This helps them thaw without losing their great texture. For quick thawing, leave them at room temperature for about 30 minutes. Enjoy your bliss balls anytime! For the full recipe, check out the original guide. Peanut Butter Bliss Balls are easy, no-bake treats made with simple ingredients. They mix creamy peanut butter with oats, honey, and chocolate chips for a sweet and satisfying snack. People love them for their taste and health benefits. These bliss balls are perfect for a quick energy boost or a healthy dessert option. Peanut Butter Bliss Balls can last up to one week in the fridge. Store them in an airtight container to keep them fresh. You can also freeze them for up to three months. Just let them thaw before enjoying. Yes! You can add your favorite flavors or ingredients. Try using almond butter instead of peanut butter. You can also mix in dried fruits, nuts, or seeds. For a fun twist, use different types of chocolate chips or add spices like cinnamon. Peanut Butter Bliss Balls offer great nutrition. They provide protein from peanut butter and fiber from oats and flaxseed. They can give you energy without the sugar crash from candy. However, keep portion sizes in mind, as they are calorie-dense. To make Peanut Butter Bliss Balls vegan, replace honey with maple syrup or agave nectar. Ensure your chocolate chips are dairy-free, or use cacao nibs. This way, you can still enjoy this tasty treat without any animal products. For the full recipe, check out the complete guide to making these delightful snacks! Peanut Butter Bliss Balls are a simple and tasty snack. We covered the key ingredients, steps, and tips for making them. You can customize these treats to match your tastes or dietary needs. Store them properly, and they will stay fresh for weeks. Enjoy these healthy bites any time you need a boost. Satisfy your cravings with a nutritious snack that’s easy to make and fun to enjoy!

Peanut Butter Bliss Balls

Indulge in a delightful treat with Peanut Butter Bliss Balls, an easy no-bake recipe perfect for satisfying your sweet cravings. Made with simple ingredients like creamy peanut butter, oats, and dark chocolate chips, these bliss balls are both nutritious and delicious. They're ideal for kids and adults alike, and customizing them is a breeze! Click through to explore the full recipe, tips, and creative variations to make your own tasty batch!

Ingredients
  

1 cup natural peanut butter (either creamy or crunchy)

1/2 cup rolled oats

1/4 cup honey or maple syrup

1/4 cup ground flaxseed

1/2 cup dark chocolate chips or cacao nibs

1/4 teaspoon sea salt

1 teaspoon vanilla extract

Optional: 1/4 cup shredded coconut (for rolling)

Instructions
 

In a large mixing bowl, combine the natural peanut butter and your choice of honey or maple syrup. Using a spatula or a whisk, stir these ingredients together thoroughly until the mixture is smooth and creamy.

    Next, add the rolled oats, ground flaxseed, sea salt, and vanilla extract to the peanut butter mixture. Mix everything together until all ingredients are uniformly combined.

      Gently fold in the dark chocolate chips or cacao nibs. Ensure that these additions are evenly distributed throughout the mixture for maximum flavor in every bite.

        With clean hands, scoop out approximately 1 tablespoon of the mixture and roll it into a round ball shape. Continue this process until all of the mixture has been formed into bliss balls.

          If you desire an extra layer of flavor and texture, roll each bliss ball in shredded coconut until fully coated.

            Arrange the bliss balls on a parchment-lined baking sheet or a decorative plate to keep them from sticking.

              Refrigerate the bliss balls for at least 30 minutes to let the flavors meld together and the texture firm up for a satisfying bite.

                Prep Time: 10 minutes | Total Time: 40 minutes | Servings: 12-15 balls

                  - Presentation Tips: Consider arranging the bliss balls on a vibrant platter for an eye-catching display. For a creative finishing touch, drizzle a bit of melted dark chocolate over the tops or place each ball in small, colorful decorative liners to elevate their festive appeal. Enjoy these bliss balls as a nutritious snack, a post-workout energy boost, or a delicious dessert!

                    Leave a Comment

                    Recipe Rating