Pilgrim Hat Cookies Delightful Thanksgiving Treat

WANT TO SAVE THIS RECIPE?

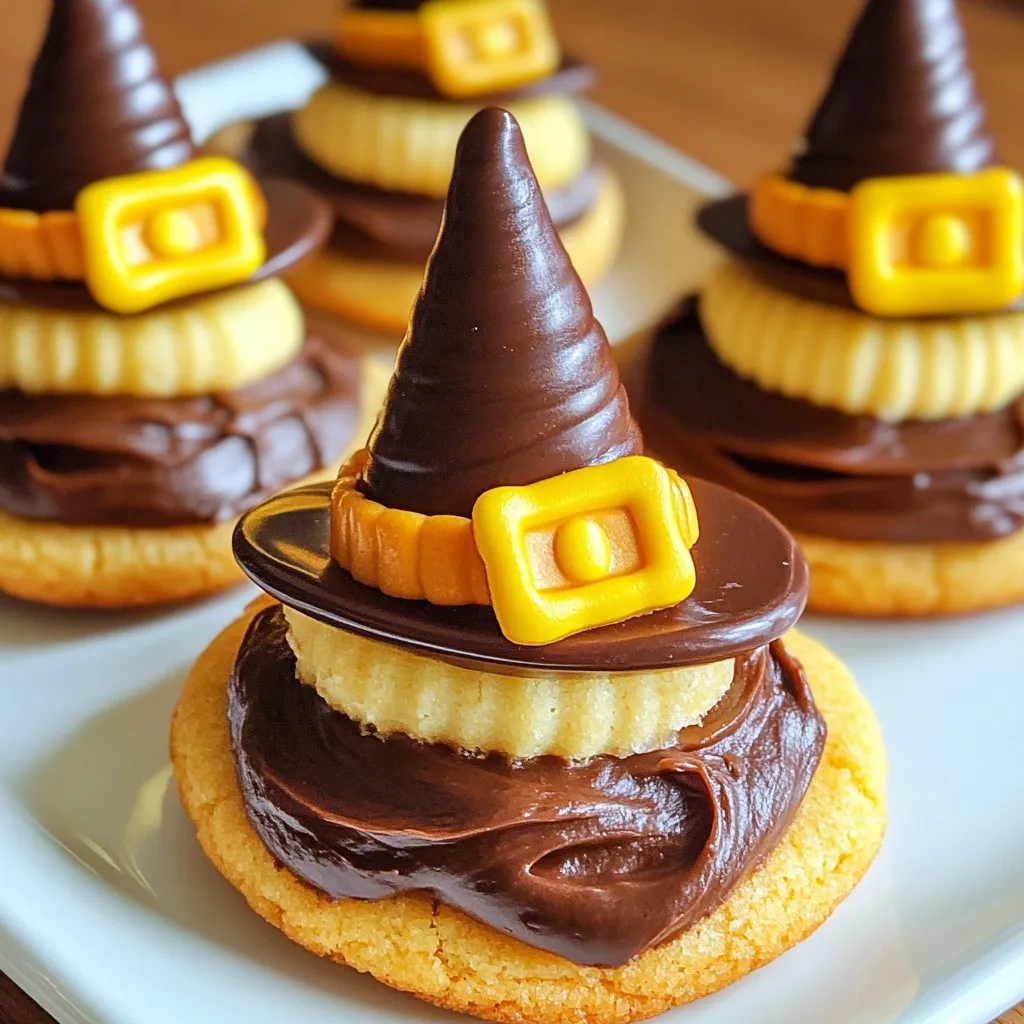
Are you ready to add a fun twist to your Thanksgiving treats? I’m excited to show you how to make Pilgrim Hat Cookies! These simple, festive cookies combine chocolate fudge cookies with a rich frosting, making them a hit for kids and adults alike. Let’s dive into the easy steps and ingredients you need to create this delightful dessert that will impress your family and friends this holiday season!

Why I Love This Recipe

  1. Fun and Festive: These cookies are not only delicious but also make a whimsical addition to any holiday gathering.
  2. Easy to Make: The simple steps and readily available ingredients make this recipe approachable for bakers of all levels.
  3. Customizable: You can easily change the toppings and colors of the candies to suit your theme or preferences.
  4. Great for Kids: This is a fantastic recipe to involve kids in the kitchen, letting them decorate their own cookies.

Ingredients

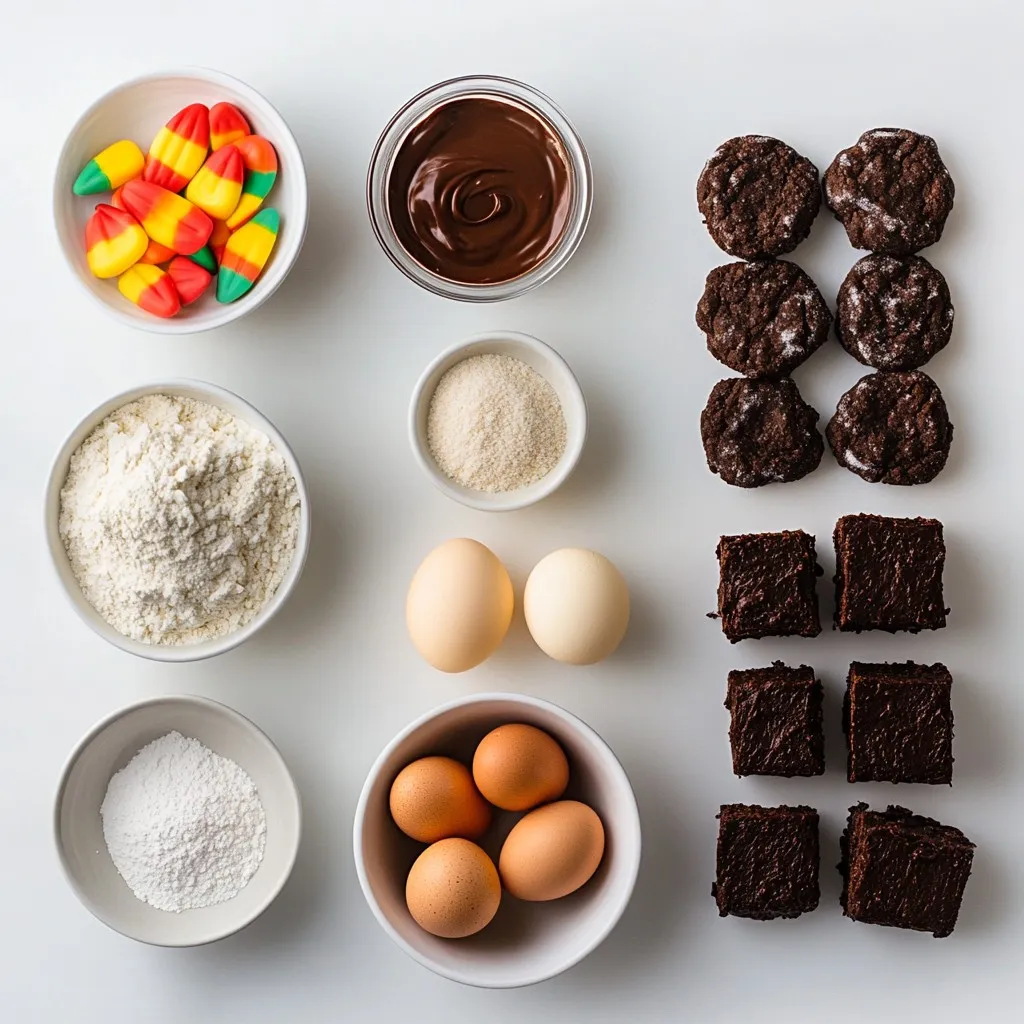
Main Ingredients List

– 1 cup unsalted butter, softened

– 1 cup granulated sugar

– 1 cup packed brown sugar

– 2 large eggs

– 2 teaspoons pure vanilla extract

– 3 cups all-purpose flour

– 1 teaspoon baking powder

– 1/2 teaspoon baking soda

– 1/2 teaspoon salt

Frosting and Decoration Ingredients

– 1 cup chocolate frosting

– 24 chocolate fudge cookies (such as Oreos)

– 24 small edible candies

When making Pilgrim Hat Cookies, gather all the ingredients first. This helps keep your kitchen organized.

You need butter and both types of sugar for a rich flavor. The eggs bring moisture and help bind the cookies. Vanilla adds a lovely taste, too.

For the dry mix, use flour, baking powder, baking soda, and salt. These ingredients will create a nice cookie structure.

Finally, you’ll need chocolate frosting to top the cookies. The fudge cookies act as the base, and the small candies are for decoration.

Having everything ready makes the baking process smooth and fun. Enjoy the act of mixing and creating these delightful Thanksgiving treats!

Step-by-Step Instructions

Prepping the Oven and Ingredients

– Preheat oven to 350°F (175°C).

– Prepare baking sheets with parchment paper.

Mixing the Dough

– In a bowl, cream together 1 cup of softened butter, 1 cup of granulated sugar, and 1 cup of brown sugar. Mix until light and fluffy.

– Add 2 large eggs one at a time, mixing well after each. Pour in 2 teaspoons of vanilla extract and blend until just mixed.

– In another bowl, whisk 3 cups of all-purpose flour, 1 teaspoon of baking powder, 1/2 teaspoon of baking soda, and 1/2 teaspoon of salt.

– Gradually add the dry mix to the wet mix. Stir on low speed until combined. The dough should be thick and sticky.

Baking Process

– Use a tablespoon to drop rounded dough onto the prepared sheets. Space them 2 inches apart. Slightly flatten each mound with your palm.

– Bake for 10-12 minutes. They are done when the edges turn golden. Remove them and let cool for 2-3 minutes on the sheets. Transfer cookies to wire racks to cool completely.

– Once cooled, spread a thick layer of chocolate frosting on top of each cookie.

– Place an Oreo on top of the frosting to resemble a hat brim.

– Secure a small edible candy on the Oreo for the buckle. Use frosting if needed to hold it in place.

– Let the frosting set for a few minutes before serving.

Tips & Tricks

Perfect Cookie Texture

To get the best cookie texture, do not overmix your dough. When you add the dry ingredients, mix just until combined. This keeps your cookies soft and chewy. Bake them for about 10-12 minutes. You want the edges to be light golden. Always check them around the 10-minute mark to avoid overbaking.

Decorating Like a Pro

For even frosting, use a spatula to spread it on each cookie. Make sure to cover the top well. When you add the Oreo on top, press gently but firmly. This helps secure it in place. To attach the small candy, use a bit of extra frosting. This acts like glue to hold the candy on top of the Oreo.

Serving Suggestions

For a creative Thanksgiving presentation, arrange the cookies on a nice platter. You can add small pumpkins or colorful leaves for festivity. Serve these cookies fresh after they set. They taste best the same day you make them. Enjoying them with family and friends makes them even sweeter!

Pro Tips

  1. Chill the Dough: For thicker cookies, refrigerate the dough for 30 minutes before baking. This helps prevent spreading and keeps the cookies nice and fluffy.
  2. Frosting Consistency: Ensure your chocolate frosting is at room temperature for easier spreading. If it’s too stiff, briefly microwave it for a few seconds to soften.
  3. Creative Hat Buckles: Mix it up by using different types of candies for the hat buckles, such as mini chocolate bars or colored icing for a festive touch.
  4. Presentation Matters: Arrange the cookies on a colorful platter with themed decorations for a beautiful Thanksgiving display that will impress your guests.

Variations

Flavor Variations

You can switch up the flavor of your Pilgrim Hat Cookies. Try using chocolate dough instead of the regular one. It adds a rich taste that pairs well with the chocolate frosting. You might also love pumpkin spice cookies. The warm spices bring a cozy fall feeling to your treats.

For the frosting, think beyond chocolate. A smooth vanilla frosting works great too. Cream cheese frosting adds a tangy twist that many enjoy. Each variation makes the cookies unique and fun for everyone.

Dietary Modifications

You can make these cookies fit different diets. For a gluten-free option, swap all-purpose flour with a gluten-free blend. Make sure it includes a binding agent like xanthan gum. This keeps the cookies chewy and tasty.

If you want vegan cookies, replace butter with coconut oil. Use flax eggs instead of regular eggs. Just mix one tablespoon of ground flaxseed with three tablespoons of water for each egg. These changes keep the cookies delicious while meeting dietary needs.

Seasonal Themes

You can adapt these cookies for different seasons. For Halloween, use orange and black candies for decoration. Instead of the edible candy buckle, use candy pumpkins for a spooky look.

At Christmas, switch to red and green candies. You can even use peppermint candies for a fresh twist. No matter the season, these cookies can bring joy and cheer to your table.

Storage Info

Best Storage Practices

To keep your Pilgrim Hat Cookies fresh, store them in an airtight container. This helps keep them soft. Make sure the cookies are completely cool before sealing them. If you stack them, place parchment paper between layers to avoid sticking.

Freezing Instructions

You can freeze these cookies for later enjoyment. To freeze, place the cookies in a single layer on a baking sheet. Once frozen, transfer them to an airtight container or a freezer bag. When you want to eat them, remove the cookies and let them defrost at room temperature. This keeps their taste and texture intact.

Shelf Life

These cookies stay fresh for about one week at room temperature. You can keep them longer in the freezer, up to three months. Watch for signs of spoilage, such as a dry texture or off smells. If they lose their softness, it’s best to toss them.

FAQs

How do I make Pilgrim Hat Cookies from scratch?

To make Pilgrim Hat Cookies, start with simple steps. First, preheat your oven to 350°F (175°C). Line two baking sheets with parchment paper. Then, mix butter, granulated sugar, and brown sugar in a bowl until fluffy. Next, add eggs and vanilla, blending them well. In another bowl, whisk flour, baking powder, baking soda, and salt. Gradually combine this dry mix with the wet mix. Once mixed, drop rounded dough onto the sheets. Bake for 10-12 minutes until golden. Cool the cookies before adding frosting. Finally, stack an Oreo on each frosted cookie and top with a candy.

Can I use different cookies instead of Oreos?

Yes, there are many options! You can use chocolate chip cookies for a sweeter flavor. Peanut butter cookies also make a tasty base. If you prefer a crunch, try graham crackers. Just ensure the cookie can hold the frosting and Oreo well. Each choice will give a unique twist to your Pilgrim Hat Cookies.

What is the best way to decorate the cookies?

For the best decoration, spread a thick layer of frosting on each cookie. Make sure it is even to hold the Oreo. When placing the Oreo on top, position it so it looks like a hat brim. For the buckle, use a small candy, like candy corn or chocolate disks. You can use extra frosting to make it stick better. For a festive look, arrange the cookies on a platter with autumn decorations. This will impress your guests during Thanksgiving!

You now have a complete guide to making delicious Pilgrim Hat Cookies. From ingredients to baking and decorating, these steps ensure success. Remember, avoid overmixing for the best texture and think creatively when decorating. You can even adapt recipes for special diets or seasonal themes. Store cookies properly to keep them fresh and tasty. Enjoy your baking adventure! Your cookies will not only look good but taste great to

- 1 cup unsalted butter, softened - 1 cup granulated sugar - 1 cup packed brown sugar - 2 large eggs - 2 teaspoons pure vanilla extract - 3 cups all-purpose flour - 1 teaspoon baking powder - 1/2 teaspoon baking soda - 1/2 teaspoon salt - 1 cup chocolate frosting - 24 chocolate fudge cookies (such as Oreos) - 24 small edible candies When making Pilgrim Hat Cookies, gather all the ingredients first. This helps keep your kitchen organized. You need butter and both types of sugar for a rich flavor. The eggs bring moisture and help bind the cookies. Vanilla adds a lovely taste, too. For the dry mix, use flour, baking powder, baking soda, and salt. These ingredients will create a nice cookie structure. Finally, you'll need chocolate frosting to top the cookies. The fudge cookies act as the base, and the small candies are for decoration. Having everything ready makes the baking process smooth and fun. Enjoy the act of mixing and creating these delightful Thanksgiving treats! {{ingredient_image_2}} - Preheat oven to 350°F (175°C). - Prepare baking sheets with parchment paper. - In a bowl, cream together 1 cup of softened butter, 1 cup of granulated sugar, and 1 cup of brown sugar. Mix until light and fluffy. - Add 2 large eggs one at a time, mixing well after each. Pour in 2 teaspoons of vanilla extract and blend until just mixed. - In another bowl, whisk 3 cups of all-purpose flour, 1 teaspoon of baking powder, 1/2 teaspoon of baking soda, and 1/2 teaspoon of salt. - Gradually add the dry mix to the wet mix. Stir on low speed until combined. The dough should be thick and sticky. - Use a tablespoon to drop rounded dough onto the prepared sheets. Space them 2 inches apart. Slightly flatten each mound with your palm. - Bake for 10-12 minutes. They are done when the edges turn golden. Remove them and let cool for 2-3 minutes on the sheets. Transfer cookies to wire racks to cool completely. - Once cooled, spread a thick layer of chocolate frosting on top of each cookie. - Place an Oreo on top of the frosting to resemble a hat brim. - Secure a small edible candy on the Oreo for the buckle. Use frosting if needed to hold it in place. - Let the frosting set for a few minutes before serving. To get the best cookie texture, do not overmix your dough. When you add the dry ingredients, mix just until combined. This keeps your cookies soft and chewy. Bake them for about 10-12 minutes. You want the edges to be light golden. Always check them around the 10-minute mark to avoid overbaking. For even frosting, use a spatula to spread it on each cookie. Make sure to cover the top well. When you add the Oreo on top, press gently but firmly. This helps secure it in place. To attach the small candy, use a bit of extra frosting. This acts like glue to hold the candy on top of the Oreo. For a creative Thanksgiving presentation, arrange the cookies on a nice platter. You can add small pumpkins or colorful leaves for festivity. Serve these cookies fresh after they set. They taste best the same day you make them. Enjoying them with family and friends makes them even sweeter! Pro Tips Chill the Dough: For thicker cookies, refrigerate the dough for 30 minutes before baking. This helps prevent spreading and keeps the cookies nice and fluffy. Frosting Consistency: Ensure your chocolate frosting is at room temperature for easier spreading. If it’s too stiff, briefly microwave it for a few seconds to soften. Creative Hat Buckles: Mix it up by using different types of candies for the hat buckles, such as mini chocolate bars or colored icing for a festive touch. Presentation Matters: Arrange the cookies on a colorful platter with themed decorations for a beautiful Thanksgiving display that will impress your guests. {{image_4}} You can switch up the flavor of your Pilgrim Hat Cookies. Try using chocolate dough instead of the regular one. It adds a rich taste that pairs well with the chocolate frosting. You might also love pumpkin spice cookies. The warm spices bring a cozy fall feeling to your treats. For the frosting, think beyond chocolate. A smooth vanilla frosting works great too. Cream cheese frosting adds a tangy twist that many enjoy. Each variation makes the cookies unique and fun for everyone. You can make these cookies fit different diets. For a gluten-free option, swap all-purpose flour with a gluten-free blend. Make sure it includes a binding agent like xanthan gum. This keeps the cookies chewy and tasty. If you want vegan cookies, replace butter with coconut oil. Use flax eggs instead of regular eggs. Just mix one tablespoon of ground flaxseed with three tablespoons of water for each egg. These changes keep the cookies delicious while meeting dietary needs. You can adapt these cookies for different seasons. For Halloween, use orange and black candies for decoration. Instead of the edible candy buckle, use candy pumpkins for a spooky look. At Christmas, switch to red and green candies. You can even use peppermint candies for a fresh twist. No matter the season, these cookies can bring joy and cheer to your table. To keep your Pilgrim Hat Cookies fresh, store them in an airtight container. This helps keep them soft. Make sure the cookies are completely cool before sealing them. If you stack them, place parchment paper between layers to avoid sticking. You can freeze these cookies for later enjoyment. To freeze, place the cookies in a single layer on a baking sheet. Once frozen, transfer them to an airtight container or a freezer bag. When you want to eat them, remove the cookies and let them defrost at room temperature. This keeps their taste and texture intact. These cookies stay fresh for about one week at room temperature. You can keep them longer in the freezer, up to three months. Watch for signs of spoilage, such as a dry texture or off smells. If they lose their softness, it's best to toss them. To make Pilgrim Hat Cookies, start with simple steps. First, preheat your oven to 350°F (175°C). Line two baking sheets with parchment paper. Then, mix butter, granulated sugar, and brown sugar in a bowl until fluffy. Next, add eggs and vanilla, blending them well. In another bowl, whisk flour, baking powder, baking soda, and salt. Gradually combine this dry mix with the wet mix. Once mixed, drop rounded dough onto the sheets. Bake for 10-12 minutes until golden. Cool the cookies before adding frosting. Finally, stack an Oreo on each frosted cookie and top with a candy. Yes, there are many options! You can use chocolate chip cookies for a sweeter flavor. Peanut butter cookies also make a tasty base. If you prefer a crunch, try graham crackers. Just ensure the cookie can hold the frosting and Oreo well. Each choice will give a unique twist to your Pilgrim Hat Cookies. For the best decoration, spread a thick layer of frosting on each cookie. Make sure it is even to hold the Oreo. When placing the Oreo on top, position it so it looks like a hat brim. For the buckle, use a small candy, like candy corn or chocolate disks. You can use extra frosting to make it stick better. For a festive look, arrange the cookies on a platter with autumn decorations. This will impress your guests during Thanksgiving! You now have a complete guide to making delicious Pilgrim Hat Cookies. From ingredients to baking and decorating, these steps ensure success. Remember, avoid overmixing for the best texture and think creatively when decorating. You can even adapt recipes for special diets or seasonal themes. Store cookies properly to keep them fresh and tasty. Enjoy your baking adventure! Your cookies will not only look good but taste great too.

Pilgrim Hat Cookies

Delicious cookies decorated to resemble pilgrim hats, perfect for Thanksgiving.
Prep Time 15 minutes
Cook Time 12 minutes
Total Time 45 minutes
Course Dessert
Cuisine American
Servings 24
Calories 150 kcal

Ingredients
  

  • 1 cup unsalted butter, softened to room temperature
  • 1 cup granulated sugar
  • 1 cup packed brown sugar
  • 2 large eggs
  • 2 teaspoons pure vanilla extract
  • 3 cups all-purpose flour
  • 1 teaspoon baking powder
  • 0.5 teaspoon baking soda
  • 0.5 teaspoon salt
  • 1 cup chocolate frosting
  • 24 pieces chocolate fudge cookies
  • 24 pieces small edible candies

Instructions
 

  • Start by preheating your oven to 350°F (175°C). Next, line two baking sheets with parchment paper to prevent sticking.
  • In a large mixing bowl, combine the softened butter, granulated sugar, and brown sugar. Beat them together with an electric mixer on medium speed until the mixture is light and fluffy, which should take about 3-4 minutes.
  • Add the eggs to the butter-sugar mixture one at a time, beating well after each addition. Then pour in the vanilla extract and mix until just incorporated.
  • In a separate bowl, whisk together the flour, baking powder, baking soda, and salt.
  • Gradually add the dry ingredients to the wet mixture, mixing on low speed until fully combined; be careful not to overmix. The dough should be thick and slightly sticky.
  • Using a tablespoon or a cookie scoop, drop rounded portions of dough onto the prepared baking sheets, making sure to space them about 2 inches apart. Slightly flatten each mound of dough with the palm of your hand.
  • Bake the cookies in the preheated oven for about 10-12 minutes. They are done when the edges turn a light golden color. Once baked, remove them from the oven and let them cool on the baking sheets for about 2-3 minutes. Then, transfer the cookies to wire racks to cool completely.
  • After the cookies have cooled, generously spread a thick layer of chocolate frosting on the top of each cookie to create a base for the hat.
  • Place an Oreo cookie on top of the frosting, positioning it so it resembles the brim of a pilgrim hat.
  • For the finishing touch, secure a small edible candy to the top of the Oreo, symbolizing the buckle of the hat. You can use a bit of extra frosting to help it stick if necessary.
  • Allow the frosting to set for a few minutes before serving to ensure it holds its shape.

Notes

For an inviting Thanksgiving presentation, arrange the cookies on a decorative platter with autumn-themed decorations.
Keyword cookies, dessert, Thanksgiving

WANT TO SAVE THIS RECIPE?

Leave a Comment

Recipe Rating