Raspberry Lemonade Bars Delightful and Easy Recipe

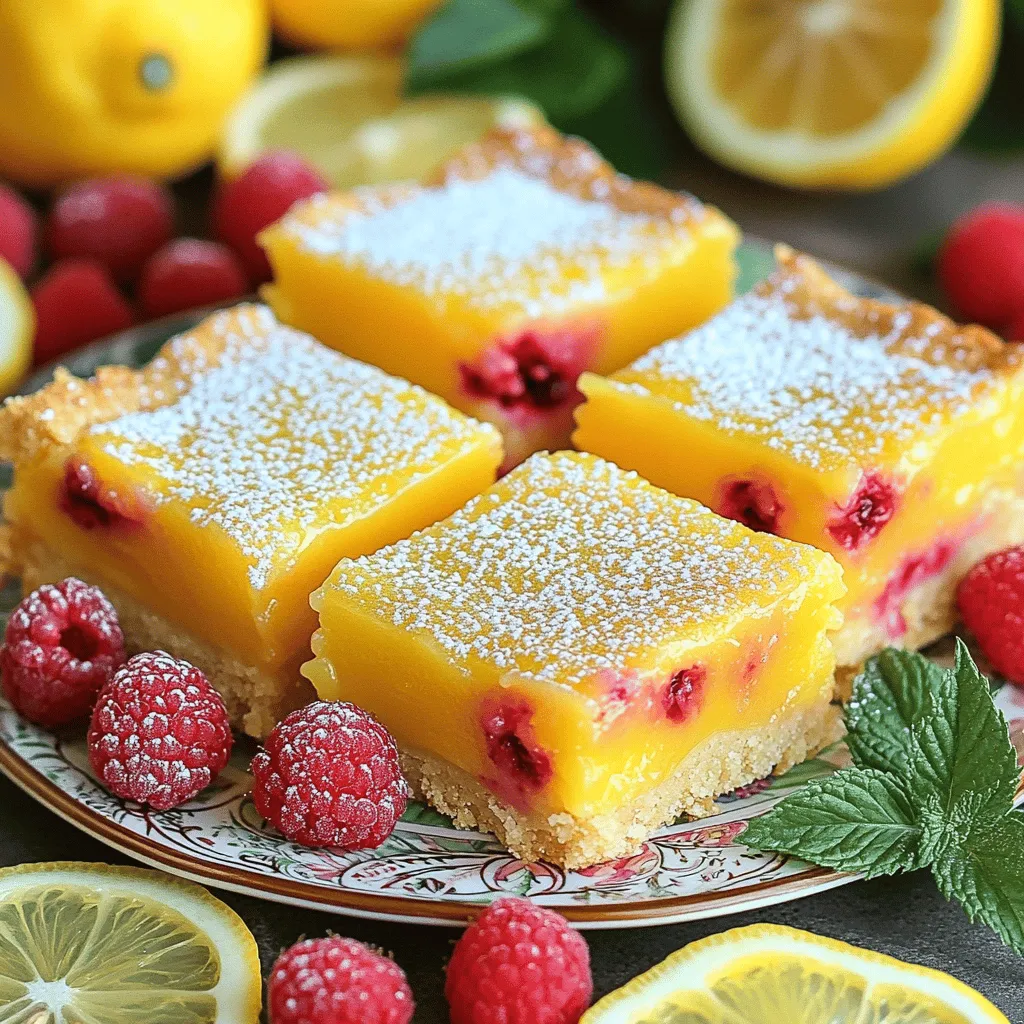
Craving something sweet and zesty? You’ll love making Raspberry Lemonade Bars! This easy recipe blends tart lemon and sweet raspberries into a delightful treat. Whether you’re a beginner or a pro, I’ll guide you step-by-step through each part. From the crust to the filling, you’ll have tasty bars perfect for any occasion. Grab your apron, and let’s get started on this delicious journey!

Ingredients for Raspberry Lemonade Bars

List of Ingredients

– 1 cup all-purpose flour

– 1/4 cup powdered sugar

– 1/2 cup unsalted butter, melted and slightly cooled

– 2 large eggs

– 1 cup granulated sugar

– 1/4 cup freshly squeezed lemon juice (about 2 medium-sized lemons)

– 1 teaspoon freshly grated lemon zest

– 1 cup fresh raspberries (or if using frozen, ensure they are fully thawed)

– 1/2 teaspoon baking powder

– A small pinch of salt

– Additional powdered sugar for dusting upon serving

Measurements and Substitutions

For the best results, use precise measurements. If you need a gluten-free option, substitute the flour with a gluten-free blend. You can swap the granulated sugar with coconut sugar for a healthier choice. If you cannot find fresh raspberries, use frozen ones but make sure they are fully thawed and drained.

Quality Tips for Ingredients

Choose high-quality butter for a rich flavor. Fresh lemons should feel heavy for their size, which indicates juiciness. When selecting raspberries, look for firm, plump berries without any mold. Using fresh, ripe ingredients will make your Raspberry Lemonade Bars taste amazing. For the best flavor, always opt for freshly squeezed lemon juice instead of bottled. This small change adds a bright and zesty touch to your bars.

Step-by-Step Instructions

Preparing the Crust

To start, preheat your oven to 350°F (175°C). Grab an 8×8 inch baking dish. You can grease it with cooking spray or line it with parchment paper. Make sure the paper hangs over the edges for easy removal. In a medium bowl, sift together 1 cup of all-purpose flour and 1/4 cup of powdered sugar. Then, pour in 1/2 cup of melted butter. Mix it with a fork until it looks crumbly. Press this mixture into the bottom of your dish. Bake the crust for about 15 minutes, or until it turns golden.

Making the Raspberry Lemon Filling

While the crust is baking, take a large bowl. Whisk together 2 large eggs and 1 cup of granulated sugar until smooth. Next, add in 1/4 cup of freshly squeezed lemon juice, 1 teaspoon of lemon zest, 1/2 teaspoon of baking powder, and a pinch of salt. Mix well. Now, gently fold in 1 cup of fresh raspberries. It’s best to leave some whole for texture.

Baking and Cooling Process

Once your crust is ready, pour the raspberry lemon filling over it. Spread the mixture evenly with a spatula. Bake for another 20 to 25 minutes. You want the filling to set and the edges to be golden. After baking, let the dish cool completely on a wire rack. This step helps the bars firm up nicely. When cool, dust the top with powdered sugar before cutting into squares. Enjoy your delightful treat! For the full recipe, refer to the provided details.

Tips & Tricks for Perfect Raspberry Lemonade Bars

How to Avoid a Soggy Crust

To keep your crust crisp, follow these easy steps:

Pre-bake the crust: Bake it for 15 minutes until lightly golden.

Use cold butter: This helps form a flakier crust.

Don’t rush cooling: Let it cool completely in the pan before adding the filling.

These steps will help prevent sogginess and give you a delightful base.

Ideal Ways to Serve

Serving your raspberry lemonade bars can be fun! Here are some ideas:

Chill before serving: Cold bars taste great on hot days.

Slice into small squares: This makes them easy to grab and enjoy.

Pair with ice cream: A scoop of vanilla ice cream adds a creamy touch.

These ideas elevate your serving game and please your guests.

Presentation Tips

Presentation makes a big difference. Here’s how to make your bars shine:

Garnish with fresh raspberries: Place a few on top for color.

Add lemon slices: Thin slices brighten up the plate.

Sprinkle powdered sugar: A dusting adds elegance and sweetness.

These tips will impress your friends and family, making every bite a treat.

Variations on Raspberry Lemonade Bars

Substituting Different Fruits

You can switch raspberries for other fruits. Think strawberries, blueberries, or peaches. Each fruit brings its own taste. For a twist, mix several fruits together. This way, you get a fun blend of flavors. Always use fresh, ripe fruit for the best taste.

Gluten-Free Adaptations

To make these bars gluten-free, use a gluten-free flour mix. You can find many options in stores. Look for a blend that works well in baking. This choice helps keep the texture light and tasty. You might need to tweak baking time. So, check them closely as they bake.

Adding Flavor Extras

Want to boost the flavor? Consider adding a drop of vanilla extract. You might also like a hint of almond extract. Another option is to mix in some fresh herbs. Mint or basil can add a nice twist. These extras make your bars unique and delightful!

Storage Information

Best Practices for Storing Bars

To keep your raspberry lemonade bars fresh, you should store them in an airtight container. This helps to keep moisture out and flavors locked in. Place a piece of parchment paper between layers to prevent sticking. You can store them at room temperature for a day. If you need to keep them longer, the fridge is a great option.

Freezing Tips

You can also freeze these delightful bars. First, let them cool completely. Then, cut them into squares. Wrap each piece in plastic wrap. Place the wrapped bars in a freezer bag or container. They can last in the freezer for up to three months. When you’re ready to enjoy, just thaw them in the fridge overnight.

Shelf Life and Freshness

When stored properly, these bars can last up to a week in the fridge. They taste best within the first few days, as they stay soft and flavorful. After that, they may lose some freshness but will still be tasty. Always check for any signs of spoilage before serving. Enjoy the burst of raspberry and lemon flavor!

FAQs about Raspberry Lemonade Bars

Can I use frozen raspberries?

Yes, you can use frozen raspberries. Just remember to thaw them first. Thawing helps keep the texture nice. Pat them dry with a paper towel before mixing them in. This stops excess moisture from making the bars soggy. Using frozen berries can be a great option if fresh ones aren’t available.

How do I know when they’re done baking?

To check if your bars are done, look for a few signs. The edges should be lightly golden. The center should look set and not jiggle when you move the pan. You can also insert a toothpick into the center. If it comes out clean or with just a few crumbs, they are ready.

What are the best ways to serve Raspberry Lemonade Bars?

Serving these bars can be fun and creative! Here are some ideas:

Chill them first: They taste great cold from the fridge.

Dust with powdered sugar: This adds a nice touch.

Garnish with fresh raspberries and lemon slices: It makes the plate pop!

Pair with whipped cream or ice cream: This adds creaminess to the tart bars.

For a special twist, add a mint sprig on top. These simple touches can make your Raspberry Lemonade Bars even more delightful!

Raspberry lemonade bars are a tasty treat made from simple ingredients. We covered the best ways to prepare the crust and make the filling, plus tips for baking. You learned how to avoid a soggy crust and served them well. Variations let you mix up the flavors, and proper storage keeps them fresh.

In summary, these bars are fun to make and enjoy any time. Get creative with your ingredients and share with friends. You will impress everyone with your tasty skills!

- 1 cup all-purpose flour - 1/4 cup powdered sugar - 1/2 cup unsalted butter, melted and slightly cooled - 2 large eggs - 1 cup granulated sugar - 1/4 cup freshly squeezed lemon juice (about 2 medium-sized lemons) - 1 teaspoon freshly grated lemon zest - 1 cup fresh raspberries (or if using frozen, ensure they are fully thawed) - 1/2 teaspoon baking powder - A small pinch of salt - Additional powdered sugar for dusting upon serving For the best results, use precise measurements. If you need a gluten-free option, substitute the flour with a gluten-free blend. You can swap the granulated sugar with coconut sugar for a healthier choice. If you cannot find fresh raspberries, use frozen ones but make sure they are fully thawed and drained. Choose high-quality butter for a rich flavor. Fresh lemons should feel heavy for their size, which indicates juiciness. When selecting raspberries, look for firm, plump berries without any mold. Using fresh, ripe ingredients will make your Raspberry Lemonade Bars taste amazing. For the best flavor, always opt for freshly squeezed lemon juice instead of bottled. This small change adds a bright and zesty touch to your bars. To start, preheat your oven to 350°F (175°C). Grab an 8x8 inch baking dish. You can grease it with cooking spray or line it with parchment paper. Make sure the paper hangs over the edges for easy removal. In a medium bowl, sift together 1 cup of all-purpose flour and 1/4 cup of powdered sugar. Then, pour in 1/2 cup of melted butter. Mix it with a fork until it looks crumbly. Press this mixture into the bottom of your dish. Bake the crust for about 15 minutes, or until it turns golden. While the crust is baking, take a large bowl. Whisk together 2 large eggs and 1 cup of granulated sugar until smooth. Next, add in 1/4 cup of freshly squeezed lemon juice, 1 teaspoon of lemon zest, 1/2 teaspoon of baking powder, and a pinch of salt. Mix well. Now, gently fold in 1 cup of fresh raspberries. It’s best to leave some whole for texture. Once your crust is ready, pour the raspberry lemon filling over it. Spread the mixture evenly with a spatula. Bake for another 20 to 25 minutes. You want the filling to set and the edges to be golden. After baking, let the dish cool completely on a wire rack. This step helps the bars firm up nicely. When cool, dust the top with powdered sugar before cutting into squares. Enjoy your delightful treat! For the full recipe, refer to the provided details. To keep your crust crisp, follow these easy steps: - Pre-bake the crust: Bake it for 15 minutes until lightly golden. - Use cold butter: This helps form a flakier crust. - Don’t rush cooling: Let it cool completely in the pan before adding the filling. These steps will help prevent sogginess and give you a delightful base. Serving your raspberry lemonade bars can be fun! Here are some ideas: - Chill before serving: Cold bars taste great on hot days. - Slice into small squares: This makes them easy to grab and enjoy. - Pair with ice cream: A scoop of vanilla ice cream adds a creamy touch. These ideas elevate your serving game and please your guests. Presentation makes a big difference. Here’s how to make your bars shine: - Garnish with fresh raspberries: Place a few on top for color. - Add lemon slices: Thin slices brighten up the plate. - Sprinkle powdered sugar: A dusting adds elegance and sweetness. These tips will impress your friends and family, making every bite a treat. {{image_4}} You can switch raspberries for other fruits. Think strawberries, blueberries, or peaches. Each fruit brings its own taste. For a twist, mix several fruits together. This way, you get a fun blend of flavors. Always use fresh, ripe fruit for the best taste. To make these bars gluten-free, use a gluten-free flour mix. You can find many options in stores. Look for a blend that works well in baking. This choice helps keep the texture light and tasty. You might need to tweak baking time. So, check them closely as they bake. Want to boost the flavor? Consider adding a drop of vanilla extract. You might also like a hint of almond extract. Another option is to mix in some fresh herbs. Mint or basil can add a nice twist. These extras make your bars unique and delightful! To keep your raspberry lemonade bars fresh, you should store them in an airtight container. This helps to keep moisture out and flavors locked in. Place a piece of parchment paper between layers to prevent sticking. You can store them at room temperature for a day. If you need to keep them longer, the fridge is a great option. You can also freeze these delightful bars. First, let them cool completely. Then, cut them into squares. Wrap each piece in plastic wrap. Place the wrapped bars in a freezer bag or container. They can last in the freezer for up to three months. When you're ready to enjoy, just thaw them in the fridge overnight. When stored properly, these bars can last up to a week in the fridge. They taste best within the first few days, as they stay soft and flavorful. After that, they may lose some freshness but will still be tasty. Always check for any signs of spoilage before serving. Enjoy the burst of raspberry and lemon flavor! Yes, you can use frozen raspberries. Just remember to thaw them first. Thawing helps keep the texture nice. Pat them dry with a paper towel before mixing them in. This stops excess moisture from making the bars soggy. Using frozen berries can be a great option if fresh ones aren’t available. To check if your bars are done, look for a few signs. The edges should be lightly golden. The center should look set and not jiggle when you move the pan. You can also insert a toothpick into the center. If it comes out clean or with just a few crumbs, they are ready. Serving these bars can be fun and creative! Here are some ideas: - Chill them first: They taste great cold from the fridge. - Dust with powdered sugar: This adds a nice touch. - Garnish with fresh raspberries and lemon slices: It makes the plate pop! - Pair with whipped cream or ice cream: This adds creaminess to the tart bars. For a special twist, add a mint sprig on top. These simple touches can make your Raspberry Lemonade Bars even more delightful! Raspberry lemonade bars are a tasty treat made from simple ingredients. We covered the best ways to prepare the crust and make the filling, plus tips for baking. You learned how to avoid a soggy crust and served them well. Variations let you mix up the flavors, and proper storage keeps them fresh. In summary, these bars are fun to make and enjoy any time. Get creative with your ingredients and share with friends. You will impress everyone with your tasty skills!

Raspberry Lemonade Bars

Indulge in a refreshing treat with these Zesty Raspberry Lemonade Bars! Perfect for dessert lovers, this easy recipe showcases a crumbly base topped with a tangy lemon-raspberry filling. With just a few simple ingredients, you can whip up a batch that's ideal for summer gatherings or a cozy afternoon snack. Ready to elevate your dessert game? Click to discover the full recipe and make these delicious bars today!

Ingredients
  

1 cup all-purpose flour

1/4 cup powdered sugar

1/2 cup unsalted butter, melted and slightly cooled

2 large eggs

1 cup granulated sugar

1/4 cup freshly squeezed lemon juice (about 2 medium-sized lemons)

1 teaspoon freshly grated lemon zest

1 cup fresh raspberries (or if using frozen, ensure they are fully thawed)

1/2 teaspoon baking powder

A small pinch of salt

Additional powdered sugar for dusting upon serving

Instructions
 

Preheat your oven to 350°F (175°C). To prepare your baking dish, either grease an 8x8 inch square dish with cooking spray or line it with parchment paper, allowing some overhang for easy removal later.

    In a medium mixing bowl, sift together the all-purpose flour and powdered sugar. Pour in the melted butter and mix with a fork or your fingers until a crumbly texture forms.

      Evenly press the flour mixture into the bottom of the prepared baking dish, creating a smooth crust. Bake this crust for approximately 15 minutes, or until it turns lightly golden and is firm to the touch.

        While the crust is baking, in a separate large bowl, whisk together the eggs and granulated sugar until the mixture is smooth and creamy.

          Gradually add the freshly squeezed lemon juice, lemon zest, baking powder, and a small pinch of salt into the egg mixture. Whisk until all ingredients are well combined and the mixture is homogenous.

            Carefully fold in the fresh raspberries with a spatula, taking care not to mash them too much—it's nice to leave some whole for texture and presentation.

              Pour the raspberry-lemon filling over the pre-baked crust, using a spatula to spread it evenly across the surface.

                Return the baking dish to the oven and continue baking for an additional 20 to 25 minutes, or until the filling has set and the edges are lightly golden.

                  Once baked, remove the dish from the oven and allow it to cool completely in the pan on a wire rack. This ensures the bars firm up nicely for cutting.

                    After cooling, dust the top generously with powdered sugar. Cut into squares or rectangles for serving.

                      - Prep Time: 15 mins | Total Time: 50 mins | Servings: 9

                        - Presentation Tips: Serve the finished bars on a decorative plate, garnished with fresh raspberries and thin slices of lemon for a vibrant look. For an extra touch of freshness, add a sprig of mint atop each bar!

                          Leave a Comment

                          Recipe Rating