Are you ready to enjoy a warm bowl of homemade apple crisp? In this guide, I’ll share my favorite recipe for savory apple crisp with an irresistible oat topping. We’ll dive into the essential ingredients you need, easy step-by-step instructions, and clever tips to elevate your dish. Whether you want to add a scoop of ice cream or make it gluten-free, I’ve got you covered. Let’s make dessert delicious together!
Ingredients
Essential Ingredients for Apple Crisp
– Fresh Apples: You need 6 medium apples. I suggest using a mix of Granny Smith and Honeycrisp. Granny Smith brings tartness, while Honeycrisp adds sweetness. This combo makes your apple crisp taste great.
– Sweeteners: Use both brown sugar and granulated sugar. Brown sugar adds a rich flavor, while granulated sugar gives a nice sweetness. The mix keeps the dessert balanced.
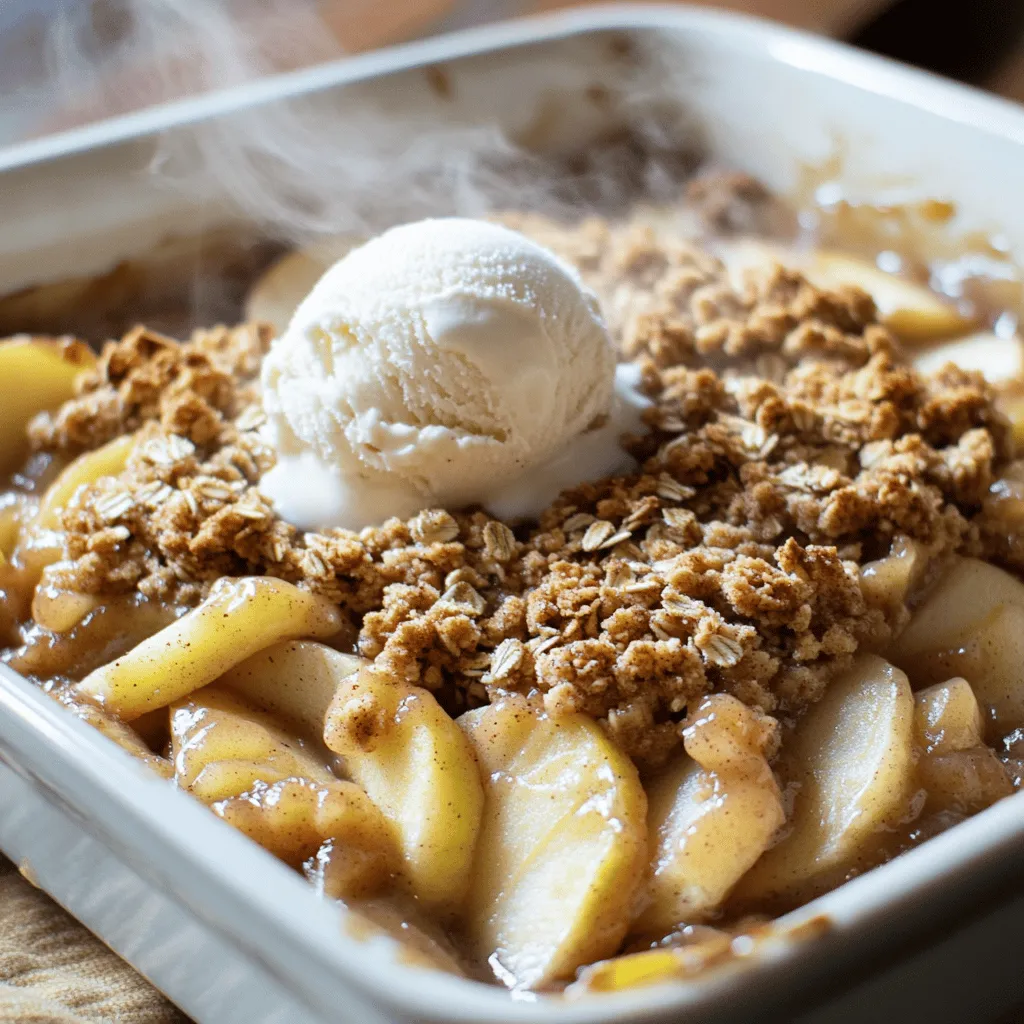
– Oat Topping Components: The oat topping needs rolled oats, all-purpose flour, and butter. Use 1 cup of oats, 3/4 cup of flour, and 1/2 cup of melted butter. This mix gives a crumbly texture and a golden top.
Optional Add-ins
– Nuts: You can add 1/2 cup of chopped walnuts or pecans. These give a nice crunch and extra flavor.
– Spices: Try using cinnamon and nutmeg. A teaspoon of cinnamon and a pinch of nutmeg enhance the apple flavor. You can also play with the amounts to suit your taste.
– Suggested Toppings: Serve your apple crisp with ice cream or whipped cream. A scoop of vanilla ice cream melts beautifully on the warm crisp. Whipped cream adds a light, fluffy touch.
Step-by-Step Instructions
Preparing the Apples
Start by peeling your apples. Use a sharp peeler for easy work. Core the apples and slice them thin. Aim for even slices to ensure they cook well. You can mix different types, like Granny Smith and Honeycrisp, for a great flavor blend. Once sliced, place the apples in a large bowl. Add one tablespoon of fresh lemon juice to keep them bright. Next, sprinkle in one teaspoon of ground cinnamon and a quarter teaspoon of grated nutmeg. Toss the apples gently so they get coated well. This mix adds flavor and helps the apples stay fresh.
Making the Oat Topping
In another bowl, combine the dry ingredients first. You need one cup of rolled oats, three-quarters cup of all-purpose flour, half a cup of packed brown sugar, half a cup of granulated sugar, and a quarter teaspoon of salt. Mix these well with a fork. Then, pour in half a cup of melted unsalted butter. Stir until the mixture forms crumbs. It should look like coarse crumbs. If you like nuts, fold in half a cup of chopped walnuts or pecans for some crunch. This topping adds the perfect texture to your crisp.
Baking Instructions
Before you bake, preheat your oven to 350°F (175°C). Grease a 9×13-inch baking dish lightly with butter or cooking spray. Spread the apple mixture evenly in the dish. Then, sprinkle the oat topping over the apples, making sure they are covered well. Place the dish in the oven and bake for 35 to 40 minutes. Look for a golden-brown topping and bubbling apples. When it’s done, take it out and let it cool for about ten minutes. This lets the flavors come together beautifully.
Tips & Tricks
How to Perfect Your Apple Crisp
Choosing the right baking dish is key. A 9×13-inch dish works well. It allows for even baking and makes serving easy. Make sure to lightly grease the dish to avoid sticking.
To achieve a golden-brown topping, watch the baking time. You want to bake it for 35-40 minutes. Look for a bubbly filling and a nice color on top. If you want a darker crust, you can broil it for a minute, but watch it closely.
Common Mistakes to Avoid
One common mistake is overmixing the oat topping. Mix just until the ingredients combine. You want a crumbly texture, not a paste.
Another mistake is under-spicing the apples. A little cinnamon and nutmeg go a long way. They make the apples taste amazing. Don’t skip this step; it brings out the best in your dessert.
Enhancing Flavor and Texture
To enhance flavor, consider adding a splash of vanilla extract or maple syrup. These add layers of sweetness that pair well with the apples.
If you need a gluten-free option, swap regular flour with almond flour or a gluten-free blend. For a dairy-free version, use coconut oil instead of butter. Both swaps will keep your apple crisp delicious!

Variations
Seasonal Add-Ins
You can make your apple crisp even better by adding some seasonal flavors. Adding cranberries or raisins can give your dish a sweet touch. These fruits pair well with apples and add a nice pop of color. You can also experiment with different fruits like peaches or pears. Each fruit brings its own taste and texture, making your crisp unique.
Creative Flavor Twists
To elevate your apple crisp, consider creative flavor twists. Drizzling your dish with caramel sauce before serving adds a rich sweetness that everyone loves. You can also add citrus zest, like lemon or orange. This brings a fresh taste that brightens the dish. Both options will impress your family and friends.
Dietary Considerations
If you follow a vegan diet, you can still enjoy apple crisp. Use coconut oil or vegan butter instead of regular butter. You can also swap out honey for maple syrup. For those watching sugar intake, try using less sweetener or a sugar substitute. These changes keep the essence of apple crisp while catering to your health needs.
Storage Info
How to Store Leftover Apple Crisp
To keep your apple crisp fresh, place it in the fridge. Use an airtight container to prevent moisture loss. This method keeps the crisp tasty for about three days. If you want to reheat it, use the oven. Preheat your oven to 350°F (175°C). Place the apple crisp in a baking dish and cover it with foil. Heat for about 15 minutes, or until warm. This helps regain some of the original crispiness.
Freezing for Future Enjoyment
If you want to save your apple crisp for later, freezing is a great option. First, let the crisp cool completely. Then, cut it into portions. Wrap each piece in plastic wrap and place them in a freezer-safe bag. Remove as much air as possible to avoid freezer burn. Store it in the freezer for up to three months. When you’re ready to enjoy it, thaw it in the fridge overnight. Reheat as mentioned above for the best results.
Lifespan of Stored Apple Crisp
In the fridge, your apple crisp can last about three days. After that, its taste and texture may change. Look for signs of spoilage. If the topping becomes soggy or the apples start to smell off, it’s time to toss it out. Trust your senses; they are your best guide to food safety.
FAQs
What type of apples are best for apple crisp?
I love using a mix of apples. Granny Smith brings tartness, while Honeycrisp adds sweetness. This blend gives a great flavor balance. Some other good choices include Fuji and Braeburn. These apples hold their shape well during baking. Always choose firm apples for the best texture.
Can I make apple crisp ahead of time?
Yes, you can make apple crisp ahead. Prepare the apple filling and oat topping separately. Store them in the fridge for up to a day. When you’re ready to bake, combine them in your dish. Bake as usual, but add a few extra minutes to the time. This keeps the flavors fresh and tasty.
Why is my apple crisp soggy?
Soggy apple crisp often comes from too much moisture. Ensure you drain excess liquid from the apples before baking. Also, avoid covering the dish tightly while baking. This traps steam and leads to a soggy bottom. You can fix it by adding more oats or flour to absorb moisture.
How to make apple crisp gluten-free?
To make apple crisp gluten-free, replace all-purpose flour with almond flour or gluten-free flour. For oats, use certified gluten-free oats. This keeps the crispy topping while catering to dietary needs. Check labels to avoid hidden gluten in other ingredients. Enjoy your delicious dessert worry-free!
Apple crisp is a simple and fun dessert that everyone loves. We explored essential ingredients like fresh apples, sweeteners, and oat toppings. You learned how to prepare, bake, and avoid common mistakes. We even shared fun variations and tips for storage. With these steps, you can create a warm, tasty dish. Enjoy each bite of your personal apple crisp creation!


