Spicy Garlic Pickled Okra Crunchy and Zesty Treat

If you crave a crunchy, zesty snack, Spicy Garlic Pickled Okra is for you! This easy recipe packs flavor and spice in every bite. With simple ingredients and step-by-step instructions, you’ll learn how to make your own pickled okra at home. Discover tips for keeping your okra crispy, variations to spice it up, and storage secrets. Let’s dive into the world of savory pickles that will impress your taste buds!

Ingredients

Fresh Okra

For this recipe, you’ll need 1 pound of fresh okra. Look for firm, bright green pods. Trim the stems but leave the okra whole. This keeps the texture crunchy and fun to eat.

Essential Spices and Seasonings

To make your pickled okra pop, gather these spices:

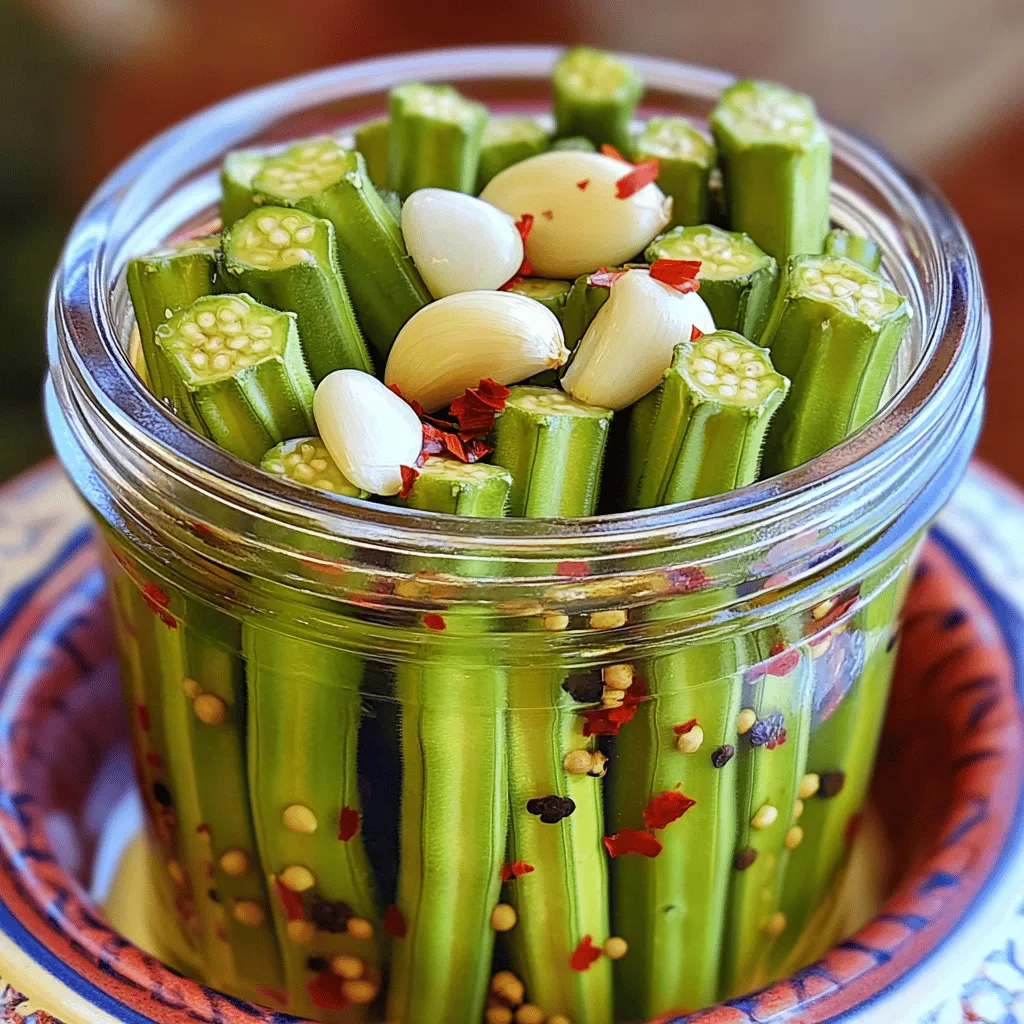
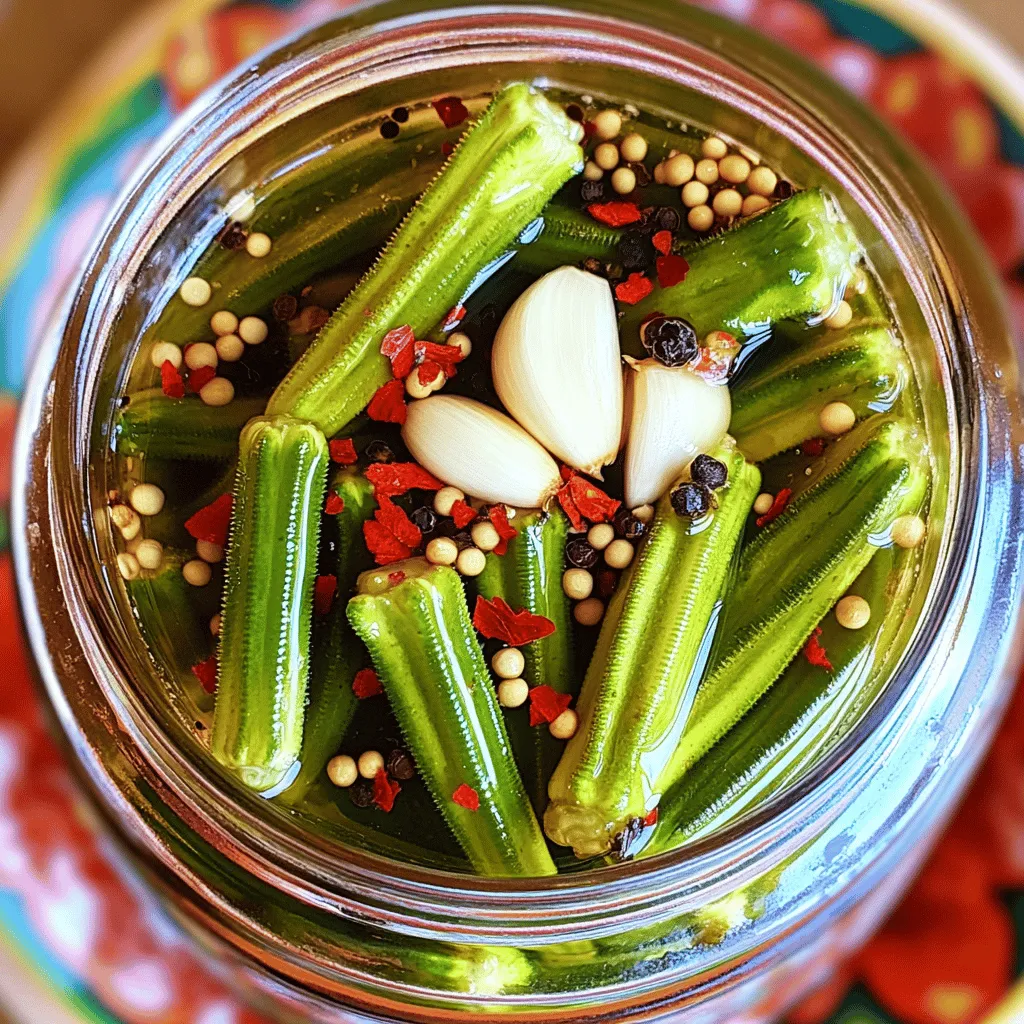
– 4 cloves garlic, smashed

– 1 teaspoon red pepper flakes (you can adjust this based on how spicy you like it)

– 1 tablespoon pickling salt

– 1 teaspoon mustard seeds

– 1 teaspoon whole black peppercorns

These ingredients add layers of flavor to your dish. The garlic gives a strong aroma, while the red pepper flakes add the heat that makes it special.

Brine Components

Now, let’s talk about the brine. It’s key to the pickling process. For this, you will need:

– 1 cup distilled white vinegar

– 1 cup water

– 1 tablespoon granulated sugar

This mix balances tartness and sweetness. The vinegar acts as a preservative, while the sugar rounds out the flavors.

For the full recipe, check out the link above. Happy pickling!

Step-by-Step Instructions

Preparing the Okra

Start by rinsing the fresh okra. Use cold water to wash off any dirt. Next, trim the stems carefully. Keep the okra whole for that nice crunch. This step is key to a great texture.

Making the Brine

In a medium saucepan, mix the distilled white vinegar, water, granulated sugar, and pickling salt. Heat the mix over medium heat. Stir it often until the salt and sugar dissolve completely. Once it boils, take it off the heat and let it cool for about ten minutes. Cooling the brine helps keep that crispy texture we love.

Packing the Jars

Grab your sterilized canning jars. Place the smashed garlic cloves, red pepper flakes, mustard seeds, and black peppercorns in each jar. Then, pack the okra tightly into the jars. Leave about an inch of space at the top for the brine. Carefully pour the cooled brine over the okra until they are fully submerged. If needed, add more vinegar or water to cover them well. Seal the jars with their lids and let them cool on the counter. After cooling, put them in the fridge for at least 24 hours. This waiting time allows the flavors to blend. The pickles will taste even better after a few days.

You can find the full recipe for more details.

Tips & Tricks

Ensuring Crunchy Okra

To keep your okra crunchy, start with fresh, young pods. Look for pods that are bright green and firm. Avoid any that are soft or blemished. When rinsing, do not soak them for long. Trim the ends but leave the okra whole. After cooking the brine, let it cool for about ten minutes. This helps the okra stay crisp. Always pack the okra tightly in jars but don’t squish them. Leave space for the brine to circulate.

Adjusting Spice Levels

You can easily change the spice level of your pickled okra. If you want more heat, add extra red pepper flakes. For less spice, reduce the amount. You can also add sliced jalapeños or other peppers to the jars. Just remember, the flavor gets stronger over time. Taste the brine before pouring it over the okra. This way, you can adjust it to your liking.

Best Practices for Sterilizing Jars

Sterilizing jars is key for safe pickling. Start by washing the jars and lids in hot, soapy water. Rinse well and place them in a pot of boiling water for ten minutes. This kills any germs. Let them air dry on a clean towel. You can also put them in the oven at 225°F for about 15 minutes. Make sure they are hot when you fill them with okra. This keeps your pickles safe and tasty. For the full recipe, check out the Spicy Garlic Pickled Okra section.

Variations

Modifications for Different Heat Levels

You can change the heat of your spicy garlic pickled okra easily. If you want a milder taste, reduce the red pepper flakes to half a teaspoon. You can also use sweet peppers for a gentler kick. For more spice, add sliced jalapeños or even habaneros. Just remember, a little goes a long way. Adjusting heat lets you enjoy this snack just the way you like it!

Adding Extra Flavor with Herbs

Herbs can add depth to your pickled okra. Dill is a classic choice, giving a fresh taste. You can also try thyme or rosemary for a unique flavor twist. Just add a few sprigs to your jars before pouring in the brine. The herbs will infuse as the okra pickles, creating a zesty treat packed with flavor.

Alternative Vegetables to Pickle

While okra shines in this recipe, you can pickle other veggies too! Try cucumbers for a classic crunch or carrots for a sweet bite. Green beans and cauliflower also work well. Just cut them to fit your jars and follow the same brining steps. Each veggie brings its own flavor, making this recipe versatile and fun! For the full recipe, check out the details above.

Storage Info

Recommended Storage Conditions

Store your spicy garlic pickled okra in the refrigerator. Keep it in a cool, dark place. Make sure the jars are sealed tightly to prevent spoilage. Avoid exposing them to direct sunlight.

Shelf Life in the Refrigerator

When stored properly, spicy garlic pickled okra lasts about 2 to 3 months in the fridge. The flavors deepen and get better over time. However, for the best taste, enjoy them within the first month.

Best Practices for Long-Term Storage

For long-term storage, consider canning the okra. Use sterilized jars to keep them fresh. Ensure the brine fully covers the okra. This helps prevent spoilage and keeps them crunchy. Always check for signs of spoilage before eating. If the jar is bulging or leaking, discard it immediately.

FAQs

How long does it take to pickle okra?

It takes about 2 days to pickle okra properly. You need to allow the okra to sit in the brine for at least 24 hours. This time helps the flavors blend well. After that, the taste improves over the next few days.

Can I use frozen okra for this recipe?

I do not recommend using frozen okra. Frozen okra loses its crunch and texture. Fresh okra gives the best results. If you can find fresh, use it for a crispier pickle.

Where can I buy pre-made Spicy Garlic Pickled Okra?

You can find pre-made spicy garlic pickled okra at many grocery stores. Check the international or pickle aisle. Local farmers’ markets may also sell homemade versions. Online shops often offer diverse brands too.

What are the health benefits of pickled okra?

Pickled okra is low in calories and high in fiber. It helps with digestion and keeps you full. It also contains vitamins A, C, and K. The probiotics from fermentation can boost gut health. Enjoying this snack can be a tasty way to eat healthy!

We covered how to pickle okra, from ingredients to storage. Fresh okra, the right spices, and a solid brine work wonders. Remember to pack jars tightly for a good crunch. Play with spices to fit your taste, and try other veggies too. Store them correctly to keep their flavor and crispness. Hopefully, you feel ready to enjoy homemade pickled okra!

For this recipe, you'll need 1 pound of fresh okra. Look for firm, bright green pods. Trim the stems but leave the okra whole. This keeps the texture crunchy and fun to eat. To make your pickled okra pop, gather these spices: - 4 cloves garlic, smashed - 1 teaspoon red pepper flakes (you can adjust this based on how spicy you like it) - 1 tablespoon pickling salt - 1 teaspoon mustard seeds - 1 teaspoon whole black peppercorns These ingredients add layers of flavor to your dish. The garlic gives a strong aroma, while the red pepper flakes add the heat that makes it special. Now, let's talk about the brine. It’s key to the pickling process. For this, you will need: - 1 cup distilled white vinegar - 1 cup water - 1 tablespoon granulated sugar This mix balances tartness and sweetness. The vinegar acts as a preservative, while the sugar rounds out the flavors. For the full recipe, check out the link above. Happy pickling! Start by rinsing the fresh okra. Use cold water to wash off any dirt. Next, trim the stems carefully. Keep the okra whole for that nice crunch. This step is key to a great texture. In a medium saucepan, mix the distilled white vinegar, water, granulated sugar, and pickling salt. Heat the mix over medium heat. Stir it often until the salt and sugar dissolve completely. Once it boils, take it off the heat and let it cool for about ten minutes. Cooling the brine helps keep that crispy texture we love. Grab your sterilized canning jars. Place the smashed garlic cloves, red pepper flakes, mustard seeds, and black peppercorns in each jar. Then, pack the okra tightly into the jars. Leave about an inch of space at the top for the brine. Carefully pour the cooled brine over the okra until they are fully submerged. If needed, add more vinegar or water to cover them well. Seal the jars with their lids and let them cool on the counter. After cooling, put them in the fridge for at least 24 hours. This waiting time allows the flavors to blend. The pickles will taste even better after a few days. You can find the full recipe for more details. To keep your okra crunchy, start with fresh, young pods. Look for pods that are bright green and firm. Avoid any that are soft or blemished. When rinsing, do not soak them for long. Trim the ends but leave the okra whole. After cooking the brine, let it cool for about ten minutes. This helps the okra stay crisp. Always pack the okra tightly in jars but don’t squish them. Leave space for the brine to circulate. You can easily change the spice level of your pickled okra. If you want more heat, add extra red pepper flakes. For less spice, reduce the amount. You can also add sliced jalapeños or other peppers to the jars. Just remember, the flavor gets stronger over time. Taste the brine before pouring it over the okra. This way, you can adjust it to your liking. Sterilizing jars is key for safe pickling. Start by washing the jars and lids in hot, soapy water. Rinse well and place them in a pot of boiling water for ten minutes. This kills any germs. Let them air dry on a clean towel. You can also put them in the oven at 225°F for about 15 minutes. Make sure they are hot when you fill them with okra. This keeps your pickles safe and tasty. For the full recipe, check out the Spicy Garlic Pickled Okra section. {{image_4}} You can change the heat of your spicy garlic pickled okra easily. If you want a milder taste, reduce the red pepper flakes to half a teaspoon. You can also use sweet peppers for a gentler kick. For more spice, add sliced jalapeños or even habaneros. Just remember, a little goes a long way. Adjusting heat lets you enjoy this snack just the way you like it! Herbs can add depth to your pickled okra. Dill is a classic choice, giving a fresh taste. You can also try thyme or rosemary for a unique flavor twist. Just add a few sprigs to your jars before pouring in the brine. The herbs will infuse as the okra pickles, creating a zesty treat packed with flavor. While okra shines in this recipe, you can pickle other veggies too! Try cucumbers for a classic crunch or carrots for a sweet bite. Green beans and cauliflower also work well. Just cut them to fit your jars and follow the same brining steps. Each veggie brings its own flavor, making this recipe versatile and fun! For the full recipe, check out the details above. Store your spicy garlic pickled okra in the refrigerator. Keep it in a cool, dark place. Make sure the jars are sealed tightly to prevent spoilage. Avoid exposing them to direct sunlight. When stored properly, spicy garlic pickled okra lasts about 2 to 3 months in the fridge. The flavors deepen and get better over time. However, for the best taste, enjoy them within the first month. For long-term storage, consider canning the okra. Use sterilized jars to keep them fresh. Ensure the brine fully covers the okra. This helps prevent spoilage and keeps them crunchy. Always check for signs of spoilage before eating. If the jar is bulging or leaking, discard it immediately. It takes about 2 days to pickle okra properly. You need to allow the okra to sit in the brine for at least 24 hours. This time helps the flavors blend well. After that, the taste improves over the next few days. I do not recommend using frozen okra. Frozen okra loses its crunch and texture. Fresh okra gives the best results. If you can find fresh, use it for a crispier pickle. You can find pre-made spicy garlic pickled okra at many grocery stores. Check the international or pickle aisle. Local farmers' markets may also sell homemade versions. Online shops often offer diverse brands too. Pickled okra is low in calories and high in fiber. It helps with digestion and keeps you full. It also contains vitamins A, C, and K. The probiotics from fermentation can boost gut health. Enjoying this snack can be a tasty way to eat healthy! We covered how to pickle okra, from ingredients to storage. Fresh okra, the right spices, and a solid brine work wonders. Remember to pack jars tightly for a good crunch. Play with spices to fit your taste, and try other veggies too. Store them correctly to keep their flavor and crispness. Hopefully, you feel ready to enjoy homemade pickled okra!

Spicy Garlic Pickled Okra

Try this delicious Spicy Garlic Pickled Okra recipe that brings a burst of flavor to your meals! With fresh okra, garlic, and a spicy brine, these pickles are perfect for enjoying on their own or as a zesty addition to your favorite dishes. Learn how to preserve that crunchy texture and elevate your snacking game. Click through to explore the full recipe and get ready to impress your friends and family with this delightful treat!

Ingredients
  

1 pound fresh okra, trimmed

4 cloves garlic, smashed

1 teaspoon red pepper flakes (adjust based on your spice preference)

1 tablespoon pickling salt

1 cup distilled white vinegar

1 cup water

1 tablespoon granulated sugar

1 teaspoon mustard seeds

1 teaspoon whole black peppercorns

Instructions
 

Begin by rinsing the fresh okra under cold running water. Trim the stems as needed, but keep the okra whole to maintain a crispy texture.

    In a medium saucepan, combine the distilled white vinegar, water, granulated sugar, and pickling salt. Heat the mixture over medium heat, stirring occasionally until both the salt and sugar are fully dissolved.

      Once the brine reaches a rolling boil, take it off the heat and allow it to cool for about 10 minutes. This cooling is important to preserve the okra's crunch.

        In sterilized canning jars, evenly distribute the smashed garlic cloves, red pepper flakes, mustard seeds, and black peppercorns across the bottom of each jar.

          Tightly pack the okra into the jars, leaving about an inch of headspace at the top to allow for the brine and expansion.

            Carefully pour the cooled brine over the okra until all the pieces are submerged. If necessary, add equal parts vinegar or water to ensure the okra is fully covered.

              Seal the jars with their lids, allowing them to cool to room temperature on the counter.

                After they’ve cooled, store the jars in the refrigerator for at least 24 hours before indulging. The pickles will continue to enhance in flavor over the next few days, developing a more complex taste.

                  Prep Time: 15 minutes | Total Time: 2 days (including refrigeration) | Servings: 4-6

                    - Presentation Tips: Serve the spicy garlic pickled okra in a vibrant, decorative bowl or arrange them artfully on a charcuterie board to create an inviting feast for the eyes. They make a flavorful snack on their own or a delightful accompaniment to your favorite sandwiches!

                      Leave a Comment

                      Recipe Rating