Skip to content
DisclaimerTerms Of UseGDPR PolicyCookie Policy

yumymoments

  • Home
  • Drinks
  • Appetizers
  • Dinner
  • Dessert
  • About
  • Contact
  • Privacy Policy
DisclaimerTerms Of UseGDPR PolicyCookie Policy

NO-ING-IMG

To make this easy ice cream, you need: - 2 cups heavy whipping cream - 1 cup sweetened condensed milk - 1 teaspoon peppermint extract - 1/4 teaspoon green food coloring (optional) - 1 cup semi-sweet chocolate chips - Pinch of sea salt These ingredients create the perfect base for a creamy, minty treat. The heavy cream gives it a rich texture, while the condensed milk adds sweetness and body. To take your ice cream up a notch, consider adding: - 1/2 cup mini marshmallows These mini marshmallows add a fun chewiness. They make each bite even more enjoyable. The optional food coloring can make your ice cream look festive and fun! You will need some basic kitchen tools: - A large mixing bowl - An electric mixer - A spatula - An airtight container Having the right equipment makes the process smooth. The mixer helps whip the cream perfectly, while the spatula ensures you fold gently without losing air. {{ingredient_image_2}} To start, grab a large mixing bowl. Pour in 2 cups of heavy whipping cream. Use an electric mixer to beat it on high speed. Keep mixing for about 3 to 5 minutes. Watch for stiff peaks to form. This step makes your ice cream light and fluffy. In a separate bowl, combine 1 cup of sweetened condensed milk with 1 teaspoon of peppermint extract. If you want a fun green color, add 1/4 teaspoon of green food coloring. Stir until the mixture is smooth and even. Now, it’s time to combine. Gently fold the whipped cream into the condensed milk mixture. Use a spatula for this. Be careful to keep that airy texture. Fold until just combined, but leave some streaks. This helps keep it light. Next, add 1 cup of semi-sweet chocolate chips. If you like, toss in 1/2 cup of mini marshmallows for extra texture. Fold these into the mixture gently. Ensure they are spread out evenly throughout. Transfer the ice cream mixture into an airtight container. Use a spatula to smooth the top. This makes it look nice and even. Sprinkle a pinch of sea salt on top. This little touch enhances the flavors. To get that creamy, smooth texture, whip the cream well. Mix it until stiff peaks form. This makes the ice cream light and fluffy. When you fold it into the milk mix, do it gently. You want to keep the air in the cream. If you over-mix, your ice cream may turn out dense. You can change the mint flavor to fit your taste. Add more peppermint extract for a stronger mint kick. For a fun twist, try using different extracts like vanilla or almond. You can also play with the color. If you want a brighter green, add a bit more food coloring. Mix in other flavors like coconut or coffee for a unique taste. Make your ice cream look as good as it tastes. Serve it in bowls or cones. Drizzle some chocolate sauce on top for extra sweetness. Sprinkle mini marshmallows or crushed cookies for added texture. You can even add a sprig of fresh mint to make it pop. These little touches make your dessert even more delightful! Pro Tips Chill Your Mixing Bowl: For an even fluffier whipped cream, chill your mixing bowl and beaters in the freezer for about 10-15 minutes before whipping the cream. Use Quality Chocolate: Opt for high-quality semi-sweet chocolate chips to enhance the overall flavor. Good chocolate makes a noticeable difference! Customize Your Mint Flavor: If you prefer a stronger mint flavor, increase the peppermint extract gradually, tasting as you go to avoid overpowering the mix. Let It Sit Before Serving: Allow the ice cream to sit at room temperature for about 5-10 minutes before scooping. This will make it easier to serve and improve the texture. {{image_4}} You can switch up the mint flavor with other fun choices. Try using almond extract for a nutty twist. Lemon or orange zest gives a bright, fresh taste. If you love chocolate, mix in cocoa powder for a richer flavor. You can also use different extracts like coconut or vanilla to change things up. For a dairy-free version, use coconut cream instead of heavy whipping cream. Look for sweetened condensed coconut milk at stores. This option keeps the creamy texture while being dairy-free. You can also add a splash of almond milk for extra moisture. This way, everyone can enjoy this treat! Get creative with your mix-ins! Chopped nuts like pecans or walnuts add a nice crunch. You can also use crushed cookies for added texture. If you love fruit, try adding fresh berries or diced bananas for a fruity twist. Mixing in a swirl of fudge or caramel can take your ice cream to the next level! To keep your Minty Chocolate Dream Delight fresh, use an airtight container. This keeps out air and prevents ice crystals. Make sure to smooth the top of the ice cream before sealing the lid. A sprinkle of sea salt adds flavor and helps with texture. Your no-churn ice cream can last up to two weeks in the freezer. After this time, it may lose flavor and texture. To enjoy the best taste, try to eat it within this time frame. When ready to serve, take the ice cream out of the freezer. Let it sit at room temperature for about 5 to 10 minutes. This makes scooping much easier. Use a warm scoop for a smoother serve. Enjoy your ice cream in bowls or cones for a fun treat! Yes, you can! If you want a different flavor, use vanilla or almond extract. These give a unique twist to the ice cream. Just keep the amount the same, about one teaspoon. You could use coconut cream instead of heavy whipping cream. It adds a nice flavor and works well for a creamy texture. Just chill the coconut cream before whipping for the best results. Check after six hours. The ice cream should feel firm to the touch. If it still feels soft, let it freeze for a few more hours. You can, but it’s not needed. This no-churn recipe is easy and quick. If you do use an ice cream maker, follow the machine’s instructions after mixing the ingredients. To lower the calories, swap heavy cream for light whipped topping. You can also use a sugar-free condensed milk. This keeps the flavor while cutting some calories. Making no-churn mint chocolate chip ice cream is fun and simple. We covered the key ingredients and helpful tools you need. You learned step-by-step how to whip the cream, mix in the base, and blend in yummy add-ins. I shared tips for texture and fun variations like dairy-free options. Remember, store your ice cream right, and it can last for weeks. With this guide, you can easily create a tasty treat that everyone will love. Enjoy your ice cream journey!

No-Churn Mint Chocolate Chip Ice Cream Delight

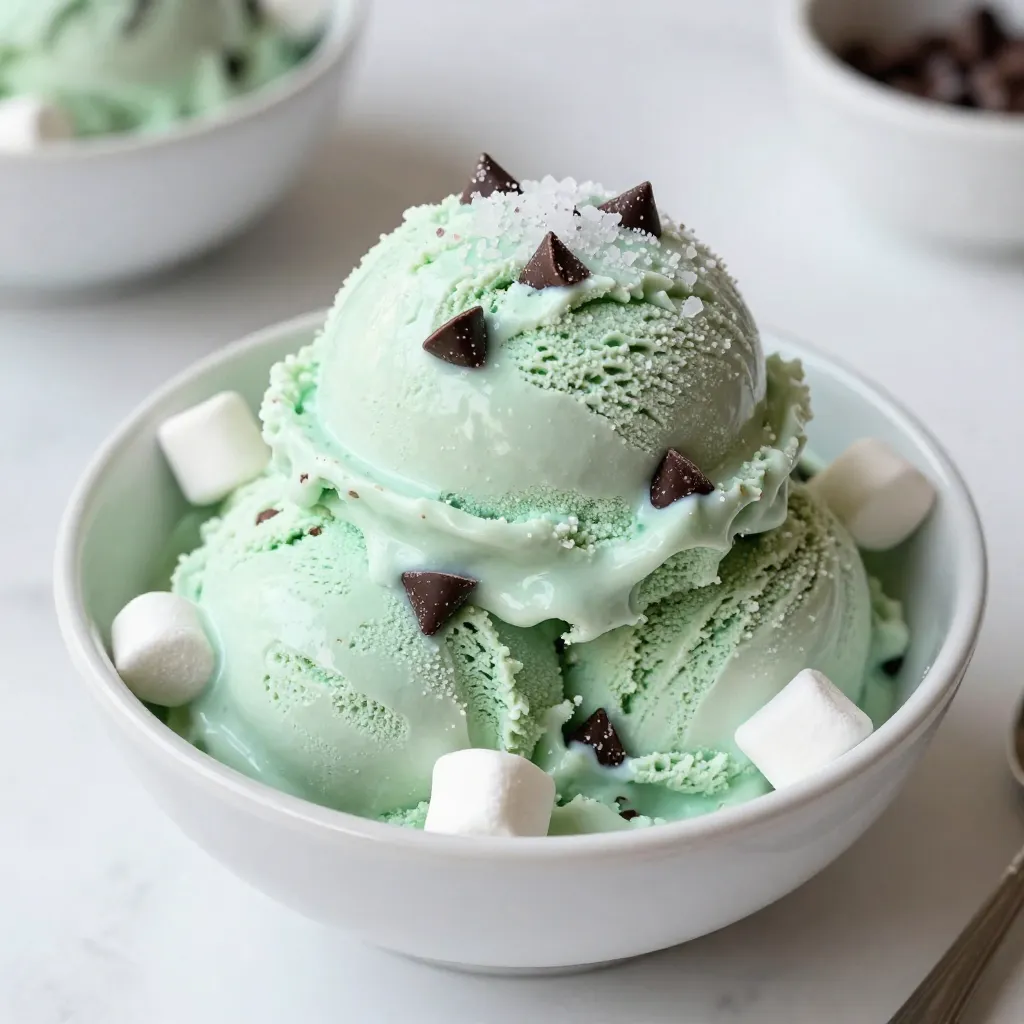
Who doesn’t love the cool crunch of mint chocolate chip ice cream? With my no-churn recipe, making this delightful treat

- 1 cup gluten-free rolled oats - 2 ripe bananas - 2 large eggs - 1/2 cup almond milk The main ingredients form the heart of your pancakes. The gluten-free rolled oats create a lovely texture. Ripe bananas add natural sweetness, making syrup less necessary. Eggs bind everything together, while almond milk gives a nice creaminess. - 1 tablespoon maple syrup - Coconut oil or unsalted butter for cooking You can add maple syrup for extra sweetness. If you prefer, use coconut oil or butter to cook the pancakes. These options enhance flavor and make cooking easier. - 1 teaspoon baking powder - 1/2 teaspoon ground cinnamon - A pinch of salt Baking powder makes your pancakes fluffy. Ground cinnamon adds warmth and flavor. A pinch of salt balances the sweetness. Together, they bring your pancakes to life. {{ingredient_image_2}} Start by blending the gluten-free rolled oats. Place them in a blender or food processor. Pulse until they turn into a fine, flour-like consistency. This oat flour is your pancake base. In a bowl, mix the oat flour with the mashed bananas. Then, add the eggs, almond milk, baking powder, ground cinnamon, and a pinch of salt. If you like, add maple syrup for sweetness. Blend this mixture until it is smooth and pourable. This batter should be thick but easy to pour. Preheat your skillet over medium heat. Add a small amount of coconut oil or butter to coat the skillet. Pour 1/4 cup of batter for each pancake. Cook for about 2-3 minutes. You will see bubbles on the surface when it is time to flip. Carefully turn each pancake using a spatula. Cook for another 2-3 minutes until they are golden brown. Transfer the pancakes to a plate and cover with foil to keep warm. Enjoy the wonderful aroma filling your kitchen! To get fluffy pancakes, let the batter rest for 5 minutes. This step helps thicken the batter. It makes the pancakes rise better when cooked. For cooking, use medium heat. If the skillet is too hot, the pancakes may burn. If it's too cool, they won't cook well. You want golden brown pancakes with a soft inside. For a pretty display, stack the pancakes high on a plate. Drizzle them with maple syrup for extra sweetness. Add fresh banana slices on top and a sprinkle of cinnamon. This makes your pancakes look appealing and taste great! For more color, serve with berries on the side. If you have leftover pancakes, store them in an airtight container. Keep them in the fridge for up to three days. You can also freeze them for up to a month. To reheat, use a microwave or a toaster. For the best texture, use a skillet on low heat. This keeps them warm and fluffy! Pro Tips Use Ripe Bananas: The riper the bananas, the sweeter your pancakes will be. Look for bananas with plenty of brown spots for maximum flavor! Experiment with Milk: While almond milk works great, feel free to use coconut milk or oat milk for a different flavor profile that complements the bananas. Adjust Thickness: If your batter is too thick, add a splash more milk. If it's too thin, add a bit more oat flour until you reach the desired consistency. Keep Pancakes Warm: If making multiple pancakes, keep them warm in an oven set to low heat (around 200°F/95°C) while you finish cooking the rest. {{image_4}} You can make these pancakes even more fun with flavor additions. Mix in chocolate chips for a sweet treat. Chopped nuts add crunch and healthy fats. You could also add a splash of vanilla extract to enhance the taste. These small changes make each pancake unique and exciting. If you need dairy-free options, switch out almond milk for oat or soy milk. Both work well and keep the pancakes moist. For a vegan twist, replace the eggs. You can use flaxseed meal mixed with water as a great egg substitute. This way, everyone can enjoy these tasty pancakes! Want to explore global flavors? Try adding spices like cardamom or nutmeg for an international flair. You could top the pancakes with yogurt and honey for a Middle Eastern touch. Consider serving them with fresh fruit syrup inspired by tropical countries. These ideas bring a world of flavors to your breakfast table! Oats are a great source of fiber. Fiber helps keep your heart healthy. It can lower cholesterol levels. This means oats can help reduce the risk of heart disease. They are naturally gluten-free. This makes them safe for people with gluten sensitivities. You can enjoy oats without worry. They also provide energy and keep you full longer. Bananas are packed with potassium. Potassium is vital for muscle function. It helps keep your heart strong. Eating bananas gives you a quick energy boost. They are also naturally sweet. This makes them a great choice for healthy eating. You can enjoy their taste without added sugars. Each serving of these pancakes has about 150 calories. This is lower than traditional pancakes. Regular pancakes can have over 300 calories. By using oats and bananas, you cut down on calories. You still get a tasty and filling meal. Enjoy these pancakes without the guilt! Using regular oats can pose a cross-contamination risk. Regular oats may contain gluten from processing. If you have gluten intolerance or celiac disease, stick to certified gluten-free oats. This ensures your pancakes stay safe and delicious. To make these pancakes vegan, replace the eggs with flax eggs. Mix one tablespoon of ground flaxseed with three tablespoons of water. Let it sit for five minutes to thicken. For milk, use almond milk or any plant-based milk. This way, you keep the taste and texture while making them vegan. If you lack almond milk, try oat milk or soy milk. Both options work well in pancakes. You can also use rice milk or coconut milk for a different flavor. Each alternative keeps your pancakes moist and tasty. To prevent sticking, heat your skillet over medium heat. Use a non-stick skillet for best results. Add a small amount of coconut oil or unsalted butter to coat the surface. Make sure the oil is hot before pouring in the batter. This helps create a lovely golden crust. To make gluten-free pancakes, you need simple, tasty ingredients. We discussed main items like oats and bananas. You learned step-by-step how to turn these into fluffy pancakes. Remember to let the batter rest for perfect texture. Don't forget the fun variations to suit your taste. These pancakes offer great nutrition with fiber and potassium, making them a healthy choice. Enjoy these pancakes for breakfast or any time. They're easy to make, healthy, and great for everyone. Try them out and share your own twists!

Gluten-Free Banana Oat Pancakes Delightful and Easy

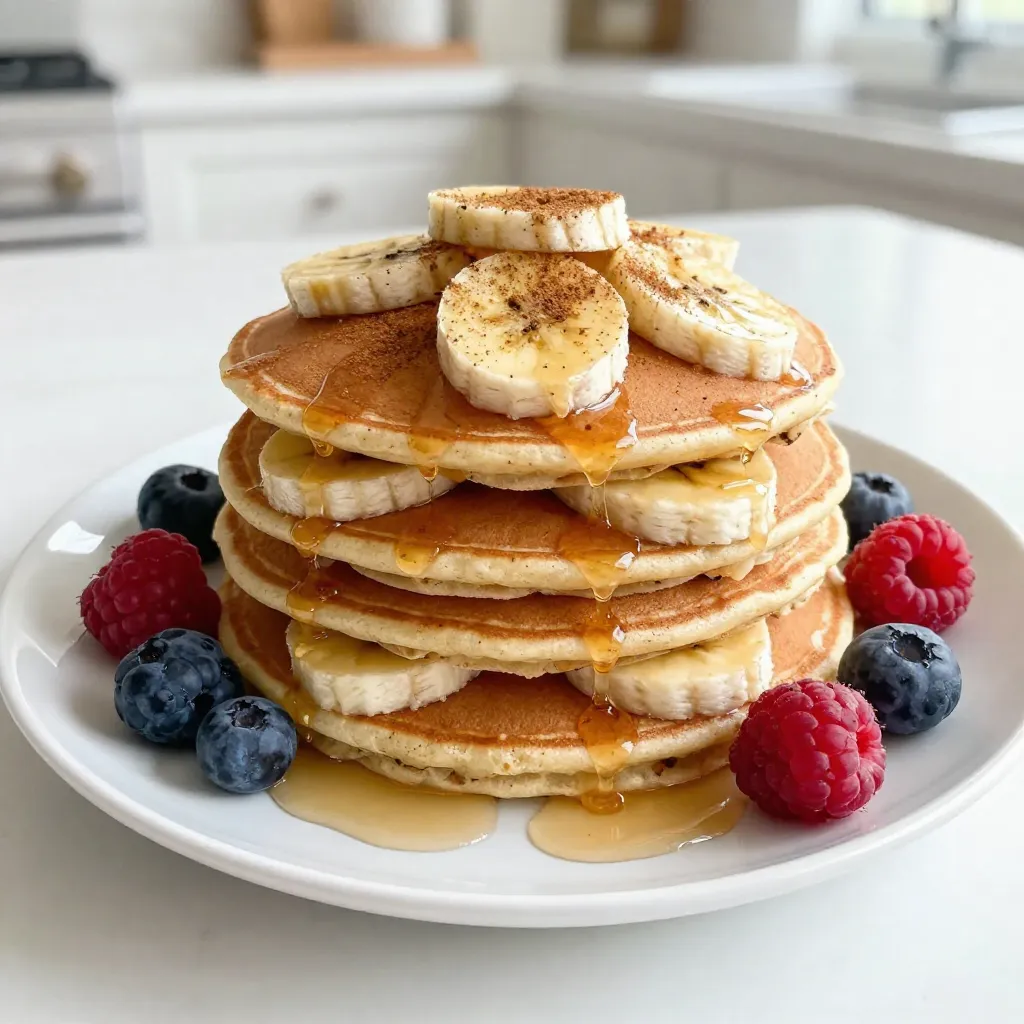
Are you ready to flip your breakfast routine upside down? These Gluten-Free Banana Oat Pancakes are easy to make and

To make fluffy Japanese pancakes, you need a few key items: - 1 cup all-purpose flour - 2 tablespoons granulated sugar - ½ teaspoon baking powder - ¼ teaspoon baking soda - ½ cup milk (warmed to body temperature) - 2 large eggs, separated into yolks and whites - 1 teaspoon vanilla extract - A pinch of fine salt - Unsalted butter (for greasing the pan) These ingredients work together to create the light and airy texture of these pancakes. Sifting the flour and other dry ingredients helps them mix well. You can enhance your pancakes with some delicious toppings: - Powdered sugar - Fresh seasonal fruits - Warm maple syrup These toppings add sweetness and color to your pancakes. They make each bite more enjoyable. To prepare fluffy Japanese pancakes, gather these kitchen tools: - Mixing bowls - Electric mixer or whisk - Non-stick skillet or frying pan Using the right equipment makes cooking easier. A non-stick skillet helps the pancakes cook evenly without sticking. {{ingredient_image_2}} Start by sifting the dry ingredients. Use a fine mesh sieve to sift the all-purpose flour, granulated sugar, baking powder, and baking soda together. Sifting helps to aerate the flour and mix the leavening agents. This step is crucial for light pancakes. Set the bowl aside when done. Now, combine the egg yolks, warmed milk, vanilla extract, and a pinch of fine salt. Use a whisk to blend these ingredients until smooth. This mixture adds richness and flavor to the pancakes. Next, make the batter. Gradually pour the wet mixture into the dry ingredients. Use a spatula or wooden spoon to stir gently. You want to mix until it's just combined. It’s okay if there are lumps. Overmixing can make pancakes dense. Whipping the egg whites is key for fluffiness. Use a clean mixing bowl and an electric mixer or whisk. Beat the egg whites until they form stiff peaks. This means you should be able to hold the bowl upside down without them falling out. Now, fold the whipped egg whites into the batter. Do this in three parts. Use a spatula and gently fold. This keeps the batter light and airy. Be careful not to deflate the egg whites. Prepare your cooking surface. Heat a non-stick skillet over low heat. Lightly grease it with unsalted butter. For the pancakes, scoop the batter using a large spoon or measuring cup. You can use ring molds for round shapes. Cover the skillet with a lid to trap steam. Cook for about 4-5 minutes until bubbles form on the surface. Once cooked, stack the pancakes on a serving plate. Dust the top with powdered sugar for a nice finish. Serve warm with fresh seasonal fruits and a drizzle of warm maple syrup. This adds a lovely touch to your breakfast. Enjoy the fluffy goodness! Whipped egg whites are key to fluffy Japanese pancakes. When you beat the egg whites, they trap air. This air helps the pancakes rise and become light. It is vital to whip them until they form stiff peaks. This means the whites stand up and hold their shape. Adjust your cooking technique too. Use low heat and cover the skillet while cooking. This creates steam, which helps the pancakes puff up. The steam cooks the pancakes gently and evenly. One common mistake is overmixing the batter. When you mix too much, the pancakes can become dense. Stir just until the wet and dry ingredients blend. It’s okay if the batter is a bit lumpy. Another issue is skillet temperature. If the pan is too hot, the pancakes will burn outside and stay raw inside. Use low heat to ensure even cooking and a nice golden color. For the best shape, consider using ring molds. These keep the pancakes round and uniform. You can find them in different sizes, so choose what you like best. Serve the pancakes warm for the best taste. They taste best right off the skillet. Add a dusting of powdered sugar and some fresh fruits. A drizzle of warm maple syrup makes them even more delightful! Pro Tips Use Fresh Ingredients: Ensure your baking powder and baking soda are fresh for maximum fluffiness. Expired leavening agents won't provide the necessary rise. Control the Heat: Cook the pancakes on low heat to allow them to rise properly without burning. Patience is key for achieving that perfect fluffiness! Whip the Egg Whites Properly: Make sure your mixing bowl is clean and dry when whipping egg whites. This will help them reach their full volume and create airy pancakes. Experiment with Toppings: Don't be afraid to add unique toppings like matcha powder, chocolate chips, or whipped cream for a twist on the classic Japanese pancake experience. {{image_4}} You can change the taste of your pancakes by adding matcha or cocoa powder. For matcha, mix in one to two teaspoons into the dry ingredients. This gives your pancakes a lovely green color and a unique flavor. For cocoa, use two tablespoons of unsweetened cocoa powder. It adds a rich, chocolatey taste that pairs well with maple syrup. If you need gluten-free options, use a gluten-free flour blend. Many are available in stores and work well in this recipe. Make sure to check that it contains xanthan gum, which helps with texture. For vegan pancakes, swap the eggs with flaxseed meal. Just mix one tablespoon of flaxseed with three tablespoons of water. Let it sit for a few minutes until it thickens, then add it to the wet ingredients. Toppings can make your pancakes even more fun. You can use whipped cream to add a creamy touch. Try making flavored whipped cream by folding in a splash of vanilla or a drizzle of honey. Seasonal fruits are another great choice. Berries, bananas, and peaches work well. You can mix them for a colorful fruit topping that tastes great with syrup. To keep your fluffy pancakes fresh, store them in the fridge. Place them in an airtight container. This keeps moisture out and prevents drying. Use parchment paper between layers if stacking. This way, they won’t stick together. Make sure to eat them within two days for best taste. If you want to freeze the pancakes, let them cool completely first. Once cool, stack them with parchment paper in between. Place the stack in a freezer-safe bag or container. Seal tightly to avoid freezer burn. When you're ready to enjoy them, reheat in the microwave or toaster. They taste great warmed up! Fluffy Japanese pancakes are best when fresh. In the fridge, they last about two days. If frozen, they can stay good for up to two months. Just remember, the sooner you eat them, the better they will taste! Japanese pancakes stand out due to their light and airy texture. They use whipped egg whites, which create a fluffy rise. Unlike regular pancakes, which can be flat, these pancakes are thick and soft. The cooking method also differs. Japanese pancakes often steam while cooking. This steam helps them puff up and become extra fluffy. You can prep some components ahead. Mix the dry ingredients and store them in a sealed bag. You can also separate the eggs and keep the yolks and whites in the fridge. However, for the best fluffiness, whip the egg whites right before cooking. This keeps them light and airy. You can add a twist to your pancakes. Try mixing in matcha powder for a green tea flavor. Cocoa powder adds a rich chocolate taste. You can also fold in fruit, like blueberries or bananas. These flavors make your pancakes unique and fun. To boost fluffiness, whip the egg whites until they form stiff peaks. This is key! Be gentle when folding them into the batter. Avoid overmixing; a few lumps are okay. Cooking on low heat with a lid helps create steam, which makes them rise even more. You now have a clear guide to making fluffy Japanese pancakes. We covered key ingredients, equipment, and step-by-step methods. Tips also help you avoid common mistakes and achieve the perfect texture. Remember to experiment with flavors and toppings to make it your own. Storing your pancakes properly can extend their life too. Enjoy creating this delightful dish, and share it with family and friends for a tasty treat!

Fluffy Japanese Pancakes Irresistible Breakfast Treat

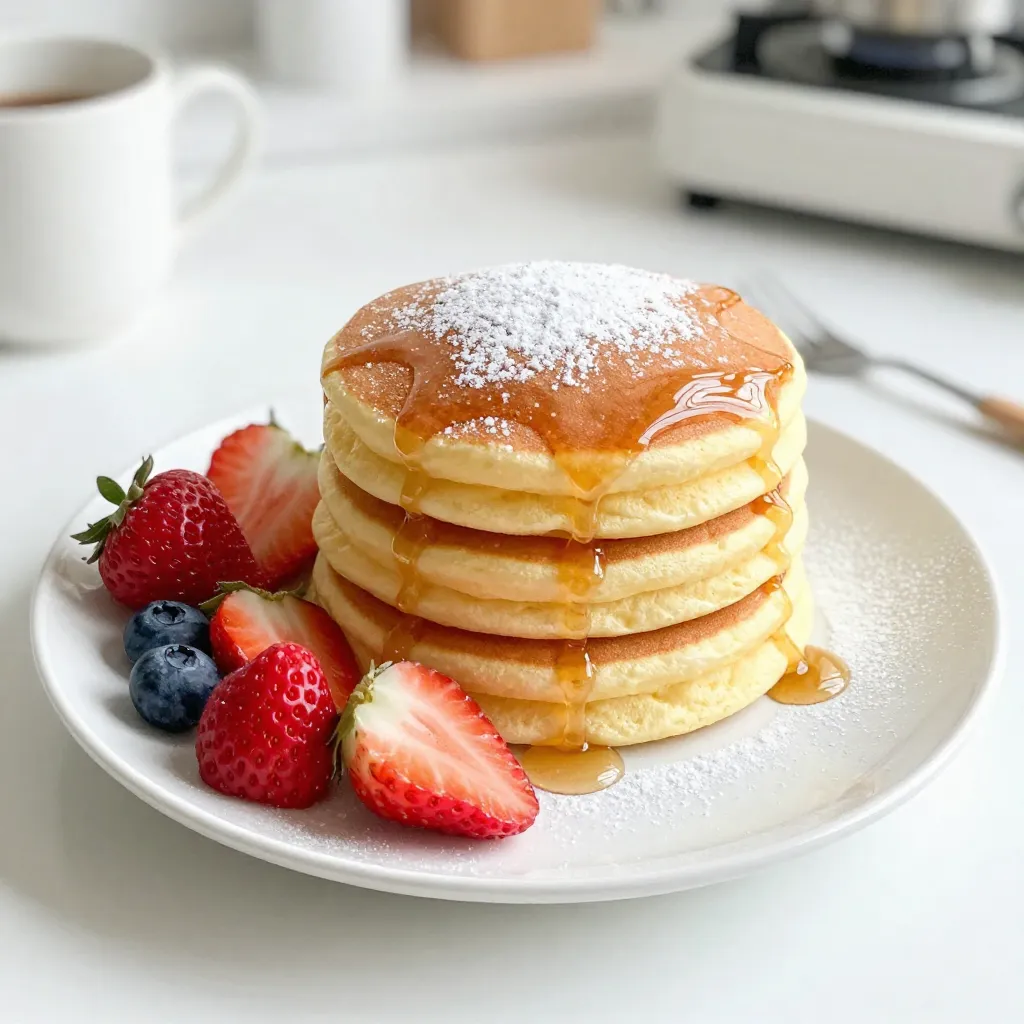
If you crave a breakfast that feels like a warm hug, fluffy Japanese pancakes are your answer. These delightful treats

- 1 cup all-purpose flour - 1/2 teaspoon baking soda - 1/4 teaspoon salt - 1/2 cup unsalted butter, softened to room temperature - 1/2 cup packed brown sugar - 1/4 cup granulated sugar - 1 large egg - 1 teaspoon pure vanilla extract - 1/2 cup semi-sweet chocolate chips - 1/2 cup mini marshmallows - 1/2 cup graham cracker crumbs To make the s'mores cookie skillet, you need simple ingredients. First, you need flour to give the cookie structure. Baking soda and salt help the cookie rise and add flavor. Softened butter is key for creaminess. Brown sugar adds moisture and a rich taste, while granulated sugar sweetens it up. You also need one large egg, which binds everything together. Pure vanilla extract brings a lovely aroma. For a sweet twist, the chocolate chips and mini marshmallows add that classic s'mores flavor. Lastly, graham cracker crumbs give that crunchy texture and remind you of campfire nights. Gather these items before you start baking. Having them ready makes the process smooth and fun. Plus, it builds excitement for this tasty treat! {{ingredient_image_2}} 1. Preheat the oven: Start by setting your oven to 350°F (175°C). This is key for baking the cookie just right. 2. Combine dry ingredients: In a medium bowl, whisk together 1 cup of all-purpose flour, 1/2 teaspoon of baking soda, and 1/4 teaspoon of salt. This mix helps the cookie rise evenly. 1. Creaming the butter and sugars: In a large bowl, mix 1/2 cup of softened unsalted butter, 1/2 cup of packed brown sugar, and 1/4 cup of granulated sugar. Use a mixer on medium speed for 2-3 minutes until it’s light and fluffy. 2. Incorporating egg and vanilla: Next, add in 1 large egg and 1 teaspoon of pure vanilla extract. Mix until everything is smooth and well combined. 1. Mixing wet and dry ingredients: Gradually add the flour mixture to the butter mix. Stir gently until just combined. Don’t mix too much, or the cookie may get tough. 2. Folding in chocolate chips and marshmallows: Now, fold in 1/2 cup of semi-sweet chocolate chips, 1/2 cup of mini marshmallows, and 1/2 cup of graham cracker crumbs. Use a spatula for even distribution. 3. Preparing the skillet: Lightly grease a 10-inch cast-iron skillet with cooking spray or butter. Spoon the cookie dough into the skillet and spread it evenly. 4. Adding extra toppings: For an extra treat, sprinkle more chocolate chips and marshmallows on top before baking. 1. Recommended baking time: Place the skillet in your preheated oven and bake for 20-25 minutes. The edges should be golden brown. 2. Checking for doneness: The center should remain soft and slightly gooey. Keep an eye on it to avoid overcooking. To get the best texture, avoid overmixing your dough. When you mix the wet and dry ingredients, stop as soon as you see no flour. This keeps your cookies soft and chewy. Also, pay attention to temperatures. Use room temperature butter for easy mixing. Cold butter leads to a dense cookie. Make sure your egg is at room temperature too. This helps the batter blend well. Serve your s'mores cookie skillet warm right from the oven. The gooey chocolate and melted marshmallows are best when hot. Pair it with graham crackers for dipping. You can also add toppings like extra mini marshmallows or chocolate chips as you serve. These add a fun twist to each bite. For a beautiful presentation, top your warm skillet with whipped cream. A drizzle of chocolate sauce adds richness. Use garnishes like crushed graham crackers or extra chocolate chips. These make the dish look even more tempting. Serve in the skillet for a rustic and cozy feel. Pro Tips Use Room Temperature Ingredients: Ensure your butter and egg are at room temperature for easier mixing and a better texture in your cookie dough. Don’t Overbake: Keep an eye on the skillet while baking; the center should remain soft and gooey, as it will continue to cook slightly after being removed from the oven. Experiment with Flavors: Feel free to swap out chocolate chips or add nuts for a different twist on the classic s'mores flavor. Serve Warm: For the best experience, serve the skillet warm straight from the oven, allowing everyone to dig in and enjoy the melty marshmallows and chocolate. {{image_4}} You can switch up the sweeteners for a healthier option. Use honey or maple syrup instead of brown sugar. For a dairy-free treat, use coconut oil or a dairy-free butter in place of unsalted butter. This keeps the rich flavor while making it suitable for those with dairy allergies. To change the flavor, add peanut butter or nuts to the dough. They add a nice crunch and depth. For a fruity twist, toss in some diced strawberries or banana slices. This brightens the dish and adds a fun surprise. You can make themed versions for holidays. Try adding peppermint extract and crushed candy canes for a festive spin. In summer, mix in fresh berries for a lighter taste. Using seasonal ingredients gives your s'mores cookie skillet a new life and keeps it exciting. To keep your S'mores Cookie Skillet fresh, let it cool first. Once cooled, cover it tightly with plastic wrap or foil. Store it in the fridge for up to three days. If you want to save it longer, place it in an airtight container. This way, it can last for about a month in the freezer. Just remember to thaw it in the fridge before reheating. You can reheat your cookie skillet in two ways: microwave or oven. If using the microwave, heat it for about 20-30 seconds. Check to see if it's warm enough. If not, heat it in 10-second bursts. For the oven, preheat it to 350°F (175°C). Place the skillet inside for about 10 minutes. This will give it a nice, warm texture. For the best taste, serve your S'mores Cookie Skillet warm. This makes the chocolate and marshmallows melt just right. If it feels a bit dry, add a scoop of ice cream on top. You can also drizzle some chocolate sauce for a fun twist. Enjoy diving back into this tasty treat! It takes about 20 to 25 minutes to bake. The edges should be golden brown. The center will stay soft and gooey. Keep an eye on it in the last few minutes. This way, you avoid overcooking it. Yes, you can make the dough ahead of time. This allows the flavors to blend well. Just wrap the dough tightly in plastic wrap. Store it in the fridge for up to 2 days. When ready to bake, let it sit at room temperature for 15 minutes. Then, bake as normal. Serve the skillet warm right from the oven. This keeps the cookie gooey and soft. Pair it with extra graham crackers for dipping. For a fun touch, add a dollop of whipped cream. A drizzle of chocolate sauce adds even more delight. You can make this recipe gluten-free by using gluten-free flour. For a vegan option, swap the butter with a plant-based alternative. Replace the egg with a flaxseed egg. This will keep the cookie delicious while meeting dietary needs. This blog post covered everything you need to know for a tasty s’mores cookie skillet. I shared the key ingredients and step-by-step instructions to help you bake it. Tips and tricks were also included to perfect your dish, from texture to presentation. Lastly, I discussed variations and storage options to keep it fresh. Enjoy your baking! Remember, s’mores cookie skillets are versatile and fun. Keep experimenting with flavors and enjoy making them with friends or family.

S’mores Cookie Skillet Irresistible Dessert Delight

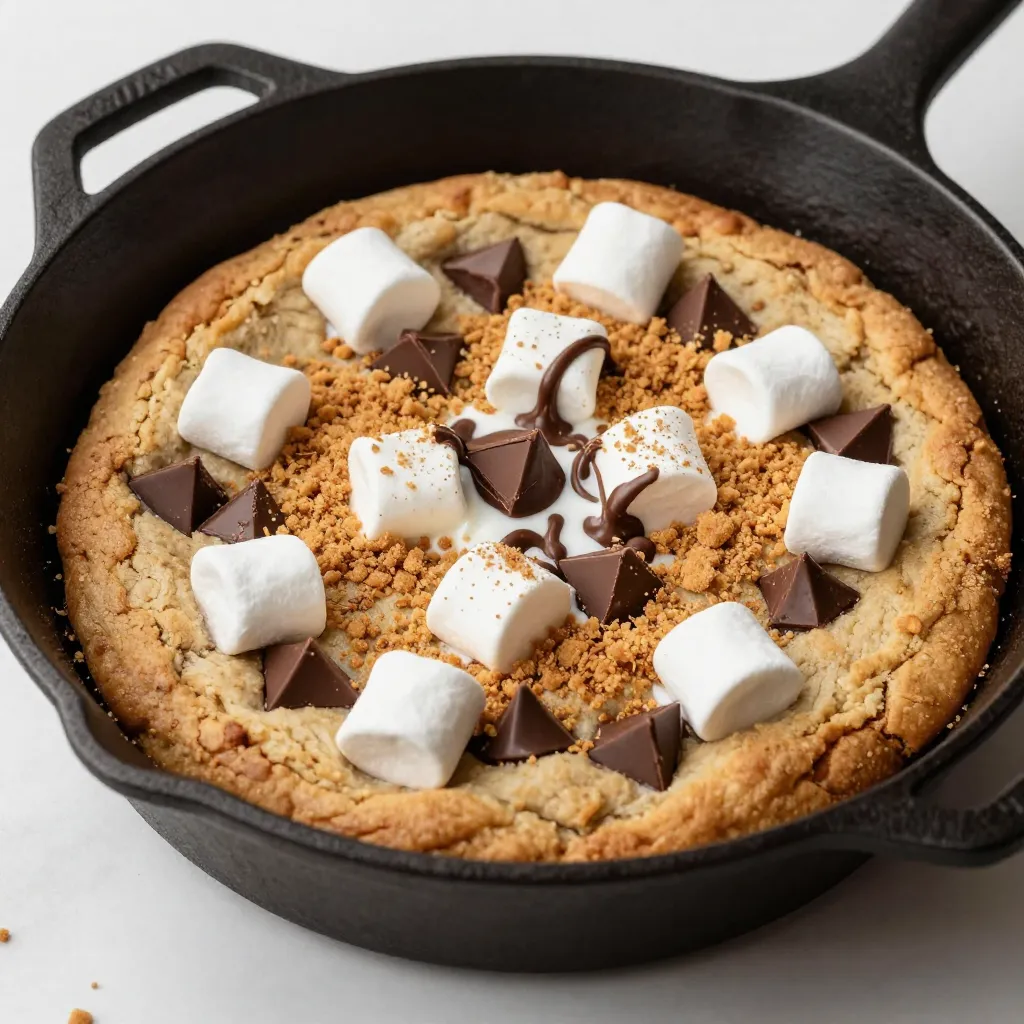
Get ready to indulge in a dessert that brings campfire joy straight to your kitchen! This S’mores Cookie Skillet combines

To make a delicious Keto Zucchini Lasagna, you need fresh and simple ingredients. Here’s the list: - 3 medium zucchinis, sliced lengthwise into thin strips - 1 pound ground beef or ground turkey - 1 cup creamy ricotta cheese - 1 cup shredded mozzarella cheese, divided - 1 cup marinara sauce (sugar-free) - 1 large egg - 1 teaspoon Italian seasoning - 1 teaspoon garlic powder - 1 teaspoon onion powder - Sea salt and freshly ground black pepper to taste - Fresh basil leaves for garnish Each ingredient plays a key role in flavor and texture. The zucchini replaces traditional pasta, making this dish low-carb. The ground beef or turkey adds protein, while the ricotta and mozzarella provide creamy richness. Using sugar-free marinara keeps it Keto-friendly, and fresh basil gives a lovely finish. When choosing zucchinis, pick firm ones for the best flavor. For the meat, both beef and turkey work well, but turkey gives a lighter taste. Always select high-quality cheeses for the best melty texture. If you want to get creative, you can even add your favorite spices or herbs to personalize the taste. {{ingredient_image_2}} - Preheat oven to 375°F (190°C). - Slice three medium zucchinis lengthwise into thin strips. - Sprinkle the strips with sea salt. - Place zucchini in a colander for 20 minutes. - This step draws out excess moisture. - After 20 minutes, pat dry with paper towels. - In a large skillet, add one pound of ground beef or turkey. - Cook over medium heat, breaking it apart with a spatula. - Brown the meat for 7-10 minutes until cooked through. - If there is excess fat, drain it from the skillet. - Stir in one cup of sugar-free marinara sauce. - Add one teaspoon each of garlic powder, onion powder, and Italian seasoning. - Season with sea salt and black pepper. - Mix well and let it simmer for 5 minutes. - In a separate bowl, combine one cup of ricotta cheese with one large egg. - Season the mixture with salt and pepper. - Mix until smooth and creamy. - Grease a 9x13 inch baking dish with olive oil. - Spread a thin layer of meat sauce on the bottom. - Layer half of the zucchini strips over the sauce. - Add half of the ricotta mixture on top. - Sprinkle a layer of half a cup of shredded mozzarella cheese. - Repeat the layering: more meat sauce, remaining zucchini, ricotta, and finish with mozzarella. - Cover the baking dish tightly with aluminum foil. - Bake in the preheated oven for 25 minutes. - After 25 minutes, remove the foil. - Bake for an additional 15 minutes until cheese is bubbly and golden. - Once baked, remove lasagna from the oven. - Let it cool for about 10 minutes before slicing. - Garnish with fresh basil leaves before serving. To keep your Keto Zucchini Lasagna low in carbs, focus on your ingredients. Use low-carb alternatives like zucchini instead of pasta. This swap makes a huge difference. Always choose sugar-free marinara sauce. Regular marinara has added sugars that can kick you out of ketosis. Moisture can ruin your lasagna. Start by salting the zucchini strips. Sprinkle sea salt and let them sit in a colander for about 20 minutes. This draws out excess moisture. After that, use paper towels to pat them dry. This step is key for a perfect texture. Cheese brings flavor and creaminess to your dish. You can use different types of cheese. Try blending mozzarella with provolone or gouda for a unique taste. If you're dairy-free, there are options for ricotta made from nuts or tofu. These swaps keep the dish creamy while aligning with your dietary needs. Pro Tips Salt the Zucchini: Salting the zucchini strips before baking helps to draw out excess moisture, preventing your lasagna from becoming watery. Use Fresh Herbs: Adding fresh basil or oregano in addition to the dried herbs can enhance the flavor of your lasagna significantly. Let it Rest: After baking, let the lasagna sit for about 10 minutes before slicing. This allows the layers to set, making it easier to serve. Experiment with Cheeses: Feel free to mix different cheeses like provolone or parmesan with mozzarella for a richer flavor profile. {{image_4}} You can easily make a vegetarian version of Keto Zucchini Lasagna. Start by swapping the meat for your favorite veggies. Try mushrooms, bell peppers, or spinach for a colorful mix. Use about 1 pound of mixed vegetables. When you cook them, sauté until soft. This brings out their sweet flavors. For cheese, choose plant-based options. There are great dairy-free ricotta and mozzarella cheeses now. These work well to create a creamy texture. Just make sure they melt nicely. You can add some nutritional yeast for a cheesy flavor without dairy. Want some heat? A spicy version can add a fun twist! Start by adding hot sauce or diced jalapeños to the meat mix. This gives a nice kick. Adjust the amount based on your spice level. Also, consider adding more seasonings. Try chili powder or crushed red pepper flakes. These spices blend well with the Italian herbs. Just remember to taste as you go. You can always add more heat, but it’s hard to take it away! Meal prepping makes life easier. You can prepare your lasagna in advance. Simply follow the same steps and assemble it in a baking dish. Cover it tightly with foil, then store it in the fridge for up to 2 days. If you want to freeze it, let it cool first. Then cover it well with plastic wrap and foil. It can last in the freezer for about 2 months. When you’re ready to eat, thaw it overnight in the fridge. Reheat in the oven until hot all the way through. This keeps the flavors fresh and delicious! To keep your Keto Zucchini Lasagna fresh, place it in the fridge. Use airtight containers to prevent moisture loss. Let the lasagna cool before sealing it. This helps keep the flavors intact. It should last about 3 to 5 days in the fridge. When it's time to enjoy leftovers, you have a few options. Use the oven for a crispier finish. Preheat it to 350°F (175°C), cover the dish with foil, and heat for about 20 minutes. You can also use the microwave for quick reheating. Place a slice of lasagna on a microwave-safe plate and cover it with a damp paper towel. Heat for 1 to 2 minutes. To keep the lasagna moist, add a splash of marinara sauce before reheating. If you want to store your lasagna for longer, freezing is a great option. Slice it into serving portions. Wrap each slice tightly in plastic wrap and place them in a freezer-safe bag. This method keeps the lasagna fresh for up to 3 months. When you're ready to eat, take it out of the freezer and thaw it in the fridge overnight. Avoid thawing at room temperature. After thawing, reheat using one of the methods mentioned earlier. To make Keto Zucchini Lasagna, follow these steps: 1. Preheat your oven to 375°F (190°C). 2. Slice the zucchinis lengthwise into thin strips. Salt them and let them sit for 20 minutes to draw out moisture. 3. Cook the ground beef or turkey in a skillet until browned. Drain excess fat. 4. Add marinara sauce and seasonings. Simmer for five minutes. 5. Mix ricotta cheese with one egg and season it. 6. In a greased baking dish, layer meat sauce, zucchini, ricotta, and mozzarella. Repeat layers. 7. Cover with foil and bake for 25 minutes. Remove foil and bake for another 15 minutes. 8. Cool for 10 minutes before serving. Yes, you can use other vegetables as noodles. Consider these options: - Eggplant: Slice thinly and bake similarly. - Spaghetti squash: Roast and shred it for a unique texture. - Bell peppers: Cut into strips for a crunchy layer. - Butternut squash: Thinly slice and layer for a sweet twist. Each option has its own taste and texture. Experiment to find what you love! Yes, Keto Zucchini Lasagna is gluten-free. The recipe uses zucchinis as noodles. All other ingredients, like meat, cheese, and marinara, are naturally gluten-free. Always check labels for hidden gluten in sauces or seasonings. Keto Zucchini Lasagna stays fresh for up to five days in the fridge. Store it in an airtight container to keep it moist. Reheat individual portions in the microwave or oven. Yes, you can prepare Keto Zucchini Lasagna ahead of time. Follow these tips: - Assemble the lasagna but do not bake it. - Cover it tightly with foil and store it in the fridge for up to 24 hours. - When ready to bake, preheat the oven and bake as directed, adding a few extra minutes if cold. This method saves time and keeps dinner stress-free! This blog post covered how to make a delicious Keto Zucchini Lasagna. You learned about the main ingredients, step-by-step instructions, and clever tips. With zucchini, meat, and cheese, you can create a tasty dish that fits your diet. Remember, you can customize it for different flavors or make it vegetarian. Store leftovers properly, and enjoy them later. I hope you feel inspired to try this recipe. It’s easy and fun! Dive in and make your kitchen smell amazing with this healthy lasagna!

Keto Zucchini Lasagna Flavorful Low-Carb Delight

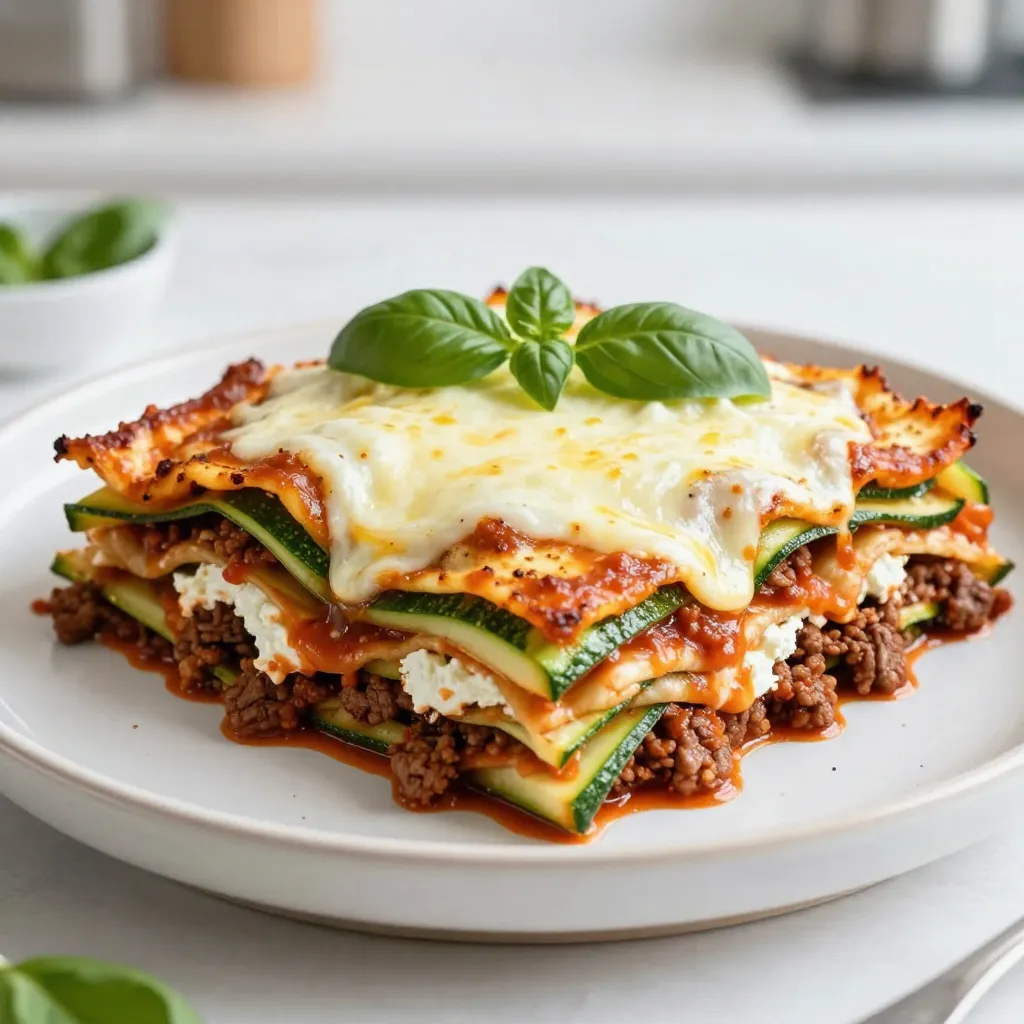
Are you craving a hearty dish without the carbs? Then, Keto Zucchini Lasagna is the answer! This low-carb delight layers

To make a tasty Cheesy Broccoli Cheddar Casserole, gather these items: - 4 cups broccoli florets (fresh or frozen) - 1 cup cooked rice (white or brown) - 2 cups shredded cheddar cheese (divided) - 1 cup milk (whole or 2%) - 1 cup sour cream - 1/2 cup mayonnaise - 1 teaspoon garlic powder - 1 teaspoon onion powder - 1/2 teaspoon freshly ground black pepper - 1/2 teaspoon salt (adjust to taste) - 1 cup crushed buttery crackers (like Ritz) - 2 tablespoons unsalted butter (melted) You can swap some of these ingredients for others. Here are a few ideas: - Use Greek yogurt instead of sour cream for a lighter option. - Try cream cheese in place of mayonnaise for a richer flavor. - If you want a dairy-free version, use plant-based cheese and milk. - Brown rice or quinoa can replace white rice for added texture and health. This casserole is tasty and has some good nutrition. Each serving (about 1/6 of the dish) has: - Calories: 380 - Protein: 14g - Carbohydrates: 30g - Fat: 24g - Fiber: 2g Keep in mind that these numbers can change based on your substitutions. Enjoying this dish can give you a good balance of flavors and nutrients! {{ingredient_image_2}} Start by heating your oven to 350°F (175°C). This gets it ready for baking. Next, bring a large pot of water to a boil. Add the broccoli florets carefully and blanch them for 2-3 minutes. They should look bright green and feel slightly tender. Drain the broccoli well and set it aside to cool. In a big mixing bowl, combine the cooked rice, 1 1/2 cups of cheddar cheese, milk, sour cream, mayonnaise, garlic powder, onion powder, black pepper, and salt. Mix everything until it is smooth. Now, gently fold the cooled broccoli into this mixture. Make sure the florets spread out nicely. Grease a 9x13 inch baking dish using cooking spray or butter. Pour the broccoli and cheese mix into the dish. Use a spatula to spread it evenly. In a small bowl, mix the crushed buttery crackers with melted butter. Coat the crackers well and sprinkle this topping over the casserole. Finally, add the last 1/2 cup of cheddar cheese on top. Place the casserole in the preheated oven. Bake it for 25-30 minutes. You’ll know it’s done when the edges bubble and the top turns a nice golden brown. To check if the casserole is ready, look for the bubbling edges. You can also insert a knife into the center. If it comes out hot, the casserole is done. Let it rest for about 5 minutes before serving. This helps the flavors blend. Enjoy your cheesy and tasty broccoli cheddar casserole! You can easily change the flavor of your casserole. Try adding different cheeses, like mozzarella or pepper jack. These will give your dish a new twist. You can also add spices or herbs. A pinch of cayenne pepper can add heat. Fresh herbs like thyme or basil can brighten the taste. Mix and match to find your favorite combo! To make your casserole extra creamy, use full-fat dairy. Whole milk and sour cream work best. You can even add cream cheese for a richer texture. Stir well to combine all creamy ingredients. This helps to create a smooth mixture. Don't skimp on the cheese! The more cheese, the creamier it gets. Avoid overcooking the broccoli. Blanch it just until bright green. This helps keep some crunch. If you skip the step of mixing well, the flavors may not blend. Make sure to coat the broccoli and rice mixture evenly. Lastly, don’t forget to let your casserole rest after baking. This helps the flavors settle and makes serving easier. Pro Tips Blanching Broccoli: Blanching the broccoli briefly before adding it to the casserole helps to preserve its bright color and crisp-tender texture. Don’t over-blanch; just a couple of minutes is enough! Cheese Variations: Feel free to mix and match different types of cheese! A combination of sharp cheddar and Monterey Jack or Gruyère can elevate the flavor profile of the casserole. Make Ahead: This casserole can be prepared in advance! Assemble it and refrigerate overnight. Just add an extra 5-10 minutes to the baking time if baking straight from the fridge. Garnishing: For an extra touch of flavor and color, consider garnishing the casserole with a sprinkle of breadcrumbs or a drizzle of hot sauce before serving. {{image_4}} You can make this dish heartier by adding protein. Cooked chicken, turkey, or ham work well. Just chop them up and mix them in with the other ingredients. You can also add some cooked bacon for a smoky flavor. If you like seafood, shrimp or crab can add a nice twist. Just be sure to adjust the baking time if you add a lot of extra ingredients. For a gluten-free version, swap the buttery crackers for gluten-free ones. You can use crushed gluten-free cornflakes or crumbs made from gluten-free bread. Also, check that your mayonnaise and any other sauces are labeled gluten-free. This way, you keep the same great taste without the gluten. To make this dish vegetarian, simply skip any meat additions. For a vegan option, use plant-based cheese and sour cream. Almond or soy milk can replace regular milk. You can also add in other veggies like bell peppers or spinach for extra flavor. Just ensure you use vegan mayonnaise for the best results. To keep your cheesy broccoli cheddar casserole fresh, let it cool first. Once cooled, place it in an airtight container. This keeps moisture in and air out. Store it in the fridge for up to three days. Make sure to cover it well to avoid drying out. If you have a lot, consider dividing it into smaller portions. This way, you can enjoy it whenever you want. When you're ready to enjoy leftovers, preheat your oven to 350°F (175°C). Place the casserole in an oven-safe dish. Cover it with foil to keep it moist. Heat for about 20-25 minutes, or until it is warm throughout. You can also microwave individual portions. Just heat for 1-2 minutes, checking often to avoid overcooking. If you want to save the casserole for a longer time, freezing is a great option. First, let it cool completely. Then, wrap it tightly in plastic wrap and foil. This prevents freezer burn. Label it with the date so you can keep track. It can stay in the freezer for about 2-3 months. When you're ready to eat it, thaw it overnight in the fridge. Then, reheat it as described above. Enjoy that cheesy goodness anytime! Yes, you can use frozen broccoli. It saves time and works well. Just add it directly to the cheese and rice mix. Tip: Make sure to thaw and drain it first. This helps avoid extra water in your dish. To add spice, try these options: - Mix in some diced jalapeños or green chilies. - Add a dash of hot sauce to the cheese mix. - Use pepper jack cheese instead of cheddar. These options give your casserole a nice kick without overpowering the cheese flavor. This casserole pairs well with many dishes. Here are some ideas: - A light side salad with vinaigrette. - Grilled chicken or baked fish for protein. - Garlic bread for a cozy touch. These sides balance the richness of the casserole and make your meal complete. This blog post covered everything you need for a delicious Cheesy Broccoli Cheddar Casserole. You learned about the key ingredients, how to prep and bake, and tips for that creamy texture. We explored variations, including gluten-free and vegan options. Proper storage and reheating tips make enjoying leftovers easy. In the end, these simple steps help you create a dish that's both tasty and adaptable. Happy cooking!

Cheesy Broccoli Cheddar Casserole Simple and Tasty

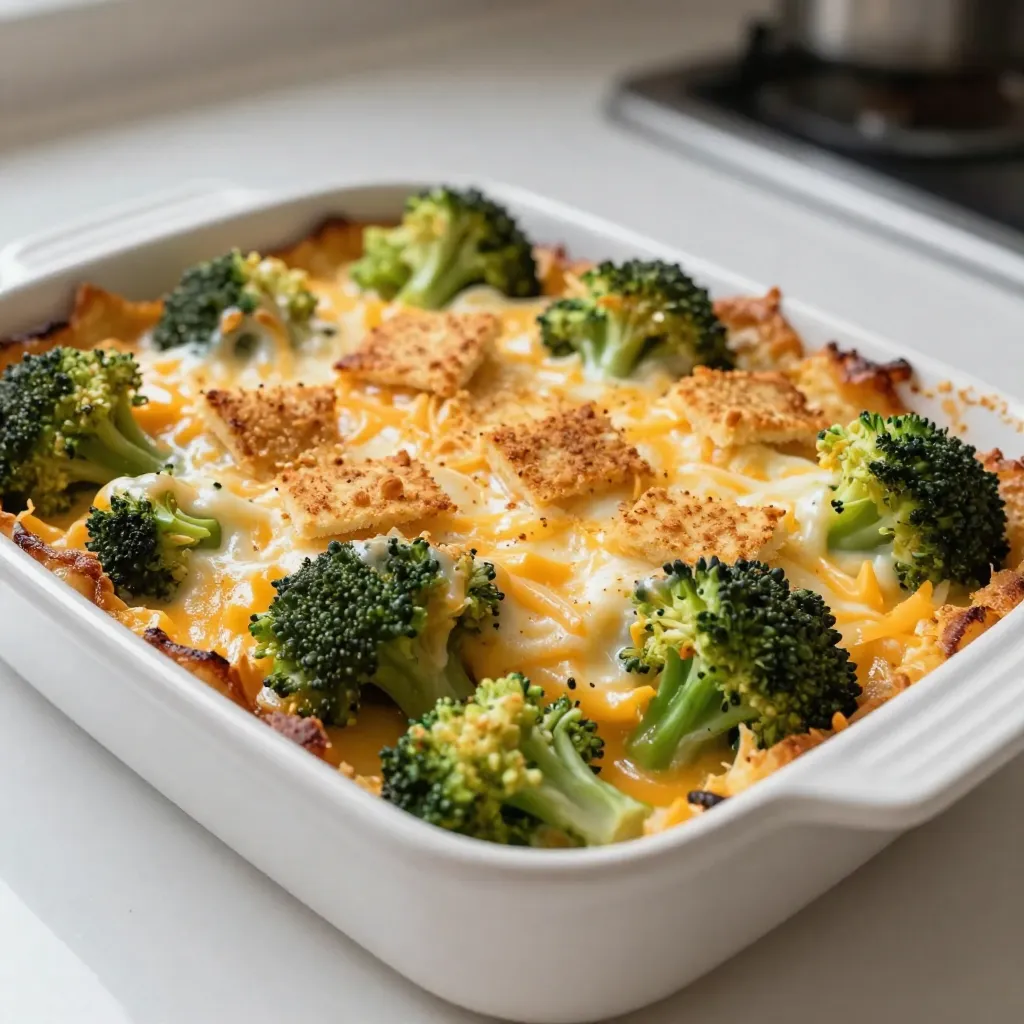
If you’re craving comfort food that’s both simple and delicious, you’ll love my Cheesy Broccoli Cheddar Casserole. It’s cheesy, creamy,

- 2 cups cooked chicken, shredded - 1 can (15 oz) white beans, drained and rinsed - 1 cup corn kernels (fresh, canned, or frozen) - 1 medium onion, diced - 2 cloves garlic, minced - 1 can (4 oz) diced green chilies - 1 teaspoon ground cumin - 1 teaspoon dried oregano - 1/2 teaspoon smoked paprika - 2 cups chicken broth - 1 cup heavy cream (or substitute with coconut milk for a lighter option) - 1 cup shredded Monterey Jack cheese - Salt and black pepper to taste - Fresh cilantro, chopped (for garnish) - Lime wedges (for serving) To make the best creamy white chicken chili, start with fresh, quality ingredients. The chicken provides protein, while the beans offer fiber. Corn adds sweetness, and the spices bring warmth. The heavy cream or coconut milk creates a rich texture. Using Monterey Jack cheese gives a nice melt and flavor. The cilantro and lime add freshness when serving. Gather these items before starting to cook. This helps you stay organized and focused. {{ingredient_image_2}} Sautéing the Onion and Garlic Start by heating about 1 tablespoon of olive oil in a large pot over medium heat. Add the diced onion and cook for 4-5 minutes. You want the onion to be soft and clear. Then, add the minced garlic and cook for another 1-2 minutes. Stir it often, but don’t let it brown. Combining Ingredients in the Pot Now it's time to add the main ingredients. Add the shredded chicken, drained white beans, corn, and diced green chilies to the pot. Then, sprinkle in the ground cumin, oregano, smoked paprika, and pour in the chicken broth. Stir everything together well so that each ingredient mixes into the pot. Simmering for Flavor Development Raise the heat to medium-high and let the mixture gently simmer. Once it bubbles, lower the heat to low. Leave it uncovered and let it simmer for about 15 minutes. This time helps all the flavors blend and become rich. Adding Cream and Cheese After simmering, it’s time for the creamy part. Stir in the heavy cream or coconut milk, along with the shredded Monterey Jack cheese. Mix it until the cheese melts and the chili becomes creamy. Adjusting Seasoning Always taste your chili. Add salt and black pepper to your liking. This step is key to making the dish perfect for you. Cooking to Perfect Consistency Let the chili cook for another 5 minutes on low heat. Stir it often to prevent sticking. Once it’s rich, creamy, and smooth, take it off the heat. How to Avoid Lumpy Chili To keep your chili smooth, mix the cream in slowly. Stir it well as you add it. This helps the cream blend without lumps. If you see lumps, use an immersion blender. It makes the chili creamy and smooth. Best Practices for Shredding Chicken For easy shredding, use warm chicken. Let it cool slightly, then pull it apart with two forks. You can also use your hands if they are clean. Shred in small pieces for the best texture in your chili. Adjusting Thickness of Chili If your chili is too thick, add more chicken broth. Stir well to combine. For a thicker chili, simmer it longer without a lid. This helps the liquid reduce and the flavors concentrate. Adding Spices for Extra Heat Want some heat? Add a pinch of cayenne pepper or red chili flakes. You can also stir in some diced jalapeños. Start with a little, then taste and add more if needed. This way, you can control the spice level. Suggested Garnishes Top your chili with fresh cilantro for a burst of flavor. You can also add a sprinkle of shredded cheese. Squeeze fresh lime juice on top for a tangy finish. These garnishes make the dish look great and enhance the taste. Serving Suggestions Serve your chili in warm bowls for the best experience. Add extra cheese and cilantro on top. Pair it with warm tortillas or crusty bread. This makes a comforting meal that everyone will love. Pro Tips Use Rotisserie Chicken: For an even quicker meal, use store-bought rotisserie chicken. It adds flavor and saves prep time! Adjust the Spice Level: If you prefer a spicier chili, add more diced green chilies or a pinch of cayenne pepper to taste. Make it Ahead: This chili tastes even better the next day! Make a batch in advance and store it in the refrigerator for quick meals. Garnish Creatively: Enhance your presentation by adding toppings like avocado slices, jalapeños, or sour cream along with cilantro. {{image_4}} Slow Cooker Recipe Adaptation You can make this creamy white chicken chili in a slow cooker. First, add all the ingredients except the cream and cheese into the slow cooker. Set it to low for 6-8 hours or high for 3-4 hours. About 30 minutes before serving, stir in the heavy cream and cheese. This method allows the flavors to blend nicely over time. Instant Pot Recipe Adaptation Using an Instant Pot makes cooking faster. Start by using the sauté function. Cook the onion and garlic until soft. Then add the rest of the ingredients, except for the cream and cheese. Seal the lid and cook on high pressure for 10 minutes. Quick release the pressure and stir in the cream and cheese before serving. Gluten-Free Alternatives This chili is naturally gluten-free. Always check your broth and any canned ingredients to ensure they are gluten-free. You can use cornstarch to thicken if needed. Vegan Version Suggestions To make a vegan version, replace the chicken with chickpeas or tofu. Use vegetable broth instead of chicken broth. Swap the cream for coconut milk and skip the cheese. You will still enjoy a rich and creamy chili that is plant-based! - Refrigeration Guidelines: Store any leftover creamy white chicken chili in an airtight container. This keeps it fresh for up to four days in the fridge. Make sure it cools to room temperature before sealing it. - Freezing Instructions: If you want to keep it longer, freeze the chili. Use freezer-safe containers or bags. It can stay good for about three months. When freezing, leave some space at the top for expansion. - Best Methods for Reheating: For best results, reheat your chili on the stove over medium heat. Stir often to heat evenly. You can also use the microwave. Heat in short bursts, stirring between each one. - How to Keep Chili Creamy When Reheating: To keep the creamy texture, add a splash of chicken broth or cream while reheating. Mix well to avoid separation. This helps maintain its rich flavor and smooth consistency. Yes, you can use canned chicken. Just drain it well. Canned chicken saves time and works great. However, using fresh cooked chicken gives more flavor and texture. If you choose canned, look for low-sodium options for a healthier choice. You can use coconut milk for a lighter option. It adds a nice flavor and keeps the chili creamy. Other substitutes include half-and-half or Greek yogurt. If using yogurt, add it at the end to avoid curdling. It lasts about 3 to 4 days in the fridge. Store it in an airtight container to keep it fresh. Always check for signs of spoilage before eating. If it smells off or looks strange, it’s best to discard it. Yes, you can freeze it! Cool the chili completely before freezing. Use freezer-safe bags or containers. It can last up to 3 months in the freezer. To reheat, thaw it overnight in the fridge first for best results. In this post, I shared a simple recipe for Creamy White Chicken Chili. We covered the key ingredients, cooking steps, and helpful tips to enhance flavor. I also presented variations for different diets and storage tips for leftovers. This dish is versatile and perfect for any meal. Don’t shy away from trying new flavors or methods. Enjoy this chili hot and fresh, or save it for later. Happy cooking!

Creamy White Chicken Chili Hearty and Comforting Meal

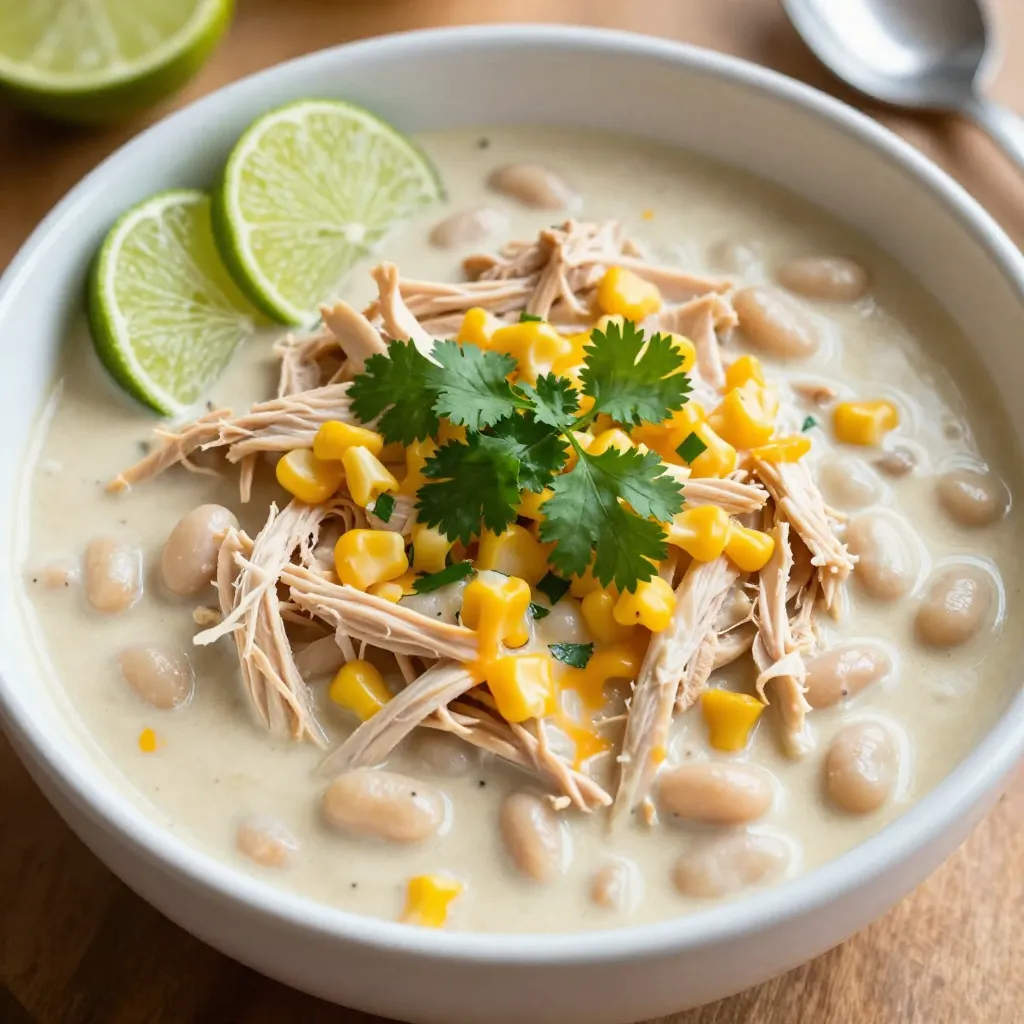
Welcome to your new favorite comfort meal: Creamy White Chicken Chili! This dish is packed with tender chicken, creamy goodness,

- 8 oz cream cheese, softened to room temperature - 1/2 cup powdered sugar - 1 teaspoon pure vanilla extract - 1 cup sour cream - 1 cup caramel sauce (plus extra for drizzling) - 1 fresh apple (preferably Granny Smith or Honeycrisp), diced into small pieces - 1/2 teaspoon ground cinnamon - 1/4 cup chopped nuts (such as walnuts or pecans) - Graham crackers or pretzel sticks for serving You need simple yet tasty ingredients for this dip. The cream cheese gives a rich, creamy base. Powdered sugar adds sweetness without grittiness. Vanilla extract boosts flavor. Sour cream makes it smooth and tangy. Caramel sauce adds that sweet, gooey goodness. Use a fresh apple for crunch and freshness. Optional ingredients can elevate your dip. Ground cinnamon adds warmth and spice. Chopped nuts give a nice crunch and flavor contrast. Serve with graham crackers or pretzel sticks for the perfect dipping experience. These ingredients will help you create a delightful and easy treat that everyone will love. {{ingredient_image_2}} 1. Start with 8 oz of softened cream cheese. Place it in a large bowl. 2. Use an electric mixer on medium speed to beat the cream cheese until it is smooth. 3. Gradually add 1/2 cup of powdered sugar and 1 teaspoon of pure vanilla extract. 4. Mix well until there are no lumps left. The texture should be creamy and fluffy. 1. Carefully fold in 1 cup of sour cream using a spatula. Mix until the dip is smooth and creamy. 2. Next, add 1 diced fresh apple, 1/2 teaspoon of ground cinnamon, and 1/4 cup of chopped nuts. 3. Make sure to mix gently. This helps to distribute the apples, cinnamon, and nuts evenly. 1. Transfer the dip mixture into a serving dish. Use a spatula to smooth the top. 2. Create a small well in the center for the caramel sauce. 3. Generously drizzle 1 cup of caramel sauce over the top. Let it flow into the well. 4. For a pretty touch, sprinkle some chopped nuts and a little ground cinnamon on top. 5. Serve right away with graham crackers or pretzel sticks. Enjoy the sweet and creamy dip! To get the right creaminess, start with softened cream cheese. Beat it well in a bowl until it’s smooth. Mixing in powdered sugar helps sweeten and lighten the dip. Add sour cream next. This gives the dip a nice tangy taste and rich texture. When it comes to balancing sweetness with apples, choose tart apples like Granny Smith. Their tartness cuts through the sweet caramel and creaminess. Dice the apples small so they mix well with the dip. This way, every bite has a bit of apple. For creative serving ideas, use a pretty dish to showcase the dip. You can even create a well in the center and fill it with extra caramel sauce. This makes it look inviting and tasty. Enhance flavor with toppings. Sprinkle chopped nuts and a dash of cinnamon on top for crunch and spice. You can also drizzle more caramel over the dip for a sweet finishing touch. Serve with graham crackers or pretzel sticks for fun, crunchy dippers. Pro Tips Use Room Temperature Ingredients: Allow your cream cheese and sour cream to come to room temperature before mixing. This helps achieve a smoother and creamier dip. Choose the Right Apples: For a balanced flavor, opt for tart apples like Granny Smith or Honeycrisp, which complement the sweetness of the caramel and cheesecake. Customize Your Toppings: Feel free to add your favorite toppings such as chocolate chips, crushed toffee, or seasonal spices for a unique twist on the flavor profile. Chill Before Serving: For the best texture and flavor, let the dip chill in the refrigerator for at least 30 minutes before serving to allow the flavors to meld. {{image_4}} You can switch up the flavor of your caramel apple cheesecake dip in fun ways. First, try using different types of apples. Granny Smith apples add a nice tartness. Honeycrisp apples bring a sweet crunch. You can even mix apples for a unique taste. Another option is to add chocolate or butterscotch. Drizzle melted chocolate over the top for a rich twist. Butterscotch sauce can also blend well with apples and caramel. Both options add a new layer of flavor and sweetness. If you want to make a nut-free version, it's easy! You can replace nuts with seeds. Sunflower seeds or pumpkin seeds add a nice crunch without nuts. They also give good nutrition. If you prefer, you can simply omit nuts entirely. This makes the dip smooth and creamy. You won't lose any flavor, and everyone can enjoy it. This way, your dip can be safe for all guests. To keep your caramel apple cheesecake dip fresh, store it in the fridge. Place the dip in an airtight container. This helps prevent any odors from the fridge from affecting its taste. Make sure the lid fits snugly to keep it sealed. If you don’t have an airtight container, cover it tightly with plastic wrap. Your dip will last about three days in the fridge. After that, it may lose its flavor and texture. Before serving leftovers, give it a quick stir to bring back the creaminess. If it looks a bit dry, add a touch more caramel sauce or sour cream to refresh it. To make this dip, follow these key steps: 1. Start with softened cream cheese in a bowl. Beat it until smooth. 2. Add powdered sugar and vanilla extract. Mix until no lumps remain. 3. Fold in sour cream gently with a spatula. 4. Add diced apple, ground cinnamon, and chopped nuts. Mix well. 5. Transfer the mixture to a serving dish. Create a well for the caramel. 6. Drizzle caramel sauce over the dip. Add more nuts and cinnamon on top. This dip is creamy, sweet, and has a nice crunch from the apples and nuts. Yes, you can make the dip ahead of time. Here are some tips: - Prepare the dip and store it in an airtight container. - Keep it in the fridge for up to two days. - Add the caramel sauce just before serving for the best taste. This way, your dip stays fresh and delicious for your guests. For the best experience, serve the dip with these options: - Graham crackers provide a sweet, crunchy bite. - Pretzel sticks add a salty contrast to the sweet dip. - Fresh fruit slices like pears or additional apples work well too. These accompaniments make the dip even more fun to enjoy! This blog post outlined how to create a tasty Caramel Apple Cheesecake Dip. We explored main and optional ingredients, step-by-step instructions, and tips for perfecting the dip. You learned about serving options and variations to suit your taste. Finally, we discussed storage and answered common questions. Overall, this dip is easy to make and fun to share. Dive into your kitchen and make this delightful treat for your next gathering! Enjoy the flavors of creamy cheesecake, fresh apples, and sweet caramel in every bite.

Caramel Apple Cheesecake Dip Delightful and Easy Treat

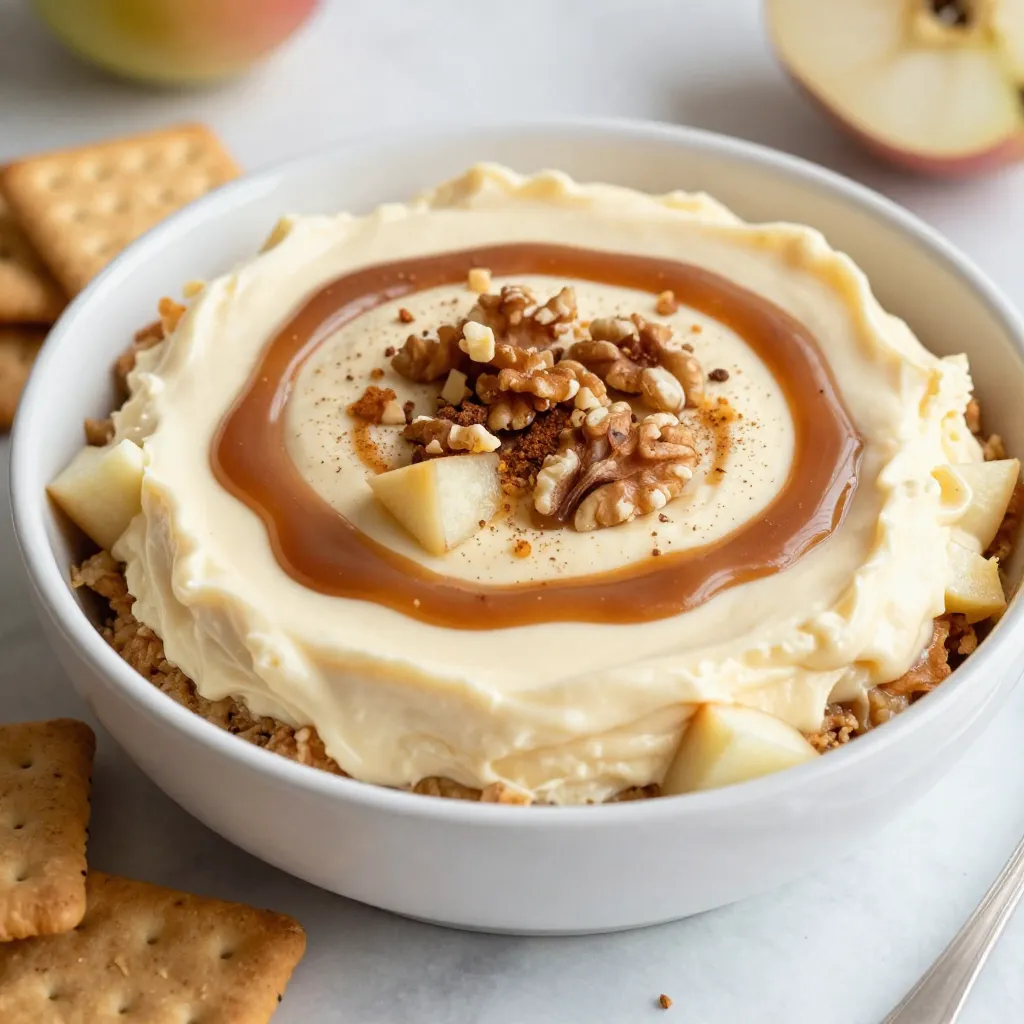
Dive into the sweet world of Caramel Apple Cheesecake Dip, where creamy goodness meets fall flavors! This easy treat combines

- 4 large russet potatoes - 1 cup sour cream - 1 cup cheddar cheese - 1/2 cup cream cheese - 1/4 cup green onions - 1/2 cup cooked turkey bacon - 1 teaspoon garlic powder - 1 teaspoon onion powder - Salt and freshly cracked black pepper - 1/2 cup milk - 1 tablespoon olive oil For this loaded baked potato casserole, I choose russet potatoes. They give a fluffy texture. You will need sour cream and cream cheese for a rich base. Cheddar cheese adds a sharp flavor. Use fresh green onions for a nice crunch. Turkey bacon adds a savory touch. Seasonings like garlic and onion powder bring out the flavors. Salt and pepper enhance the taste. The milk keeps everything creamy, while olive oil greases the baking dish. With these simple ingredients, you create a dish that is both easy and full of flavor. You can even swap ingredients, like using vegetable bacon for a meat-free option. {{ingredient_image_2}} - Preheat your oven to 400°F (200°C). - Boil a large pot of salted water. Add diced potatoes and cook for 10-15 minutes. They should be fork-tender. Drain the potatoes and let them cool. - In a big mixing bowl, combine 1 cup of sour cream, 1/2 cup of cream cheese, and 1/2 cup of milk. - Mix until smooth. Add in 1 cup of shredded cheddar cheese, 1 teaspoon of garlic powder, and 1 teaspoon of onion powder. - Season with salt and pepper. Fold in 1/4 cup of chopped green onions, saving some for later. - Gently add the cooled potatoes and 1/2 cup of crumbled turkey bacon to the mixture. - Grease a 9x13-inch baking dish with 1 tablespoon of olive oil to prevent sticking. - Spoon the loaded potato mixture into the dish and spread it out evenly. - Top with the reserved cheddar cheese. - Cover with foil and bake for 25 minutes. Then, remove the foil and bake for another 15-20 minutes. - The top should be bubbly and golden brown. - Let it cool for a few minutes before serving. Garnish with reserved green onions for a nice touch. To achieve the right potato texture, start with fresh russet potatoes. Cut them into bite-sized cubes. Boil them until they are fork-tender, about 10-15 minutes. This helps keep them fluffy but not mushy. When mixing the ingredients, be gentle. You want to fold the potatoes into the creamy mixture without breaking them apart. This keeps the texture nice and light. For even cheese melting, sprinkle some cheese on top of the casserole before baking. This creates a golden crust that everyone loves. Make sure to reserve some cheese from your main mix for this step. For ideal accompaniments, serve your casserole hot right from the oven. You can add a dollop of sour cream on each serving for extra creaminess. Garnishing with green onions adds a fresh touch. Sprinkle some on top right before serving. This brightens up the dish and adds a pop of color. You can also offer extra toppings, like crispy bacon bits or hot sauce, for flavor variety. Pro Tips Use Fresh Ingredients: Fresh, high-quality potatoes and dairy products will enhance the overall flavor and texture of the casserole. Adjust the Cheese: Feel free to mix different types of cheese like Monterey Jack or Gouda for a unique flavor twist. Layering for Flavor: Consider layering the potatoes and cheese mixture in the baking dish for a more aesthetically pleasing presentation and flavor distribution. Make-Ahead Option: Prepare the casserole a day in advance and store it in the refrigerator. Just bake it before serving for a quick and easy meal. {{image_4}} You can easily change some ingredients in this recipe. If you want a vegetarian version, use vegetable bacon instead of turkey bacon. This swaps the meat without losing flavor. You can enjoy the same crunch and taste. For a dairy-free option, look for cheese made from nuts or soy. Use a dairy-free sour cream and cream cheese, too. These choices keep the dish creamy while catering to dietary needs. Want a little heat? Add jalapeños to the mix. They give the casserole a nice kick. You can slice them thin or chop them small, depending on your taste. You can also switch up the cheese. Try gouda or pepper jack for a twist. Each type of cheese brings its own flavor and richness. Mixing different cheeses can make your casserole even more delicious! To keep your Loaded Baked Potato Casserole fresh, let it cool first. Then, place it in an airtight container. You can store it in the fridge for up to four days. If you want to store it longer, consider freezing it. In the freezer, it stays good for about three months. Just make sure to wrap it well to prevent freezer burn. When it's time to enjoy leftovers, you have a few options. The best method is to reheat it in the oven. Preheat your oven to 350°F (175°C). Cover the casserole with foil to keep it moist. Bake for about 20-25 minutes or until it’s heated through. If you’re short on time, you can use the microwave. Place a portion on a microwave-safe plate. Heat it in 30-second intervals, stirring in between, until hot. To keep the texture nice, avoid overheating. If you want extra flavor, add a bit of cheese on top while reheating. This makes it even more delicious! Can I prepare Loaded Baked Potato Casserole in advance? Yes, you can prepare this casserole ahead of time. To do this, follow the recipe up to the baking step. After mixing the ingredients, cover the dish and store it in the fridge for up to 24 hours. When you are ready to bake, let it sit at room temperature for 30 minutes. Then, bake it as directed. This makes serving easy! What can I serve with Loaded Baked Potato Casserole? This casserole pairs well with many foods. You can serve it with a simple green salad to add freshness. Grilled chicken or steak also works great as a main dish. For a lighter option, try roasted vegetables or steamed broccoli. The flavors balance nicely, making each meal a hit! Can I freeze Loaded Baked Potato Casserole? Yes, you can freeze this casserole! Allow it to cool completely after baking. Then, cover it tightly with foil or plastic wrap. It will last in the freezer for about two months. When you are ready to eat it, thaw it in the fridge overnight and reheat in the oven. Enjoy the yummy, cheesy goodness! This blog post covered how to make a delicious Loaded Baked Potato Casserole. We discussed the main ingredients, step-by-step instructions, and tips to get it just right. You learned about variations to please different diets and how to store your leftovers. Remember, this casserole is flexible and fun to make. With a few tweaks, you can create your own version. Enjoy making this dish with family and friends. It will surely be a hit at your next meal!

Loaded Baked Potato Casserole Easy and Savory Dish

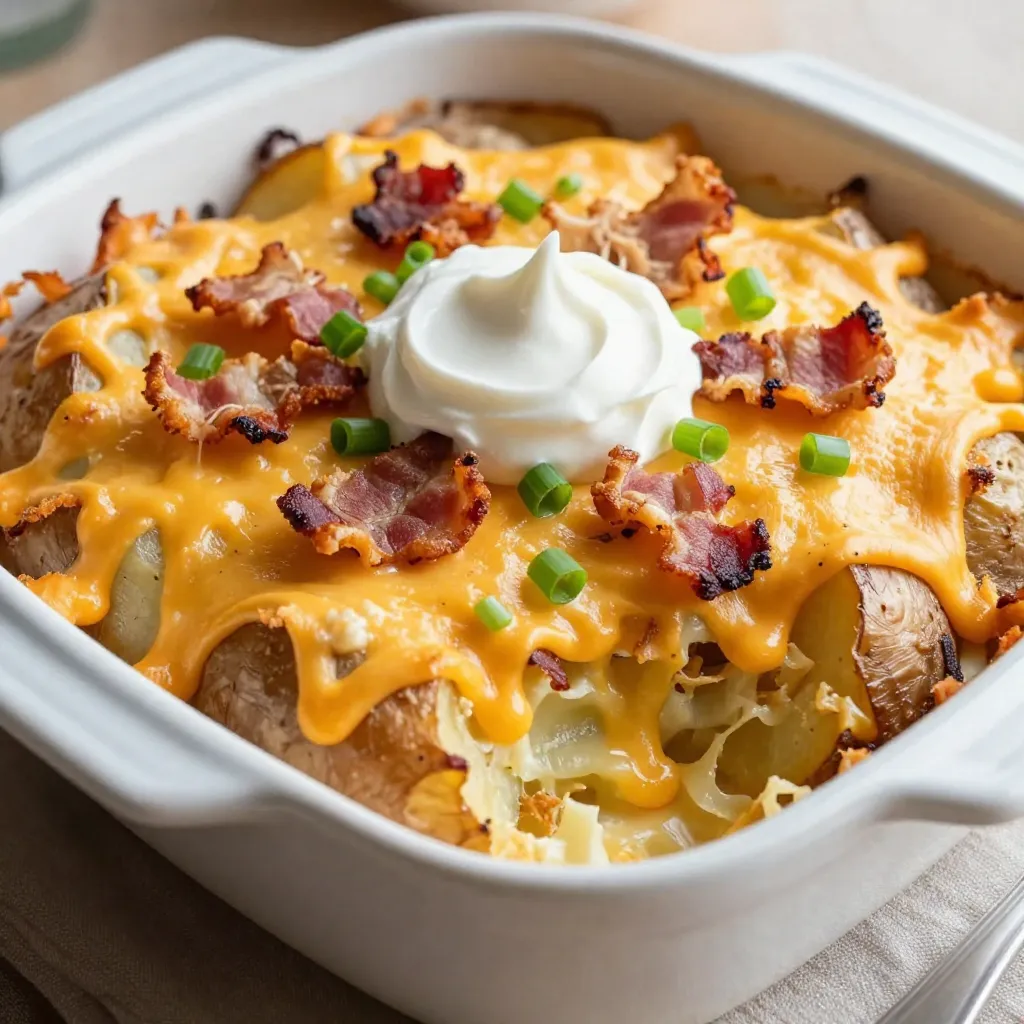
Are you ready for a dish that delivers comfort and flavor? Loaded Baked Potato Casserole combines creamy goodness with hearty

- 2 cups cooked chicken, shredded or cubed - 1 cup dried cranberries - 1/2 cup pecans, chopped - 1/2 cup celery, finely chopped - 1/4 cup red onion, finely chopped - 1/2 cup Greek yogurt - 1 tablespoon honey - 1 tablespoon Dijon mustard - Salt and black pepper to taste - Mixed greens - Optional garnishes The main ingredients in this salad give it a burst of flavor and texture. The cooked chicken serves as the base, providing protein that keeps you full. Dried cranberries add a sweet touch, while chopped pecans bring in a nice crunch. Finely chopped celery and red onion add freshness and a bit of bite. For the dressing, Greek yogurt makes it creamy and tangy. Honey sweetens it up nicely, while Dijon mustard adds a zesty kick. Don’t forget to season with salt and black pepper for more depth. When serving, I like to nestle the salad on a bed of mixed greens. This adds color and a fresh taste. You can also sprinkle some extra pecans and cranberries on top for a lovely garnish. Pair it with whole grain crackers or toasted bread for a satisfying meal. {{ingredient_image_2}} To start, shred or cube your cooked chicken. This gives a nice texture. Next, chop your pecans, celery, and red onion. Make sure the pieces are small. This helps them mix well in the salad. In a large bowl, combine the chicken, dried cranberries, chopped pecans, celery, and onion. Mix them together gently. You want all the flavors to blend well. This makes every bite tasty. In a small bowl, whisk together Greek yogurt, honey, Dijon mustard, salt, and pepper. Mix until it becomes smooth and creamy. This dressing adds richness to the salad. Drizzle it over the chicken mixture. Now, toss everything to coat the salad evenly with the dressing. Make sure all ingredients are covered. Then, chill the salad in the fridge for at least 30 minutes. This lets all the flavors meld together nicely. - Adjust seasoning to taste. After mixing, taste your salad. You might want more salt or pepper. - Let flavors meld by chilling. Cover the salad and chill it for at least 30 minutes. This makes all the tastes blend nicely. - Use extra pecans and cranberries for garnish. This makes your dish look more appealing and colorful. - Serve with whole grain crackers or toasted bread. The crunch adds a nice contrast to the soft salad. - Use leftover cooked chicken for convenience. It saves time and reduces waste. - Consider using rotisserie chicken. It’s already cooked and adds great flavor to your salad. Pro Tips Store it right: Keep your chicken salad in an airtight container in the fridge to maintain freshness for up to 3 days. Add a twist: For a zesty flavor, consider adding some fresh lemon juice or zest to the yogurt dressing. Protein boost: To make it even heartier, you can mix in some chickpeas or white beans for added protein and fiber. Versatile serving: This chicken salad can also be served as a filling for sandwiches or wraps, making it perfect for meal prep! {{image_4}} You can switch up the protein in your salad. Turkey makes a great substitute. It adds a nice flavor and keeps it lean. If you're looking for a quick option, use canned chicken. It saves time and works well in this dish. Tofu is another choice for a vegetarian twist. It absorbs flavors well and adds protein too. Want to boost the flavor? Add diced apples or grapes for a sweet crunch. They pair nicely with the tart cranberries. Fresh herbs can enhance your salad too. Try adding parsley or dill for a fresh taste. These additions can make the salad even more exciting. You can play with the dressing as well. Swap Greek yogurt for mayonnaise if you prefer a creamier texture. A vinaigrette can add a tangy kick, making it lighter. For something unique, try an avocado dressing. It gives a rich flavor and is packed with good fats. Store any leftover cranberry pecan chicken salad in an airtight container. This keeps the salad fresh. The optimal storage time is about three to four days in the fridge. After that, the flavors start to fade. I recommend checking for freshness before serving. Can you freeze chicken salad? Yes, but it may change the texture. If you want to freeze it, use a freezer-safe container. Make sure to leave some space for expansion. When thawing, place it in the fridge overnight. This keeps it safe and helps maintain flavor. Cold chicken salad tastes crisp and refreshing. The flavors meld well after chilling. However, if you serve it at room temperature, the taste changes slightly. The salad becomes softer, and the flavors may seem bolder. I suggest trying both ways to see what you prefer. You can keep Cranberry Pecan Chicken Salad in the fridge for up to three days. After that, the taste and texture may change. Always check for freshness before eating. Yes, you can make this salad ahead of time. It tastes even better after chilling for a few hours. Just cover it and store it in the fridge. Serve this salad on a bed of mixed greens. You can also add whole grain crackers or toasted bread. These options add a nice crunch. This salad is a healthy choice. It has lean protein from chicken and healthy fats from pecans. Greek yogurt adds creaminess with fewer calories than mayo. You can use fresh cranberries, but they will taste different. Fresh cranberries are tart and might need sugar to balance the flavor. Dried cranberries are sweeter and enhance the dish well. You now have a complete guide to making Cranberry Pecan Chicken Salad. We covered the key ingredients, easy steps to prepare, and various tips to enhance flavor. Consider using different proteins or dressings for more variety. Remember, store your leftovers properly and serve at the right temperature for the best taste. Enjoy this healthy, delicious salad as a meal or a side dish. This salad is perfect for any time!

Cranberry Pecan Chicken Salad Flavorful and Fresh Dish

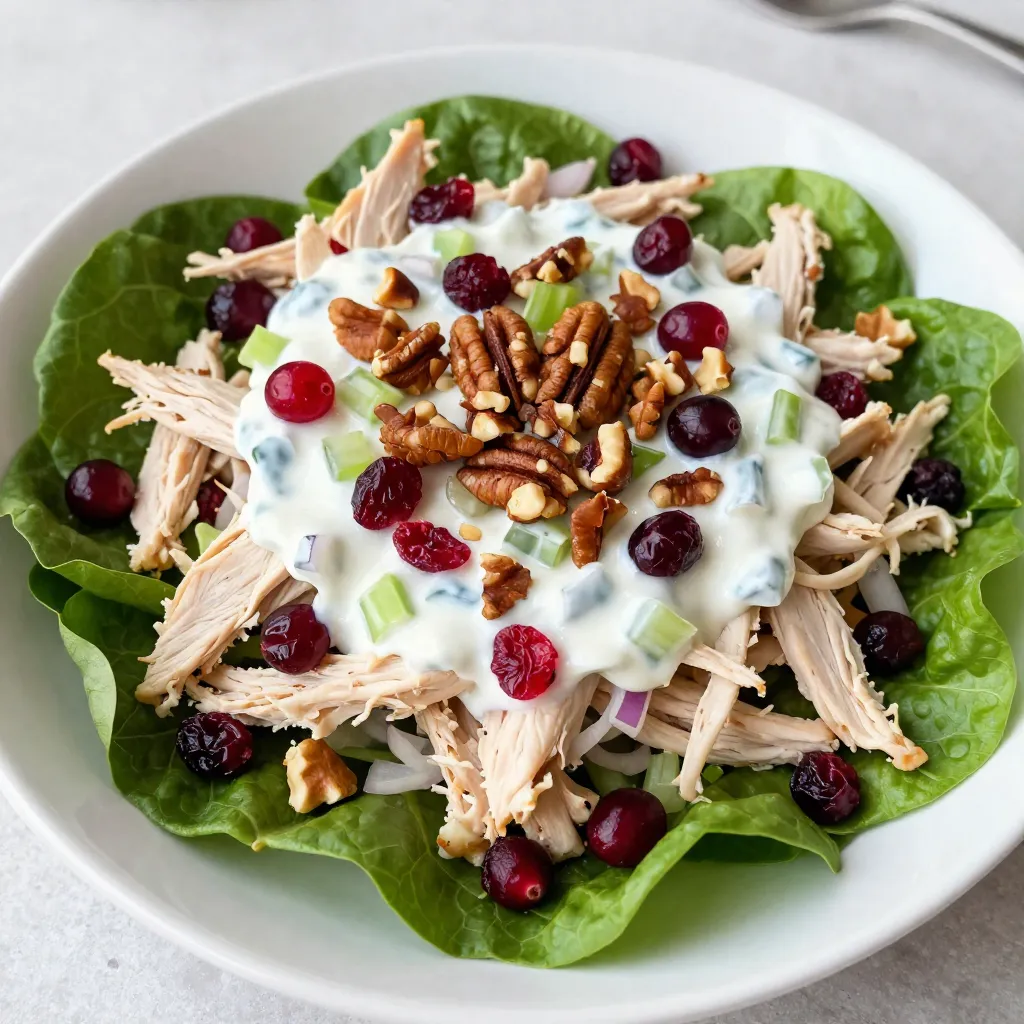
Looking for a fresh and flavorful twist on chicken salad? You’ve landed in the right place! My Cranberry Pecan Chicken

Older posts
Page1 Page2 … Page86 Next →

dsad

© 2026 yumymoments • Built with GeneratePress

Our Policies

  • Copyright Policy
  • Cookie Policy
  • GDPR Policy
  • Privacy Policy
  • Disclaimer
  • Terms Of Use

More Information

  • Home
  • About
  • Contact
  • Appetizers
  • Dessert
  • Dinner
  • Drinks
©2026, yumymoments About Back To Top