Skip to content
DisclaimerTerms Of UseGDPR PolicyCookie Policy

yumymoments

  • Home
  • Drinks
  • Appetizers
  • Dinner
  • Dessert
  • About
  • Contact
  • Privacy Policy
DisclaimerTerms Of UseGDPR PolicyCookie Policy

NO-ING-IMG

- 4 boneless, skinless chicken breasts - 1 cup cream cheese, softened to room temperature - 1 cup shredded sharp cheddar cheese - 2 fresh jalapeños, finely chopped (seeds removed for a milder flavor) - 1/4 cup fresh cilantro, gently chopped - 1 teaspoon garlic powder - 1 teaspoon onion powder - 1/2 teaspoon smoked paprika - Salt and freshly ground black pepper to taste - 1 cup breadcrumbs (for coating) - 2 tablespoons olive oil Gathering the right ingredients is key to a tasty dish. I love using fresh ingredients. This starts with boneless, skinless chicken breasts. They provide a great canvas for the flavors. Next, the cream cheese and sharp cheddar cheese mix together to create a rich filling. The cream cheese gives the filling a creamy texture. The cheddar adds a sharp, tangy flavor. Together, they make a perfect match. Adding jalapeños gives it a spicy kick. I recommend removing the seeds for a milder taste. If you like heat, keep them in. Cilantro adds freshness and a bright taste to the filling. The garlic powder, onion powder, and smoked paprika enhance the flavor. They bring depth and warmth to the dish. Don't forget to season with salt and pepper to taste. Finally, we need breadcrumbs and olive oil. Breadcrumbs create a crispy outside. The olive oil helps them brown nicely. Together, these ingredients ensure a flavorful and satisfying meal. {{ingredient_image_2}} 1. First, preheat your oven to 375°F (190°C). This helps the chicken bake evenly and quickly. 2. In a large bowl, mix 1 cup of cream cheese and 1 cup of sharp cheddar cheese. Blend until smooth and creamy. 3. Next, add in 2 finely chopped jalapeños, 1/4 cup of chopped cilantro, 1 teaspoon of garlic powder, 1 teaspoon of onion powder, and 1/2 teaspoon of smoked paprika. Season with salt and black pepper. Stir until well mixed. 4. Now, take a sharp knife and carefully slice each chicken breast horizontally. Make a pocket but do not cut all the way through. Be safe with your knife! 5. Generously fill each chicken pocket with the cheese and jalapeño mixture. If needed, use toothpicks to seal them shut. This keeps the filling inside while cooking. 6. Pour breadcrumbs into a shallow dish. Coat each stuffed chicken breast in the breadcrumbs. Press gently to help them stick well. 7. Heat 2 tablespoons of olive oil in an oven-safe skillet over medium-high heat. Add the stuffed chicken breasts. Sear each side for 3-4 minutes until they turn golden brown. 1. After searing, transfer the skillet to your preheated oven. Bake for 20-25 minutes. 2. Check the chicken for doneness. The internal temperature should reach 165°F (75°C). 3. Once cooked, remove the skillet from the oven. Let the chicken rest for 5 minutes. This helps keep the juices in, making each bite juicy and flavorful. To make a great filling, balance your flavors. Start with cream cheese and cheddar cheese. They create a smooth base. Add fresh jalapeños for spice and flavor. If you want less heat, remove the seeds. The seeds hold most of the spice. You can also adjust the spiciness by adding more or fewer jalapeños. Mix in cilantro, garlic powder, onion powder, and smoked paprika. Each adds depth to your dish. Taste your filling before using it. This way, you can adjust seasoning to your liking. Searing the chicken adds a nice flavor and texture. Heat olive oil until it shimmers. Place the stuffed chicken breasts in the hot oil. Brown each side for about 3-4 minutes. This step creates a crispy crust. After searing, transfer the skillet to the oven. Bake the chicken until fully cooked. The internal temperature should reach 165°F. Resting the chicken is key. Let it sit for about 5 minutes before slicing. This helps the juices settle, keeping the chicken moist. When you cut into it, you'll enjoy a juicy, flavorful bite. Pro Tips Use Fresh Ingredients: For the best flavor and texture, opt for fresh jalapeños and herbs. They will elevate the taste of your dish significantly. Perfectly Seal the Chicken: Use toothpicks to secure the chicken pockets after stuffing. This prevents the filling from leaking out while cooking. Adjust the Spice Level: If you prefer a milder dish, ensure all seeds are removed from the jalapeños. Alternatively, add more jalapeños for extra heat! Let it Rest: After baking, allow the chicken to rest for a few minutes before slicing. This helps retain moisture, making each bite deliciously juicy. {{image_4}} You can mix things up by trying different cheeses in your filling. For a creamier texture, use mascarpone cheese instead of cream cheese. It adds a rich flavor and smoothness. You can also use pepper jack cheese for a spicier kick. It melts well and has a nice zing. If you want more depth, consider mixing in gouda or fontina. These cheeses bring a smoky, nutty taste that pairs wonderfully with jalapeños. Flavored cream cheeses can also elevate your dish. Think about using garlic herb cream cheese or even ranch-flavored cream cheese. These options add a fun twist to your stuffed chicken. Add more veggies to your filling for extra taste and nutrition. Finely chopped red bell peppers can add sweetness and color. Spinach also works great; it wilts down and blends well with the cheese. You can also try adding corn for a sweet crunch. Fresh herbs like parsley or dill can enhance the flavor too. They bring freshness and can brighten up the dish. Experiment with what you have on hand. Each variation offers a new taste adventure for your Jalapeño Popper Stuffed Chicken. To store leftovers safely, let your chicken cool to room temperature first. Place the chicken in an airtight container. Make sure to seal it well to keep moisture in. You can keep it in the fridge for up to three days. This way, you can enjoy it later without losing flavor! I recommend using glass containers for storage. They are durable and help keep food fresh. Plus, they are easy to clean. If you prefer plastic, choose BPA-free options to stay safe. The best methods for reheating stuffed chicken are the oven or stovetop. If you're using the oven, preheat it to 350°F (175°C). Place the chicken in a baking dish and cover it with foil. This helps keep the chicken moist while it warms up. Heat for about 15-20 minutes or until it's hot all the way through. If you choose the stovetop, heat a non-stick pan over low heat. Add a splash of water to create steam. This keeps the chicken moist as it reheats. Cook for about 5-7 minutes on each side, or until warm. To keep the chicken moist, avoid cooking it too long. Use a meat thermometer to check for an internal temperature of 165°F (75°C). This ensures your chicken is safe to eat and still juicy. Enjoy your tasty leftovers! You can serve many tasty sides with Jalapeño Popper Stuffed Chicken. Here are some great ideas: - Rice: Fluffy white or brown rice soaks up the chicken's flavors. - Veggies: Steamed broccoli or roasted asparagus add color and health. - Salad: A fresh garden salad gives a nice, crisp contrast. - Potatoes: Mashed or roasted potatoes pair well with the chicken. - Corn: Sweet corn on the cob makes a fun and sweet side. These sides make your meal complete and delicious. Yes, you can freeze Jalapeño Popper Stuffed Chicken! Here’s how: - Freezing: Wrap each stuffed chicken breast tightly in plastic wrap. Then, put them in a freezer bag. - Thawing: When ready to eat, thaw in the fridge overnight. This keeps the chicken safe and tasty. Frozen stuffed chicken can last up to three months in the freezer. Checking chicken for doneness is very important. Use these steps: - Internal Temperature: Use a meat thermometer. The chicken should reach 165°F (75°C). - Visual Check: Cut into the chicken. The juices should run clear, not pink. - Texture: The meat should feel firm but not hard. These tips ensure your chicken is safe and cooked just right. In this blog post, we explored making Jalapeño Popper Stuffed Chicken. We covered the ingredients, preparation, cooking tips, and how to store leftovers. You can play with cheese and add veggies to suit your taste. Proper techniques, like searing and resting the chicken, enhance flavor and keep it juicy. Remember, cooking can be fun and rewarding. Use these steps to impress your family and friends with a delicious meal. Enjoy experimenting, and make this dish your own!

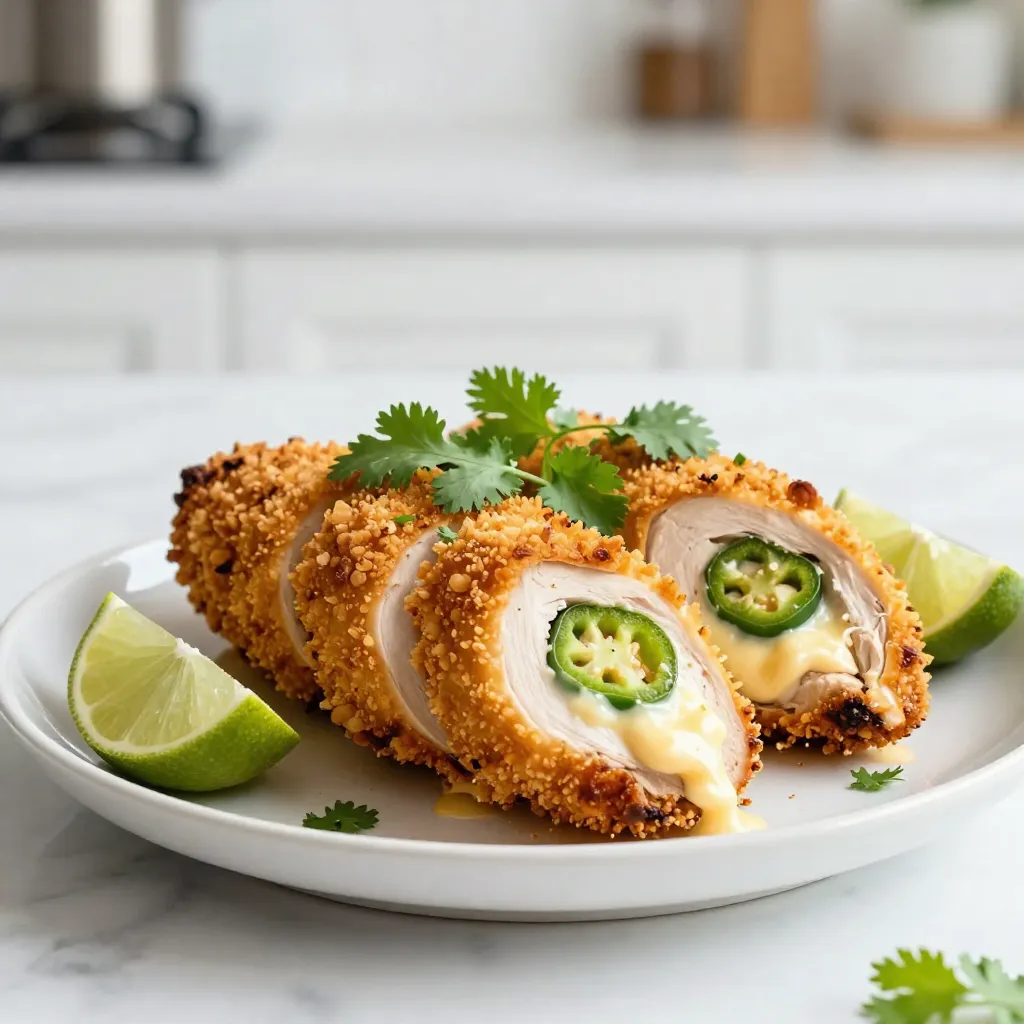
Jalapeño Popper Stuffed Chicken Flavorful Dinner Delight

Looking for a dinner that wows? Try my Jalapeño Popper Stuffed Chicken! This dish blends tender chicken with creamy cheese

When making No-Bake Chocolate Peanut Butter Bars, you need some key ingredients. Each one adds flavor and texture to the bars. - 1 cup natural peanut butter (smooth or chunky) - 1 cup rolled oats - 1/2 cup honey or maple syrup - 1/2 cup unsweetened cocoa powder - 1/4 teaspoon salt - 1 teaspoon pure vanilla extract - 1/2 cup dark chocolate chips - 2 tablespoons coconut oil (optional) Natural peanut butter is a must. It gives the bars their rich taste. Choose smooth if you like a creamier bite or chunky for a crunch. Rolled oats form the base of the bars. They add fiber and help bind everything together. Honey or maple syrup offers sweetness. Both work well, so pick your favorite. Cocoa powder adds a deep chocolate flavor. It makes the bars a treat for chocolate lovers. A tiny bit of salt balances the sweetness. It enhances the flavors in the bars. Pure vanilla extract adds warmth. It rounds out the taste, making it even more delicious. Dark chocolate chips are for topping the bars. They melt beautifully and give a rich finish. Coconut oil is optional but helpful. It creates a creamier texture if you decide to use it. These ingredients come together to make a tasty snack. Mix them right, and you will enjoy a delicious treat! - In a large bowl, combine: - 1 cup natural peanut butter - 1 cup rolled oats - 1/2 cup honey or maple syrup - 1/2 cup unsweetened cocoa powder - 1/4 teaspoon salt - 1 teaspoon pure vanilla extract Mix these ingredients using a strong spoon. Keep mixing until you get a thick blend. This blend should hold together well. - If you want a creamier texture, melt 2 tablespoons of coconut oil in a microwave. Heat it slowly and stir often. Once it melts, mix it into the peanut butter blend. - Grab an 8x8-inch baking pan. Line it with parchment paper, leaving some paper hanging over the edges. This helps when you take the bars out later. - Next, take the peanut butter mixture and press it firmly into the lined pan. Use your hands or a spatula to create a flat, even layer. - In a separate bowl, place 1/2 cup dark chocolate chips. If you want, add 1 tablespoon of coconut oil for a shiny finish. - Microwave the chocolate in short bursts. Stir often until it is fully melted and smooth. - Carefully pour this melted chocolate over the peanut butter layer. Use a spatula to spread it evenly across the top. - Put the pan in the fridge. Let the bars chill for at least 2 hours. This helps them set and become firm. - Once they are firm, lift them out using the parchment paper. Place the block on a cutting board. Cut the bars into squares or rectangles, based on how big you want each serving. To change the thickness of your bars, adjust the oats. For thicker bars, use more oats. For creamier bars, add melted coconut oil. This gives a nice texture. You can also enhance flavor by adding a dash of cinnamon or a pinch of sea salt. These small changes make a big difference. For a great look, garnish your bars. Drizzle melted chocolate on top for shine. You can add crushed peanuts or sea salt for extra flair. When serving, arrange the bars on a nice platter. This makes them perfect for parties or events. Having the right tools helps. You need a large mixing bowl and a sturdy spatula. A microwave-safe bowl is key for melting chocolate. Parchment paper is essential for easy removal. Lastly, a sharp knife helps cut the bars neatly. {{image_4}} You can make these bars more exciting by adding nuts or seeds. Try chopped almonds, walnuts, or even sunflower seeds for a nice crunch. If you want a warm spice note, add a dash of cinnamon. This simple tweak can change the whole taste. You can explore many flavor paths with just a few ingredients. If you follow a vegan diet, you can easily swap honey for maple syrup. This keeps your bars sweet without using any animal products. For gluten-free options, ensure you choose certified gluten-free oats. This way, everyone can enjoy these treats without worry. When it comes to toppings, you have choices. You can use milk chocolate, white chocolate, or even dark chocolate for a richer taste. If you want to change it up, try spreading almond butter or a layer of fruit like sliced bananas on top. These options keep your bars fresh and surprising! To keep your No-Bake Chocolate Peanut Butter Bars fresh, store them in the fridge. Use an airtight container to prevent them from drying out. Place parchment paper between layers if you stack them. This way, they won't stick together. Enjoy your bars within one week for the best taste and texture. If you want to save some bars for later, freezing is a great option. Wrap each bar in plastic wrap or aluminum foil. Place them in a freezer-safe bag for extra protection. When you want to enjoy a bar, take it out and thaw it in the fridge overnight. This keeps the texture smooth and tasty. These bars can stay fresh for up to two weeks in the fridge. Check for any changes in smell or texture to know they are still good. If you see any signs of spoilage, it's best to toss them. Always trust your senses when it comes to food safety. These bars need about 2 hours in the fridge to set. After that, they become firm and easy to slice. The longer you chill them, the better the texture. Yes, you can use almond butter or sunflower seed butter. These alternatives work well and offer different flavors. Make sure the texture is similar to peanut butter for the best result. You can add more honey or maple syrup to the mixture. Another option is to sprinkle some powdered sugar on top before chilling. This will give you a sweeter taste while keeping it delicious. Yes, you can use sunflower seed butter as a nut-free option. It gives a similar creamy texture and taste. This is great for schools or events where nut allergies are a concern. Each bar contains healthy fats from peanut butter, fiber from oats, and antioxidants from cocoa. They also provide natural sugars from honey or maple syrup. Overall, they are a good treat that can fit in a balanced diet. You learned how to make tasty no-bake chocolate peanut butter bars. We covered key ingredients, step-by-step instructions, and tips for perfect results. Remember to store them right to keep them fresh. With many variations and options, you can customize these bars to your liking. I hope you try this recipe and enjoy it as much as I do. Happy baking!

No-Bake Chocolate Peanut Butter Bars Easy Recipe

Craving a sweet treat that’s both easy and delicious? No-bake chocolate peanut butter bars are the answer! With simple ingredients

For the best Honey Butter Skillet Cornbread, gather these simple ingredients: - 1 cup cornmeal - 1 cup all-purpose flour - ½ cup granulated sugar - 1 tablespoon baking powder - ½ teaspoon salt - 1 cup milk, at room temperature - 2 large eggs, whisked - ¼ cup unsalted butter, melted and slightly cooled - ½ cup honey - ½ cup corn kernels - 2 tablespoons additional unsalted butter (for greasing) Each ingredient plays a key role. The cornmeal gives the bread its texture. The flour helps it rise. Sugar adds sweetness, while baking powder makes it fluffy. Salt enhances all the flavors. Milk keeps it moist, and eggs bind everything together. Melted butter adds richness, and honey brings a lovely sweetness. Corn kernels add bursts of flavor and texture. Using extra butter to grease the skillet ensures a crispy crust. With these ingredients, your cornbread will be rich and flavorful. First, set your oven to 400°F (200°C). Place your cast-iron skillet inside. This helps warm it up, so your cornbread gets that nice, crispy crust. In a large bowl, mix together the dry items. Add 1 cup of cornmeal, 1 cup of flour, ½ cup of sugar, 1 tablespoon of baking powder, and ½ teaspoon of salt. Whisk them well to break up any lumps. In another bowl, combine your wet items. Whisk 1 cup of milk, 2 large eggs, ¼ cup of melted butter, and ½ cup of honey. Make sure it’s smooth and mixed well. Pour the wet mixture into the dry ingredients. Use a spatula to gently fold them together. Don’t overmix! Add in ½ cup of corn kernels and fold until they are evenly spread. Carefully take the hot skillet out of the oven. Add 2 tablespoons of butter into the skillet. Swirl it around until it melts. This step helps create a golden, crispy edge. Pour the batter into the hot skillet, spreading it evenly. Place it back into the oven. Bake for 20-25 minutes. The top should be golden, and a toothpick should come out clean when inserted in the center. Let it cool for a few minutes before slicing. Enjoy! To get the best texture, use a mix of cornmeal and flour. This blend gives your cornbread a nice crumb. Make sure to fold the batter gently. Overmixing makes it tough. You want it light and fluffy. Adding corn kernels makes it even better. They add a sweet burst in every bite. A hot skillet is key for even baking. Preheat your cast-iron skillet in the oven. This helps the cornbread rise and form a great crust. Keep an eye on the time. Bake for 20-25 minutes until golden. A toothpick should come out clean from the center. Serve cornbread warm for the best taste. Cut it into wedges for easy sharing. Drizzle extra honey on top for sweetness. A pat of butter adds richness. You can also sprinkle fresh herbs, like parsley or chives, for a pop of color. This makes your dish look as good as it tastes! {{image_4}} You can make Honey Butter Skillet Cornbread even more exciting by adding spices and herbs. Try mixing in a teaspoon of chili powder for a kick. A pinch of cumin can add warmth too. Fresh herbs like thyme or rosemary bring a nice touch. Just chop them finely and fold them into the batter. These additions will enhance the flavor and make each bite special. Have fun by using different types of corn in your cornbread. Sweet corn kernels are a classic choice. You can also use white or blue cornmeal for a unique twist. If you want a richer taste, try adding creamed corn. This makes the cornbread moist and adds a sweet flavor. Experimenting with these options lets you find the perfect taste for your family. You can create sweet and savory twists to this recipe. Add some crumbled bacon or cheese for a savory delight. A little jalapeño gives it heat if you like spicy food. For a sweeter version, try folding in chocolate chips or dried fruit. These changes will make your cornbread stand out at any meal. Each option offers a new way to enjoy this delicious dish. To keep your Honey Butter Skillet Cornbread fresh, let it cool first. Once cool, wrap it tightly in plastic wrap or foil. You can also place it in an airtight container. Store it at room temperature for up to three days. If you want to keep it longer, the fridge is a good option. Cornbread will last about a week in the fridge. When you're ready to enjoy the leftovers, preheat your oven to 350°F (175°C). Place the cornbread on a baking sheet. Cover it with foil to prevent it from drying out. Heat for about 10-15 minutes, or until warm. You can also reheat it in the microwave. Just cover it with a damp paper towel and heat for about 30 seconds. For longer storage, you can freeze the cornbread. First, let it cool completely. Then, wrap it tightly in plastic wrap and aluminum foil. You can also place it in a freezer bag. It will keep well in the freezer for up to three months. When you want to eat it, thaw it in the fridge overnight. Reheat as described above. Yes, you can use gluten-free flour. Look for a brand that works well in baking. A blend of rice flour, tapioca flour, and potato starch often works best. Remember, gluten-free flour may change the texture. It might be slightly more crumbly or dense, but still delicious. To make it less sweet, reduce the sugar. Try cutting the granulated sugar to ¼ cup. You can also skip the honey drizzle on top. This will keep the cornbread tasty but less sweet. You can add a pinch of salt to balance the flavors too. This cornbread pairs well with many dishes. Serve it alongside chili, soups, or barbecued meats. It also works great with a simple salad or roasted veggies. Add a bit of butter or honey on top for extra flavor. Yes, you can prepare the batter ahead of time. Mix the dry and wet ingredients, but do not combine them yet. Store them in the fridge for up to 24 hours. When ready, combine and bake as usual. You can also bake the cornbread and store it covered for a few days. Reheat slices in the oven for best results. In this blog post, we explored how to make delicious Honey Butter Skillet Cornbread. We discussed the needed ingredients, step-by-step instructions, and helpful tips for a perfect bake. We also looked at tasty variations and storage methods to keep your cornbread fresh. Now, you can enjoy this delightful treat anytime. Remember, cooking is fun! Experiment with flavors and share your results with friends and family. Your homemade cornbread will surely impress!

Honey Butter Skillet Cornbread Rich and Flavorful Treat

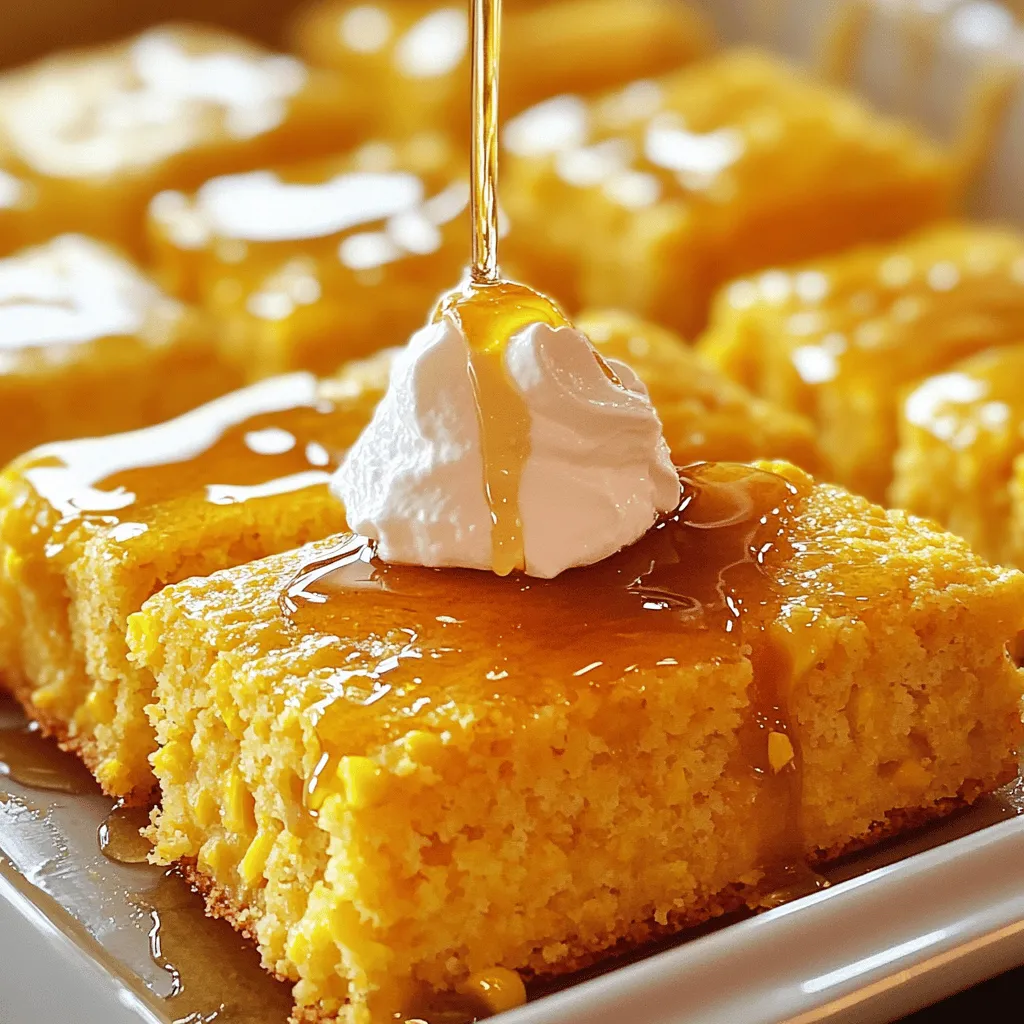
Craving a warm, rich treat? You’ll love this Honey Butter Skillet Cornbread! It’s simple to make and bursting with sweet

- 1 cup apple cider - 1 cup all-purpose flour - 1 tablespoon granulated sugar - 1 teaspoon baking powder - 1 teaspoon ground cinnamon - ½ teaspoon salt - 3 large eggs - 2 tablespoons unsalted butter, melted - Oil for frying - ½ cup granulated sugar (for coating) - 1 teaspoon ground cinnamon (for coating) - 1 cup brown sugar - ½ cup heavy cream - ½ teaspoon vanilla extract - Pinch of salt When you choose apple cider, look for a brand with no added sugars or preservatives. Fresh cider has a rich taste. For flour, buy all-purpose flour that is unbleached. This gives a better texture. Use large eggs that are fresh. Check the date on the carton. When selecting cinnamon, go for ground cinnamon that smells strong and sweet. For butter, choose unsalted for better control over flavor. Finally, be sure your brown sugar is soft and moist. This helps in making a smooth caramel dip. To start, you need apple cider. Pour 1 cup of apple cider into a medium saucepan. Heat it on medium-high until it boils. Once it boils, lower the heat. Let it simmer for about 15-20 minutes. You want the cider to reduce by half. This step adds a rich flavor to your churros. After it cools slightly, set it aside for later. Now, let's make the churro dough. In a medium bowl, mix together these dry ingredients: - 1 cup all-purpose flour - 1 tablespoon granulated sugar - 1 teaspoon baking powder - 1 teaspoon ground cinnamon - ½ teaspoon salt Mix them well and set aside. In a large bowl, whisk together the cooled apple cider, 3 large eggs, and 2 tablespoons melted unsalted butter. Stir this mixture until it’s smooth. Gradually add the dry mix into the wet mix. Stir gently until it forms a thick dough. Next, let’s fry those churros. Heat oil in a deep pot or fryer to 375°F (190°C). While the oil heats up, mix ½ cup granulated sugar and 1 teaspoon ground cinnamon in a shallow dish. Once the oil is hot, place the churro dough in a piping bag. Use a star-shaped tip for the best shape. Pipe 6-inch strips into the hot oil. Cut the dough with scissors as needed. Fry the churros for 2-3 minutes on each side, until they are golden brown. Remove them and drain on paper towels. Now for the caramel dip. In a small saucepan, combine these ingredients: - 1 cup brown sugar - ½ cup heavy cream - ½ teaspoon vanilla extract - Pinch of salt Heat on medium and stir continuously. Cook until it bubbles and becomes smooth. Let it simmer for 2-3 minutes. Remove it from heat and let it cool slightly. Now your caramel sauce is ready to dip! Serve the warm churros upright in a glass with the caramel dip on the side. Enjoy this sweet treat! - Use Fresh Ingredients: Always pick fresh apple cider and eggs. It makes a big difference. - Heat the Oil Right: The oil should be at 375°F (190°C). This helps the churros cook evenly. - Pipe with Care: Use a star tip for the piping bag. This gives churros their classic shape. - Fry in Batches: Don't overcrowd the pot. Fry a few at a time for the best results. - Skipping the Cooling Step: Let the apple cider cool after boiling. This helps the dough mix better. - Not Mixing Well: Ensure you mix the dry and wet ingredients until they are combined. Lumps can ruin the texture. - Wrong Oil Temperature: If the oil is too cold, churros will be soggy. Too hot, and they will burn. - Overcooking: Keep an eye on the frying time. Cook until golden brown, about 2-3 minutes per side. - Make It Festive: After rolling in cinnamon sugar, add a sprinkle of cinnamon on top. - Garnish with Fruit: Add thin apple slices next to the caramel dip for color and taste. - Serve Warm: Churros taste best when warm. Arrange them standing in a glass for a fun look. - Pair with Drinks: Enjoy with spiced apple cider or warm milk for a cozy treat. {{image_4}} You can change the flavor of these churros easily. Here are some fun ideas: - Pumpkin Spice: Replace some cinnamon with pumpkin spice for a fall twist. - Chocolate: Add cocoa powder to the dough for a chocolatey treat. - Maple: Use maple syrup instead of apple cider for a sweet change. These flavors add new fun to your churros, making them perfect for any season. While caramel dip is tasty, you can try other dips too. Here are a few suggestions: - Chocolate Sauce: Melt dark or milk chocolate for a rich dip. - Vanilla Frosting: Thin out store-bought frosting with a bit of milk for a sweet dip. - Fruit Sauce: Use berry or apple sauce for a fruity flavor. Each dip offers a new way to enjoy your churros and impress your friends. If you need gluten-free churros, it's simple to make a swap. Use gluten-free flour instead of all-purpose flour. This change keeps the same delicious taste while being safe for those with gluten issues. Always check the labels on your ingredients to ensure they are gluten-free. Enjoy these churros without worry! To keep leftover churros fresh, place them in an airtight container. Make sure they cool completely before sealing. Store them at room temperature for up to 2 days. If you plan to keep them longer, consider freezing them. For the best taste, reheat churros in an oven. Set the oven to 350°F (175°C) and warm them for about 5-7 minutes. This method helps restore their crispiness. You can also use an air fryer at the same temperature for 3-4 minutes. Avoid using a microwave, as it can make them soggy. To freeze churros, first cool them completely. Then, arrange them in a single layer on a baking sheet. Place the sheet in the freezer for about 1-2 hours. Once frozen, transfer the churros to a freezer-safe bag. They can last up to 2 months in the freezer. When ready to enjoy, reheat directly from frozen using the oven or air fryer. You can bake the churros instead of frying them. To do this, preheat your oven to 400°F (200°C). After you mix the churro dough, pipe it onto a parchment-lined baking sheet. Bake for about 20 minutes or until they are golden brown. You can still roll them in cinnamon sugar afterward. Baking gives a lighter texture but keeps the flavor. To make churros crispy, fry them at the right temperature, around 375°F (190°C). This hot oil seals the dough quickly. Make sure to not overcrowd the pan, as this can lower the oil's temperature. Also, let them drain on paper towels after frying. Roll them in cinnamon sugar while they are still warm for a great finish. Yes, you can use store-bought caramel sauce. It saves time and still tastes great. Just warm it slightly before serving, so it becomes easy to dip. This way, you can focus on making those tasty churros without any extra fuss. Apple cider adds a rich, sweet flavor to the churros. It also helps to create a moist dough, making the churros soft inside. The spices in the recipe pair perfectly with the apple cider, giving a warm, cozy taste. It’s a great way to celebrate fall flavors in a fun treat. Making apple cider churros is fun and easy. We covered the key ingredients and tips for selecting fresh items. Then, I shared step-by-step instructions on preparing, mixing, and frying churros, along with making caramel sauce. I also included tips to perfect your churros and common mistakes to avoid. You can explore flavor variations and alternative dips. Don’t forget storage tips to keep your churros fresh. This recipe brings joy and warmth, perfect for sharing. Enjoy these tasty treats and impress everyone with your skills!

Enticing Apple Cider Churros with Caramel Dip Recipe

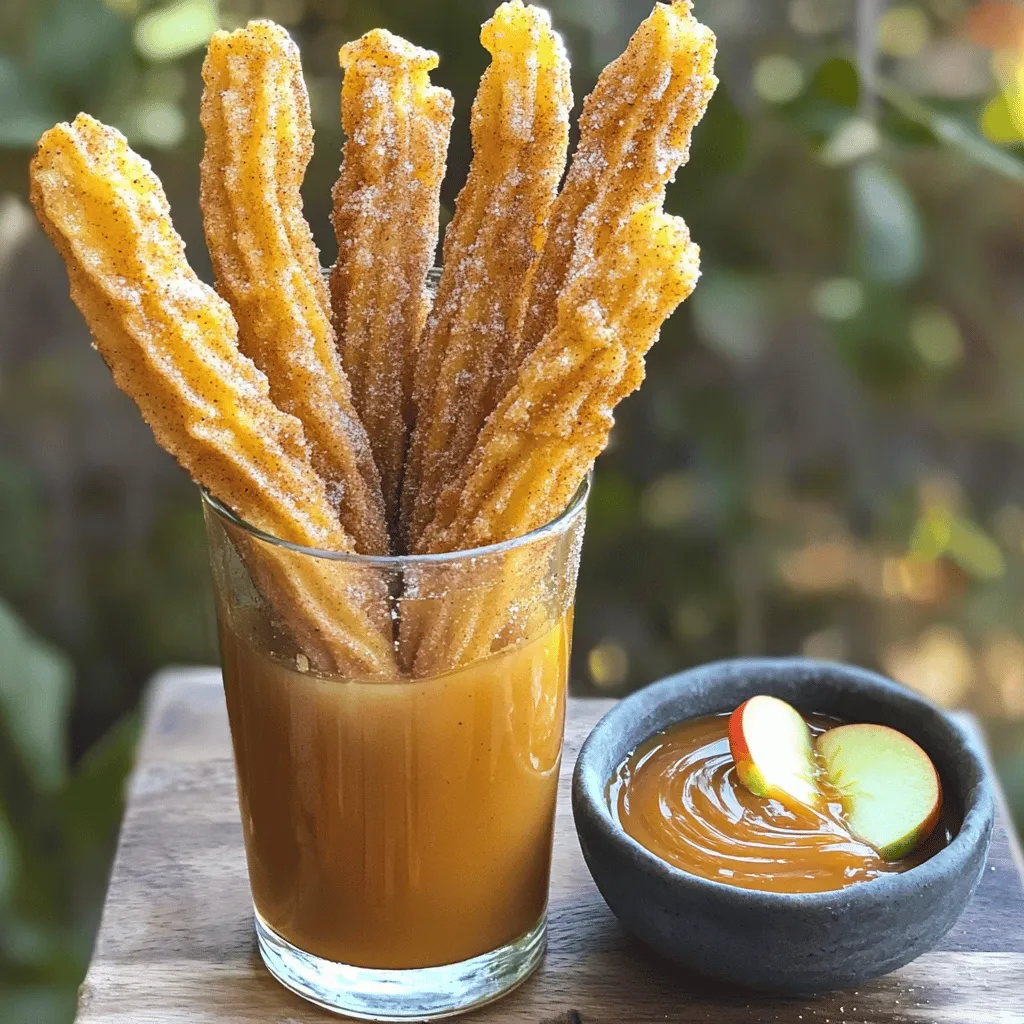
Get ready to indulge! I’m excited to share my delightful recipe for Apple Cider Churros with Caramel Dip. These sweet

- 1 ½ cups crushed pretzels - ½ cup unsalted butter, melted - ⅓ cup brown sugar - 1 cup cream cheese, softened - 1 cup smooth peanut butter - 1 cup powdered sugar - 1 teaspoon vanilla extract - ¾ cup whipped cream - ¼ cup chocolate chips (optional) - Extra pretzel pieces (optional) You can make your no-bake cheesecake bars even more fun. Here are some ideas: - Drizzle melted peanut butter on top. - Sprinkle chocolate chips for extra sweetness. - Add crushed pretzel pieces for a nice crunch. These garnishes bring more flavor and a pretty look to your bars. To whip up these bars, you’ll need a few tools: - A large mixing bowl - A 9x9 inch baking pan - A spatula for mixing - An electric mixer for smooth mixing - Parchment paper for easy lifting Having the right equipment makes the process easier and more fun! To start, gather your ingredients for the pretzel crust. You will need: - 1 ½ cups crushed pretzels - ½ cup unsalted butter, melted - ⅓ cup brown sugar First, combine the crushed pretzels, melted butter, and brown sugar in a large bowl. Mix until it looks like moist sand. This texture helps the crust hold together. Next, line a 9x9 inch baking pan with parchment paper. Firmly press the pretzel mix into the bottom of the pan. Use the back of a measuring cup to pack it down evenly. This step is key for a sturdy base. Now, let’s make the filling. For this, you’ll need: - 1 cup cream cheese, softened - 1 cup smooth peanut butter - 1 cup powdered sugar - 1 teaspoon vanilla extract - ¾ cup whipped cream In a separate bowl, mix the cream cheese, peanut butter, powdered sugar, and vanilla extract. Use an electric mixer on medium speed to blend until smooth. The filling should be creamy and free of lumps. Next, gently fold in the whipped cream with a spatula. This keeps the filling light and fluffy. Now, spread the cheesecake filling over the pretzel crust. Use an offset spatula to smooth it out evenly. After your filling is in place, it’s time to chill. If you want, sprinkle chocolate chips and extra pretzel pieces on top for added crunch. Cover the pan with plastic wrap and place it in the fridge. Chill for at least 4 hours, but overnight is even better. This helps the bars set perfectly. When ready to serve, lift the bars out using the parchment paper. Slice into neat squares and enjoy them chilled. For a fun twist, drizzle extra peanut butter or chocolate sauce on top before serving. When making these cheesecake bars, avoid the following common mistakes: - Overmixing the peanut butter filling. This can make it dense. Mix only until smooth. - Not packing the pretzel crust tightly enough. A loose crust may crumble when you slice it. Press firmly. - Skipping the chill time. These bars need time to set. Skipping this step affects texture. Folding in whipped cream can seem tricky, but it’s simple: 1. Use a spatula. A spatula helps you lift and fold gently. 2. Add whipped cream in batches. This keeps the mixture light. Start with a small amount. 3. Fold, don’t stir. Gently lift the mixture from the bottom. Rotate it to mix without deflating. Making your bars look great is easy: - Use a decorative serving dish. This adds flair to your table. - Drizzle with peanut butter or chocolate sauce. This gives a beautiful finish. - Garnish with whole pretzels. These add a fun touch and texture. These tips will help you create a stunning dessert that impresses! {{image_4}} You can swap peanut butter for other nut butters. Almond or cashew butter works well. Each nut butter gives a new flavor. This change keeps the bars fun and exciting. Always choose a smooth nut butter to match the texture of the cheesecake. To make these bars gluten-free, use gluten-free pretzels. Many brands offer good options. Check labels to ensure they are truly gluten-free. The rest of the recipe works well without changes. Your bars will taste great and suit gluten-free diets. You can add chocolate or caramel for extra flavor. Drizzle chocolate sauce on top for a sweet touch. Melted caramel can add richness. You might also mix chocolate chips into the filling. These options create a tasty twist on the classic recipe. Enjoy trying different flavors to find your favorite! To keep your No-Bake Peanut Butter Pretzel Cheesecake Bars fresh, wrap them tightly. Use plastic wrap or foil to cover the pan. This helps prevent drying out. You can also store them in an airtight container. This method keeps them moist and tasty. These cheesecake bars last about 5 days in the fridge. Make sure to check for any signs of spoilage. If you see any odd smells or changes in texture, it’s best to toss them. For the best flavor, eat them within the first few days. You can freeze these bars for longer storage. Cut them into individual pieces and wrap each one in plastic wrap. Then, place them in a freezer bag. They will stay good for up to 3 months. When you're ready to enjoy, just thaw them in the fridge overnight. Yes, you can use crunchy peanut butter! It adds a nice texture. If you enjoy bites of peanuts, go for it. Just remember, it may change the smoothness of the bars. The taste will still be rich and yummy. The cheesecake bars are set when they feel firm to the touch. They should not jiggle in the center. Chill them for at least four hours. For best results, let them sit overnight. This helps the bars firm up and makes slicing easier. If you need a substitute for cream cheese, try using Greek yogurt. It gives a similar texture with a tangy taste. You can also use mascarpone cheese for a creamier option. Just make sure it's softened for easy mixing. This blog post explored how to make delicious peanut butter cheesecake bars. We discussed key ingredients, step-by-step instructions, and helpful tips. I shared ways to add your twist with variations like nut butters and flavors. We also covered storage best practices to keep your bars fresh. In the end, making these bars is fun and creative. Don't be afraid to try new ideas. Enjoy your cheesecake bars and share them with others!

No-Bake Peanut Butter Pretzel Cheesecake Bars Delight

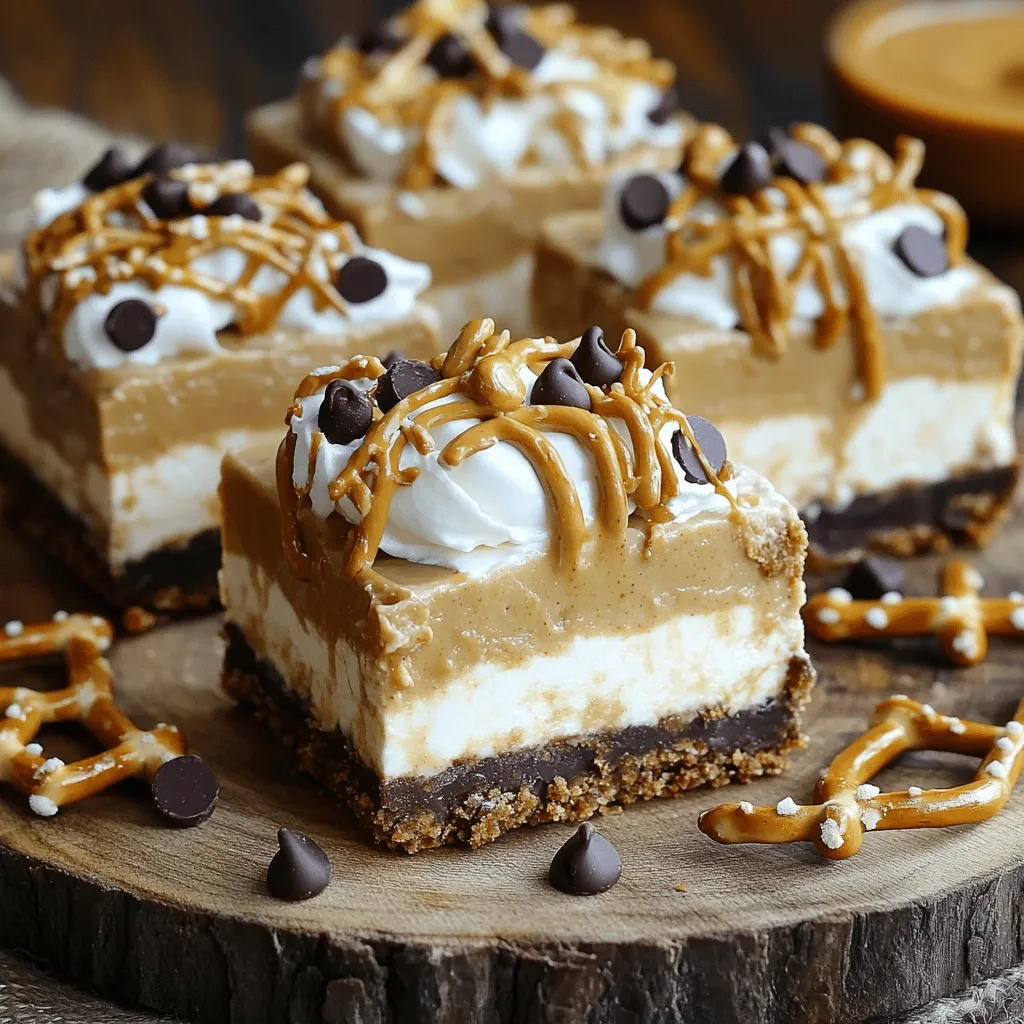
Get ready for a treat that will make your taste buds dance! My No-Bake Peanut Butter Pretzel Cheesecake Bars combine

- 1 pound large shrimp, peeled and deveined - 2 cups fresh broccoli florets - 1 cup bell peppers, sliced (red and yellow) - 1 medium zucchini, sliced into half-moons - 1 medium red onion, cut into wedges - 4 cloves garlic, finely minced - 3 tablespoons extra virgin olive oil - Juice and zest of 2 fresh lemons - 1 teaspoon dried oregano - Salt and freshly ground pepper to taste - Fresh parsley, finely chopped Lemon Garlic Shrimp Veggie Sheet Pan Delight uses simple ingredients. You need fresh shrimp and colorful veggies. Fresh broccoli adds crunch. Bell peppers bring sweetness and color. Zucchini adds a nice texture. Red onion gives a slight bite that balances the dish. For the flavors, garlic plays a key role. It gives a strong, rich taste. Extra virgin olive oil keeps everything moist. The lemon juice and zest brighten the dish. Dried oregano adds depth. Salt and pepper enhance all the flavors. Finally, the fresh parsley is not just for looks. It adds a fresh taste that ties everything together. This dish is not only tasty but also easy to make. You can serve it right from the sheet pan for a fun meal! - Preheat the oven to 400°F (200°C). - Line a large sheet pan with parchment paper. This makes cleanup easy. - Combine shrimp and vegetables in a large mixing bowl. - Use peeled shrimp, broccoli florets, sliced bell peppers, zucchini, and red onion. This mix brings color and taste. - In another bowl, prepare the lemon-garlic mixture. - Whisk together minced garlic, olive oil, lemon juice, lemon zest, dried oregano, salt, and pepper. This step blends the flavors well. - Drizzle the lemon-garlic mixture over the shrimp and veggies. - Use tongs or your hands to toss everything together. Ensure all ingredients are coated. - Spread the mixture evenly on the sheet pan. Make sure shrimp lie in a single layer. This helps them cook evenly. - Bake for 12-15 minutes. Check for doneness by looking for pink and opaque shrimp. The veggies should be tender-crisp. - Remove the pan from the oven. Let it cool slightly before serving. Sprinkle fresh parsley on top for a bright finish. To get the best results, ensure the shrimp are in a single layer on the pan. This lets them cook evenly and stay juicy. When you bake them, keep an eye on the vegetables too. You want them tender but still crisp. Check them around the 12-minute mark. If they look bright and a bit soft, they are ready. For a great presentation, you can serve the dish right from the sheet pan. It looks fun and casual. If you prefer a more formal look, transfer everything to a large platter. Pair your dish with crusty bread or a light salad. The bread can soak up the tasty juices, while the salad adds a fresh crunch. You can easily boost the flavor by adding more spices or herbs. Try some red pepper flakes for heat or fresh basil for a sweet note. If you want more veggies, consider adding asparagus, green beans, or cherry tomatoes. They add color and taste, making your meal even better. {{image_4}} You can swap shrimp for chicken or tofu. Both options work well in this dish. If you use chicken, cut it into bite-sized pieces. For tofu, press it to remove excess water before slicing. Adjust cooking times based on your protein choice. Chicken takes about 20 minutes to cook, while tofu needs just 12-15 minutes. Feel free to change up the veggies. Asparagus, green beans, or carrots are great choices. You can also use seasonal veggies to keep it fresh. Try zucchini in summer or Brussels sprouts in fall. Each vegetable adds a unique taste and color to your dish. Get creative with flavors. You can try different citrus fruits like lime or orange. These can add a fun twist! For a spicy kick, add a dash of red pepper flakes. This small change can make a big difference in taste. Store leftovers in an airtight container. This keeps the shrimp and veggies fresh. Use glass or plastic containers that seal well. Make sure to cool the dish to room temperature first. It can stay in the fridge for three days. To reheat, use the oven or microwave. For the oven, set it to 350°F (175°C). Place the dish on a baking sheet and cover it with foil. Heat for about 10 minutes. In the microwave, heat in short bursts. Stir and check every 30 seconds. This helps keep the shrimp and veggies tender. Want to save some for later? You can freeze it! Place the cooled dish in a freezer-safe container. Be sure to leave some space at the top for expansion. It can last in the freezer for up to three months. For best flavor, eat it sooner rather than later. Yes, you can prep this dish ahead of time. You can chop the veggies and shrimp a day before. Place them in the fridge in an airtight container. You can also mix the lemon-garlic sauce and store it separately. This way, you save time on busy days. Just combine everything and bake when you're ready to eat. I recommend using large shrimp for this recipe. You can choose fresh or frozen shrimp. Fresh shrimp has a sweet taste, but frozen shrimp is often just as good. If you use frozen shrimp, make sure to thaw them in cold water before cooking. This helps them cook evenly and taste great. You can tell shrimp are done when they turn pink and opaque. They should curl slightly as they cook. The veggies should be tender but still crisp. If you keep an eye on them, you can get both just right. This dish is all about bright colors and flavors, so don’t overcook! This blog post covered a tasty shrimp bake filled with fresh veggies. I provided easy steps to prepare and cook the dish. You can customize it with different proteins and vegetables. Don't forget the tips for storing and reheating leftovers. Enjoy experimenting with flavors to make it your own. This recipe offers a fun way to boost your meal prep. Try it, and you’ll have a simple, delicious dinner ready in no time. Happy cooking!

Lemon Garlic Shrimp Veggie Sheet Pan Delight

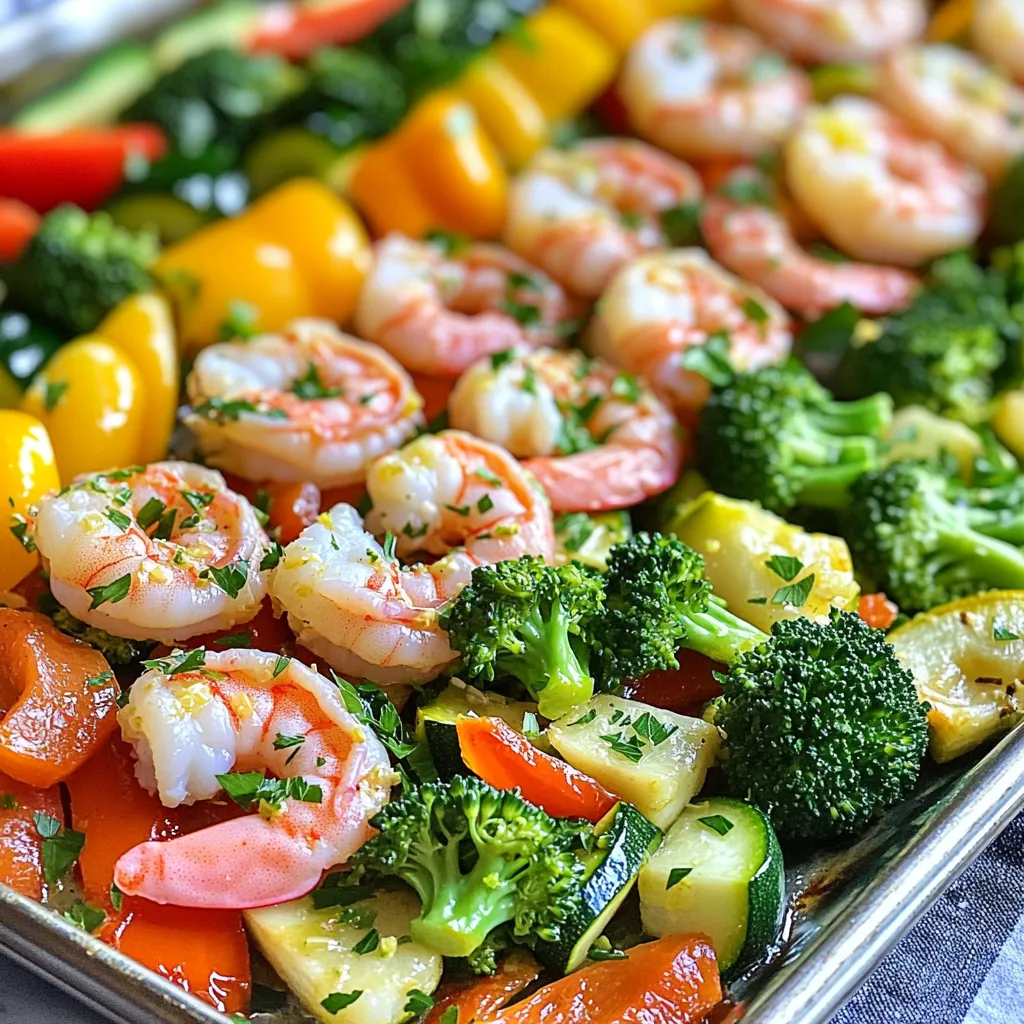
Ready for a meal that’s fresh, tasty, and super easy? My Lemon Garlic Shrimp Veggie Sheet Pan Delight is the

- 1 box (15 oz) cornbread mix - 1 can (15 oz) creamed corn - 1 can (15 oz) whole kernel corn, well-drained - 1/2 cup unsalted butter, melted - 1/2 cup honey, plus extra for drizzling - 2 large eggs - 1 cup sour cream - 1 teaspoon baking powder - 1 teaspoon salt - 1/2 teaspoon ground cinnamon (optional) To make a tasty honey butter cornbread casserole, gather these ingredients first. Each ingredient plays a key role in making this dish rich and flavorful. The cornbread mix gives it a great base. The creamed corn adds moisture, while the whole kernel corn gives texture. Honey and butter together bring sweetness, making each bite delightful. If you do not have some ingredients, don’t worry! Here are some easy swaps: - You can use a gluten-free cornbread mix if needed. - Instead of sour cream, plain Greek yogurt works well. - If you want a dairy-free option, use plant-based butter and yogurt. These swaps keep the flavor fun while catering to your needs. Feel free to experiment! Choosing a good cornbread mix can make a big difference. Here are my favorite brands: - Jiffy Corn Muffin Mix is a classic choice and easy to find. - Bob's Red Mill offers a gluten-free option that tastes great. - Krusteaz has a nice buttery flavor that many love. Using a trusted brand ensures you’ll get a consistent and yummy result. To start making your honey butter cornbread casserole, gather all your ingredients. You will need: - 1 box (15 oz) cornbread mix - 1 can (15 oz) creamed corn - 1 can (15 oz) whole kernel corn, well-drained - 1/2 cup unsalted butter, melted - 1/2 cup honey, plus extra for drizzling - 2 large eggs - 1 cup sour cream - 1 teaspoon baking powder - 1 teaspoon salt - 1/2 teaspoon ground cinnamon (optional) First, take a large bowl. Mix the cornbread mix, creamed corn, and drained whole kernel corn in it. Stir gently. You don’t want to overwork the mix. In another bowl, whisk together the melted butter, honey, eggs, sour cream, baking powder, salt, and ground cinnamon (if you choose to use it). Make sure this mixture is smooth. Next, pour the wet mix into your bowl with the dry ingredients. Stir just until everything combines. It is fine if a few lumps remain. This will help the cornbread stay fluffy. Now, prepare your slow cooker. Grease the insert with cooking spray or a bit of butter. This step is key to keep the casserole from sticking. Carefully pour the cornbread batter into the slow cooker. Spread it out evenly with a spatula. Cover the slow cooker and set it to LOW. Cook for 2 to 3 hours. You know it’s done when the center is firm. A toothpick inserted in the middle should come out clean. This slow cooking method makes the cornbread soft and moist. When cooking time is up, turn off your slow cooker. Let the casserole rest for about 10 minutes with the lid on. This helps it set more before you serve. To serve, cut the casserole into squares. Drizzle some extra honey on top for added sweetness. For a fun twist, add a dollop of whipped cream or a light sprinkle of cinnamon. Enjoy your delicious creation! To make the best honey butter cornbread casserole, watch out for a few key things: - Don’t overmix: When you combine the wet and dry ingredients, stir gently. A few lumps are okay. They keep the cornbread light and fluffy. - Check your slow cooker: Not all slow cookers cook the same. Some may run hotter or cooler. Keep an eye on the casserole as it cooks. - Use fresh ingredients: Fresh eggs and butter make a big difference in flavor. They help your casserole taste its best. You can make your casserole even tastier with simple tweaks: - Add spices: A pinch of ground cinnamon adds warmth. You can also try nutmeg or a dash of cayenne for a hint of heat. - Mix in cheese: Shredded cheddar cheese can add a rich, savory flavor. Stir in about a cup before cooking for a cheesy twist. - Herbs and greens: Fresh herbs like chives or parsley can brighten up the dish. Stir in some chopped greens for a fresh touch. Serving your honey butter cornbread casserole is fun! - Drizzle honey: Always drizzle extra honey on top before serving. It enhances sweetness and makes it more appealing. - Add toppings: Serve with whipped cream or a sprinkle of cinnamon. These add flavor and visual appeal. - Pair with savory dishes: This casserole goes well with chili, BBQ, or fried chicken. It balances rich flavors and makes a great side. {{image_4}} Spices can boost the flavor of your honey butter cornbread casserole. A pinch of cayenne pepper adds heat. You can use garlic powder for a savory kick. Ground black pepper enhances the taste, too. If you love sweetness, add nutmeg or vanilla extract. Adjust the spices to your liking to make a unique dish. This recipe is easy to adapt for different diets. For a vegetarian option, ensure your cornbread mix is meat-free. You can swap regular sour cream for a plant-based version. To make it gluten-free, use a gluten-free cornbread mix. Check labels to ensure all ingredients fit your needs. Adding ingredients can create more texture in your casserole. Try mixing in shredded cheese for a cheesy delight. Crumbled bacon brings a savory crunch. You can add chopped jalapeños for a spicy touch. Finely chopped nuts or seeds can also add a nice crunch. Mix and match to find your favorite combination! Once you finish your honey butter cornbread casserole, let it cool first. This helps keep it fresh. Cut it into squares and place them in an airtight container. Store it in the fridge for up to four days. If you want to keep it longer, freezing is a great option. When you’re ready to enjoy leftovers, simply take a square out of the fridge. You can reheat it in the microwave for about 30 seconds to a minute. Check it to make sure it’s warm throughout. If you prefer, you can also reheat it in the oven at 350°F for about 10-15 minutes. This gives it a nice, warm texture. To freeze your cornbread casserole, wrap each piece tightly in plastic wrap. Then, place them in a freezer-safe bag or container. It will keep well for up to three months. When you’re ready to eat, remove it from the freezer. Thaw it in the fridge overnight before reheating. This way, it retains its delicious taste and texture. You can tell the cornbread casserole is done by checking the center. Use a toothpick and insert it into the middle. If it comes out clean, your casserole is ready! The edges may pull away from the sides of the slow cooker. A firm center also means it’s perfect. Yes, you can use different types of corn. Try using frozen corn or fresh corn if you prefer. Just make sure to drain any liquid from canned corn first. Each type will give a unique taste and texture to your dish, making it fun to experiment. Honey butter cornbread casserole pairs well with many dishes. Serve it with chili for a warm meal. It also goes great with barbecued meats or roasted vegetables. For a sweet touch, add some fruit salad or a scoop of ice cream on the side. Enjoy the mix of flavors! This article covered all you need to make a great cornbread casserole. We discussed the key ingredients, easy substitutions, and trusted brands. The step-by-step guide shows you how to prepare and cook. I shared tips for avoiding common mistakes and adding flavor. Variations let you customize to your taste. We also went over how to store and reheat leftovers. With these insights, you’re ready to create a dish everyone will love. Enjoy making your cornbread casserole!

Honey Butter Cornbread Casserole Slow Cooker Delight

Looking for a delicious and easy dish that warms your heart? Try my Honey Butter Cornbread Casserole in a slow

- 1 lb boneless, skinless chicken breasts - 1 tablespoon extra virgin olive oil - 1 medium yellow onion, diced - 2 cloves garlic, finely minced - 1 bell pepper (red or green), diced - 1 can (15 oz) black beans, well-drained and rinsed - 1 can (15 oz) sweet corn, drained - 1 can (14 oz) diced tomatoes with green chilies - 4 cups low-sodium chicken broth - 1 tablespoon chili powder - 1 teaspoon ground cumin - 1 teaspoon smoked paprika - Salt and freshly ground black pepper, to taste - Juice of 1 fresh lime These ingredients create a rich and flavorful base for the soup. Each plays a key role in building layers of taste. The chicken provides protein, while the beans and corn add texture. The spices deliver warmth and depth. - Crunchy tortilla strips (for garnish) - Fresh cilantro leaves (for garnish) - Ripe avocado, diced (for garnish) - Shredded cheese (optional, for garnish) Garnishing adds a fun twist. You can sprinkle tortilla strips on top for crunch. Fresh cilantro and diced avocado bring freshness and creaminess. A little cheese can make it extra rich. When picking fresh ingredients, look for bright colors and firm textures. For onions, choose ones that feel heavy for their size. Garlic should be plump and dry. Bell peppers should be smooth and free of spots. Fresh herbs like cilantro should be vibrant and fragrant. Always check for the best quality to enhance your soup. {{ingredient_image_2}} Start by getting your Instant Pot ready. Set it to 'Sauté' mode. Pour in one tablespoon of extra virgin olive oil. Add one diced medium yellow onion. Cook it for about 3-4 minutes until it turns soft and clear. Then, toss in two minced garlic cloves and one diced bell pepper. Stir and cook for about 2-3 minutes until the pepper softens. Now, it’s time to spice things up! Add one tablespoon of chili powder, one teaspoon of ground cumin, and one teaspoon of smoked paprika to the pot. Don't forget to sprinkle in some salt and freshly ground black pepper. Stir the mixture for one minute. This step brings out the rich aromas of the spices. Next, place one pound of boneless, skinless chicken breasts into the pot. Add one can of black beans, one can of sweet corn, and one can of diced tomatoes with green chilies. Pour in four cups of low-sodium chicken broth. Gently stir everything to mix the flavors well. After mixing, secure the lid on the Instant Pot. Make sure the valve is set to 'Sealing'. Select the 'Pressure Cook' setting and set the timer for 15 minutes. When the time is up, let it sit for 10 minutes to release pressure naturally. Then, switch the valve to 'Venting' to let out any remaining steam. Be careful to avoid the steam! Once the lid is off, remove the chicken breasts. Use two forks to shred the chicken into bite-size pieces. Stir the chicken back into the soup and squeeze in the juice of one fresh lime. This adds a bright taste that lifts the dish. Finally, taste the soup. You may want to add more salt or pepper for your taste. Serve the soup hot in bowls. Top each bowl with crunchy tortilla strips, diced avocado, fresh cilantro, and shredded cheese if you like. For a fun twist, add a lime wedge on the side for squeezing. Enjoy your flavorful delight! To make your soup burst with flavor, start with fresh ingredients. Use ripe tomatoes and sweet bell peppers. The spices are key too! Use the full amount of chili powder and cumin. Fresh lime juice at the end brightens the taste. Lastly, let the soup sit for a few minutes before serving. This helps the flavors blend well. One common mistake is overcooking the chicken. It can turn dry and tough. Always follow the 15-minute timer for pressure cooking. Avoid skipping the sauté step; it adds great flavor to the base. Also, don’t forget to taste before serving. Adjust salt and pepper to suit your taste. If you are in a hurry, you can cut the chicken into smaller pieces. This can reduce cooking time by a few minutes. If you like your soup thicker, mash some of the beans while cooking. For a lighter soup, use less broth. Adjust these details to match your needs. Pro Tips Use Fresh Ingredients: For the best flavor, use fresh vegetables and herbs. They can significantly enhance the taste of your soup. Adjust Spice Levels: If you prefer a spicier soup, consider adding jalapeños or extra chili powder to suit your taste. Make It Ahead: This soup can be made in advance and stored in the refrigerator for up to three days, allowing the flavors to meld beautifully. Garnish for Flavor: Don't skip the garnishes! Fresh cilantro, avocado, and tortilla strips add great texture and flavor to your soup. {{image_4}} You can easily make a vegetarian or vegan version of this soup. Instead of chicken, use extra beans or lentils for protein. You can add more veggies like zucchini, mushrooms, or carrots. Replace chicken broth with vegetable broth for a full flavor. Use olive oil to sauté the vegetables. This keeps the soup light and fresh. If you love heat, add jalapeños or serrano peppers. You can toss in some crushed red pepper flakes for extra spice. A splash of hot sauce before serving brings a nice kick too. Just be careful; you can always add more, but you can't take it away! You can swap chicken for other proteins. Try shredded beef or pork for a different taste. For a seafood twist, use shrimp or fish. These options add unique flavors and textures to the soup. Just adjust the cooking time to ensure everything cooks perfectly. Store your Instant Pot chicken tortilla soup in airtight containers. Let it cool before sealing. This helps keep flavors fresh. Place it in the fridge if you plan to eat it soon. Use it within three to four days for the best taste. Reheat your soup on the stove over medium heat. Stir often to warm evenly. You can also use the microwave. Heat it in short bursts, stirring in between. Ensure it reaches a hot temperature before serving. To freeze, let the soup cool completely. Transfer it to freezer-safe bags or containers. Remove as much air as possible. Label the bags with the date. You can freeze the soup for up to three months. When ready to eat, thaw it in the fridge overnight before reheating. It takes about 15 minutes to cook chicken in an Instant Pot. This quick method seals in moisture and flavor. Always check the chicken is cooked to 165°F for safety. Yes, you can use frozen chicken. Just add a few extra minutes to the cooking time. Make sure to separate the chicken pieces, if possible. This helps them cook evenly and stay tender. You can use vegetable broth or water if you need a substitute. Just remember, the flavor will change a bit. For a richer taste, try using homemade broth or stock. To spice up your soup, add more chili powder or fresh jalapeños. You can also toss in some hot sauce. Start with a little, and adjust to your heat preference for the best results. Yes, you can make this soup in a slow cooker. Cook on low for 6-8 hours or high for 3-4 hours. Just sauté the veggies first in a pan to enhance the flavors before adding them to your slow cooker. You learned about making a delicious Instant Pot Chicken Tortilla Soup. We covered essential ingredients and how to prepare them. I shared tips for flavor and common mistakes to avoid. You also saw variations for different diets and how to store leftovers. This soup is tasty and very easy to make. Enjoy experimenting with your own twist! Happy cooking!

Instant Pot Chicken Tortilla Soup Flavorful Delight

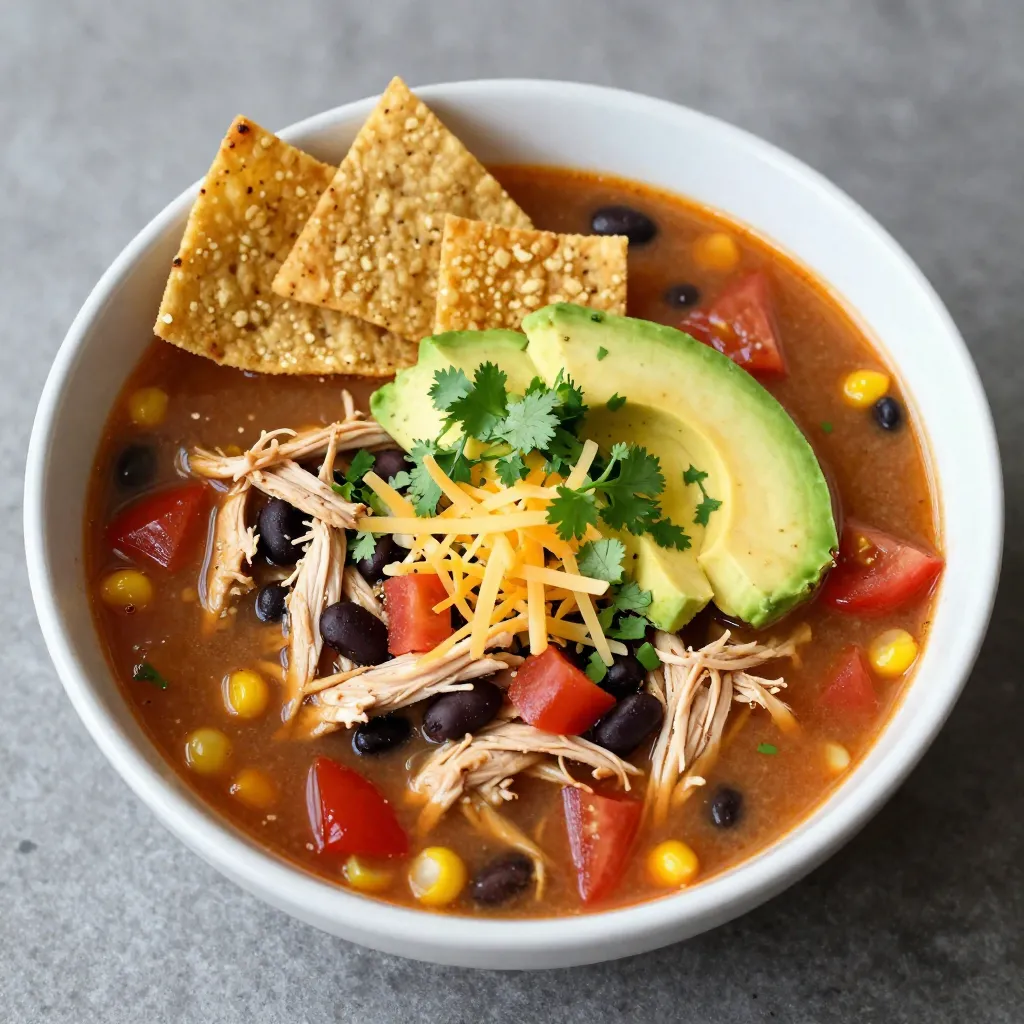
If you crave a warm, comforting bowl of soup, you’re in the right place! My Instant Pot Chicken Tortilla Soup

- 1 cup unsalted butter, softened to room temperature - 1 cup packed brown sugar - 1/2 cup granulated sugar - 2 large eggs, at room temperature - 1 teaspoon pure vanilla extract - 1 1/2 cups all-purpose flour - 1/2 teaspoon baking soda - 1/2 teaspoon fine sea salt - 2 cups rolled oats - 1 cup dark chocolate chunks - 1/2 cup chopped walnuts (optional) Every ingredient plays a key role in your chewy oatmeal chocolate chunk cookies. - Butter: It gives the cookies a rich flavor and soft texture. - Brown Sugar: This adds moisture and creates that chewy bite. - Granulated Sugar: It balances sweetness and helps achieve a nice crust. - Eggs: They bind the dough and add moisture. - Vanilla Extract: It enhances the flavor, making cookies taste amazing. - Flour: This provides structure to the cookies, keeping them from being too soft. - Baking Soda: It helps the cookies rise, giving them a fluffy texture. - Sea Salt: A little salt amplifies the sweet flavors in the cookies. - Rolled Oats: They add chewiness and a wholesome texture. - Dark Chocolate Chunks: These bring rich flavor and melty goodness. - Chopped Walnuts: If you use them, they add crunch and a nutty taste. You can customize your cookies with add-ins. Some tasty options include: - Chopped Dried Fruit: Adds sweetness and chewiness. - Coconut Flakes: Infuses a tropical flavor and chewy texture. - Peanut Butter Chips: They add a nutty twist. - Milk Chocolate Chunks: For a sweeter chocolate experience. Feel free to mix and match to create your own version! Start by preheating your oven to 350°F (175°C). This step is key for even baking. While the oven heats, prepare two baking sheets. Line them with parchment paper. This prevents the cookies from sticking and makes cleanup easy. Next, grab a large mixing bowl. Add 1 cup of softened unsalted butter. Then, mix in 1 cup of packed brown sugar and 1/2 cup of granulated sugar. Use a hand mixer or stand mixer on medium speed. Mix until the mixture is light and fluffy, about 3 to 5 minutes. Add 2 large eggs, one at a time. Mix well after each egg. Pour in 1 teaspoon of pure vanilla extract and blend until smooth. In a separate medium bowl, whisk together 1 1/2 cups of all-purpose flour, 1/2 teaspoon of baking soda, and 1/2 teaspoon of fine sea salt. This helps to evenly distribute the leavening agent and salt. Gradually add the dry mix to the wet mix. Stir gently until just combined. Be careful not to overmix, or your cookies may become tough. Now it’s time to add the fun stuff! Sprinkle in 2 cups of rolled oats, 1 cup of dark chocolate chunks, and 1/2 cup of chopped walnuts if you like. Use a spatula to fold these in evenly. Next, use a cookie scoop or tablespoon to drop rounded balls of dough onto the baking sheets. Make sure to space them about 2 inches apart. This allows room for spreading. Bake in the preheated oven for 10 to 12 minutes. They should have lightly golden edges but soft centers. Once they are done baking, let the cookies cool on the baking sheet for about 5 minutes. Then, transfer them to a wire rack to cool completely. For a delightful touch, serve these cookies warm with a glass of cold milk. You can even sprinkle a hint of flaky sea salt on top before serving to enhance the flavor! To get that chewy texture, you need to use rolled oats. They add great flavor and chewiness. Also, don't overbake the cookies. Bake them until the edges are just golden, and the centers look soft. This keeps them chewy inside. Using brown sugar is key too. It holds more moisture than white sugar, so it helps keep your cookies soft. Store your cookies in an airtight container. This keeps them soft and fresh for days. If you want them to last longer, freeze them. Just place them in a freezer-safe bag. When you want a cookie, let it thaw for a few minutes. You can even warm it in the microwave for a few seconds to restore that fresh-baked taste. One common mistake is overmixing the dough. Mix just until the dry ingredients disappear. Overmixing makes the cookies tough. Another mistake is not spacing the dough balls. They need room to spread out while baking. Lastly, many forget to check the cookies early. Start checking them at 10 minutes to avoid overbaking. {{image_4}} You can make these cookies healthier. To make them gluten-free, swap all-purpose flour for almond flour or a gluten-free blend. Use certified gluten-free oats to avoid cross-contamination. For a vegan twist, replace the butter with coconut oil and the eggs with flaxseed meal mixed with water. Use 1 tablespoon of flaxseed meal with 2.5 tablespoons of water for each egg. This keeps the cookies moist and chewy. Adding spices can boost flavor. Try a pinch of cinnamon or nutmeg to warm up the taste. You can also mix in extra goodies. Chopped walnuts add crunch, while dried cranberries or raisins bring sweetness. Feel free to experiment! Each addition gives a new twist to your cookies. While dark chocolate is rich, you can switch it up. Use milk chocolate chunks for a sweeter taste or white chocolate for a creamy flavor. If you want a fun variation, combine different chocolates. This mix creates layers of flavor in each bite. To keep your chewy oatmeal chocolate chunk cookies fresh, store them in an airtight container. This method helps maintain their soft texture and rich flavor. If you have more than one batch, separate layers with parchment paper. This prevents them from sticking together. Keep the container in a cool, dry place, away from sunlight. Your cookies will stay fresh for about one week. If you want to save cookies for later, freezing is a great option. First, let the cookies cool completely. Then, place them in a single layer on a baking sheet. Freeze them for about one hour. Once frozen, transfer the cookies to a freezer-safe bag or container. Be sure to label it with the date. Your cookies can last up to three months in the freezer. When you're ready to enjoy, just thaw at room temperature. If your cookies lose their softness, don’t worry. You can easily bring back their chewy texture. Preheat your oven to 350°F (175°C). Place the cookies on a baking sheet. Heat them for about 5 minutes. For a quicker method, microwave one cookie for about 10-15 seconds. This will warm it up and make it soft again. Enjoy each bite just like fresh! The key to chewy cookies lies in the balance of ingredients. The butter and sugars create a rich base, while the rolled oats add texture. Using brown sugar also helps since it retains moisture better than white sugar. This moisture keeps the cookies soft and chewy. Yes, you can! For the butter, use coconut oil or margarine. If you want a healthier option, try using applesauce instead of sugar. You can swap dark chocolate for milk chocolate or white chocolate if that’s your preference. Just remember, changing ingredients might affect the final texture! Watch for the edges turning lightly golden. The centers should look soft and puffy. Remove the cookies from the oven at this stage. They will harden as they cool, ensuring a chewy bite. If stored in an airtight container, these cookies last for about a week. They may stay fresher for longer if you keep them in the fridge. You can freeze them for up to three months. Just make sure to wrap them well! In this article, we explored key ingredients and their roles in making perfect cookies. You learned step-by-step instructions to bake, cool, and serve with care. We shared helpful tips for chewy texture and storage secrets. Variations offered ideas for healthy swaps and flavor boosts. Baking cookies is fun and rewarding. Remember these tips to impress yourself and others with every batch. Enjoy your baking journey!

Chewy Oatmeal Chocolate Chunk Cookies Delightfully Easy

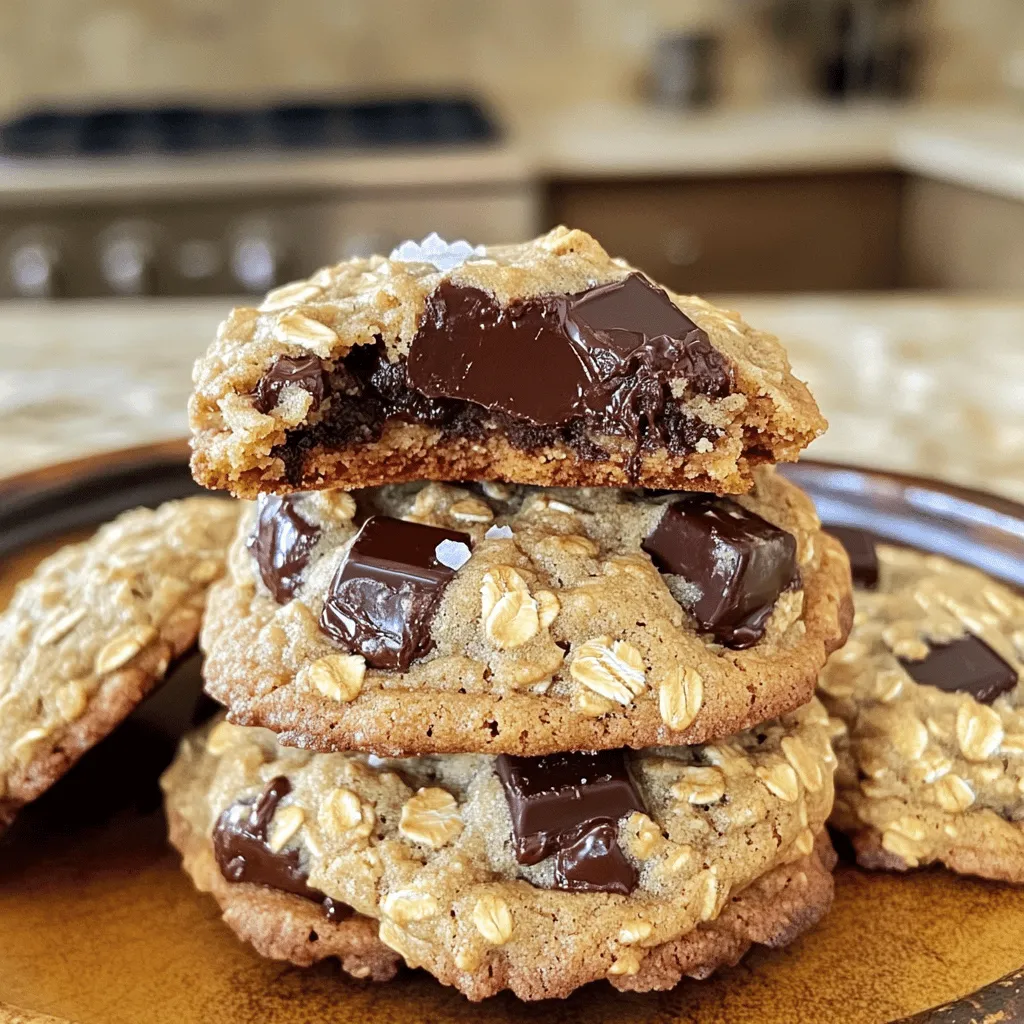
Are you ready for a sweet adventure? Today, I’ll show you how to make Chewy Oatmeal Chocolate Chunk Cookies that

- 2 cups all-purpose flour - 1 cup granulated sugar - 1 tablespoon baking powder - 1 teaspoon baking soda - 1/2 teaspoon salt - 1 teaspoon ground cinnamon - 1/2 cup unsalted butter, melted - 1 large egg - 1 cup buttermilk (or milk mixed with 1 tablespoon vinegar) - 1 teaspoon vanilla extract - 1/2 cup packed brown sugar - 1 tablespoon ground cinnamon Each ingredient plays a key role in making this bread delicious. The all-purpose flour gives the bread structure. Granulated sugar adds sweetness, while brown sugar in the swirl gives a rich flavor. Baking powder and baking soda help the bread rise. Salt enhances all the flavors, and cinnamon brings warmth. For the wet ingredients, melted butter provides moisture and richness. The egg binds everything together, while buttermilk keeps the bread tender. Vanilla extract adds a lovely aroma. Lastly, the cinnamon swirl mixture is where the magic happens. It creates that sweet, spiced ribbon inside the bread. Mixing these ingredients in the right order is crucial for the best results. Each component contributes to the overall taste and texture, making it a true bakery-style delight. 1. Preheat your oven to 350°F (175°C). This helps the bread bake evenly. 2. Grease a 9x5-inch loaf pan with cooking spray or butter. This keeps the bread from sticking. 1. In a large bowl, whisk together: - 2 cups all-purpose flour - 1 cup granulated sugar - 1 tablespoon baking powder - 1 teaspoon baking soda - 1/2 teaspoon salt - 1 teaspoon ground cinnamon 2. Mixing these dry items well ensures they blend evenly in the batter. 1. In another bowl, whisk together: - 1/2 cup melted unsalted butter - 1 large egg - 1 cup buttermilk (or milk mixed with vinegar) - 1 teaspoon vanilla extract 2. Mix until smooth. This creates a rich base for your bread. 1. Pour the wet mixture into the dry ingredients. 2. Use a spatula to stir gently. Stop mixing when just combined. It’s okay to have small lumps. This keeps the bread soft. 1. In a small bowl, mix: - 1/2 cup packed brown sugar - 1 tablespoon ground cinnamon 2. Spoon half of the batter into the loaf pan. Smooth it out. 3. Sprinkle half of the cinnamon mixture on top. 4. Add the rest of the batter over the cinnamon layer. 5. Swirl the remaining cinnamon mix into the top. Use a knife or skewer for a marbled look. 1. Place the loaf pan in the oven. Bake for 50 to 60 minutes. 2. Check doneness by inserting a toothpick. It should come out clean or with a few crumbs. 3. Remove the bread from the oven and cool in the pan for 10 minutes. 4. Transfer the loaf to a wire rack to cool completely. This helps it set before slicing. To get the best texture, don’t overmix the batter. Overmixing adds too much air and makes the bread tough. Mix just until the flour disappears. This leaves some lumps, and that’s okay. Also, use the right pan size. A 9x5-inch pan works best for even baking. A smaller pan may cause the bread to rise too high and overflow. You can add nuts or dried fruits for extra flavor. Walnuts or pecans add a nice crunch. Dried cranberries or raisins give a sweet touch. Experiment with spices, too. Try adding nutmeg or cloves for a unique twist. You can even swap out some cinnamon for cardamom. Each spice adds its own personality to the bread. Enjoy the bread warm with butter. It melts so nicely into the soft bread. You can also sprinkle a bit of cinnamon on top for a nice touch. For a sweet finish, create a glaze. Mix powdered sugar with a little milk and drizzle it over each slice. This not only adds flavor but looks great too! {{image_4}} You can easily add chopped nuts to the dough. Walnuts or pecans work great. Chop them roughly, so they mix well. Add about 1/2 cup to the batter when you combine the wet and dry ingredients. The nuts add a nice crunch and flavor to every bite. For a sweet twist, add chocolate chips to the batter. Use semi-sweet or dark chocolate chips, about 1/2 cup. Fold them into the batter after mixing the wet and dry ingredients. The chocolate melts into the bread, giving it a rich taste. It pairs perfectly with the cinnamon swirl. If you need a gluten-free version, you can swap the all-purpose flour. Try a gluten-free blend that has xanthan gum in it. Almond flour or coconut flour can also work well. Just remember, these may change the bread's texture a bit. Adjust the liquid if needed, as these flours absorb more moisture. To keep your cinnamon swirl quick bread fresh, wrap it in plastic wrap. You can also use a zip-top bag. Store it at room temperature for up to three days. If you want to keep it longer, place it in the fridge. Just be aware that it may dry out a bit. For freezing, wrap the bread tightly in plastic wrap. Then place it in a freezer-safe bag. This way, it stays fresh for up to three months. When you’re ready to enjoy it, thaw it in the fridge overnight. For a quick fix, you can microwave slices for about 15 to 20 seconds. This bread can stay fresh for about three days at room temperature. In the fridge, it lasts about a week. If frozen, it remains good for up to three months. Always look for signs of mold or off smells before eating. Enjoy your cinnamon swirl bread while it’s fresh for the best taste! Yes, you can use regular milk. To make a substitute, mix one cup of milk with one tablespoon of vinegar or lemon juice. Let it sit for five minutes. This gives the milk a tangy taste like buttermilk. The bread will still be soft and moist. Check the bread at the 50-minute mark. Insert a toothpick in the center. If it comes out clean or with a few crumbs, the bread is done. If it has wet batter, bake for a few more minutes. The top should be golden brown and spring back when touched. Yes, you can replace the egg. Use one mashed banana or a quarter cup of unsweetened applesauce. You can also use a flax egg. To make this, mix one tablespoon of ground flaxseed with three tablespoons of water. Let it sit for a few minutes until it thickens. Cinnamon swirl bread pairs well with many things. Try it warm with butter or cream cheese. Add a drizzle of honey for sweetness. You can also serve it with coffee or tea. For a fun twist, make French toast from the bread for breakfast! In this post, we explored how to make a delicious cinnamon swirl bread from scratch. We covered all the essential ingredients, then walked through each step to ensure your success. Remember, the secret to great bread lies in not overmixing and experimenting with flavors. Feel free to try different twists, like adding nuts or chocolate chips. With these tips, you'll bake a delightful treat that impresses everyone. Enjoy the warm, sweet aroma filling your kitchen!

Bakery-Style Cinnamon Swirl Quick Bread Delight

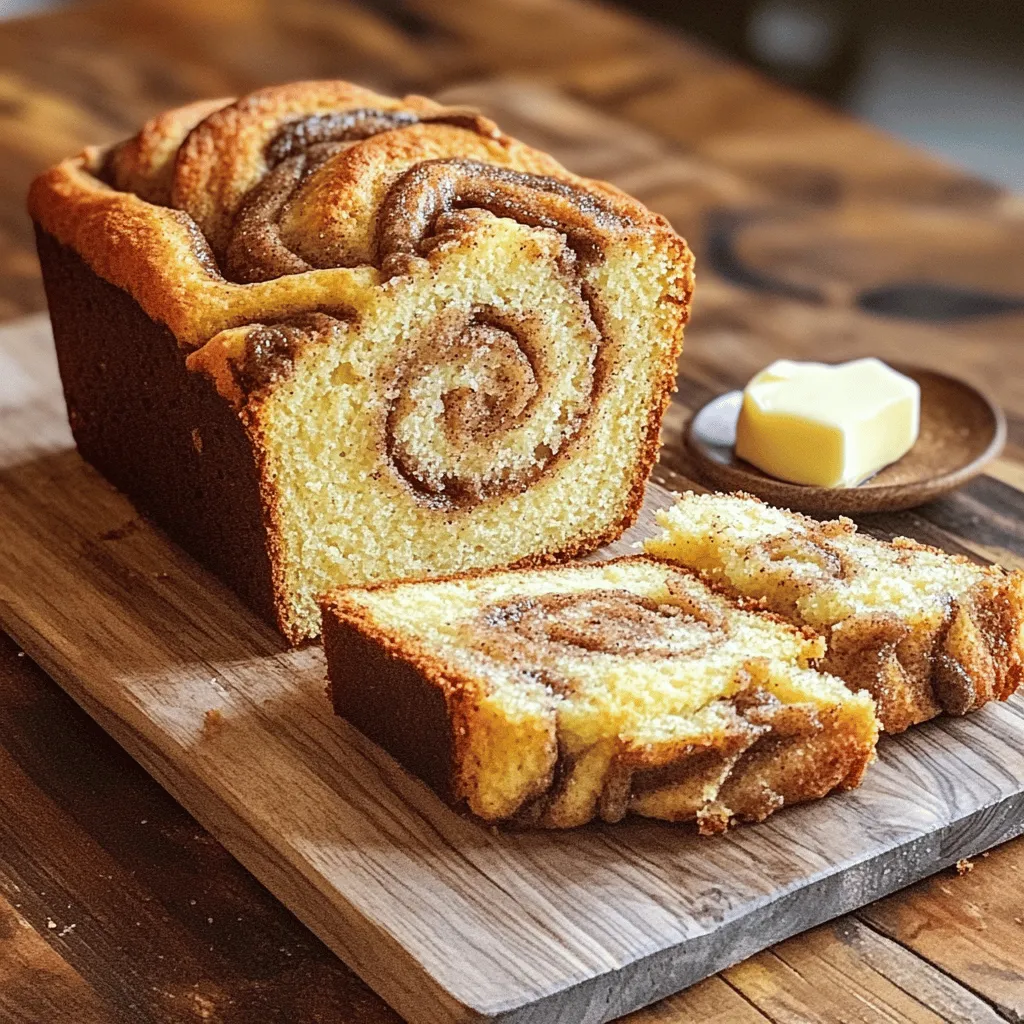
Are you ready to bake the most delightful bakery-style cinnamon swirl quick bread? This recipe is easy to follow and

Older posts
Newer posts
← Previous Page1 … Page9 Page10 Page11 … Page86 Next →

dsad

© 2026 yumymoments • Built with GeneratePress

Our Policies

  • Copyright Policy
  • Cookie Policy
  • GDPR Policy
  • Privacy Policy
  • Disclaimer
  • Terms Of Use

More Information

  • Home
  • About
  • Contact
  • Appetizers
  • Dessert
  • Dinner
  • Drinks
©2026, yumymoments About Back To Top