Skip to content
DisclaimerTerms Of UseGDPR PolicyCookie Policy

yumymoments

  • Home
  • Drinks
  • Appetizers
  • Dinner
  • Dessert
  • About
  • Contact
  • Privacy Policy
DisclaimerTerms Of UseGDPR PolicyCookie Policy

NO-ING-IMG

- 1 cup quinoa, thoroughly rinsed to remove bitterness - 2 cups vegetable broth or water, for cooking quinoa - 1 cup cherry tomatoes, halved for a burst of sweetness - 1 cup cucumber, diced, adding a refreshing crunch - 1 red bell pepper, diced, for vibrant color - 1 cup cooked chickpeas, either canned or pre-cooked - 1 cup shredded carrots, for natural sweetness and texture - 1 ripe avocado, sliced, for creaminess - 1/4 cup fresh parsley, chopped, to brighten the flavor Quinoa is a great base for this dish. It is protein-rich and filling. I always rinse it well to remove any bitterness. For cooking, I use vegetable broth. It adds more flavor than water. The fresh vegetables bring colors and textures. Cherry tomatoes offer sweetness, while cucumber gives a nice crunch. Chickpeas add protein and fiber, making this meal more satisfying. Carrots add sweetness and a pop of color. And avocado? It provides creaminess that ties everything together. - 1/4 cup tahini, for a rich, nutty dressing - 2 tablespoons lemon juice, to add freshness - 1 tablespoon olive oil, for a silky texture - 1 teaspoon garlic powder, for depth of flavor - Salt and pepper to taste, for seasoning - Optional toppings: pumpkin seeds, feta cheese, or roasted nuts The dressing is simple yet flavorful. I mix tahini, lemon juice, and olive oil for a rich flavor. Garlic powder gives it a nice kick. I always taste and adjust the salt and pepper. You can also add toppings like pumpkin seeds for crunch or feta cheese for tang. These small touches make each bite special. To cook quinoa, start by bringing 2 cups of vegetable broth or water to a boil in a medium-sized pot. Once boiling, add 1 cup of thoroughly rinsed quinoa. Lower the heat to a simmer and cover the pot with a lid. Let it cook for about 15 minutes. When done, the quinoa should be fluffy and all the water should be absorbed. To fluff the quinoa, use a fork and gently stir it. This helps separate the grains and gives it a light texture. While the quinoa cooks, prepare your dressing. In a small mixing bowl, combine 1/4 cup of tahini, 2 tablespoons of lemon juice, and 1 tablespoon of olive oil. Add 1 teaspoon of garlic powder, along with a pinch of salt and pepper. Whisk the mixture until it’s smooth. Taste the dressing and adjust the flavors as needed. You can add more lemon juice for tang or more salt for flavor. Once the quinoa is fluffy, transfer it to a large mixing bowl. Carefully fluff the quinoa again with a fork. Then, add in 1 cup each of halved cherry tomatoes, diced cucumber, diced red bell pepper, cooked chickpeas, and shredded carrots. Toss everything together so that the ingredients mix well. Drizzle your tahini dressing over the bowl and toss gently to coat everything evenly. To serve, divide the mixture into individual bowls. Add sliced avocado on top, along with a sprinkle of chopped parsley. For extra crunch or flavor, consider adding pumpkin seeds, feta cheese, or roasted nuts. Enjoy your fresh and colorful veggie-packed quinoa power bowls! Rinsing Tips Always rinse your quinoa before cooking. Rinsing removes saponins, which can make quinoa taste bitter. Place the quinoa in a fine-mesh sieve and rinse it under cold water for about a minute. This step ensures a cleaner taste and makes your dish more enjoyable. Avoiding Bitterness To avoid bitterness, use vegetable broth instead of water. Broth adds flavor and richness. Make sure to cook the quinoa until it’s fluffy. It usually takes about 15 minutes on low heat. Once cooked, fluff it with a fork to separate the grains. Consistency Adjustments For a creamy tahini dressing, mix tahini with lemon juice and olive oil. If it’s too thick, add a bit of water. Aim for a smooth texture that coats your veggies well. The right consistency makes the dressing easier to mix and enhances the overall flavor. Flavor Balancing Taste the dressing as you go. Add garlic powder for depth and adjust salt and pepper to your liking. Balancing flavors is key to a great dressing. A little extra lemon juice can brighten the taste and give it a fresh kick. Bowl Presentation Ideas Presentation matters! Divide the quinoa into bowls and layer your veggies on top. Arrange the cherry tomatoes, cucumbers, and bell peppers in a colorful way. Top with sliced avocado and a sprinkle of parsley for a vibrant look. Customizing Portions Feel free to customize your portions based on hunger levels. Add more chickpeas for protein or extra veggies for crunch. You can also include toppings like pumpkin seeds or feta cheese. This makes each bowl unique and satisfying. {{image_4}} You can switch up the protein in your quinoa power bowls easily. Legumes like lentils or black beans work great instead of chickpeas. They add fiber and protein while keeping the dish plant-based. If you prefer meat, grilled chicken or shrimp can give a nice twist. For dairy lovers, adding feta cheese will bring a creamy texture. Feel free to use seasonal vegetables. In the summer, try zucchini or sweet corn for a fresh taste. In the fall, pumpkin or roasted squash can add warmth. You can also swap the tahini dressing for a yogurt sauce or a simple vinaigrette. This gives you multiple ways to enjoy the same base dish. Want a vegan version? Just stick with the chickpeas and avoid any dairy. For a gluten-free option, ensure your broth is gluten-free. If you're watching calories, use less dressing or skip the avocado. These changes keep your meal healthy while fitting your diet. - Use airtight containers to keep your quinoa fresh. - Glass or BPA-free plastic works well. - Allow the quinoa to cool before sealing. - Store in the fridge for up to five days. - Reheat quinoa gently to keep it fluffy. - Use the microwave on medium power for two minutes. - Add a splash of water to avoid dryness. - Stir halfway to heat evenly. - Cook a big batch of quinoa at once. - Portion into individual containers for easy meals. - Mix in veggies and dressing just before eating. - This keeps flavors fresh and ingredients crisp. To make quinoa less bitter, you should rinse it well. Place the quinoa in a fine mesh strainer. Rinse it under cold running water for at least 2 minutes. This process removes the saponins, which cause bitterness. After rinsing, cook it in vegetable broth or water as directed. This adds flavor and helps balance any remaining bitterness. Yes, you can use other grains. Some good choices include brown rice, farro, or barley. These grains offer different textures and flavors. Adjust cooking times based on the grain you select. For example, brown rice takes longer to cook than quinoa. Experiment with what you enjoy most. Quinoa is packed with nutrients. It is high in protein, fiber, and essential amino acids. Here’s a quick breakdown of its nutritional value: - Protein: Quinoa is a complete protein, meaning it has all nine essential amino acids. - Fiber: It contains more fiber than many grains, aiding digestion. - Vitamins: Quinoa is rich in B vitamins, which help energy production. - Minerals: It provides magnesium, iron, and potassium, supporting overall health. These benefits make quinoa a great choice for a healthy meal. In this post, we explored making delicious power bowls. We covered ingredients like quinoa, veggies, and protein. I shared steps for cooking and making a tasty dressing. I also gave tips for perfecting quinoa and adding a creamy dressing. You can customize your bowls with different proteins and veggies. Lastly, I shared storage tips for your leftovers. By following these steps, you can create a fun, healthy meal for any day. Enjoy your cooking journey!

Veggie-Packed Quinoa Power Bowls Healthy and Fresh Meal

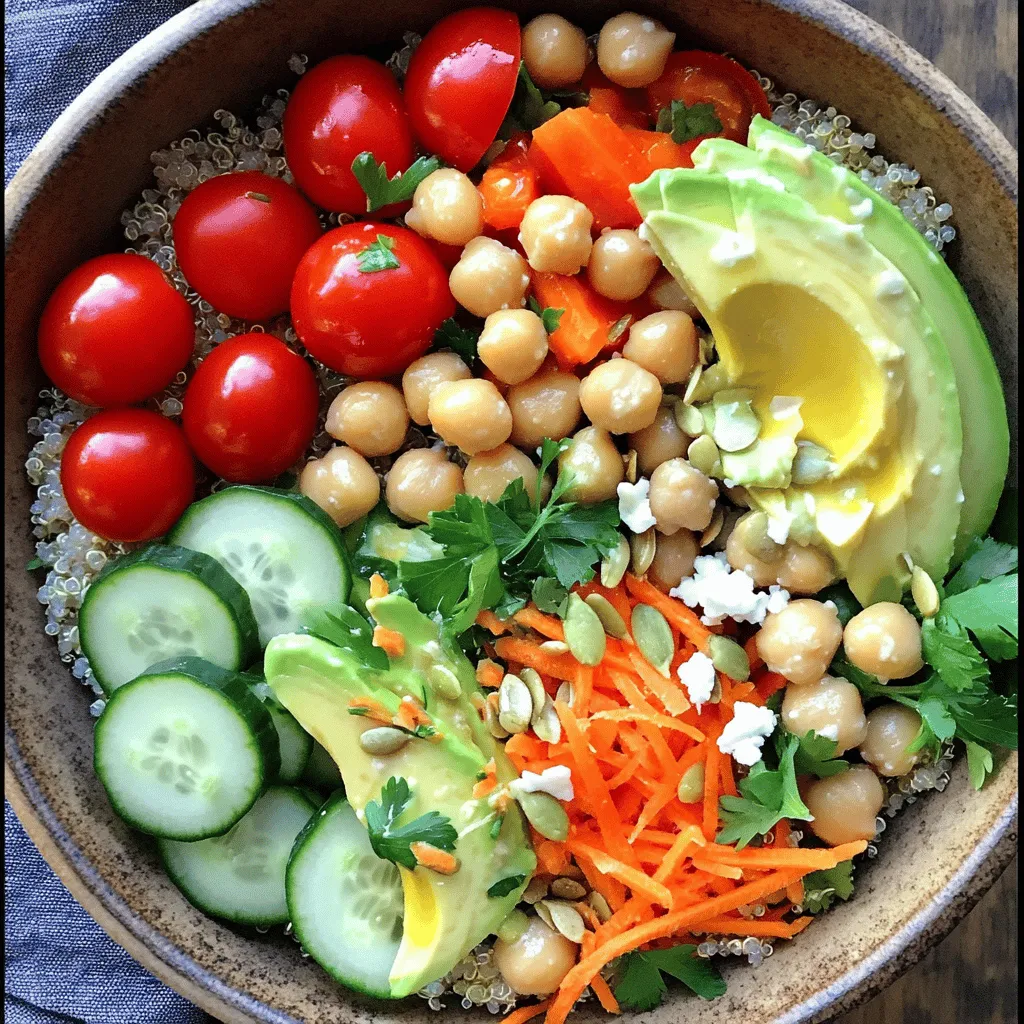
Looking for a quick, healthy meal that bursts with flavor? Veggie-Packed Quinoa Power Bowls are your answer! I’ll guide you

- 1 lb sirloin steak, cut into 1-inch cubes - 2 medium zucchinis, thinly sliced into half-moons - 4 tablespoons unsalted butter - 4 cloves garlic, finely minced - 1 teaspoon fresh rosemary, finely chopped - 1 teaspoon fresh thyme, chopped The main ingredients make this dish shine. Sirloin steak adds rich flavor and tenderness. Zucchini brings a fresh crunch and is low in calories. Garlic infuses the dish with a strong aroma. Butter creates a creamy texture, while fresh herbs add brightness. - Salt and freshly ground pepper to taste - 2 tablespoons olive oil - Fresh parsley, chopped (for garnish) - Lemon wedges (for a zesty serving) Seasoning is key for great taste. Salt and pepper enhance the meat's flavor. Olive oil helps with cooking and adds richness. Fresh parsley gives a pop of color and freshness. Lemon wedges provide a zesty touch that brightens every bite. Using fresh ingredients makes a big difference in taste. I always choose the best quality I can find. This way, you enjoy every bite of garlic butter steak bites with zucchini. Cutting the sirloin steak Start by cutting the sirloin steak into 1-inch cubes. Use a sharp knife for clean cuts. This size helps the meat cook evenly and quickly. Place the cubes in a medium bowl. Slicing Zucchini Next, take the zucchinis and slice them into thin half-moons. Aim for even slices so they cook at the same rate. Set the zucchini aside in a separate bowl. Seasoning the steak In the bowl with the steak, add salt, pepper, and half of the chopped rosemary and thyme. Toss gently to coat each piece. This seasoning boosts the flavor of the steak bites. Sautéing the zucchini Heat 1 tablespoon of olive oil in a large skillet over medium heat. Once the oil is hot, add the zucchini slices. Season them lightly with salt and pepper. Cook for 4-5 minutes, stirring occasionally. The zucchini should be fork-tender and slightly golden. After that, remove them from the skillet and set aside. Cooking the steak bites In the same skillet, add another tablespoon of olive oil and raise the heat to medium-high. When the oil is shimmering, add the seasoned steak cubes in a single layer. If your skillet is small, cook in batches for even searing. Sear the steak for 2-3 minutes on each side. Aim for your desired doneness. Once done, transfer the steak bites to a plate and set aside. Making the garlic butter Reduce the heat back to medium. Add the butter to the skillet along with minced garlic and the remaining chopped herbs. Stir continuously for 1-2 minutes. The butter will melt and the garlic will release a wonderful aroma. Combining ingredients Gently return the cooked steak bites and sautéed zucchini to the skillet. Toss everything together to coat in the garlic butter. Let it cook for an additional 1-2 minutes. This step ensures all flavors meld together. Serving suggestions Carefully transfer the garlic butter steak bites and zucchini to a serving platter. Garnish with freshly chopped parsley for a pop of color. Serve with lemon wedges for a zesty touch. This dish not only looks great but tastes amazing too! - Best practices for searing steak: Start with a hot skillet. Use a bit of olive oil. Place steak cubes in a single layer. Avoid crowding the pan for even cooking. Sear for 2-3 minutes per side until browned. This gives a great crust. - How to achieve tender zucchini: Slice zucchinis thinly for quick cooking. Sauté over medium heat until fork-tender, about 4-5 minutes. Season them lightly with salt and pepper for flavor. Avoid overcooking, as they can become mushy. - Additional spices to consider: Try adding paprika for a smoky touch. A pinch of cayenne can give it heat. You might also enjoy using cumin for earthy notes. - Variations in herbs used: Fresh basil or oregano can brighten the dish. Consider swapping herbs based on what you have on hand. Each herb brings a unique taste to the steak and zucchini. - Ideal serving dishes: Use a large, white platter to showcase the dish. The bright colors of the steak and zucchini pop against it. A shallow bowl also works well for family-style serving. - Creative garnishing ideas: Top with chopped parsley for freshness. Add lemon wedges to enhance flavors. Consider some grated Parmesan cheese for a rich finish. These details elevate your dish visually and tastefully. {{image_4}} You can mix up your garlic butter steak bites with some easy swaps. - Alternative cuts of steak: Try ribeye or filet mignon instead of sirloin. Ribeye adds extra flavor due to its fat. Filet mignon is tender and lean. - Different vegetables to use: You can swap zucchini for bell peppers or asparagus. Both add color and taste. Mushrooms add a nice earthy flavor too. If you want to make this dish fit your diet, here are some ideas. - Low-carb or keto adaptations: Keep the steak and zucchini. Just skip the butter for olive oil. This keeps it low in carbs while still delicious. - Gluten-free adjustments: This recipe is already gluten-free. Just make sure your ingredients are certified gluten-free. You can change the flavor in fun ways. - Adding spice for heat: For a kick, add red pepper flakes or a dash of cayenne. This adds a nice warmth to the dish. - Incorporating sauces or marinades: Try adding soy sauce or Worcestershire sauce to the garlic butter. This gives a savory depth that’s hard to resist. To store your garlic butter steak bites with zucchini, let them cool first. Place them in an airtight container. It helps to separate layers with parchment paper to avoid sticking. You can keep them in the fridge for 3 to 4 days. Make sure to label the container with the date. This way, you won't forget how long they have been stored. For the best results, reheat your steak bites and zucchini in a skillet. Heat a small amount of olive oil over medium heat. Add the leftovers and stir gently until they are warm. This method keeps the steak juicy and the zucchini tender. You can also use a microwave. Place the food in a microwave-safe bowl and cover it. Heat in 30-second bursts, stirring in between until warmed through. Just be careful not to overcook, as this can dry out the steak. Yes, you can freeze garlic butter steak bites! To do this, first, let them cool completely. Then, place them in a freezer-safe bag or container. Remove as much air as possible to prevent freezer burn. They can last for up to 3 months in the freezer. When you are ready to enjoy them again, thaw them overnight in the fridge. Reheat as mentioned earlier for the best taste and texture. Cutting steak well makes a big difference. I use a sharp knife for clean cuts. First, let the steak rest for a few minutes. This helps keep juices inside. Then, cut the sirloin into 1-inch cubes against the grain. Cutting against the grain makes the meat more tender when you bite it. Yes, you can use other meats in this recipe. Chicken breast or pork tenderloin works well too. Just make sure to adjust cooking times. Ground beef can also be used, but the texture will change. Each meat brings a unique flavor, so feel free to experiment. For medium-rare steak bites, cook them for about 2-3 minutes on each side. The internal temperature should reach 130-135°F. Use a meat thermometer for accuracy. If you prefer your steak more done, increase the cooking time by a minute or two. These steak bites pair well with many sides. Try serving them with roasted potatoes or a fresh salad. Grilled asparagus or steamed broccoli also complements the dish. For a heartier meal, serve with rice or pasta. Adding lemon wedges brightens the plate and enhances flavors. This article covered key ingredients and steps for making garlic butter steak bites. We explored the importance of proper seasoning, cooking techniques, and presentation tips. I shared variations for dietary needs and storage info for leftovers. Cooking can be fun and creative. Use this recipe to impress friends or family. Enjoy experimenting with flavors and making this dish your own. Happy cooking!

Garlic Butter Steak Bites with Zucchini Delight

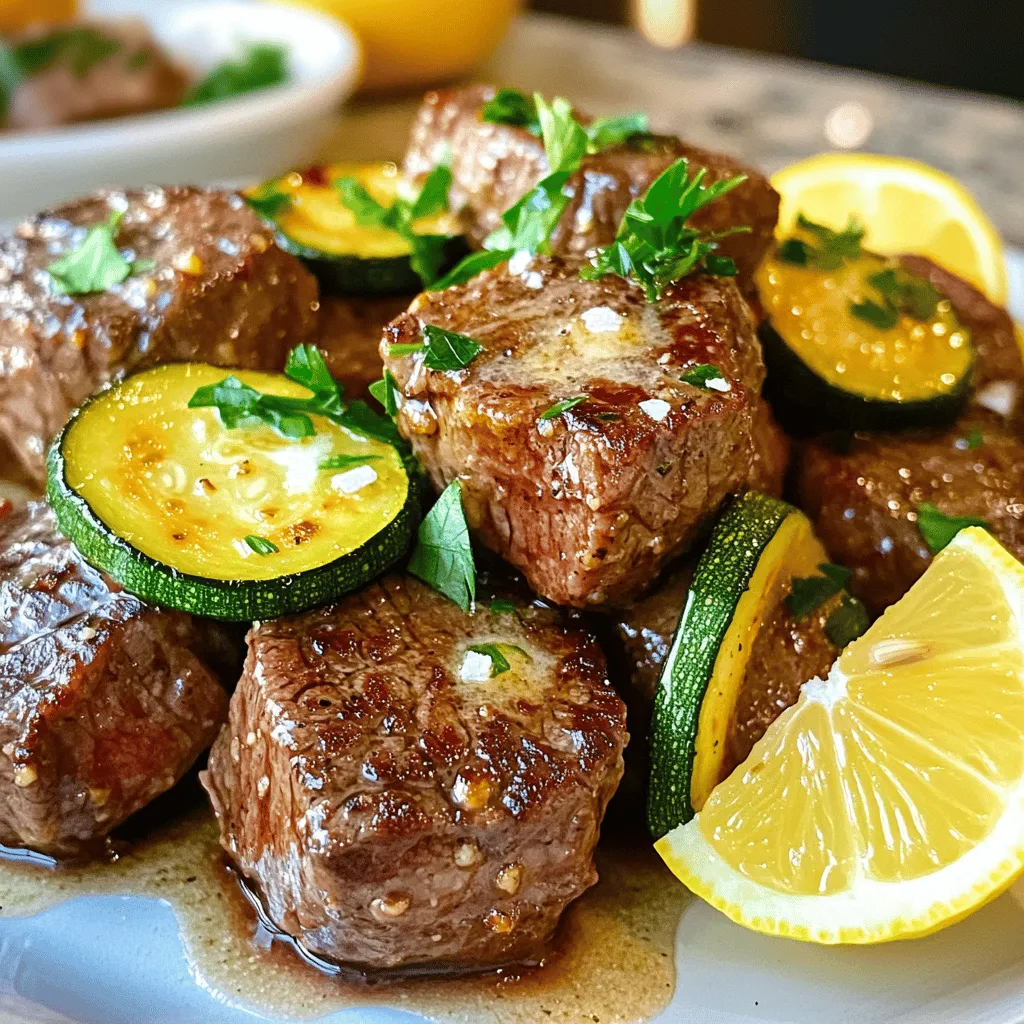
Looking for a quick and delicious meal? These Garlic Butter Steak Bites with Zucchini are your answer! With tender sirloin,

To make honey garlic glazed salmon, you need fresh and simple ingredients. Here’s what you'll need: - 4 salmon fillets (6 oz each, skin-on) - 1/4 cup honey - 3 tablespoons low-sodium soy sauce - 4 cloves garlic, finely minced - 1 tablespoon fresh ginger, freshly grated - 1 tablespoon olive oil - Salt and freshly ground black pepper to taste - 1 tablespoon sesame seeds (for final garnish) - 2 green onions, finely sliced (for garnish) These ingredients mix to create a tasty glaze. The honey adds sweetness. The soy sauce gives a salty kick. Garlic and ginger bring warmth and aroma. Each bite of salmon will burst with flavor! First, gather a mixing bowl. In this bowl, combine the honey, soy sauce, minced garlic, and freshly grated ginger. Use a whisk to blend the ingredients well. Make sure everything mixes nicely. This marinade adds sweetness and depth to the salmon. Next, take a large non-stick skillet and put it on medium-high heat. Pour in the olive oil and let it warm up. You want the oil hot but not smoking. While the oil heats, season both sides of each salmon fillet with salt and pepper. This step boosts the flavor. Once the skillet is sizzling, gently place the salmon fillets in the pan, skin-side down. Cook them for about 4 minutes. Let the skin get crispy and golden. This texture adds a nice crunch to your meal. After 4 minutes, carefully flip the salmon fillets using a spatula. Now, pour the honey garlic glaze evenly over each piece. Continue to cook for an additional 3-4 minutes. Remember to baste the salmon with the sauce occasionally. This keeps the fish moist and flavorful. When the salmon turns opaque and flakes easily, it’s done. Remove it from the skillet and let it rest for about one minute. This resting time helps the juices settle. Drizzle any leftover glaze from the skillet over the salmon. Finally, garnish your glazed salmon with a sprinkle of sesame seeds and sliced green onions. These add color and a nice crunch. Enjoy your delicious honey garlic glazed salmon! How to achieve crispy skin To get that perfect crispy skin on your salmon, make sure your pan is hot before adding the fish. Cook the salmon skin-side down for about four minutes without moving it. This allows the skin to crisp up nicely. If the skin sticks to the pan, it’s not ready to flip yet. Wait a little longer for that satisfying crunch. Importance of basting Basting is key to getting a rich flavor. After you flip the salmon, pour the honey garlic mixture over it. Use a spoon to drizzle the sauce over the top as it cooks. This keeps the fish moist and helps it soak up all that sweet and savory goodness. Basting also creates a lovely glaze on the surface. Best side dishes to pair with glazed salmon When serving your honey garlic glazed salmon, choose sides that complement its rich flavor. Steamed rice is a great base. You can also try sautéed vegetables, like broccoli or green beans. A fresh salad adds a nice crunch, too. You might even consider serving it with roasted sweet potatoes for a sweet contrast. Presentation ideas for a beautiful plate Make your plate pop by adding a wedge of lemon on the side. The bright color adds fun and a fresh burst of flavor. Place the salmon on a bed of rice or next to your veggies. Finish with a sprinkle of sesame seeds and sliced green onions for extra color and crunch. This will make your dish not only tasty but also beautiful! {{image_4}} You can change the flavor of honey garlic glazed salmon in fun ways. One option is to make a citrus-infused version. Use fresh orange or lemon juice in the marinade. This will give your salmon a bright and zesty taste. The sweet honey and tangy citrus create a great balance. Another fun twist is the spicy honey garlic salmon. Add sliced jalapeños or red pepper flakes to your marinade. This will give your dish a nice kick. The heat from the peppers pairs well with the sweet glaze. It’s a perfect way to spice up your dinner. If you're watching your carbs, you can make a low-carb version. Use a sugar-free honey substitute or a low-carb sweetener. This keeps the sweet flavor without the extra sugar. You can still enjoy the sticky glaze without the carbs. For those needing gluten-free options, try using tamari instead of soy sauce. Tamari is a gluten-free soy sauce alternative. It has a rich flavor and works just as well in the marinade. You won't lose any taste, and everyone can enjoy this dish! To store your honey garlic glazed salmon, first let it cool to room temperature. Then, wrap each fillet tightly in plastic wrap or place it in an airtight container. This helps keep the salmon fresh. You can store it in the fridge for up to three days. If you want to keep it longer, freeze the salmon. It can last up to three months in the freezer. Just make sure to label your container with the date. When reheating, I recommend using the oven or a skillet. Both methods help keep the salmon moist. If using the oven, preheat it to 350°F (175°C). Place the salmon in an oven-safe dish and cover it with foil. Heat for about 10-15 minutes, or until warmed through. If using a skillet, heat it on low. Add a splash of water or broth to the pan, then cover it. This steam will help keep the salmon from drying out. Cook for about 5 minutes until warm. Enjoy your delicious leftovers! Yes, you can use frozen salmon. Just make sure to thaw it first. Place the salmon in the fridge overnight for safe thawing. This keeps it fresh and ready for cooking. You can tell salmon is cooked when it flakes easily with a fork. The color should change to a light pink. Another way is to use a meat thermometer. Aim for an internal temperature of 145°F. Yes, you can prepare the marinade ahead of time. Mix the honey, soy sauce, garlic, and ginger. Store it in the fridge for up to two days. This makes your cooking time faster and easier! In this post, I shared a tasty recipe for honey garlic glazed salmon. You learned about the ingredients, step-by-step cooking instructions, and helpful tips for perfect results. I also shared variations you can try and best practices for storage. Remember, cooking is an art. Feel free to experiment with flavors and side dishes. Enjoy your meal and have fun in the kitchen!

Honey Garlic Glazed Salmon Tasty and Easy Recipe

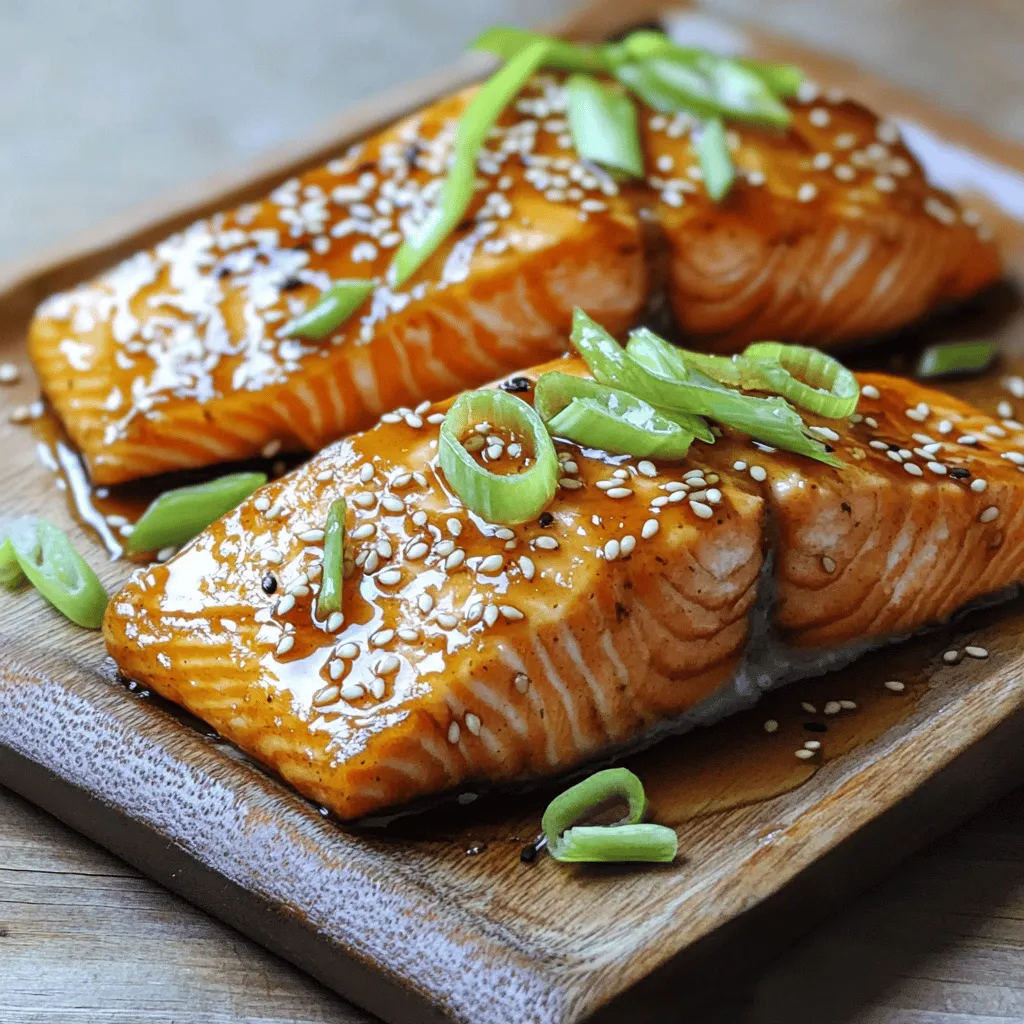
Looking for a quick, tasty meal? Try my Honey Garlic Glazed Salmon! This recipe is simple and delicious, perfect for

- 1 medium head of cauliflower, cut into bite-sized florets - 1 cup all-purpose flour - 1 cup buffalo sauce - 1 teaspoon garlic powder - 1 teaspoon onion powder - 1 teaspoon smoked paprika - 1/2 teaspoon salt - 1/2 teaspoon black pepper - 1/2 cup water (or plant-based milk for a creamier texture) - 2 tablespoons olive oil - Celery sticks and ranch dressing for serving I love using fresh cauliflower for this recipe. It makes the bites crispy and tasty. The all-purpose flour helps the batter stick well. Plus, buffalo sauce adds that spicy kick we all crave. For seasonings, garlic powder, onion powder, and smoked paprika bring depth. They make each bite bursting with flavor. The salt and black pepper balance everything out. If you want a creamier batter, use plant-based milk. It gives a nice touch. Olive oil is great for that golden crispiness we love. Finally, serve the bites with celery sticks and ranch dressing. It cools the spice and makes each bite even better! Set your air fryer to 400°F (200°C). Preheat it for about 5 minutes. This helps the cauliflower cook evenly. Wash a medium head of cauliflower well. Cut it into bite-sized florets. Make sure they are dry for better batter adherence. In a bowl, mix 1 cup of all-purpose flour, 1 teaspoon garlic powder, 1 teaspoon onion powder, 1 teaspoon smoked paprika, 1/2 teaspoon salt, and 1/2 teaspoon black pepper. Slowly whisk in 1/2 cup of water or plant-based milk. Aim for a smooth batter that sticks to the florets. Take each floret and dip it into the batter. Let any excess batter drip off. Arrange the coated florets in a single layer in the air fryer basket. This stops them from sticking together. Lightly spray the florets with olive oil. Cook them in the air fryer for 12-15 minutes. Shake the basket halfway through. This ensures every piece becomes golden brown and crispy. Transfer the cooked cauliflower to a large bowl. Pour 1 cup of buffalo sauce over them. Gently toss until every floret is well coated. Put the sauced cauliflower back in the air fryer. Cook for an extra 2-3 minutes at 400°F. This step makes the bites extra crispy and flavorful. Remove the cauliflower from the air fryer. Serve hot on a plate. Add fresh celery sticks and a side of ranch dressing for dipping. This adds a nice crunch and coolness to each bite. Getting the right texture is key. A thick batter helps the cauliflower stay crunchy. If it is too thin, it won't stick well. The batter should coat the florets evenly. Test the batter by dipping a floret. It should cling without dripping too much. To boost flavor, try adding more spices. A pinch of cayenne pepper gives heat. You can also use smoked paprika for a deeper taste. Consider adding a teaspoon of dried herbs like oregano or thyme. These will make each bite pop with flavor. Air fryers can vary in heat. If yours cooks hotter, check your bites sooner. Start at 12 minutes and adjust as needed. If they need more time, add in 1-2 minute increments. Always shake the basket halfway to ensure even cooking. {{image_4}} If you want a gluten-free version, you can use almond flour or chickpea flour. These flours work well in the batter. Simply swap the all-purpose flour with one of these. Both options will still give you that crispy texture. You may need to adjust the amount of water for the right consistency. To make this dish vegan, replace the water with plant-based milk like almond or oat milk. This will keep the batter creamy and delicious. Make sure the buffalo sauce you choose is vegan-friendly. Many brands offer great options that pack a punch without any animal products. Feel free to experiment with different sauces and seasonings. You can try ranch seasoning for a creamy twist or add some cayenne pepper for extra heat. Other popular sauces like teriyaki or barbecue can also work well. Just toss the cooked bites in your chosen sauce before the final crisping for a unique flavor. To keep your Air Fryer Buffalo Cauliflower Bites fresh, store them in an airtight container. Place the bites in the fridge within two hours of cooking. This helps keep them safe to eat. They’ll stay good for about 3 to 5 days. Before storing, let them cool to room temperature. This prevents moisture buildup that can make them soggy. When you want to enjoy leftovers, reheating is key. Use the air fryer to keep them crispy. Set the air fryer to 350°F (175°C) and heat for about 5 to 7 minutes. This method revives the crunch. You can also use an oven. Preheat to 350°F (175°C) and place them on a baking sheet for 10 to 12 minutes. Avoid the microwave, as it can make them soft. If you want to freeze the bites, do it before adding the buffalo sauce. Place the cooked, uncoated bites on a baking sheet. Freeze them for about an hour until solid. Then, transfer them to a freezer bag. They can last up to 3 months in the freezer. When you are ready to eat, thaw them in the fridge overnight and reheat as mentioned above. This method keeps their flavor and texture intact. Yes, you can make Buffalo Cauliflower Bites ahead of time. Prepare them and store in an airtight container. Keep them in the fridge for up to three days. To reheat, simply pop them back in the air fryer at 350°F for about 5-7 minutes. This will help maintain their crispy texture. To make the recipe less spicy, use less buffalo sauce. You can also mix it with a bit of plant-based milk or yogurt. This will tone down the heat. If you want a milder flavor, try using barbecue sauce instead. These bites pair well with ranch dressing. You can also serve them with a creamy blue cheese dip. Fresh celery sticks add a nice crunch. They make a great snack or side dish for parties. Yes, you can use frozen cauliflower. Just make sure to thaw and drain it well. You may need to adjust the cooking time. Check for doneness after about 10 minutes in the air fryer. In this article, we explored how to make tasty Buffalo Cauliflower Bites. We covered key ingredients like cauliflower florets, flour, and buffalo sauce. I shared step-by-step instructions, tips for the best texture, and fun variations. Remember, you can easily customize this dish to fit your diet. Whether you want it vegan or gluten-free, the options are endless. Enjoy impressing your friends with these delicious bites, whether as a snack or a fun dinner side. Try it out, and have fun in the kitchen!

Air Fryer Buffalo Cauliflower Bites Crispy and Flavorful

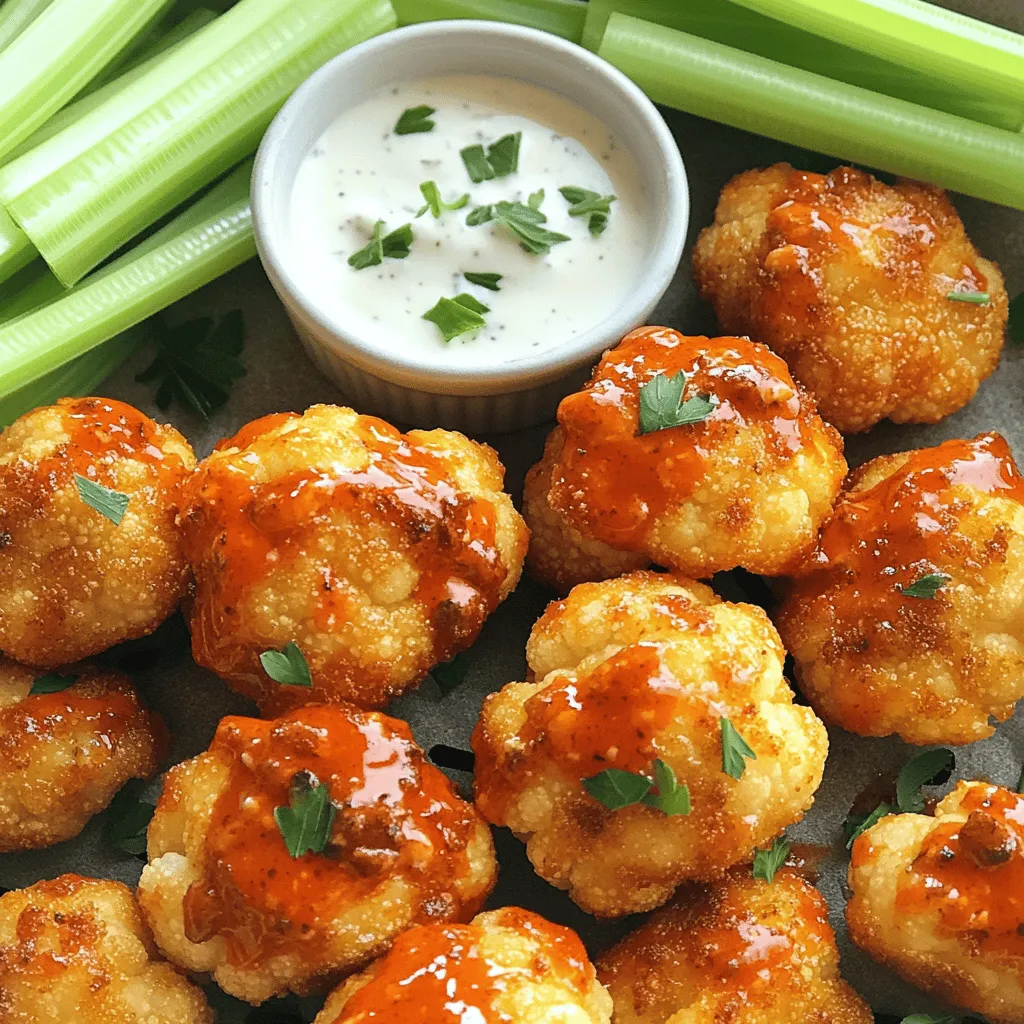
If you’re craving a snack that’s both healthful and tasty, you’re in the right place. My Air Fryer Buffalo Cauliflower

To make delicious Pesto Chicken Lettuce Wraps, gather these key ingredients: - 2 cups cooked chicken, shredded - 1/2 cup basil pesto (store-bought or homemade) - 1 cup cherry tomatoes, halved - 1/2 cup mozzarella balls, halved - 1/4 cup pine nuts, toasted - 1 tablespoon fresh lemon juice - Salt and pepper, to taste - 1 head of Romaine lettuce, with leaves separated These ingredients combine to make a fresh and tasty dish. The chicken gives protein, while pesto adds rich flavor. The tomatoes and mozzarella bring freshness and creaminess, and pine nuts provide a nice crunch. You can customize your wraps with these optional ingredients: - Avocado slices for creaminess - Spinach or kale for added greens - Grated Parmesan for extra flavor - Red onion for a bit of bite If you want to change up the protein, you can use turkey or tofu. Each option will still taste great with the pesto. Each serving of Pesto Chicken Lettuce Wraps offers a healthy meal. Here’s a quick overview of the nutrition: - Calories: Approximately 300 - Protein: 25g - Carbohydrates: 10g - Fat: 18g - Fiber: 3g These wraps are low in carbs and high in protein. They make a great choice for a balanced meal. Enjoy them as a light lunch or a fun dinner! Start by mixing the chicken with the basil pesto in a large bowl. The pesto adds flavor and moisture. Next, squeeze in the fresh lemon juice. This brightens the dish and adds a nice zing. Season with salt and pepper to taste. Stir everything well until the chicken is coated. Gently fold in the halved cherry tomatoes and mozzarella balls. Be careful not to crush the tomatoes or cheese. This mix is full of flavor and color. To toast pine nuts, heat a dry skillet over medium heat. Add the pine nuts to the pan. Stir them often for about 2-3 minutes. Watch closely as they can burn quickly. When they turn golden brown and smell fragrant, they are done. Remove them from heat and let them cool a bit. Toasted pine nuts add a rich, nutty flavor that enhances the wraps. Take a Romaine lettuce leaf and lay it flat. Spoon about two tablespoons of the pesto chicken mix into the center of the leaf. This is where the magic happens! Sprinkle some toasted pine nuts on top for crunch. Next, carefully fold or roll the lettuce around the filling. If needed, use a toothpick to hold it together. Repeat this with the rest of the leaves and filling. Arrange the wraps on a colorful platter for a beautiful presentation. When picking lettuce for wraps, look for crisp and sturdy leaves. Romaine is a great choice because it holds the filling well. You want leaves that are large enough to wrap but not too thick. They should be fresh and green, with no brown spots. Check for any wilting. Freshness means better taste. If you can, buy organic lettuce for the best flavor and nutrition. Leftover pesto chicken can be stored in the fridge. Place it in an airtight container. It stays good for up to three days. If you want to keep it longer, you can freeze it. Just put the chicken in a freezer bag and remove as much air as possible. It will last about three months in the freezer. When ready to eat, thaw it in the fridge overnight. Serve your pesto chicken lettuce wraps with fresh sides. A light salad works well. You can also add fruit, like a fruit salad, for a sweet touch. Pair it with a cold drink, such as iced tea or lemonade. For a fun twist, try adding some avocado slices or sliced bell peppers in the wraps. This adds color and flavor, making your meal more exciting. {{image_4}} If you want a meatless meal, try using roasted veggies. Zucchini, bell peppers, and eggplant work well. You can also use chickpeas or lentils for protein. Mix these with basil pesto for a tasty filling. This swap keeps the dish light yet filling. You can switch the chicken for turkey or shrimp. Each option adds a unique twist to the dish. For a kick, add diced jalapeños or a dash of hot sauce to the pesto. This will give your wraps a nice zing. Feel free to mix in different cheeses, too. Feta or goat cheese can create a creamy texture. Use what’s fresh in your garden or market. In summer, try adding diced cucumbers or fresh corn. In fall, mix in roasted butternut squash or apples for a sweet touch. Seasonal swaps make your wraps fun and exciting. They also add nutrients and flavor to your meal. To store leftover lettuce wraps, place them in an airtight container. Keep them in the fridge for up to three days. Make sure to separate the chicken filling from the lettuce leaves. This way, the leaves stay fresh and crisp. You can freeze the pesto chicken filling. Place it in a freezer-safe bag or container. Remove as much air as possible to prevent freezer burn. The filling will last for up to three months. When you want to use it, just thaw it in the fridge overnight. To reheat the pesto chicken filling, place it in a skillet over low heat. Stir it often until it is warm. You can also use the microwave. Heat it in short bursts, stirring in between, until warm. Avoid reheating the lettuce leaves, as they will get soggy. Assemble fresh wraps with the reheated filling for a tasty meal. Yes, you can make these wraps ahead of time. Prepare the pesto chicken filling a day before. Store it in the fridge. Keep the lettuce leaves separate. Assemble the wraps just before serving. This keeps the lettuce crisp and fresh. You can use different types of pesto. Try sun-dried tomato pesto or spinach pesto. You can also make a simple herb mix. Blend parsley, garlic, and nuts with olive oil. This gives you a fresh taste for your wraps. Yes, lettuce wraps are gluten-free. Lettuce is a great alternative to bread. It gives you a crunchy texture without gluten. Always check other ingredients to ensure they are gluten-free. This way, you can enjoy your meal worry-free. Making homemade pesto is easy. You will need: - 2 cups fresh basil leaves - 1/2 cup pine nuts - 1/2 cup grated Parmesan cheese - 3 cloves garlic - 1/2 cup olive oil - Salt to taste Blend the basil, pine nuts, cheese, and garlic. Slowly add the olive oil until smooth. Adjust salt to your taste. This fresh pesto works great in the wraps! Pesto chicken lettuce wraps are simple and tasty. We explored key ingredients, from chicken to pine nuts. I shared step-by-step instructions for perfect preparation and assembly. You learned tips for choosing lettuce and storing leftovers. We discussed fun variations and how to customize your wraps. Ultimately, these wraps are a quick, healthy option for any meal. Try them out and enjoy the fresh flavors!

Pesto Chicken Lettuce Wraps Flavorful and Healthy Meal

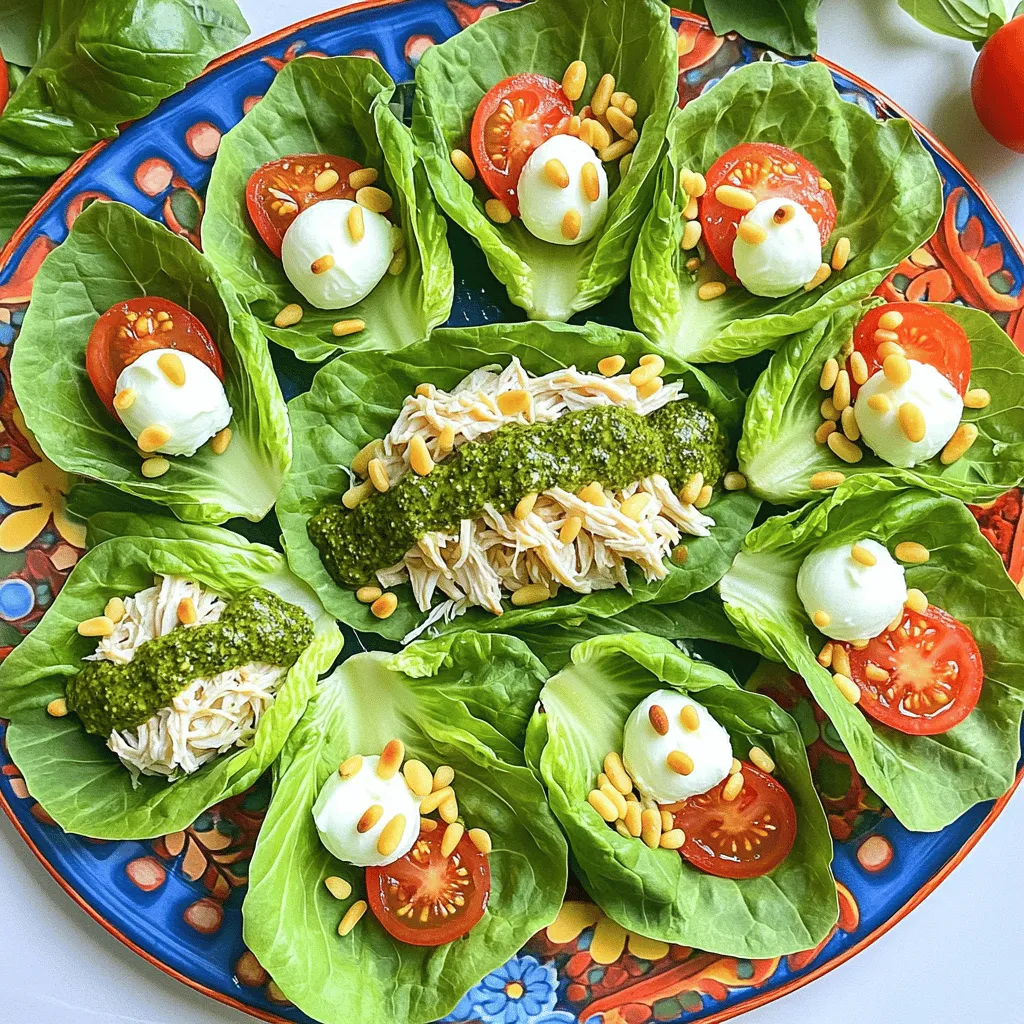
Looking for a quick, tasty, and healthy meal? Pesto Chicken Lettuce Wraps are the answer! They are fresh, vibrant, and

- 2 boneless, skinless chicken breasts - 1 cup cornstarch - 1 cup buttermilk (or non-dairy yogurt for a dairy-free option) - 1 cup panko breadcrumbs - 1/2 cup mayonnaise - 2 tablespoons sweet chili sauce - 1 tablespoon sriracha (adjust to your preferred spice level) - 1 tablespoon honey - 4 cups cooked jasmine rice - 2 cups shredded napa cabbage - 1 cup shredded carrots - 1 green onion, finely chopped - Sesame seeds, for garnish - Fresh cilantro, for garnish - Salt and pepper, to taste You can change this recipe to fit your taste. Here are some ideas: - Add sliced bell peppers or cucumber for crunch. - Use brown rice instead of jasmine rice for a hearty base. - Try different proteins, like shrimp or tofu, for variety. - Swap mayo for Greek yogurt for a tangy twist. This recipe serves four people. Each bowl has about: - Calories: 550 - Protein: 35g - Carbs: 65g - Fat: 20g - Fiber: 4g Knowing the nutrition helps you enjoy this dish while staying aware of your diet. Adjust the ingredients as needed to meet your goals. Start by cutting the chicken breasts into thin strips. Aim for pieces about one inch wide. This size helps them cook evenly. Next, sprinkle some salt and pepper on the strips. This simple step enhances the chicken's flavor. Set up your breading station with three shallow bowls. Fill the first bowl with cornstarch. Pour buttermilk into the second bowl. In the third, add panko breadcrumbs. Take a chicken strip and dip it in the cornstarch. Ensure it is well-coated. Next, move it to the buttermilk and let any extra drip off. Finally, roll the strip in the panko breadcrumbs. Press down slightly to make sure it sticks. Repeat this process for all the chicken strips. You want them all crispy and golden. Pour enough oil into a large skillet to cover the bottom by about half an inch. Heat the oil over medium-high heat until it shimmers. Carefully add the breaded chicken strips, but do not overcrowd the pan. Fry them for about three to four minutes on each side. Look for a golden brown color and ensure they are cooked through. Once done, place the chicken on paper towels. This helps soak up any extra oil. Enjoy the crunchy texture you created! - 1/2 cup mayonnaise - 2 tablespoons sweet chili sauce - 1 tablespoon sriracha - 1 tablespoon honey To make the Bang Bang sauce, start by measuring the ingredients. In a medium bowl, mix the mayonnaise, sweet chili sauce, sriracha, and honey. Use a whisk to blend until smooth. The sauce should be creamy and well combined. Taste it to see if you like the flavor. If you want it spicier, add more sriracha. If you prefer it milder, you can reduce the sriracha or add more mayonnaise. Adjusting spice levels is easy! If you love heat, add extra sriracha a little at a time. Keep tasting as you go. For less spice, use less sriracha. You can also balance spice with more honey or mayonnaise. This way, you get the flavor you love while controlling heat. {{image_4}} Start with a bowl of jasmine rice. This rice is soft and fluffy. Next, add a layer of shredded napa cabbage. The cabbage adds crunch and freshness. Then, pile on some shredded carrots for color. Finally, top it all with crispy chicken strips. Make sure the chicken is golden and hot. This layered look makes the bowl inviting and fun. Take your Bang Bang sauce and drizzle it over the chicken and veggies. Use a spoon or squeeze bottle for control. Let the sauce run down the sides, creating a beautiful flow. This adds flavor and makes the dish more appealing. Remember, the sauce is creamy and has a sweet kick. To finish, sprinkle chopped green onion over the bowl. This adds a pop of color and flavor. Next, add a handful of sesame seeds. They bring a nutty taste and nice texture. Lastly, toss on some fresh cilantro leaves for a fresh touch. If you like, serve with a lime wedge for extra zest. This garnish not only looks good but also brightens the dish. To get crispy fried chicken, use every step wisely. Start by cutting chicken into thin strips. This helps them cook faster and evenly. Season them with salt and pepper. The cornstarch gives a nice crunch. Be sure to coat each strip well. The buttermilk adds flavor and moisture. Finish with panko breadcrumbs for extra crispiness. Fry them in hot oil, but don’t overcrowd the pan. This keeps the oil hot and helps chicken cook evenly. You can easily adjust this recipe for different diets. For a dairy-free option, use non-dairy yogurt instead of buttermilk. You can also swap chicken for tofu or tempeh for a vegetarian version. If you're gluten-free, replace panko breadcrumbs with gluten-free bread crumbs. This way, everyone can enjoy the Bang Bang Chicken Bowls. These bowls are great for casual meals or special events. For a family dinner, serve them in colorful bowls. Add lime wedges for a zesty touch. If hosting friends, you can set up a DIY station. Let guests build their own bowls. This makes it fun and interactive. For a picnic, prepare the bowls ahead. Just pack the sauce separately to keep everything fresh. If you want a vegetarian version, swap chicken for crispy tofu. Cut firm tofu into strips, then coat with cornstarch and panko like the chicken. Fry the tofu until golden brown. For a low-carb option, use cauliflower rice instead of jasmine rice. This change keeps the dish light but still flavorful. To store leftovers, place the chicken and veggies in separate airtight containers. This method helps keep everything fresh. Refrigerate for up to three days. Avoid mixing the sauce with the chicken until ready to eat. This keeps the chicken crispy. To reheat, use an oven for crispiness. Preheat your oven to 350°F (175°C). Place chicken on a baking sheet for about 10 minutes. You can also use a microwave but be careful. The chicken may turn soft. For veggies and rice, heat in the microwave for one minute, stirring halfway. Enjoy your delicious Bang Bang Chicken Bowls! Bang Bang sauce is a creamy mix. It has four main ingredients: - Mayonnaise - Sweet chili sauce - Sriracha - Honey This sauce blends sweet and spicy flavors. You can adjust the spice with more or less sriracha. It adds a zesty kick to your chicken bowls. Yes, you can prepare parts of the Bang Bang Chicken Bowls ahead of time. Cook the chicken and rice in advance. Store them in separate containers in the fridge. You can also slice the veggies like napa cabbage and carrots early. Just assemble the bowls right before serving for the best taste. To add more heat, increase the sriracha in the sauce. You can also sprinkle red pepper flakes on top. Another option is to add sliced fresh jalapeños. Feel free to adjust according to your spice level. Enjoy experimenting with flavors! Bang Bang Chicken Bowls are easy and fun to make. We covered key ingredients, step-by-step cooking, and how to assemble delicious bowls. You can also customize flavors and textures to fit your needs. In the end, these bowls are more than a meal; they are a tasty experience. Whether you stick to classic recipes or try variations, enjoy every bite. Share them, and let others taste the fun.

Bang Bang Chicken Bowls Flavorful and Easy Recipe

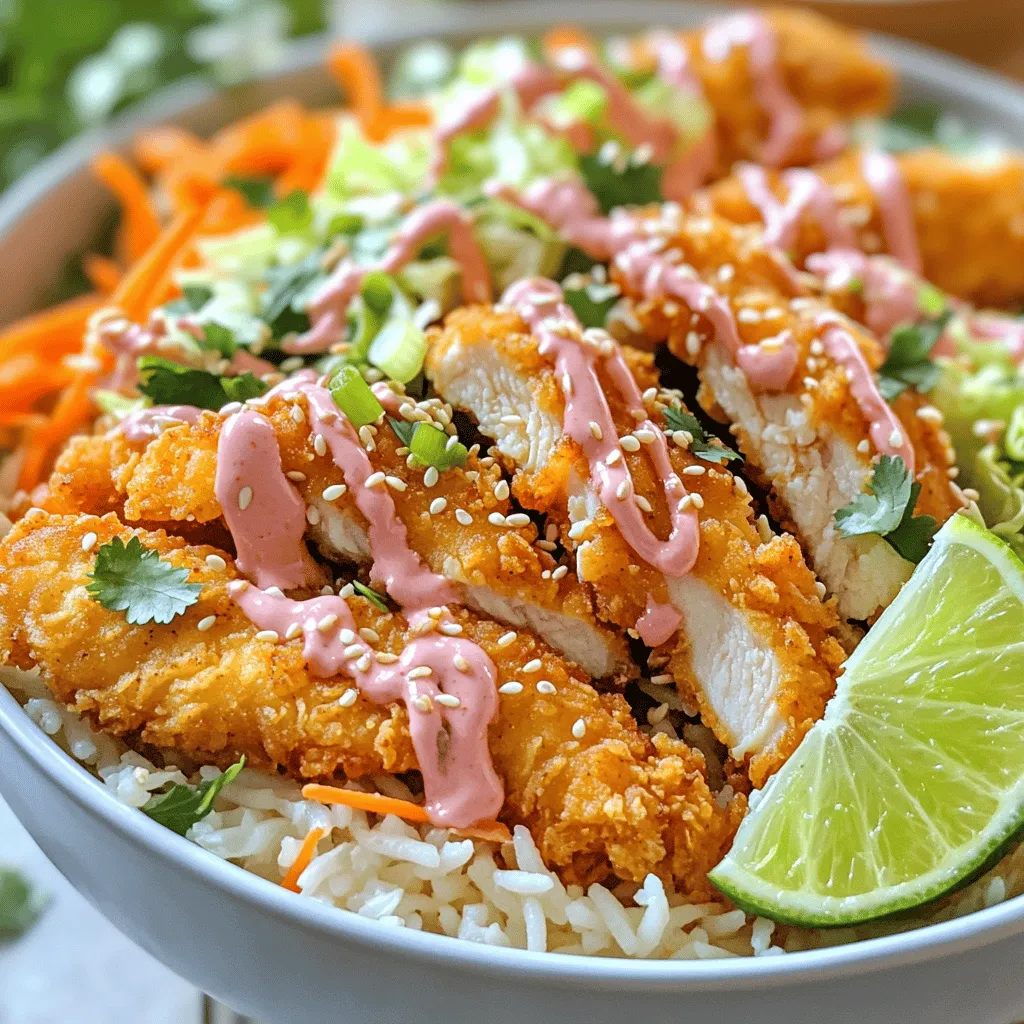
Get ready to spice up your dinner routine with Bang Bang Chicken Bowls! This recipe is not only flavorful but

- 1 cup creamy peanut butter - 1 cup rolled oats - 1/2 cup honey or maple syrup - 1/2 cup dark chocolate chips - 1/4 cup coconut flour - 1 teaspoon vanilla extract - A pinch of salt Each ingredient plays a key role in creating the perfect no-bake peanut butter bars. The creamy peanut butter adds richness and flavor. Rolled oats provide texture and help bind the bars together. Honey or maple syrup gives a touch of natural sweetness. Dark chocolate chips bring a nice finish, while coconut flour helps thicken the mix. Vanilla extract adds depth, and the pinch of salt enhances all the flavors. You can customize your bars! Here are some fun options: - Chopped nuts: Add crunch with walnuts or almonds. - Seeds: Flaxseeds or chia seeds boost nutrition. - Dried fruit: Raisins or cranberries add sweetness and chewiness. - Protein powder: Mix in a scoop for extra protein. These add-ins let you create your own twist on this classic recipe! {{ingredient_image_2}} First, grab a medium-sized mixing bowl. Add 1 cup of creamy peanut butter, 1/2 cup of honey or maple syrup, and 1 teaspoon of vanilla extract. Stir it all together until the mix is smooth. This part is key. You want a well-blended mixture, so take your time here. Next, it’s time to add more texture. Mix in 1 cup of rolled oats, 1/4 cup of coconut flour, and a pinch of salt. You’ll want to mix well until everything is combined. Your final mix should be thick and sticky, almost like dough. This texture holds the bars together, making them easy to cut later. Now, let’s get to the chocolate! Take 1/2 cup of dark chocolate chips and put them in a microwave-safe bowl. Heat them in 20-second bursts. Stir well between each burst. This helps the chocolate melt evenly. Once it’s smooth and melted, you’re ready to pour it over the peanut butter layer. This step is crucial for that rich taste. Make sure to cover every corner of the peanut butter mixture. Now, pop the dish in the fridge for at least 1-2 hours. You want the bars to set and firm up nicely. Once they’re ready, lift them out using the parchment paper. Slice them into squares or rectangles, and enjoy your tasty treat! To get the right texture, mix the peanut butter and honey well. This mix should be smooth and creamy. When you add oats and coconut flour, the blend will thicken. If it feels too dry, add a bit more honey. If it's too wet, add more coconut flour. The final mix should be thick and sticky, like dough. These bars taste great chilled. Cut them into squares or rectangles for easy serving. You can enjoy them as a snack or dessert. Pair them with fresh fruit for a balanced treat. For a fun twist, serve them with a scoop of ice cream on the side. For a beautiful display, serve the bars on a nice platter. Drizzle melted chocolate on top for added flair. A sprinkle of crushed nuts adds texture and looks great. If you want to gift these bars, package them in clear bags. Tie them with a ribbon for a charming touch. Pro Tips Use Natural Peanut Butter: Opt for a natural peanut butter without added sugars or oils for a healthier option and a more authentic peanut flavor. Chill for Optimal Texture: Allow the bars to chill longer in the refrigerator for a firmer texture, making them easier to cut into neat squares. Customize Your Toppings: Get creative with toppings! Consider adding sea salt flakes, chopped nuts, or even a sprinkle of toasted coconut for added flavor and crunch. Storage Tips: Store the bars in an airtight container in the refrigerator for up to a week, or freeze them for longer-lasting treats. {{image_4}} You can swap ingredients to fit your diet. If you're nut-free, try sun butter instead of peanut butter. For gluten-free options, use gluten-free oats and coconut flour. These swaps keep the bars tasty and safe for everyone. Dairy-free chocolate chips work well for a vegan treat. Want to mix things up? Add nuts or seeds. Chopped almonds or walnuts give a nice crunch. Sunflower seeds add a fun twist too. You can also stir in shredded coconut for extra flavor. Each addition makes your bars unique and fun to enjoy. If you prefer less sugar, you can use dates or agave syrup. These sweeteners blend well and keep the bars moist. You can try stevia or monk fruit for a low-calorie option. Remember to adjust amounts based on sweetness to keep your bars delicious. To keep your no-bake peanut butter bars fresh, store them in an airtight container. Place parchment paper between layers to avoid sticking. Keep them in the fridge for best results. This helps maintain their texture and flavor. These bars can last up to a week in the fridge. If stored properly, they remain tasty and fresh. Always check for any signs of spoilage, like an off smell or changes in texture. This ensures you enjoy them at their best quality. Want to save some for later? You can freeze these bars! Cut them into squares and wrap each piece tightly in plastic wrap. Store the wrapped bars in a freezer bag or container. They can last up to three months in the freezer. When you're ready to eat, thaw them in the fridge overnight. Enjoy their deliciousness anytime! Yes, you can use natural peanut butter. It gives a rich flavor. Just remember, natural peanut butter can be a bit runnier. If it is too thin, add a little extra coconut flour to help thicken the mix. To make these bars vegan, swap honey for maple syrup. Use dairy-free chocolate chips instead of regular ones. This way, you keep all the taste while making it plant-based. Some tasty toppings include crushed nuts, shredded coconut, or more chocolate. You can also sprinkle sea salt on top for a sweet and salty mix. Each topping adds a fun twist to the bars. We explored how to make delicious no-bake peanut butter bars. We discussed key ingredients, measurements, and optional add-ins. You learned step-by-step instructions for preparing the peanut butter mix and melting the chocolate. We also reviewed tips for the right texture and fun serving ideas. Plus, you discovered variations to fit dietary needs and flavor preferences. Finally, we covered storage tips to keep your bars fresh. Use this guide to enjoy tasty treats anytime. You now have everything you need to create your perfect no-bake bars!

No-Bake Peanut Butter Bars Quick and Easy Recipe

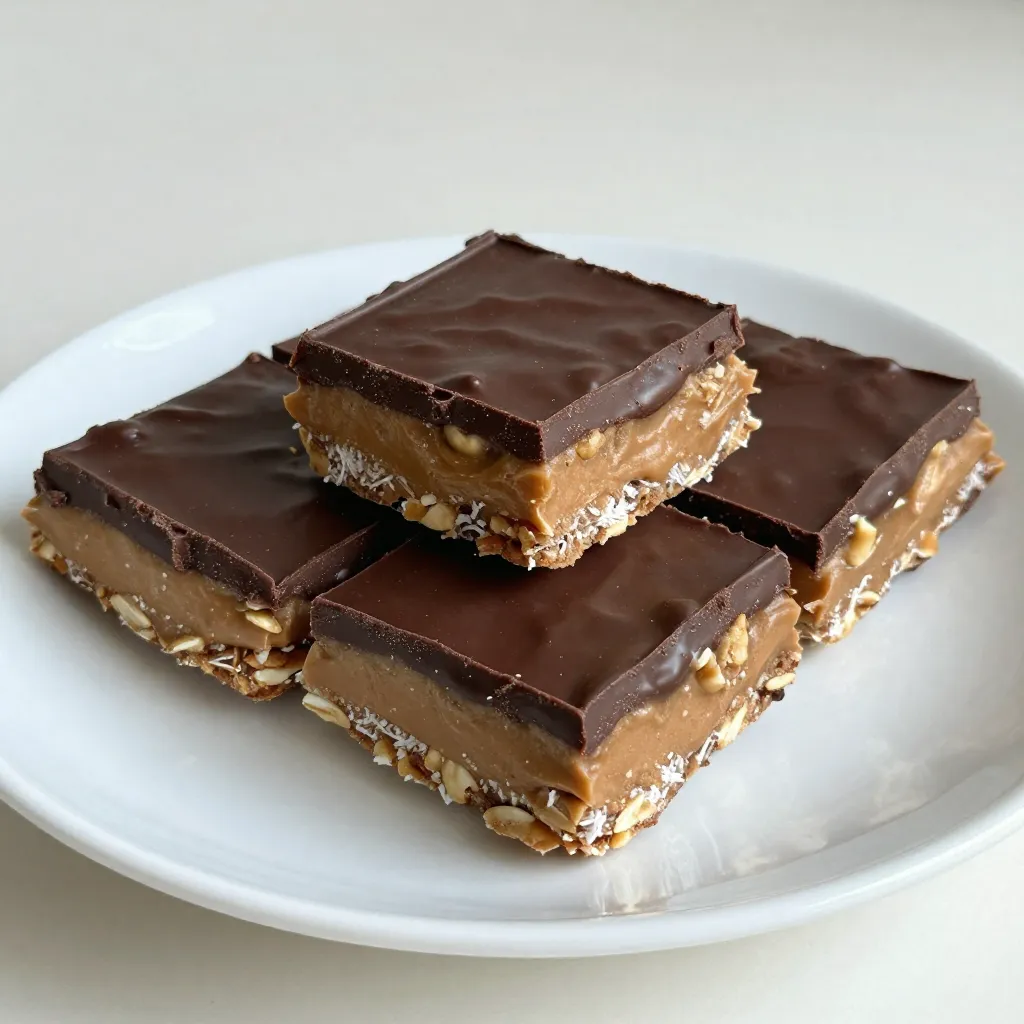
Are you craving a sweet snack that’s quick and easy? Look no further! This No-Bake Peanut Butter Bars recipe is

- 8 ounces whole wheat pasta (any shape you prefer) - 1 pound lean ground beef (90% lean for a healthier option) - 1 cup low-fat cottage cheese - 1 cup plain Greek yogurt - 1 cup low-sodium beef broth - 1 tablespoon olive oil - 1 medium onion, finely chopped - 3 cloves garlic, minced - 1 teaspoon Italian seasoning blend - Salt and pepper to taste - ½ cup grated Parmesan cheese (for optional topping) - Fresh parsley, chopped (for garnish) For this high-protein creamy beef pasta, you will use whole wheat pasta for added fiber. Lean ground beef helps keep the dish healthy while still providing plenty of protein. Low-fat cottage cheese and plain Greek yogurt create a creamy texture without too many calories. You can also add low-sodium beef broth for flavor. Olive oil helps cook the onions and garlic evenly. Chopped onion and minced garlic form a solid base for the dish. Don't forget to season with salt, pepper, and Italian seasoning to bring out all the flavors. Optional toppings like grated Parmesan cheese and fresh parsley can elevate your meal. This combination of ingredients makes a delicious and wholesome meal that you can whip up in no time. Enjoy your cooking! To start, fill a large pot with water. Add a good amount of salt. This salt boosts the pasta’s flavor. Bring the water to a rolling boil. Now, add your whole wheat pasta. Cook it according to package instructions until it's al dente. This usually takes around 8 to 10 minutes. Once done, drain the pasta and set it aside. Next, grab a spacious skillet. Heat one tablespoon of olive oil over medium-high heat. Add the finely chopped onion and cook for about 3-4 minutes. You want the onion to turn translucent. After that, toss in the minced garlic. Cook it for another minute until it smells great. This step builds a solid flavor base. Now, add the lean ground beef to the skillet. Season it with salt, pepper, and Italian seasoning blend. Cook, stirring and breaking the beef apart, until it’s fully browned. This should take around 5-7 minutes. Make sure the beef is cooked through for safety. Lower the heat to a gentle simmer. Pour in one cup of low-sodium beef broth. Now, it’s time to add the creamy elements: one cup of low-fat cottage cheese and one cup of plain Greek yogurt. Stir everything well. Let it simmer for about 3-4 minutes. You want the sauce to be creamy and heated through. It should have a smooth texture. Now, carefully add the drained pasta to the skillet. Use tongs or a large spoon to toss the pasta with the creamy beef sauce. Make sure every piece is well coated. Taste the dish and adjust the seasoning if needed. This is your chance to make it perfect. - To ensure your pasta is al dente, boil it until it has a slight bite. Follow the cooking time on the package but check a minute early. This way, your pasta won’t become mushy. - Browning ground beef effectively makes your dish rich in flavor. Use medium-high heat and let the beef sit for a bit before stirring. This helps it brown nicely. - Fresh herbs can really lift your dish. Try adding chopped parsley or basil at the end. They add bright flavors and make your dish look nice. - If you want an extra kick, consider adding red pepper flakes or a dash of hot sauce. Spice can enhance the creamy sauce and make it exciting. - For high-protein alternatives, you can swap ground beef with turkey or chicken. These options lower fat while keeping protein high. - To reduce sodium, use low-sodium beef broth and limit added salt. This keeps your dish flavorful without too much salt. {{image_4}} You can change the protein in this dish easily. Try ground turkey or chicken instead of beef. These options are lean and still pack a protein punch. If you're feeling adventurous, swap in lentils for a plant-based twist. Lentils are rich in protein and fiber. Adding vegetables is a great way to boost nutrition. Toss in spinach, bell peppers, or zucchini for color. You can sauté these veggies with the onion and garlic. This step adds flavor and texture to your creamy beef pasta. If you need gluten-free options, use gluten-free pasta. Many brands make tasty choices that work well in this recipe. Just follow the cooking time on the package. For a dairy-free version, swap the cottage cheese and Greek yogurt for cashew cream or a dairy-free yogurt. These options keep the creamy texture while catering to dietary needs. Be sure to check labels for added sugars and other ingredients. Changing the seasoning can make a big difference. Instead of Italian seasoning, try a taco spice blend for a fun twist. This adds a new flavor dimension to the dish. If you like heat, add red pepper flakes or diced jalapeños. Mixing in hot sauce can also give your creamy beef pasta a spicy kick. Experiment with different spices to find your favorite flavor. After enjoying your meal, let the pasta cool down. This step keeps it safe. Place it in a container. I recommend using an airtight container to keep the flavors fresh. Make sure to store it in the fridge if you plan to eat it within three days. To reheat, use a skillet on low heat. Add a splash of beef broth or water. This will help keep the sauce creamy. Stir gently to avoid overcooking. Overcooking can make the sauce dry. Heat until warm, but not bubbling. You can freeze portions for later. Use freezer-safe containers or bags. Leave some space for the food to expand. When ready to enjoy, thaw the pasta in the fridge overnight. Reheat slowly in a skillet for the best taste. High-protein beef pasta is a dish that combines pasta with lean ground beef and creamy ingredients. It offers a great balance of protein, carbs, and healthy fats. This dish helps build muscle and keeps you full longer. By using lean beef and whole wheat pasta, you get a meal that's both filling and nutritious. The cottage cheese and Greek yogurt add creaminess while boosting protein content. Yes, you can use other types of pasta. Options include gluten-free pasta, zoodles, or even chickpea pasta. Cooking times might change a bit. Always check the package instructions to ensure perfect texture. If you pick a thinner pasta, reduce the cooking time. For zoodles, just sauté until tender for a lighter option. You can lower the calories by making a few swaps. Use less beef or a leaner cut, like ground turkey. Replace some cottage cheese with more Greek yogurt. You can also cut back on the cheese topping. Another tip is to use less oil when cooking. Adding more veggies can help make the dish lighter without losing flavor. Yes, you can prep this dish ahead. Cook the pasta and beef mixture separately and store them in the fridge. You can mix them right before serving. This can help save time on busy days. If you want to freeze it, make sure to cool it first. When ready to eat, just reheat gently on the stove or in the microwave. This blog explores how to make a tasty high-protein beef pasta dish. We covered main ingredients like whole wheat pasta and low-fat cottage cheese. Next, I shared step-by-step cooking methods and gave tips for seasoning and storage. Finally, we discussed variations for your taste and dietary needs. With these insights, you can create a healthy meal that suits your style. Enjoy cooking and personalize this dish to fit your cravings!

High-Protein Creamy Beef Pasta Quick and Easy Recipe

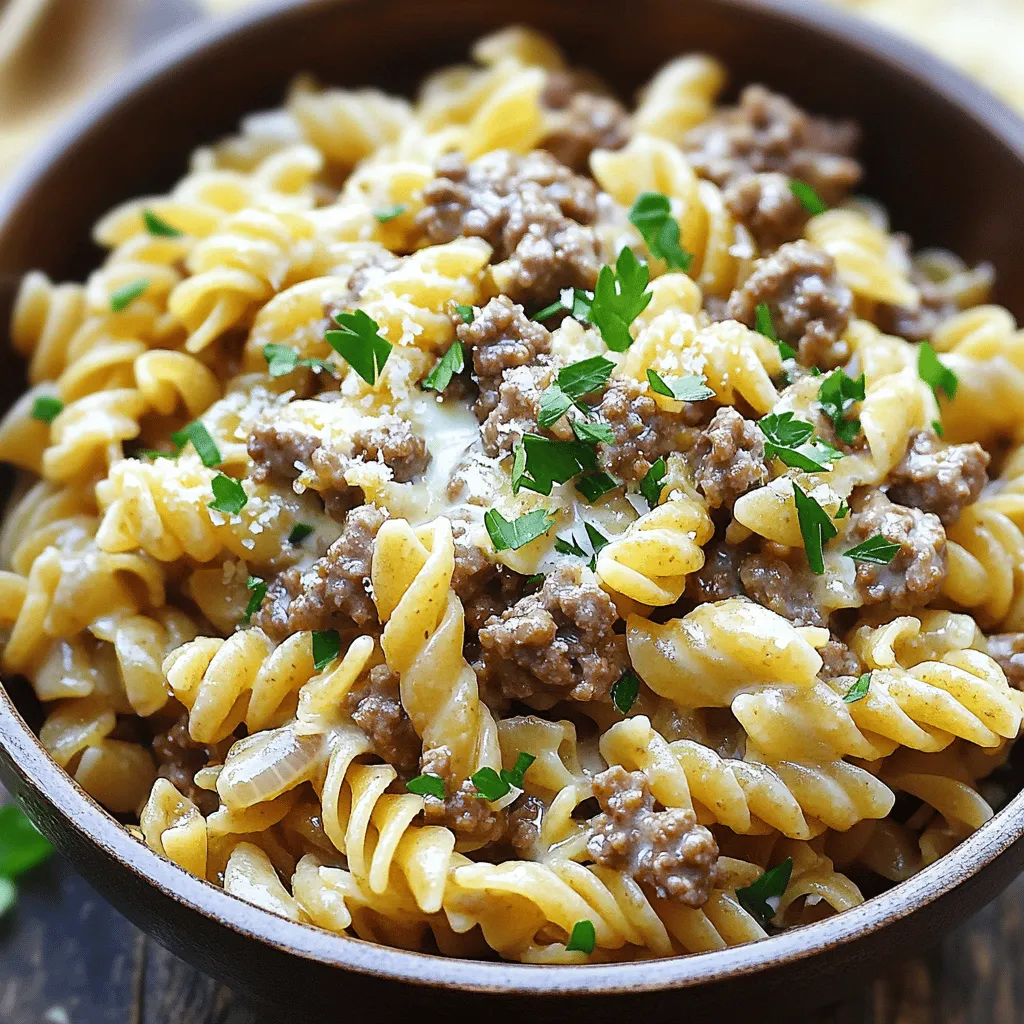
Are you ready for a filling meal that’s both creamy and packed with protein? This High-Protein Creamy Beef Pasta is

- 6 large eggs - 2 cups whole milk - 2 cups diced whole wheat bread - 1 cup cooked and crumbled turkey sausage - 1 cup fresh spinach, chopped - 1 medium bell pepper, diced - 1/2 medium onion, diced - 1 teaspoon garlic powder - 1 teaspoon dried oregano - Salt and pepper, to taste - 1 cup shredded cheddar cheese - Fresh parsley or chives for garnish The ingredients for this breakfast casserole create a tasty and filling dish. You start with eggs and milk, which form the base. The whole wheat bread adds fiber and a hearty texture. Turkey sausage gives it a nice protein boost and a savory flavor. Next, we have fresh veggies. Spinach adds color and nutrients. The bell pepper brings sweetness and crunch, while onion adds depth. Seasonings like garlic powder and oregano lift the flavors, making each bite exciting. Don’t forget salt and pepper! They bring everything together. Finally, the shredded cheddar cheese on top melts beautifully. It adds creaminess and a rich flavor that everyone loves. For a finishing touch, sprinkle fresh parsley or chives to add brightness and make it look pretty. This combination of ingredients makes your breakfast casserole not just good, but the best ever! - Preheat your oven to 350°F (175°C). This is key for even baking. - In a large bowl, crack 6 large eggs. Pour in 2 cups of whole milk. Whisk them together well. Make sure there are no lumps. - Next, add 1 teaspoon of garlic powder, 1 teaspoon of dried oregano, salt, and pepper to taste. Stir until mixed. - Prepare a greased 9x13 inch casserole dish. Spread 2 cups of diced whole wheat bread evenly across the bottom. This acts as the base. - Layer 1 cup of cooked and crumbled turkey sausage over the bread. Then add 1 cup of fresh chopped spinach, 1 medium diced bell pepper, and 1/2 medium diced onion. Spread them evenly for great flavor. - Carefully pour the egg mixture over your layered ingredients. Let it soak into the bread and veggies. - Top the casserole with 1 cup of shredded cheddar cheese. This will melt and add great flavor. - Place the casserole in your preheated oven. Bake for 45-50 minutes. It is done when a knife inserted into the center comes out clean. - After baking, let the casserole cool for about 10 minutes. This makes slicing easier. Cut it into squares for serving. - Use day-old bread for better texture. It soaks up the egg mix without getting too mushy. Fresh bread can make it soggy. - Allow the casserole to rest for a few minutes before serving. This helps the flavors blend and makes it easier to cut. - Customize with your favorite vegetables or meats. You can add mushrooms, zucchini, or even bacon for a twist. - Best garnished with fresh herbs like parsley or chives. They add color and a burst of flavor. - Pair with fresh fruit slices. Berries or melon make a great contrast to the savory dish. - Ideal for brunch gatherings or meal prep. It’s a crowd-pleaser and keeps well in the fridge. - Not whisking eggs thoroughly. Make sure they are smooth to prevent clumps in your casserole. - Overcrowding with too many toppings. Too many ingredients can lead to uneven cooking. - Underbaking or overbaking. Keep an eye on it. A knife should come out clean when it’s done. {{image_4}} You can easily change the meat in this casserole. Substitute turkey sausage with diced ham or crispy bacon. Both add rich flavors. Try different cheese varieties for a unique twist. Gouda or mozzarella can bring new tastes to the dish. Each option melts nicely and adds creaminess. Want more heat? Add hot sauce or salsa. A few drops can change the whole dish. Consider using fresh herbs for added flavor. Thyme or basil can make the casserole taste bright and fresh. These herbs pair well with the eggs and cheese. If you want a vegetarian option, just omit the meat. The casserole will still be filling and tasty. You can also make it gluten-free. Use alternative bread made from rice or almond flour. This keeps the dish enjoyable for everyone, no matter their diet. To store leftovers, let the casserole cool to room temperature first. Cover it tightly with plastic wrap or foil. You can also place it in an airtight container. This keeps your dish fresh for up to four days in the fridge. For the best storage, use glass or high-quality plastic containers. These help maintain the flavor and texture of your breakfast casserole. You can reheat your casserole in the oven or the microwave. The oven gives a crispier finish. Preheat it to 350°F (175°C) and bake for about 20 minutes. If using the microwave, heat in 30-second intervals. This makes sure it warms evenly. To keep the casserole moist, cover it with a damp paper towel in the microwave. This traps steam and prevents it from drying out. Yes, this casserole can be frozen! If you want to freeze it before baking, wrap it tightly in plastic wrap, then foil. This keeps out air and prevents freezer burn. You can freeze it for up to three months. To freeze after baking, let it cool completely. Slice it into portions for easy thawing. Wrap each slice in plastic wrap, then in foil. When you are ready to eat, thaw in the fridge overnight and reheat as described above. This casserole shines due to its unique flavor mix. The savory turkey sausage pairs well with the fresh spinach and vibrant bell pepper. Using whole wheat bread adds a hearty touch. Plus, it’s very easy to make. You can whip it up quickly, making it perfect for busy mornings or brunch with friends. Absolutely! You can prepare it the night before. Just follow the recipe up to the baking step. Cover it tightly and place it in the fridge. In the morning, simply pop it in the oven. This saves time and lets the flavors meld together for a more delicious meal. Yes! This casserole packs in nutrition. Eggs provide protein, while spinach adds vitamins and minerals. Whole wheat bread adds fiber, making it filling. To make it even healthier, you can use low-fat milk or add more veggies. You could skip the cheese or use a lighter cheese option. The knife test is key. After baking, insert a knife into the center. If it comes out clean, the casserole is ready. If it has some egg mixture on it, bake for a few more minutes. This ensures the eggs are cooked through and safe to eat. Yes, you can easily adjust the servings! If you want to make more or less, change the ingredient amounts. For example, you can double the recipe for a crowd or cut it in half for a small meal. Just keep the baking time in mind, as it may vary with different amounts. This breakfast casserole is easy to make and delicious. You gather simple ingredients like eggs, milk, and whole wheat bread. Then, layer with your choice of meats and veggies. Bake it, top with cheese, and enjoy! This dish is perfect for brunch or meal prep. You can make fun changes to match your taste. Follow the tips to avoid common mistakes. With the right prep, you’ll have the best breakfast ever!

Best Ever Breakfast Casserole Tasty and Easy Recipe

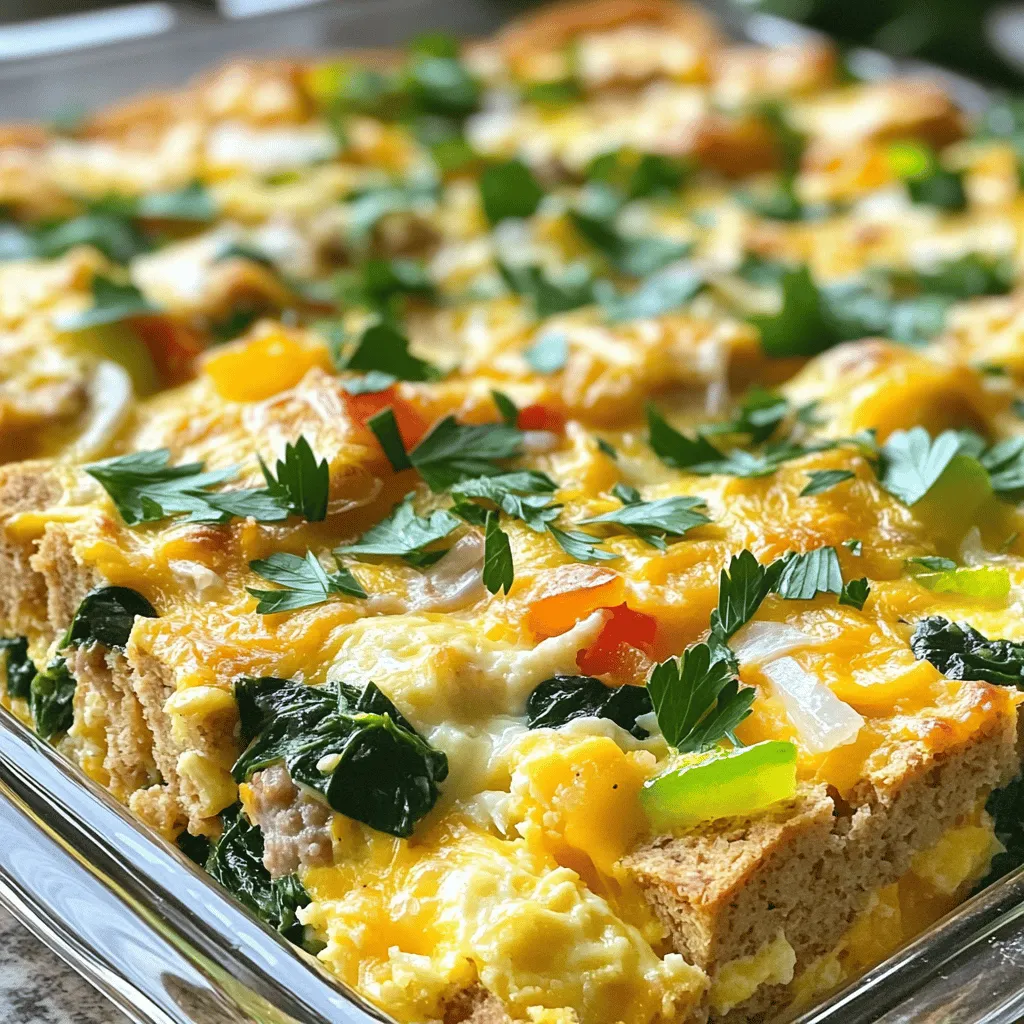
Are you ready to impress your family with a delicious breakfast? This Best Ever Breakfast Casserole is not only tasty

You need 2 cups of fresh blueberries for this recipe. Look for berries that are plump and firm. Fresh blueberries burst with flavor and add a vibrant color to your snack. If you can’t find fresh blueberries, try using frozen ones. Just make sure to thaw and drain them first. For yogurt, use 1 ½ cups of Greek yogurt. You can choose vanilla for a sweet taste or plain for a simple flavor. Greek yogurt gives a creamy texture and packs in protein. This makes your snack healthy and filling. Next, add 2 tablespoons of honey or maple syrup. This sweetens the yogurt and balances the tartness of the blueberries. You can pick based on your taste. Also, add 1 teaspoon of pure vanilla extract to boost flavor. A pinch of salt helps bring out the sweetness too. If you want more fun, consider optional toppings like granola, crushed nuts, coconut flakes, or mini chocolate chips. These add crunch and extra flavor to your bites. Start by gathering your ingredients. In a medium bowl, mix 1 ½ cups of Greek yogurt with 2 tablespoons of honey or maple syrup. Add 1 teaspoon of pure vanilla extract and a pinch of salt. Stir until it is smooth and creamy. Make sure to blend well so that all the flavors combine. This yogurt mixture is the base of your frozen bites. Next, gently fold in 2 cups of fresh blueberries. Use a spatula to combine them carefully. Be gentle to keep the blueberries whole. This step is key as you want those juicy bursts of flavor in every bite. Make sure every blueberry gets coated in the yogurt mixture. Now, prepare a baking sheet by lining it with parchment paper. Use a small spoon or scoop to place dollops of the yogurt mixture onto the sheet. You can shape them into small rounds or leave them as rustic blobs. For fun, sprinkle optional toppings like granola or mini chocolate chips on top. Once done, put the baking sheet in the freezer. Let them freeze for at least 2-3 hours. Once firm, peel them from the parchment and store in an airtight container. Enjoy these tasty bites! To get the best texture in your frozen bites, use full-fat Greek yogurt. This yogurt is thick and creamy. It holds its shape well when frozen. Mix the yogurt, honey, vanilla, and salt well. This helps create a smooth base. When you fold in the blueberries, do it gently. You want them intact, not mushy. If you follow these steps, your bites will be creamy and fun to eat. You can make your blueberry yogurt bites special with toppings. Granola adds crunch and flavor. Crushed nuts bring a nice bite. Coconut flakes give a tropical twist. Mini chocolate chips can make it feel like a dessert. Sprinkle your chosen toppings on top before freezing. This extra touch makes them more fun and tasty. Serving these bites can be simple but impressive. Use a decorative platter to show off their color. Add a handful of fresh blueberries for a pop. Drizzle honey over the bites for extra sweetness. This not only looks good but also tastes great. Remember, the way you present food can make it more appealing. Your guests will love these little treats! {{image_4}} You can easily switch up the yogurt flavor in this recipe. I love using Greek yogurt, but you can try many flavors. For example, strawberry or coconut yogurt adds a fun twist. You can even use plain yogurt if you prefer a less sweet taste. Each flavor changes the frozen bites and makes them unique. Honey and maple syrup work well, but you can try other sweeteners too. Agave nectar is a great choice for a light touch of sweetness. If you want a sugar-free option, consider using stevia or erythritol. Each sweetener changes the flavor slightly, so pick what you enjoy. You can mix in seasonal fruits for added taste and nutrition. In summer, add peaches or raspberries. In fall, diced apples or pumpkin puree can be great. Each fruit brings new flavors. Get creative and use what you have on hand for tasty variations! To keep your blueberry yogurt bites fresh, use an airtight container. This helps prevent freezer burn. Make sure the bites are fully frozen before transferring them. I recommend using parchment paper when you freeze them. It makes it easy to lift them off later. If stored properly, these bites last up to three months in the freezer. After that, they may lose texture and taste. Always check for any ice crystals or freezer burn before eating. When you're ready to enjoy your bites, take out as many as you want. Let them sit at room temperature for about five minutes. This helps them soften just enough for a perfect bite. You can also eat them straight from the freezer for a refreshing treat! Yes, you can use frozen blueberries. However, they may be softer. This can change the texture of the bites. If you use frozen, let them thaw slightly. Drain any extra water before mixing them with yogurt. This keeps your bites from becoming too runny. You can easily adjust this recipe for dietary needs. For dairy-free options, use coconut yogurt or almond yogurt. If you need a low-sugar snack, skip the honey or use a sugar substitute like stevia. Always check labels to ensure they fit your diet. These yogurt bites are versatile and fun! You can blend in other fruits like strawberries or raspberries. For a crunch, add nuts or seeds. You can also try different flavors, like chocolate yogurt or adding spices like cinnamon. They make great toppings for oatmeal or smoothies, too! You learned how to make tasty yogurt bites with fresh blueberries and yogurt. I covered the steps to get the right texture and shape. I also shared tips for adding fun toppings and serving ideas. You can try different yogurt flavors and seasonal fruits to mix things up. In the end, these bites are easy to store and enjoy later. They are perfect for you or anyone who loves a healthy snack. Enjoy creating your own version!

Blueberry Yogurt Frozen Bites Simple and Healthy Snack

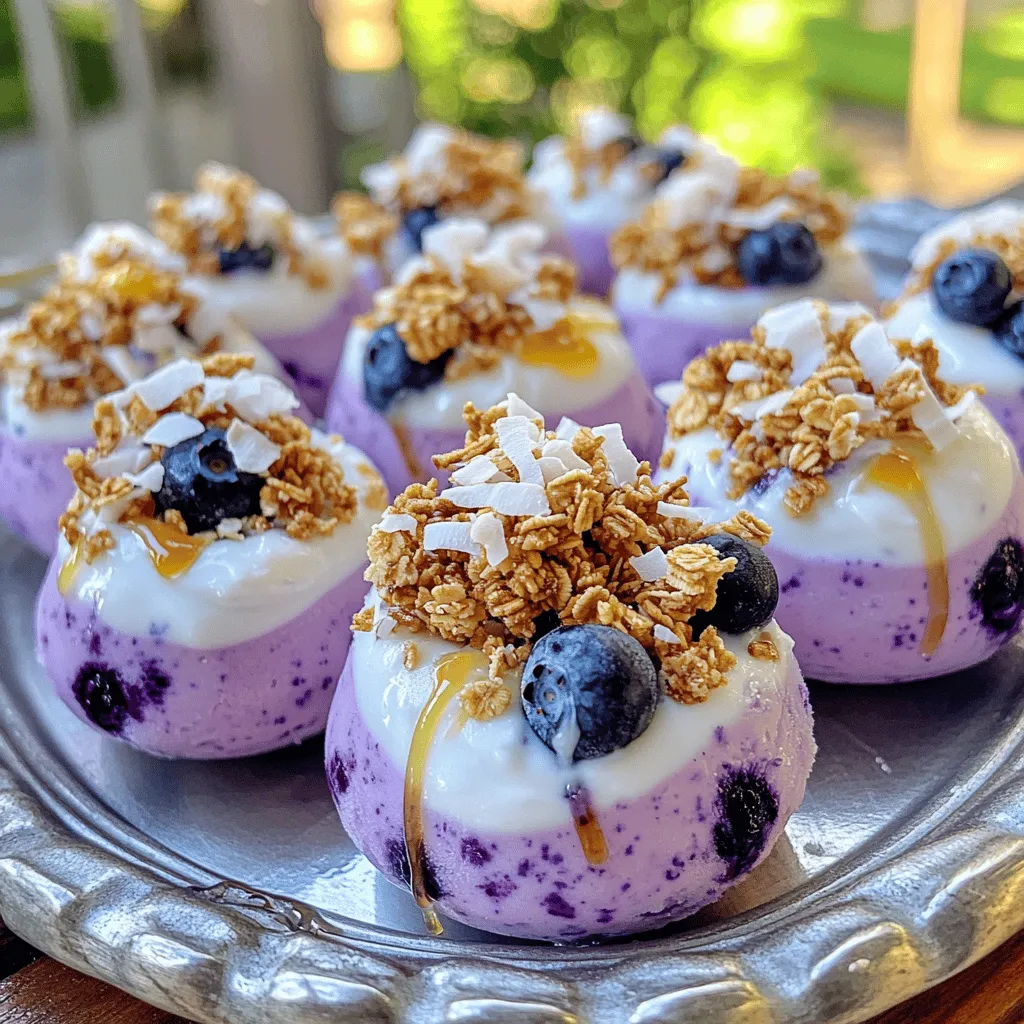
Looking for a tasty and healthy snack? Blueberry Yogurt Frozen Bites are just what you need! This simple treat combines

Older posts
Newer posts
← Previous Page1 … Page11 Page12 Page13 … Page86 Next →

dsad

© 2026 yumymoments • Built with GeneratePress

Our Policies

  • Copyright Policy
  • Cookie Policy
  • GDPR Policy
  • Privacy Policy
  • Disclaimer
  • Terms Of Use

More Information

  • Home
  • About
  • Contact
  • Appetizers
  • Dessert
  • Dinner
  • Drinks
©2026, yumymoments About Back To Top