Skip to content
DisclaimerTerms Of UseGDPR PolicyCookie Policy

yumymoments

  • Home
  • Drinks
  • Appetizers
  • Dinner
  • Dessert
  • About
  • Contact
  • Privacy Policy
DisclaimerTerms Of UseGDPR PolicyCookie Policy

NO-ING-IMG

To make a tasty Lemon Cream Chia Pudding, gather these simple ingredients: - 1/2 cup chia seeds - 2 cups almond milk (or any plant-based milk of your choice) - 1/4 cup maple syrup (can substitute with honey if desired) - Zest of 1 lemon, finely grated - 1/4 cup freshly squeezed lemon juice - 1 teaspoon pure vanilla extract - A pinch of sea salt - Optional toppings: a medley of fresh berries (strawberries, blueberries, raspberries), shredded coconut, or a handful of crushed nuts (almonds, walnuts, or pecans) Chia seeds are small but mighty. They are packed with nutrients and absorb liquid well. Almond milk gives a creamy base for the pudding. You can use any plant-based milk you enjoy. Maple syrup adds just the right amount of sweetness, but honey works too. Lemon zest and juice provide a bright, fresh flavor. The vanilla extract enhances the taste. A pinch of sea salt helps balance the sweetness. You can have fun with the toppings. Fresh berries add color and freshness. Shredded coconut can give a tropical twist. Crushed nuts bring crunch and extra flavor. 1. Combine almond milk and maple syrup In a medium bowl, pour in 2 cups of almond milk. Add 1/4 cup of maple syrup. Whisk them together until mixed well, and the syrup is dissolved. 2. Fold in chia seeds and other ingredients Next, gently add 1/2 cup of chia seeds, the zest of 1 lemon, and 1/4 cup of freshly squeezed lemon juice. Also, add 1 teaspoon of vanilla extract and a pinch of sea salt. Whisk again to mix, ensuring the chia seeds spread out evenly. 3. Allow to sit and stir for texture Let the mixture sit for about 10 minutes. After this, stir it again. This step helps break up any clumps of chia seeds. 4. Refrigerate to achieve pudding consistency Cover the bowl with plastic wrap or a lid. Place it in the fridge for at least 4 hours, or overnight if you can wait! This allows the chia seeds to absorb the liquid and create a thick pudding. 5. Serve and garnish suggestions When ready, take the pudding out of the fridge. Stir it well; if it's too thick, mix in a little more almond milk. Serve in bowls or glasses. For fun, top with fresh berries, coconut flakes, or crushed nuts for extra flavor and crunch. Whisking is key to making your lemon cream chia pudding smooth and creamy. When you mix almond milk with maple syrup, whisk well. This helps the syrup blend in and gives your pudding a nice base. To get the right thickness, you can adjust how much almond milk you use. If you want a thicker pudding, use less milk. For a thinner pudding, add more milk until it feels just right. Avoiding clumps of chia seeds is important. After you add the seeds, whisk again. Let the mixture sit for ten minutes, then stir it once more. This step breaks up any clumps that may form, ensuring a delightful texture. For a stunning presentation, layer your pudding with fresh berries. Use clear glasses to show off the creamy layers and colorful fruit. Not only does this look great, but it also adds flavor and nutrition. When serving, choose containers that fit your style. Small bowls or elegant glasses work well. They make your dessert feel special and inviting. Plus, they help showcase all those delicious toppings! {{image_4}} You can change the flavor of your Lemon Cream Chia Pudding easily. Try adding zest from other citrus fruits. Lime and orange zest can bring a fun twist. They add freshness and a unique taste. You might enjoy how the flavors blend. For sweetening, consider options like agave nectar or stevia. These alternatives let you adjust the sweetness to your taste. Agave nectar has a mild flavor, while stevia adds sweetness without calories. Both can enhance your pudding without overpowering the lemon. Using different fruits can change the look and taste of your pudding. Bananas and kiwi make great toppings. Their flavors pair well with lemon. You can slice them up and layer them on top for a colorful touch. Spices can also add depth. Sprinkle a bit of cinnamon or nutmeg on top. These spices bring warmth and a hint of spice to your dish. Experimenting with these toppings can make each serving special and exciting. Lemon cream chia pudding is a great make-ahead treat. When stored properly, it lasts up to five days in the fridge. To keep it fresh, always use a sealed container. Glass jars work well. Make sure to stir it before you serve. This helps to mix any settled chia seeds. Yes, you can freeze chia pudding! Freeze it in individual portions for easy access. Use airtight containers or freezer bags to avoid freezer burn. When you're ready to eat, take a portion out and let it thaw in the fridge for several hours or overnight. To serve, stir it well. You might need to add a splash of almond milk to get the right texture again. Enjoy your creamy pudding with fresh toppings for a delightful treat! Chia seeds are small but mighty. They are rich in fiber, which helps digestion. They also contain omega-3 fatty acids that support heart health. Plus, they are packed with protein, calcium, and antioxidants. These nutrients can boost energy and keep you feeling full longer. Yes! You can use any plant-based milk you like. Almond milk is a great choice, but oat, soy, or coconut milk work well too. Each milk brings its own flavor and texture. Just make sure to choose unsweetened milk for the best results. Absolutely! This pudding is perfect for meal prep. You can make it ahead of time and store it in the fridge. It lasts about five days. Just keep it in an airtight container. This way, you’ll always have a healthy snack ready to enjoy. Yes, this recipe is already vegan! It uses almond milk and maple syrup, both plant-based. If you choose to substitute honey, just stick to maple syrup to keep it vegan. Enjoy this creamy treat without any animal products! Chia pudding is simple and tasty. We discussed the key ingredients and how to mix them. You learned to adjust textures and explore flavor options. Don't be afraid to try new toppings and variations. This recipe is great for meal prep and easy to store. Each serving is healthy and fun to enjoy. I hope you feel inspired to make your own chia pudding, whether you're new to it or a seasoned pro. Make it your own, and enjoy every bite!

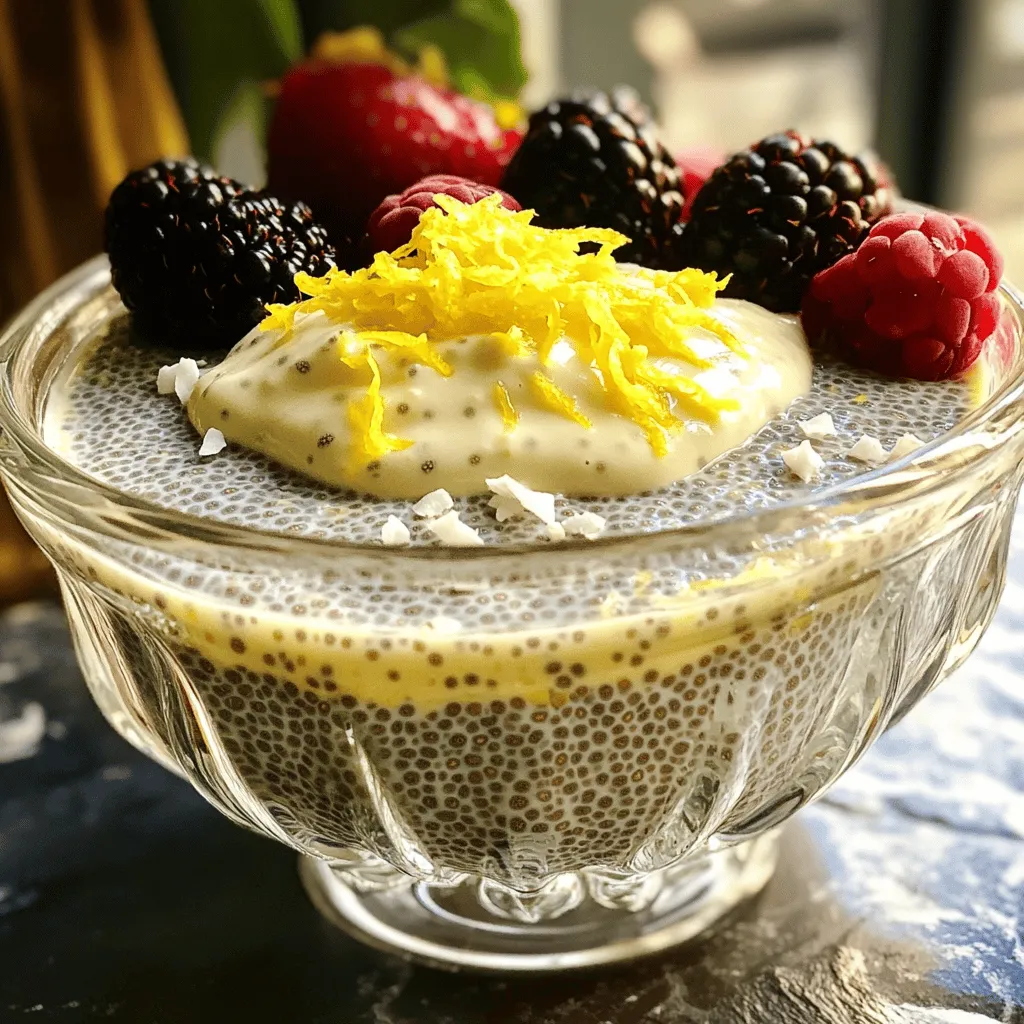
Lemon Cream Chia Pudding Fresh and Simple Delight

If you’re looking for a refreshing and simple dessert, you’ve come to the right place! This Lemon Cream Chia Pudding

- 1 lb breakfast sausage - 4 cups frozen hash browns - 8 large eggs - 1 medium onion - 1 bell pepper (red or green) - 1/2 cup milk - 1 teaspoon garlic powder - 1 teaspoon smoked paprika - Fresh parsley for garnish The ingredients in this recipe create a hearty meal. The breakfast sausage adds rich flavor and protein. Frozen hash browns make this dish quick and easy. You don’t need to thaw them, saving time in your morning routine. Next, we have the eggs. They are the base of this dish, binding everything together. They provide a fluffy texture and help create a filling meal. For vegetables, use a medium onion and a bell pepper. The onion adds sweetness, while the bell pepper gives a pop of color. Choose red or green based on your taste. The milk enriches the egg mixture, making it creamier. It helps in achieving that luscious finish. Don’t forget the seasonings! Garlic powder adds depth, and smoked paprika lends a warm, smoky flavor. These spices elevate the dish and make it even more enjoyable. Finally, top it all off with fresh parsley. It adds a bright touch and makes the dish look pretty. This meal is not just filling; it's also visually appealing! First, I cook the sausage in a large skillet. I set the heat to medium and add the crumbled breakfast sausage. I stir it often for about 5-7 minutes. I want it browned and fully cooked. Once done, I drain any excess grease. Then, I transfer the sausage to the crockpot, spreading it evenly across the bottom. Next, I use the same skillet to sauté the vegetables. I add the diced onion and bell pepper. I cook them for about 3-4 minutes. I wait until the vegetables soften and the onions turn translucent. Once ready, I add the sautéed vegetables to the crockpot with the sausage mixture. Now, I layer the hash browns on top of the sausage and vegetables. I spread 4 cups of frozen hash browns evenly over the mixture. This creates a nice layer that covers the bottom. In a separate bowl, I crack 8 large eggs and whisk them. I mix in 1/2 cup of milk, 1 teaspoon of garlic powder, 1 teaspoon of smoked paprika, salt, and pepper. I whisk until well combined and bubbly. I pour this egg mixture evenly over the hash browns in the crockpot. Next, I generously sprinkle 1 cup of shredded sharp cheddar cheese over the egg layer. This cheese will melt beautifully while cooking. Finally, I cover the crockpot with its lid. I set it to cook on low for about 7-8 hours or on high for 3-4 hours. The dish is ready when the eggs are fully set and the top is a lovely golden brown. When it is done, I gently stir the breakfast mixture to combine all layers slightly for serving. I sprinkle freshly chopped parsley on top for a pop of color before serving. You can cook this meal on low or high. On low, it takes about 7-8 hours. On high, it cooks in 3-4 hours. To know when it’s done, check if the eggs are fully set. The top should be golden brown. A toothpick can help; it should come out clean. After cooking, you may have leftovers. Store them in an airtight container in the fridge. They stay fresh for about 3-4 days. For longer storage, freeze the leftovers. Use freezer-safe bags or containers. They can last up to 3 months in the freezer. When serving, you can spoon the dish directly from the crockpot. This gives a cozy feel. For a nice touch, sprinkle chopped parsley on top. You can also serve it with fresh fruit or toast. These sides add color and balance to your meal. {{image_4}} You can change the sausage to fit your taste. Try turkey or chicken sausage for a lighter meal. If you want a plant-based option, use crumbled tofu or tempeh. For cheese, sharp cheddar is great, but you can also use Monterey Jack or pepper jack for some heat. Want to spice things up? Add cayenne pepper or chili powder for a kick. Fresh herbs like thyme or chives can add a nice touch too. You can also sneak in some greens. Spinach or kale work well and give extra nutrition. Just chop them finely and mix them in. For a fun twist, make breakfast burritos! Just scoop some of the mixture into a tortilla and roll it up. It’s perfect for on-the-go mornings. If you prefer a plated style, serve it in bowls. Add a dollop of sour cream or salsa for extra flavor. You can even pair it with fresh fruit or toast for a complete meal. To keep your Crockpot Mountain Man Breakfast fresh, use proper storage containers. Glass or BPA-free plastic containers work best. Make sure the dish cools before sealing it. Store in the fridge for up to three days. Label the container with the date to track freshness. When it's time to eat leftovers, use the microwave or an oven for reheating. If using a microwave, heat in short bursts. This way, you avoid overcooking. For the oven, set it to 350°F and cover it with foil. This helps keep the dish moist. Always check the center is hot before serving. To freeze, let the dish cool completely. Cut it into portions for easy use later. Wrap each portion tightly in plastic wrap, then place it in a freezer bag. This prevents freezer burn. You can freeze for up to three months. When ready to eat, thaw overnight in the fridge. Reheat as described above. Enjoy the same great flavors from your Crockpot Mountain Man Breakfast! Yes, you can easily make this recipe vegetarian. Instead of breakfast sausage, use plant-based sausage or crumbled tofu. You can also add more vegetables, like mushrooms or zucchini, to boost flavor and texture. This keeps the dish hearty and filling without meat. To adjust for fewer servings, cut the ingredient amounts in half. For example, use 1/2 lb of sausage, 2 cups of hash browns, and 4 eggs. This ensures you still get a tasty meal without excess food. Remember to adjust cooking times as needed, checking for doneness. This dish pairs well with fresh fruit, toast, or a light salad. You can also serve it with yogurt or pancakes for a fun twist. Add a hot coffee or tea to round out the meal. Enjoy your hearty breakfast with these tasty sides! The Crockpot Mountain Man Breakfast is a simple, tasty, and hearty dish. We covered the key ingredients, from sausage to eggs, and how to prepare them. Then, we discussed cooking tips, ingredient swaps, and food storage. This meal is easy to customize and makes breakfast stress-free. Enjoy experimenting with flavors and presentations. I hope this guide helps you create a delicious start to your day. Happy cooking!

Crockpot Mountain Man Breakfast Hearty and Filling Meal

Are you looking for a hearty breakfast that warms your soul? Look no further than the Crockpot Mountain Man Breakfast!

- 2 cups all-purpose flour - 1 ½ teaspoons baking powder - 1 teaspoon baking soda - 1 teaspoon ground cinnamon - ½ teaspoon sea salt - ¾ cup unsalted butter, softened - 1 cup packed brown sugar - ½ cup granulated sugar - 3 large eggs, at room temperature - 1 teaspoon pure vanilla extract - 1 cup buttermilk, at room temperature - 2 cups apples, peeled and diced - ½ cup walnuts or pecans, chopped (optional) The main ingredients create a moist and flavorful cake. The apples add sweetness and texture. The butter and sugars give a rich taste. The buttermilk keeps the cake soft. - ½ cup chopped walnuts or pecans - 1 teaspoon ground nutmeg - 1 cup raisins or dried cranberries Adding nuts gives a nice crunch. You can swap in dried fruit for extra sweetness. A touch of nutmeg adds warmth and depth to the flavor. - Powdered sugar for dusting - Thinly sliced apples - Extra ground cinnamon Dusting with powdered sugar makes the cake look pretty. Sliced apples on top add a fresh touch. A sprinkle of cinnamon boosts the flavor. Try these ideas to make your apple cinnamon sheet cake even better! First, you need to preheat your oven to 350°F (175°C). This ensures your cake bakes evenly. Grab a 13x9 inch baking sheet. Lightly grease it and line the bottom with parchment paper. This helps the cake come out without sticking. Next, take a medium bowl. In it, whisk together the all-purpose flour, baking powder, baking soda, ground cinnamon, and sea salt. Make sure they mix well. Set this bowl aside for later use. Now, grab a large mixing bowl. Using an electric mixer, beat the softened butter with brown sugar and granulated sugar. Mix on medium speed. Do this for about 3-4 minutes. You want the mixture to be light and fluffy. Carefully add three large eggs to the butter-sugar mix, one at a time. Mix well after each egg. Then, stir in the pure vanilla extract until the mixture is smooth. This gives your cake a nice flavor. Time to add some fruit! Gently fold in the diced apples and chopped walnuts or pecans if you want a crunch. Use a spatula to mix them evenly throughout the batter. Pour the batter into your prepared baking sheet. Smooth the top for an even layer. Bake in the preheated oven for 30-35 minutes. Check if it’s done by inserting a toothpick in the center. If it comes out clean, your cake is ready! Let it cool in the pan for about 10 minutes. Then, move it to a wire rack to cool completely. Dust the cooled cake with powdered sugar before serving. Enjoy! To keep your cake moist, use room temperature butter and eggs. This helps them mix better. Buttermilk adds flavor and moisture. Do not over-mix your batter; this can make the cake dry. Bake it until a toothpick comes out clean, but don't let it overbake. A little watch on the oven helps a lot. Use firm apples for the best texture. Peel and core them first. Cut the apples into small, even pieces. Aim for about half an inch or smaller. This way, they cook evenly in the cake. You can use a sharp knife or an apple corer to help with this task. One big mistake is not prepping the baking sheet. Grease it well and line it with parchment paper. Another common error is forgetting to preheat the oven. Always preheat before baking for even cooking. Lastly, don’t skip the dusting of powdered sugar. It makes the cake look pretty and adds a sweet touch! {{image_4}} You can make this cake gluten-free. Use a gluten-free flour mix instead of all-purpose flour. Look for one that works well for baking. Follow the recipe as usual, and enjoy the same great flavor. Your guests won’t even know the difference! To make a vegan version, swap out the eggs for flax eggs. Mix one tablespoon of ground flaxseed with three tablespoons of water for each egg. Use plant-based butter instead of regular butter. Also, choose a non-dairy milk, like almond or oat milk, instead of buttermilk. This keeps all the yummy taste while being vegan-friendly. Change up the flavors to match the seasons! In fall, add a pinch of nutmeg for warmth. In summer, try fresh berries with the apples for a fruity twist. You can even add pumpkin spice for a cozy autumn vibe. Let your creativity flow and enjoy new tastes! Store leftover apple cinnamon sheet cake in an airtight container. This keeps it fresh and moist. Place the cake in the fridge if you do not eat it within two days. Cover it with plastic wrap or foil before storing. For best taste, eat the cake within a week. You can also cut it into squares for easy grabbing. To freeze the cake, first let it cool completely. Wrap each piece in plastic wrap. Then, place the wrapped pieces in a freezer bag. Remove as much air as possible before sealing. You can freeze the cake for up to three months. When you want to enjoy it, thaw the cake in the fridge overnight. To reheat the cake, preheat your oven to 350°F (175°C). Place the pieces on a baking sheet. Heat for about 10 to 15 minutes until warm. You can microwave the cake as well. Heat individual pieces for 20 to 30 seconds. Serve the cake warm for a delightful treat. Yes, you can use other fruits. Try pears or peaches for a fun twist. They will add their unique flavors and keep the cake moist. Just make sure to chop them into small pieces, like the apples. Check the cake after 30 minutes. Insert a toothpick into the center. If it comes out clean, the cake is ready. If there’s wet batter on it, bake for a few more minutes. You can make your own buttermilk. Mix a cup of milk with one tablespoon of vinegar or lemon juice. Let it sit for five minutes. This will give you a nice tangy taste. Yes, this cake fits many occasions! It’s great for birthdays, holidays, or gatherings. The apple and cinnamon flavors make it festive and warm. Plus, it looks nice when dusted with powdered sugar. To boost the cinnamon flavor, add a bit more to the batter. You could also sprinkle some on top before baking. A cinnamon glaze on the finished cake would also work well. This blog post covered everything you need to bake a great apple cinnamon sheet cake. We talked about the main ingredients, optional variations, and perfect toppings. I shared detailed steps for making the cake and offered tips to ensure it stays moist. We also explored gluten-free and vegan options, plus storage and reheating advice. Try different fruits and flavors to make this cake your own. With these ideas, you’ll impress anyone who tries it. Happy baking!

Apple Cinnamon Sheet Cake Delicious and Easy Recipe

Welcome to my Apple Cinnamon Sheet Cake recipe! If you’re looking for a simple, tasty treat, you’re in the right

To make Cheesy Sicilian Lasagna, you need these key items: - 12 lasagna sheets - 2 tablespoons olive oil - 1 medium onion, finely chopped - 3 cloves garlic, minced - 1 pound ground beef - 1 pound Italian sausage, casings removed - 1 can (28 oz) crushed tomatoes - 2 tablespoons tomato paste - 1 teaspoon dried oregano - 1 teaspoon dried basil - Salt and pepper to taste - 2 cups ricotta cheese - 1 egg - 3 cups shredded mozzarella cheese - 1 cup grated Parmesan cheese - Fresh basil leaves for garnish The magic of Cheesy Sicilian Lasagna lies in its cheese. Three types play a big role: - Ricotta cheese adds creaminess to the layers. It has a mild taste. - Mozzarella cheese gives that stretchy, gooey bite we all love. It melts beautifully. - Parmesan cheese gives a salty kick and a nice crunch on top. It adds depth to each bite. These cheeses work together to create layers of flavor and texture in every slice. Gather these tools to make cooking easier: - Large skillet for the meat sauce - Mixing bowl for the ricotta mixture - 9x13 inch baking dish for layering - Spoon for stirring and layering - Aluminum foil for baking - Knife for slicing and serving With these essentials, you'll be ready to dive into the joy of making lasagna! {{ingredient_image_2}} Start by preheating your oven to 375°F (190°C). This step is key. A hot oven helps the lasagna cook evenly and brown nicely. In a large skillet, pour in 2 tablespoons of olive oil and heat over medium. Add 1 finely chopped onion and 3 minced garlic cloves. Sauté for 3-4 minutes until soft. Then, add 1 pound of ground beef and 1 pound of Italian sausage. Cook for about 7-10 minutes, stirring often. Break up the meat with a spoon. When the meat is browned, stir in 1 can of crushed tomatoes, 2 tablespoons of tomato paste, 1 teaspoon of dried oregano, and 1 teaspoon of dried basil. Add salt and pepper to taste. Let this simmer for 15 minutes. This melds the flavors and creates a rich sauce. Grab a 9x13 inch baking dish. Start by spreading a thin layer of meat sauce at the bottom. Place 3 lasagna sheets over the sauce. Next, spread one-third of the ricotta mixture over the sheets. Then, layer one-third of the meat sauce on top. Add 1 cup of shredded mozzarella cheese. Repeat this layering two more times: sheets, ricotta, sauce, and mozzarella. Finish with a layer of meat sauce on top. Top it off by sprinkling the remaining mozzarella and 1 cup of grated Parmesan cheese on the last layer. This will give you a cheesy, golden crust. To get the best cheese layer, use a mix of cheeses. I love using ricotta, mozzarella, and Parmesan. Each cheese adds a unique taste. For a creamier layer, mix ricotta with an egg. This helps it stay together. Spread each cheese layer evenly. This will give every bite a rich flavor. Don't skip the mozzarella on top! It melts perfectly and creates a golden crust. Soggy lasagna can ruin your meal. To stop this, make sure to drain your meat well. Too much liquid from the meat can make the noodles soggy. Also, boil the noodles for a shorter time if you use traditional sheets. This helps them stay firm. Layering with a thin meat sauce on the bottom helps too. It keeps the noodles from soaking up too much moisture. Presentation matters! Slice the lasagna into neat squares. Serve on a bright plate to make it pop. A sprinkle of Parmesan on top adds charm. Add a fresh basil leaf for color. This small touch makes a big difference. Pair it with a side salad for a complete meal. This way, your dish looks as good as it tastes! Pro Tips Use Fresh Herbs: Fresh basil enhances the flavor of your lasagna significantly. Add it to the meat sauce or the ricotta mixture for a vibrant taste. Layering Technique: Ensure even distribution of the layers by using a spatula to spread the ricotta and meat sauce evenly. This helps avoid dry spots in your lasagna. Let It Rest: Allow the lasagna to sit for at least 10-15 minutes after baking. This resting time helps the layers set and makes slicing easier. Customize Your Cheese: Feel free to mix different types of cheese like provolone or fontina with the mozzarella for a unique flavor profile. {{image_4}} You can easily make a vegetarian version of this dish. Start by replacing the meat with your favorite vegetables. I suggest using mushrooms, spinach, and zucchini. Sauté these veggies until tender, and mix them into the sauce. Add a bit of extra olive oil for flavor. The ricotta and mozzarella will still give you that creamy texture. This makes for a hearty meal that everyone will love. If you need a gluten-free option, there are great alternatives available. Use gluten-free lasagna sheets, which you can find in many stores. You can also make your own using almond flour or quinoa. Just remember to adjust the cooking time as needed. The flavors will still shine through, and everyone can enjoy this cheesy delight. Feel free to experiment with different cheeses. While mozzarella and ricotta are traditional, you can try using goat cheese or feta for a tangy twist. A mix of cheddar and Gouda adds a rich depth of flavor. Each cheese brings its unique taste, making your lasagna special. Mix and match to find your favorite combination! To reheat leftover lasagna, preheat your oven to 350°F (175°C). Place the lasagna in an oven-safe dish. Cover it with aluminum foil to keep it moist. Heat for about 20-30 minutes, or until it's hot throughout. You can also reheat individual slices in the microwave for 2-3 minutes. Just make sure to cover them to avoid drying out. If you have extra lasagna, you can freeze it. First, let it cool completely. Then, slice it into portions. Wrap each slice tightly in plastic wrap, then in aluminum foil. Place the wrapped slices in a freezer-safe bag. This way, it stays fresh for up to three months. When you’re ready to eat, thaw it in the fridge overnight before reheating. Store leftover lasagna in the fridge for up to 4 days. Use an airtight container to keep it fresh. Always let the lasagna cool before placing it in the fridge. This helps prevent moisture buildup. Label your containers with the date, so you know when to enjoy your tasty leftovers! Sicilian lasagna has a few unique traits. First, it often uses a mix of meats, like ground beef and Italian sausage. This blend gives it a rich flavor. Second, it has a thicker sauce, which makes it heartier. Finally, Sicilian lasagna usually includes more cheese. You will find layers of ricotta, mozzarella, and Parmesan. This combination makes each bite creamy and satisfying. Yes, you can use pre-cooked lasagna noodles. These noodles save time and make the process easier. Just layer them like regular noodles in your dish. Keep in mind that pre-cooked noodles may not absorb as much sauce. This can make the lasagna a bit wetter. To fix this, you might want to bake it a bit longer. You can tell the lasagna is fully cooked by checking a few things. First, look for bubbly cheese on top. This shows the cheese has melted nicely. Second, insert a knife into the center. If it goes in easily, the lasagna is done. Lastly, let it cool for about 10-15 minutes after baking. This helps the layers set and makes slicing easier. Enjoy your delicious Sicilian lasagna! You’ve learned how to make delicious Sicilian lasagna step by step. We covered the best ingredients and utensils needed. You now know tips for perfecting layers and avoiding sogginess. With options for vegetarian and gluten-free versions, everyone can enjoy this dish. Remember the best ways to store and reheat it. Enjoy creating your homemade lasagna and impress your friends and family with your skills!

Cheesy Sicilian Lasagna Flavorful Family Favorite

Looking to delight your family with a delicious meal? My Cheesy Sicilian Lasagna is the answer! This tasty dish is

- 1 cup unsalted butter, softened - 2 cups granulated sugar - 4 large eggs - 2 tablespoons fresh lemon zest - 1/2 cup freshly squeezed lemon juice - 2 cups all-purpose flour - 1 teaspoon baking powder - 1/2 teaspoon fine salt - 1 cup powdered sugar (for glaze) - 2 tablespoons lemon juice (for glaze) - Extra lemon zest for garnish - 9x13-inch baking pan - Electric mixer - Mixing bowls - Spatula or wooden spoon - Whisk When making Bright Lemon Brownies, gather all your ingredients first. Fresh lemon zest gives a bright flavor. Use a zester or fine grater to get the zest from your lemons. You can zest about two large lemons for the perfect amount. The lemon juice needs to be fresh too. This adds zing and makes the brownies moist. Next, ensure your butter is softened. This helps it mix well with the sugar. For the best results, let the butter sit at room temperature for about 30 minutes. You will need a few tools. An electric mixer saves time and effort. A 9x13-inch baking pan is key for the right size. Mixing bowls, a spatula, and a whisk are also essential. With these ingredients and tools ready, you can make these treats shine in your kitchen. Enjoy the bright flavors and aromas as you bake! - Preheat oven to 350°F (175°C). - Grease or line a 9x13-inch baking pan. Start with a clean space. Preheating the oven ensures even baking. I like to use parchment paper for easy cleanup. It helps the brownies pop out with ease. - Cream butter and sugar. - Add eggs, lemon zest, and lemon juice. In a large bowl, mix softened butter and sugar with an electric mixer. Beat them until fluffy, about 3-4 minutes. Then, add eggs one at a time. Make sure each egg blends in well. Next, stir in lemon zest and juice. This adds that bright flavor you want. - Whisk together flour, baking powder, and salt. - Fold dry mix into wet mixture. In a separate bowl, whisk flour, baking powder, and salt. Combine these dry ingredients with the wet ingredients. Use a spatula to fold them gently. Be careful not to overmix. You want a smooth batter without any flour streaks. - Transfer batter to pan. - Bake for 25-30 minutes. Pour the batter into the prepared pan. Spread it evenly. Bake in the preheated oven for 25-30 minutes. Check for doneness by inserting a toothpick in the center. It should come out clean when the brownies are ready. - Mix powdered sugar and lemon juice. While the brownies bake, prepare the lemon glaze. In a small bowl, whisk together powdered sugar and lemon juice. Aim for a smooth, pourable mix. It should be like syrup in texture. - Drizzle glaze over warm brownies. - Garnish with lemon zest. Once the brownies cool for about 10-15 minutes, drizzle the glaze over them. Spread it evenly for a sweet and tangy finish. For the final touch, sprinkle extra lemon zest on top. This adds extra flavor and a nice look. Enjoy your bright lemon brownies! How to avoid overmixing: Overmixing can make brownies tough. Mix your wet and dry ingredients until you see no flour streaks. Use a gentle hand when folding. This keeps your brownies soft and chewy. Testing for doneness: To check if your brownies are done, insert a toothpick into the center. If it comes out clean or with a few moist crumbs, your brownies are ready. If it comes out wet, they need more time. Adding poppy seeds or nuts: For extra texture, consider adding poppy seeds or chopped nuts. They give a nice crunch and pair well with the lemon flavor. Just fold them into the batter before baking. Using lemon extract: If you want a stronger lemon taste, add a teaspoon of lemon extract. This can boost the flavor without using more juice. It’s an easy way to make your brownies even zestier. Pair with tea or coffee: These lemon brownies taste great with a cup of tea or coffee. The bright flavors contrast well with the warm drinks. It makes for a lovely afternoon treat. Presentation ideas for gatherings: To impress your guests, serve each brownie on a nice dessert plate. Add a sprig of fresh mint on the side. This adds color and makes your dessert look special. {{image_4}} If you need a gluten-free treat, you can easily change the flour. Use almond flour or a gluten-free flour blend. This swap keeps the texture light and tasty. Make sure your baking powder is also gluten-free. This way, everyone can enjoy these bright lemon brownies! Want to make these brownies vegan? No problem! Simply replace the eggs with flax eggs or applesauce. For flax eggs, mix one tablespoon of ground flaxseed with three tablespoons of water. Let it sit for about five minutes to thicken. Applesauce also works great and adds moisture. Your brownies will still be soft and yummy! If you love chocolate, add it to your lemon brownies. You can swirl in some melted chocolate or mix in cocoa powder. This gives you a delicious chocolate-lemon combo. It adds richness while keeping that zesty lemon flavor. Try it out for a fun twist! Store your lemon brownies at room temperature in an airtight container. This keeps them fresh and soft. You can stack the brownies with parchment paper in between layers. They will stay good for up to three days. If you want to keep them longer, you can place the brownies in the fridge. First, let them cool completely. Then, wrap them in plastic wrap or foil. This helps avoid drying out. They will last about a week in the fridge. For longer storage, freezing works great. Cut the brownies into squares. Wrap each piece tightly in plastic wrap. Then, place them in a freezer bag. Make sure to remove as much air as possible. They can stay frozen for up to three months. When you're ready to enjoy, just thaw them in the fridge overnight. You can use bottled lemon juice. It is convenient and lasts longer. However, fresh lemon juice has a brighter taste. Bottled juice may lack the same fresh flavor. If you use bottled, choose a brand with no additives. Fresh juice makes your brownies taste better. To check if the brownies are done, insert a toothpick in the center. If it comes out clean, they are ready. The edges should be slightly brown, and the center should look set but still soft. Trust your eyes and the toothpick test! Lemon brownies pair well with several options. Serve them with a scoop of vanilla ice cream. A cup of hot tea or coffee also works nicely. For a fun twist, try a dollop of whipped cream. Fresh berries add color and flavor too! Lemon brownies can last up to a week at room temperature. Keep them in an airtight container to stay fresh. In the fridge, they last about two weeks. If you freeze them, they can stay good for three months. Just thaw them before enjoying! Yes, you can make these brownies ahead of time. Bake them and let them cool completely. Store them in an airtight container. You can frost them later or leave them plain. For best taste, eat them within a week. You now have everything to make delicious lemon brownies. We've covered all the ingredients and tools you need. Follow the detailed steps for mixing and baking. Don't forget the tasty glaze and garnishes. You can also try out variations for different tastes. These brownies are great for any occasion. Whether you enjoy them yourself or share with friends, they won’t disappoint. Now, grab your tools and start baking! Your kitchen will smell amazing, and you will have a sweet treat to enjoy.

Bright Lemon Brownies Scrumptious and Easy Treat

Are you ready to brighten your day with a delicious treat? These Bright Lemon Brownies are easy to make, flavorful,

To make this soup, gather these simple items: - 1 pound white fish fillets (like cod or tilapia), cut into bite-sized pieces - 1 tablespoon extra-virgin olive oil - 1 small onion, finely diced - 2 cloves garlic, minced - 1 inch fresh ginger, finely grated - 1 can (14 oz) full-fat coconut milk - 2 cups fish stock or vegetable broth - 1 lime, juiced and zested - 1 tablespoon fish sauce - 1 tablespoon brown sugar - 1 red bell pepper, thinly sliced - 1 cup snap peas, trimmed - Fresh cilantro leaves, for garnish - Sea salt and freshly ground black pepper to taste The heart of this soup is the fish. White fish provides a mild taste and absorbs the soup's flavors well. Coconut milk adds richness and creaminess, making every spoonful feel luxurious. Lime juice and zest brighten the dish, giving it a fresh kick. Garlic and ginger infuse warm, aromatic notes. Fish sauce adds umami depth, while brown sugar balances the flavors. You can play with extras for fun twists. Try adding a chopped chili for heat or a splash of soy sauce for more depth. Fresh herbs, like basil or mint, can add a unique touch. For a crunch, consider topping the soup with crushed nuts or seeds. Each addition can make the dish even more special! Gather all the ingredients before you start. This makes cooking easier. You will need: - 1 pound white fish fillets (such as cod or tilapia), cut into bite-sized pieces - 1 tablespoon extra-virgin olive oil - 1 small onion, finely diced - 2 cloves garlic, minced - 1 inch fresh ginger, finely grated - 1 can (14 oz) full-fat coconut milk - 2 cups fish stock or vegetable broth - 1 lime, juiced and zested - 1 tablespoon fish sauce - 1 tablespoon brown sugar - 1 red bell pepper, thinly sliced - 1 cup snap peas, trimmed - Fresh cilantro leaves, for garnish - Sea salt and freshly ground black pepper to taste First, dice the onion and mince the garlic. Grate the ginger next. Make sure your fish fillets are ready. You want them in bite-sized pieces. Heat a large pot over medium heat. Add the olive oil. Once the oil is hot, add the diced onion. Cook it for about five minutes. The onion should turn soft and clear. Next, add the minced garlic and grated ginger. Stir them for about one minute. You want them to smell great but not burn. Now, pour in the coconut milk and fish stock. Stir gently until mixed. Raise the heat and bring the pot to a gentle simmer. This helps the flavors blend well. Add the lime juice, lime zest, fish sauce, and brown sugar. Stir everything together. This step adds a nice mix of sweet and tangy flavors. Carefully add the fish pieces, sliced red bell pepper, and snap peas. Let the soup simmer for five to seven minutes. The fish will turn opaque and flake easily with a fork when done. Taste the soup and season with sea salt and black pepper. Adjust to your preference. Once seasoned, take the pot off the heat. Let it sit for a few minutes. This helps the flavors meld together. When serving, ladle the soup into warm bowls. Garnish each bowl with fresh cilantro leaves. For a zesty kick, add lime wedges on the side. This allows everyone to squeeze fresh lime juice over their soup. Enjoy the bright, fresh flavors! To make your Coconut Lime Fish Soup pop, think about layering flavors. Start by sautéing the onion until it’s soft. This builds a sweet base. Next, add garlic and ginger for warmth and spice. When you pour in the coconut milk, use full-fat for a rich taste. The lime juice and zest add brightness, so don’t skip them! A touch of fish sauce boosts umami. Finally, let the soup sit for a few minutes before serving. This lets all the flavors mingle nicely. One common mistake is overcooking the fish. It should be tender and flake easily. Keep an eye on it as it simmers. Another mistake is adding salt too early. Wait until the soup is done to taste and season. Also, be careful with the heat. If the soup boils too hard, it may break the coconut milk. Aim for a gentle simmer to keep it creamy and smooth. For a complete meal, pair this soup with a side of warm, crusty bread. The bread soaks up the delicious broth. You can also serve it with jasmine rice. For a drink, try a light, fruity white wine. A fresh salad with mango or avocado complements the soup's bright flavors. If you want more zest, offer lime wedges to squeeze over the bowl just before eating. {{image_4}} You can easily swap out ingredients in this soup. Instead of white fish, use shrimp or scallops. Chicken can also work well. If you want a creamy touch, try almond milk instead of coconut milk. For a crunch, add carrots or zucchini. You can even use frozen peas if fresh ones are not available. This soup is quite flexible for dietary needs. To make it vegan, use tofu or chickpeas instead of fish. Swap the fish stock for vegetable broth. For gluten-free diets, check the fish sauce label to ensure it meets your needs. You can also skip the fish sauce if you prefer. Different regions offer unique twists on this soup. In Southeast Asia, add lemongrass and Thai basil for a more aromatic flavor. In the Caribbean, try adding mango or pineapple for a sweet touch. Each region's spices can change the whole dish, making it fun to explore. After enjoying your Coconut Lime Fish Soup, let it cool. Transfer the soup to an airtight container. Store it in the fridge for up to three days. If you want to keep it longer, freezing is best. To reheat, pour the soup into a pot. Warm it over medium heat. Stir gently to ensure even heating. You can also use the microwave. Heat it in short bursts, stirring in between. Just be careful not to overcook the fish. If you plan to freeze the soup, do so before adding the fish. This helps keep the fish's texture nice when reheating. Store the soup in a freezer-safe container. It can last up to three months. When you're ready to eat, thaw it overnight in the fridge before reheating. For this soup, I recommend using white fish like cod or tilapia. These fish are mild and flaky. They absorb flavors well and cook quickly. You want a fish that adds a light texture, not heaviness. Feel free to use any firm white fish you love. Yes, you can prepare this soup ahead of time. Make it and cool it completely before storing. Place it in an airtight container in the fridge. It will stay fresh for up to three days. When you're ready to eat, just reheat it on the stove. The flavors will deepen and taste even better! To add some heat, you can try several options. Add sliced jalapeños or red pepper flakes while cooking. You can also include a dash of hot sauce at the end. Adjust the spice level to suit your taste. Remember, you can always add more spice, but you can't take it out! - 1 pound white fish fillets (cod or tilapia), cut into bite-sized pieces - 1 tablespoon extra-virgin olive oil - 1 small onion, finely diced - 2 cloves garlic, minced - 1 inch fresh ginger, finely grated - 1 can (14 oz) full-fat coconut milk - 2 cups fish stock or vegetable broth - 1 lime, juiced and zested - 1 tablespoon fish sauce - 1 tablespoon brown sugar - 1 red bell pepper, thinly sliced - 1 cup snap peas, trimmed - Fresh cilantro leaves, for garnish - Sea salt and freshly ground black pepper to taste In this blog post, we explored the key ingredients for Coconut Lime Fish Soup. You learned about preparation, cooking steps, and finishing touches. I shared tips to enhance flavors and avoid common mistakes. We also discussed ingredient swaps for dietary needs and how to store leftovers. Remember, cooking is about experimentation and enjoyment. Try your variations and find what you love most. Enjoy this delicious dish with friends and family. Happy cooking!

Coconut Lime Fish Soup Flavorful and Fresh Delight

Are you ready to make a dish that’s both tasty and refreshing? Coconut Lime Fish Soup is a perfect mix

For a vibrant Strawberry Spinach Salad, gather these fresh ingredients: - 4 cups fresh baby spinach, thoroughly washed and dried - 1 cup strawberries, hulled and sliced into thin rounds - 1/2 cup feta cheese, crumbled into bite-sized pieces - 1/4 cup sliced almonds, lightly toasted until golden brown - 1/4 red onion, finely sliced into thin rings These fresh ingredients create a colorful and tasty salad. Spinach adds a crunchy base, while strawberries bring sweetness. Feta cheese offers a creamy note, and toasted almonds add a lovely crunch. The red onion adds a sharp flavor that rounds out the dish. For the dressing, you will need: - 1/4 cup high-quality olive oil - 2 tablespoons apple cider vinegar - 2 tablespoons honey or maple syrup for sweetness - 1 tablespoon poppy seeds - Salt and freshly ground black pepper to taste This dressing is simple yet flavorful. Olive oil gives a rich base, while apple cider vinegar adds tang. Honey or maple syrup sweetens the mix perfectly. Poppy seeds add a fun texture and a slight crunch. This salad is a powerhouse of nutrients. Each serving contains: - Calories: Approximately 200 - Protein: 5 grams - Carbohydrates: 15 grams - Fat: 15 grams The spinach provides vitamins A and C. Strawberries offer antioxidants. Feta cheese adds calcium, while almonds give healthy fats. This salad is not only tasty but also good for you! {{ingredient_image_2}} To start, gather your dressing ingredients. In a small bowl, mix together: - 1/4 cup high-quality olive oil - 2 tablespoons apple cider vinegar - 2 tablespoons honey or maple syrup - 1 tablespoon poppy seeds - A pinch of salt and freshly ground black pepper Whisk these ingredients until they blend well. This dressing should be smooth and creamy. The sweet and tangy taste will complement the salad perfectly. Now, take a large salad bowl. Begin by adding: - 4 cups fresh baby spinach, thoroughly washed and dried This spinach serves as a fresh base. Next, layer on: - 1 cup strawberries, hulled and sliced into thin rounds - 1/2 cup feta cheese, crumbled into bite-sized pieces - 1/4 cup sliced almonds, lightly toasted until golden brown - 1/4 red onion, finely sliced into thin rings Arrange these ingredients artfully. The colors will look bright and inviting, making your salad pop! Once you have everything in the bowl, drizzle the poppyseed dressing over the top. Use gentle hands to toss the salad. Make sure the dressing coats each ingredient well. This step is key to enjoy all those flavors together. Serve your salad right away. You can use a large bowl for sharing or individual plates for a more stylish look. For a final touch, garnish with extra almonds and a few whole strawberries. This adds a beautiful finish to your dish! When selecting strawberries, look for bright red color. They should feel firm and plump. Check for any white or green spots, as this means they are not ripe. Smell the strawberries; a sweet scent means they are fresh. Always pick organic strawberries when possible. They taste better and are healthier for you. If you have leftover salad, store it in an airtight container. Keep the dressing separate to avoid sogginess. The salad will stay fresh for up to two days. Place any leftover strawberries on top to keep them from bruising. Always check for freshness before eating. You can make this salad even better! Try adding grilled chicken for protein. Avocado adds a creamy texture and healthy fats. For a crunch, toss in some sunflower seeds or pumpkin seeds. Fresh herbs like mint or basil can brighten the flavors. Experiment to find your favorite mix! Pro Tips Fresh Spinach is Key: Always choose fresh, vibrant baby spinach for the best flavor and texture. Wilted or yellowing leaves can affect the overall taste of your salad. Toast the Almonds: Lightly toasting the almonds enhances their nutty flavor and adds a delightful crunch to your salad. Be sure to watch them closely to avoid burning. Adjust Sweetness: Feel free to adjust the amount of honey or maple syrup in the dressing according to your taste preference. Start with less and add more if needed. Chill the Ingredients: For a refreshing salad, chill your ingredients in the refrigerator for about 30 minutes before assembling. This adds a nice crispness to each bite. {{image_4}} You can easily boost this salad's nutrition by adding protein. Grilled chicken is a great choice. Simply slice cooked chicken breast and place it on top. This adds flavor and makes the salad more filling. If you prefer a plant-based option, try cooked quinoa. It adds texture and is packed with protein. Just sprinkle it over the salad, and you’re set! If you want to change the nuts, you can! Walnuts or pecans work well in this salad. They give a nice crunch and pair well with the other flavors. Toast them lightly for extra taste. If you have nut allergies, seeds like sunflower or pumpkin seeds are great substitutes. They add a delightful crunch without the nuts. This salad is not just for summer! You can make it all year long. In spring, add fresh peas or asparagus for a pop of green. In fall, try adding roasted sweet potatoes or apples for a cozy touch. In winter, pomegranate seeds add a burst of color and taste. This way, you enjoy fresh flavors no matter the season! To keep your strawberry spinach salad fresh, store the ingredients separately. This keeps the spinach crisp and prevents soggy salad. Wash and dry the spinach well. Place it in a clean container lined with paper towels. This helps absorb moisture. Keep strawberries in a different container, covered lightly. The feta cheese and almonds should also have separate containers. Store them in airtight bags or containers to keep them fresh. Using the right containers is key. Glass containers work well because they don’t stain and seal tightly. If you use plastic, make sure it is BPA-free. Choose containers with lids that lock in air. This helps keep ingredients fresh for longer. Keep everything in the fridge until you are ready to toss the salad. The salad ingredients, when stored properly, can last for about three days in the fridge. The spinach should stay fresh for at least two days. Strawberries can last up to three days, depending on their ripeness. The dressing, if stored in a sealed jar, can last for about a week. Always check for any signs of spoilage before using. Enjoy your salad fresh for the best taste! Yes, you can make the dressing ahead of time. Just mix the olive oil, apple cider vinegar, honey, poppy seeds, and a pinch of salt and pepper in a bowl. Whisk it well until blended. Pour it into a jar and seal it tight. Store it in the fridge for up to a week. This makes it easy to whip up the salad later. Just shake the jar to mix it again before using. If you don't have feta cheese, you can try goat cheese. It has a creamy taste that fits well. You can also use ricotta or blue cheese for a stronger flavor. For a dairy-free option, try crumbled tofu or a nut-based cheese. These substitutes will still give your salad a nice texture and taste. Yes, this salad is great for meal prep! You can prepare the salad ingredients separately. Keep the spinach, strawberries, and onions in a container. Store the feta and almonds in another. Make the dressing in a jar. When you're ready to eat, just toss everything together. This keeps the salad fresh and crisp. Enjoy it throughout the week! In this blog post, we looked at how to make a fresh salad. We covered the key ingredients like strawberries and dressing. I shared easy steps for making poppyseed dressing and assembling the salad. You learned tips for choosing fresh strawberries and storing leftovers. We also explored fun variations to keep it exciting all year. Remember, this salad is great for meal prep and can fit many tastes. Enjoy creating your version with fresh flavors that you love!

Strawberry Spinach Salad with Poppyseed Dressing Delight

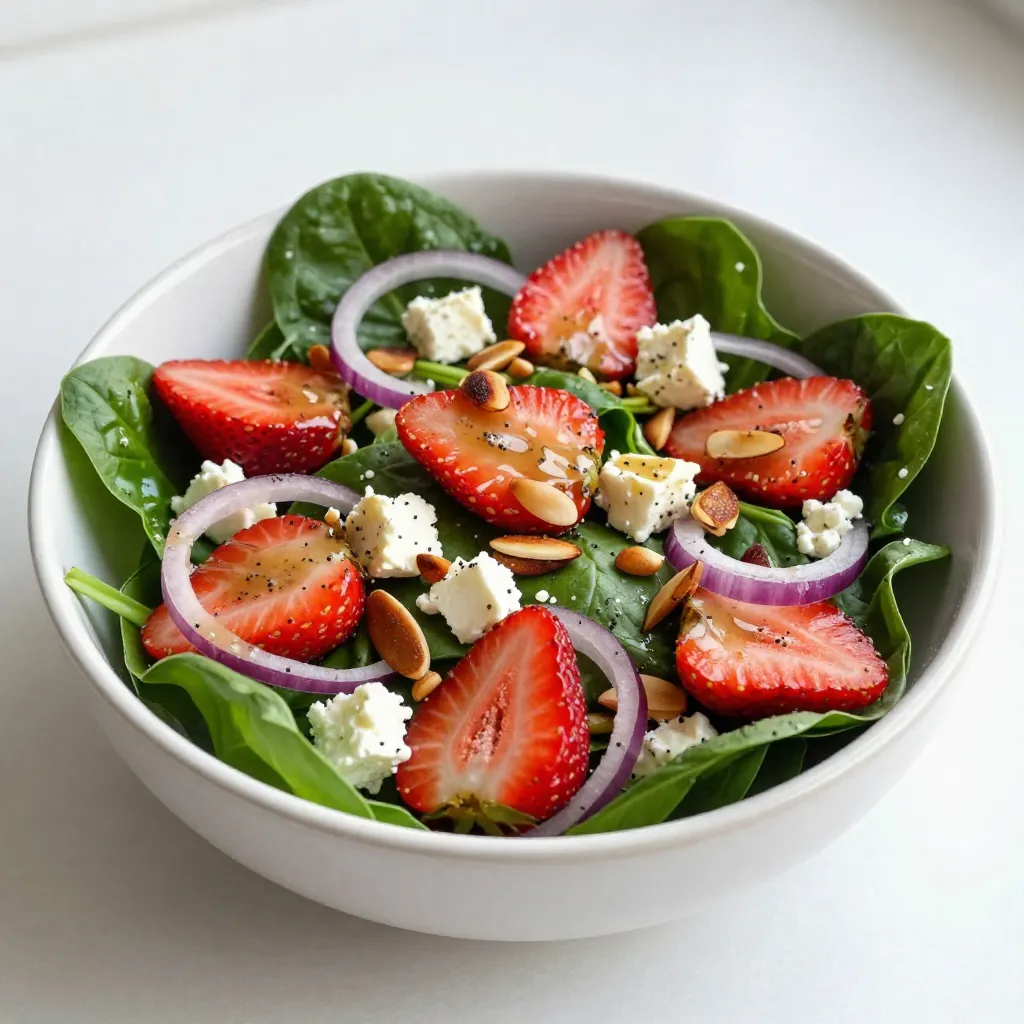
Are you ready to elevate your salad game? My Strawberry Spinach Salad with Poppyseed Dressing is fresh, vibrant, and packed

- 1 pound chicken breast, cut into bite-sized pieces - 4 tablespoons unsalted butter - 4 cloves garlic, minced - 1 teaspoon dried Italian herbs (combination of oregano, thyme, and basil) - ½ cup chicken broth - 1 cup heavy cream - 1 cup Parmesan cheese, freshly grated - Fresh parsley, chopped (for garnish) - Salt and pepper to taste - 8 ounces fettuccine or your preferred pasta In this recipe, the main ingredients are vital for flavor and texture. The chicken breast provides protein, and the unsalted butter adds richness. Garlic infuses the dish with a fragrant aroma. For the pasta and sauce, dried Italian herbs bring warmth and depth. Chicken broth adds a savory base, while heavy cream creates a luscious texture. Freshly grated Parmesan cheese gives that cheesy finish we all love. Don’t forget the optional ingredients. Fresh parsley adds a pop of color and freshness. Salt and pepper enhance the overall taste. You can use any pasta you enjoy, but I recommend fettuccine for its perfect pairing with creamy sauces. Gather all these ingredients, and you're set to make a delicious meal that will impress! - Start by filling a large pot with water. - Add a generous pinch of salt to the water. - Bring the water to a vigorous boil. - Once boiling, add 8 ounces of fettuccine. - Cook the pasta for 8-10 minutes until it's al dente. - Reserve about ½ cup of the pasta water before draining. - Set the drained pasta aside while you make the sauce. - In a large skillet, melt 4 tablespoons of butter over medium-high heat. - Wait until the butter bubbles but does not brown. - Add 1 pound of bite-sized chicken pieces to the skillet. - Season the chicken with salt, pepper, and 1 teaspoon of dried Italian herbs. - Cook the chicken for 5-7 minutes, stirring it often. - Make sure the chicken is golden and cooked through. - Lower the heat to medium after the chicken is cooked. - Add 4 minced cloves of garlic to the skillet. - Sauté the garlic for 1-2 minutes until it smells great. - Be careful not to let the garlic burn. - Pour in ½ cup of chicken broth and let it simmer. - Let it cook uncovered for 2-3 minutes to reduce. - Now pour in 1 cup of heavy cream. - Stir in 1 cup of freshly grated Parmesan cheese. - If the sauce is too thick, add some reserved pasta water. - Mix until the sauce is creamy and smooth. - Toss the cooked fettuccine with the sauce and chicken. - Make sure every piece of pasta is well-coated. - Serve the dish and enjoy the creamy goodness! To ensure your chicken bites are juicy and packed with flavor, use fresh chicken breast. Cut it into bite-sized pieces. This helps it cook evenly. Keep your heat at medium-high when you sauté. Cook for 5-7 minutes, stirring often, until golden brown. Check that the chicken is fully cooked by cutting into the largest piece. It should not be pink inside. To adjust your sauce's consistency, save some pasta water before draining. Add this starchy water to your creamy sauce if it feels too thick. Start with a tablespoon and mix it in well. This will help you achieve the perfect creaminess. The sauce should coat your pasta nicely without being runny. For garnishing, sprinkle chopped fresh parsley on top. This will add color and freshness. You can also drizzle extra olive oil for a touch of shine. Serve the garlic butter chicken bites on a bed of creamy pasta. For a gourmet look, use a microplane to grate fresh Parmesan cheese over the dish before serving. This adds a rich flavor and makes your meal look fancy. {{image_4}} You can switch the chicken for shrimp or tofu. Shrimp cooks fast and adds a nice flavor. Just sauté it for 3-4 minutes until it turns pink. Tofu is great for a plant-based meal. Use firm tofu, cut it into cubes, and sauté until golden. This gives you tasty options that still pair well with the creamy sauce. If you want gluten-free pasta, many brands offer it now. Look for rice or lentil pasta for a healthy choice. Whole-wheat pasta is another option; it adds fiber and a nutty flavor. Cook it just like regular pasta, and it will work beautifully in this dish. Adding vegetables can really boost this meal. Try spinach, bell peppers, or peas; they not only add color but also nutrients. You can toss them in when you add the garlic. For spices, a pinch of red pepper flakes can add a nice kick. Experiment with your favorites to find the perfect blend that suits your taste. To keep your garlic butter chicken bites fresh, store leftovers in an airtight container. Place the container in the fridge. This dish stays good for up to three days. If you want, you can separate the pasta and chicken to keep textures nice. When it's time to eat again, you can reheat in two ways. The stovetop method works best. Heat a skillet over medium heat, add a splash of broth, and stir. This keeps the pasta creamy and moist. If you use the microwave, place the dish in a microwave-safe bowl. Add a little broth, cover it, and heat in short bursts. Stir often to avoid dry spots. You can freeze this dish for longer storage. To do this, let it cool completely. Then, place it in a freezer-safe container or bag. Be sure to remove air to prevent freezer burn. It can last up to three months in the freezer. When you're ready to enjoy it, thaw it overnight in the fridge. Reheat gently on the stovetop for the best results. Yes, you can use frozen chicken. Just make sure to thaw it first. This helps the chicken cook evenly. If you start with frozen chicken, plan for a longer cook time. You may need an extra 5-10 minutes. Always check the chicken for doneness. It should reach an internal temperature of 165°F. If you want a lighter option, you can use half-and-half. This gives a creamy texture but with less fat. For a dairy-free choice, try coconut milk or almond milk. These options can alter the flavor slightly, but they work well. You can also use Greek yogurt mixed with a bit of water for a thicker sauce. To add heat, include red pepper flakes while cooking the chicken. Start with a pinch, and add more if you like it spicy. You can also use hot sauce or diced jalapeños. Mixing in a bit of smoked paprika adds flavor and heat, too. Don’t forget to taste as you go to find your perfect spice level! This post showed you how to make garlic butter chicken bites with pasta. We covered the main ingredients like chicken and garlic, plus the steps to cook pasta and sauté chicken. I shared tips for perfecting the dish and adding your twist. In the end, enjoy experimenting with flavors and options. Remember, cooking can be fun and creative! Enjoy your meal!

Garlic Butter Chicken Bites with Creamy Pasta Delight

Ready to savor a quick and tasty meal? Our Garlic Butter Chicken Bites with Creamy Pasta Delight will make your

- 2 medium zucchinis, grated - 1/2 cup all-purpose flour - 1/4 cup cornmeal - 1 large egg - 1/2 cup grated Parmesan cheese I start with grated zucchini, which gives the fritters their fresh taste. I use all-purpose flour and cornmeal to help bind the mixture and add texture. The egg acts as a binder, while Parmesan cheese adds a rich, savory flavor. - 1/4 cup green onions, finely chopped - 1 clove garlic, minced - 1/2 teaspoon black pepper - 1/2 teaspoon smoked paprika - Olive oil, for frying - Greek yogurt or sour cream, for serving (optional) I love to add green onions and garlic for extra flavor. Black pepper gives a nice kick, while smoked paprika adds a hint of warmth. For serving, I recommend Greek yogurt or sour cream. They add creaminess and balance the fritters' crunch. - Start by grating the zucchinis. Use the large holes of a box grater. - After grating, sprinkle 1 teaspoon of salt on the zucchini. This helps draw out moisture. - Let the salted zucchini rest for about 10 minutes. This step is key for crisp fritters. - After 10 minutes, grab a clean kitchen towel. Gather the zucchini in the towel and twist it. - Squeeze out as much liquid as you can. Less moisture means crispier fritters! - In a large bowl, combine the drained zucchini with the other dry ingredients. - Add 1/2 cup of all-purpose flour, 1/4 cup of cornmeal, and 1 large egg. - Include 1/2 cup of grated Parmesan cheese, 1/4 cup of chopped green onions, and 1 clove of minced garlic. - Sprinkle in 1/2 teaspoon of black pepper and 1/2 teaspoon of smoked paprika. - Mix well until all the ingredients blend into a cohesive mixture. - Heat olive oil in a large skillet over medium heat. Use enough oil to cover the bottom of the skillet. - Scoop up portions of the zucchini mixture with a tablespoon. Drop them gently into the hot oil. - Press down lightly on each portion to flatten it into a fritter. Fry in batches to avoid crowding. - Cook each fritter for 3-4 minutes per side until they look golden brown and crispy. - Once cooked, place the fritters on a paper towel-lined plate to absorb extra oil. - Serve warm with Greek yogurt or sour cream for dipping, if you like a creamy touch! To make sure your fritters are crispy, focus on moisture removal. Zucchini has a lot of water. When you salt it, let it sit for 10 minutes. This draws out moisture. After that, use a towel to squeeze out the liquid. The drier your zucchini, the better your fritters will be. Next, pay attention to the oil temperature. Heat your olive oil in a skillet over medium heat. You want it hot but not smoking. If the oil is too cool, your fritters will soak up oil and become soggy. A good rule is to drop a small amount of the zucchini mix into the oil. If it sizzles, you are ready to fry. To change the taste of your fritters, think about adding herbs or spices. Fresh herbs like parsley or dill can brighten the flavor. Spices like cumin or chili powder can add a kick. Experiment with what you like. When it comes to shaping, flattening fritters evenly helps them cook well. Use the back of a spoon or your fingers to press down gently. This way, they will cook evenly and get crispy on all sides. Enjoy your cooking! {{image_4}} You can make crispy zucchini fritters gluten-free. Use almond flour or chickpea flour instead of all-purpose flour. These flours work well and keep the fritters tasty. For a dairy-free version, replace the egg with a flax egg. Just mix one tablespoon of ground flaxseed with three tablespoons of water. Let it sit for five minutes, and it will thicken. You can also swap the Parmesan cheese with nutritional yeast for a cheesy flavor without dairy. Get creative with spices! Adding cumin gives a warm, earthy taste. Dill adds a fresh, herbal note. Experimenting with different spices can change the whole dish. You can also mix in other vegetables. Carrots or shredded sweet potatoes work great. These veggies add color, nutrients, and even more flavor. Just make sure to adjust the moisture, so your fritters stay crispy. To store your crispy zucchini fritters, let them cool completely. Then, place them in an airtight container. This keeps them fresh and helps avoid sogginess. You can store them in the fridge for up to three days. However, they taste best when eaten fresh. To reheat fritters and keep them crispy, use an oven or an air fryer. Set your oven to 375°F (190°C) and bake them for about 10 minutes. This method warms them without making them soggy. If you want to freeze the fritters, let them cool first. Place them in a single layer on a baking sheet and freeze until solid. After that, transfer them to a freezer bag. They can last up to three months in the freezer. When ready to eat, just reheat them straight from the freezer using the oven or air fryer for best results. Yes, you can make zucchini fritters ahead of time. To prepare in advance, grate and salt the zucchini. Let it rest and squeeze out the moisture. You can mix the batter and store it in the fridge for a few hours. When you are ready to eat, just heat the oil and fry the fritters. This way, you save time and still enjoy fresh fritters. Zucchini fritters pair well with many sides and dips. You can serve them with: - Greek yogurt - Sour cream - Hummus - Marinara sauce - A fresh salad on the side These options add flavor and make a great meal. Knowing when fritters are done is easy. Look for these signs: - They should be golden brown. - The edges will be crisp. - When you press them lightly, they should feel firm. If you see these signs, take them out and enjoy your fritters! Zucchini fritters are a delicious, crispy treat that anyone can make. We covered the key ingredients, like zucchini, flour, and Parmesan. I shared step-by-step instructions to help you prepare and cook them perfectly. You learned tips for keeping them crispy and ideas for flavor tweaks. Store leftovers properly and reheat them so they're just as good. With these insights, you can enjoy tasty fritters any time. Enjoy experimenting with your own flavors and variations!

Crispy Zucchini Fritters Flavorful and Easy Recipe

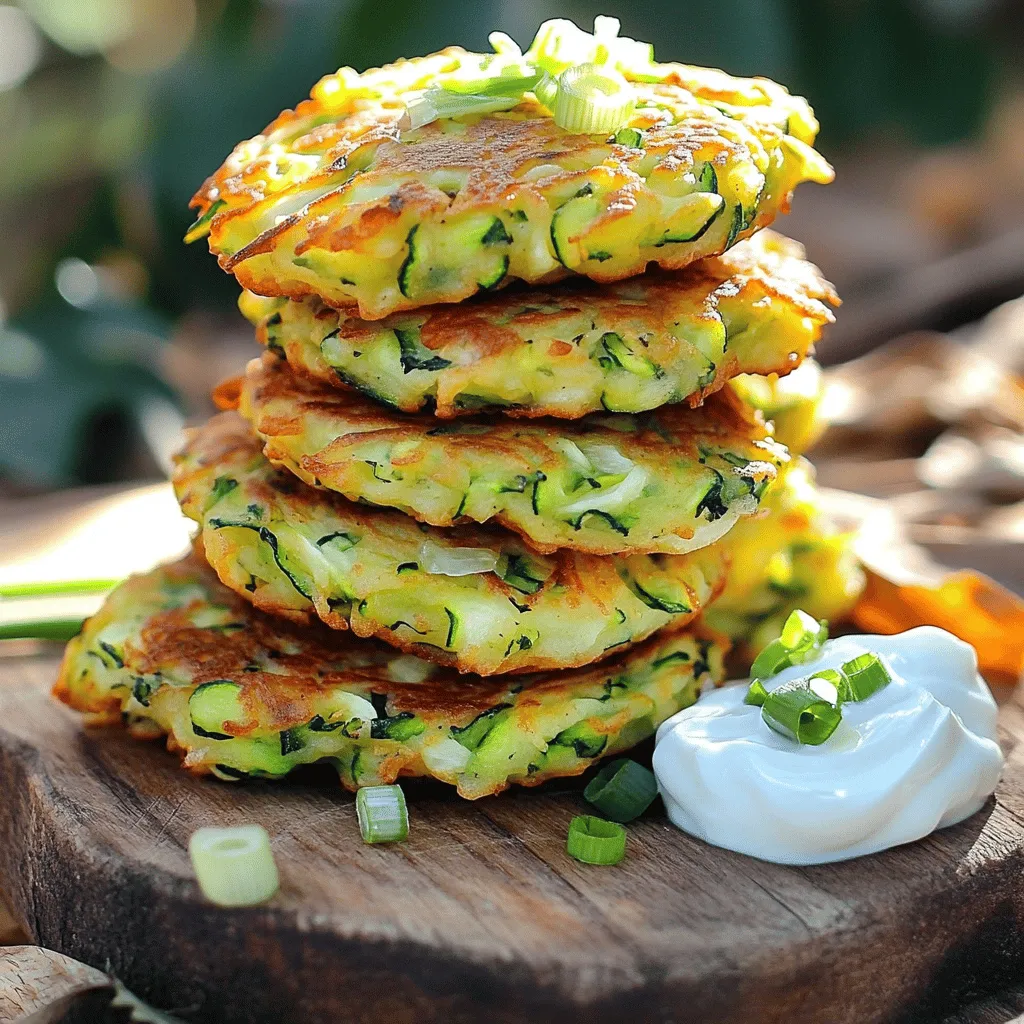
Looking for a tasty way to use up that fresh zucchini? You’re in the right place! In this post, I’ll

- 1 pound beef sirloin, cut into bite-sized cubes - 4 tablespoons unsalted butter - 4 cloves garlic, minced - 1 tablespoon fresh rosemary, finely chopped - 1 tablespoon fresh thyme, finely chopped - Salt and black pepper, to taste - 1 tablespoon olive oil - Fresh parsley, chopped, for garnish - Red pepper flakes for added heat - Lemon juice for brightness - Parmesan cheese for extra flavor To make Garlic Butter Beef Bites, you need a few key ingredients. The star of the dish is the beef sirloin. It gives a nice, tender bite. You’ll also use butter, garlic, and fresh herbs. These ingredients create a rich and savory flavor. I recommend using unsalted butter. It allows you to control the saltiness. Fresh herbs like rosemary and thyme brighten the dish. Don’t skip the garlic; it adds a wonderful aroma. For a spicy kick, add red pepper flakes. A squeeze of lemon juice can brighten the flavor. You may also sprinkle some parmesan cheese on top for an extra layer of taste. Gather these ingredients, and you’ll be ready to create a delicious meal in no time! 1. Heat a large skillet over medium-high heat. 2. Add one tablespoon of olive oil to the hot skillet. 3. While the oil heats, season 1 pound of beef sirloin cubes with salt and black pepper. 4. Once the oil is hot, place the beef in a single layer. 5. Sear the beef for 2-3 minutes until it gets a nice brown crust. 6. Flip the beef with tongs to brown the other side for another 2-3 minutes. 1. Lower the heat to medium-low. Move the beef to one side of the skillet. 2. In the clear space, add 4 tablespoons of unsalted butter, 4 minced garlic cloves, 1 tablespoon of chopped rosemary, and 1 tablespoon of chopped thyme. 3. Let the butter melt slowly. Stir to mix the garlic and herbs, cooking for 1-2 minutes. 4. Toss the beef bites in the garlic butter sauce, coating each piece well. 5. Cook for an extra 1-2 minutes until the beef is done to your liking. 1. Transfer the beef bites to a serving platter. 2. Garnish with freshly chopped parsley for a pop of color. - Avoid overcrowding the pan. If you add too many beef cubes, they won’t brown well. Each piece needs space to sear. - Use high heat for a good crust. A hot skillet helps lock in the juices. - Experiment with additional herbs. Try adding sage or oregano for a new twist. Fresh herbs can brighten the dish. - Consider marinating the beef beforehand. A simple marinade can add depth and help tenderize the meat. - Try different cuts of beef. Cuts like ribeye or tenderloin work great too. Each cut has a unique flavor and texture. - Make it spicy with additional seasonings. Add red pepper flakes or hot sauce for a kick. Adjust these to match your taste. {{image_4}} You can change how you cook your beef bites for more fun. Grilling is one tasty option. Preheat your grill to medium-high heat. Thread the seasoned beef cubes onto skewers. Grill for about 2-3 minutes on each side. This gives a great smoky flavor that many love. Using a slow cooker is another method. This makes the beef very tender. Simply add the beef, garlic, butter, and herbs to the slow cooker. Cook on low for 6-8 hours. The flavors mix well, and the beef becomes very soft. Want to mix it up? You can add sauces to your beef bites. For a sweet and tangy taste, try teriyaki or BBQ sauce. Just toss the cooked beef bites in the sauce before serving. This adds a nice glaze and extra flavor. Another fun idea is a creamy garlic sauce. You can make this by adding heavy cream to your garlic butter mix. Stir it in after the garlic cooks. This gives a rich and smooth sauce that pairs well with the beef. If you want a meat-free meal, you can switch beef for tofu or mushrooms. Tofu absorbs flavors well. Cut it into cubes and follow the same steps as beef. For mushrooms, use large portobello or shiitake. They add a nice, earthy taste. Another tasty option is to create garlic butter veggie bites. Use a mix of your favorite veggies like bell peppers, zucchini, and asparagus. Sauté them in garlic butter just like the beef. This gives you a delightful, healthy dish that everyone will enjoy. To store leftover Garlic Butter Beef Bites, let them cool first. Place the beef bites in an airtight container. This keeps them fresh and prevents odors from mixing. I recommend using glass or plastic containers with tight lids. They work well for storage and reheating. The best way to reheat beef bites is on the stove. Use a skillet over medium heat. Add a little olive oil or butter to keep them moist. Stir gently to ensure they heat evenly. You can also use a microwave, but be careful to not overcook them. This keeps the flavor and texture just right. You can freeze Garlic Butter Beef Bites for later meals. Let them cool completely before freezing. Place them in freezer-safe bags or containers. Remove as much air as possible to prevent freezer burn. When you’re ready to eat, thaw them in the fridge overnight. Then, reheat them gently in a skillet for best results. To make Garlic Butter Beef Bites spicy, add red pepper flakes. You can also use a spicy seasoning blend. Adjust the amount based on your heat preference. For a zesty twist, add a splash of hot sauce when tossing the beef. This will give your dish a nice kick. Yes, you can use frozen beef. However, make sure to thaw it fully first. This helps the beef cook evenly. If you cook frozen beef, the outside may burn before the inside cooks. Thawing ensures you get that nice brown crust you want. Garlic Butter Beef Bites go well with many sides. A simple green salad adds freshness. You can also serve it with mashed potatoes for comfort. Roasted veggies make a colorful plate. Rice or pasta can soak up the tasty garlic butter too. To check if the beef is cooked perfectly, use a meat thermometer. For medium-rare, aim for 130-135°F. If you don’t have a thermometer, cut a piece in half. The center should still have some pink but not be raw. You can prep some parts ahead of time. Cut the beef and mince the garlic earlier. However, cook the beef just before serving for the best flavor. If you make it ahead, reheat it gently on low heat to keep it juicy. Using fresh herbs like rosemary and thyme adds great flavor. Dried herbs can work in a pinch but won’t taste as bright. If fresh herbs are not available, use about a third of the amount of dried herbs. This blog post shared a simple and tasty recipe for Garlic Butter Beef Bites. You learned about the key ingredients, step-by-step cooking instructions, and helpful tips for best results. Remember, you can customize the dish with herbs, sauces, or cooking methods. Leftovers store well and can be reheated without losing flavor. Enjoy experimenting with this dish, making it your own, and impressing family or friends. Cooking should be fun and easy, so get in the kitchen and start making your beef bites today!

Garlic Butter Beef Bites Savory and Quick Recipe

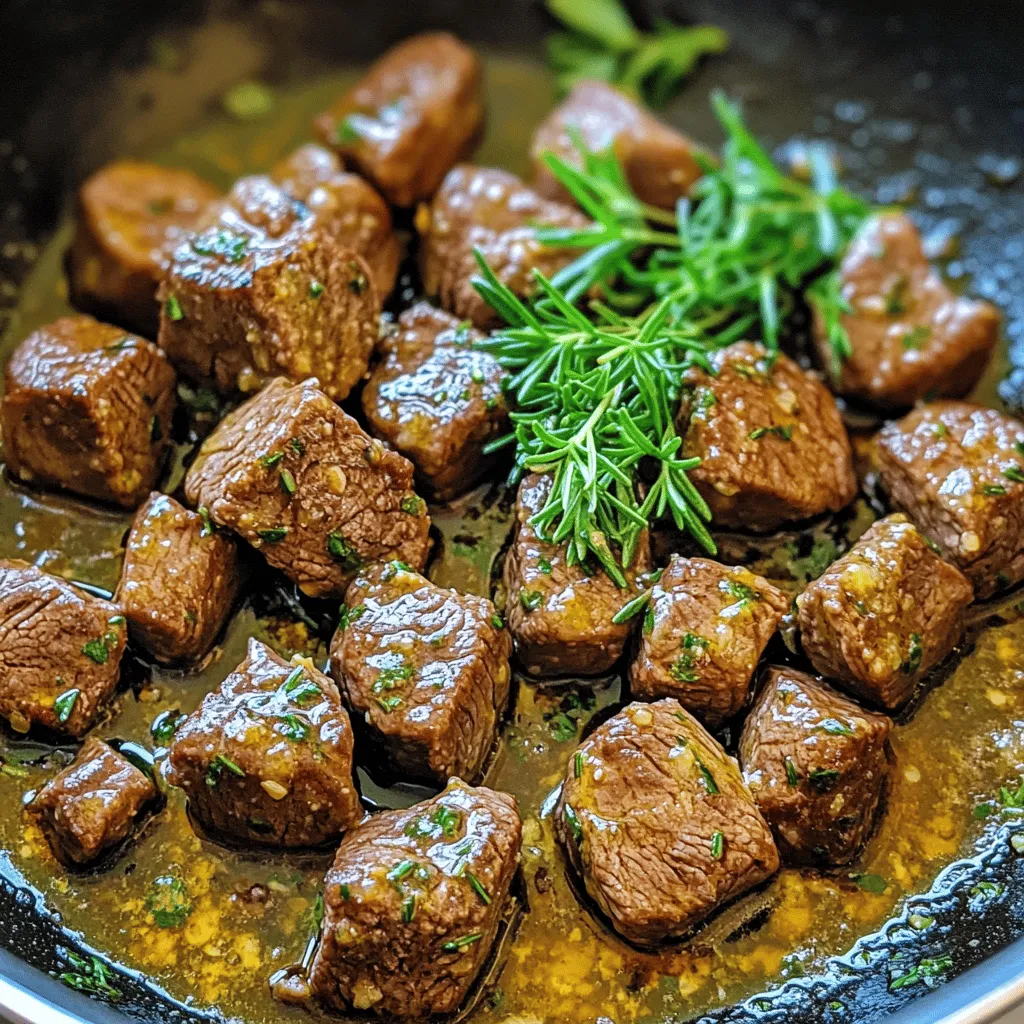
Are you ready to elevate your dinner game with a dish that’s both savory and quick? My Garlic Butter Beef

Older posts
Newer posts
← Previous Page1 … Page12 Page13 Page14 … Page86 Next →

dsad

© 2026 yumymoments • Built with GeneratePress

Our Policies

  • Copyright Policy
  • Cookie Policy
  • GDPR Policy
  • Privacy Policy
  • Disclaimer
  • Terms Of Use

More Information

  • Home
  • About
  • Contact
  • Appetizers
  • Dessert
  • Dinner
  • Drinks
©2026, yumymoments About Back To Top