Skip to content
DisclaimerTerms Of UseGDPR PolicyCookie Policy

yumymoments

  • Home
  • Drinks
  • Appetizers
  • Dinner
  • Dessert
  • About
  • Contact
  • Privacy Policy
DisclaimerTerms Of UseGDPR PolicyCookie Policy

NO-ING-IMG

- 4 boneless, skinless chicken breasts - 1 packet (1 oz) ranch seasoning mix - 8 oz cream cheese, cut into cubes - 1 cup shredded sharp cheddar cheese - 1 cup chicken broth (low-sodium recommended) - 1/2 cup green onions, finely chopped, plus extra for garnish - 1/4 cup crispy fried onions (for topping) - Salt and pepper, to taste For ranch seasoning, I like Hidden Valley. Their mix gives a great taste. For cream cheese, Philadelphia is a solid choice. It melts well and adds creaminess. For shredded cheese, I recommend Tillamook. Their sharp cheddar has a rich flavor. For chicken broth, Swanson’s low-sodium broth is perfect. It adds depth without too much salt. If you don't have ranch seasoning, you can use Italian seasoning. It gives a nice twist. For cream cheese, Greek yogurt works too. It’s lighter and adds tang. If you want a different cheese, use mozzarella for a milder taste. You can skip the fried onions if you prefer a lighter dish. Fresh herbs can add flavor without extra crunch. Start by gathering your ingredients. You need four boneless, skinless chicken breasts. Place the chicken flat in the slow cooker. This helps it cook evenly. Next, sprinkle the ranch seasoning mix over the chicken. Make sure to cover it well with seasoning for the best flavor. Now, cut the cream cheese into cubes and place them on top. The cream cheese melts and makes the dish creamy. Then, pour the chicken broth around the chicken. This keeps it moist and prevents sticking. You can cook your Crack Chicken on low or high. If you cook it on low, set the timer for 6 to 7 hours. For high, set it for 3 to 4 hours. The chicken is ready when it reaches 165°F. It should shred easily with a fork. When the cooking time is up, it’s time to shred the chicken. Use two forks to pull the chicken apart right in the slow cooker. Mix it well with the cream cheese and broth. This creates a rich, creamy sauce. After shredding, stir in the shredded sharp cheddar cheese. Let it melt and blend in. Taste the mix and add salt or pepper if you need more flavor. Serve it warm, topped with chopped green onions and crispy fried onions for crunch. Enjoy this easy family meal! To achieve the best texture for your slow cooker crack chicken, start with fresh, boneless chicken breasts. Lay them flat in the cooker. This helps them cook evenly. Make sure to add enough chicken broth. It keeps the chicken moist and tender. For a creamier dish, use full-fat cream cheese. This adds richness and flavor. After cooking, shred the chicken right in the pot. Mix it well with the cream cheese to create a smooth sauce. To boost flavor, use a good quality ranch seasoning mix. This is key to the dish's taste. Feel free to add extra seasonings like garlic powder or onion powder. Fresh herbs, like parsley or thyme, can also enhance the dish. For a spicy kick, mix in some red pepper flakes. Taste your mixture before serving and adjust salt and pepper as needed. Don’t forget to top with crispy fried onions for added crunch! Cleaning the slow cooker is easy if you follow a few steps. Let it cool before washing. Soak the pot in warm, soapy water for a few minutes. This helps loosen any stuck-on food. Use a soft sponge to avoid scratches. For tough stains, a paste of baking soda and water works well. Always check the manual for specific cleaning guidelines. Keeping your slow cooker clean ensures it lasts longer and works better. {{image_4}} You can swap chicken for turkey or pork. Both meats work well with the ranch flavor. For turkey, use boneless turkey breasts. They stay juicy and cook nicely. For pork, try boneless pork chops or a pork shoulder. Adjust the cooking time as needed. Turkey may cook faster, while pork may take a bit longer. The same creamy sauce will make these meats shine. If you want a meat-free option, I have great ideas. Use plant-based chicken or tofu as the base. Both absorb flavors well. For tofu, choose firm block tofu. Press it to remove excess water. Cut it into cubes and follow the same steps. The creamy ranch sauce will still taste amazing. You can also try cauliflower or chickpeas for a hearty dish. Serve Slow Cooker Crack Chicken over rice or mashed potatoes. Both soak up the sauce beautifully. You can also use it in wraps or on buns for sandwiches. Add a side of veggies or a fresh salad for balance. Top with extra green onions for a fresh crunch. Don't forget crispy fried onions for that extra flavor kick! After you enjoy your slow cooker crack chicken, let it cool first. Place the leftovers in an airtight container. You can keep them in the fridge for up to four days. Make sure to label your container with the date. This helps you know when to eat it! When you’re ready to eat the leftovers, you can reheat them easily. Use the microwave or stovetop. If using the microwave, place the chicken in a bowl and cover it. Heat in short bursts. Stir in between to warm it evenly. If using the stovetop, add a little broth and heat over low. Stir until warm. To freeze the crack chicken, let it cool fully. Place it in a freezer bag or an airtight container. Remove as much air as possible to prevent freezer burn. This dish can last up to three months in the freezer. When ready to eat, thaw it in the fridge overnight before reheating. You can serve Slow Cooker Crack Chicken with many sides. Try it over fluffy rice or creamy mashed potatoes. Steamed vegetables add color and nutrition to your meal. You can also serve it in soft tortillas for tasty wraps. A fresh salad can balance the rich flavors well. Yes, you can make this recipe in the oven. Use a baking dish and preheat your oven to 350°F. Place the chicken breasts in the dish and add the ranch seasoning and cream cheese on top. Pour the chicken broth around the chicken. Cover with foil and bake for 30-40 minutes. Check that the chicken is fully cooked before shredding. Yes, Slow Cooker Crack Chicken can be gluten-free. Make sure to use a gluten-free ranch seasoning mix. Most chicken broth is also gluten-free, but check the label to be sure. This way, you can enjoy this dish without worry. Leftovers of Slow Cooker Crack Chicken will last 3-4 days in the fridge. Store it in an airtight container to keep it fresh. Reheat it on the stove or in the microwave for a quick meal. You can double the recipe! Just use a larger slow cooker. Be sure to adjust the cooking time if needed. The chicken should still reach 165°F and shred easily. Enjoy more delicious meals with your family! In this blog post, we explored how to make Slow Cooker Crack Chicken. We covered key ingredients, suggested brands, and smart substitutions. You learned clear steps to prepare and cook the dish perfectly. I shared tips for texture, flavor, and slow cooker care. We also discussed meat and vegetarian variations, along with how to store and reheat leftovers. In the end, this recipe is flexible and fun. Try new flavors and share it with friends! Enjoy the tasty results.

Savory Slow Cooker Crack Chicken Easy Family Meal

Craving a delicious family meal that cooks itself? Look no further! My Savory Slow Cooker Crack Chicken is the perfect

To make Chocolate Peanut Butter Fudge, you need these key items: - 1 cup creamy peanut butter - 1 cup semi-sweet or dark chocolate chips - 1/2 cup unsweetened cocoa powder - 1/4 cup maple syrup or honey - 1 teaspoon pure vanilla extract - A pinch of salt These ingredients create a rich, smooth fudge that melts in your mouth. The mixture of peanut butter and chocolate is simply heavenly. You can enhance your fudge with toppings like: - Crushed peanuts - Flaked sea salt - Mini chocolate chips These toppings add texture and extra flavor. They make your fudge look great too! If you need to change some ingredients, here are my suggestions: - For the peanut butter, use almond butter or sun butter for a nut-free option. - Swap maple syrup with agave nectar or corn syrup if you prefer. - Use dairy-free chocolate chips for a vegan version. These swaps can help you fit your diet needs while keeping the fudge delicious. {{ingredient_image_2}} Start by lining an 8-inch square baking dish with parchment paper. Make sure the paper hangs over the edges. This helps later when you lift out the fudge. It makes cutting much easier. Next, grab a medium saucepan and set it over low heat. Add 1 cup of creamy peanut butter and 1 cup of chocolate chips into the pan. Stir with a spatula until it melts into a smooth mix. Keep stirring so nothing burns. Once melted, take the saucepan off the heat. Now, add ½ cup of cocoa powder, ¼ cup of maple syrup or honey, and 1 teaspoon of vanilla extract. Don’t forget a pinch of salt! Stir it all together until thick and fudgy. Carefully pour the fudge mixture into your lined baking dish. Use a spatula to spread it evenly. Aim for a uniform thickness so each piece is just right. If you want to jazz it up, sprinkle crushed peanuts, flaked sea salt, or mini chocolate chips on top. These toppings add flavor and texture. Feel free to get creative! Place the dish in the fridge for at least 2 hours. This time is key for the fudge to set. After it’s firm, lift it out using the parchment paper. Use a sharp knife to cut it into squares. Be careful to slice through any toppings. To get the best fudge, watch your heat. Melt the peanut butter and chocolate slowly. Stir often so it stays smooth. If it's too thick, add a bit more syrup. If too soft, chill it longer. The right texture is firm yet soft. One mistake is not lining the pan well. If you do not use parchment paper, it’s hard to lift out the fudge. Another mistake is not waiting for it to set. Cutting it too soon makes a mess. Also, don’t skip the salt! It brings out the flavors. For a fun touch, cut the fudge into different shapes. Use a cookie cutter for stars or hearts. Place the fudge on a nice plate. Add toppings like crushed peanuts or a drizzle of chocolate. These small details make it look professional and inviting. Pro Tips Use room temperature ingredients: Ensuring your peanut butter is at room temperature helps it blend more easily with the chocolate, resulting in a smoother fudge. Experiment with flavors: Add a dash of espresso powder or a few drops of almond extract to enhance the flavor profile of your fudge. Chill thoroughly: Make sure to chill the fudge for at least 2 hours, as this allows it to set properly and achieve the perfect texture. Store properly: Keep your fudge in an airtight container in the refrigerator to maintain its freshness and prevent it from becoming too soft. {{image_4}} If you want nut-free fudge, use sun butter instead of peanut butter. Sun butter is creamy and has a similar taste. You can also use tahini for a unique twist. Just follow the same steps in the recipe. This way, you can enjoy fudge without nuts. To make vegan fudge, swap honey for maple syrup. Use dark chocolate chips that are dairy-free. Many brands offer vegan chocolate chips. This keeps the fudge rich and tasty while being plant-based. Follow the rest of the recipe as is, and you’ll have a great vegan treat. You can add fun flavors to your fudge! For mint fudge, mix in 1 teaspoon of peppermint extract. If you love coffee, stir in 1 tablespoon of espresso powder. These flavors make your fudge even more special. You can also try adding a pinch of cinnamon for a warm twist. Just be creative and mix what you love! To keep your fudge fresh, store it in an airtight container. Use parchment paper to separate layers of fudge. This prevents them from sticking together. Place the container in a cool, dry place, away from sunlight. Avoid storing fudge in the fridge as it can dry out. When stored properly, fudge can last up to two weeks at room temperature. If you keep it in the fridge, it can last up to a month. However, the texture may change. For the best taste and feel, enjoy it within the first week. You can freeze fudge for up to three months. Cut it into squares before freezing. Wrap each piece in plastic wrap, then place them in a freezer bag. When you want to enjoy the fudge, simply take it out. Let it thaw in the fridge for a few hours. This keeps the texture nice and smooth. To cut fudge, start with a sharp knife. Use a clean, dry knife to avoid sticking. First, chill the fudge for at least two hours. After it's set, lift it out with the parchment paper. Place it on a cutting board. Cut it into small squares or rectangles. Wipe the knife with a damp cloth between cuts for smooth edges. This helps keep each piece neat and pretty. Yes, you can use crunchy peanut butter! It will add texture and a nutty bite to your fudge. Just swap it in for the creamy kind. The flavor will still be rich and delicious. If you like a little crunch, this is a great choice. Just keep in mind that it may affect the smoothness of the fudge slightly. You will know the fudge is set when it feels firm to the touch. It should not be sticky or soft. After about two hours in the fridge, check it. If it holds its shape when pressed gently, it's ready to cut. If it is still soft, leave it in the fridge for a bit longer. Patience pays off for that perfect fudge! Absolutely! You can add mix-ins like dried fruits, nuts, or candy pieces. Just fold them in before pouring the fudge into the dish. This makes each bite a fun surprise. Be careful not to add too many, as it may change the texture. A few mix-ins can add flavor without overwhelming the fudge. Yes, this fudge makes a great gift! It is easy to make and looks lovely. Once cut, place the fudge in a nice box or on a decorative plate. You can wrap it in cellophane or tie it with a ribbon. Personal touches make it special. Friends and family will love receiving this sweet treat! This blog shared all you need to know about making chocolate peanut butter fudge. We covered the ingredients, step-by-step instructions, tips, variations, and storage advice. You can create your fudge with simple steps and fun flavors. Remember to avoid common mistakes to ensure a perfect treat. Enjoy making this tasty fudge for yourself or as a gift. Your friends and family will love it!

Chocolate Peanut Butter Fudge Decadent Sweet Treat

Craving a rich, sweet treat? Look no further than my Chocolate Peanut Butter Fudge. This delightful dessert combines smooth chocolate

- 12 oz pasta of your choice (recommendations: penne or fusilli) - 1 cup fresh broccoli florets - 1 package (5.2 oz) Boursin cheese (garlic & fine herbs flavor) - 3 cups low-sodium vegetable broth - 1 cup cherry tomatoes, halved - 2 tablespoons extra virgin olive oil - 1 teaspoon garlic powder - Salt and freshly cracked black pepper - Freshly shaved Parmesan cheese for garnish - Fresh basil leaves for garnish When I create One-Pot Boursin Broccoli Pasta, I love using fresh ingredients. The Boursin cheese adds a creamy flavor. You can choose any pasta you like, but I recommend penne or fusilli. They hold the sauce well. Fresh broccoli gives a bright green color and crunch. I wash and chop it into small florets. Cherry tomatoes add a sweet and juicy bite. I slice them in half for easy mixing. I use low-sodium vegetable broth for a rich base. It keeps the dish light and healthy. Extra virgin olive oil helps cook the pasta and adds flavor. For seasoning, I sprinkle garlic powder for a warm taste. I also add salt and black pepper to bring out the flavors. When serving, I top my dish with shaved Parmesan and fresh basil. They enhance the look and taste of the pasta. Gather these ingredients, and you’re ready to make a quick and tasty meal! To start, heat 2 tablespoons of extra virgin olive oil in a spacious pot over medium heat. This step adds flavor and helps cook the pasta evenly. Next, add 12 oz of uncooked pasta to the pot. You can use penne or fusilli, which work well in this dish. Pour in 3 cups of low-sodium vegetable broth. This broth gives a rich taste to the pasta. Sprinkle 1 teaspoon of garlic powder into the mix, and stir thoroughly to combine all the ingredients. Increase the heat until the mixture boils. Once boiling, reduce the heat to a steady simmer. Cook the pasta for about 6-8 minutes, stirring occasionally. This helps prevent the pasta from sticking together. When the pasta is halfway cooked and still a bit firm, it’s time to add 1 cup of fresh broccoli florets and 1 cup of halved cherry tomatoes. Cook for an additional 3-4 minutes. The pasta should be al dente, and the broccoli should be tender yet bright green. Remove the pot from heat and stir in 1 package (5.2 oz) of Boursin cheese. Choose the garlic and fine herbs flavor for extra taste. Stir until the cheese melts and forms a creamy sauce that coats the pasta well. Taste the dish and adjust the seasoning with salt and freshly cracked black pepper as needed. Let the pasta rest for about a minute to thicken before serving. This resting time helps the flavors meld together. Dish out the pasta while hot, garnishing with freshly shaved Parmesan cheese and fresh basil leaves for a lovely finish. To cook pasta just right, timing is key. You want your pasta to be al dente, which means it should still have a slight bite. Start checking the pasta around the 6-minute mark. If it feels firm but not hard, it’s ready for the next step. Stir the pasta often to keep it from sticking together. This helps create a nice, creamy sauce later. Boursin cheese adds a lovely flavor, but you can try other cheeses too. Cream cheese or ricotta can work well. For a sharper taste, consider using goat cheese or feta. You can also mix in herbs like thyme or dill to change the flavor. Just add them at the same time you stir in the cheese. Want a little kick? Add red pepper flakes to the pot. Start with a pinch, and then taste it. You can also boost the flavor with extra herbs. Oregano and parsley pair nicely with the other ingredients. Just sprinkle them in before serving for a fresh taste. {{image_4}} You can switch up the veggies for new tastes. Try adding bell peppers, spinach, or zucchini. These will give the dish color and crunch. You can also add legumes like chickpeas or lentils for protein. This makes the meal heartier and keeps it filling. If you need gluten-free options, use gluten-free pasta like brown rice or chickpea pasta. These types cook well and taste great. You can also adapt the recipe by checking the vegetable broth for gluten. Always read labels to be sure. You can make this dish ahead of time. Just cook the pasta and veggies as usual. Let it cool before storing it in the fridge. For reheating, add a splash of broth to keep it creamy. Heat it in a pot over low heat. Stir gently until warmed through, and it will taste fresh! To keep your One-Pot Boursin Broccoli Pasta fresh, follow these steps: - Let it cool: Allow the pasta to cool for about 30 minutes after cooking. - Use airtight containers: Store leftovers in airtight containers. This helps to keep the pasta from drying out. - Refrigerate: Place the containers in the fridge. The pasta will stay good for up to 3 days. If you want to save the pasta for later, freezing works great: - Cool it first: Make sure the pasta is completely cool before freezing. - Portion it out: Divide into single servings for easy thawing later. - Use freezer-safe bags: Place pasta in freezer bags and remove as much air as possible. - Label and date: Write the date on each bag to track freshness. To thaw and reheat: - Thaw overnight: Move the frozen pasta to the fridge the night before. - Reheat gently: Warm the pasta on the stove over low heat, adding a splash of broth or water to keep it moist. Enjoy your meal! One-Pot Boursin Broccoli Pasta lasts about 3 to 5 days in the fridge. To keep it fresh, store it in an airtight container. Make sure it cools down before sealing. This will help avoid moisture build-up. When you're ready to eat, heat it up in a pan or microwave. Stir in a splash of broth or water to keep it moist. Yes, you can use other types of cheese. Cream cheese is a great option if you want a similar texture. You might try goat cheese for a tangy flavor. If you prefer a sharper taste, try cheddar or feta. Just remember, the cheese you choose will change the dish's flavor. Adjust other seasonings to match your cheese choice. Absolutely! To make a vegan version, switch to a plant-based cheese. Look for brands that offer creamy vegan cheese. You can also use nutritional yeast for a cheesy flavor. For broth, choose vegetable broth without animal products. This keeps the dish tasty and vegan-friendly. In this blog post, we explored the One-Pot Boursin Broccoli Pasta recipe, highlighting key ingredients and cooking steps. You learned about perfecting your pasta, various cheese options, and even meal prep ideas. Remember, creativity in the kitchen is key. Experiment with different veggies and spices to make this dish your own. Don’t stress if you need to adjust for dietary needs; there are many ways to customize it. Enjoy the process, and savor every bite!

One-Pot Boursin Broccoli Pasta Quick and Flavorful Meal

Want a quick and tasty meal that’s easy to clean up? Meet One-Pot Boursin Broccoli Pasta! This dish combines the

To make cornbread honey butter muffin bites, you will need: - 1 cup cornmeal - 1 cup all-purpose flour - 1 tablespoon baking powder - 1/2 teaspoon salt - 1/4 cup granulated sugar - 1 cup milk - 2 large eggs - 1/4 cup unsalted butter, melted - 1/2 cup honey - 2 tablespoons unsalted butter, softened (for honey butter) - Additional honey for drizzling Exact measurements are key for great muffins. Here’s what you need: - Cornmeal: 1 cup gives a nice texture. - All-purpose flour: 1 cup helps bind the mix. - Baking powder: 1 tablespoon makes them rise. - Salt: 1/2 teaspoon adds flavor. - Granulated sugar: 1/4 cup balances the taste. - Milk: 1 cup keeps it moist. - Large eggs: 2 eggs add richness. - Unsalted butter (melted): 1/4 cup for a lovely flavor. - Honey: 1/2 cup sweetens the mix. - Softened butter (for honey butter): 2 tablespoons make it creamy. - Extra honey: Drizzle as desired for extra sweetness. Choosing high-quality ingredients makes a big difference. Here are my tips: - Cornmeal: Look for stone-ground for the best taste. - Flour: Use unbleached all-purpose flour for better texture. - Baking powder: Make sure it's fresh for the best rise. - Honey: Use raw or local honey for richer flavor. - Butter: Choose unsalted butter for better control over salt. - Milk: Whole milk yields a creamier muffin. When you pick the best ingredients, your muffins will shine! Enjoy each bite of your cornbread honey butter muffin bites. Start by preheating your oven to 400°F (200°C). This step is key for getting those muffins to rise nicely. While the oven warms up, grab a mini muffin tin and lightly grease it. This will help the muffins come out easily. In a large mixing bowl, combine these dry ingredients: - 1 cup cornmeal - 1 cup all-purpose flour - 1 tablespoon baking powder - 1/2 teaspoon salt - 1/4 cup granulated sugar Stir these ingredients well. This helps mix them evenly and breaks up any lumps. In another bowl, whisk together: - 1 cup milk - 2 large eggs - 1/4 cup melted unsalted butter Make sure it’s smooth. Once mixed, pour this wet mixture into the bowl with dry ingredients. Stir gently until just combined. It’s okay if there are a few lumps; don’t overmix. This keeps the muffins light and fluffy. Using a spoon or small ice cream scoop, fill each muffin tin cavity about two-thirds full. This leaves space for the muffins to rise. Place the muffin tin in the preheated oven. Bake for 12 to 15 minutes. You’ll know they’re done when the tops are golden brown. A toothpick inserted in the center should come out clean. While the muffins bake, prepare the honey butter. In a small bowl, mix: - 2 tablespoons softened unsalted butter - 1/2 cup honey Stir until it’s smooth and creamy. This sweet treat will be perfect for spreading. After baking, let the muffins cool in the tin for about 5 minutes. Then, transfer them to a wire rack to cool completely. Serve these warm with a drizzle of honey. Add a generous dollop of honey butter on top for a delicious finish. Enjoy! To get the best texture in your cornbread honey butter muffin bites, focus on mixing. Combine dry ingredients well to avoid lumps. When you mix in the wet ingredients, stir just enough to blend. Leaving some lumps is okay. This keeps your muffins light and fluffy. Also, don’t overbake them. Check for doneness at 12 minutes. The tops should be golden brown. Avoid using too much flour. This makes the muffins dense. Don’t skip the resting time after mixing. Letting the batter sit for a few minutes helps it rise better. Also, remember to grease your muffin tin well. This prevents sticking and makes for easy removal. Lastly, don’t skip the honey butter. It adds a sweet, creamy finish that enhances the flavor. Serve your muffins warm for the best taste. Try drizzling extra honey on top for sweetness. Pair these muffin bites with a cup of tea or coffee. They also go great with chili or soup. For a fun twist, serve with fresh fruit or jam. This adds color and flavor to your table. Enjoy sharing these bites with friends and family for a cozy treat. {{image_4}} You can boost the flavor of your cornbread honey butter muffin bites. Try adding cheese for a savory touch. Sharp cheddar works great. You can also mix in cooked bacon bits for extra richness. For a sweet twist, fold in blueberries or diced peaches before baking. Nuts like pecans or walnuts add a nice crunch too. If you need a gluten-free option, swap the all-purpose flour for a gluten-free blend. Look for a mix that has a good balance of rice flour and starches. This keeps the texture light. Make sure your baking powder is gluten-free as well. Check the labels to be safe. You can enjoy these muffin bites without worry! You can create different flavors based on your mood. For sweet muffin bites, add cinnamon or a dash of nutmeg to the batter. A drizzle of maple syrup can enhance the sweetness. For savory options, try herbs like chives or thyme. These herbs add depth and aroma. You can even top them with a sprinkle of coarse salt before baking. To keep your cornbread honey butter muffin bites fresh, store them in an airtight container. This prevents moisture loss and keeps them soft. If you plan to eat them within two days, leave them at room temperature. For longer storage, consider refrigeration. You can freeze these muffin bites for up to three months. To do this, allow them to cool completely. Then, place them in a freezer-safe bag. When you’re ready to enjoy them, thaw them in the fridge overnight. For a quick reheat, pop them in the microwave for about 15 seconds. These muffin bites last about four days in the fridge. Check for any signs of spoilage, like mold or an off smell. If they feel hard or dry, it's best to toss them. Always trust your senses when it comes to food safety. Yes, you can use cornmeal mix. It includes flour and leavening agents. Just skip the baking powder in your recipe. The muffins will still taste great! Check the muffins after 12 minutes. Insert a toothpick into the center. If it comes out clean, your muffins are ready. The tops should also look golden brown. If you need a substitute for honey, try maple syrup or agave nectar. Both add sweetness and flavor. You can also use brown sugar mixed with a little water. To make these muffins gluten-free, use a gluten-free flour blend. For a dairy-free option, swap milk with almond milk or oat milk. Use coconut oil instead of butter for a vegan option. Yes! You can bake the muffins a day in advance. Store them in an airtight container. Reheat in the oven for a few minutes before serving. Enjoy them warm! Cornbread honey butter muffin bites are delicious and easy to make. We covered the main ingredients and measurements needed to create them. Following the step-by-step instructions ensures perfect muffins every time. I shared tips to enhance texture and avoid common mistakes. You can also explore fun variations and learn about storing your muffins. In summary, these muffins are tasty, versatile, and great for any occasion. Enjoy baking and sharing them!

Cornbread Honey Butter Muffin Bites Simple and Tasty

If you’re looking for a sweet and savory treat that’s easy to make, these Cornbread Honey Butter Muffin Bites are

To make TikTok feta tomato pasta, you need these simple ingredients: - 200g pasta (penne or fusilli) - 200g block feta cheese - 250g cherry tomatoes, halved - 3 cloves garlic, finely minced - 1/4 cup extra virgin olive oil - 1 teaspoon dried oregano - Salt and freshly cracked black pepper - Fresh basil leaves for garnish - Zest of 1 lemon (optional) These ingredients create a creamy delight that is easy to prepare. The feta cheese adds richness, while the cherry tomatoes bring sweetness. The garlic gives depth to the flavor. Using fresh basil enhances the dish, making it fresh and fragrant. When you gather the ingredients, focus on quality. Choose ripe cherry tomatoes and fresh herbs. This choice boosts the taste of your dish. You can also adjust the ingredients based on what you have at home. For example, swap the pasta type if needed or add your favorite spices. Keep these ingredients handy, as they make this dish fun and delicious. {{ingredient_image_2}} - Preheat your oven to 200°C (400°F). - In a medium baking dish, combine halved cherry tomatoes, minced garlic, and crumbled feta cheese. - Drizzle 1/4 cup of olive oil over the top. - Sprinkle with 1 teaspoon of dried oregano, plus salt and cracked black pepper to taste. - Place the baking dish in the oven. - Roast the tomatoes and feta for 25-30 minutes. - Look for blistered tomatoes and soft, melted feta. - While the feta and tomatoes roast, cook 200g of pasta. - Follow the package instructions to cook until al dente. - Reserve about 1/2 cup of the pasta water before draining. - Remove the baking dish from the oven. - Use a fork to mash the roasted feta and tomatoes into a creamy sauce. - Add the cooked pasta and reserved pasta water to the dish. - Toss everything together until the pasta is well-coated. - Taste and adjust seasoning, adding more salt, pepper, or lemon zest if desired. - Plate the creamy pasta hot and garnish with fresh basil leaves. To make this dish even better, think about adding extra spices. You can try red pepper flakes for some heat. Fresh herbs like thyme or parsley can also bring a different taste. Always taste your dish as you go. Adjust the salt and pepper to your liking. A little lemon zest adds brightness, too! Cooking pasta just right is key. Aim for al dente, which means it should still have a bite. Follow the package instructions but start checking a minute early. While the pasta cooks, keep an eye on the tomatoes and feta in the oven. You want to time them so they’re done when your pasta is. Garnishing makes your dish look special. Fresh basil leaves add color and a nice aroma. For a pop of color, sprinkle some extra black pepper on top. Serve the pasta hot right from the pan for a cozy feel. You can even add some extra feta on top for a rich touch! Pro Tips Choose the Right Pasta: Opt for pasta shapes like penne or fusilli that can hold onto the creamy sauce, ensuring every bite is flavorful. Roasting Time is Key: Keep an eye on the tomatoes and feta while roasting; you want them to blister and soften without burning for optimal flavor. Save the Starchy Water: Reserving pasta water helps to adjust the sauce's consistency, making it creamier and allowing it to cling better to the pasta. Fresh Herbs Make a Difference: Adding fresh basil at the end not only enhances the dish's flavor but also adds a beautiful touch of color and freshness. {{image_4}} You can switch up the cheese for something different. Try goat cheese or ricotta for a new taste. You can also add veggies like bell peppers or zucchini. They will give your dish more color and flavor. If you need gluten-free options, choose gluten-free pasta. It will still taste great. Want more flavor? Use fresh herbs like parsley or thyme. They will make your dish pop. Spices like red pepper flakes add some heat if you like it spicy. You can also add proteins. Toss in cooked chicken or shrimp for a complete meal. They will make it heartier. Pair this dish with a simple salad. A fresh green salad will balance the creaminess. You can also serve it with garlic bread for a special touch. As for drinks, a crisp white wine like Sauvignon Blanc complements the pasta well. If you prefer non-alcoholic, try a sparkling water with lemon. It refreshes the palate nicely. After enjoying your creamy feta tomato pasta, you might have some left. Store it in the fridge. Use an airtight container to keep it fresh. It will last for about three days. If you want to freeze it, use freezer-safe bags. Make sure to remove as much air as possible. This way, it can last up to a month. To reheat, use the microwave or stovetop. If using the microwave, place the pasta in a bowl. Add a splash of water to keep it moist. Heat it in short bursts, stirring in between. On the stovetop, warm it gently in a pan. Add a bit of olive oil or butter to keep it flavorful. You can also get creative with leftovers. Mix it into a salad for a tasty lunch. Or, use it as a filling for stuffed peppers. These ideas will help you enjoy your pasta in new ways. You can use many pasta shapes for this dish. Here are some suggestions: - Penne - Fusilli - Farfalle - Rotini These shapes hold the creamy sauce well. Choose your favorite for a fun twist! Yes, you can easily make this recipe vegan. Here are some swaps: - Use a plant-based feta cheese. - Replace the pasta with a gluten-free option if needed. - Substitute olive oil with a plant-based butter. These changes keep the dish creamy and delicious! Adding veggies boosts flavor and nutrition. Here are some ideas: - Spinach for a fresh touch. - Zucchini or bell peppers for crunch. - Broccoli or peas for extra color. Mix these in before roasting or stir them in after cooking! Yes, this dish works well for meal prep! Here are some tips: - Store the pasta and sauce separately to keep it fresh. - Use airtight containers for easy storage. - Reheat portions in the microwave or on the stove. This way, you can enjoy this creamy delight all week! This blog shared a simple and tasty feta pasta recipe. You learned which ingredients to use and how to cook them step-by-step. We explored tips for the best flavor and presentation. You also found many ways to customize this dish. Try it out and enjoy your meal! Cooking can be fun and rewarding.

TikTok Feta Tomato Pasta Easy Creamy Delight

Are you ready to dive into a creamy, dreamy dish that takes just minutes to make? TikTok’s Feta Tomato Pasta

To make this tasty pumpkin chocolate chip bread, you need the following main ingredients: - 1 cup canned pumpkin puree - 1/2 cup vegetable oil - 1 cup granulated sugar - 1/2 cup brown sugar, packed - 3 large eggs - 1 teaspoon vanilla extract - 2 cups all-purpose flour - 1 teaspoon baking soda - 1/2 teaspoon baking powder - 1 teaspoon ground cinnamon - 1/2 teaspoon ground nutmeg - 1/4 teaspoon ground ginger - 1/2 teaspoon salt - 1 cup semi-sweet chocolate chips These ingredients work together to create a soft and rich bread. The pumpkin adds moisture and flavor. The sugars give it sweetness and a lovely crust. The spices like cinnamon and nutmeg bring warmth to every bite. You can customize your bread with some optional add-ins: - Chopped walnuts (1/2 cup): They add a nice crunch and earthy flavor. - Chocolate chunks: Swap chocolate chips for chunks for an extra gooey texture. - Dried fruits: Add raisins or cranberries for a sweet twist. If you need substitutes, here are a few options: - Oil: Use melted butter for a richer taste. - Sugars: Replace granulated sugar with coconut sugar for a healthier choice. - Flour: Use whole wheat flour for added fiber. Here’s a quick look at the nutrition facts per slice: - Calories: 210 - Protein: 3g - Fat: 10g - Carbohydrates: 30g - Fiber: 1g - Sugar: 15g This bread is a delicious treat. While it has some sugar, the pumpkin adds vitamins and minerals. Enjoy it as a snack or dessert! Start by preheating your oven to 350°F (175°C). This warm-up helps the bread bake evenly. Grab a 9x5 inch loaf pan and grease it with butter or cooking spray. You can also line it with parchment paper for easy removal later. Next, take a large bowl. Add the canned pumpkin puree, vegetable oil, granulated sugar, brown sugar, eggs, and vanilla extract. Whisk these together until smooth. You want everything mixed well. In another bowl, sift together all-purpose flour, baking soda, baking powder, cinnamon, nutmeg, ginger, and salt. Sifting helps combine the dry ingredients evenly and adds air. Now, slowly add the dry mix to the wet mix. Stir gently with a spatula or wooden spoon until just combined. Do not overmix; this keeps the bread light and fluffy. Finally, fold in the chocolate chips and optional walnuts. Make sure they are spread evenly in the batter. Pour the batter into your greased or lined loaf pan. Use a spatula to smooth the top. This helps the loaf bake evenly. Place the pan in your preheated oven. Bake for 60 to 70 minutes. It’s important to keep an eye on it. To check if your bread is done, insert a toothpick into the center. If it comes out clean, the bread is ready. If the top browns too much, cover it with aluminum foil for the last 15 minutes. Once baked, remove the loaf from the oven. Let it cool in the pan for 10 minutes. After that, transfer it to a wire rack. Allow it to cool completely for the best texture. To get the best texture in your pumpkin chocolate chip bread, use room temperature eggs. This helps mix well with the other wet ingredients. Also, avoid overmixing the batter. Stir until just combined. This keeps the bread light and fluffy. You can use a spatula or wooden spoon for this step. Lastly, let the batter rest for a few minutes before baking. This allows the flavors to meld together. One common mistake is not measuring the flour correctly. Too much flour can make the bread dense. Use the spoon-and-level method: spoon the flour into the measuring cup and level it off. Another mistake is skipping the sifting step. Sifting helps the baking soda and powder mix evenly. Lastly, don’t forget to check for doneness at the right time. Every oven is different, so keep an eye on your bread. When serving pumpkin chocolate chip bread, slice it thick for a hearty treat. Enjoy it warm, adding a pat of butter on top. For an extra touch, sprinkle a bit of ground cinnamon over the butter. You can also add a few extra chocolate chips for a nice look. This makes it even more inviting to your guests. Pair it with a hot drink for a cozy experience. {{image_4}} You can easily make this bread gluten-free. Use a gluten-free flour blend in place of all-purpose flour. Look for one that contains xanthan gum, as it helps with texture. The taste remains rich and delicious, so no one will miss the gluten! To make this bread vegan, swap the eggs with flax eggs. Use one tablespoon of ground flaxseed mixed with three tablespoons of water for each egg. Replace the vegetable oil with coconut oil or applesauce for moisture. This version stays just as tasty and moist as the original. Feel free to add more flavors to your bread! Here are some ideas: - Spices: A pinch of allspice or cloves can deepen the flavor. - Citrus: Add a teaspoon of orange or lemon zest for a fresh twist. - Nuts: Chopped pecans or hazelnuts can add crunch. - Dried Fruit: Raisins or cranberries work well too. Experiment with these options to make your bread unique. You can create a new favorite each time you bake! Store your pumpkin chocolate chip bread in an airtight container. This keeps it fresh and moist. Place it at room temperature for up to three days. If you want it to last longer, refrigeration is a good option. Just remember, cold storage can change its texture a bit. To freeze your bread, first let it cool completely. Wrap it tightly in plastic wrap. Then, place it in a freezer-safe bag. This will help avoid freezer burn. You can freeze it for up to three months. When you're ready to enjoy it, simply thaw it in the fridge overnight. To reheat your pumpkin chocolate chip bread, slice it first. Place slices on a plate and cover them with a damp paper towel. Microwave for 15-20 seconds. This warms the bread while keeping it moist. You can also reheat in the oven. Set the oven to 350°F (175°C) and bake for 10 minutes. Enjoy it warm for the best taste! Yes, you can use fresh pumpkin. Start by roasting a pumpkin. Cut it in half, scoop out the seeds, and bake it at 350°F until soft. Once baked, scoop out the flesh and mash it until smooth. Use this fresh pumpkin puree in place of canned. Fresh pumpkin can taste sweeter and richer than canned, giving your bread a unique flavor. Pumpkin chocolate chip bread can last for about 3 to 5 days at room temperature. Keep it in an airtight container to keep it fresh. If you want to store it longer, you can refrigerate it for about a week. Always check for signs of spoilage, like mold or off smells. Absolutely! You can replace chocolate chips with nuts or dried fruit. Try using walnuts or pecans for a nice crunch. Dried cranberries or raisins add a sweet and chewy texture. You can also use white chocolate chips for a fun twist. Just remember to keep the mix-ins to about 1 cup total for the best texture. Pumpkin chocolate chip bread is easy to make and fun to enjoy. We covered the main ingredients, gave step-by-step baking instructions, and shared tips for the best texture. Remember to explore variations like gluten-free and vegan options. Storing and reheating your bread is simple with the right steps. Cooking should be enjoyable, so experiment and make this recipe yours. Each slice brings warmth and flavor, perfect for any season. You have all the tools you need to bake this delicious treat. Happy baking!

Pumpkin Chocolate Chip Bread Rich and Tasty Recipe

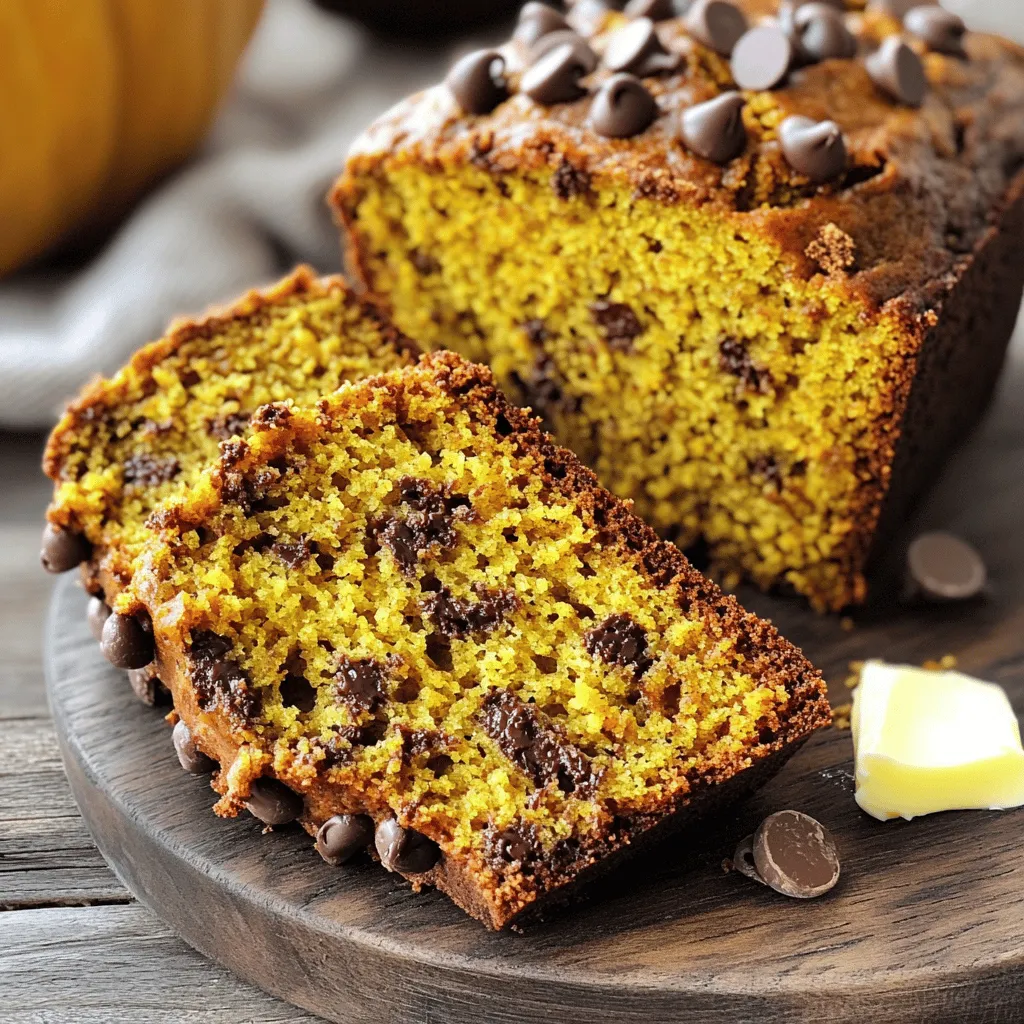
Fall is here, and it’s time to bake something warm and delicious! This Pumpkin Chocolate Chip Bread is the perfect

To make my strawberry cream cheese quesadillas, you need a few simple ingredients. These items come together to create a sweet and creamy treat. - 4 whole wheat tortillas - 8 oz cream cheese, softened to room temperature - 2 tablespoons honey (adjust based on sweetness preference) - 1 teaspoon pure vanilla extract - 1 cup fresh strawberries, hulled and sliced into thin rounds - 1/4 cup powdered sugar (optional for extra sweetness) - 1 tablespoon coconut oil or butter (for cooking) - Optional toppings: additional powdered sugar, whipped cream, or fresh mint leaves for garnish Each ingredient plays a key role in the flavor and texture of the quesadillas. Whole wheat tortillas offer a nutty taste and a healthy base. Cream cheese gives the filling its rich and creamy texture. Honey adds just the right amount of sweetness, while vanilla extract enhances the flavors. Fresh strawberries bring a burst of fruity goodness. If you like it sweeter, add powdered sugar to the cream cheese mix. Finally, cooking with coconut oil or butter gives the quesadillas a nice golden color and crispiness. Feel free to customize your toppings! A sprinkle of powdered sugar, a dollop of whipped cream, or a few mint leaves can make your dish look and taste even better. Enjoy experimenting with these ingredients to find your perfect balance! Start by gathering your ingredients. You need cream cheese, honey, vanilla, and optional powdered sugar. In a mixing bowl, combine 8 oz of softened cream cheese, 2 tablespoons of honey, and 1 teaspoon of pure vanilla extract. If you like it sweeter, add 1/4 cup of powdered sugar. Mix well until it's smooth and creamy. This mixture will be the star of your quesadillas! Next, lay out 4 whole wheat tortillas. Using a spatula, spread a generous layer of the cream cheese mixture on one side of each tortilla. Make sure to cover the edges well for full flavor. Now, take 1 cup of fresh strawberries and slice them into thin rounds. Place the strawberry slices evenly on one half of each tortilla. Fold each tortilla in half, enclosing the filling. Gently press down the edges to help seal them. Now it’s time to cook! Heat a non-stick skillet over medium heat. Add 1 tablespoon of coconut oil or butter, letting it melt. Once it shimmers, place your folded quesadillas in the skillet. Cook each quesadilla for about 2-3 minutes until golden brown and crispy. Carefully flip them and cook for another 2-3 minutes on the other side. Once they’re done, let them cool for a minute, then cut into wedges. Enjoy! To get a great texture, make sure your cream cheese is soft. It should be at room temperature for easy mixing. Mix it well with honey and vanilla. This blend should feel smooth and creamy. Spread it evenly on the tortillas. When you cook them, aim for a crispy outside. The inside should stay creamy and soft. You can change the sweetness to fit your taste. If you like it sweeter, add more honey or powdered sugar. Start with the basic 2 tablespoons of honey. Taste the mixture before spreading. You can always add more honey if needed. Remember, you can adjust it based on who you serve. Kids often enjoy a sweeter touch! Serve these quesadillas warm for the best flavor. Cut them into wedges for easy sharing. You can add toppings like whipped cream or more powdered sugar. Fresh mint leaves also add nice color and flavor. Try serving them with a side of yogurt for dipping. These quesadillas make a fun snack or dessert! {{image_4}} You can switch out strawberries for other fruits. Ripe bananas, blueberries, or peaches work well. Each fruit brings a unique taste. You can also mix fruits for a fun twist. Try using a combination of bananas and blueberries for added flavor. While cream cheese is great, you can try other cheeses. Mascarpone offers a rich and creamy texture. Ricotta gives a light and fluffy filling. You can also use Greek yogurt for a tangy flavor. Each cheese adds its special touch to your quesadillas. Whole wheat tortillas add fiber, but you can use others. Corn tortillas bring a different flavor and are gluten-free. Flour tortillas provide a softer bite. If you're feeling adventurous, try spinach or tomato tortillas for color and taste. Each tortilla option changes the experience of your dish. To store any leftover quesadillas, let them cool first. Then, wrap each one in plastic wrap. You can also place them in an airtight container. Stored this way, they stay fresh for up to three days in the fridge. Always check for any signs of spoilage before enjoying them again. To reheat your quesadillas, use a skillet. Heat it over medium-low heat. Place the quesadilla in the pan and cook for about two minutes on each side. This method keeps them crispy and warm. You can also use a microwave, but it may make them a bit soft. If using a microwave, heat for about 30 seconds, checking often. If you want to save some for later, freezing is a great option. Wrap each quesadilla tightly in plastic wrap, then place them in a freezer-safe bag. They can stay frozen for up to two months. To eat, thaw them in the fridge overnight, then reheat as described above. You can fill quesadillas with many tasty options. Try using bananas, chocolate, or peanut butter. You can also mix fruits like blueberries or raspberries. For a savory twist, cheese, beans, or chicken work well. Experimenting with different flavors makes it fun! Yes, you can prepare the filling in advance. Mix the cream cheese, honey, and vanilla, then store it in the fridge. You can also slice the strawberries ahead. Just assemble and cook the quesadillas when you are ready to eat. This saves time and keeps it fresh. Absolutely! Look for gluten-free tortillas made from corn or almond flour. They taste great and work perfectly in this recipe. Check your local store for options. Many brands offer gluten-free choices that are soft and easy to use. Enjoy your quesadillas worry-free! These strawberry quesadillas are not just tasty; they’re fun to make. We discussed the ingredients, including fresh strawberries and cream cheese, and shared step-by-step instructions to guide you. I offered tips for great texture and sweetness adjustments. You learned about variations with different fruits and cheeses and how to store and reheat leftovers. Next time you crave a sweet snack, try these. You’ll impress your friends and family with your cooking skills! Enjoy each bite of your delicious creation.

Strawberry Cream Cheese Quesadillas Delightful Treat

Looking for a fun, tasty snack? Try my Strawberry Cream Cheese Quesadillas! They’re easy to make and perfect for any

- 1 cup pumpkin puree (canned or homemade) - 1/2 cup granulated sugar - 1/2 cup packed brown sugar - 1/2 cup vegetable oil (or melted coconut oil) - 2 large eggs (room temperature) - 1 teaspoon pure vanilla extract - 1 1/2 cups all-purpose flour - 1 teaspoon baking soda - 1 teaspoon baking powder - 1 teaspoon ground cinnamon - 1/2 teaspoon ground nutmeg - 1/4 teaspoon ground ginger - 1/4 teaspoon fine sea salt - 1 cup semi-sweet chocolate chips (or a mix of dark and milk chocolate) Using fresh ingredients makes a big difference. Choose pure pumpkin puree, not pumpkin pie filling. The sugars give your muffins sweetness and moisture. Always use room temperature eggs to help with mixing. When you use quality chocolate chips, the taste improves. Look for semi-sweet or dark chocolate for a rich flavor. Fresh spices lend a better taste than old ones. You can swap vegetable oil for melted coconut oil if you want a different flavor. If you don’t have brown sugar, you can use more granulated sugar. Applesauce can replace oil for a lighter muffin. For gluten-free muffins, use a gluten-free flour blend. If you want fewer calories, try using a sugar substitute. You can also replace chocolate chips with dried fruits or nuts for a twist. Start by gathering all your ingredients. You will need pumpkin puree, sugars, oil, eggs, and vanilla. You also need flour, leavening agents, spices, and chocolate chips. Preheat your oven to 350°F (175°C). Line a muffin tin with paper liners for easy cleanup. 1. In a large bowl, mix pumpkin puree, granulated sugar, brown sugar, vegetable oil, eggs, and vanilla extract. Whisk it well until smooth and creamy. 2. In another bowl, sift together flour, baking soda, baking powder, cinnamon, nutmeg, ginger, and salt. This step helps mix the dry ingredients well. 3. Slowly add the dry mix to the wet mix. Stir gently until just combined. It’s okay if you see some flour streaks; don’t overmix. 4. Fold in the chocolate chips with a spatula. Make sure they are mixed evenly in the batter. 5. Use a spoon or ice cream scoop to fill each muffin cup about two-thirds full. This allows space for the muffins to rise while baking. 6. Place the muffin tin in the oven and bake for 18 to 22 minutes. Keep an eye on them as they bake. To check if your muffins are done, insert a toothpick into the center of a muffin. If it comes out clean or with a few moist crumbs, they are ready. If it has wet batter, bake for a few more minutes. Once they are done, let them cool in the pan for about 5 minutes. Then, transfer them to a wire rack to cool completely. To make moist muffins, use fresh pumpkin puree. You can use canned puree, too. Both add great flavor. The oil keeps muffins soft. I recommend vegetable oil or melted coconut oil. Do not skip the eggs. They add moisture and help with structure. Use room temperature eggs for the best results. Overmixing is a common mistake. When you mix too much, muffins can turn out dense. To avoid this, mix the wet and dry ingredients until just combined. You should still see some streaks of flour. Gently fold in the chocolate chips. This helps keep the batter light and fluffy. Cooling muffins properly is key to great texture. After baking, let them cool in the pan for about 5 minutes. This makes them easier to remove. Then, transfer them to a wire rack. This allows air to circulate around the muffins. Avoid stacking them until they are fully cooled. This keeps them from getting soggy. {{image_4}} You can make these muffins even tastier. Adding nuts like walnuts or pecans gives a nice crunch. Chopped nuts pair well with the soft muffins. You can also spice things up by adding a pinch of cloves or allspice. This twist will give your muffins a warm, cozy flavor. If you need a gluten-free option, use a gluten-free flour blend. This swap works well in this recipe. For a vegan version, replace the eggs with flax eggs. Mix one tablespoon of ground flaxseed with three tablespoons of water. Let it sit for a few minutes to thicken. Use a plant-based oil instead of vegetable oil, and you’re all set! Seasonal flavors can make these muffins special. Adding dried cranberries gives a tart burst that balances the sweetness. Chopped pecans can add a lovely nutty taste, too. You can even sprinkle pumpkin seeds on top for a festive touch. These small changes can bring a new life to your pumpkin chocolate chip muffins! To keep your pumpkin chocolate chip muffins fresh, store them in an airtight container. You can line the container with paper towels. This helps absorb moisture. Place the muffins inside and seal the lid tightly. This method keeps them soft and tasty for days. Keep them at room temperature for up to three days. If you want to store them longer, freezing is a great option. Freezing muffins is easy and effective. First, let your muffins cool completely. Then, wrap each muffin in plastic wrap. Next, place the wrapped muffins in a freezer-safe bag. This way, they won’t stick together. These muffins can freeze well for up to three months. When you’re ready to enjoy one, simply take it out and thaw it at room temperature. You can also heat it in the microwave for a warm treat! When stored properly, your pumpkin chocolate chip muffins will taste their best for several days. At room temperature, they stay fresh for about three days. After that, they may begin to dry out. In the freezer, they maintain their flavor and texture for up to three months. Remember, if you notice any signs of spoilage, it's best to discard them. Enjoy your fluffy muffins while they’re still fresh! To make pumpkin chocolate chip muffins from scratch, follow these steps: 1. Preheat your oven to 350°F (175°C). 2. Line a muffin tin with paper liners. 3. In a bowl, mix 1 cup of pumpkin puree, 1/2 cup of granulated sugar, and 1/2 cup of brown sugar. 4. Add 1/2 cup of vegetable oil, 2 room temperature eggs, and 1 teaspoon of vanilla extract. 5. Whisk until smooth. 6. In another bowl, sift 1 1/2 cups of flour, 1 teaspoon of baking soda, 1 teaspoon of baking powder, and spices (cinnamon, nutmeg, ginger, and salt). 7. Gradually add the dry mix to the wet mix. Stir gently. 8. Fold in 1 cup of chocolate chips. 9. Fill muffin cups two-thirds full with batter. 10. Bake for 18-22 minutes. Let them cool before serving. Yes, you can use fresh pumpkin. First, cook the pumpkin until soft. Then, scoop out the flesh and puree it. This gives your muffins a fresh taste. Fresh pumpkin adds moisture and flavor. Just be sure to measure the puree accurately, similar to the canned version. Serve your muffins warm with butter or cream cheese. They pair well with coffee or tea. You can also dust them with powdered sugar for a sweet touch. For a fun twist, add extra chocolate chips on top. Enjoy them fresh, or share with friends for a cozy treat! This blog post covered key ingredients, baking steps, and tips for great muffins. We explored how to choose high-quality ingredients and make smart substitutions. You learned ways to keep muffins moist and how to cool them right. We also discussed fun variations, storage tips, and answered common questions. Remember to experiment with flavors that excite you. Happy baking, and enjoy your delicious creations!

Pumpkin Chocolate Chip Muffins Irresistible and Fluffy

If you love warm, fluffy muffins, you’re in for a treat! My Pumpkin Chocolate Chip Muffins are delicious and super

- 1 cup canned pumpkin puree - 1/2 cup vegetable oil - 1 cup packed brown sugar - 1/2 cup granulated sugar - 3 large eggs - 1 teaspoon pure vanilla extract - 2 cups all-purpose flour - 1 teaspoon baking soda - 1/2 teaspoon baking powder - 1 teaspoon ground cinnamon - 1/2 teaspoon ground nutmeg - 1/2 teaspoon sea salt - 1 cup semi-sweet chocolate chips - Optional: 1/2 cup chopped walnuts or pecans I love using canned pumpkin puree for this bread. It makes the process quick. You can also roast fresh pumpkin if you want a richer flavor. Just cook it, blend it, and use it in place of the canned version. For the oils, I prefer vegetable oil for its light taste. If you want a twist, try using coconut oil. It will add a hint of coconut flavor. You might be curious about the sugars. I mix brown and granulated sugars. This combo gives the bread a lovely sweetness and a nice texture. Three large eggs help bind the bread together. If you want a vegan version, try using flax eggs instead. Just mix 1 tablespoon of flaxseed meal with 2.5 tablespoons of water. The flour is essential for structure. All-purpose flour works best, but you can use gluten-free flour. Just make sure it has xanthan gum for the right texture. Baking soda and baking powder help the bread rise. Cinnamon and nutmeg give it that warm fall flavor. The sea salt balances the sweetness. Chocolate chips are a must! I use semi-sweet, but dark chocolate works too. If you want some crunch, add chopped walnuts or pecans as an option. - Preheat oven and prepare loaf pan: Start by setting your oven to 350°F (175°C). Grease a 9x5-inch loaf pan lightly with oil or line it with parchment paper. This helps with easy removal later. - Mixing wet ingredients: In a large bowl, combine 1 cup of canned pumpkin puree, 1/2 cup of vegetable oil, 1 cup of packed brown sugar, and 1/2 cup of granulated sugar. Whisk them together until the mix is smooth and creamy. - Incorporating dry ingredients: In a separate bowl, sift together 2 cups of all-purpose flour, 1 teaspoon of baking soda, 1/2 teaspoon of baking powder, 1 teaspoon of ground cinnamon, 1/2 teaspoon of ground nutmeg, and 1/2 teaspoon of sea salt. This step ensures even mixing of the dry ingredients. - Pouring and smoothing the batter: Gently fold the dry mix into the wet ingredients until they just combine. Be careful not to overmix. Then, fold in 1 cup of semi-sweet chocolate chips and, if you like, 1/2 cup of chopped walnuts or pecans for crunch. Pour the batter into your prepared loaf pan and smooth the top with a spatula. - Baking time and temperature: Place the pan in the oven and bake for 55-65 minutes. - Checking for doneness: To check if your bread is done, insert a toothpick into the center. It should come out clean or with a few moist crumbs. If it needs more time, bake it longer. To make the best chocolate chip pumpkin bread, avoid common mistakes. One mistake is adding too much flour. This can make your bread dense. Always measure flour correctly. Spoon it into your measuring cup and level it off. Another key tip is to not overmix the batter. When you mix too much, the bread can get tough. Mix just until you see no dry flour. This keeps the bread soft and fluffy. To achieve a moist texture, use enough pumpkin puree. The puree adds moisture and flavor. If you want, add some extra chocolate chips or nuts. They also help keep the bread moist. For serving, rich cream cheese works great on warm slices. You can also use creamy butter for a classic touch. Try sprinkling cinnamon on top for extra flavor. Pair your pumpkin bread with warm drinks. Coffee or chai tea makes a perfect match. The spices in these drinks blend well with the bread. For a pretty presentation, slice the bread thick. Arrange the pieces on a nice platter. Drizzle some melted chocolate over the top for a special finish. {{image_4}} - Adding spices for extra warmth You can boost the flavor by adding spices. Try using ground ginger or allspice along with cinnamon. This will give your bread a cozy, warm taste that is perfect for fall. - Chocolate chip alternatives If you want to switch things up, use white chocolate chips or dark chocolate chips instead. Each type adds a unique twist to your pumpkin bread. You can also try butterscotch or peanut butter chips for a fun change. - Incorporating fruits or dried fruits Adding fruits can make your bread even better. Dried cranberries or raisins add sweetness. Fresh apples or pears also work well. Just chop them small, so they mix nicely into your batter. - Making it dairy-free To make this recipe dairy-free, substitute vegetable oil with coconut oil. Use almond milk or oat milk instead of regular milk. This keeps the bread moist and tasty without dairy. - Modifying for lower sugar content If you want less sugar, cut the brown sugar by half. Replace it with applesauce for natural sweetness. This way, you can enjoy your bread without too much sugar. - Enhancements for protein boost To add protein, mix in some nuts or seeds. Chia seeds or flaxseeds are great options. You can also use a protein powder in your batter. This will help make your pumpkin bread more filling and nutritious. To keep your chocolate chip pumpkin bread fresh, store it at room temperature. Place it in a bread box or wrap it in plastic wrap. This will keep it soft for about three days. If you want to store it longer, put it in the fridge. This helps prevent mold but may dry it out a bit. To wrap it properly, use foil or plastic wrap. Make sure it is tight to avoid air exposure. Freezing is great for long-term storage. To freeze, let the bread cool completely. Then, wrap it well in plastic wrap, followed by aluminum foil. This double wrap helps prevent freezer burn. You can freeze it for up to three months. When you are ready to eat it, take it out and let it thaw in the fridge overnight. For the best texture, warm it in the oven for a few minutes before serving. This will bring back its soft, fresh taste. Can I use fresh pumpkin instead of canned? Yes, you can use fresh pumpkin. First, cook it until soft. Then, mash it well. Make sure to drain any excess water. This will help your bread stay moist. How do I know when my bread is done baking? To check for doneness, insert a toothpick in the center. If it comes out clean or with a few moist crumbs, it is ready. The edges should also pull away from the pan. How long does homemade pumpkin bread last? Homemade pumpkin bread lasts about 3-5 days at room temperature. Store it in a cool, dry place. You can also wrap it well to keep it fresh. What to do if the bread is too dense? If your bread is dense, it may be due to overmixing. Try mixing just until combined next time. This helps keep the bread light and fluffy. How to fix undercooked pumpkin bread? If your bread is undercooked, return it to the oven. Bake for an additional 5-10 minutes. Check again with a toothpick to see if it's done. Why is my bread not rising properly? If your bread does not rise, check your baking soda and powder. They need to be fresh to work well. Also, ensure you mixed the wet and dry ingredients properly. This blog post shared a simple method for making chocolate chip pumpkin bread. We covered all the key ingredients, steps, and tips to perfect your baking. Don't forget the options to tweak the recipe, add flavors, or cater to dietary needs. In the end, follow the advice here to enjoy a treat that everyone loves. Baking can bring joy and warmth to your kitchen. Gather your ingredients, and start your tasty adventure today!

Chocolate Chip Pumpkin Bread Simple and Tasty Recipe

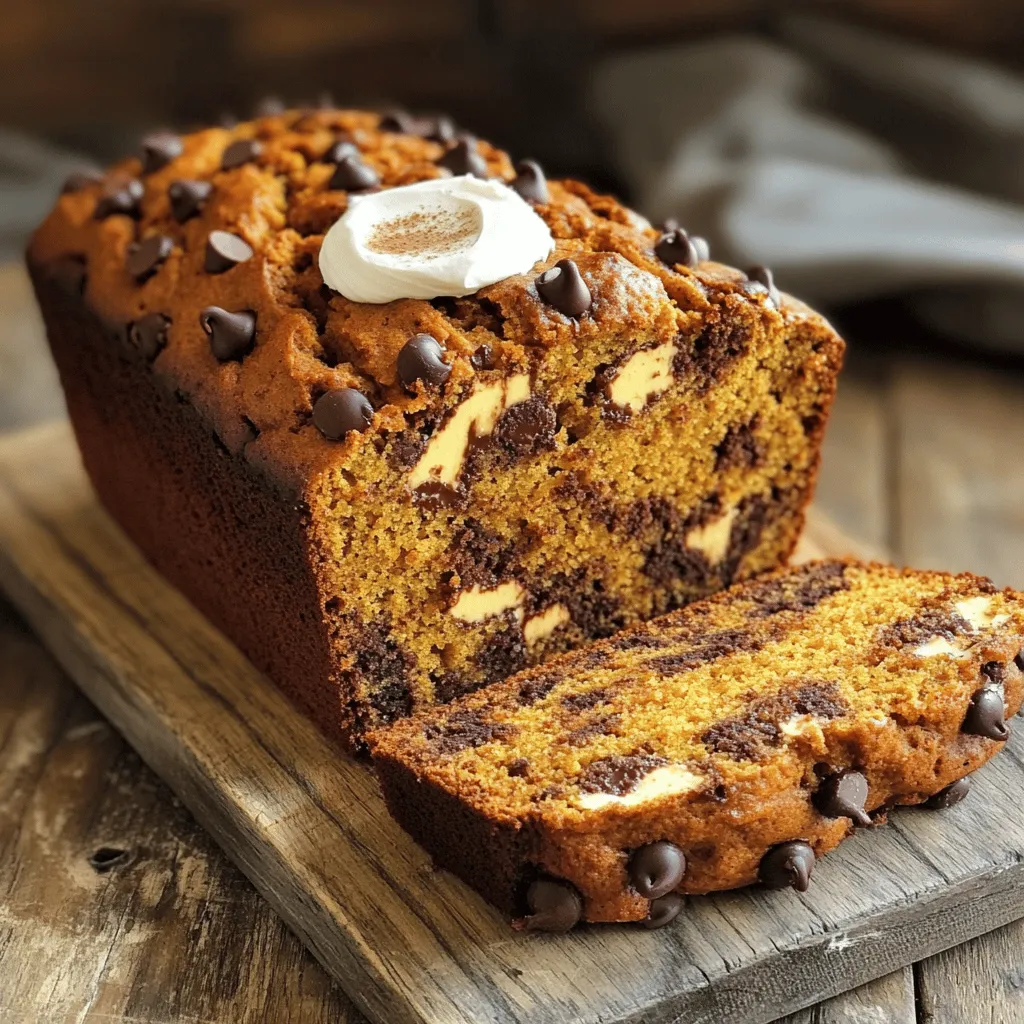
Are you ready to bake something that combines fall flavors and sweet treats? My Chocolate Chip Pumpkin Bread recipe is

- Natural peanut butter: Choose creamy for a smooth texture or crunchy for bites of nut. - Honey or maple syrup: Use honey for sweetness or maple syrup for a vegan option. - Rolled oats: Ensure oats are gluten-free if needed to meet dietary needs. - Vanilla protein powder: This adds protein and boosts nutrition. It’s great if you want extra energy. - Dark chocolate chips: You can choose regular or mini chips for a more chocolatey treat. - Unsweetened cocoa powder: This gives a rich chocolate flavor and can enhance the taste without extra sugar. 1. First, grab a medium saucepan. Add 1 cup of natural peanut butter and 1/2 cup of honey (or maple syrup) to it. 2. Place the saucepan on low heat. Stir the mixture with a spatula for about 2-3 minutes. Keep stirring until it is smooth and well blended. 3. Remove the saucepan from the heat. Now, stir in 1 teaspoon of pure vanilla extract and a pinch of salt. This helps to bring out the rich flavors. 1. Next, take a large mixing bowl. Add in 2 cups of rolled oats, 1/2 cup of vanilla protein powder (if you choose to use it), and 1/4 cup of unsweetened cocoa powder. 2. Mix these dry ingredients together well. This ensures that everything is evenly combined before adding the wet ingredients. 1. Carefully pour the warm peanut butter mixture over the dry ingredients in your large bowl. 2. Use your spatula to fold everything together. Make sure all the oats are coated and no dry oats are left. 3. Now, gently fold in 1/2 cup of dark chocolate chips, mixing them in without breaking them. 4. Line an 8x8 inch square baking dish with parchment paper. Leave some overhang for easy removal later. 5. Transfer the mixture into the prepared dish. Use your spatula to press it down firmly. Make sure it is an even and compact layer. 6. Once pressed down, put the dish in the refrigerator for at least 1 hour. This helps the bars to set and firm up. 7. After they are firm to the touch, lift the bars out using the parchment paper overhang. Place on a cutting board and slice them into squares or rectangles. To make your no bake peanut butter bars look great, stack them on a nice plate. You can drizzle melted dark chocolate on top for a fancy touch. A sprinkle of sea salt adds a little flair, too. This will make your treat look extra tempting! One common mistake is not pressing the mixture down firmly enough. This can make the bars crumbly. Make sure to pack the mixture tightly in the baking dish. Another mistake is over-mixing the chocolate chips. Just fold them in gently so they stay whole. This keeps the texture nice! If you want a lower sugar option, use less honey or maple syrup. You can also try using a sugar substitute. For nut butter, you can swap peanut butter for almond or cashew butter. This gives you a different taste while keeping the bars delicious! {{image_4}} You can make your no bake peanut butter bars even more exciting by adding a few spices. Try mixing in cinnamon or nutmeg for warmth and depth. These spices can enhance the nutty flavor of peanut butter. Adding dried fruits like raisins or cranberries can also boost both taste and nutrition. Seeds such as chia or flax add crunch and healthy fats. These simple changes can turn your bars into a new treat each time! The type of peanut butter you choose will change the texture of your bars. Crunchy peanut butter adds delightful bits, while smooth peanut butter creates a creamy finish. You can also play with different oats. Quick oats give a finer texture, while old-fashioned oats add a heartier bite. Experimenting with these options allows you to find your perfect texture. If you want to make a vegan version, just use maple syrup instead of honey. This small swap keeps the bars sweet and plant-based. For those needing gluten-free options, ensure your rolled oats are certified gluten-free. This way, everyone can enjoy these tasty treats without worry. To keep your no bake peanut butter bars fresh, store them in an airtight container. This helps prevent moisture and keeps them from drying out. You can keep them in the fridge for a firmer texture. If you prefer a softer bite, you can leave them at room temperature for a short time. Just remember, they will last longer when chilled. If you want to save your bars for later, freezing is a great option. Cut the bars into squares or rectangles before freezing. Wrap each piece in plastic wrap and place them in a freezer-safe bag. This way, they won't stick together. When ready to enjoy, take out the bars and let them thaw in the fridge overnight. This keeps their taste and texture just right. These bars can last up to two weeks in the fridge. If you freeze them well, they can last up to three months. Watch for signs of spoilage, like an off smell or a change in color. If they look or smell different, it's best to toss them. Enjoy your tasty treats while they are fresh! No bake peanut butter bars last up to one week in the fridge. They stay fresh and tasty when stored in an airtight container. If you freeze them, they can last up to three months. Just wrap each bar well to prevent freezer burn. Yes, you can use almond or cashew butter instead of peanut butter. These nut butters will give your bars a different taste. Almond butter has a milder flavor, while cashew butter is creamier. Both options work well and keep the bars delicious. Refrigeration is essential for the best texture and taste. Chilling the bars helps them firm up, making them easier to cut and eat. A cold bar has a nice, chewy texture that many enjoy. If you like a firmer bite, always refrigerate these bars. In this post, we explored making no-bake peanut butter bars. You learned about key and optional ingredients, from peanut butter to chocolate chips. I shared step-by-step instructions, tips, and variations to customize your bars. Remember, well-pressed mixtures and storage practices keep them fresh. Experiment with flavors and textures to find your favorite. This simple recipe can fit many diets and preferences. Enjoy your tasty treats; they are worth the effort!

No Bake Peanut Butter Bars Quick and Easy Recipe

Craving a sweet treat that’s quick and easy? Look no further! I’ve got a simple no-bake peanut butter bar recipe

Older posts
Newer posts
← Previous Page1 … Page13 Page14 Page15 … Page86 Next →

dsad

© 2026 yumymoments • Built with GeneratePress

Our Policies

  • Copyright Policy
  • Cookie Policy
  • GDPR Policy
  • Privacy Policy
  • Disclaimer
  • Terms Of Use

More Information

  • Home
  • About
  • Contact
  • Appetizers
  • Dessert
  • Dinner
  • Drinks
©2026, yumymoments About Back To Top