Skip to content
DisclaimerTerms Of UseGDPR PolicyCookie Policy

yumymoments

  • Home
  • Drinks
  • Appetizers
  • Dinner
  • Dessert
  • About
  • Contact
  • Privacy Policy
DisclaimerTerms Of UseGDPR PolicyCookie Policy

NO-ING-IMG

To make a cozy bowl of Instant Pot chicken noodle soup, you need just a few simple ingredients. Here’s what you will need: - 2 tablespoons olive oil - 1 medium onion, finely chopped - 2 carrots, peeled and sliced into rounds - 2 stalks celery, sliced - 3 cloves garlic, minced - 1 teaspoon dried thyme - 1 teaspoon dried oregano - 1/2 teaspoon freshly ground black pepper - 4 cups low-sodium chicken broth - 2 boneless, skinless chicken breasts - 1 cup egg noodles - 1 cup frozen peas - Salt to taste - Fresh parsley, chopped (for garnish) These ingredients work together to create a warm, flavorful soup. Each one adds its own touch, making the soup rich and satisfying. For instance, the olive oil helps sauté the vegetables, while the chicken broth gives the soup its base flavor. Fresh parsley adds a nice pop of color and flavor. When selecting your chicken, choose fresh, high-quality breasts for the best taste. I often use low-sodium broth to control the salt level. This soup is all about comfort and taste, so feel free to adjust the herbs and spices to match your personal preference. For the full recipe, check out the detailed steps provided. 1. Set your Instant Pot to 'sauté' mode. 2. Add 2 tablespoons of olive oil and let it heat for about 1 minute. 3. Chop 1 medium onion, 2 carrots, and 2 stalks of celery. 4. Add the chopped veggies to the pot. Sauté for 4-5 minutes. The onion should be soft and clear. 5. Mince 3 cloves of garlic and add them to the pot. 6. Stir in 1 teaspoon of dried thyme, 1 teaspoon of dried oregano, and 1/2 teaspoon of black pepper. 7. Sauté for another 1-2 minutes until you smell the garlic. 1. Pour in 4 cups of low-sodium chicken broth. 2. Scrape any bits stuck to the bottom of the pot. 3. Place 2 boneless, skinless chicken breasts into the broth. Make sure they are fully submerged. 4. Close the lid and set the valve to sealing. 5. Select 'manual' or 'pressure cook' and set the timer for 10 minutes. 1. After cooking, let the pot release pressure for 5 minutes naturally. 2. Carefully switch the valve to venting to release remaining pressure. 3. Remove the cooked chicken breasts and set them aside. 4. Shred the chicken into bite-sized pieces with two forks. 5. Stir in 1 cup of egg noodles and 1 cup of frozen peas. 6. Set the pot back to 'sauté' mode and let it cook for 5 minutes. 7. Taste the soup and add salt as needed. 8. Serve hot, garnished with fresh parsley. For the full recipe, check [Full Recipe]. Enjoy this cozy soup! When using an Instant Pot, keep these tips in mind: - Pressure Cooking Chicken: Always ensure the chicken is submerged in broth. This step keeps it moist. Use boneless chicken for quick cooking. Adjust the time based on thickness. Thin breasts need less time. - Avoiding Mistakes in Soup Making: Do not skip the sauté step. This builds flavor. Stir frequently to prevent sticking. If you see any stuck bits, deglaze the pot with broth before adding chicken. To boost flavor in your soup, consider these ideas: - Herbs and Spices: Try adding bay leaves for depth. Fresh parsley adds brightness. A pinch of red pepper flakes gives a nice kick. - Homemade vs. Store-Bought Broth: Homemade broth tastes richer. It allows you to control salt and flavor. Store-bought broth is convenient. Choose low-sodium to manage salt levels. For the full recipe, check out Comforting Instant Pot Chicken Noodle Soup. {{image_4}} You can change up the vegetables in your soup. Consider using spinach or corn. Both add great flavor and color. You can also add green beans or bell peppers for variety. When it comes to noodles, you have options too. Whole wheat noodles offer a nutty taste. Gluten-free noodles work for dietary needs. Just remember to adjust cooking times if you choose a different type. If you want a lower-sodium soup, use low-sodium broth. You can also skip adding extra salt. Fresh herbs can boost flavor without the sodium. For a vegetarian version, replace the chicken with tofu or chickpeas. Use vegetable broth instead of chicken broth. This keeps the soup hearty and delicious. You can still enjoy all the great tastes while meeting your dietary needs. For the full recipe, check the main article. To store your leftover Instant Pot Chicken Noodle Soup, let it cool first. Pour the soup into an airtight container. This helps keep the soup fresh. You can store it in the fridge for up to 3 to 4 days. Make sure to check for any off smells or color changes before you eat it. If you want to save the soup for later, freezing is a great option. Let the soup cool down completely. Then, transfer it to freezer-safe bags or containers. Remove as much air as you can to prevent freezer burn. The soup can last in the freezer for about 3 months. When you're ready to eat it, thaw the soup overnight in the fridge. To reheat, pour the soup into a pot and heat on low until warm. Stir occasionally. You can also use the microwave. Just heat in short bursts, stirring in between. Enjoy your cozy soup anytime! For the full recipe, check the details above. To make Instant Pot Chicken Noodle Soup, follow these steps: 1. Set the Instant Pot to 'sauté' and heat olive oil. 2. Add chopped onion, sliced carrots, and celery. Sauté for 4-5 minutes. 3. Stir in minced garlic, thyme, oregano, and black pepper. Cook for 1-2 minutes. 4. Pour in chicken broth, scraping the bottom. Add chicken breasts. 5. Close the lid and set the pot to 'manual' for 10 minutes. 6. Allow a natural release for 5 minutes, then vent the remaining pressure. 7. Remove and shred the chicken. Return it to the pot. 8. Stir in egg noodles and frozen peas. Cook on 'sauté' for 5 minutes. 9. Season with salt and serve hot with parsley on top. Yes, you can add more vegetables! Consider using spinach, corn, or bell peppers. Just chop them small, so they cook well. Add them with the noodles for best results. This gives you more nutrients and flavor. Absolutely! This recipe is perfect for meal prep. You can store it in the fridge for up to 3 days. Just make sure to let it cool before storing. Reheat it gently on the stove or in the microwave. If you want a substitute for egg noodles, try whole wheat noodles or gluten-free options. You can also use rice or quinoa. Adjust the cooking time, as these may need different times to cook through. For the full recipe, check out the detailed instructions above and enjoy this cozy meal! This blog post covered everything you need to make Instant Pot Chicken Noodle Soup. We explored the key ingredients like chicken, vegetables, and spices. I shared step-by-step instructions and important tips to enhance your soup. You can even tweak the recipe for dietary needs. Remember, homemade soup offers rich flavors and comfort. With these insights, you can make a delicious meal that's easy and quick. Enjoy your cooking adventure!

Instant Pot Chicken Noodle Soup Cozy and Easy Recipe

Craving comfort food that’s quick and easy? You’ll love this Instant Pot Chicken Noodle Soup recipe! With simple ingredients and

For a tasty slow cooker chicken tortilla soup, gather these simple ingredients: - 1 pound boneless, skinless chicken breasts - 1 can (15 oz) black beans, rinsed and drained - 1 can (15 oz) sweet corn, drained - 1 can (14.5 oz) diced tomatoes with green chilies - 1 medium onion, finely diced - 3 cloves garlic, minced - 1 red bell pepper, diced into small pieces - 1 teaspoon ground cumin - 1 teaspoon smoked paprika - 1 teaspoon chili powder - 4 cups low-sodium chicken broth - Salt and freshly cracked black pepper to taste - Juice of 1 fresh lime - Tortilla strips or crunchy tortilla chips for serving - Fresh cilantro, chopped, for garnish - Fresh avocado, diced, for topping - Shredded cheese (optional, such as cheddar or Monterey Jack) You can make your soup even better with these fun toppings: - Sliced jalapeños for heat - Sour cream for creaminess - Fresh lime wedges for extra zest - Green onions for crunch - Cotija cheese for a rich flavor If you need to swap ingredients, here are some easy ideas: - Use chicken thighs instead of breasts for more flavor. - Swap black beans for pinto beans or kidney beans. - Use vegetable broth for a vegetarian version. - Try fresh tomatoes if you prefer them over canned. - Replace red bell pepper with yellow or green peppers for a different taste. Experimenting with these swaps can lead to new flavors you will love! For the full recipe, check out the section above. First, gather all your ingredients. You will need: - 1 pound boneless, skinless chicken breasts - 1 can (15 oz) black beans, rinsed and drained - 1 can (15 oz) sweet corn, drained - 1 can (14.5 oz) diced tomatoes with green chilies - 1 medium onion, finely diced - 3 cloves garlic, minced - 1 red bell pepper, diced into small pieces - 1 teaspoon ground cumin - 1 teaspoon smoked paprika - 1 teaspoon chili powder - 4 cups low-sodium chicken broth - Salt and freshly cracked black pepper to taste - Juice of 1 fresh lime - Tortilla strips or crunchy tortilla chips for serving - Fresh cilantro, chopped, for garnish - Fresh avocado, diced, for topping - Shredded cheese (optional, such as cheddar or Monterey Jack) Start by placing the chicken at the bottom of your slow cooker. This ensures it cooks evenly. Next, mix the black beans, corn, diced tomatoes, onion, garlic, and bell pepper in a large bowl. Add the spices and mix well. Pour this mixture over the chicken, spreading it evenly. Now it’s time to add the chicken broth. Pour it gently into the slow cooker. Stir carefully, so you don’t disturb the chicken too much. Cover the slow cooker with its lid. Set it to cook on low for 6-7 hours or high for 3-4 hours. The chicken will become tender and fully cooked. About 30 minutes before you serve the soup, shred the chicken. I like to use two forks for this. Stir in the lime juice to brighten the flavors. Taste the soup and adjust the seasoning if needed. Add more salt and pepper if you like. When ready to serve, ladle the soup into warm bowls. Top each bowl with crispy tortilla strips or chips. Add diced avocado, chopped cilantro, and shredded cheese if you like. This adds flavor and a nice look to your dish. For an extra touch, serve with a lime wedge on the side. It enhances the zesty flavor and makes it even more fun to eat. Enjoy your delicious slow cooker chicken tortilla soup! For the full recipe, check out the earlier section. To make your soup sing, use fresh ingredients. Fresh garlic and onions add a lot of taste. I also love using low-sodium chicken broth. It gives a good base without too much salt. You can add a splash of lime juice right before serving. This brightens up all the flavors. Fresh herbs like cilantro also boost the taste. They add a nice green touch and a pop of flavor. Shredding chicken can be easy. After cooking, take two forks and pull the chicken apart right in the slow cooker. This keeps all the flavor in the soup. If you find it hard, let the chicken cool for a few minutes. Then, it will be easier to handle. Shredded chicken helps to mix well with the soup and gives you bites of chicken in every spoonful. If you like things spicy, add more chili powder. You can also include diced jalapeños for extra heat. Start with a small amount, then taste and adjust as you go. If you want a thicker soup, mash some of the beans with a fork. This adds creaminess without extra work. For a thinner soup, add more broth until it reaches your desired consistency. {{image_4}} You can easily make a vegetarian version of this soup. Replace the chicken with more beans. Use 2 cans of black beans or chickpeas. You can also add more veggies. Try zucchini, carrots, or bell peppers. This adds nice color and flavor. The broth can stay the same. Just make sure to use vegetable broth instead of chicken broth. If you like heat, add fresh jalapeños or red pepper flakes. You can chop jalapeños and stir them in while cooking. For a smoky taste, add chipotle peppers in adobo sauce. You can also top your soup with sliced radishes or pickled onions. These add a nice crunch and tangy taste. Feel free to adjust the spice to your liking. Switching proteins is easy and fun. Instead of chicken, try turkey or shredded beef. You can even use shrimp for a seafood twist. Just be sure to adjust the cooking time. Fish or shrimp cooks faster, so add them in the last hour. This way, they stay tender and do not overcook. Use the full recipe to guide you through these changes. To keep your soup fresh, let it cool first. Once cool, transfer it to an airtight container. Make sure to leave some space at the top. This space allows for expansion when freezing. Store it in the fridge if you plan to eat it within three days. When you’re ready to enjoy your soup again, pour the desired amount into a pot. Heat it on medium-low and stir often to prevent sticking. You can also use the microwave. Place the soup in a microwave-safe bowl. Heat it in short bursts, stirring in between, until it’s hot. Adding a splash of broth can boost the flavor. To freeze, use a freezer-safe container. Leave about an inch of space at the top to allow for expansion. You can also freeze portions in zip-top bags for easy meals later. Lay the bags flat in the freezer to save space. The soup can last up to three months in the freezer. When ready to eat, thaw it in the fridge overnight before reheating. For the full recipe, check the earlier section! Yes, you can use frozen chicken. Just place it in the slow cooker. Cooking time will increase. If you use frozen chicken, cook on high for about 4-5 hours or low for 8-9 hours. Always check that the chicken reaches 165°F internally for safety. You can serve tortilla soup with many sides. Here are some ideas: - Grilled cheese sandwiches - Quesadillas - Rice or corn muffins - A fresh salad - Chips with salsa These sides add variety and balance to your meal. If your soup is too thin, there are easy ways to thicken it. You can: - Mix in some cornmeal or masa harina - Add a slurry of cornstarch and water - Mash some of the beans in the soup - Simmer with the lid off for a while These tricks help you get the perfect texture. For the full recipe, follow the steps outlined above! In this post, we covered the key ingredients for chicken tortilla soup, from the complete list to optional toppings. I detailed the step-by-step process, ensuring each phase is clear. Tips for enhancing flavor and shredding chicken help you get the best results. I shared fun variations and essential storage info, plus answers to common questions. With these insights, you can create a soup that shines every time. Enjoy making this delicious dish!

Satisfying Slow Cooker Chicken Tortilla Soup Recipe

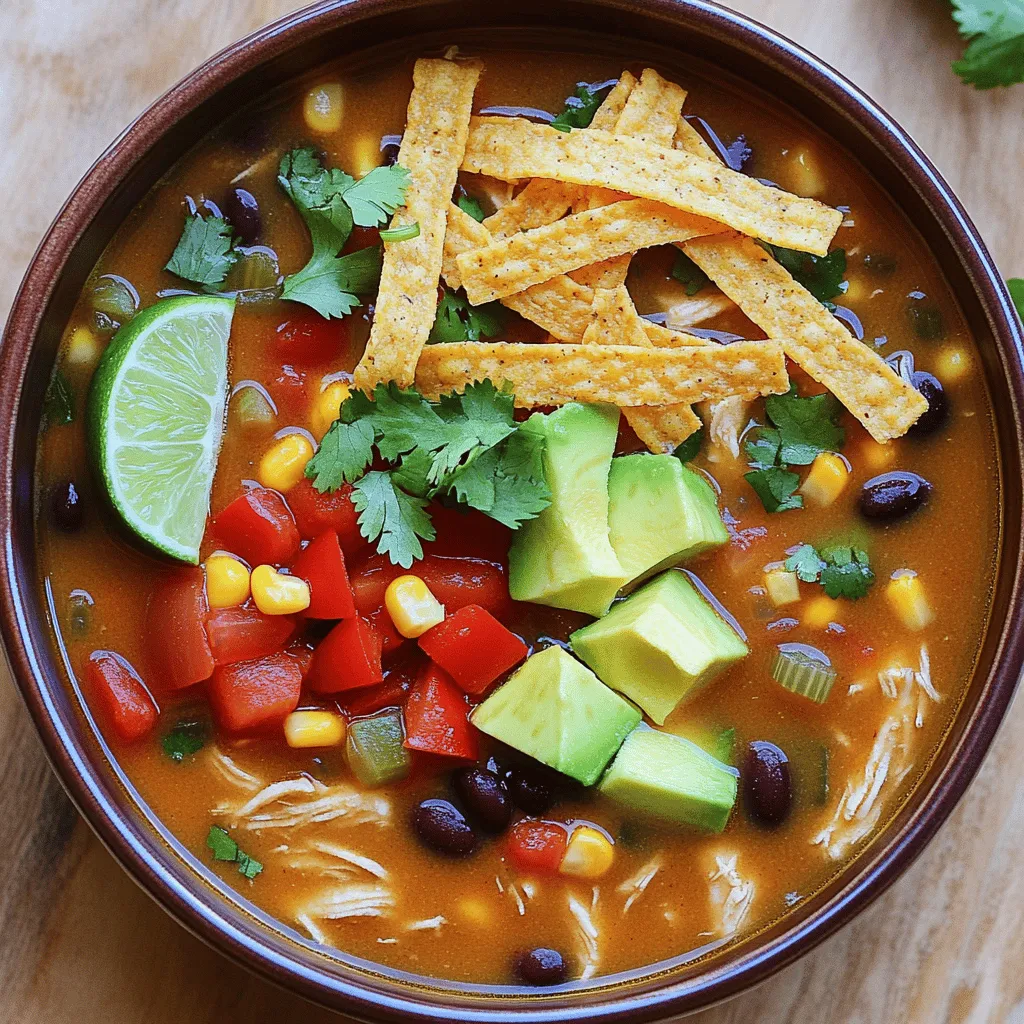
Craving a warm bowl of comfort? This Satisfying Slow Cooker Chicken Tortilla Soup recipe is your answer. I’ll guide you

- 4 large russet potatoes - 1 cup sharp cheddar cheese - ½ cup cream cheese - ½ cup sour cream - ½ cup milk - 3 tablespoons butter - 1 teaspoon garlic powder - 1 teaspoon onion powder - Salt and freshly ground black pepper - ¼ cup green onions for garnish - ½ cup crispy breadcrumbs or crushed crackers To make my Cheddar Mashed Potato Casserole, I start with four large russet potatoes. I peel and cube them for cooking. These potatoes give the casserole its creamy base and fluffy texture. Next, I add one cup of sharp cheddar cheese, which brings a rich, cheesy taste. Cream cheese and sour cream follow. They add creaminess and a slight tang. Then, I mix in half a cup of milk and three tablespoons of butter. This combination makes the mash smooth and luscious. For flavor, I sprinkle in garlic powder and onion powder. These spices enhance the dish without overpowering it. Finally, I season with salt and fresh black pepper. I use green onions for garnish, adding a pop of color and a fresh crunch. Crispy breadcrumbs or crushed crackers top off the casserole, giving it a delightful crunch. This dish is simple but packed with flavor. You can find the complete recipe for making this cheesy delight in the Full Recipe section. - Preheat the oven to 350°F (175°C). - Cook the potatoes in salted water. Add the cubed potatoes and boil for 15 to 20 minutes. They should be fork-tender. - Drain and dry potatoes. Return them to the pot and keep on low heat for a few minutes to remove extra moisture. - Mash the potatoes with butter and cream cheese. This makes them creamy and rich. - Incorporate sour cream, milk, garlic powder, and onion powder. Mix well until smooth and creamy. - Fold in cheddar cheese. Save a bit for the top. - Prepare the casserole dish by greasing it first. This helps with easy serving. - Add toppings and bake. Sprinkle the reserved cheese and breadcrumbs on top. Bake for 25 to 30 minutes until golden brown. For the full recipe, check out the Cheddar Bliss Mashed Potato Casserole. To get the best texture for your Cheddar Mashed Potato Casserole, start with russet potatoes. They have a high starch content, which makes them fluffy. Boil the potatoes until they are fork-tender. After draining, let them sit for a few minutes to dry out. This helps keep your mash creamy. To boost the flavor, try adding fresh herbs like chives or parsley. You can also mix in spices like paprika or cayenne for a kick. When it comes to cheese, sharp cheddar works great, but feel free to mix in some mozzarella. This adds a nice stretch and creaminess. Garnish your casserole with chopped green onions for a fresh look. For extra color, sprinkle some paprika on top. When serving, dish out the casserole hot and bubbly. Pair it with a fresh salad or roasted veggies to make a complete meal. {{image_4}} You can make this dish even better with a few fun twists. Adding bacon or ham gives it a savory kick. Just cook the bacon crispy, chop it up, and mix it in with the cheese. You can also add diced ham for a hearty touch. Experimenting with different cheeses can change the flavor, too. Try gouda, mozzarella, or pepper jack for a spicy kick. Each cheese adds a new layer of taste to your mashed potato casserole. If you're looking for gluten-free options, use gluten-free breadcrumbs. You can find these in most stores. They still give the dish that crunchy topping without the gluten. For a plant-based version, swap out the dairy ingredients. Use almond milk instead of regular milk. You can also try vegan cream cheese and sour cream. This way, everyone can enjoy the casserole, no matter their diet. Scaling the recipe is easy for larger gatherings. Just double the ingredients and use a bigger casserole dish. This way, you have enough for everyone at the party. If you're cooking for fewer people, make mini casseroles. Use small ramekins or muffin tins. This makes for great single servings, and they look adorable on the table. For the full recipe, check out the Cheddar Bliss Mashed Potato Casserole 🥔. After you enjoy your Cheddar Mashed Potato Casserole, store any leftovers in the fridge. Use an airtight container to keep them fresh. This way, your casserole stays creamy and tasty. The casserole lasts for up to four days in the fridge. Be sure to reheat it well before serving again. If you want to save it for later, freezing is a great choice. First, let the casserole cool completely. Then, wrap it tightly in plastic wrap or foil. Place it in a freezer-safe container. This helps keep it from getting freezer burn. You can freeze the casserole for up to three months. When you're ready to eat, let it thaw overnight in the fridge. Reheat it in the oven at 350°F (175°C) until it is hot all the way through. You can get creative with any leftover casserole. Consider making potato cakes by mixing in some flour and frying them until golden. Or, use them as a filling for savory stuffed peppers. You can also serve them as a side dish with grilled meats. This adds a new twist and reduces waste. Each idea makes your meals fun and different! You can prepare this casserole a day in advance. Make the mashed potatoes and place them in a dish. Cover it tightly with plastic wrap. Store it in the fridge. When ready to bake, remove the wrap and add the toppings. Bake it as instructed in the recipe. It saves time and makes serving easier. Yes, you can use other cheeses if you wish. Try gouda, mozzarella, or pepper jack. Each will add its unique flavor to the dish. Mix and match your favorites to create a blend you love. This casserole pairs well with many dishes. Serve it with roasted chicken or grilled steak. It also goes great with a fresh salad or steamed veggies. You can even enjoy it with hearty soups! Yes, you can make a vegan version. Use plant-based butter, cheese, and sour cream. Substitute milk with almond or oat milk. Make sure to check labels for dairy-free options. This way, everyone can enjoy this creamy delight! To avoid lumps, use starchy potatoes like russets. Cook them until they are fork-tender. When mashing, be gentle and use a ricer or hand masher. Add warm butter and cream for a smooth texture. The key is to mix well without overworking the potatoes. For the complete details, check the Full Recipe. This blog post covered how to make a delicious Cheddar Mashed Potato Casserole. We explored the key ingredients, detailed step-by-step instructions, and shared helpful tips and tricks. I offered variations for different tastes and dietary needs, along with storage advice for leftovers. Creating this dish is simple and fun. You can customize it to suit any meal or occasion. Enjoy the rich flavors and the warmth it brings to your table. Cooking should be joyful, so take these ideas and make them your own!

Cheddar Mashed Potato Casserole Creamy and Simple Recipe

Are you ready to elevate your comfort food game? This Cheddar Mashed Potato Casserole combines creamy, cheesy goodness with simple

- 4 medium carrots - 4 medium parsnips - 3 tablespoons honey - 2 tablespoons extra-virgin olive oil - 1 teaspoon fresh thyme leaves - Salt and black pepper - Zest of 1 orange - 1 tablespoon balsamic vinegar (optional) - Baking sheet - Parchment paper - Mixing bowls - Whisk - Approximate calories per serving: 120 - Key vitamins and minerals in carrots and parsnips: Vitamin A, Vitamin C, potassium, and fiber Honey roasted carrots and parsnips are a sweet and savory side dish. The bright colors and natural sweetness make them a hit at any meal. I love how simple these ingredients are. Fresh carrots and parsnips bring flavor and health benefits. The honey adds a lovely glaze that caramelizes while roasting. For tools, you will need a baking sheet lined with parchment paper. This helps with easy cleanup. Mixing bowls and a whisk are also essential for making the glaze. About the nutrition, both carrots and parsnips are packed with vitamins. They are rich in Vitamin A, which supports eye health. You also get Vitamin C, which helps boost your immune system. Potassium in these veggies aids heart health, while fiber supports digestion. If you want to learn more, check out the [Full Recipe]. It has all the steps to make this tasty side dish. - Set temperature to 400°F (200°C) - Prepare the baking sheet with parchment Start by preheating your oven. This helps the carrots and parsnips cook evenly. Use parchment paper on your baking sheet. This makes cleanup easy and keeps the veggies from sticking. - Peel and cut carrots and parsnips into sticks Next, grab your carrots and parsnips. Peel them well. Cut each vegetable into sticks. Aim for uniform pieces. This helps them cook at the same rate. - Mix honey, olive oil, thyme, salt, pepper, and orange zest In a bowl, mix honey and olive oil. Add fresh thyme, salt, and pepper. For a zesty kick, include orange zest. This glaze brings a sweet and savory flavor that enhances the veggies. - Toss vegetables in honey glaze - Ensure even coating Pour the glaze over your vegetable sticks. Toss them gently to coat evenly. Each piece should have a nice layer of glaze. This step is key for flavor. - Spread vegetables in a single layer - Avoid overcrowding Spread the coated carrots and parsnips on the baking sheet. Make sure they sit in a single layer. Avoid overcrowding, as this helps them roast well and caramelize. - Roast for 25-30 minutes - Turn halfway through Place the baking sheet in the oven. Roast for 25-30 minutes. Halfway through, turn the vegetables. This helps them brown evenly. Check for tenderness; they should be soft and caramelized. For the full recipe, refer to the details above. Enjoy creating this tasty side dish! To get your carrots and parsnips caramelized perfectly, here are some tips: - Cut Evenly: Make sure all pieces are about the same size. This helps them cook evenly. - Single Layer: Spread the veggies in one layer on your baking sheet. This keeps them from steaming. - High Heat: Roasting at 400°F (200°C) gives you a nice golden color. The right baking sheet matters too. A heavy-duty, dark baking sheet works best. It absorbs heat well and promotes browning. If you use a shiny sheet, your veggies may not caramelize as much. You can adjust sweetness or saltiness in this dish. If you want it sweeter, add more honey. If it’s too sweet, add more salt. A pinch of salt enhances the flavor of the honey. For a twist, try different flavors for honey. Maple syrup or agave nectar can work well. They add a unique taste and keep the dish sweet. For serving, you can be creative! Use a rustic wooden board or a vibrant platter. This makes your dish stand out. Garnish with fresh thyme leaves or a sprinkle of orange zest. This adds color and makes the dish look fresh. A few nuts can also add crunch and flavor. Enjoy serving this tasty side dish! For the full recipe, check out the details above. {{image_4}} You can change the sweet flavor by using maple syrup or agave nectar. Both options give a nice twist. Maple syrup adds a rich taste that pairs well with the earthy roots. Agave nectar is lighter and has a subtle flavor. Swap honey for either in equal amounts. This keeps the sweetness but adds new flavors. Adding garlic or ginger can take your dish to the next level. Garlic gives a warm, savory note that balances the sweetness well. Ginger adds a spicy kick that brightens the dish. You can also try different spice blends. Cinnamon or nutmeg can add warmth. A pinch of cumin gives a fun twist. Mix and match until you find your favorite flavor. Feel free to add more root vegetables to the mix. Sweet potatoes, beets, or turnips work well and add color. Just remember to cut them into similar sizes. This ensures even cooking. You may need to adjust the cooking time. Denser veggies like sweet potatoes may need a few extra minutes. Always check for tenderness with a fork before serving. To keep your honey roasted carrots and parsnips fresh, place them in the fridge. Use an airtight container to prevent moisture loss. You can also cover them with plastic wrap. Aim to eat leftovers within three days for the best taste. The best way to reheat these veggies is in the oven. Set the oven to 350°F (175°C). Spread the carrots and parsnips on a baking sheet. Heat for about 10-15 minutes. This method keeps them crispy. You can also use the microwave, but this may make them soft. Heat for 1-2 minutes. Check often to avoid overcooking. If you want to save some for later, you can freeze them. First, let the carrots and parsnips cool completely. Then, place them in a freezer-safe bag. Remove as much air as possible. You can freeze them for up to three months. To keep the flavor, reheat them directly from the freezer. This method helps keep the taste and texture. Yes, you can prep honey roasted carrots and parsnips ahead. - Peel and cut the carrots and parsnips. - Store them in a sealed container in the fridge. - Mix the glaze and keep it in a separate container. - When ready, just mix and roast. These roasted veggies pair well with many dishes. - Serve them alongside roasted chicken for a hearty meal. - They also go great with grilled fish for a light option. - Try them with a savory shepherd's pie for a cozy dinner. Yes, honey roasted carrots and parsnips are quite healthy. - They are full of vitamins A and C, which boost immunity. - Carrots have fiber, good for digestion. - Parsnips offer potassium, helping control blood pressure. - Just watch the honey if you need to limit sugar. If parsnips are hard to find, you have options. - Turnips work well as a substitute. - Sweet potatoes can add a nice twist, too. - Just adjust cooking time since they may roast differently. For the full recipe to make this tasty side dish, check out the [Full Recipe]. You now have a clear guide to making honey roasted carrots and parsnips. Start with the right ingredients and tools for success. Follow the step-by-step instructions to achieve a sweet and savory dish. Remember, tips about seasoning and variations let you personalize your cooking experience. Proper storage and reheating techniques help keep your leftovers fresh. Enjoy the health benefits of these veggies, and don’t hesitate to explore flavors. Try creating this dish today for a tasty addition to your meals. Happy cooking!

Honey Roasted Carrots and Parsnips Tasty Side Dish

Looking for a delicious side dish that’s easy to make? Honey Roasted Carrots and Parsnips will elevate any meal! This

- 1 medium butternut squash - 3 tablespoons pure maple syrup - 2 tablespoons extra virgin olive oil - 1 teaspoon ground cinnamon - 1/2 teaspoon freshly grated nutmeg - Sea salt and black pepper - 1/4 cup walnuts - Fresh thyme sprigs Butternut squash is the star of this dish. It has a sweet, nutty taste. You want a medium squash for the best results. Make sure to peel and seed it before cutting it into 1-inch cubes. Maple syrup adds a rich sweetness. Use pure maple syrup for the best flavor. Extra virgin olive oil gives a nice, smooth base. Cinnamon and nutmeg bring warmth and spice. These flavors blend well with the squash. Don't forget to add sea salt and black pepper. They enhance the taste of all the ingredients. You can add walnuts for a crunchy texture. They also add healthy fats. Fresh thyme sprigs can make the dish look pretty and add more flavor. For the full recipe, check the link above. Enjoy making this delightful dish! 1. Preheat your oven to 425°F (220°C). This heat brings out the best flavors in the squash. 2. Carefully peel the butternut squash with a sharp knife. Cut it in half, scoop out the seeds, and cube it into 1-inch pieces. This size helps the squash cook evenly. 1. In a large mixing bowl, combine the cubed squash with olive oil, maple syrup, ground cinnamon, nutmeg, sea salt, and black pepper. 2. Toss the squash gently to ensure every piece is coated well. The mix of flavors will make each bite special. 1. Spread the coated squash on a baking sheet lined with parchment paper. Make sure the pieces are in a single layer. This helps them roast evenly. 2. Roast the squash in your preheated oven for 25-30 minutes. Halfway through, stir the squash. This step is key for even browning and caramelization. Look for them to be tender and slightly golden. If you want a crunch, add chopped walnuts in the last five minutes of roasting. This gives them time to toast and adds a nice texture. For a fresh touch, sprinkle thyme over the squash before serving. You can find the full recipe for Maple Cinnamon Roasted Butternut Squash in the article above. Enjoy! To get the best results, space the squash on the baking sheet. This helps the heat circulate. If the pieces are too close together, they will steam instead of roast. Stir the squash halfway through cooking. This step promotes even browning and brings out the best flavors. You can add other spices to change the taste. Try a pinch of cayenne for heat or some ginger for a warm touch. You can also mix in other vegetables. Carrots or sweet potatoes work well with butternut squash. They roast nicely and add color to the dish. Garnish the dish with fresh thyme. This adds a lovely green color and a fresh smell. You can serve it as a side or even a main dish. Pair it with roasted chicken or a grain salad for a complete meal. You can find the full recipe in this article for more details. {{image_4}} You can make this dish a bit healthier with easy swaps. Try using different sweeteners like honey or agave syrup instead of maple syrup. Each brings its own unique flavor. For the oil, consider using avocado oil or coconut oil. Both oils add healthy fats and a nice taste. They can also handle high heat well, making them perfect for roasting. Want to spice things up? Adding garlic or onion can create a lovely savory layer. Chop them finely and mix them in with the squash before roasting. You can also experiment with fresh herbs. Rosemary or sage can add depth to the dish. Just sprinkle them in before roasting for a flavorful twist. Using seasonal spices can enhance your dish. In fall, try adding a pinch of allspice or cloves. They bring warmth and a hint of spice that pairs well with the squash. Pairing with seasonal vegetables can also elevate your meal. Think of carrots or Brussels sprouts. Roast them alongside the squash for a colorful and tasty dish. You can find the full recipe for Maple Cinnamon Roasted Butternut Squash to explore all these variations further. To store your leftover Maple Cinnamon Roasted Butternut Squash, wait until it cools down. Place it in an airtight container. This keeps it fresh and tasty. You can keep it in the fridge for up to four days. Make sure to check for any signs of spoilage before eating. You can freeze roasted butternut squash for later use. First, let it cool completely. Then, spread the squash on a baking sheet in a single layer. Freeze it for about an hour. After that, transfer the squash to a freezer-safe bag or container. This way, it won't stick together. When you're ready to enjoy it again, simply reheat the squash. You can microwave it or bake it in the oven. If using the oven, set it to 350°F (175°C) and warm it for about 15-20 minutes. This will help bring back its delightful flavors and textures. For the full recipe, check the instructions above. How do I choose a ripe butternut squash? Look for a squash that feels heavy for its size. The skin should be smooth and tan. Avoid any squash with soft spots or blemishes. A ripe butternut squash has a dull, matte finish, not shiny. Can I make Maple Cinnamon Roasted Butternut Squash ahead of time? Yes, you can prepare this dish in advance. Roast the squash and let it cool. Store it in the fridge for up to three days. Reheat it in the oven or microwave before serving. What are the health benefits of butternut squash? Butternut squash is rich in vitamins A and C. It also contains fiber, which aids digestion. The antioxidants in squash help fight inflammation. Eating this veggie may improve heart health and boost your immune system. Nutritional breakdown of the dish One serving (about 1 cup) of Maple Cinnamon Roasted Butternut Squash has roughly: - Calories: 120 - Protein: 2g - Carbohydrates: 30g - Fat: 4g This dish is a great source of vitamins and minerals while being low in calories. What dishes pair well with Maple Cinnamon Roasted Butternut Squash? This squash dish complements roasted chicken or turkey. It also pairs well with quinoa or brown rice for a hearty meal. Try serving it alongside greens for a balanced plate. Is this dish suitable for meal prep? Absolutely! This dish stores well and tastes great reheated. Portion it out in containers for easy lunches or dinners. Enjoy it throughout the week, making meal planning a breeze. For the full recipe, check the section above! This article guides you through making Maple Cinnamon Roasted Butternut Squash. We covered the key ingredients, from the squash to spices and optional add-ins. The step-by-step instructions simplify the preparation, mixing, and roasting processes. You learned tips for even cooking and flavor enhancements, plus various ways to serve and store it. In conclusion, this dish is tasty and easy to make. I encourage you to try different variations and enjoy the warm flavors. Don’t hesitate to experiment with new ingredients. Your taste buds will thank you!

Maple Cinnamon Roasted Butternut Squash Delight

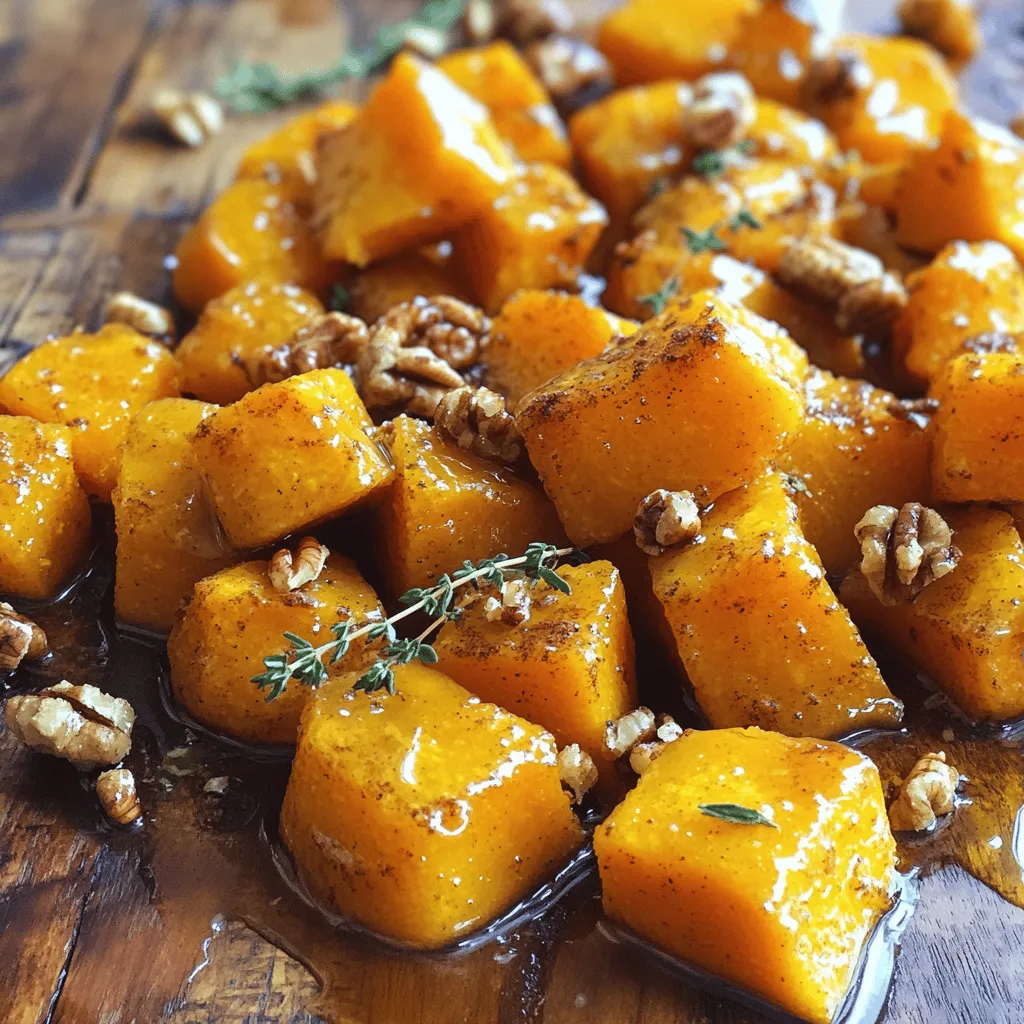
Are you ready to discover a new fall favorite? Maple Cinnamon Roasted Butternut Squash Delight is the perfect dish for

To make creamy garlic mashed potatoes, you need these simple ingredients: - 2 pounds Yukon Gold potatoes - 4 cloves garlic - 1 cup whole milk (or heavy cream) - 1/2 cup unsalted butter - 1/2 teaspoon salt - 1/4 teaspoon freshly ground black pepper - 1/4 cup sour cream - Fresh chives for garnish These ingredients work together to create a rich and smooth texture. Yukon Gold potatoes are great because they are creamy and buttery. The garlic adds a lovely flavor that makes each bite delightful. You can choose whole milk for a lighter dish or heavy cream for extra richness. Sour cream gives a tangy kick, making the mash even more special. Using fresh chives as a garnish not only looks nice but adds a fresh taste. When you gather all these items, you’re on your way to a perfect side dish. For the complete steps, check out the Full Recipe. To start, place the cubed Yukon Gold potatoes in a large pot. Cover them with cold salted water. Turn the heat to medium-high and bring the water to a boil. Once boiling, reduce the heat to medium. Let the potatoes simmer for about 15-20 minutes. You want them fork-tender, which means they should break apart easily when you poke them with a fork. While the potatoes cook, take a small saucepan. Combine the minced garlic and your choice of milk or cream in it. Set the saucepan on medium heat. Warm the mixture for about 3-5 minutes. Stir it gently and watch closely. You don’t want it to boil. Just warm enough to let the garlic flavor seep into the milk or cream. When the potatoes are done, drain them in a colander. Return them to the pot. This helps any leftover moisture to evaporate. Next, add the softened butter and your warm garlic-infused milk (or cream) to the potatoes. Also, add the sour cream for a nice tang. Use a potato masher or an electric mixer to mash everything together. Keep mashing until you reach your desired smoothness. Make sure there are no lumps left. Finally, season your mashed potatoes with salt and freshly ground black pepper. Adjust to taste for the best flavor. Serve your creamy garlic mashed potatoes in a bowl. Fluff the top with a fork and sprinkle some finely chopped chives on top. This adds a fresh touch. For the full recipe, check [here](Full Recipe). To get the best creamy texture, you can choose how to mash your potatoes. You can use a manual masher or an electric mixer. Both work well, but an electric mixer will give a smoother finish. The key here is to use warm ingredients. Warm milk and butter mix better with the potatoes. Cold ingredients can make the mash thick and lumpy. You can adjust the flavor of your garlic mashed potatoes easily. If you want more garlic, add an extra clove, or use roasted garlic for a sweeter taste. You can also add fresh herbs like rosemary or thyme for a fresh twist. If you enjoy spice, a pinch of cayenne pepper can add a kick. For a beautiful presentation, serve your creamy garlic mashed potatoes in elegant bowls. Use warm plates to keep your dish nice and hot. Create a butter well by making a small indentation in the center of the mash. Place a pat of butter there to melt beautifully. This adds a lovely touch to your meal. {{image_4}} You can make creamy garlic mashed potatoes fit your needs. If you need lactose-free options, use almond milk or oat milk instead of whole milk. For butter, try using olive oil or a dairy-free spread. These swaps will still give you a creamy texture. For seasoning, feel free to change it up! Instead of garlic, you can use roasted garlic for a sweeter flavor. Add herbs like rosemary or thyme for a fresh twist. The type of potato you use matters. Yukon Gold potatoes are creamy, but russet potatoes work well too. Russets give a fluffier texture. Red potatoes have a waxy feel, making them great for a chunky mash. Want to try something new? Use sweet potatoes! They add a lovely sweetness and a bright color. Just boil them like regular potatoes, and mash away. If you follow a vegan diet, you can still enjoy this dish. Use plant-based butter and coconut cream instead of regular butter and cream. This keeps the creamy goodness intact. For gluten-free diets, you’re already safe! Mashed potatoes are naturally gluten-free. Just make sure any seasonings or added ingredients are also gluten-free. To keep your creamy garlic mashed potatoes fresh, place them in an airtight container. This helps lock in moisture and flavor. Store the container in the fridge. They will last for about three days. When you reheat them, add a splash of milk. This keeps them creamy and smooth. You can also freeze mashed potatoes for later use. First, let them cool completely. Then, spoon them into freezer-safe bags or containers. Remove as much air as possible. When you're ready to eat, thaw them in the fridge overnight. To reheat, warm them gently on the stove or in the microwave. Expect some texture changes; they might be a bit grainy. Just stir in a little milk or butter to improve the texture. In the fridge, creamy garlic mashed potatoes last about three days. If they sit longer, check for signs of spoilage. Look for changes in color or smell. If they smell sour or look off, it's best to discard them. Enjoy your creamy garlic mashed potatoes fresh for the best taste! For the full recipe, check the link provided. You can make creamy garlic mashed potatoes in advance. First, prepare your potatoes as usual. After mashing, let them cool. Store them in an airtight container in the fridge for up to two days. To reheat, place them in a pot over low heat. Add a splash of milk or cream to keep them creamy. Stir often to avoid sticking. This method makes it easy to serve later. Yes, you can use various potatoes for your mash. Yukon Gold offers a creamy texture with a buttery taste. Russet potatoes are fluffy and light, making them a great option too. Red potatoes give a waxy texture, which can be nice if you prefer some lumps. Each type brings its own flavor and texture, so feel free to experiment! Creamy garlic mashed potatoes pair well with many dishes. Serve them with roast chicken for a classic meal. They also work great alongside a juicy steak or grilled salmon. For a vegetarian option, enjoy them with sautéed mushrooms and steamed greens. The creamy texture complements many flavors and makes any meal feel special. For the complete recipe, check out the [Full Recipe](#). It has all the details you need to create this delicious dish! In this blog post, I covered everything needed for creamy garlic mashed potatoes. You learned the key ingredients, simple steps, and helpful tips. We explored variations for different diets and how to store leftovers. Creamy garlic mashed potatoes can impress anyone and fit any meal. With the guide provided, you can create your own delicious dish at home. Now, enjoy your creamy mashed potatoes and share them with others!

Creamy Garlic Mashed Potatoes Simple and Soft Delight

If you crave creamy garlic mashed potatoes, you’re in the right place! I’ll guide you through making this soft delight

- 4 large russet potatoes, peeled and sliced - 2 cups shredded sharp cheddar cheese - 1 cup heavy cream - 1 cup milk - 4 tablespoons unsalted butter - 3 tablespoons all-purpose flour - 1 teaspoon garlic powder - 1 teaspoon onion powder - Salt and pepper, to taste - Optional: 1/2 teaspoon paprika - Fresh parsley for garnish Gathering these ingredients is simple and fun. Start with four large russet potatoes. Peel them and slice them into thin rounds. This will give the dish a nice texture. Next, you’ll need two cups of sharp cheddar cheese. This cheese adds a rich flavor that makes the dish shine. Heavy cream and milk are key for creaminess. You need one cup of each. Unsalted butter, at four tablespoons, helps create a smooth sauce. You’ll also need three tablespoons of all-purpose flour to thicken it. Don’t forget the spices! Garlic powder and onion powder each need one teaspoon. They boost flavor without overpowering the dish. Salt and pepper are crucial for seasoning. You can add 1/2 teaspoon of paprika if you want a hint of color and smokiness. Finally, fresh parsley adds a bright touch. It makes your dish look and taste fresh. Make sure you have everything ready before you start cooking. This will make the process smooth and enjoyable. For the full recipe, check the section above! - Preheat oven to 375°F (190°C). - Melt butter in a medium saucepan over medium heat. Create a roux by adding flour and whisking for 1-2 minutes until smooth. - In a greased 9x13-inch baking dish, lay half of the sliced potatoes. - Evenly sprinkle half of the shredded cheddar cheese over the potatoes. - Pour half of the sauce over the cheese and potatoes. - Repeat with the remaining potato slices, cheese, and sauce. - Cover the dish tightly with aluminum foil and bake for 45 minutes. - After 45 minutes, uncover the dish and bake for another 15-20 minutes until golden brown. - Let the dish rest for about 10 minutes before serving. Whisking is key to a smooth sauce. It helps blend the butter and flour well. If you skip whisking, you may end up with lumps. To avoid lumps, add the cream slowly while whisking. This helps to keep everything nice and creamy. You can switch up the seasonings. Try adding thyme or rosemary for a fresh twist. If you want a bolder flavor, add a pinch of cayenne pepper. For cheese, sharp cheddar is great, but you can also use gouda or mozzarella. Mixing cheeses gives depth to the dish. If your dish is too watery, try baking it a bit longer. This will help thicken the sauce. You can also add a bit more cheese to absorb excess liquid. If your potatoes are undercooked, cover the dish and bake for another 10 minutes. This will help soften them without burning the top. {{image_4}} You can easily swap heavy cream or milk. Try using half-and-half or coconut milk. These alternatives keep the dish rich and creamy. Want to add some color? Toss in veggies like spinach or broccoli. They not only boost nutrition but also add a pop of green. Cheddar is a classic choice, but don’t stop there! Gouda adds a smoky flavor, while mozzarella gives a nice stretch. You can also mix cheeses for more depth. A blend of sharp cheddar and creamy mozzarella creates a delightful texture and taste. Need a gluten-free option? Use cornstarch instead of flour for the sauce. It thickens without gluten. For a vegan version, swap heavy cream with cashew cream and use plant-based cheese. You can still enjoy creamy scalloped potatoes while keeping it plant-based. Explore these variations to find your perfect cheesy delight! For a complete recipe, check the Full Recipe section. To keep your cheesy scalloped potatoes fresh, store them in the fridge. Place them in an airtight container. This will keep the flavors intact. You can also cover the dish with plastic wrap if you prefer. Just be sure it is tight to avoid air exposure. The potatoes will stay good for about 3 to 5 days in the fridge. When reheating, avoid drying out your dish. Use the oven for the best results. Preheat your oven to 350°F (175°C). Cover the dish with foil to keep moisture in. Heat for about 20 to 30 minutes until warmed through. If you want a crispy top, remove the foil for the last 5 to 10 minutes. You can also use a microwave, but be careful. Heat in small bursts and stir in between. This will help keep the texture nice. You can freeze cheesy scalloped potatoes, but there are some tips. It is best to freeze them after cooking. Let them cool first, then place in a freezer-safe container. They will stay good for about 2 to 3 months. When you're ready to eat, thaw them in the fridge overnight. For quick thawing, you can use the microwave on defrost. After thawing, reheat as mentioned above. Keep in mind that uncooked scalloped potatoes may not freeze well. They can become mushy when thawed. Yes, you can prep Cheesy Scalloped Potatoes in advance. This makes meal time easier. To do this, prepare the layers and sauce, but don't bake them yet. Assemble everything in your baking dish, then cover it tightly. Store in the fridge for up to two days. When ready to bake, let it sit at room temperature for 30 minutes. Then, bake as directed. This method helps the flavors mix well. You can tell when the potatoes are done by checking for tenderness. After baking, use a fork to pierce the potatoes. They should feel soft and break apart easily. The top should also be golden brown. If the potatoes are still hard, continue to bake for a few more minutes. Keep a close eye on the color of the top to avoid burning. Cheesy Scalloped Potatoes go well with many main dishes. Here are some great options: - Roast chicken: The savory flavors balance nicely. - Grilled steak: Adds a hearty touch to the meal. - Baked ham: A classic pairing that many love. - Steamed green beans: The fresh crunch complements the creaminess. - Caesar salad: A crisp salad contrasts well with the rich potatoes. These pairings enhance the meal and create a satisfying dining experience. Enjoy! You’ve learned how to make creamy, cheesy scalloped potatoes step by step. We covered the ingredients, useful tools, and tips for the best results. Don’t forget to try different cheeses and seasonings to make the dish your own. Store leftovers properly, and reheat them without losing flavor. Enjoy this hearty side dish with your favorite meals and make it a family favorite. Simple changes can add joy to your cooking. Happy baking!

Cheesy Scalloped Potatoes Rich and Creamy Delight

Craving a side dish that steals the show? My Cheesy Scalloped Potatoes are exactly what you need! Rich, creamy, and

To make Garlic Parmesan Roasted Cauliflower, you need a few simple ingredients. Here’s what you will need: - 1 large head of cauliflower, cut into bite-sized florets - 4 tablespoons extra virgin olive oil - 4 cloves garlic, finely minced - 1/2 teaspoon red pepper flakes (optional) - 1/2 cup freshly grated Parmesan cheese - 1 teaspoon dried Italian herbs - Salt and freshly ground black pepper to taste - Fresh parsley, finely chopped (for garnish) These ingredients come together to create a dish that bursts with flavor. The garlic gives a strong aroma, while the Parmesan adds a rich, savory taste. If you enjoy a little heat, the red pepper flakes are a great choice. They give this dish a nice kick without overwhelming the other flavors. I always recommend using fresh ingredients. Fresh garlic and herbs enhance the taste and aroma of the dish. Plus, freshly grated Parmesan melts better than store-bought pre-grated cheese. This dish is not just tasty; it also looks stunning on the table. The golden, crispy edges of the cauliflower make it a feast for the eyes. For the full recipe, check out the detailed instructions that follow! - Preheat oven to 425°F (220°C) and line the baking sheet with parchment paper. - Toss cauliflower florets with olive oil, garlic, red pepper flakes, dried herbs, salt, and pepper. To start, I like to preheat my oven to 425°F (220°C). This high heat helps the cauliflower get nice and crispy. I also line my baking sheet with parchment paper. It makes cleanup easy, and the cauliflower won’t stick. Next, I grab a large bowl and add my cauliflower florets. I pour in the olive oil and sprinkle in the minced garlic. If you want some heat, add red pepper flakes. I also throw in dried Italian herbs, salt, and pepper. Then, I mix everything well. I want each floret to be covered in the tasty oil and seasonings. - Spread cauliflower on the baking sheet in a single layer. - Roast for 25-30 minutes, stirring halfway through for even cooking. Now, I carefully spread the coated cauliflower on my lined baking sheet. I make sure the florets are in a single layer. This helps them roast evenly. I pop them in the oven for 25 to 30 minutes. Halfway through, I take the sheet out and give the florets a good stir. This step is key for even cooking. I want them golden brown and tender. - Sprinkle grated Parmesan cheese over hot cauliflower. - Return to the oven for an additional 5 minutes until cheese is melted. Once the cauliflower is perfectly roasted, I pull it out of the oven. I immediately sprinkle grated Parmesan cheese over the hot florets. The heat helps the cheese melt beautifully. I then return the baking sheet to the oven for an extra 5 minutes. When it comes out, the cheese is bubbly and delicious. Now, my Garlic Parmesan Roasted Cauliflower is ready to serve. You can find the full recipe earlier in this article. Enjoy this flavorful side dish with your favorite meals! - Use fresh ingredients for the best flavor. Fresh garlic and herbs shine in this dish. - Ensure even roasting by spacing florets properly. Give each piece room to brown. - Overcrowding the baking sheet. This traps steam and makes the cauliflower soggy. - Not stirring halfway through the roast. Stirring helps the cauliflower cook evenly. - Serve warm as a side dish. It pairs well with many meals. - Pair with grilled meats or pasta dishes. The flavors complement each other nicely. For the complete guide, check out the Full Recipe. {{image_4}} You can boost the flavor of Garlic Parmesan Roasted Cauliflower in fun ways. Adding lemon zest brings a bright, fresh taste. It balances the richness of the cheese. You can also try adding smoked paprika. This spice gives a subtle, smoky flavor that makes each bite special. Experiment with these enhancements for a new twist. If you want a vegan option, use nutritional yeast instead of Parmesan. It adds a cheesy flavor without dairy. You can also swap the cauliflower for broccoli or Brussels sprouts. Both vegetables roast well and absorb flavors nicely. This makes the dish suitable for different diets and tastes. Get creative with how you serve this dish. It makes a great salad topping, adding crunch and flavor. You can also use it as an ingredient in a grain bowl. If you want to serve it as an appetizer, pair it with dips like hummus or ranch. The versatility of this dish adds to its charm. For the complete Garlic Parmesan Roasted Cauliflower recipe, check the Full Recipe section. Refrigerate your Garlic Parmesan Roasted Cauliflower in an airtight container for up to 3 days. This keeps it fresh and tasty. Make sure it cools down first before sealing it. It’s a great way to enjoy leftovers without losing flavor. To reheat, you can microwave or re-roast the cauliflower. If you use the microwave, heat it on medium until warm. If you want a crispier texture, re-roast it in the oven. Preheat the oven to 350°F (175°C) and roast until heated through. You can freeze Garlic Parmesan Roasted Cauliflower for up to 2 months. Place it in a freezer-safe container. Make sure to label it with the date. When you're ready to eat, just thaw in the fridge overnight, then reheat. This keeps the flavors intact and makes for a quick meal. For the full recipe, check the earlier section. Total cooking time is about 40 minutes (10 minutes prep + 30 minutes roast). This means you can enjoy this tasty side dish without spending all day in the kitchen. Yes, but adjust roasting time as needed. Frozen cauliflower may take a bit longer to cook. Keep an eye on it to ensure it roasts evenly. Nutritional yeast or a plant-based cheese can be used for dairy-free versions. Both options provide a nice flavor boost while keeping the dish vegetarian-friendly. If you're looking for that cheesy taste without dairy, these substitutes work well. You can find more details in the Full Recipe. This blog post covered how to make Garlic Parmesan Roasted Cauliflower. We explored key ingredients, preparation steps, and roasting tips. Remember, using fresh items makes a big difference. Avoid crowding the baking sheet for even cooking. This dish can pair well with many meals and offers a great taste. You can also try fun variations or store leftovers easily. Enjoy your cooking and feel free to get creative!

Garlic Parmesan Roasted Cauliflower Flavorful Side Dish

Looking for a side dish that packs a punch? Garlic Parmesan Roasted Cauliflower is your answer. This dish turns simple

- 1 pound Brussels sprouts, trimmed and halved - 3 tablespoons extra virgin olive oil - 3 tablespoons pure maple syrup - 2 tablespoons high-quality balsamic vinegar - 1 teaspoon garlic powder - 1/2 teaspoon sea salt - 1/4 teaspoon freshly ground black pepper - 1/4 cup chopped pecans (optional for a crunchy addition) - Fresh parsley, finely chopped, for garnish When choosing Brussels sprouts, look for bright green ones. They should feel firm and not have any brown spots. Fresh sprouts taste better and cook well. I recommend using pure maple syrup for the best flavor. Other syrups can taste different. Extra virgin olive oil adds richness. You can swap it for another oil if needed. The balsamic vinegar gives tang. It balances the sweet maple syrup nicely. Garlic powder blends well with all the flavors. You can use fresh garlic if you prefer. For a crunch, add pecans. Toast them lightly in the oven for extra flavor. Fresh parsley adds color and freshness to your dish. This recipe serves four people. Each serving has about 180 calories. You get healthy fats from the olive oil and nuts. Brussels sprouts are high in fiber and vitamins. They support good digestion and overall health. The maple syrup adds natural sugar. It's better than processed sugar. If you add pecans, you increase protein and healthy fats. Enjoy these Brussels sprouts as a side or a snack! Feel free to check out the Full Recipe for more details. Start by preheating your oven to 400°F (200°C). This makes sure the Brussels sprouts roast evenly. An even temperature helps them caramelize well. In a big bowl, add the halved Brussels sprouts. Pour in the olive oil, maple syrup, balsamic vinegar, garlic powder, sea salt, and black pepper. Use your hands or a spatula to mix everything together. Make sure every sprout gets covered in the tasty glaze. Spread the Brussels sprouts out on a baking sheet. Keep them in a single layer to roast properly. Place the sheet in the oven and roast for 20-25 minutes. Halfway through, stir them for even cooking. They should be tender and golden brown when done. If you want a crunchy touch, add the chopped pecans in the last 5 minutes of roasting. This gives them a nice toast. After roasting, take the sheet out and let it cool for a minute. Then, place the Brussels sprouts on a serving platter. For the final touch, sprinkle chopped parsley on top. You can also drizzle a bit more maple syrup for a sweet shine. For the full recipe, check out the earlier sections. To get the best results, preheat your oven to 400°F (200°C). This helps the Brussels sprouts cook evenly. Cut the sprouts in half to allow more surface area for roasting. Spread them out on the baking sheet. Give them space! Overcrowding leads to steaming, not roasting. Stir the sprouts halfway through cooking. This ensures each piece gets nice and crispy. For an extra flavor boost, try using fresh garlic instead of garlic powder. You can also add a pinch of red pepper flakes for heat. If you want a tangy twist, switch balsamic vinegar for apple cider vinegar. It adds a fruity note that pairs well with maple syrup. Finally, consider adding fresh herbs like thyme or rosemary for depth. One common mistake is using low-quality maple syrup. This can lead to a less tasty dish. Always use pure maple syrup for the best flavor. Another mistake is not trimming the sprouts properly. Make sure to remove any dried leaves. Lastly, don’t skip the last five minutes of roasting if you’re using nuts. This step ensures they are toasted and crunchy. For the full recipe, check out the detailed instructions above! {{image_4}} You can change up the texture of your maple glazed Brussels sprouts by adding nuts. Pecans add a sweet crunch, but walnuts or almonds work well too. Just chop them and add during the last five minutes of roasting. This way, they get nice and toasty. The nutty flavor pairs well with the maple syrup. While maple syrup is the star of this dish, you can try other sweeteners too. Honey or agave syrup can be great substitutes. Both will give a similar sweetness. If you want a low-sugar option, consider using stevia or monk fruit sweetener. Adjust the amount to your taste, as these sweeteners can be much sweeter. If Brussels sprouts aren’t your thing, don’t worry! You can substitute them with other veggies. Broccoli, cauliflower, or even carrots can hold the glaze well. Just cut them into similar sizes for even cooking. The roasting time may vary, so keep an eye on them. Each vegetable will bring its unique flavor to the dish. After enjoying your maple glazed Brussels sprouts, you may have some left. Let them cool completely before storing. Use an airtight container. They will stay fresh in the fridge for up to four days. If you want to keep them longer, freezing is a great option. To reheat, use the oven for the best flavor. Preheat your oven to 350°F (175°C). Spread the Brussels sprouts on a baking sheet. Heat them for about 10 to 15 minutes. This helps them regain their crispness. You can also use a microwave, but they may become soft. Heat them in short bursts to avoid overcooking. If you want to freeze your Brussels sprouts, follow a few simple steps. First, blanch them in boiling water for about three minutes. Then, cool them in ice water to stop the cooking. Drain and dry them well. Place them in a freezer bag, removing as much air as possible. They can last up to three months in the freezer. When ready to eat, thaw them in the fridge overnight before reheating. For a recipe with delicious details, check out the Full Recipe. To make maple-glazed Brussels sprouts, start by preheating your oven to 400°F (200°C). Next, take 1 pound of Brussels sprouts, trim them, and cut them in half. In a large bowl, mix the sprouts with 3 tablespoons of olive oil, 3 tablespoons of pure maple syrup, 2 tablespoons of balsamic vinegar, 1 teaspoon of garlic powder, 1/2 teaspoon of sea salt, and 1/4 teaspoon of black pepper. Toss everything well to coat the sprouts. Spread them on a baking sheet and roast for 20-25 minutes, stirring halfway. If you like, sprinkle 1/4 cup of chopped pecans on top during the last 5 minutes. Finally, garnish with fresh parsley and enjoy! Yes, you can use frozen Brussels sprouts! However, they may not get as crispy as fresh ones. To use frozen sprouts, thaw them first. Pat them dry with a paper towel to remove excess moisture. Then, toss them with the maple glaze as you would with fresh sprouts. Roast them in the oven at the same temperature, but check for doneness. They may take a few extra minutes to cook. Maple-glazed Brussels sprouts pair well with many dishes. You can serve them alongside roasted chicken or turkey for a hearty meal. They also go great with grilled salmon or a veggie stir-fry. For a lighter option, serve them with quinoa or a mixed green salad. These sprouts also make a fantastic side for holiday meals. To make this recipe vegan, simply ensure that the maple syrup you use is pure and free from animal products. The other ingredients are already vegan-friendly. Use extra virgin olive oil and balsamic vinegar as they are. This recipe is naturally plant-based and fits perfectly into a vegan diet. Enjoy the sweet and savory flavors guilt-free! In this post, we covered everything you need for maple-glazed Brussels sprouts. I shared the ingredients, tips for cooking, and nutritional info. You learned step-by-step instructions, plus ways to enhance flavors and avoid common mistakes. I also offered variations and storage tips. Now, you can make this dish perfect every time. Enjoy exploring these flavors and impressing your friends at dinner. With practice, you will master this tasty recipe!

Maple Glazed Brussels Sprouts Tasty and Easy Recipe

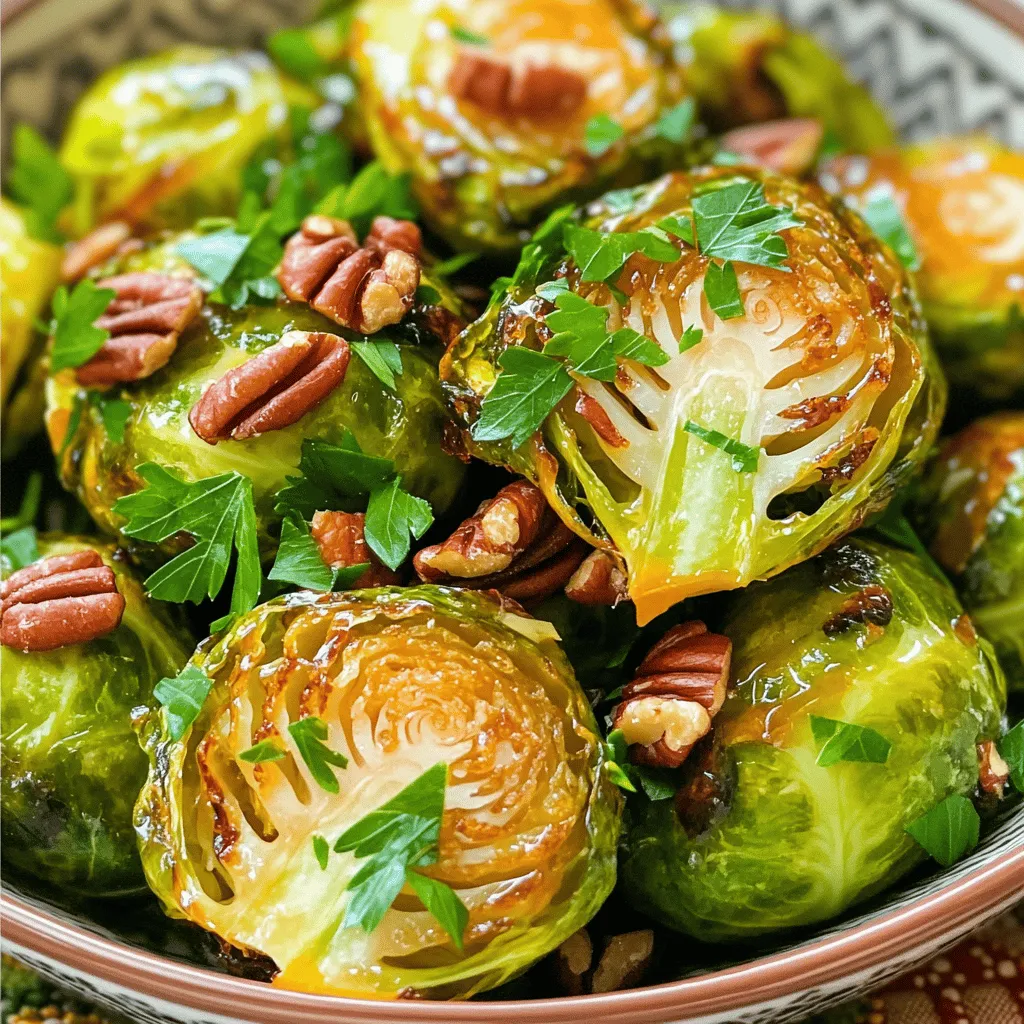
Looking for a quick and delicious side dish? You’re in the right place! This maple glazed Brussels sprouts recipe is

For your tasty Air Fryer Apple Fries, gather these simple ingredients: - 3 medium apples (preferably Granny Smith or Honeycrisp) - 1 cup all-purpose flour - 1 teaspoon ground cinnamon - ½ teaspoon ground nutmeg - ¼ teaspoon salt - 2 large eggs, beaten - 1 cup panko breadcrumbs - 2 tablespoons packed brown sugar (optional) - Cooking spray for air frying These ingredients work together to create a crispy, sweet treat that everyone will love. The apples provide a juicy, tart base, while the spices add warmth and depth. Using panko breadcrumbs ensures that your fries come out light and crunchy. If you want extra sweetness, the brown sugar is a great addition. Make sure to peel and slice the apples into fry-shaped pieces for the best texture. The combination of flavors and textures makes these fries a delightful snack or dessert. Check out the Full Recipe for a step-by-step guide to making these delicious Air Fryer Apple Fries. 1. Preheat your air fryer to 375°F (190°C). This step is crucial for even cooking. 2. In a bowl, mix together the flour, cinnamon, nutmeg, and salt. This spice mix will add great flavor. 1. First, dip each apple fry into the flour mixture. Shake off excess flour. 2. Next, dip the coated fry into the beaten eggs. Make sure it is fully covered. 3. Finally, roll the fry in panko breadcrumbs until it is well coated. This will ensure a crispy texture. 4. To coat evenly, press the panko onto the apple fry. This helps it stick better. 1. Place the coated apple fries in a single layer in the air fryer basket. Avoid overcrowding. This allows proper air flow. 2. Lightly spray the tops with cooking spray for extra crispiness. 3. Cook for 10-12 minutes. Flip the fries halfway through. This promotes even browning. 4. When done, the fries should be golden brown and crispy. Let them cool for a minute before serving. For the full recipe, check out the detailed instructions to enjoy this tasty treat! To get the best crispiness, air circulation in the fryer is key. The air fryer works by moving hot air all around the food. If the basket is too full, the air can't move well. This can make your apple fries soggy. Keep them in a single layer and leave space between each fry. This helps them cook evenly and become crispy. Dipping sauces can make your apple fries even better. Honey and caramel are great choices. They add sweetness and flavor. You can also try chocolate sauce for a fun twist. For a nice touch, dust the fries with powdered sugar. This makes the fries look fancy and taste even more delicious. You can use different apple types to change the taste. Granny Smith apples are tart, while Honeycrisp apples are sweet. Try each and see which you like best. You can also add spices to the mix. A pinch of cloves or ginger can give your fries a unique flavor. Experiment and find your favorite combination! {{image_4}} You can make your air fryer apple fries even tastier with a few fun tweaks. Adding a splash of vanilla extract to the batter gives it a sweet, warm flavor. You can also mix in nuts or seeds into the coating for a delightful crunch. Think of chopped almonds or sunflower seeds for added texture. These twists make each bite a little different. If you want to make these fries a bit healthier, try using whole wheat flour instead of all-purpose flour. This change boosts fiber and nutrients. For those who need gluten-free options, almond or coconut flour works great. Both options keep your fries tasty while catering to various diets. Want to change things up? You can create a savory version by adding cheese or herbs to the batter. This gives your fries a unique flavor that is not just sweet. If you like a kick, try adding some chili powder for a spiced version. These ideas let you enjoy apple fries in a whole new way! To keep your apple fries fresh, store them right. Place cooled apple fries in an airtight container. This helps keep them from getting soggy. You can use glass or plastic containers. Make sure they are sealed tightly. Store them in the fridge for up to three days. If you have extra, try to eat them quickly for the best taste. The best way to reheat your apple fries is in the air fryer. Set it to 350°F (175°C) and heat for about 4-5 minutes. This brings back their crunch. If you do not have an air fryer, you can use an oven. Preheat it to 350°F (175°C) and place the fries on a baking sheet. Heat them for about 10 minutes. This will also help keep them crispy. To freeze un-cooked apple fries, prepare them as usual. After coating, place the fries in a single layer on a baking sheet. Freeze them for about an hour until they are solid. Then, transfer them to a freezer bag. This saves space and keeps them fresh. When ready to cook, no need to thaw. Just add a few extra minutes to the cooking time. Enjoy your tasty treat anytime with the full recipe! Yes, you can use different apples. Some apples are better for frying. I recommend Granny Smith or Honeycrisp. They have a nice balance of sweet and tart. Other good choices include Fuji and Gala. These apples hold their shape well when cooked. Air Fryer Apple Fries taste best fresh. If you have leftovers, store them in an airtight container. They last about 3 days in the fridge. However, the crispiness may fade over time. Reheat them in the air fryer for better texture. Yes, you can! If you don’t have an air fryer, bake them in the oven. Preheat your oven to 400°F (200°C). Place the coated apple fries on a baking sheet lined with parchment paper. Bake for 15-20 minutes, flipping halfway through. They will still be delicious! Air Fryer Apple Fries pair well with many things. Consider serving them with honey or caramel for dipping. You can also enjoy them with ice cream or yogurt. They make a great side for pork or chicken dishes, too. For the complete recipe, please refer to the [Full Recipe](#) link. Making air fryer apple fries is easy and fun. We covered the ingredients, preparation, and cooking steps to make delicious fries. Remember, you can try different apple types or spices for unique flavors. Use our tips for the best crispiness and serving ideas. You can store and reheat them for later, too. Exploring variations can add more excitement. Enjoy creating this treat and impressing your friends and family!

Air Fryer Apple Fries Tasty and Crunchy Delight

Looking for a fun and tasty snack? Try Air Fryer Apple Fries! These crispy treats are easy to make and

Older posts
Newer posts
← Previous Page1 … Page17 Page18 Page19 … Page86 Next →

dsad

© 2026 yumymoments • Built with GeneratePress

Our Policies

  • Copyright Policy
  • Cookie Policy
  • GDPR Policy
  • Privacy Policy
  • Disclaimer
  • Terms Of Use

More Information

  • Home
  • About
  • Contact
  • Appetizers
  • Dessert
  • Dinner
  • Drinks
©2026, yumymoments About Back To Top