Skip to content
DisclaimerTerms Of UseGDPR PolicyCookie Policy

yumymoments

  • Home
  • Drinks
  • Appetizers
  • Dinner
  • Dessert
  • About
  • Contact
  • Privacy Policy
DisclaimerTerms Of UseGDPR PolicyCookie Policy

NO-ING-IMG

To make Lemon Garlic Butter Shrimp Skillet, you need fresh and simple ingredients. Here’s what you will need: - 1 pound large shrimp, peeled and deveined - 4 tablespoons unsalted butter, divided - 4 cloves garlic, minced - Zest from 1 lemon - 2 tablespoons lemon juice - 1 teaspoon red pepper flakes - Salt and black pepper, to taste - 2 tablespoons fresh parsley, chopped - 1 cup cherry tomatoes, halved - 1 cup baby spinach These ingredients come together to create a bright and flavorful dish. The shrimp add protein, while the butter and garlic create a rich base. Lemon zest and juice add a refreshing zing. Red pepper flakes bring just the right amount of heat, and the veggies provide color and texture. Using fresh parsley not only enhances the flavor but also adds a lovely touch to your dish. I recommend using high-quality shrimp for the best results. You can find the full recipe to guide you through the cooking process. To make the shrimp shine, start with drying them. Use paper towels to pat them dry. This helps the shrimp sear nicely. Next, season them well with salt and black pepper. This step is key. Good seasoning brings out the shrimp’s natural flavor. Now, let’s melt the butter. Heat 2 tablespoons of unsalted butter in a large skillet over medium heat. Watch it carefully. You want it to melt but not brown. If it browns, it can change the dish’s taste. Once the butter is melted, it’s garlic time! Add minced garlic to the skillet. Stir it often for about a minute. You want it to smell great, not burn. Burnt garlic can ruin the dish, adding bitterness instead of flavor. Raise the heat to medium-high. Add the seasoned shrimp in a single layer. Cook for 2-3 minutes on one side until they turn pink. Flip the shrimp and cook for another 1-2 minutes. They should be opaque and fully cooked. Now we add the tomatoes and spinach. Toss in halved cherry tomatoes and fresh spinach leaves. Stir gently for about 2 minutes. Cook just until the spinach wilts and the tomatoes soften. To brighten the dish, add lemon zest and juice. Lower the heat a bit and stir in the remaining butter. Mix in red pepper flakes for a hint of heat. Let it all simmer for a minute. This melds the flavors beautifully. You can find the full recipe in the previous section. To get that perfect shrimp texture, you want to start with dry shrimp. Pat them with paper towels before seasoning. This helps them sear better. Cook them quickly over medium-high heat. This keeps them juicy and tender. For added flavor, use fresh ingredients. Fresh garlic and lemon make a big difference. You can adjust the red pepper flakes to your liking. This lets you control the heat level. If you want more flavor, try adding a splash of white wine after cooking the shrimp. It adds depth and a nice touch. For a rustic look, serve the shrimp in the skillet. This gives a homey feel. Garnish with extra parsley and lemon wedges. The bright colors make it eye-catching. For a more polished plate, spoon the shrimp onto a white plate. Add a side of crusty bread for dipping. You could also serve it over fluffy rice. This adds substance and balances the dish. Make sure to drizzle some of that tasty sauce over everything. It ties the meal together beautifully. {{image_4}} You can easily change up this dish with different veggies. Consider adding bell peppers, zucchini, or peas for extra color and flavor. If you want less heat, reduce the red pepper flakes or leave them out. You can also use a pinch of paprika for a mild spice that adds depth. For gluten-free and dairy-free options, swap butter with olive oil or coconut oil. Use a dairy-free butter substitute if you prefer. If you are watching carbs, serve the shrimp over cauliflower rice instead of regular rice. This keeps the dish light but still very tasty. To enjoy your Lemon Garlic Butter Shrimp again, heat it gently. The best methods are: - Stovetop: Place the shrimp in a skillet over low heat. Add a splash of water or broth to keep it moist. Stir frequently until heated through. - Microwave: Use a microwave-safe dish. Cover it with a damp paper towel. Heat in short bursts of 30 seconds, stirring in between, until warm. To avoid a rubbery texture, do not overheat. Shrimp cooks fast, so keep an eye on it. If you have leftovers, freezing is a great option. To freeze shrimp properly: 1. Cool Down: Let the shrimp cool completely before freezing. 2. Seal: Place them in an airtight container or a freezer bag. Remove as much air as possible to prevent freezer burn. 3. Label: Write the date on the container. This helps track how long it’s been in the freezer. For thawing, move the shrimp to the fridge overnight. If you need them fast, place the bag in cold water for about 30 minutes. Avoid using hot water as it can cook the shrimp. Follow these tips to keep your Lemon Garlic Butter Shrimp tasty and fresh! For the full recipe, check out the [Full Recipe]. How to know when shrimp are fully cooked? Shrimp cook quickly. You know they are done when they turn pink and opaque. The tails curl slightly as they cook. If you cut one open, it should be white inside, not translucent. Can I use frozen shrimp for this recipe? Yes, you can use frozen shrimp! Just make sure to thaw them first. Place the shrimp in cold water for about 15-20 minutes before cooking. This keeps them juicy and tasty. What can I serve with Lemon Garlic Butter Shrimp Skillet? This dish pairs well with rice or pasta. You can also serve it with crusty bread to soak up the sauce. A fresh salad or steamed veggies make great sides too. How to make it ahead of time? You can prep the shrimp and veggies a few hours in advance. Just store them in the fridge. When you're ready, cook everything in the skillet. It only takes about 10-15 minutes to finish. Can I add other proteins to the skillet? Absolutely! You can add chicken or scallops. Just make sure to cook them longer for safety. Adjust cooking times based on the protein you choose. This way, you can enjoy different flavors in one dish. This blog post covered how to make a delicious Lemon Garlic Butter Shrimp Skillet. We went over the key ingredients, step-by-step cooking instructions, and helpful tips. You learned about variations and storage options, too. Remember, cooking is not just about the recipe. It's also about enjoying the process. Whether you follow the exact steps or make your own tweaks, have fun with it! I hope you try this dish soon and make it your own.

Lemon Garlic Butter Shrimp Skillet Quick and Tasty Dish

If you’re craving a quick and delicious meal, I’ve got the perfect solution: Lemon Garlic Butter Shrimp Skillet. This dish

To make these Vegan Buffalo Cauliflower Tacos, you need some simple ingredients. Each one adds to the flavor and texture. Here’s the list: - Medium head of cauliflower - All-purpose flour - Almond milk or plant-based milk - Garlic powder - Onion powder - Smoked paprika - Sea salt - Vegan buffalo sauce - Corn tortillas - Ripe avocado - Red cabbage - Fresh cilantro - Lime wedges Let’s unpack these ingredients a bit more. The cauliflower serves as the star of the show. It becomes crispy and flavorful when baked. The all-purpose flour and almond milk create a batter that coats the cauliflower, giving it that crunch we all love. The spices—garlic powder, onion powder, and smoked paprika—add depth and warmth to the dish. Sea salt enhances all these flavors, making each bite pop. Then, we have the vegan buffalo sauce. It brings that tangy, spicy kick that pairs so well with the cooling avocado and crunchy cabbage. Corn tortillas are the perfect base for these tacos. They hold all the fillings together without falling apart. The ripe avocado adds creaminess, while the red cabbage gives a nice crunch. Fresh cilantro adds brightness, and lime wedges provide a zesty finish. You can find the full recipe [here](#). Enjoy the process of gathering these ingredients. Each one plays a key role in making your tacos delicious! First, preheat your oven to 450°F (230°C). This high heat helps the cauliflower become crispy. Next, line a large baking sheet with parchment paper. This keeps the cauliflower from sticking and makes cleanup easy. In a mixing bowl, combine all-purpose flour, almond milk, garlic powder, onion powder, smoked paprika, and sea salt. Whisk until the mixture is smooth. You want a batter-like consistency. This coating adds flavor and crunch to the cauliflower. Take each cauliflower floret and dip it into the batter fully. Make sure it is coated well. Place the coated florets on the prepared baking sheet in a single layer. Bake the cauliflower for about 20-25 minutes. Flip them halfway through to ensure they cook evenly. They should come out crispy and golden brown. Once the cauliflower is crispy, toss it in vegan buffalo sauce. Make sure each piece is covered well. In a dry skillet, warm the corn tortillas for about 30 seconds on each side. This makes them soft and tasty. To assemble, take a warm tortilla. Place a generous amount of buffalo cauliflower in the center. Top with shredded red cabbage, avocado slices, and fresh cilantro. Serve with lime wedges on the side. Squeezing fresh lime juice adds a bright flavor. For the full recipe, check out the details above. Baking your cauliflower is a healthier choice than frying. When you bake, you use less oil. This keeps the tacos lighter but still crispy. Frying can add extra fat and calories. Baking gives you that great crunch without the guilt. Plus, it’s easy to make a larger batch in the oven. To boost flavor, add your favorite spices and seasonings. You can try cayenne for heat or smoked paprika for depth. Consider marinating the cauliflower in buffalo sauce before baking. This lets the flavors soak in better. A good marinade can make a big difference in taste. These tacos pair well with dips or salsas. A cool avocado dip can balance the heat. Fresh guacamole or a zesty salsa verde adds a nice touch. For side dishes, serve with rice or a simple salad. A light coleslaw can also enhance the meal. For the full recipe, check out the details above. {{image_4}} You can change up the vegetables in your tacos. Cauliflower is fantastic, but other veggies work great too. Try using broccoli for a fun twist. You can also swap in zucchini or bell peppers. If you want a heartier option, mushrooms add a meaty texture. Tempeh is another awesome choice. It soaks up flavors well and adds protein. Don't be afraid to experiment! Do you like it hot? Buffalo sauce comes in different heat levels. Choose mild, medium, or hot according to your taste. For more kick, add sliced jalapeños or a few dashes of extra hot sauce. This way, you can make your tacos as spicy as you want. Adjusting the spice level makes a big difference, so have fun playing with it. Garnishes can change the whole dish. Instead of cilantro, try hemp seeds for a nutty flavor. Vegan cheese adds creaminess and a different taste. You could also sprinkle some green onions or radishes for crunch. Each topping gives your tacos a unique twist. Mix and match your favorites to find your perfect combination. After enjoying your tacos, store any leftovers in an airtight container. This helps keep them fresh. I recommend eating them within three days for the best taste and texture. To reheat your tacos, use an oven or a skillet. The oven keeps them crispy. Preheat the oven to 350°F (175°C) and bake for about 10 minutes. If using a skillet, warm each taco over medium heat for about 2-3 minutes. This method helps maintain their crunch. You can freeze the buffalo cauliflower if you want to save some for later. Place the cooled cauliflower in a freezer-safe bag or container. It can last up to three months in the freezer. When you’re ready to eat, thaw it in the fridge overnight. Reheat in the oven or skillet for the best results. Enjoy the deliciousness again! For the full recipe, check out the instructions above. The best sauce for buffalo cauliflower tacos is vegan buffalo sauce. This sauce is spicy and tangy, making it perfect for the dish. You can find many vegan buffalo sauces in stores, or you can make your own. To make a quick sauce, mix hot sauce with melted vegan butter. Adjust the heat by changing the amount of hot sauce you use. Yes, you can easily make these tacos gluten-free. To do this, use gluten-free flour instead of all-purpose flour. Many brands offer gluten-free flour blends that work well. For tortillas, choose corn tortillas, as they are naturally gluten-free. Always check the label to ensure they are indeed gluten-free. To keep your tacos crispy, follow these tips. First, make sure your cauliflower is dry before coating it in the batter. This helps the batter stick better. Bake the cauliflower until it is golden brown and crispy. Also, warm tortillas just before serving to avoid moisture buildup. Finally, assemble tacos right before eating to keep everything fresh and crunchy. For the full recipe, refer to the section above. This blog post covered how to make delicious buffalo cauliflower tacos, using simple ingredients. You learned step-by-step instructions, tips for the best flavor, and storage advice. With variations like different veggies and spice levels, you can customize these tacos to your taste. Keep experimenting and enjoying this tasty meal. Whether you’re feeding a crowd or just treating yourself, these tacos are sure to please. Turn your cooking into a fun adventure!

Vegan Buffalo Cauliflower Tacos Flavorful and Easy Recipe

Are you looking for a plant-based dish that packs a punch? These Vegan Buffalo Cauliflower Tacos are the answer! Not

To make No Bake Oreo Cheesecake Bars, gather these simple ingredients: - 24 Oreo cookies, finely crushed - 1/4 cup unsalted butter, melted - 16 oz cream cheese, softened - 1 cup powdered sugar, sifted - 1 teaspoon pure vanilla extract - 2 cups whipped cream or stabilized whipped topping - 8 Oreo cookies, coarsely chopped for topping - Optional: chocolate shavings for garnish These ingredients create a creamy, rich, and delicious dessert. The crushed Oreos form a tasty crust, while the cream cheese and whipped cream give the filling its smooth texture. Using sifted powdered sugar adds just the right sweetness. You can top the bars with more Oreo pieces for crunch and chocolate shavings for a touch of elegance. This recipe is all about balance and indulgence, making it a favorite for gatherings or a sweet treat at home. For the complete recipe, check out the Full Recipe section. - First, combine 24 finely crushed Oreo cookies and 1/4 cup melted unsalted butter in a bowl. - Next, press the mixture firmly into a 9x9 inch baking dish. Use your fingers or the back of a measuring cup to make it even. - Chill the crust for 10-15 minutes in the fridge. This helps it firm up before adding the filling. - In a large mixing bowl, beat 16 oz of softened cream cheese until it is smooth. - Gradually mix in 1 cup of sifted powdered sugar and 1 teaspoon of pure vanilla extract. Keep blending until everything is well combined. - Gently fold in 2 cups of whipped cream or stabilized whipped topping. Use a spatula for this step to keep the filling light and airy. - Now, fold in 8 coarsely chopped Oreo cookies to add extra texture. - Pour the cheesecake filling over the chilled Oreo crust. Use a spatula to spread it evenly. - Finally, cover the dish and refrigerate until set, which will take at least 4 hours. This step is key to getting the right texture for your bars. For more details, check out the Full Recipe. To make your No Bake Oreo Cheesecake Bars great, start with softened cream cheese. If the cream cheese is cold, it will stay lumpy. Soft cream cheese mixes well and helps create a smooth filling. Take it out of the fridge at least 30 minutes before you start. This will help it warm up. When you fold in the whipped cream, be gentle. Use a spatula and lift the cream from the bottom. This keeps the mixture light and fluffy. If you mix too hard, you might lose that airy texture we want. For serving, a decorative platter makes a big difference. Place the bars neatly and drizzle some chocolate sauce on top. This adds a nice touch and makes them look fancy. You can also sprinkle a fresh mint leaf for color. For a fun twist, try adding chocolate shavings on top. They give a rich look and taste. You can even put extra chopped Oreos on top. This adds a fun crunch and makes each bar even more delicious. Check out the Full Recipe for more details on how to make these tasty treats! {{image_4}} You can change up the flavor of your No Bake Oreo Cheesecake Bars in fun ways. One great option is to add peanut butter. Just mix in half a cup of creamy peanut butter into the cheesecake filling. This adds a rich, nutty taste. If you prefer mint, add a few drops of mint extract. It makes the bars fresh and cool! For toppings, think beyond Oreos. Try adding chopped nuts for crunch. Walnuts or pecans work well. You can also use fresh fruit, like strawberries or raspberries. They add a nice color and burst of flavor. Drizzling caramel or chocolate sauce on top will make your bars even more special. If you need a gluten-free treat, it’s easy! Just swap regular Oreos for gluten-free Oreos. They taste just as good and let everyone enjoy these bars. This small change keeps all the flavors you love while making it safe for those with gluten allergies. You can still follow the same steps in the Full Recipe to make your gluten-free version. To keep your No Bake Oreo Cheesecake Bars fresh, use an airtight container. Place the bars in the container and cover them well. This method keeps them moist and tasty. Store the container in the fridge. Your bars will last for about 4 to 5 days. After that, they may lose their flavor and texture. Freezing is great for longer storage. To freeze the cheesecake bars, first cut them into squares. Wrap each square in plastic wrap. Then, place the wrapped bars in a freezer bag. Seal the bag tightly to prevent freezer burn. When you want to enjoy a bar, take one out and let it thaw in the fridge for a few hours. It will taste just as good as fresh! Yes, you can! Many cookies work well for the crust. If you want a twist, try using chocolate or vanilla wafer cookies. Graham crackers also make a great base for a lighter flavor. Each cookie will change the taste a bit, so feel free to experiment. Just remember, the key is to crush them finely and mix with melted butter. The cheesecake is set when it feels firm to the touch. You can gently press the top with your finger to check. It should bounce back slightly. If it feels too soft, let it chill longer. After about four hours in the fridge, it should be ready to cut. Look for a smooth top without any wobble. Yes! You can make this cheesecake a day ahead. Just keep it covered in the fridge. This allows the flavors to blend nicely. Make sure to add toppings right before serving for the best look and taste. Enjoy the ease of prep and the delight of serving a tasty dessert! These no-bake Oreo cheesecake bars are easy and fun to make. We covered the key ingredients, step-by-step instructions, and helpful tips to ensure a creamy texture. You learned about variations, storage tips, and got answers to common questions. Enjoy experimenting with flavors and toppings. You'll impress friends and family every time you serve these delicious bars!

No Bake Oreo Cheesecake Bars Tasty Dessert Delight

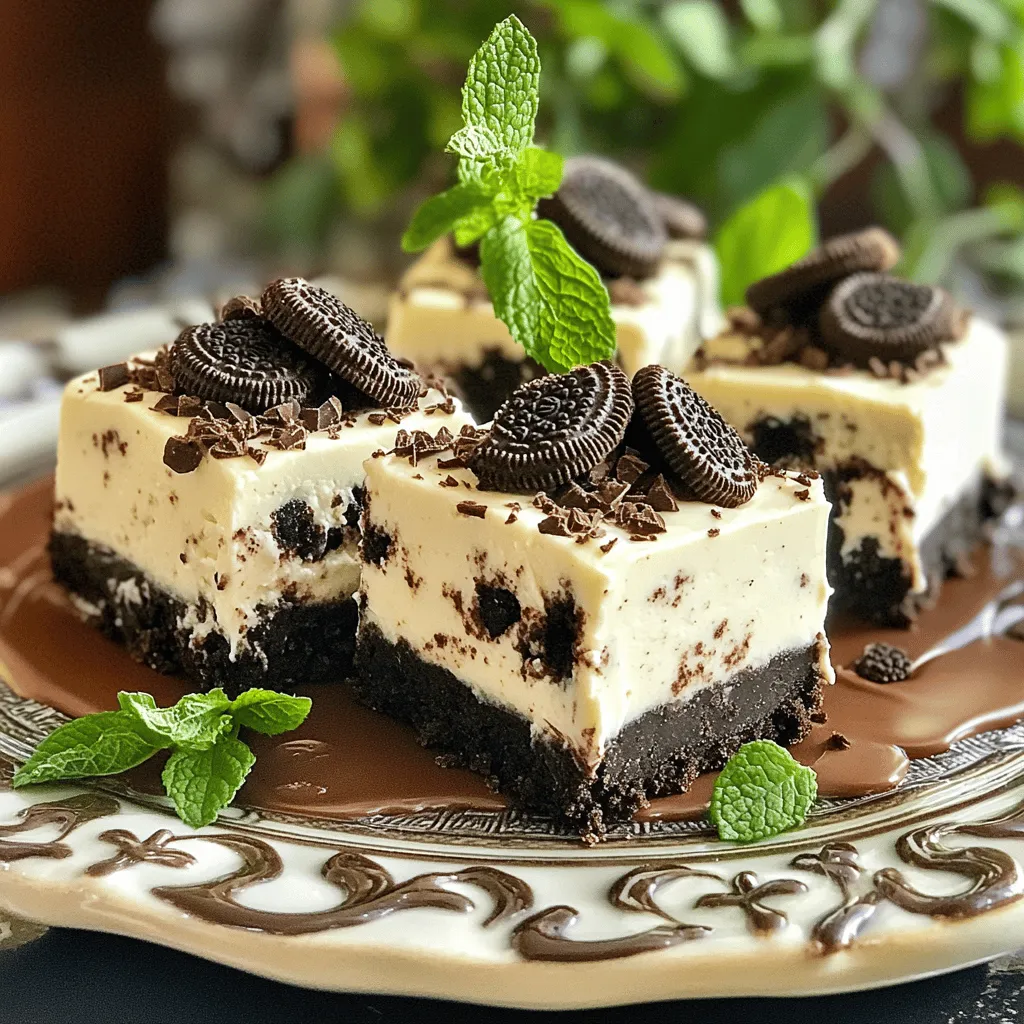
Looking for a dessert that combines silky cheesecake and Oreo cookies? You’re in the right place! My No Bake Oreo

To make these cookies, you need some key ingredients. Here is what you will use: - 1 cup unsalted butter (2 sticks) - 1 cup tightly packed brown sugar - 1/2 cup granulated sugar - 2 large eggs - 1 teaspoon pure vanilla extract - 2 1/4 cups all-purpose flour - 1 teaspoon baking soda - 1/2 teaspoon sea salt - 1 cup semisweet chocolate chips These ingredients work together to create rich, chewy cookies. The brown butter adds a nutty flavor that makes them special. You can make these cookies even more delicious with some add-ins. Here are a few ideas: - 1/2 cup chopped walnuts - 1/2 cup chopped pecans - A pinch of sea salt on top Adding nuts gives a nice crunch and flavor. The sea salt on top balances the sweetness. Feel free to experiment with your favorite flavors! If you have dietary needs, you can swap some ingredients. Here are a few simple swaps: - Use coconut oil for butter if you want a dairy-free option. - Substitute almond flour for all-purpose flour for a gluten-free version. - Use maple syrup instead of sugar for a less sweet option. These swaps still let you enjoy chewy cookies with great taste! Don't hesitate to mix and match based on what you have at home. For the full recipe, check the main article. Start by melting 1 cup of unsalted butter in a medium saucepan over medium heat. Stir constantly to prevent burning. In about 5-7 minutes, the butter will turn a lovely golden brown color. You will also notice a nutty aroma. Once it reaches this point, take it off the heat. Let it cool for 5-10 minutes before using. This brown butter adds a rich flavor to your cookies. In a large mixing bowl, add the warm brown butter. Whisk in 1 cup of packed brown sugar and 1/2 cup of granulated sugar until smooth. Next, crack in 2 large eggs, adding them one at a time. Beat well after each addition. Pour in 1 teaspoon of pure vanilla extract and mix until combined. In a separate bowl, sift together 2 1/4 cups of all-purpose flour, 1 teaspoon of baking soda, and 1/2 teaspoon of sea salt. This ensures that your dry ingredients blend well. Gradually fold the dry mixture into the wet mixture using a spatula. Be careful not to overmix, as this keeps the cookies chewy. Now, it’s time to add in the fun stuff! Gently fold in 1 cup of semisweet chocolate chips. If you like nuts, add 1/2 cup of chopped walnuts or pecans. Once mixed, cover the bowl tightly with plastic wrap. Chill the dough for at least 30 minutes. This step is crucial for getting the best flavor and texture. While waiting, preheat your oven to 350°F (175°C). Line baking sheets with parchment paper. Use a cookie scoop or a tablespoon to drop dough balls onto the sheets, spacing them about 2 inches apart. Bake for 10-12 minutes, until the edges are golden. The centers may look slightly underbaked; that’s okay! They will firm up while cooling. Let the cookies cool on the baking sheet for about 5 minutes, then transfer them to a wire rack to cool completely. Enjoy these chewy delights warm for the best experience! For the full recipe, check out the details above. To get that perfect chewy texture, start by browning the butter. This adds a deep, nutty flavor. Make sure you chill the dough for at least 30 minutes. This step helps the cookies keep their shape and stay chewy. When mixing, avoid overmixing the dough. This keeps the cookies tender. Lastly, take them out when they are slightly underbaked. They will firm up as they cool. One common mistake is skipping the chilling step. If you bake the dough right away, the cookies can spread too much. Another error is using cold eggs. Always use room temperature eggs for better mixing. Don’t forget to measure your flour correctly. Too much flour can make your cookies dry. Lastly, avoid overbaking. Keep an eye on the edges for that golden brown color. For a lovely presentation, serve the cookies on a rustic wooden platter. You can sprinkle a little sea salt on top for a nice touch. This adds a sweet and salty contrast. Pairing them with cold milk makes them even more appealing. You can also stack them high for a fun display. For special occasions, consider using colorful napkins or plates to brighten the table. {{image_4}} You can change the flavor of these cookies by using dark chocolate instead of semisweet. Dark chocolate gives a rich taste that many love. You might also try adding milk chocolate for a sweeter bite. For a twist, consider mixing in some peanut butter chips or even white chocolate chunks. Each adds a unique vibe to the classic cookie. If you need a gluten-free version, swap out the all-purpose flour for a gluten-free blend. Many options work well, like almond flour or coconut flour. To make it vegan, replace the butter with coconut oil or vegan butter. Use flax eggs instead of regular eggs; mix one tablespoon of flaxseed meal with three tablespoons of water for each egg. These changes keep the cookies delicious while meeting your needs. You can make these cookies fit the seasons. In fall, add in some chopped apples and cinnamon for a warm flavor. During winter, stir in peppermint chips for a festive touch. In spring, consider adding shredded coconut or chopped dried fruit like cranberries or cherries. Each season brings new tastes to explore in your chewy cookies. For the full recipe, check out the instructions above. Enjoy experimenting with these variations! To keep your chewy brown butter chocolate chip cookies fresh, store them in an airtight container. This helps to lock in moisture. Place parchment paper between layers to prevent them from sticking together. Keep the container at room temperature, away from heat and light. This way, your cookies stay soft and delicious for longer. You can freeze both the dough and the baked cookies. For dough, scoop it into balls and place them on a baking sheet. Freeze until firm, then transfer them to a zip-top bag. They can stay frozen for up to three months. When ready to bake, just add a few extra minutes in the oven. For baked cookies, allow them to cool completely before freezing. Store them in an airtight container or freezer bag to avoid freezer burn. When stored properly, your chewy cookies can last about one week at room temperature. If you freeze them, they can remain good for about three months. Always check for any signs of spoilage before enjoying them. For ultimate flavor, eat them fresh, especially right after baking. For the full recipe, check out the details to make these delightful treats! The secret to chewy cookies is in the ingredients and the method. Brown butter adds a rich flavor and moisture. Brown sugar holds more moisture than white sugar, which helps keep the cookies soft. I also chill the dough before baking. This allows the flavors to meld and keeps the cookies from spreading too much. Yes, you can! Using white sugar will make the cookies crisper, while brown sugar yields chewiness. Mixing both gives a nice balance. You can even try coconut sugar for a unique taste. Just remember, the sugar type affects both texture and sweetness. To keep your cookies soft, store them in an airtight container. You can add a piece of bread to the container. The bread will keep the cookies moist. Avoid refrigerating them, as that can dry them out. For longer storage, freeze them in a sealed bag. If you want to bake them fresh, use the Full Recipe to guide you through the process. In this post, we explored how to make chewy brown butter chocolate chip cookies. We discussed essential ingredients, tips for the perfect texture, and baking instructions. Also, we looked at flavors, dietary swaps, and storage tips. Remember, having fun and being creative is key. Every bake is a chance to learn and enjoy. Keep experimenting with flavors and techniques. Each batch will bring you closer to cookie perfection. Happy baking!

Chewy Brown Butter Chocolate Chip Cookies Delight

Are you ready to indulge in the best cookies ever? Let’s dive into the world of Chewy Brown Butter Chocolate

- Pasta options: penne, fusilli, or rigatoni - Key ingredients: feta cheese, cherry tomatoes, olive oil - Spices and seasonings: garlic, oregano, red pepper flakes, salt, and pepper To create the magic of baked feta pasta, you'll need simple, fresh ingredients. First, choose your pasta. I love penne, fusilli, or rigatoni; each offers great texture. Now for the star of the dish: feta cheese. It melts beautifully and adds a creamy touch. Next, grab cherry tomatoes. Their sweetness bursts in the oven, giving this dish its vibrant flavor. Don’t forget olive oil; it helps to roast the tomatoes and makes everything rich and tasty. For spices, you want garlic for depth, oregano for earthiness, and red pepper flakes for a little kick. Salt and pepper are essential to bring all these flavors together. Remember, fresh ingredients make a big difference. Each one plays a role in creating a delightful dish. If you're ready for the full recipe, check out [Full Recipe]. Let's get cooking! 1. Preheat your oven to 400°F (200°C). This step is key for baking. 2. In a large baking dish, mix together the halved cherry tomatoes, feta cheese, minced garlic, olive oil, dried oregano, red pepper flakes, salt, and black pepper. Toss gently until the tomatoes are evenly coated. 3. Create a small space in the center of the dish. Place the feta cheese in this spot. Drizzle a bit more olive oil over the feta and sprinkle with salt and pepper. 4. Bake everything in the preheated oven for about 30 minutes. You want the tomatoes to burst and the feta to turn a nice golden color. 1. While the tomatoes and feta bake, cook your pasta. Use the package instructions to guide you. 2. Aim for al dente pasta. This means the pasta should be firm when bitten. It will mix better with the sauce later. 1. When the baking time is up, take the dish out of the oven. Use a fork to mash the feta and tomatoes together. This will create a creamy sauce. 2. Add the cooked pasta to the dish. Toss everything until the pasta is well coated in the sauce. If it feels too thick, add a bit of the pasta water. 3. Stir in the lemon zest and taste. Adjust the seasoning if needed. 4. Serve right away, topping with fresh basil leaves for extra flavor. You can even drizzle some olive oil on top. To bake your feta pasta just right, aim for a temperature of 400°F (200°C). This heat helps the tomatoes burst and the feta brown nicely. For the pasta, cook it until it's al dente, usually around 8-10 minutes, depending on the type you choose. This way, it won’t turn mushy when mixed with the sauce. Be careful not to overcook the tomatoes or the feta. You want the tomatoes soft but not mushy and the feta creamy, not dry. Also, watch the seasoning. Too much salt or pepper can overwhelm the dish. Taste it as you go to find the right balance. For a visually appealing dish, serve the pasta in shallow bowls. A drizzle of olive oil on top adds shine and flavor. You can sprinkle more red pepper flakes for a pop of color. Finally, add fresh basil leaves for a vibrant finish. This not only looks great but also elevates the taste. For more details, check the Full Recipe. {{image_4}} You can swap feta cheese for goat cheese. It gives a tangy taste. Cream cheese is also a good choice for creaminess. You can try different vegetables too. Bell peppers and zucchini work well. Spinach adds great color and flavor. For a vegan option, use a plant-based feta. You can also use nutritional yeast for a cheesy flavor. To make it lactose-free, choose lactose-free feta and cream cheese. If you need gluten-free pasta, use rice or quinoa pasta. Both options taste great with this dish. Add spices like basil, thyme, or parsley for extra flavor. A splash of balsamic vinegar can brighten it up. If you want protein, consider adding cooked chicken or shrimp. Chickpeas can also add a nice touch. They boost protein and make it filling. For the full recipe, check out the section above! To keep your baked feta pasta fresh, store it in an airtight container. Glass or plastic containers work well. Let the pasta cool to room temperature before sealing it. In the fridge, it lasts for about three to four days. Make sure to check for any signs of spoilage before eating. If you want to save some for later, freezing is a great option. First, let the dish cool completely. Then, spoon the pasta into freezer-safe bags or containers. Squeeze out any extra air to prevent freezer burn. It can stay in the freezer for up to three months. When you’re ready to enjoy it, thaw it in the fridge overnight. To reheat the pasta, use the oven or microwave. If using the oven, preheat it to 350°F (175°C). Place the pasta in a baking dish, cover with foil, and heat for about 15-20 minutes. This method helps keep the pasta moist. If you choose the microwave, use a microwave-safe bowl and cover it with a lid. Heat in short bursts of 1-2 minutes, stirring in between. Avoid reheating too long, as it can dry out the dish. Baked feta pasta tastes great for about 3 to 5 days when stored in the fridge. Make sure to keep it in an airtight container. For longer storage, you can freeze it. In the freezer, it lasts up to 3 months. Just thaw it in the fridge overnight before reheating. Yes, you can use any pasta you like! Penne, fusilli, or rigatoni work well. If you prefer whole wheat or gluten-free pasta, those options fit nicely too. Make sure to adjust the cooking time based on the pasta you choose. If you want a change, you can try goat cheese or ricotta cheese. Cream cheese also works if you want a creamier texture. Each cheese brings a different taste, so feel free to experiment! This recipe has a hint of spice from red pepper flakes. If you like it mild, use just a little or skip it. For more heat, add extra flakes. Adjust it to your taste, and enjoy! This baked feta pasta recipe mixes simple ingredients to create a tasty dish. I covered essential steps, from choosing pasta and prepping the ingredients to baking and serving. Remember to avoid overcooking the tomatoes and feta for best results. Feel free to experiment with flavors, cheeses, and even dietary needs. Store leftovers right to enjoy later. With a little care, you can serve a delightful meal that everyone will love. Now, grab your ingredients and start cooking!

Baked Feta Pasta with Cherry Tomatoes Delightful Recipe

Are you ready to impress your taste buds? Baked Feta Pasta with Cherry Tomatoes is a dish that brings big

- 1 cup rolled oats - 1 cup almond milk (or any milk of your choice) - ½ cup canned pumpkin puree - 2 tablespoons maple syrup (or honey) - 1 teaspoon vanilla extract - 1 teaspoon pumpkin pie spice (or cinnamon) - ¼ teaspoon sea salt - 2 tablespoons chia seeds - Crushed graham crackers - Fluffy whipped cream - Chopped pecans or walnuts To make these easy pumpkin pie overnight oats, you need a few key ingredients. First, gather rolled oats and almond milk. These form the base. Then, add canned pumpkin puree to give it that fall flavor. Sweeten it up with maple syrup or honey, depending on your taste. A dash of vanilla extract boosts the flavor even more. Next, sprinkle in some pumpkin pie spice or cinnamon for warmth. A touch of sea salt balances the sweetness. Finally, chia seeds add nutrition and help thicken the mixture. For toppings, you can get creative! Crushed graham crackers add crunch. Fluffy whipped cream makes it feel special. Chopped pecans or walnuts give a nutty twist. Choose any combination you like to make your oats perfect. For the full recipe, check the section above. Enjoy your tasty creation! Start by gathering your ingredients. In a medium mixing bowl, combine the rolled oats, almond milk, pumpkin puree, maple syrup, vanilla extract, pumpkin pie spice, sea salt, and chia seeds. Mix everything together well. Stir vigorously until you have a creamy mixture. This step is key for a smooth texture. Next, taste your mixture. If you want it sweeter, add more maple syrup. Stir again to blend in the added sweetness. Make sure all the ingredients are well blended. This ensures every bite is delicious. Now, it's time to divide your pumpkin oats. Pour the mixture evenly into two jars or containers. Seal them tightly to keep the flavors in. Place the jars in the refrigerator. Let them chill overnight or for at least four hours. This waiting time helps the oats absorb the liquid and flavors. Enjoy your Easy Pumpkin Pie Overnight Oats in the morning! To achieve the best texture, use soaked oats. When you soak the oats, they absorb the almond milk and flavors. This makes them soft and creamy. Stir the mixture well before serving. This gives you a smooth and even consistency that is a joy to eat. Feel free to customize your oats! You can add fruits like banana or berries. Nuts like almonds or pecans also add a nice crunch. Adjust the spices to suit your taste. If you love cinnamon, add a bit more. This makes the oats even more delightful. Serving in clear jars makes your oats look great. You can see the layers and colors, which is fun! Garnish with a light sprinkle of pumpkin pie spice. This adds to the visual appeal and enhances the flavor. Enjoy your beautiful creation! {{image_4}} You can use different types of milk to change the flavor. Coconut milk gives a rich taste. Soy milk adds a creamy texture. Almond milk is light and nutty. Each milk type can change the oats' taste. If you prefer, try oat milk for a smooth blend. Adjust sweeteners based on your milk. Coconut milk may need less sugar, while soy milk can balance flavors well. You can swap sweeteners for different tastes. Brown sugar offers a deep, caramel flavor. Agave syrup is a great option for a lighter sweetness. If you want a healthy choice, use mashed bananas or dates. These natural sweeteners add flavor without extra sugar. Make sure to adjust the amount to your taste. Start with less and add more if needed. You can add seasonal flavors for a twist. In fall, try adding chopped apples or pecans. In winter, a dash of peppermint can be refreshing. You might also mix in chocolate chips for a sweet treat. For summer, fresh berries make a tasty addition. Each variation brings a new taste to your oats. Experiment to find your favorite! For the full recipe, check out the delightful pumpkin pie overnight oats. Store your pumpkin pie overnight oats in the fridge. They stay fresh for up to five days. The oats soak up the almond milk and flavors, making them creamy and tasty. After three days, check for any changes in smell or texture. If they smell odd, it’s best to toss them. You can freeze overnight oats if you want to keep them longer. Use freezer-safe containers. They will last about three months in the freezer. When you want to eat them, move the oats to the fridge for a night to thaw. You can also microwave them for a quick reheat. Just add a little almond milk to help them rehydrate. Choose airtight containers for the best storage. They keep your oats fresh and tasty. I recommend using jars with a lid. They are perfect for portion control. A pint-sized jar holds just the right amount for one serving. Plus, they make a fun presentation! You should let the oats soak for at least 4 hours. Overnight is best. This time allows the oats to absorb the milk and flavors. You will enjoy a creamier and softer texture. If you are in a rush, 4 hours will still work well. Yes, you can use instant oats. However, the texture will be different. Instant oats cook faster and become mushier. Rolled oats give a heartier bite and more chew. If you prefer a creamier base, instant oats will work. For a more filling meal, stick to rolled oats. You can top your oats with many delicious options. Try adding fresh fruit like bananas or berries. A sprinkle of cinnamon or nutmeg adds warmth. If you love crunch, add nuts or seeds. Chocolate chips can give a sweet twist. You can get creative with your toppings! This blog post covered all you need for amazing overnight oats. We explored key ingredients, preparation, and storage tips. You learned how to customize flavors and make each bowl special. Remember, using quality ingredients gives the best results. Enjoy your creamy oats with fun toppings! With these tips, you'll create delicious, healthy meals that delight. Try different variations to keep breakfast exciting. The possibilities are endless, so have fun with it!

Easy Pumpkin Pie Overnight Oats Tasty and Simple Recipe

Are you craving a tasty breakfast that’s both simple and satisfying? Look no further! This Easy Pumpkin Pie Overnight Oats

To make crispy pickle fries, gather these simple ingredients. Each item plays an important role in bringing out the flavor and crunch. - 1 cup dill pickle chips (or spears, if you prefer) - 1/2 cup all-purpose flour - 1 teaspoon garlic powder - 1 teaspoon onion powder - 1/2 teaspoon cayenne pepper (omit or adjust for spice preference) - 1 teaspoon paprika - 1 large egg - 1 cup breadcrumbs (panko recommended for extra crunch) - Cooking oil (for frying) - Salt and freshly ground black pepper to taste These ingredients create a balanced mix of flavors and textures. The dill pickles provide a tangy bite, while the seasoned flour and breadcrumbs add crunch. The egg acts as a glue, helping the coating stick. This combination makes each bite a delightful experience. You can find the full recipe for crispy pickle fries linked in the article. Enjoy making this fun snack! 1. Drying the pickles: Start by laying your dill pickle chips on paper towels. Pat them gently to remove excess moisture. This helps the fries become crispy when fried. 2. Seasoning the flour mixture: In a shallow bowl, mix 1/2 cup of all-purpose flour with spices. Add 1 teaspoon of garlic powder, 1 teaspoon of onion powder, 1/2 teaspoon of cayenne pepper, and 1 teaspoon of paprika. Don’t forget to add a pinch of salt and pepper. Mix well so the flavors blend together. 3. Whisking the egg: Crack one large egg into another bowl. Whisk it until it gets frothy. This helps the breadcrumbs stick to the pickles. 4. Preparing the breadcrumbs: Place 1 cup of breadcrumbs in a third shallow bowl. If you use panko breadcrumbs, they will add a nice crunch to your fries. 1. Coating the pickles in flour: Take each pickle chip and coat it in the seasoned flour. Shake off any extra flour to avoid clumps. 2. Egg and breadcrumb coating: Next, dip the floured pickles in the egg mixture. Let any excess egg drip back into the bowl. 3. Ensuring even coverage: Finally, roll the pickles in the breadcrumbs. Press down gently to make sure they stick well. 1. Heating the oil: In a large skillet, pour in about an inch of cooking oil. Heat it on medium-high. To check if it’s ready, drop in a few breadcrumbs. They should sizzle right away. 2. Frying the pickles: Carefully add the breaded pickles to the hot oil in batches. Do not overcrowd the pan. Fry them for 2-3 minutes on each side. Look for a golden brown color. 3. Draining excess oil: Use a slotted spoon to move the fried pickles to a plate lined with paper towels. This will absorb any extra oil. Now you have delicious crispy pickle fries ready to enjoy! For the full recipe, check out the complete guide. To get the perfect crispy pickle fries, drying the pickles is key. When pickles are wet, they won’t fry well. Use paper towels to pat them dry before coating. This step is simple but vital for that satisfying crunch. Next, choose your breadcrumbs wisely. I always recommend panko over regular breadcrumbs. Panko has a coarser texture, which gives your pickle fries extra crispiness. It makes a big difference in the final result. Managing oil temperature is also very important. Heat your oil to medium-high. You can test it by dropping in a few breadcrumbs. If they sizzle right away, the oil is ready. If not, wait a bit longer. Cooking at the right temperature ensures even frying and prevents sogginess. When it comes to dips, ranch dressing is a classic choice. It pairs perfectly with the salty crunch of pickle fries. You can also try spicy mayo for a kick. Another fun option is honey mustard, which adds a sweet touch. For garnishing, consider fresh herbs. Chopped dill or parsley can brighten up the plate. A light sprinkle of sea salt right before serving enhances flavor. These crispy pickle fries are great for game day, parties, or movie nights. They’re also fun for kids and adults alike. Serve them fresh out of the fryer for the best taste! {{image_4}} You can choose different types of pickles for your fries. Dill pickles are tangy and classic. Sweet pickles bring a fun twist with their sugariness. Both options work great, so pick based on your taste. You can also use pickle spears or chips. Chips are thin and crunchy. Spears give you a nice bite. Try both to see which you like best! If you need a gluten-free option, swap regular flour for almond or rice flour. These flours still coat the pickles well and keep them crispy. You can also play with the spices in the batter. Add cayenne for heat or paprika for a smoky flavor. Get creative with your spices to make unique pickle fries. You can bake your pickle fries if you want a healthier choice. Just coat them like you would for frying, then place them on a baking sheet. Bake at 425°F (220°C) for about 15 minutes until crispy. If you prefer using an air fryer, it’s simple! Preheat the air fryer to 400°F (200°C). Place the breaded pickles in a single layer and cook for 10-12 minutes. You’ll get a golden brown finish without all the oil. Explore these variations to make your crispy pickle fries even more delicious! For the full recipe, check out the link. To keep your crispy pickle fries fresh, store them in the fridge. Place them in an airtight container. This helps maintain their taste and texture. Use a container that is just the right size. You want to avoid extra space where air can get in. This keeps them from going soggy. When it’s time to enjoy the leftovers, you have two good options: the oven or the microwave. I recommend using the oven to keep them crispy. Preheat your oven to 375°F (190°C). Spread the fries on a baking sheet. Heat them for about 10-12 minutes. This will help them regain their crunch. If you use the microwave, be aware that they might get soft. Place them on a microwave-safe plate. Heat them for 30 seconds, then check for warmth. Repeat as needed. To keep them crunchy, you might want to pop them back in the oven for a few minutes after microwaving. For the best taste, enjoy your crispy pickle fries as soon as possible. You can find the full recipe to make them again whenever you like! How to make crispy pickle fries at home? To make crispy pickle fries, start by drying dill pickle chips. This helps them crisp up. Next, coat the pickles in a mix of seasoned flour. Dip them in beaten egg, then cover with breadcrumbs. Fry the pickles in hot oil until golden brown. For a full recipe, check the link below. Can I use other types of pickles? Yes, you can use other types of pickles. Sweet pickles work well for a different taste. You can also try pickled jalapeños for a spicy kick. Just remember to adjust the coating to match the flavor of the pickles. What dips pair well with crispy pickle fries? Crispy pickle fries taste great with many dips. Ranch dressing is a classic choice. Spicy mayo adds a nice kick. You can also serve them with mustard or a tangy barbecue sauce for extra flavor. Are crispy pickle fries healthy? Crispy pickle fries are not the healthiest snack. They are fried, which adds extra calories and fat. However, using less oil or baking them can make them a bit healthier. Enjoy them in moderation for a tasty treat! For the complete recipe for crispy pickle fries, [click here](#). You now know how to make crispy pickle fries from start to finish. We covered the ingredients, the step-by-step process, and tips for great results. Remember to dry your pickles well and watch the oil temperature for the best crunch. Try different pickles or cooking methods to find your favorite. Store leftovers right and reheat them to keep that crispy goodness. Enjoy your crispy pickle fries as a snack or a fun side. Happy cooking!

Crispy Pickle Fries Irresistible Snack Idea

Craving a crunchy, tasty treat? Crispy Pickle Fries are the solution. These crispy bites are easy to prepare and perfect

- 1 cup all-purpose flour - 1/2 cup whole wheat flour - 1/2 cup granulated sugar - 1/4 cup brown sugar, packed firmly - 2 teaspoons baking powder - 1/2 teaspoon baking soda - 1/4 teaspoon salt - 2 large eggs, at room temperature - 1/2 cup milk, preferably whole or 2% - 1/4 cup vegetable oil - 1 teaspoon pure vanilla extract - 1 cup fresh cherries, pitted and sliced in half - 1/2 cup dark chocolate chips - 1 tablespoon powdered sugar, for dusting When you gather these ingredients, make sure they are fresh for the best flavor. If you want to mix things up, you can swap whole wheat flour with almond flour for a nutty taste. You can also change the type of sugar. Brown sugar gives a richer taste, while granulated sugar adds more sweetness. If you don’t have fresh cherries, frozen ones work too. Just thaw them first. The dark chocolate chips can be replaced with milk chocolate if you prefer a sweeter bite. This recipe is flexible, so feel free to explore what works for you. For the full recipe, check out the detailed instructions that follow. Enjoy your baking! 1. First, preheat your oven to 375°F (190°C). This will help your muffins bake evenly. 2. Prepare your muffin tin by lining it with paper liners or spraying it with cooking oil. This prevents sticking and makes cleanup easy. 3. In a large bowl, sift together the all-purpose flour, whole wheat flour, granulated sugar, brown sugar, baking powder, baking soda, and salt. Using a whisk helps to mix well and add air to the dry mix. 4. In another bowl, beat the eggs, milk, vegetable oil, and vanilla extract until smooth. This is your wet mixture. 1. Gradually pour the wet ingredients into the dry mix. Use a wooden spoon or spatula to combine them gently. Stir just until you don’t see dry flour anymore. Overmixing can make your muffins tough. 2. Carefully fold in the halved cherries and dark chocolate chips. This adds flavor and texture; be gentle to keep the cherries intact. 3. Using a spoon or ice cream scoop, fill each muffin cup about two-thirds full. This gives them room to rise while baking. 4. Bake in the preheated oven for 18-20 minutes. To check if they are done, insert a toothpick into the center of a muffin. If it comes out clean or with a few moist crumbs, they are ready. 5. Let the muffins cool in the pan for about 5 minutes. Then, transfer them to a wire rack to cool completely. This keeps them light and fluffy. 6. After cooling, dust the tops with powdered sugar for a sweet touch and nice look. Enjoy your Cherry Chocolate Chip Muffins with a warm cup of tea or coffee! You can also find the Full Recipe for more detailed steps. - Avoiding overmixing: Mix your batter just enough to combine wet and dry ingredients. When you see no dry flour, stop stirring. Overmixing can make muffins tough and dry. - Temperature of ingredients: Use room temperature eggs and milk. This helps the batter mix evenly and rise well. Cold ingredients can lead to uneven baking. - Choosing the right type of cherries: Fresh, sweet cherries work best. Sour cherries can make muffins too tart. If you use frozen cherries, thaw and drain them first to avoid soggy muffins. - Dusting with powdered sugar: After the muffins cool, sprinkle powdered sugar on top. This adds sweetness and a nice touch to the muffins' look. - Presentation ideas for serving: Serve muffins warm on a colorful platter. Place a few whole cherries beside them. This adds a pop of color and highlights the cherry flavor. {{image_4}} You can make your cherry chocolate chip muffins even more fun with unique add-ins. Adding nuts or seeds gives great texture. Chopped walnuts or sliced almonds work well. You can also try sunflower seeds for a nut-free option. Mixing in different types of chocolate can change the flavor too. Use white chocolate or milk chocolate for a sweeter taste. You can even mix in some cocoa powder for extra chocolate flavor. If you want a gluten-free version, simply swap all-purpose flour for a gluten-free blend. Many brands work well in baking and keep the muffins light. For a vegan option, replace eggs with flaxseed meal mixed with water. Use plant-based milk and oil instead of dairy products. These changes keep the muffins moist and tasty while still being friendly to different diets. Explore the Full Recipe for more ideas and tips! To keep your Cherry Chocolate Chip Muffins fresh, store them at room temperature. If you plan to eat them in a few days, place them in an airtight container. This will keep them soft and moist. If you need to store them longer, refrigeration is not ideal. It can dry them out. Instead, keep the muffins in a cool, dry place. You can freeze your muffins for later enjoyment. To do this, allow them to cool completely. Once cooled, wrap each muffin in plastic wrap. Then, place the wrapped muffins in a freezer-safe bag. This helps prevent freezer burn. When you're ready to eat one, simply take it out of the freezer. Thawing tips for the best quality include leaving the muffin at room temperature for a few hours. You can also warm it in the microwave for about 15 seconds. This will help restore its fresh, baked taste. Enjoy your muffins any time! Can I use frozen cherries? Yes, you can use frozen cherries. They work well in muffins. Just make sure to thaw and drain them first. This helps avoid excess moisture in your batter. How do I know when my muffins are done? You can check if your muffins are done by inserting a toothpick into the center. If it comes out clean or with a few moist crumbs, your muffins are ready. Keep an eye on the baking time, as ovens can vary. What can I substitute for eggs? If you need an egg substitute, you have options. You can use 1/4 cup of applesauce or mashed banana for each egg. This keeps your muffins moist and adds a slight sweetness. Another option is to mix 1 tablespoon of ground flaxseed with 2.5 tablespoons of water. Let it sit for a few minutes before adding it to your batter. For more details on making these tasty muffins, check the Full Recipe. You now have all the tools to make delicious cherry chocolate chip muffins. We covered the ingredients, step-by-step preparation, and expert tips for moist results. Remember to keep your mixtures gentle and choose the right cherries. Feel free to experiment with add-ins and dietary options that suit you. Store them properly to keep your muffins fresh longer. Enjoy baking and sharing these tasty treats as you explore different variations. Happy baking!

Cherry Chocolate Chip Muffins Delightfully Easy Recipe

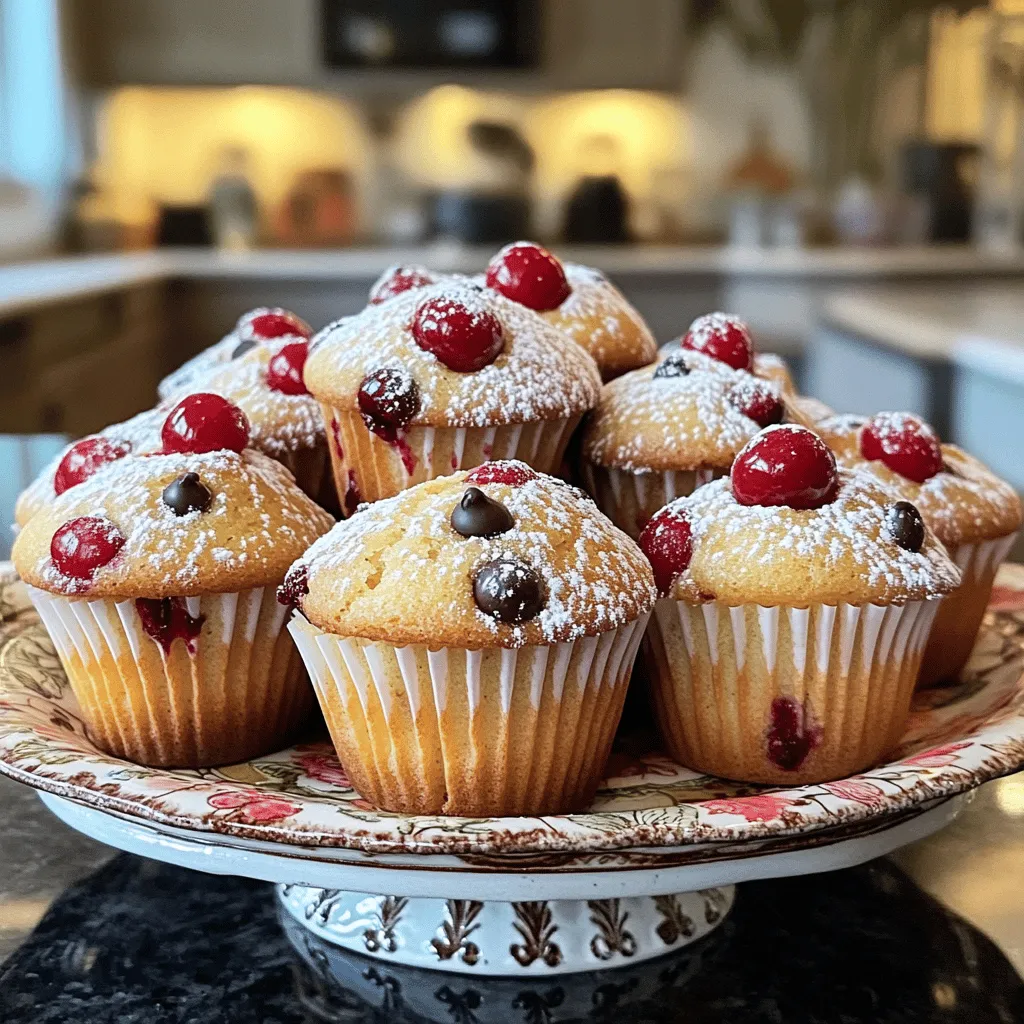
Are you ready to bake something fabulous? Cherry chocolate chip muffins are a tasty treat that anyone can make! This

- 4 large russet potatoes, cut into wedges - 1 cup dill pickle juice - 1 tablespoon olive oil - 1 teaspoon garlic powder - 1 teaspoon onion powder - 1 teaspoon smoked paprika - 1 teaspoon dried dill - Salt and freshly ground pepper to taste - ½ cup ranch dressing (store-bought or homemade) - Fresh dill fronds for garnish - Hot sauce for a spicy kick - Grated cheese to sprinkle on top - Fresh herbs like parsley for extra flavor - Use sweet potatoes instead of russet potatoes for a sweeter taste. - Swap dill pickle juice with lemon juice for a different tang. - Greek yogurt can replace ranch dressing for a healthier dip. Start by cutting 4 large russet potatoes into wedges. Place them in a large bowl. Pour in 1 cup of dill pickle juice. Make sure all the wedges are fully coated. Cover the bowl with plastic wrap. Refrigerate for at least 30 minutes. This helps the potatoes soak up the tangy flavor. While the potatoes marinate, preheat your oven to 425°F (220°C). This high heat is key for crispiness. For easy cleanup, line a baking sheet with parchment paper. This keeps the wedges from sticking. After marinating, drain the potato wedges in a colander. In a separate bowl, mix 1 tablespoon of olive oil, 1 teaspoon of garlic powder, 1 teaspoon of onion powder, 1 teaspoon of smoked paprika, and 1 teaspoon of dried dill. Add salt and pepper to taste. Toss the potato wedges in this mix. Make sure each wedge is coated well. Now, spread the seasoned wedges on the prepared baking sheet. Arrange them in a single layer, leaving space between each wedge. Bake for 30-35 minutes. Flip the wedges halfway through for even crispiness. They should turn a nice golden brown. When done, remove them from the oven. Drizzle ranch dressing over the warm wedges or serve it on the side. Garnish with fresh dill fronds for a lovely touch. For the full recipe, refer to the earlier section. Enjoy your crispy and flavorful snack! To get your Pickle Ranch Potato Wedges crispy, follow a few key steps. First, cut the potatoes into even wedges. This helps them cook at the same rate. Second, soak the wedges in dill pickle juice for at least 30 minutes. This adds flavor and moisture. When you bake them, make sure the wedges are not crowded on the baking sheet. Space allows heat to circulate and creates a crispier texture. Flip the wedges halfway through baking to ensure even browning. This will give you those golden, crunchy edges. You can easily adjust the flavor of your potato wedges. If you want a stronger pickle taste, marinate them longer in the dill pickle juice. For a milder flavor, reduce the marinating time. You can also add more garlic powder or smoked paprika for extra kick. If you like heat, try adding cayenne pepper or chili powder. Taste the seasoning mix before coating the wedges to find your perfect balance. You can always tweak it to suit your taste. Pickle Ranch Potato Wedges make a great side dish for many meals. They pair well with grilled meats, like burgers or chicken. They also complement sandwiches and wraps perfectly. Try serving them with a fresh salad for a light meal. For a fun twist, serve them with a variety of dips. Besides ranch dressing, try barbecue sauce, or a spicy aioli. These flavors will enhance your snacking experience. For the full recipe, check out the detailed steps above. {{image_4}} For a kick, try adding some heat. Mix in 1-2 teaspoons of cayenne pepper or chili powder with your seasoning blend. This will give your potato wedges a nice spicy kick. You can adjust the heat to your taste. If you want even more spice, add sliced jalapeños before baking. These spicy pickle ranch potato wedges are sure to be a hit. Who doesn't love cheese? After baking the potato wedges, sprinkle shredded cheddar cheese on top. Pop them back in the oven for a few minutes until the cheese melts. This adds a creamy texture and rich flavor. You can also use crumbled feta or mozzarella for a different taste. Cheese-topped pickle ranch potato wedges are a cheesy delight. Boost the nutrition and flavor by adding veggies. Try tossing in some sliced bell peppers, onions, or even zucchini with the potato wedges. These will roast nicely alongside the potatoes. This not only adds color but also enhances the taste. For a fun twist, you can even add corn or cherry tomatoes. Adding vegetables makes your meal more balanced. For the full recipe, don’t forget to check out the complete details! You can store leftover potato wedges in an airtight container. Make sure they cool down first. Keep them in the fridge for up to three days. If you want them to stay crispy, place a paper towel at the bottom of the container. This helps absorb extra moisture. To reheat your potato wedges, use an oven or air fryer. Preheat the oven to 400°F (200°C). Spread the wedges on a baking sheet in a single layer. Bake for about 10-15 minutes, flipping halfway. This keeps them crispy and warm. If using an air fryer, set it to 375°F (190°C) for 5-7 minutes. You can freeze potato wedges for later. Lay them out in a single layer on a baking sheet. Freeze them for about an hour, then transfer them to a freezer bag. They will last for up to three months. When ready to eat, bake them straight from the freezer. Just add a few extra minutes to the cooking time. For the best flavor, try to use them sooner rather than later. You should marinate the potato wedges for at least 30 minutes. This time allows them to soak up the tangy pickle juice. If you have more time, you can marinate them longer, even overnight. Longer marinating adds more flavor and makes them even tastier. Yes, you can use other potatoes like Yukon Gold or red potatoes. Each type gives a unique taste and texture. Just remember, russet potatoes are best for crispy wedges because they have high starch content. Whichever you choose, cut them into similar-sized wedges for even cooking. These wedges pair well with many dishes. Try serving them with burgers, grilled chicken, or sandwiches. They also make a great snack on their own. For a party, serve them with a variety of dips like ranch or ketchup for extra fun. You can make this recipe healthier by reducing the oil and using less ranch dressing. Try baking instead of frying, which cuts down on fat. You can also add veggies like carrots or bell peppers to the mix for added nutrition and flavor. To make homemade ranch dressing, combine these ingredients: - 1 cup Greek yogurt - ½ cup buttermilk - 1 tablespoon fresh dill, chopped - 1 teaspoon garlic powder - 1 teaspoon onion powder - Salt and pepper to taste Mix well and adjust the seasoning as needed. This dressing is creamy and perfect for dipping your crispy potato wedges. For the full recipe of Pickle Ranch Potato Wedges, check out the detailed instructions above. This guide helps you make delicious Pickle Ranch Potato Wedges. We covered key ingredients, how to marinate and bake, and tips for crispy texture. Explore fun variations and learn storage methods. These wedges are tasty, and you can adjust them to fit your taste. Try pairing them with your favorite meals. Enjoy creating this easy and yummy dish!

Pickle Ranch Potato Wedges Crispy and Flavorful Snack

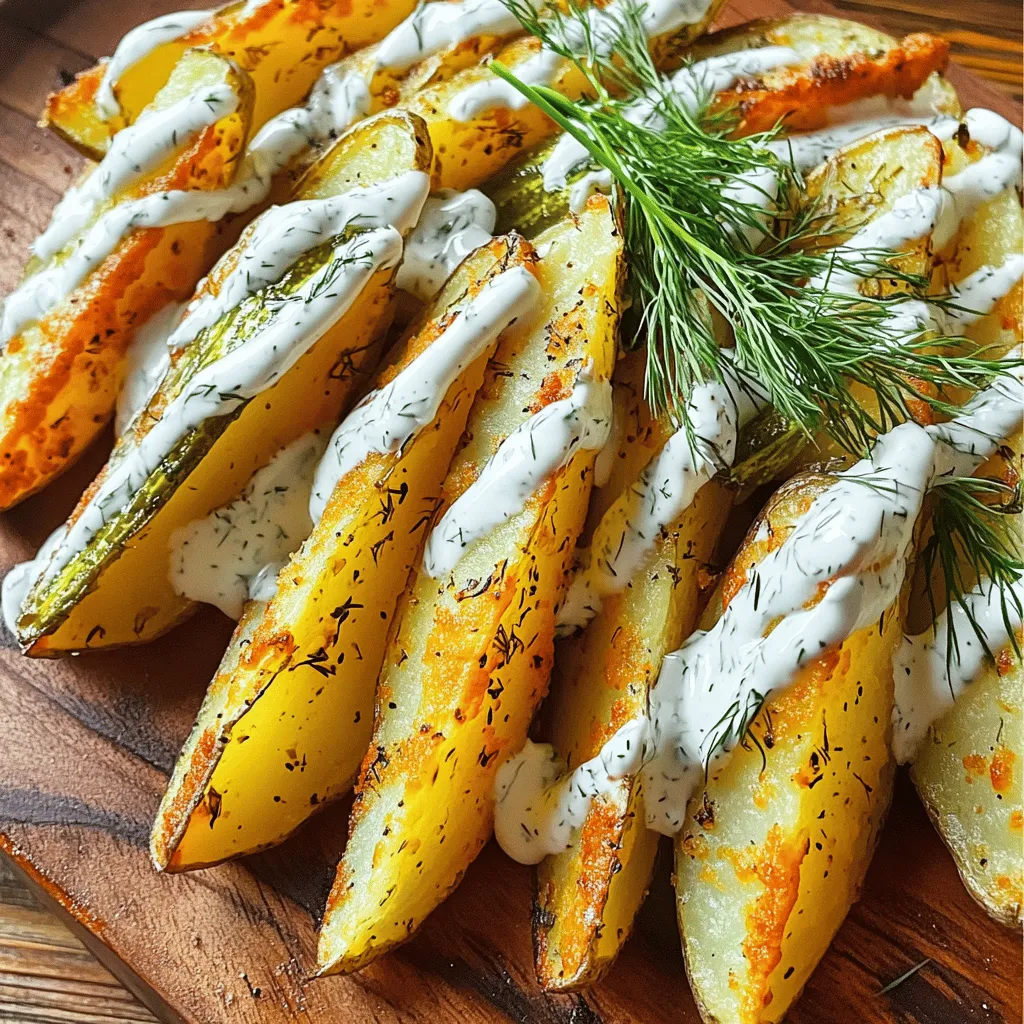
Craving a crispy and flavorful snack? You’ve got to try Pickle Ranch Potato Wedges! This recipe blends tangy pickles with

To make Cherry Lemonade Popsicles, you need the following ingredients: - 2 cups fresh cherries, pitted and halved - 1 cup freshly squeezed lemon juice (about 4-6 medium lemons) - 1/2 cup granulated sugar (adjust for desired sweetness) - 1 cup water - Zest of 1 lemon (for extra flavor) - Fresh mint leaves for garnish (optional) Using fresh cherries is key for the best taste. Look for bright, firm cherries. Choose lemons that feel heavy for their size, as they have more juice. Fresh juice provides a vibrant flavor. When selecting sugar, use regular granulated sugar for sweetness. Check the expiry date for the best quality. Fresh mint adds a nice touch, so opt for vibrant, green leaves. You can improve your popsicles with some fun add-ins. Try adding a splash of vanilla extract for warmth. A few slices of ginger can add zing. If you enjoy a little tartness, mix in some lime juice. For a colorful twist, add thin slices of strawberries or blueberries. These changes make your popsicles unique and delicious. First, we need to make a simple syrup. This syrup adds sweetness to our popsicles. In a medium saucepan, mix 1 cup of water with 1/2 cup of granulated sugar. Heat this over medium heat. Stir often until the sugar dissolves. This takes about 2-3 minutes. Once dissolved, remove the pan from the heat. Let the syrup cool completely before using it. While the syrup cools, let's prepare the cherries. You need 2 cups of fresh cherries, pitted and halved. Place these cherries in a blender. Blend them gently using short pulses. You want the cherries to be mostly smooth but still a bit chunky. This gives the popsicles a nice texture. Set the blended cherries aside for later. Now it’s time to mix everything together. In a large mixing bowl, combine the cooled syrup with 1 cup of freshly squeezed lemon juice and the zest of 1 lemon. Add half of the blended cherries into the mixture and stir well. This is where all the flavors come together! Next, pour this mixture into your popsicle molds, filling them halfway. Now, add a spoonful of the reserved cherry puree into each mold. This adds a lovely layer of color and flavor. Then, fill the molds to the top with the lemonade mixture, leaving a little space at the top. This space helps the popsicles expand while freezing. Insert popsicle sticks into the molds, making sure they are centered. Place the molds in the freezer for at least 4-6 hours. They should be completely solid before you enjoy them. To remove the popsicles, run warm water over the outside of the molds for a few seconds. Then gently pull the sticks to release the popsicles. For the full recipe, check the instructions above! To get the best popsicles, choose molds that are sturdy. Silicone molds work great. They make it easy to pop out the treats. Fill the molds carefully to avoid spills. Leave a little space at the top for expansion. This helps the popsicles freeze evenly. For a creamier texture, try adding yogurt or coconut milk to the mixture. Blend it in with the cherries and lemon juice. This small change makes a big difference. If you want a bit of crunch, add chopped nuts or seeds. Just remember to keep the other ingredients balanced. To serve your popsicles, place them on a nice plate or a wooden board. Use fresh mint leaves to add color and aroma. You can even drizzle some extra cherry syrup over the top. This makes them look fancy and inviting. For a fun touch, give each popsicle a colorful stick. Enjoy your beautiful, homemade treats! {{image_4}} You can mix in other fruits for fun flavors. Strawberries, raspberries, or blueberries work great. Just blend your chosen fruit and add it to the popsicle mix. This will give your popsicles a colorful twist. You can layer the fruits for a beautiful look, too. Each bite will surprise you with new tastes. Adjust the sweetness to fit your taste. If you like it sweet, add more sugar. For a tart flavor, cut back on the sugar. You can also use honey or agave syrup as a natural sweetener. Remember, the balance between sweet and tart is key for a refreshing treat. Always taste the mixture before freezing. Try using coconut water instead of water for a tropical vibe. It adds a light coconut flavor and extra hydration. You can also mix in fruit juices, like orange or pineapple, for added zest. This change makes your popsicles even more refreshing. Experiment with different bases to find your favorite blend. For the complete recipe, click on [Full Recipe]. To keep your Cherry Lemonade Popsicles fresh, store them in an airtight container. This helps prevent freezer burn and keeps them flavorful. You can also use plastic wrap to cover the popsicle molds before freezing. Make sure to label the container with the date so you know when you made them. Homemade Cherry Lemonade Popsicles can last about 2 to 3 months in the freezer. After this time, they may lose some flavor and texture. Always check for any signs of freezer burn before tasting. Ice crystals can form on popsicles if they are not stored properly. To prevent this, try these tips: - Make sure the popsicles are fully frozen before removing them from the molds. - Store them at a consistent, cold temperature in the freezer. - Avoid opening the freezer often, as this can cause temperature changes. - If you notice ice crystals, blend the popsicle mixture again before refreezing. Yes, you can use frozen cherries. Just let them thaw first. This helps them blend better. Frozen cherries may change the taste slightly, but they still work great. They are also convenient and save time. Cherry Lemonade Popsicles take about 4 to 6 hours to freeze. For best results, leave them overnight. This way, they will be fully solid and ready to enjoy. If you are in a hurry, you can try to freeze them for at least 4 hours. You can mix things up with many flavors! Here are some fun ideas: - Strawberry Lemonade: Use fresh strawberries instead of cherries. - Peach Basil: Blend fresh peaches with a hint of basil. - Watermelon Mint: Purée watermelon and mix in some fresh mint. - Pineapple Coconut: Use fresh pineapple and add coconut water for a tropical twist. These flavors are easy to make and delicious, just like the Cherry Lemonade Popsicles. For the full recipe, check the earlier sections of this article. In this blog post, I shared how to make Cherry Lemonade Popsicles. We covered the need for fresh and quality ingredients, plus some tasty add-ins. I provided step-by-step instructions, helpful tips, and fun flavor variations. Remember to store your popsicles well to keep them fresh and tasty. You can adjust sweetness and experiment with different fruits. Making these treats is easy and fun. Enjoy your popsicles on a hot day or any time you crave a cool snack!

Cherry Lemonade Popsicles Refreshing Summer Treat

Looking for a fun and tasty way to beat the heat? These Cherry Lemonade Popsicles are the perfect summer treat!

Older posts
Newer posts
← Previous Page1 … Page22 Page23 Page24 … Page86 Next →

dsad

© 2026 yumymoments • Built with GeneratePress

Our Policies

  • Copyright Policy
  • Cookie Policy
  • GDPR Policy
  • Privacy Policy
  • Disclaimer
  • Terms Of Use

More Information

  • Home
  • About
  • Contact
  • Appetizers
  • Dessert
  • Dinner
  • Drinks
©2026, yumymoments About Back To Top