Skip to content
DisclaimerTerms Of UseGDPR PolicyCookie Policy

yumymoments

  • Home
  • Drinks
  • Appetizers
  • Dinner
  • Dessert
  • About
  • Contact
  • Privacy Policy
DisclaimerTerms Of UseGDPR PolicyCookie Policy

NO-ING-IMG

- 4 boneless, skinless chicken breasts - 1 cup dill pickles, finely chopped - 1 cup shredded sharp cheddar cheese - 1 cup cream cheese, softened to room temperature - 1/2 cup mayonnaise The main ingredients are simple and tasty. First, the chicken breasts serve as the base. They provide protein and a juicy texture. Dill pickles add a tangy crunch, which makes the dish special. Cheddar cheese brings richness and melts beautifully on top. Cream cheese helps create a creamy sauce that binds everything together. Mayonnaise adds extra moisture and flavor. - 1 teaspoon garlic powder - 1 teaspoon onion powder - 1/2 teaspoon smoked paprika - Salt and freshly ground black pepper to taste Seasoning makes a big difference in flavor. Garlic and onion powder give depth without being too strong. Smoked paprika adds a subtle smokiness. Salt and pepper boost all the flavors in the dish. Adjust these seasonings to match your taste. - Fresh dill sprigs - Serving suggestions Garnish adds a nice touch to your meal. Fresh dill sprigs look pretty and enhance the pickle flavor. You can serve the Cheesy Pickle Chicken Bake straight from the dish or on plates. Pair it with steamed vegetables or a fresh salad for a complete meal. These options provide color and balance to the dish. Preheating the oven is key. It helps cook the chicken evenly. Set your oven to 375°F (190°C). This is the perfect temperature for our bake. Start with a large bowl. Mix 1 cup of cream cheese and 1/2 cup of mayonnaise. Whisk until smooth. It should be creamy with no lumps. Next, add 1 teaspoon of garlic powder, 1 teaspoon of onion powder, and 1/2 teaspoon of smoked paprika. Don’t forget salt and pepper to taste! Finally, fold in 1 cup of finely chopped dill pickles. Mix well, and then add half of the shredded cheddar cheese. Take your 4 chicken breasts and season them well. Use salt and pepper on both sides. Place the breasts in a greased baking dish. Now, spread the creamy mixture over each chicken breast. Make sure they are all covered! Top with the rest of the cheddar cheese for extra gooeyness. Put the baking dish in your preheated oven. Bake for 25-30 minutes. To check if it’s done, use a meat thermometer. The chicken should reach 165°F (75°C). The cheese will be melted and bubbly. After baking, let the dish rest for 5 minutes. This helps keep the chicken juicy. Add fresh dill on top for a nice touch. For the full recipe, check the [Full Recipe]. To boost flavor, try adding spices like paprika or dill. These spices bring warmth and depth. You can also mix in fresh herbs like chives or parsley for a fresh touch. To adjust creaminess, you can use more cream cheese or mayonnaise. If you want a lighter dish, swap some cream cheese for Greek yogurt. Resting the chicken is key. Let it sit for about five minutes after baking. This helps keep the juices locked in. For perfect results, check the internal temperature with a meat thermometer. The chicken should reach 165°F (75°C). This ensures it’s safe to eat and fully cooked. For serving, you can plate the Cheesy Pickle Chicken Bake in individual dishes. This makes it feel special. Add a fresh garden salad or steamed veggies on the side to balance the meal. These sides add color and nutrition. You can also sprinkle fresh dill on top for a pop of green and added flavor. For the full recipe, refer to the earlier section. {{image_4}} If you want to change things up, you can swap the chicken. Try using turkey or even tofu for a great twist. These options work well with the creamy pickle mix. For those avoiding dairy, there are tasty dairy-free options. Use vegan cream cheese and dairy-free cheese. These will keep your Cheesy Pickle Chicken Bake creamy and flavorful without dairy. You can add more veggies to this dish for extra color and flavor. Consider mixing in chopped bell peppers, spinach, or green onions. They blend well with the pickles and cheese. For cheese lovers, feel free to experiment with different types of cheese. Mozzarella adds a stretchy texture, while pepper jack can bring some heat. The choice is yours! If you prefer using a slow cooker, it’s easy. Just place the seasoned chicken in the slow cooker, then spread the creamy pickle mix on top. Cook on low for 4-6 hours. This method makes the chicken extra tender. An Instant Pot is another great option. Add the chicken and pickle mix, then seal and cook on high for about 10 minutes. Quick and easy! You’ll still get that delicious cheesy flavor in less time. For the full recipe, check out the detailed instructions. Happy cooking! To store leftovers, place the Cheesy Pickle Chicken Bake in an airtight container. Make sure it cools completely before sealing. This step helps keep the dish fresh and tasty. The shelf life in the fridge is about 3 to 4 days. Always check for signs of spoilage before eating. You can freeze the Cheesy Pickle Chicken Bake for longer storage. First, let it cool down completely. Then, wrap it tightly in plastic wrap and foil, or use a freezer-safe container. This helps prevent freezer burn. When you're ready to eat, thaw it overnight in the fridge. For reheating, place it in the oven at 350°F (175°C) until heated through. This usually takes about 20-30 minutes. You can also microwave it, but be sure to cover it to keep moisture in. Preparing in advance can save time on busy nights. You can make the Cheesy Pickle Chicken Bake a day ahead and store it in the fridge. Portioning the bake into single servings makes it easy to grab for meals. You can also pair these portions with sides like rice or veggies. This method helps create quick and easy dinners all week long. For the full recipe, check out the link provided. You can serve this dish with many tasty sides. Here are some great ideas: - Steamed broccoli or green beans - A fresh garden salad - Creamy mashed potatoes or rice - Garlic bread for extra crunch For drinks, I suggest: - A crisp white wine, like Sauvignon Blanc - Iced tea for a refreshing choice - Lemonade for a sweet touch Yes, you can prepare this dish in advance. Here are some meal prep tips: - Mix the creamy pickle sauce and store it in the fridge. - Season the chicken and keep it in a covered dish. - Combine everything the night before. Just pop it in the oven when you're ready! You can check the chicken's doneness in a few ways: - Look for clear juices running from the chicken. - The meat should not be pink inside. - The best way is to use a meat thermometer. Aim for 165°F (75°C) for safe eating. Absolutely! Here are some tips to reduce calories: - Use Greek yogurt instead of cream cheese for less fat. - Choose low-fat mayonnaise for a lighter option. - You can replace chicken with lean turkey for fewer calories. These options help make this delicious dish a bit healthier without losing flavor! For the detailed recipe, check [Full Recipe]. Cheesy Pickle Chicken Bake combines tasty ingredients like chicken, pickles, and cheese. I provided easy steps to make it delicious. You learned tips for perfect baking and creative variations. This dish is great for meal prep and fun to serve. Keep it fresh and frozen for later. Enjoy this tasty recipe, share it with friends or family, and don't forget to experiment with your favorite flavors! Cooking should be fun, and this dish is a great start.

Cheesy Pickle Chicken Bake Flavorful Easy Dinner Recipe

Are you ready to wow your family at dinner time? My Cheesy Pickle Chicken Bake is both quick and delicious!

- 4 cups popped popcorn - 1 cup dill pickle chips - 1 cup mini pretzels - 1/2 cup roasted salted peanuts The main ingredients in this snack mix create a fun blend. First, you need popped popcorn. You can pop it on the stove or use a microwave. The popcorn gives a light and fluffy base. Next, add dill pickle chips for that tangy flavor. They add a crunch and a zesty kick. Mini pretzels bring a salty twist and a satisfying crunch. The roasted salted peanuts add nutty flavor and extra texture. Together, they make a wonderful mix. - 1/4 cup ranch seasoning mix - 1 tablespoon pickle juice - 2 tablespoons extra virgin olive oil - 1 teaspoon garlic powder - Salt to taste For the dressing, combine ranch seasoning mix with pickle juice. This mix gives your snack a creamy and tangy taste. The extra virgin olive oil adds richness and helps coat everything. Garlic powder boosts the flavor even more. Adjust with salt to make it just right for your taste. This dressing ties all the flavors together, making each bite special. - Fresh dill fronds For a fresh touch, I like to add fresh dill fronds. They enhance the pickle flavor and make the mix look pretty. You can sprinkle them on top just before serving. This simple garnish can really elevate your snack mix. If you want to impress your guests, this small step makes a big difference. For the full recipe, check out the recipe section. Enjoy making this tasty and crunchy treat! To start, you need to pop the popcorn. You can use a popcorn maker or a large pot. If using a pot, heat it over medium heat. Add a bit of oil and the kernels. Cover it with a lid. Wait for the popping sounds to slow down. Once done, carefully pour the popcorn into a large mixing bowl. Check for any unpopped kernels and toss those aside. Next, let’s make the dressing. In a small bowl, mix extra virgin olive oil, pickle juice, garlic powder, and ranch seasoning. Use a whisk to blend them well until the dressing is smooth and creamy. This dressing will add amazing flavor to your snack mix. Now it’s time to combine everything. To your popcorn, add chopped dill pickle chips, mini pretzels, and roasted salted peanuts. Pour the dressing over the mix. Using a large spatula or your hands, gently toss everything. Make sure each piece is coated well with the dressing. Once mixed, it’s time to taste. Sample your snack mix and see if it needs more salt. If it does, sprinkle some in and toss again. Adjusting the flavors will make the mix even better. Let the mix sit for 15-20 minutes. This time allows the flavors to meld together beautifully. For serving, use individual snack bowls or one big bowl to share. - Presentation Tips: Add a touch of visual charm by garnishing with fresh dill fronds. You can also serve it in a clear bowl with a scoop for easy access. For the complete recipe, check out the Full Recipe. To make your pickle popcorn snack mix truly unique, think about customizing the flavors. You can add a sprinkle of cayenne for heat or some cheese powder for a savory twist. Try adding a bit of lemon zest for a fresh kick. Each change can make your mix tasty in a new way. When adjusting the seasoning, start with the ranch mix. Taste it before you add more salt. Everyone’s taste is different. You might find you love it just as it is! Popping corn can be fun! I recommend using an air popper for light, fluffy popcorn. If you use the stove, heat oil in a heavy pot. Add a few kernels first to test the heat. When they pop, add the rest. This keeps your popcorn crisp. After popping, let your popcorn cool a bit. This helps keep it from getting soggy when you add the dressing. For drinks, pickle popcorn pairs great with lemonade or a light beer. The tanginess of the popcorn goes well with these drinks. When you serve your snack mix, use a big bowl for sharing or small cups for each guest. For a nice touch, consider adding fresh dill on top. It makes your snack look fancy and fun! {{image_4}} For a spicy kick, try a spicy dill pickle popcorn mix. Add cayenne pepper or chili powder to the mix. This adds heat and flavor, making it exciting. You can also use spicy pickles for a bolder taste. If you prefer something sweet, create a sweet and salty variation. Mix in chocolate chips or caramel bits. This balance will satisfy your cravings for both salty and sweet. Use less ranch seasoning for a milder flavor. If you need gluten-free options, use gluten-free pretzels. They provide the same crunch without the gluten. You can also swap regular peanuts for roasted chickpeas. This keeps the mix crunchy and adds protein. For vegan alternatives, replace ranch seasoning with a vegan blend. You can also use nutritional yeast for a cheesy flavor without dairy. This way, everyone can enjoy the snack mix! Game day recipes benefit from this mix's crunch. Serve it in a big bowl for sharing. Add some spicy nuts for extra flavor. Your friends will love it during the game! For movie night recipes, pair this mix with your favorite movie snacks. Create small bowls for each guest. This makes it easy to munch while watching. You can even add popcorn toppings like cheese powder for added fun! To keep your Pickle Popcorn Snack Mix fresh, use an airtight container. Glass jars or plastic bins work well. These containers help keep out air and moisture. Store the mix in a cool, dark place like a pantry or cupboard. Avoid warm areas, as heat can make it go stale. Your snack mix will taste best for about one week. After that, the flavors may fade. Look for signs of staleness. If the mix feels soft or tastes bland, it has likely gone stale. Trust your senses to know when it’s time to toss it. If your mix loses its crunch, don’t worry! You can easily restore it. Preheat your oven to 250°F (120°C). Spread the mix on a baking sheet. Bake for about 10 minutes. Keep an eye on it, so it doesn’t burn. This will help revive the crispiness of the popcorn and pretzels. Enjoy the crunch again! Pickle Popcorn Snack Mix is a fun and crunchy treat. It combines flavors of dill pickles, popcorn, pretzels, and peanuts. The tangy taste from the pickles pairs well with the salty crunch of the other snacks. This mix is great for parties or movie nights. You can serve it in a big bowl or in individual cups. The mix is easy to make and full of flavor. If you want the full recipe, check the earlier section. Yes, you can make this snack mix in advance. Just store it in an airtight container. This keeps it fresh and crunchy. I recommend making it a day ahead for the best taste. Letting it rest helps the flavors blend well. Just remember to avoid adding salt too early, as it can make the popcorn soggy. You can find ready-made versions of pickle popcorn snack mix at some stores. Check specialty snack shops or health food stores. Many places offer unique flavors of popcorn. You can also look online for brands that sell this type of mix. However, homemade versions taste better and are fresher. Yes, there are some health benefits in this mix. Popcorn is a whole grain, which is good for digestion. Dill pickles can have probiotics, which help gut health. Peanuts provide protein and healthy fats. However, be careful with the salt and ranch seasoning. Enjoy this mix in moderation for a tasty yet nutritious snack! There are many ways to customize your pickle popcorn mix. You can add spices like cayenne for heat. Try using different nuts or adding cheese puffs for extra crunch. You can swap the ranch seasoning for taco seasoning for a fun twist. Experiment with flavors to make it your own! In this post, we explored how to make a tasty Pickle Popcorn Snack Mix. You learned about the main ingredients, the dressing, and optional garnishes. I provided step-by-step instructions and shared tips to perfect the taste. You also discovered variations to try, storage info, and answered common questions. This snack is perfect for any gathering. With easy customization, it’s simple to add your favorite flavors. Enjoy making and sharing this fun treat!

Pickle Popcorn Snack Mix Tasty and Crunchy Treat

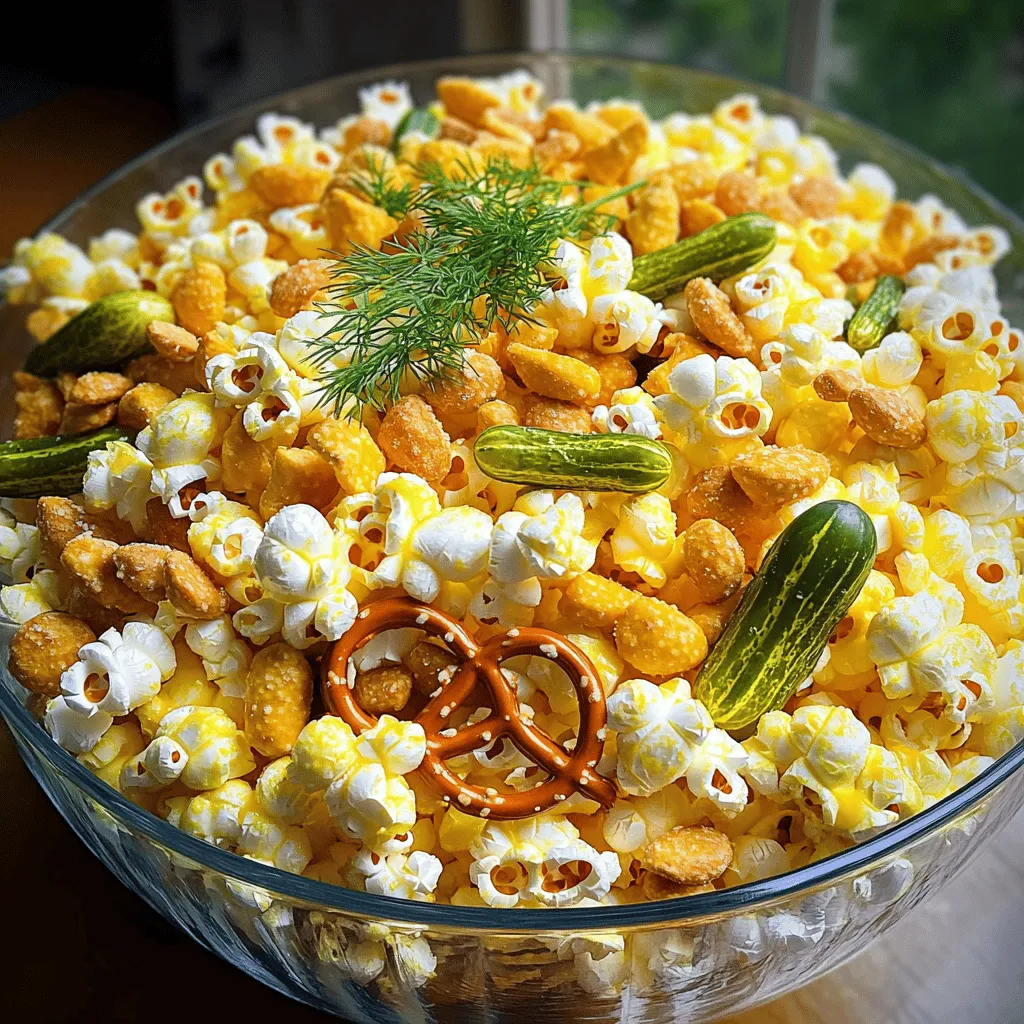
Are you ready to dive into a crunchy, tangy world of flavor? My Pickle Popcorn Snack Mix combines the best

- 1 ½ cups crushed graham crackers - ½ cup unsalted butter, melted - 1 cup heavy whipping cream - 1 cup cream soda - 1 cup vanilla ice cream - ½ cup powdered sugar - 1 teaspoon vanilla extract - Optional toppings: Whipped cream, maraschino cherries You need simple, tasty ingredients for this pie. I love using crushed graham crackers for the crust. They bring a sweet crunch that pairs well with the creamy filling. Just melt some unsalted butter and mix it with the crumbs. It gives the crust a rich flavor. Next, we need heavy whipping cream. This is key for a light and fluffy texture. When you whip it, it will become soft peaks. This helps the pie feel airy. Cream soda adds a fun twist. It gives the pie a sweet, fizzy flavor. You can’t have a cream soda pie without vanilla ice cream. It makes the filling rich and creamy. Combine that with powdered sugar and vanilla extract for added sweetness. For decoration, use whipped cream and maraschino cherries. They make the pie look special. Plus, the cherries add a pop of color. This pie is perfect for hot days or any sweet craving. You can find the full recipe in the article to guide you through making this treat. 1. Preheat the oven to 350°F (175°C). This step helps the crust bake evenly. 2. In a mixing bowl, combine 1 ½ cups of crushed graham crackers and ½ cup of melted unsalted butter. Mix well until the crumbs soak up the butter. 3. Press the graham cracker mixture into a 9-inch pie pan. Make sure it’s even on the bottom and sides. 4. Bake the crust for 8-10 minutes. It should be lightly golden. Let it cool completely at room temperature. 1. In a large mixing bowl, beat 1 cup of heavy whipping cream with an electric mixer. Beat until soft peaks form, which takes about 3-5 minutes. 2. In another bowl, mix together 1 cup of cream soda, 1 cup of vanilla ice cream, ½ cup of powdered sugar, and 1 teaspoon of vanilla extract. Whisk until smooth and creamy. 3. Gently fold the whipped cream into the cream soda mixture. Keep folding until no streaks are left. This gives the filling a light and airy texture. 1. Pour the filling into the cooled graham cracker crust. Smooth the top with a spatula for an even finish. 2. Cover the pie with plastic wrap and place it in the freezer. Let it set for at least 4 hours or until firm. This recipe is a fun way to enjoy a frozen treat. For the full recipe, check the details above! Achieving the right texture To get the best texture, beat the heavy cream until soft peaks form. This step is key. A light and airy filling makes the pie delightful. How to properly cool the crust Once you bake the crust, let it cool at room temperature. Cooling it prevents the filling from melting. A warm crust can make your pie soggy. Techniques for folding whipped cream When you fold whipped cream, use a spatula. Gently lift the mixture from the bottom. This keeps air in and makes the pie light. Avoid stirring too hard or too fast. Presentation tips Slice the pie into wedges. Place each slice on a plate with care. Top with extra whipped cream and a cherry. This makes your pie look inviting and fun. Pairing with other desserts This pie goes well with fresh fruit. Consider serving it with berries or sliced bananas. You can also enjoy it with a scoop of vanilla ice cream. Each bite will be a treat! {{image_4}} You can change the taste of your Cream Soda Milkshake Pie in fun ways. Start with ice cream flavors. Instead of vanilla, try chocolate or coffee ice cream. These flavors mix well with cream soda. You can also mix in fruity flavors like strawberry or orange. Each choice gives the pie a new twist. Using flavored cream sodas is another great way to mix things up. Try cherry, grape, or even root beer. Each soda brings its own unique flavor to the pie. Just remember to keep the balance right. You want the flavors to blend well, not clash. If you want to switch the crust, you have options. A chocolate cookie crust adds a rich taste. Just crush chocolate cookies and mix them with melted butter. Press this mixture into your pie pan, and bake it like the graham cracker crust. Nut-based crusts are another choice. Use almonds or pecans for a crunchy texture. Simply grind the nuts and mix them with butter. This crust pairs well with the creamy filling. It adds a nice contrast to the smooth pie. For the full recipe, visit the Cream Soda Milkshake Pie section earlier in this article. To keep your pie fresh, store it in the freezer. Wrap it tightly in plastic wrap. This helps avoid freezer burn and keeps it tasting great. You can also use an airtight container. The pie stays fresh for up to two weeks in the freezer. If you plan to eat it soon, you can keep it in the fridge for up to three days. Just make sure to cover it well. If you have leftover pie, freezing is easy. First, let the pie set in the freezer for at least four hours. Once it’s firm, slice it into pieces. This way, you can take out just what you need. Wrap each slice in plastic wrap. For best results, place the slices in a freezer-safe bag. When you're ready to eat the pie, thaw it in the fridge. This method keeps the texture nice. Allow it to thaw overnight for best flavor. You can also thaw it at room temperature for about 30 minutes. Just be careful not to leave it out too long, or it will get too soft. Can I make this pie ahead of time? Yes, you can make this pie a day before you plan to serve it. Just freeze it after you prepare it. This saves you time on the day of your event. Make sure to cover it well with plastic wrap. What can I substitute for heavy whipping cream? You can use coconut cream or a dairy-free heavy cream as a substitute. Both options will still give you a nice texture. You can also try using whipped topping if you want something simple. Can this pie be turned into individual servings? Absolutely! You can pour the filling into small cups or jars instead of a pie pan. This makes for fun, single servings that are easy to share. Just make sure to adjust the freezing time based on the size of your cups. What is the best way to cut a frozen pie? To cut a frozen pie, use a warm knife. Place the knife in hot water for a few seconds. Wipe it dry and then slice through the pie. This helps make clean cuts without breaking the crust. How long does the pie last in the freezer? The pie can last up to two months in the freezer. Just make sure it is tightly covered to prevent freezer burn. When you're ready to eat it, let it thaw in the fridge for a few hours. This keeps the texture nice and creamy. In summary, you learned to make a Cream Soda Milkshake Pie. We covered ingredients, step-by-step instructions, and helpful tips for success. You now know how to customize the pie with different flavors and crust options. Remember to store it properly to keep it fresh longer. Enjoy experimenting with this fun dessert. Share it with family and friends for smiles all around!

Cream Soda Milkshake Pie Delightful Frozen Treat

Get ready to enjoy a Cream Soda Milkshake Pie, a fun and tasty treat! This dessert combines the sweet flavor

- 2 cups plain Greek yogurt - 1/4 cup honey or maple syrup - 1 teaspoon vanilla extract I love using plain Greek yogurt for this recipe. It has a thick texture and adds protein. Honey or maple syrup gives sweetness. You can choose either based on your taste. Vanilla extract adds nice flavor and aroma. - 1 cup fresh or frozen cherries, pitted and halved - 1/4 cup dark chocolate chips (optional) - 1/4 cup sliced almonds (optional) Cherries are the stars of this dish. You can use fresh or frozen, making it easy to find. If you love chocolate, dark chocolate chips add a rich taste. Sliced almonds bring a nice crunch and extra flavor. You can mix and match toppings to suit your mood. To start, grab a medium bowl. Add 2 cups of plain Greek yogurt. Then, mix in 1/4 cup of honey or maple syrup. Next, add 1 teaspoon of vanilla extract. Stir well until the mixture is smooth and creamy. This will be the base of your delicious bark. Now, take a baking sheet and line it with parchment paper. Make sure the edges hang over a bit. This makes it easy to lift the bark later. A lined sheet ensures that nothing sticks, giving you perfect pieces. Pour the yogurt mixture onto the prepared baking sheet. Use a spatula to spread it evenly. Aim for a layer about 1/4 inch thick. In a separate bowl, lightly mash 1 cup of halved cherries with a fork. Drizzle the mashed cherries over the yogurt mixture. Then, use a knife or toothpick to swirl the cherries into the yogurt. This creates a fun marbled design. Transfer the baking sheet to the freezer. Let it freeze for at least 4 to 6 hours. Check that the bark is solid and firm to touch. Once frozen, lift the yogurt bark from the parchment paper. Break it into irregular pieces for a rustic look. Enjoy your Cherry Swirl Frozen Yogurt Bark! For the full recipe, check the main section above. To make your Cherry Swirl Frozen Yogurt Bark look great, follow these tips. First, arrange the broken pieces on a nice platter. Use a colorful serving dish to catch the eye. Add some fresh cherry halves on top for a pop of color. A light sprinkle of sliced almonds can also add charm. This treat is great as a snack or dessert! Feel free to switch things up with different fruits. You can use strawberries, blueberries, or peaches instead of cherries. For sweeteners, try agave nectar or coconut sugar. Each fruit brings its own flavor. Experimenting keeps it fun and fresh. For the best texture, make sure to spread the yogurt mixture evenly. A 1/4 inch thick layer works well. If you prefer crunch, add nuts or seeds. Almonds, walnuts, or even pumpkin seeds can do the trick. These will give your bark a delightful bite. {{image_4}} You can swap cherries for other fruits. Berries work great here. Try strawberries, blueberries, or raspberries. Their bright colors add charm to your bark. Peaches also make a sweet choice. Just chop them up and follow the same steps. Seasonal fruits bring fresh flavors. Mix and match to find your favorite combos! Want to add a twist? You can infuse your yogurt with spices. A dash of cinnamon gives warmth. Lemon or lime zest brightens the flavors. Just mix in a teaspoon or two before spreading. It makes each bite pop with flavor. Get creative and try different spices for fun! You can also explore yogurt types. Non-dairy yogurts work well. Look for coconut, almond, or soy options. These can make your bark creamy. Flavored yogurts, like vanilla or berry, add extra taste. Just keep the base ingredients in mind. This allows for easy swaps while keeping the recipe simple. Try these variations to make Cherry Swirl Frozen Yogurt Bark your own! Each twist can lead to new favorites. To keep your Cherry Swirl Frozen Yogurt Bark fresh, follow these tips: - Use an airtight container to prevent freezer burn. - Wrap the bark in plastic wrap before placing it in the container. - Keep the bark away from strong-smelling foods in the freezer. These steps will help maintain the creamy texture and fruity flavor. Thaw the bark properly for the best taste: - Remove the yogurt bark from the freezer. - Place it in the fridge for about 30 minutes before serving. - If you're in a hurry, let it sit at room temperature for about 10 minutes. This way, it will soften just enough to enjoy without melting. Cherry Swirl Frozen Yogurt Bark lasts well in the freezer: - It can stay fresh for up to two months. - After that, it may lose some flavor and texture. Label your container with the date to keep track. Enjoy your delicious treat while it's at its best! It takes about 4 to 6 hours to freeze this bark. For the best results, I suggest freezing it overnight. This extra time ensures that the bark is firm and easy to break into pieces. If you're in a hurry, check it after 4 hours. If it feels solid, then it's ready to enjoy. Yes, you can use substitutes for Greek yogurt. If you prefer a dairy-free option, try coconut yogurt or almond yogurt. Both will give you a creamy texture. For those who are lactose intolerant, look for lactose-free yogurt. Just make sure to keep the yogurt thick for the best results. This recipe offers several health benefits. Greek yogurt is high in protein and calcium. It helps build strong bones and supports muscle health. Cherries add antioxidants and vitamins, which can boost your immune system. Together, they make a tasty snack that is both healthy and satisfying. Enjoy this cherry swirl frozen yogurt bark knowing you’re treating yourself well! This blog post showed you how to make Cherry Swirl Frozen Yogurt Bark. We covered key ingredients, step-by-step instructions, and tips for serving. You learned about variations and how to store this treat. Creating this bark is easy and fun. Customize it with your favorite fruits and flavors. Enjoy this healthy snack that kids and adults will love. Make it today and share it with family!

Cherry Swirl Frozen Yogurt Bark Simple Frozen Delight

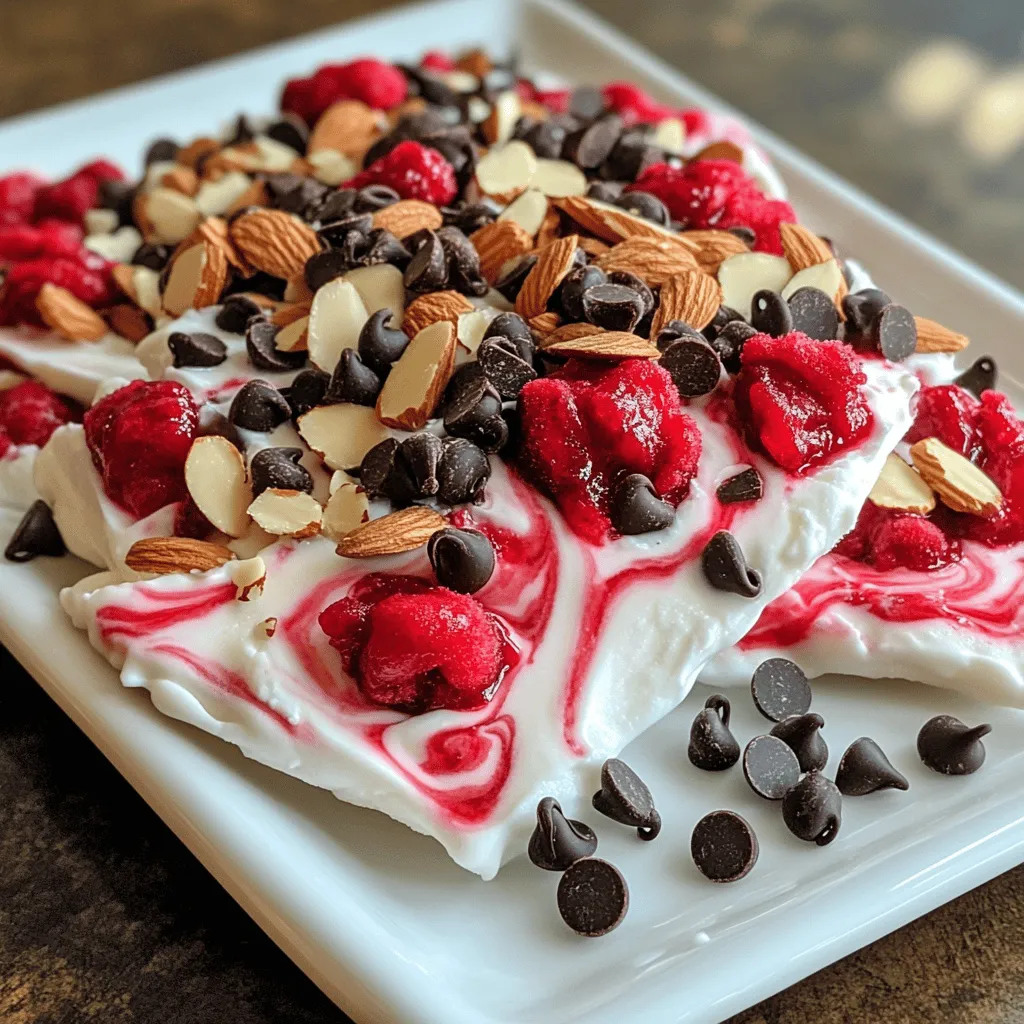
Looking for a cool treat that’s simple and delicious? I’ve got just the recipe for you! Cherry Swirl Frozen Yogurt

To make Dill Pickle Pizza with Spicy Honey, you need these key ingredients: - 1 pre-made pizza crust (store-bought or homemade) - 1 cup shredded mozzarella cheese - 1 cup dill pickles, sliced thin - 1/2 cup cream cheese, softened to room temperature - 1 tablespoon fresh dill, finely chopped - 1 tablespoon garlic powder - 2 tablespoons spicy honey (mix honey with a pinch of cayenne pepper or your favorite hot sauce) - Olive oil for drizzling - Salt and black pepper to taste These ingredients come together to create a unique and tasty pizza. The cream cheese will add a rich texture, while the dill pickles give a crunchy and tangy bite. You can customize your pizza with these optional ingredients: - Cooked bacon bits for added crunch - Sliced jalapeños for extra heat - Additional cheeses like cheddar or feta for depth of flavor - Fresh arugula or spinach for a fresh topping after baking These options allow you to tweak the recipe to suit your taste. Feel free to mix and match to find your perfect flavor! Make sure you have these tools handy for a smooth cooking process: - Baking sheet or pizza stone - Mixing bowl for the cream cheese mixture - Spatula for spreading the cream cheese - Knife for slicing the dill pickles - Oven for baking the pizza Having the right tools will make your cooking experience easier. You’ll be ready to whip up this delicious Dill Pickle Pizza with Spicy Honey in no time! For more details on the full recipe, check out the Full Recipe section. Start by mixing the cream cheese. You want it soft, so take it out first. In a bowl, combine the cream cheese, fresh dill, garlic powder, and a pinch of salt and black pepper. Mix it well until it is smooth. This cream cheese blend adds a nice base to the pizza. Next, grab your pre-made pizza crust. Spread the cream cheese mixture evenly over the crust. Leave a little space at the edge for the crust. Now, sprinkle the shredded mozzarella cheese on top. Make sure to cover all the cream cheese. After that, layer the thinly sliced dill pickles evenly over the cheese. The pickles bring a tangy flavor that pairs nicely with the cheese. Now it's time to bake! Preheat your oven to 450°F (230°C). Once it's hot, place your assembled pizza inside. Bake for about 12-15 minutes. Look for the cheese to be melted and slightly golden. When it’s done, take it out of the oven and drizzle spicy honey over the hot pizza. This sweet and spicy touch makes the pizza special. Let it cool for a minute, then slice and serve. Enjoy your unique dill pickle pizza with spicy honey! For the full recipe, check out the complete instructions above. The pizza crust is the base of your dish. A good crust makes all the difference. Here are some tips to help you: - Choose the Right Crust: Use a pre-made crust that you enjoy. If you prefer homemade, try a simple recipe. - Preheat Your Oven: Always preheat your oven to the right temperature. This helps the crust cook evenly. - Don’t Overwork the Dough: If making your own crust, handle the dough gently. Overworking makes it tough. - Add Olive Oil: Drizzling a little olive oil on your crust adds flavor and helps it crisp up. Melted cheese is key for a great pizza. You want it gooey and delicious. Here’s how: - Use Fresh Cheese: Always use fresh mozzarella for the best melt. Pre-shredded cheese has additives that can affect melting. - Layering Matters: Spread the cheese evenly. This ensures every bite has that wonderful cheesy goodness. - Baking Time: Keep an eye on your pizza while it bakes. You want it bubbly and a bit golden on top, without burning. Serving your pizza well elevates the meal. Here are some ideas: - Garnish with Fresh Dill: After baking, sprinkle some fresh dill on top for a pop of color and flavor. - Pair with Spicy Honey: Serve a small bowl of extra spicy honey on the side. This lets guests add their preferred heat. - Rustic Presentation: Place the pizza on a wooden board. It adds a cozy touch that makes it more inviting. - Include Sides: Pair it with a light salad or chips. This balances the flavors and adds crunch. {{image_4}} You can change up your dill pickle pizza with fun toppings. Try adding crispy bacon for a savory crunch. Pepperoni slices bring classic flavor. You can also add green olives for a briny kick. Feel free to mix in some fresh vegetables like bell peppers or red onions for added color and taste. Each topping can add a new twist to this unique pizza. While spicy honey is a star in this dish, other sauces can work well too. A tangy ranch dressing adds a creamy touch. You might enjoy a drizzle of sriracha for extra heat. If you love barbecue, try using that sauce instead. Each sauce can change the flavor profile and make your pizza even more exciting. Not everyone likes the same level of heat. You can easily adjust the spice in this recipe. For a milder version, use less spicy honey or skip the cayenne. If you love heat, add more spicy honey or sprinkle crushed red pepper on top. You can even mix in jalapeños for a fresh pop of flavor. Just remember, you control the spice! For more detailed guidance, check the Full Recipe to explore every delicious option. To keep your leftover dill pickle pizza fresh, wrap each slice in plastic wrap. This helps avoid dryness. You can also place slices in an airtight container. Store it in the fridge for up to three days. The pizza may lose some crunch but will still taste great! If you want to save your pizza for later, freezing works well. First, let the pizza cool completely. Then, wrap each slice tightly in foil or plastic wrap. Place the wrapped slices in a freezer bag. This will help keep the flavors locked in. Your pizza can last in the freezer for up to two months. To reheat your pizza, use the oven for the best taste. Preheat the oven to 375°F (190°C). Place the pizza slices on a baking sheet. Heat for about 10-15 minutes until warm. This method helps keep the crust crispy. You can also use a microwave, but the crust may get soft. If using the microwave, heat for 30 seconds at a time until warm. Enjoy your tasty leftovers! For the full recipe, check out the detailed instructions above. Dill pickle pizza stands out because of its bold flavors. The combination of cheese, pickles, and spicy honey creates a fun taste experience. The creamy texture from the cream cheese pairs well with the crunch of pickles. This pizza surprises many who try it, and they love it! The spicy honey adds a sweet kick to the dish, making each bite exciting. Yes, you can use a gluten-free crust if you need one. Many stores sell tasty gluten-free pizza crusts. You can also make your own at home using gluten-free flour. Just follow the same steps in the Full Recipe to get great results. Make sure to check that your other ingredients are also gluten-free, especially the cream cheese. Making spicy honey is easy! Just mix honey with a pinch of cayenne pepper or your favorite hot sauce. Start with a small amount, taste, then adjust to your liking. This blend adds a nice heat to the honey, making it perfect for drizzling over your pizza. You can also try adding chili flakes or sriracha for a different flavor twist. In this post, we explored making dill pickle pizza. We covered ingredients, with options for custom flavors. The step-by-step guide made assembly and baking easy. I shared tips for perfect crusts and cheese melts. We also discussed variations, like toppings and sauces. Finally, I explained how to store and reheat leftovers. Dill pickle pizza can excite your taste buds. Give it a try, and enjoy!

Dill Pickle Pizza with Spicy Honey Tasty Flavor Fusion

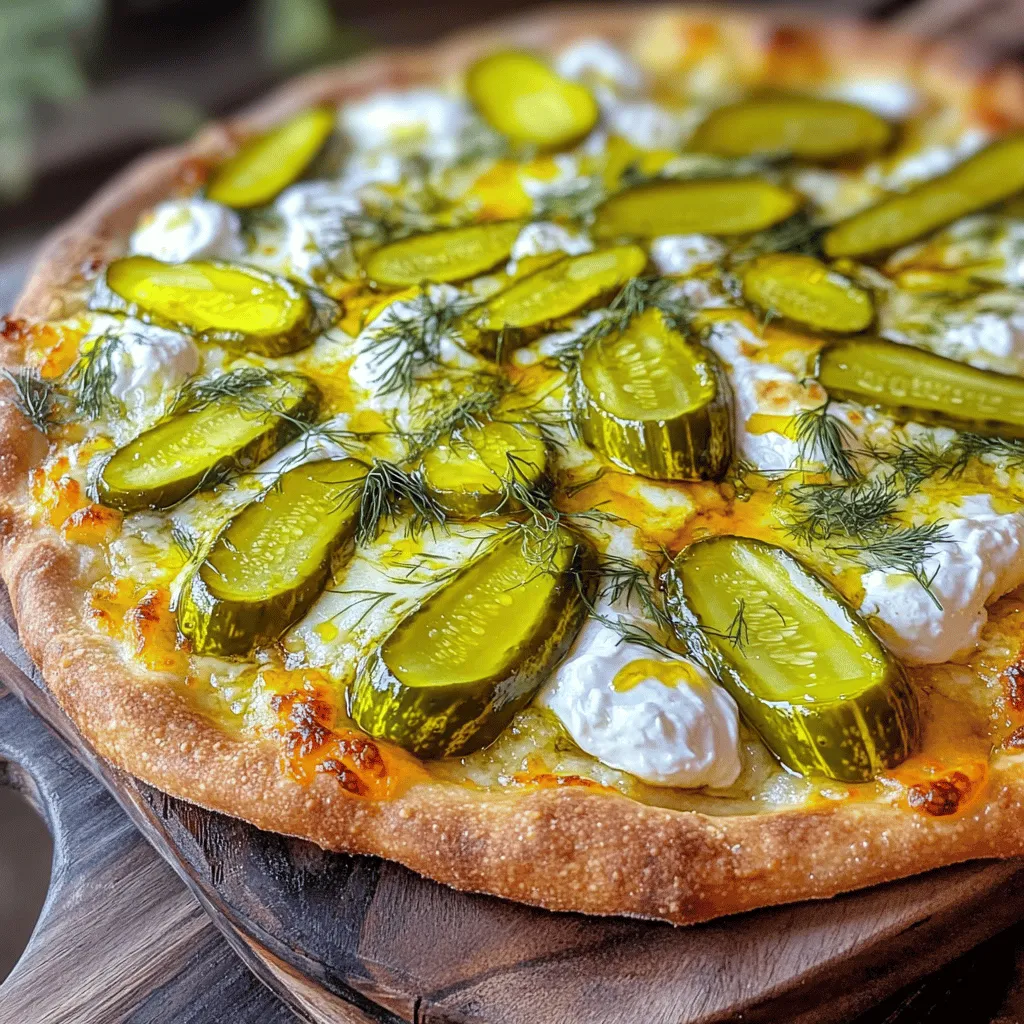
Are you ready to spice up your pizza night? This Dill Pickle Pizza with Spicy Honey offers a twist that

For Sheet Pan Fajita Veggies, you need fresh, colorful ingredients. Here’s what to gather: - 1 red bell pepper, thinly sliced - 1 yellow bell pepper, thinly sliced - 1 green bell pepper, thinly sliced - 1 medium red onion, sliced into wedges - 2 medium zucchinis, cut into half-moons - 1 tablespoon extra virgin olive oil Season with these spices: - 2 teaspoons chili powder - 1 teaspoon ground cumin - 1 teaspoon smoked paprika - 1/2 teaspoon garlic powder - 1/2 teaspoon fine sea salt - 1/4 teaspoon freshly ground black pepper These ingredients create a tasty base for your fajita veggies. To take your fajita veggies up a notch, consider adding: - Additional spices like cayenne pepper for heat - Fresh herbs such as oregano or thyme If you want protein, add grilled chicken, shrimp, or tofu. These options make the meal heartier. Pair your fajita veggies with: - Warm tortillas for wrapping - Rice for a filling base Trending side dishes include: - Guacamole for creaminess - Black beans for added protein These pairings make your meal balanced and satisfying. For the full recipe, check out the details provided above. Enjoy your cooking! First, let’s prep the vegetables. I like to slice one red, one yellow, and one green bell pepper. They add color and taste. Also, cut a medium red onion into wedges. Finally, slice two zucchinis into half-moons. This mix creates a nice texture and flavor. Next, we need to mix the spice blend. In a small bowl, combine two teaspoons of chili powder, one teaspoon of ground cumin, and one teaspoon of smoked paprika. Add half a teaspoon of garlic powder, half a teaspoon of fine sea salt, and a quarter teaspoon of freshly ground black pepper. Mix well. This blend gives our veggies a tasty kick. Now, let’s cook. Preheat your oven to 425°F (220°C). Once it’s hot, place the seasoned veggies on a large sheet pan in a single layer. This helps them roast evenly. Bake for 20 to 25 minutes. Stir halfway through. This step is key. Stirring helps all the vegetables cook well and gain that lovely golden color. After roasting, take the pan out and let it cool for 5 minutes. This time allows the flavors to blend. For garnishing, sprinkle fresh cilantro leaves over the veggies. They add a fresh touch. Serve the fajita veggies warm, paired with lime wedges. Squeezing fresh lime juice over them enhances the flavor. Enjoy this colorful and tasty dish! For more details, check the Full Recipe. - Overcrowding the pan: When you place too many veggies on the pan, they steam instead of roast. This means you won’t get that nice, crispy texture. Aim for a single layer of veggies for the best results. - Not preheating the oven properly: A hot oven helps your veggies cook evenly. If you don’t preheat, they may take longer to cook. Always set your oven to 425°F (220°C) and wait for it to reach that temperature before cooking. - Adding different vegetables: Feel free to mix in any veggies you love. Try corn, mushrooms, or asparagus. Each vegetable brings its own flavor and texture, making your dish unique. - Spice level adjustments: If you want more heat, add some diced jalapeños or a pinch of cayenne pepper. For milder flavors, reduce the chili powder or skip it altogether. Tailor the spices to fit your taste. - Ideas for storing and reheating: Store leftovers in an airtight container in the fridge for up to four days. To reheat, simply place them in a hot oven or microwave until warm. This keeps the flavors fresh and lovely. - Creative leftover recipes: Use leftover fajita veggies in wraps, omelets, or salads. They add great flavor and nutrition to any meal. You can even mix them into rice or quinoa for a quick lunch. For more details, check out the Full Recipe on how to create these tasty fajita veggies! {{image_4}} You can make your fajita veggies even better by adding more options. Try adding mushrooms, corn, or even eggplant. Each veggie brings its own taste and texture. You can also add leafy greens like spinach or kale for a healthy boost. For a vegan alternative, skip any animal-based toppings. Use avocado or a cashew cream instead. These swaps keep your meal plant-based and still full of flavor. If you need gluten-free options, focus on your seasonings. Most spices are naturally gluten-free. Always check labels to be sure. For a low-calorie twist, reduce the olive oil. You can use a light spray instead. This way, you cut calories without losing flavor. You can also add more veggies to fill your plate. This keeps your meal satisfying and healthy. Batch cooking can save time. Cook a large batch of fajita veggies on the weekend. Store them in meal prep containers. They last well in the fridge for up to five days. For freezer-friendly options, let the veggies cool completely. Place them in airtight bags or containers. You can store them for up to three months. When you’re ready to eat, just reheat and enjoy! Check out the Full Recipe for complete details. To keep your fajita veggies fresh, use airtight containers. Glass or plastic containers work great. Make sure they seal tightly. This helps keep air out and maintains flavor. If you have leftover veggies, cool them first before storing. This prevents moisture from building up inside the container. You can store fajita veggies in the fridge for up to four days. After that, they may spoil. Check for any slimy texture or bad smell. If you see these signs, it’s time to toss them. Always use your senses when checking for freshness. If you want to freeze fajita veggies, pack them in freezer-safe bags. Remove as much air as possible to prevent freezer burn. Label the bags with the date for easy tracking. When you’re ready to eat, thaw them in the fridge overnight for best results. Heat them in a pan to bring back their flavor and texture. Roasting fajita veggies at 425°F (220°C) gives the best results. This high heat helps the veggies caramelize. Caramelization adds great flavor and color. It also ensures they cook evenly and quickly. Make sure your oven is preheated before adding the veggies. This step is key to getting that perfect char and tenderness. Sheet pan fajita veggies can last about 3 to 5 days in the fridge. Store them in an airtight container. This helps keep the veggies fresh and tasty. Before eating, check for any signs of spoilage. If they look or smell off, it’s best to throw them away. Enjoy them warm or cold in salads or wraps. Yes, you can use frozen vegetables! However, they may release more water during cooking. This can lead to a softer texture. To avoid this, thaw and drain them first. Pat the veggies dry with a paper towel. Toss them with the oil and spices like fresh veggies. This way, you can still get a great flavor. If your veggies turn out soggy, don’t worry! There are a few fixes. First, try roasting them at a higher temperature. This helps moisture evaporate quickly. If they are already cooked, you can pan-fry them briefly. This will help crisp them up again. Next time, avoid overcrowding the pan. Give each piece space to roast well. For the full recipe, check out the detailed instructions. Sheet pan fajita veggies are a tasty and simple meal option. We covered essential ingredients, cooking steps, and tips to avoid common mistakes. You learned how to customize your dish for your taste and how to store leftovers. Now, you can enjoy fajita veggies that are bursting with flavor and easy to make. Use these tips to create a fun and healthy meal any night of the week. Happy cooking!

Sheet Pan Fajita Veggies Flavorful and Easy Dinner

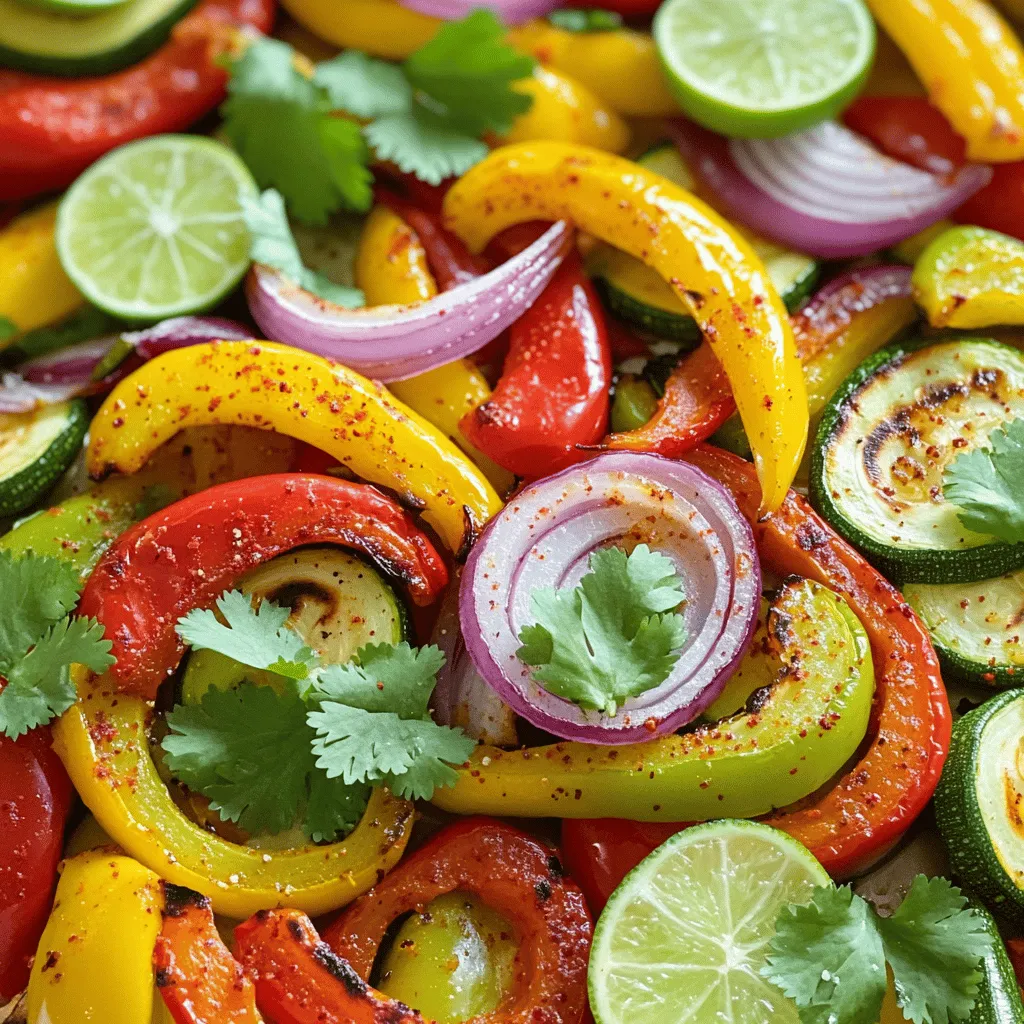
Looking for a quick and tasty dinner idea? Sheet Pan Fajita Veggies could be your new favorite! This dish features

For this tasty Honey Garlic Chicken Stir Fry, gather the following: - 1 lb (450g) boneless, skinless chicken breasts, thinly sliced - 2 tablespoons honey - 3 cloves garlic, minced - 1 tablespoon fresh ginger, minced - 2 tablespoons soy sauce - 1 tablespoon sesame oil - 1 bell pepper (red or yellow), thinly sliced - 1 cup broccoli florets - 1 cup snap peas - 2 green onions, finely chopped - 1 tablespoon cornstarch mixed with 2 tablespoons water (slurry) - Salt and pepper to taste - Cooked jasmine rice or noodles, for serving Using fresh ingredients makes a big difference. Choose: - Chicken: Look for organic, free-range chicken for better flavor. - Vegetables: Fresh, crisp veggies add texture and color to your dish. - Honey: Opt for raw honey for a richer taste and health benefits. - Soy Sauce: Use low-sodium soy sauce to control salt levels. Good-quality ingredients help create a delicious meal that everyone will enjoy. This stir fry pairs well with: - Jasmine rice for a fluffy base. - Noodles for a comforting twist. - A side salad for extra crunch and freshness. Add these sides to make your meal more complete and satisfying. Start by slicing the chicken into thin strips. Make sure they are even for cooking. In a large bowl, combine the sliced chicken with honey, minced garlic, ginger, soy sauce, and a bit of salt and pepper. Mix it well. This marinade helps the chicken soak up all the tasty flavors. Let it sit for at least 15 minutes. This wait makes a big difference in taste. Heat sesame oil in a large skillet or wok over medium-high heat. You want the oil to shimmer but not smoke. Once hot, add the marinated chicken to the skillet. Stir-fry for about 5 to 7 minutes. You want the chicken to be fully cooked and golden brown on the edges. This caramelization adds depth to the dish. Next, toss in the bell pepper, broccoli, and snap peas. Stir-fry for another 3 to 4 minutes. The goal is to keep the veggies bright and a bit crunchy. Then, pour in the cornstarch slurry while stirring. This will thicken the sauce and help it cling to the chicken and veggies. Cook for an additional minute until the sauce is thick and glossy. Finally, remove the skillet from heat and sprinkle with green onions. This adds a fresh burst of flavor. Serve the stir-fry over warm jasmine rice or noodles for a filling meal. For the full recipe, check the earlier section. To make your honey garlic chicken stir fry pop, use fresh ingredients. Fresh garlic and ginger add a bright taste. Try adding a splash of rice vinegar for some zing. You can also use a bit of chili paste if you like heat. Mixing in a squeeze of lime juice before serving brightens the dish. Don’t skip the cornstarch slurry; it helps the sauce stick to the chicken and veggies. A large skillet or wok is best for this stir fry. A non-stick surface helps prevent sticking and makes clean-up easier. Use a wooden spatula or a heat-resistant silicone spatula to toss the chicken and veggies. This keeps everything intact while mixing. If you have a splatter guard, it can help keep your stove clean while cooking. Serve your honey garlic chicken stir fry over warm jasmine rice or noodles. This helps soak up the delicious sauce. To make it look fancy, garnish with chopped green onions and sesame seeds. Adding a drizzle of extra honey on top makes it even more special. You can serve it with a side of steamed dumplings or a simple salad for a full meal. Enjoy your flavorful weeknight treat! {{image_4}} You can switch the chicken for other proteins. Try using shrimp or beef. Both options add unique flavors. Cook shrimp until they turn pink. For beef, choose thin slices of flank steak. Each protein will change the dish's taste, making it exciting. If you want a vegetarian or vegan meal, tofu works great. Use firm tofu for the best texture. Press it to remove extra moisture, then cube it. Marinate it just like the chicken. This allows tofu to soak in all the flavors. You can also use tempeh for a nutty taste. Feel free to mix and match your veggies. Carrots, bell peppers, and mushrooms are delicious options. You can even toss in spinach or zucchini for more color. Choose what you enjoy or what you have on hand. This keeps the dish fresh and fun. After enjoying your Honey Garlic Chicken Stir Fry, store leftovers in an airtight container. Let the stir fry cool down first. Place it in the fridge where it can last for up to three days. If you keep it in a shallow container, it cools faster. This helps keep the food fresh longer. When reheating, you want to keep the flavors intact. Use a skillet for the best results. Heat it over medium heat. Add a splash of water or broth to keep it moist. Stir it often until it's hot all the way through. This method makes sure your stir fry stays tasty and not dry. If you want to save some for later, freezing is a great option. First, let the stir fry cool completely. Then, place it in freezer-safe bags or containers. Remove as much air as possible to avoid freezer burn. It can last in the freezer for up to three months. When you're ready to eat, thaw it in the fridge overnight before reheating. To spice up your Honey Garlic Chicken Stir Fry, add chili flakes or fresh peppers. You can also use sriracha or chili garlic sauce for heat. Start with a small amount and taste as you go. Adjust according to your taste. Yes, you can swap soy sauce for tamari or coconut aminos. For a twist, try teriyaki or sweet and sour sauce. Each option gives a new flavor to the dish while keeping it delicious. Many Asian restaurants feature Honey Garlic Chicken Stir Fry on their menus. Look for local Chinese or Thai spots. They often have tasty versions that you can enjoy when you don’t feel like cooking. To scale up the recipe, simply multiply the ingredients by the number of servings you need. Keep the same cooking times, but use a larger skillet or wok. This way, everything cooks evenly. Jasmine rice pairs perfectly with this stir fry due to its light flavor. If you prefer noodles, try rice noodles or egg noodles. Both options soak up the sauce well and make the meal complete. For the full recipe and detailed instructions, check the [Full Recipe]. You’ll find everything you need to create this tasty dish with ease. In this blog post, we covered the recipe for Honey Garlic Chicken Stir Fry. We looked at ingredients, cooking steps, and important tips to boost flavor. You can even explore variations with different proteins and vegetables. Proper storage and reheating methods are key to enjoying leftovers. Finally, I answered common FAQs for more guidance. Use this recipe to create tasty meals that impress. Enjoy cooking!

Honey Garlic Chicken Stir Fry Flavorful Weeknight Meal

Are you ready to whip up a tasty meal that the whole family will love? My Honey Garlic Chicken Stir

- Cauliflower florets - All-purpose flour - Buffalo sauce - Olive oil - Fresh parsley for garnish - Garlic powder - Onion powder - Smoked paprika - Salt and pepper To make buffalo cauliflower bites, you need a few key items. First, use fresh cauliflower florets. This gives a great texture. Next, grab all-purpose flour. It helps create a crispy coating. Finally, buffalo sauce brings the heat and flavor. You can add olive oil for extra richness. Fresh parsley adds a nice touch when you serve. It makes the dish pop with color. For seasonings, garlic powder and onion powder are must-haves. They add depth to the flavor. Smoked paprika gives a slight smokiness. Don't forget salt and pepper to enhance everything. These ingredients are simple but crucial. They work together to create a delicious snack. You'll enjoy every crispy bite. For more details, check the Full Recipe. To make buffalo cauliflower bites, follow these clear steps. - Preheat your oven to 450°F (230°C). - Line a baking sheet with parchment paper. This helps with cleanup and sticking. - In a bowl, combine 1/2 cup of all-purpose flour, 1/2 cup of water, 1 teaspoon of garlic powder, 1 teaspoon of onion powder, 1/2 teaspoon of smoked paprika, and salt and pepper to taste. - Whisk these ingredients until smooth. The batter should not have lumps. - Dip each cauliflower floret into the batter. Make sure each piece is well-coated. - Place the coated florets on the lined baking sheet. Bake for 25 minutes, flipping them halfway for even browning. - In a small bowl, mix 1 cup of buffalo sauce with 1 tablespoon of olive oil. - Stir well to ensure the sauce is smooth and even. - After the first bake, toss the cauliflower bites in the buffalo sauce. - Return them to the oven for another 10 to 15 minutes. This makes them crispy and flavorful. For a complete guide, check the Full Recipe. Enjoy creating this tasty snack! To make your buffalo cauliflower bites extra crispy, you can bake them longer if necessary. Keep an eye on them in the oven. If they aren’t brown enough, add a few more minutes. If your oven has a convection setting, use it! This setting helps circulate hot air, which makes the bites crispier. Want to switch things up? Use gluten-free flour for a great gluten-free option. You can also try different hot sauces. Each sauce brings its own unique flavor. Experiment to find your favorite! These bites are tasty on their own, but you can make them even better. Pair them with crunchy vegetable sticks like celery or carrots. They add a fresh taste and nice texture. For dipping sauces, ranch or blue cheese works wonders. These flavors complement the spicy bites perfectly. Try these tips to elevate your buffalo cauliflower bites! For the complete cooking process, don’t forget to check out the Full Recipe! {{image_4}} You can easily make buffalo cauliflower bites vegan. First, check that your buffalo sauce is vegan. Many brands offer plant-based options. Next, instead of all-purpose flour, use a flax egg. To make a flax egg, mix one tablespoon of ground flaxseed with three tablespoons of water. Let it sit for about five minutes until it thickens. This swap keeps the bites vegan while adding a nice texture. Want more kick? Add a pinch of cayenne pepper to the batter for extra heat. You can also try different spices. Cumin adds a warm, earthy flavor. Smoked paprika gives a rich taste that enhances the dish. Don’t be afraid to get creative here; you might find a new favorite. For a healthier option, try using an air fryer. Set it to 400°F (200°C) and cook the bites for about 15 minutes, shaking the basket halfway through. This method keeps them crispy without much oil. If you prefer stovetop frying, heat oil in a pan over medium heat. Fry the battered cauliflower for about 3-4 minutes on each side until golden brown. This traditional method offers a delightful crunch and a rich flavor. To store leftover buffalo cauliflower bites, let them cool first. Place the bites in an airtight container. This helps keep them fresh. I recommend using glass or plastic containers with tight lids. These containers prevent moisture loss and keep your bites crispy. If you want to freeze your buffalo cauliflower bites, let them cool completely. Then, lay them on a baking sheet in a single layer. This way, they freeze without sticking together. After a few hours, transfer them to a freezer-safe bag or container. Make sure to remove as much air as possible. To reheat, bake them at 400°F (200°C) for about 15 minutes. This will help restore their crispiness. Buffalo cauliflower bites last about 3-5 days in the fridge. Make sure to check for signs of spoilage, like a sour smell or slimy texture. If you see any mold, it’s best to discard them. Keeping track of your bites will ensure you enjoy them at their best! Buffalo cauliflower bites are a tasty, plant-based snack. They have a crunchy outside and a tender inside. The flavor combines the heat of buffalo sauce with garlic and spices. You get a hint of smoke from the smoked paprika. This snack is a great alternative to chicken wings. To boost the heat, you can add cayenne pepper to the batter. You can also mix in extra hot sauce with the buffalo sauce. Try using a spicier brand of buffalo sauce for more kick. Adjust the spice level to fit your taste buds. Start small and add more heat until it’s just right. Yes, you can use frozen cauliflower florets. Thaw them first and pat them dry with a towel. This step helps remove excess moisture. A dry floret will get crispier when baked. Keep in mind that the cooking time may change slightly. Making buffalo sauce at home is easy. Start with 1 cup of hot sauce. Combine it with 1/4 cup of melted butter. Mix in a bit of garlic powder for flavor. Adjust the flavor with more hot sauce or butter to suit your taste. For a twist, add a dash of vinegar or a pinch of cayenne. You can find the full recipe in the main article. Buffalo cauliflower bites are easy and fun to make. We covered key ingredients like cauliflower, flour, and buffalo sauce. I shared step-by-step instructions for baking them to crispy perfection. You now have tips for extra crispiness and ways to customize flavors. Whether you enjoy them as a snack or a meal, these bites deliver a tasty punch. Keep experimenting with new flavors and cooking methods to find your favorite way to enjoy them. With the right ingredients and techniques, you can impress friends and family every time.

Buffalo Cauliflower Bites Crispy Flavorful Snack

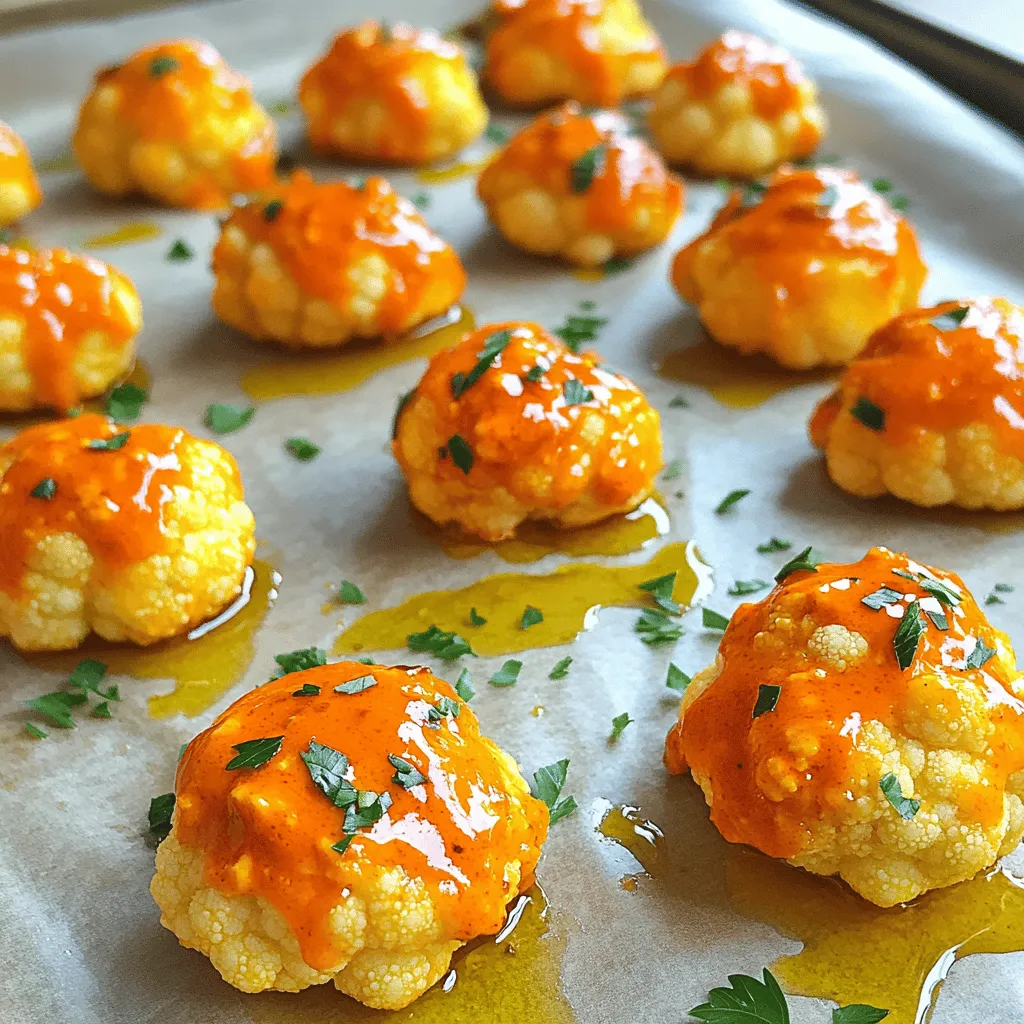
If you’re craving a bold, tasty snack, Buffalo Cauliflower Bites are the answer. These crispy, flavorful bites pack a punch

- 2 medium zucchinis, thinly sliced into rounds - 1 cup freshly grated Parmesan cheese - 2 tablespoons extra virgin olive oil - 1 teaspoon garlic powder - 1 teaspoon onion powder - 1 teaspoon smoked paprika - Sea salt and freshly ground black pepper, to taste - Fresh parsley, finely chopped (for garnish) When I make Garlic Parmesan Zucchini Chips, I love using fresh zucchinis. They add a sweet and mild flavor. The Parmesan cheese gives a rich taste. It melts perfectly and turns golden while baking. Extra virgin olive oil ensures the chips crisp up nicely. For seasonings, I use garlic powder, onion powder, and smoked paprika. Each spice adds depth to the flavor. The garlic powder gives a strong kick, while onion powder adds sweetness. Smoked paprika brings a subtle smokiness that really elevates the dish. You can also add optional garnishes. A sprinkle of sea salt enhances the taste. Freshly ground black pepper adds a bit of heat. Lastly, I love adding chopped parsley for a pop of color. It makes the chips look even more appealing. This dish is simple yet packed with flavor. You can find the detailed instructions in the Full Recipe. - Preheat the oven to 225°F (110°C). - Prepare the baking sheet by lining it with parchment paper. This keeps the chips from sticking. - In a bowl, combine the grated Parmesan cheese, garlic powder, onion powder, smoked paprika, sea salt, and black pepper. Mix them well. - Add the thin zucchini slices to the bowl. Drizzle olive oil over the slices. Toss gently to coat each piece. - Arrange the coated zucchini on the baking sheet in a single layer. Make sure they do not overlap. - Place the baking sheet in the oven and bake for about 2 hours. Check them halfway through. Rotate the baking sheet for even cooking. - When golden brown and crispy, take them out. Let them cool a bit before serving. - For a nice touch, sprinkle fresh parsley over the chips before you enjoy them. - Slice thickness: Cut your zucchini into thin rounds, about 1/8 inch thick. Thin slices bake better and become crispier. - Oven temperature tips: Bake at 225°F (110°C). This low temperature dries them out slowly, leading to perfect crispiness. - Additional spices: Try adding cayenne for heat or Italian herbs for a twist. A pinch of chili powder also works well. - Alternative cheese options: You can use Pecorino Romano for a sharper taste or nutritional yeast for a vegan option. - Presentation ideas: Serve in a rustic bowl or on a wooden platter. This makes your chips look inviting. - Dipping sauce recommendations: Pair with marinara sauce or a garlic aioli. These dips add flavor and fun to your snack time. For the full recipe, check out the detailed instructions above. Enjoy your tasty snack! {{image_4}} You can spice things up with a spicy garlic Parmesan version. Just add some red pepper flakes to the cheese mix. This gives your chips a nice kick. You can also try herb-infused versions. Mix in dried oregano or thyme for a fresh taste. If you want to switch it up, use other vegetables. Sweet potatoes or eggplant make great alternatives. They both have a different texture but will still taste amazing. You can also change the cheese. Try using cheddar or a dairy-free cheese for a unique flavor. For a faster option, use an air fryer. Preheat it to 350°F (175°C) and cook the zucchini chips for about 10-15 minutes. Keep an eye on them to avoid burning. If you prefer pan-frying, heat some olive oil in a skillet. Fry each chip until golden brown and crispy. This gives a nice, crunchy texture. Experiment with these variations to find your favorite flavor and method! If you need detailed guidance, check the Full Recipe for complete steps. To keep your zucchini chips fresh, store them in an airtight container. This will help maintain their crunch. If you have a lot of chips, use a larger container. Remember to let them cool completely before storing. This way, moisture won’t build up inside the container. For the best texture, reheat your chips in the oven. Set your oven to 350°F (175°C). Spread the chips on a baking sheet and warm them for about 5-10 minutes. This helps them stay crispy. If you use a microwave, expect them to lose some crunch. Place them on a microwave-safe plate, cover lightly, and warm for 30 seconds at a time. Your Garlic Parmesan zucchini chips can last up to 3 days when stored properly. Always check for signs of spoilage. If they smell off or feel soft, it’s best to toss them. Fresh and crispy chips are always the goal! Enjoy your tasty snack while it lasts. You can serve Garlic Parmesan Zucchini Chips with various dips. Here are some tasty options: - Marinara sauce - Ranch dressing - Hummus - Tzatziki sauce These dips add a nice touch to the crunchy chips. You can also pair them with other snacks. Try serving them with: - Fresh veggie sticks - Cheese platter - Mixed nuts These combinations make a fun snack board for sharing. Yes, you can make these zucchini chips ahead of time. To store them, follow these tips: - Keep the chips in an airtight container. - Place parchment paper between layers to prevent sticking. This helps them stay fresh and crisp. To keep your zucchini chips crispy, focus on these key factors: - Slice the zucchini very thin. This helps them bake evenly. - Use a low oven temperature. Baking at 225°F (110°C) helps them dry out. - Space the chips out on the baking sheet. Allowing air to circulate keeps them crisp. By following these steps, you can enjoy delicious, crunchy zucchini chips! This blog post covered the key ingredients and steps needed to make delicious garlic Parmesan zucchini chips. We explored how to prepare and bake the chips for the best texture. I shared tips for extra flavor and different cooking methods. Remember, these chips are easy to make and fun to serve. Use the variations and storage tips for your next snack. Enjoy experimenting with flavors and impress your family and friends!

Garlic Parmesan Zucchini Chips Crunchy and Tasty Snack

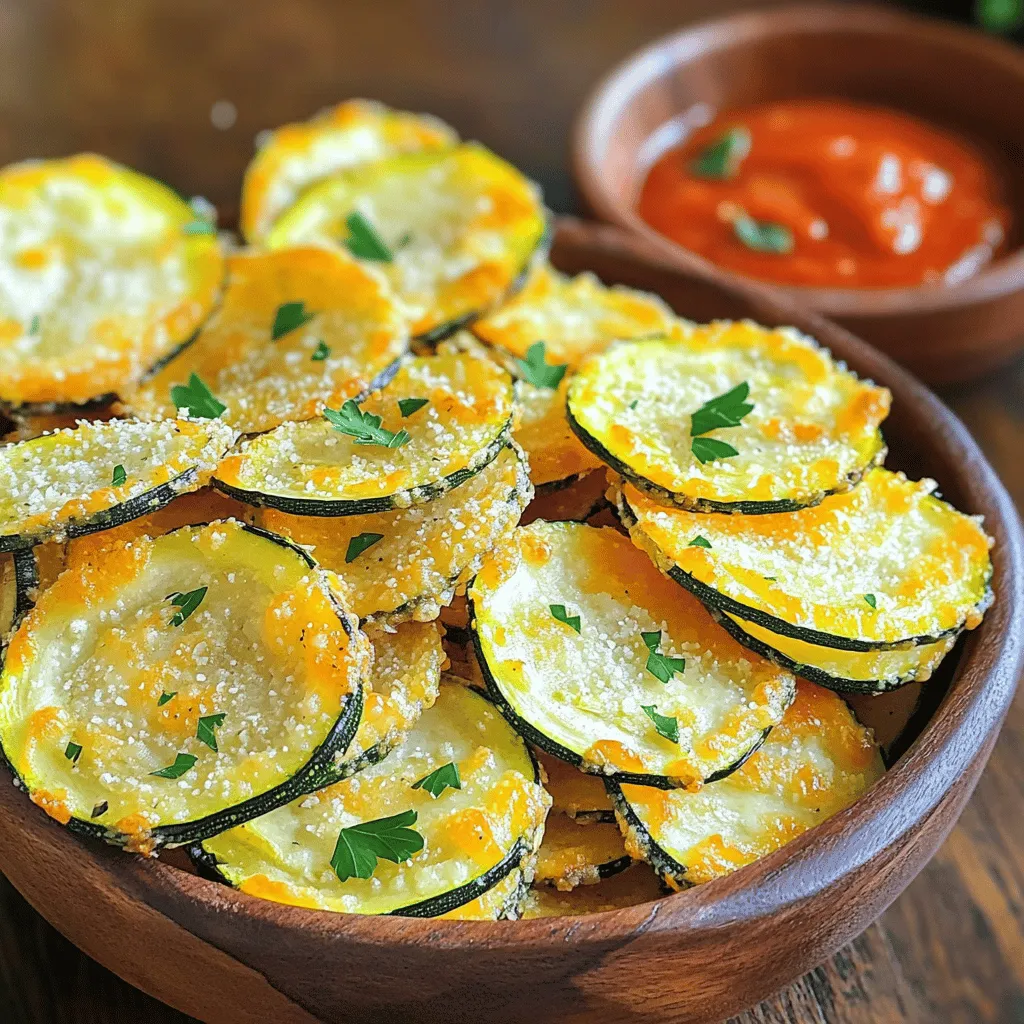
Looking for a crunchy and tasty snack that won’t ruin your diet? Garlic Parmesan Zucchini Chips are the perfect solution!

- 1 cup unsalted butter, melted - 1 cup granulated sugar - 1 cup packed brown sugar - 4 large eggs - 1 teaspoon vanilla extract - 1 cup all-purpose flour - 1/2 cup unsweetened cocoa powder - 1/4 teaspoon salt - 1 cup chocolate chips - 2 cups mini pretzels - 1/2 cup caramel sauce (for drizzling) - Sea salt for sprinkling To make these brownies, you need simple ingredients. The unsalted butter gives the base a rich taste. Both granulated and brown sugar add sweetness and depth. Eggs help bind everything together and create a soft texture. Vanilla extract adds a warm flavor that enhances the chocolate. Next, all-purpose flour and cocoa powder provide the structure. The flour helps the brownies rise while the cocoa gives that deep chocolate flavor. A pinch of salt balances the sweetness and enhances taste. Chocolate chips add melty goodness. They create pockets of rich chocolate in each bite. Mini pretzels crown the brownies with a salty crunch. They also bring a fun twist to the dessert. Finally, caramel sauce drizzled on top adds a sweet, gooey finish. A sprinkle of sea salt on top makes the flavors pop. These ingredients combine to create a delicious treat that has something for everyone. For the full recipe, check out the detailed instructions later in this article. Start by preheating your oven to 350°F (175°C). Next, grab a 9x13 inch baking pan. Grease it lightly or line it with parchment paper. This will help you remove the brownies easily once they are baked. In a large bowl, pour in the melted butter. Then add the granulated sugar and brown sugar. Use a whisk to mix until smooth. Next, crack in the eggs, one at a time. Make sure to mix well after each egg. Finally, stir in the vanilla extract for that yummy flavor. In a separate bowl, sift together the all-purpose flour, cocoa powder, and salt. Gradually add this dry mix to the wet ingredients. Use a spatula to fold it gently, being careful not to overmix. You want the batter just combined for that perfect fudgy texture. Now, gently fold in the chocolate chips. This will add rich bites of chocolate in every piece. Carefully pour the brownie batter into your prepared baking pan. Use a spatula to spread it evenly in the pan, reaching all corners. Take your mini pretzels and press them lightly into the top of the brownie batter. Arrange them to form a beautiful crown in the center. Make sure to leave space around the edges for the brownies to rise while baking. Place your baking pan in the preheated oven. Bake for 25-30 minutes. To check if they are done, insert a toothpick in the center. It should come out with moist crumbs; avoid wet batter. Once baked, remove the pan and let the brownies cool for about 15 minutes. While still warm, drizzle caramel sauce over the top. Sprinkle a bit of sea salt for that perfect touch. After they cool completely, cut into squares. Enjoy your brownies crowned with pretzels! For the full recipe, check out the details above. To get soft and chewy brownies, follow these tips. Use room temperature eggs for even mixing. Melt your butter but do not let it boil. This keeps the brownies moist. Mix the wet and dry ingredients gently. Overmixing makes them tough. Bake just until a toothpick shows moist crumbs. You can change up the flavors for fun! Try adding nuts like walnuts or pecans for crunch. Swap in peanut butter chips for a nutty taste. If you love coffee, add a teaspoon of instant espresso. For a fruity twist, mix in some chopped cherries or raspberries. When serving, cut the brownies into squares for easy sharing. Drizzle extra caramel sauce on top for a sweet touch. Sprinkle a bit of sea salt to balance the sweetness. Place them on a pretty platter with more mini pretzels around. For a fun treat, serve with a scoop of vanilla ice cream on the side. For the full recipe, check above. Enjoy baking these brownies with a pretzel crown! {{image_4}} You can make your brownies even better by adding nuts. Walnuts or pecans work well. Chop them up and mix them into the batter before you pour it into the pan. You can also sprinkle them on top with the pretzels. This adds a nice crunch to your sweet treat. If you want something sweeter, try adding mini marshmallows or even M&Ms. These toppings can create a fun and colorful look. If you have dietary needs, you can still enjoy these brownies. Use coconut oil instead of butter for a dairy-free option. You can also swap regular sugar for coconut sugar if you want a healthier choice. For a gluten-free version, use almond flour or a gluten-free blend instead of all-purpose flour. Just make sure to adjust the baking time as needed. These changes let everyone enjoy a delicious brownie. Want to shake things up? Add flavors to your brownies! A teaspoon of espresso powder gives a rich taste. It enhances the chocolate flavor. If you love mint, add a few drops of peppermint extract. This will make your brownies fresh and exciting. You can even mix in orange or almond extract for a unique twist. Experiment with these flavors to find your favorite! To keep your brownies fresh, store them in an airtight container. Place parchment paper between layers if you stack them. This prevents sticking and keeps the pretzels crunchy. Avoid using plastic wrap directly on the brownies. It can make them soggy. When stored correctly, brownies with pretzel crown last about 3 to 4 days at room temperature. If you want to keep them longer, move them to the fridge. In the fridge, they can last up to a week. Just remember to bring them back to room temperature before serving for the best taste. Freezing brownies is easy and fun. Cut them into squares first. Wrap each piece tightly in plastic wrap, then place them in a freezer bag. They can last up to 3 months in the freezer. When you're ready to enjoy, let them thaw in the fridge overnight. You can also warm them up in the microwave for a few seconds. This brings back their gooey goodness! For the full recipe, check out the earlier section where I covered all the steps. Yes, you can! You can swap mini pretzels for regular-sized ones. You can even use chocolate-covered pretzels for a sweet twist. Just make sure they fit well on top of the brownies. Their salty crunch adds a fun texture. It balances the rich chocolate flavor perfectly. If you need an egg substitute, use unsweetened applesauce. A quarter cup of applesauce replaces one egg well. You can also use mashed bananas or flaxseed meal. For flaxseed, mix one tablespoon with three tablespoons of water. Let it sit for five minutes before using. These options keep your brownies moist and tasty. To check if your brownies are done, insert a toothpick into the center. If it comes out with moist crumbs, they are ready. Avoid wet batter on the toothpick, as that means they need more time. Keep an eye on them around the 25-minute mark to prevent overbaking. Yes, you can make these brownies gluten-free! Simply swap all-purpose flour for a gluten-free flour blend. Make sure the blend you choose works well in baking. This way, you can enjoy the same fudgy texture and flavor without gluten. Just follow the same steps in the Full Recipe. This blog post shows you how to make delicious brownie treats. You learned the key ingredients, like butter, chocolate chips, and pretzels. I shared easy step-by-step instructions for baking. We talked about tips for perfect texture and fun variations to try. I also covered how to store your brownies and answers to common questions. Now, you are ready to bake these sweet snacks. Enjoy every bite!

Brownies with Pretzel Crown Irresistible Sweet Treat

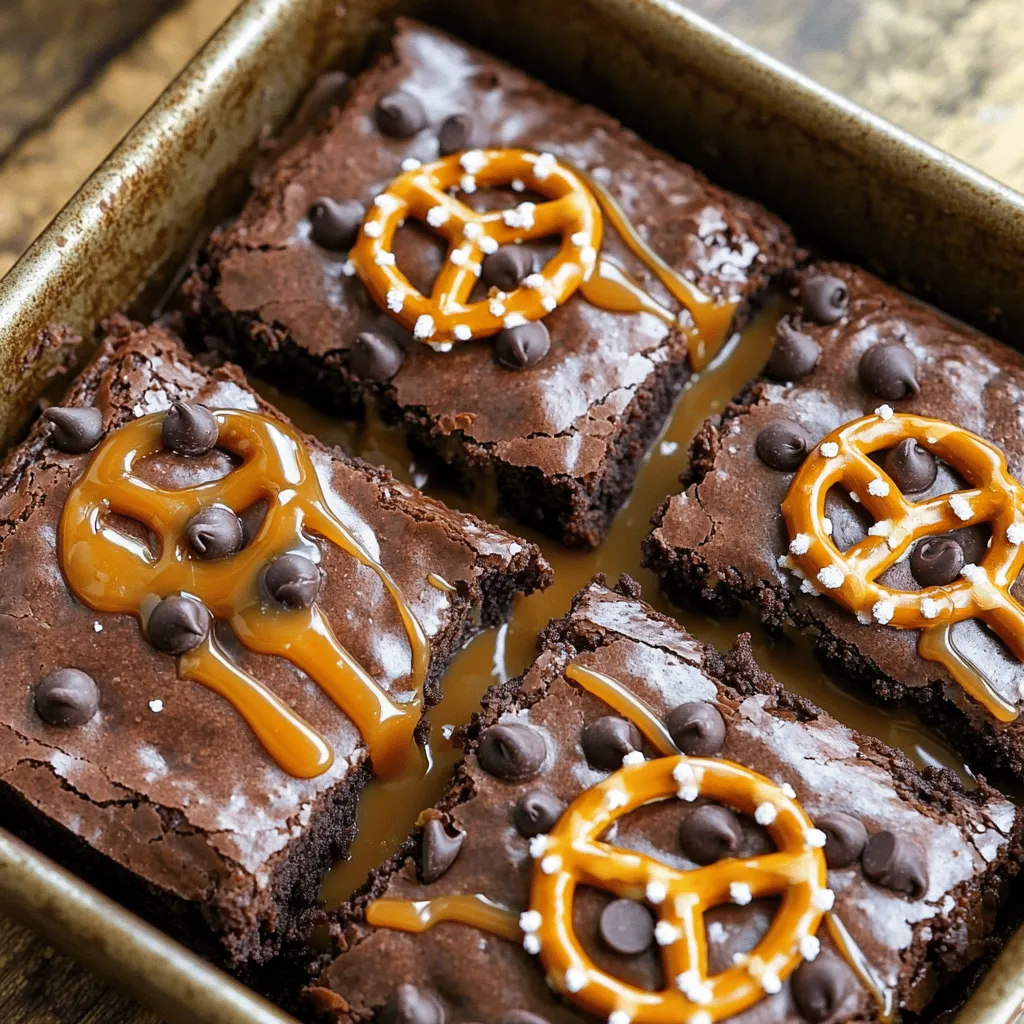
Are you ready to try an amazing dessert? These Brownies with Pretzel Crown combine rich chocolate with crunchy pretzels, creating

Older posts
Newer posts
← Previous Page1 … Page23 Page24 Page25 … Page86 Next →

dsad

© 2026 yumymoments • Built with GeneratePress

Our Policies

  • Copyright Policy
  • Cookie Policy
  • GDPR Policy
  • Privacy Policy
  • Disclaimer
  • Terms Of Use

More Information

  • Home
  • About
  • Contact
  • Appetizers
  • Dessert
  • Dinner
  • Drinks
©2026, yumymoments About Back To Top