Skip to content
DisclaimerTerms Of UseGDPR PolicyCookie Policy

yumymoments

  • Home
  • Drinks
  • Appetizers
  • Dinner
  • Dessert
  • About
  • Contact
  • Privacy Policy
DisclaimerTerms Of UseGDPR PolicyCookie Policy

NO-ING-IMG

- 1.5 lbs boneless, skinless chicken thighs - 1 cup teriyaki sauce (store-bought or homemade) - 2 cups broccoli florets - 1 red bell pepper, sliced into strips - 1 cup carrots, peeled and julienned - 1 tablespoon olive oil - 1 teaspoon sesame oil - 2 cloves garlic, finely minced - 1 teaspoon fresh ginger, grated - Sesame seeds and green onions for garnish - Salt and freshly ground black pepper to taste When preparing sheet pan teriyaki chicken and veggies, you want fresh and vibrant ingredients. Start with 1.5 pounds of boneless, skinless chicken thighs. They cook evenly and stay juicy. You can also use chicken breasts, but thighs add more flavor. Teriyaki sauce is key for this dish. You can buy it or make your own. A homemade sauce often tastes fresher and has more depth. Your veggies should consist of 2 cups of broccoli florets, 1 sliced red bell pepper, and 1 cup of julienned carrots. The colors not only look good but also give a range of flavors and textures. For the marinade, you need olive oil, sesame oil, minced garlic, and grated ginger. These ingredients enhance the chicken's taste and aroma. Finally, don't forget salt and black pepper to bring all the flavors together. Finish with sesame seeds and sliced green onions for garnish. They add crunch and a fresh touch. - Preheat the oven to 400°F (200°C). - In a bowl, mix teriyaki sauce, garlic, ginger, olive oil, and sesame oil. Set aside one-third of the marinade for later. - Place chicken thighs in a dish or bag. - Pour the marinade over the chicken, ensuring it’s well coated. - Let it marinate for at least 30 minutes, but two hours is best. - Wash and cut the broccoli, bell pepper, and carrots. - Spread the veggies on the sheet pan. Drizzle with olive oil, then add salt and pepper. Toss gently to coat. - Take the marinated chicken out and place it on the veggies. - Make sure the chicken and vegetables are spread out evenly. - Put the sheet pan in the oven and roast for 25-30 minutes. - Check that the chicken reaches 165°F (75°C) and that veggies are tender. - In the last five minutes, brush the reserved marinade onto the chicken for extra flavor. - Once done, sprinkle sesame seeds and sliced green onions before serving. - Best practices for marinating chicken: Always marinate the chicken for at least 30 minutes. For the best flavor, I suggest marinating it for up to 2 hours. Use a ziplock bag or a shallow dish. Make sure the chicken is well coated in the marinade. This helps the flavors soak in. - How to enhance the teriyaki flavor: To boost the teriyaki taste, add minced garlic and fresh ginger to the marinade. These ingredients add depth. A sprinkle of sesame seeds on top after baking gives a nutty finish. - Ensuring even cooking of chicken and veggies: Spread the chicken and veggies in a single layer on the sheet pan. This allows heat to circulate. It helps everything cook evenly. Check the chicken's internal temperature; it should hit 165°F (75°C). - Using parchment paper for easy cleanup: Line your sheet pan with parchment paper before you start. This makes cleanup simple. You can just lift the parchment and toss it after serving. - Presentation tips for serving the dish: Serve directly from the sheet pan for a casual feel. For a fancier touch, plate individual servings. Garnish with extra sesame seeds and a wedge of lime. This adds color and freshness. - Pairing ideas with sides or beverages: This dish pairs well with steamed rice or quinoa. A light salad with a citrus vinaigrette complements the flavors nicely. For drinks, try iced green tea or a light white wine. {{image_4}} You can switch up the protein in this dish. Chicken thighs are great, but chicken breasts work too. Just ensure they are cooked to 165°F. If you want a meatless option, try tofu. Firm tofu soaks up the marinade well. For a seafood twist, shrimp is a fun choice. It cooks quickly and adds a nice flavor. Many vegetables fit well in this dish. You can use snap peas, zucchini, or asparagus. These add crunch and color. You can also use seasonal veggies. In spring, add peas or radishes. In fall, try butternut squash or Brussels sprouts. Fresh veggies make the meal pop. While teriyaki sauce is tasty, other options can change the flavor. Try a sweet chili sauce for a kick. For a spicy touch, add sriracha to the marinade. You can also go for a honey garlic sauce. Just mix honey, soy sauce, and garlic for a quick dip. This dish is fun to customize with sauces. To store your Sheet Pan Teriyaki Chicken and Veggies, let it cool first. Place it in an airtight container. This dish lasts about 3 to 4 days in the fridge. Ensure you keep it at a safe temperature below 40°F (4°C). This way, you can enjoy leftovers without worry. If you want to save it for later, freezing is a great option. After cooling, transfer the chicken and veggies to freezer-safe bags or containers. It will stay fresh for about 2 to 3 months. When you’re ready to eat, thaw it in the fridge overnight. You can also use the microwave for quicker thawing. Just be careful not to cook it in the microwave. To reheat your dish, the oven works best. Preheat it to 350°F (175°C). Place the chicken and veggies on a baking sheet. Heat for about 15 to 20 minutes, or until warm. You can also use the microwave, but this may change the texture. If you want to keep the flavor and crispness, the oven is your best friend. Yes, you can use frozen chicken. However, it will change the marination and cooking times. First, thaw the chicken completely. This may take a few hours in the fridge. Once thawed, you can marinate it as usual. Be aware that cooking time may increase by 5 to 10 minutes. Always check that the chicken reaches 165°F (75°C) to ensure it is safe to eat. Yes, making your own teriyaki sauce is easy. Just mix these ingredients in a bowl: - 1 cup soy sauce - 1/2 cup honey or brown sugar - 1/4 cup rice vinegar - 2 cloves minced garlic - 1 teaspoon grated ginger Heat the mixture in a saucepan until it thickens slightly. You can also find many recipes online for homemade teriyaki sauce. You can serve this dish with many sides. Here are some great options: - Steamed rice or jasmine rice - Quinoa for a healthier choice - A fresh green salad - Noodles tossed in sesame oil These sides will complement the flavors of the teriyaki chicken and veggies well. Yes, this recipe is great for meal prep. You can make it ahead of time and store it. After cooking, let the chicken and veggies cool completely. Then, put them in airtight containers. They will last about 3-4 days in the fridge. Reheat in the oven or microwave when ready to enjoy. This makes for easy and delicious lunches or dinners! This recipe for sheet pan teriyaki chicken is an easy and tasty choice. You learn about main ingredients, including chicken, veggies, and sauces. I shared steps for marinating, baking, and serving this dish. You can adapt it with different proteins and veggies. For the best flavor, use fresh ingredients and try different sauces. Enjoy this dish as a meal prep option or a quick dinner. With simple steps, you can create a delicious meal your whole family will love!

Sheet Pan Teriyaki Chicken & Veggies Easy Dinner

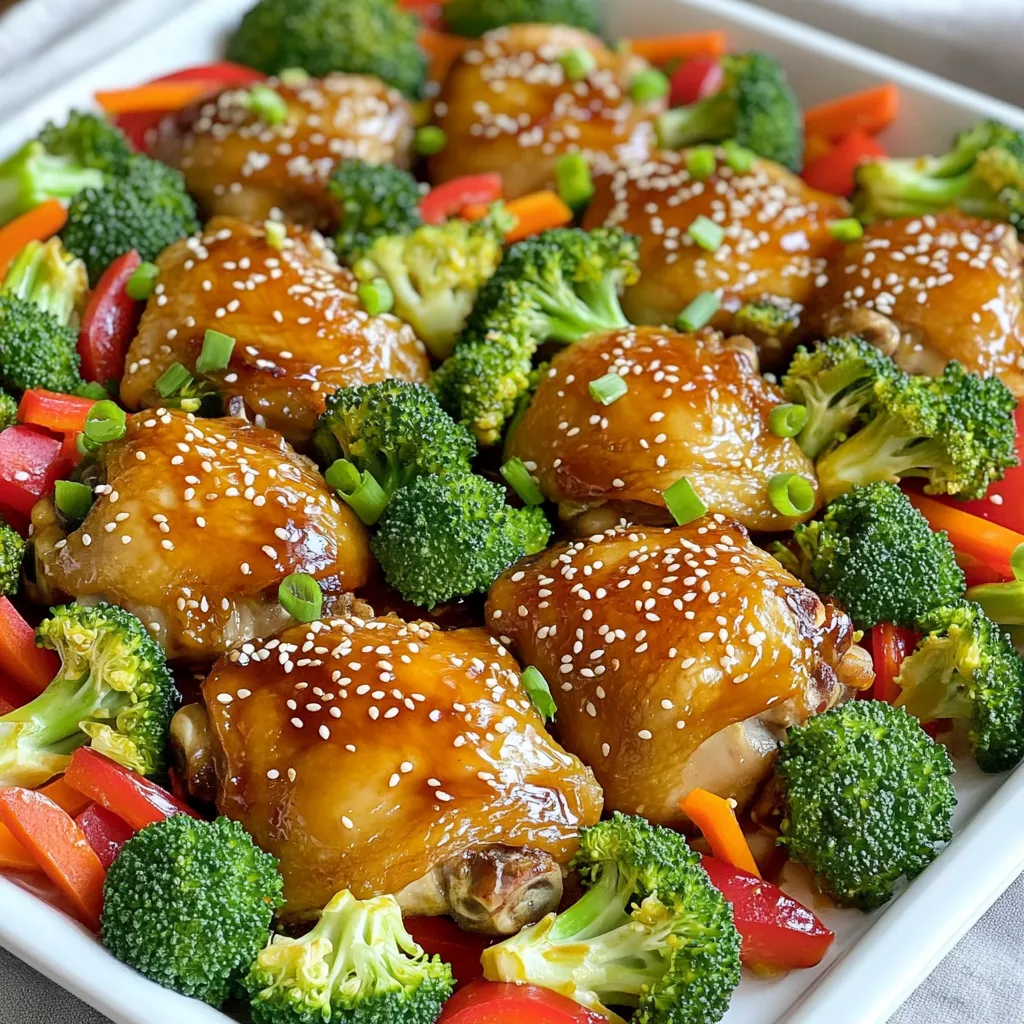
Looking for a quick and delicious dinner idea? Try my Sheet Pan Teriyaki Chicken & Veggies! This easy dish is

To make crispy air fryer cauliflower wings, you need the following main ingredients: - 1 medium head of cauliflower, cut into bite-sized florets - 1 cup all-purpose flour (or chickpea flour for gluten-free) - 1 teaspoon garlic powder - 1 teaspoon onion powder - 1 teaspoon smoked paprika - 1/2 teaspoon cayenne pepper (adjust to taste) - 1 cup unsweetened plant-based milk - 1 cup breadcrumbs (panko for extra crunch) - 1 tablespoon olive oil - Salt and pepper to taste These ingredients help create a tasty batter and coating that makes the wings crispy. For added flavor, consider these optional ingredients: - Your favorite hot sauce for tossing after cooking - Additional spices like cumin or Italian herbs - Nutritional yeast for a cheesy flavor These extras can elevate the taste and make your cauliflower wings unique. If you want to keep this recipe gluten-free, use chickpea flour instead of all-purpose flour. Panko breadcrumbs can be swapped with gluten-free breadcrumbs. This way, you can enjoy delicious wings without gluten. Start by washing the cauliflower. Cut it into bite-sized florets. Make sure to pat them dry with a paper towel. This step removes excess moisture. Drying helps the wings become extra crispy. In a mixing bowl, add 1 cup of all-purpose flour. Then, add 1 teaspoon of garlic powder, onion powder, and smoked paprika. For heat, include 1/2 teaspoon of cayenne pepper, plus salt and pepper to taste. Gradually mix in 1 cup of unsweetened plant-based milk. Whisk until you have a smooth, thick batter without lumps. Take each floret and dip it into the batter. Ensure each piece is fully coated. Let the excess batter drip back into the bowl. On a separate plate, place 1 cup of breadcrumbs. Roll each battered floret in the breadcrumbs. Press gently to help the crumbs stick well. Preheat your air fryer to 375°F (190°C) for about 5 minutes. Lightly spray the basket with olive oil to prevent sticking. Place the coated cauliflower wings in a single layer. Leave space between each piece for even cooking. Spray the tops of the wings lightly with more olive oil. Cook them for 12-15 minutes. Flip them halfway for even browning. They should turn golden brown and crispy. Once cooked, toss the wings in your favorite hot sauce if you like spice. Serve the wings hot on a platter. Pair them with dipping sauces such as ranch or blue cheese. For a nice touch, garnish with chopped parsley for color. Enjoy this tasty treat! To get your cauliflower wings super crispy, start by drying the florets well. Use a paper towel to absorb any moisture. This step is key! When making the batter, whisk it until smooth, without lumps. A thicker batter helps the breadcrumbs stick better. After coating, let the wings sit for a minute before air frying. This helps the coating adhere. Finally, spray the tops lightly with olive oil before cooking. This adds an extra crunch. If you like heat, adjust cayenne pepper in the batter. Start with 1/4 teaspoon for mild spice, then taste. You can always add more if you want it spicier. For a smoky flavor, add more smoked paprika. Remember, balance is key! If you want a milder flavor, skip the cayenne and use just garlic and onion powder. It’s all about what you enjoy most. Dipping sauces make these wings even better! Try classic ranch or creamy blue cheese for a rich taste. For a zesty kick, mix hot sauce with vegan mayo. You can also try a sweet chili sauce for a fun twist. If you're feeling adventurous, a garlic aioli pairs well too. These sauces add flavor and make the meal more fun! {{image_4}} You can mix things up with your cauliflower wings. Try different seasonings to create unique flavors. Here are some ideas: - Buffalo Style: Add more cayenne pepper and toss cooked wings in hot sauce. - BBQ Flavors: Use smoked paprika and toss in your favorite BBQ sauce. - Asian Twist: Add soy sauce and sesame oil to the batter for an Asian flavor. Each option brings a new taste, making your wings exciting every time! While the air fryer is great, you can also cook cauliflower wings in other ways. Here are some alternatives: - Oven-Baked: Preheat your oven to 425°F (220°C). Place wings on a baking sheet. Bake for 20-25 minutes until crispy. - Pan-Fried: Heat oil in a pan over medium heat. Cook the wings in batches until golden and crispy, about 5-7 minutes per side. These methods can also give you deliciously crispy wings if you don’t have an air fryer. Cauliflower wings are already a hit with vegetarians and vegans! Here are some tips to keep them plant-based: - Flour Options: Use chickpea flour instead of all-purpose flour for a gluten-free choice. - Milk Alternatives: Stick with unsweetened almond or soy milk in the batter. - Dipping Sauces: Pair with vegan ranch or a cashew-based dip for a tasty option. These choices make it easy for everyone to enjoy this healthy treat! Store leftover cauliflower wings in an airtight container. Let them cool completely before sealing. They will stay fresh for up to three days in the fridge. If you want to keep them longer, consider freezing. To reheat your cauliflower wings, use an air fryer or an oven for crispiness. Preheat the air fryer to 375°F (190°C). Cook the wings for 5-7 minutes until they are hot and crispy again. The oven method works too. Place them on a baking sheet and heat at 350°F (175°C) for about 10-15 minutes. You can freeze uncooked cauliflower wings for later use. After coating them in batter and breadcrumbs, place them on a baking sheet in a single layer. Freeze until solid, then transfer to a freezer bag. They can stay in the freezer for up to three months. When ready to cook, no need to thaw! Just air fry them straight from the freezer, adding a few extra minutes to the cook time. To make Air Fryer Cauliflower Wings crispy, follow these steps: - Dry the cauliflower: After washing, pat the florets dry. - Use a good batter: Mix flour, spices, and plant-based milk for a thick batter. - Use panko breadcrumbs: They create a crunchier texture. - Preheat the air fryer: This helps achieve a golden finish. - Do not overcrowd: Space out the wings in the basket for even cooking. - Spray with oil: A light spray before and after cooking boosts crunch. Yes, you can use frozen cauliflower. However, frozen florets may not crisp up as well. Thaw them first and pat them dry. This helps remove excess moisture. You may need to adjust the cooking time. Check for a golden color and crispiness before serving. Here are some great dipping sauce ideas: - Ranch dressing: A classic choice for flavor. - Blue cheese sauce: Perfect for those who love strong flavors. - Buffalo sauce: Adds more heat and spice. - Garlic aioli: A creamy option with a hint of garlic. - BBQ sauce: Sweet and tangy for a unique taste. Cooked cauliflower wings can last up to 3-4 days in the fridge. Store them in an airtight container to keep them fresh. When ready to eat, reheat them in the air fryer for best results. This will help restore their crispiness. You now have a clear path to making Air Fryer Cauliflower Wings. The main ingredients shine, while optional ones add flair. We broke down each step, from prep to cooking, making it simple. Remember the tips for crispiness and flavor adjustments. Consider variations to mix up your wings. Store leftovers properly, so nothing goes to waste. Enjoy experimenting with dip options for fun tastes. With this guide, you can create a delicious, healthy snack everyone will love. Dive in and enjoy your cauliflower creation!

Air Fryer Cauliflower Wings Crispy and Flavorful Treat

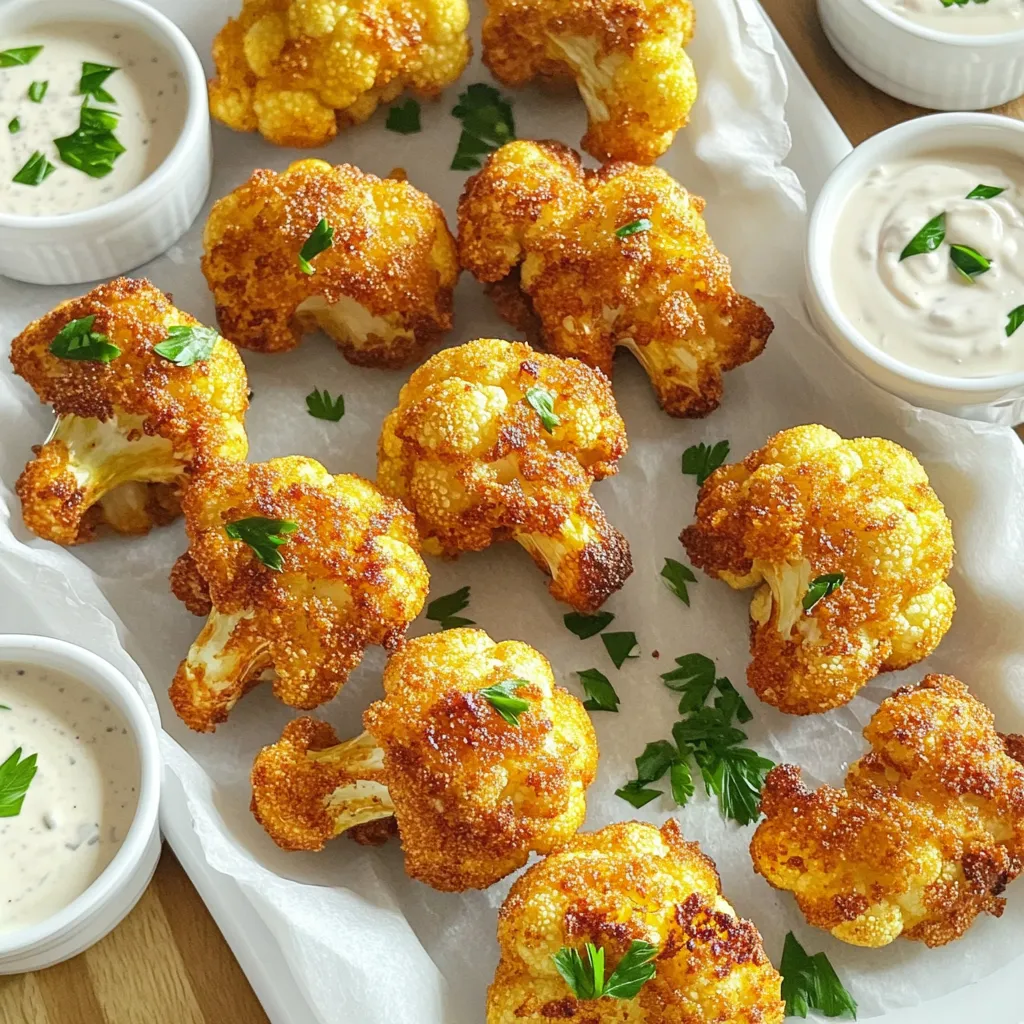
Looking for a tasty way to enjoy cauliflower? You’ve landed in the right place! Air Fryer Cauliflower Wings are not

To make Cheesy Broccoli Cheddar Soup, you will need: - 4 cups fresh broccoli florets, chopped into bite-sized pieces - 1 medium onion, finely diced - 3 cloves garlic, minced - 4 cups vegetable broth (preferably low-sodium) - 2 cups shredded sharp cheddar cheese - 1 cup whole milk - 1/2 cup heavy cream - 1/4 cup all-purpose flour - 1 teaspoon Dijon mustard - 1/2 teaspoon ground nutmeg - Salt and freshly cracked black pepper to taste - 2 tablespoons extra virgin olive oil For garnish, you can use: - Homemade or store-bought croutons When choosing ingredients, fresh broccoli is best for flavor and texture. Sharp cheddar cheese brings a strong taste. Using low-sodium broth helps control the saltiness of the soup. You can also swap heavy cream with a lighter option if you prefer. To start, heat 2 tablespoons of extra virgin olive oil in a large pot over medium heat. Once the oil shimmers, add 1 finely diced onion. Sauté the onion for about 5 minutes. It should become soft and see-through. Next, add 3 minced cloves of garlic. Sauté for another minute. This will give your soup a wonderful aroma. Now it’s time to create a roux. Sprinkle 1/4 cup of all-purpose flour over the onion and garlic. Mix it well so that it combines. Cook this mixture for about 2-3 minutes. You want it to turn a light golden color. Stir constantly to avoid sticking. After your roux is ready, slowly pour in 4 cups of vegetable broth. Whisk while you pour to prevent lumps. Bring this mixture to a gentle simmer. Now, add 4 cups of chopped broccoli florets. Cook for 10-12 minutes. The broccoli should be bright green and tender but still firm. Next, it’s time to blend. Use an immersion blender to puree the mixture to your desired smoothness. You can leave it a bit chunky for texture. Lower the heat, then mix in 1 cup of whole milk, 1/2 cup of heavy cream, 1 teaspoon of Dijon mustard, and 1/2 teaspoon of ground nutmeg. Stir everything until well combined. Finally, add 2 cups of shredded sharp cheddar cheese. Let it melt on low heat. Taste your soup and add salt and freshly cracked black pepper to your liking. You can adjust the seasoning until it’s just right. Enjoy your cheesy broccoli cheddar soup! To get the right texture, you can blend the soup smooth or keep it chunky. If you want a smooth soup, use an immersion blender. This tool lets you blend right in the pot. For a chunkier soup, blend only half. You can also use a regular blender in batches. Just let the soup cool a bit first to avoid splashes. You can add extra flavor with spices. Try a pinch of cayenne pepper or paprika for warmth. A dash of garlic powder can also boost taste. If you want to switch the cheese, go for Gruyère or Monterey Jack. They melt well and add a nice twist. When serving, ladle the soup into bowls. For a nice touch, swirl in some cream on top. A sprinkle of fresh parsley adds color. If you like crunch, top with croutons. Place them right before serving to keep them crisp. This makes your soup look appealing and inviting. {{image_4}} You can make your cheesy broccoli cheddar soup even better by adding some fun ingredients. Here are a few ideas: - Protein additions: You can toss in cooked chicken or white beans. Chicken adds heartiness, while beans give you fiber and plant protein. - Alternative vegetables: Try adding cauliflower or spinach. Cauliflower makes the soup creamier, and spinach adds a pop of color and nutrients. These add-ins can make your soup more filling and boost the health factor. If you have special dietary needs, you can still enjoy this soup. Here are some easy swaps: - Vegan and lactose-free swaps: Use plant-based cheese and almond milk in place of dairy. This keeps the taste creamy without the dairy. - Gluten-free options: Substitute all-purpose flour with cornstarch or a gluten-free flour blend. This way, everyone can enjoy the soup without worries. These changes let you enjoy this comforting dish, no matter your diet. To store your Cheesy Broccoli Cheddar Soup, first let it cool. Place it in an airtight container. This soup stays fresh in the fridge for up to three days. Make sure to keep it sealed well. If you want to enjoy it later, check for any signs of spoilage before eating. To freeze the soup, let it cool completely first. Pour it into freezer-safe containers, leaving space at the top. This allows for expansion. You can freeze it for up to three months. When you’re ready to eat it, take the soup out of the freezer. Move it to the fridge and let it thaw overnight. If you need it faster, you can thaw it in a microwave. Reheat it on the stove over medium heat. Stir until it’s hot throughout. If it seems too thick, add a splash of milk or broth to thin it out. Can I make this soup in advance? Yes, you can make this soup ahead of time. Store it in the fridge in an airtight container. It stays fresh for about 3-4 days. When ready to eat, just reheat it on the stove until warm. Is it possible to make this soup without cheese? Yes, you can make it without cheese. To keep it creamy, use more milk or a dairy substitute. You might miss the cheese flavor, but you can add nutritional yeast for a cheesy taste. Is this soup healthy? This soup has healthy ingredients like broccoli and low-sodium broth. It provides vitamins and fiber. However, it also has cream and cheese, which add calories and fat. Enjoy it in moderation. What is the calorie count per serving? Each serving has about 300 calories. This number may change based on your chosen ingredients and portion sizes. Check labels for more accurate counts. What to do if the soup is too thick/thin? If the soup is too thick, add more broth or milk bit by bit until it reaches your desired consistency. If it's too thin, simmer it longer to let it reduce, or mix in more flour to thicken. How to fix an overly salty soup? To fix salty soup, add more milk or cream to balance the saltiness. You can also add more broccoli or potatoes to absorb some salt. Taste as you go for the best results. In this post, I shared how to make a tasty cheesy broccoli cheddar soup. We covered ingredients, cooking steps, and helpful tips. You learned about variations and how to store leftovers. Remember, you can customize this soup to fit your needs. Making this soup is easy and fun. Whether you want it smooth or chunky, you have options. With a few tweaks, you can make it vegan or gluten-free. Enjoy making this dish and sharing it with others!

Cheesy Broccoli Cheddar Soup Comforting and Creamy Treat

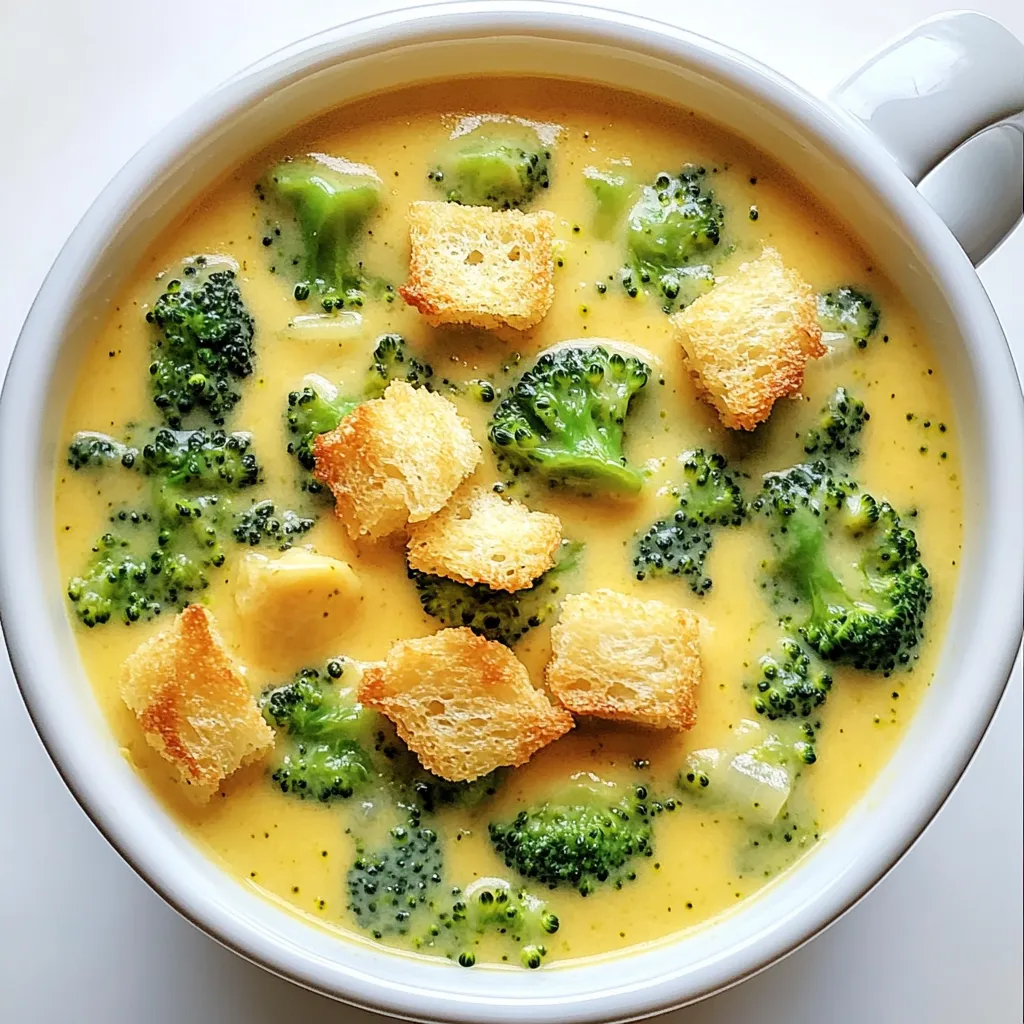
When the cold weather hits, nothing warms you up like a bowl of Cheesy Broccoli Cheddar Soup. This rich and

- 300g udon noodles - 3 tablespoons vegetable oil - 6 cloves garlic, finely minced - 1 tablespoon fresh ginger, grated - 2 red chilies, sliced thinly - 1 bell pepper, sliced into thin strips - 1 cup bok choy or fresh spinach, roughly chopped - 4 tablespoons soy sauce - 2 tablespoons toasted sesame oil - 1 tablespoon rice vinegar - 1 teaspoon granulated sugar Spicy garlic udon noodles need simple yet bold ingredients. You start with udon noodles. They are thick, chewy, and make the dish hearty. You can find them fresh or dried. Next, add vegetable oil. It helps cook the garlic and ginger. Then, we have garlic and ginger. These two create a fantastic base. Mince the garlic finely for better flavor. Grate the ginger to release its zest. For veggies, red chilies and bell pepper add heat and color. You can adjust the chilies based on your spice level. Bell pepper brings sweetness and crunch. Bok choy or spinach gives a nice green touch. They are quick to cook and healthy. Lastly, sauces and seasonings make the flavors pop. Soy sauce adds umami. Toasted sesame oil gives a nutty taste. Rice vinegar adds a slight tang. Sugar balances the heat and salt. With these ingredients, your spicy garlic udon noodles will shine on any plate. Start by bringing a large pot of salted water to a boil. This step is key. The salt adds flavor to the noodles. Once the water is boiling, add 300g of udon noodles. Cook them for 3 to 4 minutes, or until they are just al dente. Be sure to stir occasionally to prevent sticking. After they are done, drain the noodles in a colander. Rinse them briefly under cold water. This stops the cooking and keeps them from getting mushy. Set the noodles aside for later. Now, let's make the stir-fry base. Heat 3 tablespoons of vegetable oil in a large skillet or wok over medium-high heat. You want the oil to shimmer; this shows it’s hot enough. Add 6 cloves of minced garlic and 1 tablespoon of grated ginger. Sauté them for about 30 seconds. Stir constantly until the garlic is lightly golden. At this point, you will notice a wonderful fragrance filling your kitchen. Next, it’s time to add some spice and color. Toss in 2 sliced red chilies and 1 sliced bell pepper. Stir-fry this mixture for 2 to 3 minutes. The bell pepper should soften and change color slightly. After that, add 1 cup of chopped bok choy or fresh spinach. Stir continuously until the greens wilt and look vibrant. This step brings both flavor and nutrition to your dish. Now, let’s combine everything. Gently toss the cooked udon noodles into the skillet with the vegetables. In a separate bowl, whisk together 4 tablespoons of soy sauce, 2 tablespoons of toasted sesame oil, 1 tablespoon of rice vinegar, and 1 teaspoon of granulated sugar. Pour this sauce over the noodles and veggies. Use tongs to mix everything well. Make sure the noodles are evenly coated. Keep stir-frying for another 2 to 3 minutes to heat through. Once heated, remove the skillet from the heat. Transfer the spicy garlic udon noodles to a large serving platter or individual bowls. To make it look appealing, sprinkle sesame seeds and chopped green onions on top. For an extra touch, serve with a lime wedge. This allows everyone to squeeze fresh lime juice over the dish for a nice tang. When you serve it, create height in the bowls by piling the noodles in the center. This makes the dish look even more delicious. To control the heat in your spicy garlic udon noodles, start with the chilies. Use two red chilies for a kick, or cut back to one if you prefer less spice. You can also try adding red pepper flakes, sriracha, or chili oil for extra heat. These options let you customize the flavor to fit your taste. Prep your ingredients ahead of time to speed up cooking. Chop your veggies and mince your garlic and ginger before you start. This way, you can move quickly when cooking. Always use high heat for stir-frying. This gives your noodles a nice char and keeps the veggies crisp. Garnish your dish with sesame seeds and green onions for added flavor and crunch. You can also try other toppings like crushed peanuts or cilantro. For sauces, switch things up with hoisin, oyster sauce, or even a splash of lime juice. Each option brings a new twist to your udon noodles! {{image_4}} You can add protein to your spicy garlic udon noodles for more flavor. Some great options are chicken, tofu, or shrimp. - Chicken: Cut it into bite-sized pieces. Cook it for about 5-7 minutes until it's golden and fully cooked. - Tofu: Use firm tofu. Press it, cube it, and fry it for 3-4 minutes until golden. - Shrimp: Add peeled shrimp to the skillet. Cook for 3-4 minutes until pink and opaque. These proteins add taste and make your meal more filling. You can easily make this dish vegetarian or vegan. Swap out any non-plant-based ingredients. - Alternative vegetables: Use veggies like zucchini, carrots, or snap peas. They add crunch and color. - Sauces: Check your soy sauce. Some brands use fish. Choose a vegan version for a plant-based dish. These changes keep the dish fresh and exciting. If you need a gluten-free meal, don’t worry! You can still enjoy udon noodles. - Gluten-free udon noodles: Look for brands that offer gluten-free options made from rice or buckwheat. - Sauces: Use tamari instead of soy sauce. It has a similar taste and is gluten-free. These simple swaps make this dish safe and tasty for everyone. To keep your spicy garlic udon noodles fresh, refrigerate them right away. Use shallow containers to help cool them quickly. Store them in airtight containers, so they don’t dry out. Label the containers with the date, so you know when to eat them. When you want to enjoy your leftovers, reheating is key. The best method is to use a skillet over medium heat. Add a splash of water or oil to help steam the noodles. Stir often to keep them from sticking. This way, your noodles will stay tender and not turn mushy. If you want to save udon noodles for later, freezing works too. Place the noodles in a freezer-safe bag. Try to remove as much air as possible to avoid freezer burn. Note that freezing may change the texture a bit. To thaw, move them to the fridge overnight, then reheat as mentioned above. Udon noodles are thick, chewy wheat noodles from Japan. They have a smooth, soft texture that holds sauces well. Udon is often served in soups or stir-fries, making them versatile. Their mild flavor pairs nicely with strong spices, like garlic and chili. Yes! You can swap udon for many other noodles. Try soba, rice noodles, or even spaghetti if you need a quick fix. Each type will give a different taste and texture, but the dish will still be tasty. To reduce the heat, use fewer red chilies or remove the seeds. You can also add more vegetables, like bell peppers or bok choy, to balance the spice. Another option is to add a splash of coconut milk for creaminess and mildness. Absolutely! You can cook the noodles and stir-fry the veggies ahead of time. Just store them in separate containers in the fridge. When you're ready to eat, reheat them in a pan or microwave. Add the sauce just before serving for the best flavor. Udon stir-fry is tasty and easy to make. You learned about key ingredients like udon noodles, veggies, and sauces. I explained step-by-step cooking methods, tips for spice levels, and ways to store leftovers. You can customize this dish with proteins or make it vegan or gluten-free. By following these steps and ideas, you can enjoy a delicious udon meal anytime. Happy cooking!

Spicy Garlic Udon Noodles Flavorful and Easy Dish

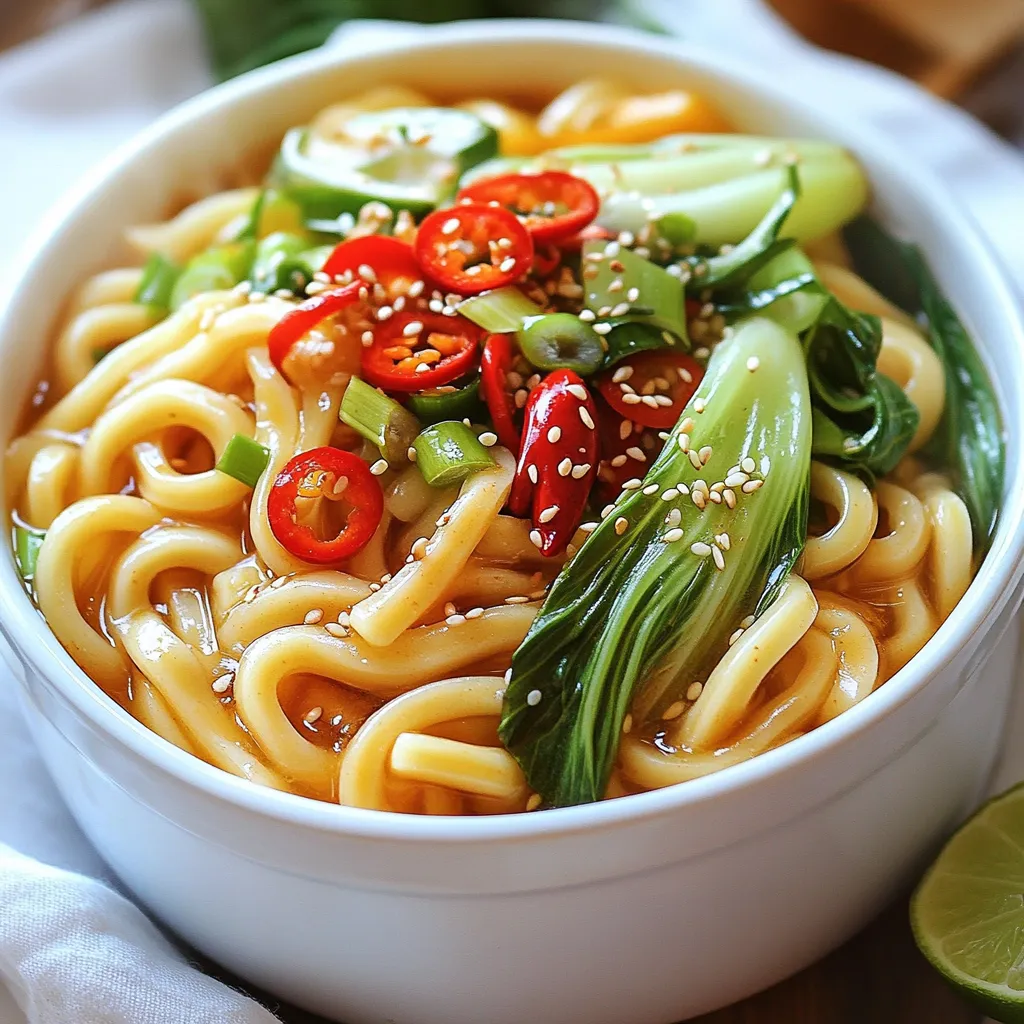
Are you ready to spice up your meal routine? This Spicy Garlic Udon Noodles recipe packs bold flavor with every

- 2 cups rolled oats - 1 cup pecans, roughly chopped - 1 cup pumpkin seeds - 1/2 cup honey or maple syrup - 1/2 cup pumpkin puree - 1 teaspoon pumpkin pie spice - 1/2 cup unsweetened shredded coconut - 1 cup dried cranberries or raisins - 1/2 teaspoon sea salt - 1/4 teaspoon vanilla extract The main ingredients create a solid base for your granola. Rolled oats give crunch and fiber. Pecans add richness and a nutty taste. Pumpkin seeds are full of nutrients and add a nice crunch. Next, sweeteners and flavorings make this granola stand out. Honey or maple syrup offers sweetness and stickiness. Pumpkin puree adds moisture and a lovely pumpkin flavor. Pumpkin pie spice brings warmth with its mix of cinnamon, nutmeg, and ginger. You can also choose optional add-ins. Unsweetened shredded coconut gives a tropical twist. Dried cranberries or raisins add sweetness and chewiness. Sea salt enhances all the flavors. A touch of vanilla extract rounds out the taste with its sweet aroma. Mix and match the ingredients to fit your taste. This flexibility makes the granola personal and special. Each bite can be a unique experience! 1. Start by setting your oven to 350°F (175°C). This will get it ready for baking. 2. Line a baking sheet with parchment paper. This will stop the granola from sticking. 3. In a large mixing bowl, combine the rolled oats, chopped pecans, pumpkin seeds, shredded coconut, and sea salt. Stir them well with a wooden spoon. Make sure all the dry ingredients mix evenly. 1. In a different bowl, whisk together the honey or maple syrup, pumpkin puree, pumpkin pie spice, and vanilla extract. Mix until it’s smooth and well combined. 2. This mixture brings all the flavors together. The pumpkin puree adds moisture and taste. 1. Pour the wet mixture over the dry ingredients. Use the wooden spoon to fold everything together. Make sure every piece gets coated. 2. Spread the granola evenly on the prepared baking sheet. This helps it bake evenly. 3. Put the sheet in the oven and bake for 25-30 minutes. Stir the granola halfway through. This ensures even browning. You want it golden brown and smelling great. 4. Once it’s baked, carefully take it out of the oven. Let it cool completely on the baking sheet. It will become crunchy as it cools. 5. If you want, mix in dried cranberries or raisins after it cools. These add a sweet touch. 6. Store your granola in an airtight container. This keeps it fresh for your next breakfast or snack! To make the best pumpkin spice granola, cooling is key. After baking, let it sit on the sheet for at least 30 minutes. This helps it harden and gives you that crunchy bite. If you want it even crunchier, bake for a few more minutes. Just keep an eye on it to prevent burning. Pumpkin spice granola is a treat for breakfast or a snack. I love it with creamy yogurt or cold milk. You can also sprinkle it on waffles or pancakes for extra flavor. Want a bit more? Add fresh fruit or a drizzle of honey on top. It's a simple way to make your meal special. To keep your granola fresh, store it in an airtight container. Glass jars or plastic bins work great. Keep it in a cool, dry place. Proper storage can keep it good for up to two weeks. If you want to keep it longer, consider freezing it. Just make sure to let it thaw before eating. {{image_4}} You can switch honey with agave syrup for a vegan twist. This change keeps the granola sweet and sticky. If you want to add more crunch, try mixing in other nuts or seeds. Almonds, walnuts, or sunflower seeds can make your granola even tastier. Get creative with spices! You can add cinnamon or nutmeg for a warm taste. If you enjoy a bit of sweetness, consider mixing in dried fruits like raisins or cranberries. Chocolate chips also make a fun addition for a sweet touch. If you prefer gluten-free options, look for gluten-free oats. They work great in this recipe and keep it crunchy. For those watching their sugar, you can cut back on sweeteners or use a sugar substitute. This way, you can enjoy your granola without the extra sugar. Each serving of pumpkin spice granola is about 1/2 cup. This serving has around 200 calories. Here is the breakdown of the nutritional values: - Fats: 8 grams - Carbohydrates: 30 grams - Protein: 5 grams This granola packs a tasty punch while keeping the calories balanced. Oats are a great source of fiber. They help keep you full and support digestion. Pecans add healthy fats and nutrients like magnesium. Pumpkin seeds also boost your health. They are rich in zinc and antioxidants. The spices, like pumpkin pie spice, add warmth and flavor. They also may help with inflammation. This recipe contains nuts and oats, which some people may be allergic to. If you need a gluten-free option, make sure to use certified gluten-free oats. For nut-free diets, try seeds like sunflower or pumpkin seeds instead of pecans. Always check labels to ensure safety. You can easily make this granola vegan by swapping honey with maple syrup. Maple syrup is a great sweetener that adds a rich flavor. You can also try agave nectar or brown rice syrup for different tastes. Both options work well in this recipe. Just make sure to choose a brand that fits your diet. Yes, you can use other nuts! Almonds, walnuts, or cashews are great choices. They each bring a unique flavor and texture. You can also mix nuts together for a fun twist. Just remember to chop them roughly, just like the pecans, so they toast evenly. Homemade granola can last about two weeks if stored right. Keep it in an airtight container to keep it fresh. You can also freeze it for up to three months. Just let it cool completely before storing it. This way, you’ll have a tasty snack ready whenever you need it! You learned how to make pumpkin spice granola with simple steps. The main ingredients like oats, pecans, and pumpkin seeds give it great taste. You can add different sweeteners, fruits, or spices to change the flavor. Remember to store it well for freshness. This granola is not just tasty; it also packs nutrition. Whether you enjoy it with yogurt or as a snack, it's a win. Try it out and share your own twists! Enjoy making delicious and healthy choices every day.

Pumpkin Spice Granola with Pecans Crunchy Delight

Get ready for a tasty fall treat with my Pumpkin Spice Granola with Pecans! This crunchy delight combines rolled oats,

- 2 cups apple cider - 1 cup granulated sugar - 1/2 cup packed brown sugar - 1/2 cup unsalted butter - 3 large eggs - 1 teaspoon pure vanilla extract - 3 cups all-purpose flour - 1 tablespoon baking powder - 1 teaspoon baking soda - 1 teaspoon ground cinnamon - 1/2 teaspoon ground nutmeg - 1/2 teaspoon salt - 1 cup diced Granny Smith apples - 1/2 cup powdered sugar for dusting The base of this cake is apple cider. It gives a rich flavor. You need two cups. Next, granulated sugar and brown sugar make the cake sweet. You will use one cup of granulated sugar and half a cup of brown sugar. Butter adds moisture. Use half a cup of unsalted butter that is soft. Then, crack three large eggs into the bowl. These eggs bind the ingredients together. Don’t forget one teaspoon of pure vanilla extract for a warm, sweet note. For the dry mix, gather three cups of all-purpose flour. You also need one tablespoon of baking powder and one teaspoon of baking soda to make the cake rise. One teaspoon of ground cinnamon and half a teaspoon of ground nutmeg add that cozy spice. Lastly, one teaspoon of salt balances the flavors. The apples add a tasty bite. Use one cup of diced Granny Smith apples for a tart touch. Once the cake bakes, you can dust the top with half a cup of powdered sugar. It gives the cake a lovely finish. Gather these ingredients, and you are ready to make a delicious Apple Cider Donut Bundt Cake! - Preheat the oven to 350°F (175°C). - Grease and flour the bundt pan. Start by heating your oven. This way, it’s ready when you need it. Greasing and flouring the bundt pan helps the cake come out easily. Use a good amount of butter or cooking spray. Then, sprinkle flour around the pan. Tap off any extra flour. - Boil and reduce apple cider to 1 cup. Next, pour the apple cider into a medium saucepan. Heat it on medium-high until it boils. Once it bubbles, lower the heat to simmer. Stir it occasionally. Let it cook until it reduces to 1 cup. This takes about 15-20 minutes. Remove it from heat and let it cool a bit. - Cream sugars and butter. - Add eggs and vanilla extract. - Combine apple cider with the sugar mixture. In a large bowl, mix the granulated sugar, brown sugar, and softened butter. Beat them with an electric mixer until light and fluffy. This should take about 2-3 minutes. Then add the eggs, one at a time. Mix well after each egg. Finally, add the vanilla extract. Slowly pour in the cooled apple cider. Mix on low speed until smooth. - Mix dry ingredients. - Combine wet and dry ingredients carefully. - Fold in diced apples. In a separate bowl, whisk together the flour, baking powder, baking soda, cinnamon, nutmeg, and salt. Once mixed, slowly add the dry ingredients to the wet mixture. Mix gently to combine. Be careful not to overmix. Finally, fold in the diced apples. This adds great flavor and texture. - Pour batter into the bundt pan. - Bake for 45-50 minutes. Pour the batter into your prepared bundt pan. Use a spatula to smooth the top. Place it in your preheated oven. Bake for 45-50 minutes. To check if it’s done, insert a toothpick in the center. If it comes out clean, the cake is ready. - Cool in the pan and then on a wire rack. - Dust with powdered sugar before serving. Let the cake cool in the pan for about 10-15 minutes. Then, carefully invert it onto a wire rack. Let it cool completely. Once cool, dust the top with powdered sugar for a nice touch. Now your Apple Cider Donut Bundt Cake is ready to enjoy! - Properly grease and flour the bundt pan. This helps the cake come out smoothly. I like to use a mix of butter and flour. You can also use a baking spray. - Allow the cake to cool before inverting. Cooling lets the cake set. If you flip it too soon, it may break. - Avoid overmixing the batter. When you mix too much, the cake can be tough. Just mix until the ingredients blend well. - Use room-temperature ingredients. This helps the batter mix evenly. Cold ingredients can cause lumps. - Pairing with drinks is key. Enjoy this cake with warm cider or coffee. A scoop of vanilla ice cream also works well. - For presentation, slice the bundt cake and serve on a rustic wooden platter. Garnish with thin apple slices and a sprinkle of cinnamon for a lovely touch. {{image_4}} To make your Apple Cider Donut Bundt Cake even more fun, try adding spices. Ginger and cardamom can give it a nice twist. You can also mix in other fruits. Pears or cranberries can add a fresh taste. Feel free to experiment. Each fruit brings a new flavor. Adding a glaze can take your cake to the next level. A caramel glaze adds sweetness and richness. A cream cheese glaze gives a smooth, tangy touch. You might also sprinkle nuts or chocolate chips on top. These add crunch and depth. Try these options and find your favorite. If you want a vegan version, swap eggs for flax eggs. Use applesauce instead of butter. For a gluten-free cake, replace all-purpose flour with a gluten-free blend. These changes let everyone enjoy the cake. You can share it with friends, no matter their diet. To keep your Apple Cider Donut Bundt Cake fresh, place it in an airtight container. This helps to lock in moisture and flavor. You can store it at room temperature for up to three days. If you want to keep it longer, refrigerate it for up to a week. To freeze the bundt cake, wrap it tightly in plastic wrap. Then, place it in a freezer-safe bag or container. This method prevents freezer burn. You can freeze it for up to three months. When you are ready to enjoy it, thaw the cake in the fridge overnight. For a quicker option, let it sit at room temperature for a few hours. Enjoy every bite of this delightful treat! Yes, you can! While Granny Smith apples work great, feel free to use any apple you like. Honeycrisp or Fuji apples add sweetness. Tart apples balance the cake’s flavor well. Just remember to dice them small for even distribution. Check the cake by inserting a toothpick into the center. If it comes out clean, the cake is ready. If you see wet batter, bake it for a few more minutes. The edges should be golden brown, and the top should bounce back when pressed lightly. Absolutely! This cake stores well. You can bake it a day in advance. Just let it cool completely before wrapping it in plastic. Keep it at room temperature for the best taste. If you want to store it longer, consider freezing. To reheat the cake, slice a piece and warm it in the microwave for about 10-15 seconds. You can also warm it in the oven at 350°F for about 5-10 minutes. This keeps the cake moist while warming it up. To boost the apple flavor, consider adding more diced apples. You could also add apple sauce to the batter. Another option is to sprinkle some apple pie spice into the mix. Each of these will make your cake even more apple-packed and delicious! This blog post guides you through making a delicious apple cider bundt cake. We covered essential ingredients, simple steps, and helpful tips to ensure success. Remember, greasing the pan well is key to a perfect cake release. Feel free to explore fun variations or dietary swaps. Whether you enjoy it fresh or save some for later, this cake is bound to impress. Now, it's time to get baking! Your kitchen will smell amazing, and you will savor every slice.

Apple Cider Donut Bundt Cake Simple and Delicious Treat

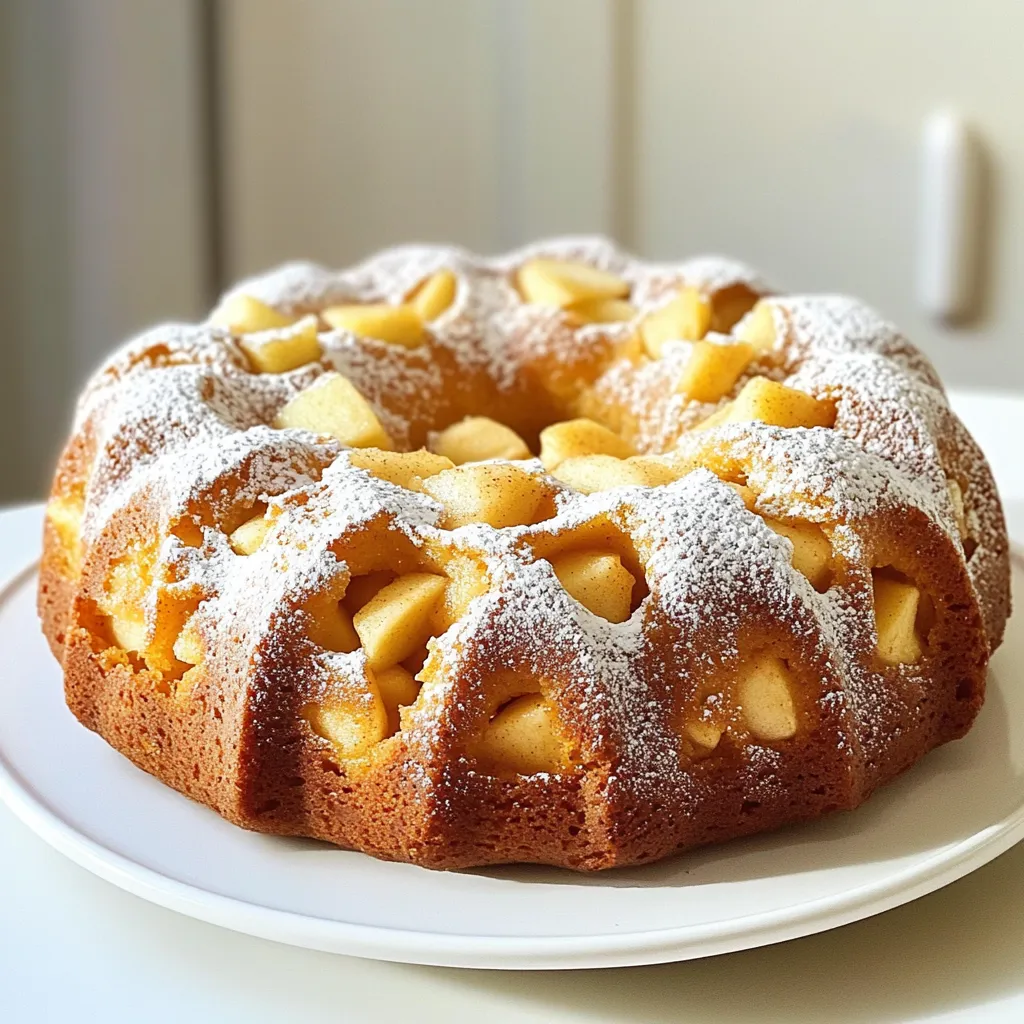
Get ready to warm your home with a delightful Apple Cider Donut Bundt Cake! This treat blends rich apple cider,

Cottage cheese is the star of this dip. Use one cup of full-fat or low-fat cottage cheese. It gives the dip a creamy texture and adds protein. The flavor stays mild, letting the cocoa shine through. Next is cocoa powder. You’ll need a quarter cup of unsweetened cocoa powder. This adds that rich chocolate taste we crave. Make sure it’s unsweetened for the best balance with the sweeteners. For sweetness, use half a cup of pure maple syrup. You can swap it with honey if you like. Adjust the sweetness to taste. It’s all about making it perfect for your palate. Add half a teaspoon of pure vanilla extract. This gives the dip depth and a lovely aroma. Vanilla and chocolate pair perfectly, enhancing the overall flavor. I use a quarter cup of almond flour for a nutty touch. You can swap it with regular all-purpose flour if you prefer. This helps thicken the dip and gives it that brownie batter feel. Don’t forget the fun! Add one-third cup of mini chocolate chips. They create pops of chocolatey goodness in every bite. Fold them in gently to keep them whole. A small pinch of salt balances the sweetness. It brings out all the flavors nicely. For presentation, serve in a colorful bowl, and top with extra chocolate chips or a dusting of cocoa powder. Pair with fruit, pretzels, or graham crackers for dipping. Enjoy this sweet indulgence! Start by grabbing a medium bowl. Add 1 cup of cottage cheese. Then, sprinkle in ¼ cup of unsweetened cocoa powder. Next, pour in ½ cup of pure maple syrup and ½ teaspoon of pure vanilla extract. Mix these ingredients together using a hand mixer or food processor. Blend until the mix is smooth and creamy, with no lumps left behind. Now, it’s time to make it thick. Gradually add ¼ cup of almond flour to your mix. Stir well to combine. You want the mixture to look like thick brownie batter. If it seems too runny, add a little more almond flour. This will help achieve that perfect texture. Take ⅓ cup of mini chocolate chips and gently fold them into the batter. Use a spatula or spoon for this. Make sure the chocolate chips are evenly mixed. You want those little bursts of chocolate in every bite. Once your dip is mixed, it’s time to taste. If you want it sweeter, you can add more maple syrup or a few extra chocolate chips. Mix again after adding more to ensure the sweetness is just right for you. After you get the flavor you love, transfer the dip to a nice serving bowl. Cover it and place it in the fridge for at least 30 minutes. This waiting time allows the flavors to blend well and enhances the overall taste. To get a smooth dip, start with room temperature cottage cheese. Cold cheese can make it lumpy. Use a hand mixer or food processor to blend. Mix on medium speed until creamy. This method helps break down any lumps. If you see lumps, keep mixing. The goal is a smooth, thick consistency, like brownie batter. You can adjust the dip to fit your needs. For a dairy-free version, use silken tofu instead of cottage cheese. If you need a gluten-free option, swap almond flour for regular flour. To cut sugar, use less maple syrup or honey. You can also try a sugar substitute like stevia. These changes keep the dip tasty while meeting your dietary needs. Serving this dip can be fun and creative. Use a colorful bowl to catch the eye. Top it with extra mini chocolate chips or a dusting of cocoa powder for flair. Pair the dip with fresh fruit slices, like apples or strawberries. Crispy pretzel sticks or graham crackers make great dippers too. This mix of colors and textures makes for a lovely presentation. Enjoy sharing this sweet treat with friends and family! {{image_4}} To make this dip gluten-free, you can swap almond flour for regular flour. Almond flour adds a nice nutty flavor. You can also use oat flour, which is made from ground oats. Just make sure your oats are certified gluten-free. These options keep the dish creamy and tasty without gluten. If you want a dip with less sugar, use less maple syrup. You can also try using sugar-free sweeteners like stevia or erythritol. These sweeteners give the dip a nice taste without all the sugar. Just be careful with the amount, as some can be very sweet. To make your dip even more fun, consider adding flavor. A spoonful of peanut butter or almond butter can add a rich creaminess. You can also mix in spices like cinnamon or nutmeg. These little tweaks can really change the flavor and make it your own. To keep your cottage cheese brownie batter dip fresh, store it in an airtight container. This helps prevent it from absorbing other smells in the fridge. Make sure to seal the lid tightly after each use. You can also use plastic wrap to cover the dip if you don’t have a container. This dip lasts about 3 to 5 days in the fridge. Always check for signs of spoilage before eating. If you see any changes in color or smell, it’s best to discard it. Remember, the fresher, the better! You can eat this dip cold or at room temperature. If you prefer it warm, gently heat it in the microwave. Use short intervals and stir often to avoid overheating. Be careful not to cook it, as it may change the texture. Enjoy this sweet treat whenever you like! Yes, you can use low-fat cottage cheese in this dip. It will still taste great! The dip may be a bit less creamy, but it will still be delicious. You have plenty of yummy options! Here are a few ideas: - Fresh fruit slices like apples or strawberries - Crispy pretzel sticks - Classic graham crackers - Animal crackers for a fun twist These pair well with the dip and add different textures. You can store the dip in the fridge for up to three days. Keep it in an airtight container to keep it fresh. Just give it a good stir before serving again. I do not recommend freezing this dip. Freezing can change its texture. It’s best enjoyed fresh or stored in the fridge. Absolutely! This dip is a fun treat for kids. It has a sweet taste and a creamy texture that they love. Just watch the amount of sweetener you use, based on their taste. This blog post covered how to make a delightful brownie batter dip using simple ingredients. We discussed each ingredient's role, from cottage cheese to chocolate chips. I shared step-by-step instructions to ensure you get the right texture and flavor. Plus, we explored tips for dietary preferences and fun variations. Now you can create a delicious dip that suits everyone’s tastes. Enjoy this treat for any occasion, and remember to have fun customizing it!

Cottage Cheese Brownie Batter Dip Indulgent Treat

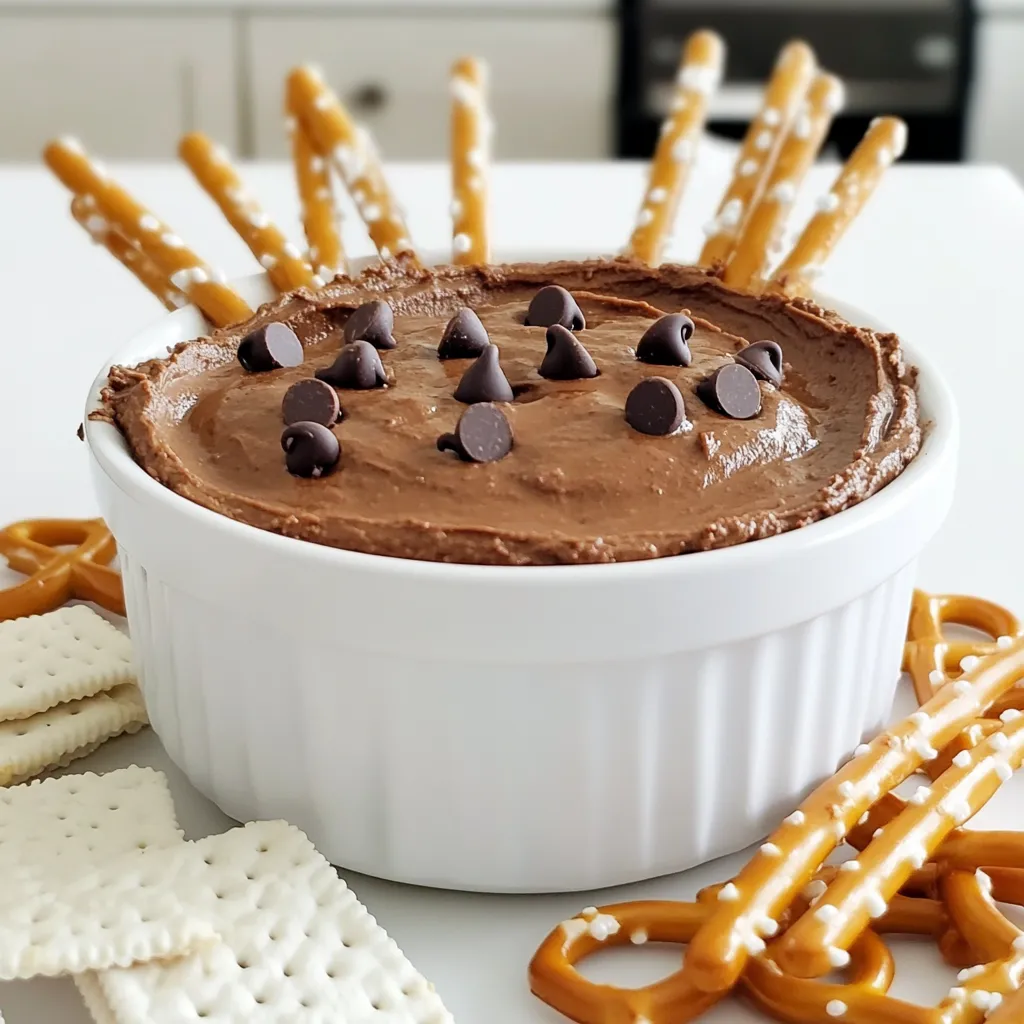
Are you ready to enjoy a guilt-free treat that tastes like dessert? My Cottage Cheese Brownie Batter Dip is a

To make this delicious treat, you will need: - 2 cans (16 oz each) of refrigerated biscuit dough - 4 medium apples, peeled, cored, and diced into small cubes - 1 cup packed brown sugar - 1/2 cup granulated sugar - 1 teaspoon ground cinnamon - 1/2 cup unsalted butter, melted - 1 cup caramel sauce For a bit of crunch and extra flavor, consider adding: - 1/2 cup chopped pecans - Powdered sugar, for a light dusting To create this monkey bread, gather these items: - Bundt pan - Large mixing bowl - Whisk - Non-stick baking spray - Serving plate These ingredients and tools will help you make a great caramel apple monkey bread. Each one plays a key role in the flavor and texture. The apples add freshness, while the caramel sauce brings sweetness. You can also customize it with nuts for extra crunch. Enjoy the process and get ready for a tasty treat! First, you need to heat your oven. Set it to 350°F (175°C). While the oven warms, grab a bundt pan. Spray it well with non-stick baking spray. This step helps the monkey bread come out easily later. Now, let’s focus on the apples. Peel, core, and cut four medium apples into small cubes. In a large bowl, mix the diced apples with half a cup of granulated sugar and one teaspoon of ground cinnamon. Stir until the apples are coated. Set the bowl aside to let the sugars soak into the apples. Next, open the two cans of refrigerated biscuit dough. Cut each biscuit into four pieces. You can also tear the dough with your hands for a fun texture. In another bowl, mix half a cup of melted unsalted butter with one cup of packed brown sugar. Stir until smooth. Now, take each biscuit piece and dip it into the brown sugar mixture. Make sure each piece is fully coated. Start layering in the bundt pan. Place half of the coated biscuit pieces at the bottom. Then add half of the apple mixture. If you want some crunch, sprinkle in half a cup of chopped pecans. Repeat this process with the remaining biscuit pieces, apple mix, and pecans. Pour any leftover brown sugar mixture on top. Finally, drizzle half of the caramel sauce over everything. Now it’s time to bake! Place the bundt pan in your preheated oven. Bake for 30-35 minutes. Look for a golden brown top and fluffy biscuit pieces. Once done, take the pan out of the oven. Let it cool for about 10-15 minutes. This cooling helps it set. After cooling, carefully flip the pan onto a serving plate. Your monkey bread should slide out easily. To finish, warm up the rest of the caramel sauce. Drizzle it over the warm monkey bread. For a sweet touch, dust some powdered sugar on top. Enjoy this delightful treat! When making caramel apple monkey bread, avoid these common mistakes: - Not Greasing the Pan Well: Always grease the bundt pan generously. This helps the bread slide out easily. - Skipping the Cooling Step: Let the monkey bread cool for 10-15 minutes. This step helps it set and stay together. - Overmixing the Apple Mixture: Stir the apples gently with sugar and cinnamon. Overmixing can make them mushy. To get the best results, follow these tips closely: - Use Fresh Apples: Crisp apples like Granny Smith or Honeycrisp work best. They give a nice tartness. - Coat Biscuit Pieces Well: Make sure each biscuit piece is fully coated in the brown sugar mixture. This adds flavor and sweetness. - Layer Evenly: While layering, alternate between biscuit pieces and apple mixture evenly. This ensures every bite is delicious. - Check for Doneness: Bake until golden brown. You can use a toothpick to check if the inside is cooked. Serve caramel apple monkey bread warm for the best taste. Here are some serving tips: - Garnish: Drizzle extra warm caramel sauce over the top. It adds sweetness and richness. - Dust with Powdered Sugar: A light dusting of powdered sugar makes it look pretty and adds a nice touch. - Pair with Whipped Cream: Offer whipped cream on the side. It’s perfect for dipping! - Share with Friends: This dish is great for gatherings. Eating it together makes the experience fun! {{image_4}} You can change the flavor of your monkey bread by using different apples. For a sweet touch, try Fuji or Honeycrisp apples. If you want a tart kick, use Granny Smith apples. Mixing varieties can also give your dish a unique taste. Each apple type brings its own charm, so explore and find your favorite mix! Pecans add a nice crunch, but feel free to swap them for walnuts or almonds. Both nuts will give your monkey bread a different flavor. If you want to skip nuts, consider sprinkling chocolate chips for a sweet twist. You can also top it with shredded coconut for a tropical vibe. The sky's the limit with toppings! To make this monkey bread gluten-free, use gluten-free biscuit dough. Many brands offer tasty options that work well. For a vegan version, look for plant-based butter and caramel sauce. You can also find dairy-free biscuit dough. These changes keep the spirit of the recipe while catering to different diets. Everyone can enjoy this treat! To store leftover monkey bread, let it cool completely. Once cooled, wrap it tightly in plastic wrap or foil. This will keep it fresh. You can also place it in an airtight container. Store it at room temperature for up to two days. If you want it to last longer, refrigerate it for up to a week. To reheat your monkey bread, preheat the oven to 350°F (175°C). Place the monkey bread on a baking sheet. Cover it loosely with aluminum foil to keep it soft. Heat for about 10-15 minutes, or until warm. You can also use a microwave. Heat it in short bursts of 20 seconds. Check it often to avoid drying it out. For long-term storage, you can freeze monkey bread. First, let it cool completely. Wrap it tightly in plastic wrap, then in foil. This will help prevent freezer burn. You can freeze it for up to three months. To enjoy, thaw overnight in the fridge. Then reheat it in the oven or microwave for the best taste. Monkey bread is a sweet, pull-apart bread. It comes from the fun way you eat it. You tear off pieces with your hands, much like a monkey would. The name also hints at the messy but joyful experience of sharing this treat. Yes, you can prepare the monkey bread ahead of time. You can layer the ingredients in the bundt pan and cover it. Store it in the fridge overnight. Just remember to take it out to warm up before baking. The monkey bread is fully cooked when it is golden brown on top. You can also check by inserting a toothpick into the middle. If it comes out clean, your monkey bread is ready to enjoy. You can make some swaps to make this recipe healthier. Use whole wheat biscuit dough instead of regular. You can also reduce the sugar or use a sugar substitute. Adding more apples can boost the fiber too. Caramel Apple Monkey Bread is a tasty treat you can easily make. We covered the key ingredients and equipment needed. I shared step-by-step instructions to ensure your bread turns out great. You learned tips to avoid common mistakes and variations for a unique twist. Finally, we discussed how to store leftovers and reheat them perfectly. Now, with these methods, you can impress family and friends with fun, delicious monkey bread. Enjoy every bite, and don’t forget to get creative with your flavors!

Caramel Apple Monkey Bread Delightful and Easy Recipe

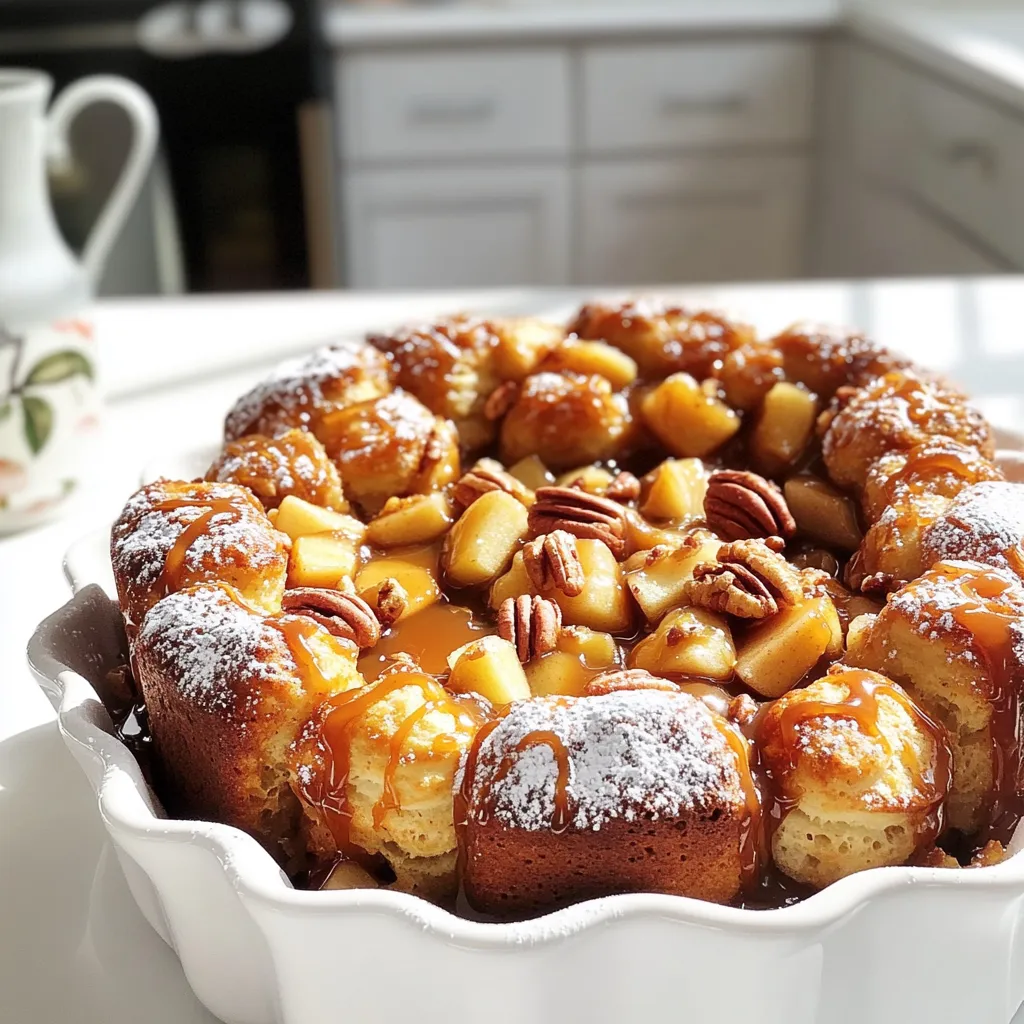
Craving a warm and gooey treat? Let’s make Caramel Apple Monkey Bread! This easy recipe blends rich caramel, sweet apples,

- 4 salmon fillets (approximately 6 oz each) - 1/4 cup pure maple syrup - 3 tablespoons soy sauce (substitute tamari for a gluten-free option) - 2 tablespoons good-quality olive oil - 2 cloves garlic, minced finely - 1 teaspoon fresh ginger, grated - Salt and freshly ground black pepper, to taste - 1 lb asparagus, trimmed of tough ends - 1 red bell pepper, sliced into thin strips - 1/2 teaspoon sesame seeds (optional, for an elegant garnish) - Fresh cilantro or parsley, chopped (for a vibrant garnish) - Large baking sheet - Parchment paper (for easy cleanup) - Small mixing bowl - Whisk - Knife and cutting board You can swap salmon for other fish like trout or cod. For a vegan option, use tofu or tempeh. Use maple syrup for sweetness; honey works too. If you need a gluten-free dish, use tamari instead of soy sauce. You can change the veggies based on what you have. Broccoli, green beans, or zucchini all work well. For a spicy kick, add red pepper flakes to the glaze. First, preheat your oven to 400°F (200°C). This step helps cook the salmon and veggies just right. While the oven warms up, take a large baking sheet. Line it with parchment paper. This makes cleanup easy and keeps your food from sticking. Next, grab a small mixing bowl. In it, whisk together these ingredients: - 1/4 cup pure maple syrup - 3 tablespoons soy sauce - 2 tablespoons olive oil - 2 cloves garlic, minced - 1 teaspoon fresh ginger, grated - Salt and freshly ground black pepper Whisk until everything mixes well. You want a smooth glaze. This glaze gives your salmon a sweet and savory flavor. Now, it’s time to build your dish. Place the salmon fillets skin-side down on one side of the baking sheet. Brush each fillet with the maple glaze. Make sure to coat them evenly. Save some glaze for later. On the other side, add the vegetables. Use 1 lb of trimmed asparagus and 1 sliced red bell pepper. Drizzle them with a bit of olive oil. Sprinkle salt and pepper on top. Toss the veggies gently to coat them well. Once everything is ready, place the baking sheet in the oven. Bake for 12-15 minutes. The salmon should flake easily with a fork when done. The veggies should stay tender-crisp. In the last 2 minutes, turn on the broiler. This caramelizes the glaze, adding a lovely flavor. Watch closely to prevent burning. Finally, take the baking sheet out and drizzle the reserved maple glaze over the salmon and veggies. Optionally, sprinkle sesame seeds on top and garnish with fresh cilantro or parsley. This adds color and a nice touch to your meal. To get salmon just right, start with fresh fillets. Look for bright color and firm texture. Preheat your oven to 400°F (200°C). This heat cooks the fish evenly. Brush the salmon with maple glaze. This adds great flavor and moisture. Bake for 12-15 minutes. The salmon should flake easily with a fork. For a nice finish, broil it for the last two minutes. This gives a lovely caramelized crust. When roasting vegetables, cut them evenly. This ensures they cook at the same rate. Asparagus and bell peppers are great choices for this dish. Toss them with olive oil, salt, and pepper. Spread them out on the baking sheet. Avoid overcrowding to help them roast well. Bake alongside the salmon for about the same time. This way, everything cooks together, saving you time. To boost the flavor of your dish, try adding lemon juice. A splash will brighten the maple glaze. You can also sprinkle fresh herbs like cilantro or parsley. They add a fresh taste and color. Consider using different spices, like paprika or cayenne, for heat. Sesame seeds can give a nice crunch too. Don’t be afraid to mix and match flavors to find what you love! {{image_4}} You can switch salmon for other proteins. Try chicken breasts for a hearty meal. They soak up the glaze well too. If you want seafood, shrimp works great. It cooks quickly and tastes amazing with the maple glaze. Tofu is another option for a plant-based meal. This protein absorbs flavors, making it a smart choice. Feel free to mix up your veggies. Broccoli is a great choice; it adds a nice crunch. Carrots bring sweetness and colorful appeal. You can also use zucchini for a light touch. Just cut them into similar sizes for even cooking. Remember, any veggie you love can shine in this dish. Want to change the taste? Add some heat with red pepper flakes. This will give your meal a nice kick. For a smoky flavor, add smoked paprika to the glaze. If you love citrus, a splash of orange juice can brighten things up. You can even switch maple syrup for honey for a different sweetness. These little changes can make your dish unique and exciting. To keep leftover maple glazed salmon fresh, place it in an airtight container. You can also cover it tightly with plastic wrap. Store it in the fridge. It will stay good for up to three days. For best taste, enjoy it within two days. When you're ready to eat leftovers, you can reheat the salmon in several ways. The best method is to use the oven. Preheat it to 350°F (175°C). Place the salmon on a baking sheet and cover it with foil. Heat it for about 10 minutes, or until warm. You can also use a microwave. Heat the salmon on a microwave-safe plate for 1-2 minutes. Check often to avoid overcooking. If you want to keep salmon longer, freezing works well. Wrap each fillet tightly in plastic wrap. Then, place them in a freezer-safe bag or container. Make sure to remove as much air as possible. The salmon can last up to three months in the freezer. When ready to eat, thaw it in the fridge overnight before reheating. You can pair your maple glazed salmon with many sides. Here are some great options: - Rice: White, brown, or jasmine rice works well. - Quinoa: This adds a nice nutty flavor. - Salad: A fresh green salad with a light dressing. - Roasted Potatoes: Crispy potatoes add a wonderful crunch. - Bread: A nice crusty bread can round out the meal. These sides bring balance and make the meal more filling. Yes, you can use frozen salmon fillets. Just remember to thaw them first. Place the fillets in the fridge overnight or use a cold water bath for faster thawing. Once thawed, you can follow the recipe as usual. The glaze will still work great on frozen fish. Just make sure to check the cooking time. It may take a few extra minutes to cook through. To check if your salmon is done, look for a few signs: - Color: The salmon should turn from bright pink to a pale pink. - Flaking: Use a fork to see if it flakes easily. - Temperature: The internal temperature should reach 145°F (63°C). If you see all these signs, your salmon is perfectly cooked! Enjoy your meal! In this article, I covered key ingredients, tools, and step-by-step cooking tips for maple glazed salmon. You learned how to prepare, cook, and store your dish. I also shared variations and answers to common questions. With these insights, you can create a delicious meal every time. Enjoy experimenting with flavors and ingredients. Get ready to impress your family and friends! Cooking should be fun and tasty. Now, get started on your next dish!

Maple Glazed Salmon Sheet-Pan Easy and Flavorful Meal

If you’re seeking an easy, tasty meal, look no further! This Maple Glazed Salmon Sheet-Pan dish combines sweet and savory

- 1 pound breakfast sausage, casings removed - 1 cup fresh spinach, roughly chopped - 6 large eggs - 2 cups whole milk - 1 teaspoon Dijon mustard - 1/2 teaspoon garlic powder - 1/2 teaspoon onion powder - Salt and freshly ground black pepper, to taste - 8 slices whole grain bread, cut into 1-inch cubes - 1 cup shredded sharp cheddar cheese - 1/4 cup freshly grated Parmesan cheese The main ingredients bring flavor and texture. The sausage adds richness, while spinach gives freshness. Eggs and milk create a creamy base. Whole grain bread absorbs all the flavors and holds it together. Cheese adds a savory, golden crust. You can add more depth with herbs and spices. Consider these options: - Fresh parsley or chives for a bright kick - Red pepper flakes for a bit of heat - Italian seasoning for an herby twist These extra touches can elevate your strata. They add layers of flavor that make each bite exciting. If you want to switch up the cheese, try these: - Monterey Jack for a milder taste - Feta cheese for a tangy flavor - Gruyère cheese for a nutty touch Each cheese brings its own character. Feel free to mix and match to create your perfect dish. First, preheat your oven to 350°F (175°C). This helps the strata bake evenly. Next, grab a 9x13-inch baking dish. Generously grease it with cooking spray or softened butter. This step is key to avoid sticking later. In a large skillet, add 1 pound of breakfast sausage. Set the heat to medium. Use a wooden spoon to break the sausage up. Cook it for about 5-7 minutes until it's brown and cooked through. Then, stir in 1 cup of chopped spinach. Cook for another 2-3 minutes. You want the spinach to wilt nicely. Once done, take it off the heat and let it cool a bit. In a large bowl, crack 6 large eggs. Whisk them with 2 cups of whole milk, 1 teaspoon of Dijon mustard, 1/2 teaspoon of garlic powder, and 1/2 teaspoon of onion powder. Add a good pinch of salt and black pepper. Mix until everything is well combined and frothy. Now, add the cubed bread. Use 8 slices of whole grain bread cut into 1-inch cubes. Then, fold in the cooled sausage and spinach mixture. Make sure all the bread is coated well. Transfer this mixture into your prepared baking dish. Spread it out evenly. Now, sprinkle 1 cup of shredded sharp cheddar cheese and 1/4 cup of grated Parmesan cheese on top. This creates a delicious cheesy crust. Cover the dish with aluminum foil, not too tight, and place it in the oven. Bake for 30 minutes. After that, remove the foil and bake for another 15-20 minutes. The top should be golden brown and the center firm. Let it cool for a few minutes before slicing and serving warm. To keep your strata from getting soggy, start with stale bread. Stale bread soaks up the egg mix without turning mushy. Cut your bread into cubes, and let it sit out for a few hours or overnight. This helps it dry out. When you mix the bread with the egg, let it rest for about 10 minutes. This gives the bread time to absorb the egg mix fully. Avoid overloading with milk; stick to the recipe's amount. I love serving this strata warm with fresh herbs on top. Chopped parsley or chives add color and flavor. You can also add a side of fresh fruit for a sweet touch. A dollop of light yogurt brings creaminess and balance. For those who love a kick, serve with hot sauce on the side. This dish shines with simple, fresh flavors that make breakfast special. To cook your strata evenly, spread the mixture out well in the dish. Use a spatula to flatten it. Covering it with foil for the first half of baking keeps it moist. Remove the foil later to let the top brown. Bake until the center is firm, not jiggly. A toothpick inserted in the center should come out clean. This ensures a fluffy, well-cooked strata every time. {{image_4}} To make this breakfast strata vegetarian, swap the sausage for plant-based options. Use mushrooms, beans, or lentils for protein. Adding roasted peppers or zucchini boosts flavor and texture. Spinach is great, but feel free to add kale or Swiss chard for variety. This keeps the dish hearty while keeping it meat-free. If you're gluten-free, choose gluten-free bread. This will let everyone enjoy the strata. For those with dairy issues, use almond milk and dairy-free cheese. You can also try using eggs from a plant-based source, like flax eggs. These swaps help you cater to many dietary needs without losing taste. You can switch up the meat for turkey sausage or chicken. Each adds a different spin. If you like spice, chorizo or spicy sausage works well. For veggies, mix in artichokes or sun-dried tomatoes. These changes create a unique flavor each time you make it. The possibilities are endless! To store leftovers, allow the strata to cool first. Place it in an airtight container. This keeps it fresh for up to three days in the fridge. If you want to keep it longer, consider freezing it. For the best flavor, reheat the strata in the oven. Preheat your oven to 350°F (175°C). Place the strata in a baking dish. Cover it with foil to keep it moist. Heat for about 15-20 minutes. You can also use a microwave. Just heat it in 30-second intervals until warm. To freeze, cut the strata into portions. Wrap each piece tightly in plastic wrap. Then, place them in a freezer-safe bag. This way, you can enjoy it later! It can last up to three months in the freezer. When you're ready to eat, thaw it in the fridge overnight before reheating. Yes, you can prepare this strata the night before. Just follow the recipe up to the baking step. After mixing the ingredients, cover the dish with foil and put it in the fridge. In the morning, take it out and let it sit for about 30 minutes. Then, bake it as directed. This method lets the flavors meld together, making it even tastier. This strata pairs well with many sides. Here are some of my favorites: - Fresh seasonal fruit - Light yogurt with honey - A simple green salad - Crispy bacon or turkey sausage These sides add freshness and contrast to the rich strata. You can easily adjust this recipe to fit dietary needs. Here are some ideas: - Use turkey or chicken sausage for less fat. - Swap whole grain bread for gluten-free bread. - Substitute dairy milk with almond or oat milk. - Add more veggies like bell peppers or mushrooms for extra nutrients. These changes keep the dish delicious and satisfying. Absolutely! Stale bread works great in this dish. It soaks up the egg mixture well. Just make sure to cut it into cubes. If your bread is too hard, leave it out for a few minutes to soften slightly. This way, you reduce waste and still enjoy a tasty breakfast. In this post, I shared how to make a tasty Savory Sausage and Spinach Breakfast Strata. We discussed the key ingredients, cooking steps, and helpful tips. I also covered fun variations and storage advice. By following these steps, you can create a dish your family will love. Don't hesitate to customize it to fit your taste. Enjoy experimenting and eating this delicious breakfast option!

Savory Sausage and Spinach Breakfast Strata Delight

Start your day right with my Savory Sausage and Spinach Breakfast Strata Delight! This hearty dish combines savory sausage, fresh

Older posts
Newer posts
← Previous Page1 Page2 Page3 Page4 … Page86 Next →

dsad

© 2026 yumymoments • Built with GeneratePress

Our Policies

  • Copyright Policy
  • Cookie Policy
  • GDPR Policy
  • Privacy Policy
  • Disclaimer
  • Terms Of Use

More Information

  • Home
  • About
  • Contact
  • Appetizers
  • Dessert
  • Dinner
  • Drinks
©2026, yumymoments About Back To Top