Skip to content
DisclaimerTerms Of UseGDPR PolicyCookie Policy

yumymoments

  • Home
  • Drinks
  • Appetizers
  • Dinner
  • Dessert
  • About
  • Contact
  • Privacy Policy
DisclaimerTerms Of UseGDPR PolicyCookie Policy

NO-ING-IMG

- 1 cup unsalted butter - 1 cup apple cider - 2 cups all-purpose flour - 1 cup granulated sugar - 1/2 cup packed brown sugar - 1 teaspoon baking soda - 1/2 teaspoon baking powder - 1/2 teaspoon salt - 2 teaspoons ground cinnamon - 1/2 teaspoon ground nutmeg - 1 large egg - 1 teaspoon vanilla extract - 1/2 cup caramel sauce (for drizzling) You can swap unsalted butter for salted butter. This will add some salt to the cookies. Use maple syrup instead of apple cider for a different flavor. Brown sugar can replace granulated sugar if you want a richer taste. If you're out of baking powder, add an extra 1/2 teaspoon of baking soda. For a nut-free option, skip the nutmeg or use vanilla extract for added warmth. When picking butter, look for a creamy, pale color. For apple cider, choose a brand without preservatives. It should smell fresh and fruity. Flour should be stored in a cool, dry place. Check the package for the best-by date. Ground spices should be aromatic; if they lack smell, they may be old. Always pick fresh eggs, which should feel heavy and have a clean shell. To make brown butter, melt 1 cup of unsalted butter in a medium saucepan. Heat it on medium. Stir it often, and watch for a golden brown color. This process takes about 5 to 7 minutes. The nutty aroma will fill your kitchen. Once ready, take it off the heat and let it cool for about 10 minutes. This step adds a rich flavor to your cookies. Grab a small saucepan and pour in 1 cup of apple cider. Heat it over medium until it boils. Once boiling, lower the heat. Let it simmer for about 10 to 15 minutes. Stir it occasionally. You want the cider to reduce to about 1/3 cup. When done, remove it from the heat and let it cool. This concentrated flavor will shine in your cookies. - Chilling the Dough In a mixing bowl, whisk together 2 cups of all-purpose flour, 1 teaspoon of baking soda, 1/2 teaspoon of baking powder, 1/2 teaspoon of salt, 2 teaspoons of ground cinnamon, and 1/2 teaspoon of ground nutmeg. Set this aside. In another bowl, mix the cooled brown butter with 1 cup of granulated sugar and 1/2 cup of packed brown sugar. Blend them well. Then, add in 1 large egg and 1 teaspoon of vanilla extract. Beat until smooth and creamy. Gently fold in the reduced apple cider, mixing until just combined. Gradually stir the dry mix into the wet mix. Be careful not to overmix; this keeps your cookies soft. - Baking the Cookies After mixing, cover the dough with plastic wrap. Refrigerate it for at least 1 hour. This step is key for a great cookie texture. Preheat your oven to 350°F (175°C). Line a large baking sheet with parchment paper. Using a tablespoon or cookie scoop, drop rounded dough onto the sheet, spacing them about 2 inches apart. Bake for 10 to 12 minutes. The cookies should turn golden brown around the edges. Let them cool on the sheet for 5 minutes before moving them to a wire rack. - Drizzling Caramel Sauce Once your cookies are cool, it’s time to drizzle. Use 1/2 cup of caramel sauce and generously drizzle it over the cookies. This sweet touch makes them even more irresistible. Enjoy the rich flavors and delightful aroma! To get the best texture for your cookies, follow these key tips: - Chill the Dough: Always chill the dough for at least one hour. This step is crucial. It helps the cookies spread less and stay soft. - Don’t Overmix: When you combine wet and dry ingredients, mix just until blended. Overmixing can make cookies tough. - Use a Cookie Scoop: A cookie scoop ensures that each cookie is the same size. This helps them bake evenly. Even the best bakers can make mistakes. Here are some common ones to watch out for: - Skipping Brown Butter: Don’t skip browning the butter. It adds a rich flavor that elevates the cookies. - Not Measuring Ingredients Properly: Use measuring cups and spoons. Too much flour can lead to dry cookies. - Ignoring Oven Temperature: Make sure your oven is preheated. Baking at the wrong temperature can ruin the texture. You can easily customize these cookies to suit your taste. Here are some ideas: - Add Chopped Nuts: Walnuts or pecans add a nice crunch and flavor. - Mix in Dried Fruit: Consider adding dried cranberries or raisins for a sweet twist. - Experiment with Spices: Try adding a pinch of allspice or ginger for extra warmth. - Use Different Extracts: Swap vanilla for almond extract for a unique flavor. These tips and tricks will help you bake perfect Brown Butter Apple Cider Sugar Cookies every time! {{image_4}} You can make these cookies gluten-free. Use a gluten-free all-purpose flour blend instead of regular flour. Look for blends that have xanthan gum, as it helps with texture. Follow the same recipe steps, and you will have tasty gluten-free cookies. To make these cookies vegan, swap the egg for a flaxseed egg. Mix 1 tablespoon of ground flaxseed with 2.5 tablespoons of water. Let it sit for 5 minutes to thicken. Use vegan butter instead of unsalted butter. For the caramel drizzle, choose a vegan-friendly caramel sauce. You can change the spices to fit your taste. Try using pumpkin pie spice instead of cinnamon and nutmeg. For a different flavor, add a splash of maple extract in place of vanilla extract. These small changes can make your cookies unique and exciting. To keep your Brown Butter Apple Cider Sugar Cookies fresh, store them in an airtight container. Place parchment paper between layers to prevent sticking. You can keep them at room temperature for up to a week. If you want them to last longer, put them in the fridge. Just let them come to room temperature before eating. Freezing cookie dough is easy and smart. After mixing the dough, scoop it into balls. Place the dough balls on a baking sheet and freeze them until firm. Then, transfer the frozen dough balls to a freezer-safe bag. Label the bag with the date and type of cookie. You can freeze the dough for up to three months. When ready to bake, just bake them straight from the freezer! Add a minute or two to the baking time. Baked cookies have a good shelf life. When stored properly in an airtight container, they can last about a week at room temperature. If you store them in the fridge, they can last up to two weeks. For the best taste and texture, enjoy them within the first few days. If you notice them getting stale, a quick reheat in the oven can bring back that cozy, fresh-baked taste. Yes, you can make these cookies ahead of time. You can prepare the dough and chill it. Once chilled, shape the dough into balls. Place them on a baking sheet and freeze them. When you're ready, bake them straight from the freezer. This way, you have fresh cookies anytime! Brown butter is simply butter that has been melted and cooked a bit longer. You cook it until it turns golden brown and gives off a nutty smell. To make it, melt the unsalted butter in a saucepan over medium heat. Stir it often for about 5-7 minutes. Watch closely so it doesn't burn! Once it's browned, let it cool a bit before using it in your recipe. If your cookie dough is too sticky, don't worry! You can add a little more flour. Start with one tablespoon and mix it in. If it's still sticky, add more, one tablespoon at a time. You can also chill the dough for a longer time to help it firm up. This will make it easier to scoop and shape. In this blog post, we explored making delicious brown butter apple cider cookies. We covered key ingredients, step-by-step instructions, tips for the best cookie texture, and variations for special diets. Storing these cookies and troubleshooting common issues is also important. With these tips, you can create tasty treats every time. Enjoy experimenting in the kitchen, and have fun baking!

Irresistible Brown Butter Apple Cider Sugar Cookies

If you’re craving a cozy treat that captures fall in every bite, look no further! My irresistible brown butter apple

- 1 large head of cauliflower, cut into bite-sized florets - 1 cup all-purpose flour - 1 cup unsweetened almond milk (or milk of choice for creaminess) - 1 teaspoon garlic powder - 1 teaspoon onion powder - 1 teaspoon smoked paprika for a hint of smokiness - ½ teaspoon salt for seasoning - ½ teaspoon black pepper to taste - 1 cup buffalo sauce (your favorite store-bought or homemade variety) - 1 tablespoon olive oil for drizzling - Fresh parsley, finely chopped (for a vibrant garnish) I love using fresh ingredients. They make the flavors pop. The cauliflower is the star here. It gives a great texture and absorbs all the spices. The flour and almond milk mix to create a smooth batter. It clings well to the florets. The garlic and onion powders add depth. Smoked paprika gives a nice smoky hint that you’ll enjoy. Salt and pepper balance the taste. Buffalo sauce is key for that spicy kick. You can use your favorite brand or make your own. Lastly, a drizzle of olive oil adds richness. The fresh parsley not only looks good but also adds a burst of color. Gather these ingredients, and you’re ready to create a snack that everyone will love. Enjoy the process of cooking! - In a large bowl, combine: - 1 cup all-purpose flour - 1 cup unsweetened almond milk - 1 teaspoon garlic powder - 1 teaspoon onion powder - 1 teaspoon smoked paprika - ½ teaspoon salt - ½ teaspoon black pepper - Whisk until smooth. This batter should cling well to the cauliflower. - Take each cauliflower floret and dip it into the batter. - Make sure each piece gets an even coating. Let excess batter drip off gently. - Preheat your air fryer to 400°F (200°C). - Lightly spray the fryer basket with olive oil. - Arrange the battered florets in a single layer, avoiding crowding. - Cook for 12-15 minutes. Shake the basket halfway for even crispiness. - Once cooked, toss the cauliflower in a bowl with 1 cup of buffalo sauce. - Ensure each piece is well-coated. - Return them to the air fryer for 3-5 minutes. This caramelizes the sauce. To make your buffalo cauliflower extra crispy, avoid overcrowding the air fryer. When you pack too many florets in, they steam instead of fry. This leads to soggy bites. Instead, cook in batches if needed. Aim for a single layer for best results. For optimal cooking times, set your air fryer to 400°F (200°C). Cook the cauliflower for 12 to 15 minutes. Shake the basket halfway through to ensure even cooking. You will see the florets turn golden brown and crispy. For a great batter coating, make sure to dip each floret evenly. This helps every piece get that delicious flavor. If the batter seems too thick, add a bit more almond milk. If it’s too thin, sprinkle in some flour. The right consistency helps the batter cling well. Serve your buffalo cauliflower with celery sticks and ranch dressing. These sides add a nice crunch and coolness to the dish. For a pop of color, use a bright platter. Arrange the cauliflower in a fun pattern. A sprinkle of fresh parsley on top makes it look even more appealing. {{image_4}} You can change up the sauce to fit your taste. Try different hot sauces for more heat. Some sauces are mild, while others pack a punch. If you want to make your own buffalo sauce, mix melted butter with hot sauce. You can add garlic powder or spices for more flavor. Homemade sauce allows you to control the heat and taste. If you want a vegan version, swap out the milk for plant-based milk. Almond milk works great, but soy or oat milk are good choices too. You can replace the all-purpose flour with chickpea flour or a gluten-free blend. These swaps keep the dish tasty and friendly for everyone. Don't hesitate to get creative with spices and herbs. Adding cumin or cayenne can enhance the taste. For a cheesy twist, mix in nutritional yeast. This gives a cheesy flavor without dairy. You can even sprinkle fresh herbs like cilantro or basil to brighten up the dish. Each variation can make your buffalo cauliflower unique and exciting. To keep your buffalo cauliflower fresh, store any leftovers in an airtight container. Place the container in the fridge. This way, your snack stays tasty for up to three days. When reheating, use the air fryer at 375°F. This will help regain that crispy texture. Heat for about 5-7 minutes. Yes, you can freeze buffalo cauliflower! First, let it cool completely. Spread the florets on a baking sheet lined with parchment paper. Freeze for about an hour, then transfer to a freezer bag. This prevents sticking. When you want to enjoy it again, no need to thaw. Preheat the air fryer to 400°F and cook for 12-15 minutes. This will keep them crispy and delicious! Yes, you can use frozen cauliflower. Just thaw it first. Pat it dry to remove excess moisture. This helps the batter stick better. However, fresh cauliflower gives a crunchier texture. To add more heat, use extra buffalo sauce. You can mix in cayenne pepper or hot sauce. Taste as you go. Adjust the spice level to your liking. You could also add a sprinkle of crushed red pepper. Buffalo cauliflower pairs well with celery sticks. A side of ranch dressing is a classic choice. You can also serve it with blue cheese sauce for an extra kick. Consider adding other crunchy veggies like carrots or bell peppers. Absolutely! You can air fry broccoli, Brussels sprouts, or zucchini. Just follow the same battering method. Adjust cooking times as needed. The buffalo sauce works well with many veggies. Cooked buffalo cauliflower lasts about 3-5 days in the fridge. Store it in an airtight container. To keep it crispy, reheat it in an air fryer for a few minutes. This helps regain its crunch. This buffalo cauliflower recipe is simple and fun. You learned how to prepare the batter, coat the florets, and air fry them to perfection. I also shared tips for crispiness and suggested ways to serve your dish. You can even try different sauces or make it vegan. With these steps, you can make a tasty snack or side dish everyone will enjoy. Get ready to impress your friends and family with this delicious twist on cauliflower!

Buffalo Cauliflower Air Fryer Crisp and Tasty Snack

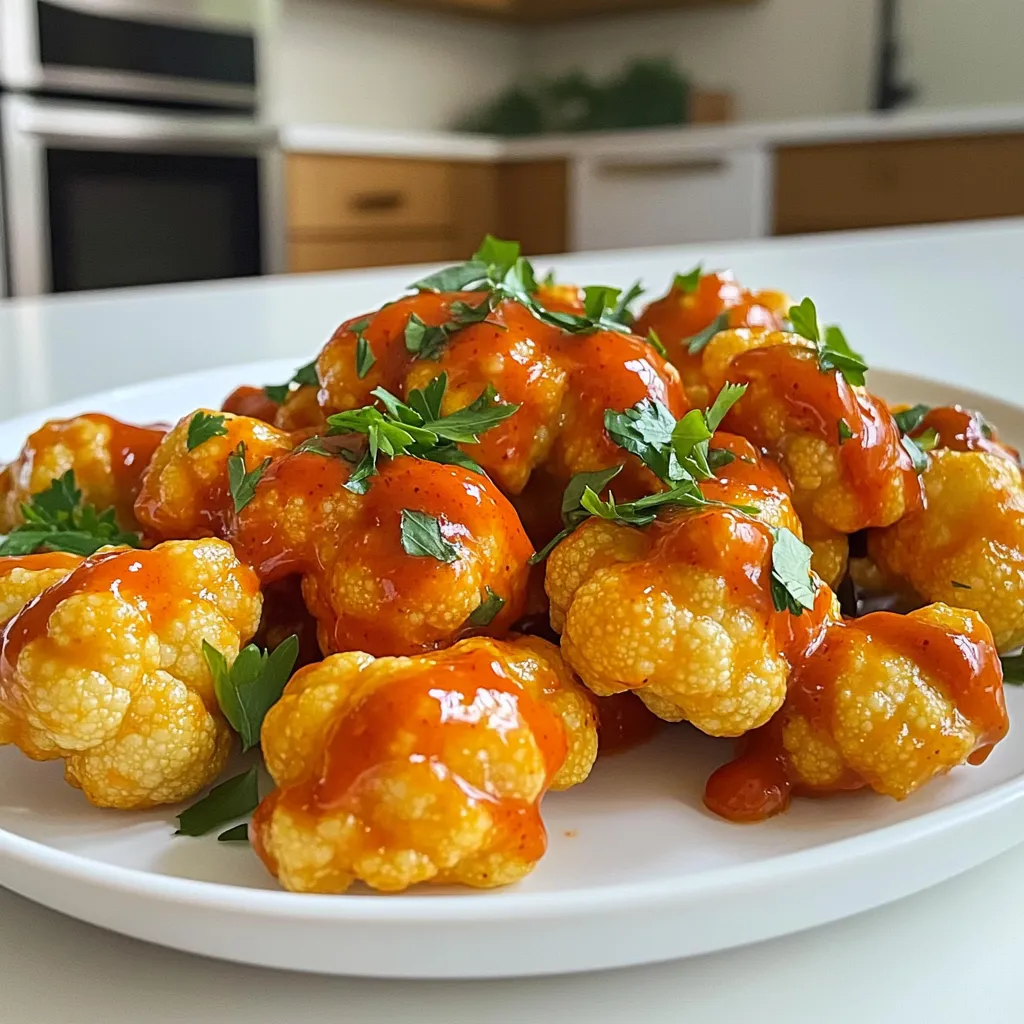
Looking for a crispy, tasty snack that packs a punch? You’re in the right place! This Buffalo Cauliflower Air Fryer

- 6 medium russet potatoes - 1 medium onion - 3 cloves of garlic - 4 cups vegetable broth - 1 cup heavy cream - 1 cup shredded sharp cheddar cheese - 1/2 cup sour cream - 1 teaspoon smoked paprika - Salt and black pepper - Crispy bacon bits - Diced fresh tomatoes - Freshly chopped chives For my Loaded Baked Potato Soup, I start with the main ingredients. I peel and dice six medium russet potatoes into one-inch cubes. These potatoes give the soup its hearty base. Next, I finely chop one medium onion and mince three cloves of garlic. These add depth and flavor. I pour four cups of vegetable broth over the veggies. This broth is the heart of the soup, making it rich and warm. I then sprinkle in one teaspoon of smoked paprika. It brings a lovely smoky flavor. I also add salt and black pepper to taste. For creaminess, I mix in one cup of heavy cream, one cup of shredded sharp cheddar cheese, and half a cup of sour cream. These ingredients make the soup creamy and dreamy. Finally, I like to add toppings. Crispy bacon bits add crunch. Diced fresh tomatoes bring brightness. Freshly chopped chives give a pop of color and flavor. Each ingredient works together to create a comforting bowl of soup. - First, peel and dice 6 medium russet potatoes into 1-inch cubes. - Next, finely chop 1 medium onion and mince 3 cloves of garlic. These simple steps set up a great base for your soup. The russet potatoes give it a hearty feel. The onion and garlic add rich flavor. - Layer the diced potatoes, onion, and garlic in the slow cooker. - Carefully pour in 4 cups of vegetable broth. Make sure all potatoes are submerged. - Sprinkle in 1 teaspoon of smoked paprika, and add salt and black pepper to taste. Stir the mix gently with a wooden spoon. This spreads the spices evenly. Cover the slow cooker. Cook on low for 6-7 hours or on high for 3-4 hours. The potatoes should be tender and easy to pierce. - After cooking, use a potato masher to mash some potatoes. This helps create a creamy texture while keeping some chunks. - Stir in 1 cup of heavy cream, 1 cup of shredded sharp cheddar cheese, and 1/2 cup of sour cream. Mix until the cheese melts fully. Taste the soup and add more salt or pepper if needed. Ladle the hot soup into bowls. Top with extra cheddar cheese, crispy bacon bits, and sliced green onions. This adds a burst of flavor and color. Enjoy your creamy delight! To get the right texture in your soup, you can use either a potato masher or an immersion blender. A potato masher gives you control. You can mash to your liking, leaving some chunks for bite. An immersion blender creates a smoother soup. Just be careful not to over-mash. This can turn your soup too creamy and lose that nice texture. You want your soup to taste just right. Adjust the seasonings to match your flavor preference. If you like spice, try adding a bit of cayenne pepper or chili powder. Fresh herbs like thyme or rosemary can also add depth. Experiment until it feels perfect for you! Serve your soup in rustic-style bowls for a cozy feel. Top with a sprinkle of green onions and extra cheese. This makes it look tasty. Pair your soup with crusty bread for dipping. You can even set up a toppings bar. Let everyone pick their favorite toppings like crispy bacon bits or fresh tomatoes. This adds fun to the meal! {{image_4}} You can change the main ingredients for different flavors. Instead of russet potatoes, try Yukon Gold potatoes. They add a creamier texture. For the broth, use chicken broth for added depth or a low-sodium option to control salt. If you want to make it dairy-free, swap heavy cream for coconut milk. You can also use cashew cream for a rich taste. For sour cream, try using a dairy-free yogurt. These options keep the soup creamy without dairy. For a kick, add spices like cumin and chili powder for a Southwestern twist. A dash of cayenne pepper can bring heat, too! You can also stir in proteins like cooked chicken or sausage. This makes the soup heartier and more filling. You can enjoy this soup all year. In the fall, add pumpkin puree for a sweet touch. It pairs well with the potatoes and spices. In winter, try adding roasted garlic for a warm, rich flavor. This makes the soup cozy and comforting during cold days. To keep your loaded baked potato soup fresh, store it in the refrigerator. Use an airtight container for best results. Let the soup cool down before sealing. This helps keep the flavor rich. For freezing, choose freezer-safe containers. Leave some space at the top. The soup will expand as it freezes. You can also use heavy-duty freezer bags. Just remember to remove as much air as possible. When it's time to enjoy leftovers, you can reheat on the stove or in the microwave. For the stove, pour the soup into a pot. Heat it over low to medium heat. Stir often to prevent sticking. In the microwave, use a microwave-safe bowl. Heat in short bursts, stirring in between. This helps keep the soup creamy. If it gets too thick, add a splash of broth or cream. In the fridge, your creamy soup lasts about three to four days. Be sure to check for spoilage signs. If you see any mold or it smells off, throw it out. Watch for changes in texture or color. If the soup separates too much, it may be past its prime. Always prioritize safety when it comes to food. Yes, you can make this soup ahead of time. It keeps well in the fridge. Here are some best practices for meal prep and reheating: - Cook and cool: After cooking, let the soup cool to room temperature. - Store: Place the soup in an airtight container. It can stay in the fridge for up to three days. - Reheat: Heat on the stove over low heat. Stir often to keep it creamy. You can add a splash of broth if it seems too thick. I recommend using russet potatoes for this soup. They have high starch content, which creates a creamy texture. Here’s a quick comparison: - Russet potatoes: Light, fluffy, and great for mashing. They break down well in soups. - Yukon gold potatoes: Creamy and buttery, but hold their shape a bit more. - Red potatoes: Firm and waxy, which may not break down as much. For a smooth soup, stick with russets. They offer the best flavor and texture. Absolutely! You can easily make this soup vegan. Here are some suggestions for dairy alternatives: - Heavy cream: Use coconut cream or cashew cream for a rich texture. - Sour cream: Try vegan sour cream or a blend of blended silken tofu and lemon juice. - Cheddar cheese: Use vegan shredded cheese or nutritional yeast for a cheesy flavor. These swaps keep the soup creamy and delicious while being plant-based. Enjoy your vegan version! In this blog post, we explored how to make a delicious Loaded Baked Potato Soup. We covered all the key ingredients, from russet potatoes to sharp cheddar cheese. You learned step-by-step instructions for cooking it in a slow cooker and tips for perfect texture and flavor. We also discussed variations you can try, like dairy-free options and seasonal add-ins. Don’t forget to store your leftovers properly to enjoy this soup later. Now, it’s time to make this tasty dish and impress your friends and family!

Loaded Baked Potato Soup Slow Cooker Creamy Delight

Are you ready to enjoy a warm bowl of comfort? My Loaded Baked Potato Soup is just the dish you

- 2 boneless, skinless chicken breasts - 4 oz cream cheese, at room temperature - 1 cup sharp cheddar cheese, shredded - 2 fresh jalapeños, finely chopped - 1/2 teaspoon garlic powder - 1/2 teaspoon onion powder - 1/2 teaspoon smoked paprika - Salt and black pepper to taste - 1/4 cup panko breadcrumbs - Non-stick cooking spray For this recipe, I love using fresh ingredients. The two chicken breasts serve as a perfect base for our filling. The cream cheese adds creaminess, while sharp cheddar brings a great flavor. Jalapeños give that spicy kick, and the spices enhance the overall taste. I prefer using panko breadcrumbs for a crunchy texture. They make the chicken crispy in the air fryer. Non-stick cooking spray helps the breadcrumbs stick and ensures a golden finish. Feel free to adjust the spices to match your taste. You can add more jalapeños for extra heat or less if you prefer mild flavors. Each ingredient works together to create a tasty dish that is easy to make. First, set your air fryer to 390°F (200°C). Preheating helps cook the chicken evenly. It takes about 5 minutes to heat up. This step is key for a crispy texture. In a medium bowl, mix 4 oz of cream cheese with 1 cup of shredded cheddar cheese. Add 2 finely chopped jalapeños, 1/2 teaspoon garlic powder, 1/2 teaspoon onion powder, and 1/2 teaspoon smoked paprika. Season with a pinch of salt and black pepper. Stir until smooth and creamy. Take 2 boneless, skinless chicken breasts and slice them in half horizontally. This creates thinner fillets that cook faster. Spread the creamy filling on one side of each chicken fillet. Fold the chicken over to keep the filling inside. Pour 1/4 cup of panko breadcrumbs into a shallow dish. Lightly spray the stuffed chicken with non-stick cooking spray. Press each side into the breadcrumbs for an even coating. This adds crunch and flavor. Place the coated chicken in the preheated air fryer basket. Make sure they are in a single layer and not touching. Cook for 12-15 minutes at 390°F (200°C). Check that the chicken reaches an internal temperature of 165°F (75°C) for safe eating. After cooking, take the chicken out and let it rest for a few minutes. This keeps it juicy. For presentation, slice the chicken and place it on a rustic wooden board. You can garnish with green onions and a drizzle of ranch dressing for a fresh touch. If you have thicker chicken breasts, you need to adjust the cooking time. Thicker pieces take longer to cook. Add 3 to 5 extra minutes to the air fryer time. Always check the chicken’s internal temperature. It should reach 165°F (75°C) for safe eating. To keep leftovers fresh, store them in an airtight container. Place the chicken in the fridge if you plan to eat it within a few days. If you want to keep it longer, freeze the chicken. When reheating, use the air fryer for the best texture. Heat at 350°F (175°C) for about 5 minutes. Want to spice things up? Add more jalapeños or use spicy cheese. You can also mix in spices like cayenne or chili powder. For dipping, ranch dressing is a great choice. You could also try barbecue sauce or a zesty salsa. These add a fun kick to each bite! {{image_4}} You can switch up the cheese in this dish. Mozzarella gives a stretchy, melty texture. Pepper jack adds a spicy kick, perfect for heat lovers. If you need dairy-free options, try vegan cream cheese or cashew cheese. These can still provide creaminess without the dairy. Feel free to get creative with your stuffing. You can add chopped bell peppers, spinach, or even corn for extra flavor. Want a smoky taste? Add crispy bacon bits. The bacon will bring a savory crunch that pairs well with the creamy filling. To make this a full meal, serve with a fresh salad. A simple side of roasted veggies or rice can round out your plate. You can also pair it with a dipping sauce like ranch or a zesty salsa. This adds flavor and makes the meal even more fun to eat. To store your Air Fryer Jalapeño Popper Chicken, let it cool first. Place the leftovers in an airtight container. This keeps the flavors fresh. You can refrigerate it for up to 3 days. If you want to keep it longer, freeze it. Wrap each piece tightly in plastic wrap and foil. Frozen chicken can last for about 2 months. When reheating, you have two good options: the microwave or the air fryer. If you use the microwave, heat it on low. This keeps the chicken moist. However, it might make the coating soft. Using the air fryer is better for keeping the crunch. Preheat it to 350°F (175°C). Then air fry for about 5 minutes. This way, the chicken stays tasty and crispy. You can make this dish in advance for quick meals. Cook the chicken, then let it cool. Store it in the fridge for easy access. You can also use pre-cooked chicken. Just mix it with the creamy filling and follow the same steps. This saves time and still gives you great flavor. Use boneless, skinless chicken breasts for this recipe. They cook evenly and stay juicy. Look for chicken breasts that are uniform in size. This helps them cook at the same rate. If you want a thicker piece, you can cut the breast in half. This way, the filling stays inside and cooks perfectly. Yes, you can use an oven. Preheat your oven to 375°F (190°C). Place the stuffed chicken breasts on a baking sheet. Bake for about 25-30 minutes. Make sure the outside is golden brown and the chicken is cooked through. You can also use a skillet on the stove. Cook over medium heat for about 5-7 minutes per side. The chicken is done when it reaches an internal temperature of 165°F (75°C). Use a meat thermometer to check. Insert it into the thickest part of the chicken. If it’s not at 165°F, cook it longer. This ensures your chicken is safe to eat and juicy. Yes, you can use frozen chicken breasts. However, you need to adjust cooking time. Cook the chicken at 390°F (200°C) for 15-20 minutes longer. Make sure to check the internal temperature. It should still reach 165°F (75°C). Thawing the chicken first gives better results, but it’s not necessary. This guide covered how to make delicious stuffed chicken breasts in an air fryer. You learned the key ingredients and steps, from preparing the creamy filling to air frying for a crispy finish. Don't forget to try the variations and adjustments for flavor! Now, with everything you need in hand, you can impress anyone with this simple recipe. Happy cooking!

Air Fryer Jalapeño Popper Chicken Flavorful and Easy

Are you ready to elevate your dinner game? With Air Fryer Jalapeño Popper Chicken, you’ll enjoy a flavor-packed dish that’s

- 1 cup rolled oats - 1 cup whole wheat flour - 1/2 cup pure maple syrup - 1/2 cup unsalted butter, melted - 1/4 cup packed brown sugar - 1/2 teaspoon baking soda - 1/2 teaspoon baking powder - 1/2 teaspoon ground cinnamon - 1/4 teaspoon sea salt - 1 cup pecans, chopped - 1/2 cup dried cranberries (or goji berries) - 1 tablespoon pure vanilla extract These ingredients create a hearty cookie packed with flavor. The rolled oats give a chewy texture. Whole wheat flour adds fiber and nutrients. Pure maple syrup offers natural sweetness and a rich flavor. The butter binds everything together, while brown sugar enhances the cookie’s warm taste. Baking soda and baking powder help the cookies rise. Ground cinnamon adds warmth, and sea salt balances the sweetness. Pecans bring a nutty crunch, making each bite delightful. Dried cranberries or goji berries add a sweet-tart burst. Finally, vanilla extract gives a lovely aroma. This blend of ingredients makes the perfect breakfast cookie to start your day right. Each cookie has about 120 calories. Here’s a quick breakdown: - Fats: 6g - Carbohydrates: 15g - Sugars: 5g - Protein: 2g These cookies offer a good balance of nutrients. They provide energy from carbs and healthy fats from nuts. You can switch out maple syrup for agave nectar or honey if needed. For gluten-free cookies, use gluten-free flour. These swaps keep your cookies tasty and fun. 1. First, preheat your oven to 350°F (175°C). This helps the cookies bake evenly. 2. Next, line a baking sheet with parchment paper. This keeps the cookies from sticking. 3. In a large mixing bowl, pour in the melted butter, maple syrup, and packed brown sugar. 4. Add the pure vanilla extract to the bowl. Use a whisk or spoon to mix everything together. Make sure you blend until smooth. 1. In another bowl, sift together the rolled oats, whole wheat flour, baking soda, baking powder, ground cinnamon, and sea salt. 2. Sifting combines all the dry ingredients and makes the flour lighter. 1. Slowly add the dry mixture to the wet ingredients. Stir gently until just mixed. 2. Avoid overmixing. This keeps the cookies soft and chewy. 3. Next, fold in the chopped pecans and dried cranberries. Make sure they are evenly spread in the dough. 1. Using a tablespoon or cookie scoop, drop rounded dough onto the prepared baking sheet. 2. Leave about 2 inches of space between each cookie. This allows them to spread while baking. 3. Gently flatten each dough mound with a spoon or your fingers. This helps them bake evenly. 4. Bake the cookies for 12-15 minutes. Look for a golden-brown edge to know they are done. 5. Once they are baked, let the cookies cool on the sheet for a few minutes. 6. Then, transfer them to a wire rack to cool completely. To make soft cookies, mix the dough gently. Overmixing makes them tough. Combine wet and dry ingredients until just blended. This keeps the cookies soft and chewy. For even baking, use a preheated oven. Rotate the baking sheet halfway through. This helps every cookie bake evenly. For a lovely display, place cookies on a pretty plate. Drizzle extra maple syrup on top. Sprinkle chopped pecans for crunch and beauty. Pair these cookies with milk or tea. They make a perfect breakfast treat. To keep cookies fresh, store them in an airtight container. This keeps them soft for days. If you want to store them longer, freeze the cookies. They last up to three months in the freezer. Just thaw them at room temperature before enjoying! {{image_4}} You can easily change the flavor of your Maple Pecan Breakfast Cookies. Try adding chocolate chips for a sweet touch. Use different nuts, like almonds or walnuts, for a new crunch. You can also adjust spices to create unique profiles. Adding nutmeg or ginger can give a warm twist to the flavor. If you want to make these cookies vegan, swap the butter for coconut oil. Use maple syrup as your sweetener. You can also use flaxseed meal mixed with water as an egg replacement. For a healthier option, reduce the brown sugar. You can cut it down by half and still enjoy tasty cookies. Incorporate seasonal flavors for a fun twist. In fall, try adding pumpkin spice to the dough. You can also mix in chopped apples or pears for a fresh taste. During winter, add cinnamon or nutmeg to bring warmth to your cookies. Seasonal fruits can make your breakfast cookies special and festive. Can I make these cookies ahead of time? Yes, you can make these cookies ahead of time. You can prepare the dough and store it in the fridge for up to three days. When ready to bake, scoop the dough onto your baking sheet and bake as usual. This saves time in the morning. What do I do if my dough is too sticky? If your dough feels too sticky, add a little extra flour. Start with a tablespoon at a time. Mix well until the dough feels manageable. Remember, aim for a soft but workable texture. How to adjust baking time for different ovens? Ovens can vary in heat. If your cookies bake too fast, lower the temperature by 25°F and check them a few minutes earlier. If they take too long, raise the heat slightly. Always keep an eye on the color of the edges. Substituting ingredients for allergies For nut allergies, use sunflower seeds instead of pecans. You can also swap maple syrup with agave nectar or honey. Ensure all substitutes fit your dietary needs. Read labels to avoid allergens. Best beverages to pair with these cookies These cookies go well with a glass of milk or a warm cup of tea. You might also enjoy them with coffee. The flavors blend nicely and make for a cozy breakfast. How to serve for different occasions For a casual breakfast, stack these cookies on a plate. Drizzle with maple syrup and sprinkle extra pecans on top. For a brunch, serve with fresh fruit and yogurt. These options look great and taste even better. If you love these Maple Pecan Breakfast Cookies, you might enjoy other breakfast cookies too. Here are some tasty options: - Oatmeal Chocolate Chip Cookies - Peanut Butter Banana Cookies - Almond Joy Breakfast Cookies For more yummy breakfast ideas, check out my blog. You will find recipes like fluffy pancakes, hearty muffins, and smoothie bowls. Visual learners can benefit from cooking videos. Here’s a link to a great video tutorial showing how to make these breakfast cookies. Watching someone else do it can make it easier to follow along. You might also want to check out cooking channels on YouTube. They often feature recipes similar to this one. Find channels that focus on healthy baking and breakfast ideas. I love to hear from you! Share your own twists on these cookies. Did you add chocolate chips or use a different nut? Tell me about it in the comments! Use the hashtag #MaplePecanCookies when you share on social media. I’d love to see your creations! These cookies are easy and delicious to make. We covered the ingredients, steps, and tips to ensure your baking goes smoothly. You learned about substitutions and ways to present your cookies. Remember, cooking is fun, and you can adjust the recipe to fit your taste. Try different flavors or share with friends. Keep these tips in mind, and enjoy the process! Your cookies will surely delight everyone. Keep baking and experimenting with new ideas!

Maple Pecan Breakfast Cookies Perfect Start to Day

Start your day right with delicious Maple Pecan Breakfast Cookies! Bursting with flavor, these cookies are easy to make and

- 12 oz fettuccine pasta - 16 oz assorted mushrooms (cremini, shiitake, button) - 1 cup heavy cream - 1/2 teaspoon freshly grated nutmeg - Sea salt and cracked black pepper to taste - Fresh parsley, chopped - Large pot for pasta - Spacious skillet - Cooking utensils When making Creamy Mushroom Alfredo Fettuccine, you need the right ingredients. The fettuccine pasta serves as a perfect base, providing a chewy texture. For mushrooms, I suggest using a mix of cremini, shiitake, and button. These mushrooms add rich flavors and a variety of textures. Heavy cream is essential for that dreamy, creamy sauce that coats the pasta beautifully. For seasoning, freshly grated nutmeg gives a warm, unique flavor. Sea salt and cracked black pepper enhance the taste without overpowering it. Fresh parsley adds a pop of color and freshness to the dish when you serve it. Gather your equipment before you start cooking. A large pot will help you boil the fettuccine, while a spacious skillet is crucial for making the sauce. Don't forget your cooking utensils, like a wooden spoon, for mixing everything together. With these ingredients and tools, you’re ready to create a delightful dish that everyone will love. To start, bring a large pot of salted water to a boil. The salt helps flavor the pasta. Once it boils, add 12 oz of fettuccine pasta. Cook this for about 8 to 10 minutes, or until it's al dente, which means it’s firm but not hard. It’s important to reserve 1 cup of pasta water before draining. This water helps adjust the sauce later. Next, heat 2 tablespoons of extra virgin olive oil in a spacious skillet over medium heat. Once hot, add 1 medium onion, finely diced. Sauté it for about 5 minutes until it turns translucent. Then, stir in 4 cloves of minced garlic. Cook for another 1 to 2 minutes. It should smell great but not burn. Now, raise the heat to medium-high. Add 16 oz of assorted mushrooms, sliced thin. Use cremini, shiitake, and button mushrooms for great flavor. Be sure to season with sea salt and cracked black pepper. Sauté the mushrooms for 8 to 10 minutes until they are nicely browned. Stir them occasionally, and let their moisture evaporate for the best texture. Lower the heat back to medium. Carefully pour in 1 cup of heavy cream with the sautéed mushrooms. Bring this to a gentle simmer. Gradually stir in 1 cup of finely grated Parmesan cheese and 1/2 teaspoon of freshly grated nutmeg. Mix well until the cheese melts, creating a creamy sauce. Taste it and add more salt and pepper if you like. Add the drained fettuccine directly to the skillet with the Alfredo sauce. Toss everything together well. This allows the fettuccine to soak up the creamy sauce. If the sauce seems too thick, add some reserved pasta water a little at a time. This helps reach your desired sauce consistency. For serving, place the fettuccine in deep bowls or on plates. This creates an elegant look. Garnish each serving with fresh chopped parsley. You can also add more Parmesan cheese for a finishing touch. For a full meal, consider pairing it with a crisp salad and some crusty garlic bread. To make the sauce creamy, use heavy cream. Heat it slowly and stir often. Add freshly grated nutmeg for a warm flavor. Taste the sauce as you go. If it needs more salt, add some. For a richer taste, add more cheese. Timing is key when cooking fettuccine. Follow the package for cooking time. Check the pasta a minute before the time is up. It should be firm, but not hard. Al dente pasta has a slight bite to it. Store any leftovers in an airtight container. Keep them in the fridge for up to three days. When reheating, add a splash of water or cream. This keeps the pasta from drying out. Heat gently on the stove or in the microwave. {{image_4}} You can use different types of mushrooms for this dish. Cremini, shiitake, and button mushrooms work well together. Mixing them gives a rich flavor. If you want a lighter taste, try using just button mushrooms. You can also substitute mushrooms with vegetables like zucchini or spinach. Just sauté them until soft and mix them in with the sauce. If you need a dairy-free version, use coconut cream instead of heavy cream. Nutritional yeast can replace Parmesan cheese. This adds a cheesy flavor without dairy. Be sure to adjust your seasonings. You might need a bit more salt to balance the flavors. Taste as you go to find what works best for you. Adding protein can make this dish even heartier. You can mix in cooked chicken, shrimp, or tofu. For chicken, sauté it in the skillet until golden. For shrimp, add them when you cook the mushrooms, and they will cook quickly. Tofu should be pressed and cubed before adding. Cook it until it’s crispy on the outside for better texture. This will enhance your creamy mushroom Alfredo fettuccine, making it a satisfying meal. Store your Creamy Mushroom Alfredo Fettuccine in airtight containers. Glass or plastic containers work best. Make sure the dish cools down before sealing. In the fridge, it stays fresh for about 3 to 5 days. To freeze, let the dish cool completely. Then, pack it in freezer-safe containers or bags. Remove as much air as possible to avoid freezer burn. It can last for up to 2 months in the freezer. When ready to eat, thaw it overnight in the fridge. Reheat gently on the stove or in the microwave until warm. This creamy dish lasts in the fridge for 3 to 5 days. In the freezer, it can be stored for up to 2 months. Watch for signs of spoilage, like an off smell or change in texture. If it smells sour or has mold, it’s best to toss it out. Yes, you can use other pasta types. Penne, rigatoni, or even spaghetti work well. Just keep an eye on the cooking time. Each pasta has its own texture and shape, which can change the dish's feel. Absolutely! You can make this dish ahead of time. Cook the fettuccine and sauce separately. Store them in airtight containers. When you’re ready to eat, reheat them together on the stove. This helps keep the pasta from getting mushy. To make it cheesy, try adding more Parmesan cheese. You can mix in mozzarella or even goat cheese for a twist. Just remember to melt it slowly into the sauce for smoothness. This dish pairs well with a crisp side salad. A Caesar or mixed greens salad adds freshness. Garlic bread is another great choice to soak up the sauce. Yes, this dish can be vegetarian. Just use vegetable broth instead of chicken stock if you add any. For vegan options, swap heavy cream with coconut cream. Nutritional yeast can replace cheese for flavor. In this blog post, we explored the key ingredients for a delicious Creamy Mushroom Alfredo Fettuccine. I shared step-by-step instructions on cooking the pasta, sautéing aromatics, and making a rich sauce. You learned tips for perfecting the dish and storing leftovers. Remember, you can customize this recipe with different mushrooms, proteins, or even dairy-free options. With this guide, you can create a comforting meal that suits your taste. Enjoy every creamy bite!

Creamy Mushroom Alfredo Fettuccine Delightful Dish

Are you ready to dive into a bowl of pure comfort? Creamy Mushroom Alfredo Fettuccine is a savory dish that

- 1 pound beef chuck - 1 cup pearl barley - 4 cups beef broth - 2 cups water - 1 medium onion, finely diced - 2 medium carrots, peeled and sliced - 2 celery stalks, sliced - 3 cloves garlic, minced - Dried herbs (thyme, rosemary, bay leaf) - Salt and freshly ground black pepper - 1 cup frozen peas - Chopped fresh parsley for garnish - Olive oil for browning the beef The main ingredients for our soup include beef chuck and pearl barley. Beef chuck is great because it gets tender and juicy. The pearl barley adds a nice chewy texture and heartiness to the dish. For vegetables, I use onion, carrots, and celery. They bring sweetness and depth to the soup. Garlic adds a punch of flavor. I use dried herbs like thyme and rosemary, along with a bay leaf, to enhance the taste. Don’t forget salt and pepper; they balance the flavors perfectly. You may want to add frozen peas for freshness. They brighten up the soup with color and flavor. Chopped parsley as a garnish adds a lovely touch. The olive oil is key for browning the beef. This step builds flavor through caramelization. With these ingredients, your Slow Cooker Beef Barley Soup will be hearty and satisfying. To start, we need to brown the beef chuck. This step is key for great flavor. Heat one tablespoon of olive oil in a large skillet over medium-high heat. Add the beef cubes. Let them cook for about 5-6 minutes. You want them to be nicely browned on all sides. This searing process locks in juices and adds depth to the soup. Next, we move to the slow cooker. Carefully transfer the browned beef into the cooker. Now, add in your diced onion, sliced carrots, and sliced celery. Don’t forget the minced garlic! This mix adds sweetness and aroma. Stir in one cup of pearl barley along with dried thyme, rosemary, and a bay leaf. Season with salt and pepper to taste. Now, let’s add the liquids. Pour in 4 cups of beef broth and 2 cups of water. Gently stir everything together. Cover the slow cooker with its lid. You can set it to cook on low for 6-8 hours or on high for 3-4 hours. The soup is ready when the beef is tender and the barley is soft. For a fresh touch, if you want, add one cup of frozen peas about 15 minutes before serving. They will heat up nicely and add a pop of color. Remember to taste the soup before serving. Adjust the seasoning as needed. Enjoy your hearty meal! For the best taste, adjust your seasoning. I often add salt and pepper at the end. This helps to bring out the flavors in the soup. Don’t skip the browning step for the beef. Searing the beef first adds a rich, deep flavor. I recommend browning it in olive oil for about 5-6 minutes. This simple step can really make your soup shine. When serving, use rustic bowls. They make the soup feel homey and warm. A slice of crusty bread on the side is perfect for dipping. For a splash of color, garnish with fresh parsley. Just a sprinkle adds brightness and freshness. You can also add a few extra peas on top for a nice touch. Be careful not to overcook the vegetables. Adding them at the right time is key. If you add them too soon, they can turn mushy. Also, adjust the liquid based on your barley choice. Different kinds of barley absorb water differently. Keep an eye on the consistency to get it just right. {{image_4}} You can change the beef cut to suit your taste. Brisket or stew meat works well. Both cuts give great flavor. If you want a lighter option, swap barley for other grains. Quinoa or farro are excellent choices. They add unique textures and flavors to your soup. Using different grains may change cooking times. Keep an eye on it to ensure everything cooks perfectly. Want to boost nutrition? Add more veggies! Potatoes or bell peppers are great options. They add flavor and color to the soup. Chop them into bite-sized pieces for easy eating. When adding extra ingredients, adjust your cooking time. You want all the veggies to soften without getting mushy. Stir everything together as it cooks to combine those lovely flavors. You can elevate the taste of your soup with a few simple tricks. Adding sauces like Worcestershire or soy sauce gives depth. Just a splash will enhance the overall flavor. For a fresh twist, squeeze in some lemon juice. This adds brightness and balances the rich flavors. Experiment with these additions to find your perfect blend! To store your leftover soup, let it cool first. Place it in an airtight container. This keeps it fresh and safe to eat. Make sure to seal the lid tightly. You can store it in the fridge for up to three days. If you notice any off smells or changes in color, toss it out. Freezing is a great option for longer storage. First, cool the soup completely. Then, pour it into freezer-safe bags or containers. Leave some space at the top since soup expands when frozen. Your soup can stay good for about three months in the freezer. When ready to eat, thaw it in the fridge overnight. To reheat your soup, use the stove or microwave. If you use the stove, warm it over low heat. Stir often to prevent sticking. If using the microwave, heat it in short bursts, stirring in between. Be careful not to overcook the barley. This will keep it from turning mushy. Once heated, enjoy your hearty soup! Slow Cooker Beef Barley Soup lasts about 3 to 4 days in the fridge. To keep it safe, store it in an airtight container. Always check for signs of spoilage before eating. If you see any off smells or mold, it’s best to throw it away. Yes, making this soup ahead of time is a great idea. It allows the flavors to meld together, making the soup even better. You can prepare it up to a day in advance. Just let it cool before you store it in the fridge. When you're ready to eat, reheat it on the stove or in the microwave. Absolutely! For a vegetarian barley soup, you can use mushrooms, lentils, or chickpeas instead of beef. These options add great flavor and texture. You can also use vegetable broth instead of beef broth. This way, you still enjoy a hearty and satisfying meal without meat. This article covered how to make a delicious Beef Barley Soup in a slow cooker. You learned about the key ingredients, step-by-step instructions, and helpful tips for perfect flavor. Variations and storage info also show how to customize and keep your soup fresh. Now, it's your turn to create this hearty dish. Enjoy the warmth and flavor with each bowlful. Whether you share it or savor it alone, this soup will surely delight anyone who tries it.

Slow Cooker Beef Barley Soup Hearty and Satisfying Meal

Looking for a warm and filling meal? Slow Cooker Beef Barley Soup is just what you need! This hearty dish

- 1 cup all-purpose flour - 2 tablespoons granulated sugar - 2 teaspoons baking powder - ½ teaspoon baking soda - ¼ teaspoon salt - 1 cup buttermilk (or substitute with 1 cup milk mixed with 1 tablespoon vinegar) - 1 large egg - 2 tablespoons unsalted butter, melted - 1 teaspoon vanilla extract - 3 tablespoons brown sugar - 1 tablespoon ground cinnamon - 2 tablespoons cream cheese, softened - 1 cup powdered sugar - 1-2 tablespoons milk (to achieve glaze consistency) When you make fluffy cinnamon roll pancakes, you need some simple ingredients. First, gather your dry ingredients. This includes all-purpose flour, sugar, baking powder, baking soda, and salt. These make your pancakes rise and taste sweet. Next, prepare the wet ingredients. You will need buttermilk, or you can mix milk with vinegar as a substitute. Add a large egg, melted butter, and vanilla extract. These add moisture and flavor to your pancakes. For the cinnamon swirl, mix brown sugar and ground cinnamon. This will create a sweet and spicy swirl in your pancakes. Finally, to make the cream cheese glaze, combine softened cream cheese, powdered sugar, and milk. This will give your pancakes a rich and creamy topping. Now you have all the ingredients ready to create fluffy cinnamon roll pancakes that are easy and delicious! {{ingredient_image_2}} To start, grab a large bowl. In it, combine the dry ingredients. Measure out 1 cup of all-purpose flour, 2 tablespoons of granulated sugar, 2 teaspoons of baking powder, ½ teaspoon of baking soda, and ¼ teaspoon of salt. Whisk these ingredients together until they mix well and are free of lumps. Next, take another bowl. Whisk together 1 cup of buttermilk, 1 large egg, 2 tablespoons of melted unsalted butter, and 1 teaspoon of vanilla extract. Mix until smooth. Now, pour the wet ingredients into the dry ones. Gently stir with a spatula until just combined. The batter should be slightly lumpy. This keeps the pancakes fluffy. In a small bowl, you will create the cinnamon swirl. Combine 3 tablespoons of brown sugar and 1 tablespoon of ground cinnamon. Mix until well combined. Set this aside. When you’re ready to cook, pour about ¼ cup of the pancake batter onto the hot skillet. Before the batter sets, drizzle about 1 teaspoon of the cinnamon mixture in a spiral pattern over the top. Use a toothpick or butter knife to swirl the cinnamon gently into the batter. Be careful not to over-mix! Preheat your skillet or griddle over medium heat. Lightly grease it with cooking spray or a small pat of butter. This helps prevent sticking. Once it’s hot, pour the batter in. Cook for about 2-3 minutes or until bubbles form on the surface. Once you see bubbles, flip the pancakes. Cook for another 1-2 minutes until they turn golden brown on both sides. When done, remove the pancakes from the skillet. Keep them warm on a plate while you repeat the process with the remaining batter. For the cream cheese glaze, use a small bowl. Whisk together 2 tablespoons of softened cream cheese, 1 cup of powdered sugar, and 1-2 tablespoons of milk. Mix until smooth and creamy. If the glaze is too thick, add more milk a little at a time until you reach the desired consistency. Now you’re ready to serve! Stack your fluffy pancakes high and drizzle the glaze generously over the top. Enjoy every bite! To make your pancakes fluffy, mixing is key. Here are some do’s and don'ts: - Do mix the dry and wet ingredients separately first. This helps blend them better. - Don’t overmix your batter. Stop once it’s just combined. Lumps are okay! Buttermilk is a secret ingredient for fluffiness. It adds moisture and reacts with baking soda. This reaction helps create air bubbles. Those bubbles make your pancakes light and fluffy. For perfect pancakes, pay attention to the skillet temperature. Preheat it over medium heat. If it’s too hot, the outside cooks fast. The inside stays raw. A good test is to sprinkle water on the skillet. If it sizzles, you’re ready. Timing is also important. Cook each pancake for 2-3 minutes until bubbles form. When you flip, cook for 1-2 more minutes. Look for a golden-brown color for the best texture. You can make your pancakes even more fun! Add nuts or fruits like blueberries or bananas. They give extra flavor and texture. Customizing the glaze is easy too. If you want a twist, add a splash of vanilla or a hint of lemon juice. These small changes can make your pancakes unique and exciting! Pro Tips Use Fresh Ingredients: Make sure your baking powder and baking soda are fresh for the best rise and fluffy texture in your pancakes. Don't Overmix: Overmixing can lead to dense pancakes. Stir just until combined, leaving some lumps in the batter for fluffiness. Temperature Matters: Ensure your skillet is at the right temperature before pouring the batter. Too hot can burn the pancakes, while too cool will result in undercooked centers. Customize Your Glaze: Feel free to add flavors to your cream cheese glaze, such as vanilla extract or a splash of maple syrup, to enhance the taste. {{image_4}} To make these pancakes gluten-free, you can use almond flour or a gluten-free blend. Both options work well. When using gluten-free flour, add a bit more baking powder. This helps keep the pancakes fluffy. You may also want to mix in a tablespoon of cornstarch for added lightness. For a vegan version, replace the egg with a flax egg. To make a flax egg, mix one tablespoon of ground flaxseed with three tablespoons of water. Let it sit for a few minutes until it thickens. Use almond milk or oat milk instead of buttermilk. These swaps keep the pancakes soft and tasty. You can switch up the flavor by adding different spices. Try nutmeg or cardamom for a twist. You can also add chocolate chips or chopped nuts to the batter. For a fruity touch, mix in blueberries or diced apples. These add-ins make your pancakes even more fun and delicious. To store leftover pancakes, let them cool first. Place them in an airtight container. You can also use plastic wrap. In the fridge, pancakes last for about 3 days. If you want them to last longer, consider freezing them. To freeze pancakes, stack them with a piece of parchment paper between each one. This prevents sticking. Wrap the stack tightly in plastic wrap and place it in a freezer bag. They can stay frozen for up to 2 months. When ready to enjoy, reheat them in the toaster or microwave. Heat until they are warmed through. You can prepare the batter ahead of time. Mix the dry and wet ingredients separately. Store them in the fridge for up to 24 hours. When ready to cook, mix them together just before you start. This keeps the pancakes fresh. For cooked pancakes, layer them with parchment paper and keep them warm in a low oven while you cook the rest. Yes, you can use regular milk. To make a buttermilk substitute, mix 1 cup of milk with 1 tablespoon of vinegar. Let it sit for about five minutes. This mix will give you a tangy flavor, just like buttermilk. It helps the pancakes rise and stay fluffy. To make fluffy pancakes, avoid overmixing the batter. Mix until the dry and wet ingredients just combine. Some lumps are okay. Another tip is to use buttermilk. The acidity reacts with baking soda, making the pancakes light and airy. Lastly, let the batter rest for a few minutes before cooking. If you want a non-dairy option, you can use a vegan cream cheese or a thick yogurt. For a simple glaze, mix powdered sugar with almond milk or coconut milk. Adjust the thickness by adding more milk. This will keep the glaze smooth and easy to drizzle. To keep pancakes warm, place them on a plate in a low oven, around 200°F. You can also cover them with a clean kitchen towel. This keeps them warm and soft without drying out. If you stack them, place parchment paper between layers to prevent sticking. You now know how to make delicious cinnamon swirl pancakes. We covered each ingredient, from dry to wet, with a rich cinnamon taste. I detailed step-by-step instructions on mixing and cooking. Then, I shared tips for fluffiness and perfect texture. I also discussed gluten-free and vegan options. Finally, storing and reheating pancakes can keep them fresh for later. Enjoy making these pancakes for breakfast or brunch! They are a sweet treat everyone will love.

Fluffy Cinnamon Roll Pancakes Easy and Delicious Recipe

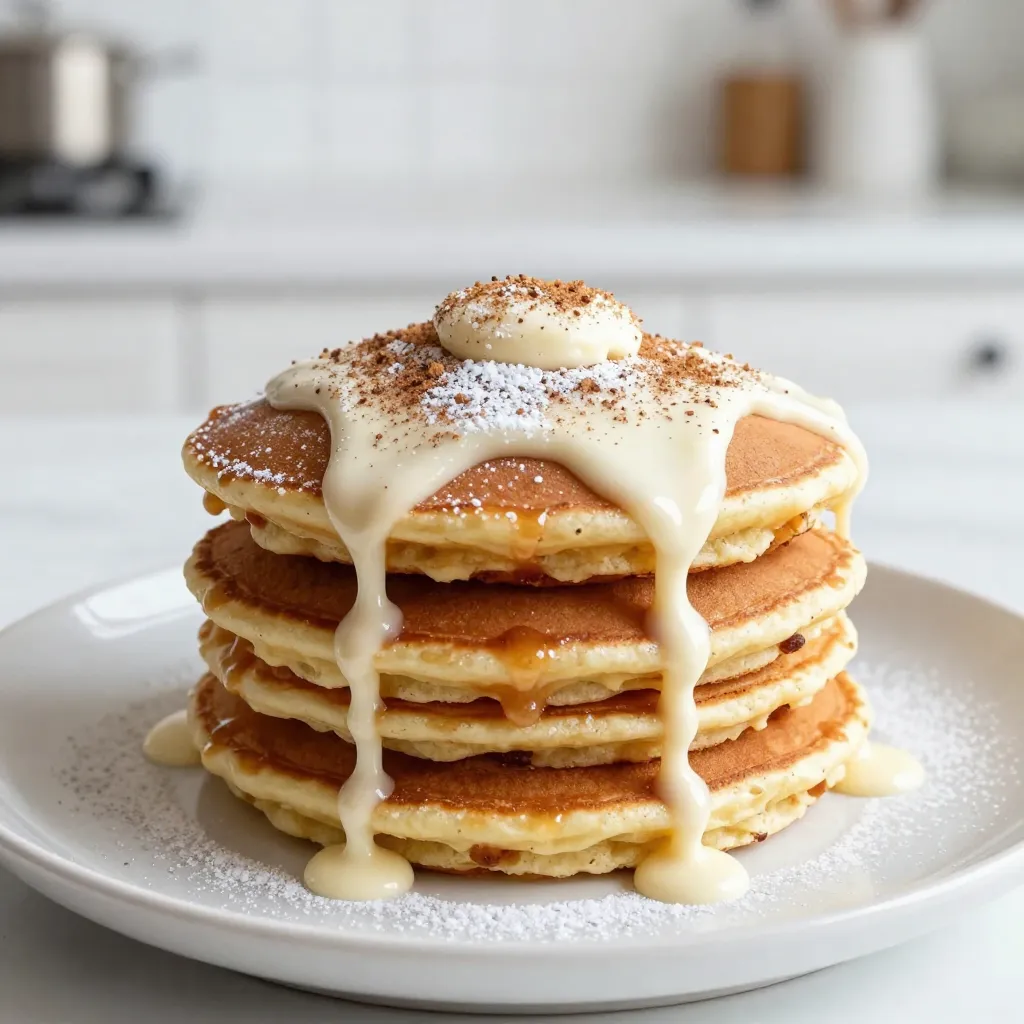
If you’re craving something sweet and fluffy for breakfast, let me make your morning! These Fluffy Cinnamon Roll Pancakes combine

- 1 large head of cauliflower, cut into bite-sized florets - 1 cup cornstarch - 2 tablespoons vegetable oil - 1 tablespoon fresh ginger, minced - 2 cloves garlic, minced - 1/4 cup soy sauce (low-sodium recommended) - 1/4 cup hoisin sauce - 2 tablespoons rice vinegar - 1 tablespoon sesame oil - 1 tablespoon Sriracha (adjust according to your spice preference) - 2 green onions, finely sliced - Sesame seeds - Baking sheet - Mixing bowl - Saucepan Gathering these ingredients is key to making General Tso’s Cauliflower. The cauliflower serves as the star of the dish. It becomes crispy and tender after baking. Cornstarch helps achieve that crunchy texture. Vegetable oil contributes to the browning. The sauces add depth and flavor. Soy sauce gives saltiness. Hoisin sauce adds sweetness. Rice vinegar brings some tang. Sesame oil provides a nutty taste. Sriracha adds heat. You can adjust the Sriracha to suit your taste. For garnishing, green onions and sesame seeds add freshness and crunch. They make the dish look nice too. Don't forget the right tools! A baking sheet helps roast the cauliflower evenly. A mixing bowl is needed for coating the florets. A saucepan cooks the sauce. With these ingredients and tools, you're ready to create a tasty dish! - Preheat your oven to 425°F (220°C). Line a baking sheet with parchment paper. - In a large bowl, add the cauliflower florets. Sprinkle 1 cup of cornstarch over them. Toss gently to coat each piece well. - Spread the coated cauliflower in one layer on the baking sheet. Drizzle 2 tablespoons of vegetable oil over the tops. - Bake in the oven for 25-30 minutes. Flip the florets halfway to ensure they cook evenly. They should be golden and crispy when done. - While the cauliflower bakes, heat a medium saucepan over medium heat. Add 1 tablespoon of minced ginger and 2 cloves of minced garlic. Sauté them for about 1 minute until they smell great. - Pour in 1/4 cup of soy sauce, 1/4 cup of hoisin sauce, 2 tablespoons of rice vinegar, 1 tablespoon of sesame oil, and 1 tablespoon of Sriracha. Stir well and let it simmer for about 5 minutes. The sauce will thicken a bit. - Once the cauliflower is done baking, take it out of the oven. Carefully transfer it to the saucepan with the sauce. Toss until each floret is coated. - Spread the coated cauliflower back on the baking sheet. Bake for another 5 minutes. This lets all the flavors blend nicely. - After baking, let it cool for a few minutes. If you like it spicy, drizzle more Sriracha on top. - Serve warm on a platter, garnished with sliced green onions and sesame seeds for a nice touch. To get that perfect crunch, cornstarch is key. It forms a light coating that crisps up while baking. When you toss the florets, make sure every piece gets coated. This helps in achieving a uniform crispness. For even baking, spread the florets out on your baking sheet. Leave space between them so hot air can circulate. Flip them halfway through cooking for the best results. This way, you avoid soggy spots. If you want to control the heat, start with less Sriracha. You can always add more later. Mixing in a touch of honey can balance the spice if it gets too hot. You might also try other spicy ingredients. For example, crushed red pepper flakes or chili paste can give you a different heat profile. Experiment to find what you enjoy most. Add more vegetables for extra flavor and nutrition. Peppers, broccoli, or snap peas can make the dish more colorful and tasty. Just toss them in with the cauliflower before baking. Using fresh herbs like cilantro or basil can brighten up the dish. Add them right before serving for a fresh touch. They can really elevate the flavors and make your meal pop. {{image_4}} For a gluten-free version of General Tso’s Cauliflower, you can easily swap out some key ingredients. - Substitute for soy sauce: Use tamari instead of soy sauce. Tamari is a gluten-free soy sauce that provides a similar taste. - Using gluten-free hoisin sauce: Check labels for gluten-free hoisin sauce. This keeps your dish flavorful without gluten. If you want to add more protein, consider these options. - Adding tofu or chickpeas: Both tofu and chickpeas work well. Tofu adds a nice texture, while chickpeas add a hearty feel. You can toss them in with the cauliflower for a complete meal. Feel free to get creative with the sauce for different flavors. - Sweet and sour version: Mix equal parts vinegar and sugar. Add soy sauce for a tangy twist. This will give your dish a fun, fruity flavor. - Spicy peanut sauce alternative: Blend peanut butter with soy sauce, lime juice, and a touch of Sriracha. This gives a nutty, spicy taste. To store leftovers, let the cauliflower cool down first. Place it in an airtight container. This keeps it fresh and tasty for later. Store it in the fridge for up to three days. When you want to eat it again, just reheat in the oven. This helps keep it crispy. You can freeze General Tso's cauliflower too. First, let it cool completely. Then, place it in a freezer-safe bag or container. Press out the air to avoid freezer burn. It can last up to three months in the freezer. To reheat, thaw it in the fridge overnight. Bake it at 400°F (200°C) until hot and crispy. In the fridge, the dish lasts up to three days. In the freezer, it lasts about three months. Always check for changes in smell or color before eating. This way, you ensure your meal remains safe and delicious. Yes, you can use frozen cauliflower. However, it may not get as crispy. Frozen cauliflower has more water, which can make it soggy. If using frozen, thaw it first. Drain any water and pat it dry. This step helps keep the texture right. Fresh cauliflower gives the best crunch and flavor. General Tso's cauliflower is a healthier choice than traditional General Tso's chicken. Cauliflower is low in calories and high in fiber. It's packed with vitamins like C and K. The dish uses sauces that add flavor without too many calories. You control the spice level too. This dish is a great way to enjoy veggies. You can prep the cauliflower and sauce ahead of time. Just store them separately in the fridge. When you're ready, bake the cauliflower and toss it in the sauce. This dish tastes best fresh but can last for a day. If you want, you can also reheat leftovers in the oven. We covered a great recipe for General Tso's cauliflower. We discussed key ingredients, tasty garnishes, and essential equipment. I shared step-by-step instructions to help you bake crispy cauliflower. Tips on spice levels and flavor boosts can give your dish a personal touch. Consider variations for gluten-free options and extra protein. Don’t forget storage tips to keep leftovers fresh. This dish is both delicious and healthy, making it perfect for any meal. Enjoy your cooking, and have fun experimenting with flavors!

General Tso’s Cauliflower Crispy and Flavorful Dish

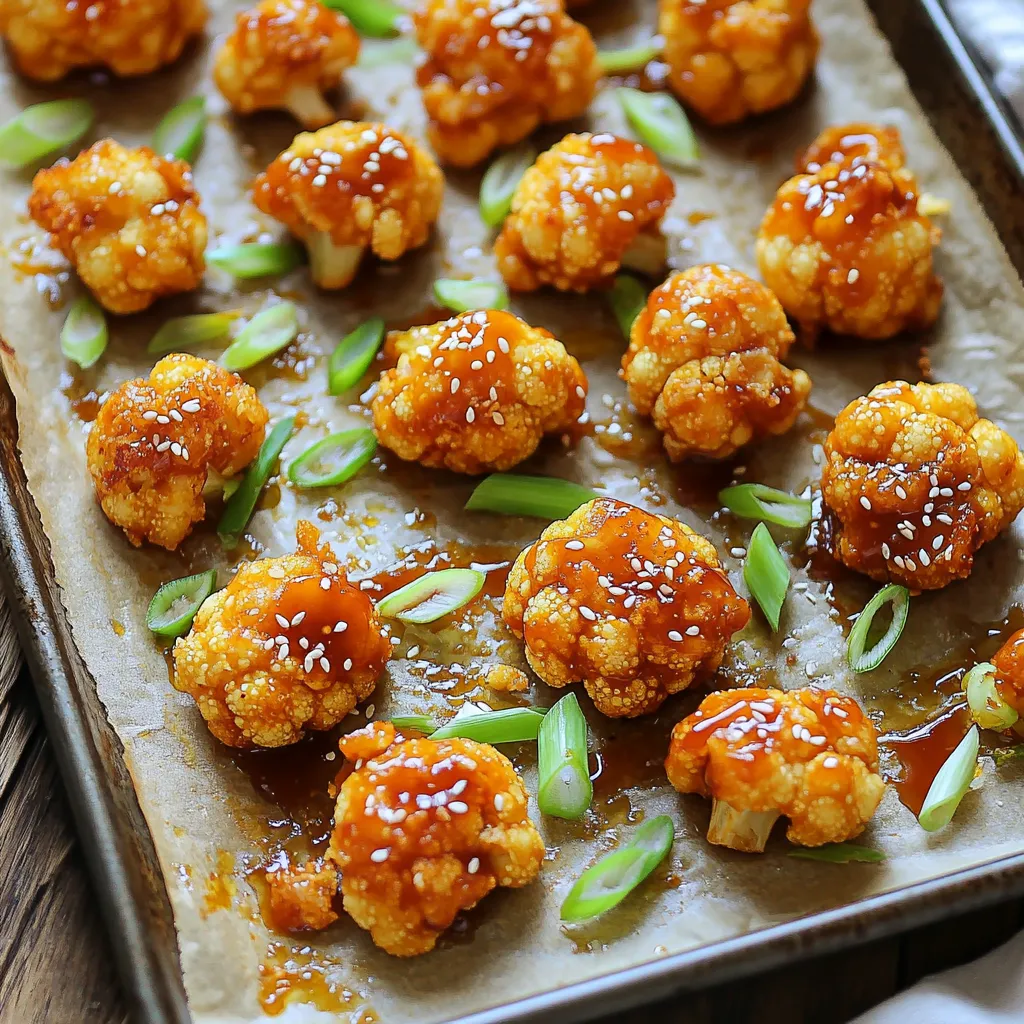
Are you ready to enjoy a crispy and flavorful twist on a classic? General Tso’s Cauliflower transforms a beloved dish

To make Sheet-Pan Lemon Herb Chicken, gather these ingredients: - 4 boneless, skinless chicken breasts - 2 lemons (one for juice and one sliced) - 3 tablespoons extra-virgin olive oil - 4 cloves of garlic, finely minced - 2 teaspoons dried oregano - 2 teaspoons dried thyme - 1 teaspoon smoked paprika - Sea salt and freshly cracked black pepper to taste - 1 cup cherry tomatoes, halved - 1 bell pepper (any color), sliced into thin strips - 1 medium red onion, cut into wedges - A handful of fresh parsley, chopped (for garnish) Both fresh and dried herbs can work well in this recipe. - Fresh Herbs: They offer a bright flavor. Use them if you have them on hand. Just chop them finely and add them in place of dried herbs. - Dried Herbs: They are convenient and have a long shelf life. Use about one-third of the amount of dried herbs compared to fresh ones. They still pack a great flavor punch! Garnishes can add flair to your dish. Consider these options: - Fresh parsley: Sprinkle it on top before serving for a fresh touch. - Lemon slices: Add these for extra zest and color. - Red pepper flakes: If you like a little heat, sprinkle some on. These garnishes not only make the dish look better but also enhance the taste. Enjoy experimenting to find your favorite combinations! First, set your oven to 425°F (220°C). This hot temperature helps the chicken cook fast and brown well. While it heats, gather your ingredients. You will need boneless chicken breasts, fresh lemons, garlic, herbs, and colorful veggies. In a large bowl, mix the olive oil, lemon juice, minced garlic, oregano, thyme, smoked paprika, salt, and pepper. This marinade gives the chicken a tasty kick. Add in the chicken breasts and turn them well in the marinade. Cover the bowl. Let the chicken sit for at least 15 minutes. If you have time, marinate it for up to 1 hour in the fridge. This makes the chicken even better! While the chicken marinates, prepare your veggies. Take another bowl and add halved cherry tomatoes, sliced bell pepper, and red onion wedges. Drizzle a bit of olive oil over them. Season with salt and pepper. Toss gently so all the veggies get coated in oil and seasoning. Grab a large sheet pan. Place the marinated chicken breasts in the center. Surround them with the lemon slices and your seasoned veggies. Spread everything out so it cooks evenly. This way, you get tasty chicken and soft, roasted vegetables. Put the sheet pan in the hot oven. Roast everything for 25-30 minutes. The chicken is done when it reaches 165°F (75°C) inside. The veggies should be tender and slightly charred. This gives them a sweet flavor. When the chicken and veggies are cooked, take the pan out of the oven. Let it rest for 5 minutes. This helps keep the chicken juicy. Before serving, sprinkle chopped parsley on top. It adds color and freshness. Serve directly from the pan or transfer to a platter. Enjoy your meal! To enhance the flavor of your dish, always use fresh herbs when you can. Fresh herbs like parsley add a bright touch. If you use dried herbs, crush them slightly in your hands before adding them. This releases their oils and boosts their flavor. Oregano and thyme are great choices for this recipe. For juicy chicken, use a meat thermometer. The chicken should reach 165°F (75°C). Marinating the chicken is key. Let it soak in the marinade for at least 15 minutes. If you have extra time, let it sit for an hour. This adds depth and helps keep the chicken moist. Cut your vegetables into similar sizes. This ensures they cook evenly. Cherry tomatoes, bell peppers, and red onions work well together. Toss them in olive oil, salt, and pepper to coat them fully. This simple step makes them flavorful and tender after roasting. Presentation matters! You can serve right from the sheet pan for a casual look. If you prefer a more formal touch, transfer everything to a large platter. Garnish with fresh lemon slices and parsley. This adds color and freshness, making your meal visually appealing. {{image_4}} You can change the veggies to suit your taste. Try using broccoli, zucchini, or asparagus. These add great color and flavor. You can also use carrots or green beans for a nice crunch. Just remember to cut them into similar sizes. This helps them cook evenly with the chicken. If you want to switch proteins, chicken isn’t your only option. Salmon works well with this recipe. The lemon and herbs will flavor the fish nicely. You can also use firm tofu for a plant-based meal. Just make sure to press the tofu first. This removes extra water and helps the marinade soak in better. Feel free to get creative with marinades! Try adding honey for some sweetness. A splash of soy sauce makes a savory twist. You can also add mustard for a tangy kick. Mixing different herbs can change the flavor too. Basil or rosemary can work well. Just remember, keep it simple and fun! To keep your lemon herb chicken fresh, store it in an airtight container. Place the chicken and veggies together. Let the meal cool down first. You can keep it in the fridge for up to three days. Be sure to label the container with the date. This helps you track how long it has been stored. Reheating is easy and quick. You can use your oven or microwave. For the oven, preheat it to 350°F (175°C). Place the chicken and veggies on a baking sheet. Heat for about 10-15 minutes. This warms everything evenly. If you use the microwave, cover the dish with a lid or wrap. Heat on high for about 2-3 minutes. Check if it’s hot all the way through. Freezing is a smart way to save extra chicken. Allow the cooked meal to cool completely. Divide it into portions and place them in freezer-safe bags. Squeeze out as much air as you can. Label the bags with the date. You can freeze it for up to three months. When you’re ready to eat, thaw it in the fridge overnight. Reheat as mentioned above. Enjoy your flavorful meal later! You should marinate the chicken for at least 15 minutes. For more flavor, try to marinate it for up to 1 hour. This allows the chicken to soak in all the tasty herbs and lemon juice. It makes each bite juicy and full of flavor. Yes, you can use bone-in chicken. Keep in mind that bone-in chicken will need a longer cooking time. Make sure the chicken reaches an internal temperature of 165°F (75°C) to be safe to eat. Adjust the roasting time to about 35-40 minutes for best results. You can serve this dish with many sides. Some great options include: - Rice or quinoa for a grain base - A fresh green salad for a light touch - Crusty bread to soak up the juices - Roasted potatoes for extra comfort These sides balance the meal and add more flavor. To adjust the spice level, add more or less smoked paprika. If you like heat, try adding a pinch of red pepper flakes. For a milder taste, reduce the amount of paprika. Always taste as you go to find your perfect balance. Yes, this recipe is perfect for meal prep. You can cook a large batch and store leftovers in the fridge. It stays fresh for about 3-4 days. Just reheat in the microwave or oven when you’re ready to eat. Enjoy a flavorful meal anytime! This blog post covered key steps for making sheet-pan lemon herb chicken. We looked at essential ingredients, like fresh or dried herbs. You learned how to marinate chicken and prepare vegetables for the best flavor. I shared tips for perfect cooking and presentation. We explored different variations to keep meals exciting and shared storage tips for leftovers. Incorporating these ideas will make your cooking fun and easy. Enjoy the delicious results!

Sheet-Pan Lemon Herb Chicken Flavorful and Simple Meal

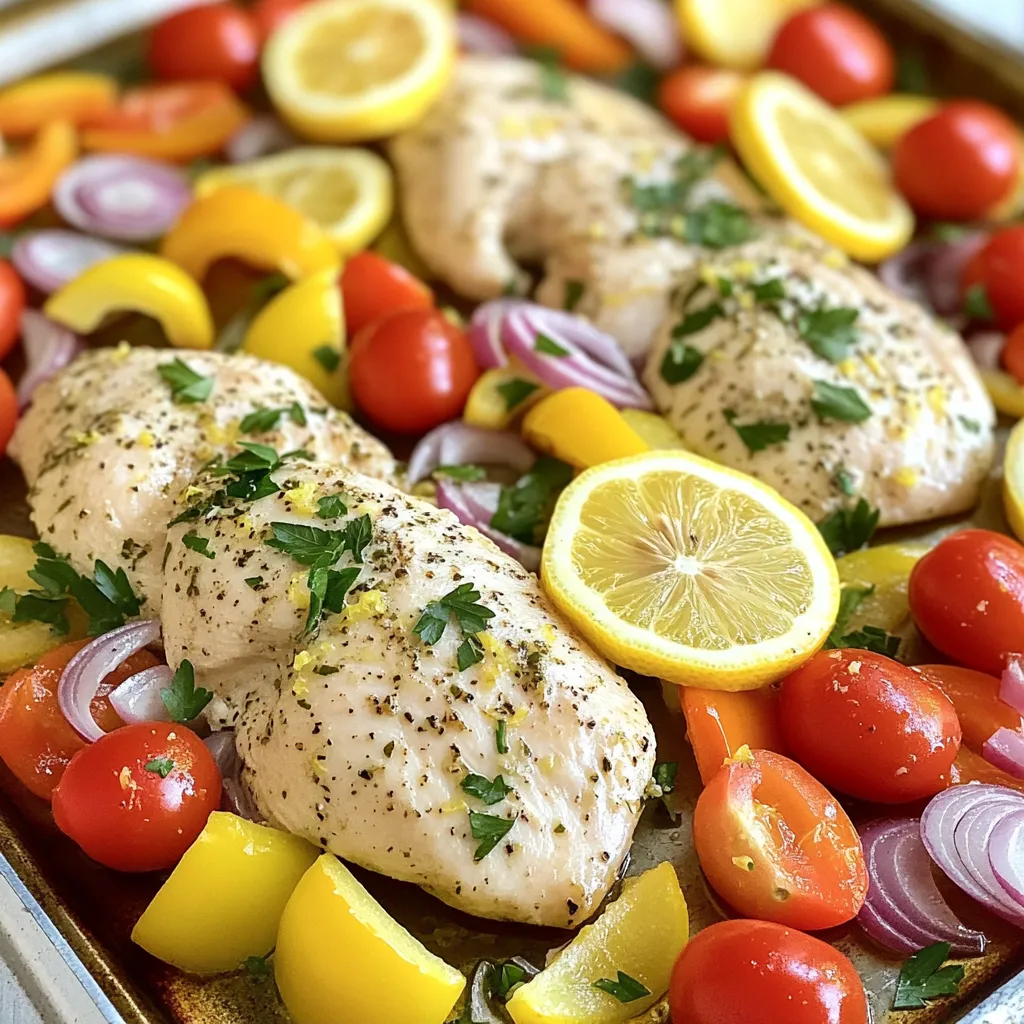
Looking for a simple, tasty meal? Sheet-Pan Lemon Herb Chicken is your answer! This dish is easy to make and

Older posts
Newer posts
← Previous Page1 … Page3 Page4 Page5 … Page86 Next →

dsad

© 2026 yumymoments • Built with GeneratePress

Our Policies

  • Copyright Policy
  • Cookie Policy
  • GDPR Policy
  • Privacy Policy
  • Disclaimer
  • Terms Of Use

More Information

  • Home
  • About
  • Contact
  • Appetizers
  • Dessert
  • Dinner
  • Drinks
©2026, yumymoments About Back To Top