Skip to content
DisclaimerTerms Of UseGDPR PolicyCookie Policy

yumymoments

  • Home
  • Drinks
  • Appetizers
  • Dinner
  • Dessert
  • About
  • Contact
  • Privacy Policy
DisclaimerTerms Of UseGDPR PolicyCookie Policy

NO-ING-IMG

- 4 boneless, skinless chicken breasts - 3 tablespoons extra virgin olive oil - Juice of 2 large lemons - Zest of 1 lemon - 3 cloves garlic, finely minced - 2 tablespoons fresh parsley, finely chopped - 1 tablespoon fresh thyme, finely chopped (or 1 teaspoon dried thyme) - 1 tablespoon fresh rosemary, finely chopped (or 1 teaspoon dried rosemary) - 1 teaspoon paprika - Salt and freshly ground black pepper to taste When I think about Baked Lemon Herb Chicken, I get excited. The bright flavors of lemon and herbs make every bite special. Let’s dive into the ingredients that make this dish shine. First, you need chicken. I prefer boneless, skinless chicken breasts for this recipe. They cook evenly and stay juicy. The olive oil adds richness, while the lemon juice brings a tangy kick. Together, they create a marinade that does wonders. Next, the herbs and spices. The zest of one lemon adds a fresh aroma. Minced garlic brings depth of flavor. Fresh parsley gives a pop of color and taste. These elements blend perfectly to enhance the chicken. For seasoning, fresh thyme and rosemary add a lovely earthiness. If you don’t have fresh herbs, dried ones work too. Paprika gives a subtle smokiness, while salt and pepper round out the flavors. These ingredients come together to create a juicy and flavorful delight. For the complete recipe, check out the [Full Recipe]. - Preheat your oven to 400°F (200°C). - In a bowl, mix olive oil, lemon juice, lemon zest, garlic, parsley, thyme, rosemary, paprika, salt, and pepper. - Place chicken breasts in a baking dish in a single layer. - Pour the marinade over the chicken, covering each piece well. - Bake the chicken for 25-30 minutes. Check that the internal temperature is 165°F (75°C). - For a golden finish, broil for another 2-3 minutes. This simple method ensures juicy, flavorful baked lemon herb chicken every time. For the full recipe, check the earlier section. For the best flavor, marinate the chicken for at least 30 minutes. However, if you have more time, let it sit for up to 2 hours in the fridge. This extra time helps the chicken absorb all the tasty lemon and herb goodness. If you prepare the marinade the night before, it saves time on cooking day. Just remember to bring the chicken back to room temperature before cooking. To keep the chicken moist and tender, avoid overcooking. Use an instant-read thermometer to check the internal temperature. Aim for 165°F (75°C) for safe eating. After cooking, let the chicken rest for about 5 minutes. This step allows the juices to settle, making every bite juicy and flavorful. Garnish the chicken with fresh lemon slices and a sprinkle of chopped parsley. This adds a pop of color and freshness. Arrange the chicken on a platter and drizzle some of the leftover marinade on top. You can also serve it alongside roasted vegetables or a light salad for a complete meal. Making the plate look nice enhances the dining experience. {{image_4}} You can switch up the herbs for baked lemon herb chicken. Try oregano or basil for a new taste. These herbs add unique flavors. If you use dried herbs, remember they are stronger. Use about one-third of the amount of dried herbs compared to fresh ones. Fresh herbs give bright notes. Dried herbs bring depth. To make this dish gluten-free, check your spices. Most spices are gluten-free, but always read labels. For a low-carb option, pair it with veggies instead of rice. If you want a vegan version, replace the chicken with firm tofu. Marinate the tofu just like the chicken for best flavor. For a kick, add cayenne pepper to your marinade. This spice gives it a nice heat. You can also play with citrus. Try using lime or orange juice instead of lemon juice. This change brightens the dish in a new way. Feel free to mix in other herbs or spices for even more flavor. For the full recipe, refer to the [Full Recipe]. To keep your baked lemon herb chicken fresh, store it in an airtight container. Place the chicken in the fridge within two hours of cooking. This helps keep it safe and tasty. You can enjoy leftovers for up to four days. If you want to save it longer, freeze the chicken. Wrap it tightly in plastic wrap and then foil. This way, it can last for up to three months in the freezer. When reheating, your goal is to keep the chicken juicy. A good method is to use the oven. Preheat it to 350°F (175°C). Place the chicken in a baking dish with a splash of broth or water. Cover it with foil to trap the steam. Heat for about 15-20 minutes until warmed through. You can also use a microwave, but be careful. Heat it in short bursts to avoid drying it out. Leftovers are great for salads, sandwiches, or wraps. Just shred or slice the chicken and add it to your favorite dishes. Baked lemon herb chicken stays good in the fridge for four days. If frozen, it maintains quality for three months. Always check for signs that it has gone bad. A sour smell or a change in color means it's time to toss it. If the chicken feels slimy, do not eat it. Proper storage helps you enjoy this flavorful delight longer. Yes, you can use bone-in chicken. Bone-in chicken adds flavor and moisture. Just adjust your baking time. Bone-in pieces may take 10 to 15 minutes longer to cook. Check the internal temperature to ensure it reaches 165°F (75°C). Baked lemon herb chicken works great with many sides. Here are some of my favorites: - Roasted vegetables like carrots, zucchini, and bell peppers - A light salad with mixed greens and lemon vinaigrette - Garlic mashed potatoes or creamy polenta - Quinoa or couscous for a grain option These sides balance the flavors and add some crunch or creaminess to your meal. If you don’t have a thermometer, there are other ways to check doneness. First, cut into the thickest part of the chicken. The juices should run clear, not pink. Another method is to check the texture. Cooked chicken feels firm to the touch. If it feels soft or squishy, it needs more time. Always be cautious and double-check to avoid undercooking. You learned how to craft baked lemon herb chicken using simple, fresh ingredients. The steps from marination to baking ensure juicy and flavorful chicken. Remember to adjust herbs for different tastes and try out vegan options if desired. Proper storage keeps leftovers fresh. Enjoy your meal with great sides and impress your family. This recipe is not just about cooking; it's about sharing delicious moments together. Now, grab your ingredients and make this tasty dish!

Baked Lemon Herb Chicken Juicy and Flavorful Delight

Are you ready to treat your taste buds? This Baked Lemon Herb Chicken is a juicy and flavorful delight that

To make a quick and tasty veggie stir fry, gather the following ingredients: - 1 cup broccoli florets - 1 cup bell peppers (a mix of red, yellow, and green), sliced into strips - 1 cup snap peas or snow peas, trimmed - 1 medium carrot, julienned into thin matchsticks - 1 cup baby corn, halved lengthwise - 1 tablespoon fresh ginger, minced finely - 2 cloves garlic, minced or pressed - 3 tablespoons soy sauce (or tamari for a gluten-free option) - 1 tablespoon toasted sesame oil - 1 tablespoon vegetable oil (such as canola or grapeseed) - 1 teaspoon sesame seeds (for a delightful garnish) - Fresh cilantro leaves or chopped green onions for garnish - Salt and pepper to taste Each ingredient adds its own unique flavor and texture. The vibrant colors of the vegetables make the dish appealing. Fresh ginger and garlic add warmth and depth. Soy sauce provides a savory kick, while sesame oil brings a rich, nutty flavor. Remember, you can always adjust the amounts based on your taste or what you have on hand. For the full recipe, check out the section titled Full Recipe. Start by washing all your vegetables. Rinse them under cool water to remove dirt. For the carrot, peel it first. Then, cut it into thin matchsticks. Slice the bell peppers into strips. Trim the ends off the snap peas. Cut the baby corn in half lengthwise. Make sure to chop all the veggies evenly. This helps them cook at the same time. Next, grab a large skillet or wok. Place it over medium-high heat for about one minute. Once hot, add the vegetable oil. Let the oil heat until it shimmers. Then, add the minced ginger and garlic. Stir them for about 30 seconds. This helps release their great smells into the oil. Be careful not to let them brown too much. Now, it's time to add the vegetables. Start with the broccoli florets and julienned carrots. Stir constantly for 2-3 minutes. You want them to soften while staying crunchy. Next, toss in the sliced bell peppers and halved baby corn. Keep stirring for another 2 minutes. This keeps the colors bright and the veggies crisp. Finally, add the snap peas. Stir-fry for another 1-2 minutes. All your veggies should be tender-crisp and colorful. Once the veggies are ready, it’s sauce time! Drizzle the soy sauce and toasted sesame oil over them. Stir gently to coat them well with the sauce. Now, taste your stir-fry. Adjust the flavors with salt and pepper if needed. Remember, the soy sauce adds some saltiness. To plate your stir fry, use a wide, shallow bowl. This lets you show off all the lovely colors. For a zesty kick, you can add a lime or lemon wedge on the side. Garnish with sesame seeds and fresh herbs like cilantro or green onions. This makes it look even more inviting. For the full recipe, check out the Colorful Veggie Extravaganza Stir Fry! To keep your stir fry bright, start with fresh vegetables. Use a mix of colors. This helps make your dish look lively. Cut your veggies into uniform pieces. This ensures even cooking. To avoid soggy vegetables, cook them quickly. High heat is key. Stir them often, but do not overcrowd the pan. If needed, cook in batches. This keeps each piece crisp and firm. For the best stir fry, use a wok or a large skillet. Woks have high sides and heat up fast. A heavy skillet also works well. It helps to keep the heat steady. Always use high heat for stir frying. This helps seal in flavors and keeps veggies from getting mushy. You want that nice char on the outside. Each vegetable cooks at a different rate. Carrots take longer, while snap peas cook quickly. Start with the tougher veggies like broccoli and carrots. Add softer ones later. Keep an eye on your veggies. They should be bright and tender-crisp. Taste them to check. If they are soft but still have a bit of bite, they are ready. If you have a lot of veggies, cook in batches. This way, each piece gets the heat it needs. This will make your stir fry taste great and look amazing. For the full recipe, check out the Colorful Veggie Extravaganza Stir Fry. {{image_4}} If you want to change up your stir fry, here are some fun swaps. Seasonal vegetables work great. Try zucchini, asparagus, or cauliflower. You can also use leafy greens like spinach or kale for a fresh twist. For extra protein, think beyond tofu. Add edamame, chickpeas, or tempeh. These options make your stir fry hearty and filling. To take your stir fry to the next level, explore different sauces. A splash of hoisin or oyster sauce can add depth. For a kick, try chili sauce or sriracha. You can also mix in fresh herbs like basil or mint to brighten the flavors. If you enjoy heat, sprinkle in some red pepper flakes. You can also use fresh sliced jalapeños if you want more spice. This adds a fun layer to your dish. Serving your veggie stir fry can be just as fun. For sides, pair it with steamed rice or fried rice. Noodles are another great option. Try rice noodles, soba, or even whole wheat spaghetti. To make it special, serve your stir fry in a bowl and top it with crunchy nuts or seeds. A squeeze of lime or lemon adds a zesty touch. This makes your meal not only tasty but also pretty on the plate. For the full recipe, check out Colorful Veggie Extravaganza Stir Fry 🥦. To keep your veggie stir fry fresh, use airtight containers. Glass or BPA-free plastic containers work best. Let the stir fry cool before sealing. This prevents moisture buildup, keeping it crisp. Store in the fridge for up to three days. When reheating, use a skillet or microwave. For the skillet, heat on medium. Add a splash of water or soy sauce to keep it moist. Stir frequently to heat evenly. In the microwave, cover with a damp paper towel. This helps steam the dish and keeps it from drying out. If you want to freeze leftovers, portion them out first. Use freezer-safe bags or containers. Remove as much air as possible to prevent freezer burn. Label the bags with the date. You can freeze it for up to three months. When ready to eat, thaw in the fridge overnight before reheating. For a full recipe of this colorful dish, check out the Full Recipe. You can use many fresh vegetables for stir-frying. Here are some favorites: - Broccoli florets - Bell peppers (mixed colors) - Snow peas or snap peas - Carrots, julienned - Baby corn - Zucchini, sliced - Mushrooms, sliced - Green onions, chopped - Bok choy, chopped These veggies cook quickly and stay crisp. Choose any mix you like! To boost flavor, try these simple tips: - Use fresh ginger and garlic. They add great taste. - Add a splash of soy sauce or tamari. This gives a salty kick. - Toss in a dash of sesame oil. It adds a nutty flavor. - Try adding chili flakes for heat. - Use fresh herbs like cilantro or basil for a fresh note. Experiment with these ideas to find your favorite flavors! Yes, you can! Here are some ways to stir-fry without oil: - Use a non-stick pan. This helps prevent sticking. - Add broth or water. This keeps the veggies moist while cooking. - Steam the veggies first, then toss them in the pan briefly. - Try using a splash of lemon juice for flavor instead of oil. These methods make a light stir-fry without losing taste. There are many sauces to choose from. Here are some great options: - Soy sauce or tamari: For a classic flavor. - Teriyaki sauce: For sweetness and depth. - Hoisin sauce: Adds a sweet and tangy taste. - Oyster sauce: Gives a rich umami flavor. Select a sauce based on what you like best! To keep your stir-fry crisp, follow these tips: - Cut vegetables evenly. This helps them cook at the same rate. - Cook in small batches. Too many veggies at once can steam them. - Use high heat. This keeps the veggies from cooking too long. - Add sauces at the end. This prevents excess moisture. Keep these tips in mind for a perfect stir-fry every time! For a delicious recipe, check out the Full Recipe. To sum it up, we covered how to create a colorful, tasty stir fry using fresh veggies. You learned the right ingredients, cooking steps, and tips for perfect texture. Remember, even cutting helps veggies cook evenly. Experiment with flavors and substitute vegetables to keep it exciting. Store leftovers properly to enjoy later. With this guide, you can stir-fry like a pro! Enjoy your cooking adventures and impress your friends and family with your skills.

Easy Veggie Stir Fry Flavorful and Quick Meal Guide

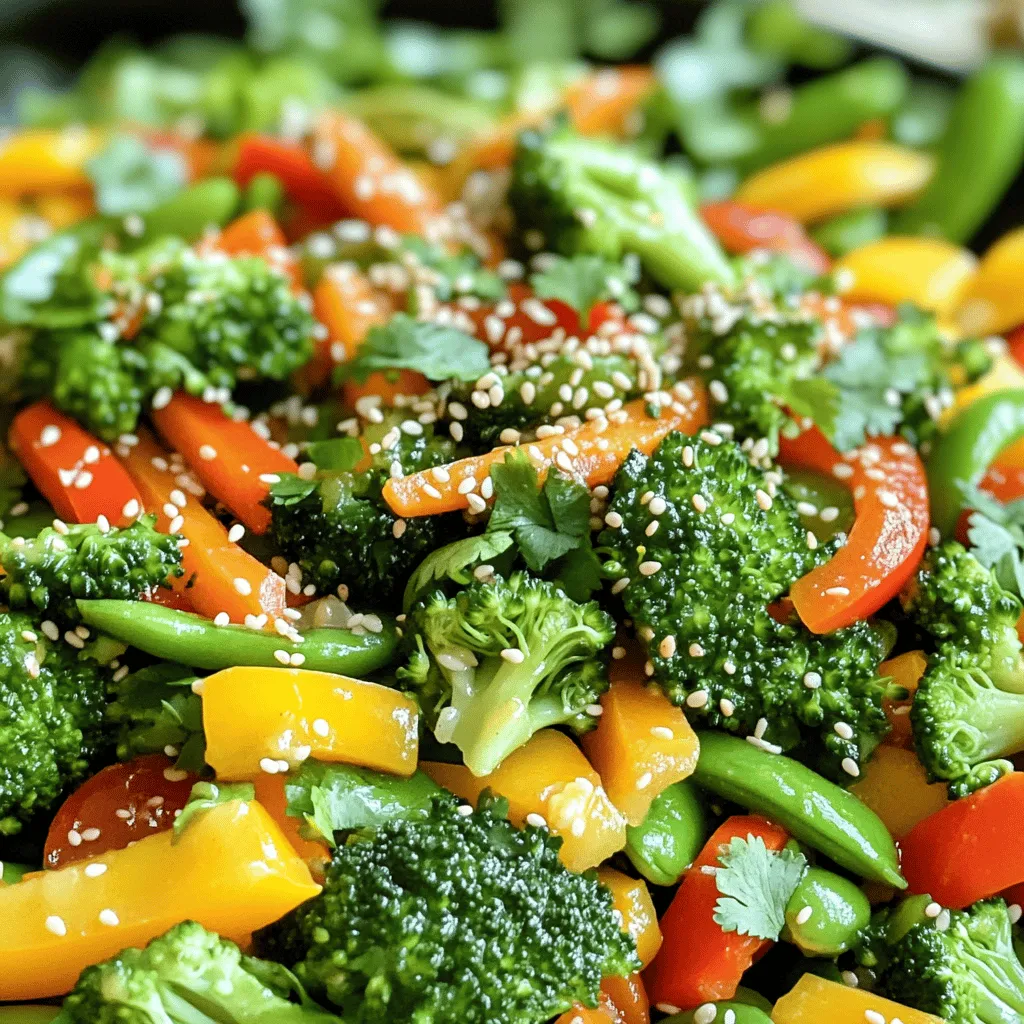
Looking for a quick and tasty meal? This Easy Veggie Stir Fry is just what you need! With vibrant vegetables,

- 2 ripe avocados - 4 slices of whole grain bread - 4 large eggs - 1 tablespoon extra virgin olive oil - 1 teaspoon garlic powder - 1 teaspoon smoked paprika - Sea salt and freshly cracked black pepper, to taste - Fresh cilantro leaves, for garnish - Thinly sliced radishes, for topping - A squeeze of fresh lime juice Each ingredient plays a key role in this dish. - Avocados are rich in healthy fats. They help keep your heart healthy. - Whole grain bread adds fiber, which is good for digestion. - Eggs provide protein, helping you feel full longer. - Olive oil is packed with antioxidants and good fats. - Garlic powder adds flavor and may boost your immune system. - Smoked paprika gives a nice smoky taste. - Sea salt and black pepper enhance all the flavors. - Cilantro adds freshness and a nice pop of color. - Radishes provide a crunchy texture and are low in calories. - Lime juice brightens the dish with its zesty flavor. Not all ingredients need to be set in stone. Here are some easy swaps: - If you can't find ripe avocados, use guacamole instead. - Any bread works, but gluten-free bread suits those with gluten issues. - Swap eggs for tofu for a plant-based option. - Use any oil, like avocado oil, if you don't have olive oil. - Fresh herbs can replace cilantro if you prefer something different. - Try different spices like chili powder for a kick. This recipe gives you room to play and make it yours! For the full recipe, refer back to the main section. 1. Toast the Bread: Start by preheating your toaster or a pan to medium heat. Toast four slices of whole grain bread until they turn golden brown and crispy. Set them aside on a plate. 2. Prepare the Avocado Spread: Take two ripe avocados and cut them in half. Use a spoon to scoop the green flesh into a medium bowl. Mash them with a fork until slightly chunky. Add one teaspoon of garlic powder, one teaspoon of smoked paprika, sea salt, and freshly cracked black pepper. Squeeze fresh lime juice into the bowl. Mix everything well and taste it. Adjust the seasoning if needed. 1. Cook the Eggs: In a non-stick skillet, pour one tablespoon of extra virgin olive oil. Heat it over medium heat until it shimmers. Crack four large eggs gently into the skillet. Make sure they have enough space. Cook them until the whites are set, but the yolks are still runny. This usually takes about 3-4 minutes. Season the eggs with a pinch of salt and pepper. 1. Assemble the Toast: Take each slice of toasted bread. Spread a generous layer of your avocado mixture on top. Make sure it’s even. 2. Top with Eggs: Carefully place one cooked egg on each slice. Let the warm yolk flow into the avocado. 3. Garnish: Finish your dish by sprinkling fresh cilantro leaves on top. Add thinly sliced radishes for a nice crunch. For a special touch, arrange the avocado toast on a large platter. Drizzle a little extra olive oil on top. Serve with lime wedges for extra zing. Enjoy your simple and delicious avocado toast with egg! For more details, check the Full Recipe. To get the best flavor, use ripe avocados. They should feel soft when you press them gently. Cut them in half and remove the pit. Scoop the flesh into a bowl. Use a fork to mash it until it’s slightly chunky. This texture adds to the taste. Add garlic powder, smoked paprika, sea salt, and lime juice for extra flavor. These spices make the avocado shine. Taste it and adjust the seasonings as needed. Cooking eggs can be simple if you follow a few tips. Use a non-stick skillet for easy cooking. Heat the skillet over medium heat and add olive oil. Wait until the oil shimmers before adding the eggs. Crack each egg gently, keeping space between them. Cook until the whites are set and the yolks are still runny. This sunny-side-up style works great. If you like them cooked more, just flip them carefully. Season with salt and pepper right before serving. How you present your avocado toast is key. Arrange the toast on a large platter for a beautiful display. Top each slice with a warm egg, letting the yolk run a bit. Add fresh cilantro leaves for a pop of color. Thinly sliced radishes give a nice crunch and look great on top. Drizzle a bit of olive oil for shine. Serve with lime wedges on the side. This way, everyone can add a splash of lime juice before taking a bite. Enjoy your creation! {{image_4}} You can change up your avocado toast with many tasty toppings. Try sliced tomatoes for sweetness. Feta cheese adds a creamy bite. For a spicy twist, sprinkle some red pepper flakes on top. You can also use a poached egg instead of fried for a softer texture. Sliced cucumbers give a fresh crunch. Each topping brings a new flavor to your dish. You can cook your eggs in many ways. If you like soft eggs, try poaching them. Poached eggs have a silky texture and go well with avocado. For a firmer bite, scramble your eggs with a bit of cheese. You could also bake them in the oven for an easy option. Just crack the eggs into a dish and bake until set. Each method will change the toast’s taste and feel. Boost your avocado toast with fun flavors. Add a drizzle of hot sauce for heat. A sprinkle of everything bagel seasoning brings great taste. You can mix in herbs like basil or dill for freshness. For a sweet touch, top with sliced strawberries or a drizzle of honey. These small additions can make your meal feel special and unique. For the full recipe, check out Avocado Toast with a Twist. If you have leftover avocado toast, it’s best to store it in the fridge. Place it in an airtight container. This helps keep it fresh. Use it within one day for the best taste. The avocado may brown, but you can scrape off the top layer before eating. You can freeze some of the ingredients for later use. Avocados freeze well, but they change texture. To freeze, mash them and add lime juice. This helps prevent browning. Store the mash in freezer bags. You can also freeze bread. Slice it first, then wrap and seal tightly. To reheat your toast, use a toaster or oven. This keeps the bread crispy. Avoid the microwave, as it can make the toast soggy. For eggs, reheat on low heat in a pan. Add a splash of water to keep them moist. Enjoy your avocado toast warm for the best flavor! Yes, you can prepare some parts ahead of time. Toast the bread and cook the eggs in advance. Keep them in the fridge. However, I recommend making the avocado spread fresh. It tastes best when it is creamy and bright. To keep your avocado fresh, use lime juice. The acid slows down browning. Store any leftover avocado in an airtight container. You can also cover it tightly with plastic wrap. Press it directly on the surface to limit air exposure. Whole grain bread works great for avocado toast. It adds a nice texture and flavor. You can also try sourdough or multigrain bread. They provide a solid base for your toppings. Choose a bread you like to enjoy your meal even more. For the full recipe, check out [Full Recipe]. In this post, we covered key ingredients for avocado toast and their benefits. We shared easy steps for preparation, cooking, and serving. You learned tips to perfect the avocado mash and cook eggs. We explored different toppings, flavor enhancements, and how to store leftovers. Remember, avocado toast is versatile and simple. Now, you can make a great meal at home. Enjoy experimenting with flavors and techniques!

Avocado Toast with Egg Simple and Delicious Recipe

Are you ready to elevate your breakfast game? This Avocado Toast with Egg recipe is simple, tasty, and packed with

To make the savory spinach and feta stuffed chicken, you'll need these ingredients: - 4 boneless, skinless chicken breasts - 2 cups fresh spinach, finely chopped - 1 cup feta cheese, crumbled - 1/2 cup cream cheese, softened to room temperature - 1/4 cup sun-dried tomatoes, finely chopped - 2 cloves garlic, minced - 1 teaspoon dried oregano - 1 teaspoon fresh lemon zest - Salt and freshly cracked pepper to taste - Olive oil for drizzling - Toothpicks or kitchen twine for securing the chicken If you want to switch things up, here are some easy substitutes: - Use ricotta cheese instead of cream cheese for a lighter filling. - Swap spinach for kale if you prefer a different green. - Try goat cheese instead of feta for a tangy twist. - If you don’t have sun-dried tomatoes, you can use roasted red peppers instead. - For a dairy-free option, use a plant-based cream cheese and skip the feta. This dish is not only delicious but also packed with nutrients. Each serving contains: - Calories: 350 - Protein: 40g - Carbohydrates: 5g - Fat: 20g - Fiber: 1g - Sodium: 600mg When you make this spinach and feta stuffed chicken, you enjoy a meal rich in protein and flavor. You can find the full recipe in this article, so you can enjoy this delightful dish soon! Start with the chicken breasts. Use a sharp knife to cut a pocket in each breast. Be careful not to cut all the way through. This pocket will hold the filling. Rinse the chicken under cold water and pat it dry with paper towels. Season both sides with salt and pepper for added flavor. In a medium skillet, heat a drizzle of olive oil over medium heat. Add minced garlic and sauté for about 1 minute. Once the garlic is fragrant, stir in the chopped spinach and sun-dried tomatoes. Cook for 2-3 minutes until the spinach wilts. In a bowl, mix this spinach mixture with crumbled feta cheese, softened cream cheese, dried oregano, and lemon zest. Stir until smooth. This filling is rich and creamy. Heat a tablespoon of olive oil in an oven-safe skillet over medium-high heat. Place the stuffed chicken breasts in the skillet. Sear each side for about 3-4 minutes until golden brown. Once browned, transfer the skillet to a preheated oven at 375°F (190°C). Bake for 20-25 minutes or until the chicken reaches an internal temperature of 165°F (75°C). After baking, let the chicken rest for 5 minutes. Finally, remove the toothpicks or twine, then slice to show off the beautiful filling inside. For the full recipe, refer to the earlier section. Select chicken breasts that are plump and firm. Look for a pale, pink color. Avoid any that have a grayish hue or a slimy texture. Fresh chicken should feel moist but not wet. Organic or free-range options can offer better flavor and quality. Searing is key to flavor. Start with a hot skillet and a bit of olive oil. Place the chicken in the skillet and let it cook without moving it. This helps form a crust. Sear each side for 3-4 minutes. The chicken should be golden brown before you transfer it to the oven. Always preheat your oven to 375°F (190°C). This ensures even cooking. Use a meat thermometer to check for doneness. The internal temperature should reach 165°F (75°C). After cooking, let the chicken rest for 5 minutes. This helps retain juices and enhances flavor. For the full recipe, refer to the earlier section. {{image_4}} You can change the filling for a new taste. Try using ricotta cheese instead of feta. You can mix in roasted red peppers for a sweet kick. Mushrooms add a nice earthy flavor. For a twist, use cooked quinoa for added texture and protein. Each option brings its own delight. You can grill the stuffed chicken for a smoky flavor. Just make sure to seal the openings well. Grill each side for about 6-8 minutes. Slow cooking is a great choice too. Cook on low for 4-5 hours, and the chicken will be juicy and tender. Both methods make the dish unique. Add fresh herbs like basil or parsley for extra freshness. You can also sprinkle some red pepper flakes for heat. A dash of smoked paprika adds depth and warmth. Experimenting with these herbs and spices can give your dish a new twist. Enjoy the fun of mixing flavors! To keep your spinach and feta stuffed chicken fresh, first let it cool. Place any leftovers in an airtight container. Store it in the fridge for up to 3 days. Make sure to separate the stuffing from the chicken if you prefer. This helps keep the textures nice. When you are ready to enjoy the leftovers, preheat your oven to 350°F (175°C). Place the stuffed chicken in a baking dish. Add a splash of water or broth to keep it moist. Cover the dish with foil. Bake for about 15-20 minutes. You can also reheat in the microwave. Heat it on medium power for 2-3 minutes. Check to make sure it's hot throughout. You can freeze the stuffed chicken for longer storage. Wrap each piece tightly in plastic wrap, then place them in a freezer-safe bag. Remove as much air as possible. It will stay good for about 3 months. To thaw, place it in the fridge overnight before reheating. This method helps keep the chicken juicy and tasty. For best results, cook the chicken before freezing. You can find the Full Recipe [here]. Yes, you can prepare Spinach and Feta Stuffed Chicken ahead. Stuff the chicken and store it in the fridge for up to 24 hours. Just cover it well to keep it fresh. When ready to cook, take it out and let it sit for 15 minutes. This helps it cook evenly. This dish pairs well with many sides. Consider serving it with: - A light salad with mixed greens - Roasted vegetables like carrots and zucchini - Creamy mashed potatoes - Quinoa or rice for a hearty touch These options add color and flavor to your meal. If you have frozen stuffed chicken, it takes longer to cook. Preheat your oven to 375°F (190°C) and bake it for about 50-60 minutes. Always check that the center reaches 165°F (75°C). This ensures it's safe to eat. No, it is not safe to eat undercooked chicken. Eating chicken that is not fully cooked can lead to foodborne illnesses. Always make sure the internal temperature of the chicken is at least 165°F (75°C). This keeps you safe and healthy. For the full recipe, check the details above. In this post, we explored how to make delicious Spinach and Feta Stuffed Chicken. You learned about the ingredients, substitutions, and nutrition facts. We detailed each step, from prepping the chicken to cooking it to perfection. Plus, I shared tips on choosing chicken and variations to spice things up. Finally, we discussed how to store leftovers safely. Enjoy experimenting with this tasty dish and remember, cooking is all about having fun and being creative in the kitchen!

Savory Spinach and Feta Stuffed Chicken Delight

Ready to impress at dinner? This Savory Spinach and Feta Stuffed Chicken Delight is your answer! Packed with flavor and

- 4 large russet potatoes, thinly sliced - 2 cups sharp cheddar cheese, shredded - 1 cup whole milk - 1 cup heavy cream For Cheesy Scalloped Potatoes, russet potatoes work best. They are starchy, which makes them soft and creamy after baking. The sharp cheddar cheese adds a rich, tangy flavor. Whole milk and heavy cream create a smooth, velvety sauce. - 1 medium onion, finely chopped - 3 cloves garlic, minced - 1 teaspoon dried thyme - 1 teaspoon smoked paprika - Salt and pepper to taste The chopped onion and minced garlic bring warmth to the dish. Dried thyme gives a hint of earthiness. Smoked paprika adds depth and a slight smokiness. Adjust salt and pepper to your taste for the perfect balance. - Fresh parsley, chopped (for garnish) - Additional cheese for topping A sprinkle of fresh parsley brightens the dish. You can also add more cheese on top for an extra cheesy finish. This makes it even more appealing and delicious. For the full recipe, you can refer to the recipe section above. First, preheat your oven to 375°F (190°C). This step is key for even cooking. While the oven heats, grab a 9x13 inch baking dish. Generously grease it with butter. This helps the potatoes not to stick to the dish. Next, melt three tablespoons of butter in a medium saucepan over medium heat. Once it melts, add one finely chopped onion and three minced garlic cloves. Cook these for about five minutes. You want the onion to turn translucent and smell great. The fragrance adds depth to your dish. Now, it’s time to make the cream mixture. Gradually pour in one cup of whole milk and one cup of heavy cream. Stir well to combine. Season it with one teaspoon of dried thyme, one teaspoon of smoked paprika, salt, and pepper. Heat this mix until it’s just warm. Avoid boiling it to keep the flavors fresh. Start layering your potatoes. Use four large russet potatoes, thinly sliced. Place the first layer in the greased dish, slightly overlapping each slice. Pour a thin layer of your creamy mixture over this layer. Then, sprinkle a generous amount of shredded cheddar cheese on top. Cover your baking dish with aluminum foil. This keeps moisture in while it bakes. Place it in the preheated oven and bake for 40 minutes. After this time, check if the potatoes are soft. Once the 40 minutes are up, carefully remove the foil. Allow the dish to bake uncovered for another 20 to 30 minutes. This step gives a nice golden brown crust. When it's done, let it cool for about ten minutes. Before serving, sprinkle some freshly chopped parsley on top for a pop of color. You can find the full recipe for more details. You can adjust the creaminess of your Cheesy Scalloped Potatoes easily. If you want a lighter dish, use more milk and less cream. This keeps the flavor but reduces the fat. For a richer taste, use all heavy cream. You can even mix in some sour cream for a tangy twist. When it comes to cheese, sharp cheddar is classic, but feel free to mix it up. Try gouda for a smoky flavor or mozzarella for extra stretch. You can also blend cheeses for depth. Adding a little blue cheese brings a bold kick that many enjoy. Choosing the right potato is key. Russet potatoes are starchy and make for creamy layers. Yukon Golds are another great choice, offering a buttery taste. Avoid waxy potatoes like red or fingerling, as they won’t soften well. To prevent sogginess, slice your potatoes thinly. Aim for about 1/8 inch thick. This allows them to cook evenly. Layer your potatoes loosely, giving them space to breathe. Also, make sure your cream mixture is not too watery; this helps keep the dish firm. Cheesy Scalloped Potatoes pair well with roasted meats, like chicken or beef. They also complement grilled veggies nicely. For a festive touch, add a salad on the side to balance the richness. Serving ideas can enhance your dish's appeal. Try placing a sprig of fresh thyme on top for color. You can also drizzle a bit of truffle oil around the edges. For a family-style meal, serve in a large, shallow dish. This invites everyone to dig in and enjoy! For the full recipe, check out the detailed steps provided earlier. {{image_4}} You can easily change the flavor of cheesy scalloped potatoes by using different cheeses. Try Gruyère for a nutty taste or mozzarella for a stretchier texture. Mixing cheeses can also create a new flavor profile that excites your palate. Adding vegetables boosts nutrition and color. Spinach or broccoli can bring freshness to the dish. Layer them in with the potatoes. This adds flavor and makes your dish more vibrant and healthy. Want to take your cheesy scalloped potatoes to the next level? Add meats like crispy bacon or savory ham. These ingredients add depth and a satisfying crunch. They make the dish feel heartier and more filling. Don’t forget spices! A pinch of nutmeg adds warmth, while rosemary gives a fragrant touch. Experimenting with different spices can make your dish unique every time you cook it. If you need a gluten-free option, use gluten-free flour in the creamy mixture. This keeps the dish rich without the gluten. Always check labels to ensure safety. For a vegan twist, swap out the cream and cheese. Use coconut milk or cashew cream for richness. Nutritional yeast can bring a cheesy flavor that satisfies. These swaps let everyone enjoy the comfort of this dish. For the full recipe, visit the link provided. To keep your cheesy scalloped potatoes fresh, use an airtight container. Glass or plastic works well. Store them in the fridge for up to three days. If you want to keep them longer, the freezer is a great option. They can last for about two months when frozen. When it’s time to enjoy leftovers, reheating is key. You can use an oven or a microwave. If you choose the oven, preheat it to 350°F (175°C). Place the potatoes in a baking dish and cover with foil. Heat for about 20 minutes. In the microwave, put a portion on a microwave-safe plate. Heat it in short bursts of one minute, stirring in between. This keeps the texture and flavor intact. To freeze your cheesy scalloped potatoes, follow these steps: 1. Cool Completely: Allow the dish to cool down to room temperature. 2. Portion Out: Cut the potatoes into serving-sized pieces. 3. Wrap Tight: Use plastic wrap to cover each piece tightly. 4. Use a Freezer Bag: Place the wrapped pieces in a freezer bag or container. 5. Label and Date: Write the date on the bag for easy tracking. When you're ready to eat them, thaw in the fridge overnight for best results. You can then reheat as mentioned above. Enjoy your creamy goodness even after days! You can use half-and-half or coconut cream. Both give a nice creaminess. Half-and-half has less fat but still works well. Coconut cream adds a unique taste and is great for dairy-free diets. Cheesy scalloped potatoes take about one hour to cook. You bake them covered for 40 minutes, then uncovered for 20 to 30 minutes. This helps achieve that golden, bubbly top. Yes, you can prepare them ahead. Assemble the dish, then cover and store in the fridge. Bake when you are ready to serve. This makes meal prep easy for busy days. These potatoes pair well with many dishes. Try serving them with roasted chicken, grilled steak, or a fresh green salad. They also complement steamed veggies nicely. Yes, traditional ingredients are gluten-free. The main components are potatoes, cheese, and cream. Just ensure your seasonings and any added ingredients are also gluten-free. Cheesy scalloped potatoes are a simple yet delicious dish. We covered the core ingredients like potatoes and cheese, and how to prepare them step-by-step. Remember to sauté your aromatics for great flavor and layer well for even cooking. You can also modify the dish with different cheeses or add veggies. Store leftovers properly for later enjoyment. With these tips, you'll make a tasty side dish every time. Enjoy experimenting and happy cooking!

Cheesy Scalloped Potatoes Rich and Comforting Delight

Cheesy scalloped potatoes are a rich and comforting delight for any meal. With layers of tender potatoes and melty cheese,

To make these delicious bars, you need these main ingredients: - 1 cup creamy peanut butter - 1 cup rolled oats - 1/2 cup honey or pure maple syrup - 1/4 cup coconut flour - 1/2 cup dark chocolate chips (dairy-free if desired) - 1/4 teaspoon vanilla extract - A pinch of salt For some customization, you can add: - Chopped nuts for crunch - Cocoa powder for a chocolatey twist - Dried fruits for sweetness These bars contain common allergens such as peanuts and possibly gluten from oats. If you need allergen-friendly options: - Use almond butter or sunflower seed butter instead of peanut butter. - Choose gluten-free oats to avoid gluten. - For sweeteners, use agave syrup if avoiding honey. Always check labels to be safe! Start by taking 1 cup of creamy peanut butter. Add in 1/2 cup of honey or pure maple syrup. Mix them together in a large bowl. I like using a spatula for this step. Make sure the mixture is smooth and well blended. A smooth mix is key. It makes the bars taste great and helps hold them together. Next, take 1 cup of rolled oats and 1/4 cup of coconut flour. Add these dry ingredients into your peanut butter mix. Use a wooden spoon to stir them in. Make sure everything is mixed well. You don’t want any dry spots left. This helps each bite have the same yummy taste. Now, it’s time to pack the mixture into a baking dish. I use an 8x8-inch dish lined with parchment paper. This makes it easy to lift the bars out later. Press the mixture firmly into the dish. Use your hands or a spatula to make it even. Chill the dish in the refrigerator for 1 to 2 hours. This helps the bars set up nicely. When they are firm, lift them out using the parchment paper. Cut them into bars or squares as you like. For the full recipe, check back to see all the steps! To get the best texture for your No-Bake Peanut Butter Bars, you need the right balance of ingredients. Make sure to use creamy peanut butter. This keeps the bars smooth and not too crumbly. When mixing, stir slowly to blend all ingredients well. If you see dry spots, keep mixing. Common mistakes include not packing the mixture tightly enough in the dish. If it’s loose, the bars may fall apart when you cut them. Press the mixture firmly into the baking dish to avoid this. Also, make sure to chill the bars long enough, about 1-2 hours. This sets them perfectly. Serving your No-Bake Peanut Butter Bars can be fun and creative. Arrange the bars neatly on a nice plate. For a special touch, drizzle some melted chocolate on top. You can also sprinkle chopped nuts or a pinch of sea salt for extra flavor and texture. This makes them look pretty and taste even better! If you want to make these bars ahead of time, they freeze well. Wrap the bars tightly in plastic wrap or place them in an airtight container. They can last up to three months in the freezer. When you're ready to enjoy them, take the bars out and let them thaw in the fridge for a few hours. This keeps them firm and tasty. Enjoy your delicious treat! {{image_4}} You can easily change the flavor of your no-bake peanut butter bars. One option is to add cocoa powder. This gives a rich, chocolatey taste. Just mix in 1/4 cup of cocoa powder with the dry ingredients. If you're after a protein boost, try adding protein powder instead. A scoop of your favorite protein powder blends well and keeps the bars nutritious. You can also swap peanut butter for other nut butters. Almond or cashew butter works great. Each nut butter brings a unique taste. So, feel free to experiment with what you like best. Adding mix-ins can make your bars even better. Try seeds like chia or flax for extra crunch and nutrients. Dried fruits like cranberries or raisins can add a sweet touch. Just make sure to chop them small, so they mix in well. For toppings, consider drizzling melted dark chocolate over the bars. This adds a nice finish and makes them look fancy. You can also sprinkle chopped nuts or coconut flakes on top. These toppings give extra flavor and texture. Enjoy creating your own perfect no-bake peanut butter bars! Check out the Full Recipe for more ideas. To keep your no-bake peanut butter bars fresh, follow these tips: - Cool completely: Always let the bars cool in the fridge for at least 1-2 hours. - Use airtight containers: Store them in a clean, airtight container. This helps keep moisture out. - Layer with parchment: If stacking, place parchment paper between layers to prevent sticking. - Refrigerate: Store in the fridge to maintain texture and taste. No-bake peanut butter bars can last a while! Here’s how long you can keep them: - Refrigerated: Up to one week. - Frozen: They last up to three months in the freezer. Check for signs of spoilage like an off smell or a change in texture. If they feel too soft or sticky, it's best to toss them. Enjoy your tasty treat while it’s fresh! The total prep and cook time is about 2 hours and 15 minutes. You need only 15 minutes to mix everything together. The rest is chilling time in the fridge. This makes it easy to fit into your day. Yes, you can swap honey or maple syrup for other sweeteners. Agave syrup or brown rice syrup work well too. If you prefer something sugar-free, try stevia or erythritol. Just make sure to adjust the amount since some sweeteners are much sweeter than others. To check if the bars are set, gently press on the top with your finger. If it feels firm and doesn't leave an imprint, they are ready. You can also look for a glossy finish on the top. If they still feel soft, give them more time in the fridge. To recap, you learned how to make no-bake peanut butter bars. We discussed the required ingredients and possible allergens. I shared step-by-step instructions to help you create the perfect mixture. You also found tips for storing and serving the bars, along with unique variations. These bars are easy to customize and a healthy treat. You can enjoy them guilt-free, knowing exactly what’s inside. Now, it’s time to grab those ingredients and start making your delicious bars!

No-Bake Peanut Butter Bars Simple and Tasty Treat

Craving a simple, no-bake treat? These No-Bake Peanut Butter Bars are your answer! Packed with rich flavor and easy to

To make classic banana bread, you will need these simple ingredients: - 3 ripe bananas, thoroughly mashed - 1/3 cup coconut oil, melted - 1/2 cup brown sugar, packed - 1 large egg, beaten - 1 teaspoon pure vanilla extract - 1 teaspoon baking soda - Pinch of salt - 1 cup all-purpose flour - 1/2 teaspoon ground cinnamon - 1/2 cup chopped walnuts or pecans (optional) These ingredients come together to create a moist and flavorful bread that everyone loves. Coconut oil alternatives If you don't have coconut oil, you can use unsalted butter or canola oil. Both will work well and keep the bread rich. Swapping brown sugar for other sweeteners You can swap brown sugar for white sugar or honey. Just note that honey will make the bread a bit denser. Gluten-free flour options For a gluten-free option, use almond flour or a gluten-free all-purpose blend. This way, everyone can enjoy banana bread! 1. Preheat your oven to 350°F (175°C). This helps the bread bake evenly. 2. Grease a 9x5-inch loaf pan well. This ensures easy removal after baking. 3. In a large bowl, mash 3 ripe bananas until smooth. Use a fork; it works great! 4. Add 1/3 cup of melted coconut oil to the mashed bananas. Mix until combined. 5. Now, add 1/2 cup of brown sugar, 1 beaten egg, and 1 teaspoon of vanilla extract. Stir until smooth. 1. Sprinkle 1 teaspoon of baking soda and a pinch of salt over the banana mix. Mix gently. 2. Gradually sift in 1 cup of all-purpose flour and 1/2 teaspoon of ground cinnamon. 3. Use a spatula or wooden spoon to mix. Do not overmix; a few lumps are okay! 4. If you want, fold in 1/2 cup of chopped walnuts or pecans gently for a crunchy texture. 1. Pour the banana batter into your prepared loaf pan. Smooth the top for even baking. 2. Bake in the preheated oven for 55-60 minutes. The smell will be amazing! 3. To check for doneness, insert a toothpick into the center. It should come out clean. 4. Once baked, remove the loaf from the oven. Let it cool for 10 minutes. 5. Transfer the bread to a wire rack to cool completely before slicing. This recipe is simple and makes a tasty loaf. For the full recipe, check out the ingredients section. To make great banana bread, avoid overmixing. Overmixing can make the bread tough. Mix just until the flour blends in. A few lumps are fine! Choosing the right bananas is key. Use ripe bananas with brown spots for the best sweetness. The more spots, the sweeter the bread. If your bananas are not ripe, place them in a paper bag for a day. This speeds up the ripening process. Adding spices can boost flavor. A pinch of nutmeg gives warmth. Cloves add a nice twist, too. You can also try cinnamon or ginger for added depth. Experiment with extracts to find your favorite. Vanilla is classic, but almond or coconut can surprise you. Just a few drops can make a big difference. Serve your banana bread warm for the best taste. Cut slices and drizzle with honey for a sweet touch. You can also spread cream cheese on top. For a beautiful display, garnish with banana slices. A sprinkle of cinnamon adds color and flavor. Use a rustic wooden board for a homey feel. This makes your presentation inviting and fun! {{image_4}} You can have fun with banana bread by adding new flavors. Here are two tasty ideas: - Chocolate chip banana bread: Add 1 cup of chocolate chips to the batter. This makes the bread sweet and rich. The chocolate melts into the warm bread and creates a lovely treat. - Vegan banana bread options: Swap the egg for 1/4 cup of applesauce. Use non-dairy milk in place of coconut oil. This keeps the bread moist and delicious without any animal products. You can also change your banana bread based on the season. Here are two great suggestions: - Adding pumpkin for a fall twist: Mix in 1 cup of pumpkin puree. This gives the bread a warm, cozy flavor. Add a pinch of nutmeg for extra fall spice. - Incorporating dried fruits for a holiday special: Toss in 1/2 cup of dried cranberries or raisins. This adds a chewy texture and a burst of flavor for your holiday gatherings. If you're looking for different ways to bake banana bread, try these methods: - Instant Pot banana bread recipe: Pour the batter into a small, greased pan. Place it in the Instant Pot with a cup of water. Cook on high pressure for 50 minutes. This makes a moist, fluffy bread in no time. - Gluten-free banana bread variations: Substitute all-purpose flour with gluten-free flour blends. This way, everyone can enjoy your banana bread, no matter their diet. Store banana bread at room temperature for the best taste. Wrap it tightly in plastic wrap or foil. This keeps the bread moist and fresh. For extra protection, place it in an airtight container. If you live in a hot or humid area, the fridge may help it last longer. But, it can dry out in the fridge, so only use it if needed. To freeze banana bread, first let it cool completely. Then, slice the bread into pieces. Wrap each slice tightly in plastic wrap. Place all the wrapped slices in a freezer bag. This keeps them fresh for up to three months. To thaw, take out a slice and leave it at room temperature for about an hour. You can also warm it in the microwave for a few seconds if you want it warm. Banana bread lasts about 2 to 4 days at room temperature. Make sure to check for signs of spoilage. Look for mold or an off smell. If it feels very dry or hard, it’s best to toss it. Proper storage ensures you enjoy every slice of this delicious treat. For the full recipe, check out the Banana Bliss Bread section. To check if your banana bread is done, look for a few signs. The top should be golden brown and firm to the touch. You can also insert a toothpick into the center. If it comes out clean, the bread is ready. Another sign is the smell; it should fill your kitchen with a sweet aroma. If the edges pull away from the pan, that’s a good sign too. Yes, you can use frozen bananas! Just thaw them before using. Drain any excess liquid after they thaw. Mash them well, just like you would with fresh bananas. This can even enhance the flavor since frozen bananas tend to get sweeter. It’s a great way to use up overripe bananas you might have stashed in your freezer. If your banana bread turns out dense, there are a few tips to fix it. First, make sure you measure the flour correctly. Too much flour can cause density. Use a spoon to scoop flour into the measuring cup, then level it off. Also, avoid overmixing the batter. Mix just until combined, as overmixing can lead to a tough loaf. If you want it lighter, add one extra egg. Yes, it is normal for banana bread to crack on top! This happens during baking as the bread rises. It can also be due to humidity in the air. If your oven is too hot, it may crack more. To help prevent this, ensure your oven is at the right temperature and avoid opening the door while baking. Cracks are often a sign of a good rise! You can make delicious banana bread with simple steps. Remember to mash ripe bananas well and mix the ingredients without overdoing it. Adding tips for flavor and presentation can elevate your bread. Make sure to store it properly to keep it fresh. Whether you stick to classic recipes or try new twists, banana bread is always a tasty treat. Enjoy baking it and sharing it with others!

Classic Banana Bread Simple and Tasty Recipe Guide

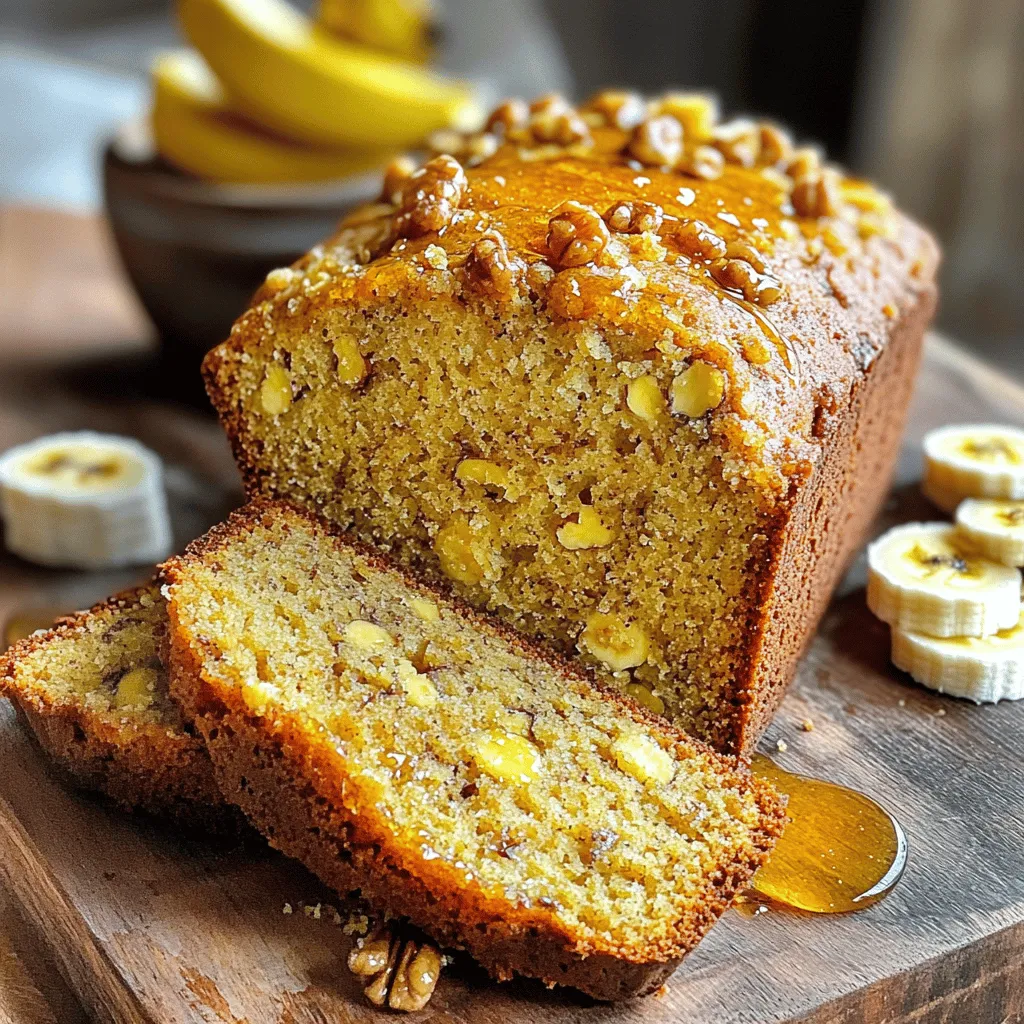
Welcome to your go-to guide for making classic banana bread! This simple and tasty recipe will turn your overripe bananas

To make your Easy Chicken Enchiladas, you will need the following main ingredients: - 2 cups cooked chicken, shredded - 1 cup black beans, drained and rinsed - 1 cup corn kernels (frozen or fresh) - 1 cup enchilada sauce (store-bought or homemade) - 8 small flour tortillas - 1 cup shredded cheese (cheddar or a Mexican blend) - 1/2 teaspoon cumin - 1/2 teaspoon chili powder - 1/4 cup fresh cilantro, chopped (plus extra for garnish) - 1/2 cup sour cream (for serving) - Salt and pepper to taste These ingredients come together quickly. The chicken provides protein, while the beans and corn add fiber and sweetness. Each ingredient plays a role in making these enchiladas tasty and satisfying. You can enhance your enchiladas with a few optional garnishes: - Extra fresh cilantro - Sliced avocado - Chopped green onions - Jalapeño slices - Lime wedges These garnishes not only add flavor but also make your dish look pretty. A sprinkle of cilantro adds a fresh touch, while a squeeze of lime gives a zesty kick. Pair your enchiladas with some delicious side dishes: - A fresh green salad - Mexican rice - Refried beans - Corn on the cob These sides complement the enchiladas well. A salad adds crunch, while rice and beans round out your meal nicely. You can mix and match based on your taste! For the full method of preparing these enchiladas, check out the Full Recipe. To start, gather your ingredients. You need cooked chicken, black beans, corn, and enchilada sauce. In a large bowl, mix the shredded chicken, black beans, and corn together. Pour in half of the enchilada sauce. Sprinkle the cumin, chili powder, and chopped cilantro on top. Add salt and pepper to taste. Stir until everything is well combined. This filling is where the magic begins. Now, take a flour tortilla. Place about 1/4 cup of your filling in the center. Roll the tortilla tightly around the filling. Make sure the seam is down when you place it in a greased baking dish. Repeat this with the other tortillas until they are all filled. Once they are in the dish, pour the rest of the enchilada sauce over the top. This makes each enchilada juicy. Then, sprinkle the shredded cheese on top. It's time to bake! Slide the dish into your preheated oven at 350°F (175°C). Bake for 20 to 25 minutes. You want the cheese to melt and turn golden brown. When it's done, take it out and let it cool for a few minutes. This cooling time helps the flavors come alive. Serve your enchiladas warm, and don't forget the sour cream! For the full recipe, check out the details above. Rolling tortillas can be tricky. Start with warm tortillas; they bend better. Place filling in the center, leaving space at the edges. Fold the sides in first, then roll tightly from the bottom. This keeps the filling inside. Make sure the seam is on the bottom in the dish. This helps them stay closed while baking. To boost flavor, use spices like cumin and chili powder. They add warmth and depth. Mix them into the chicken and bean filling for even flavor. You can also add garlic or onion powder for extra taste. Fresh cilantro brightens the dish, so don’t skip it. These small additions make a big impact. Cheese makes enchiladas creamy and delicious. I recommend using cheddar or a Mexican blend. Both melt well and add great taste. For a richer flavor, try Monterey Jack or pepper jack cheese. Sprinkle the cheese generously on top before baking. This creates a lovely golden crust that everyone loves. {{image_4}} You can easily make vegetarian enchiladas. Swap the chicken for more beans or veggies. Try using 2 cups of spinach or 1 cup of mushrooms. You can also add bell peppers or zucchini for extra flavor. Make sure to keep the seasoning, like cumin and chili powder, for that great taste. This way, you still get a hearty meal without meat. If you love heat, make spicy chicken enchiladas. Add diced jalapeños or serrano peppers to the filling. You can also use spicy enchilada sauce instead of mild. For a fiery kick, mix in some hot sauce. This variation will please anyone who enjoys bold flavors in their meals. To make gluten-free enchiladas, use corn tortillas instead of flour. They hold up well and add a nice taste. Check your enchilada sauce to ensure it is gluten-free as well. This way, everyone can enjoy this tasty dish without worries. Feel free to explore these variations and make the recipe your own. For the full recipe, check out the details above! Store leftover enchiladas in an airtight container. Make sure they cool down first. Place a piece of wax paper between layers if stacking. This keeps the cheese from sticking. You can keep them in the fridge for up to three days. To reheat your enchiladas, preheat the oven to 350°F (175°C). Place the enchiladas in a baking dish. Cover with foil to keep them moist. Heat for about 15-20 minutes. You can also use the microwave. Just cover them with a damp paper towel. Heat for 1-2 minutes or until warm. To freeze enchiladas, wrap each one tightly in plastic wrap. Then place them in a freezer-safe bag or container. This keeps them fresh for up to three months. When ready to eat, thaw overnight in the fridge. Reheat as mentioned above for a tasty meal. Check out the Full Recipe for more tips on making these enchiladas! Yes, rotisserie chicken works great! It saves you time and adds flavor. Just shred the chicken and mix it into your filling. You can use any leftover chicken too. This makes the dish even easier. If you don’t have enchilada sauce, try salsa or tomato sauce. You can also make a quick sauce with canned tomatoes, spices, and broth. Blend them together for a smooth texture. This gives you a tasty base for your enchiladas. You can prepare the filling and roll the enchiladas a day in advance. Just store them in the fridge before baking. Cover them well to keep them fresh. When ready, pour sauce and cheese on top, then bake as usual. This makes dinner quick and easy! For more detailed steps, check out the Full Recipe. We’ve covered the key ingredients for easy chicken enchiladas, from main fillings to garnishes. I shared step-by-step instructions for prepping, assembling, and baking. We explored tips for perfect rolling and flavor enhancement. I also presented variations, storage info, and answers to your burning questions. You now have a solid foundation to create tasty enchiladas. Enjoy making and sharing this meal with others, knowing you can customize it to your taste.

Easy Chicken Enchiladas Flavorful and Quick Dinner

Are you craving a quick and tasty dinner? Look no further than easy chicken enchiladas! This dish packs bold flavors

- 2 cups cherry tomatoes, halved - 1 medium cucumber, diced - 1 bell pepper (any color), diced - ½ medium red onion, thinly sliced Fresh vegetables are key to a great Greek salad. Cherry tomatoes add sweetness and color. Use ripe tomatoes for the best taste. Cucumbers provide a crisp and refreshing bite. Choose a medium cucumber for easy dicing. Bell peppers bring crunch and vibrant color. You can select any color you like. Red onion gives a mild flavor and sharpness. Slice it thin for a perfect mix. - 1 cup Kalamata olives, pitted - 1 cup feta cheese, crumbled - 2 tablespoons fresh oregano, finely chopped Kalamata olives are a must for authentic flavor. They add a briny richness to the salad. Feta cheese gives creaminess and tang. Crumble it over the top to enhance texture. Fresh oregano brings a fragrant touch. Use finely chopped oregano for an even flavor throughout. These extra ingredients turn a simple salad into a delight. - 3 tablespoons extra virgin olive oil - 1 tablespoon red wine vinegar (optional for added tanginess) - Salt and black pepper to taste The dressing brings it all together. Use extra virgin olive oil for a fruity taste. It enhances the flavors of the vegetables. Red wine vinegar adds a zesty kick, but it’s optional. Season the dressing with salt and black pepper. This simple mix amplifies all the tasty ingredients. For the full recipe, check out the details above. Start by taking a large mixing bowl. Add the halved cherry tomatoes, diced cucumber, diced bell pepper, and thinly sliced red onion. Mix these base ingredients gently. You want to combine their flavors without mashing them. Next, incorporate the Kalamata olives and crumbled feta cheese. This adds richness and texture to your salad. Scatter fresh oregano over the top. This herb gives a lovely aroma and flavor. In a separate small bowl, whisk together extra virgin olive oil and red wine vinegar. You can skip the vinegar if you prefer a milder taste. Season the mixture with salt and black pepper. This step enhances the overall taste. Once mixed, drizzle the dressing over the salad. Use two large spoons to toss all the ingredients together. Be careful to keep the feta cheese intact. You want it creamy, not crumbled. After tossing, taste the salad. Adjust the seasoning with more salt and pepper if needed. For a beautiful presentation, serve the salad in a large, shallow bowl. Garnish with whole Kalamata olives and a sprinkle of oregano. You can also add a lemon wedge on the side for an extra burst of flavor. For the full recipe, check the details above. Choosing the right vinegar Pick a vinegar that adds zest. Red wine vinegar works well for a classic taste. It gives a nice tang without overpowering. You can also try lemon juice for a fresh kick. Both options add brightness to your salad. Adjusting the saltiness Salt brings out flavors. Start with a small amount and taste. Add more if needed. Use flaky sea salt for a burst of flavor. You can also consider the saltiness of feta cheese. It can change how much salt you need. Serving suggestions Serve your salad in a wide, shallow bowl. This lets the colors shine. Place it in the center of your table. Everyone can dig in. You can also use individual bowls for a fun touch. It makes each serving feel special. Garnishing ideas Garnishes add charm to your dish. Use whole Kalamata olives on top. A sprinkle of fresh oregano brightens the look. You can also add lemon wedges on the side. Guests love to squeeze fresh lemon juice on their salad. Keeping the salad fresh and crunchy Choose crisp, fresh vegetables. They keep your salad lively. Use ripe cherry tomatoes and firm cucumbers. Cut them just before serving. This keeps them crunchy and bright. Ensuring flavor balance Try to balance sweet, salty, and tangy flavors. The tomatoes add sweetness. The feta cheese offers saltiness. The vinegar brings tang. Mix them well to create a perfect blend. Tasting as you go helps you find that sweet spot. For the full recipe, check out the Colorful Mediterranean Bliss Salad. {{image_4}} For a vegan option, swap feta cheese for tofu or chickpeas. Tofu adds protein and absorbs flavors well. Chickpeas give a nice texture and extra nutrients. Both choices keep your salad healthy and filling. For gluten-free needs, this salad is already safe. Just ensure any added ingredients, like dressings, are gluten-free. You can make your salad even better with unique additions. Try adding creamy avocado for a rich taste. Avocado also adds healthy fats. Artichokes bring a nice, tangy flavor that pairs well with the other ingredients. Seasonal vegetables like zucchini or asparagus can also enhance freshness and crunch. Dressings can change your salad's whole vibe. A simple lemon vinaigrette made with fresh lemon juice brightens flavors. It adds a zesty twist. You can also use herb-infused oils for depth. These oils, like rosemary or basil, give extra aroma and taste. Try different dressings to find your favorite combination. For the full recipe, check out the Colorful Mediterranean Bliss Salad. To store leftovers, place your Greek salad in an airtight container. This helps keep the flavors fresh. If you have extra dressing, store it separately. This prevents the salad from becoming soggy. I recommend using glass containers. They do not absorb smells and keep the salad crisp. Can you freeze Greek salad? It’s not the best idea. Freezing can change the texture of the veggies. However, you can freeze individual ingredients. For example, freeze olives or diced peppers. This way, you can use them later in other dishes. How long does the salad last? In the fridge, it lasts about three days. After that, it may lose its crispness and flavor. Look for signs of spoilage. If the veggies look slimy or smell off, it’s best to toss them. Enjoy your Healthy Greek Salad fresh for the best taste! For the full recipe, check it out! A healthy Greek salad is full of nutrient-rich ingredients. You will find: - 2 cups cherry tomatoes, halved - 1 medium cucumber, diced - 1 bell pepper, diced - ½ medium red onion, thinly sliced - 1 cup Kalamata olives, pitted - 1 cup feta cheese, crumbled - 2 tablespoons fresh oregano, finely chopped - 3 tablespoons extra virgin olive oil - 1 tablespoon red wine vinegar (optional for tanginess) - Salt and black pepper to taste These colorful veggies provide vitamins and antioxidants. The olives add healthy fats, while feta gives protein and calcium. Together, they create a tasty and balanced meal. To make a Greek salad vegan, you can substitute feta cheese. Use tofu or chickpeas for protein. Tofu crumbles easily and absorbs flavors well. Chickpeas add a hearty texture and complement the salad's taste. You can also skip the cheese altogether. Instead, try adding avocado or sunflower seeds for creaminess. These swaps keep the salad delicious and plant-based. Yes, you can use different olives in your Greek salad. Kalamata olives are traditional, but many other options exist. Try green olives for a milder taste. Castelvetrano olives are sweet and buttery. Black olives give a rich flavor. Each type has a unique texture and taste. Feel free to mix and match to find your favorite combination. This post covered how to make a healthy Greek salad. We started with fresh veggies like tomatoes and cucumbers. Then, we added olives and feta for flavor. You also learned how to make a tasty dressing. My final thoughts are that this salad is fun to make. You can mix and match ingredients to suit your taste. Keep experimenting to find your favorite version! Enjoy your fresh Greek salad often.

Healthy Greek Salad Flavorful and Fresh Delight

Looking to brighten up your meals? A Healthy Greek Salad is a perfect choice! Packed with fresh veggies, tangy feta,

To make these tasty stuffed bell peppers, gather the following ingredients: - 4 large bell peppers (choose a colorful mix: red, yellow, green) - 1 cup quinoa, thoroughly rinsed - 2 cups vegetable broth - 1 can (15 oz) black beans, rinsed and drained - 1 cup corn (fresh, frozen, or canned) - 1 cup cherry tomatoes, halved - 1 teaspoon ground cumin - 1 teaspoon smoked paprika - 1 teaspoon garlic powder - Salt and pepper to taste - 1 cup shredded cheese (cheddar or a plant-based alternative for a vegan option) - Fresh cilantro, chopped, for garnish - 1 tablespoon olive oil - Juice of 1 lime (about 2 tablespoons) Pick bell peppers that feel firm and heavy. Check for shiny skin and bright color. Avoid any with soft spots or wrinkles. Smell can also help; fresh peppers smell sweet. Choose a mix of colors for a fun look on your plate. This recipe can fit many diets. For a vegan option, skip the cheese or use a plant-based alternative. Quinoa is naturally gluten-free, making this meal safe for those with gluten sensitivities. You can also add extra veggies or beans to keep it filling and nutritious. If you're looking for a low-carb option, consider substituting quinoa with cauliflower rice. Enjoy the endless possibilities! Start by setting your oven to 375°F (190°C). This gets it hot and ready for the peppers. Next, take four large bell peppers, choosing a mix of colors like red, yellow, and green. Cut the tops off, and remove the seeds and membranes. For extra flavor, brush the outside with olive oil. Stand them up in a baking dish, ready for stuffing. In a medium saucepan, pour in two cups of vegetable broth. Bring it to a boil. Once boiling, add one cup of rinsed quinoa. Lower the heat and cover it. Let it simmer for about 15 minutes. The liquid will absorb, and the quinoa will become fluffy. After cooking, fluff it with a fork to keep it light. In a large bowl, combine the cooked quinoa with one can of black beans, one cup of corn, and one cup of halved cherry tomatoes. Add one teaspoon each of ground cumin, smoked paprika, and garlic powder. Squeeze the juice of one lime into the mix. Stir everything well, then add half a cup of shredded cheese. Season with salt and pepper to taste. Now it’s time to fill the peppers! Take the quinoa mix and spoon it into each pepper. Pack it tightly to fit as much filling as you can. Top each filled pepper with the rest of the shredded cheese. Cover your baking dish with aluminum foil. This helps keep the peppers moist while baking. Place the dish in your preheated oven. Bake for 25 minutes. Then, remove the foil and bake for another 10 to 15 minutes. The peppers should be tender, and the cheese should be melted and slightly golden. Let them cool for a few minutes, then garnish with chopped cilantro before serving. For the full recipe, check the Rainbow Stuffed Bell Peppers section. To get great stuffed peppers, choose fresh ones. Look for bell peppers that feel firm and heavy. The colors matter too; try red, yellow, and green for a bright dish. When you cut the tops, make sure to leave enough space for filling. Brush the outside with olive oil for flavor and a nice shine. Bake covered initially to keep them moist, then uncover to allow cheese to brown. You can mix up the stuffing easily. Try using different grains like rice or farro instead of quinoa. You can add more veggies like zucchini or spinach for extra nutrients. For protein, you can use ground turkey or tofu. Don’t forget spices! Adding chili powder or herbs can really boost the flavor. Taste the mixture before stuffing to adjust the seasoning. For a great cheese topping, choose cheeses that melt well, like cheddar or mozzarella. Shred your cheese yourself; pre-shredded cheese has additives that prevent melting. Add cheese at the end of baking. This way, it will melt evenly and get golden brown on top. If you love a crispy texture, broil the peppers for a minute or two after baking. Just watch them closely! For the complete recipe, check out the Full Recipe for Rainbow Stuffed Bell Peppers. {{image_4}} Stuffed bell peppers are flexible and fun. You can create many tasty variations to please everyone. Here are some ideas. For a vegetarian version, use beans and grains. You can keep the base recipe and swap the meat for more veggies. Try using: - 1 cup cooked lentils - 1 cup diced zucchini - 1 cup chopped spinach These add great flavor and nutrition. Feel free to mix in your favorite herbs, like basil or oregano. This way, you get a vibrant dish that’s full of life! If you're watching carbs, you can easily adjust your stuffed peppers. Replace quinoa with cauliflower rice. This gives you a low-carb base. You can also skip the corn for fewer carbs. Use: - 1 cup cauliflower rice (fresh or frozen) - 1 cup diced mushrooms These ingredients keep the dish filling without the carbs. Add spices like chili powder or Italian seasoning for extra flavor. Stuffed bell peppers can travel the world through flavors. You can create dishes inspired by different cuisines. Here are some fun ideas: - Mexican: Mix in black beans, corn, and salsa. Top with avocado and cilantro. - Mediterranean: Use feta cheese, olives, and diced tomatoes. Add fresh herbs like parsley. - Italian: Stir in Italian sausage, marinara sauce, and mozzarella cheese. Each variation brings new tastes and creativity to your table. Don’t hesitate to try different flavors and make it your own! For a full recipe of my Rainbow Stuffed Bell Peppers, check out the details above. After enjoying your stuffed peppers, let them cool to room temperature. Place them in an airtight container. You can store them in the fridge for up to four days. If you want to keep them longer, freezing is a great option. To reheat your stuffed peppers, preheat your oven to 350°F (175°C). Place the peppers in an oven-safe dish. Cover them with foil to keep them moist. Heat for about 20-25 minutes or until they are warm all the way through. You can also use a microwave. Just place a pepper on a plate and heat for about 2-3 minutes. To freeze stuffed peppers, wrap each pepper in plastic wrap. Then, place them in a freezer-safe bag or container. They can last in the freezer for up to three months. When you’re ready to eat, thaw them overnight in the fridge. Bake them as usual, and they’ll taste fresh! Yes, you can use other grains instead of quinoa. Brown rice, farro, or couscous work well. Each grain adds its own texture and flavor. If you choose rice, make sure it's cooked before mixing it with the other ingredients. You can also try gluten-free options like rice or millet for a tasty twist. To add some heat, you can use spicy peppers like jalapeños or serranos. Chopped fresh herbs like cilantro or spicy seasonings like cayenne pepper can help too. Another great way is to add hot sauce to the filling. Start with a little, then taste and adjust to your liking. Stuffed peppers are very healthy! They are full of fiber and protein. The bell peppers provide vitamins A and C. The quinoa and beans add extra nutrients. You can also make them lower in calories by using less cheese or a low-fat option. They are a great meal for many diets. Stuffed peppers can last about 3-5 days in the fridge. Store them in an airtight container to keep them fresh. If you notice any changes in smell or color, it’s best to toss them. Reheat them in the oven or microwave before eating. Yes, you can prepare stuffed peppers ahead of time. You can stuff them a day before and keep them in the fridge. They will taste great when baked the next day. If you want to freeze them, do so before baking. Just thaw and bake when you’re ready to eat. For the full recipe, check out the detailed instructions above. In this blog post, I shared how to make delicious rainbow stuffed bell peppers. I covered needed ingredients, cooking steps, and tips for perfecting your peppers. We also looked at different variations and storage methods. These peppers are easy to make and can fit many diets. Get creative with your flavors. Make these tasty meals your own. Enjoy the bright colors and great taste of your stuffed peppers! Happy cooking!

Stuffed Bell Peppers Flavorful and Nutritious Meal

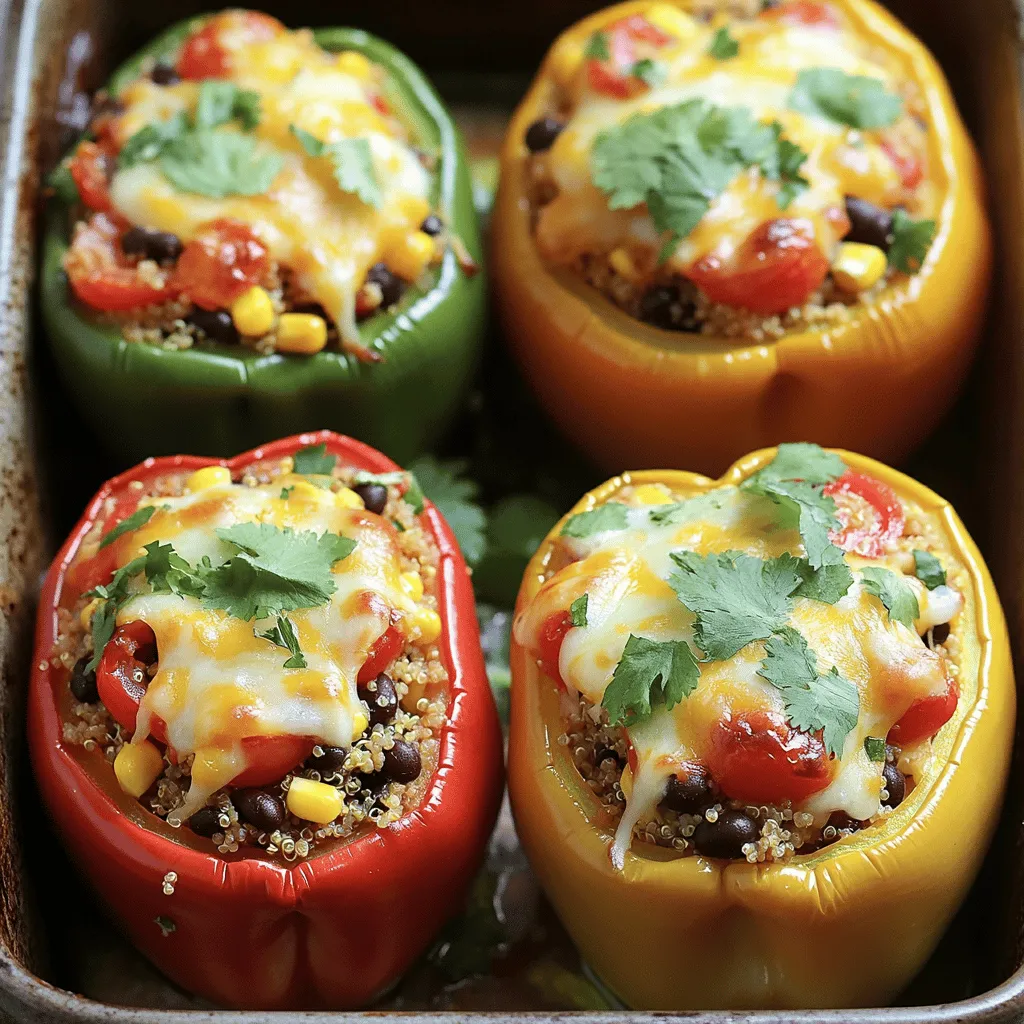
Stuffed bell peppers are a vibrant and tasty meal choice that packs a nutritional punch. If you’re looking for a

Older posts
Newer posts
← Previous Page1 … Page41 Page42 Page43 … Page86 Next →

dsad

© 2026 yumymoments • Built with GeneratePress

Our Policies

  • Copyright Policy
  • Cookie Policy
  • GDPR Policy
  • Privacy Policy
  • Disclaimer
  • Terms Of Use

More Information

  • Home
  • About
  • Contact
  • Appetizers
  • Dessert
  • Dinner
  • Drinks
©2026, yumymoments About Back To Top