Skip to content
DisclaimerTerms Of UseGDPR PolicyCookie Policy

yumymoments

  • Home
  • Drinks
  • Appetizers
  • Dinner
  • Dessert
  • About
  • Contact
  • Privacy Policy
DisclaimerTerms Of UseGDPR PolicyCookie Policy

NO-ING-IMG

- 1 pre-made pizza dough - 1 cup cooked chicken, shredded - 1/2 cup BBQ sauce (select your favorite flavor) - 1 cup mozzarella cheese, shredded - 1/2 cup red onion, thinly sliced - 1/2 cup sweet corn (canned or boiled) - 1/4 cup fresh cilantro, finely chopped - 1 teaspoon olive oil - Salt and pepper to taste When you choose your ingredients, fresh is best. Look for the following: - Chicken: Use rotisserie chicken for easy shredding and great flavor. - BBQ Sauce: Pick a sauce that balances sweetness and tang. Taste it first! - Cheese: Fresh mozzarella melts well and creates that gooey texture we love. - Veggies: Select crisp, vibrant red onions and sweet corn for the best taste. If you cannot find one of the ingredients, you can swap it with these: - Pizza Dough: Use pita bread or flatbread for a quick base. - Chicken: Substitute with shredded pork or even tofu for a different twist. - BBQ Sauce: Try ranch dressing or a spicy sauce for a new flavor. - Cheese: Cheddar or a dairy-free cheese can work well too. Using these tips, you can customize your BBQ chicken pizza to suit your taste. Enjoy making it your own! 1. Prepare the Oven: First, heat your oven to 475°F (245°C). If you have a pizza stone, place it in the oven to get hot. 2. Season the Chicken: Take a bowl and mix the shredded chicken with half of the BBQ sauce. Add salt and pepper to your taste. Stir until the chicken is fully coated in the sauce. 3. Shape the Dough: On a floured surface, roll out your pre-made pizza dough. Make it as thick or thin as you like. If you have a pizza stone, put the rolled dough on parchment paper for easy moving. 4. Prepare the Dough: Brush the top of the pizza dough lightly with olive oil. This keeps the crust crisp and prevents sogginess. 5. Add the Sauce: Spread the remaining BBQ sauce evenly over the dough, leaving a small edge for the crust. 6. Layer the Chicken: Evenly spread the seasoned chicken over the saucy pizza base. 7. Top It Off: Add a generous layer of shredded mozzarella cheese on top of the chicken. Next, sprinkle sliced red onion and sweet corn for extra flavor. 8. Bake the Pizza: Carefully transfer the pizza onto the hot pizza stone or onto a baking sheet. 9. Cooking Time: Bake for 12-15 minutes. Look for a golden brown crust and bubbly cheese. 10. Garnish and Serve: After baking, take the pizza out and sprinkle freshly chopped cilantro on top. 11. Slice and Enjoy: Let the pizza cool for a minute. Then, slice it into pieces and serve hot. For a fun touch, serve your BBQ chicken pizza on a wooden cutting board. Drizzle extra BBQ sauce around the edges for added flavor and a nice presentation. To make great pizza dough, start with quality ingredients. Use high-protein flour for a better texture. Always let the dough rise until it doubles in size. This gives the crust a nice airy feel. Roll it out gently to keep air bubbles intact. This helps create a light and crispy crust. Having the right tools makes cooking easier. Here’s what you need: - Rolling pin for shaping the dough - Baking sheet or pizza stone for even cooking - Parchment paper to help transfer the pizza - Mixing bowl for chicken and sauce - Pizza cutter for perfect slices These tools help you achieve better results and make cooking more fun. Cooking BBQ chicken pizza is all about temperature and timing. Preheat your oven to 475°F (245°C) for a crispy crust. If using a pizza stone, let it heat up for at least 30 minutes. This helps the bottom cook evenly. When baking, keep an eye on the pizza. Look for a golden crust and bubbling cheese. Finish with fresh cilantro for a burst of flavor. These simple steps make your pizza taste great and look amazing. {{image_4}} You can mix toppings to make BBQ chicken pizza exciting. Try adding: - Pineapple for sweetness - Jalapeños for heat - Bell peppers for crunch - Goat cheese for creaminess - Bacon for extra flavor These toppings can change the taste and feel of your pizza. Experiment with different combinations to find your favorite mix. You can make a delicious BBQ chicken pizza without meat. For a vegetarian option, use: - Grilled vegetables like zucchini or eggplant - Mushrooms for a meaty texture - A blend of beans for protein For a vegan twist, swap the cheese for vegan cheese or nutritional yeast. Use the same BBQ sauce to keep the flavor strong. You have two main choices for cooking BBQ chicken pizza: grilling or baking. Grilling gives your pizza a smoky flavor. To grill, preheat the grill and place the pizza on a pizza stone or directly on the grill grates. Watch it closely for 8-10 minutes. Baking is easier and more common. Just follow the steps in the Full Recipe. You’ll get a crunchy crust and bubbly cheese. Each method brings a unique taste, so try both to see which you like best! To keep your leftover BBQ chicken pizza fresh, wrap it well. Use plastic wrap or foil. Place it in an airtight container. This helps to keep the crust crisp and the toppings tasty. Store the pizza in the fridge for up to three days. If you plan to eat it later, freezing is a great option. For the best taste, reheat your BBQ chicken pizza in the oven. Preheat your oven to 350°F (175°C). Place the pizza on a baking sheet. Heat it for about 10-15 minutes. This will make the crust nice and crispy. You can also use a skillet. Heat the skillet on medium, add a few drops of water, and cover it. This method keeps the cheese gooey while crisping the bottom. Freezing your BBQ chicken pizza is simple. First, let it cool completely. Slice it into pieces. Wrap each slice in plastic wrap. Then, place all the slices into a freezer bag. Try to remove as much air as possible. Label the bag with the date. You can freeze it for up to two months. When you’re ready to eat, reheat it from frozen in the oven for the best results. Enjoy every bite of your homemade BBQ bliss! The best BBQ sauce for BBQ chicken pizza depends on your taste. Sweet sauces add a nice balance. Smoky sauces give a rich flavor. Spicy sauces can heat things up. Look for sauces that you enjoy. Try different brands to find your favorite. You can mix sauces too! This can create a unique flavor for your pizza. To make your BBQ chicken pizza spicy, add hot sauce to the chicken mix. You can use sriracha or any hot sauce you love. Another option is to sprinkle crushed red pepper on top before baking. You can also add jalapeños for fresh heat. Just remember, start small and taste as you go. You can always add more spice! Yes, you can use other types of cheese for your BBQ chicken pizza. Cheddar cheese gives a sharp flavor that pairs well. Gouda adds a nice smokiness. You can even mix cheeses for more depth. Just make sure to melt well. The key is to find flavors that you enjoy. Experiment and see what you like best! You can find the complete BBQ Bliss Chicken Pizza instructions in the Full Recipe section. It has all the steps you need. From prepping to baking, it covers everything. This recipe makes it simple to create a tasty pizza at home. Enjoy the process and have fun in your kitchen! In this blog post, we explored the key ingredients for BBQ Chicken Pizza and how to choose them. We provided step-by-step instructions for prep and cooking, ensuring you achieve great results. I shared tips and tricks to master your pizza dough and suggested various topping ideas. We also discussed proper storage methods and common FAQs to guide you. Now, you have the tools to make amazing BBQ Chicken Pizza. Enjoy experimenting with flavors and making it your own!

BBQ Chicken Pizza Flavorful and Easy Homemade Recipe

If you crave a tasty twist on pizza night, my BBQ Chicken Pizza is a must-try! This easy homemade recipe

For tasty sheet pan fajitas, gather these key items: - 1 lb boneless, skinless chicken breasts, thinly sliced into strips - 1 red bell pepper, sliced into strips - 1 yellow bell pepper, sliced into strips - 1 green bell pepper, sliced into strips - 1 red onion, sliced into thin wedges - 3 tablespoons olive oil - 2 tablespoons fajita seasoning (can use store-bought or homemade) - Salt and pepper to taste - Juice of 1 lime - Fresh cilantro, chopped, for garnish - Tortillas, for serving The right seasoning brings flavor to your fajitas. I recommend using fajita seasoning. It blends well with chicken and veggies. You can buy it or make your own with these spices: - Chili powder - Cumin - Garlic powder - Onion powder - Paprika - Oregano Mix these spices to your taste for a personal touch. Toppings add fun and flavor to your meal. I suggest these options: - Sour cream - Guacamole - Shredded cheese - Salsa These toppings let everyone customize their fajitas for a tasty experience. Enjoy the Full Recipe to create your own delicious feast! First, gather your ingredients. This includes chicken, bell peppers, red onion, olive oil, and seasoning. The prep is easy and quick. Start by preheating your oven to 425°F (220°C). While it heats, grease a large sheet pan with cooking spray or a bit of olive oil. This prevents sticking. In a large bowl, mix your sliced chicken and veggies. Pour the olive oil over them, then add fajita seasoning, salt, and pepper. Toss everything well to coat. Spread the chicken and veggies evenly on the prepared sheet pan. Make sure that no pieces overlap. This helps them cook evenly. Place the pan in the hot oven. Bake for 20-25 minutes. Check that the chicken is fully cooked and the veggies are tender. When done, take the pan out and squeeze fresh lime juice over everything. This adds a nice zing. Finally, sprinkle chopped cilantro on top. Serve the fajitas hot with warm tortillas. You can set out toppings like sour cream, guacamole, shredded cheese, and salsa. Guests can customize their wraps as they like. This makes every bite special. For the full recipe, you can refer to the earlier section. Enjoy your colorful and tasty meal! To make the best sheet pan fajitas, start with fresh veggies. I love using colorful bell peppers and onions. Cut them into strips for even cooking. Thinly slice the chicken so it cooks quickly and stays juicy. Use a large sheet pan. This helps the chicken and veggies brown nicely. Don't crowd the pan; this keeps everything crispy. Bake until the chicken is cooked through. It should be 165°F inside. You can easily change the flavors. Swap chicken for shrimp or beef if you like. Try different spices too. Smoked paprika or chipotle powder adds a nice kick. If you want a vegetarian option, use black beans or tofu. For extra crunch, add corn or zucchini. Feel free to adjust the lime juice to your taste. You can also mix in your favorite herbs for a twist. Serve your fajitas hot right from the oven. Warm the tortillas so they are soft and pliable. Set up a toppings bar with sour cream, guacamole, and salsa. Fresh cilantro gives a nice touch. You can also add cheese or jalapeños for heat. Don’t forget to check out the Full Recipe for more ideas and tips! {{image_4}} You can make fajitas without meat. Just swap in your favorite veggies. Use mushrooms, zucchini, or eggplant instead. These veggies roast well and add great taste. You can also add black beans for protein. They give a nice texture and flavor. Just follow the same steps in the [Full Recipe], and you will have a delicious vegetarian meal. If you prefer beef, use flank steak or sirloin. Cut the meat into thin strips. Season it with fajita spices just like chicken. For seafood lovers, shrimp is a great choice too. Cook shrimp for about 10 minutes in the oven. Both beef and shrimp add a rich flavor. Use these proteins in place of chicken in the [Full Recipe]. Fajitas can easily be gluten-free. Just check your tortillas. Many brands offer gluten-free options. Also, ensure your seasoning is gluten-free. Some store-bought mixes may contain gluten. Making your own seasoning is a great option. This way, you control every ingredient. Adjust your meal to fit any dietary needs with these simple swaps. After enjoying your sheet pan fajitas, let them cool down. Use a clean container with a lid. Place the fajitas in the container and seal it tightly. Store them in the fridge. They stay fresh for about three to four days. Make sure to keep any toppings separate to keep them fresh longer. When you're ready to eat your leftovers, you can reheat them easily. Preheat your oven to 350°F (175°C). Spread the fajitas on a baking sheet. Heat them for about 10-15 minutes, or until warm. You can also use a microwave. Place the fajitas in a microwave-safe dish, cover it with a lid, and heat for 1-2 minutes. Stir halfway for even heating. If you want to save some fajitas for later, freezing works well. Pack the cooled fajitas in a freezer-safe container or bag. Remove as much air as possible to prevent freezer burn. Label the container with the date. You can freeze them for up to three months. When you're ready to eat, thaw them in the fridge overnight. Reheat using the instructions above for a quick meal. For a full recipe, check out the details in the main article! Yes, you can use frozen chicken for this recipe. Just make sure to thaw it first. It’s best to plan ahead. Thaw it overnight in the fridge for best results. If you use frozen chicken, you may need to cook it a little longer. Always check that the chicken is fully cooked. It should reach an internal temperature of 165°F (74°C). The best protein for fajitas is chicken, beef, or shrimp. Chicken is popular because it's tender and absorbs flavor well. Beef offers a rich taste, especially flank steak or skirt steak. Shrimp cooks quickly and adds a nice twist. You can also try tofu for a vegetarian option. Each protein brings its unique flavor to the dish. To make homemade fajita seasoning, combine a few simple spices. Here’s a quick mix: - 1 tablespoon chili powder - 1 teaspoon cumin - 1 teaspoon paprika - 1 teaspoon garlic powder - 1 teaspoon onion powder - 1/2 teaspoon salt - 1/2 teaspoon black pepper Mix these spices in a bowl. Adjust the amounts to fit your taste. This seasoning works great for fajitas and adds a lot of flavor. You can store any extra in an airtight container. For the full recipe, check out the Sheet Pan Fajitas Fiesta. In this article, we covered the key ingredients for fajitas, including options for seasoning and toppings. I shared step-by-step instructions for preparation and cooking. You learned tips for customizing your fajitas and the best practices for perfect results. We explored variations, like vegetarian and gluten-free options. Lastly, I provided guidance for storing leftovers and reheating them. Fajitas are fun and easy to make. You can enjoy a tasty meal your way. Now, it’s your turn to try these ideas!

Sheet Pan Fajitas Flavorful and Easy Dinner Idea

Looking for a simple and tasty dinner? Sheet pan fajitas are your answer! You can make this fun meal in

For a Vegan Buddha Bowl, you need simple, fresh items. Here is your shopping list: - 1 cup quinoa, thoroughly rinsed - 2 cups vegetable broth (low-sodium recommended) - 1 can (15 oz) chickpeas, drained and rinsed - 1 medium sweet potato, peeled and diced into 1-inch cubes - 1 cup kale, stems removed and chopped into bite-sized pieces - 1 ripe avocado, sliced - 1/2 cup cherry tomatoes, halved - 1/4 cup red cabbage, finely sliced - 2 tablespoons tahini - 2 tablespoons freshly squeezed lemon juice - 1 tablespoon pure maple syrup - 1 teaspoon garlic powder - 1 teaspoon smoked paprika - Sea salt and freshly ground black pepper to taste - Fresh cilantro leaves, for garnishing Each ingredient brings its own benefits. Here’s what they offer: - Quinoa: High in protein and fiber. It is a complete protein source. - Chickpeas: Packed with protein and help keep you full longer. - Sweet Potato: Rich in vitamins A and C for healthy skin and eyes. - Kale: Loaded with vitamins K, A, and C. Great for bones and immune health. - Avocado: Contains healthy fats that are good for your heart. - Cherry Tomatoes: Full of antioxidants. They help fight inflammation. - Red Cabbage: High in vitamins and has anti-cancer properties. - Tahini: Made from sesame seeds, it provides healthy fats and protein. - Lemon Juice: Rich in vitamin C, which boosts your immune system. - Maple Syrup: A natural sweetener that offers some minerals. You can swap ingredients based on your taste or what you have. Here are some ideas: - Quinoa: Use brown rice or farro for a different grain. - Chickpeas: Try black beans or lentils for added protein. - Sweet Potato: Substitute with butternut squash or regular potatoes. - Kale: Spinach or Swiss chard work well as leafy greens. - Tahini: Use peanut butter or sunflower seed butter if needed. - Lemon Juice: Lime juice can add a nice twist to your dressing. Feel free to mix and match based on your preferences. This recipe is flexible, making it fun to create your perfect bowl! For the full recipe, check out our detailed instructions. Start by rinsing your quinoa well. This removes bitter saponins and makes it taste better. Drain the quinoa thoroughly to avoid excess water. Next, peel and dice your sweet potato into 1-inch cubes. This size helps them cook evenly. Remove the stems from the kale and chop it into bite-sized pieces. For the cherry tomatoes, simply slice them in half. Finally, slice your avocado right before serving to keep it fresh and green. To cook quinoa, use a medium saucepan. Bring 2 cups of vegetable broth to a boil. Then, add your rinsed quinoa. Cover the pot and reduce the heat to low. Let it simmer for about 15 minutes. After that, check if all the liquid is absorbed. The quinoa should look fluffy. Remove it from the heat and let it sit for 5 more minutes, covered. This step gives it a great texture. Preheat your oven to 425°F (220°C). Spread the diced sweet potatoes on a lined baking sheet. Drizzle with olive oil. Sprinkle garlic powder, smoked paprika, salt, and pepper over them. Toss the sweet potatoes well to coat them evenly. Roast for 20-25 minutes, flipping halfway through. They should be tender and golden brown. This roasting brings out their natural sweetness. For the full recipe, check out the complete guide. Enjoy the vibrant flavors and textures in every bite! To make your Buddha bowl pop, use bright colors. Arrange the ingredients in sections. Each color adds beauty and invites eating. Use a variety of textures, like crunchy cabbage and creamy avocado. Choose contrasting bowls that enhance the colors of your meal. Dressings can elevate your bowl. A tahini dressing works well. Mix tahini, lemon juice, and maple syrup for a sweet and tangy taste. You can also add a drizzle of balsamic glaze for a rich touch. For crunch, sprinkle sesame seeds or chopped nuts. Fresh herbs like cilantro or parsley can add brightness. Meal prep saves time. Cook a large batch of quinoa and store it in the fridge. Roast sweet potatoes ahead and keep them in an airtight container. You can assemble your bowl quickly on busy days. Keep toppings like avocado and tomatoes fresh by adding them just before serving. This way, your meal stays colorful and tasty. For the full recipe, check the main article for guidance on making this dish easily. {{image_4}} You can use many grains in your Buddha Bowl. Quinoa is great, but you can switch it up. Try brown rice for a chewy texture. Farro adds a nutty flavor, while barley brings a hearty bite. You can even use millet or couscous for a unique twist. Each grain offers different nutrients and flavors to explore. Chickpeas are a fantastic protein source. If you want more options, consider black beans or lentils. Edamame is another quick choice full of protein and flavor. You can also use tempeh or tofu for a meatier texture. Adding nuts or seeds can give your bowl an extra protein boost while adding crunch. Incorporating seasonal veggies makes your Buddha Bowl fresh and colorful. Use asparagus or peas in spring. Summer brings ripe tomatoes and zucchini. In fall, roasted pumpkins or butternut squash shine. Winter is perfect for hearty greens like kale or Swiss chard. Choose what’s freshest to enjoy the best flavors and nutrients. For the full recipe, check out the complete guide on creating your Vegan Buddha Bowl! Store your Vegan Buddha Bowl leftovers in an airtight container. This will keep the food fresh. Place the quinoa, veggies, and dressing in separate containers. This helps maintain texture and flavor. Use the leftovers within three days for the best taste. If you have extra roasted sweet potatoes, they can last for about four days in the fridge. You can freeze some Buddha Bowl ingredients for later use. Quinoa freezes well. Just let it cool, then place it in a freezer-safe bag. It can last for up to three months in the freezer. Roasted sweet potatoes also freeze nicely. You can freeze them on a baking sheet first, then transfer to a bag. Chickpeas can be frozen too. Just drain, rinse, and dry them before freezing. When reheating, avoid using the microwave if possible. Instead, use a skillet on low heat. Add a splash of water to help steam the ingredients. This keeps your bowl moist and flavorful. For quinoa, you can reheat in a saucepan with a bit of water. Stir occasionally until heated through. If you have dressing left, drizzle it on after reheating to keep it fresh. For the full recipe, check it out in the main article. A Vegan Buddha Bowl is a colorful meal in a bowl. It includes grains, veggies, and protein. You can mix any plant-based ingredients you love. This dish is healthy, filling, and visually appealing. It often has a base of grains like quinoa or brown rice. Then, you add roasted or fresh vegetables. You can also include legumes, nuts, or seeds for protein. A tasty dressing pulls it all together. Each bite is a delightful mix of flavors and textures. You can easily create a vegan Buddha bowl with leftovers. Start with a base of grains, like rice or quinoa. Look for leftover veggies in your fridge. Roasted or fresh, any leftover vegetables work well. You can also add beans or lentils for protein. If you have nuts or seeds, sprinkle them on top for crunch. For a dressing, mix olive oil, lemon juice, and your favorite herbs. This way, you use what you have while making a tasty meal. If you don't have tahini, try these easy swaps. Almond butter or peanut butter can work well. They give a nutty flavor and creamy texture. You can also use sunflower seed butter if you're nut-free. Greek yogurt is another option for a creamy dressing. If you want a lighter option, use avocado or a simple vinaigrette. Mix lemon juice, olive oil, and a bit of maple syrup. This will add flavor without tahini. In this blog post, I explored how to build a tasty vegan Buddha bowl. We covered key ingredients, helpful cooking tips, and fun variations. You learned how to use different grains and proteins for better nutrition. You can make your bowl attractive with the right dressings and toppings. Finally, remember that meal prep can make your week easier. A vibrant Buddha bowl not only nourishes but also excites your taste buds. Enjoy creating and customizing your own bowl!

Vegan Buddha Bowl Delightful and Nutritious Meal

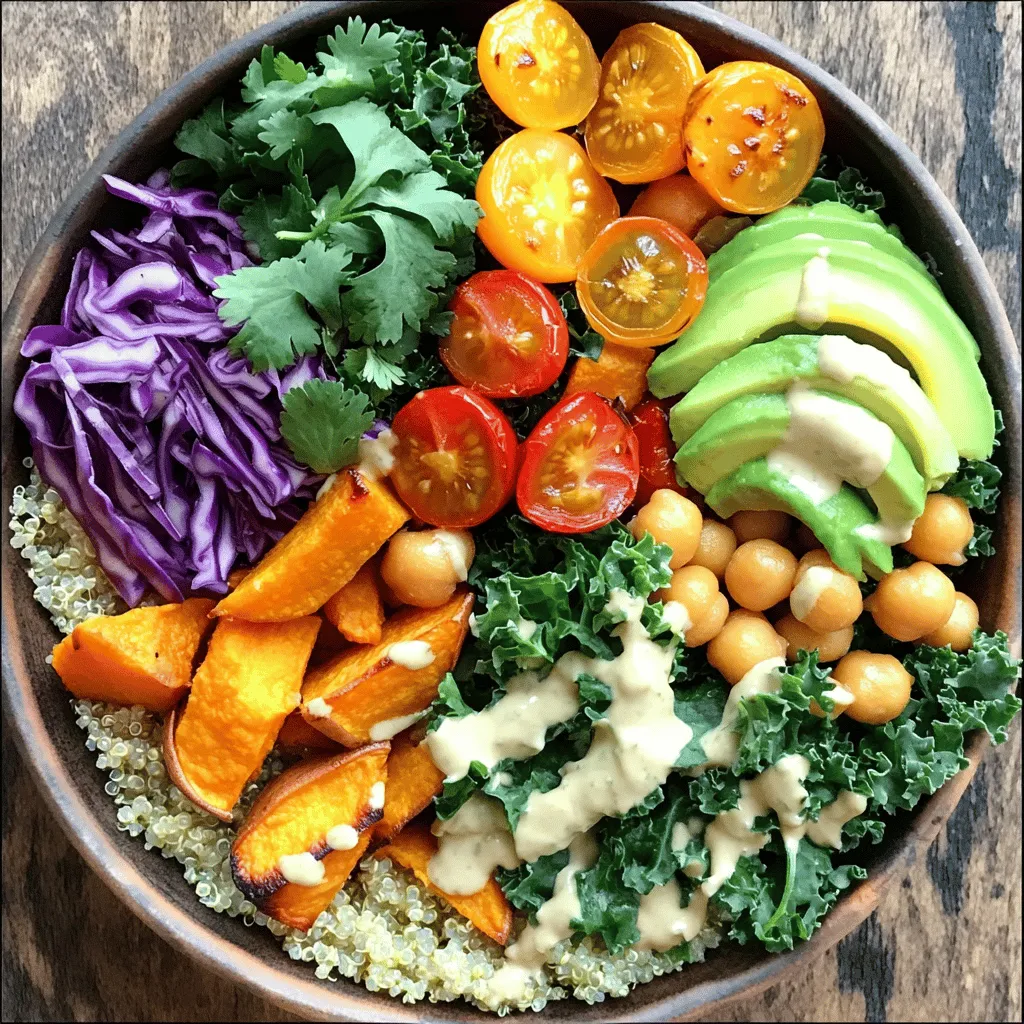
Looking for a meal that’s both delightful and packed with nutrition? A Vegan Buddha Bowl might be just what you

- 1 medium head of cauliflower - 2 tablespoons sesame oil - 2 cloves garlic - 1 small onion - 1 cup mixed vegetables - 2 large eggs - 3 tablespoons soy sauce - 1 green onion - Salt and pepper - Optional: chili flakes When I make cauliflower fried rice, I start with a medium head of cauliflower. This is the star of the dish. You need to rice it, which means grating it into small, rice-like pieces. I use a box grater or a food processor. Next, I heat two tablespoons of sesame oil in my skillet. I love the nutty flavor it adds. I then toss in two cloves of minced garlic and one small diced onion. The aroma fills my kitchen. After a few minutes of sautéing, I add a cup of mixed vegetables. Diced carrots, peas, and bell peppers work great. For protein, I beat two large eggs and add them to the mix. I pour in three tablespoons of soy sauce to bring everything together. Don’t forget to season with salt and pepper. If you like heat, add some chili flakes! Finally, I slice one green onion for freshness. All these ingredients blend into a tasty dish. You can find the full recipe in the link. Start by grating the cauliflower. Use a box grater or a food processor to turn it into rice-sized pieces. This step is key for a good texture. Once finished, set the riced cauliflower aside. You want it ready to mix in later. Next, heat 2 tablespoons of sesame oil in a large skillet over medium heat. Wait until the oil shimmers. Then, add 2 cloves of minced garlic and 1 small diced onion. Sauté for about 2-3 minutes. You want the garlic to smell good and the onion to turn soft. After that, incorporate 1 cup of mixed vegetables. Diced carrots, peas, and bell peppers work well. Cook them for 3-4 minutes until they soften. Now, push the veggies to one side of the skillet. Pour in 2 beaten eggs on the other side. Quickly scramble the eggs for about 1-2 minutes until they are cooked. Then, fold the eggs into the veggies. Next, mix in the riced cauliflower and 3 tablespoons of soy sauce. Stir everything together. Continue to fry for an extra 5-7 minutes. This helps the cauliflower get tender but still a bit crunchy. Finally, add salt, pepper, and optional chili flakes for heat. Gently fold in a sliced green onion. This adds a nice touch. Serve your cauliflower fried rice hot for a tasty meal. Check out the Full Recipe for more details! To fry cauliflower rice, use medium heat. This temperature lets the cauliflower cook evenly. If the heat is too high, it can burn. Aim for a slight sizzle when you add ingredients. This shows the pan is ready. Keeping cauliflower crunchy is key. Cook it just enough to soften, but not too long. You want a tender bite, not mushy. Stir-fry for about five to seven minutes. This will help you keep that nice texture. To add more flavor, try different seasonings. A dash of garlic powder or onion powder can boost taste. You might also like adding some ginger for a zing. Experiment with flavors to find what you love. Fresh herbs can add brightness. Try cilantro or basil as a garnish. They not only taste good but also look nice. Sprinkle them on top right before serving to keep them fresh. Use a large skillet or wok for best results. A wide pan helps the cauliflower fry evenly. Non-stick pans are great, too. They stop sticking and make cleanup easier. When ricing cauliflower, a box grater works well. You can also use a food processor. Just pulse the florets until they look like rice. Be careful not to over-process, or you’ll get mush instead of rice. For the full recipe, check out the [Full Recipe]. {{image_4}} You can swap out vegetables for more seasonal options. Try using zucchini in summer or sweet potatoes in fall. Fresh veggies add color and crunch. You can also add proteins like chicken or shrimp. Just make sure to cook them first. Then toss them in with the riced cauliflower. Want it vegan or vegetarian? Skip the eggs and use tofu instead. Tofu gives protein and texture. For gluten-free options, use tamari in place of soy sauce. This keeps the dish safe for those with gluten issues. Do you prefer mild or spicy? You can adjust the heat easily. For mild dishes, skip the chili flakes. If you like spice, add more chili flakes or some sriracha. Different sauces can change the flavor, too. Try teriyaki or sweet chili sauce for a fun twist. After cooking, let your cauliflower fried rice cool down. Place it in an airtight container. This helps keep the dish fresh. Store it in the fridge for up to four days. Always check for freshness before serving. You can freeze cauliflower fried rice for longer storage. Use a freezer-safe bag or container. Remove as much air as possible. The dish can last up to three months in the freezer. When you're ready to eat, thaw it in the fridge overnight. For reheating, use a skillet over medium heat. Add a splash of water or oil to help steam it. Stir occasionally until hot. This keeps it from drying out. Cauliflower fried rice lasts up to four days in the fridge and three months in the freezer. Watch for signs of spoilage. If it smells off or has a slimy texture, it’s best to throw it away. Always trust your senses when it comes to food safety. If you need a soy sauce substitute, you can try tamari. Tamari is gluten-free and tastes similar. Coconut aminos provide a sweeter, milder flavor. You can also mix balsamic vinegar with a little water for a quick swap. Each option works well in cauliflower fried rice. Yes, you can make cauliflower fried rice ahead of time. It stays fresh in the fridge for up to three days. For meal prep, cook the dish and let it cool. Store it in airtight containers. When you’re ready to eat, simply reheat in a skillet over medium heat. This keeps the flavors bright and fresh. Yes, cauliflower fried rice is low in carbs. A serving has about 5 grams of carbs compared to about 45 grams in regular fried rice. This makes it a great choice for low-carb diets. Plus, it has more fiber and nutrients. You get the taste you love without the extra carbs. To avoid mushy cauliflower fried rice, don’t overcook the cauliflower. Keep it tender-crisp, and avoid adding too much liquid. Use a hot skillet to fry quickly. Also, be sure to dry the riced cauliflower after grating. This keeps it from getting soggy. Following these tips will give you perfect cauliflower fried rice every time. Cauliflower Fried Rice offers a tasty, low-carb twist on a classic dish. You learned about the main ingredients, step-by-step cooking instructions, and handy tips. I shared ways to modify the recipe for different diets and tastes. Remember, the key is to keep the cauliflower crunchy and adjust flavors to your liking. This dish is quick, simple, and great for meal prep. Enjoy making your own version and experimenting with flavors!

Cauliflower Fried Rice Tasty and Quick Weeknight Meal

Looking for a quick and tasty dinner? Cauliflower fried rice is your answer! This healthy twist on a classic dish

To make classic banana bread, you need simple ingredients that blend well together. Here’s what you’ll need: - 3 ripe bananas, thoroughly mashed - 1/3 cup coconut oil, melted and slightly cooled - 1/2 cup packed brown sugar - 1 large egg, beaten well - 1 teaspoon pure vanilla extract - 1 teaspoon baking soda - Pinch of fine sea salt - 1 1/2 cups all-purpose flour - 1/2 cup walnuts or pecans, chopped coarse - 1/4 teaspoon ground cinnamon (optional for warmth) These ingredients create a soft, moist bread that everyone loves. The ripe bananas add natural sweetness and flavor. Coconut oil keeps the bread rich and tender. Brown sugar enhances the taste while adding a nice color. Feel free to add or swap ingredients, like using a different nut or leaving them out if you prefer. You can check the Full Recipe for detailed steps. Enjoy the process and have fun baking! - Preheat your oven to 350°F (175°C). This is key for even baking. - Prepare a 9x5 inch loaf pan by greasing it lightly with oil. You can also use parchment paper for easy removal. - In a large bowl, combine the well-mashed bananas with the melted coconut oil. Stir until smooth. - Add the packed brown sugar to the banana mix. Stir well to blend it in. - Next, add the beaten egg and vanilla extract. Mix until everything is combined. - Sprinkle the baking soda and salt into the mixture. Be sure to mix it evenly. - Gradually sift in the all-purpose flour, folding it gently. Be careful not to overmix; a few lumps are okay. - Fold in the chopped walnuts or pecans for crunch. You can also add ground cinnamon for warmth. - Carefully pour the batter into your prepared loaf pan. Smooth the top with a spatula for even baking. For the complete recipe, check out the [Full Recipe]. To make banana bread with the right texture, avoid overmixing. When you mix too much, the bread becomes tough. Mix just until everything is combined. You want some lumps in the batter for the best result. Ripe bananas are key. The darker the banana, the sweeter and softer it becomes. They add moisture and flavor that make your bread delicious. Aim for bananas with lots of brown spots. Knowing when the bread is done can be tricky. Stick a toothpick in the center. If it comes out clean or with a few moist crumbs, it’s ready. If you see wet batter, give it more time. To cool your bread, use a wire rack. This method lets air flow around it. Avoid cooling it in the pan for too long. Otherwise, the bottom can become soggy. When serving, slice the banana bread slightly warm. A pat of butter on top adds richness. You can also toast the slices for extra flavor. For garnish, sprinkle some chopped nuts on top. This not only looks nice but also adds a nice crunch. For the full recipe, check the link provided. {{image_4}} You can easily make a nut-free banana bread. Just replace nuts with seeds. Sunflower seeds or pumpkin seeds work great. They add crunch and flavor without the nuts. This swap keeps the bread safe for those with nut allergies. Plus, it’s still tasty! Want to jazz up your banana bread? Adding chocolate chips is a fun idea. They melt and create gooey pockets of chocolate. You can also try different spices. A touch of nutmeg or cardamom can change the flavor. These spices add warmth and depth. Experiment and find your favorite mix! If you need a gluten-free option, use almond flour or oat flour. These flours make the bread light and fluffy. You can also mix gluten-free all-purpose flour with xanthan gum. This helps mimic the texture of regular flour. Just swap the all-purpose flour in the Full Recipe. Enjoy your gluten-free treat! To keep your banana bread fresh, I suggest wrapping it in plastic wrap. Store it at room temperature. This will keep the bread soft for about three days. If you want to keep it longer, place it in an airtight container. This helps prevent it from drying out. If you want to save banana bread for later, freezing is great. First, let it cool completely. Then, wrap the loaf tightly in plastic wrap. For extra protection, place it in a freezer bag. This way, it can last up to three months. When you're ready to eat it, just thaw it in the fridge overnight. To enjoy leftover banana bread, slice it first. You can reheat slices in the microwave for about 10 to 15 seconds. For a crispy crust, toast the slices in a toaster or oven. This warms them up and adds a nice crunch. Serve with butter or your favorite spread for a tasty snack. For the full recipe, check out the deliciously nutty banana bread details above. To make banana bread moist, use ripe bananas. They add natural sweetness and moisture. Use the right amount of coconut oil, about 1/3 cup. This helps keep the bread soft. Avoid overbaking; check at 50 minutes. If a toothpick comes out clean, it’s done. Yes, you can use frozen bananas! Thaw them overnight in the fridge. You can also microwave them for a few seconds. Once thawed, mash them well. They are just as tasty in banana bread. For a vegan option, use flaxseed meal or chia seeds. Mix 1 tablespoon of either with 3 tablespoons of water. Let it sit for a few minutes until it thickens. You can also use applesauce. A quarter cup works well to replace one egg. Banana bread lasts about 3 to 4 days at room temperature. Store it in an airtight container to keep it fresh. If you want it to last longer, freeze it. It stays good for about 2 to 3 months in the freezer. Yes, you can double the recipe easily! Just use double the ingredients listed in the Full Recipe. Use two loaf pans or one large pan. Adjust the baking time; it may need a bit longer to cook through. Check it with a toothpick to be sure! This blog post covered the key steps to make delicious banana bread. We discussed the needed ingredients, including ripe bananas and coconut oil. You learned the mixing and baking process, as well as tips for texture and presentation. Variations let you customize your bread, and storage advice keeps it fresh. With these insights, you can bake a tasty loaf that everyone will love. Enjoy your baking adventure!

Classic Banana Bread Simple and Tasty Recipe

Banana bread is a classic comfort food that’s easy to make and always tasty. With just a few ripe bananas

To make tasty homemade granola bars, we need a few key ingredients: - 1 ½ cups rolled oats - ½ cup almond butter - ¼ cup honey or maple syrup These ingredients form the base of our bars. Rolled oats add texture and fiber. Nut butter gives protein and richness. Sweeteners like honey or maple syrup bind everything and add sweetness. You can customize your granola bars with fun extras. Here are some ideas: - Nuts and seeds (e.g., almonds, walnuts, sunflower seeds) - Dried fruits (e.g., cranberries, raisins) - Chocolate or other flavor enhancements Adding nuts and seeds gives crunch and healthy fats. Dried fruits provide natural sweetness and chewiness. If you want a treat, mix in some chocolate chips or cocoa powder for extra flavor. Try different combinations to find your favorite mix. You can also check the Full Recipe for more ideas. 1. Prepping the baking pan: Start by preheating your oven to 350°F (175°C). Grab an 8x8 inch baking pan. Line it with parchment paper, leaving some paper hanging over the edges. This will help you lift the bars out later. 2. Mixing dry ingredients: In a large bowl, add the rolled oats, chopped mixed nuts, sunflower seeds, dried cranberries, and a pinch of salt. Mix them well. This step is key. You want the dry ingredients to blend nicely. 3. Preparing the wet mixture and combining: On low heat, warm the almond butter and honey (or maple syrup) in a small saucepan. Stir it gently until it turns smooth. Once it's ready, remove it from the heat and add the vanilla extract. Pour this warm mixture over the dry ingredients. Stir until everything is coated well. If you like chocolate, fold in the dark chocolate chips here for added fun! 1. Baking time and temperature: Transfer your mixture into the lined baking pan. Use a spatula to press it down firmly and evenly. This is important for the bars to hold together. Place the pan in your preheated oven. Bake for about 15 to 20 minutes. You want the edges to turn a nice golden brown. 2. Cooling the bars before slicing: Once baked, let the granola bars cool in the pan for about 10 minutes. Carefully lift them out by the parchment paper. Set them on a wire rack to cool completely. This cooling step is critical. It helps the bars firm up before you slice them into pieces. Make sure to check out the Full Recipe for more details! Enjoy your homemade granola bars! To make sure your granola bars hold together, you need to press the mixture firmly into the pan. This helps all the ingredients stick as they bake. Look for a golden brown color at the edges when they are done. They should be firm but not too hard. If they are too soft, they may fall apart. You can easily make these granola bars vegan. Just swap honey for maple syrup. For gluten-free options, use gluten-free oats and check all your ingredients. This way, you can enjoy a tasty snack that fits your diet. Remember, the key is to have fun and be creative with your mix-ins! {{image_4}} You can easily change the flavor of your granola bars. Try adding spices like cinnamon or nutmeg. These spices bring warmth and depth, making each bite special. If you want something different, consider savory options. Herb granola bars with rosemary or thyme can surprise your taste buds. This twist makes them perfect for a snack or light meal. The texture of your granola bars can also change how they taste. You can make chewy bars by using more nut butter or honey. For crunchier bars, use less wet ingredients and add crispy rice. Puffed grains add airiness and a fun crunch. Mixing in your favorite nuts or seeds can also change the texture. You might try using chia seeds for a unique bite. These variations let you personalize your granola bars. The full recipe gives you the perfect base to start experimenting. To keep your homemade granola bars fresh, use airtight containers. These containers block air, which helps prevent the bars from becoming stale. You can also wrap them in parchment paper. This method keeps them neat and easy to grab. If you choose to wrap them, make sure to cover them tightly. This way, they stay fresh longer. For best results, store your bars in a cool, dry place. They can last about one week at room temperature. If you want to keep them longer, consider freezing. Freezing granola bars is a smart way to keep them fresh for months. To freeze them, first cut the bars into squares or rectangles. Then wrap each bar in plastic wrap or foil. After that, place the wrapped bars in a freezer-safe bag. Be sure to remove as much air as possible to avoid freezer burn. When you're ready to eat a bar, simply take it out of the freezer. Let it thaw at room temperature for about 30 minutes. For a quicker option, you can microwave it for a few seconds. This will help keep the flavor and texture just right, so you can enjoy your homemade granola bars anytime! How can I make these granola bars healthier? You can swap almond butter for peanut butter or use less sweetener. Add in more seeds or nuts for extra protein. Consider using whole grain oats instead of processed oats to boost fiber. You can even replace part of the sweetener with mashed bananas or applesauce for natural sweetness. Can I substitute ingredients based on allergies? Yes! If you are allergic to nuts, use sunflower seed butter. You can also use pumpkin seeds instead of nuts. Substitute honey with agave syrup if you need a vegan option. Just keep the ratios similar to ensure good texture. How long do homemade granola bars last? These granola bars stay fresh for about a week at room temperature. Store them in an airtight container. For longer storage, they can last up to three months in the freezer. Make sure to wrap them well to avoid freezer burn. What’s the best way to cut granola bars without crumbling? To cut granola bars without crumbling, let them cool completely. Use a sharp knife and cut them in one smooth motion. You can also warm the knife slightly to help it glide through the bars more easily. What is the nutritional value of homemade granola bars? Homemade granola bars are rich in fiber, protein, and healthy fats. They can provide a balanced energy boost. Each bar typically has around 150-200 calories, depending on the ingredients used. Check specific ingredients for exact values. Are homemade granola bars cost-effective compared to store-bought? Yes, making homemade granola bars is usually cheaper than buying them. Store-bought bars can cost up to $2 each. By making your own, you can spend less than $1 per bar, especially if you buy ingredients in bulk. Can I make granola bars without baking? Absolutely! You can make no-bake granola bars by combining the ingredients and pressing them into a pan. Chill in the refrigerator until firm. This method is quick and easy, perfect for hot days when you want to avoid the oven. Check the Full Recipe for guidance on both methods. Making homemade granola bars is simple and fun. You learned about key ingredients like oats, nut butter, and sweeteners. We explored how to mix and bake for perfect bars. Tips on storage and variations let you customize your snacks. Overall, these bars are nutritious, tasty, and easy to adapt. Now, you can create delicious granola bars that fit your taste and needs. Enjoy trying new flavors and sharing your creations!

Homemade Granola Bars Nutritious and Simple Recipe

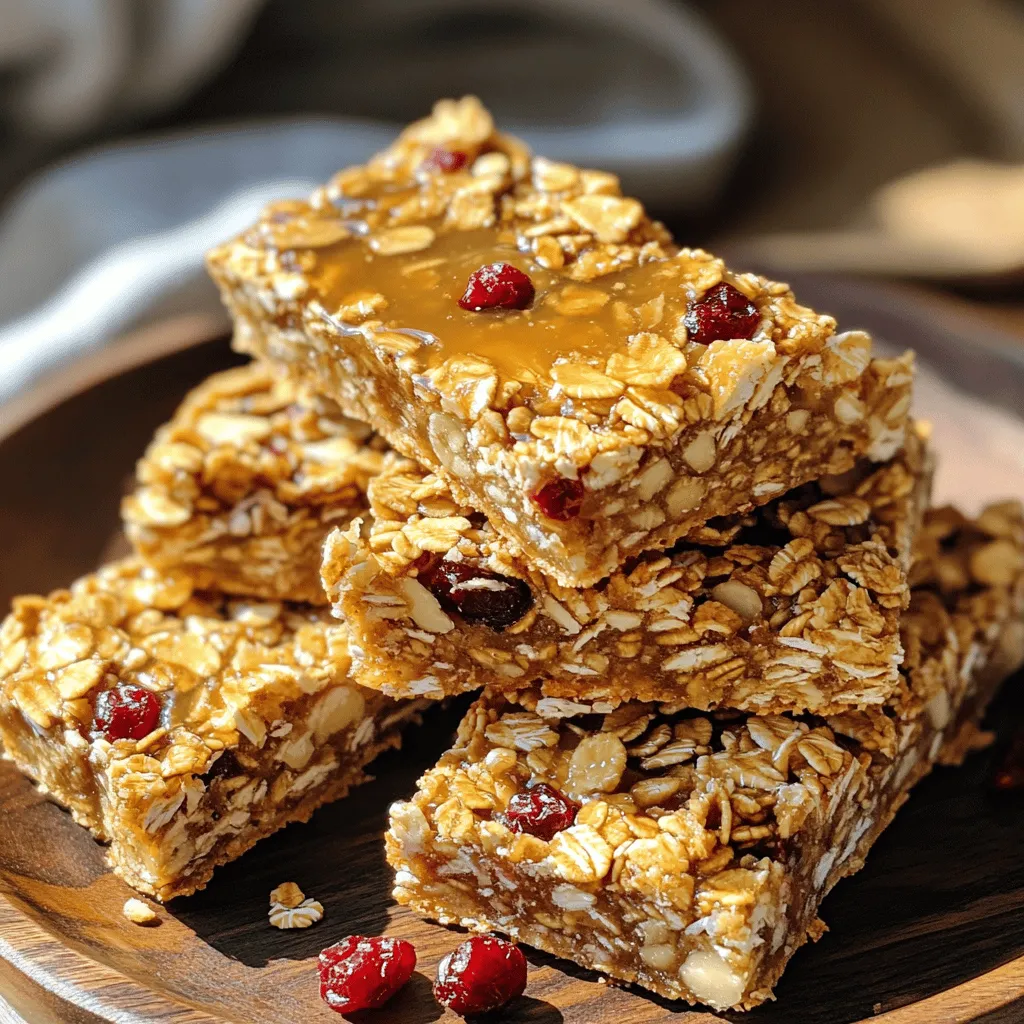
Looking for a healthy snack that’s easy to make? Homemade granola bars are the perfect solution! With simple ingredients and

To make delicious Parmesan crusted zucchini chips, you need simple ingredients. Here’s the list: - Zucchini and its preparation - 2 medium zucchinis, sliced into thin rounds - Seasoning details - 1 teaspoon garlic powder - 1 teaspoon onion powder - 1 teaspoon dried oregano - 1/2 teaspoon salt - 1/2 teaspoon black pepper - Coating components - 1 cup grated Parmesan cheese - 1 cup breadcrumbs (panko preferred for extra crunch) - 2 large eggs, beaten - Olive oil spray Zucchini is a great base for this recipe. It has a mild taste, so it absorbs flavors well. The Parmesan cheese adds a rich, savory kick. The breadcrumbs, especially panko, create a crispy texture that makes these chips irresistible. The spices, like garlic and oregano, add depth. They make each bite burst with flavor. Using fresh eggs helps the coating stick well to the zucchini. Finally, a light spray of olive oil ensures a golden finish. For the full recipe, check out the detailed steps to create these tasty snacks! Start by setting your oven to 425°F (220°C). This temperature is key for getting that perfect crunch. While it heats, line a baking sheet with parchment paper to make cleanup simple. This step helps the chips not stick and keeps them crispy. In a shallow bowl, mix 1 cup of grated Parmesan cheese and 1 cup of breadcrumbs. I like using panko for extra crunch. Add 1 teaspoon each of garlic powder, onion powder, and dried oregano. Don’t forget 1/2 teaspoon of salt and pepper. Stir everything together until it’s well blended. This mix adds flavor to your chips. Take a zucchini slice and dip it into the beaten eggs first. Make sure it gets fully coated. Then, move it to the breadcrumb mix. Press down gently so the coating sticks well. This step is important for even coverage and great taste. Place the coated zucchini chips in a single layer on your baking sheet. For a crispy finish, lightly spray the tops with olive oil. Bake them in the preheated oven for about 15-20 minutes. Keep an eye on them. You want them golden brown and crunchy. After baking, let the chips cool for a few minutes. This helps the flavors settle and keeps them from burning your mouth. Serve them on a bright platter. Pair with marinara sauce or a creamy yogurt dip for extra flavor. You can even add fresh herbs like parsley or basil for a lovely touch. Check out the full recipe if you want to dive deeper into each step! For the best crunch, use panko breadcrumbs. They help create a light and airy texture. When you bake, make sure to lay the zucchini chips flat in a single layer. Avoid crowding them on the baking sheet. This allows hot air to circulate, leading to even cooking. Lightly spray the tops with olive oil to boost crispiness. To take your zucchini chips up a notch, try adding a pinch of paprika or cayenne pepper. These spices can give a nice kick. You might also consider fresh herbs like thyme or rosemary for a fragrant touch. These flavors pair well with Parmesan, making your chips even more delicious. For dipping, I recommend marinara sauce or a cool yogurt dip. Both add a nice contrast to the crispy chips. To make your dish look great, serve the chips on a colorful platter. Sprinkle fresh herbs on top for a pop of color. This not only makes the dish eye-catching but also enhances the flavors. You can find the full recipe for Parmesan Crusted Zucchini Chips in the article. {{image_4}} You can change the flavor by using other cheeses. Some good options are cheddar, mozzarella, or goat cheese. Each cheese brings its own taste. If you use a stronger cheese like cheddar, reduce the amount slightly. Aim for about three-quarters of a cup instead of one cup. This keeps the flavor balanced and tasty. To make this dish gluten-free, swap regular breadcrumbs for gluten-free ones. Look for brands made from rice or corn. These options still give a nice crunch. If you need an egg substitute, use a mix of ground flaxseed and water. Mix one tablespoon of flaxseed with two and a half tablespoons of water. Let it sit for a few minutes until it thickens. Try different herbs and spices to change the taste. You can use paprika for a smoky flavor or Italian herbs for a classic twist. A mix of rosemary and thyme adds a lovely aroma. Feel free to get creative! Combining several seasonings can also make a unique flavor profile. Just remember to keep it balanced so no one spice overpowers the others. To keep your Parmesan crusted zucchini chips fresh, store them in an airtight container. This helps to lock in flavor and crispness. Use a container that is not too big, so the chips do not move around too much. If possible, place a paper towel inside to absorb any moisture. This keeps the chips from getting soggy. To reheat your zucchini chips, use an oven or an air fryer. Preheat your oven to 375°F (190°C) for the best results. Place the chips on a baking sheet and heat for about 5-7 minutes. This method helps them regain their crunchy texture. If using an air fryer, set it to 350°F (175°C) and heat for 3-5 minutes. Enjoy your chips crispy, just like when they were fresh! Yes, you can use other veggies! Eggplant, sweet potatoes, and carrots work great. Slice them thin, just like zucchini. Each veggie brings its own flavor. You might need to adjust cooking times. Keep an eye on them while baking. To keep your chips crispy, follow these tips: - Pat the zucchini dry with paper towels. This removes extra moisture. - Use panko breadcrumbs for extra crunch. They are lighter and crispier than regular ones. - Bake at a high temperature. This helps them crisp up faster. - Avoid overcrowding the baking sheet. Give them space to breathe. These chips pair well with many snacks and meals: - Serve with marinara sauce for dipping. The tangy flavor complements the chips. - Try a creamy yogurt dip. It adds a cool touch. - They make a great side for grilled meats. The crunch contrasts well with juicy dishes. - Enjoy them alone as a healthy snack! To add heat, try these ideas: - Mix some cayenne pepper into the breadcrumb mixture. Start with a small amount. - Use spicy cheese instead of regular Parmesan. Pepper jack is great. - Add red pepper flakes for a kick. Sprinkle them on before baking. Yes, this recipe is perfect for meal prep! Here are some tips: - Bake a big batch and store them in an airtight container. - Keep them in the fridge for up to three days. - Reheat in the oven to regain crispiness. Use 350°F (175°C) for about 10 minutes. - You can also freeze them. Just make sure they cool first. This blog post showed how to make tasty Parmesan Crusted Zucchini Chips. We covered ingredients, prep steps, tips for crispiness, and variations to try. You now have the tools to create exciting snacks that fit your taste. Experiment with different spices and veggies to make the recipe your own. With the right techniques, you can enjoy perfect chips every time. Remember, cooking is about fun and creativity—so let your imagination shine!

Parmesan Crusted Zucchini Chips Flavorful Snack Idea

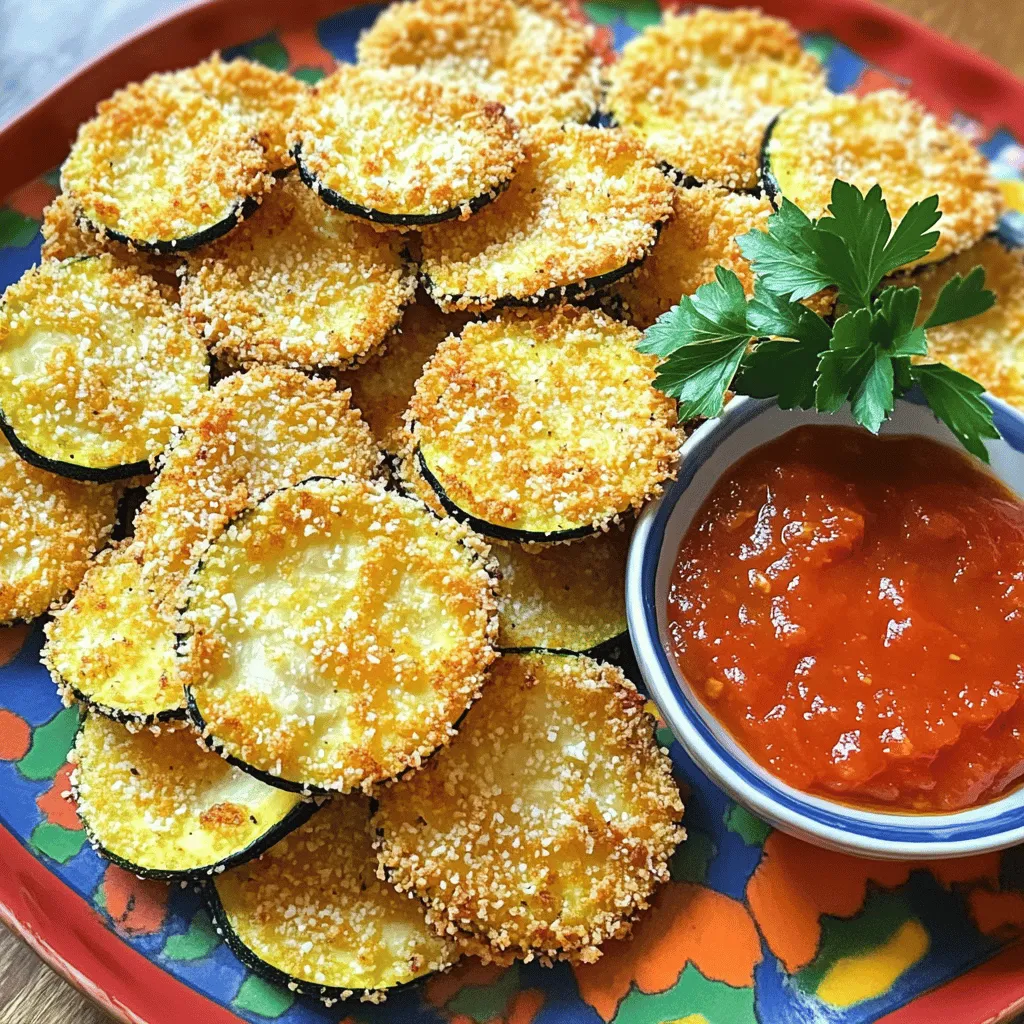
Are you ready for a snack that’s both tasty and healthy? Parmesan Crusted Zucchini Chips offer the perfect crunch with

- 4 large ripe peaches, peeled and sliced - 1 tablespoon fresh lemon juice - 1/4 cup packed brown sugar - 1 teaspoon ground cinnamon - 1 cup rolled oats - 1/2 cup all-purpose flour (or whole wheat flour) - 1/3 cup granulated sugar - 1/2 cup cold unsalted butter, cut into small cubes - 1/2 cup chopped nuts (optional) - Pinch of salt The key to a great peach crisp is using ripe peaches. Fresh peaches make the dish sweet and juicy. Each ingredient works together to create that perfect balance of flavors. The lemon juice brightens the peaches. Brown sugar adds depth, while cinnamon gives warmth. Oats, flour, and butter combine to make a wonderful topping. If you want some crunch, add chopped nuts. They give your crisp extra texture. Don't skip the pinch of salt. It enhances the sweetness of the dish. For the full recipe, you can check out [Full Recipe]. Remember, the best desserts come from fresh ingredients! First, we need to prepare the star of our dish: the peaches. Start by peeling and slicing four large ripe peaches. In a big mixing bowl, toss the sliced peaches with a tablespoon of fresh lemon juice and a quarter cup of packed brown sugar. This mix helps to bring out the sweet flavor of the peaches while balancing their natural tartness. Once the peaches are well-coated, gently arrange them in a greased 8x8-inch baking dish. Spread the peach mixture evenly across the bottom so each bite is filled with flavor. Next, let’s make the crisp topping. In a separate bowl, combine one cup of rolled oats, half a cup of all-purpose flour, one-third cup of granulated sugar, and a pinch of salt. Mix these dry ingredients well. Then, add half a cup of cold unsalted butter, cut into small cubes. Using your fingers or a pastry cutter, blend the butter into the dry mix until it resembles coarse crumbs. If you want a nutty crunch, fold in half a cup of chopped nuts like walnuts or pecans at this stage for extra flavor and texture. Now it’s time to bake! Evenly sprinkle the oat and butter mixture over the peaches in the baking dish. Make sure to cover all the peaches so they stay moist and flavorful. Preheat your oven to 350°F (175°C) and then place the baking dish inside. Bake for 30 to 35 minutes. You’ll know it’s done when the topping is golden brown and the peaches are bubbling around the edges. Once baked, let it cool for about ten minutes before serving. This gives the flavors a chance to meld together beautifully. Check out the Full Recipe for more details! When selecting peaches, look for firmness and ripeness. Ripe peaches should yield slightly to gentle pressure. Their skin should be a warm yellow or golden hue, with a sweet aroma. Avoid peaches that are too soft or have blemishes. I suggest visiting your local farmer's market for the freshest options. You'll often find peaches that taste far better than store-bought ones. To boost flavor, consider adding a splash of vanilla extract or a sprinkle of spices. Cinnamon is a classic choice, but nutmeg can also add depth. Think about layering other fruits like blueberries or raspberries. These can add a fun twist and a pop of color. Mixing fruits can create a unique taste that excites the palate. For a crispy topping, watch your baking time closely. If you want a little extra crunch, try broiling the crisp for the last few minutes. Just keep an eye on it to prevent burning. You can also adjust the baking time if the topping looks pale. A golden brown color means it's perfectly done. {{image_4}} You can easily switch peaches for other fruits. Apples work well in this crisp. Just peel and slice them like you do with peaches. Berries, such as blueberries or raspberries, add a fun twist. You can also mix several fruits together for a tasty blend. Each fruit brings a unique flavor, making your crisp special every time. If you want a healthier version, consider using less sugar. You can replace brown sugar with a sugar substitute, like stevia or monk fruit. For a gluten-free option, swap all-purpose flour with almond flour or a gluten-free blend. These changes keep your dessert delicious while fitting into a healthier diet. To make your crisp even better, try adding different nuts or spices. Walnuts and almonds give a nice crunch. You can also mix in spices like nutmeg or cardamom for extra flavor. Don’t be afraid to get creative. Every change adds new layers of taste to your peach crisp. For the full recipe, check out the Peachy Paradise Crisp section where all the details await. To keep your leftover peach crisp fresh, let it cool completely. Place it in an airtight container. You can also cover it tightly with plastic wrap. Store it in the fridge. It will stay good for up to three days. For best taste, eat it within the first two days. When you want to enjoy the crisp again, preheat your oven to 350°F (175°C). Place the crisp in an oven-safe dish. Heat it for about 10-15 minutes. This method keeps the topping crispy. If you use a microwave, heat it for short bursts. This may soften the topping, so be careful. If you want to freeze your peach crisp, follow these steps: 1. Let it cool completely before freezing. 2. Cut the crisp into serving sizes for easier thawing. 3. Wrap each piece in plastic wrap or foil. 4. Place the wrapped pieces in a freezer-safe bag or container. 5. Label the bag with the date. Your crisp can last up to three months in the freezer. To thaw, move it to the fridge overnight. Reheat it in the oven for a crispy finish. Enjoy it just like fresh! If you want the full recipe, check out the complete guide to make this delightful dessert. Easy Peach Crisp takes about 15 minutes to prep. You will then bake it for 30 to 35 minutes. In total, you need around 45 minutes from start to finish. This makes it perfect for a quick dessert. Yes, you can use frozen peaches. Just thaw them before mixing with lemon juice and sugar. Drain any extra liquid to keep your crisp from getting soggy. Frozen peaches work well and save time. Peach crisp tastes great with many toppings. I suggest serving it warm with vanilla ice cream or whipped cream. You can also add a sprinkle of cinnamon or a drizzle of caramel for extra flavor. The crisp is done when the topping is golden brown. You should see the peaches bubbling at the edges. If you poke the topping, it should feel firm but crumbly. This means it is perfectly baked and ready to enjoy! You can create a delicious peach crisp with the right ingredients and steps. Start by mixing ripe peaches with lemon juice and brown sugar. Top them with a crunchy blend of oats, flour, and cold butter. Remember to pick the best peaches for fuller flavor. You can also try different fruits or make it healthier if needed. Store leftovers properly to enjoy later. With these tips in mind, you can craft a tasty treat that will please anyone. Enjoy your baking journey!

Easy Peach Crisp Simple and Delicious Dessert Treat

If you’re looking for a tasty and simple dessert, Easy Peach Crisp is the answer. Juicy peaches, a warm, buttery

- 2 large red onions, thinly sliced - 1 cup apple cider vinegar - 1/2 cup water - 1 tablespoon granulated sugar - 1 teaspoon sea salt - 1 tablespoon mustard seeds - 1/2 teaspoon whole black peppercorns - 1/4 teaspoon crushed red pepper flakes (optional, for heat) - Fresh herbs (such as dill or thyme), to enhance flavor (optional) If you want to change the flavor, you can use white vinegar or rice vinegar instead of apple cider vinegar. Both will give a different taste but still work well. You can also try using yellow or sweet onions. They will change the sweetness of the pickles. Using fresh ingredients makes a big difference in flavor. Fresh red onions taste crisp and bright, while old ones can taste bitter or mushy. Look for onions that feel firm and have smooth, dry skins. You can find great produce at local farmer's markets or trusted grocery stores. Buying local helps support your community and gets you the best taste! To start, peel the red onions. Use a sharp knife to cut off the ends first. Then, make a shallow cut down the side. This helps remove the skin easily. Next, slice the onions thinly. Aim for 1/8 inch thick slices. You can use a knife or a mandoline. A mandoline offers even cuts, which helps with pickling. Now, let’s cook the pickling liquid. In a medium saucepan, mix together the apple cider vinegar, water, sugar, sea salt, mustard seeds, and whole black peppercorns. If you like heat, add crushed red pepper flakes. Place the saucepan over medium heat. Bring this mixture to a gentle simmer. Stir it occasionally until the sugar and salt dissolve. Simmering enhances the flavor by marrying the ingredients. Once simmered, remove the pot from heat. Let the mixture cool for about five minutes. Take a clean glass jar with a tight lid. Pack the sliced onions into the jar, leaving an inch at the top. Carefully pour the warm pickling liquid over the onions. Ensure all slices are submerged. If you want, add fresh herbs on top. Allow the jar to cool to room temperature. Seal it tightly and place it in the fridge. Let the onions pickle for at least one hour for a quick taste. For the best flavor, let them sit for 24 hours. These zesty pink pickled onions will last up to two weeks in the fridge. For the full recipe, refer to the earlier section. To boost the taste of your pickled red onions, think about adding herbs and spices. I love using fresh dill or thyme because they add a nice touch. You can also try mustard seeds, which give a nice crunch. For a unique twist, explore different vinegar types. You can use red wine vinegar for a richer flavor or rice vinegar for a milder taste. This choice can change the whole dish! Slice thickness is key for pickled onions. Aim for 1/8 inch thick slices. This helps them soak up the brine evenly. If they are too thick, they might not pickle well. After slicing, pack them tightly in your jar. This ensures every piece gets pickled. A clean jar with a tight lid also helps keep your onions fresh and flavorful. If you plan to make a lot of pickled onions, prep them in batches. You can slice several onions at once and store them in the fridge. This makes it quick to pickle whenever you want. For the pickling liquid, heat it in a microwave. Mix your vinegar, water, sugar, and spices in a bowl, then zap it for a minute or two. This saves time and gets the sugar dissolved fast. For the full recipe, check out the section above! {{image_4}} To make spicy pickled onions, add more peppers or spices. You can mix in jalapeños or serranos for a kick. If you want mild heat, try adding just a pinch of crushed red pepper flakes. For a medium level, use one chopped jalapeño. For more heat, add two or three! Adjust the spice to match your taste. You can enhance your pickled onions by adding fruits like mango or pineapple. These fruits add a sweet twist. Start with a small amount, about 1/2 cup, and adjust to your liking. If you add fruits, consider reducing the sugar. This balance keeps your sweet and tangy flavors just right. Using different vinegar types can change the flavor of your pickled onions. Rice vinegar gives a milder taste, while white vinegar can be sharper. Each vinegar brings a new twist to the dish. Try mixing apple cider and rice vinegar for a unique taste. Experiment to find your favorite blend! For the full recipe, check out the Zesty Pink Pickled Onions. To keep your pickled red onions fresh, store them in the fridge. Use a clean glass jar with a tight lid. Glass is best because it doesn’t absorb flavors. Make sure to fill the jar to the top with liquid. This keeps the onions submerged and safe from air. Pickled red onions last about two weeks in the fridge. After this time, they may start to lose their crunch. Watch for signs of spoilage, like a change in color or smell. If the onions feel slimy or smell off, it is best to throw them away. You can reuse the pickling liquid for new batches of onions. Just strain it and heat it again before using. You can also try pickling other veggies, like cucumbers or carrots, in the same liquid. This way, you create new flavors with the same base. For the full recipe, check out the Zesty Pink Pickled Onions. To pickle red onions, you need at least one hour. This quick method gives a nice tang. For a stronger flavor, let them sit for 24 hours. The longer they soak, the more the flavor develops. If you want them crispy, check them after an hour. For soft and tangy, wait a day. Yes, you can can pickled onions. However, it is crucial to follow safe canning practices. Use sterilized jars and lids to prevent spoilage. Make sure to process them in a boiling water bath. This step helps kill any bacteria. Always check for seals before storing. If a lid pops up, the jar is not sealed. Store sealed jars in a cool, dark place. Pickled red onions are quite healthy. They are low in calories and high in flavor. Onions contain antioxidants which support heart health. They also have fiber, which is good for digestion. The vinegar can help with blood sugar levels, too. Just watch the sugar in the recipe. For more health benefits, enjoy them on salads, tacos, or sandwiches. Check the full recipe for more tips on using them! Pickling red onions is simple and rewarding. We covered the key ingredients like red onions and apple cider vinegar. Homemade pickles enhance meals with unique flavors. Remember, fresh ingredients matter for the best taste. You can customize recipes and explore variations, like spicy or sweet versions. Proper storage extends shelf life, and reusing pickling liquid brings new life to your creations. Enjoy your pickling journey; it’s fun and adds freshness to your meals!

Homemade Pickled Red Onions Tangy and Tasty Delight

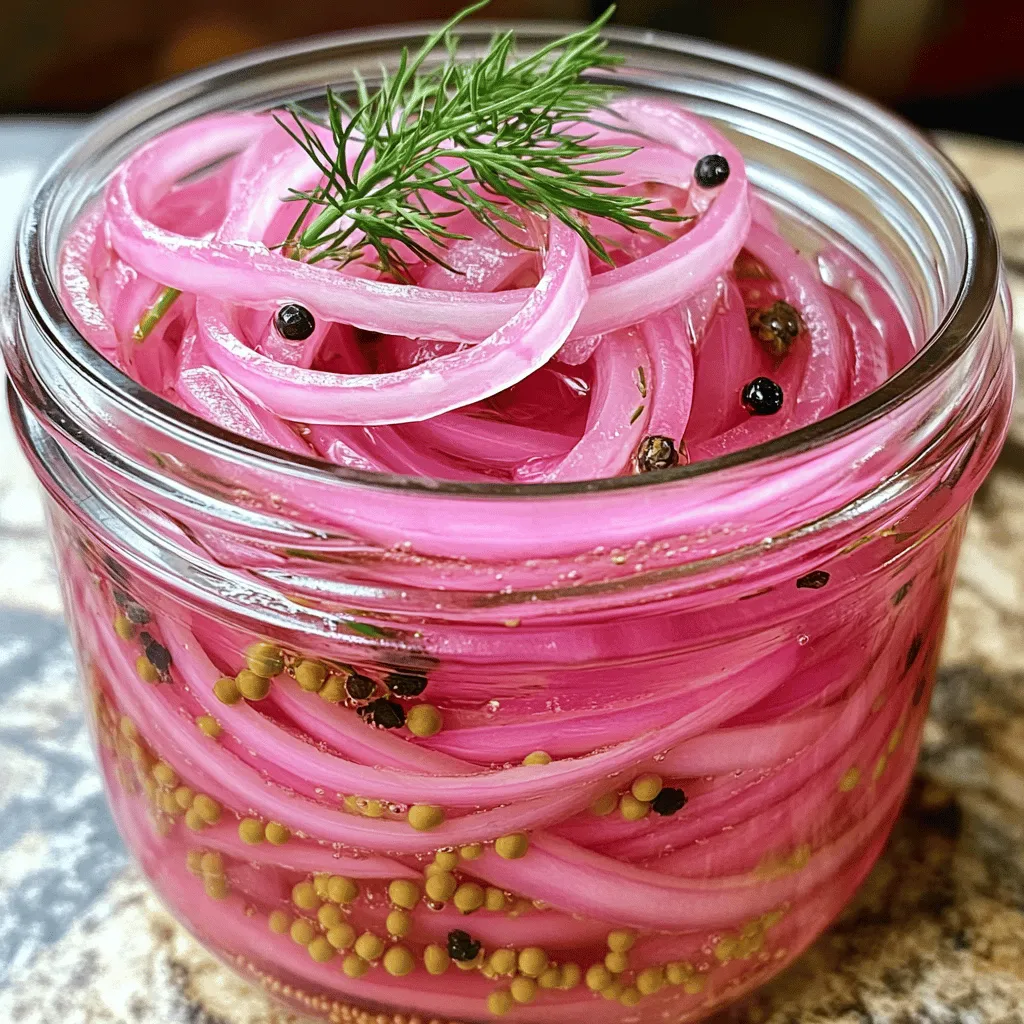
Are you ready to elevate your meals with the perfect tangy crunch? Homemade pickled red onions are a simple and

- 1 ½ cups graham cracker crumbs - ½ cup unsalted butter, melted - 2 cups cream cheese, softened to room temperature - 1 cup powdered sugar - 1 teaspoon pure vanilla extract - 1 cup heavy whipping cream - 2 cups fresh peaches, pitted and sliced - ½ teaspoon ground cinnamon - Fresh mint leaves for garnish (optional) When measuring ingredients, use dry measuring cups for solids. For liquids, use liquid measuring cups. Make sure to level off dry ingredients with a knife for accuracy. This helps ensure your cheesecake turns out great. If you are unsure, double-check your amounts. A few extra grams can change the result. Use fresh peaches for the best flavor. Choose ripe peaches that are firm yet slightly soft to the touch. For cream cheese, look for full-fat options; they yield a richer taste. The same goes for heavy cream; full-fat cream gives a better texture. Using quality ingredients makes a big difference in taste. Always opt for unsalted butter to control the salt in your dish. A great cheesecake starts with the right base! To start, gather your graham cracker crumbs and melted butter. In a medium bowl, combine the two. Mix until all the crumbs are coated. The texture should feel like wet sand. Next, take a 9-inch springform pan. Press the crumb mix firmly into the bottom. Aim for an even layer. After that, place the pan in the fridge to chill while you make the filling. Now for the filling! Grab a large mixing bowl and your softened cream cheese. Using an electric mixer, beat the cream cheese until smooth. You want it creamy, with no lumps left. Slowly add the powdered sugar and vanilla extract. Keep mixing until the blend is silky and well combined. In another bowl, pour in the heavy whipping cream. Whip it on high speed until soft peaks form. This usually takes a few minutes. Carefully fold the whipped cream into the cream cheese mix with a spatula. Be gentle to keep the mixture light and airy. With the crust chilled, it’s time to assemble! Spoon the filling onto the crust. Use a spatula to smooth out the top. Now, take your fresh peaches. Toss them in a small bowl with ground cinnamon. Once coated, arrange the peaches on top of the cheesecake filling. This adds a lovely touch. Cover the cheesecake with plastic wrap. Place it in the fridge for at least four hours. For the best results, chill it overnight. This allows the flavors to meld and the cheesecake to set properly. If you want a perfect slice, run a knife around the pan edges before releasing the springform. Enjoy your creation! To avoid lumps in your cheesecake filling, start with soft cream cheese. Let it sit out for about 30 minutes. This step helps make mixing easy. Use an electric mixer on medium speed to blend it well. Add powdered sugar slowly while mixing. This method helps create a creamy texture. Fold in whipped cream gently to keep it light. For a lovely touch, garnish your cheesecake with fresh mint leaves. You can also add sliced peaches on top. A drizzle of honey or caramel enhances the flavor. If you want a bit of crunch, sprinkle crushed graham crackers over the top. Serve each slice on a colorful plate for a nice presentation. One common mistake is using cold cream cheese, which can lead to lumps. Always soften your cream cheese first. For the crust, press the crumbs firmly. This creates a solid base that won't crumble when you cut the cheesecake. Lastly, be patient when setting the cheesecake; chilling it for at least four hours is key. This ensures it firms up nicely. {{image_4}} You can switch up the fruit on your cheesecake. While peaches are great, try using berries or mango. Berries add bright color and tartness. Strawberries, blueberries, or raspberries work well. Mango brings a sweet and tropical vibe. Just slice them thin and arrange them on top. Want to give your cheesecake a twist? Add some spices or extracts. A pinch of nutmeg or a dash of almond extract can change the taste. Try adding lemon zest for a fresh kick. These small changes can make a big difference in flavor. If you need a gluten-free treat, it’s easy to adapt this recipe. Use gluten-free graham crackers for the crust. Check the labels to ensure they are truly gluten-free. The rest of the ingredients are gluten-free, so you’re all set! Enjoy your cheesecake without worry. For the full recipe, visit the [Full Recipe]. To keep your no bake peach cheesecake fresh, place it in the fridge. Use an airtight container, or cover it tightly with plastic wrap. This way, it stays moist and tasty. Make sure to keep it chilled at all times. If you have leftover slices, wrap each piece with plastic wrap. This helps lock in flavor and keeps it safe from odors. If you want to save some cheesecake for later, freezing is a great option. First, let the cheesecake set in the fridge for at least four hours. Once it’s firm, slice it into pieces. Wrap each slice tightly in plastic wrap, then place them in a freezer-safe bag. Make sure to remove as much air as possible. When you want to enjoy it again, just take a slice out and let it thaw in the fridge overnight. In the refrigerator, this delightful cheesecake will stay good for about 5 days. After that, it may lose its great taste and texture. If you freeze it, the cheesecake can last up to 2 months. But for the best flavor, try to eat it sooner. Enjoy every delightful bite of your no bake peach cheesecake! You can find the full recipe above. Yes, you can use canned peaches if fresh ones are not available. Choose peaches in light syrup or juice for the best taste. Drain them well to avoid excess moisture, which can make the cheesecake soggy. Slice them into smaller pieces for a better texture on top of the cheesecake. The cheesecake needs at least 4 hours to set in the fridge. For the best results, I suggest letting it chill overnight. This allows the flavors to meld and the texture to become firm. The longer it sits, the better it tastes! Yes, you can use mascarpone cheese or Greek yogurt as a substitute for cream cheese. Both options give a nice creaminess. However, the flavor will change slightly. If you want a vegan option, use a plant-based cream cheese. Slice the cheesecake into wedges and serve it chilled. You can add a sprig of fresh mint on top for a pop of color. A drizzle of peach syrup or honey can also enhance the flavor. Pair it with a scoop of vanilla ice cream for a treat! Yes, you can make a vegan version of this cheesecake. Use vegan cream cheese and coconut whipped cream in place of regular cream cheese and heavy cream. For the crust, use vegan butter or coconut oil. This way, everyone can enjoy this delicious dessert! For the complete recipe, check out the Full Recipe. This blog post shared a simple peach cheesecake recipe. You learned about the essential ingredients and tips for success. We detailed how to make the crust and filling, assemble, chill, and serve the cheesecake. Remember, using fresh ingredients and avoiding common mistakes are key. Whether you choose peaches or other fruits, this dessert is a win. Enjoy making it, sharing it, and savoring each slice. Happy baking!

No Bake Peach Cheesecake Delightful and Simple Treat

Are you craving a sweet, refreshing treat that’s easy to make? Look no further! My No Bake Peach Cheesecake is

Older posts
Newer posts
← Previous Page1 … Page42 Page43 Page44 … Page86 Next →

dsad

© 2026 yumymoments • Built with GeneratePress

Our Policies

  • Copyright Policy
  • Cookie Policy
  • GDPR Policy
  • Privacy Policy
  • Disclaimer
  • Terms Of Use

More Information

  • Home
  • About
  • Contact
  • Appetizers
  • Dessert
  • Dinner
  • Drinks
©2026, yumymoments About Back To Top