Skip to content
DisclaimerTerms Of UseGDPR PolicyCookie Policy

yumymoments

  • Home
  • Drinks
  • Appetizers
  • Dinner
  • Dessert
  • About
  • Contact
  • Privacy Policy
DisclaimerTerms Of UseGDPR PolicyCookie Policy

NO-ING-IMG

- 4 salmon fillets (approximately 6 oz each) - 2 lemons (one for thin slices, one for juicing) - 3 tablespoons extra virgin olive oil - 3 cloves garlic, finely minced - 1 teaspoon dried oregano - 1 teaspoon dried thyme - Salt and freshly ground pepper, to taste - 1 pound fresh asparagus, trimmed - Fresh parsley, chopped, for garnish In this dish, the salmon shines with its rich flavor. The lemons add brightness. The olive oil keeps everything moist and tasty. Fresh garlic brings a lovely aroma. Dried herbs like oregano and thyme enhance the flavor. The asparagus pairs well with the salmon. It adds a crisp texture and fresh taste. Fresh parsley gives a nice finish. It adds color and a hint of freshness. For the best taste, use quality ingredients. Fresh salmon and ripe lemons make a huge difference. You can find the full recipe [here]. First, preheat your oven to 400°F (200°C). This step is key for even cooking. Next, line a large sheet pan with parchment paper. This helps with cleanup and prevents sticking. In a small bowl, mix 3 tablespoons of olive oil, 3 minced garlic cloves, and the juice from one lemon. Add 1 teaspoon of dried oregano, 1 teaspoon of dried thyme, and sprinkle in some salt and pepper. Whisk until it smells great! Now, place the 4 salmon fillets on one half of the prepared sheet pan. Drizzle half of the olive oil mixture over the salmon. Make sure each fillet gets a good coating for the best flavor. On the other half, add 1 pound of trimmed asparagus in a single layer. Drizzle the rest of the olive oil mixture over the asparagus. Toss them gently so they are well coated too. Cut the second lemon into thin slices. Lay these lemon slices on top of the salmon fillets. This adds a fresh, zesty flavor as it bakes. Now, put the sheet pan in the oven and bake for about 12-15 minutes. The salmon is done when it flakes easily with a fork. The asparagus should be tender but still crisp. After baking, let the sheet pan cool for a few minutes. You can sprinkle fresh parsley on top for a nice finish. For the full recipe, check the details above! To achieve the ideal texture and flavor in your salmon, start with fresh fillets. Look for bright, shiny skin and a fresh smell. Use a high-quality extra virgin olive oil for the best taste. Drizzle it generously over the salmon before baking. This helps keep the fish moist and adds rich flavor. After baking, let your salmon rest for a few minutes. This step is crucial as it allows the juices to redistribute, ensuring every bite is tender and juicy. For perfect asparagus, choose thin, tender stalks. This will help them cook evenly. Arrange them in a single layer on the sheet pan. Too much crowding can steam them instead of roasting. Remember to keep them tender-crisp; they should snap when bent. If you want to switch things up, try other veggies. Broccoli, bell peppers, or zucchini work well. Each adds its unique taste and texture to the dish. Presentation makes a big difference. Serve the salmon and asparagus right on the sheet pan for a rustic look. Or, transfer them to individual plates for a more polished meal. Adding a lemon wedge on the side brightens the dish and adds a splash of color. Pair this meal with a light salad or roasted potatoes. A crisp white wine, like Sauvignon Blanc, complements the flavors perfectly. For a cozy touch, add some warm, crusty bread to soak up any leftover juices. This will make your meal even more delightful. For the full recipe, check out the details above. {{image_4}} You can change the flavor of your salmon easily. Try adding different herbs or spices. For example, dill or basil can give a fresh twist. You can also add a glaze or marinade. Sweet teriyaki or spicy chili sauce both taste great on salmon. Just brush them on before baking. Salmon pairs well with many different veggies. Broccoli, bell peppers, or zucchini are good choices. You can also use seasonal veggies like Brussels sprouts in the fall or green beans in the summer. These swaps keep your meal fresh and exciting! If you have dietary restrictions, don't worry! This dish is already gluten-free. For low-carb options, skip starchy sides. Instead, serve your salmon with a salad or sautéed greens. You can add nuts or seeds for extra crunch and healthy fats. To keep your leftovers fresh, store them in airtight containers. Place salmon and asparagus in separate containers to maintain texture. Make sure to cool the dish to room temperature before sealing. This helps prevent condensation and sogginess. For best taste, refrigerate within two hours of cooking. If you want to freeze them, wrap the salmon and asparagus tightly in plastic wrap, then place them in freezer bags. This will help keep them fresh for up to three months. When reheating salmon, the best method is the oven. Preheat your oven to 350°F (175°C). Place the salmon on a baking sheet and cover it with foil. This keeps it moist. Heat for about 10 minutes or until warmed through. For asparagus, you can use the microwave. Heat it in short bursts, stirring in between. Avoid overcooking, as this can make the asparagus mushy. A common mistake is reheating at too high a temperature, which can dry out the salmon. In the refrigerator, your cooked salmon and asparagus will last about three days. Make sure to check for any off smells or changes in color. If the salmon appears dull or the asparagus looks slimy, it’s best to toss them. Always trust your senses; if something seems off, don't eat it. Keeping track of how long your leftovers last helps you enjoy them at their best. The best internal temperature for salmon is 145°F (63°C). At this temperature, the salmon becomes flaky and moist. Use a meat thermometer to check the thickest part of the fillet. If it reads 145°F, your salmon is ready to eat! Yes, you can use frozen salmon. You need to thaw it first for even cooking. Place the frozen salmon in the fridge overnight or use the cold-water method. For the cold-water method, seal the salmon in a bag and submerge it in cold water for about an hour. This keeps the fish safe while it thaws. To prep ahead, marinate the salmon and store it in the fridge for up to two hours. You can also chop the asparagus and mix the olive oil with garlic and herbs in advance. Just keep everything in the fridge until you're ready to cook. This makes meal prep easy and fast! Yes, sheet pan cooking is very healthy! Cooking salmon with veggies keeps the meal balanced. Salmon is rich in omega-3 fatty acids, which are good for your heart. The asparagus adds fiber and vitamins. This method also uses less oil, making it a lighter option. Plus, it’s easy to clean up! This article covers how to make delicious Sheet Pan Lemon Salmon. You learned about the key ingredients, cooking tips, and ways to customize the dish. Remember, using fresh ingredients like salmon and asparagus enhances flavor and health benefits. Follow the steps to achieve a perfect meal. Store leftovers correctly to enjoy again later. With these insights, you'll impress everyone at your dinner table. Happy cooking!

Sheet Pan Lemon Salmon Simple and Flavorful Dish

Looking for a quick, tasty meal? This Sheet Pan Lemon Salmon dish is your answer! With fresh salmon, bright lemon,

- 1 pound ground beef or turkey - 1 medium onion, finely chopped - 2 cloves garlic, minced - 1 bell pepper, diced - 2 tablespoons taco seasoning - 1 (14.5 oz) can diced tomatoes with green chilies - 2 cups low-sodium chicken or vegetable broth - 8 oz pasta (penne, rotini, or your favorite shape) - 1 cup corn (frozen or canned) - 1 cup black beans (rinsed and drained) - 1 cup shredded cheese (cheddar, Monterey Jack, or Mexican blend) - Olive oil, salt, pepper, fresh cilantro, sour cream To make the One Pot Taco Pasta, gather all the listed ingredients. Each one plays a key role in creating rich flavors. The ground meat adds protein. The onion and garlic build a tasty base. The bell pepper adds crunch and color. Taco seasoning gives it that classic taste. You can find canned tomatoes with green chilies in your grocery aisle. They bring heat and depth to the dish. Broth adds moisture and flavor, while the pasta cooks right in the mix. The optional add-ons like corn and black beans boost nutrition, and cheese makes it creamy. Fresh cilantro and sour cream serve as great toppings. For the full recipe, check the detailed instructions. You'll love how simple and satisfying this dish is! - Warm the olive oil in a large pot over medium heat. - Add the finely chopped onion and sauté for about 3 minutes until soft. - Next, add the minced garlic and diced bell pepper. Sauté for 2 more minutes until fragrant. - Incorporate the ground beef or turkey into the pot. - Cook until the meat is browned. Break it into smaller pieces with a spoon. - If there is excess fat, drain it carefully. - Sprinkle in the taco seasoning and mix well. - Pour in the diced tomatoes and low-sodium broth. Stir everything together. - Bring the mixture to a boil. - Once boiling, reduce the heat to low and cover the pot. - Let it simmer for 10 to 12 minutes. Stir occasionally until the pasta is al dente. - Fold in the corn and black beans. Cook for an extra 2 to 3 minutes. - Remove the pot from heat. - Stir in the shredded cheese until it melts and the dish becomes creamy. - Taste and season with salt and pepper as needed. For the full recipe, check out the One Pot Taco Pasta Delight. Enjoy your meal! To get the pasta texture just right, cook it until it's al dente. This means it should be firm but not hard. Start checking a minute or two before the suggested cooking time. If you cook it too long, it can turn mushy. For seasoning, I like to mix a dash of smoked paprika or cumin. These spices add depth. You could also use fresh lime juice for a bright, zesty kick. When serving One Pot Taco Pasta, toppings make it shine. I love adding fresh cilantro and a scoop of sour cream. You can also sprinkle some sliced jalapeños for heat. As for side dishes, crispy tortilla chips pair well. A simple green salad can add a nice crunch. You might also serve it with avocado slices for creaminess. Use a large pot for this recipe. A Dutch oven works great, too. It holds heat well and makes cooking easier. For utensils, a wooden spoon is best. It won’t scratch your pot and helps mix everything well. Cleanup can be simple. Use one pot for cooking and serve right from it. This way, you save time on washing dishes. Plus, it keeps the meal warm for seconds! For the complete dish, check the Full Recipe. {{image_4}} You can switch out ground beef or turkey for ground chicken. This option keeps your dish lean and healthy. If you prefer vegetarian meals, try using lentils or mushrooms. Both options add great flavor and texture. You can also explore plant-based proteins like tofu or tempeh. These ingredients soak up the taco spices well. Finding gluten-free pasta is easier than ever. Look for rice or quinoa pasta at your local store. These pastas cook similarly to regular pasta. You may need to adjust the cooking time, so check the package. For a gluten-free taco pasta, ensure your broth and taco seasoning are also gluten-free. This way, you can enjoy a full meal without worry. Taco seasoning is key to this dish, but don’t stop there! Try using different blends like chipotle or smoked paprika. This adds a smoky twist to your pasta. Adding veggies like zucchini or spinach boosts the nutrition too. You can also sprinkle in some chili flakes for heat. This way, you make the dish your own and keep it fun! To store your One Pot Taco Pasta, let it cool first. Then place it in an airtight container. This keeps moisture in and air out. You can store it in the fridge for up to three days. After that, it may lose its taste and texture. If you want to freeze One Pot Taco Pasta, follow these steps. First, let it cool completely. Then, transfer it to a freezer-safe container. Use a lid or plastic wrap to seal it tight. It will keep well for about three months. To thaw, place it in the fridge overnight. You can also use the microwave for quick thawing. When reheating, do it slowly. Use a pot over low heat for best results. Stir often to keep it from sticking. Add a splash of broth or water to keep it moist. To make busy days easier, prep this dish in advance. You can chop your onions and peppers ahead of time. Cook the ground meat and store it in the fridge. Combine everything when you are ready to eat. For reheating, use a pot or microwave. If using a pot, add a little broth to keep it creamy. This way, you can enjoy a warm meal in no time. For a fun twist, consider garnishing with extra cheese or fresh cilantro. You can find the full recipe [here](#). Making One Pot Taco Pasta is quick and easy. You need about 10 minutes to prep. Cooking takes around 20 minutes. In total, you can enjoy this meal in just 30 minutes. Yes! You can use many pasta shapes. My favorites are penne and rotini. These shapes hold sauce well and add fun to your dish. If you want, try elbow macaroni or fusilli too. This recipe is perfect for meal prep. You can make a big batch and store it. Keep it in airtight containers in the fridge. It stays fresh for up to 4 days. You can also freeze it for longer storage. Just thaw it in the fridge before reheating. If you don't have taco seasoning, you can make your own. Mix chili powder, cumin, garlic powder, and onion powder. You can add a pinch of paprika and oregano for extra flavor. This mix gives a great taste to your pasta. To add heat, try a few different methods. You can add diced jalapeños or a dash of hot sauce. Red pepper flakes also work well. If you like smoky flavors, add chipotle powder. Adjust the spice to your taste! One Pot Taco Pasta is easy and fun to make. We covered all the main ingredients, steps, and tips. Remember to choose your meat or alternatives and add your favorite toppings. This dish offers great flavor and comfort. It also works well for meal prep, making busy days easier. Try different variations to keep things exciting. With just a bit of creativity and care, you'll enjoy a delicious meal. Dive into cooking and make this dish your own!

One Pot Taco Pasta Flavorful and Easy Dinner Recipe

Are you ready for a dinner that’s both flavorful and easy to prepare? One Pot Taco Pasta is your answer!

- 3 large ripe tomatoes - 1 cup fresh basil leaves - 8 oz fresh mozzarella cheese - 3 tablespoons extra-virgin olive oil - 1 tablespoon balsamic glaze - Sea salt and freshly cracked black pepper The heart of a great Caprese salad lies in its fresh ingredients. You need ripe tomatoes. They should feel slightly soft when you press them. Look for vibrant color, too. Fresh basil leaves add a sweet, peppery taste. Use whole, green leaves as they hold more flavor. For the cheese, fresh mozzarella is key. It should be creamy and soft, not rubbery. Slice it thickly to match your tomato slices. This creates harmony in both taste and texture. Next, we add flavor with olive oil and balsamic glaze. Extra-virgin olive oil gives richness. Balsamic glaze adds a sweet touch. Finally, sprinkle sea salt and cracked black pepper. This enhances all the flavors. For the full recipe, follow the steps closely to create a delicious dish. Enjoy every bite of this fresh and flavorful delight! To make your Caprese salad shine, start with the tomatoes and mozzarella. Slice three large, ripe tomatoes into thick rounds. Then, take eight ounces of fresh mozzarella and cut it into similar thicknesses. Now, layer them on a large platter or individual plates. Alternate the slices of tomato and mozzarella in a circle or straight line. This pattern creates a lovely visual. Aim for balance in color and size. For a beautiful display, keep the layers even and neat. Fresh basil is key to this dish. It adds a fragrant aroma and bright flavor. After layering the tomatoes and mozzarella, tuck fresh basil leaves between each slice. This not only looks great but also enhances taste. Place the basil leaves strategically, allowing them to peek out. You can use whole leaves or tear them for a rustic look. The green color really pops against the red and white of the salad. Next, it’s time to drizzle. Use three tablespoons of extra-virgin olive oil. Pour it evenly over the salad. Let the oil catch the edges of the tomatoes and mozzarella for added flavor. Now for the balsamic glaze. Drizzle one tablespoon over the top. This adds a sweet and tangy kick to each bite. Finally, season with sea salt and freshly cracked black pepper. Start with a pinch of salt and a few cracks of pepper. Taste and adjust as needed. This simple step makes your salad come alive. For the full recipe, check out the details above! To make a great Caprese salad, start with ripe tomatoes. Look for tomatoes that feel heavy for their size. Their skin should be smooth and slightly shiny. A ripe tomato will have a sweet aroma too. The color should be bright and deep, showing it's ready to eat. When picking mozzarella, fresh is best. Look for mozzarella packed in water for extra moisture. Choose mozzarella that feels soft and springy. It should not be rubbery or too hard. A good mozzarella has a creamy taste that pairs well with tomatoes. A drizzle of olive oil adds richness to your salad. Use high-quality extra-virgin olive oil for the best flavor. It should taste fruity and fragrant. Balsamic glaze adds a sweet and tangy kick. Drizzle it lightly to enhance the dish without overpowering it. Adjust the salt and pepper to make the flavors pop. Start with a small pinch of salt and a few cracks of pepper. Taste as you go, adding more if needed. This balance will make each bite sing. To make your Caprese salad shine, consider garnishing with extra basil leaves. Arrange them neatly on top for a fresh look. You can also sprinkle some chili flakes for a hint of heat. When serving, consider the occasion. For a picnic, use individual plates for easy grabbing. For a dinner party, a large platter looks stunning. Make sure to serve it right away for the best taste and freshness. {{image_4}} You can make your Caprese salad even more fun by adding extra ingredients. Try different vegetables, like bell peppers or cucumbers. These veggies add crunch and color. You can also mix in fruits. Sliced avocado or peaches can give a nice twist to the flavor. Experimenting with cheeses can also change the dish. While fresh mozzarella is classic, you might enjoy burrata for a creamier taste. Feta cheese provides a salty kick. Each cheese brings its own flavor, making each bite unique. Need to make it vegan or dairy-free? No problem! Simply skip the cheese or use a dairy-free alternative. Cashew cheese or almond cheese works well. For a tasty vegan version, add nuts for protein. If you’re looking for gluten-free options, Caprese salad is already gluten-free. Pair it with gluten-free bread or crackers for a complete meal. This way, everyone can enjoy it, no matter their diet. Caprese salad shines as an appetizer. Serve small portions on skewers for a fun finger food. Stack tomato and mozzarella cubes with basil leaves. Drizzle olive oil over them for extra flavor. Want to turn it into a hearty meal? Add grilled chicken or shrimp. This makes a filling lunch or dinner. You can also toss it with pasta for a fresh, flavorful dish. The options are endless! For the full recipe, check out the Caprese Delight Salad. To keep your Caprese salad fresh, store it in an airtight container. Layer the tomatoes, mozzarella, and basil with care. This helps protect the delicate flavors. Use paper towels to absorb extra moisture. This keeps the salad crisp and tasty. For leftovers, finish the salad within two days. The tomatoes can get mushy over time. If you want to keep the ingredients fresh longer, store the basil separately. Keep it in a glass of water like a flower. This method keeps it vibrant and green. You can prep the ingredients ahead of time. Slice the tomatoes and mozzarella a few hours before serving. Store them in separate containers. This way, they stay fresh until you are ready to assemble. For meal prepping, layer the ingredients in jars. Start with tomatoes, then mozzarella, and finish with basil. Drizzle olive oil and balsamic glaze just before serving. This keeps the salad from getting soggy. Can you freeze Caprese salad? No, it's best not to freeze it. Freezing changes the texture of tomatoes and mozzarella. They become watery and mushy when thawed. If you want to freeze individual ingredients, that works. You can freeze basil in ice cube trays with olive oil. This makes a great flavor booster for future dishes. Just remember, always assemble the salad fresh for the best taste. The best mozzarella for Caprese salad is fresh mozzarella. It has a soft and creamy texture that melts in your mouth. There are two main types of fresh mozzarella: *mozzarella di bufala* and *fior di latte*. - Mozzarella di bufala: Made from buffalo milk. It is richer and more flavorful. This type is often creamier, making it a top choice for gourmet dishes. - Fior di latte: Made from cow's milk. It is milder and less fatty than buffalo mozzarella. It works well for those who prefer a lighter taste. Choosing between these types depends on your flavor preference. Both types will elevate your Caprese salad. Yes, you can make Caprese salad in advance. However, I recommend preparing the ingredients separately. This keeps the salad fresh and tasty. Here are some tips for preparing ahead: - Slice tomatoes and mozzarella: You can slice these a few hours before serving. Keep them covered in the fridge. - Wash and dry basil: Prepare basil leaves beforehand. Store them in a damp paper towel in a sealed bag. - Dress before serving: Wait to drizzle the olive oil and balsamic glaze until just before you serve. This prevents the salad from getting soggy. By following these tips, you can enjoy a fresh Caprese salad even when you're busy. There are many fun ways to mix up your Caprese salad. Here are some popular alternatives and enhancements: - Add fruit: Try sweet fruits like peaches or strawberries. They add a nice twist. - Use different cheeses: Goat cheese or burrata can create a delightful change. - Incorporate veggies: Slice cucumbers or bell peppers for crunch. They also bring extra colors to your dish. - Drizzle with flavored oils: Use herb-infused oils for a new taste experience. These variations allow you to customize your Caprese salad and keep it exciting! For the full recipe, check the earlier sections of this article. You learned how to make a fresh and tasty Caprese salad. I shared key ingredients like ripe tomatoes, fresh basil, and mozzarella. You know how to layer and present them beautifully. You also discovered tips for selecting quality ingredients and adding flavors. Remember, you can get creative with variations and serving ideas. Incorporate what you’ve learned, and enjoy making this dish your own!

Easy Caprese Salad Fresh and Flavorful Delight

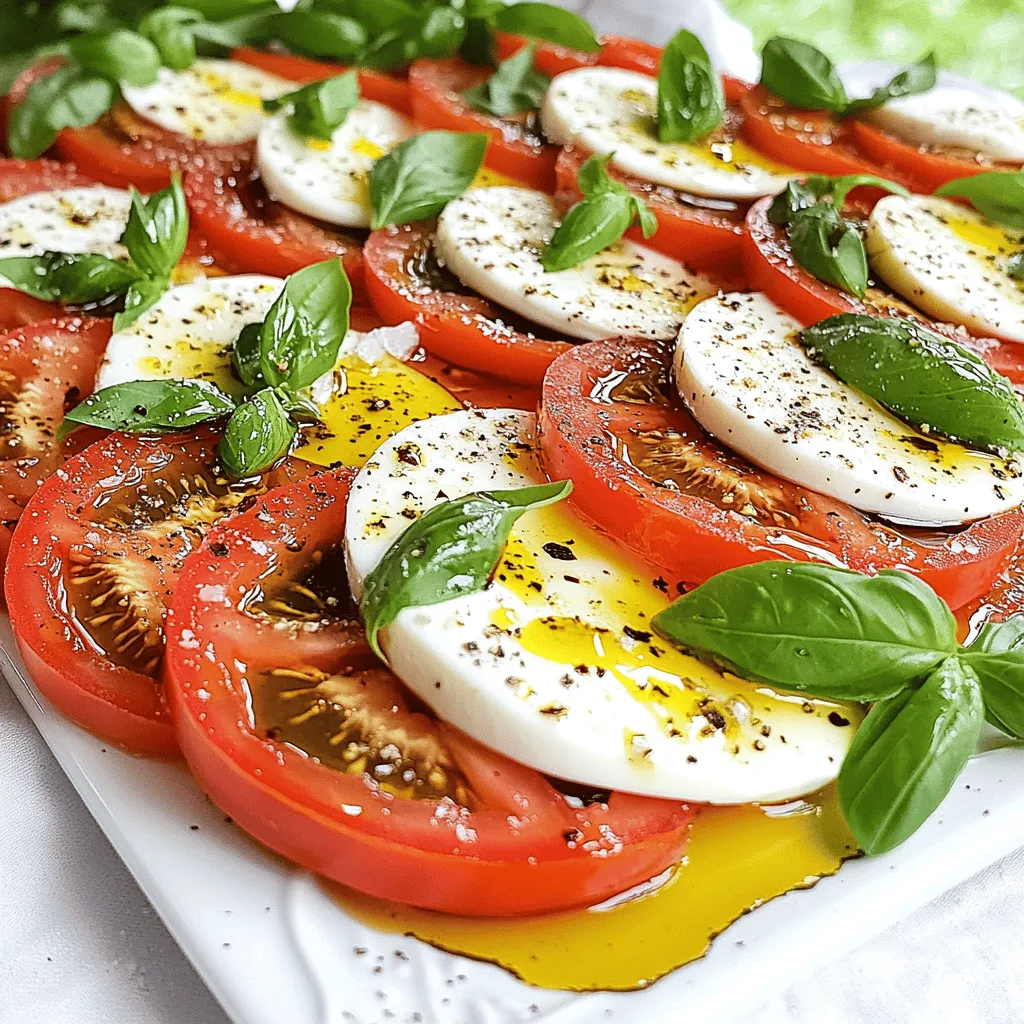
If you’re on the hunt for a fresh and flavorful dish, look no further! The Easy Caprese Salad is a

To make a tasty crockpot chicken and rice, you need key ingredients. Here’s what you will need: - 4 boneless, skinless chicken thighs - 1 cup long-grain rice - 1 medium onion, diced - 3 cloves garlic, minced - 4 cups low-sodium chicken broth - 1 cup frozen peas and carrots - 1 tablespoon dried thyme - 1 teaspoon paprika - Salt and pepper to taste - 2 tablespoons olive oil - Fresh parsley, chopped, for garnish These ingredients work together to create a comforting meal. The chicken thighs bring rich flavor and moisture. The rice absorbs all the savory broth. You can add some optional ingredients for extra taste. Consider these options: - 1 cup sliced mushrooms for earthiness - 1 bell pepper, diced for sweetness - A squeeze of lemon juice for brightness - 1 teaspoon garlic powder for more depth These additions can make your dish even more delicious. They also let you customize it to your taste. If you have allergies, you can swap some ingredients. Here are some safe replacements: - Use quinoa instead of rice for a gluten-free option. - Swap chicken for tofu or chickpeas for a plant-based dish. - Use vegetable broth instead of chicken broth for a vegan version. These alternatives help everyone enjoy the meal. Just remember to adjust cooking times if needed. You can find the full recipe in the main article for thorough guidance. First, gather your chicken thighs. You want four boneless, skinless thighs. Season them well with salt, pepper, dried thyme, and paprika. This step adds great flavor. Make sure the seasoning covers every side. Next, heat two tablespoons of olive oil in a skillet. Once hot, add the chicken thighs. Sear them for about 3-4 minutes on each side. You want them golden brown. This browning helps build a rich taste. Now, it is time to layer your ingredients in the crockpot. Start by adding one diced medium onion and three cloves of minced garlic to the bottom. This mix will create a flavor base that smells amazing. After that, place your seared chicken thighs on top of the onion and garlic. Next, pour in four cups of low-sodium chicken broth. This broth will keep the chicken moist. After the broth, add one cup of long-grain rice and one cup of frozen peas and carrots. Gently mix these ingredients without disturbing the chicken too much. Cover the crockpot with the lid and set it to cook. You have two options for cooking time. If you choose low, cook for 4-5 hours. If you want it faster, set it to high for 2-3 hours. Keep an eye on the chicken. It should be fully cooked, and the rice should be tender and absorb all the broth. Once done, take the chicken out and shred it with two forks. Return the shredded chicken to the pot and mix everything well. Taste your dish and adjust the seasoning as needed. This step ensures every bite is full of flavor. To get the best taste from your dish, start by seasoning the chicken well. Use salt, pepper, thyme, and paprika. Each spice adds its own touch. Searing the chicken in olive oil also helps. This step creates a crust that locks in juices. Next, layer the onion and garlic at the bottom of the crockpot. These will cook down and add great flavor. Always follow your crockpot’s instructions. Set it to low for a longer cook time. This gives flavors time to blend. Use a meat thermometer to check the chicken. It should reach 165°F for safety. Keep the lid closed during cooking. This keeps steam inside and helps the food cook evenly. One mistake is skipping the searing step. This can dull the flavor. Another is overcrowding the crockpot. Make sure there is enough space for heat to circulate. Don’t rush the cooking time. Cooking too fast can leave the chicken dry. Finally, avoid lifting the lid too often. Each peek releases heat and can extend cooking time. For the full recipe, check out the detailed instructions above. {{image_4}} You can make this dish healthier by swapping out some ingredients. Here are a few ideas: - Chicken Thighs: Use skinless chicken breasts for less fat. - Rice: Substitute white rice with brown or cauliflower rice for more fiber. - Broth: Choose vegetable broth or make your own for fewer sodium levels. These changes keep the dish tasty while boosting its health benefits. Don't hesitate to play with flavors. Here are some great options: - Cumin: Adds a warm, earthy touch. - Cinnamon: A pinch can give a sweet note. - Basil or oregano: Fresh or dried can bring a Mediterranean vibe. - Chili flakes: For a bit of heat, just sprinkle in some. Mix and match these spices to create your own unique flavor profile! You can enjoy this dish even without chicken. Consider these swaps: - Chickpeas: They add protein and texture. - Tofu: Firm tofu works great when cubed and added. - Mushrooms: Use a mix of your favorites for a meaty taste. Replace the chicken while keeping the rest of the recipe the same. You will still get a hearty meal! For the Full Recipe, check the earlier sections of this article. After enjoying your meal, store leftovers right away. Let the dish cool to room temperature. Use airtight containers to keep the food fresh. Divide it into smaller portions. This makes reheating easier later. Keep the chicken and rice separate if possible. This helps maintain texture and flavor. You can freeze Crockpot Chicken and Rice. Place it in freezer-safe bags or containers. Remove as much air as you can. Label the bags with the date. It’s best to eat frozen portions within three months. When you’re ready to enjoy it again, thaw it overnight in the fridge. Reheat in a microwave or on the stove. Add a splash of broth to keep it moist. In the fridge, your leftovers last for about three to four days. Make sure to check for any off smells or changes in texture before eating. If stored properly, frozen chicken and rice can last for up to three months. Always prioritize food safety, and when in doubt, throw it out. Enjoy the full recipe for a delicious meal that can be enjoyed later! Yes, you can make Crockpot Chicken and Rice ahead of time. You can prepare the dish and store it in the fridge. Just cook it, let it cool, and cover it. It can last up to three days in the fridge. When you're ready to eat, just reheat it on the stove or in the microwave. To adjust the recipe for more servings, simply increase the amount of each ingredient. For every extra two servings, add one more chicken thigh and half a cup of rice. You can also add more broth and veggies. Just ensure you have a larger crockpot to hold everything. Crockpot Chicken and Rice pairs well with many sides. You can serve it with a fresh green salad. Garlic bread or steamed broccoli also makes a great match. If you want something hearty, try a warm biscuit. Each will add a nice touch to your meal. Yes, you can make this dish gluten-free. Use gluten-free broth and check your rice brand for gluten. Also, ensure any added seasonings or extras are gluten-free. It’s simple to enjoy this meal without gluten! For the full recipe, check out the details above. In this blog post, we explored how to make Crockpot Chicken and Rice. We covered essential and optional ingredients, plus allergen substitutions for all. You learned step-by-step cooking methods for tender chicken and rice. I shared tips to enhance flavor and avoid common mistakes, and we looked at healthy and vegetarian variations. Proper storage techniques ensure your leftovers stay fresh. Overall, this dish is easy, flexible, and delicious. With these tips, you can enjoy great meals every time. Happy cooking!

Crockpot Chicken and Rice Simple Flavorful Recipe

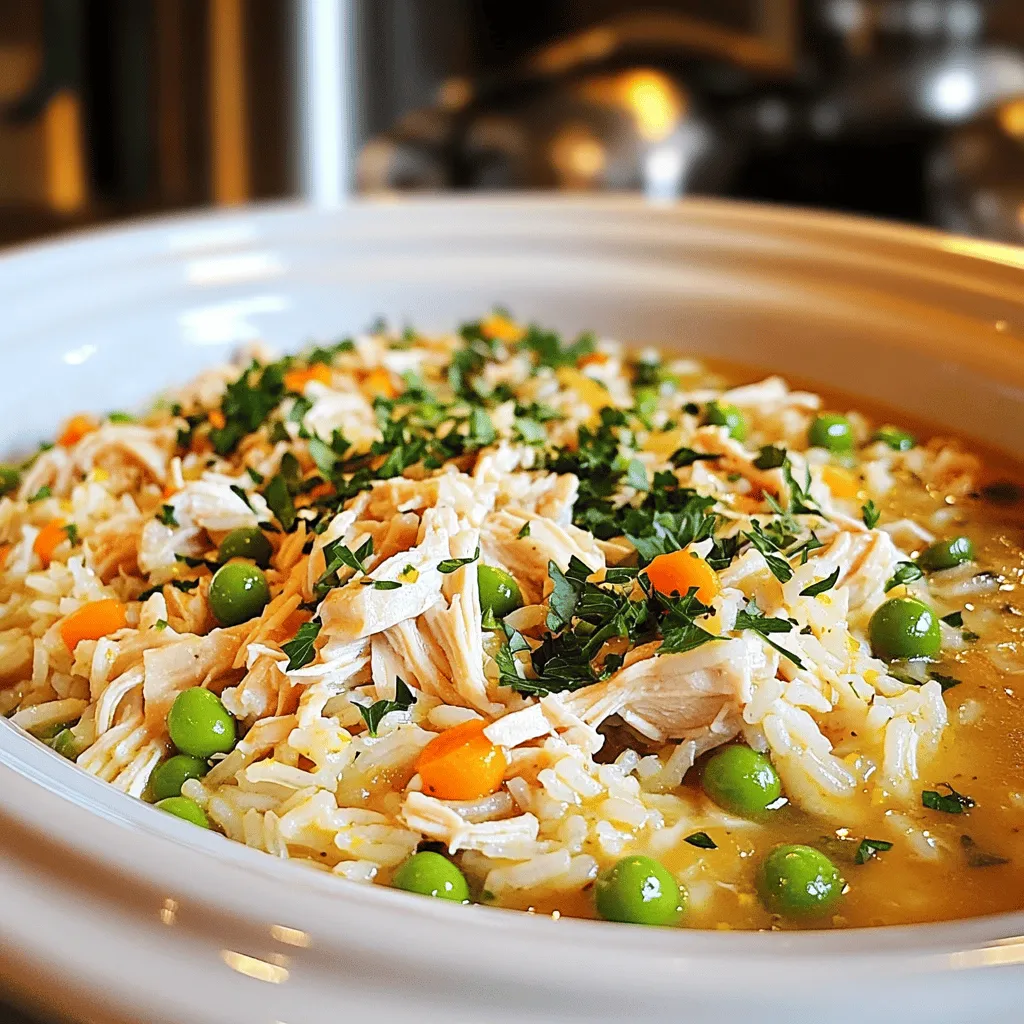
If you’re looking for a simple, tasty meal, you’ll love this Crockpot Chicken and Rice recipe. It combines tender chicken

- 4 boneless, skinless chicken breasts - 2 tablespoons olive oil - 4 cloves garlic, finely minced - 1 cup heavy cream - 1 cup cherry tomatoes, halved - 1 cup fresh spinach, roughly chopped - ½ cup freshly grated Parmesan cheese - 1 teaspoon Italian seasoning blend - Salt and freshly cracked black pepper, to taste - Fresh basil leaves, for garnish To make Creamy Garlic Tuscan Chicken, gather these ingredients first. The chicken breasts are the star, providing a juicy base for the dish. The olive oil helps to sear the chicken, adding flavor. Minced garlic brings a wonderful aroma and depth to the sauce. Next, the heavy cream is key. It creates that rich and creamy texture. Halved cherry tomatoes add a burst of color and sweetness. Fresh spinach not only gives a vibrant green, but it also adds nutrition. The freshly grated Parmesan cheese ties everything together, making the sauce extra creamy and delicious. For seasoning, the Italian blend adds a mix of herbs. Salt and pepper enhance the flavors. Lastly, fresh basil leaves offer a pop of freshness, rounding out the dish beautifully. This combination of ingredients ensures you get a tasty and satisfying meal. You can find the complete recipe in the Full Recipe. Start by warming 2 tablespoons of olive oil in a large skillet over medium-high heat. While the oil heats, season 4 boneless, skinless chicken breasts with salt and black pepper. When the oil shimmers, carefully place the chicken in the skillet. Cook each side for about 5-7 minutes. You want the chicken to turn golden brown and fully cook to an internal temperature of 165°F. Once cooked, take the chicken out and set it aside on a plate. Cover it to keep warm. Next, using the same skillet, add 4 cloves of minced garlic. Sauté the garlic for about 30 seconds. Stir often until it smells great, but don't let it burn. Then, pour in 1 cup of heavy cream. Stir to mix it with the garlic. Let this simmer gently. Now, add 1 cup of halved cherry tomatoes and 1 teaspoon of Italian seasoning. Stir to combine them well. Let the mixture simmer for about 3-4 minutes. You want the sauce to thicken and the tomatoes to soften. After that, add 1 cup of roughly chopped fresh spinach. Stir and cook for 2 more minutes until the spinach wilts and blends into the creamy sauce. Lower the heat to a gentle simmer. Now, add ½ cup of freshly grated Parmesan cheese. Stir until the cheese melts and mixes into the sauce. This will create a rich and creamy texture. Finally, return the cooked chicken to the skillet. Nestle it in the sauce and spoon the creamy mixture over the chicken. Heat everything through for another 2-3 minutes. Before serving, garnish with fresh basil leaves for a pop of color and flavor. Enjoy your Creamy Garlic Tuscan Chicken! For the full recipe, check out the details above. To cook chicken perfectly, aim for an internal temperature of 165°F. This ensures the chicken is safe to eat. Use a meat thermometer for accuracy. To avoid overcooking, check the temperature near the end of cooking. Remove the chicken from the heat as soon as it reaches that temperature. Let it rest for a few minutes before slicing. This helps keep the juices in. When making the sauce, fresh herbs give a bright taste. Dried herbs work too, but fresh can make a big difference. If you prefer a creamier sauce, add more heavy cream. For a bolder flavor, increase the garlic or Italian seasoning. You can also add a splash of lemon juice for brightness. Adjust the seasoning to fit your taste. For the best look, serve the chicken over fluffy rice or creamy mashed potatoes. This adds a nice base for the sauce. Drizzle extra sauce over the chicken to make it shine. Top with more Parmesan cheese and fresh basil for color. This makes the dish pop on the plate. You want it to look as good as it tastes! Check out the Full Recipe for more details. {{image_4}} If you want to switch things up, try using different ingredients. Instead of heavy cream, you can use Greek yogurt or coconut milk. These options give a lighter touch to your dish. For Parmesan cheese, consider using nutritional yeast for a dairy-free version or a mix of mozzarella and cheddar for a different taste. You can also play with the veggies. Instead of spinach, try kale or arugula. Both add a nice flavor and texture. If cherry tomatoes aren't available, diced bell peppers or sun-dried tomatoes make great substitutes. To add some kick, consider using red pepper flakes or cayenne pepper. Just a pinch can elevate the dish. If you prefer a zestier flavor, lemon zest or juice can brighten it up. For cheese lovers, experiment with different cheeses. Feta adds a nice tang, while gouda gives a smoky flavor. Mixing cheeses can create a richer sauce and make it unique. Pair this dish with various starches. Serve it over rice, pasta, or quinoa for a filling meal. You can even use polenta for a creamy, comforting base. If you're in the mood for more protein, grilled shrimp or sautéed mushrooms are tasty options. To complete the meal, add side dishes like roasted vegetables or a fresh salad. These sides balance the richness of the creamy sauce and make your meal even more satisfying. For the full recipe, check out the link to create your own delicious Creamy Garlic Tuscan Chicken! To keep your creamy garlic Tuscan chicken fresh, store it in an airtight container. Make sure it cools down before sealing. You can keep it in the fridge for up to three days. If you want to save it longer, freeze it. The chicken lasts in the freezer for about three months. Just remember to label your container with the date. When it's time to enjoy your leftovers, reheating carefully is key. You can use a pan on low heat. This method helps keep the chicken tender. Heat for about 5-7 minutes, stirring the sauce gently. You can also use the microwave if you're short on time. Heat it in short bursts of 30 seconds, stirring in between. Aim for a warm and creamy texture when done. To make this dish, follow these steps: 1. Warm olive oil in a skillet. 2. Season chicken breasts with salt and pepper. 3. Cook chicken for 5-7 minutes on each side. 4. Remove chicken and sauté minced garlic. 5. Add heavy cream and simmer. 6. Stir in halved cherry tomatoes and seasoning. 7. Mix in fresh spinach until it wilts. 8. Add Parmesan cheese and return chicken to skillet. 9. Heat everything together for a few minutes. 10. Garnish with fresh basil before serving. For the full recipe, check out the complete guide. Yes, you can! Try using: - Turkey breasts for a leaner option. - Pork chops for a different flavor. - Shrimp for a quick seafood twist. Each meat brings its own taste and texture, making this dish versatile. Just adjust cooking times based on the meat you choose. This dish pairs well with many sides. Here are some great options: - Fluffy rice for a hearty base. - Creamy mashed potatoes for comfort. - Steamed vegetables for a fresh touch. - Garlic bread to soak up the sauce. Choose your favorite to complement the rich flavors of this chicken dish! In this post, you've learned how to make Creamy Garlic Tuscan Chicken. You know the main and additional ingredients, along with step-by-step cooking instructions. Tips helped you improve chicken and sauce, while variations opened up creative options. Proper storage and reheating methods ensure you'll enjoy leftovers too. This dish is fun and easy to make, perfect for any occasion. Enjoy cooking and impressing your friends and family with this tasty meal!

Creamy Garlic Tuscan Chicken Savory and Simple Dish

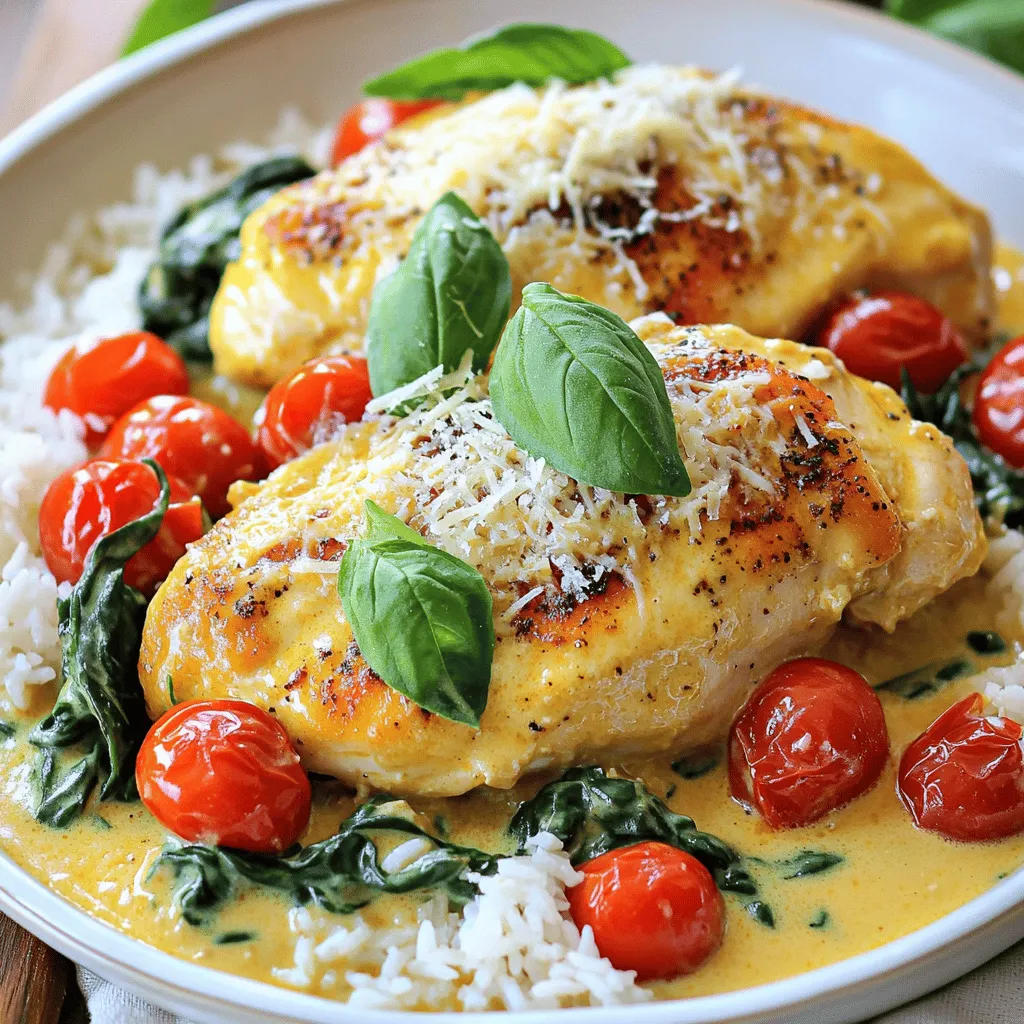
If you crave a dish that’s both rich in flavor and easy to make, look no further than Creamy Garlic

To make Zucchini Lasagna Roll Ups, you need a few key ingredients. Each one adds flavor and texture to your dish. Here’s a detailed list to guide you: - Zucchini Specifications - 3 medium zucchinis: Look for firm ones without soft spots. They should be about the same size for even cooking. - Cheese Types and Brands - 1 cup ricotta cheese: I recommend using a whole milk brand for creaminess. - 1 cup shredded mozzarella cheese, divided: Choose a brand that melts well for that gooey topping. - 1/2 cup grated Parmesan cheese: Freshly grated gives the best flavor. - Recommended Marinara Sauce Options - 1 cup marinara sauce: You can use store-bought or homemade. I like a sauce with no added sugars for a healthier choice. These ingredients combine to create a comforting meal that feels indulgent yet is packed with veggies. You can find the full recipe above to guide you through the cooking process! Preheating the Oven Start by preheating your oven to 375°F (190°C). This step ensures the oven is hot when your dish is ready to bake. Zucchini Preparation Techniques To prepare the zucchini, use a mandoline slicer or a sharp knife. Slice the zucchinis lengthwise into strips about 1/4 inch thick. This creates the perfect base for your roll-ups. Sprinkle a little salt on the slices and let them rest for about 10 minutes. This helps draw out excess moisture. After that, pat the slices dry with a paper towel to remove any extra water. Cheese Filling Assembly Process In a medium bowl, mix together the ricotta cheese, 1/2 cup of shredded mozzarella, grated Parmesan, egg, Italian seasoning, minced garlic, and a pinch of salt and pepper. Stir until you have a smooth mixture. This creamy filling adds great flavor to your roll-ups. Rolling Technique for Zucchini On each zucchini strip, spread about 2 tablespoons of the cheese mixture. Carefully roll the zucchini from one end to the other. Try to keep the filling inside as you roll. This method gives you a neat and tasty roll-up. Layering Marinara and Cheese Spread a thin layer of marinara sauce on the bottom of a baking dish. This keeps the roll-ups from sticking and adds flavor. Place each rolled zucchini seam-side down in the dish. Make sure they are snug but not overcrowded. Once all the strips are rolled, pour the remaining marinara sauce over the top. Coat the roll-ups well. Finally, sprinkle the rest of the mozzarella cheese on top for a bubbly finish. Baking Instructions and Timings Cover the baking dish with aluminum foil to keep the moisture in. Bake in the preheated oven for 25 minutes. After that, carefully remove the foil. Continue baking for another 10 minutes, or until the mozzarella is bubbly and golden brown. Once baked, let the dish cool for a few minutes before serving. Enjoy your healthy Zucchini Lasagna Roll Ups! For more details, check out the Full Recipe. Avoiding Excess Moisture Start by salting the zucchini strips. This step is key. Let the salted strips sit for about 10 minutes. This helps draw out moisture. Afterward, pat them dry with a paper towel. This makes sure your roll-ups stay firm and tasty. Ensuring Even Cheese Distribution When you spread the cheese mixture, use about 2 tablespoons per strip. This amount gives you even flavor. Roll each zucchini tightly but gently. This keeps the filling inside and makes the roll-ups neat and tidy. Best Practices for Baking Cover the dish with foil when you bake it. This traps moisture and helps cook everything evenly. After 25 minutes, remove the foil. Let the cheese get bubbly and golden for 10 more minutes. This creates a nice crust on top. Plating Ideas for Serving Serve the roll-ups on individual plates. Drizzle a little marinara sauce over the top. This adds color and flavor. A sprinkle of freshly grated Parmesan adds a nice touch too. Garnishing Techniques with Fresh Herbs Use fresh basil leaves for garnish. Place one or two leaves on each plate. This adds a pop of green and fresh flavor. You can also chop the basil and sprinkle it over the roll-ups. Pairing Ideas with Side Dishes Zucchini Lasagna Roll Ups go well with a simple salad. Try a mixed greens salad with a light vinaigrette. You can also serve them with garlic bread for a heartier meal. These sides complement the flavors nicely. {{image_4}} You can easily change some ingredients in Zucchini Lasagna Roll Ups to fit your taste. - Alternative Cheeses for Different Flavors: You can swap ricotta for cottage cheese. This makes it lighter. You can also use goat cheese for a tangy twist. Each cheese gives a unique taste and texture. - Additional Vegetables for Filling: Add spinach or mushrooms to your cheese mix. This boosts the flavor and adds nutrients. You can also use bell peppers for a sweet crunch. Feel free to experiment with your favorite veggies. - Dairy-Free and Vegan Options: For a dairy-free version, use cashew cheese instead of ricotta. You can blend soaked cashews with nutritional yeast. This creates a creamy texture that is both rich and healthy. To make your Zucchini Lasagna Roll Ups more exciting, try these flavor twists. - Spicy Zucchini Lasagna Roll Ups: Add red pepper flakes to the cheese mix for a kick. You can also include spicy sausage in your marinara sauce. This adds heat and extra flavor to your dish. - Mediterranean-Inspired Additions: Mix in sun-dried tomatoes or olives with the cheese. This gives a nice Mediterranean flair. You can also top the roll-ups with feta for a salty bite. - Italian Sausage Incorporation: Cook some Italian sausage and mix it into the cheese filling. This makes the roll-ups heartier and full of flavor. The savory sausage pairs well with the fresh zucchini. Feel free to explore these variations and make them your own! Check out the Full Recipe for more details on how to prepare this dish. To keep your Zucchini Lasagna Roll Ups fresh, store them in the fridge. Let them cool first. Once cool, place them in an airtight container. This helps keep them tasty for up to three days. If you use a glass container, it can help prevent odors from mixing. If you want to save the roll-ups for later, freezing is a great option. Wrap each roll tightly in plastic wrap. Then, place them in a freezer bag. This way, they can last up to three months. When you’re ready to eat, just take them out and thaw in the fridge overnight. To reheat, preheat your oven to 350°F (175°C). Place the roll-ups in a baking dish with a splash of marinara sauce. Cover with foil to keep them moist. Bake for about 20 minutes or until they are hot. This method helps keep the flavors and texture intact. For the full recipe, check out the Zucchini Lasagna Roll Ups 🥒. Can I use other vegetables instead of zucchini? Yes, you can! Eggplant and bell peppers work well. They can add different flavors. Slice them thin, just like zucchini. How do I make the roll-ups less watery? To reduce moisture, sprinkle salt on zucchini slices. Wait for 10 minutes, then pat them dry. This step helps keep your roll-ups firm and tasty. Can I prepare Zucchini Lasagna Roll Ups in advance? Absolutely! You can assemble them a day ahead. Just cover and refrigerate. Bake them when you’re ready to eat. Caloric Content per Serving Each serving has about 300 calories. This can vary based on cheese and sauce used. Health Benefits of Ingredients Used Zucchini is low in calories and high in vitamins. Ricotta cheese adds protein and calcium. Marinara sauce offers antioxidants from tomatoes. Together, they make a healthy meal. Suggestions for Modifying for Dietary Needs For gluten-free, use a gluten-free marinara sauce. If you need dairy-free, try almond or coconut-based cheeses. You can still enjoy the flavors! Brief History of Lasagna Adaptations Lasagna has roots in Italy. People have made many twists on this classic. Stuffing it with veggies is one delicious way to enjoy it. Popularity of Zucchini in Healthy Cooking Zucchini is trendy in health food. It is low in carbs and great for meals. Many cooks love to use it to replace pasta. This keeps dishes light and fresh. In this blog post, we explored delicious Zucchini Lasagna Roll-Ups. We covered the key ingredients, including zucchini, cheese, and marinara. We then outlined the steps for preparation and baking. I shared tips to make your dish perfect and suggested fun variations. Finally, we discussed storage methods and answered common questions. Zucchini roll-ups are versatile, tasty, and easy to make. Enjoy experimenting with flavors and presentation. Your kitchen will shine with these healthy dishes. Get cooking!

Zucchini Lasagna Roll Ups Healthy Comfort Meal

Are you ready to whip up a dish that’s both comforting and healthy? Zucchini Lasagna Roll Ups take the classic

- 2 ripe peaches, peeled and diced - 1 ½ cups all-purpose flour - ½ cup granulated sugar - ½ cup brown sugar, packed - 1 tablespoon baking powder - ½ teaspoon baking soda - ½ teaspoon salt - 1 teaspoon ground cinnamon - ½ cup unsalted butter, melted and slightly cooled - 2 large eggs - ½ cup milk - 1 teaspoon vanilla extract The main ingredients in these muffins create a sweet and moist treat. Fresh peaches add a juicy burst of flavor. All-purpose flour gives structure and helps the muffins rise. The sugars balance the flavors, while eggs and butter contribute to a rich texture. - ½ cup rolled oats - ¼ cup all-purpose flour - ½ cup brown sugar, packed - 1 teaspoon ground cinnamon - ¼ cup unsalted butter, softened The streusel topping adds a crunchy contrast to the soft muffins. Rolled oats provide chewiness, while brown sugar brings a deep sweetness. Ground cinnamon ties all the flavors together, making each bite even more delightful. - Muffin tin - Mixing bowls - Whisk - Spatula Using the right tools makes baking easier. A muffin tin shapes the muffins perfectly. Mixing bowls help keep everything organized. A whisk combines the wet and dry ingredients smoothly, while a spatula ensures no batter is left behind. For the full recipe, check out the detailed instructions and enjoy baking these Classic Peach Streusel Muffins! Preheat your oven to 375°F (190°C). Grab your muffin tin. You can line it with paper liners or lightly grease it with cooking spray. This step helps your muffins come out easily. In a medium bowl, mix these ingredients for the streusel: - ½ cup rolled oats - ¼ cup all-purpose flour - ½ cup brown sugar, packed - 1 teaspoon ground cinnamon - ¼ cup unsalted butter, softened Use your hands or a fork to blend until it looks like coarse crumbs. Set it aside for later. In a large bowl, whisk together the dry ingredients: - 1 ½ cups all-purpose flour - ½ cup granulated sugar - ½ cup brown sugar, packed - 1 tablespoon baking powder - ½ teaspoon baking soda - ½ teaspoon salt - 1 teaspoon ground cinnamon In another bowl, whisk these wet ingredients: - ½ cup unsalted butter, melted and slightly cooled - 2 large eggs - ½ cup milk - 1 teaspoon vanilla extract Pour the wet mixture into the dry ingredients. Stir gently until just combined. Do not overmix, or your muffins may turn out dense. Now, fold in two diced peaches with a spatula or wooden spoon. Spoon the muffin batter into the prepared muffin tins. Fill each cup about two-thirds full. This allows space for the muffins to rise. Next, generously sprinkle the streusel topping on each muffin to add that delicious crunch. Place the muffin tin in the preheated oven. Bake for 20-25 minutes. Check doneness by inserting a toothpick into the center of a muffin. If it comes out clean, you are good to go! The tops should look lightly golden. Enjoy the sweet smell as they bake. To make great muffins, you want a soft, fluffy texture. Start by measuring your flour correctly. Use a spoon to fill your measuring cup, then level it off with a knife. This helps avoid too much flour in the mix. Next, mix your batter until just combined. Overmixing makes muffins dense and tough. Stir gently to keep air in the batter. Let your muffins cool for about five minutes in the pan. This makes them easier to remove. After that, transfer them to a wire rack. Serve them warm for the best taste. You can enjoy them plain or with a pat of butter. A drizzle of honey also adds a sweet touch. For a fun twist, add a slice of fresh peach on the side. If your muffins turn out dense, check your mixing technique. Overmixing can cause this problem. If the centers are uncooked, your oven might be too hot. Try lowering the temperature by 25°F. Keep an eye on the baking time. Use a toothpick to test for doneness. If it comes out clean, your muffins are ready. For the best results, follow the Full Recipe closely. {{image_4}} You can make this recipe healthier by changing a few ingredients. Whole wheat flour works great in place of all-purpose flour. It adds fiber and nutrients. If you prefer, almond flour is also a great choice. It gives a nutty flavor and is gluten-free. Keep in mind that the texture will change slightly. You may need to adjust the liquid in your recipe. To make your muffins even more exciting, try adding spices or nuts. A pinch of nutmeg or ginger can add warmth. You can also mix in chopped walnuts or pecans for crunch. If you want to change the fruit, consider using blueberries or raspberries. They pair well with the sweetness of peaches. Feel free to experiment with what you have on hand. Want a fun twist? Try making mini muffins instead of regular ones. Just fill the smaller cups about halfway. They bake faster, usually in about 12-15 minutes. You can also use a loaf pan for a peach bread. Just adjust the baking time, checking for doneness with a toothpick. This way, you can enjoy your delicious treat in different forms. For the full recipe, check out the link above. To keep your muffins fresh, store them at room temperature. Use an airtight container to prevent them from drying out. If you want to keep them longer, you can refrigerate them. Just remember that refrigeration can make them a bit dry. I prefer to keep them in a cool, dry place. Freezing muffins is a great way to store them for long-term use. Wrap each muffin tightly in plastic wrap. Then, place them in a freezer-safe bag or container. This protects them from freezer burn. When you're ready to eat, take one out and leave it in the fridge overnight to thaw. You can also thaw them at room temperature for a few hours. To enjoy your muffins warm, reheating is key. You can use the oven for the best results. Preheat your oven to 350°F (175°C). Place the muffins on a baking sheet for about 5-10 minutes. If you're in a hurry, the microwave works too! Heat them for about 15-20 seconds. Enjoy your muffins fresh and warm! For the complete recipe, check the Full Recipe. Your muffins are done when they are golden brown on top. The best test is the toothpick test. Insert a toothpick into the center of a muffin. If it comes out clean, your muffins are ready. If it has wet batter, bake for a few more minutes. Keep an eye on them, as ovens can vary. Yes, you can use frozen peaches. Just make sure to thaw them first. Drain any excess liquid before adding them to the batter. This helps keep the muffins from getting too wet. You may want to add a bit more flour to balance the moisture. If you don't have unsalted butter, you can use salted butter. Just reduce the salt in the recipe by half. You can also use vegetable oil or coconut oil as a substitute. These options work well and will keep your muffins moist. To get a crunchy streusel, make sure to mix the butter well. Use cold butter and cut it into the dry ingredients until crumbly. Don’t skip the oats; they add texture. Bake the muffins until the topping is golden brown. This will give you that perfect crunch every time. Making peach streusel muffins is easy and fun. We explored fresh ingredients like peaches, flour, and butter for a tasty treat. The step-by-step guide shows how to combine everything and achieve the perfect texture. I shared tips on storage and how to troubleshoot common issues. Try these variations to make your muffins unique. Whether you enjoy them fresh or frozen, these muffins will brighten your day. Now, gather your tools and bake a batch to savor!

Classic Peach Streusel Muffins Irresistible Morning Treat

Wake up your mornings with my Classic Peach Streusel Muffins! These tasty treats blend fresh peaches and a crunchy topping

To make garlic butter zucchini noodles, you need these main ingredients: - 4 medium zucchinis - 4 tablespoons unsalted butter - 4 cloves garlic, finely minced - 1 teaspoon red pepper flakes - 1/4 cup freshly grated Parmesan cheese - Salt and freshly ground black pepper to taste - Juice of 1 lemon Zucchini is the star here. It’s light, fresh, and easy to work with. The butter adds richness, while garlic brings a warm, savory taste. If you like heat, the red pepper flakes will spice things up. For this dish, salt and black pepper are key. They highlight the flavors of the garlic and zucchini. Fresh lemon juice adds a burst of brightness. This combo makes every bite pop with taste. To finish your dish, consider these optional garnishes: - Fresh basil leaves Basil gives a nice color and a fresh aroma. You can also add more Parmesan if you love cheesy flavors. These simple touches make your meal look and taste great! For the complete process of making this dish, check out the Full Recipe. To start, wash the zucchinis well. You want them clean and fresh. Then, use a spiralizer to create long, thin noodles. If you don’t have one, a vegetable peeler works too. You can make wider strips with it. Once you finish, set the zucchini noodles aside on a plate. This will help keep them ready for the next steps. Grab a large skillet and place it on medium heat. Add the unsalted butter and let it melt. Watch it closely, as you don’t want it to brown. Next, add the minced garlic. Sauté it for about 30 seconds. You will smell a lovely aroma. Stir often to keep it from burning. After that, sprinkle in the red pepper flakes. This adds a nice kick to your dish. Sauté for another 30 seconds to blend the flavors. Now, it’s time to add the zucchini noodles to the skillet. Toss them gently with the garlic sauce. Cook for about 3-4 minutes, stirring occasionally. You want the noodles to be tender but still have a slight bite. After cooking, season with salt and pepper to taste. Remove the skillet from the heat. Squeeze fresh lemon juice over the noodles. Then, add the grated Parmesan cheese. Stir until the cheese melts and mixes well. Serve the dish right away, topped with fresh basil leaves. This makes for a colorful and tasty meal. For the full recipe, feel free to check out the details above. When picking zucchini, look for firm ones. They should be smooth and shiny. Avoid any with soft spots or blemishes. Smaller zucchinis are often sweeter and more tender. Aim for medium-sized ones, around 6 to 8 inches long. These will spiralize well and create nice, even zoodles. Cook your zoodles quickly to keep them crunchy. Overcooking makes them mushy. Sauté for about 3 to 4 minutes. Stir often to ensure even cooking. If you want extra firmness, use a kitchen towel to remove excess moisture before cooking. This helps keep the dish light and fresh. Fresh herbs like basil and parsley add a nice touch. You can also try adding oregano or thyme for more depth. If you like heat, increase red pepper flakes. For a zesty kick, squeeze in some lemon juice. This brightens the dish and balances the richness of the garlic butter. You can find the full recipe for these Garlic Butter Zucchini Noodles to explore more flavors. {{image_4}} You can boost your Garlic Butter Zucchini Noodles with some protein. Chicken, shrimp, or tofu work great. For chicken, cook it first in the skillet before adding the garlic. If you choose shrimp, sauté it until pink, then add the garlic. For tofu, cube it and fry until crispy. This gives you a hearty meal that fills you up. Zucchini noodles are just the start. You can mix in other veggies too. Carrots, bell peppers, or snap peas add color and crunch. Use a spiralizer for carrots to make fun noodles. Slice bell peppers and snap peas thinly and toss them in with the zucchini. This adds flavor and makes your dish more exciting. Change things up with seasonal flavors. In fall, add pumpkin or butternut squash. In summer, toss in fresh corn or cherry tomatoes. For a winter touch, try roasted Brussels sprouts or kale. Each season brings new veggies to explore. This keeps your dish fresh and gives it a new twist every time you make it. Check out the Full Recipe for more ideas! To keep your garlic butter zucchini noodles fresh, store them in an airtight container. Make sure to cool them to room temperature before sealing. This way, you can enjoy your meal later without losing flavor. Use the leftovers within two to three days for the best taste. When you’re ready to eat your leftovers, reheat them gently. You can use a skillet over low heat. Add a splash of water or a bit of butter to prevent sticking. Stir frequently until they are heated through. If you prefer, you can microwave them in short bursts. Just be careful not to overcook the noodles. If you want to store zucchini noodles for a longer time, freezing is an option. First, blanch the noodles in boiling water for one to two minutes. Then, cool them in an ice bath. Drain well, and place them in a freezer bag. Remove as much air as possible before sealing. You can freeze them for up to three months. When ready to use, thaw them in the fridge overnight or cook them straight from frozen. The best way to make zucchini noodles is to use a spiralizer. This tool creates long, thin strands. If you don't have one, a vegetable peeler works too. Just peel the zucchini into wide strips. Aim for even shapes for the best cooking. You can also try a box grater for a different texture. Yes, you can use garlic powder if you need. However, fresh garlic offers a stronger taste. Use about 1/8 teaspoon of garlic powder for each clove. Mix it in with the butter to let the flavor bloom. Keep in mind, the taste may vary slightly. Yes, you can easily make this dish vegan. Simply substitute the butter with a plant-based alternative. Olive oil or vegan butter works well. For the cheese, use nutritional yeast for a cheesy flavor. This keeps the dish creamy and tasty without dairy. You can add more flavor with herbs and spices. Try fresh basil, oregano, or even thyme. Red pepper flakes boost heat, while lemon juice adds brightness. Mix in sautéed onions or bell peppers for extra depth. You can also add nuts for crunch. You can prepare zucchini noodles ahead of time. Just spiralize and store them in an airtight container. Keep them in the fridge for up to two days. Cook the garlic butter fresh for the best taste. This way, the noodles stay crisp and fresh. Zucchini noodles cook quickly. They should be tender but still crisp. Cook them for about 3-4 minutes. Stir them often to prevent sticking. Taste a noodle to check for doneness. If it’s too soft, you’ve cooked them too long. These noodles pair well with many dishes. Serve them as a side with grilled meats or fish. They also go great with a light salad. For a complete meal, add protein like shrimp or chicken. The flavors blend nicely for a tasty dinner. Garlic butter zucchini noodles are simple and tasty. We covered the key ingredients, spices, and garnishes. I shared easy steps to prepare zoodles and cook the garlic sauce. You also learned tips for choosing zucchini and cooking it right. Variations let you add proteins or other veggies. Plus, I included guidance on storage and reheating. Making this dish is fun and rewarding. Enjoy your meal, and don’t hesitate to get creative!

Garlic Butter Zucchini Noodles Tasty and Easy Recipe

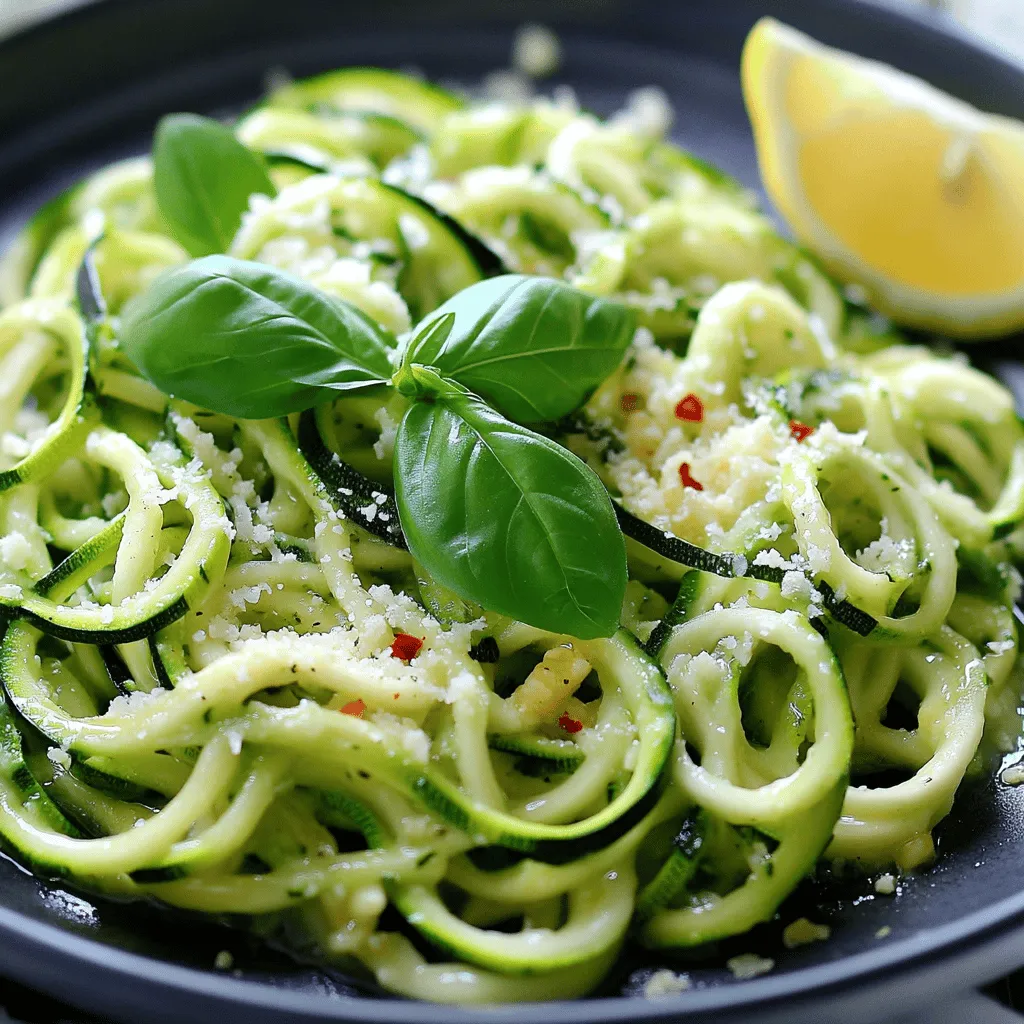
Looking for a quick and tasty meal? Garlic Butter Zucchini Noodles are the answer! This easy recipe combines fresh zucchini

To make these Peach Raspberry Oat Bars, you need simple and wholesome ingredients. Each one plays a key role in flavor and texture. Here’s what you need: - 2 cups rolled oats - 1 cup almond flour - 1/2 cup brown sugar, lightly packed - 1/2 teaspoon salt - 1/2 teaspoon ground cinnamon - 1/2 cup coconut oil, melted - 1/4 cup honey or maple syrup - 1 teaspoon pure vanilla extract - 2 large ripe peaches, diced - 1 cup fresh raspberries - 1 tablespoon lemon juice - Optional: 1/4 cup chopped nuts (such as walnuts or pecans) Each ingredient contributes to the bars' health and taste. The rolled oats provide fiber and a chewy base. Almond flour adds protein and richness. Brown sugar offers sweetness without being too overpowering. Coconut oil gives moisture and a subtle flavor. Honey or maple syrup sweetens while keeping it natural. The fresh fruits add juicy bursts and a beautiful color. You can mix in nuts for crunch, but it’s not a must. Using fresh, ripe peaches and raspberries makes the bars even more delicious. The lemon juice brightens the fruit flavors. For the full recipe, refer to the main section in the article. Enjoy making these tasty and healthy treats! Start by preheating your oven to 350°F (175°C). Grab an 8x8 inch baking dish. Line it with parchment paper. Leave some paper hanging over the edges. This will help you lift out the bars later. In a large bowl, combine the following: - 2 cups rolled oats - 1 cup almond flour - 1/2 cup brown sugar, lightly packed - 1/2 teaspoon salt - 1/2 teaspoon ground cinnamon Stir these ingredients together. Make sure they mix well. This step adds flavor and texture to the bars. In a different bowl, whisk together: - 1/2 cup coconut oil, melted - 1/4 cup honey or maple syrup - 1 teaspoon pure vanilla extract Mix them until smooth. This blend adds moisture and sweetness to your bars. Now, pour the wet mixture into the dry bowl. Stir everything together until it combines well. You want a crumbly texture that holds together when pressed. This will be your base and topping. In another bowl, gently mix: - 2 large ripe peaches, diced - 1 cup fresh raspberries - 1 tablespoon lemon juice - Optional: 1/4 cup chopped nuts Toss these ingredients carefully. Make sure the fruit stays intact. This fruit filling adds freshness and flavor. Take 1 cup of the oat mixture and set it aside for topping. Press the rest into the bottom of your prepared baking dish. Spread the fruit mixture evenly over the top. Crumble the reserved oat mix over the fruit. Bake for 25-30 minutes until the top is golden brown. Let the bars cool for at least 30 minutes before cutting. Enjoy your Peach Raspberry Oat Bars! For more details, check the Full Recipe. To keep your Peach Raspberry Oat Bars fresh, store them in an airtight container. They stay good at room temperature for 2-3 days. For longer storage, put them in the fridge for up to a week. You can also freeze the bars for up to three months. Just wrap them tightly in plastic wrap, then put them in a freezer bag. When you want to enjoy them, thaw at room temperature. These bars make a great snack or dessert. Serve them warm or at room temperature. For a fun twist, top them with a scoop of vanilla ice cream. Add a dollop of yogurt for extra creaminess. You can also sprinkle some chopped nuts on top for added crunch. Feel free to get creative with the recipe. You can swap peaches and raspberries for other fruits like blueberries or strawberries. Try adding spices like nutmeg or ginger for a new flavor. If you want to make them vegan, just use maple syrup and coconut oil. You can also add seeds or dried fruits for different textures. For a nut-free option, skip the nuts altogether or use sunflower seeds. For the full recipe, check the section above. {{image_4}} Each serving of Peach Raspberry Oat Bars has about 180 calories. This number may vary based on your ingredients. Here’s a simple breakdown: - Rolled oats: 70 calories - Almond flour: 50 calories - Brown sugar: 20 calories - Coconut oil: 40 calories These bars provide a good mix of carbs, healthy fats, and some protein. They make a great snack or dessert. These bars are not just tasty; they are good for you too! Here are some benefits: - Rolled oats: They are high in fiber, which helps digestion. - Almond flour: It contains healthy fats and protein. It’s also gluten-free. - Peaches: These fruits are low in calories and rich in vitamins. - Raspberries: They are full of antioxidants and vitamins. Plus, they add fiber. - Honey or maple syrup: These natural sweeteners provide energy without refined sugars. Eating these bars gives you a mix of nutrients that support your health. You can easily boost the nutrition in your Peach Raspberry Oat Bars. Here are some tips: - Use less sugar: Cut down on brown sugar or use a sugar substitute. - Add seeds: Chia seeds or flaxseeds can add more fiber and omega-3s. - Swap oils: Use apple sauce or Greek yogurt instead of coconut oil for less fat. - Include nuts: Add walnuts or pecans for extra protein and crunch. These changes can help make your bars even healthier while keeping them delicious. To make Peach Raspberry Oat Bars, follow these steps closely. Start by preheating your oven to 350°F (175°C). Line an 8x8 inch baking dish with parchment paper. Next, mix your dry and wet ingredients in separate bowls. Combine them and press part of the mix into the dish for the base. Prepare your fruit filling and spread it on top. Crumble the reserved oat mixture over the fruit. Finally, bake for 25 to 30 minutes. Let them cool before cutting into bars. Here’s what you need to gather for this recipe: - 2 cups rolled oats - 1 cup almond flour - 1/2 cup brown sugar, lightly packed - 1/2 teaspoon salt - 1/2 teaspoon ground cinnamon - 1/2 cup coconut oil, melted - 1/4 cup honey or maple syrup - 1 teaspoon pure vanilla extract - 2 large ripe peaches, diced - 1 cup fresh raspberries - 1 tablespoon lemon juice - Optional: 1/4 cup chopped nuts (such as walnuts or pecans) Prep time is just 15 minutes, and total time is 1 hour. This recipe makes 12 bars, perfect for sharing or enjoying throughout the week. Each bite is a mix of sweet peaches and tart raspberries, all wrapped in a hearty oat crust. Enjoy these healthy treats as a snack or dessert! Yes, you can. You can use oat flour or all-purpose flour instead. Both will work well in this recipe. Oat flour keeps the bars gluten-free. All-purpose flour offers a softer texture. Just remember, each flour brings its own flavor and texture. Look for a golden brown color on top. The edges will also pull away from the sides. You can also test them by inserting a toothpick. If it comes out clean, your bars are ready. Absolutely! These bars freeze well. Just cut them into pieces and wrap each piece tightly in plastic wrap. Store them in a freezer bag. They will stay fresh for up to three months. When you're ready to eat, let them thaw in the fridge overnight. You can mix and match fruits! Try blueberries, strawberries, or even chopped apples. Each fruit gives a new twist to the bars. Feel free to experiment with seasonal fruits for the best taste. To keep your bars from crumbling, make sure to press the oat mixture firmly in the pan. Also, use enough coconut oil or honey to bind everything together. If the mixture feels too dry, add a bit more honey or oil. You’ve learned about the tasty Peach Raspberry Oat Bars. We covered the key ingredients and how to mix and bake them step by step. Remember to store them well and try different fruits for fun. These bars are not just good to eat; they are also good for you. Use what you learned here to impress your friends and family with your new baking skills. Enjoy making your own delicious treats anytime!

Peach Raspberry Oat Bars Irresistible Healthy Treat

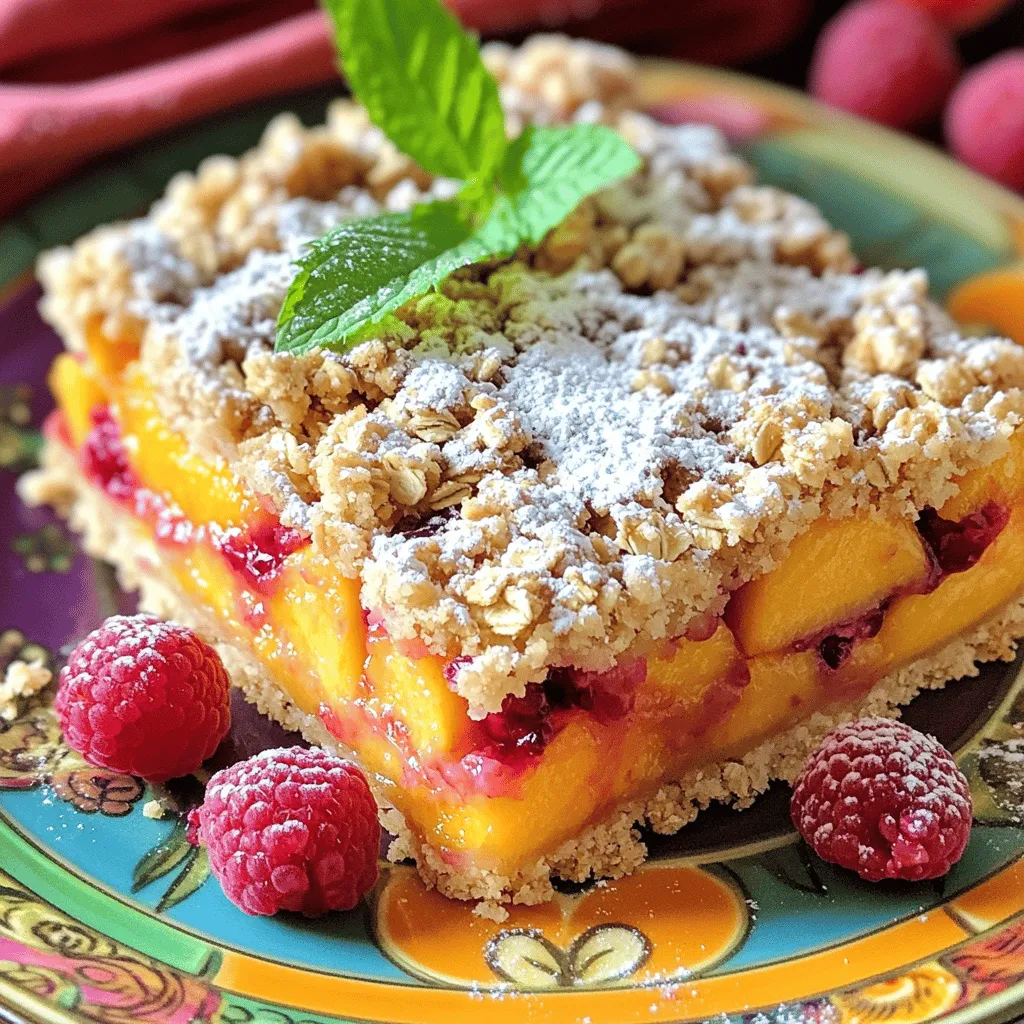
Looking for a sweet and healthy treat that’s easy to make? You’ve come to the right place! These Peach Raspberry

- 2 medium zucchinis - 1 teaspoon salt - 1/2 cup all-purpose flour - 1/4 cup grated Parmesan cheese - 2 large eggs - 1/4 teaspoon black pepper - 1/4 teaspoon garlic powder - 1/4 teaspoon cayenne pepper (optional) - 1/4 cup green onions - Olive oil for frying When selecting zucchini, look for firm, smooth skin. Avoid any with soft spots or blemishes. The best zucchinis are bright green and medium-sized. Smaller zucchinis tend to be sweeter and more tender. You can also feel for weight; heavier zucchinis are usually juicier. If possible, buy organic to avoid pesticides. To elevate your fritters, consider adding fresh herbs like dill or basil. You can also mix in chopped bell peppers or grated carrots for extra color and taste. For a cheesy boost, try adding feta or cheddar cheese. A squeeze of lemon juice can brighten the flavors, too. Experimenting with these ingredients lets you make the dish your own. For the full recipe, check out the detailed instructions and tips. Start by grating two medium zucchinis. I like using a box grater for even pieces. Once grated, place the zucchini in a large bowl. Add one teaspoon of salt to it. This salt helps draw out moisture from the zucchini. Let it sit for about 10 minutes. Afterward, grab a clean dish towel or cheesecloth. Wring out the zucchini to remove excess liquid. This step is key for crispy fritters. Once drained, transfer the zucchini to a new bowl. In the bowl with zucchini, add the following ingredients: - 1/2 cup all-purpose flour - 1/4 cup grated Parmesan cheese - 2 large eggs, beaten - 1/4 teaspoon black pepper - 1/4 teaspoon garlic powder - 1/4 teaspoon cayenne pepper (optional) - 1/4 cup green onions, finely chopped Mix all of these together very well. You want a thick mixture that holds together. If it feels too wet, add a bit more flour. This mixture is the heart of your fritters. It brings all the flavors together. Heat Levels: High vs. Medium For cooking, I recommend medium heat. This way, the fritters cook through without burning. High heat can lead to a crispy outside but a raw inside. Cooking Time for Crispy Texture Heat one tablespoon of olive oil in a non-stick skillet. Once it’s hot, use heaping tablespoons of the mixture. Shape them into small patties, about 1/2 inch thick. Place them in the skillet without crowding. Cook each fritter for about 3-4 minutes on each side. Look for a golden brown color for a perfect crisp. If they brown too fast, lower the heat. Once done, transfer fritters to a paper towel-lined plate to absorb extra oil. Continue cooking the rest, adding oil as needed. You want them warm and ready to serve. Check out the Full Recipe for more details. To get your zucchini fritters extra crispy, start by salting the grated zucchini. This step removes moisture. After ten minutes, wring out the zucchini with a towel. This helps the fritters stay dry and crispy. Next, use a good amount of oil in the pan. This ensures even cooking and a nice golden color. Finally, don’t overcrowd the pan. Leave space between the fritters for air to flow. One common mistake is not draining the zucchini enough. If too much water remains, the fritters can turn soggy. Also, be careful not to skip the salt when drawing moisture. Another issue is using too much flour. This can make the fritters heavy instead of light. Lastly, resist the urge to flip the fritters too soon. Wait until they are golden brown on one side before turning them. Yes, you can prep zucchini fritters ahead of time! Grate the zucchini and mix all ingredients except the oil. Store this mix in the fridge for up to 24 hours. When you’re ready to cook, heat the oil and fry them fresh. This way, you enjoy the best texture and taste. For easy serving, you can also freeze cooked fritters. Just reheat them in a skillet for a quick meal. Check out the Full Recipe for detailed steps! {{image_4}} You can transform your zucchini fritters by adding spices and herbs. A pinch of smoked paprika gives a nice depth. Try fresh herbs like dill or parsley for brightness. If you enjoy heat, add a bit more cayenne pepper. Each spice will change the flavor, making it fun to experiment. Think about what you love and go for it. If you need gluten-free fritters, swap the all-purpose flour for a gluten-free mix. Use almond flour or coconut flour for a different texture. These flours will work well with the zucchini. Be sure to check the mix for any extra ingredients. This way, you can enjoy a crispy fritter without gluten. Adding cheese can take your fritters up a notch. Try feta or cheddar for a delicious twist. You can also sneak in more veggies. Finely chopped spinach or bell peppers add color and nutrients. Just be careful not to add too much moisture. Each add-in changes the flavors and makes each batch unique. For the full recipe, see above. To keep your leftover fritters fresh, store them in an airtight container. Place a paper towel at the bottom to absorb moisture. This helps maintain their crispiness. Keep the container in the fridge and enjoy the fritters within three days. When you're ready to eat your leftovers, reheating is key. Use a skillet over medium heat. Add a bit of olive oil to the pan. Heat each fritter for about two to three minutes on each side. This method revives their crunchy texture. You can also use an air fryer for a few minutes at 350°F for a quick and crispy option. Freezing zucchini fritters is a great option. Start by letting them cool completely. Place parchment paper between each fritter to prevent sticking. Then, transfer them to a freezer-safe bag. You can freeze them for up to three months. When you’re ready to enjoy, thaw in the fridge overnight and reheat as mentioned above. For best results, do not freeze fritters that are already reheated. Use the full recipe for guidance on making fresh fritters before freezing. Yes, you can make zucchini fritters in advance. First, prepare the fritter mixture as stated in the recipe. Then, shape the fritters and place them on a baking sheet lined with parchment paper. Cover them and store them in the fridge for up to 24 hours. When you're ready to cook, just heat oil in the pan and fry them until golden brown. Zucchini fritters pair well with many sides. Here are some ideas: - Greek yogurt or sour cream for dipping - A fresh salad with lemon vinaigrette - A side of marinara sauce for a tangy twist - Sliced avocado for creaminess These options add flavor and make your meal more enjoyable. To make zucchini fritters without eggs, you can use flaxseed meal or chia seeds. Mix 1 tablespoon of flaxseed meal with 2.5 tablespoons of water. Let it sit for about 5 minutes until it becomes gel-like. This will help bind your fritters. You can also use mashed bananas or applesauce for a different taste. - Use flaxseed meal or chia seeds as mentioned. - Replace cheese with nutritional yeast for a cheesy flavor. - Use plant-based yogurt as a dip. These swaps keep your fritters tasty and plant-based. Yes, you can bake zucchini fritters. Preheat your oven to 400°F (200°C). Place the fritters on a baking sheet lined with parchment paper. Brush them lightly with olive oil. Bake for about 20 minutes, flipping halfway through. This method is healthier and still gives a nice texture. Zucchini fritters are simple to make and tasty. You need just a few ingredients and some easy steps. Choosing fresh zucchini gives you the best flavor. Remember to avoid common mistakes for nice, crispy fritters. You can also try different spices or add in your favorite veggies. Store leftovers well for later. Enjoy your cooking and experimenting! These fritters can be a fun dish for any meal or snack.

Easy Zucchini Fritters Crispy and Delicious Recipe

Zucchini fritters are simple, tasty, and a great way to use fresh veggies. Whether you want a quick snack or

Older posts
Newer posts
← Previous Page1 … Page44 Page45 Page46 … Page86 Next →

dsad

© 2026 yumymoments • Built with GeneratePress

Our Policies

  • Copyright Policy
  • Cookie Policy
  • GDPR Policy
  • Privacy Policy
  • Disclaimer
  • Terms Of Use

More Information

  • Home
  • About
  • Contact
  • Appetizers
  • Dessert
  • Dinner
  • Drinks
©2026, yumymoments About Back To Top