Skip to content
DisclaimerTerms Of UseGDPR PolicyCookie Policy

yumymoments

  • Home
  • Drinks
  • Appetizers
  • Dinner
  • Dessert
  • About
  • Contact
  • Privacy Policy
DisclaimerTerms Of UseGDPR PolicyCookie Policy

NO-ING-IMG

- 4 medium zucchinis, sliced into even rounds - 1 cup fresh ricotta cheese - 1 cup shredded mozzarella cheese, divided - ½ cup finely grated Parmesan cheese, divided - 2 cloves garlic, minced - 1 teaspoon dried oregano - 1 teaspoon dried basil - ½ teaspoon red pepper flakes (optional for added heat) - 1 cup panko breadcrumbs - 2 tablespoons extra virgin olive oil - Fresh basil or parsley for garnish Creating Cheesy Zucchini Bake is fun and simple. The main stars are the zucchinis, which give the dish a fresh taste. I love using medium zucchinis because they hold their shape well when baked. The ricotta cheese adds creaminess, while mozzarella and Parmesan bring that golden, bubbly goodness. I season the dish with garlic for depth and flavor. Oregano and basil add warmth and earthiness. If you like a little heat, red pepper flakes do the trick. For crunch, I use panko breadcrumbs. They create a lovely texture on top. A drizzle of olive oil makes the breadcrumbs golden and crisp. Finally, I garnish with fresh herbs like basil or parsley. They add color and a burst of freshness. This dish is rich, flavorful, and perfect for sharing. Find the full recipe in the article to make your own Cheesy Zucchini Bake! First, preheat your oven to 375°F (190°C). This is important for even baking. Next, take a 9x13-inch baking dish. Grease it with non-stick spray or drizzle some olive oil. Make sure to cover the whole dish to prevent sticking. Slice the zucchinis into even rounds. In a large bowl, combine these slices with minced garlic, dried oregano, dried basil, and red pepper flakes if you want some heat. Add a good pinch of salt and pepper. Toss everything gently until all pieces are well coated. This will ensure every bite is packed with flavor. In another bowl, mix the ricotta cheese with half of the shredded mozzarella and half of the grated Parmesan. Stir well until the mixture is smooth and creamy. This will be the rich layer that adds depth to your dish. Start layering your dish by placing half of the seasoned zucchini slices at the bottom. Then, spread half of the cheese mixture over the zucchini. Repeat with the rest of the zucchini slices and then the remaining cheese mixture. This layering makes the dish visually appealing and tasty. Now, sprinkle the rest of the shredded mozzarella and Parmesan on top. This will give your dish a cheesy crown. In a small bowl, mix the panko breadcrumbs with olive oil. Stir until all breadcrumbs are coated. Then, evenly spread this mixture over the cheesy layer for a crunchy topping. Place the baking dish in your preheated oven. Bake for 25-30 minutes. Watch for the top to turn golden brown and bubble. This means it is ready. After baking, let it cool for a few minutes. This helps the layers set, making slicing easier. You can find the full recipe for more detailed instructions and tips. Enjoy your Cheesy Zucchini Bake! When selecting zucchini, look for firm and shiny skin. Avoid any with soft spots or blemishes. Choose medium-sized zucchinis for the best flavor and texture. Smaller zucchinis tend to be sweeter and more tender than larger ones. If you find organic zucchini, grab those for better taste and health. Fresh zucchini makes this Cheesy Zucchini Bake even more delightful. You can easily modify the seasoning to suit your taste. If you like garlic, add more minced cloves. For a spicy kick, increase the red pepper flakes. Feel free to mix in other herbs like thyme or rosemary for extra flavor. Always taste as you go, so you can find the perfect balance. This way, your Cheesy Zucchini Bake will be just how you like it. To ensure even cooking, layer your ingredients evenly in the dish. Spread the zucchini slices and cheese mixture in a flat layer. This helps everything cook through nicely. Keep an eye on the bake time. You want a golden-brown top with bubbly cheese. If the top browns too fast, cover it loosely with foil. This keeps it from burning while the center cooks through. {{image_4}} You can easily add meat to your Cheesy Zucchini Bake. Ground turkey or beef works great. Simply brown the meat in a pan before mixing it with the zucchini. This adds flavor and protein. You can mix the cooked meat into your seasoned zucchini before layering. Just remember to adjust the seasoning slightly to balance the flavors. For a vegetarian twist, consider adding more veggies. Spinach and bell peppers are fantastic choices. You can sauté these veggies lightly before mixing them with the zucchini. This step enhances their flavors and keeps them tender. Feel free to experiment with other vegetables too, like mushrooms or carrots. If you need a gluten-free version, swap the panko breadcrumbs. Use gluten-free breadcrumbs or crushed gluten-free crackers instead. You can also try almond flour for a nutty flavor. Check all other ingredients to ensure they are gluten-free, too. This way, you can enjoy your dish without worry. To keep your Cheesy Zucchini Bake fresh, store leftovers in an airtight container. Place it in the fridge within two hours after baking. This helps prevent spoilage. The dish stays good in the fridge for about three to four days. Always label the container with the date. This way, you know when it’s time to enjoy it or toss it. Reheat your Cheesy Zucchini Bake to bring back its cheesy goodness. The best method is using the oven. Preheat your oven to 350°F (175°C). Place the leftovers in a baking dish. Cover it with foil to keep moisture in. Heat for about 15-20 minutes, or until it's warm. This keeps the texture nice and melty. You can also use the microwave. Heat in short bursts of 30 seconds, checking often. Stir it well to avoid hot spots. If you want to save some for later, freezing is a great option. First, let the dish cool completely. Then, cut it into portions for easy use. Wrap each portion tightly in plastic wrap. After that, place them in a freezer-safe bag. Label the bag with the date. The Cheesy Zucchini Bake can stay in the freezer for up to three months. When ready to eat, thaw it overnight in the fridge. Reheat it in the oven for the best results. Enjoy your delicious dish anytime! For the full recipe, check the earlier section. Yes, you can make Cheesy Zucchini Bake ahead of time. Prepare the dish up to the baking step. Cover it tightly with plastic wrap or foil. Store it in the fridge for up to 24 hours. When ready to bake, let it sit at room temperature for about 15 minutes. This helps it bake evenly. Then, pop it in the preheated oven for 30 to 35 minutes. This allows the bake to heat through and develop that golden topping. Cheesy Zucchini Bake pairs well with many sides. Here are some tasty options: - A simple green salad with lemon vinaigrette - Garlic bread for a crunchy bite - Steamed vegetables, like broccoli or green beans - Quinoa as a healthy grain option - Grilled chicken or fish for added protein These sides complement the rich flavors of the bake and create a balanced meal. Baking Cheesy Zucchini Bake takes about 25 to 30 minutes. You want the top to be golden brown. It should bubble slightly to show it’s hot inside. Always check for doneness before serving. If it needs more time, continue baking in 5-minute increments. This blog post covered everything you need for a tasty Cheesy Zucchini Bake. We started with the main ingredients, like zucchini and cheeses, and discussed key seasonings. Step-by-step, you learned how to prepare, layer, and bake your dish. I shared tips for the perfect bake and fun variations to try. Don't forget to store leftovers properly for later enjoyment. With this knowledge, you can create a delicious meal that everyone will love. Enjoy your cooking adventure!

Cheesy Zucchini Bake Flavorful and Simple Dish

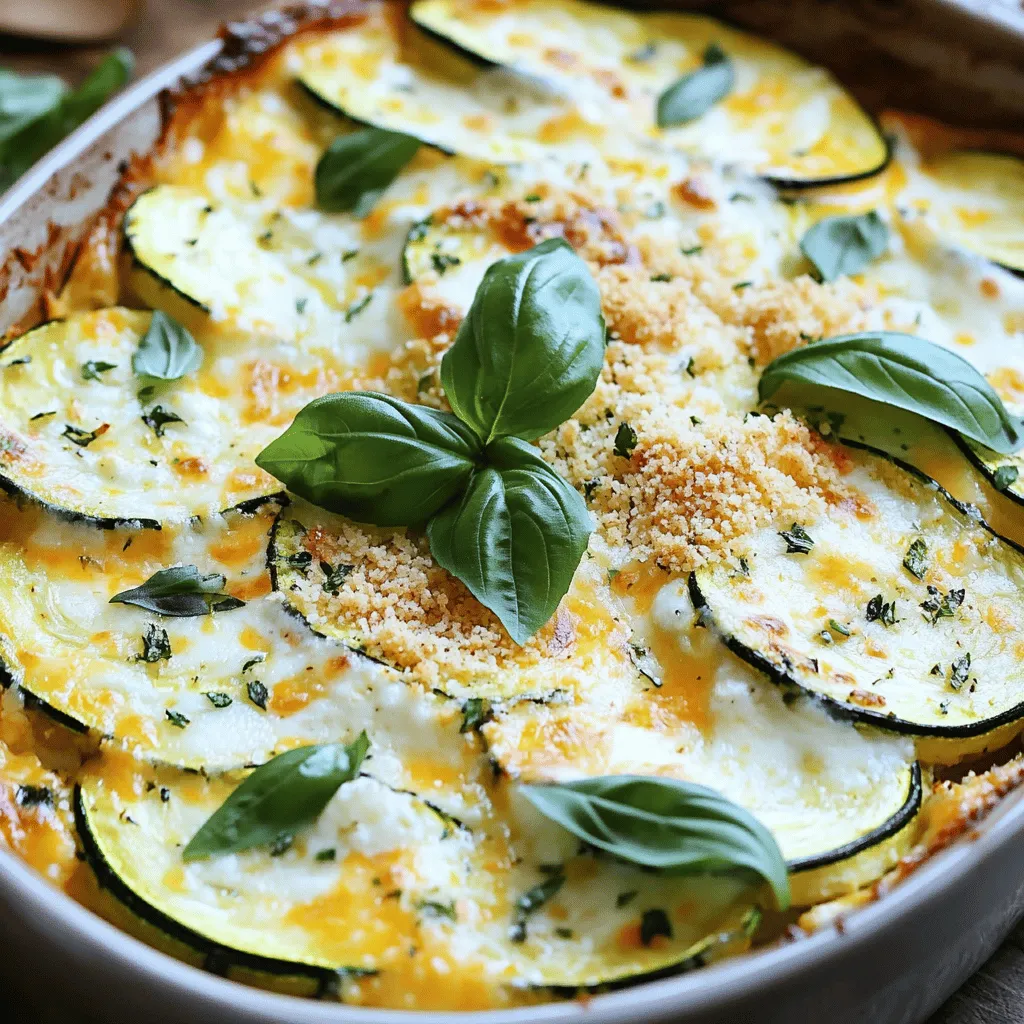
Do you love cheesy comfort food that’s easy to make? Then this Cheesy Zucchini Bake is just for you! Packed

- 2 cups plain Greek yogurt (low-fat or non-fat options) - 1 cup granola (low-sugar variety) - 1 cup mixed berries (strawberries, blueberries, raspberries) - Honey or maple syrup (for sweetness) - Ground cinnamon (for flavor) - Fresh mint leaves (for garnish) Gathering your ingredients is the first step to making a tasty Greek yogurt parfait. I love using plain Greek yogurt because it is thick and creamy. It packs a protein punch and keeps you full. You can choose low-fat or non-fat based on what you like. Granola adds a nice crunch. I suggest picking a low-sugar variety to keep things healthy. Mixed berries are colorful and full of flavor. Strawberries, blueberries, and raspberries mix well together. They add natural sweetness and vitamins to your parfait. If you want extra sweetness, consider adding honey or maple syrup. A pinch of ground cinnamon can boost the flavor and make it warm. Lastly, fresh mint leaves add a pop of color and a cooling taste. This parfait is easy to customize. You can mix and match your favorite fruits and toppings. For the full recipe, check the link provided. 1. First, grab your medium mixing bowl. Mix the Greek yogurt with a pinch of cinnamon. If you want it sweeter, add honey or maple syrup. Stir well until it’s smooth. 2. Next, pick out your clear serving glasses or bowls. These will show off the pretty layers. Start by adding a big scoop of your yogurt mix to the bottom of each glass. 3. After that, sprinkle a layer of granola over the yogurt. Follow this with a layer of mixed berries. Spread them out so they look nice. 4. Keep layering: add more yogurt, then granola, and berries. Finish with a nice layer of yogurt on top. 5. To make it look special, add some extra berries and a fresh mint leaf on top. - Start with the yogurt at the bottom. Then, add granola and berries on top. - Repeat this process until the glasses are full. Always end with a yogurt layer on top. This method gives your parfait a lovely look and a great taste. For a detailed guide, check out the Full Recipe. When making a parfait, choosing the right yogurt is key. Low-fat Greek yogurt gives a creamy texture with fewer calories. Non-fat Greek yogurt is even lighter but still rich in protein. Both options are healthy and delicious. You can also find flavored Greek yogurts. These can add a fun twist. Just watch for added sugars in flavored kinds. To get clean layers in your parfait, use a steady hand. Start with a layer of yogurt, then granola, and finish with berries. Repeat this until your glass is full. The right glassware makes a big difference. Clear glasses or bowls show off the layers beautifully. This makes your parfait look as good as it tastes. Crunchy toppings elevate your parfait. Granola adds a nice bite, but you can also try nuts or seeds. For sweetness, balance it with tart flavors. The berries bring a fresh taste that pairs well with yogurt. If you want more sweetness, add a drizzle of honey or maple syrup. Just be careful not to make it too sweet. {{image_4}} You can switch up the fruits in your parfait based on the season. In summer, try adding juicy peaches or ripe strawberries. In fall, crisp apples or sweet pears work great. This keeps your parfait fresh and exciting. Always choose fruits that are in season for the best taste and nutrition. Plus, it makes your parfait colorful! If you follow a vegan or dairy-free diet, you can still enjoy this parfait. Use coconut yogurt or almond yogurt in place of Greek yogurt. For those avoiding gluten, look for granola made from oats or seeds. There are many brands that offer gluten-free options. You can even make your own granola at home! Want to add some fun flavors? Try mixing in nut butters like almond or peanut. Chocolate lovers can sprinkle in some cocoa powder or mini chocolate chips. For a warm twist, add spices like nutmeg or ginger to your yogurt. These flavors will make your parfait truly unique. Feel free to experiment and find your favorite combinations! Remember, you can find the Full Recipe to create your own Healthy Greek Yogurt Parfait. To keep your Greek yogurt parfait fresh, you want to store it in the fridge. Place it in an airtight container. This helps keep the layers intact and prevents sogginess. If you have leftover parfaits, they will last for about 2 to 3 days in the fridge. After that, the granola might get too soft. You can prepare the parts of your parfait ahead of time. Mix the Greek yogurt and spices and store them separately. Wash and slice your berries and keep them in a separate container. You can also store the granola in a cool, dry place. Assemble the parfaits just before serving for the best taste and texture. This way, you have a delightful treat ready to enjoy! For the full recipe, check the details above. Greek yogurt is rich in protein. It helps you feel full longer. It also has probiotics, which support gut health. Compared to regular yogurt, Greek yogurt has less sugar and more protein. This makes it a better choice for anyone wanting to eat healthier. Yes, you can use various types of granola. Look for low-sugar granola to keep it healthy. You can also make your own granola at home. This way, you control the ingredients and sweetness. You can add many flavors to your parfait. Try nuts, seeds, or different fruits. If you want it vegan, use coconut yogurt instead. For gluten-free options, choose gluten-free granola. The choices are endless! You can find the detailed recipe for the Deliciously Creamy Healthy Greek Yogurt Parfait [here](#). This blog post covered how to make a healthy Greek yogurt parfait. We explored key ingredients like Greek yogurt, granola, and berries. You learned steps for mixing and layering these ingredients. Tips helped you choose yogurt, achieve perfect layers, and enhance flavors. You can also adapt the parfait for seasonal fruits and dietary needs. With these simple steps, you can create a tasty and nutritious treat. Enjoy experimenting with flavors and finding what you love!

Healthy Greek Yogurt Parfait Easy Layered Delight

Looking for a quick, healthy breakfast or snack? You’ll love this Healthy Greek Yogurt Parfait Easy Layered Delight! With just

- 1 can sliced peaches in syrup - 1 box yellow cake mix - 1/2 cup unsalted butter - Fresh diced peaches (optional) The main ingredients for Easy Peach Dump Cake are simple and easy to find. The sliced peaches in syrup bring sweetness and moisture. You can use a can, or if you like, add fresh diced peaches for more flavor. The yellow cake mix acts as the base, giving it that delicious cake texture. The unsalted butter adds richness and helps the cake bake beautifully. - Ground cinnamon - Chopped pecans or walnuts - Vanilla ice cream or whipped cream for serving You can make this dessert even more special with optional add-ins. Ground cinnamon gives a warm flavor that pairs well with peaches. Nuts like pecans or walnuts add a nice crunch. Finally, serving it with vanilla ice cream or whipped cream makes each bite feel like a treat. These choices let you customize your cake to match your taste. For the full recipe, check out the detailed steps to make this delightful dessert! 1. Preheat the oven to 350°F (175°C). This makes sure the cake bakes evenly. 2. Grease a 9x13 inch baking dish. This helps the cake come out easily. Add the can of sliced peaches, undrained, right into the dish. The syrup adds moisture and sweetness. If you like, you can also add fresh diced peaches for extra flavor. 1. Open your box of yellow cake mix. Sprinkle it evenly over the peaches. Do not stir! The uneven look adds charm to the cake. 2. Drizzle the melted butter over the cake mix. Try to cover as much as you can. This ensures an even bake. 3. Now, sprinkle ground cinnamon across the top. If you want a crunch, add chopped pecans or walnuts at this stage. 1. Place the baking dish in the preheated oven. Bake for 35-40 minutes. You want it golden brown and bubbly around the edges. 2. Once baked, take it out and let it cool for about 10 minutes. This cooling time helps the flavors settle. Feel free to check the [Full Recipe] for more details! Using undrained peaches is key. The syrup adds sweetness and moisture. It helps the cake bake perfectly. If you drain the peaches, the cake can turn out dry. Do not stir the cake mix. Just sprinkle it over the peaches. The mix will form a lovely crust as it bakes. This step keeps the dump cake easy and fun. Serve your dump cake warm. A scoop of vanilla ice cream adds creaminess. The cold ice cream contrasts well with the warm cake. It makes every bite delightful. For a pretty touch, garnish with a slice of fresh peach. You can also sprinkle some chopped nuts on top. This adds a nice crunch and brightens the dish. Enjoy making your Easy Peach Dump Cake shine! {{image_4}} You can easily change this recipe to suit your taste. Adding fresh berries makes a fun twist. Try using blueberries or raspberries. They pair well with the peaches. Just sprinkle them on top of the peaches before you add the cake mix. You can also use different cake mix flavors. A spice cake mix adds warmth and depth. A yellow cake mix gives a classic taste. If you want something unique, opt for a chocolate cake mix. The chocolate will blend nicely with the peaches. If you need a gluten-free option, use a gluten-free cake mix. Many brands offer great flavors. Just check the label to be sure. For vegan options, use a vegan butter substitute. Coconut oil works well and adds a nice flavor. You can also use applesauce to keep things moist. This way, everyone can enjoy this delicious dessert! For the full recipe, check out the entire section above. To keep your Easy Peach Dump Cake fresh, first let it cool. Cover the dish with plastic wrap or foil. Store it in the fridge for up to four days. This helps keep the cake moist and tasty. When you're ready to enjoy it again, reheat it in the oven. Set the oven to 350°F (175°C) and heat for about 15 minutes. This way, the topping stays crispy. If you want to save your dump cake for later, freezing is a great option. Cut the cake into pieces and place them in an airtight container. You can also wrap each piece in plastic wrap before placing it in a freezer bag. This method helps avoid freezer burn. The cake can last up to three months in the freezer. When you want to eat it, take the cake out of the freezer. Let it thaw in the fridge overnight. If you need it fast, you can set it at room temperature for a few hours. Once thawed, reheat it in the oven for that fresh-baked taste. Enjoy your Peach Dump Cake warm, just like the first time. For full details on making this cake, check the Full Recipe. How long does Easy Peach Dump Cake last? Easy Peach Dump Cake can last for about 3 to 5 days when stored in the fridge. Make sure to cover it well to keep it fresh. If you want to save it longer, you can freeze it. Just wrap it tightly and it can last for about 2 to 3 months. Can I use frozen peaches instead of fresh? Yes, you can use frozen peaches! Just make sure to thaw and drain them first. This way, you avoid too much liquid in your cake. Frozen peaches work well and can save you time. Why is my dump cake not bubbly? If your dump cake is not bubbly, it might be undercooked. Check if the oven was at the right temperature. You may need to bake it a bit longer. The cake should bubble around the edges when it’s done. What to do if the cake mix burns on top? If the cake mix burns, you can cover it loosely with foil. This will protect it from direct heat. You can also lower the oven temperature next time. Keep an eye on the cake as it bakes to avoid burning. In this post, we explored how to make a delicious Easy Peach Dump Cake. We covered the key ingredients, preparation steps, and tips for perfecting your dish. You have various toppings and add-ins to enhance flavor and presentation. Remember to store leftovers properly and try different variations to suit your taste. Whether making it for a gathering or a cozy night in, this dessert is simple and rewarding. Enjoy baking and sharing this sweet treat with loved ones!

Easy Peach Dump Cake Delicious and Simple Dessert Recipe

If you want a quick and tasty dessert, you’re in the right place! My Easy Peach Dump Cake combines sweet

- 2 medium zucchinis - 1 cup whole wheat breadcrumbs - ½ cup freshly grated Parmesan cheese - 1 teaspoon garlic powder - 1 teaspoon onion powder - ½ teaspoon dried oregano - ½ teaspoon salt - ¼ teaspoon black pepper - 2 large eggs - Olive oil spray or a drizzle You can swap breadcrumbs for crushed nuts or oats for a different crunch. If you want a vegan option, use nutritional yeast instead of Parmesan cheese. For the eggs, try flaxseed meal mixed with water as a binding agent. Using fresh zucchini makes a big difference in taste and texture. Fresh zucchini has a crisp bite that adds to the overall enjoyment. Freshly grated Parmesan cheese enhances the flavor better than pre-grated options. The fresh cheese melts beautifully, giving you that perfect cheesy finish. For the full recipe, check out the detailed instructions and enjoy your cooking! First, preheat your oven to 425°F (220°C). This high heat helps make the zucchini fries crispy. Next, prepare your baking sheet. Line it with parchment paper to keep the fries from sticking. This makes cleaning up much easier. Now, let’s cut the zucchinis. Rinse them well under cool water. Trim off the ends, then slice each zucchini into fries. Aim for about a quarter-inch thickness. This size cooks evenly. In a medium bowl, mix the whole wheat breadcrumbs, Parmesan cheese, garlic powder, onion powder, oregano, salt, and black pepper. Stir until everything is well combined. In another bowl, crack the two large eggs. Beat them well. This egg mixture will help the coating stick to the fries. Take a zucchini fry, dip it in the egg, and let the excess drip off. Next, roll it in the breadcrumb mix, ensuring it’s fully coated. Place each fry on the prepared baking sheet in a single layer. Now, let’s bake those fries! Lightly spray or drizzle the coated fries with olive oil. This step is key for a crispy finish. Bake the fries for 20 to 25 minutes. Flip them halfway through to ensure they cook evenly. Look for a golden brown color. This shows they are ready. Once baked, let them cool for a few minutes. They will be hot, so be careful when you serve. Enjoy your crispy baked Parmesan zucchini fries! For the full recipe, check the above details. To make your zucchini fries super crispy, use olive oil spray or drizzle. This small step adds a light coat of oil that helps them crisp up in the oven. You want to spray or drizzle just enough to coat each fry evenly. Too much oil can make them soggy, so be mindful. Position your baking sheet in the center of the oven. This allows for even heat distribution. If your fries are too close to the top or bottom, they may not brown evenly. A center rack is the best place for perfect cooking. Zucchini fries taste great with dipping sauces. Try marinara sauce for a classic touch. Ranch dressing is another favorite; it adds a creamy contrast. You can also use a spicy aioli for a kick. To make a full meal, pair your fries with a fresh salad or grilled chicken. A light lemon vinaigrette on the salad will balance the fries well. This way, you create a colorful and tasty plate that satisfies everyone. If you want to serve more people, you can easily adjust the ingredient quantities. Just double or triple the recipe as needed. Keep the same proportions for the breadcrumbs and cheese for the best results. For meal prepping, cut and coat your zucchini fries ahead of time. Store them in the fridge for up to a day before baking. This makes it easy to enjoy a quick and healthy snack or side dish later. Just remember to bake them fresh for that crispy texture! {{image_4}} You can boost the taste of your baked zucchini fries with some simple tweaks. Adding spices like cayenne or paprika gives them a nice kick. You can sprinkle these spices into the breadcrumb mix. This change makes each bite exciting and bold. Herbs also add freshness to your fries. Try using dried basil or thyme for a lovely aroma. Mix these herbs into your breadcrumb coating. Fresh herbs, like parsley or cilantro, can also elevate the fries after baking. Just chop them finely and sprinkle on top before serving. If you want to switch things up, consider using an air fryer. It cuts cooking time and keeps the fries crisp. Set your air fryer to 400°F (200°C) and cook for about 15 minutes. Shake the basket halfway through to ensure even crispiness. Another option is deep frying. This method gives the fries a different texture. Heat oil in a pot to 350°F (175°C). Fry the zucchini fries in small batches until golden brown. This method makes them extra crunchy, but be mindful of the oil used. For those needing gluten-free options, you can substitute the breadcrumbs. Use crushed gluten-free crackers or almond flour instead. This keeps the crunch while meeting dietary needs. If you're watching carbs, try a low-carb version. You can skip the breadcrumbs and coat the zucchini in grated cheese. This will add flavor without the carbs. Experimenting with different coatings can lead you to your favorite version of these fries. For the full recipe, check out the detailed instructions provided above. Store your leftover zucchini fries in the fridge. Use airtight containers to keep them fresh. Make sure they cool down before sealing. This helps keep moisture out and maintains crispiness. To reheat, use the oven for the best results. Preheat your oven to 400°F (200°C). Place the fries on a baking sheet. Heat them for 10-15 minutes. This restores their crunchiness. You can also use an air fryer. It works great too! You can freeze your zucchini fries if you have extras. First, let them cool completely. Spread them in a single layer on a baking sheet. Freeze for about 1-2 hours. Then, transfer them to a freezer bag. They will stay fresh for about 2-3 months. When ready to eat, thaw in the fridge overnight before reheating. Enjoy your tasty snack anytime! For the full recipe, check out the earlier section! To make your zucchini fries crispier, focus on a few key techniques. First, cut the zucchini into even pieces. This helps them cook at the same rate. Next, use whole wheat breadcrumbs. They add a great crunch. Another tip is to coat the fries well with the egg and breadcrumb mix. Make sure every fry is covered. Finally, spray them lightly with olive oil before baking. This adds moisture while helping them crisp up. Yes, you can prepare these fries in advance! You can cut the zucchini and coat them with the breadcrumb mix a few hours ahead. Just keep them in the fridge until you're ready to bake. You can also freeze unbaked fries. Place them on a baking sheet in a single layer and freeze them. Once frozen, transfer them to a bag. When you’re ready to cook, bake them straight from the freezer. This way, they stay fresh and tasty. These fries pair well with many dips and dishes. Try serving them with marinara sauce for a classic touch. Ranch dressing also makes a great choice. For a twist, consider a spicy aioli or tzatziki. You can also serve them as a side dish with grilled chicken or fish. They make a fun addition to a veggie platter too. You can store leftover zucchini fries in the fridge for up to three days. Place them in an airtight container to keep them fresh. If you want to store them longer, consider freezing them. They can last for about a month in the freezer. Just remember to reheat them well to regain some crispiness. Yes, these zucchini fries are a healthy snack! Zucchini is low in calories and high in vitamins. It also has fiber, which is good for digestion. Using whole wheat breadcrumbs adds nutrients compared to regular ones. The Parmesan gives you protein and calcium. Overall, these fries are a tasty and healthy choice for snacking or side dishes. For the full recipe, check out the section above. Baked Parmesan Zucchini Fries offer a tasty and healthy snack. We explored the key ingredients, their roles, and substitutions. Fresh ingredients boost flavor, while proper preparation ensures crispiness. Remember the baking tips and serving ideas to enhance your dish. You can also adjust recipes for dietary needs or try different cooking methods. Enjoy these fries as part of a meal or as a fun snack with dips. Your kitchen adventure with zucchini fries is just beginning. Enjoy the process and the great taste!

Baked Parmesan Zucchini Fries Crispy and Flavorful Snack

Looking for a delicious snack that’s both crispy and healthy? You’re in the right place! I’ll show you how to

To make a Chocolate Peanut Butter Mug Cake, you need just a few simple ingredients. Here’s what you will need: - 4 tablespoons all-purpose flour - 4 tablespoons granulated sugar - 2 tablespoons unsweetened cocoa powder - 1/8 teaspoon baking powder - 1/8 teaspoon salt - 3 tablespoons milk (any kind) - 2 tablespoons peanut butter (choose creamy or crunchy based on preference) - 2 tablespoons vegetable oil - 1/4 teaspoon pure vanilla extract - Optional: Chocolate chips or chopped nuts for extra toppings These ingredients come together to create a rich, warm treat. Each element plays a role. The flour gives structure, while cocoa adds that deep chocolate flavor. Sugar sweetens the mix, and peanut butter brings creaminess. It’s a perfect balance for a quick dessert. If you want to elevate your mug cake, you can add toppings like chocolate chips or nuts. They add texture and flavor. For the full recipe, check out the details above. Enjoy crafting this delightful treat! Start by gathering your ingredients. In a microwave-safe mug, you will mix key dry ingredients. Combine: - 4 tablespoons all-purpose flour - 4 tablespoons granulated sugar - 2 tablespoons unsweetened cocoa powder - 1/8 teaspoon baking powder - 1/8 teaspoon salt Use a fork or small whisk to mix these dry ingredients thoroughly. Make sure no clumps remain. This step helps your mug cake rise and taste great. Next, pour in the wet ingredients directly into the mug with your dry mixture. Add: - 3 tablespoons milk (any kind) - 2 tablespoons peanut butter (creamy or crunchy) - 2 tablespoons vegetable oil - 1/4 teaspoon pure vanilla extract Using a spoon, stir the mixture together. Mix until you achieve a smooth and cohesive batter. Scrape down the sides of the mug to ensure everything is well mixed. If you want extra flavor, fold in a tablespoon of chocolate chips or chopped nuts at this stage. Now it’s time to cook your mug cake. Place the mug in the microwave. Cook on high for about 1 minute and 30 seconds. Microwaves can vary, so watch your cake closely. You may need to adjust the cooking time slightly. The cake should expand and look set on top when it is ready. Once cooked, carefully use oven mitts to remove the mug from the microwave. It will be very hot! Allow the mug cake to cool for about a minute to avoid burns. For an indulgent touch, sprinkle more chocolate chips on top. Dive in with a spoon and enjoy every bite straight from the mug! For more detailed steps, check the Full Recipe. Cooking times can change based on your microwave wattage. Most microwaves cook between 600 to 1200 watts. If your microwave is lower, you may need to add 15 to 30 seconds to the cooking time. Always check for doneness by looking for a set top. The cake should rise and not look wet. If it looks too wet, cook for a few more seconds. You can tweak the ingredients for a better texture. If you want it fluffier, add a bit more baking powder. For a denser cake, use less flour or more peanut butter. To make it more chocolatey, add extra cocoa powder or chocolate chips. For a stronger peanut taste, add more peanut butter. Just remember to keep balance in mind! Serving your mug cake in the mug adds charm and ease. For a fun twist, top with whipped cream or a scoop of ice cream. This adds a nice contrast to the warm cake. You can also sprinkle extra chocolate chips or crushed nuts on top. This extra touch makes it look fancy and yummy. Enjoy your masterpiece right from the mug for a cozy treat! For the full recipe, check out the detailed instructions above. {{image_4}} You can easily change the flavor of your mug cake. Try using different nut butters, like almond or cashew. Each nut butter gives a unique taste. You can also swap out cocoa powder for other flavors. Try using vanilla for a sweet twist. Matcha adds a fun green color and earthy flavor. If you need gluten-free options, use gluten-free flour instead of all-purpose flour. This keeps your mug cake tasty and safe for gluten-sensitive eaters. For vegan options, replace milk with almond or soy milk. Use a plant-based butter instead of regular peanut butter. This way, everyone can enjoy a delicious treat! Toppings can take your mug cake to the next level! Try adding a scoop of ice cream or whipped cream on top. You can also mix in fresh fruits like bananas or strawberries. Seasonal toppings can make it fun too! In fall, add pumpkin spice. During summer, try fresh berries for a burst of flavor. Mix and match your favorites for an exciting dessert every time! To keep any uneaten mug cake fresh, let it cool first. Cover the mug with plastic wrap or place it in an airtight container. This helps keep moisture in. Store it in the fridge for up to two days. If you notice the cake drying out, a little milk can help revive it. When you're ready to enjoy your leftover mug cake, the microwave is your best friend. Place the mug in the microwave and heat it for 10 to 15 seconds. Check if it’s warm enough; if not, heat in small bursts. To restore the texture, add a splash of milk before reheating. This keeps the cake moist and fluffy. Yes, you can freeze mug cake! To do this, let the cake cool completely. Wrap it in plastic wrap or foil, then place it in a freezer bag. It will stay good for up to a month. To defrost, move the mug cake to the fridge overnight. When ready to eat, reheat it in the microwave as mentioned earlier. Enjoy your Chocolate Peanut Butter Mug Cake anytime! For the full recipe, check out the earlier sections. A mug cake usually takes about 1 minute and 30 seconds to cook in the microwave. However, cooking times can vary based on microwave wattage. Here’s a quick guide: - 700 watts: Cook for 1 minute and 45 seconds. - 800 watts: Cook for 1 minute and 30 seconds. - 1000 watts: Cook for 1 minute and 15 seconds. Always keep an eye on your cake as it cooks. If it seems too wet, you can add a few more seconds. Yes, you can make multiple mug cakes at once! This is a great way to share this treat with friends or family. Here are some tips: - Use different mugs for each cake. This keeps them from mixing. - Cook each mug cake separately. Microwaves usually cook better this way. - If you have a powerful microwave, you can try two at a time, but check them often. If you have allergies or just want a change, there are great substitutes for peanut butter: - Almond butter: A tasty alternative with a similar texture. - Sunflower seed butter: A nut-free option that works well. - Soy nut butter: Another nut-free choice with a rich flavor. These substitutes can change the taste but still give you a yummy mug cake. You can use the Full Recipe with these alternatives for a new twist! This blog post covered everything you need to make a delicious mug cake. We started with a simple list of ingredients and then walked through easy steps for mixing and cooking. I shared tips for cooking times and variations to suit your taste. Finally, we discussed storage and reheating. In the end, mug cakes offer quick and tasty joy. Experiment with flavors and toppings to make it uniquely yours. Enjoy your cake!

Chocolate Peanut Butter Mug Cake Dreamy Quick Treat

If you crave a quick, delicious treat, look no further! This Chocolate Peanut Butter Mug Cake is your answer. You

To make Zesty Cilantro Lime Rice, gather these simple ingredients: - 1 cup long-grain white rice - 2 cups vegetable broth (or water) - 1 tablespoon extra virgin olive oil - Zest of 1 fresh lime - Juice of 1 fresh lime - 1/4 cup fresh cilantro, finely chopped - 1 garlic clove, minced - 1/2 teaspoon sea salt - 1/4 teaspoon freshly cracked black pepper You can add more flavor with these optional items: - 1/4 teaspoon ground cumin (for an extra kick) To prepare this dish, you will need: - Medium-sized saucepan - Fine mesh strainer - Wooden spoon or spatula - Measuring cups and spoons - Fork for fluffing the rice Each item helps make your cooking smooth and easy. With these ingredients and tools, you will create a dish that bursts with flavor! For the full recipe, check the details above. - Rinsing the Rice Start by rinsing the long-grain white rice. Use a fine mesh strainer. Rinse it under cold running water. This step helps remove excess starch. Rinse until the water runs clear. Drain the rice well to ensure it is ready for cooking. - Sautéing Garlic and Rice In a medium-sized saucepan, pour in the olive oil. Heat it over medium heat. When the oil shimmers, add the minced garlic. Sauté the garlic for about 30 seconds. Stir it often but don't let it brown. Burnt garlic can taste bitter. - Cooking the Rice Next, add the rinsed rice to the saucepan. Stir to coat the rice with oil and garlic. Cook the rice for 2-3 minutes. Keep stirring until it turns a light golden color. Then, carefully pour in the vegetable broth or water. Add the sea salt, black pepper, and cumin, if using. Bring this mix to a boil. Once boiling, reduce the heat to low. Cover the saucepan with a tight lid. Let it simmer for 15-18 minutes. Avoid lifting the lid to keep the steam in. - Fluffing and Serving Suggestions After the cooking time, remove the saucepan from heat. Keep it covered for 5 more minutes. This resting time lets the rice finish cooking. Afterward, fluff the rice gently with a fork. Fold in the lime zest, lime juice, and chopped cilantro. Mix until everything is combined. Taste it and adjust the seasoning if needed. Serve your Zesty Cilantro Lime Rice warm. You can enjoy it as a side dish or a main course. For a finishing touch, add extra fresh cilantro on top. For the complete recipe, refer to the Full Recipe section. To cook perfect rice, always rinse it first. Rinsing removes excess starch. This makes your rice fluffy and light. Use a fine mesh strainer for this step. Rinse under cold water until it runs clear. This can take a minute or two. Use the right ratio of rice to liquid. For long-grain white rice, use two cups of liquid for every cup of rice. I like to use vegetable broth for extra flavor. Bring the broth to a boil before adding the rice. This helps the rice cook evenly. You can play with flavors easily. If you want more zest, add extra lime juice or zest. Fresh cilantro adds a nice herbal note. If you want a kick, stir in some ground cumin. This spice gives a warm, earthy taste. Taste your rice after mixing in the lime and cilantro. Adjust with sea salt or black pepper if needed. Just a pinch can enhance the overall flavor. Presentation makes food special. Serve your Zesty Cilantro Lime Rice in a nice bowl. Sprinkle extra cilantro on top for color. You can also add lime wedges on the side. It looks pretty and adds more zing. Pair it with grilled chicken or fish for a complete meal. You can even use it as a base for burrito bowls. This rice not only tastes great but also looks inviting. Enjoy your vibrant dish! {{image_4}} You can boost the taste of your zesty cilantro lime rice by adding spices or veggies. For a spicy kick, add a pinch of cayenne pepper or chili powder. This adds warmth and depth. You can also toss in diced bell peppers or corn for a sweet crunch. These veggies not only add flavor but also make your dish colorful. If you want gluten-free or vegan options, this recipe is easy to adapt. The rice and broth are naturally gluten-free. Use a vegan broth to keep it plant-based. Skip any animal products, and you’ll have a tasty vegan dish. This rice pairs well with beans or grilled veggies for a complete meal. You can serve your zesty cilantro lime rice in many ways. Try it as a side with tacos or grilled chicken. It also works great as a base for a burrito bowl. Top it with avocado, black beans, and salsa for a fun twist. You can even mix it into salads for a refreshing touch. For the full recipe, check the recipe link above. To store leftover Zesty Cilantro Lime Rice, first, let it cool. Place it in an airtight container. This helps keep the rice fresh and tasty. You can store it in the fridge for up to four days. Make sure to label the container with the date. This way, you won’t forget when you made it. When you're ready to eat your leftover rice, you can reheat it easily. The best method is to use the microwave. Place the rice in a microwave-safe bowl. Add a splash of water to keep it moist. Cover it with a damp paper towel. Heat it in short bursts of 30 seconds. Stir between each burst to ensure even heating. You can also reheat it on the stovetop. Just add a little water and heat it over low heat, stirring often. If you want to keep Zesty Cilantro Lime Rice longer, freezing is a good option. Portion the rice into freezer-safe bags or containers. Make sure to remove as much air as possible. Label each bag with the date. You can freeze it for up to three months. When you want to use it, thaw the rice in the fridge overnight before reheating. Enjoy the same great taste even after freezing! For the full recipe, check out the earlier section. To enhance the taste of cilantro lime rice, you can add extra lime juice or zest. A touch of garlic powder or onion powder also boosts flavor. Mixing in diced tomatoes or bell peppers adds color and taste. If you enjoy heat, try adding jalapeños or chili flakes. You can also experiment with different herbs like parsley or green onion for a fresh twist. Yes, you can use brown rice instead of white rice. Brown rice has a nuttier flavor and chewy texture. However, it takes longer to cook, about 40-45 minutes. Adjust the liquid to 2 1/2 cups of broth or water for brown rice. Follow the same cooking steps as in the Full Recipe, but keep an eye on the rice as it cooks. You can store leftover cilantro lime rice in an airtight container for up to four days in the fridge. To keep it fresh, make sure it cools down before sealing. If you want to keep it longer, you can freeze it. In the freezer, it lasts for up to three months. When ready to eat, thaw it overnight in the fridge and reheat in the microwave or on the stove. This blog post covered all you need for great cilantro lime rice. We explored key ingredients, preparation steps, and cooking tips. You learned about flavor changes and serving ideas. Remember to store leftovers properly to enjoy later. With practice, you can make perfect rice every time. Now, it’s time to experiment with your own flavors and adjustments. Happy cooking!

Zesty Cilantro Lime Rice Easy and Flavorful Recipe

If you love bright flavors, Zesty Cilantro Lime Rice is a must-try! This easy recipe pairs perfectly with tacos, grilled

- 2 cups shredded cooked chicken - 1 cup shredded mozzarella cheese - 1 cup shredded cheddar cheese - 1 bell pepper, diced (any color) - 1 small onion, diced - 2 teaspoons taco seasoning - 4 large flour tortillas - 2 tablespoons olive oil - Optional: Salsa and sour cream for serving Choosing the best tortillas I love using large flour tortillas for quesadillas. They are soft and easy to fold. Make sure they are fresh for the best taste. Look for tortillas that are pliable and not dry. Substitutions for a healthier option You can swap regular cheese for low-fat cheese. This cuts calories but keeps flavor. Try whole wheat tortillas for more fiber. You can also add veggies like spinach or mushrooms to boost nutrition. The benefits of using homemade taco seasoning Making your own taco seasoning is simple and fun. You control the flavor and spice level. It often tastes fresher than store-bought. Combine chili powder, cumin, garlic powder, and salt for a quick mix. This adds extra zing to your chicken quesadillas. Try it out in the Full Recipe for a delightful twist! - Mix chicken and vegetables In a large bowl, combine the shredded chicken, diced bell pepper, and diced onion. Add the taco seasoning, mozzarella, and cheddar cheese. Use a spatula or spoon to mix everything well until it is evenly combined. This step makes sure each bite is full of flavor. - Heat the skillet Next, heat one tablespoon of olive oil in a large skillet over medium heat. This oil helps the quesadilla get that nice, crispy texture. Make sure the skillet is hot before adding the tortilla. - Assembling the quesadilla Place one tortilla in the hot skillet. Spread half of the chicken and cheese mixture on one half of the tortilla. This will create a tasty filling. Carefully fold the tortilla in half, covering the filling. - Cooking to golden perfection Cook the quesadilla for about 3-4 minutes or until the bottom is golden brown. Use a spatula to flip it over. Cook for another 3-4 minutes. You want both sides crispy and the cheese melted. This is where the magic happens! - Slicing and serving Once cooked, take the quesadilla out of the skillet. Let it cool for a minute, then slice it into wedges. This makes it easy to share. Serve warm with salsa and sour cream, if you like. - Best practices for reheating If you have leftovers, store them in an airtight container. To reheat, use a skillet over medium heat. This keeps the quesadilla crispy. Avoid the microwave, as it can make them soggy. Follow these steps to enjoy your quesadillas again! To get the best texture in your quesadillas, think about the tortillas. You can choose crispy or soft tortillas based on your taste. - Crispy Tortillas: Cook them longer in the skillet. This gives a nice crunch. - Soft Tortillas: Heat them less for a chewy bite. When it comes to the filling, balance is key. Use enough cheese to keep everything together but not so much that it spills out. A mix of chicken, veggies, and cheese creates a delightful bite. Pair your quesadillas with tasty sides. Guacamole is a classic choice. It adds creaminess to balance the quesadillas' crispiness. You can also serve them with salsa or sour cream for extra flavor. For drinks, choose light beverages like lemonade or iced tea. These refresh your palate and complement the dish. Kids can be picky eaters, but you can make quesadillas fun! Try using different shapes with cookie cutters. You can also let them pick their fillings. Letting kids help in the kitchen makes cooking exciting. They can mix the filling or help assemble the quesadillas. This way, they feel involved and are more likely to eat what they make. For more fun ideas, check out the Full Recipe! {{image_4}} If you want to switch things up, try using shredded beef or pork instead of chicken. These meats add a rich flavor that pairs well with cheese and spices. You can also try vegetarian options, like black beans or mushrooms, for a hearty substitute. These swaps make your quesadillas tasty and fun. To give your quesadillas a kick, add spices like cumin and chili powder to the mix. These spices add warmth and depth. You can also try different cheeses, like pepper jack or gouda, for extra flavor. Mixing cheeses creates a unique taste that keeps everyone guessing. Make quesadilla dippers by slicing them into strips. Serve these with salsa or guacamole for a fun snack. You can also enjoy quesadillas as a breakfast option. Add scrambled eggs, spinach, and cheese, then cook them just like the original recipe. Breakfast quesadillas are quick and delicious! For the full recipe, check out the details above. You can keep leftover chicken quesadillas in the fridge for about 3 to 4 days. Store them in an airtight container to keep them fresh. If you need to save them for longer, freezing is a great option. Wrap each quesadilla in plastic wrap and place them in a freezer-safe bag. They can last up to 2 months in the freezer. To enjoy your quesadillas again, the best way to reheat them is in a skillet. Heat the skillet over medium heat. Place the quesadilla in the skillet for about 3-5 minutes on each side. This method keeps them crispy. If you're in a hurry, you can use the microwave. Heat them for about 1-2 minutes, but they may get a bit soft. To avoid sogginess, let the quesadillas cool completely before storing. This will stop moisture from building up. Use a paper towel inside the container to absorb any extra moisture. I recommend using a shallow container to keep them flat. This way, they stay crispy when stored. To make Easy Chicken Quesadillas, gather your ingredients. You'll need: - 2 cups shredded cooked chicken - 1 cup shredded mozzarella cheese - 1 cup shredded cheddar cheese - 1 bell pepper, diced (any color) - 1 small onion, diced - 2 teaspoons taco seasoning - 4 large flour tortillas - 2 tablespoons olive oil - Optional: Salsa and sour cream for serving First, mix the chicken, bell pepper, onion, and taco seasoning in a bowl. Add the cheeses and stir well. Heat a skillet and add oil. Place a tortilla in the skillet and fill half with your mixture. Fold the tortilla and cook until crispy. Flip and cook the other side. Slice and serve with salsa and sour cream. You can find the Full Recipe above. Yes, you can use leftover chicken! It's a great way to save time. Just shred it and mix it with the other ingredients. Make sure the chicken is heated through when you cook the quesadillas. This keeps them tasty and safe to eat. The best cheese for quesadillas is a mix of mozzarella and cheddar. Mozzarella melts well and gives a gooey texture. Cheddar adds a nice flavor. You can also try pepper jack for a spicy kick. If you're lactose intolerant, use non-dairy cheese. To prevent sticking, use a non-stick skillet. Heat the skillet first, then add oil. Make sure to coat the bottom evenly. If your quesadillas still stick, use a spatula to gently lift them. This helps keep everything intact while cooking. Yes, you can make quesadillas in advance! Assemble them, but don’t cook yet. Store them in the fridge for up to a day. When you're ready, just heat them in a skillet until crispy. This makes for a quick meal at any time. This post covers how to make tasty chicken quesadillas. I shared essential ingredients, including chicken and cheese, plus tips for best results. You learned cooking steps, from mixing to serving, and options to suit all eaters. Don't forget storage advice to keep leftovers fresh. With these steps, you can create delicious quesadillas easily. Experiment with flavors and get the kids involved for a fun meal. Enjoy making and sharing this meal with everyone!

Easy Chicken Quesadillas Quick and Tasty Recipe

Are you craving a quick and tasty meal? Look no further! My Easy Chicken Quesadillas are perfect for busy weeknights.

To make a classic key lime pie, you need these key ingredients: - 1 ½ cups graham cracker crumbs - ½ cup unsweetened coconut flakes - ½ cup granulated sugar - ½ cup unsalted butter, melted - 4 large egg yolks - 1 can (14 oz) sweetened condensed milk - ½ cup fresh key lime juice (or substitute with regular lime juice) - Zest from 2 key limes - 1 cup heavy whipping cream - 2 tablespoons powdered sugar - Lime slices and fresh mint leaves for garnish You can make some easy swaps if you don’t have certain ingredients. Here are a few: - Graham cracker crumbs: Use crushed digestive biscuits or vanilla wafers. - Unsweetened coconut flakes: Swap with crushed nuts for a different texture. - Granulated sugar: Coconut sugar or honey can work as a sweetener. - Egg yolks: You may use a vegan egg substitute if needed. - Sweetened condensed milk: Try using coconut cream for a dairy-free option. Fresh key lime juice gives the best flavor. It’s bright and zesty. Bottled juice can taste dull and less vibrant. If you use bottled juice, choose a high-quality brand. Fresh key limes are small and have a unique tartness. You can find them in stores or local markets. The zest from the limes adds even more flavor, so don’t skip it! Make sure to check out the Full Recipe for more details on preparation and serving. To start, preheat your oven to 350°F (175°C). In a medium bowl, mix together the graham cracker crumbs, unsweetened coconut flakes, and granulated sugar. Next, pour in the melted butter. Stir until the crumbs look like wet sand. This means they are ready. Now, take a 9-inch pie dish. Firmly press the crumb mixture into the bottom and sides. Make sure it is even. Place the pie dish in the oven for 8 to 10 minutes. Look for a light golden color. Once baked, take it out and let it cool completely. In another bowl, whisk the egg yolks until they are smooth and pale. Slowly add the sweetened condensed milk while you whisk. Next, pour in the fresh key lime juice and add the lime zest. Mix until everything is well combined and thickens a bit. Carefully pour the lime filling into your cooled crust. Smooth the top if needed. Bake the pie in the oven for 10 to 12 minutes. The filling should set but still jiggle slightly in the center. After baking, take it out and let it cool completely at room temperature. For the full recipe, you can check out the details above! To make the best whipped cream, start with cold cream. Use heavy whipping cream for rich flavor. Pour it into a clean bowl. Add powdered sugar for sweetness. Beat with an electric mixer on medium speed. Watch for soft peaks to form. This takes about 2-3 minutes. Do not overbeat; it can turn grainy. You want it fluffy and smooth for your pie. Many people skip chilling the pie before serving. Chilling helps flavors blend. It also makes slicing easier. Avoid overbaking the filling. It should jiggle slightly in the center. If it sets too firm, the pie may taste dry. Lastly, don’t forget to zest the limes. The zest adds a fresh, bright flavor. Serve slices on chilled plates. This keeps the pie cool and refreshing. For a fun touch, drizzle extra key lime juice on top. Add lime slices and mint leaves for color. Pair your pie with fresh fruit or a scoop of vanilla ice cream. These add sweetness and balance the tartness. For the full recipe, check out the link! {{image_4}} You can easily make a gluten-free key lime pie. Use gluten-free graham crackers or ground nuts for the crust. Almond flour works well and gives a nice flavor. Combine it with melted butter like you would with regular crumbs. Bake as usual, and you’ll have a gluten-free treat that everyone can enjoy. Making a vegan key lime pie is simple and fun. Replace the egg yolks with silken tofu or coconut cream. This keeps the filling creamy and smooth. Use a plant-based condensed milk or make your own using coconut milk and sugar. The key lime juice still gives it that zesty kick. You can whip coconut cream as a topping, too. Get creative with flavors! Try adding fresh fruit like strawberries or raspberries to the filling. This gives a fruity twist that complements the lime. You can also add a hint of ginger for a spicy kick. For a tropical flavor, mix in some crushed pineapple. Each twist offers a new taste that makes key lime pie exciting. For the full recipe, check out the Zesty Key Lime Dream Pie. It's full of flavor and sure to impress! To keep your leftover key lime pie fresh, cover it well. Use plastic wrap or foil. This will prevent the pie from absorbing other smells in the fridge. Store it in the refrigerator for up to four days. The pie’s flavor will stay strong, and you can enjoy it again. You can freeze key lime pie if you have leftovers. First, let it cool completely. Then, slice it into pieces. Wrap each slice tightly in plastic wrap. Place the wrapped slices in a freezer-safe bag. This way, you can keep them for up to three months. When you want to eat it, thaw the pie in the fridge overnight. To keep your crust crispy, avoid storing it in a closed container. Moisture can make it soggy. Instead, place the pie in the fridge uncovered for a day or two. If you freeze it, the crust might soften a bit. When you thaw it, you can crisp it up by baking it for a few minutes. This will help restore its crunch. Key Lime Pie uses key limes, which are smaller and tarter than regular limes. Key limes give the pie a unique flavor. They also have a distinct fragrance that adds to the pie's appeal. The pie's filling is creamy, made with sweetened condensed milk, egg yolks, and key lime juice. This combination creates a smooth, tangy dessert that stands out from regular lime pie. You will find that the taste is richer and more vibrant. Yes, you can use regular limes in a pinch. However, the flavor will change. Regular limes are less tart and more bitter than key limes. If you substitute, you might want to adjust the sugar to balance the taste. Many people still enjoy the pie made with regular limes. It just won’t have that classic key lime flavor you expect. You can keep Key Lime Pie in the fridge for about 3 to 5 days. Make sure to cover it well to prevent it from drying out. If you want it to last longer, consider freezing it. Just remember that the crust might become a bit soft after thawing. For the best taste, I recommend eating it fresh. Enjoy the zesty flavors right after making it for the best experience. To make a great Key Lime Pie, use fresh ingredients and follow clear steps. We covered how to prepare the crust, make the filling, and cool the pie. I offered tips for whipped cream and common mistakes to avoid. Plus, you can explore variations like gluten-free or vegan options. Store leftovers properly for the best taste. Now, you have the tools to create your perfect pie. Enjoy each bite of your delicious Key Lime Pie creation!

Classic Key Lime Pie Simple and Refreshing Recipe

Who can resist the creamy, zesty goodness of a classic Key Lime Pie? This simple and refreshing recipe brings the

- Baby potatoes - Fresh herbs (rosemary, thyme, parsley) - Garlic The main stars of this dish are baby potatoes. They are small and tender, perfect for roasting. I love using fresh herbs like rosemary, thyme, and parsley. These herbs add a burst of flavor. Garlic plays a big role too. It brings warmth and depth to the mix. - Extra virgin olive oil - Smoked paprika - Salt and black pepper For oil, I recommend extra virgin olive oil. It has a rich taste that enhances the potatoes. Smoked paprika adds a hint of smokiness. It gives a nice color too. Don't forget salt and black pepper. They bring out the flavors of the potatoes and herbs. - Mixing bowl - Baking sheet - Oven You will need a mixing bowl to combine your ingredients. A baking sheet is key for roasting. It helps the potatoes get that crispy texture. Lastly, an oven is essential. Preheat it to 425°F (220°C) for the best results. Follow the Full Recipe for detailed steps. Set your oven to 425°F (220°C) for roasting. This high heat helps the potatoes cook evenly. A preheated oven is key. It ensures your potatoes get that nice golden-brown crust. Without it, you may end up with soggy spuds instead of crispy ones. In a large bowl, combine the halved baby potatoes and minced garlic. Add the fresh herbs: rosemary, thyme, and parsley. Pour in the extra virgin olive oil. Sprinkle in smoked paprika, salt, and black pepper to taste. Use your hands or a spatula to mix everything well. Make sure each potato is coated in oil and herbs. This ensures all the flavors blend together in every bite. Spread the seasoned potatoes on a large baking sheet. Arrange them in a single layer; this helps them roast evenly. Place the sheet in the oven. Roast for about 30-35 minutes. Flip the potatoes halfway through cooking. This step is crucial for even browning. When they are golden and tender, remove them from the oven. Let them cool for a few minutes before serving. This resting time lets the flavors settle. For the complete recipe, check the [Full Recipe]. For the best garlic herb roasted potatoes, use baby potatoes. They roast evenly and have a smooth skin. Red or yellow varieties work well. They are tender and sweet. Aim for potatoes that are similar in size. This helps them cook at the same rate. If you have larger potatoes, cut them into smaller, even pieces. This will help with consistent cooking. You can boost the flavor with more herbs. Try adding oregano or basil for a twist. Fresh herbs offer a bright taste, but dried herbs are fine too. For garlic, fresh makes a big difference. It gives a strong, rich flavor. Dried garlic can work, but it is milder. Fresh garlic adds a nice bite to the dish. Roasting is the best way to cook these potatoes. It gives a crispy outside and fluffy inside. Other methods, like boiling, make them soggy. Ensure there is space on the baking sheet. If the potatoes are too close, they will steam instead of roast. This can lead to uneven cooking. For the best results, spread them out in a single layer. This allows for perfect browning and texture. {{image_4}} You can change the taste of your garlic herb roasted potatoes in fun ways. Adding cheese is a great idea. Try crumbled feta or grated Parmesan. These add richness and creaminess. You can also mix in other veggies. Bell peppers, onions, or carrots work well. They add color and flavor to your dish. If you like heat, consider spicy variations. Red pepper flakes add a nice kick. Sprinkle them in when you mix the potatoes. This gives the dish a bold twist. You can adjust the amount based on your spice level. You can use different methods to cook these potatoes. An air fryer is a fantastic option. It cooks potatoes quickly and makes them crispy. Simply toss your seasoned potatoes in the air fryer. Cook them at 400°F for about 20 minutes. Shake the basket halfway through for even cooking. If you need a quicker method, try the Instant Pot. Add a cup of water to the pot, and place the potatoes on the steaming rack. Cook them on high pressure for 10 minutes. After cooking, use the quick release. Then, you can roast them in the oven for a few minutes for that golden finish. Garlic herb roasted potatoes pair well with many main dishes. They are great alongside grilled chicken, steak, or fish. Their flavor complements these proteins well. You can also serve them with vegetarian meals, like a hearty salad or stuffed peppers. For gatherings, think about creative presentations. Serve the potatoes in a big bowl. You can also add fresh herbs on top for a pop of color. Another idea is to use individual ramekins. This gives a personal touch to each serving. For the full recipe, check the earlier sections. You will find all the details to create this tasty dish! To store leftovers, let your Garlic Herb Roasted Potatoes cool completely. Place them in an airtight container. They will stay fresh for about three to five days in the fridge. If you want to enjoy them later, make sure to seal the container well. This helps keep their flavor intact. You can freeze roasted potatoes, but they may lose some texture. To freeze, let them cool completely. Spread them on a baking sheet in a single layer. Freeze for an hour, then transfer them to a freezer bag. This method prevents them from sticking together. They will keep well for about three months. When you're ready to eat them, thaw the potatoes in the fridge overnight. You can reheat them in the oven or skillet for the best results. To keep texture and flavor when reheating, use the oven. Preheat your oven to 400°F (200°C). Spread the potatoes on a baking sheet and heat for about 10 to 15 minutes. This helps them regain some crispness. Avoid microwaving if possible, as it can make them soggy. If you must use a microwave, heat them in short bursts and check often. Enjoy your flavorful side dish again! For the full recipe, visit the section above. To check if the potatoes are done, look for two main signs: - Texture indicators: They should feel soft when pierced with a fork. - Color changes to look for: The skin should turn a nice golden-brown. When you see these signs, your Garlic Herb Roasted Potatoes are ready to serve! Yes! You can switch herbs to change the flavor. Some great options include: - Basil: Adds a sweet and fragrant touch. - Oregano: Gives a warm and earthy flavor. - Sage: Offers a more robust and slightly peppery taste. Using different herbs can really change the dish, making it unique each time. These potatoes go well with many main dishes. Here are some ideas: - Complementary main courses: Try them with grilled chicken or baked salmon. - Salad and side dish ideas: A fresh green salad or steamed veggies add a nice balance. These pairings will make a great meal that everyone will love. For the complete recipe, check the Garlic Herb Roasted Potatoes section above. Roasting baby potatoes is simple and fun. You learned about key ingredients, tools, and methods. Preheating the oven helps achieve perfect texture. Mixing with fresh herbs and spices adds great flavor. Use the tips to select the best potatoes and discover various cooking styles. Store leftovers for future meals or try new flavor combinations. Whether you want a side dish or a creative serving idea, roasted garlic herb potatoes are versatile. Enjoy experimenting and making this dish your own!

Garlic Herb Roasted Potatoes Flavorful Side Dish Recipe

Looking for a simple yet delicious side dish? Garlic Herb Roasted Potatoes are your answer! In just a few steps,

- 2 cups fresh strawberries - 1/4 cup granulated sugar - 1 teaspoon vanilla extract - 1 pound pound cake - 2 cups whipped cream - 1 cup vanilla pudding - Fresh mint for garnish To make a great Strawberry Shortcake Trifle, you need fresh ingredients. The strawberries should be ripe, sweet, and bright red. The sugar helps bring out their natural sweetness. Vanilla extract adds a nice depth of flavor. You can use store-bought pound cake, but homemade is best if you have time. Whipped cream makes the trifle light and fluffy. You can use instant pudding for ease or make your own for a richer taste. Finally, fresh mint adds a splash of color and a refreshing taste on top. - Large mixing bowl - Electric mixer or whisk - Trifle dish or serving glasses - Spatula You need a few tools to make this dessert. A large mixing bowl is great for combining ingredients. An electric mixer or whisk helps you whip the cream easily. A trifle dish or clear serving glasses show off the layers beautifully. A spatula is perfect for spreading and layering the creamy fillings. A typical serving of Strawberry Shortcake Trifle has about: - Calories: 300-400 - Fats: 15-20 grams - Sugars: 25-30 grams This dessert is rich in flavors but also rich in calories and sugars. Enjoy it in moderation as a special treat! Remember, you can always tweak the recipe to make it a bit lighter or healthier. To start, you need fresh strawberries. Take 2 cups of hulled and sliced strawberries. In a medium bowl, mix them with 1/4 cup of granulated sugar. Stir gently to coat the strawberries in sugar. Let them sit for about 15 minutes. This step is called maceration. It helps the strawberries release their juicy goodness. The result? Sweet and flavorful strawberries for your trifle. You can either buy whipped cream or make it at home. For homemade whipped cream, use 2 cups of heavy cream. Pour it into a large bowl. Whip it on medium-high speed until stiff peaks form. This should take a few minutes. Then, fold in 1 teaspoon of vanilla extract. If you prefer store-bought, just grab a tub and it’s ready to go. Now comes the fun part: assembling your trifle! Grab a large trifle dish or individual serving glasses. Start by layering the pound cake. Use 1 pound of pound cake, cut into 1-inch cubes. Place the cubes evenly at the bottom. Next, add a layer of your macerated strawberries. Pour some of the sweet strawberry juice over the cake. This adds extra flavor. Then, spread a layer of vanilla pudding, about 1 cup. Use a spatula to smooth it out. After that, add a generous layer of whipped cream on top. Repeat these layers: cake, strawberries, pudding, and whipped cream. Keep going until you use all the ingredients. Finish with a fluffy layer of whipped cream on top. Chilling the trifle is important. It helps all the flavors blend together nicely. Cover your trifle with plastic wrap. Place it in the refrigerator for at least 1 hour. This chill time makes a big difference. The longer you chill, the better the flavors will be. Enjoy your delicious Strawberry Shortcake Trifle! For the full recipe, check out the instructions above. To make your trifle shine, use clear glass dishes. This lets everyone see the lovely layers. You can use a large trifle bowl or individual cups. Adding fresh mint leaves on top gives a nice touch. The green looks great against the red strawberries and white cream. Layering is key for a great trifle. Start with pound cake cubes. Spread them evenly at the bottom. Next, add macerated strawberries on top. Pour some juice over the cake to keep it moist. Follow this with a layer of vanilla pudding. Smooth it out gently to keep it neat. Finally, add whipped cream to top it off. Repeat these steps until you run out of ingredients. Always end with whipped cream for a sweet finish. You can prepare the trifle in advance. This is great for parties or busy days. Make it a few hours or even the night before. Just keep it covered in the fridge until you serve it. Chilling helps the flavors mix and taste better. You can find the full recipe for the Strawberry Shortcake Trifle to help with timing and steps. {{image_4}} You can change the fruit in your trifle. For a twist, use blueberries or peaches. Each fruit brings its own unique taste. Blueberries add a burst of tartness, while peaches offer a sweet, juicy flavor. You can mix and match fruits to create your favorite combination. Try strawberries and bananas together for a fun twist! Making this trifle for special diets is easy. For a gluten-free option, use gluten-free pound cake. You can find many brands that taste great. If you want a vegan trifle, swap the whipped cream for coconut cream. Use a plant-based pudding mix as well. These small changes let everyone enjoy this dessert! You can make themed trifles for holidays or seasons. For a summer treat, add fresh mint and berries. In fall, use pumpkin spice pudding and apples. For winter, try chocolate pudding and crushed peppermint. Each season offers different flavors. These themed versions make your trifle even more special for gatherings or celebrations. For the full recipe, check out the details above. To store leftover trifle, cover it tightly with plastic wrap. This keeps the air out and prevents it from drying out. If you use a trifle dish, you can place a lid on top if it fits. Always keep it in the refrigerator to keep it fresh. When stored well, your trifle will stay fresh for about 2 to 3 days. After that, the flavors may fade, and the whipped cream could lose its texture. Enjoy it within this time frame for the best taste and quality. Freezing trifle is not ideal. The whipped cream and pudding may separate when thawed. Instead, consider freezing the pound cake and strawberries separately. You can then assemble the trifle fresh when you are ready to enjoy it. Yes, you can use frozen strawberries. They work well, too. Just remember to thaw them first. Thawed strawberries will be softer, which can change the texture. Fresh strawberries taste brighter and have a nice crunch. If you want the best flavor, I suggest using fresh fruit when possible. Chill the trifle for at least one hour. This time allows the flavors to mix well. If you have more time, chill it for four hours or overnight. Longer chilling enhances the taste and texture. It makes each bite creamy and tasty. Absolutely! You can use sponge cake, angel food cake, or even cookies. Each option gives the trifle a unique flavor and texture. Choose a cake that you love. If you want a lighter dessert, go for angel food cake. For a more decadent feel, try a chocolate cake. Yes, you can make the trifle a day ahead. This saves time and lets flavors develop. Just cover it well and keep it in the fridge. However, avoid adding fresh fruit or whipped cream on top until serving. This keeps it fresh and pretty. For the full recipe, check out the detailed instructions. This trifle recipe combines fresh ingredients for a delicious dessert. You need strawberries, sugar, vanilla, and more. Remember to layer carefully for a stunning look. Chill it to boost the flavors and enjoy it later. You can also switch up flavors with different fruits or adapt for dietary needs. Feel free to make this ahead of time for convenience. With these tips and tricks, you’re set to create a delightful treat that everyone will love.

Strawberry Shortcake Trifle Simple and Delicious Dessert

Are you ready to impress your friends and family with a stunning yet simple dessert? The Strawberry Shortcake Trifle combines

Older posts
Newer posts
← Previous Page1 … Page45 Page46 Page47 … Page86 Next →

dsad

© 2026 yumymoments • Built with GeneratePress

Our Policies

  • Copyright Policy
  • Cookie Policy
  • GDPR Policy
  • Privacy Policy
  • Disclaimer
  • Terms Of Use

More Information

  • Home
  • About
  • Contact
  • Appetizers
  • Dessert
  • Dinner
  • Drinks
©2026, yumymoments About Back To Top