Skip to content
DisclaimerTerms Of UseGDPR PolicyCookie Policy

yumymoments

  • Home
  • Drinks
  • Appetizers
  • Dinner
  • Dessert
  • About
  • Contact
  • Privacy Policy
DisclaimerTerms Of UseGDPR PolicyCookie Policy

NO-ING-IMG

To make this delightful cake, you will need: - 1 ¾ cups all-purpose flour - 1 teaspoon baking powder - ½ teaspoon baking soda - ¼ teaspoon salt - 1 cup unsalted butter, softened to room temperature - 1 ½ cups granulated sugar - 4 large eggs, at room temperature - 1 tablespoon freshly grated lemon zest - 2 tablespoons fresh lemon juice - 1 teaspoon pure vanilla extract - 1 cup fresh blueberries, washed and dried - ½ cup powdered sugar (for glaze) - 1 tablespoon fresh lemon juice (for glaze) These ingredients work together to create a moist, flavorful cake. The butter adds richness, while the lemon zest and juice bring a bright, tangy flavor. You might find yourself short on some ingredients. Here are easy swaps: - Use coconut oil instead of butter for a dairy-free option. - Substitute Greek yogurt for eggs to make the cake vegan. - Replace all-purpose flour with gluten-free flour blend for a gluten-free cake. - Use maple syrup in place of granulated sugar for a natural sweetener. These substitutions still yield a tasty cake without compromising texture or flavor. When choosing blueberries, look for these signs of quality: - Choose firm, plump berries with a deep blue color. - Avoid berries that have green or red spots; they may be under ripe. - Smell the blueberries; they should have a sweet, fruity aroma. - If possible, buy organic blueberries to avoid pesticides. Good blueberries elevate the cake's taste. They add natural sweetness and juicy bursts that balance the tartness of lemon. For the full recipe, check out the Full Recipe section. Start by gathering all your tools. You need a 9x5 inch loaf pan, mixing bowls, and a whisk. Preheat your oven to 350°F (175°C). This step is key to getting a nice rise on your cake. Grease and flour the loaf pan. This helps the cake come out easily after baking. In a medium bowl, mix your dry ingredients. Combine 1 ¾ cups of flour, 1 teaspoon of baking powder, ½ teaspoon of baking soda, and ¼ teaspoon of salt. Whisk them together well. In a large bowl, beat together 1 cup of softened butter and 1 ½ cups of sugar. Mix on medium speed until it looks light and fluffy. This should take about 3-5 minutes. Add 4 large eggs one at a time. Mix well after each egg. Next, add 1 tablespoon of lemon zest, 2 tablespoons of lemon juice, and 1 teaspoon of vanilla extract. Stir until smooth. Now, slowly add the dry mix to the wet mix. Use a spatula to fold them together gently. Be careful not to overmix. This makes the cake dense. Finally, fold in 1 cup of fresh blueberries. Do this gently to keep the berries whole. Pour the batter into the prepared loaf pan and smooth the top. Bake in your preheated oven for 50-60 minutes. Check for doneness by inserting a toothpick into the center. It should come out clean or with a few moist crumbs. Once baked, let it cool in the pan for about 10 minutes. Then, move it to a wire rack to cool completely. While it cools, make the lemon glaze. Mix ½ cup of powdered sugar with 1 tablespoon of lemon juice. Stir until smooth. Once the cake has cooled, drizzle the glaze over the top. Let it sit for about 15 minutes. This lets the glaze set before you slice it. Enjoy your Lemon Blueberry Pound Cake! For the full recipe, check out the detailed instructions. To get a light and fluffy texture, I suggest two key steps. First, make sure your butter is at room temperature. This helps it cream well with sugar. Second, mix your batter gently. Overmixing introduces air, which can create a dense cake. Just stir until the ingredients blend. Be careful not to skip the lemon zest. This adds a burst of flavor. Also, avoid using cold eggs. They can affect how the batter mixes. Finally, be sure to check your oven temperature. An oven that is too hot can burn the cake’s edges while leaving the center raw. You can make this cake a day in advance. Just wrap it tightly in plastic wrap after cooling. If you want to freeze it, slice the cake first. Wrap each piece well in plastic wrap, then place them in a freezer bag. When ready to eat, thaw at room temperature for a tasty treat anytime. {{image_4}} You can add a fun twist to your lemon blueberry pound cake by including nuts. Chopped walnuts or pecans add a nice crunch. If you want to switch up the flavor, try using strawberries or raspberries instead of blueberries. They pair well with lemon too. Just remember to adjust the amount if you use larger fruit. You might wonder about the difference between a lemon blueberry cake and a pound cake. A pound cake is rich and dense, made with equal parts butter, sugar, eggs, and flour. In contrast, a lemon blueberry cake is lighter and often contains baking powder for rise. Both cakes are tasty, but the texture sets them apart. For a change, try different glazes or frostings. A cream cheese frosting adds a creamy touch that complements the lemon flavor. You can also make a honey glaze for a sweeter finish. To make it, mix honey with lemon juice until smooth. These options let you customize your cake for any occasion. For the full recipe, check out the Lemon Blueberry Bliss Pound Cake. To keep your lemon blueberry pound cake fresh, store it in an airtight container. You can use plastic wrap or a cake dome. This will help keep moisture in and prevent it from drying out. If you have a lot of cake left, slice it first. This makes it easier to grab a piece later. Your cake will stay good at room temperature for about 3 days. If you want it to last longer, store it in the fridge. In the fridge, it can last up to a week. Just remember to cover it well to keep it moist. If you freeze it, it can be good for up to 3 months. Wrap it tightly in plastic wrap and then in foil before freezing. If your cake has been in the fridge or freezer, you might want to warm it up. This helps bring back some moisture. To reheat, slice the cake and place it on a microwave-safe plate. Heat it in the microwave for about 10-15 seconds. Check to see if it’s warm enough. If you like your cake warm, this is a great way to enjoy it again. For a crispier edge, you can also warm it in the oven at 350°F for about 5-10 minutes. Enjoy your delicious lemon blueberry pound cake! For the full recipe, check out the detailed instructions above. Yes, you can use frozen blueberries. They work well in this recipe. However, frozen blueberries may release more juice during baking. This can make the cake a bit moister. To prevent this, toss the frozen berries in a little flour before adding them to the batter. This helps absorb some of the extra moisture. If you lack a loaf pan, use a round cake pan or a muffin tin. For a round pan, adjust the baking time to about 30-40 minutes. Check for doneness by using a toothpick. For muffins, fill each cup about two-thirds full and bake for around 20-25 minutes. Keep an eye on them for perfect golden tops. To make this cake gluten-free, swap the all-purpose flour for a gluten-free flour blend. Ensure it has a 1:1 ratio for best results. You might also need to add a bit of xanthan gum, about 1/2 teaspoon, to help with texture. This will keep the cake moist and fluffy while allowing you to enjoy its delicious flavor. Check out the Full Recipe for more details! In this post, we explored how to make a lemon blueberry pound cake. We covered key ingredients, useful substitutions, and quality tips for choosing blueberries. I shared a clear guide on prepping, mixing, and baking. We also discussed texture tricks, common mistakes to avoid, and how to freeze leftovers. Finally, we looked at exciting variations and storage tips. With these insights, you can easily bake a delicious cake. Enjoy your baking journey and have fun experimenting with flavors!

Lemon Blueberry Pound Cake Delicious and Easy Recipe

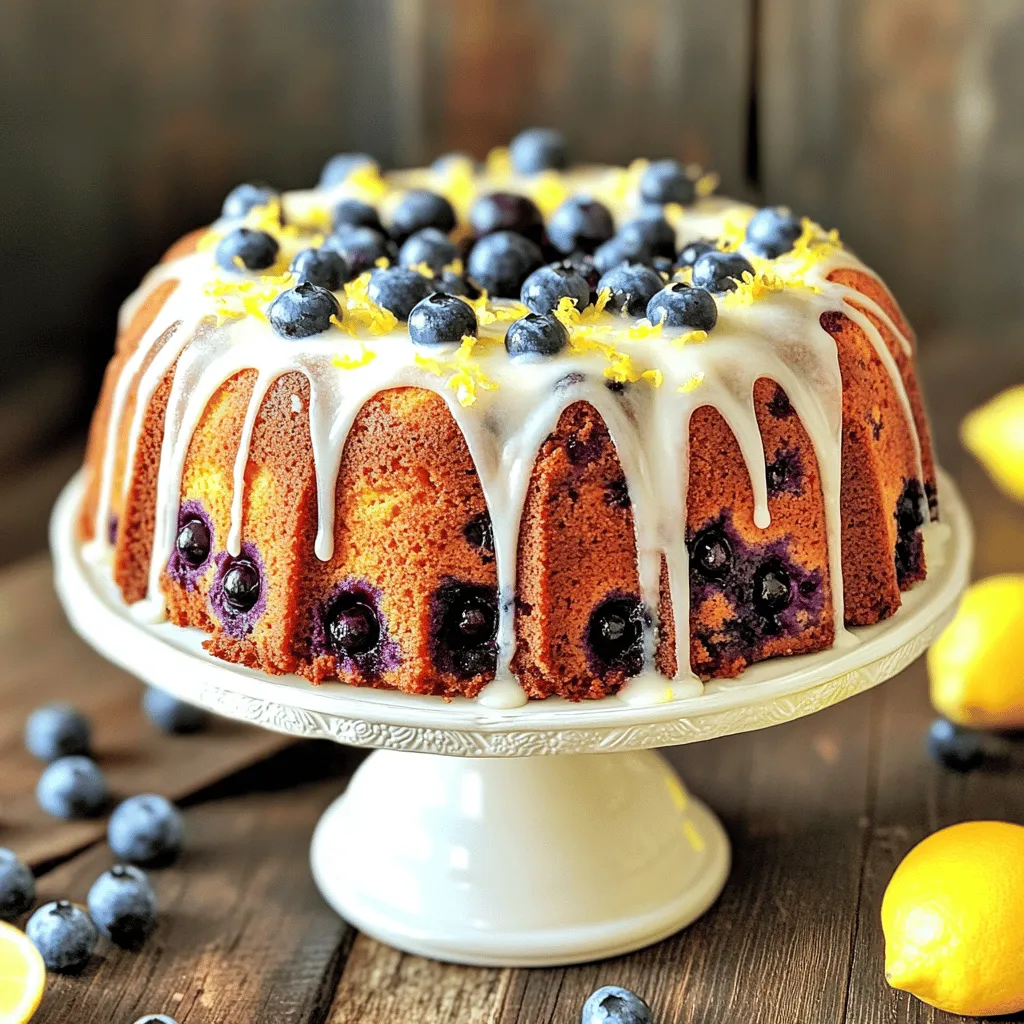
If you crave a sweet treat that’s bursting with flavor, look no further! This Lemon Blueberry Pound Cake is simple

To make Funfetti Cake Batter Dip, gather these key items: - 1 cup all-purpose flour, heat-treated for safety - 1 cup powdered sugar - 1/2 cup unsalted butter, softened to room temperature - 1/4 cup granulated sugar - 1 teaspoon vanilla extract - 1/4 cup milk (adjust for your preferred consistency) - 1/2 cup colorful rainbow sprinkles - 1/4 teaspoon salt These ingredients create a sweet and creamy base. The heat-treated flour ensures safety while keeping the dip rich and tasty. You can make this dip even more fun with optional add-ins. Consider adding: - Mini chocolate chips for a chocolatey twist - Chopped nuts for crunch - Different types of sprinkles for variety - A dash of almond extract for depth These add-ins can change the flavor and texture, making the dip your own. To get the best taste and texture from your dip, follow these tips: - Always use softened butter for easy mixing. - Adjust the milk to get your dip just right. Too thick? Add more milk. Too thin? Use less. - Use fresh sprinkles to keep the colors bright and fun. These tips help ensure your Funfetti dip is a hit at any gathering. For the complete recipe, check the Full Recipe section. To start, gather all your ingredients. This will make the process smooth. You need: - 1 cup all-purpose flour, heat-treated for safety - 1 cup powdered sugar - 1/2 cup unsalted butter, softened to room temperature - 1/4 cup granulated sugar - 1 teaspoon vanilla extract - 1/4 cup milk (adjust based on your preferred consistency) - 1/2 cup colorful rainbow sprinkles - 1/4 teaspoon salt Now, place the softened butter, powdered sugar, and granulated sugar into a medium bowl. Mix them together until they look fluffy. This takes about 2-3 minutes at medium speed with an electric mixer. Next, add the heat-treated flour and salt. Mix until it becomes a thick, smooth mixture. Pour in the vanilla extract and slowly add milk. Stir well. You can change the amount of milk based on how thick you want the dip. Keep mixing until it is creamy and smooth. Now, gently fold in the rainbow sprinkles. This step is fun! Make sure the sprinkles are spread out well. They add color and joy to your dip. Transfer your funfetti dip into a nice serving bowl. Use a spatula to smooth the top. This makes it look pretty. For the best taste, chill the dip for at least 30 minutes. This helps the flavors mix better. When ready to serve, add some fun dippers! You can use crispy graham crackers, crunchy pretzels, or fresh fruit. For a final touch, sprinkle some extra rainbow sprinkles on top. This dip is perfect for parties or just a fun snack at home. Enjoy! You can make this funfetti dip your own! Add chocolate chips for a sweet twist. You could mix in crushed cookies for extra crunch. Want a fruity flavor? Try adding diced strawberries or raspberries. For a richer taste, use cream cheese instead of butter. Just remember to balance the sweetness if you do! Choosing the right dippers can make your dip shine. I love using crispy graham crackers; they add a nice crunch. Pretzels give a salty kick that pairs well with the sweet dip. Fresh fruit, like apple slices or strawberries, adds a refreshing touch. You can even use mini waffles for a fun twist! Avoid using raw flour; always heat-treat it for safety. It’s important to fold in the sprinkles gently, or they may break. Don’t skip the chilling time; it helps the flavors blend. If your dip is too thick, add a splash of milk to loosen it up. Lastly, taste before serving; you might want more sprinkles or sugar! {{image_4}} You can change the flavor of Funfetti Cake Batter Dip easily. Swap vanilla extract for almond extract for a nutty twist. Add cocoa powder to make a chocolate version. You can also mix in a bit of orange or lemon zest for a refreshing citrus note. Each flavor adds a unique taste and keeps things fun! If you want a lighter dip, try Greek yogurt instead of butter. It gives creaminess while cutting fat. You can also use coconut sugar in place of granulated sugar for a less sweet option. Additionally, you can add some finely chopped nuts for a crunchy texture and more nutrition. Make your dip fit the seasons! For spring, add pastel sprinkles and mini chocolate eggs for an Easter vibe. In autumn, mix in pumpkin spice for a cozy flavor. During winter, use red and green sprinkles for a festive look. These twists make your dip perfect for any holiday or gathering. For more details on how to make this tasty treat, check the Full Recipe. To keep your Funfetti Cake Batter Dip fresh, place it in an airtight container. This will help prevent it from drying out. Store it in the fridge for up to three days. If you want to enjoy it later, make sure to use a clean spoon each time. This avoids adding any bacteria that could spoil it. You can freeze Funfetti Cake Batter Dip if you want to save it for later. Use a freezer-safe container or bag. Make sure to remove as much air as possible. Freeze it for up to two months. When you are ready to eat, let it thaw in the fridge overnight. Stir it well before serving. This dip stays fresh in the fridge for three days. After that, the quality may drop. Always check for any off odors or changes in texture before eating. If you see any signs of spoilage, it’s best to toss it out. When in doubt, throw it out! Enjoy your Funfetti Cake Batter Dip safely. For the full recipe, check out the main article. Yes, you can make this dip ahead of time. I often prepare it a day before a party. Just store it in an airtight container in the fridge. Chilling it for a few hours helps the flavors blend well. When you're ready to serve, give it a quick stir. If you find it too sweet, there are easy fixes. You can cut back on powdered sugar. Start with 3/4 cup instead of 1 cup. Another option is to add a pinch of salt. This can help balance the sweetness. Heat-treated flour is important for safety. If you can't find it, you can make your own. Spread regular flour on a baking sheet and heat it at 350°F for about 5 minutes. Let it cool before using. This makes it safe to eat raw. Absolutely! You can use any sprinkles you like. Rainbow sprinkles are fun, but themed sprinkles work well too. Think of seasonal colors or even chocolate sprinkles for a different look. You can serve this dip with many fun dippers. Here are some ideas: - Graham crackers - Pretzels - Fresh fruit like apple slices or strawberries - Vanilla wafers These add nice texture and flavor. The dip lasts up to 5 days in the fridge. Just keep it in an airtight container. If you notice any change in smell or texture, it’s best to toss it out. Freezing is not recommended for this dip. The texture changes after thawing. It’s best enjoyed fresh or chilled. If you have leftovers, store them in the fridge instead. Leftovers can be a tasty treat for later. Try spreading it on toast or using it as a topping for pancakes. You can also mix it into yogurt for a sweet twist. This article covered the key ingredients and steps to make Funfetti Cake Batter Dip. I shared tips for mixing, serving, and customizing your dip. I also discussed different flavor ideas and storage methods. Keep these tips in mind to create a tasty treat that everyone will love. Remember, small changes can lead to big flavor. Enjoy making this fun dessert for your next gathering or snack!

Funfetti Cake Batter Dip Simple and Tasty Treat

Looking for a fun and easy dessert? This Funfetti Cake Batter Dip is perfect for you! It’s creamy, colorful, and

- 2 cups fresh strawberries, hulled and sliced - 4 tablespoons granulated sugar, divided - 1 teaspoon pure vanilla extract - 1 cup heavy whipping cream - 1/2 cup powdered sugar - 1 cup angel food cake, cut into bite-sized pieces - 1 cup Greek yogurt (plain or vanilla) - Fresh mint leaves for garnish (optional) When making the trifle, you can adjust the sugar to your taste. Use less if you prefer. If you need a dairy-free option, try coconut cream instead of heavy cream. You can also swap angel food cake for pound cake if you want a richer flavor. If you don’t have Greek yogurt, regular plain yogurt works just fine too. Always pick ripe strawberries for the best flavor. Look for bright red berries with no soft spots. Fresh cream should be cold; this helps it whip better. For the best texture, use high-quality vanilla extract. Avoid imitation vanilla, as it lacks the depth of flavor that real vanilla provides. Lastly, if you have time, make your own angel food cake. It’s much better than store-bought! To start, gather your fresh strawberries. You need 2 cups, hulled and sliced. Mix them in a bowl with 2 tablespoons of granulated sugar. This step helps the strawberries become sweet and juicy. Let them sit for 15 minutes. You will see syrup form as they rest. Next, take another bowl. In it, whip 1 cup of heavy whipping cream. Add 2 tablespoons of sugar. Use a hand mixer until soft peaks form. Gently fold in 1 teaspoon of pure vanilla extract. This cream adds a light and rich flavor to your trifle. Now, grab your angel food cake. Cut 1 cup into bite-sized pieces. You’re ready to start layering! Begin with a layer of angel food cake pieces at the bottom of your trifle bowl. Spread them evenly to cover the base. Next, add a layer of Greek yogurt, about 1 cup. Use the back of a spoon to spread it smoothly. Now, add the strawberries on top. Pour in some of the syrup too. The syrup adds moisture and flavor. After the strawberries, use your whipped cream to create the next layer. Spread it evenly over the strawberries. Repeat these layers until you use all your ingredients. Always end with a lovely layer of whipped cream on top. It makes the trifle look so inviting! You will need a few tools for making your trifle. Use a medium mixing bowl for the strawberries. A separate mixing bowl is best for the whipped cream. A hand mixer helps whip the cream quickly. For layering, a large glass trifle bowl shows off your work best. If you prefer, individual serving glasses work too. They make for a cute presentation. Don’t forget a spatula to help spread your cream. This simple setup makes it easy to create your Strawberry Shortcake Trifle. Enjoy the process and have fun with the layers! When making a strawberry shortcake trifle, avoid overmixing the whipped cream. This makes it grainy and less fluffy. Also, do not skip the step of macerating the strawberries. Skipping it leads to less flavor. Use fresh strawberries for the best taste. Frozen ones may turn mushy and watery. Lastly, ensure your layers are even. Uneven layers can make your trifle look messy. To make perfect whipped cream, start with cold heavy cream. A cold bowl helps too. Use a hand mixer and whisk on medium speed. Beat until you see soft peaks form, then add in the vanilla extract. Do not overbeat. Once it looks fluffy, stop mixing. This keeps it light and airy, perfect for your trifle. To make your trifle stand out, use clear glass dishes. This shows off all the beautiful layers. Start with a layer of cake, then yogurt, followed by strawberries, and finish with whipped cream. Top it with fresh mint leaves and a drizzle of strawberry syrup for extra flair. Arrange your strawberries artfully on the top. This adds color and makes it inviting. Enjoy your delightful creation! {{image_4}} You can switch the strawberries for other fruits. Ripe peaches or sweet blueberries work well. Just slice them up like you did with the strawberries. You can also mix different fruits for a fun twist. Think about adding bananas or raspberries. The key is to use fruits that taste great together. This makes your trifle more colorful and tasty. To make this trifle gluten-free, use gluten-free cake. There are many brands available. You can also use gluten-free cookies for added crunch. For a vegan version, swap the heavy cream for coconut cream. It whips up nicely and has a great flavor. Use dairy-free yogurt instead of Greek yogurt. Always check labels to ensure your ingredients are vegan. You can boost the taste of your trifle with simple additions. Try adding lemon or orange zest to the whipped cream. This gives it a fresh, bright flavor. You can also add a splash of almond extract to the yogurt. It adds a nice twist to the taste. Just remember to keep flavors balanced so they don’t overpower the fruit. Store any leftover strawberry shortcake trifle in an airtight container. Keep it in the fridge. This helps keep the layers fresh and tasty. Use a container that fits the size of your trifle to minimize air exposure. There is no need to reheat this trifle. It tastes best served cold. If you notice the whipped cream has lost some volume, gently whip it again. You can also add a touch of sugar to refresh its flavor. Your trifle will stay fresh for about 2 to 3 days in the fridge. After that, the cake may become soggy, and the strawberries will lose their crispness. Always check for any off smells or changes in texture before serving. Enjoy the delightful layers while they’re at their best! You can use sponge cake or pound cake. They give a nice texture. A ladyfinger is another option. Each choice adds a unique twist. Just keep in mind that flavor may change slightly. Yes, you can prepare it a day ahead. Just layer the cake, yogurt, and strawberries. Add whipped cream just before serving. This keeps it fresh and fluffy. The full recipe yields about six servings. Each serving is a delightful treat. You can easily adjust the recipe for larger gatherings. Just double or triple the ingredients as needed. This blog post covers how to create a delicious trifle. We explored the key ingredients, their measurements, and helpful substitutions. I provided detailed preparation steps and layering techniques. You learned tips for perfect whipped cream and ways to present your trifle beautifully. Variations help you cater to different diets. I also shared how to store leftovers and answered common questions. Making a trifle can be fun and rewarding. With these tips, you will impress everyone. Enjoy your tasty creation!

Strawberry Shortcake Trifle Delightfully Simple Treat

Are you ready for an easy, tasty dessert that wows every time? This Strawberry Shortcake Trifle is your answer! It’s

To make a delightful Pineapple Upside Down Cake, gather these simple ingredients. Each one plays a key role in giving the cake its rich flavor and texture. - 1 cup all-purpose flour - 1 teaspoon baking powder - 1/2 teaspoon baking soda - 1/4 teaspoon salt - 1/2 cup unsalted butter, softened to room temperature - 1 cup brown sugar, packed firmly - 2 large eggs at room temperature - 1 teaspoon vanilla extract - 1/2 cup milk (whole or 2% preferred) - 1 can (20 oz) sliced pineapple, well-drained (reserve the juice for later) - Maraschino cherries for garnish - 1/4 cup shredded coconut (optional, for an added crunch) These ingredients blend together to create a cake that is both moist and bursting with flavor. The brown sugar caramelizes, giving the top a beautiful golden look. The pineapple adds sweetness and a touch of tartness. You can find the full recipe in the earlier sections. 1. Preheat your oven to 350°F (175°C). This step is key for great baking. 2. Prepare a 9-inch round cake pan by greasing it with butter. Lightly dust it with flour or use non-stick spray. This helps the cake come out easily. 3. In a medium bowl, mix 1 cup of all-purpose flour, 1 teaspoon of baking powder, 1/2 teaspoon of baking soda, and 1/4 teaspoon of salt. Whisk until blended. Set this dry mix aside. 4. In a large bowl, cream together 1/2 cup of softened unsalted butter and 1 cup of packed brown sugar. Use an electric mixer on medium speed for 2-3 minutes. The mix should be light and fluffy. 5. Add 2 large eggs one at a time. Mix well after each addition. Then add 1 teaspoon of vanilla extract and blend until smooth. 6. Gradually add the dry flour mix to the butter mix. Alternate with 1/2 cup of milk. Start and end with the flour. Stir gently until just combined. Avoid overmixing to keep the cake light. 1. Pour a small amount of the reserved pineapple juice into the bottom of the cake pan. Just enough to coat the bottom lightly. 2. Arrange the drained pineapple slices in an even layer at the bottom of the pan. Place a maraschino cherry in the center of each slice. If you like, sprinkle shredded coconut over the top. 3. Carefully pour the prepared cake batter over the pineapple and cherries. Use a spatula to spread it evenly. 4. Bake in the preheated oven for 35-40 minutes. The cake is done when a toothpick inserted in the center comes out clean. 5. Once baked, let the cake cool in the pan for about 10 minutes. Then, invert the cake onto a serving plate. The pineapple should be on top. Tap the bottom gently if needed to release it. 6. Allow the cake to cool slightly before serving. Enjoy this delightful treat while warm! For the full recipe, check out the Tropical Pineapple Upside Down Delight . To make your cake great, avoid overmixing the batter. Mix just until the ingredients blend. If you mix too much, the cake can become tough. Always check doneness with a toothpick. Insert it into the center of the cake. If it comes out clean, your cake is done. If it has batter on it, bake a few more minutes. When inverting the cake, let it cool for about 10 minutes. This step helps it release from the pan. Tap gently on the bottom to help it come out. Place a serving plate on top of the pan. Flip it over quickly. The pineapple should be on top. For a lovely touch, garnish with whipped cream or ice cream. A dollop of cream adds a rich flavor. A scoop of ice cream makes it fun and cool. Add fresh mint for a pop of color. Just a few leaves make the dish look bright. It also adds a fresh taste. When serving for special occasions, slice the cake neatly. Serve on pretty plates for a nice look. You can even sprinkle some shredded coconut on top for extra flair. {{image_4}} You can make this cake even more fun with different flavors. Here are some ideas: - Tropical twists with different fruits: Try using mango, peaches, or even berries. Each fruit adds a unique taste and twist. - Coconut-infused batter or toppings: Mix shredded coconut into the batter. You can also sprinkle it on top before baking for a crunchy finish. - Using flavored extracts for extra zest: Add almond or coconut extract to the batter. This small change adds a big flavor boost. You can easily adapt this cake for different diets. Here are some options: - Gluten-free substitutions: Use a gluten-free flour blend instead of all-purpose flour. This keeps the cake soft and tasty. - Dairy-free options for the recipe: Swap regular milk for almond or oat milk. Use coconut oil instead of butter for a rich flavor. - Adjusting for low sugar or healthier versions: Try using a natural sweetener like honey or maple syrup. You can also reduce the sugar by a third without losing taste. For the full recipe, check out the Tropical Pineapple Upside Down Delight! To keep your leftover pineapple upside down cake fresh, store it in an airtight container. This will help prevent it from drying out. 1. Wrap the Cake: If you don’t have a container, wrap the cake tightly in plastic wrap. This keeps it moist and flavorful. 2. Refrigerate: Place the wrapped cake in the fridge if you plan to eat it within a few days. It should stay good for about 3 to 5 days. 3. Freezing Options: For longer storage, you can freeze the cake. Slice it into pieces for easy serving later. Wrap each slice in plastic wrap and then place the slices in a freezer bag. This way, you can grab a piece whenever you want! When you're ready to enjoy your cake again, reheating it is simple. This will help keep it soft and tasty. - Microwave Method: Place a slice on a microwave-safe plate. Heat it for about 10-15 seconds. Check to see if it’s warm enough. If not, heat in 5-second intervals. - Oven Method: For a more even heat, preheat your oven to 350°F (175°C). Wrap the cake in foil and heat for about 10-15 minutes. This helps maintain its moisture and flavor. Enjoy your delicious cake warm, and it will taste as good as fresh! How do I prevent my cake from sticking to the pan? To stop the cake from sticking, grease the pan well. Use butter or non-stick spray. Lightly dust the pan with flour after greasing. This makes it easier to remove the cake later. Can I use fresh pineapple instead of canned? Yes, you can use fresh pineapple! Just slice it into rings and make sure to drain any juice. Fresh pineapple gives a brighter taste and a nice texture. What can I serve with Pineapple Upside Down Cake? You can serve this cake with a scoop of vanilla ice cream. Whipped cream also works well. Fresh fruit or a sprig of mint adds color and flavor too. Troubleshooting when the cake sinks in the middle If your cake sinks, it might be due to overmixing the batter. Always mix until just combined. Too much air in the batter can cause it to deflate. What to do if the cake is too dry If the cake turns out dry, it may have baked too long. Next time, check for doneness a few minutes early. You can also add a little extra milk to the batter for moisture. Adjustments for high-altitude baking At high altitudes, you may need to reduce the sugar and increase the liquid. Lower the baking powder a bit too. This helps the cake rise without sinking. For a complete guide, check the Full Recipe! This blog post covered how to make a delicious Pineapple Upside Down Cake. We explored the key ingredients like flour, butter, and canned pineapple. I shared easy steps to prepare and bake the cake. You learned helpful tips to avoid common mistakes and ways to make it look tasty. We also discussed fun variations and proper storage techniques. Remember, each step matters for a perfect cake. Enjoy baking this delightful treat and share it with family and friends!

Pineapple Upside Down Cake Delightful Sweet Treat

Are you ready to bake a classic dessert that never fails to impress? Pineapple Upside Down Cake is a delightful

To make a No Bake Lemon Icebox Pie, gather these ingredients: - 1 cup graham cracker crumbs - 1/2 cup unsalted butter, melted - 1/2 cup granulated sugar - 1 can (14 oz) sweetened condensed milk - 1/2 cup fresh lemon juice (about 3-4 lemons) - Zest of 1 lemon - 1/4 teaspoon salt - 1 cup heavy whipping cream - 2 tablespoons powdered sugar - Extra lemon zest for garnishing (optional) You can also try variations. For a twist, add some berries or coconut. You can mix in lime juice instead of lemon juice for a different flavor. Here are the essential tools you will need: - 9-inch pie dish - Mixing bowls - Electric mixer or whisk - Spatula - Measuring cups and spoons - Plastic wrap These tools make your preparation smooth. A good electric mixer helps whip cream quickly. A spatula is great for folding. Having all your tools ready helps you enjoy the process! To make the crust, start by mixing graham cracker crumbs with melted butter. Use a medium bowl to combine them well. You want a texture similar to wet sand. This will help the crust hold together. Next, press this mixture firmly into a 9-inch pie dish. Use your fingers or the bottom of a measuring cup. Make sure it is even across the bottom and up the sides. This step is key for a great crust. Once done, place the crust in the fridge. Let it chill for about 15 minutes to firm up. Now, let's make the lemon filling. In a separate bowl, whisk together sweetened condensed milk, fresh lemon juice, lemon zest, granulated sugar, and salt. Start with the milk and add the other ingredients one by one. This order helps the filling thicken nicely. Whisk until the mixture is smooth and creamy. You will see it getting thicker due to the lemon juice. This is a good sign! For the whipped cream, use a clean mixing bowl. Pour in heavy whipping cream and add powdered sugar. Use an electric mixer to beat them together. Start on low speed, then increase to high. Whip until you see stiff peaks form. Be careful not to overwhip. If you go too far, the cream can turn grainy. Stop once it's light and fluffy. It’s time to combine the filling and whipped cream. Gently fold the whipped cream into the lemon mixture. Use a spatula and make slow, careful motions. This helps keep the whipped cream airy. Once combined, pour the lemon filling into the chilled graham cracker crust. Smooth the top with a spatula. Cover the pie with plastic wrap and place it in the fridge. Chill for at least 4 hours or overnight. This lets the pie set properly and develop great flavor. For the full recipe, check out my detailed notes! To make the best No Bake Lemon Icebox Pie, focus on a few key tips: - Chill Your Tools: Before whipping cream, chill your mixing bowl and beaters. This helps the cream whip faster. - Use Fresh Ingredients: Fresh lemons give the best flavor. Avoid bottled lemon juice if you can. - Adjust Sweetness: If you want it sweeter, add more sugar. For a tart twist, add extra lemon juice. - Thicken the Filling: If your filling is too runny, let it sit for a few minutes before pouring it into the crust. Here are some fun ways to serve your pie: - Presentation: Slice the pie into even pieces. Serve on chilled plates for a refreshing bite. - Garnish: Top each slice with a little extra lemon zest. This adds color and fresh aroma. - Pair with Fruit: Serve with fresh berries or slices of lemon for a fruity kick. - Minty Touch: Add a mint leaf on top for extra flair and flavor. These tips and serving ideas will make your No Bake Lemon Icebox Pie a hit at any summer gathering. If you want the full details on how to make it, check the Full Recipe. {{image_4}} You can make this pie even more fun by changing the flavors! Try using lime juice instead of lemon juice. Lime gives a nice tangy taste. Orange juice also works well. It adds a sweet, bright flavor. Mix-ins can make the pie extra special. Berries like strawberries or blueberries add color and taste. You can fold them into the filling for a fruity twist. Shredded coconut can also be a fun mix-in. It adds a nice texture and tropical flair. If you want to switch up the crust, go for it! An Oreo crust adds a rich chocolate flavor. Gluten-free options are also available. You can use almond flour or gluten-free cookies. Different crusts change the pie's taste and feel. A cookie crust is sweeter and richer, while a traditional graham cracker crust is lighter. Experiment with what you like best! It’s fun to find your favorite combination. For more details, check out the Full Recipe. To keep your No Bake Lemon Icebox Pie fresh, choose an airtight container. A glass or plastic pie dish with a lid works well. Wrap the pie tightly in plastic wrap if you lack a lid. This keeps moisture out and prevents it from getting soggy. Always store the pie in the refrigerator. The cool temperature helps maintain its smooth texture and bright flavor. You can freeze this pie for later enjoyment. First, let it set in the fridge for at least 4 hours. Then, wrap it in plastic wrap and foil. This helps avoid freezer burn. You can store it in the freezer for up to one month. When you're ready to eat it, thaw it in the fridge overnight. This ensures the pie stays creamy and delicious. Yes, you can make this pie a day in advance. It tastes great when chilled. I often prepare it the night before a gathering. This gives the pie enough time to set properly. Just make sure to cover it well before chilling. This way, it stays fresh and delicious. You can use coconut cream for a dairy-free version. Another option is to mix almond milk with sugar. Just use a 1:1 ratio. Both options work well in this recipe and keep the pie creamy. They also add a unique flavor twist. Look for a firm but slightly wobbly texture. The surface should not jiggle too much. You can also gently press the top; it should feel solid. If it seems firm, it is ready to serve. Chill it longer if you are unsure. Absolutely! Fresh fruit adds color and flavor. Berries like strawberries or blueberries work great. You can also use sliced kiwi or peaches. They make the pie look beautiful and add a refreshing taste. Plus, the fruit adds vitamins and nutrients! No Bake Lemon Icebox Pie is easy to make and delicious. You learned key ingredients, tools, and steps to prepare this treat. By following the tips and exploring variations, you can create your own unique pie. Remember to store it correctly for the best taste. With these instructions, you can impress your family and friends. Enjoy making your tasty pie and share it with others!

No Bake Lemon Icebox Pie Refreshing Summer Dessert

Looking for a cool and easy dessert to beat the heat? This No Bake Lemon Icebox Pie is your perfect

- 1 ½ cups all-purpose flour - 1 cup granulated sugar - 1 tsp baking soda - 1 tsp unsweetened cocoa powder - 1 tsp salt - 1 cup vegetable oil - 1 cup buttermilk, at room temperature - 2 large eggs, at room temperature - 2 tbsp red food coloring - 1 tsp pure vanilla extract - 1 tsp white vinegar For the Cream Cheese Frosting: - 8 oz cream cheese, softened to room temperature - ½ cup unsalted butter, softened to room temperature - 4 cups powdered sugar - 1 tsp pure vanilla extract The main star of red velvet cupcakes is the food coloring. It gives them that bright red hue. The cocoa powder adds a hint of chocolate flavor, but it does not overpower the cake. The buttermilk keeps the cupcakes moist and adds a slight tang. Using room temperature eggs helps create a smooth batter. The cream cheese frosting is rich and creamy. It balances the sweetness of the cake. The butter in the frosting adds a nice texture, while the powdered sugar sweetens it perfectly. You can replace buttermilk with regular milk mixed with a bit of vinegar. Just add 1 tsp of vinegar to 1 cup of milk, stir, and let it sit for 5 minutes. If you don’t have vegetable oil, you can use melted coconut oil or canola oil. For a lighter frosting, you could use whipped cream instead of cream cheese. If you want to skip the food coloring, use beet juice for a natural alternative. Just remember, it might change the taste a bit! Explore the Full Recipe for more details and tips to make these scrumptious treats! Start by preheating your oven to 350°F (175°C). This step is key for even baking. Next, line a standard muffin pan with cupcake liners. This makes for easy removal and adds a pop of color. In a large mixing bowl, sift together the dry ingredients. Combine 1 ½ cups of all-purpose flour, 1 cup of granulated sugar, 1 tsp of baking soda, 1 tsp of unsweetened cocoa powder, and 1 tsp of salt. Mixing these well ensures that the flavors blend nicely. In another bowl, whisk together the wet ingredients. Mix 1 cup of vegetable oil, 1 cup of buttermilk, 2 large eggs, 2 tbsp of red food coloring, 1 tsp of pure vanilla extract, and 1 tsp of white vinegar. Make sure it is smooth and fully blended. Gradually pour the wet mixture into the dry ingredients. Stir gently until just combined. It is okay to have a few lumps. Next, fill each cupcake liner about two-thirds full with batter. This allows them to rise properly. Place the muffin pan in the oven and bake for 18-20 minutes. Check for doneness by inserting a toothpick in the center of a cupcake. If it comes out clean, they are ready. Once baked, take the muffin pan out of the oven. Let the cupcakes cool in the pan for 5 minutes. Then, move them to a wire rack to cool completely. While they cool, prepare the cream cheese frosting. Beat 8 oz of softened cream cheese and ½ cup of softened butter until smooth. Gradually mix in 4 cups of powdered sugar and 1 tsp of pure vanilla extract. Once the cupcakes are cool, frost each one generously. Enjoy your beautifully crafted red velvet cupcakes from the full recipe! To get soft and fluffy red velvet cupcakes, use room-temperature ingredients. Cold butter or eggs can lead to dense cupcakes. Mix the wet and dry ingredients gently. Overmixing can create tough cupcakes. Aim for a batter that is just combined. A few small lumps are fine. One common mistake is using too much flour. Always measure flour correctly. Spoon it into the measuring cup and level it off. Another mistake is skipping the vinegar. The vinegar helps the baking soda work better, giving your cupcakes a nice rise. Don’t forget to let the cupcakes cool completely before frosting. Frosting on warm cupcakes can make a messy situation. Make your cupcakes look as good as they taste! Use a piping bag with a star tip for a professional touch. For a fun twist, top with fresh berries or chocolate shavings. You can also drizzle some melted chocolate on top for added flair. Dusting with cocoa powder or edible shimmer gives an elegant finish. For the full recipe, be sure to check out the detailed steps and ingredients listed above! {{image_4}} When it comes to frosting your red velvet cupcakes, you have options. The classic choice is cream cheese frosting. This frosting adds a tangy flavor that pairs well with the sweetness of the cupcake. It's rich and creamy, making each bite a delight. If you want a sweeter option, consider buttercream. This frosting is smooth and fluffy. You can customize it with different flavors, like vanilla or chocolate. Both frostings look beautiful when piped on top of the cupcakes. Choose the one that fits your taste! Red velvet cupcakes are great on their own, but adding flavors can make them even better. Try adding a few drops of mint extract for a refreshing twist. Almond extract can give your cupcakes a nutty taste. These small changes can create a unique experience. You can also mix in different spices. A pinch of cinnamon or nutmeg can add warmth to your cupcakes. Experimenting with flavors is fun and can surprise your friends and family with new tastes! If you or your guests have dietary needs, you can make red velvet cupcakes that fit. For gluten-free cupcakes, swap all-purpose flour with gluten-free flour blends. Many blends work well, but check the package for best results. For a vegan version, replace eggs with flax eggs or applesauce. Use plant-based milk instead of buttermilk. You can also find vegan butter for the frosting. These swaps can keep the delicious taste while making the recipe more inclusive. With these variations, your red velvet cupcakes can suit any occasion, preference, or dietary need. For the full recipe, check out the details above! To keep your leftover cupcakes fresh, place them in an airtight container. You can put a piece of parchment paper between layers to avoid sticking. Store them at room temperature for up to three days. If you want to keep them longer, the fridge is a good option. Just remember to bring them to room temp before serving. Freezing is a great way to save cupcakes for later. First, let them cool completely. Then, wrap each cupcake tightly in plastic wrap. Put them in a freezer-safe bag or container. They can stay fresh in the freezer for up to three months. Just label the bag with the date to keep track. When you’re ready to enjoy those frozen treats, take them out of the freezer. Unwrap them and let them sit at room temperature for about 30 minutes. For a warm cupcake, pop it in the microwave for about 10-15 seconds. This will make the cake soft again and melt the frosting just right. Enjoy these cupcakes with a great cup of coffee or tea. You can find the Full Recipe to make your own batch. Red velvet cupcakes get their color from red food coloring. You can use natural beet juice for a healthier option. The cocoa powder also plays a role in giving a slight reddish hue. The mix of these ingredients creates that classic red color we all love. Yes, you can make these cupcakes in advance. Bake them a day or two ahead of time. Just store them in an airtight container. Frost them right before serving to keep the frosting fresh and creamy. To prevent sinking cupcakes, don’t overmix the batter. Overmixing adds too much air, which can cause sinking. Also, make sure your baking powder is fresh. Proper oven temperature is key; always preheat your oven before baking. Red velvet cake has cocoa powder, but it’s not as chocolaty as chocolate cake. It also has buttermilk, giving it a unique flavor and moist texture. The red color and cream cheese frosting set it apart, making it a special treat. For the full recipe, check out the section above. You learned about making classic red velvet cupcakes. We covered key ingredients, step-by-step instructions, and tips for success. You now know about frosting options and fun variations. Remember to store unused cupcakes correctly to keep them fresh. Baking these cupcakes is a fun way to enjoy a treat. With these tips, you can impress friends and family. Enjoy experimenting with flavors and decorations to make them your own. Happy baking!

Classic Red Velvet Cupcakes Irresistibly Delicious Treat

Welcome to the world of baking where classic red velvet cupcakes reign supreme! If you crave a treat that’s both

To make the Cottage Cheese Egg Muffins, gather these key items: - 1 cup cottage cheese - 4 large eggs - 1/2 cup bell pepper, diced - 1/2 cup fresh spinach, chopped - 1/4 cup green onions, chopped - 1/2 teaspoon garlic powder - 1/4 teaspoon paprika - Salt and pepper to taste - 1/2 cup shredded sharp cheddar cheese - Cooking spray or olive oil for greasing These ingredients work together to create a fluffy, cheesy muffin packed with nutrients. You can customize your muffins with these tasty add-ins: - Cooked bacon or sausage for extra protein - Chopped tomatoes for a fresh twist - Herbs like basil or parsley for added flavor - Feta cheese for a tangy kick Feel free to mix and match based on what you enjoy or have on hand. These muffins offer some great benefits: - High in protein from cottage cheese and eggs - Low in carbs, making them great for many diets - Can be gluten-free if you check your ingredients - Easy to modify for dairy-free diets using alternatives This dish fits various dietary needs while being delicious and satisfying. {{ingredient_image_2}} Start by gathering all your ingredients. You will need: - 1 cup cottage cheese - 4 large eggs - 1/2 cup bell pepper, diced - 1/2 cup fresh spinach, chopped - 1/4 cup green onions, chopped - 1/2 teaspoon garlic powder - 1/4 teaspoon paprika - Salt and pepper to taste - 1/2 cup shredded sharp cheddar cheese - Cooking spray or olive oil Preheat your oven to 375°F (190°C). This step is key for baking the muffins evenly. While the oven heats, chop the bell pepper, spinach, and green onions. The colors will brighten your muffins and add great flavor. In a large bowl, combine the cottage cheese and eggs. Use a whisk to mix until the blend is smooth. This ensures the eggs and cheese mix well. Then, add your diced bell pepper, chopped spinach, green onions, garlic powder, paprika, and a sprinkle of salt and pepper. Stir the mixture well until all ingredients are evenly combined. Next, fold in the shredded cheddar cheese. Be gentle when folding so the cheese stays intact, adding nice bites of flavor. Lightly grease a muffin tin with cooking spray or olive oil. This step prevents sticking and makes it easy to remove your muffins later. Pour the egg mixture into each muffin cup, filling them about two-thirds full. This allows space for the muffins to rise. Place the muffin tin in the preheated oven. Bake the muffins for about 20 to 25 minutes. They are ready when they look golden and set in the center. After baking, carefully take the muffin tin out of the oven. Let the muffins cool for a few minutes. Use a knife to gently run around the edges. Then, lift them out of the tin. Enjoy your warm cottage cheese egg muffins as a healthy breakfast! To get the best texture, blend the cottage cheese and eggs well. I like to whisk until smooth. This helps make the muffins light and fluffy. Be careful not to overmix after adding the veggies and cheese. Gentle folding keeps them airy. These muffins taste great warm. To reheat, pop them in the microwave for about 20-30 seconds. You can also use an oven at 350°F (175°C) for about 10 minutes. Serve them on a colorful platter with fresh herbs on top. They look nice and taste even better. One common mistake is overfilling the muffin cups. Fill them only two-thirds full to let them rise. Another mistake is not greasing the tin well. Use cooking spray or olive oil to avoid sticking. Lastly, ensure you bake them long enough. They should be set in the middle and golden on top. Pro Tips Use Fresh Ingredients: The quality of your vegetables can greatly enhance the flavor of your muffins. Opt for fresh, vibrant bell peppers and spinach for the best taste. Experiment with Cheese: While sharp cheddar is delicious, try mixing in other cheeses like feta or pepper jack for a different flavor profile. Ensure Even Baking: Rotate the muffin tin halfway through baking to ensure even cooking, especially if your oven has hot spots. Perfect Storage: To keep muffins fresh, store them in an airtight container in the refrigerator. For longer storage, freeze them and reheat as needed. {{image_4}} You can change the taste of your cottage cheese egg muffins easily. Adding crispy bacon brings a smoky flavor. Try mixing in fresh herbs like parsley or chives for a bright taste. You can also add diced tomatoes for a burst of freshness. If you love spice, toss in chopped jalapeños or a dash of hot sauce. Each change can create a completely new muffin. These muffins can fit many diets. For a low-carb option, skip the bell pepper and use zucchini instead. This keeps the muffins light and fluffy. If you need a dairy-free version, substitute the cottage cheese with silken tofu. It blends well and keeps the muffins moist. You can also use a dairy-free cheese to maintain that cheesy goodness. You can make these muffins in different sizes. Use a mini muffin tin for bite-sized snacks. They bake faster and are perfect for kids or parties. For a heartier meal, use a larger muffin tin. Serve them warm with a side of fruit. You can also stack them in a basket or on a colorful platter to impress your guests. A sprinkle of fresh herbs on top adds a lovely touch. To keep your cottage cheese egg muffins fresh, store them in an airtight container. Place them in the fridge within two hours of baking. They will stay good for up to one week. Make sure to separate layers with parchment paper to prevent sticking. This helps keep them intact for the next breakfast. If you want to save some muffins for later, freezing is a great option. First, let the muffins cool completely. Then, wrap each muffin in plastic wrap or foil. Place them in a freezer-safe bag or container. They can last for up to three months in the freezer. When you’re ready to eat, just thaw them in the fridge overnight. Reheating is simple! You can use the microwave or the oven. For the microwave, place a muffin on a plate and heat for 30-45 seconds. Check if it’s warm enough, and add more time if needed. For the oven, preheat it to 350°F (175°C). Place the muffins on a baking sheet and heat for 10-15 minutes. Enjoy them warm just like fresh! Yes, you can make these muffins ahead of time. They are great for meal prep. Bake a batch on the weekend and enjoy them all week. Store them in the fridge, and they stay fresh. Just reheat them when you are ready to eat. This saves time on busy mornings. If you don't have cottage cheese, you can use Greek yogurt. It gives a similar texture and adds protein. Ricotta cheese is another option that works well. Both will keep your muffins creamy and tasty. Feel free to experiment with these substitutes in your recipe. Cottage cheese egg muffins last about one week in the fridge. Make sure to store them in an airtight container. This helps keep them fresh and tasty. If you notice any change in smell or texture, it's best to toss them. Enjoy them warm for a quick breakfast or snack! In this blog post, we covered how to make delicious cottage cheese egg muffins. We explored the main ingredients, optional add-ins, and dietary options. The step-by-step instructions guide you through prepping, mixing, and baking. I offered tips to perfect texture and avoid common mistakes. You can adapt the recipe with various flavors and sizes. Finally, we discussed storage tips and answered key questions. These muffins are simple, tasty, and great for any meal. Now, you have all you need to create your perfect batch!

Cottage Cheese Egg Muffins Healthy and Easy Breakfast

If you’re looking for a quick, healthy breakfast, you’ll love these Cottage Cheese Egg Muffins! Packed with protein and customizable

For perfect air fryer chicken tenders, gather these main ingredients: - 1 lb of chicken tenders - 1 cup of buttermilk - 1 cup of all-purpose flour - 1/2 cup of breadcrumbs (opt for panko for ultimate crispiness) These core items create juicy chicken with a crunchy coating. The buttermilk makes the chicken tender and flavorful. The flour and breadcrumbs work together for that satisfying crunch. Next, you need to add some zest with seasonings: - 2 teaspoons of garlic powder - 1 teaspoon of onion powder - 1 teaspoon of paprika - 1/2 teaspoon of salt - 1/2 teaspoon of freshly ground black pepper These spices bring warmth and depth to the dish. Garlic powder and onion powder enhance the savory notes. Paprika adds a touch of color and sweetness, while salt and pepper balance the flavors. To make your dish pop, consider these garnish options: - Optional: Finely chopped fresh parsley (for garnish) A sprinkle of fresh parsley adds color and a fresh taste. It makes the plate look beautiful and appetizing. You can serve your crispy chicken tenders with your favorite dipping sauces to enhance the meal. For the full recipe, check out the details above. Enjoy cooking! Start by marinating the chicken. Place the chicken tenders in a large bowl. Pour in the buttermilk. Make sure each piece is well-coated. This step helps keep the chicken juicy and adds flavor. Let them sit for at least 30 minutes. For the best taste, refrigerate for up to 2 hours. Next, let's prepare the coating. In another bowl, mix the all-purpose flour, breadcrumbs, garlic powder, onion powder, paprika, salt, and pepper. Stir until all the dry ingredients are blended. This mix will create a crispy outer layer for your tenders. Now, preheat your air fryer. Set it to 400°F (200°C) and let it run for about 5 minutes. Preheating is essential. It helps the chicken cook evenly and become nice and crispy. Once the chicken is marinated, take each piece out. Let any extra buttermilk drip off. Dredge each tender in the flour mixture. Make sure to coat every side. This will give the chicken that sought-after crunch. Place the coated chicken tenders in the air fryer basket. Arrange them in a single layer. Avoid overcrowding the basket. If you have a lot, cook in batches. This allows hot air to circulate, cooking the chicken perfectly. Lightly spray the chicken with cooking spray. This will help achieve a golden-brown exterior. Cook the tenders for 10-12 minutes. Flip them halfway through for even cooking. Check that they reach an internal temperature of 165°F (74°C). They should look golden and crispy when finished. For the full recipe, refer back to the main section. To make sure your chicken tenders turn out crispy, follow some key steps. First, always marinate the chicken in buttermilk. This keeps the chicken moist and adds flavor. Next, use panko breadcrumbs instead of regular ones. Panko gives a better crunch. Finally, spray a light coat of cooking spray before cooking. It helps achieve that golden-brown look. Boost the flavor of your chicken tenders with some easy tricks. Add spices to the flour and breadcrumb mix. Garlic powder and paprika work well. You can also try adding cayenne for a kick. If you want a fresh taste, mix in herbs like thyme or oregano. These small tweaks make a big difference. The cooking time for chicken tenders can vary. If your tenders are thicker, they may need a bit more time. Start with 10 minutes at 400°F. Flip them halfway through for even cooking. Always check the internal temperature. It should be 165°F. If they aren't done, add a couple of extra minutes. Adjusting time can ensure perfect, crispy tenders every time. For the full recipe, refer back to the earlier section. {{image_4}} To make spicy air fryer chicken tenders, add some heat. Mix 1-2 teaspoons of cayenne pepper or chili powder into your coating mixture. You can also marinate the chicken in buttermilk mixed with hot sauce. This adds flavor and a nice kick. Adjust the spice level to suit your taste. For a gluten-free version, swap all-purpose flour with gluten-free flour. Use gluten-free breadcrumbs instead of regular ones. Make sure to check all labels for gluten-free certification. This way, you can enjoy crispy tenders without the gluten. Try different coatings for your chicken tenders. You can use crushed cornflakes or nuts for a unique crunch. For a healthier option, coat the chicken in ground oats or almond flour. You can also experiment with different herbs and spices in your coating mix. This adds a fun twist to your dish. Check out the Full Recipe for more tips on how to customize your air fryer chicken tenders. To keep your air fryer chicken tenders fresh, store them in an airtight container. They stay good in the fridge for up to three days. Make sure they cool down before sealing. This helps keep the coating crispy longer. Reheat your chicken tenders in the air fryer for the best texture. Set it to 350°F (175°C) for about 5-7 minutes. This method restores their crunch. You can also use an oven at the same temperature for around 10 minutes. If you want to save some for later, freeze the tenders before cooking. Lay them on a baking sheet and freeze for about an hour. Then, transfer to a freezer bag. They last up to three months. When ready to eat, cook from frozen. Just add a few extra minutes to the cooking time in your air fryer for a delicious treat. Check out the [Full Recipe] for more details! To get crispy chicken tenders, focus on two things: the coating and cooking method. Use panko breadcrumbs for extra crunch. Make sure to coat each tender well. Lightly spray the chicken with cooking spray before cooking. This helps create a golden crust. Preheating the air fryer is key. It ensures even cooking and crispiness. Yes, you can use frozen chicken tenders! However, you need to thaw them first. Thaw the chicken by placing it in the refrigerator overnight. This way, the coating sticks better. If you cook them from frozen, increase the cooking time. Check that the internal temperature reaches 165°F (74°C) for safety. Dipping sauces make chicken tenders even better! Here are some tasty options: - Honey mustard - BBQ sauce - Ranch dressing - Buffalo sauce - Ketchup Feel free to mix and match them to find your favorite! Air fryer chicken tenders last about 3 to 4 days in the fridge. Store them in an airtight container to keep them fresh. Let them cool down before placing them in the fridge. For best taste, reheat them in the air fryer or oven to maintain crispiness. Enjoy them as leftovers! You now know how to make delicious air fryer chicken tenders. We discussed key ingredients, step-by-step instructions, and tips for crispiness. You learned variations to suit your taste and how to store leftovers properly. Each step helps ensure you get the best results. Enjoy your tasty, homemade chicken tenders and share them with friends and family. You can easily impress anyone with this simple dish. Now go ahead and make your perfect batch!

Air Fryer Chicken Tenders Crispy and Flavorful Delight

If you crave crispy, flavorful chicken tenders without the guilt, you’ve come to the right place! In this post, I’ll

To make Greek chicken souvlaki bowls, you will need: - 1 lb (450g) boneless, skinless chicken breasts, cut into 1-inch cubes - 3 tablespoons extra virgin olive oil - Juice of 1 medium lemon - 3 cloves garlic, minced - 1 teaspoon dried oregano - 1 teaspoon dried thyme - Salt and freshly ground pepper to taste - 2 cups cooked quinoa or couscous - 1 cup cherry tomatoes, halved - 1 medium cucumber, diced - 1 small red onion, thinly sliced - 1 cup tzatziki sauce (store-bought or homemade) - Fresh parsley, finely chopped, for garnish - Crumbled feta cheese (optional, for added richness) When shopping, look for fresh ingredients. Select firm chicken breasts with no blemishes. Go for bright, plump tomatoes and crisp cucumbers. Fresh herbs enhance the flavor, so choose vibrant parsley. For tzatziki, check the deli section for quality store-bought options. If making your own, find the freshest yogurt and cucumbers. Local markets often have the best produce. If you can’t find boneless chicken, use thighs for more flavor. For a vegetarian twist, tofu or grilled veggies work well. If you prefer grains, swap quinoa with brown rice or farro. You can also replace tzatziki with hummus for a different taste. Add your favorite nuts or seeds for crunch. Get creative! To start, gather a large mixing bowl. Add 3 tablespoons of extra virgin olive oil. Squeeze in the juice of one medium lemon. Next, mince 3 cloves of garlic and add them to the bowl. Then, sprinkle in 1 teaspoon each of dried oregano and dried thyme. Season this blend with salt and freshly ground pepper to taste. Whisk all these ingredients together until mixed well. Now, take your 1 pound of chicken breasts. Cut them into 1-inch cubes. Place the chicken into the marinade, ensuring every piece is coated. Cover the bowl with plastic wrap. Refrigerate it for at least 30 minutes. For more flavor, you can marinate it for up to two hours. Preheat your grill or grill pan to medium-high heat. If you’re using wooden skewers, soak them in water for about 30 minutes. This helps prevent burning. Once the grill is ready, take the chicken out of the marinade. Thread the cubes onto the skewers. Place the skewers on the grill and cook for 10 to 12 minutes. Turn them occasionally for even cooking. The chicken is done when it’s fully cooked and has a light char. The internal temperature should reach 165°F (75°C) for safety. While the chicken is grilling, you can start assembling your bowls. Begin with 2 cups of cooked quinoa or couscous. Layer this at the bottom of each serving bowl. Once the chicken is done, place the skewers on top of the quinoa or couscous. Next, add 1 cup of halved cherry tomatoes, 1 medium diced cucumber, and 1 small thinly sliced red onion around the chicken. Drizzle tzatziki sauce over everything. This adds a fresh and creamy touch. Finally, garnish with finely chopped fresh parsley. If you like, sprinkle crumbled feta cheese on top for extra flavor. For a complete guide, check out the Full Recipe. Enjoy this colorful and tasty meal! To get the best flavor from your chicken, marinate it well. Use fresh ingredients like lemon juice, garlic, and herbs. These add great taste. I recommend marinating for at least 30 minutes. For even better flavor, let it sit for two hours. This allows the chicken to soak up all those wonderful flavors. When grilling chicken, preheat your grill to medium-high heat. This helps the chicken cook quickly and evenly. If you use wooden skewers, soak them in water for 30 minutes to stop them from burning. Grill the chicken for 10-12 minutes, turning it often. The chicken should have a nice char and reach 165°F (75°C) inside. This ensures it's juicy and safe to eat. For a stunning bowl, layer your ingredients. Start with quinoa or couscous at the bottom. Place the grilled chicken skewers on top. Arrange the cherry tomatoes, cucumber, and red onion around the chicken. Finish by drizzling tzatziki sauce all over. For a nice touch, sprinkle fresh parsley and feta cheese on top. Serve with lemon wedges for a pop of color and flavor. Enjoy your Greek Chicken Souvlaki Bowls with pride! {{image_4}} You can swap chicken for other proteins. Pork, beef, or tofu all work well. To use pork, choose tenderloin or shoulder. For beef, cut sirloin into cubes. If you prefer tofu, use firm or extra firm. Marinate these proteins just like the chicken. Each option adds its own unique flavor to your bowl. If you want a vegetarian bowl, skip the meat. Instead, use grilled vegetables like bell peppers and zucchini. Add chickpeas for protein and fiber. You can also toss in some olives for a salty bite. Try adding roasted eggplant or mushrooms for more depth. Each of these choices makes the dish hearty and tasty. While quinoa and couscous are great, you can switch up the grain. Brown rice offers a nutty flavor. Farro adds a chewy texture and earthy taste. Bulgur is another quick-cooking option. All these grains provide different tastes and health benefits. Choose one that fits your diet or what you have on hand. For more details, check out the Full Recipe. To keep your Greek chicken souvlaki bowls fresh, store them in airtight containers. Make sure to cool the food to room temperature before sealing. This helps prevent bacteria growth. Store the bowls in the fridge for up to three days. If you have leftover tzatziki, keep it separate to maintain its texture. When reheating, use a microwave or a skillet. If using a microwave, place the bowl in for about 1-2 minutes. Stir halfway through to ensure even heating. For the skillet, heat the chicken on medium-low until warm. This keeps the chicken tender. Do not overheat the tzatziki, as it may lose its creamy texture. You can freeze the cooked chicken and grains separately. Place them in freezer-safe bags or containers. Label the bags with dates. The chicken can last up to three months in the freezer. When ready to eat, thaw in the fridge overnight. Reheat as described above before serving. Souvlaki has roots in ancient Greece. People made skewers of meat and grilled them over fire. The name comes from the Greek word “souvla,” meaning skewer. It became popular as street food in the 20th century. Today, souvlaki is a tasty staple of Greek cuisine. You can find it in many restaurants and homes. Yes, you can easily make tzatziki sauce at home! You need just a few simple ingredients. Here’s a quick recipe: - 1 cup plain Greek yogurt - 1 small cucumber, grated and drained - 2 cloves garlic, minced - 1 tablespoon olive oil - 1 tablespoon lemon juice - Salt to taste Mix all these ingredients in a bowl. Let it chill in the fridge for at least 30 minutes. This will help the flavors blend well. To check if the chicken is cooked, use a meat thermometer. Insert it into the thickest part of the chicken. The internal temperature should reach 165°F (75°C). If you don’t have a thermometer, cut a piece of chicken in half. The meat should be white, with no pink inside. This ensures it is safe to eat. You learned the key ingredients and steps to make a delicious bowl. I shared tips on marinating and grilling chicken perfectly. We explored variations for proteins and grains to suit your taste. Plus, I covered how to store leftovers safely. In summary, these bowls are tasty and easy to customize. Enjoy experimenting with flavors and ingredients to make them your own!

Greek Chicken Souvlaki Bowls Simple and Flavorful Meal

Looking for a simple, flavorful meal? Greek Chicken Souvlaki Bowls are the answer! Packed with bright flavors and fresh ingredients,

To make this easy taco soup, you'll need: - 1 lb ground turkey or beef - 1 medium onion, finely diced - 2 cloves garlic, minced - 1 red bell pepper, chopped - 1 can (15 oz) black beans, drained and rinsed - 1 can (15 oz) sweet corn, drained - 1 can (15 oz) diced tomatoes with green chilies - 2 cups chicken or vegetable broth - 2 tablespoons taco seasoning - 1 teaspoon ground cumin - Salt and freshly ground black pepper to taste - 1 cup shredded cheese (cheddar or Mexican blend) - Fresh cilantro leaves, chopped, for garnish - Sour cream for topping These ingredients create a rich and hearty soup. The ground turkey or beef provides protein, while the beans and corn add fiber. The diced tomatoes and broth give the soup its base and flavor. You can make your taco soup unique by adding: - Jalapeños for heat - Avocado for creaminess - Bell peppers of different colors for fun - Extra spices like chili powder or smoked paprika - Lime juice for a zesty kick Feel free to mix and match these options. Customize it to fit your taste! Toppings can make your taco soup even better. Here are some tasty choices: - Shredded cheese for creaminess - Sour cream to cool the spice - Chopped green onions for a fresh taste - Crushed tortilla chips for crunch - Sliced olives for a salty bite These toppings add flavor and texture. They also make the final dish look appealing. For the full recipe, check out the detailed cooking steps that follow! Start by heating a large pot or Dutch oven over medium-high heat. Add 1 pound of ground turkey or beef. Cook the meat, stirring often, until it turns brown. This takes about 5 to 7 minutes. If you see extra fat, drain it carefully. This step keeps your taco soup light and tasty. Next, add one finely diced medium onion, two minced garlic cloves, and one chopped red bell pepper to the pot. Sauté these veggies for about 5 minutes. You want them to soften and release their nice aroma. This mix adds depth to your soup. Now, pour in one can of drained black beans, one can of drained sweet corn, and one can of diced tomatoes with green chilies. Follow this with 2 cups of chicken or vegetable broth. Sprinkle in 2 tablespoons of taco seasoning and 1 teaspoon of ground cumin. Season with salt and freshly ground black pepper to taste. Stir everything well. Increase the heat until it simmers gently. Then lower the heat and let it cook for about 15 minutes. This helps the flavors meld beautifully. After simmering, taste your soup. Adjust the seasoning if needed. You can add more salt, pepper, or spices to fit your taste. Now, ladle the hot soup into bowls. Top each bowl with a handful of shredded cheese, a dollop of sour cream, and fresh chopped cilantro. If you want to impress, serve it with tortilla chips on the side. This adds a fun crunch to your meal. For a festive look, use colorful bowls. Enjoy your easy taco soup! To make your taco soup burst with flavor, use fresh spices. Fresh spices give more taste than old ones. Add the taco seasoning early, but taste later. This way, you can adjust flavors to your liking. Don't skip the salt; it boosts all other flavors. When cooking meat, choose lean ground turkey or beef. This keeps the soup light and healthy. Heat your pot before adding the meat. Cook on medium-high heat until browned. Stir often to break up the meat and cook evenly. If there’s extra fat, drain it out to avoid greasiness. For a fun texture, add ingredients at different times. Sauté onions and peppers first for a nice crunch. Adding beans and corn later helps keep them firm. For a vibrant look, use colorful bowls. Top with bright cilantro and cheese to make the dish pop. Enjoy the soup with crunchy tortilla chips for extra fun! {{image_4}} You can easily make a vegetarian or vegan version of taco soup. Instead of meat, use lentils or quinoa as your protein. They add great texture and keep the soup filling. Replace chicken broth with vegetable broth for a full flavor. You can also add more beans like kidney or pinto beans. Don't forget to add extra veggies like zucchini or carrots for more nutrition. If you like heat, spice up your taco soup. Add fresh jalapeños or a dash of hot sauce to the pot. You can also use spicy diced tomatoes instead of regular ones. For an extra kick, mix in chipotle peppers in adobo sauce. They add a smoky flavor that pairs well with the other ingredients. Adjust the spice to your taste. Using a slow cooker makes taco soup even easier! Simply brown the meat first, then add it to the slow cooker. Toss in all your other ingredients, including broth and spices. Set the cooker on low for 6-8 hours or high for 3-4 hours. This method lets the flavors blend beautifully. Stir it well before serving. Enjoy your easy taco soup with minimal fuss! If you want the full recipe, check out the [Full Recipe]. To keep your taco soup fresh, store it in an airtight container. Make sure to let it cool first. Place the container in the fridge. It will stay good for about 3 to 4 days. If you want to keep it longer, consider freezing it. Freezing is a great option for taco soup. Use freezer-safe containers or bags. Divide the soup into single servings for easy meals. Label each bag with the date. You can freeze taco soup for up to 3 months. When you're ready to eat, you’ll have a quick meal on hand! Reheating taco soup is simple. You can use the stove or microwave. To reheat on the stove, pour the soup into a pot. Heat it over medium heat until warm, stirring often. For the microwave, place the soup in a microwave-safe bowl. Heat it in 1-minute intervals, stirring between each. Make sure it’s hot all the way through before serving. Enjoy your tasty leftovers! Yes, you can make Easy Taco Soup ahead of time. It tastes great after it sits. The flavors blend well when stored. Just let it cool and put it in the fridge. You can keep it for about three days. When you are ready to eat, just heat it up on the stove or in the microwave. You can try several options instead of ground turkey or beef. Ground chicken works well and is light. You can also use lentils for a plant-based choice. Crumbled tofu or tempeh adds good protein too. If you want a richer flavor, try chorizo. Each option gives a unique twist to the soup. To spice up your Taco Soup, add jalapeños or other hot peppers. You can also mix in hot sauce while cooking. Another tip is to use spicy taco seasoning. A sprinkle of cayenne pepper can also boost the heat. Just be careful; add a little at a time until it meets your taste. Taco Soup pairs well with crunchy tortilla chips. You can serve it with a fresh salad for a light touch. Cornbread is also a great choice to soak up the soup. For a fun twist, try quesadillas or guacamole on the side. Each option adds a nice addition to your meal. You can find the Full Recipe right here in this article. It gives you all the steps and tips you need. Enjoy making this simple and tasty dish! In this blog post, we explored easy taco soup. We covered key ingredients, simple cooking steps, and helpful tips for flavor. You can add protein and customize the soup to fit your tastes. Variations like vegetarian versions or slow cooker methods cater to different needs. Finally, we discussed storing leftovers and reheating for quick meals. Taco soup is flexible and tasty. Whether you make it spicy or mild, enjoy every savory bite.

Easy Taco Soup Simple and Delicious Meal Recipe

Are you ready for a warm, tasty treat? This Easy Taco Soup is your answer! It’s quick to make, filled

Older posts
Newer posts
← Previous Page1 … Page47 Page48 Page49 … Page86 Next →

dsad

© 2026 yumymoments • Built with GeneratePress

Our Policies

  • Copyright Policy
  • Cookie Policy
  • GDPR Policy
  • Privacy Policy
  • Disclaimer
  • Terms Of Use

More Information

  • Home
  • About
  • Contact
  • Appetizers
  • Dessert
  • Dinner
  • Drinks
©2026, yumymoments About Back To Top