Skip to content
DisclaimerTerms Of UseGDPR PolicyCookie Policy

yumymoments

  • Home
  • Drinks
  • Appetizers
  • Dinner
  • Dessert
  • About
  • Contact
  • Privacy Policy
DisclaimerTerms Of UseGDPR PolicyCookie Policy

NO-ING-IMG

To make a fresh mango salsa, gather these ingredients: - 2 ripe mangoes, peeled and diced into bite-sized pieces - 1 small red onion, finely chopped - 1 jalapeño, deseeded and minced - 1 red bell pepper, diced - 1/4 cup fresh cilantro, roughly chopped - Juice of 2 fresh limes - 1 tablespoon honey (optional) - Salt and freshly cracked black pepper to taste Selecting ripe mangoes is key for great flavor. Look for mangoes that give slightly when you press them. Their skin should have a vibrant color, often yellow or red. A sweet aroma near the stem is a good sign. Avoid mangoes that feel hard or have dark spots. You can customize your salsa by adding other tasty items. Try diced pineapple for extra sweetness. Avocado adds creaminess and richness. Garlic or ginger gives depth. You may also add black beans for protein. Each option makes the salsa unique and personal. {{ingredient_image_2}} To start, gather all your ingredients on a clean counter. You will need: - 2 ripe mangoes, peeled and diced into bite-sized pieces - 1 small red onion, finely chopped to enhance flavor - 1 jalapeño, deseeded and minced for a mild heat - 1 red bell pepper, diced for sweetness and color - 1/4 cup fresh cilantro, roughly chopped - Juice of 2 fresh limes for a zesty kick - 1 tablespoon honey (optional), for a hint of natural sweetness - Salt and freshly cracked black pepper to taste First, peel and dice the mangoes. Make sure they are ripe for the best taste. Next, chop the red onion finely. This adds strong flavor. Then, take the jalapeño and remove the seeds. Mince it well. The jalapeño gives a nice, mild heat. Now, dice the red bell pepper. This adds sweetness and bright color. Now it’s time to mix everything. In a large bowl, add the diced mangoes, chopped onion, minced jalapeño, and diced bell pepper. Use a spoon to stir gently. Be careful not to mash the mangoes. Next, add the chopped cilantro and squeeze in the juice of the two limes. The lime juice brightens the flavor. If you want extra sweetness, drizzle the honey on top. This is optional but can enhance the salsa. After adding all ingredients, toss gently with a spatula. Make sure everything is well mixed. Finally, season with salt and freshly cracked black pepper. Taste and adjust if needed. Letting the salsa rest is key. After mixing, let it sit for at least 15 minutes at room temperature. This resting time allows the flavors to blend. The longer it sits, the more the tastes will come together. It helps your salsa become more vibrant and delicious. After resting, serve your Tropical Mango Tango Salsa with tortilla chips or on grilled dishes. Enjoy the fresh flavors and bright colors! To make your mango salsa stand out, balance the flavors. You can add a pinch of salt to bring out the sweetness of the mangoes. Lime juice adds a nice tang, while honey can add a hint of sweetness if needed. Try adding diced avocado for creaminess or corn for texture. For more heat, include extra jalapeño or a dash of hot sauce. Each ingredient plays a role, so taste as you mix. To keep your salsa fresh, store it in an airtight container. Place it in the fridge for up to three days. If you notice excess liquid, drain it before serving. The flavors will deepen over time, but the mangoes can get mushy. So, if you plan to enjoy it later, mix the ingredients just before serving. This keeps the salsa bright and crunchy. Mango salsa shines as a dip with tortilla chips. It also works great as a topping on grilled chicken or fish. Try it on tacos for a fresh twist. You can even add it to salads for added flavor. For a fun presentation, serve it in a colorful bowl with cilantro on top. This makes your dish pop with color and taste. Pro Tips Use Ripe Mangoes: Ensure your mangoes are perfectly ripe for the best flavor and sweetness. Slightly soft to the touch indicates they are ready to be used. Adjust Heat Level: If you prefer a spicier salsa, keep some seeds from the jalapeño. For a milder version, remove all seeds and membranes. Fresh Lime Juice: Always use fresh lime juice instead of bottled for a brighter, more vibrant taste that elevates the overall flavor of the salsa. Chill Before Serving: For an even more refreshing taste, refrigerate the salsa for about 30 minutes before serving. This allows the flavors to meld together beautifully. {{image_4}} You can make mango salsa even better by adding other fruits. Pineapples add a sweet, tangy twist. Just chop them into small pieces and mix them in. Avocados bring creaminess and a rich flavor. Dice them up and gently fold them in. Both choices add texture and taste, making your salsa unique. If you like a kick, add more jalapeño or other peppers. For less heat, use only half of a jalapeño. You can also try replacing it with a milder pepper, like a bell pepper. Another option is to add a pinch of cayenne pepper for warmth. Adjust the spice level to fit your taste buds. To change the flavor, try different dressings or seasonings. A splash of orange juice can add a sweet twist. You can also use apple cider vinegar for a tangy bite. To spice things up, mix in some cumin or smoked paprika. Each change brings a new flavor to your salsa, making it fun to explore! One serving of Tropical Mango Tango Salsa has about 80 calories. This salsa is light yet packed with flavor. The calories mostly come from the mangoes and honey. Each serving contains: - 2 ripe mangoes: around 130 calories - 1 tablespoon of honey (optional): about 64 calories - Other ingredients: very low in calories You can enjoy this salsa guilt-free. It’s a great way to add a fresh taste to your meals. Mangoes provide vitamins A and C, boosting your immune system. They also have fiber, which helps digestion. Red onion adds antioxidants, which can help protect your cells. Jalapeños contain capsaicin, known for its anti-inflammatory properties. Red bell peppers are rich in vitamins and add a nice crunch. Cilantro is full of vitamins K and C, plus it may support heart health. This salsa gives you essential nutrients while being delicious! Tropical Mango Tango Salsa is vegan and gluten-free. It fits many diets, making it a great choice for gatherings. You can enjoy it with tortilla chips or as a topping for grilled proteins. If you skip the honey, it stays vegan-friendly. Enjoy this bright dish without worry! Fresh Mango Salsa lasts about three days in the fridge. Store it in an airtight container. After three days, the flavors may fade. You’ll also notice the mangoes can get mushy. Always check for any signs of spoilage before eating. Freezing Fresh Mango Salsa is not ideal. The texture of the mango can change. However, if you want to freeze it, use a freezer-safe container. Make sure to leave some space for expansion. Use it within three months for the best taste. You can serve Mango Salsa with many dishes. Here are some great ideas: - Tortilla chips for a crunchy snack. - Grilled chicken to add a fresh twist. - Fish tacos for a bright flavor boost. - Tacos or burritos for extra flavor. - Rice or quinoa bowls for a colorful addition. Feel free to mix and match! Enjoy your Mango Salsa with any of these tasty options. Fresh mango salsa is easy and fun to make. You start with ripe mangoes and combine them with tasty ingredients. Remember, resting time helps the flavors blend. You can enhance the taste with spices and enjoy it with various dishes. This salsa is not just delicious; it’s healthy too. It fits into many diets, making it a great choice for everyone. Now, get ready to try this fresh dish. Your taste buds will thank you!

Fresh Mango Salsa Flavorful Summer Delight

Nothing screams summer like a vibrant bowl of Fresh Mango Salsa! This tasty treat bursts with color and flavor, making

- 1 pound baby carrots (or 4 large carrots, peeled and cut into sticks) - 3 tablespoons unsalted butter, melted - 2 tablespoons honey - 1 teaspoon ground cinnamon - 1/2 teaspoon sea salt - 1/4 teaspoon freshly ground black pepper - Fresh thyme leaves For this recipe, you need simple, fresh ingredients. Baby carrots work well, but you can use larger carrots too. Just peel and cut them into sticks. The butter and honey blend creates a sweet and rich flavor. Ground cinnamon adds warmth, while sea salt and black pepper balance the sweetness. You can also add fresh thyme leaves as a garnish. This adds a nice touch and a burst of herbal flavor. It makes the dish look pretty and taste even better. Start by preheating your oven to 400°F (200°C). This temperature helps the carrots roast just right. If the oven is too cool, the carrots won’t caramelize well. Proper heat ensures you get those sweet, golden edges. Next, grab a large mixing bowl. In it, whisk together three tablespoons of melted butter and two tablespoons of honey. This creates a sweet and rich sauce. Add in one teaspoon of ground cinnamon, half a teaspoon of sea salt, and a quarter teaspoon of black pepper. Whisk until the mixture is smooth. This step is key for making sure every carrot gets coated evenly. Now, it’s time to add your carrots. Use one pound of baby carrots or four large carrots cut into sticks. Toss them gently in the honey butter mixture. Make sure each piece gets a nice coat. This step is important for flavor. Next, line a baking sheet with parchment paper. Spread the carrots out in a single layer. This helps them roast evenly. Put the baking sheet in the oven. Roast the carrots for about 25 to 30 minutes. Halfway through, turn the carrots with a spatula. This helps them cook evenly and caramelize nicely. You’ll know they are done when they are tender and lightly golden. Once they're perfect, take them out and let them cool slightly before serving. Enjoy the sweet and savory taste of your honey butter roasted carrots! To achieve that lovely caramelization, start with dry carrots. You want them clean, but not wet. When you coat them in honey butter, make sure they are fully covered. Spread them out on the baking sheet. This helps them cook evenly. Roast at 400°F (200°C) for 25-30 minutes. Halfway, turn the carrots with a spatula. This step ensures all sides get that golden color. Look for tenderness and light browning for the best results. Honey butter roasted carrots pair well with many meals. They work great with roasted chicken or grilled steak. Try them alongside pork chops for a sweet and savory mix. If you serve fish, these carrots are a perfect match. Their sweetness balances well with fish dishes. For a vegetarian meal, serve them with quinoa and greens. The flavors will blend beautifully. For a stunning presentation, arrange the carrots in a fan shape on a platter. This makes them look elegant and inviting. Add a sprig of fresh thyme on top for a pop of color. You can also drizzle a bit of honey over them for extra shine. Serve them warm to keep their flavor alive. Each bite will bring joy to your table. {{image_4}} You can use many types of carrots for this dish. Baby carrots work well, but larger ones add depth. Try rainbow carrots for a colorful twist. They bring different flavors and textures. Just peel and cut them into sticks, and you are good to go. If you want a change, swap honey for maple syrup. Maple syrup gives a unique taste. It will still blend well with butter and spices. You can also try agave nectar for a lower-glycemic choice. This keeps the sweetness without using honey. To make your carrots even tastier, add garlic or ginger. Minced garlic brings a savory touch to the sweetness. Fresh ginger adds warmth and spice. Just mix them into the honey butter before coating the carrots. This extra flavor will amaze your guests and family. To keep your Honey Butter Roasted Carrots fresh, place them in an airtight container. Store them in the fridge for up to four days. Make sure they cool down before sealing. Cooling keeps moisture from building up, which can lead to sogginess. It’s best to keep them without extra sauce to avoid mushiness. When reheating, aim for tenderness and flavor. Preheat your oven to 350°F (175°C). Spread the carrots on a baking sheet. Add a small amount of water to help steam them. Cover with foil to keep them moist. Heat for about 10-15 minutes. You can also use the microwave, but this may make them a bit softer. Heat in short bursts, checking often. You can freeze Honey Butter Roasted Carrots for later use. First, let them cool completely. Spread them in a single layer on a baking sheet and freeze for 1-2 hours. Once frozen, transfer them to a freezer-safe bag. Squeeze out as much air as possible. They can last for three months. To thaw, place them in the fridge overnight before reheating. Yes, you can make Honey Butter Roasted Carrots ahead of time. For meal prep, roast the carrots and let them cool. Store them in an airtight container in the fridge for up to three days. When you’re ready to serve, simply reheat them in the oven at 350°F (175°C) for about 10 minutes. This keeps them warm and tasty. The carrots are done when they are fork-tender and lightly golden. You can check by poking a carrot with a fork; it should slide in easily. Look for a bit of caramelization on the edges, which adds to the flavor. Turning the carrots halfway through roasting helps achieve this perfect finish. Honey Butter Roasted Carrots pair well with many dishes. Here are some ideas: - Roast chicken or turkey for a savory balance. - Grilled steak or pork chops for a hearty meal. - Quinoa or rice for a lighter option. These sides complement the sweet and savory taste of the carrots well. This blog post covered making delicious Honey Butter Roasted Carrots step-by-step. We discussed essential ingredients like carrots, butter, and honey. You learned how to prepare and roast carrots for the best flavor. I shared useful tips for perfecting your dish, along with serving ideas and variations. Remember, this simple side can enhance any meal. Enjoy experimenting with flavors and make it your own. Your cooking will shine with this easy recipe. Happy roasting!

Honey Butter Roasted Carrots Flavorful Side Dish Recipe

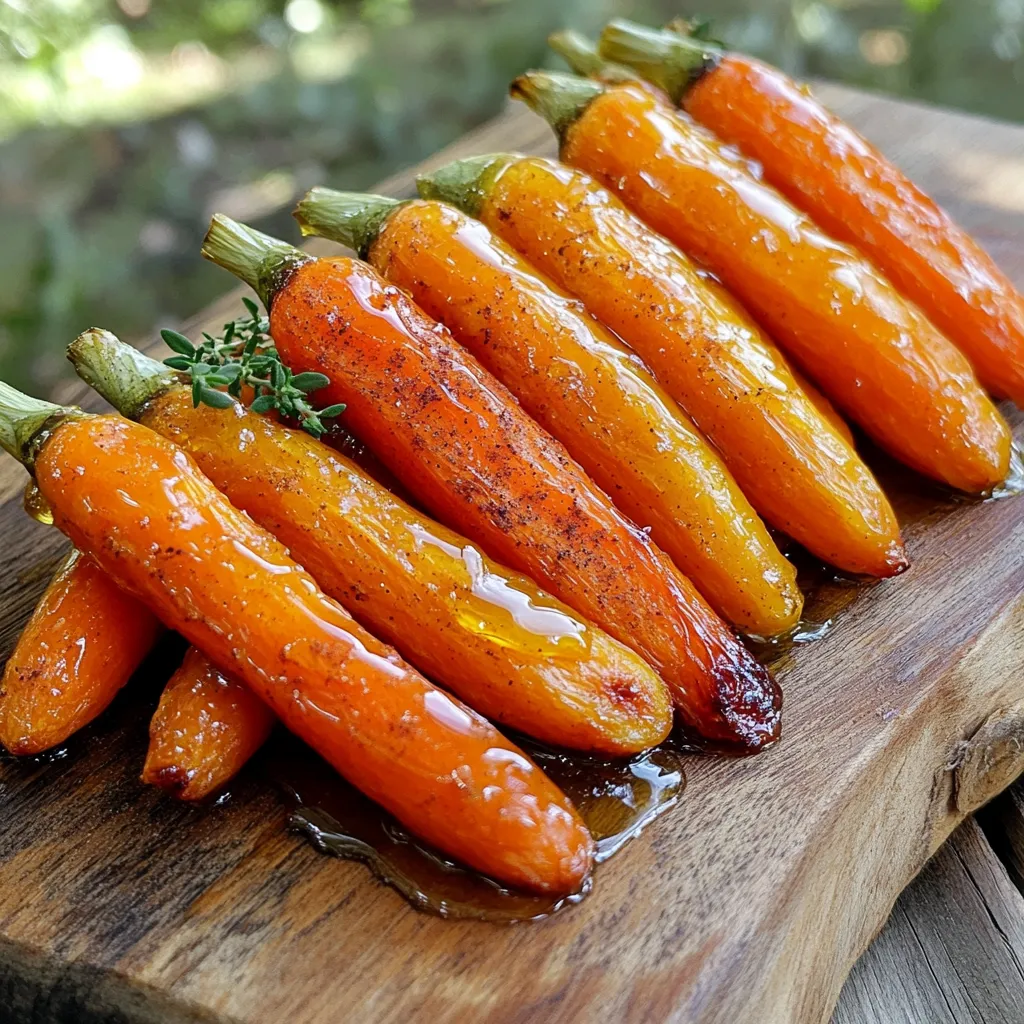
Looking for a side dish that’s both sweet and savory? These Honey Butter Roasted Carrots are your answer! This flavorful

- 2 cups graham cracker crumbs - 1 cup unsweetened shredded coconut - 1 cup dried cranberries - 1/2 cup almond butter (or peanut butter as a substitute) - 1/4 cup honey or maple syrup - 8 oz white chocolate, finely chopped - 1 teaspoon vanilla extract - A pinch of sea salt When I make these bars, I gather all my ingredients first. This helps keep things organized. The graham cracker crumbs form the base. They give the bars a nice crunch. The unsweetened shredded coconut adds a chewy texture and a hint of sweetness. Dried cranberries bring a burst of tartness, balancing the flavors. I often use almond butter, but peanut butter works great, too. It adds creaminess and a nutty taste. Honey or maple syrup acts as a natural sweetener. It helps bind the mixture while adding flavor. The white chocolate is the star here. It melts beautifully and adds a rich sweetness. The vanilla extract enhances the flavor. A pinch of sea salt rounds it all out. This combination makes for a treat that is both tasty and satisfying. - Caloric breakdown per serving: Approximately 180 calories - Macros: - Carbs: 24g - Protein: 3g - Fats: 8g Understanding the nutritional value can help you enjoy these bars in moderation. Each serving gives you a good mix of carbs for energy, protein for muscle strength, and healthy fats for satisfaction. Enjoying these bars as a snack or dessert can feel balanced and delicious! Start by mixing graham cracker crumbs, coconut, and dried cranberries. In a large bowl, add 2 cups of graham cracker crumbs, 1 cup of shredded coconut, and 1 cup of dried cranberries. Stir well. Make sure all the ingredients mix evenly. This base gives our bars their crunch and flavor. Next, melt the almond butter and honey. Use a microwave-safe bowl for this. Measure 1/2 cup of almond butter and 1/4 cup of honey. Heat them in the microwave for 30 seconds. Stir after each time until they are smooth. Then, add in 1 teaspoon of vanilla extract and a pinch of sea salt. This makes the mix rich and tasty. Now, pour the warm almond butter mixture into the dry ingredients. Use a spatula or spoon to mix everything together. You want a sticky mixture that holds together. This step is important for the bars to keep their shape when cut. For the chocolate, take 8 oz of chopped white chocolate and melt it. Use another microwave-safe bowl. Heat it in 30-second bursts, stirring each time. Once melted, pour half of this chocolate into the sticky mixture. Stir gently to coat everything in chocolate. Next, transfer the mixture to an 8x8 inch baking dish. Use parchment paper for easy removal. Press it down firmly and evenly. Then, pour the rest of the melted chocolate on top. Spread it out with a spatula for a smooth finish. Finally, put the baking dish in the fridge. Let it chill for at least 2 hours. This helps the bars set properly. Once set, lift the bars out using the parchment paper. Cut them into squares or rectangles. Serve chilled for the best taste and texture. To achieve smooth chocolate, always chop it finely. This helps it melt evenly. I recommend using a microwave for melting. Heat it in 30-second bursts. Stir after each round to avoid burning. If you find it thick, add a little coconut oil. This makes it silky and easy to spread on top. If you don’t have almond butter, peanut butter works well too. It gives a nice nutty flavor. For sweeteners, honey is great, but maple syrup is a tasty vegan option. You can also try agave syrup if you want something lighter. Each will change the taste slightly, but they all work! When serving, arrange the bars on a pretty plate. For a pop of color, sprinkle extra dried cranberries on top. You can also dust with shredded coconut for a nice touch. Serve the bars chilled to keep them firm and delicious. This will impress your guests and make the dish look fancy! {{image_4}} You can easily customize these bars by adding nuts or seeds. I love using chopped almonds or walnuts for a tasty crunch. You might also try sunflower seeds or pumpkin seeds for a fun twist. Just mix them in when you combine the dry ingredients. This not only adds texture but also boosts the nutrition. If you need gluten-free options, use gluten-free graham crackers. For a vegan version, swap honey for maple syrup. You can also use a plant-based butter instead of almond butter. These simple swaps keep the bars delicious while meeting different dietary needs. Seasonal fruits or spices can brighten these bars. In the fall, add a pinch of cinnamon or nutmeg for warmth. In summer, toss in some diced strawberries or blueberries. These fruits add fresh flavor and color, making the bars even more appealing. Feel free to get creative with what you have on hand! To keep your no-bake white chocolate cranberry bars fresh, use an airtight container. Glass or plastic containers work well. Line the bottom with parchment paper for easy removal. This keeps the bars from sticking. Store them in the fridge to maintain their texture. If you plan to serve them later, you can leave them in the fridge for a quick grab-and-go treat. These bars will last about one week in the fridge. After that, they may lose their flavor and texture. If you notice any changes in smell or color, it’s best to discard them. Keeping them in the right container helps preserve their freshness for longer. You can freeze these bars for up to three months. First, cut them into squares. Wrap each piece tightly in plastic wrap. Then, place the wrapped bars in a freezer-safe bag or container. When you are ready to eat them, simply remove a bar and let it thaw in the fridge overnight. This way, you can enjoy a sweet treat anytime! You can use peanut butter as a great alternative. Sunflower seed butter works too. Both will give a nice flavor. If you need a nut-free option, try soy nut butter. Each choice will change the taste a bit. Choose what fits your needs best. The bars need to chill for at least two hours. After that, check their firmness. Press gently on the top. If it feels solid, they are ready. If they feel soft, let them chill longer. You want them firm but not hard. Yes, you can make these bars a day or two in advance. This is great for parties or gatherings. Simply store them in the fridge. They will hold up well in an airtight container. The flavor may even improve as they sit. Enjoy the ease of prep ahead of time! We explored the key ingredients and steps to make delicious, healthy snack bars. These bars combine graham cracker crumbs, coconut, and cranberries for a tasty treat. I shared tips on perfecting texture and suggested ingredient swaps for your needs. Plus, we covered storage and freezing methods for long-lasting snacks. Incorporating variations can keep your bars exciting. Enjoy making and sharing these simple yet delightful bites!

No-Bake White Chocolate Cranberry Bars Delightful Treat

Are you ready to indulge in a sweet treat that requires no baking? These No-Bake White Chocolate Cranberry Bars are

To make a tasty Apple Cider Mocktail, you'll need: - 2 cups apple cider - 1 cup sparkling water - 1 tablespoon freshly squeezed lemon juice - 1 teaspoon ground cinnamon - 1 teaspoon ginger syrup (or to taste) - Fresh apple slices for garnish - Cinnamon sticks for garnish - Ice cubes Garnishes make your drink fun and pretty. Use fresh apple slices. They look great and add flavor. You can also add cinnamon sticks. They give a warm aroma and a hint of spice. Want to mix things up? Try some optional add-ins. A splash of orange juice can brighten the drink. You can add a dash of nutmeg for a warm flavor. If you like it spicy, try a little bit of cayenne pepper. Just a pinch will do! 1. Start by pouring 2 cups of apple cider into a large pitcher. 2. Add 1 tablespoon of freshly squeezed lemon juice and 1 teaspoon of ground cinnamon. 3. Mix well with a whisk or spoon until the cinnamon dissolves. 4. Next, add 1 teaspoon of ginger syrup. Taste it and add more if needed. 5. For serving, take four glasses and fill each with ice cubes. 6. Pour the apple cider mixture into each glass until two-thirds full. 7. Carefully add sparkling water to each glass, letting it mix gently. 8. Stir lightly with a spoon to keep the bubbles. - Use a whisk for a better mix. It helps blend ingredients well. - Adjust the ginger syrup to match your taste. Sweetness can vary. - Stir gently to keep the drink fizzy. Don’t rush this step. - Use fresh apple slices on the rim of each glass. It looks nice and adds flavor. - Place a cinnamon stick inside each glass for a warm touch. - Serve immediately for the best taste and fizz. Enjoy your drink! To make the best apple cider mocktail, first focus on the flavors. The apple cider gives a sweet and tart base. The lemon juice adds brightness. The ground cinnamon gives warmth. Adjust the ginger syrup for extra sweetness. Taste as you mix. This helps you find the balance you love. Garnishing makes your drink look nice and adds flavor. Use fresh apple slices to decorate the glass. This also adds a fruity touch. A cinnamon stick in each glass gives a warm, spicy note. It looks great and smells amazing too. Keep it simple but eye-catching. Many people make the mistake of adding too much ginger syrup. Start small and taste often. Another mistake is not stirring enough. You want the flavors well mixed but keep the bubbles in the drink. Finally, don’t forget the ice. It keeps your mocktail cool and refreshing. {{image_4}} You can play with flavors to make your apple cider mocktail unique. Try adding different fruits like pears or cranberries. A splash of orange juice can give it a nice zest. Mixing in herbal teas can also add depth. For a spicy touch, add a pinch of nutmeg or cardamom. Each twist can change your drink's character. As the seasons change, so can your mocktail. In winter, add warm spices like cloves and star anise. For spring, mix in fresh mint leaves for a refreshing taste. In summer, serve it chilled with extra ice and a fruit skewer. This keeps your drink exciting all year round. You may want a healthier twist on your mocktail. Swap apple cider for unsweetened apple juice. Use sparkling water with no added sugar instead of soda. Choose fresh ginger instead of ginger syrup for a natural kick. These changes can make your drink lighter and still tasty. If you have leftover apple cider mocktail, store it in the fridge. Use an airtight container. This keeps it fresh and tasty for 2 to 3 days. When you are ready to drink it, add fresh ice and sparkling water again. This helps restore its fizz. Always use fresh apple cider for the best flavor. If you have leftover ingredients, like lemon juice or ginger syrup, store them separately in the fridge. Fresh apple slices and cinnamon sticks can last a day or two. Keep them in a dry place to maintain their freshness. You can prepare the apple cider mixture in advance. Mix the cider, lemon juice, cinnamon, and ginger syrup. Store this in the fridge for up to 24 hours. Just before serving, add the ice and sparkling water. This keeps the drink bubbly and refreshing. An apple cider mocktail is a non-alcoholic drink made with apple cider. It mixes cider with sparkling water and some fresh lemon juice. The drink is spiced with cinnamon and ginger syrup for a cozy taste. You can serve it over ice, making it refreshing. It is perfect for fall gatherings or any time you want a tasty drink without alcohol. Yes, you can make this mocktail in advance. Prepare the apple cider mixture early. Mix the apple cider, lemon juice, and spices together. Keep it in the fridge until you’re ready to serve. Just add the sparkling water right before serving. This keeps the drink fizzy and fresh. Garnish with apple slices and cinnamon sticks for a nice look. Apple cider is not just for drinks. You can use it in many dishes. Here are some ideas: - Marinades: Use it to marinate meats for flavor. - Salad dressings: Mix cider with oil and vinegar. - Baking: Add to muffins or cakes for moisture. - Soups: Use it as a base for a warm, sweet soup. Apple cider adds a lovely flavor to many recipes. This blog post detailed how to make a delicious apple cider mocktail. We covered the key ingredients, fun garnishes, and tips for mixing and serving. You learned about flavor balance and common mistakes to avoid. We also explored different variations and storage tips. In the end, enjoy trying this recipe. Make it your own with unique twists. Your guests will love your refreshing drink!

Apple Cider Mocktail Refreshing Fall Flavor Drink

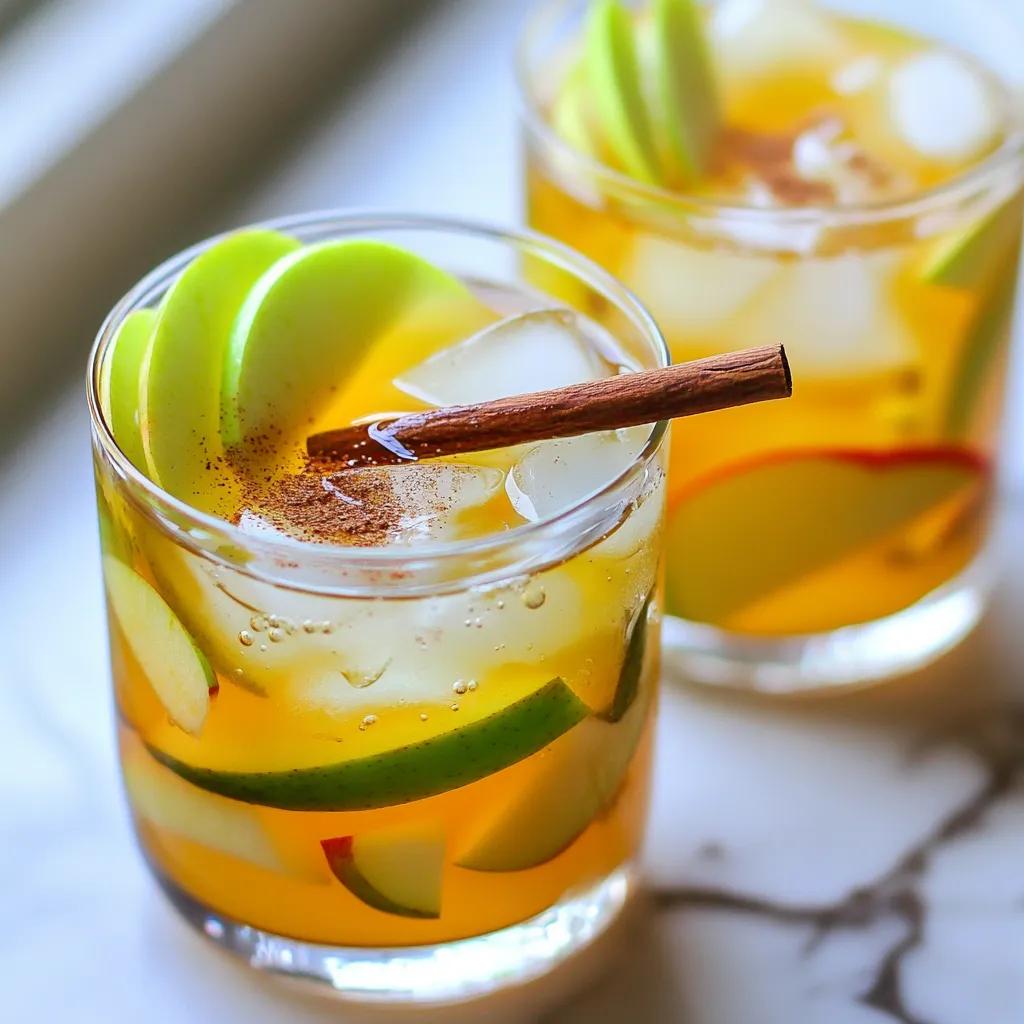
If you’re craving a drink that captures autumn’s essence, my Apple Cider Mocktail is it. This refreshing blend of crisp

- 2 cups fresh broccoli florets - 3 cloves garlic, finely minced - 1 teaspoon fresh lemon zest - 2 tablespoons extra virgin olive oil - 1/4 cup freshly grated Parmesan cheese - 1/2 teaspoon red pepper flakes (optional, for heat) - Sea salt and freshly cracked black pepper to taste - Preheat your air fryer to 375°F (190°C). This step helps the broccoli cook evenly. - In a large bowl, toss the broccoli with olive oil. - Add the minced garlic, sea salt, and black pepper. Mix well. - Next, add the Parmesan cheese and lemon zest. If you like heat, sprinkle in red pepper flakes. Stir until the broccoli is well coated. - Place the broccoli in the air fryer basket. Arrange them in a single layer. - Cook for 10-12 minutes. Shake the basket halfway through to ensure even cooking. - Your broccoli should be tender, with crispy edges when done. This dish delivers a burst of flavor with every bite! To get that lovely crunch, you must layer the broccoli evenly in the air fryer. If the florets sit on top of each other, they won’t cook well. Make sure they spread out in one layer. If your broccoli pieces are different sizes, adjust the cooking time. Smaller pieces cook faster. Check them at the 8-minute mark for perfect texture. You can boost the flavor of your broccoli by adding spices. Try garlic powder, onion powder, or smoked paprika for a twist. Fresh herbs like thyme or oregano also work great. If you want to mix things up, use different cheese options. Cheddar or feta cheese can add a new flavor profile. Just remember to keep the cheese amount similar to the Parmesan. When serving, arrange your crispy broccoli on a colorful plate. A white platter makes the green pop. For a nice touch, sprinkle more Parmesan on top. Add a lemon wedge on the side for color and extra zest when serving. This not only looks great but also gives a fresh flavor burst. Your guests will love the tasty and pretty dish! You can play with cheese types in this recipe. Cheddar cheese adds a rich, sharp taste. It melts well and gives a different flavor. If you prefer vegan options, try using vegan cheese. Many brands melt nicely and taste great. Want to switch it up? Add fresh lemon juice for brightness. It pairs well with broccoli and cheese. You can also try different spices. Smoked paprika adds a nice depth. Cumin can give it a warm, earthy touch. Mix and match to find your favorite combo. Feel free to swap in other veggies. Cauliflower or Brussels sprouts work well with the same seasonings. If you need a low-sodium option, cut back on the salt. Use herbs like thyme or oregano for added flavor without extra salt. Adjusting ingredients can keep your meal fresh and exciting. {{image_4}} To keep your Air Fryer Parmesan Garlic Broccoli fresh, store leftovers in an airtight container. Make sure it cools completely before sealing. This dish lasts about 3 to 4 days in the fridge. The flavors will meld together, making it even tastier. To maintain crispiness, use the air fryer for reheating. Set it to 375°F (190°C) and heat for about 5 minutes. This method keeps the broccoli crunchy. If you use a microwave, it may turn soft. So, I recommend sticking with the air fryer. Yes, you can freeze this dish! Place the cooled broccoli in a freezer-safe bag. Squeeze out all the air to prevent freezer burn. It can last up to 2 months in the freezer. To thaw, move it to the fridge overnight. For best results, reheat directly from frozen in the air fryer. This keeps it crispy and delicious! Each serving of Air Fryer Parmesan Garlic Broccoli contains about 100 calories. This dish is rich in vitamins and minerals. Broccoli offers vitamin C and fiber, which boost your immune system. Olive oil adds healthy fats that support heart health. Garlic is known for its anti-inflammatory properties. Parmesan cheese provides calcium, which is great for bones. Overall, this dish is a tasty way to nourish your body. This recipe is gluten-free and vegetarian. You can easily adjust it for other diets. If you want a vegan option, swap Parmesan for a vegan cheese. You can also leave out the cheese completely. If you need it low-sodium, use less salt and cheese. This flexibility makes the dish suitable for various eating plans. A good serving size is about half a cup. This portion is great as a side dish. Pair it with grilled chicken or fish for a balanced meal. You can also enjoy it with quinoa or brown rice. This will add protein and make your meal more filling. Enjoying it this way gives you a complete and satisfying dinner. Cooking broccoli in an air fryer takes about 10-12 minutes at 375°F (190°C). The time can vary based on the size of the florets. Small florets may cook faster, while larger ones may take longer. Always check for tenderness. Yes, you can add other vegetables! Carrots, bell peppers, and cauliflower work well. Mix them with the broccoli for a colorful and tasty dish. Just make sure to cut them into similar sizes for even cooking. Yes, this recipe is great for meal prep. You can make it ahead and store it in the fridge. Keep it in an airtight container for up to three days. To reheat, use the air fryer for a quick and crispy option. Your broccoli is done when it is tender and has crispy edges. It should have a nice golden color. You can poke a floret with a fork to check its softness. Always keep an eye on it as it cooks! In this article, we explored how to make delicious air-fried broccoli. We covered fresh ingredients like broccoli and garlic, along with pantry staples. You learned step-by-step instructions for prepping, mixing, and air frying. Plus, we discussed tips for perfect crispiness and flavor boosts. Remember, you can swap ingredients for your taste or diet. Proper storage and reheating keep your leftovers tasty. Air-fried broccoli is not just healthy; it’s easy to make and customize. Enjoy trying these tips for your next meal!

Air Fryer Parmesan Garlic Broccoli Crispy and Flavorful

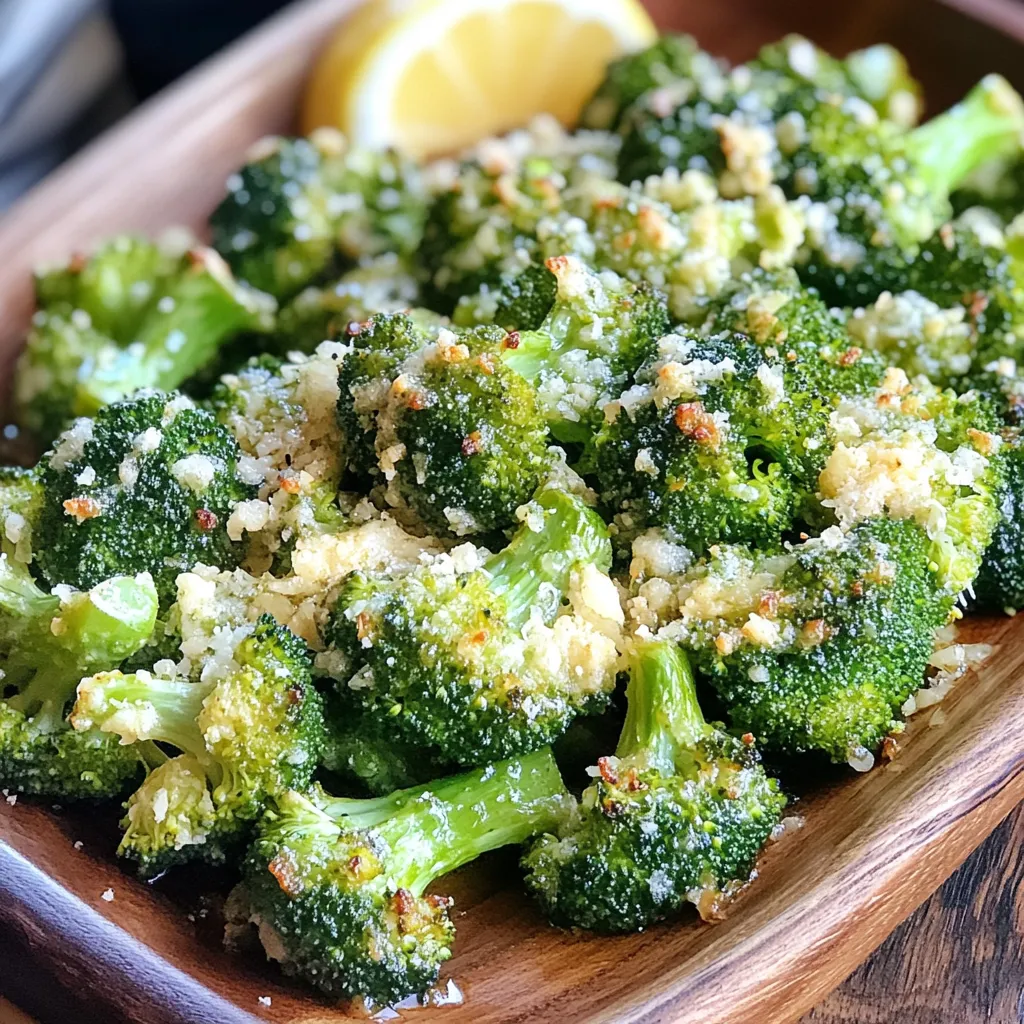
Looking for a quick and tasty side dish? Air Fryer Parmesan Garlic Broccoli is your answer! This recipe transforms fresh

- 1 lb boneless, skinless chicken breast, thinly sliced - 1 cup creamy Greek yogurt - 2 cloves garlic, finely minced - 1 tablespoon freshly squeezed lemon juice - 1 tablespoon extra virgin olive oil - 1 teaspoon dried oregano - 1 teaspoon ground cumin - Salt and black pepper, to taste - 4 large, soft pita breads - 1 cup cucumber, finely diced - 1 cup ripe tomatoes, diced - ½ red onion, thinly sliced - ¼ cup fresh parsley, finely chopped - ¼ cup feta cheese, crumbled Using good ingredients makes a big difference. Fresh chicken gives you juicy bites. Quality Greek yogurt adds creaminess and tang. Fresh veggies bring crunch and color. When you pick fresh herbs like parsley, your wraps taste bright and lively. Always choose ripe tomatoes and crisp cucumbers for the best flavor. Remember, great meals start with great ingredients. For this recipe, use a kitchen scale for chicken. It helps you get the right amount. For liquids like yogurt and oil, measuring cups work well. Use a tablespoon for lemon juice and spices. When you measure, be precise. This ensures even flavor and perfect texture in your wraps. If you need to scale up, just keep the ratios the same. Enjoy creating your delicious Greek chicken gyro wraps! {{ingredient_image_2}} To start, make a tasty marinade for the chicken. In a bowl, mix 1 cup of Greek yogurt, 2 minced garlic cloves, 1 tablespoon of lemon juice, and 1 tablespoon of olive oil. Add 1 teaspoon of dried oregano and 1 teaspoon of ground cumin. Finally, season with salt and black pepper. Stir until smooth. Next, take 1 pound of thinly sliced chicken breast and add it to the marinade. Make sure each piece is well coated. Cover the bowl with plastic wrap. Let it chill in the fridge for at least 30 minutes. This step helps the chicken soak up all those great flavors. You can cook the chicken either on a grill or in a skillet. If you choose to grill, preheat it to medium-high heat. Once hot, remove the chicken from the marinade. Shake off any extra marinade before placing the chicken on the grill. Cook for about 6-7 minutes on each side. Look for a nice golden-brown color. If using a skillet, heat it over medium-high heat. Add a little olive oil to prevent sticking. Cook the chicken for the same amount of time until it’s fully cooked. After cooking, let the chicken rest for a few minutes, then slice it into bite-sized pieces. Now it's time to build your wrap! Start by mixing fresh ingredients. In a bowl, combine 1 cup of diced cucumber, 1 cup of diced tomatoes, and ½ a thinly sliced red onion. Add ¼ cup of chopped fresh parsley and ¼ cup of crumbled feta cheese. Toss everything gently to mix. Take a large, soft pita bread and lay it flat. Spoon a generous amount of grilled chicken into the center. Top it with your fresh veggie-feta mix. Finally, fold the pita over the filling. Make sure it wraps securely. Serve your gyro wraps warm for the best taste! To make tasty Greek chicken gyro wraps, the marinade is key. Start with Greek yogurt. It adds creaminess and keeps chicken moist. Combine it with minced garlic and lemon juice. This mix gives your chicken a fresh taste. Don't forget the olive oil, oregano, and cumin. These spices bring depth and flavor. Coat your chicken well in the marinade. Each slice should have a nice layer. Cover the bowl and chill it for at least 30 minutes. For best results, let it sit for a few hours. This step makes the chicken juicy and flavorful. Cooking the chicken right is crucial. Preheat your grill or skillet to medium-high heat. This ensures a good sear. Once hot, place the chicken slices on the grill. Cook for 6-7 minutes on each side. Look for a golden-brown color. It means the chicken is cooked perfectly. After cooking, let the chicken rest a bit. This helps keep the juices locked in. Slice it into bite-sized pieces for easy wrapping. To serve your gyro wraps nicely, use a pretty platter. Place the wraps with care. Lay a rustic cloth underneath for a homey feel. Adding a small bowl of tzatziki next to the wraps adds flavor and color. Garnish with lemon wedges for a fresh pop. This not only looks good but also makes the meal more inviting. Pro Tips Marinate Longer for Flavor: The longer you marinate the chicken, the more flavorful it will be. If you have time, marinate it for several hours or even overnight in the refrigerator. Use Fresh Herbs: For an intensified flavor, consider adding fresh herbs like dill or mint to your vegetable mixture. They will elevate the freshness of your gyro wraps. Grill for Smoky Flavor: Grilling the chicken adds a smoky flavor that enhances the overall taste of the gyro. If possible, use a charcoal grill for the best results. Warm the Pita: Before assembling, warm the pita in a skillet or on the grill for a few seconds on each side. This makes it more pliable and enhances its flavor. {{image_4}} You can swap chicken for other proteins. Lamb is a popular choice. It adds a rich flavor that pairs well with the spices. Just marinate it like you would the chicken. For a plant-based option, use tofu. Press firm tofu to remove excess water. Then cut it into slices and marinate it as well. Grill it until golden for a tasty twist. Change up the veggies for more flavor or variety. Try bell peppers for crunch. Grated carrots add sweetness and color. You can also add olives for a salty kick. If you like heat, some sliced jalapeños can spice things up! Mixing different veggies keeps your gyro fresh and fun. Experiment with spices to create unique flavors. Try adding smoked paprika for a hint of smokiness. A dash of cayenne pepper can give a nice kick. Change the sauce to tzatziki for a classic taste. Or use a spicy harissa for a North African flair. You could even try a sweet chili sauce for a different profile. These twists make each wrap a new adventure! After enjoying your Greek chicken gyro wraps, you can save any leftovers. Place the wraps in an airtight container. Keep them in the fridge for up to three days. If you have leftover chicken, store it separately from the pita. This helps keep the bread fresh. Freezing is a great option if you want to save your wraps for later. Wrap each gyro tightly in plastic wrap. Then, place them in a freezer-safe bag. They can stay in the freezer for up to three months. For best results, freeze the chicken and veggies separately from the pita. When you are ready to enjoy your frozen gyro, thaw it in the fridge overnight. To reheat, use an oven or skillet. Preheat your oven to 350°F (175°C). Place the wrapped gyro on a baking sheet and heat for about 10-15 minutes. If using a skillet, warm each side for about 3-4 minutes. This keeps your pita soft while warming the filling. Enjoy your tasty wraps again! To make gyro sauce, combine Greek yogurt, minced garlic, lemon juice, and olive oil. Add salt, pepper, and a pinch of dried oregano. Stir well until smooth. This simple sauce adds great flavor to your wraps. You can adjust the garlic and lemon to taste. Greek chicken gyro wraps go well with a few tasty sides. Here are some ideas: - Greek salad with cucumbers and tomatoes - Crispy roasted potatoes - Tzatziki sauce for dipping - Fresh pita chips or bread - A light lemon or herb quinoa salad These sides enhance the flavors of your gyro wraps and create a complete meal. Yes, you can use store-bought pita bread. Look for soft, fresh pita for the best taste. Choose whole wheat or regular, depending on your preference. Store-bought options save time, making your meal quick and easy. Just warm them slightly before filling to enhance their flavor and texture. This blog post covered how to create delicious Greek chicken gyro wraps. We explored the importance of quality ingredients and effective measuring. I shared step-by-step cooking methods and offered tips for perfect marinating and presentation. You can also try various proteins, veggies, and flavor twists to keep it fresh. Finally, I provided storage and reheating advice for leftovers. Use this guide to make your wraps tasty and satisfying. Enjoy your cooking journey and impress your friends and family!

Greek Chicken Gyro Wraps Flavorful and Simple Meal

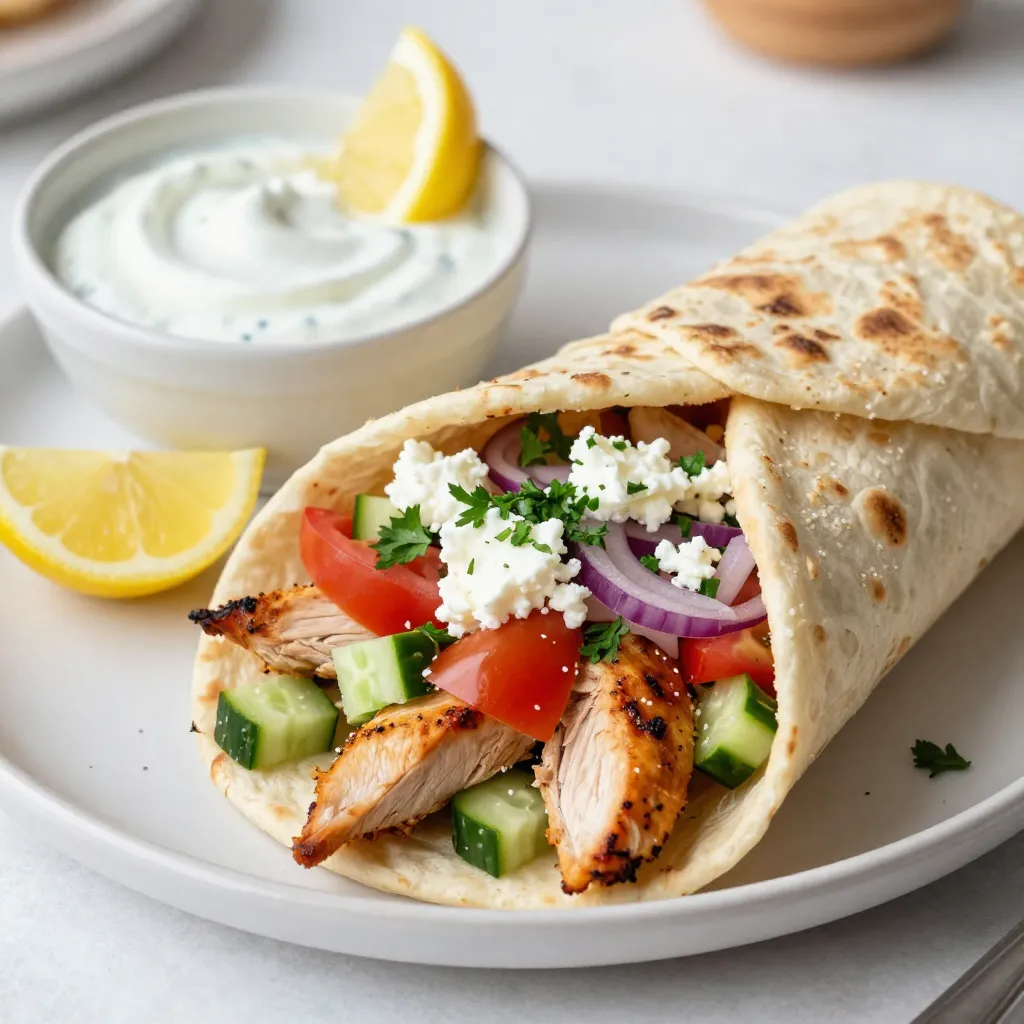
Are you looking for a meal that’s both tasty and easy to make? Greek Chicken Gyro Wraps are the answer!

For this One Pot Spinach Artichoke Pasta, gather these items: - 2 cups pasta (penne or rotini recommended) - 1 tablespoon extra virgin olive oil - 3 cloves garlic, minced - 1 cup frozen spinach, thoroughly thawed and drained - 1 can (14 oz) artichoke hearts, drained and quartered - 1 cup vegetable broth - 1 cup heavy cream (or substitute with coconut cream for a vegan option) - 1 cup freshly shredded mozzarella cheese - ½ cup grated Parmesan cheese (or nutritional yeast as a vegan alternative) - 1 teaspoon dried Italian herbs (such as oregano and basil) - Salt and pepper to taste - Fresh parsley, chopped, for garnish For this dish, I suggest using penne or rotini. Both shapes hold the creamy sauce well. They also add nice texture and bite to each forkful. You can use other types, but these two work best. If you want a lighter option, you can swap heavy cream with coconut cream. It gives a rich, creamy taste that fits well. For cheese alternatives, try nutritional yeast. It adds a cheesy flavor without dairy. Start by boiling some salted water in a large pot. When it bubbles, add 2 cups of pasta. Penne or rotini works best. Cook it based on the package guides until it's al dente. Drain the pasta and set it aside. Don’t forget to keep a small cup of pasta water for later. In the same pot, heat 1 tablespoon of extra virgin olive oil over medium heat. Once hot, toss in 3 cloves of minced garlic. Sauté for about 1 minute until fragrant and just golden. Watch carefully to avoid burning it. Now, add 1 cup of thawed and drained frozen spinach and 1 can of drained artichoke hearts, quartered. Mix well with the garlic. Let it cook for 2-3 minutes so all the ingredients heat up nicely. Pour in 1 cup of vegetable broth. Raise the heat slightly and let it simmer gently for 3-4 minutes. This step helps all the flavors blend together perfectly. Lower the heat to low. Stir in 1 cup of heavy cream, 1 cup of shredded mozzarella, and ½ cup of grated Parmesan cheese. Add 1 teaspoon of dried Italian herbs. Mix until the cheeses melt, creating a rich and creamy sauce. Add the drained pasta back into the pot. Toss everything together gently. This ensures that the pasta is well-coated in the creamy sauce. If the sauce is too thick, add a splash of the reserved pasta water. Season with salt and pepper to your taste. Let the pasta cook on low heat for 2-3 more minutes. This warms everything through and allows flavors to meld. Serve the creamy spinach artichoke pasta in bowls. You can garnish with fresh parsley for a lovely touch. Enjoy your meal! To bring out the best flavor in your One Pot Spinach Artichoke Pasta, try these tips: - Add a squeeze of fresh lemon juice before serving. This brightens flavors. - Mix in a pinch of red pepper flakes for a gentle heat. - Use freshly minced garlic instead of jarred for a stronger taste. - Consider adding a splash of white wine when simmering the broth. This adds depth. Each of these methods can elevate this dish from good to great, making every bite memorable. Here are some common errors that can affect your pasta dish: - Overcooking the pasta can lead to mushy noodles. Aim for al dente. - Not draining the spinach well can add excess water, making the sauce runny. - Forgetting to reserve some pasta water can limit your sauce's creaminess. Save a cup for adjustments. - Adding cheese too early can lead to clumping. Stir it in slowly on low heat. Avoiding these pitfalls helps ensure a creamy, delicious meal every time. A lovely presentation makes every meal more inviting. Here are my top tips: - Use shallow pasta bowls for serving. This gives a nice look. - Sprinkle extra grated Parmesan on top for a touch of elegance. - Add fresh parsley right before serving for a pop of color. - Consider drizzling a little olive oil around the edge of the bowl for shine. These simple steps will impress your guests and make your dish look as good as it tastes. {{image_4}} To make this dish vegan, swap the heavy cream for coconut cream. This keeps the sauce rich and creamy without dairy. Use nutritional yeast instead of Parmesan cheese for a cheesy flavor. Replace mozzarella with vegan cheese. These swaps make the dish plant-based and still delicious. If you're gluten-free, choose pasta made from rice or corn. This keeps the meal safe for those with gluten issues. The other ingredients, like spinach and artichokes, are naturally gluten-free. Just check labels to be sure any broth or cheese is also gluten-free. You can add extra veggies for more flavor. Try mushrooms for a nice earthiness. Sun-dried tomatoes add a sweet and tangy twist. Chopped olives can give a briny kick. You can even toss in some cooked chicken or shrimp for added protein. Feel free to get creative with what you have! To keep your One Pot Spinach Artichoke Pasta fresh, store it in airtight containers. Let the pasta cool down before sealing. This helps prevent moisture buildup. Place the containers in the fridge if you plan to eat it within three days. For longer storage, freezing is a great option. When you're ready to enjoy the pasta again, use a microwave or a stovetop. If you use a microwave, heat it in short bursts. Stir it in between to ensure even warming. On the stovetop, add a splash of vegetable broth or water. Heat on low until warm, stirring often. This keeps the sauce creamy and delicious. You can freeze One Pot Spinach Artichoke Pasta for up to three months. Use freezer-safe containers to avoid freezer burn. Divide the pasta into single servings for easy meals later. To thaw, place it in the fridge overnight. Reheat as mentioned above, adding a bit of liquid if needed. To make this dish creamier, you can add more heavy cream. You can also stir in some cream cheese. If you want a vegan option, use more coconut cream for a rich texture. Mixing in a little extra mozzarella cheese also helps. Just keep stirring until everything melts together. Yes, you can use fresh spinach. Just wash and chop about 3 cups of fresh spinach. Sauté it with the garlic until it wilts. This will give a fresher taste. Fresh spinach cooks down more, so adjust the amount based on your taste. Absolutely! This pasta is great for meal prep. Cook it, let it cool, and store it in airtight containers. You can keep it in the fridge for up to four days. Just reheat it in the microwave or on the stove when you want to eat. Leftover One Pot Spinach Artichoke Pasta lasts about 3 to 4 days in the fridge. Make sure to store it in a sealed container. If you see any change in smell or color, it's best to throw it away. Always check before eating! We explored all the key elements to make One Pot Spinach Artichoke Pasta tasty. I shared the ingredients, cooking steps, and helpful tips to avoid common mistakes. You can even adapt the dish for dietary needs with simple swaps. Don't forget the best storage methods to keep leftovers fresh. With these insights, you can create a delicious meal everyone will enjoy. Now it's time to put your skills to the test and impress those around you!

One Pot Spinach Artichoke Pasta Delight Recipe

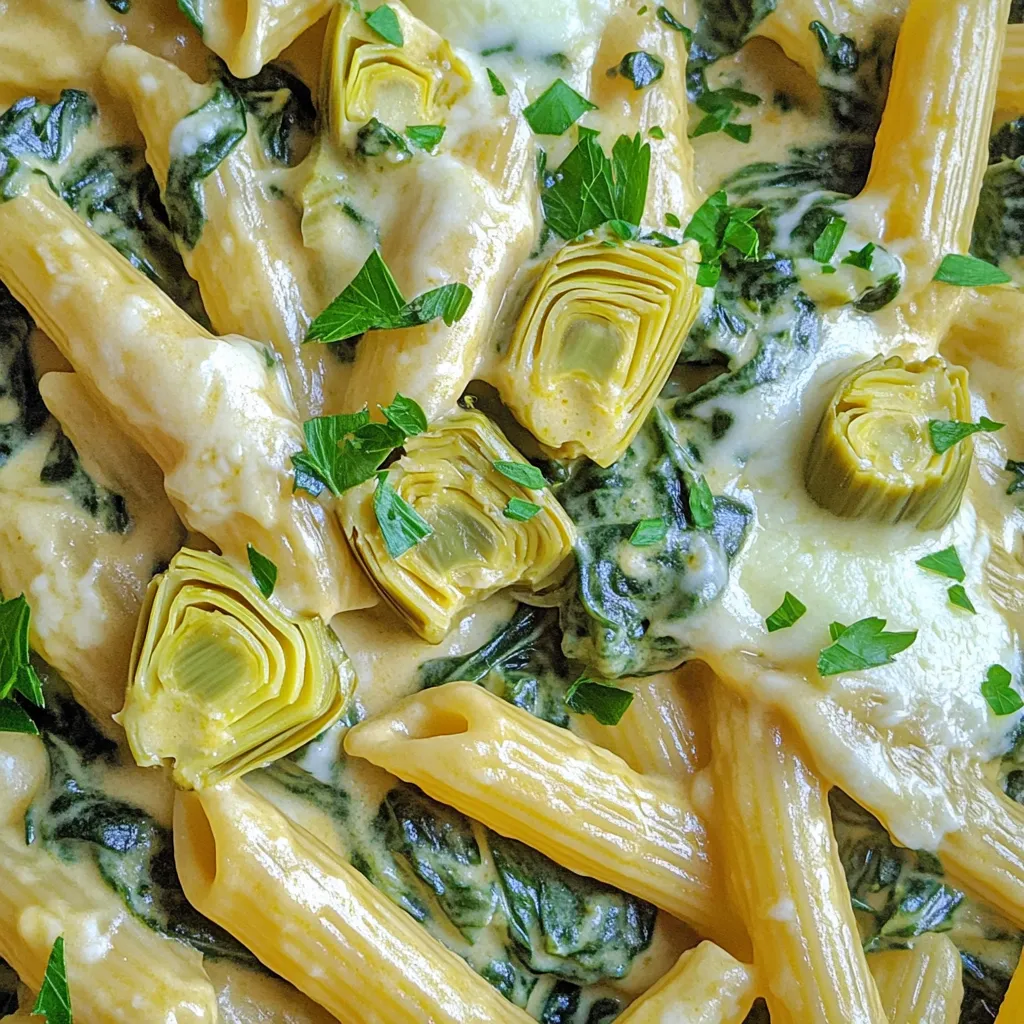
Welcome to my One Pot Spinach Artichoke Pasta Delight Recipe! This dish is creamy, tasty, and simple. You can have

- 1 cup almond flour - 1/2 cup vanilla protein powder - 1/4 cup coconut sugar - 1/2 teaspoon baking powder - 1/4 teaspoon salt - 1/2 cup unsweetened applesauce - 2 large eggs - 1 teaspoon vanilla extract - 1/4 cup almond milk (or any milk of your choice) - 1/2 cup dark chocolate chips (choose dairy-free if preferred) - Optional toppings (powdered sugar, melted chocolate) When I create chocolate chip protein donuts, I focus on the balance of flavors and texture. These ingredients combine to give you a tasty treat that also packs a protein punch. For the dry ingredients, almond flour serves as a base, providing healthy fats and a nice tender crumb. The vanilla protein powder adds protein and flavor, making these donuts a great snack. Coconut sugar adds a hint of sweetness without being too overpowering. Baking powder helps the donuts rise, while salt enhances all the flavors. For the wet ingredients, unsweetened applesauce keeps the donuts moist and adds natural sweetness. Eggs bind everything together and give some structure. The vanilla extract gives a warm flavor, while almond milk keeps the batter smooth. You can swap almond milk for any milk you prefer. Finally, the add-ins include dark chocolate chips, which are the star of this recipe. They melt slightly while baking, creating pockets of chocolate goodness. You can also top your donuts with powdered sugar or melted chocolate for extra flair and sweetness. Using these quality ingredients ensures your chocolate chip protein donuts are not just healthy, but also delicious. When you take a bite, you’ll enjoy a perfect mix of flavors that satisfy your sweet tooth without any guilt. - Preheat the oven to 350°F (175°C). - Grease the donut pan well to stop sticking. - In a large bowl, combine almond flour, protein powder, coconut sugar, baking powder, and salt. Mix well to remove lumps. - In a separate bowl, whisk applesauce, eggs, vanilla extract, and almond milk until smooth. - Pour the wet mix into the dry mix. Stir gently until just combined. Don’t overmix to keep them fluffy. - Use a piping bag or a ziplock bag with the tip cut off to fill the donut pan. Fill each cavity about two-thirds full. - Bake for 12-15 minutes. To check if they are done, insert a toothpick in the center. It should come out clean. - Let the donuts cool in the pan for about 5 minutes. - Carefully transfer them to a wire rack to cool completely before serving. You can swap flours to suit your needs. Try oat flour for a different texture. You can also use maple syrup or honey instead of coconut sugar. If you're vegan, replace the eggs with flaxseed meal. Mix 1 tablespoon of flaxseed with 2.5 tablespoons of water. Let it sit for a few minutes until it thickens. The batter should be thick, but not dry. If it feels too thick, add a splash of almond milk. Mix until just combined to keep your donuts light. Overmixing can make them dense and tough. Use a gentle folding motion to combine wet and dry ingredients. Make your donuts look fancy with a dusting of powdered sugar. Use a fine sieve to sprinkle it evenly. For a chocolatey finish, drizzle melted chocolate on top. You can place the donuts on a pretty plate with fresh berries for a pop of color. {{image_4}} You can change the taste of your donuts easily. Adding spices, like cinnamon or nutmeg, can make them warm and cozy. Just a pinch can go a long way. If you love fruit, consider mixing in mashed bananas or a touch of orange zest. This adds natural sweetness and a burst of flavor. Need your donuts to fit a special diet? No problem! For a gluten-free option, use almond flour as the base. It works well and keeps the donuts light. If you want them dairy-free, choose dairy-free chocolate chips and use your favorite milk alternative. These swaps keep the treats tasty and healthy. How can you enjoy these donuts? They pair great with yogurt or smoothie bowls. Just add a few donuts on the side for a balanced snack. You can also use these donuts as a pre or post-workout snack. They give you energy and help your body recover after exercise. Enjoy your treats in fun ways! To keep your chocolate chip protein donuts fresh, store them in an airtight container. This helps prevent them from drying out. I like to use glass containers because they seal well and do not hold odors. You can also use a plastic container if it closes tightly. For the best taste, keep them at room temperature for up to three days. If you want to save some for later, consider freezing them. You can freeze these donuts to enjoy them later. First, let them cool completely. Then, wrap each donut in plastic wrap. This keeps them from getting freezer burn. Place the wrapped donuts in a freezer-safe bag or container. To thaw, simply take the donuts out and leave them at room temperature for about an hour. You can also warm them in the microwave for a few seconds. This makes them soft again. Avoid leaving them in the freezer for too long to maintain their great texture. To add more chocolate flavor, try using more chocolate chips. You can increase the amount to 3/4 cup. Another option is to mix in cocoa powder. Start with 1-2 tablespoons. You can also drizzle melted chocolate on top after baking. This gives a rich finish that everyone loves. Yes, you can make these donuts without protein powder. You can replace it with extra almond flour. Use an extra half cup of almond flour instead. You could also try using oat flour or coconut flour. Just note that this may change the taste and texture a bit. To help your donuts rise, follow these tips: - Use fresh baking powder. Check the expiration date. - Mix wet and dry ingredients until just combined. Overmixing can make them dense. - Make sure your oven is fully preheated. This helps the donuts rise quickly. - Fill the donut pan only two-thirds full. This gives them space to rise. These protein donuts are tasty and easy to make. You need simple ingredients, like almond flour and applesauce, to create a healthy treat. Follow the steps carefully, from mixing to baking, for the best results. Use tips for variations and storage to keep them fresh and fun. Whether you add chocolate chips or spices, you can customize them to your taste. Enjoy your homemade donuts as a snack or treat anytime!

Chocolate Chip Protein Donuts Tasty and Healthy Snack

Looking for a quick and tasty snack that’s also healthy? These Chocolate Chip Protein Donuts are here to save the

- 8 oz. fettuccine pasta - 1 lb. large shrimp, peeled and deveined - 3 tablespoons unsalted butter - 3 cloves garlic, finely minced - 1 cup heavy cream - Zest and juice of 1 large lemon - 1 teaspoon dried oregano - Salt and freshly cracked black pepper, to taste - Fresh parsley, finely chopped (for garnish) - Freshly grated Parmesan cheese, for serving In this recipe, the main ingredients create a rich and creamy dish. The fettuccine pasta acts as a perfect base. It holds the sauce well and gives a nice texture. The large shrimp provide protein and a sweet flavor. The unsalted butter is essential for that rich, buttery taste. Next, the flavor enhancers elevate the dish. Garlic adds depth and aroma. Heavy cream makes the sauce silky and smooth. The zest and juice of lemon bring freshness and brightness. This zest is key; it gives that pop of flavor you will love. For seasoning and garnish, dried oregano adds warmth. Salt and black pepper will sharpen all the flavors. Fresh parsley not only adds color but also a fresh taste. Lastly, freshly grated Parmesan cheese on top makes everything feel special. This combination of ingredients is what makes the One-Pan Creamy Lemon Butter Shrimp Pasta so delightful and satisfying. First, melt the butter in a large skillet over medium heat. Add the minced garlic and sauté it for about one minute. You want the garlic to smell great but not brown. Next, add the shrimp to the skillet. Season them with salt, pepper, and oregano. Cook the shrimp for 2-3 minutes. Watch for them to turn pink and opaque. Once they are done, take them out and set them aside. In the same skillet, pour in the heavy cream. Then, add the lemon zest and juice. Stir the mixture well. Let it simmer for 2-3 minutes. This helps the sauce thicken slightly. Keep stirring so it doesn’t stick to the pan. While the sauce simmers, boil a big pot of salted water. Add the fettuccine and cook it until it is al dente. Follow the package instructions for the right time. Once the pasta is ready, drain it but save about half a cup of the pasta water. Now, add the drained fettuccine directly into the skillet with the sauce. Toss it gently to coat the pasta. If the sauce is too thick, add a little reserved pasta water to thin it out. After that, fold the cooked shrimp back into the skillet with the pasta and sauce. Toss it all together and heat it for 1-2 minutes. Finally, taste the dish and adjust the seasoning if needed. To cook shrimp just right, aim for a bright pink color. This means they are done! Overcooked shrimp turn tough and rubbery. Season the shrimp with salt and pepper before cooking. If you want more flavor, add some garlic powder or paprika. These simple tweaks can enhance the taste. The secret to a great sauce is the reserved pasta water. When you drain the pasta, save about half a cup. If the sauce seems too thick, add a little pasta water. This helps the sauce cling to the pasta perfectly. Some people like a thicker sauce, while others prefer it lighter. Adjust as you see fit! Serve the pasta in nice bowls or on platters. A sprinkle of fresh parsley on top adds color. You can also add lemon wedges on the side for a zesty touch. For drinks, a crisp white wine pairs well. You can even serve a light salad as a side. This makes for a lovely meal! {{image_4}} You can swap fettuccine for other pasta types. Penne or linguine work well in this dish. If you prefer a gluten-free option, try using rice noodles or gluten-free pasta. Each choice gives a different twist to the dish while keeping it creamy and delicious. Incorporating veggies can enhance the dish. Spinach adds a nice pop of color and nutrients. You can also use cherry tomatoes or bell peppers for sweetness. Simply sauté them with the shrimp to keep it simple. For a crunchy texture, consider adding broccoli or asparagus. These options brighten the plate and add flavor. If you want to replace shrimp, chicken is an excellent choice. Cook it until golden brown, just like the shrimp. Tofu is another great option for a plant-based twist. Make sure to use firm tofu and sauté it until crispy. Both options will keep the dish hearty and satisfying while still being creamy and full of flavor. To store leftovers, let the pasta cool first. Place it in an airtight container. It will stay fresh for 3 days in the fridge. If you want to keep it longer, freezing is a good option. The best way to reheat this pasta is on the stove. Add a splash of water or cream to keep it moist. Heat it over low to medium heat, stirring often. You can also use the microwave. Just cover it and heat in short bursts, stirring in between. To freeze the pasta, place it in a freezer-safe container. Make sure it’s sealed well to avoid freezer burn. It can last for up to 2 months in the freezer. To thaw, move it to the fridge overnight. Reheat with a bit of water or cream for the best texture. Yes, you can use frozen shrimp. Just make sure to thaw them first. Place the frozen shrimp in a bowl of cold water for about 15-20 minutes. This will help them thaw quickly and safely. After thawing, pat them dry with a paper towel. This step ensures they cook evenly and absorb flavors well. If you want a lighter version, you can use half-and-half or whole milk. These options reduce fat while still giving a creamy texture. For a dairy-free choice, try coconut milk or cashew cream. Both will add a unique flavor to the dish. Just remember, using lighter options may change the sauce's thickness. To keep your pasta firm, cook it until just al dente. This means it should have a slight bite when you taste it. Drain the pasta right away and avoid rinsing it with water; this washes away the starch that helps the sauce stick. If you combine the pasta with the sauce quickly, it will absorb flavors without becoming mushy. This recipe uses fresh shrimp, creamy sauce, and fettuccine pasta. You learned how to prepare shrimp, make the sauce, and cook the pasta perfectly. Tips help you avoid soggy noodles and adjust flavors. Variations let you switch proteins or add veggies. Store leftovers well, and reheating is easy. Enjoy your delicious meal with friends and family. Cooking can be fun and tasty!

One-Pan Creamy Lemon Butter Shrimp Pasta Recipe

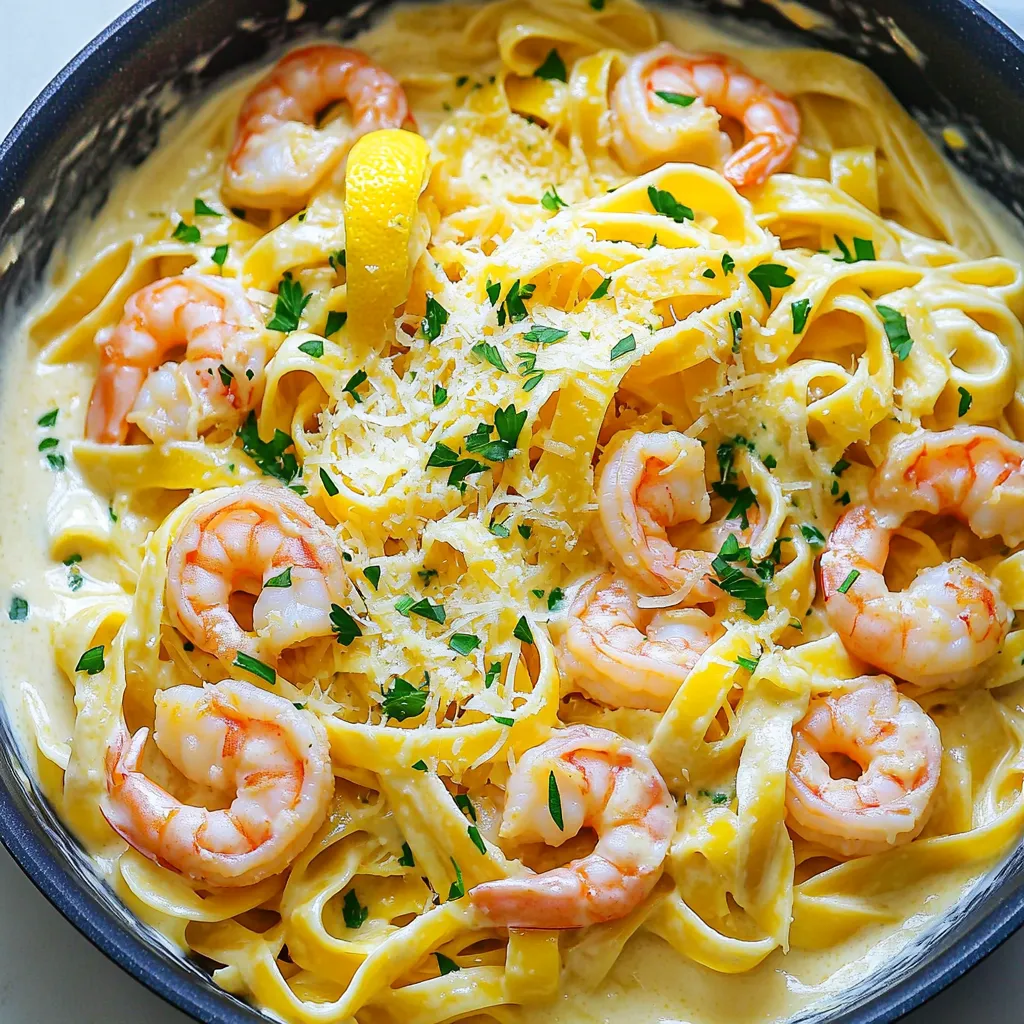
Get ready to impress your dinner guests with my One-Pan Creamy Lemon Butter Shrimp Pasta. This dish bursts with vibrant

- 2 cups all-purpose flour - 1/4 cup granulated sugar - 1 tablespoon baking powder - 1/2 teaspoon salt - 1/2 cup unsalted butter, chilled and cut into small cubes - 3/4 cup heavy cream - 1 teaspoon pure vanilla extract - 1/2 cup semi-sweet chocolate chips - 1 egg (for egg wash) - Turbinado sugar, for sprinkling To make bakery-style chocolate chip scones, you need simple yet key ingredients. Each one plays an important role. First, all-purpose flour gives the scones their base. It helps create a nice structure. Granulated sugar adds a touch of sweetness, making each bite delightful. Baking powder helps the scones rise, giving them that fluffy texture. Salt enhances all the flavors, balancing sweetness with a slight kick. Next is unsalted butter. Use it cold and cut into small cubes. This helps create flaky layers. Heavy cream adds moisture and richness. The pure vanilla extract brings a lovely aroma and depth of flavor. Then we have semi-sweet chocolate chips. These melt slightly during baking, adding a nice gooey texture. An egg is used for an egg wash. This gives the scones a shiny finish. Finally, sprinkle turbinado sugar on top for a crunchy finish. Each ingredient is essential for creating delicious scones. Gather these items before you start baking. Enjoy the process of mixing and baking your way to a warm batch of sweet scones! First, preheat your oven to 400°F (200°C). This will ensure even baking. Next, line a baking sheet with parchment paper. This step helps the scones not stick. In a large bowl, combine the following: - 2 cups all-purpose flour - 1/4 cup granulated sugar - 1 tablespoon baking powder - 1/2 teaspoon salt Whisk these dry ingredients together until they blend well. Make sure there are no lumps. Now, add 1/2 cup of chilled, cubed unsalted butter to the flour mix. Use a pastry cutter or your fingertips to work the butter in. You want a texture like coarse crumbs. This adds richness to your scones. In another bowl, mix together: - 3/4 cup heavy cream - 1 teaspoon pure vanilla extract Pour this creamy mix into the dry ingredients. Stir gently with a spatula. Mix until just combined. Avoid overworking the dough. This keeps your scones light and fluffy. Next, fold in 1/2 cup of semi-sweet chocolate chips. Make sure they spread evenly in the dough. This adds sweetness and richness. Lightly flour your work surface. Turn the dough out onto it and shape it into a disc about 1-inch thick. Use a sharp knife to cut the disc into wedges or a round cutter for individual scones. Place the cut scones on your lined baking sheet. In a small bowl, whisk an egg. Brush it over the tops of the scones for a shiny finish. Sprinkle some turbinado sugar on top for crunch. Bake for 15-20 minutes until golden brown. A toothpick should come out clean when inserted. Let the scones cool for a few minutes before moving them to a wire rack. To get the best texture, keep your butter cold. Cold butter makes the scones flaky. When you mix it into the flour, stop when you see small crumbs. This step is key for a soft scone that has a nice rise. Always chill your ingredients before you start. Chilled butter and heavy cream help create that tender texture. If your butter warms up, it will not mix well. This can lead to dense scones instead of light and fluffy ones. When mixing the dough, be gentle. Over-mixing can make your scones tough. Use a spatula to fold in the chocolate chips. Aim for just mixed, with some dry flour still showing. This keeps the scones soft and airy. Store your scones in an airtight container. They stay fresh for up to three days at room temperature. If you want them to last longer, freeze them. Just wrap each scone in plastic wrap and place them in a freezer bag. Serve warm scones with clotted cream or butter. Adding a touch of jam can elevate the flavor. For a fun twist, pair with fresh fruit like strawberries or raspberries. They make a delightful breakfast or afternoon treat! {{image_4}} You can easily customize your chocolate chip scones. Try adding nuts like walnuts or pecans for a nice crunch. Dried fruits like cranberries or apricots can add a sweet twist too. If you want a different chocolate flavor, use dark or milk chocolate chips. White chocolate will make the scones sweeter and richer. Experimenting with these flavors keeps each batch unique! If you need a gluten-free option, replace all-purpose flour with a gluten-free blend. Look for a blend that includes xanthan gum. This helps the scones rise and stay tender. Be mindful of your baking powder, as some brands contain gluten. Always check the labels to ensure your ingredients are gluten-free. You can make these scones vegan by swapping out a few key ingredients. Use a plant-based butter instead of unsalted butter. Replace heavy cream with coconut cream or almond milk mixed with a little vinegar for tang. For the egg wash, brush the scones with almond milk or a bit of plant-based milk instead. These changes will give you delicious vegan scones without losing flavor! To keep your scones fresh, place them in an airtight container. You can use plastic wrap or a zip-top bag too. Store them at room temperature for up to two days. If you want to keep them longer, refrigeration is a good option. Just remember, cold air can dry them out. You can freeze scones for longer storage. First, let them cool completely. Then, wrap each scone tightly in plastic wrap. Place them in a freezer-safe bag or container. They can stay fresh in the freezer for up to three months. To enjoy them later, just thaw them at room temperature. To reheat scones, preheat your oven to 350°F (175°C). Place the scones on a baking sheet. Heat them for about 10 minutes. This will help bring back their fresh-baked taste. You can also microwave them for a few seconds, but they may lose some crispiness. Enjoy your warm scones again! Yes, you can use different flours. All-purpose flour is best for scones. You may try whole wheat flour, but the texture changes. The scones may become denser. If you want lighter scones, stick with all-purpose flour. You can use milk mixed with butter as a substitute. For every cup of heavy cream, mix 3/4 cup of milk with 1/4 cup of melted butter. You can also use coconut cream for a dairy-free option. The texture may vary, but the flavor stays good. Look for a golden brown color on top. Insert a toothpick into the center of a scone. If it comes out clean, the scones are done. They should feel firm but not hard when you touch them. Yes, you can make the dough ahead of time. Wrap it in plastic wrap and store it in the fridge for up to 24 hours. When ready, just shape and bake it. This helps the flavors develop, making your scones even better. Homemade scones last about 2 to 3 days at room temperature. Store them in an airtight container to keep them fresh. If you want to keep them longer, freeze the scones. They can last up to 3 months in the freezer. In this post, we explored how to make delicious scones. We covered the key ingredients, from flour to chocolate chips. I shared step-by-step instructions, keeping it simple for success. You learned important tips on texture and storage, and even variations for different diets. Remember, making scones allows for creativity and fun. With these guidelines, you can enjoy warm, fresh scones anytime. Get baking and enjoy your tasty treats!

Bakery-Style Chocolate Chip Scones Easy and Delicious

If you’ve ever craved bakery-style chocolate chip scones, you’re in the right place! I’ll guide you through a simple and

Older posts
Newer posts
← Previous Page1 … Page4 Page5 Page6 … Page86 Next →

dsad

© 2026 yumymoments • Built with GeneratePress

Our Policies

  • Copyright Policy
  • Cookie Policy
  • GDPR Policy
  • Privacy Policy
  • Disclaimer
  • Terms Of Use

More Information

  • Home
  • About
  • Contact
  • Appetizers
  • Dessert
  • Dinner
  • Drinks
©2026, yumymoments About Back To Top