Skip to content
DisclaimerTerms Of UseGDPR PolicyCookie Policy

yumymoments

  • Home
  • Drinks
  • Appetizers
  • Dinner
  • Dessert
  • About
  • Contact
  • Privacy Policy
DisclaimerTerms Of UseGDPR PolicyCookie Policy

NO-ING-IMG

- 14 oz firm tofu - 2 tablespoons cornstarch - 2 tablespoons vegetable oil - 1 bell pepper, sliced - 1 cup snap peas - 1 medium carrot, julienned - 2 cloves garlic, minced - 1 tablespoon fresh ginger, minced - 1/4 cup sweet chili sauce - Sesame seeds - Fresh cilantro (optional) - 3 green onions, chopped Sweet Chili Tofu Stir Fry is a vibrant dish, and picking the right ingredients makes all the difference. You want firm tofu because it holds its shape well. Press the tofu to get rid of extra moisture. This step helps it crisp up nicely when cooked. Next, coat the tofu with cornstarch. This creates a crunchy outer layer. The vegetable oil is key for frying. Use enough to cover the pan, but not too much. For the veggies, I love using a mix of colors and textures. Bell peppers bring sweetness, while snap peas add a nice crunch. Carrots are great for their crispness and bright color. You can mix and match based on your taste. Now let’s talk about flavor. Garlic and ginger are essential in this dish. They give a warm and spicy aroma. The sweet chili sauce ties everything together. It adds sweetness and a bit of heat. Finally, garnishing adds a nice touch. Sesame seeds sprinkle on top give a nutty flavor. Fresh cilantro brightens the dish, while green onions add a mild onion taste. This recipe is simple yet full of flavor. You can find the full recipe to guide you through each step. Enjoy making this delicious Sweet Chili Tofu Stir Fry! First, press the tofu to remove moisture. This step takes about 30 minutes. Place the tofu on a plate, then add another plate on top. Put something heavy, like a can, on top. After pressing, cut the tofu into 1-inch cubes. Place the cubes in a bowl and coat them with cornstarch. This coating gives the tofu a nice, crispy texture when cooked. Next, heat the vegetable oil in a large skillet over medium-high heat. Once the oil is hot and shimmering, add the coated tofu cubes. Pan-fry the tofu for 4-5 minutes. Keep turning the tofu until it turns golden brown and crispy. After cooking, take the tofu out of the skillet and set it aside on a plate. In the same skillet, add the sliced bell pepper, snap peas, and julienned carrot. Stir-fry the veggies for 3-4 minutes until they become tender but still crisp. Now, it's time to add flavor. Add the minced garlic and ginger to the skillet. Stir them for about one minute until they smell great. Then, return the crispy tofu to the skillet. Pour in the sweet chili sauce and soy sauce. Toss everything together gently for 2 minutes. Make sure the tofu and veggies are well-coated and heated through. To finish, drizzle sesame oil over the stir fry. Give it one last toss to mix in the flavor. Then, remove the skillet from heat. Now, garnish the dish with chopped green onions and a sprinkle of sesame seeds. If you want, add fresh cilantro for extra flavor and a nice look. You can find the full recipe for Sweet Chili Tofu Stir Fry to help with your cooking journey. Tofu can be soft and watery. Pressing it helps remove excess moisture. This step is key for getting crispy tofu. I suggest pressing for at least 30 minutes. After pressing, cut the tofu into cubes. Next, coat the cubes with cornstarch. This will create a crispy outer layer when cooked. Choose fresh, colorful vegetables for a vibrant dish. Bell peppers, snap peas, and carrots work great. Their crunch adds texture to the stir fry. Timing is also important. Add the firmer veggies first, like carrots, and then softer ones like snap peas. This keeps everything tender-crisp. Sweet chili sauce gives the dish its name and flavor. You can adjust the sauce to fit your taste. If you want it sweeter, add more. For a saltier kick, use soy sauce. A splash of sesame oil adds a nice finish. It brings warmth and depth to the dish. For more tips and the complete recipe, check out the [Full Recipe]. {{image_4}} You can swap tofu for chicken or shrimp. Both add great flavor and texture. Chicken cooks quickly and gives a nice bite. Shrimp is sweet and tender, perfect for this dish. If you want to keep it plant-based, try tempeh or seitan. Both options are high in protein and fit well in stir-fries. Feel free to get creative with sauces. Try teriyaki sauce for a sweeter taste. You can also add chili flakes or sriracha for heat. Mixing these flavors can change the whole dish. Just remember, a little spice goes a long way! Add different veggies for a fresh twist. Broccoli and bok choy are great choices. They cook well and add a nice crunch. You can also use seasonal vegetables like zucchini or asparagus. These swaps keep your stir-fry exciting and full of color. To keep your Sweet Chili Tofu Stir Fry fresh, store it right after cooling. Place it in an airtight container. This helps prevent it from drying out. The dish stays good in the fridge for about 3 to 4 days. Always label your container with the date. This way, you can track how long it has been stored. When it is time to enjoy your leftovers, you have two great options. You can use the microwave or the stovetop. If you choose the microwave, heat the stir fry in short bursts. Stir it every 30 seconds for even heating. This helps keep the tofu and veggies from getting soggy. If you prefer the stovetop, heat a pan over low heat. Add a splash of water or oil to keep it moist. Stir until everything is heated through. For busy days, meal prep is a smart choice. You can prepare your ingredients ahead of time. Chop the vegetables and cube the tofu. Store them in separate containers in the fridge. This keeps your veggies fresh. You can also pre-cook the tofu and store it in an airtight container. This way, you can quickly toss everything together for a fast meal. This method saves time while ensuring your dish tastes great every time. Check the [Full Recipe] for more tips on cooking! Yes, you can use frozen tofu. Freezing changes the texture. It becomes spongy, which helps absorb flavors. To prepare, thaw the tofu completely. Then, press it to remove excess water. After pressing, cut it into cubes and coat with cornstarch. This method works well for a hearty bite. Sweet Chili Tofu Stir Fry lasts about 3 to 5 days in the fridge. Store it in an airtight container. When you reheat it, make sure it’s heated all the way through. If it looks or smells off, it’s best to toss it. Always check before eating. This dish pairs well with many sides. Here are some options: - Steamed rice - Cooked noodles - Quinoa - Cauliflower rice - A simple salad These sides balance the flavors and make a complete meal. Absolutely! To make it gluten-free, use tamari instead of soy sauce. Check the sweet chili sauce for gluten-free labeling. Most cornstarch brands are gluten-free, but it’s good to check. With these swaps, you can enjoy this dish worry-free. Sweet chili tofu stir fry is an easy and tasty dish. It combines tofu, fresh veggies, and bold flavors. You learned how to prepare and cook each ingredient, ensuring everything turns out great. Remember, crispy tofu and fresh veggies make all the difference. Feel free to try different proteins and sauces for variety. This recipe is a great base for meal prep, too. Enjoy your cooking and explore new twists on this delicious stir fry!

Sweet Chili Tofu Stir Fry Flavorful and Simple Dish

Are you ready to whip up a dish that dazzles your taste buds? My Sweet Chili Tofu Stir Fry is

- 2 cups cooked chicken, shredded - 1 cup shredded cheese (cheddar or Monterey Jack) - 1 red bell pepper, diced - 1 small onion, finely chopped - 1 teaspoon ground cumin - 1 teaspoon smoked paprika - 4 large flour tortillas - 2 tablespoons olive oil (divided) - Salt and black pepper to taste - Fresh cilantro, chopped (for garnish) - Sour cream (for serving) Choose fresh vegetables for the best taste. Look for bright red bell peppers and firm onions. Use high-quality cheese for meltiness and flavor. Shredded cheese is convenient, but block cheese melts better. When selecting chicken, pick meat that is juicy and tender. You can use rotisserie chicken to save time. For a zesty twist, add jalapeños for heat. Black beans can boost protein and fiber. You might also try corn for a sweet crunch. Avocado or guacamole can add creaminess. Consider lime juice for a fresh kick. Each of these ingredients can elevate your quesadilla and create unique flavors. For the full recipe, check out the details above! Start by heating 1 tablespoon of olive oil in a large skillet over medium heat. Once hot, add the finely chopped onion and diced red bell pepper. Sauté them for about 3-4 minutes. Stir occasionally until they soften up. Season these veggies with ground cumin, smoked paprika, salt, and black pepper. This helps to blend the flavors together. Now, add the shredded chicken to the skillet. Stir it well with the sautéed vegetables. Let this mixture cook for an additional 2-3 minutes. This warms the chicken and lets the flavors mix. You want everything heated through and tasty. In a separate skillet, heat 1 tablespoon of olive oil over medium heat. Place one flour tortilla in this skillet. Sprinkle half of the shredded cheese evenly over the tortilla. Then, spread half of the chicken mixture on top. Add another layer of cheese before placing a second tortilla on top. Cook the quesadilla for about 3-4 minutes until the bottom gets golden brown and the cheese begins to melt. Carefully flip it using a large spatula, and cook for another 3-4 minutes until both sides are crispy. Remove the quesadilla and let it cool for a minute. Slice it into wedges with a sharp knife or pizza cutter. Repeat this with the remaining ingredients. Serve the warm quesadillas on a platter, garnished with chopped cilantro and a side of sour cream for dipping. For the full recipe, refer to the earlier section. To get a crispy quesadilla, use medium heat. Heat your skillet, then add oil. You want enough oil to cover the bottom, but not too much. Use a spatula to press down on the quesadilla while it cooks. This helps the cheese melt and brown the tortilla. Flip it carefully to keep the filling inside. Cook each side until golden brown, around 3-4 minutes. Let it cool slightly before slicing for the best crunch. You will need a few tools to make your quesadillas. Here’s what I suggest: - A large skillet for cooking - A spatula to flip the quesadilla - A sharp knife or pizza cutter for slicing - Mixing bowls for prepping the filling - Measuring spoons for spices These tools make the process easy and fun. If your quesadilla is soggy, it may need more heat. Make sure the skillet is hot enough before adding the tortilla. If the cheese does not melt, try using more cheese or a different type. For burnt quesadillas, lower the heat a bit. If your filling spills out, remember to press down gently while it cooks. Adjust these tips based on your stove and skillet for the best results. {{image_4}} You can easily make vegetarian quesadillas. Just swap out chicken for veggies. Use ingredients like black beans, corn, or spinach. For a fresh touch, add diced tomatoes or mushrooms. They add great flavor and color. You can also use different cheeses like feta or goat cheese for a tangy twist. If you love heat, spice up your chicken quesadillas. Add diced jalapeños or chipotle peppers to the chicken mix. For a spicy kick, mix in hot sauce. You can even use pepper jack cheese instead of cheddar. This gives your quesadilla a nice, spicy flavor. Cheese is a key player in quesadillas. While cheddar is classic, try other cheeses for a new taste. Monterey Jack melts well and adds creaminess. Gouda offers a rich, smoky flavor. For a sharp taste, use aged cheddar. Blend different cheeses for a complex flavor profile. Each variation brings its own unique touch to the dish. For the full recipe, check out the Easy Chicken Quesadillas Delight above! After you enjoy your meal, let the quesadillas cool. Place them in an airtight container. They stay fresh for up to three days in the fridge. If you want to save space, cut them into wedges. This makes them easier to store and reheat later. To reheat, use a skillet for the best results. Heat it over medium heat. Place the quesadilla in the skillet for about 3-4 minutes on each side. This keeps the quesadilla crispy. You can also use a microwave, but it might make them soft. If you use the microwave, heat for 30 seconds at a time until warm. You can freeze the quesadillas for later use. Wrap each quesadilla tightly in plastic wrap. Then, place them in a freezer bag. They can last up to three months. When you're ready to eat, thaw them in the fridge overnight. Reheat them using the skillet method for the best taste. This makes for a quick meal anytime! For the full recipe, check out the Cheesy Chicken Quesadillas Delight section. Yes, you can! Ground beef, turkey, or pork work great. You could also try shrimp or tofu for a fun twist. Just make sure to season them well. Each protein brings its own flavor. Cook them until done, just like the chicken. You can use an oven! Preheat it to 400°F (200°C). Place the quesadillas on a baking sheet. Bake for 10-12 minutes until golden and crispy. Flip them halfway for even cooking. You can also use a microwave, but they won’t be crispy. Many sides work well! Here are some ideas: - Mexican rice - Refried beans - Guacamole - Salsa - Corn salad These sides add color and taste to your meal. They also make a complete dinner. Enjoy with your quesadillas for a full feast. For the full recipe, refer to the Easy Chicken Quesadillas section! In this blog post, we covered all you need for making delicious quesadillas. We shared the right ingredients, tips for selection, and options for extra flavor. I walked you through each step, from prepping veggies to assembly. We also discussed important tips for crispiness and tools to use, plus variations for every taste. Lastly, I provided storage info to keep leftovers fresh. Now, it’s time to create your perfect quesadilla! Enjoy this tasty dish any day of the week.

Easy Chicken Quesadillas Flavorful and Quick Meal

If you’re craving a quick and tasty meal, Easy Chicken Quesadillas are the answer! This dish is full of flavor

- 250g pasta (penne or fusilli) - 200g block of feta cheese - 1 cup cherry tomatoes, halved - 1/2 cup Kalamata olives, pitted and sliced - 4 cloves garlic, finely minced - 1/4 cup extra virgin olive oil - 1 teaspoon dried oregano - 1 teaspoon red pepper flakes (optional) - Sea salt and freshly ground black pepper, to taste - Fresh basil leaves, for garnish - Zest of 1 lemon Baked feta pasta is a simple dish made with few key ingredients. The pasta makes it filling, while the feta adds a creamy texture. You can use penne or fusilli; both work well. For the best flavor, use fresh cherry tomatoes. They burst in the oven, giving the sauce a bright taste. The Kalamata olives add a salty punch. Garlic gives the dish depth, while extra virgin olive oil binds everything. Season with oregano and red pepper flakes for some heat. Adjust the salt and pepper to your taste. Fresh basil leaves make a lovely garnish, and lemon zest brightens the dish. You can find the full recipe in the article, which guides you through cooking this delightful meal. Each ingredient plays a role, so don’t skip any. Enjoy the process and the delicious results! 1. Preheat your oven to 200°C (400°F). This step is key for a perfect bake. 2. In a large baking dish, combine the halved cherry tomatoes, sliced Kalamata olives, and minced garlic. Mix them well to spread the flavors evenly. 1. Drizzle the olive oil over the tomato mixture. Add the dried oregano and red pepper flakes if you like a bit of heat. Season with sea salt and freshly ground black pepper. Toss everything to coat well. 2. Nestle the block of feta cheese right in the middle of the mixture. Drizzle more olive oil over the feta and sprinkle the lemon zest for a bright flavor. 1. Place the baking dish in the preheated oven. Bake for about 25-30 minutes. The tomatoes should blister and the feta will get soft and golden. 2. While that bakes, cook your pasta according to the package instructions until al dente. Once done, drain the pasta and set it aside. 3. Carefully remove the dish from the oven. Use a fork to gently mash the feta and tomatoes together. This creates a creamy sauce. 4. Add the cooked pasta to the baking dish. Toss everything together until the pasta is fully coated in the feta-tomato sauce. 5. Taste and adjust seasoning if needed. 6. Serve hot, garnished with fresh basil leaves for an extra burst of flavor. This dish is not only simple but also bursts with flavor. Enjoy every bite! For the complete list of ingredients and detailed instructions, check out the Full Recipe. To get the perfect feta texture, start with a good block of feta. Look for a firm, creamy type that holds its shape when baked. When it melts, it should become soft but not runny. The best pasta types for this recipe are penne or fusilli. They hold sauce well and give each bite great flavor. Other shapes, like rotini or farfalle, work too, but choose one that can grip the sauce. To boost the flavor, try adding spices like Italian seasoning or garlic powder. Fresh herbs like thyme or oregano can also add depth. You can even toss in some capers for a briny kick. Adjusting seasoning is key; taste your dish before serving. If it needs more salt or pepper, don’t be afraid to add it. A squeeze of lemon juice right before serving can brighten the whole dish. For a creative serving idea, dish the pasta into individual bowls. This makes it feel special and elegant. Top each bowl with extra basil leaves for color and freshness. Drizzle a bit of olive oil over the top for a shiny finish. You can also serve the pasta directly from the baking dish for a rustic look. Just make sure to have a nice serving spoon ready! {{image_4}} You can easily add protein to your baked feta pasta. Grilled chicken or shrimp works well. Just cook them separately and mix them in at the end. This adds flavor and makes the meal heartier. For a vegetarian option, consider chickpeas or lentils. They blend nicely with the sauce and boost nutrition. Think about adding vegetables for extra color and flavor. Spinach and zucchini are great choices. You can also use bell peppers or broccoli for crunch. Seasonal options like asparagus in spring or butternut squash in fall can keep things fresh and exciting. Mix and match based on what you love or have on hand. If you want to switch up the cheese, try goat cheese or ricotta. These add a different taste and texture. For those who need dairy-free options, nut-based cheeses work wonderfully. Look for brands that melt well. Always check labels to ensure they fit your diet. Each cheese brings its own unique twist to this dish. For the full recipe, check out the complete guide on baked feta pasta. To keep your baked feta pasta fresh, store leftovers right away. Place them in an airtight container. This helps to keep the flavors and texture intact. Let the pasta cool down before sealing the container. It’s best to use the leftovers within three days for optimal taste. Yes, you can freeze baked feta pasta! However, the texture may change. If you want to freeze it, let it cool completely first. Then, place it in a freezer-safe container. It’s best to consume it within two months. When ready to eat, thaw it overnight in the fridge. Reheat your baked feta pasta safely in the oven or microwave. If using the oven, preheat to 180°C (350°F). Place the pasta in a baking dish, cover it with foil, and heat for about 15-20 minutes. Stir halfway through to maintain even warmth. If using a microwave, heat it in short bursts. Stir between intervals to keep the texture creamy. Enjoy your meal again without losing its delicious taste! Baked feta pasta is a simple dish that combines baked feta cheese with pasta. It became popular on social media in 2020. The dish comes from Finland and quickly gained fans worldwide. The creamy feta and juicy tomatoes create a flavorful sauce. You mix everything together, and it becomes a comforting meal. Yes, you can prepare Baked Feta Pasta ahead of time. You can store it in the fridge for up to three days. Just keep the pasta and sauce separate until you're ready to bake. This way, the pasta won't get mushy. When you want to eat, bake it as directed. Baked feta pasta pairs well with many side dishes. A fresh green salad balances the rich flavors. Garlic bread is perfect for dipping into the sauce. For wine, a crisp white wine like Sauvignon Blanc works nicely. Baked feta pasta is great for meal prep. You can make a big batch and divide it into portions. Store it in airtight containers for easy lunches. Reheat it in the oven or microwave when you're ready to eat. The spice level depends on how many red pepper flakes you use. A teaspoon adds mild heat. You can always add more if you like it spicy. If you want to avoid heat, leave them out. Baked feta pasta is simple and fun to make. We covered the key ingredients, steps, and tips to help you create this tasty dish. You can mix it up with proteins or veggies, and even choose different cheeses to fit your needs. Remember, storage is easy too, so leftovers won’t go to waste. Enjoy the fresh flavors and get creative with your unique twist. This dish is a crowd-pleaser that shines on any table. Happy cooking!

Baked Feta Pasta Flavorful and Easy Weeknight Meal

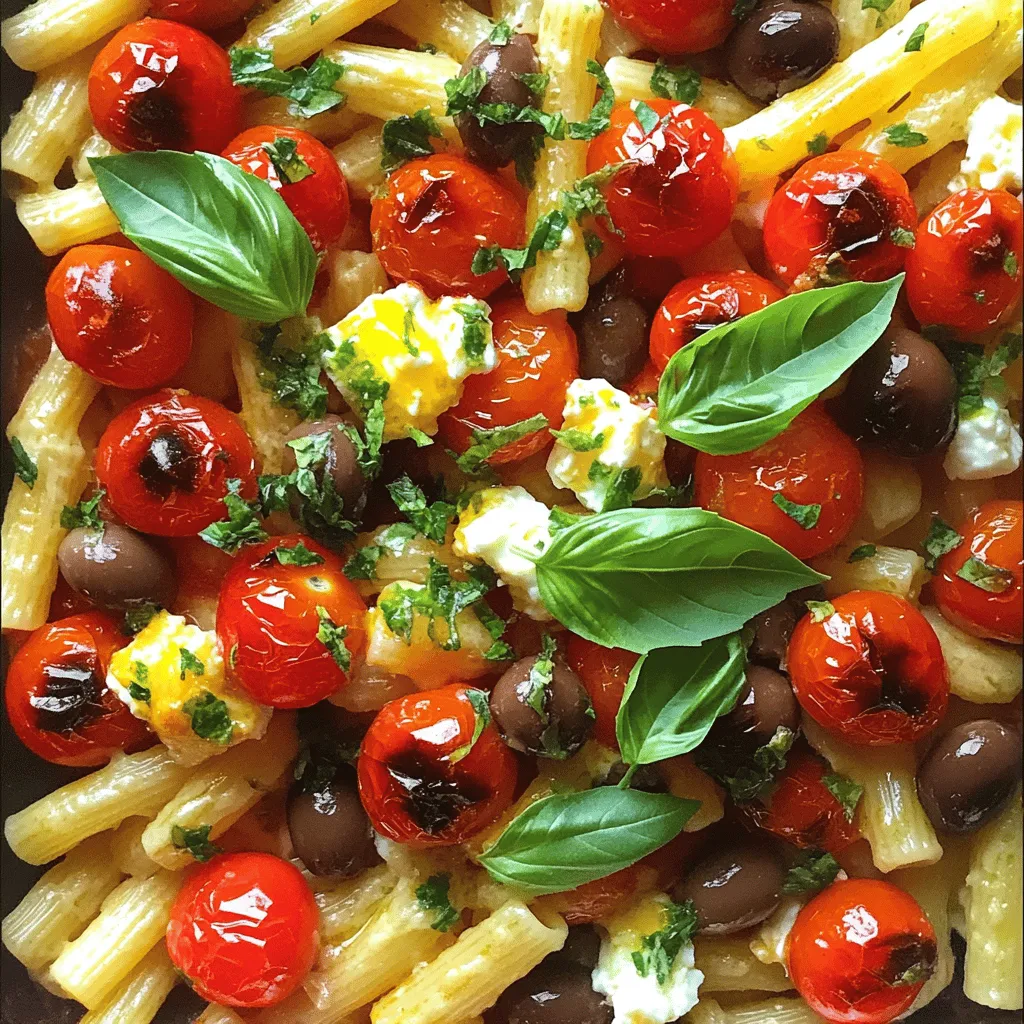
Looking for a simple, delicious weeknight meal? Baked feta pasta checks all the boxes! It combines creamy feta, juicy tomatoes,

To make a tasty Southwest Chicken Salad, you need these main items: - 2 grilled chicken breasts, thinly sliced - 1 can (15 oz) black beans, thoroughly rinsed and drained - 1 cup sweet corn (fresh or canned, drained if canned) - 1 red bell pepper, diced into small pieces - 1 ripe avocado, diced - 1 cup cherry tomatoes, halved - 1/2 red onion, sliced finely - 1 cup romaine lettuce, chopped into bite-sized pieces - 1/4 cup fresh cilantro, finely chopped Each ingredient adds a unique flavor and texture. The grilled chicken provides protein, while the beans and corn add fiber. The veggies bring color and crunch. For a more exciting salad, consider these optional add-ins: - Jalapeños for heat - Black olives for a briny touch - Cheese, like feta or cheddar, for creaminess - Sliced radishes for extra crunch These add-ins can give your salad a new twist. Feel free to mix and match based on your taste. A great dressing can elevate your salad. Here’s what you need: - Juice of 2 fresh limes - 3 tablespoons extra virgin olive oil - 1 teaspoon ground cumin - 1 teaspoon chili powder - Salt and freshly ground black pepper to taste This dressing is zesty and complements the salad perfectly. The lime juice adds brightness, while cumin and chili powder bring warmth. You can find the full recipe for this delicious salad to guide you step by step. Start by gathering all your ingredients. In a large mixing bowl, add the sliced grilled chicken. Next, add the rinsed black beans and sweet corn. Then, toss in the diced red bell pepper and avocado. Add halved cherry tomatoes, finely sliced red onion, and chopped romaine lettuce. Mix everything gently to combine. This colorful base is where the magic begins. In a small bowl, squeeze the juice from two fresh limes. Add three tablespoons of extra virgin olive oil. Sprinkle in one teaspoon of ground cumin and one teaspoon of chili powder. Finally, season with salt and black pepper to taste. Whisk all these together until well mixed. This zesty dressing will bring life to your salad. Pour the dressing over the salad base. Use a spatula or wooden spoon to toss everything gently. Make sure every bite gets a taste of that zesty goodness. After mixing, add the chopped fresh cilantro and mix again. Let the salad sit for about 5-10 minutes. This allows all the flavors to meld nicely. Serve the salad in bowls and top with crispy tortilla strips. The crunch adds a nice touch. For the full recipe, check out the details above. To cook chicken breasts well, start with uniform thickness. This helps them cook evenly. Use a meat mallet to flatten thicker parts. Season with salt and pepper before cooking. Heat a skillet over medium-high heat and add olive oil. Cook the chicken for about six to seven minutes on each side. Check that the internal temperature reaches 165°F. Let the chicken rest for five minutes before slicing. This keeps the juice in and makes it tender. Fresh ingredients make a big difference in your salad. Choose ripe avocados and bright bell peppers. Look for firm tomatoes and crisp lettuce. When buying canned beans or corn, check the expiration date. Rinse canned items well to remove excess salt. Store your fresh produce in the fridge to keep it crisp. Use fresh cilantro just before serving to keep its flavor bright. Seasoning can elevate your salad. Beyond salt and pepper, use spices like cumin and chili powder for depth. Lime juice adds a zesty lift, while olive oil brings richness. Taste as you go; you can always adjust the seasoning. If you want a kick, add a pinch of cayenne pepper. Let the salad sit for a few minutes after dressing. This allows the flavors to blend better. For even more flavor, consider marinating the chicken before grilling. You can find the full recipe for this delicious salad in the Full Recipe section. {{image_4}} You can easily make a vegetarian version of this salad. Replace the grilled chicken with extra black beans or chickpeas. This adds protein and keeps it filling. You can also use tofu for a different texture. Grilled corn adds a nice smoky flavor. The dressing can change the flavor of your salad. Try a creamy avocado dressing for a rich taste. A simple vinaigrette with lime juice and olive oil is fresh and light. For a spicy kick, add some chipotle or jalapeño to your dressing. Seasonal ingredients can take your salad to the next level. In summer, add juicy peaches or berries for sweetness. In fall, roasted butternut squash gives a warm feel. Always look for fresh produce at local markets to keep your salad vibrant and tasty. For the full recipe, check out the Zesty Southwest Chicken Salad Delight. To store leftover salad, first, place it in a bowl. Cover the bowl tightly with plastic wrap or a lid. This keeps the salad fresh. Avoid mixing the dressing with the salad if you plan to store it. This way, the greens stay crisp and tasty. Use airtight containers for the best results. Glass or plastic containers work well. Make sure they seal tightly to keep air out. Label each container with the date you made the salad. This helps you know when to eat it. Freezing salad is tricky because it changes the texture. If you want to freeze it, only freeze the chicken and beans. Store them in a freezer bag. Remove as much air as possible. For the fresh veggies, it's best to eat them fresh. You can prepare the salad again using the full recipe when you’re ready. To make this salad gluten-free, simply avoid any added gluten items. Use corn chips instead of tortilla strips. Always check labels on beans and corn for gluten. Most canned beans and corn are gluten-free. You can also use fresh corn for a great taste. You can use several options for protein in this salad. Grilled shrimp adds a nice flavor. Black beans work well for a veggie option. You can also try grilled tofu or chickpeas for extra protein. These options keep the salad hearty and filling. Yes, you can prepare this salad ahead of time. Just mix all the veggies and protein, but leave the dressing separate. This keeps the salad fresh and crisp. When you are ready to serve, add the dressing and toss. Enjoy the fresh taste anytime! This blog covered everything you need for a tasty Southwest Chicken Salad. You learned about key ingredients, how to prepare them, and tips for cooking chicken perfectly. We also explored variations for different diets and how to store leftovers. Overall, this salad is easy to make, healthy, and full of flavor. Enjoy creating your own version, and don’t hesitate to try new add-ins!

Savory Southwest Chicken Salad Quick and Easy Recipe

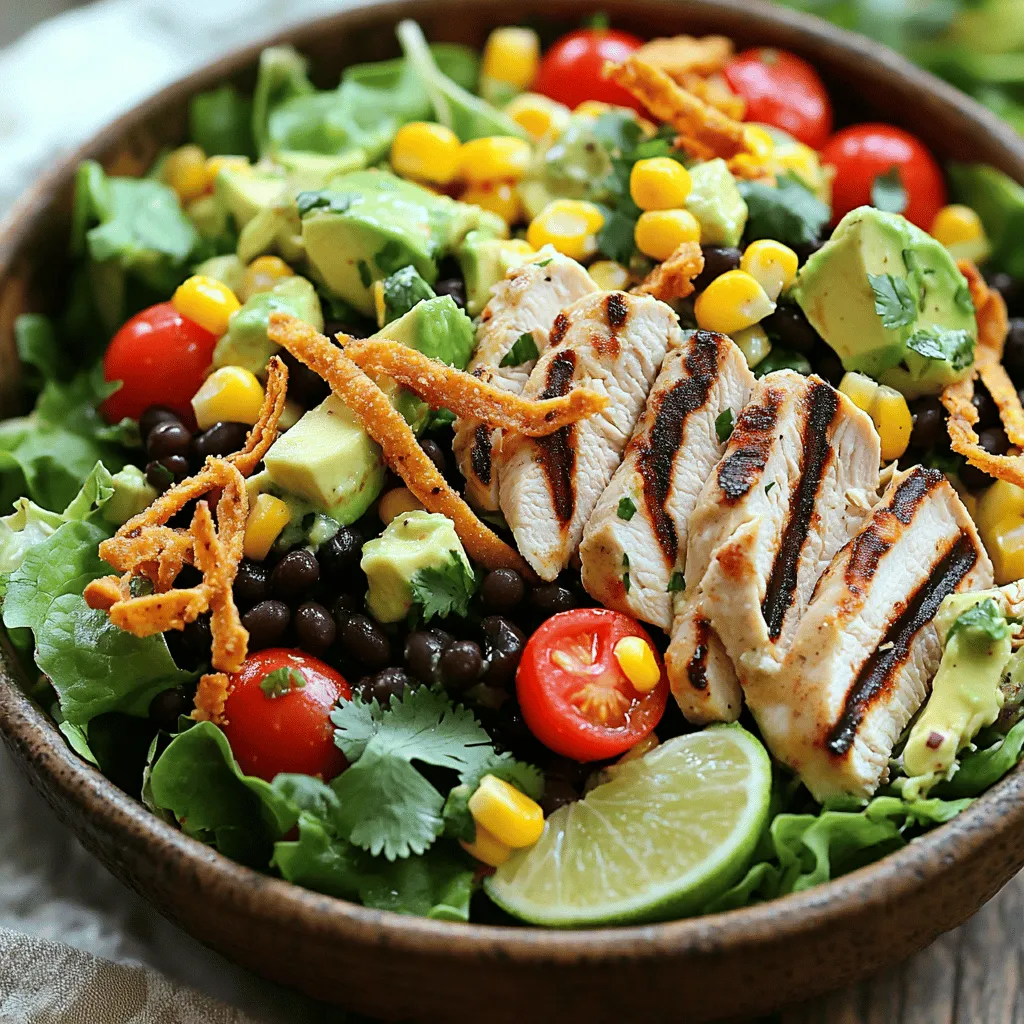
Craving a delicious meal that’s quick to make? You’re in the right place! My Savory Southwest Chicken Salad packs bold

For a great loaded baked potato soup, I always start with the right base. Here are the must-have ingredients: - 4 large russet potatoes, peeled and diced into bite-sized pieces - 1 medium onion, finely chopped - 3 cloves garlic, minced - 4 cups vegetable broth (or chicken broth for extra flavor) Russet potatoes give a creamy texture to the soup. They break down well and mix with other flavors. Onions and garlic add a nice depth to the base. You can choose vegetable broth for a lighter taste or chicken broth for more richness. Next, we bring in the creamy elements and spices. Here’s what you need: - 1 cup heavy cream - 1/2 cup shredded sharp cheddar cheese, plus extra for garnish - 1 teaspoon dried thyme - 1 teaspoon smoked paprika - Sea salt and freshly ground black pepper, to taste - Optional toppings: 1/2 cup cooked turkey bacon, crumbled, and 1/4 cup sour cream Heavy cream makes the soup rich and smooth. Cheddar cheese adds that classic baked potato flavor. Thyme and smoked paprika bring warmth and earthiness. Don’t forget to taste and adjust salt and pepper as you go. For toppings, crumbled turkey bacon adds crunch, while sour cream gives a tangy finish. You can find the full recipe [here](Full Recipe) to make this delicious soup. To start, we need to build the base of our soup. First, heat a splash of olive oil in a large pot over medium heat. Add the finely chopped onion. Sauté it for about 5 minutes until it turns soft and translucent. This adds a sweet flavor to our soup. Next, add the minced garlic and sauté for one more minute. You want the garlic to smell good but not to brown. This keeps the flavor fresh and bright. Now, let’s add the star of the show: the potatoes. Toss in the diced russet potatoes, along with the vegetable broth. You can use chicken broth for a richer taste. Also, add dried thyme and smoked paprika. Stir everything well. Increase the heat until the mixture gently boils, then reduce it to low. Let it simmer for 15 to 20 minutes until the potatoes are soft enough to pierce with a fork. After the potatoes are tender, it’s time to create that creamy texture. Use a potato masher or an immersion blender to mash the soup. I like to leave some potato chunks for a hearty feel. It adds a nice bite to each spoonful. Now, pour in the heavy cream and add the shredded cheddar cheese. Stir continuously over low heat for about 5 minutes. This helps the cheese melt smoothly into the soup, making it rich and creamy. Don’t forget to season with sea salt and freshly ground black pepper. Taste and adjust as needed. If you want to add a savory crunch, fold in crumbled turkey bacon at this point. Remove the pot from heat and let the soup cool slightly before serving. This allows the flavors to mix well. For the full recipe, you can check the details above. Choosing the right potatoes is key. I love using russet potatoes. They are starchy and creamy, making the soup thick and rich. For best results, pick potatoes that feel heavy and firm. Avoid any that are soft or have blemishes. Adjusting seasoning is important for flavor balance. Start with sea salt and freshly ground black pepper. Taste as you go, and add more if needed. A pinch of smoked paprika adds a nice depth. If you want a hint of herbal flavor, add dried thyme. For the best garnishes, focus on visual appeal. Top each bowl with a sprinkle of shredded cheddar cheese. A dollop of sour cream adds creaminess. Fresh chives or green onions provide a nice crunch and color. These toppings make the soup look inviting. Pair your soup with a simple salad for a fresh touch. A crusty bread or garlic toast goes great with it too. For drinks, try a light beer or a crisp white wine. These pairings enhance the warmth of the soup. Find the full recipe [here](#). {{image_4}} You can change this soup in many ways. Adding protein makes it heartier. Try crumbled bacon or diced chicken for a savory kick. Both add flavor and texture. If you want a lighter option, use turkey bacon or leave out meat entirely. For a vegetarian or vegan twist, swap out the heavy cream for coconut milk or a cashew cream. Use vegetable broth and skip the bacon. You can still enjoy all the rich, creamy goodness of this soup. Spices and herbs can change the game. Try adding a pinch of cayenne pepper for heat. A sprinkle of dill or parsley can brighten the flavors. Experimenting with spices keeps the soup exciting. You can also add more veggies. Broccoli or leeks work well in this soup. Just chop them up and add them with the potatoes. They add color and nutrients, making the soup even better. For the full recipe, check out the creamy loaded baked potato soup section. To keep your loaded baked potato soup fresh, let it cool first. This step is key. Pour the soup into a container with a tight lid. Glass or plastic containers work well. Make sure to leave some space at the top. This allows the soup to expand when frozen. For refrigeration, your soup can last up to four days. Just keep it in the fridge. If you want to save it longer, freezing is the way to go. In the freezer, it can last for three months. Just remember to label your container with the date. When you are ready to enjoy your soup again, there are two great ways to reheat it. The first is on the stove. Pour the soup into a pot and warm over low heat. Stir it often to avoid sticking. The second method is the microwave. Use a microwave-safe bowl. Heat in short bursts, stirring in between. This helps it heat evenly. For best taste, consume your soup within four days if refrigerated. If frozen, aim to eat it within three months for the best flavor and texture. Enjoy every comforting bite! How long does loaded baked potato soup last in the fridge? Loaded baked potato soup lasts about 3 to 5 days in the fridge. Store it in an airtight container to keep it fresh. Always check for any signs of spoilage before eating. Can I make this soup ahead of time? Yes, you can make this soup ahead of time. It actually tastes even better the next day! Just let it cool, then store it in the fridge. Reheat gently on the stove when you are ready to enjoy it. Why is my soup too thick or too thin? If your soup is too thick, add some broth or water to thin it out. Stir well and heat it through. If it’s too thin, let it simmer longer to thicken. You can also mash in more potatoes for extra body. How do I make my soup creamier? To make your soup creamier, add more heavy cream or cheese. You can also blend a portion of the soup for a silkier texture. This helps create a rich, smooth feel in every spoonful. Caloric details per serving Each serving of loaded baked potato soup has about 350 calories. This can vary based on the specific ingredients you use. Check the labels for accurate counts. Ingredient substitutions for dietary restrictions If you want a lighter soup, use low-fat milk instead of cream. For a vegan option, try coconut milk or almond milk. You can also skip the cheese and use nutritional yeast for a cheesy flavor without dairy. In this post, we covered how to make loaded baked potato soup. We started with the essential ingredients, then moved through preparation steps and final touches. I shared tips to enhance flavor and offered serving suggestions. Variations showed how to adapt the recipe to your taste and needs. Finally, we discussed storage and answered common questions. Now, you can enjoy a warm bowl of soup made just for you. This dish is fun to customize and perfect for any time.

Loaded Baked Potato Soup Comforting and Creamy Recipe

There’s nothing like a warm bowl of Loaded Baked Potato Soup to chase away the chill. This creamy recipe combines

To make your Teriyaki Salmon Bowls, gather these fresh and tasty ingredients: - 2 salmon fillets (approximately 6 ounces each) - ¼ cup low sodium soy sauce - 2 tablespoons honey - 1 tablespoon rice vinegar - 1 tablespoon sesame oil - 2 cloves garlic, minced - 1 teaspoon fresh ginger, grated - 1 cup cooked jasmine rice - 1 cup broccoli florets - 1 medium carrot, julienned - ½ ripe avocado, sliced - 2 green onions, finely sliced for garnish - Sesame seeds for garnish Each ingredient plays a vital role. The salmon gives protein and healthy fats. The soy sauce adds that classic umami flavor. Honey balances the saltiness with sweetness. Rice vinegar brings a nice tang. Sesame oil adds depth and fragrance. Garlic and ginger enhance the taste with bold notes. The veggies add color and crunch. The avocado provides creaminess. Finally, the green onions and sesame seeds give a beautiful finish. You can find the Full Recipe linked above. This meal is easy and quick to prep. It’s also packed with flavor and nutrients. Enjoy creating your delicious Teriyaki Salmon Bowls! Start by mixing the marinade. In a small bowl, add low sodium soy sauce, honey, rice vinegar, sesame oil, minced garlic, and fresh ginger. Use a whisk to blend until the honey mixes well. This marinade gives the salmon its rich taste. Take your salmon fillets and place them in a shallow dish. Pour the marinade over the fillets. Make sure they are well coated. Cover the dish with plastic wrap and put it in the fridge. Let them marinate for at least 30 minutes or up to 2 hours. This step makes the salmon flavorful. Fill a pot with water and bring it to a boil. Add in broccoli florets and julienned carrots once the water is boiling. Steam them for 3-5 minutes. The vegetables should be bright and tender but still have some crunch. Drain and set them aside. Preheat a non-stick skillet on medium-high heat. Carefully take the salmon from the marinade and place it skin-side down in the pan. Cook the salmon for about 4-5 minutes. When it’s time, gently flip the fillets. Pour the marinade you set aside into the skillet. Cook for another 3-4 minutes, until the salmon is fully done and the sauce thickens. For serving, put a scoop of jasmine rice at the bottom of each bowl. Top with the steamed broccoli and carrots, and add the sliced avocado. Place a salmon fillet on top. This mix of colors and textures makes the bowl look great. Drizzle any thickened teriyaki sauce from the skillet over the salmon. Finally, add sliced green onions and a sprinkle of sesame seeds for extra flavor and a nice crunch. This garnish makes the dish even more special. The marinade is key to a great teriyaki salmon bowl. Start with low sodium soy sauce. It gives flavor without being too salty. Honey adds a touch of sweetness. Rice vinegar gives a mild tang. Add minced garlic and fresh ginger for a hit of flavor. Mix all these in a bowl until smooth. Let the salmon soak in this mix. I suggest marinating for at least 30 minutes. If you have time, go for two hours to deepen the taste. Cooking salmon can be tricky, but it’s easy with a few tips. First, preheat your non-stick skillet. A hot skillet keeps the salmon from sticking. Place the fillets skin-side down first. This helps make the skin crispy. Cook for about 4-5 minutes. Then flip the salmon gently. Pour the leftover marinade into the pan. This will add more flavor and help the sauce thicken. Cook for 3-4 more minutes. The salmon should be flaky and moist when done. How you serve your teriyaki salmon bowl matters. Start with a scoop of jasmine rice. This rice is slightly sweet and fluffy. Next, add steamed broccoli and carrots for a pop of color. Place the salmon fillet on top. Drizzle the thickened sauce over the salmon. Garnish with sliced green onions and sesame seeds. These add crunch and a fresh taste. For a nice touch, serve with a lime wedge. The lime juice brightens the flavors. Enjoy your beautiful, tasty meal! {{image_4}} You can easily swap out some ingredients. If you prefer a different protein, try chicken or tofu. Both work well with the teriyaki sauce. You can also use quinoa instead of jasmine rice for a nutty flavor. If you like a stronger taste, consider using tamari sauce. It’s gluten-free and adds a rich depth. Feel free to mix in your favorite veggies. Bell peppers, snap peas, or even spinach add great color and taste. You can roast or stir-fry the vegetables for extra flavor. Just make sure you cut them into similar sizes for even cooking. This helps create a balanced bowl that’s both healthy and tasty. To add some heat, include chili paste or red pepper flakes in the marinade. You can also top your bowl with sliced jalapeños or sriracha for a kick. If you want a milder spice, try adding a dash of smoked paprika. This gives you flavor without too much heat. Experimenting with spice can turn a simple dish into a bold meal. To keep your Teriyaki Salmon Bowls fresh, cool them to room temperature. Place them in an airtight container. Store them in the fridge for up to three days. If you want to keep them longer, freezing is a good option. To reheat, use a microwave or stovetop. If using a microwave, place the bowl in for 1-2 minutes. Check to make sure it heats evenly. For stovetop, heat in a skillet over low heat. Add a splash of water to keep it moist. You can freeze the salmon and veggies separately. Wrap the salmon in plastic wrap and then foil. This prevents freezer burn. For the veggies, store them in a sealed bag. They will last for up to three months. When ready to eat, thaw in the fridge overnight before reheating. For the full recipe, check out the steps above! The best way to cook salmon is in a hot skillet. Start with skin-side down. Cook for about 4-5 minutes. Then, flip it gently. Pour the reserved marinade into the skillet and cook for another 3-4 minutes. This method keeps the salmon moist and tasty. Yes, you can use other fish. Try trout, tuna, or even tilapia. Each fish will bring its own flavor and texture. Just adjust the cooking time based on the thickness of the fish. You should marinate the salmon for at least 30 minutes. If you want a stronger flavor, go up to 2 hours. Be careful not to marinate too long, as the soy sauce can make the fish too salty. Great side dishes include: - Steamed green beans - Cucumber salad - Pickled vegetables - Miso soup These pair well with the flavors of teriyaki. You can find the Full Recipe for Teriyaki Salmon Bowls right here in this article. Follow the ingredients and steps to create a delicious meal. This blog post covered how to create tasty Teriyaki Salmon Bowls. We discussed key ingredients, step-by-step cooking tips, and various ways to personalize your dish. Remember, you can swap ingredients and adjust cooking times for your taste. Don't forget to try new veggies or make it spicy! Enjoying this dish is easy, and leftovers store well. Dive into your kitchen and create a bowl that makes you smile.

Teriyaki Salmon Bowls Flavorful and Easy Meal Prep

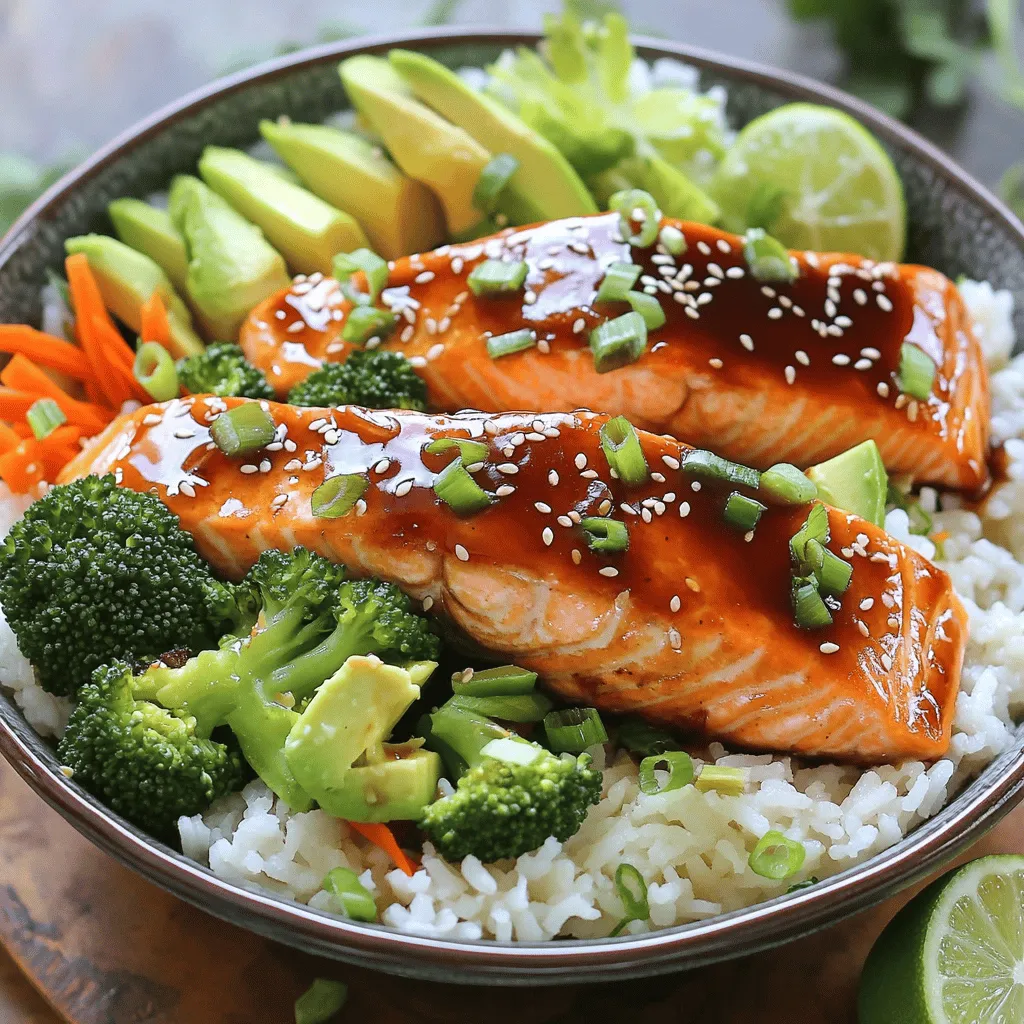
If you want a meal that’s tasty and quick, I’ve got just the thing—Teriyaki Salmon Bowls! This dish combines tender

To make the best lemon blueberry muffins, you need a few basic ingredients that come together for a soft, flavorful treat. Here’s what you should gather: - 1 cup all-purpose flour - 1 cup whole wheat flour - 1/2 cup granulated sugar - 1/4 cup packed brown sugar - 2 teaspoons baking powder - 1/2 teaspoon baking soda - 1/2 teaspoon salt - 1/2 cup unsalted butter, melted - 1/2 cup buttermilk - 2 large eggs - Zest of 1 large lemon - 1/4 cup fresh lemon juice - 1 1/2 cups fresh blueberries (or frozen, thawed and drained) - 1 teaspoon vanilla extract Each ingredient plays a key role. The all-purpose flour gives structure, while the whole wheat flour adds a nutty flavor. The sugars provide sweetness and help with browning. Baking powder and baking soda help the muffins rise, creating that soft texture we crave. The melted butter keeps the muffins moist, and buttermilk adds a slight tang. The eggs bind everything together, creating a light texture. Lemon zest and juice infuse a bright, fresh flavor that pairs perfectly with blueberries. Blueberries bring bursts of sweetness, making every bite delightful. For the full recipe, you can check out the detailed instructions to create these muffins from scratch. Enjoy the process of baking and the delicious results! Start by preheating your oven to 375°F (190°C). This temperature is perfect for baking. While the oven warms, prepare your muffin tin. You can either line it with paper liners or grease each cup with a bit of butter. This step helps prevent the muffins from sticking. In a large bowl, mix the dry ingredients. Combine 1 cup of all-purpose flour, 1 cup of whole wheat flour, 1/2 cup of granulated sugar, 1/4 cup of brown sugar, 2 teaspoons of baking powder, 1/2 teaspoon of baking soda, and 1/2 teaspoon of salt. Whisk them together until no lumps remain. This ensures even rising. In a separate bowl, whisk the wet ingredients. Use 1/2 cup of melted butter, 1/2 cup of buttermilk, and 2 large eggs. Add in the zest and juice of 1 lemon and 1 teaspoon of vanilla extract. Mix until smooth. Make sure the eggs blend in well for a uniform texture. Now, gently pour the wet mixture into the dry ingredients. Use a spatula to stir them together. Mix just until combined. It’s okay if some lumps remain. Overmixing will make the muffins tough, so keep it light and fluffy. Next, fold in the blueberries. Gently add 1 1/2 cups of fresh blueberries. If you use frozen berries, make sure they are thawed and drained. Be careful when folding to keep the blueberries whole. This way, they burst with flavor in every bite. Spoon the batter into the prepared muffin tin, filling each cup about three-quarters full. Bake for 18-20 minutes. Check if they are done by inserting a toothpick into the center. It should come out clean or with a few crumbs. Let the muffins cool in the tin for about 5 minutes. Then transfer them to a wire rack for complete cooling. For the full recipe, check the details above. Enjoy your baking! To get soft and fluffy muffins, start with room-temperature ingredients. Cold butter or eggs can make your batter dense. Let your eggs and butter sit out for a bit before mixing. Next, avoid overmixing. When you combine wet and dry ingredients, stir gently. A few lumps are fine. Too much mixing can create tough muffins. You can boost the taste of your muffins by adding spices or extracts. A pinch of cinnamon gives warmth. A splash of almond extract adds a lovely twist. Play around with flavors to find your favorite mix. Serve your muffins warm for the best taste. Try adding a sprinkle of powdered sugar or a drizzle of lemon glaze on top. For gatherings, arrange them on a pretty plate. Scatter fresh blueberries around for a colorful touch. This makes them look as good as they taste! You can find the Full Recipe for these delightful muffins to enjoy and share! {{image_4}} To make gluten-free lemon blueberry muffins, you can swap all-purpose flour with gluten-free flour blends. Look for blends that contain xanthan gum. This helps give the muffins structure. You may also try almond flour or coconut flour. Be sure to adjust the liquid in your recipe. Gluten-free flours absorb moisture differently. Start with a little less liquid and add more if needed. If you want vegan lemon blueberry muffins, replace eggs with flax eggs. To make one flax egg, mix one tablespoon of ground flaxseed with three tablespoons of water. Let it sit for a few minutes until it thickens. For dairy, use almond milk or oat milk instead of buttermilk. You can also use coconut oil instead of butter for a rich flavor. You can swap blueberries for other berries if you like. Raspberries, strawberries, or blackberries work well. Each berry brings a unique taste. If you use strawberries, chop them into small pieces. This helps them mix better in the batter. You can even mix different berries for a fun flavor blend. To keep your lemon blueberry muffins fresh at room temperature, place them in an airtight container. This helps prevent them from drying out. You can also wrap them in plastic wrap or foil. Store them for up to three days. If you live in a humid area, using a container can help keep moisture away. For long-term storage, freezing is the best option. Allow the muffins to cool completely first. Then, wrap each muffin in plastic wrap. Place them in a freezer-safe bag or container. This method keeps them fresh for up to three months. When you're ready to enjoy them, take out the muffins, and let them thaw in the fridge overnight. You can also thaw them at room temperature for a few hours. To enjoy your muffins warm, preheat your oven to 350°F (175°C). Place the muffins on a baking sheet and cover them with foil to keep them moist. Heat for about 10-15 minutes. You can also use a microwave for a quick option. Heat each muffin for about 15-20 seconds. This way, they stay soft and tasty. Enjoy your lemon blueberry muffins just like they were fresh out of the oven! You can make these muffins healthier by reducing the sugar. Try using half the amount of granulated sugar. You can also swap out some butter for applesauce. This change cuts fat while keeping the muffins moist. Additionally, you can use whole wheat flour for all-purpose flour to add fiber and nutrients. Yes, you can use frozen blueberries! Just make sure to thaw and drain them first. This helps prevent excess liquid in your batter. You might want to toss the blueberries in a bit of flour before adding them. This trick helps them stay suspended in the batter and not sink. If your muffins sink, it might be due to overmixing. This can create too much air in the batter. Ensure you mix just until combined. Another reason could be underbaking. If they are not cooked through, they can collapse. Always test for doneness with a toothpick. To check if your muffins are done, insert a toothpick into the center. If it comes out clean or with a few crumbs, they are ready. If the toothpick is wet with batter, bake them a few more minutes. Keep an eye on the muffins for a golden-brown top, too. Making lemon blueberry muffins is simple and fun. We covered the key ingredients and step-by-step instructions. You learned about mixing techniques and baking tips to get the right texture. We discussed different variations to suit your needs, as well as storage methods to keep your muffins fresh. Remember, small changes can lead to delicious results. Enjoy your baking adventure and share these tasty muffins with others!

Lemon Blueberry Muffins Irresistibly Soft and Flavorful

If you crave a treat that’s both soft and bursting with flavor, you’re in for a delight! These Lemon Blueberry

- 1 tablespoon olive oil - 1 small onion, finely diced - 2 cloves garlic, minced - 1 bell pepper (any color), chopped into small pieces - 1 medium zucchini, diced into bite-sized cubes - 1 medium carrot, diced into small pieces - 1 can (15 oz) black beans, drained and rinsed thoroughly - 1 can (15 oz) kidney beans, drained and rinsed thoroughly - 1 can (15 oz) diced tomatoes, including all the juice - 1 cup corn kernels (fresh or frozen) - 2 tablespoons chili powder - 1 teaspoon ground cumin - 1 teaspoon smoked paprika - ½ teaspoon cayenne pepper (optional, for an extra kick) - Salt and black pepper to taste To make a great vegetarian chili, you need some key ingredients. First, olive oil is essential for sautéing. It adds flavor and helps cook the veggies. Next, onion and garlic give the dish a nice base. Their smell makes your kitchen feel warm and inviting. You can add various vegetables like bell pepper, zucchini, and carrot. They bring color and texture. Beans and tomatoes are the heart of the chili. Black beans and kidney beans add protein. Diced tomatoes provide a rich sauce. Finally, spices and seasonings are a must. Chili powder, cumin, and smoked paprika create a warm, spicy flavor. If you like it hot, add cayenne pepper. Don't forget salt and black pepper to taste. - Fresh cilantro - Slices of avocado - Lime wedges Toppings can elevate your chili. Fresh cilantro adds a burst of flavor. It also makes the dish look bright and fresh. Slices of avocado give a creamy touch. They balance the spices well. Lime wedges add a zesty kick. Squeeze some on top for extra taste. For the full recipe, check out the details above. Enjoy making your vegetarian chili! 1. Sautéing the aromatics Start by heating the olive oil in a large pot over medium heat. When the oil shimmers, add the finely diced onion. Sauté for about 5 minutes until the onion is soft and see-through. Next, stir in the minced garlic and cook for one more minute. This step adds a lovely base flavor to your chili. 2. Adding vegetables Now, add the chopped bell pepper, diced zucchini, and carrot to the pot. Sauté these veggies for about 5 to 7 minutes. You want them to soften and release their flavors. This mix gives your chili a colorful and tasty boost. 3. Mixing in beans and spices It’s time to add in the star ingredients! Stir in the black beans, kidney beans, diced tomatoes (with juice), and corn kernels. Then, sprinkle in the chili powder, ground cumin, smoked paprika, cayenne pepper (if you like it spicy), and salt and black pepper to taste. Mix everything well so all the flavors combine. 1. Cooking time and heat adjustments Bring the mixture to a gentle simmer. Once it bubbles, reduce the heat to low. Cover the pot with a lid and let it cook for about 20 to 25 minutes. Stir occasionally. This step helps blend the flavors of your chili and makes it rich. 2. Tips for flavor enhancement After cooking, taste your chili. You can adjust the seasoning if needed. If you want it thicker, uncover the pot and cook for an extra 5 to 10 minutes while stirring. This gives your chili a hearty texture. 1. Garnishing the dish Serve your hot chili in bowls. Top it with fresh chopped cilantro and slices of avocado for creaminess. A squeeze of lime juice adds a zesty finish that brightens the dish. 2. Best accompaniments This chili goes well with warm cornbread, tortilla chips, or a simple green salad. Each bite can be a new experience with these sides! For the full recipe, check out the Fiery Fiesta Vegetarian Chili details above. You can make this chili fit your taste. For a vegan version, just skip the avocado. Use veggie broth instead of water for more flavor. If you love heat, add more cayenne or a chopped jalapeño. You can also play with spices. Try adding smoked chipotle for a smoky twist or some fresh herbs like oregano for extra flavor. You can cook your chili on the stovetop or in a slow cooker. For the stovetop, follow the steps in the Full Recipe. It takes about 45 minutes. If you use a slow cooker, just add all the ingredients and cook on low for 6-8 hours. This will give the flavors time to blend deeply. If you own an Instant Pot, you can make this chili in just 20 minutes. Use the sauté function first for the onions and garlic. Then, add all the other ingredients and set it to pressure cook for 10 minutes. Want to boost nutrition? Add some chopped kale or spinach. These greens blend well and add vitamins. You could also stir in some quinoa for extra protein and fiber. Instead of regular olive oil, try using avocado oil. It has a higher smoke point and adds healthy fats. Swap out regular beans for lentils for a different texture. Just remember, lentils cook faster than beans, so adjust your cooking time. These tips will help make your vegetarian chili even better! {{image_4}} You can make vegetarian chili in many ways. One popular style adds a smoky flavor. You can get this by using smoked paprika or chipotle peppers. These ingredients bring warmth and depth to your dish. If you want something different, try a beanless chili. Instead of beans, use lentils or quinoa. These ingredients provide protein and texture. They also soak up the spices well. Using fresh, seasonal veggies can make your chili taste better. In spring, add asparagus or peas. During summer, use tomatoes and bell peppers. Fall brings squash and sweet potatoes, while winter is great for root veggies like carrots and turnips. You can also use leftovers in your chili. Got extra veggies from dinner? Toss them in! This not only reduces waste but also adds flavor. Adding spices from different cultures can elevate your chili. Try using cumin, coriander, or even curry powder for a twist. Each spice brings a unique taste, making your chili more exciting. You might also enjoy fusion recipes. Think about blending chili with Asian flavors, like ginger and soy sauce. These combinations can surprise your taste buds in a delightful way. For a complete experience, check out the Full Recipe for delicious vegetarian chili ideas! To keep your vegetarian chili fresh, start by cooling it down. Once cool, transfer it to an airtight container. If you plan to eat it within three to four days, refrigerate it. For longer storage, use your freezer. Portion the chili into freezer-safe containers. This way, you can thaw just what you need later. When you're ready to enjoy leftovers, there are a few great methods. The best way is to heat it on the stove. Pour the chili into a pot and warm it over medium heat. Stir occasionally to prevent sticking. This keeps the flavor rich. You can also use a microwave for quick reheating. Just place it in a microwave-safe bowl, cover it, and heat for one to two minutes. Stir halfway through to ensure even heating. Chili lasts in the fridge for about three to four days. In the freezer, it can stay good for up to six months. Always check for signs of spoilage before eating. If it smells sour or has an off color, it’s best to toss it. If you see mold, throw it away too. Storing chili properly helps you enjoy this hearty dish longer! Yes, vegetarian chili is great for meal prep. It stores well in the fridge and freezer. You can make a big batch and keep it for later. This saves time on busy days. The flavors also get better after sitting. You can reheat it easily in the microwave or on the stove. Plus, it’s healthy and filling, making it a smart choice for any meal plan. Yes, you can add meat if you want. Ground beef or turkey works well. Just cook the meat first before adding the other ingredients. Make sure to drain any fat. This keeps the chili rich and hearty. You can also use cooked chicken or sausage. Adjust the spices to match the meat's flavor. If you want to skip the beans, there are good alternatives. You can use lentils, which add protein and fiber. Chopped mushrooms also work well, giving a meaty texture. You can try quinoa for a grainy feel. Other options include diced tofu or tempeh for more protein. These substitutes keep your chili filling and tasty. The spice level is flexible. The chili powder gives it warmth. If you want more heat, add cayenne pepper. You can also use jalapeños for a fresh kick. Taste as you cook and adjust the spices. For milder chili, just use less chili powder. It’s all about what you like! In this post, I covered how to make delicious vegetarian chili. We explored key ingredients, cooking steps, and tips for customization. You learned about different styles and how to store your chili safely. Remember, you can adapt this recipe to suit your taste. Try adding your favorite spices or seasonal veggies. The options are endless! Enjoy experimenting, and don't hesitate to make this chili your own. You'll love the flavors and feel proud of your dish. Happy cooking!

Vegetarian Chili Flavorful and Hearty Recipe Guide

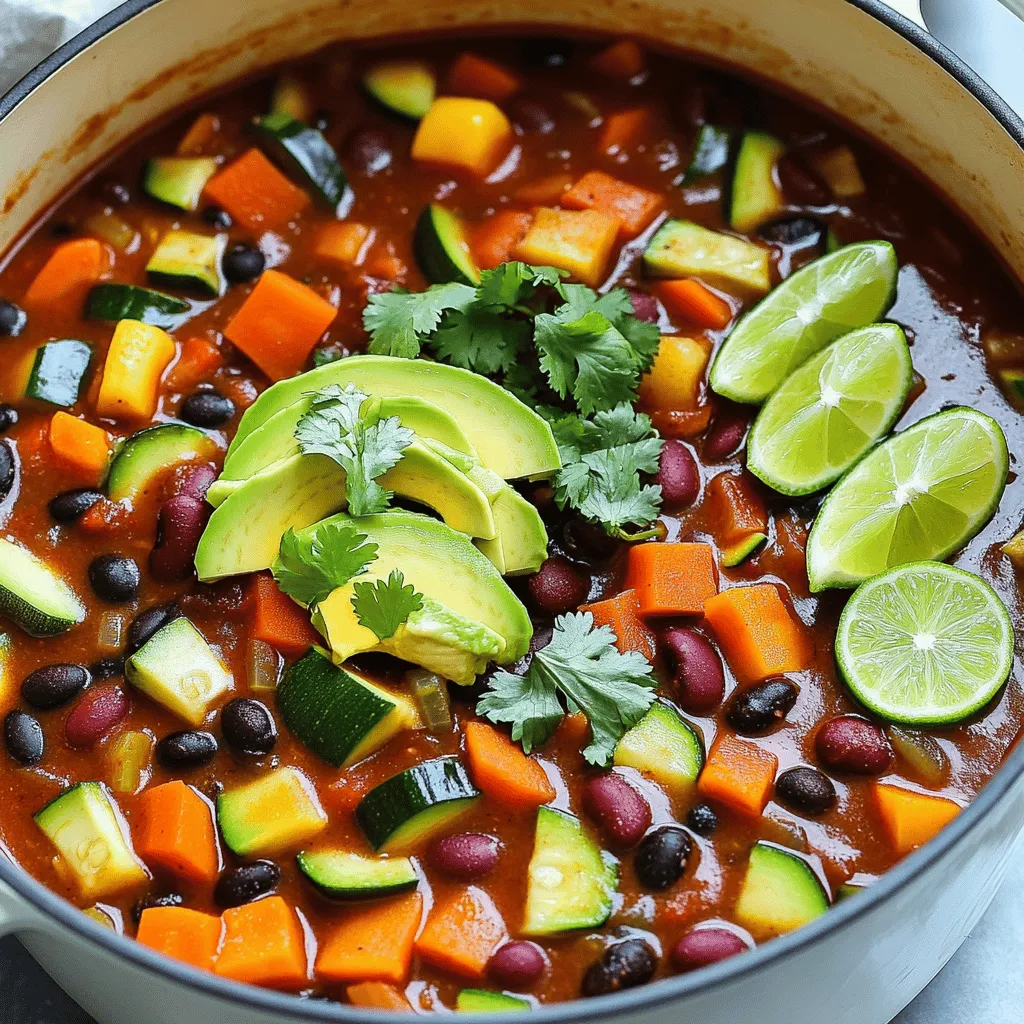
Looking for a hearty meal that’s packed with flavor and easy to make? This Vegetarian Chili recipe is your answer!

For the main dish, you need a few key items: - 1 whole chicken (approximately 4-5 pounds) - 4 cloves garlic, finely minced - 2 lemons (one juiced, one sliced into rounds) - 1/4 cup high-quality olive oil - Salt and freshly ground black pepper to taste These ingredients bring out the bright and tangy flavor in the chicken. The garlic adds depth, and the lemon gives that fresh zing. Fresh herbs make a big difference here. Use: - 2 tablespoons fresh rosemary, finely chopped (or 1 tablespoon dried rosemary) - 1 tablespoon fresh thyme leaves (or 1/2 tablespoon dried thyme) Both herbs add fragrance and flavor. They meld beautifully with the lemon and garlic, enhancing the dish's taste. You can add veggies for a complete meal. I recommend: - 1 medium onion, cut into quarters - 2 cups baby carrots (or a medley of your favorite root vegetables) The onion and carrots roast well. They soak up the chicken juices and become sweet and tender. You can always mix in your favorite vegetables too! For the full recipe, check the details provided above. First, gather all your ingredients. You will need a whole chicken, garlic, lemons, olive oil, herbs, and vegetables. Preheat your oven to 425°F (220°C). This ensures even cooking. In a bowl, mix olive oil, minced garlic, lemon juice, chopped rosemary, thyme, and salt and pepper. This mix will be your marinade. Next, pat the chicken dry with paper towels. This step helps the skin get crispy. Carefully loosen the skin from the breast and thighs. Use your fingers to do this gently. Avoid breaking the skin. Now, take half of your marinade and rub it under the skin. This adds flavor directly to the meat. Rub the rest of the marinade all over the chicken's outside. Stuff the chicken's cavity with onion quarters and lemon slices. This adds extra flavor. Arrange your baby carrots around the chicken in the roasting pan. This makes a complete meal. Tie the chicken legs with kitchen twine. This helps it cook evenly. Tuck the wing tips under the body to keep them from burning. Place the roasting pan in the oven. Roast the chicken for about 1 hour and 15 minutes. The chicken is done when it reaches an internal temperature of 165°F (75°C). The juices should run clear when pierced. Halfway through, baste the chicken with pan juices. This keeps the skin moist and adds flavor. Once fully cooked, remove the chicken from the oven. Let it rest for 10-15 minutes. Resting keeps the juices inside the meat. To carve, start with the legs. Cut through the joints to separate them. Next, carve the breast meat. Slice it into nice pieces. For serving, place the chicken on a large platter. Arrange the roasted carrots around it. You can add lemon slices and fresh herbs for a beautiful touch. This dish is not just tasty; it's also a feast for the eyes. Enjoy your Lemon Garlic Roasted Chicken! You can find the Full Recipe here. To ensure your chicken stays juicy, always start with a dry bird. Pat it down with paper towels before seasoning. This step helps achieve crispy skin. Another key tip is to rub the marinade under the skin. This adds flavor directly to the meat, making every bite delicious. Remember to let the chicken rest after roasting. This keeps the juices inside, making it tender. To boost flavor, consider adding more herbs. Fresh thyme and rosemary brighten up the dish. You can also include whole garlic cloves in the cavity. They roast beautifully and add rich taste. For a zesty kick, try using lime or orange juice instead of lemon. These small tweaks make a big difference in flavor. One mistake is overcooking the chicken. Always check the internal temperature with a meat thermometer. Aim for 165°F (75°C) to ensure safe eating. Another common error is skipping the resting time. Cutting too soon lets juices escape, resulting in dry meat. Lastly, don’t forget to season well. A pinch of salt and pepper can elevate the dish. For the full recipe, check out the earlier section. {{image_4}} You can mix up the herbs in this recipe. Instead of rosemary, try using sage or oregano. These herbs add their unique taste that pairs well with chicken. You can also add paprika or chili flakes for a bit of heat. Experiment with flavors to find what you like best. Each option offers a new twist on the classic dish. If you don't have a whole chicken, you can use chicken thighs or breasts. They will cook faster, so adjust your time. Lemon can be swapped with lime for a different flavor. Olive oil can be replaced with melted butter for a rich taste. Feel free to use any veggies you have on hand, like potatoes or bell peppers. I love one-pan meals for easy clean-up. You can add potatoes or green beans to the pan with the chicken. Toss them in the same marinade for a full meal. The veggies soak up the chicken's juices and flavor. This method makes dinner simple and delicious. For more ideas, check out the Full Recipe for tips on pairing sides. After enjoying your Lemon Garlic Roasted Chicken, store leftovers in an airtight container. Make sure to let the chicken cool to room temperature before sealing it. This helps keep the chicken fresh and tasty. You can store it in the fridge for up to 3 days. If you want to keep it longer, consider freezing the chicken. When ready to eat leftovers, preheat your oven to 350°F (175°C). Place the chicken in an oven-safe dish. Add a splash of chicken broth or water to keep it moist. Cover the dish with foil to prevent drying out. Heat for about 20-25 minutes or until warm. You can also microwave it, but it might not taste as great. Aim for even heating to maintain the chicken's juiciness. To freeze your Lemon Garlic Roasted Chicken, carve it into pieces. Wrap each piece in plastic wrap, then place them in a freezer bag. Remove as much air as possible to avoid freezer burn. Label the bag with the date. You can freeze the chicken for up to 3 months. To thaw, move the chicken to the fridge overnight. This keeps it safe and ready for a tasty meal later. For the complete recipe, visit the [Full Recipe]. The best temperature for roasting chicken is 425°F (220°C). This high heat helps the skin turn golden and crispy while keeping the meat juicy. It ensures even cooking throughout the chicken. You want to cook it until the internal temperature hits 165°F (75°C) for safety. Let the chicken rest for 10-15 minutes before carving. This time allows the juices to settle, making the meat more tender and flavorful. If you cut it too soon, the juices will run out, leaving the chicken dry. Remember, patience pays off! Yes, you can grill Lemon Garlic Roasted Chicken! Grilling adds a nice smoky flavor. Start by marinating the chicken as you would for roasting. Preheat your grill to medium-high heat and cook the chicken on indirect heat. This method allows it to cook evenly without burning. Aim for the same 165°F (75°C) internal temperature for safety. Enjoy the delicious flavors of lemon and garlic with that grilled touch! Lemon Garlic Roasted Chicken is easy and delicious. You learned about the key ingredients and made a plan to prepare, roast, and serve the chicken. I shared tips to keep it juicy and ways to change up flavors. You also found out how to store and reheat any leftovers. Enjoy trying new variations and impress your family with this tasty dish. Happy cooking!

Lemon Garlic Roasted Chicken Simple and Delicious Meal

Looking for a simple and delicious meal? This Lemon Garlic Roasted Chicken recipe is packed with flavor and easy to

To make stuffed avocado with tuna, gather these key ingredients: - 2 ripe avocados, halved and pitted - 1 can (5 oz) tuna in water, thoroughly drained - 1/4 cup plain Greek yogurt - 1 tablespoon Dijon mustard - 1/4 cup celery, finely chopped - 1/4 cup red bell pepper, finely chopped - 1 tablespoon fresh dill, chopped - 1 tablespoon fresh lemon juice - Salt and freshly ground black pepper These ingredients come together to create a creamy and savory filling. The tuna adds protein, while the avocado provides healthy fats. The Greek yogurt brings creaminess without too much fat. The mustard adds a nice tang, which really wakes up the flavors. For a touch of color and flavor, consider these garnishes: - Halved cherry tomatoes - Microgreens These garnishes make your dish look beautiful and add a fresh crunch. They also enhance the taste, making each bite more exciting. You can mix and match your garnishes based on your personal preference. This dish is not just tasty; it's also good for you. Each serving is packed with nutrients. Here is a quick breakdown: - Calories: Approximately 350 - Protein: 22 grams - Fat: 20 grams - Carbohydrates: 15 grams - Fiber: 8 grams This recipe fits well into a balanced diet. It offers healthy fats and protein while keeping the carbs in check. You can enjoy this dish guilt-free, knowing you are fueling your body right. For the full recipe, check out the detailed instructions! To start, gather your ingredients. In a medium bowl, mix the drained tuna with Greek yogurt and Dijon mustard. Stir until the mixture feels smooth. This adds creaminess and a tangy taste. Next, chop the celery, red bell pepper, and dill. Add them to the bowl along with lemon juice. Season with salt and black pepper to taste. Mix everything well. You want a creamy and flavorful filling that tastes fresh. Now, take your ripe avocados. Cut each one in half and remove the pit. Use a spoon to scoop out a bit of the flesh. This creates more room for the filling. Set that flesh aside; you can use it later. Next, fill each avocado half with the tuna mixture. Press it down gently to pack it in. You want them to look full and inviting. For a colorful touch, add halved cherry tomatoes and microgreens on top. This makes them pop! Serve your stuffed avocados right away. Pair them with lemon wedges for a zesty kick. These avocados make a great lunch or light dinner. You can also serve them at parties as a healthy appetizer. They look beautiful on a plate and taste even better. Enjoy your tasty creation! For the complete recipe, check out the Full Recipe. To pick the best avocados, look for ones that feel soft but not mushy. Gently squeeze the avocado in your hand. If it gives slightly, it is ripe. Check for dark green or black skin, which usually means it’s ready to eat. Avoid any avocados with large dark spots or dents. These signs often mean the inside is not good. If you find hard avocados, you can ripen them at room temperature. After they soften, store them in the fridge to keep them fresh longer. You can prepare the tuna filling a day in advance. Mix the tuna, Greek yogurt, mustard, and veggies, then store in an airtight container. Keep the mixture in the fridge until you are ready to use it. When you are ready to eat, simply stuff the avocados and enjoy. If you want to cut the avocados ahead of time, sprinkle lemon juice on the flesh. This prevents browning and keeps them looking fresh. Spices can take your stuffed avocado to the next level. Try adding a pinch of cayenne pepper for heat. You could also mix in some paprika for a smoky flavor. If you love herbs, fresh cilantro or parsley can brighten the dish. Don’t forget about salt and pepper; they help the other flavors shine. Experiment with different spices to find your perfect mix. For a twist, add a splash of hot sauce to the filling for extra zing. For the full recipe, check out the section above! {{image_4}} You can swap tuna for other proteins. Try cooked chicken, shrimp, or crab. These options add new flavors and textures. If you use chicken, shred it for a nice bite. For shrimp, chop it into small pieces. Crab meat brings a sweet taste that pairs well with avocado. Each choice adds a unique twist to your dish. To make this dish vegetarian, use chickpeas or black beans. Simply mash them up and mix with yogurt and spices. For a vegan option, replace yogurt with avocado or a plant-based mayo. This keeps the creaminess without dairy. You can also add diced cucumbers or corn for extra texture and flavor. Change the flavor by adding spices or herbs. For a spicy kick, mix in some diced jalapeños or a splash of hot sauce. If you prefer Mediterranean flavors, use olives, feta cheese, or sun-dried tomatoes. You can also add oregano or basil for a fresh touch. These changes make each dish unique and exciting. Explore the possibilities and find your favorite! For the complete recipe, check out the [Full Recipe]. To keep your stuffed avocados fresh, store them in an airtight container. This helps prevent browning. You can place a layer of plastic wrap over them for extra protection. Keep the container in the fridge. This method helps preserve flavor and texture for later enjoyment. Stuffed avocados are best eaten fresh, but they can last up to two days in the fridge. After that, the avocado may start to brown and lose its appeal. If you notice any off smell or texture, it’s best to discard them. Always trust your senses! You can freeze the tuna filling if you want to save it. Place the filling in a freezer-safe container or bag. Make sure to remove as much air as possible. The filling can last up to three months in the freezer. When ready to use, thaw it overnight in the fridge. Always check the texture and smell before using. For the best taste, avoid freezing the avocado itself, as it doesn’t hold up well. For the full recipe, refer to the earlier section. Yes, you can use canned tuna in oil. It adds more flavor and richness. Just remember to drain it well before mixing. The oil might make the filling a bit greasier, so keep that in mind. If you prefer a lighter dish, use tuna in water. It keeps the taste fresh and clean. You have many options! You can add: - Chopped green onions for a mild onion taste - Sliced olives for a salty kick - Avocado flesh for extra creaminess - Capers for a tangy burst - Hard-boiled eggs for added protein Feel free to mix and match based on your taste. Each addition can make the dish more interesting. To make this stuffed avocado low-carb, skip the Greek yogurt. Instead, use mashed avocado as a base. This keeps the creaminess without adding carbs. You can also reduce or skip the red bell pepper and celery. Focus on high-protein ingredients, like tuna and spices, to keep it filling. Enjoy the fresh taste without the carbs! For the full recipe, check out the details above! Stuffed avocados with tuna are easy and tasty. We discussed key ingredients, flavors, and nutritional facts. You learned how to prepare, assemble, and serve them. Choosing ripe avocados and making them ahead saves time. I shared many variations for different tastes, including vegetarian options. It's important to store leftovers correctly. With these tips and tricks, you can enjoy this dish often. Try it out and make it your own!

Stuffed Avocado with Tuna Flavorful Healthy Dish

Looking for a quick, tasty, and healthy meal? Stuffed avocado with tuna is the perfect choice! This dish is packed

Older posts
Newer posts
← Previous Page1 … Page52 Page53 Page54 … Page86 Next →

dsad

© 2026 yumymoments • Built with GeneratePress

Our Policies

  • Copyright Policy
  • Cookie Policy
  • GDPR Policy
  • Privacy Policy
  • Disclaimer
  • Terms Of Use

More Information

  • Home
  • About
  • Contact
  • Appetizers
  • Dessert
  • Dinner
  • Drinks
©2026, yumymoments About Back To Top