Skip to content
DisclaimerTerms Of UseGDPR PolicyCookie Policy

yumymoments

  • Home
  • Drinks
  • Appetizers
  • Dinner
  • Dessert
  • About
  • Contact
  • Privacy Policy
DisclaimerTerms Of UseGDPR PolicyCookie Policy

NO-ING-IMG

- 2 medium sweet potatoes, peeled and diced into 1-inch cubes - 1 can (15 oz) black beans, rinsed and drained thoroughly - 8 small corn tortillas The main ingredients create a tasty base. Sweet potatoes provide natural sweetness. They are also high in vitamins. Black beans add protein and a creamy texture. Corn tortillas hold everything together perfectly. - 1 teaspoon ground cumin - 1 teaspoon smoked paprika - ½ teaspoon chili powder These spices bring flavor to the dish. Ground cumin gives an earthy taste. Smoked paprika adds a hint of smokiness. Chili powder offers warmth and depth to each bite. - 1 ripe avocado, sliced into wedges - ¼ cup fresh cilantro, roughly chopped - Diced red onion Toppings enhance the tacos' flavor and look. Creamy avocado adds richness. Fresh cilantro brings brightness. Diced red onion offers a nice crunch. For more zest, try adding some lime juice. For the complete recipe, visit the [Full Recipe]. 1. Preheat the Oven: Start by setting your oven to 425°F (220°C). This heat is perfect for roasting sweet potatoes. 2. Toss the Sweet Potatoes with Spices: In a large bowl, mix diced sweet potatoes with 1 tablespoon of olive oil. Add 1 teaspoon ground cumin, 1 teaspoon smoked paprika, ½ teaspoon chili powder, and salt and pepper to taste. Mix until the sweet potatoes are well coated. 3. Roast the Sweet Potatoes: Spread the seasoned sweet potatoes on a baking sheet. Roast them in the oven for 25-30 minutes. Stir halfway through to ensure even cooking. They should be tender and slightly golden when done. 1. Heat the Black Beans: While the sweet potatoes roast, pour 1 can of rinsed black beans into a pot. Heat them over medium heat for about 5 minutes. Stir occasionally and season with salt and pepper. 2. Warm the Corn Tortillas: In a skillet, warm the 8 corn tortillas over medium heat. Cook each side for about 30 seconds. This makes them soft and pliable. Keep them warm in a towel. 1. Layering the Ingredients: Take a warm tortilla and spoon some black beans onto it. Then add a generous scoop of roasted sweet potatoes on top. 2. Adding Fresh Toppings: Top your tacos with avocado slices and fresh cilantro. You can also add diced red onion, feta cheese, or hot sauce if you like. 3. Finishing with Lime: Just before eating, squeeze fresh lime juice over the tacos. This brightens the flavors and adds a zesty kick. For the complete recipe, check out the [Full Recipe]. Enjoy creating these tasty tacos! To ensure even roasting of sweet potatoes, cut them into uniform 1-inch cubes. This helps them cook at the same rate. Toss them in olive oil and spices well. Spread them out on a baking sheet without crowding. When warming tortillas, use a dry skillet over medium heat. Cook each tortilla for about 30 seconds. Flip and warm the other side. Keep them stacked in a clean kitchen towel to stay warm. For visual appeal, stack the tacos neatly on a colorful platter. Arrange lime wedges around them. This adds a nice pop of color. You can also garnish with fresh cilantro sprigs for a lively touch. For spice adjustments, feel free to add more chili powder or a pinch of cayenne for heat. If you want a richer flavor, try adding a dash of garlic powder. You can also incorporate additional ingredients, like diced red onion or crumbled feta cheese. These toppings add texture and flavor. For a twist, drizzle your favorite hot sauce over the top for an extra kick. For the full recipe, check out the Sweet Potato & Black Bean Tacos. {{image_4}} You can switch out black beans for pinto beans. Pinto beans add a creamy texture and taste. You can also try using roasted corn or zucchini instead of sweet potatoes. These swaps can give your tacos a new twist. These tacos are already vegan and gluten-free! You can easily add protein too. Grilled chicken or tofu works well. Just make sure to season them to match the taco flavors. Try adding Southwest-inspired toppings like corn salsa or guacamole. They add a burst of flavor. You can also use different salsas or sauces. A spicy chipotle sauce can give your tacos a nice kick. For the full recipe, check out the steps provided earlier. To store leftover sweet potato and black bean tacos, follow these steps: - Place tacos in an airtight container. - Separate layers with parchment paper to avoid sticking. - Cool the tacos to room temperature before sealing. This keeps them fresh and tasty! Reheat the sweet potatoes and black beans as follows: - Use a microwave for quick reheating. - Place sweet potatoes and beans in a microwave-safe dish. - Heat in short bursts of 30 seconds until warm. To keep tortillas fresh: - Wrap them in a damp paper towel. - Microwave for 15-20 seconds until warm. This method keeps your tacos soft and delicious! Leftover tacos can last in the fridge for about 3-5 days. For freezing options: - Store sweet potatoes and black beans in separate freezer bags. - They can last up to 3 months in the freezer. Just remember, fresh ingredients taste best! For the full recipe, check out [Full Recipe]. Sweet potatoes are packed with nutrients. They are high in fiber, which aids digestion. They also contain vitamins A and C. These vitamins help keep your immune system strong. Sweet potatoes are low in fat and calories. They have antioxidants that fight free radicals in your body. Their natural sweetness makes them a healthy choice for meals. Including them in your diet can support overall health. Yes, you can prepare these tacos ahead of time. Cook the sweet potatoes and black beans in advance. Store them in separate containers in the fridge. You can warm them up when you're ready to eat. Corn tortillas can be kept in a sealed bag. Heat them just before serving for the best taste. This meal prep saves time on busy days. Several sides complement these tacos perfectly. A fresh salad with lime dressing adds crunch. You can also serve corn on the cob for sweetness. Guacamole or salsa brings extra flavor. A side of rice or quinoa can make it a full meal. These sides enhance the overall dining experience. Sweet Potato and Black Bean Tacos are tasty and easy to make. You learned about the main ingredients, spices, and optional toppings. I gave a simple step-by-step guide to prepare, cook, and assemble your tacos. Tips help with cooking and presentation, while variations offer fun twists. Storage info ensures your leftovers stay fresh. These tacos are not just healthy; they're flexible, too. Enjoy creating your own flavor combinations!

Sweet Potato and Black Bean Tacos Flavorful Delight

Are you ready to take taco night to the next level? Sweet Potato and Black Bean Tacos are a vibrant,

- Ripe avocados - Unsweetened cocoa powder - Maple syrup or honey Chocolate avocado mousse starts with ripe avocados. These add creaminess and healthy fats. Choose avocados that yield slightly to pressure. They should feel soft but not mushy. Next, use unsweetened cocoa powder. This gives the mousse its rich chocolate flavor. You can find cocoa powder in most grocery stores. Lastly, sweeten with maple syrup or honey to taste. This balances the cocoa's bitterness. - Fresh berries - Mint leaves For a pop of color and flavor, add fresh berries. Raspberries and strawberries work best. They create a lovely contrast with the dark mousse. Mint leaves are another great option. They add a refreshing touch to each bite. Feel free to mix and match your garnishes for a fun look! - Almond milk vs. whole milk - Sweetener alternatives For a creamier texture, use whole milk. Almond milk is lighter and a good dairy-free choice. You can also try other milk alternatives like oat or soy milk. When it comes to sweeteners, you can use agave or stevia if you prefer. Adjust the amount to your taste. These alternatives let you customize the mousse to fit your diet. This mousse is simple yet delightful. Check out the Full Recipe for all the details! Start by slicing the avocados in half. Use a sharp knife for safety. Carefully remove the pit from each half. I like to use a spoon for this task. Next, scoop the creamy flesh into your blender. Make sure to get all of it! The ripe avocado gives the mousse its rich texture. Now, it’s time to add the fun ingredients to the blender. Pour in the unsweetened cocoa powder. Then, add your choice of maple syrup or honey for sweetness. Next, add the almond milk for a smooth blend. Don’t forget the pure vanilla extract and a pinch of sea salt! Blend on high speed until the mixture is velvety smooth. You may need to stop and scrape down the sides. This step ensures everything mixes perfectly. Taste your mousse and adjust the sweetness if you want it sweeter. Once your mousse is smooth, it’s time to serve. Spoon the chocolate avocado mousse into small bowls or elegant glasses. This makes it look fancy! Cover the bowls with plastic wrap. Refrigerate for at least 30 minutes. This chilling time helps the mousse firm up and flavors develop. When you’re ready to eat, add fresh berries and mint leaves on top for color and taste. For the full steps, check the [Full Recipe]. To make your mousse super creamy, blending is key. Use a high-powered blender for the best results. Start by blending on low, then increase to high speed. This helps break down any lumps. If you find your mousse is too thick, add a splash of almond milk. Blend again until it’s smooth and velvety. Sweetness is personal. I suggest starting with half a cup of maple syrup or honey. After blending, taste it. If you want it sweeter, add more syrup or honey. Blend again until it's perfect for your taste buds. Serving your mousse can be as fun as making it. For a classy touch, use clear glasses. This lets the rich color shine. You can also layer the mousse with fresh berries. This adds texture and color. Garnishing is where you can get creative. Fresh berries like raspberries or strawberries work well. A sprig of mint adds a pop of color and a fresh taste. Just place them on top before serving. A common mistake is over-blending. This can make the mousse too airy. Stop blending once it’s smooth and creamy. Remember, you want a rich texture, not a whipped cream. Choosing ripe avocados is crucial. If they're too firm, the mousse will be chunky. If they're overripe, the taste can be off. Look for avocados that yield slightly to gentle pressure. This ensures a perfect blend for your mousse. For the full recipe, check the section above. Enjoy your chocolate avocado mousse! {{image_4}} You can easily change the flavor of your chocolate avocado mousse. Adding espresso gives it a mocha twist. Just mix in one shot of espresso. This boosts the chocolate taste. You can also add spices like cinnamon. A dash of cinnamon brings warmth to the mousse. Just use a pinch to start. You can always add more if you want! If you follow a vegan diet, you can still enjoy this mousse. Use maple syrup instead of honey. Almond milk is a great choice since it adds creaminess. For those who want a sugar-free option, try a sugar substitute. Stevia or erythritol works well. Just make sure to adjust the amount based on your taste. Serving can change the way people enjoy the mousse. You can use different types of containers. Glass jars or small cups look great. For events, making mini portions is fun. Use shot glasses or small bowls. This lets everyone try a taste without feeling too full. For the full recipe, check out the detailed steps above! To keep your chocolate avocado mousse fresh, use airtight containers. Glass jars work well. They help prevent any odors from the fridge. You can also use plastic containers if they seal tightly. Store the mousse in the refrigerator for the best flavor and texture. You can freeze the mousse, but it may change in texture. If you freeze it, put it in a freezer-safe container. Leave some space at the top. The mousse will expand as it freezes. Chocolate avocado mousse lasts about 3 to 5 days in the fridge. Look for color changes or a sour smell. These signs mean it is spoiled. If the mousse looks dry or grainy, it's time to toss it. Trust your senses to know when it is no longer good. If you have leftover mousse, get creative! You can layer it in parfaits with granola and fruit. It also makes a great filling for cakes or pastries. You can use it as a dip for fresh fruit. This way, you can enjoy the mousse in new ways. No, you cannot taste the avocado in the mousse. The rich chocolate flavor hides the avocado well. When blended, avocados give the mousse a creamy texture without a strong taste. This makes it a great choice for chocolate lovers. The cocoa powder and sweetener dominate the flavor profile. So, you enjoy a thick, rich treat without the green taste. Yes, Chocolate Avocado Mousse is healthy. Avocados provide many nutrients. They are full of healthy fats, fiber, and vitamins. These nutrients help your body in many ways. They can lower bad cholesterol and improve heart health. Plus, avocados are great for your skin. Using natural sweeteners like maple syrup makes it even better. You get a dessert that tastes good and is good for you. You can easily make Chocolate Avocado Mousse ahead of time. First, prepare the mousse and place it in serving bowls. Cover them tightly with plastic wrap. This keeps the mousse fresh and prevents oxidation. You can store them in the fridge for up to two days. Just before serving, add your favorite toppings like fresh berries. This will make it look nice and tasty. For the full recipe, check out the instructions above. This blog post covered how to make delicious chocolate avocado mousse. You learned about key ingredients like ripe avocados and cocoa powder, plus optional garnishes like fresh berries. I shared step-by-step instructions for preparing, blending, and serving the mousse. You also discovered tips to perfect the texture and avoid common mistakes. Lastly, we explored variations and storage options. Try this easy recipe for a healthy treat. Enjoy the process and get creative!

Chocolate Avocado Mousse Rich and Creamy Delight

Are you ready to indulge in a sweet treat that’s healthy too? Chocolate Avocado Mousse is a rich and creamy

- 1 pound large shrimp, peeled and deveined - 4 tablespoons unsalted butter, at room temperature - 4 cloves garlic, finely minced - Grated zest of 1 lemon - Freshly squeezed juice of 1 lemon - 1 teaspoon red pepper flakes (adjust to your desired spice level) - Sea salt and freshly cracked black pepper to taste - 2 tablespoons fresh parsley, finely chopped (for garnish) - 1 tablespoon extra virgin olive oil - Thin lemon slices (for garnish) You can swap large shrimp for smaller ones if needed. If you want less fat, use olive oil instead of butter. You can also use garlic powder if you lack fresh garlic. Fresh parsley can be replaced with dried parsley. For a tangy twist, try lime juice instead of lemon juice. This dish serves four. Each serving has about 250 calories. It contains 15 grams of fat and 22 grams of protein. The meal is low in carbs, making it a great option for many diets. The shrimp provide healthy omega-3 fatty acids, while garlic and lemon add vitamins and flavor. Enjoy this dish knowing it’s tasty and nourishing! For the complete cooking process, check the Full Recipe. First, gather all your ingredients. You will need shrimp, butter, garlic, lemon, and spices. Make sure the shrimp is peeled and deveined. This saves time. Mince the garlic finely. Zest the lemon and squeeze the juice. Chop the parsley for garnish. 1. Heat 1 tablespoon of olive oil in a large skillet over medium heat. Wait until the oil shimmers. 2. Add the minced garlic and red pepper flakes. Stir them for about 1 minute. This helps the garlic smell great. 3. Put the shrimp in the skillet. Sprinkle with sea salt and black pepper. Cook for 2-3 minutes until they turn pink on one side. 4. Flip the shrimp carefully. Add the butter, lemon zest, and lemon juice. Cook for another 2-3 minutes until the shrimp is fully cooked. 5. Remove the skillet from heat. Toss in the parsley for a fresh taste. 6. Serve the shrimp right away. Add thin lemon slices on top for extra flavor. This dish goes well with rice or crusty bread. You can also serve it over pasta for a heartier meal. Pair it with a fresh salad or steamed vegetables for balance. Enjoy this quick and tasty recipe with family and friends! For the complete recipe, check out the Full Recipe. When picking shrimp, look for a few key signs. Fresh shrimp should smell like the ocean, not fishy. The shells should be firm, and the flesh should be translucent. If you see black spots, avoid those shrimp. Always buy shrimp with no ice glaze. This means they are fresh and not frozen. If possible, buy shrimp from a trusted fishmonger or market. Check for local sources to get the best quality. Garlic brings a lot of flavor to this dish. To get the best taste, use fresh garlic cloves. Mince them finely for a stronger flavor. Sauté the garlic in olive oil before adding shrimp. Cook it just until fragrant, about one minute. If you cook it too long, it can burn and taste bitter. If you want a more intense garlic flavor, you can add some garlic powder along with the fresh garlic. This shrimp dish tastes best when served hot. As soon as you finish cooking, plate it right away. Letting it sit can make the shrimp tough. If you have leftovers, store them in the fridge and reheat them gently. Use a low heat on the stove or in the microwave. Add a bit of lemon juice to keep the flavor fresh. Enjoy this dish with a side of warm bread or over rice for a complete meal. For the full recipe, check out the section above. {{image_4}} You can turn lemon garlic butter shrimp into a hearty meal by adding pasta. Cook your favorite pasta, like spaghetti or fettuccine. Once the shrimp is ready, toss it with the cooked pasta. The sauce clings to the noodles. This makes for a tasty and filling dish. You can add a sprinkle of cheese for extra flavor. If you want a kick, try the spicy Cajun style. Add Cajun seasoning when cooking the shrimp. A teaspoon or two will do. This spice mix brings heat and depth. The butter and lemon balance the spices well. You'll love the bold flavors in each bite. Boost nutrition by adding veggies. Bell peppers, snap peas, or spinach work great. Sauté them with the garlic for a few minutes. Then add the shrimp as usual. This not only adds color but also fiber and vitamins. Your meal becomes more balanced and healthy. For more delicious ideas, check out the Full Recipe. After enjoying your Lemon Garlic Butter Shrimp, let any leftovers cool. Place them in an airtight container. Store in the fridge for up to two days. Make sure to seal it well to keep the shrimp fresh. If you want to save them longer, consider freezing. To reheat, use a skillet on low heat. Add a splash of water or broth to keep it moist. Stir gently to warm the shrimp evenly. You can also microwave them, but do it in short bursts to avoid overcooking. To freeze, place the cooled shrimp in a freezer-safe bag. Remove as much air as possible to prevent freezer burn. These shrimp can last up to three months in the freezer. When ready to eat, defrost them in the fridge overnight before reheating. Enjoy your meal even after a few days! To add heat, increase the red pepper flakes. Start with 1 teaspoon. If you want more spice, try adding ½ teaspoon more. You can also use fresh chopped chili peppers for extra kick. Adjust to your taste, so it’s just right for you. Yes, you can use frozen shrimp. Make sure to thaw them first. Put the shrimp in a bowl of cold water for about 15 minutes. This method keeps the shrimp firm. Drain and pat them dry before cooking. This helps avoid a watery dish. Lemon garlic butter shrimp pairs well with many sides. Here are some great options: - Rice: White, brown, or jasmine rice soaks up the sauce well. - Pasta: Toss with spaghetti or linguine for a hearty dish. - Vegetables: Steamed broccoli or green beans add color and nutrition. - Salad: A light salad with greens and a lemon vinaigrette can balance the meal. Feel free to explore these options to find a match you love! For the full recipe, check the instructions above. This recipe guide covered all you need for a tasty lemon garlic butter shrimp dish. We discussed each ingredient, substitutions, and key nutritional info. I shared simple prep steps and cooking directions, plus tips to enhance garlic flavor. You learned about food variations and how to store leftovers properly. Shrimp is versatile and delicious. By following these steps, you can enjoy a great meal! Keep experimenting with flavors and enjoy your cooking journey.

Lemon Garlic Butter Shrimp Quick and Tasty Recipe

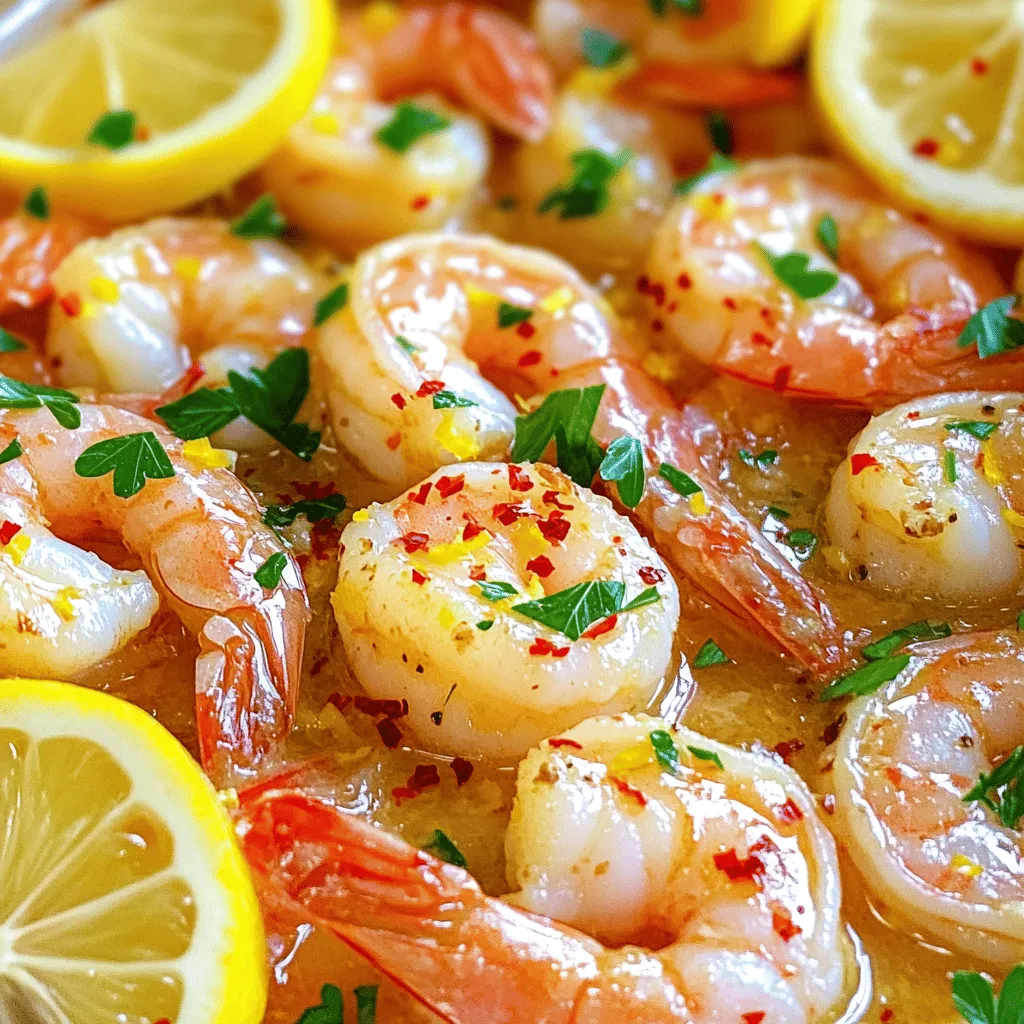
Ready for a dish that combines bright flavors with a quick prep time? This Lemon Garlic Butter Shrimp recipe is

To make a delicious cinnamon roll casserole, you need simple and tasty ingredients. Here’s what you’ll need: - 2 cans of refrigerated cinnamon rolls (15 oz each) - 4 large eggs - 1 cup whole milk - 1/2 cup pure maple syrup - 1 teaspoon vanilla extract - 1 teaspoon ground cinnamon - 1/4 teaspoon ground nutmeg - 1/2 cup pecans, chopped (optional) - 1/2 cup raisins (optional) - Powdered sugar for drizzling These ingredients combine to create a warm and gooey breakfast delight. The cinnamon rolls give a fluffy texture, while the eggs and milk make a rich custard. Maple syrup adds sweetness, and spices like cinnamon and nutmeg bring warmth. If you enjoy a bit of crunch, consider adding pecans. Raisins add a nice chewiness too. Feel free to experiment based on your taste. You can find the full recipe [here](#). - Preheat the oven to 375°F (190°C). - Grease a 9x13 inch baking dish. - Cut cinnamon rolls into quarters and arrange in the baking dish. First, you need to preheat your oven to 375°F (190°C). This helps your casserole cook evenly. While the oven warms up, grab a 9x13 inch baking dish. Lightly grease it with butter or cooking spray. This helps prevent sticking. Now, open your cans of cinnamon rolls. Cut each roll into quarters. Spread these pieces out in the baking dish. Make sure they fit snugly and cover the bottom. - Whisk eggs, milk, maple syrup, vanilla extract, cinnamon, and nutmeg together. Next, let's make the egg mixture. In a medium bowl, crack four large eggs. Add one cup of whole milk, half a cup of pure maple syrup, and one teaspoon each of vanilla extract and ground cinnamon. Finish with a quarter teaspoon of ground nutmeg. Use a whisk to mix everything well. This mixture adds flavor and moisture to the casserole. - Pour the egg mixture over cinnamon rolls and add pecans and raisins. - Press down to ensure even soaking. Now, pour the egg mixture over the cinnamon rolls in the dish. Use a spatula or fork to coat all the pieces. If you want, sprinkle half a cup of chopped pecans and half a cup of raisins on top. Gently press down on the cinnamon rolls with your hands. This helps them soak up the egg mixture. - Bake for 25-30 minutes until golden brown and a toothpick comes out clean. - Cool for 5-10 minutes before serving. Place the baking dish in your preheated oven. Bake for 25 to 30 minutes. The casserole is done when it is golden brown. You can check this by inserting a toothpick in the center. If it comes out clean, it’s ready. Once baked, take it out and let it cool for 5 to 10 minutes. This cooling time helps the casserole set up perfectly. Enjoy your delicious creation with family and friends! For the full recipe, check out the details above. - Ensure even coating of cinnamon roll pieces for better texture. This step helps each piece soak up the egg mixture. - Use fresh ingredients for maximum flavor. Fresh eggs and milk enhance the taste of your casserole. - Serve with a drizzle of cream cheese frosting. This adds a sweet, creamy touch to each bite. - Pair with fresh fruit or whipped cream. Berries or bananas can balance the sweetness and add freshness. These tips and tricks will help you make the best cinnamon roll casserole. For the full recipe, check the details above. Enjoy your cooking! {{image_4}} You can easily change the flavor of your cinnamon roll casserole. Instead of maple syrup, try honey or agave syrup. Both options add a different sweetness. You can also swap the whole milk for flavored creamers. Imagine a vanilla or hazelnut twist in every bite! If you need to make dietary changes, it’s simple! Use gluten-free cinnamon rolls to make the dish gluten-free. This way, everyone can enjoy it. For a dairy-free version, choose alternative milks like almond or oat milk. You can also use egg substitutes to make it work for your needs. These options help everyone enjoy this tasty breakfast delight! You can store any leftover cinnamon roll casserole in an airtight container. It will stay fresh in the fridge for up to 3 days. Make sure to let it cool down before sealing it up. This way, it will taste great when you reheat it. If you want to keep it longer, freeze portions in freezer-safe containers. It can last for up to 2 months in the freezer. When you're ready to enjoy it again, just reheat it in the oven or microwave. This makes for a quick and easy breakfast option on busy mornings. Yes, you can prepare and refrigerate the casserole overnight. This makes your morning easier. Just bake it in the morning. It will still taste amazing. To check if the casserole is done, insert a toothpick into the center. If it comes out clean, your casserole is ready. The top will also look golden brown. Absolutely! You can use other sweet rolls. Chocolate or raspberry rolls add fun flavors. Get creative with what you have at home. I love pairing this casserole with coffee. Orange juice or milk also works great. These drinks complement the sweet flavors perfectly. For the full recipe, check out the [Full Recipe]. This blog shared a simple recipe for a delicious Cinnamon Roll Casserole. You learned about ingredients, step-by-step instructions, and helpful tips. The dish is versatile, allowing flavor and dietary changes to fit your needs. Remember to store leftovers properly for later enjoyment. Whether you prepare it in advance or add your twist, this casserole is a fun dish for any meal. Enjoy sharing this recipe with friends and family!

Cinnamon Roll Casserole Tasty Breakfast Delight

If you love warm, gooey cinnamon rolls, then this Cinnamon Roll Casserole is your new favorite breakfast! This dish combines

To make a tasty herbed quinoa salad, gather these fresh ingredients: - 1 cup quinoa, thoroughly rinsed and drained - 2 cups vegetable broth (or water if preferred) - 1 cup cherry tomatoes, cut in half - 1 cucumber, diced into small pieces - 1 small red onion, finely chopped - 1 bell pepper (your choice of color), diced - 1 cup fresh parsley leaves, finely chopped - 1/2 cup fresh mint leaves, finely chopped - Juice of 1 lemon - 3 tablespoons extra virgin olive oil - Salt and freshly ground pepper to taste - Crumbled feta cheese for garnishing (optional) These ingredients create a vibrant and refreshing dish that is both filling and healthy. You can customize your herbed quinoa salad by adding some optional ingredients: - Avocado, diced for creaminess - Black beans or chickpeas for protein - Corn, for a sweet crunch - Radishes, for a peppery bite - Nuts or seeds, for added texture These options can help you tailor the salad to your taste or dietary needs. Fresh herbs make this salad pop with flavor. Here are some great choices: - Basil, for a sweet and aromatic touch - Cilantro, for a zesty kick - Chives, for a mild onion flavor - Dill, for a fresh, grassy note For veggies, you can try adding: - Carrots, grated for sweetness - Spinach or kale, for extra greens - Zucchini, for a mild, tender bite By mixing and matching these ingredients, you can create a unique herbed quinoa salad every time. To access the full recipe, check out the details in the article. To make a great herbed quinoa salad, start by rinsing your quinoa. Rinse it well under cold water. This removes the bitter coating called saponin. After rinsing, place the quinoa in a medium saucepan. Add 2 cups of vegetable broth or water. Bring this mix to a boil over medium-high heat. Once it boils, lower the heat to simmer. Cover the saucepan and let it cook for about 15 minutes. The quinoa will absorb all the liquid and look fluffy. After cooking, take it off the heat but keep the lid on for another 5 minutes. This helps it steam and become even fluffier. Finally, use a fork to fluff the quinoa and let it cool to room temperature. In a large mixing bowl, add your cooled quinoa. Next, toss in halved cherry tomatoes, diced cucumber, finely chopped red onion, and diced bell pepper. These veggies add color and crunch to your salad. Then, stir in the freshly chopped parsley and mint. These herbs bring freshness to the dish. Mix all the ingredients gently to combine them well. This step is crucial for a balanced taste. For the dressing, grab a small bowl. Combine the juice of one lemon and three tablespoons of extra virgin olive oil. Then, add salt and freshly ground pepper to taste. Whisk all these together until they blend smoothly. This dressing adds brightness and flavor to your salad. Pour the dressing over the quinoa and veggies. Toss everything together gently, ensuring all the ingredients get coated. If you like, finish with crumbled feta cheese for a creamy touch. For the full recipe, you can refer to the earlier section. To cook quinoa perfectly, start with rinsing one cup of quinoa. Rinsing removes the bitter coating called saponin. Use two cups of vegetable broth or water for cooking. This adds more flavor. Bring the liquid to a boil in a medium saucepan. Once boiling, lower the heat and cover it. Let it simmer for about 15 minutes. The quinoa should absorb all the liquid. After that, take it off the heat but keep it covered for five more minutes. Fluff it with a fork. This step gives it a light and airy texture. For a tasty salad, balance is key. The fresh herbs, like parsley and mint, brighten the dish. Use lemon juice and olive oil for a zesty dressing. Start with the juice of one lemon and three tablespoons of olive oil. Add salt and pepper to taste. This combination enhances all the flavors. You can adjust the seasoning based on your preference. Taste as you go. If you like it tangy, add a bit more lemon juice. If you prefer richness, increase the olive oil. Make your herbed quinoa salad visually appealing. Serve it in a large bowl to showcase its colorful ingredients. For individual servings, use small plates. Garnish each plate with fresh herbs. You can also add a lemon wedge on the side. This adds a pop of color and a fresh touch. Consider sprinkling crumbled feta cheese on top for a creamy texture. The presentation should invite everyone to dig in. Enjoy the beauty of your dish as much as the flavors! For the full recipe, check out the detailed steps above. {{image_4}} This Herbed Quinoa Salad is naturally gluten-free. Quinoa is a great grain choice. You do not need to change any ingredients to keep it gluten-free. Just make sure your vegetable broth is also gluten-free. To make this recipe vegan, skip the feta cheese topping. You can also add avocado for a creamy texture. Another option is to use nutritional yeast. It adds a cheesy flavor without any dairy. If you want to cut carbs, swap quinoa with cauliflower rice. Cauliflower rice is low in carbs and very filling. You can also add more veggies like zucchini or bell peppers. This will keep it fresh and tasty while lowering carbs. For the full recipe, check back for detailed steps. After enjoying your herbed quinoa salad, you may have some leftovers. To store them, place the salad in an airtight container. This helps keep it fresh and prevents it from drying out. Make sure to cool the salad to room temperature before sealing the container. If you add feta cheese, keep it separate until you are ready to eat. This keeps the cheese from getting soggy. When stored correctly, herbed quinoa salad lasts about 3 to 5 days in the fridge. If you notice any changes in smell or color, it’s best to throw it away. Always check for freshness before enjoying leftovers. The taste is best within the first few days after making it. You can enjoy herbed quinoa salad cold or at room temperature. If you prefer it warm, gently reheat it in a pan over low heat. Stir it often to avoid cooking it too much. You may want to add a splash of olive oil or lemon juice to freshen the flavor. If you serve it cold, consider adding extra herbs or a squeeze of lemon for a fresh boost. For more ideas, check the Full Recipe for serving suggestions. The best way to cook quinoa is by rinsing it first. This step helps remove any bitterness. Use a ratio of 1 cup of quinoa to 2 cups of liquid, like vegetable broth or water. Bring the liquid to a boil, then lower the heat and cover. Cook for about 15 minutes until the quinoa absorbs the liquid. Fluff it with a fork afterward. This method yields fluffy, perfect quinoa for your salad. Yes, you can make Herbed Quinoa Salad ahead of time. It tastes even better after some time in the fridge. Make the salad and store it in an airtight container. You can prepare it up to 2 days in advance. Just give it a good stir before serving to mix the flavors again. If you add feta cheese, do so just before serving to keep it fresh. You can serve Herbed Quinoa Salad in many ways. Try it as a side dish with grilled chicken or fish. It also works well as a light lunch on its own. For extra flavor, top it with avocado slices or nuts. Pair it with a refreshing drink like iced tea or lemonade. This salad is versatile and can shine at any meal. For the complete recipe, check out the Full Recipe. Herbed Quinoa Salad is a simple, tasty dish. We explored all the key ingredients, customization options, and fresh herb suggestions. I walked you through preparing quinoa, mixing veggies, and making the perfect dressing. We covered cooking tips, flavor balance, and how to present your dish well. I shared variations for gluten-free, vegan, and low-carb diets, plus storage info for leftovers. In short, this salad is easy to make and enjoy. It’s healthy and versatile. You can adapt it to fit your needs. Enjoy creating delicious meals!

Herbed Quinoa Salad Fresh and Flavorful Recipe

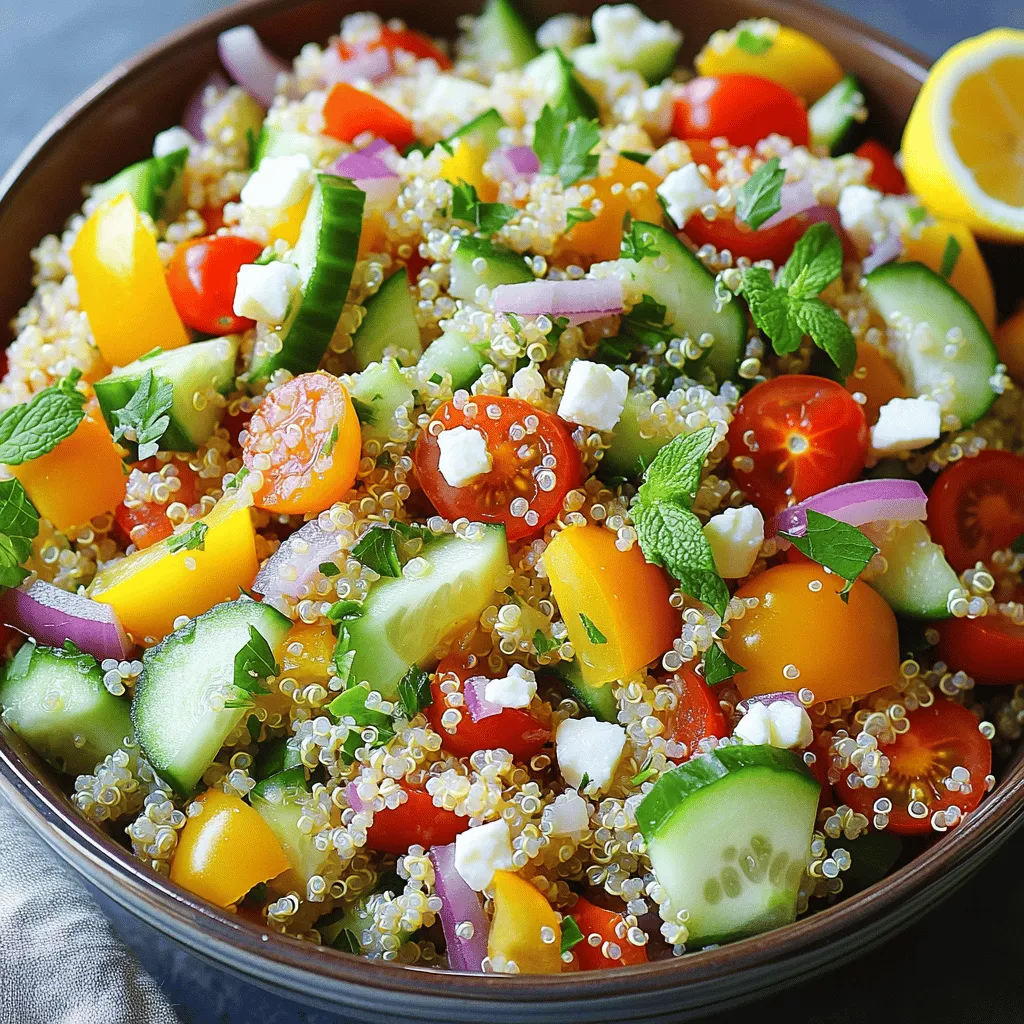
Are you ready to elevate your salad game? This Herbed Quinoa Salad recipe bursts with fresh flavors that are both

- 4 boneless, skinless chicken thighs - 1 cup basil pesto (homemade or high-quality store-bought) - 1 cup cherry tomatoes, halved - 1 cup shredded mozzarella cheese - 1 tablespoon extra virgin olive oil - Sea salt and freshly cracked pepper to taste - Fresh basil leaves for garnish - Balsamic glaze (optional for a flavorful drizzle) When I make Baked Pesto Chicken, I love how simple and fresh the ingredients are. The chicken thighs become juicy and tender when you bake them. The pesto adds a burst of flavor that makes the dish shine. You can use homemade pesto or grab a jar from the store. Both options work great. The cherry tomatoes are a fun addition. They soften and sweeten as they cook, adding color and taste. I always choose fresh mozzarella for a creamy finish. The cheese melts beautifully on top of the chicken, creating a delicious layer. For seasoning, I use extra virgin olive oil to add richness. A sprinkle of sea salt and fresh pepper brings out the best flavors. Fresh basil leaves are perfect for garnishing. They add a bright look and a hint of aroma. If you want a tangy touch, drizzle some balsamic glaze over the top. It’s optional but oh-so-good! These ingredients combine to create a dish that is both easy to make and delightful to eat. You’ll find the full recipe for Baked Pesto Chicken Delight in the article. It’s a dish that will impress anyone at your table! - Preheat the oven to 375°F (190°C). - Drizzle olive oil in the baking dish and spread evenly. To start, preheat your oven. This step is key for even cooking. While it warms up, grab a medium-sized baking dish. Add olive oil at the bottom. This will help keep the chicken from sticking. Make sure to spread the oil well. - Season chicken thighs with sea salt and pepper. - Coat each thigh generously with pesto. Now, take your chicken thighs. Sprinkle them with sea salt and pepper. Don’t be shy; this adds flavor. Next, grab that delicious pesto. Use a spoon to coat each thigh well. The more pesto, the better. This will make the chicken juicy and packed with flavor. - Scatter cherry tomatoes around the chicken. - Cover with foil and bake for 25 minutes. - Remove foil, add mozzarella, and bake for an additional 15 minutes until cooked through. Time to bake! Add halved cherry tomatoes around the chicken. They bring a nice sweetness. Cover the dish tightly with foil. Bake for 25 minutes. After that, carefully remove the foil. Be careful; steam will escape. Now, sprinkle shredded mozzarella on top. This will melt and create a cheesy layer. Bake for another 15 minutes. Make sure the chicken is cooked through. It should reach 165°F (75°C). Enjoy the aroma filling your kitchen! - Ensure chicken reaches 165°F (75°C) for safety. This is key to enjoying your meal. - Let chicken rest for a few minutes before serving. This helps lock in the juices. - Garnish with fresh basil and a drizzle of balsamic glaze. This adds color and flavor. - Serve with a side salad or crusty bread for a complete meal. The bread is great for soaking up juices. In my experience, these simple tips can elevate your dish. Enjoy making this baked pesto chicken! For the complete recipe, check out the [Full Recipe]. {{image_4}} You can mix things up with different proteins for baked pesto chicken. If you want a leaner option, use chicken breasts instead of thighs. They will still soak up the pesto flavor well. Another great choice is shrimp. The quick cooking time makes shrimp a fun twist. You can easily enjoy the same pesto goodness with a seafood flair. If you prefer a plant-based option, try using tofu. Firm tofu will soak up the pesto and give you a hearty meal. Just make sure to press it first to remove excess water. Adding flavor boosts the taste of your baked pesto chicken. One fun way is to incorporate roasted garlic. Roasting garlic makes it sweet and soft, adding depth to the dish. You can also mix in sun-dried tomatoes. They bring a rich, tangy flavor that pairs well with the pesto. If you love citrus, try adding lemon zest. The zest adds a bright and fresh kick that balances the dish nicely. These flavor additions can elevate your meal and keep it exciting each time you make it. You can store leftover baked pesto chicken easily. Place it in an airtight container. It will stay fresh in the fridge for up to 3 days. If you want to keep it longer, freeze it. It can last in the freezer for up to 3 months. Just make sure to wrap it well to avoid freezer burn. When you’re ready to enjoy the leftovers, reheat them in the oven. This method keeps the chicken juicy and the cheese melty. Set the oven to 350°F (175°C) and warm for about 15-20 minutes. If you need a quick option, use the microwave. However, this may change the texture. The chicken might become a bit rubbery. For the best taste, I always recommend the oven! Yes, homemade pesto can enhance the flavor of the dish. Making your own pesto allows you to control the taste. You can adjust the garlic, cheese, and nuts to your liking. Fresh basil adds a bright note to the chicken. If you have a favorite recipe, use it! Consider pairing it with pasta, rice, or a salad. The chicken's rich flavor works well with many sides. You can toss pasta with olive oil and garlic for a simple dish. A fresh green salad adds crunch and balance. Rice can soak up the tasty juices, making every bite better. Boneless chicken thighs typically take around 40 minutes in the oven. The key is to cook them until they reach 165°F (75°C). This ensures the chicken is safe to eat. If you use bone-in thighs, they will take longer to cook. Always check the temperature in the thickest part. Yes, as long as you use gluten-free pesto and bread, if serving with it. Many store-bought pestos are gluten-free, but always check the labels. If you make your own pesto, you control the ingredients. This dish can fit into many diets without fuss. In this blog post, we covered how to make baked pesto chicken thighs. You learned about key ingredients like chicken, pesto, and cheese. We went through the simple steps for preparation and baking. I provided tips for cooking and serving this dish perfectly. Remember, you can add your twist by changing up proteins or flavors. Don’t forget to store leftovers properly for another tasty meal. Enjoy cooking this easy dish that is full of flavor!

Baked Pesto Chicken Juicy and Flavorful Delight

Looking for a simple yet mouthwatering dish? Baked Pesto Chicken is your answer! This recipe is packed with juicy chicken

- 4 large sweet potatoes, peeled and cut into 1-inch cubes - 1/2 cup packed brown sugar - 1/4 cup pure maple syrup - 1/2 cup unsalted butter, softened to room temperature - 1 teaspoon vanilla extract - 1/2 teaspoon ground cinnamon - 1/4 teaspoon ground nutmeg - 1/2 teaspoon salt - 1/2 cup milk (or almond milk for a creamy dairy-free alternative) Sweet potatoes are the star of this dish. They add natural sweetness and a creamy texture. I love using fresh sweet potatoes for the best taste. Brown sugar and maple syrup give it that rich flavor. Butter and milk create a smooth blend that ties everything together. - 1 cup mini marshmallows - 1/2 cup pecans, finely chopped - Alternative toppings: granola or streusel Toppings can change the whole vibe of sweet potato casserole. I often use mini marshmallows for a sweet, gooey layer. Chopped pecans add a nice crunch. If you want something different, try granola or a streusel topping for added texture and flavor. - Dairy-free alternatives: Use almond milk and dairy-free butter. - Gluten-free options: This recipe is naturally gluten-free. - Reducing sugar for a healthier version: Cut back on brown sugar or maple syrup. You can easily modify this dish to fit your needs. For a dairy-free version, you can swap in almond milk and dairy-free butter. The recipe is naturally gluten-free, which is a bonus. If you want a healthier option, reduce the sugar or use a sugar substitute. This way, everyone can enjoy this comfort food delight! First, fill a large pot with water. Bring the water to a rolling boil. Add the cubed sweet potatoes carefully. Cook them for about 15 to 20 minutes. You want them fork-tender. Once they are soft, drain the potatoes. Let them cool for a few minutes before mixing. In a large mixing bowl, add the cooled sweet potatoes. Combine them with brown sugar, maple syrup, and softened butter. Don’t forget the vanilla extract, ground cinnamon, ground nutmeg, salt, and milk. Use a potato masher to mix everything. Aim for a smooth and creamy texture. Now, take a greased 9x13-inch baking dish. Transfer the sweet potato mixture into it. Spread the mixture evenly across the dish. Next, sprinkle mini marshmallows and chopped pecans on top. Make sure to layer them evenly for great texture. Preheat your oven to 350°F (175°C). Place the baking dish in the oven. Bake for 25 to 30 minutes. Check for readiness when the marshmallows puff up and turn golden brown. The edges should bubble nicely. Once done, take the dish out and let it rest for a few minutes. For the full recipe, check out the detailed instructions. When making sweet potato casserole, the texture matters. You can choose between a mashed or chunky style. I prefer a creamy texture that blends well. For this, mash the sweet potatoes fully. Use a potato masher or fork to mix. Make sure all lumps are gone. This ensures a smooth, rich dish. Mixing is key, too. Blend the ingredients well. This helps the flavors combine. When you mix, start slow and pick up speed. This ensures even distribution of spices and sweetness. A well-mixed casserole is a delight to eat. You can serve your casserole in two ways: individual portions or family-style. Individual servings look nice and are easy to manage. You can use small ramekins for a fun touch. Family-style serving works great for gatherings. Just place the whole dish on the table. Pair this dish with your favorite holiday meals. It goes well with turkey or ham. The sweet tones balance savory flavors nicely. Add a fresh salad on the side for color and crunch. To boost the flavor of your casserole, use fresh spices. Fresh cinnamon and nutmeg really pop. They add a warm aroma that fills the kitchen. Dried spices can work, but fresh is always better. You can also add unexpected ingredients. Try mixing in a bit of ginger for a zing. A splash of orange juice adds brightness. These small tweaks give depth to your dish. For the full recipe, check out the Sweet Potato Casserole Delight. {{image_4}} Sweet potato casserole is fun to mix up. You can choose between a marshmallow topping or a pecan crumble. Marshmallows add a sweet and gooey layer. They create a lovely contrast with the creamy sweet potatoes. On the other hand, a pecan crumble adds crunch and a nutty flavor. Both options taste great, so pick your favorite! Savory sweet potato casseroles are also popular. These versions use herbs and spices for depth. Instead of sweet toppings, they might feature garlic or rosemary. These casseroles work well as a side dish for dinner. They add warmth and comfort to any meal. You can change your sweet potato casserole with the seasons. In fall, try adding warm spices like ginger or clove. They give the dish a cozy, festive feel. These spices enhance the sweet flavor of the potatoes. Fruits like cranberries or apples can also brighten your casserole. Adding these ingredients gives a tart balance to the sweet potatoes. You can mix in chopped apples for a refreshing twist. Or, you can fold in cranberries for a splash of color and flavor. To make your casserole more special, consider adding unique flavors. A splash of bourbon can bring warmth and a hint of sweetness. The flavor pairs well with the natural taste of sweet potatoes. Orange zest is another fun addition. Just a little can brighten the dish with citrus notes. You can also infuse the casserole with other vegetables. Carrots or parsnips can add more texture and flavor. Mixing these veggies in gives your casserole a new twist. For the full recipe, check out Sweet Potato Casserole Delight. To keep your sweet potato casserole fresh, store it in the fridge. Place it in an airtight container. It can last for up to four days when stored properly. If you want to keep it longer, consider freezing it. Use a heavy-duty freezer bag or a freezer-safe dish. Make sure to label it with the date. Frozen casserole can last for about three months. When reheating, the oven is your best choice. Preheat it to 350°F (175°C). Place the casserole in a baking dish, cover it with foil, and heat for about 20-25 minutes. This method keeps the texture nice. If you use a microwave, heat in short bursts. Stir it often to ensure even warming. This way, you keep the flavor intact. Sweet potato casserole tastes best fresh. However, if stored well, it can be safe to eat for several days. Check for any signs of spoilage. If you see mold or any off smells, it’s time to toss it. Always trust your senses! Keeping track of freshness helps you enjoy this comfort food delight longer. For best results, aim to eat leftovers within four days. To make Sweet Potato Casserole from scratch, start with fresh sweet potatoes. Boil them until fork-tender, then mash them with sugar, butter, and spices. Mix all the ingredients well. Spread the mixture in a baking dish and add toppings. Bake until golden. - Quick tips for first-time bakers: - Use fresh sweet potatoes for the best taste. - Make sure to mash the sweet potatoes well for a smooth texture. - Don’t skip the spices; they add depth to the flavor. Yes, you can prepare Sweet Potato Casserole ahead of time. Just make the filling and store it in the fridge. When ready, add toppings and bake. This saves time on busy days. - Best practices for pre-making the dish: - Cover the dish tightly with plastic wrap. - Keep it in the fridge for up to two days. - Add toppings just before baking to keep them fresh. Yes, Sweet Potato Casserole is naturally gluten-free. However, if you use any pre-made toppings, check the labels. Some may contain gluten. - Information on ingredients to watch out for: - Marshmallows are usually gluten-free, but always check. - If you use granola, ensure it’s gluten-free. You can swap sugar with healthier options. Use honey, maple syrup, or agave nectar. These add sweetness without refined sugar. - Healthy alternatives for sweetness: - Use mashed bananas for natural sweetness. - Coconut sugar is another great option. Absolutely! To make it vegan, replace butter and milk with plant-based options. Use vegan butter and almond milk. This keeps the casserole creamy and rich. - Options for vegan butter and milk in recipes: - Coconut milk is a great creamy choice. - Olive oil can substitute butter for a different flavor. Sweet potato casserole is versatile and tasty. You learned about key ingredients, like sweet potatoes and toppings. There are many options to fit dietary needs and preferences. I shared step-by-step instructions to help you prepare this dish perfectly. Don’t forget the tips for perfecting texture and enhancing flavor. Feel free to explore variations that surprise your taste buds. Store leftovers properly and reheat with care. Enjoy making this delicious and comforting dish for family and friends!

Savory Sweet Potato Casserole Comfort Food Delight

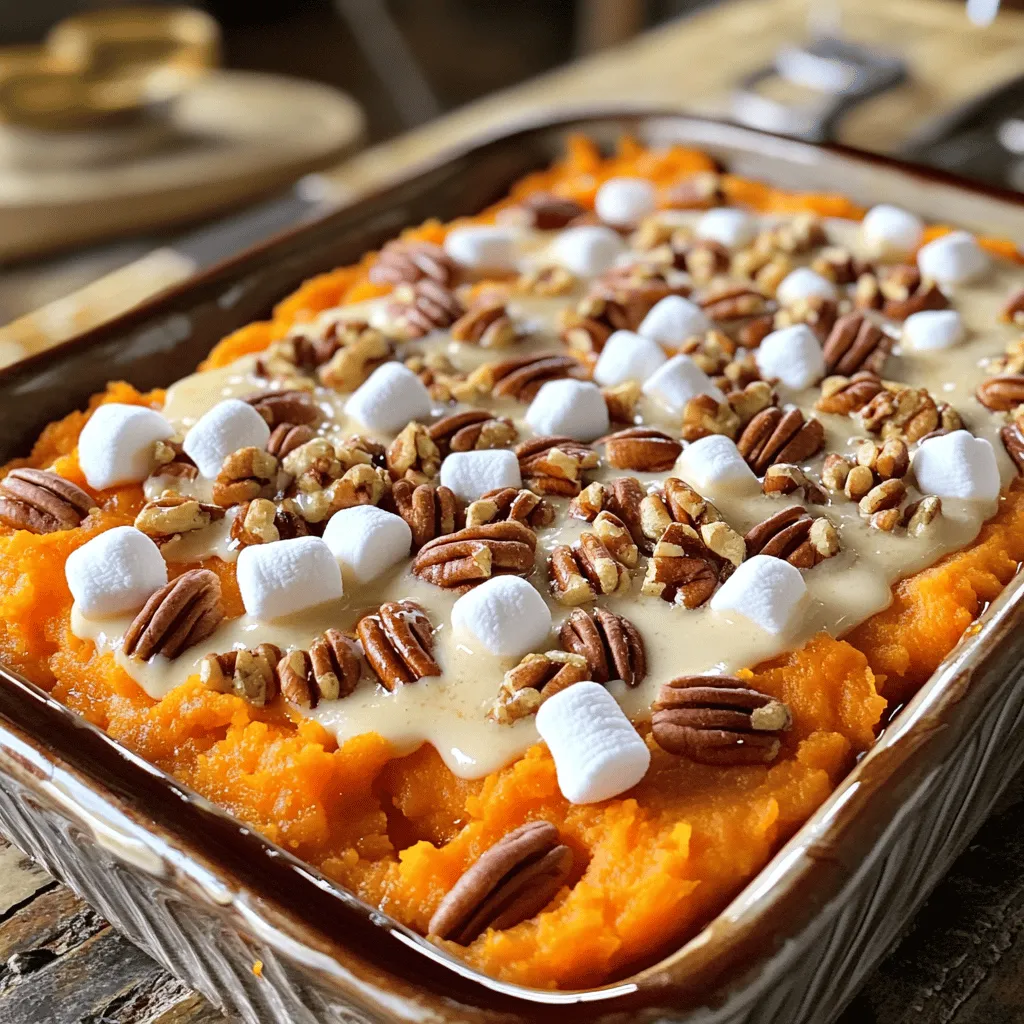
Are you ready to enjoy a warm and cozy treat? Sweet Potato Casserole is the perfect comfort food for any

For a tasty chickpea salad sandwich, you need simple, fresh ingredients. Here’s what you’ll need: - 1 can (15 oz) chickpeas, rinsed and thoroughly drained - 1/4 cup plain Greek yogurt (or your favorite vegan yogurt) - 1 tablespoon Dijon mustard - 1 tablespoon fresh lemon juice - 1/2 teaspoon garlic powder - 1/2 teaspoon onion powder - 1/4 teaspoon ground cumin - Salt and freshly cracked black pepper, to taste - 1/2 cup celery, finely diced - 1/4 cup red bell pepper, finely diced - 2 green onions, thinly sliced - 4 slices of hearty whole grain bread - Crisp lettuce leaves, for serving Adding a few optional ingredients can really boost the flavor of your sandwich. Here are some ideas: - 1/4 cup freshly chopped parsley or cilantro for garnish This chickpea salad sandwich is not just delicious; it’s also healthy. Here’s a quick look at what you get in each serving: - Calories: About 350 - Protein: 15 grams - Fiber: 10 grams - Fat: 8 grams - Carbohydrates: 50 grams This meal packs nutrients and flavor into every bite. You’ll enjoy it without feeling guilty! For the full recipe, check out the Chickpea Delight Sandwich. To start, grab a can of chickpeas. Rinse and drain them well. Place the chickpeas in a mixing bowl. Use a fork or potato masher to break them down. Leave some chunks for texture. This makes the filling more fun to eat. Next, add the Greek yogurt, Dijon mustard, fresh lemon juice, garlic powder, onion powder, and ground cumin. Sprinkle in some salt and pepper. Mix everything well until it is creamy and smooth. Taste the filling and adjust the seasoning if needed. Then, fold in the finely diced celery, red bell pepper, and sliced green onions. This adds color and flavor. Make sure they are evenly mixed throughout the chickpea base. If you like a crunchy bite, lightly toast the bread. Toast until it is golden brown. This adds a nice texture to your sandwich. Now, take two slices of toasted bread. Spread a generous amount of the chickpea filling on each slice. Don’t be shy! Next, layer on crisp lettuce leaves. If you want, add fresh parsley or cilantro on top. This gives your sandwich a fresh kick. Finally, place the other slices of bread on top. Press down gently. Slice each sandwich in half for easy eating. Serve your tasty sandwiches on a colorful plate. Cut them in half to show off the filling. Garnish with extra herbs for a pretty finish. I love to pair my chickpea salad sandwich with crunchy pickles or carrot sticks. They add a great crunch. You can also serve it with a side of fresh fruit for a sweet touch. Try this full recipe for a delightful meal that is both tasty and healthy! To make a great chickpea salad sandwich, start with good chickpeas. If using canned chickpeas, rinse them well. This removes excess salt and improves taste. If you prefer dried chickpeas, soak them overnight. Cook them until soft, then let them cool. After preparing, mash them gently. Leave some chunks for a fun texture. You can easily adapt this recipe. For a vegan option, swap Greek yogurt for your favorite plant-based yogurt. This keeps the creaminess while fitting your needs. If you want a nut-free meal, check the yogurt labels. Some brands may have nuts. You can also replace celery with diced cucumber for a fresh crunch. Want to make lunch easy? Prepare the chickpea filling ahead of time. Store it in the fridge for up to three days. To pack a quick lunch, spread the filling on bread in the morning. Add lettuce just before eating to keep it crisp. You can also use pita bread for a fun twist. For a balanced meal, pair your sandwich with fresh fruit or veggie sticks. Try the Full Recipe for a tasty guide! {{image_4}} Want a kick in your chickpea salad? Add some heat! You can mix in chopped jalapeños or a dash of hot sauce. This gives your sandwich a spicy twist. The heat pairs well with the creamy yogurt. You can also sprinkle in some cayenne pepper for extra flavor. This variation wakes up your taste buds and makes lunchtime exciting! For a Mediterranean flair, add diced olives and sun-dried tomatoes. You can also mix in some chopped cucumbers and fresh basil. A drizzle of olive oil brings everything together. This version is fresh and bright, making it a great choice for summer days. Serve it on pita bread for a fun twist. Your taste of the Mediterranean awaits! If you want a vegan option, swap Greek yogurt for your favorite plant-based yogurt. There are many tasty choices available. You can also add nutritional yeast for a cheesy flavor without dairy. Want more crunch? Toss in sliced radishes or chopped pickles. These additions make the sandwich fun and packed with flavor. Enjoy creating your own vegan masterpiece! For the full recipe, check out the Chickpea Delight Sandwich section above! You can store leftover chickpea salad in an airtight container. Make sure the lid seals tightly. Place the container in the fridge. This keeps the salad fresh and tasty for later. I do not recommend freezing the chickpea salad. Freezing can change the texture. Creamy ingredients like yogurt may separate when thawed. If you must freeze it, use a freezer-safe bag. Remove as much air as you can before sealing. The chickpea salad lasts for about three days in the fridge. After that, it may lose flavor and freshness. Always check for any off smells or changes in texture before eating. For full recipe, check the detailed instructions above. Yes, you can make this sandwich ahead of time. I suggest preparing the chickpea salad mixture and storing it in the fridge. This keeps the flavors fresh. Just assemble the sandwich when you are ready to eat. The bread can get soggy if you wait too long. I love using hearty whole grain bread. It adds texture and flavor. You can also try sourdough or rye for a unique taste. Gluten-free bread works great too if you need it. Always choose a bread that can hold the filling well. To make your chickpea salad gluten-free, choose gluten-free bread. Many brands offer tasty options. Check the labels to ensure there is no gluten. The chickpea salad itself is naturally gluten-free. Just be careful with any added ingredients or condiments. You can enjoy this healthy delight without worry! You now have a complete guide for making a delicious chickpea salad sandwich. We covered essential and optional ingredients to boost flavor. You learned how to prep the filling, assemble the sandwich, and serve it well. Making variations caters to different tastes. You can easily store leftovers and prepare meals ahead of time. This sandwich is nutritious, tasty, and great for quick lunches. Enjoy creating your perfect chickpea salad sandwich!

Chickpea Salad Sandwich Tasty and Healthy Delight

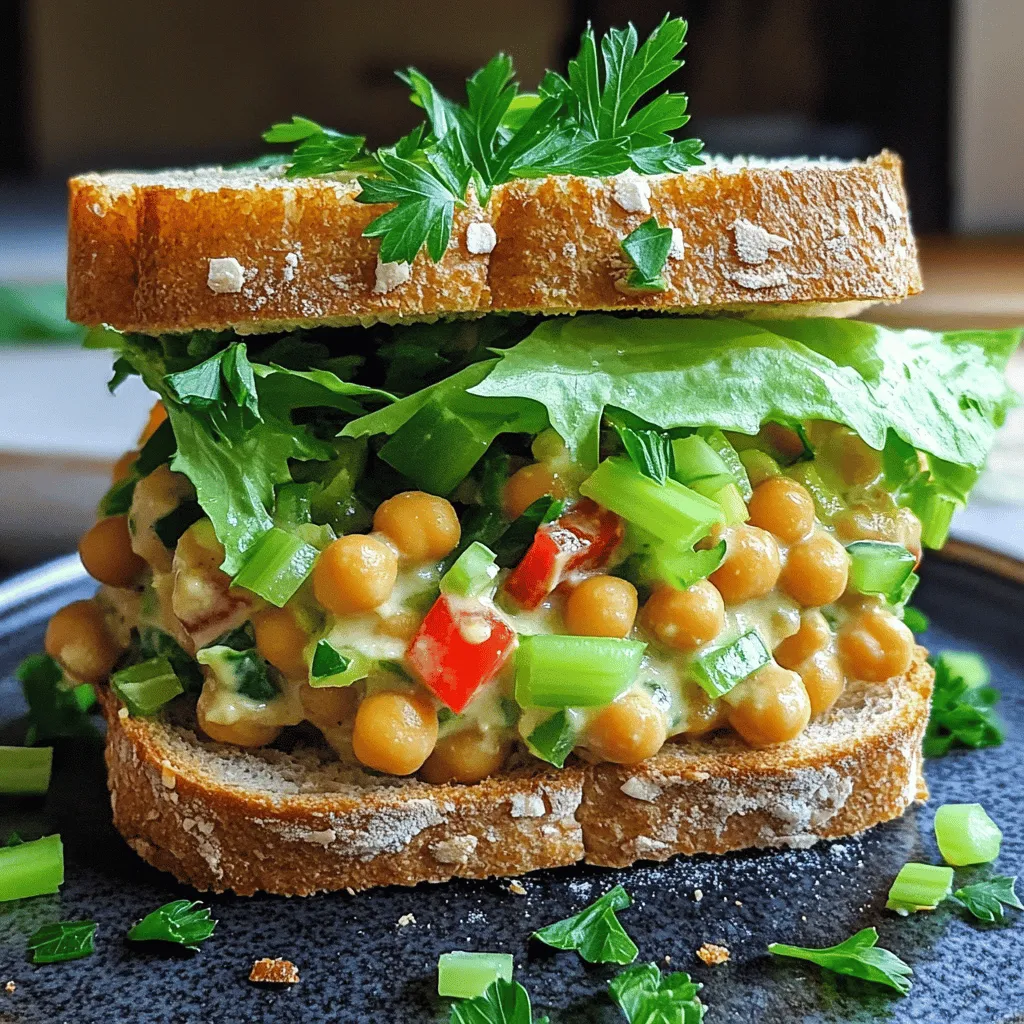
Looking for a quick and healthy meal? A Chickpea Salad Sandwich packs a punch of flavor and nutrition. This easy

In this section, I will share the key components needed for making chocolate hazelnut spread cookies. Each ingredient plays a big role in creating that soft, chewy texture and rich flavor. Here’s what you need: - 1 cup all-purpose flour - 1/4 cup unsweetened cocoa powder - 1/2 teaspoon baking soda - 1/4 teaspoon salt - 1/2 cup unsalted butter, softened - 1/2 cup packed brown sugar - 1/4 cup granulated sugar - 1 large egg - 1 teaspoon pure vanilla extract - 1/2 cup chocolate hazelnut spread - 1/2 cup chopped hazelnuts - Flaky sea salt for topping Each of these ingredients blends together to create a cookie that is not only soft but also bursting with flavor. The cocoa powder gives it a deep chocolate taste. The chocolate hazelnut spread adds a creamy texture that makes the cookies melt in your mouth. Chopped hazelnuts provide a nice crunch and extra nutty flavor. Once you gather these ingredients, you will be ready to create a delicious treat. Check out the Full Recipe for more detailed steps and tips! - Preheat your oven to 350°F (175°C). - Prepare a baking sheet by lining it with parchment paper. This keeps the cookies from sticking. - In a medium bowl, whisk together the flour, cocoa powder, baking soda, and salt. Mix until well combined. - In a large bowl, cream together the softened butter, brown sugar, and granulated sugar. Use an electric mixer on medium speed for 2-3 minutes until light and fluffy. - Next, add the egg and vanilla extract. Beat until the mixture is smooth and fully combined. - Gradually mix the dry ingredients into the wet mixture. Use low speed to avoid overmixing, which can make the cookies tough. - Carefully fold in the chocolate hazelnut spread and chopped hazelnuts. Use a spatula to ensure even distribution. - Scoop generous spoonfuls of dough onto the prepared baking sheet, leaving about 2 inches between each cookie. - Sprinkle a light pinch of flaky sea salt on top of each cookie. This adds a nice contrast to the sweetness. - Bake the cookies for 10-12 minutes. The edges should be set, while the centers stay soft. - After baking, let the cookies cool on the sheet for 5 minutes. Then, transfer them to a wire rack to cool completely. For the full recipe, check the earlier sections! Enjoy the delightful taste of these chocolate hazelnut spread cookies. - Best practices for measuring ingredients: Always use measuring cups and spoons. Level off dry ingredients with a knife for accuracy. For sticky ingredients like honey or syrup, spray the measuring cup with cooking spray first. This helps them slide out easily. - How to avoid overmixing the dough: Mix just until you see no dry flour. Overmixing can lead to tough cookies. Use a spatula to fold in the chocolate hazelnut spread and hazelnuts gently. - Toasting hazelnuts for added depth: Toasting hazelnuts brings out their rich flavor. Spread them on a baking sheet and bake at 350°F (175°C) for about 10 minutes. Keep an eye on them to avoid burning. - Optional ingredients for flavor variations: You can add a pinch of sea salt for balance or mix in chocolate chips for extra chocolatey goodness. A dash of espresso powder can also deepen the flavor. - Arranging cookies for serving: Place the cookies on a rustic wooden board or a white plate for contrast. Make sure to leave space between them for a neat look. - Drizzling extra chocolate hazelnut spread: Melt a bit of the spread in the microwave for a few seconds. Use a spoon to drizzle it over the cookies. This adds a lovely finish and extra flavor. For the full recipe, check out the full recipe section. {{image_4}} You can easily change some ingredients in the cookie recipe. If you want gluten-free cookies, use gluten-free flour instead of all-purpose flour. Brands like Bob's Red Mill offer good options that work well in baking. For a dairy-free option, swap the butter for coconut oil or a vegan butter substitute. These will keep your cookies soft and tasty without dairy. Adding spices can take your cookies to the next level. A pinch of cinnamon gives warmth. If you enjoy coffee, try adding a bit of espresso powder for a rich flavor. You can also mix in chocolate chips or other nuts. Semi-sweet or dark chocolate chips add extra sweetness. For nut lovers, try pecans or walnuts for a different crunch. If you want to make a vegan version, replace the egg with a flaxseed egg. Mix 1 tablespoon of ground flaxseed with 2.5 tablespoons of water. Let it sit for a few minutes until it thickens. This works great in cookies! For lower sugar options, use a sugar substitute like monk fruit or stevia. Just keep in mind that the taste may change a bit. You can also reduce the sugar in the original recipe by a third. These swaps and adaptations let you enjoy your cookies while keeping your diet in check. To keep cookies fresh, cooling them properly is key. After baking, let the cookies sit on the baking sheet for about 5 minutes. This allows them to set. Next, move them to a wire rack to cool completely. This prevents soggy bottoms and keeps them soft. For storage, choose airtight containers. Glass jars or plastic containers work well. Always wait until cookies are cool before sealing them. If you stack them, place parchment paper between layers to avoid sticking. Freezing cookie dough is simple and a great way to save time. First, scoop the dough onto a baking sheet. Leave space between each scoop. Freeze them until solid, about 1-2 hours. Then, transfer the frozen dough balls to a zip-top bag. Label the bag with the date and type of cookie. To bake frozen cookies, no need to thaw. Preheat your oven and add a few minutes to the baking time. This way, you get fresh cookies anytime you want. At room temperature, these cookies stay fresh for about 5 days. Store them in an airtight container. Look for signs of spoilage, like a dry or hard texture. If you see mold, toss them out. Enjoy your cookies while they are soft and tasty! Can I use dark chocolate hazelnut spread? Yes, you can use dark chocolate hazelnut spread. It adds a rich, bold flavor. This option works well if you enjoy deep chocolate taste. Just keep the rest of the recipe the same. How do I make cookies softer? To keep cookies soft, don’t overbake them. Bake until the edges are set, but the centers are still soft. Let them cool on the baking sheet. This way, they remain chewy and delicious. What can I substitute if I don't have hazelnuts? If you lack hazelnuts, use walnuts or almonds. Both nuts provide a nice crunch. You can also skip the nuts for a nut-free option. How do I know when the cookies are done? Check the edges of the cookies. They should look firm. The centers may appear soft and slightly underbaked. This is perfect as they will firm up while cooling. Can I adjust the sweetness of the cookies? Yes, you can adjust the sweetness. Use less sugar if you prefer less sweet cookies. You can also add a pinch of salt to balance flavors. What is the best way to prevent cookies from spreading? To stop cookies from spreading, chill the dough before baking. This helps maintain their shape. Also, ensure you use enough flour in the mix to create a good texture. How can I add more chocolate flavor to the cookies? To boost the chocolate taste, add chocolate chips to the dough. You can also use a mix of cocoa powder and melted chocolate. This adds depth and richness to your cookies. For the full recipe, check the detailed instructions above! This blog post provided a clear guide to making delicious hazelnut cookies. We covered the ingredients, step-by-step instructions, and helpful tips. You learned about flavor variations, storage methods, and common questions. Baking is fun and rewarding. With the right tools and knowledge, you can create amazing treats. Enjoy experimenting with flavors, and share your cookies with friends! Happy baking!

Chocolate Hazelnut Spread Cookies Delightfully Soft

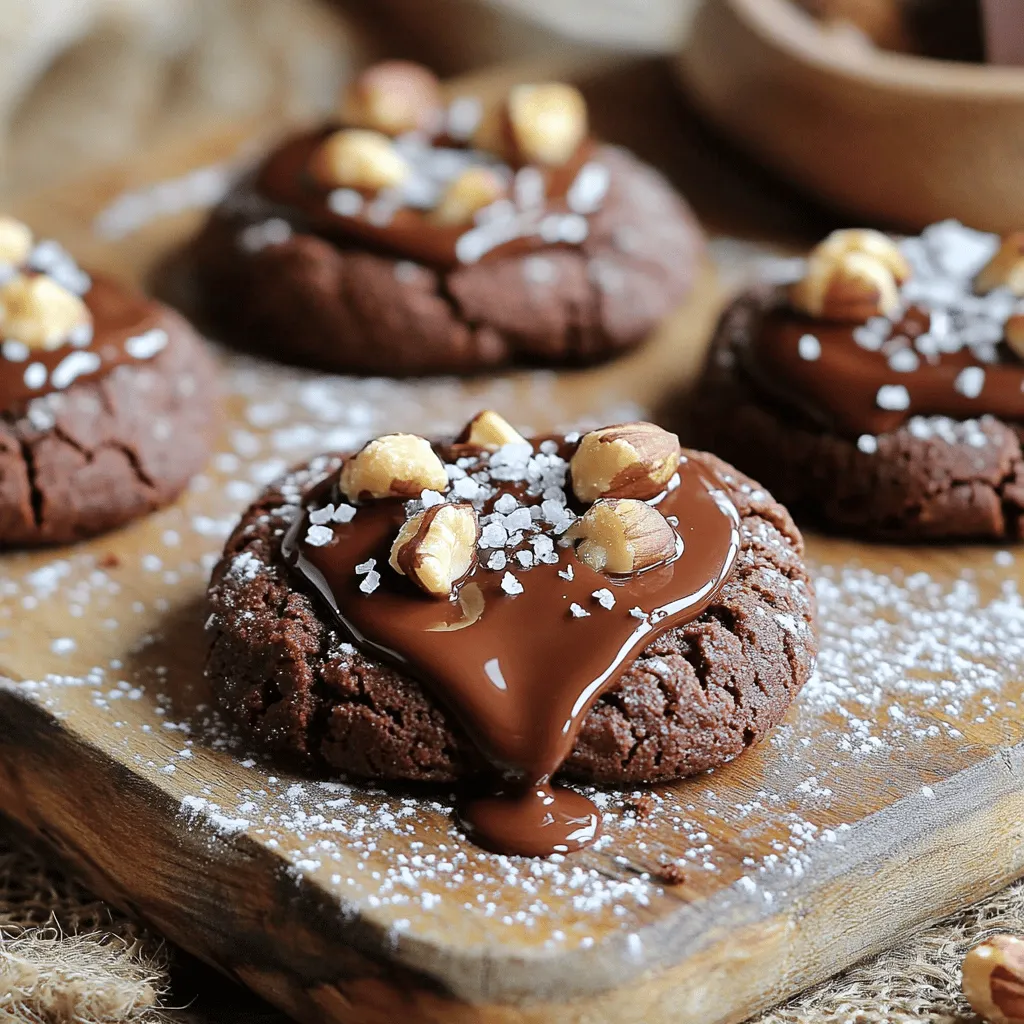
Get ready to indulge with my delightful Chocolate Hazelnut Spread Cookies! These soft treats blend rich cocoa with creamy hazelnut

- 1 ½ cups all-purpose flour - ½ cup granulated sugar - 1 teaspoon baking powder - ½ teaspoon baking soda - ¼ teaspoon salt - Zest and juice from 1 large lemon - ½ cup unsalted butter, melted - 2 large eggs, at room temperature - ½ cup buttermilk (or milk mixed with ½ tablespoon vinegar, let sit for 5 minutes) - 1 teaspoon pure vanilla extract - 1 cup fresh blueberries (or frozen blueberries, do not thaw) - Optional: Coarse sugar for topping Each ingredient plays a big role in the flavor and texture of the muffins. - All-purpose flour gives structure and helps the muffins rise. - Granulated sugar adds sweetness and helps with browning. - Baking powder and baking soda create the lift, making muffins light. - Salt enhances all the flavors. - Lemon zest and juice add brightness and a fresh taste. - Unsalted butter brings richness and moisture to the muffins. - Eggs bind ingredients together, adding protein. - Buttermilk creates a tender crumb and adds a slight tang. - Vanilla extract rounds out the flavor. - Blueberries provide natural sweetness and juicy bursts in every bite. If you need to swap ingredients, here are some ideas: - Use whole wheat flour for more fiber. - Substitute honey or maple syrup for sugar for natural sweetness. - If you don’t have buttermilk, mix milk with vinegar as mentioned. - Replace butter with coconut oil for a dairy-free option. - For a flavor twist, try using lime juice or orange zest instead of lemon. With these ingredients and tips, you can make delicious Lemon Blueberry Muffins. For the full recipe, check the detailed instructions above. Enjoy baking! First, preheat your oven to 375°F (190°C). This temperature helps the muffins rise well. Take a muffin tin and line it with paper liners or grease it with cooking spray. This step keeps the muffins from sticking. Next, gather your ingredients. You will need flour, sugar, baking powder, baking soda, salt, lemon zest, lemon juice, melted butter, eggs, buttermilk, vanilla extract, and blueberries. Having everything ready makes baking easier. In a large bowl, mix the dry ingredients. Combine the flour, sugar, baking powder, baking soda, and salt. Whisk them well to ensure they blend. In another bowl, mix the wet ingredients. Combine the lemon zest, lemon juice, melted butter, eggs, buttermilk, and vanilla extract. Whisk until smooth. This mixture adds flavor and moisture to your muffins. Now, pour the wet mix into the dry mix. Use a spatula to fold them together gently. Be careful not to overmix; a few lumps are okay. This step keeps the muffins light and fluffy. After that, fold in the blueberries gently. You want to keep them whole for juicy bites of flavor in every muffin. Using a spoon or an ice cream scoop, fill each muffin cup about ¾ full with the batter. This helps them rise without spilling over. If you like, sprinkle coarse sugar on top for a sweet crunch. Place the muffin tin in the oven and bake for 18-22 minutes. Check for doneness by inserting a toothpick into the center. If it comes out clean, your muffins are ready. Once done, let the muffins cool in the tin for about 5 minutes. Then, transfer them to a wire rack to cool completely. This step helps them maintain a nice texture. Enjoy your lemon blueberry muffins warm or at room temperature. For the full recipe, refer to the previous section. To get soft and fluffy muffins, use room temperature ingredients. This includes butter, eggs, and buttermilk. Cold ingredients can lead to dense muffins. Also, avoid overmixing the batter. Mix just until combined. A few lumps are fine. Bake your muffins at 375°F (190°C) for about 18-22 minutes. Start checking around the 18-minute mark. Insert a toothpick in the center. If it comes out clean, your muffins are ready. Overbaking can make them dry, so keep an eye on them. One mistake is using too much flour. Scoop it gently and level off with a knife. Another mistake is overmixing, which makes the muffins tough. Lastly, don’t skip the lemon zest; it boosts flavor. Follow these tips for a delightful treat. For the complete recipe, check out the Full Recipe section. {{image_4}} You can make your lemon blueberry muffins even better. Adding nuts gives a nice crunch. Chopped walnuts or almonds work well. You can also add spices like cinnamon or nutmeg. These spices boost the flavor and warmth. Try adding a pinch for a cozy touch! If you need gluten-free muffins, swap all-purpose flour for a gluten-free blend. Many blends work well in baking. For a dairy-free option, use almond milk or coconut milk instead of buttermilk. Replace butter with coconut oil or a dairy-free spread. These swaps keep the muffins soft and tasty. Blueberries are great, but other fruits shine too! Use raspberries for a tart taste. Strawberries add a sweet touch. You can mix fruits for a fun flavor. Just keep the total fruit amount the same. Each fruit brings its own joy to your muffins. For the full recipe, check out [Full Recipe]. To keep your lemon blueberry muffins fresh, store them in an airtight container. This helps lock in moisture and flavor. Place a piece of parchment paper between layers to avoid sticking. If you make a big batch, you might want to separate them with paper towels. You can freeze these muffins for longer storage. Make sure they are cool before wrapping them tightly in plastic wrap. Then place them in a freezer bag. They will stay fresh for up to three months. When you want to enjoy one, thaw it overnight in the fridge. You can also reheat it in the microwave for about 15-20 seconds. Lemon blueberry muffins taste best within the first few days. After that, they may start to lose their soft texture. Store them at room temperature for up to two days. If you notice any signs of mold or dryness, it’s best to toss them. For the freshest taste, follow the Full Recipe and enjoy them soon! Yes, you can use frozen blueberries. Just add them straight to the batter without thawing. This helps keep the muffins moist and stops them from turning purple. Frozen blueberries also add a nice burst of flavor when baked. To make these muffins healthier, you can try these tips: - Substitute whole wheat flour for all-purpose flour. - Use less sugar or switch to a natural sweetener like honey or maple syrup. - Replace half the butter with unsweetened applesauce. - Add chia seeds or flaxseeds for extra fiber. To check if the muffins are done, look for these signs: - The tops should be golden brown. - A toothpick inserted into the center comes out clean. - The muffins feel springy to the touch. These signs mean your muffins are ready to enjoy! To make mini muffins, adjust the baking time. Fill each mini cup about ¾ full. Bake at the same temperature but for only 10 to 15 minutes. Keep an eye on them, as they will bake faster. Enjoy your mini treats! For the full recipe, check out the details above! In this article, we covered all you need for perfect Lemon Blueberry Muffins. I shared the complete ingredients list and explained key components. You now know how to mix, bake, and store your muffins. Plus, I highlighted variations and tips for the best results. Remember, baking is fun and easy. With the right ingredients and steps, you can create tasty muffins. Enjoy making them your own!

Lemon Blueberry Muffins Soft and Flavorful Delight

Get ready to elevate your baking game with these Lemon Blueberry Muffins! I’ll show you how to create soft, flavorful

Older posts
Newer posts
← Previous Page1 … Page53 Page54 Page55 … Page86 Next →

dsad

© 2026 yumymoments • Built with GeneratePress

Our Policies

  • Copyright Policy
  • Cookie Policy
  • GDPR Policy
  • Privacy Policy
  • Disclaimer
  • Terms Of Use

More Information

  • Home
  • About
  • Contact
  • Appetizers
  • Dessert
  • Dinner
  • Drinks
©2026, yumymoments About Back To Top