Skip to content
DisclaimerTerms Of UseGDPR PolicyCookie Policy

yumymoments

  • Home
  • Drinks
  • Appetizers
  • Dinner
  • Dessert
  • About
  • Contact
  • Privacy Policy
DisclaimerTerms Of UseGDPR PolicyCookie Policy

NO-ING-IMG

First, you need to press the tofu. This step gets rid of extra moisture. Wrap the tofu in a clean kitchen towel. Place a heavy object on top for 15-20 minutes. After pressing, slice the tofu into cubes. Aim for bite-sized pieces to ensure even cooking. Next, heat one tablespoon of sesame oil in a large skillet over medium-high heat. Once hot, add the diced tofu. Sauté the tofu for about 5-7 minutes. Turn it gently so it becomes golden brown on all sides. After that, remove the tofu from the skillet and set it aside on a plate. In the same skillet, add the remaining tablespoon of sesame oil. Stir in the sliced red onion, minced garlic, and grated ginger. Sauté these for about 2 minutes. You want the onion to become soft and see-through. Then, add the broccoli, bell peppers, snap peas, and julienned carrot. Stir-fry this mixture for 5-7 minutes. Your goal is to have tender-crisp and colorful vegetables. Now it's time to bring it all together. Return the sautéed tofu to the skillet. Drizzle the soy sauce over the mix. Gently toss everything until it’s well coated. Let it cook for an extra 1-2 minutes. This helps the flavors blend nicely. Taste the stir fry and season with salt and fresh black pepper as needed. For more details, you can check the Full Recipe. Tofu can either be soft or crispy. Pressing tofu is key. This step removes excess water. It helps the tofu absorb flavors and become crispy. Wrap the tofu in a towel. Place a heavy object on top for about 15-20 minutes. After pressing, cut the tofu into cubes. For crispy tofu, sauté it in a hot pan. Use a non-stick skillet or wok. Heat some sesame oil and add the tofu. Cook until all sides are golden brown. This takes about 5-7 minutes. You’ll love the crunch! Adjusting seasonings can transform your dish. Start with soy sauce. It adds a savory touch. If you want more heat, try some chili flakes. For sweetness, add a dash of honey or maple syrup. You can balance these flavors to suit your taste. Experiment with fresh herbs too. Add basil or cilantro for a fresh kick. These small changes can make a big difference in flavor. Serving ideas can enhance your meal's appeal. Use colorful bowls to show off the vibrant veggies. A mix of colors makes the dish pop! Garnish your stir fry with toasted sesame seeds. They add texture and a nice crunch. Fresh herbs like cilantro or green onions also look great. These tips will elevate your dish and impress your guests. Enjoy your vibrant stir fry! For the full recipe, check the previous section. {{image_4}} You can change up your stir fry by using different vegetables. Seasonal swaps keep your dish fresh. For example, use zucchini in summer or squash in fall. You can also add leafy greens like spinach or bok choy. These greens cook quickly and add a nice color to your meal. Tofu is great, but you can use different types. Silken tofu is soft and creamy. It works well in sauces or soups. Extra-firm tofu has more texture and holds its shape better. If you want to try something new, chickpeas or tempeh are good choices too. They add protein and flavor. Spice things up with chili sauce if you like heat. It gives your stir fry a nice kick. You can also try teriyaki or hoisin sauce for a sweeter taste. Each sauce will change the flavor, so feel free to experiment and find what you love. To store leftovers properly, first let the stir fry cool. Then, transfer it to an airtight container. Make sure to seal it tightly to keep out air. Place the container in the fridge. The recommended shelf life for vegetable stir fry with tofu is about 3 to 5 days. After that, the flavors and texture may decline. Always check for any signs of spoilage before eating. For freezing stir fry, let the dish cool completely. Then, pack it into freezer-safe containers. Leave a little space at the top to allow for expansion. You can also use freezer bags, squeezing out as much air as possible. When reheating frozen leftovers, the best method is to thaw them overnight in the fridge. Then, heat in a skillet over medium heat. Add a splash of water or oil to help revive the dish. Stir until it’s heated through. Enjoy your meal again without losing flavor! Yes, you can easily make this dish gluten-free. The key is to use gluten-free soy sauce, known as tamari. This substitute provides the same rich flavor without the gluten. Always check labels when buying tamari to ensure it's free from gluten. For stir fry, firm or extra-firm tofu works best. These types hold their shape and provide a nice texture. Soft or silken tofu tends to break apart easily. When using firm tofu, press it well to remove moisture. This step ensures a crisp exterior when you fry it. Absolutely! Meal prepping this stir fry is simple. You can chop the vegetables and press the tofu in advance. Store them in airtight containers in the fridge. When you are ready to eat, just sauté everything together. To reheat, simply warm it in a skillet over medium heat for a few minutes. This blog post covered a tasty vegetable stir fry with tofu. You learned about the main ingredients, like tofu and fresh veggies, plus flavor enhancers like garlic and soy sauce. I shared step-by-step instructions and helpful tips for the best texture and taste. You can customize this dish with different vegetables or proteins. Proper storage and reheating tips ensure you enjoy your meal later. Remember, stir fry is fun and flexible. Experiment with flavors to make it your own, making easy meal prep a breeze. Enjoy cooking!

Vegetable Stir Fry with Tofu Quick and Easy Meal

Looking for a quick and easy meal that packs a punch? My Vegetable Stir Fry with Tofu recipe is here

- 4 bone-in chicken thighs, skin-on - 1 tablespoon extra virgin olive oil - 2 cloves fresh garlic, minced - 1 tablespoon fresh rosemary, finely chopped - 1 tablespoon fresh thyme leaves - 1 tablespoon fresh parsley, finely chopped - Zest of 1 lemon - Salt and freshly cracked black pepper to taste - 1 cup cherry tomatoes, halved - 1 lemon, sliced into rounds When making herb roasted chicken thighs, the right ingredients matter. I always choose bone-in, skin-on chicken thighs for more flavor. The skin helps keep the meat juicy. The olive oil adds richness, while garlic gives a bold taste. Fresh herbs are key for bright flavors. I love using rosemary, thyme, and parsley. They blend well and create an aromatic dish. The lemon zest adds a fresh kick that brightens up the flavors. Don't forget to season well with salt and pepper. This step enhances every bite. The cherry tomatoes and lemon slices not only add color but also flavor. They roast beautifully with the chicken, creating a dish that is both pretty and tasty. For the full recipe, check the details above. 1. First, preheat your oven to 425°F (220°C). This high heat helps the chicken skin get crispy. 2. In a small bowl, combine 1 tablespoon of extra virgin olive oil, 2 cloves of minced garlic, 1 tablespoon of chopped rosemary, 1 tablespoon of thyme leaves, 1 tablespoon of chopped parsley, and the zest of 1 lemon. Add salt and black pepper to taste. Stir until you have a nice herb paste. 1. Take 4 bone-in chicken thighs and pat them dry with paper towels. This step is key for crispy skin. 2. Rub the herb paste generously under and over the skin of the chicken thighs. Make sure every piece is well coated to lock in flavor. 1. Arrange the chicken thighs, skin side up, in a large baking dish. 2. Add 1 cup of halved cherry tomatoes and a few lemon slices around the chicken. This adds color and flavor. 3. Roast the chicken in the oven for 30-35 minutes. Make sure the internal temperature reaches 165°F (75°C) for safe eating. This method makes every bite juicy and full of flavor. For the full details on how to make this dish, see the Full Recipe. To get that perfect crispy skin, start by patting the chicken thighs dry. This simple step removes moisture that can make the skin soggy. Next, cook the chicken at a high temperature of 425°F (220°C). This heat helps the skin crisp up nicely while keeping the meat juicy. For a deeper flavor, try marinating the chicken overnight. This allows the herbs and spices to soak into the meat. Fresh herbs, like rosemary and thyme, add bright flavors. If you use dried herbs, remember to use less, as they are more potent. Pair your herb roasted chicken thighs with side dishes like roasted vegetables or creamy mashed potatoes. These sides complement the rich flavors of the chicken. When plating, serve the chicken on a large platter. Arrange roasted cherry tomatoes and lemon slices around the chicken for a colorful and inviting display. Drizzle pan juices over the chicken for added flavor and shine. This makes your dish look as good as it tastes! {{image_4}} You can change the herbs in this dish to suit your taste. If you love basil, try it instead of rosemary. Oregano works well with chicken too. Fresh herbs give the best flavor, but dried herbs are fine too. Use one-third the amount when using dried herbs. So, if a recipe calls for one tablespoon of fresh herbs, use one teaspoon of dried. You don’t have to roast the chicken in the oven. Grilling gives a nice smoky taste. Just preheat your grill and cook the chicken thighs for about 20 minutes. Flip them halfway to cook evenly. If you’re busy, try a slow cooker. Place the thighs with herbs and some broth in the cooker. Set it on low for 6 hours. You’ll get juicy chicken with little effort. Adding vegetables makes this dish even better. Try seasonal veggies like zucchini or bell peppers. Toss them in with the chicken for roasting. You can also use root veggies like carrots or potatoes. They roast nicely and soak up the flavors. This way, you have a full meal on one tray, saving time and dishes. For a complete recipe, check the Full Recipe link. After enjoying your herb roasted chicken thighs, store any leftovers right away. Place the chicken in the fridge within two hours of cooking. Use an airtight container to keep it fresh. You can also wrap the chicken tightly in plastic wrap. This helps prevent air from drying it out. When you are ready to enjoy the leftovers, you want them juicy and tasty. To do this, use a microwave or oven. If using a microwave, cover the chicken with a damp paper towel. This keeps moisture in while it heats. If using an oven, set it to 350°F (175°C). Place the chicken in a baking dish, and add a splash of broth to keep it moist. Heat for about 15-20 minutes or until warm. If you want to save the chicken for later, freezing is a great choice. Cool the chicken completely before freezing. Wrap each piece in plastic wrap, then place them in a freezer bag. Be sure to remove as much air as possible. This helps prevent freezer burn. When you are ready to eat, thaw the chicken in the fridge overnight. For quick thawing, place the wrapped chicken in cold water for a few hours. Never thaw at room temperature, as it can lead to unsafe bacteria growth. For the full recipe, check the earlier sections! Cook bone-in chicken thighs for 30 to 35 minutes at 425°F (220°C). The skin should turn golden and crispy. Use a meat thermometer to check doneness. The thickest part must reach 165°F (75°C). This ensures your chicken is safe to eat and juicy. Yes, you can use boneless chicken thighs. Adjust the cooking time to about 25 to 30 minutes. Since they cook faster, keep an eye on the temperature. This helps you avoid dry chicken while still enjoying great flavor. Herb roasted chicken thighs pair well with many sides. Try roasted vegetables like carrots and broccoli. You can also serve it with creamy mashed potatoes or a fresh salad. Rice pilaf or crusty bread are also great options. These sides will enhance your meal. To keep chicken thighs tender, start by patting them dry. This helps get crispy skin. Use the herb paste generously under and over the skin. Allow the chicken to rest for five minutes after cooking. This helps the juices stay in the meat, making it juicy and tasty. In this post, I covered how to make herb-roasted chicken thighs. I shared important ingredients, step-by-step instructions, and helpful tips. You can achieve crispy skin and great flavor with fresh herbs. I also explored storage options and variations to try. Now, you have all you need to create a tasty meal. Enjoy experimenting with your own flavors and ingredients. Cooking can be fun and rewarding!

Herb Roasted Chicken Thighs Juicy and Flavorful Dish

Are you ready to impress your family with a dish that’s both juicy and full of flavor? Herb Roasted Chicken

For a great peach crumble, you need the right ingredients. Here’s what you will need: - 4 large, ripe peaches, peeled and sliced into wedges - 1 tablespoon fresh lemon juice - 1/4 cup packed brown sugar - 1 teaspoon pure vanilla extract - 1 cup rolled oats - 1/2 cup all-purpose flour - 1/3 cup granulated sugar - 1 teaspoon ground cinnamon - 1/4 teaspoon fine sea salt - 1/2 cup cold unsalted butter, cut into small cubes Using ripe peaches is key. They give the dessert a sweet, juicy flavor. The lemon juice adds a nice zing and balances the sweetness of the brown sugar. You can add some fun flavors to your peach crumble. Here are some ideas: - Chopped nuts like almonds or walnuts for crunch - Seeds like sunflower or pumpkin for added texture - Alternative sweeteners like honey or maple syrup for a twist Feel free to mix and match these options based on your taste or dietary needs. Gathering your kitchen tools makes cooking easier. Here's what you need: - Large mixing bowls for combining ingredients - A 9x9 inch baking dish for the crumble When choosing a baking dish, make sure it fits your oven. If you want a thicker crumble, use a smaller dish. For a thinner layer, use a larger one. For the full recipe, check [Full Recipe]. To make the best peach crumble, start with fresh, ripe peaches. First, take a sharp knife and cut a small "X" at the bottom of each peach. This step helps with peeling. Next, place the peaches in boiling water for about 30 seconds. Then, quickly move them to an ice bath. This method makes peeling easy. Once peeled, slice the peaches into wedges. Next, mix the peach wedges in a bowl. Add 1 tablespoon of lemon juice, 1/4 cup of brown sugar, and 1 teaspoon of vanilla extract. Gently toss everything together. The sugar will help to draw out the juices, making the filling juicy and sweet. For the crumble topping, grab a clean bowl. Combine 1 cup of rolled oats, 1/2 cup of all-purpose flour, 1/3 cup of granulated sugar, 1 teaspoon of ground cinnamon, and 1/4 teaspoon of sea salt. Mix them well until they are evenly blended. Now, it’s time to add the butter. Cut 1/2 cup of cold unsalted butter into small cubes. Add these cubes into the dry mixture. Use your fingers or a pastry cutter to mix. You want it to look like coarse crumbs. Some larger pieces are okay. They add great texture. Preheat your oven to 350°F (175°C). While it heats, prepare your baking dish. Grease a 9x9 inch dish for easy serving. Spread the peach filling evenly on the bottom. After that, sprinkle the crumble topping over the peaches. Place the dish in the oven and bake for 25 to 30 minutes. You want the topping to turn a lovely golden brown. Check the peaches too; they should bubble around the edges. Once done, take it out and let it cool for a few minutes. Now, you are ready to enjoy this peach crumble dessert delight! To get the right crumble texture, mix the dry ingredients well. Use cold butter for the topping. This keeps the butter solid, which helps create a nice crunch when baked. Work the butter into the oats and flour until it looks like coarse crumbs. Avoid over-mixing. This keeps some larger pieces for added texture. To prevent a soggy bottom crust, spread the peach filling evenly in the baking dish. Make sure the peaches are not too juicy. If they are, you can add a bit of cornstarch to absorb excess liquid. This will help keep your base firm and tasty. Adding spices can really make your peach crumble shine. A pinch of nutmeg or ginger can boost the flavor a lot. These spices add warmth and depth. You can also try cinnamon for a classic twist. For a mixed fruit crumble, consider adding berries or apples. Use a ratio of about 2 cups of peaches to 1 cup of other fruits. This keeps the peach flavor in the spotlight while adding new tastes. Serving your peach crumble warm is a must. It pairs wonderfully with a scoop of vanilla ice cream on top. The cold ice cream melts slightly and adds creaminess. This makes each bite a delight. For garnishing, consider adding a sprig of fresh mint. It gives a pop of green and looks beautiful. You can also sprinkle some extra cinnamon or a few sliced almonds on top for added style. For the full recipe, check the Peachy Summer Crumble Extravaganza. Enjoy your culinary adventure! {{image_4}} To make a gluten-free peach crumble, you need to swap some ingredients. You can use almond flour or coconut flour instead of regular flour. For oats, look for certified gluten-free oats. When baking gluten-free, be careful with how much liquid you use. Sometimes, gluten-free flours soak up more moisture. You may need to adjust the liquid in your recipe. Aim for a crumbly topping, not a soggy one. If you want a vegan peach crumble, you can replace butter with plant-based butter. Look for brands that are labeled vegan. You can also use coconut oil, which gives a nice flavor. For sweeteners, try maple syrup or agave nectar. Both work well in this dessert. Just remember, these sweeteners are liquid, so reduce other liquids in your recipe a bit. Mixing fruits can create fun flavors in your crumble. You can add berries like blueberries or strawberries. Apples are also a great match with peaches. For mixed fruit, keep the ratio about 2:1. For every two cups of peaches, add one cup of other fruits. This keeps the peach flavor strong but adds new tastes. You can have fun trying different combinations! For the full recipe, check out Peachy Summer Crumble Extravaganza! To keep your peach crumble fresh, store it in the fridge. Place it in an airtight container. This helps maintain its flavor and texture. When ready to serve, re-warm it gently. Heat it in the oven at 350°F for about 15 minutes. This helps restore the crisp topping and warm, juicy peaches. You can freeze both unbaked and baked peach crumble. For unbaked crumble, assemble it in your baking dish. Cover it tightly with plastic wrap. It can stay in the freezer for up to three months. For baked crumble, let it cool completely before freezing. Wrap it well in foil or plastic wrap. This also lasts up to three months. To thaw your frozen peach crumble, move it to the fridge overnight. If you’re in a hurry, you can thaw it at room temperature for a few hours. Once thawed, reheat it in the oven at 350°F. Bake it for about 20 minutes. This keeps the topping crispy and the peaches warm and soft. Enjoy your delicious peach crumble! Yes, you can use canned peaches. However, there are some trade-offs. Canned peaches often have a softer texture than fresh ones. They also tend to be sweeter since they are packed in syrup. This can make your crumble a bit too sweet. If you choose canned peaches, drain them well to avoid excess moisture. Fresh peaches give a better texture and flavor. For the best results, I recommend using ripe, fresh peaches. To ripen peaches quickly, place them in a paper bag. This traps the ethylene gas they emit, speeding up the ripening. You can add an apple or banana to the bag for even faster results. Check the peaches daily. Once they feel soft to the touch, they are ripe and ready to use in your peach crumble. This simple trick can transform hard fruit into juicy, sweet peaches in just a few days. To make a crunchy topping, use cold butter cut into small cubes. Mixing cold butter with the dry ingredients helps create that perfect crumbly texture. Incorporate rolled oats and a bit of flour for added crunch. You can also add nuts like almonds or pecans for an extra crunch. Be sure to bake it until it turns a golden brown. A crunchy topping will elevate your peach crumble to a whole new level of deliciousness. For the full recipe, check out the Peachy Summer Crumble Extravaganza. To make a perfect peach crumble, focus on ripe peaches for the best flavor. Use the essential ingredients and follow the step-by-step instructions to create a delicious dessert. Don’t forget the tips for texture and flavor to elevate your dish. Whether you want to make it gluten-free or vegan, there are options for all. Store any leftovers properly, and reheating will keep it tasty. Now, you have the knowledge to enjoy this wonderful dessert with family and friends. Happy baking!

Peach Crumble Dessert Delightful and Simple Recipe

Craving a delicious, easy dessert? Let’s make a Peach Crumble that’s sure to impress! With simple ingredients and straightforward steps,

- 1 ½ cups graham cracker crumbs - ½ cup unsalted butter, melted - ½ cup packed brown sugar - 1 cup mini marshmallows - 1 cup semi-sweet chocolate chips - ½ cup creamy peanut butter - ½ teaspoon vanilla extract - A pinch of salt Gathering the right ingredients is key. You want the best flavors for your S'mores Bars. The graham cracker crumbs give a nice base. The unsalted butter adds richness. Brown sugar brings sweetness, while mini marshmallows provide that gooey texture. Semi-sweet chocolate chips melt perfectly. Creamy peanut butter adds a twist, making it even tastier. A little vanilla extract enhances all these flavors. The salt balances the sweetness, making every bite delightful. - Gluten-free options: Use gluten-free graham cracker crumbs. Almond flour can work too. - Vegan alternatives: Swap unsalted butter for coconut oil or a vegan butter. Use vegan chocolate chips and skip the creamy peanut butter if you prefer. These substitutions keep the fun alive. You can still enjoy S'mores Bars even with different diets. Get creative and make it your own! First, preheat your oven to 350°F (175°C). This helps the bars bake evenly. Next, prepare a 9x9 inch baking pan. You can grease it lightly or use parchment paper. Parchment makes it easier to lift the bars out later. Now, let’s make the crust. In a bowl, mix together graham cracker crumbs, melted butter, and brown sugar. Stir until it looks crumbly. Press this mixture firmly into the bottom of your pan. It should cover the whole base. Bake the crust for 8 to 10 minutes. You want it to look light golden brown. After baking, let it cool for a few minutes. Next, prepare the peanut butter layer. Heat creamy peanut butter in the microwave for about 30 seconds. It should be smooth and pourable. Add vanilla extract and a pinch of salt. Stir well. Drizzle the peanut butter over the cooled crust. Spread it evenly with a spatula. Then, sprinkle mini marshmallows and chocolate chips on top. Press them down gently so they stick. Return the pan to the oven. Bake for another 10 to 12 minutes. Look for golden marshmallows and melted chocolate. This gives the bars their gooey texture. Once baked, take the pan out of the oven. Allow the bars to cool completely in the pan. This prevents them from falling apart when sliced. When cool, use a sharp knife to cut the bars into squares. For a fun twist, serve them on a rustic wooden board. You can also add extra mini marshmallows or a drizzle of warm chocolate on top. Enjoy your homemade S'mores Bars! For the full recipe, refer back to the ingredients and instructions. - Ensuring optimal texture: To get the best texture, do not skip the cooling step. Let your crust cool for a few minutes before adding the layers. This helps keep the bars from becoming too soggy. You want a nice crunch from the graham cracker base, so watch your baking time closely. Bake the crust until it is light golden brown. - Avoiding burnt marshmallows: Keep an eye on the marshmallows as they bake. They can go from perfect to burnt quickly. I recommend checking them at the 10-minute mark. If they are golden and puffy, it's time to take them out. You want that gooey texture, not charred bits! - How to serve beautifully: For a stunning display, cut your bars into neat squares. Arrange them on a rustic wooden cutting board. This adds a homey touch. You can also use small cupcake liners to serve individual pieces. This makes it easy for guests to grab a bar. - Garnishes to enhance appearance: Add extra mini marshmallows on top for a fun look. A drizzle of warm melted chocolate can elevate the visual appeal. You can also sprinkle a bit of graham cracker crumbs on top for texture. It makes your S'mores Bars look even more inviting! Enjoy these tips to make your S'mores Bars the star of the show! For the complete recipe, check out the Full Recipe section. {{image_4}} You can make S'mores Bars even more fun by changing flavors. Here are a few ideas: - Adding nuts or fruit: Try adding chopped nuts like walnuts or almonds. You can also mix in fruit like sliced bananas or strawberries. These add great taste and texture. - Chocolate types: You don’t have to stick to semi-sweet chocolate chips. Use dark chocolate for a richer flavor or white chocolate for a sweeter touch. Each type changes the taste and makes it special. S'mores Bars can fit many diets. Here’s how to adapt them: - Gluten-free S'mores Bars: To make these bars gluten-free, swap graham cracker crumbs with gluten-free crumbs. You can find these at most stores. Make sure all other ingredients are gluten-free too. - Vegan S'mores Bars: For a vegan option, use vegan butter and dairy-free chocolate. Replace the mini marshmallows with vegan marshmallows. These swaps keep the bars tasty while meeting vegan needs. With these variations, you can create your perfect S'mores Bars. Check out the Full Recipe to get started! To keep your s'mores bars fresh, store them in an airtight container. This will help keep them soft and chewy. Place a piece of wax paper between the bars to prevent sticking. You can also wrap each bar in plastic wrap for added protection. If you want to save some for later, freezing works great. Cut the bars into squares. Wrap each square in plastic wrap, then place them in a freezer bag. They can last up to three months in the freezer. At room temperature, these bars stay fresh for about five days. To maintain their taste and texture, keep them in a cool, dry place away from sunlight. Look for signs of spoilage. If you see mold or an off smell, it’s best to throw them away. Enjoy your delicious bars while they are fresh! How do I make S'mores Bars without an oven? You can make S'mores Bars on the stovetop or in a microwave. For the stovetop, use a non-stick pan. Melt the butter and mix in the crumbs and sugar. Press it into the pan. Add layers as usual. For the microwave, layer the ingredients in a microwave-safe dish. Heat in short bursts until the chocolate and marshmallows melt. Can I make S'mores Bars ahead of time? Yes, you can make S'mores Bars a day or two in advance. After baking, let them cool completely. Cover them tightly with plastic wrap or foil. Store them in a cool, dry place. This way, they stay fresh and tasty when you're ready to enjoy them. What is the best way to reheat S'mores Bars? To reheat S'mores Bars, use the microwave. Heat them for about 10 to 15 seconds. This warms them up and makes the chocolate soft again. Don't heat too long, or the marshmallows may melt too much. Why are my bars too crumbly? Bars can crumble if there isn't enough butter or if you overbake them. Ensure you measure the butter correctly. When baking, look for a light golden brown color. If they crumble, try pressing them back together with your hands. How to fix burnt marshmallows? If your marshmallows burn, remove the pan right away. You can gently scrape off the burnt parts. To avoid this, keep a close eye on the bars as they bake. If you see signs of burning, lower the oven temperature or remove them early. You learned how to make delicious S'mores Bars with simple steps. We covered the key ingredients, how to layer them, and tips for perfect baking. You can switch ingredients for dietary needs, like gluten-free or vegan options. Storing and serving these sweet treats is easy with my best practices. Enjoy experimenting with flavors and variations that suit your taste. Now, you can bake confidently and share these tasty bars with everyone!

S’mores Bars Irresistible and Easy Dessert Recipe

Craving a sweet treat that’s easy to make? Look no further! These S’mores Bars bring all the cozy campfire flavors

To make a tasty cinnamon roll casserole, you need just a few simple items. Here’s what you need: - 2 cans refrigerated cinnamon roll dough (with included icing) - 4 large eggs - 1 cup milk (preferably whole or 2%) - 1 teaspoon pure vanilla extract - 1 teaspoon ground cinnamon - ½ cup pure maple syrup You can add more flavors to your casserole if you like. These ingredients will make it even better: - ½ cup chopped pecans (for added crunch) - 1 cup fresh blueberries (for a fruity twist) If you don’t have a few items, don’t worry! Here are some easy swaps: - Use almond milk instead of regular milk for a nutty flavor. - Swap maple syrup for honey if you prefer its taste. - If you lack eggs, try mashed bananas or unsweetened applesauce. Using these ingredients, you will create a delicious and delightful cinnamon roll casserole. This dish is perfect for breakfast or any special occasion. For the full recipe, please check the earlier section. To start, gather your ingredients. You need two cans of cinnamon roll dough, eggs, milk, vanilla, cinnamon, maple syrup, and optional toppings. Preheat your oven to 375°F (190°C). Grease a 9x13 inch baking dish to keep the casserole from sticking. Next, open the cinnamon roll cans and cut each roll into quarters. Spread these pieces evenly in the baking dish. In a large bowl, whisk together four eggs, one cup of milk, one teaspoon of vanilla, and one teaspoon of cinnamon. Pour this mixture over the dough pieces. Press down gently to soak the bread. Now, drizzle half a cup of maple syrup on top. If you want, add chopped pecans and fresh blueberries for extra flavor. Bake the casserole in the oven for 25-30 minutes. Check for a golden top and a firm center. Let the casserole cool for about 10 minutes after baking. Drizzle the icing from the cinnamon roll cans on top for a sweet glaze. Cut the casserole into squares for serving. For a pretty touch, add more blueberries or a sprinkle of powdered sugar. A dollop of whipped cream on the side also adds flair. Enjoy your Cinnamon Roll Casserole Delight! For the full recipe, check the previous section. To make the best cinnamon roll casserole, keep these tips in mind: - Use fresh dough for the best rise. - Cut the cinnamon rolls into even pieces for uniform cooking. - Whisk the egg mixture well to blend flavors. - Pour the egg mix evenly to soak all the dough. - Let it cool slightly before serving to set. Avoid these common pitfalls: - Don't skip greasing the pan; it will stick! - Avoid overbaking; check at 25 minutes. - Don't forget the icing; it adds sweetness and flavor. - Skip the toppings at your own risk; they add great texture. To boost the flavors, consider these ideas: - Add a dash of nutmeg for warmth. - Mix in a splash of orange juice for zest. - Use flavored syrup, like vanilla or caramel, instead of maple. - Toss in other fruits, like sliced bananas or apples. Enjoy crafting your perfect cinnamon roll casserole with these tips! For the full recipe, check out the section above. {{image_4}} You can add a fruity twist to your cinnamon roll casserole. Fresh blueberries are a great choice. They add a sweet and tangy flavor. Just sprinkle one cup of blueberries over the dough before baking. Strawberries also work well. Simply slice them and lay them on top. The fruit becomes soft and juicy while baking. This makes each bite a burst of flavor. Adding nuts gives your casserole a nice crunch. Pecans are my favorite choice. They add a rich, buttery taste. You can chop about half a cup and sprinkle them on top. Walnuts are another option. They have a slightly bitter taste that balances the sweetness. Both nuts pair well with the cinnamon and syrup. You can change the flavor of your casserole easily. For a fall treat, try pumpkin spice. Just add one tablespoon of pumpkin spice to the egg mixture. It gives a warm, cozy taste. Chocolate lovers can add chocolate swirls. Drizzle melted chocolate over the top before baking. This creates a rich and sweet treat. Each variation makes the recipe new and exciting! For the full recipe, check out the details above. Store leftover cinnamon roll casserole in an airtight container. Let it cool down first. Keep it in the fridge for up to three days. If you want to keep it longer, consider freezing it. To reheat, preheat your oven to 350°F (175°C). Place the casserole in an oven-safe dish. Cover it with foil to prevent drying out. Heat for about 15-20 minutes, or until warm. You can also use the microwave. Heat it in short bursts, checking often. If you freeze the casserole, wrap it tightly in plastic wrap and foil. It can last up to three months. When you are ready to eat, thaw it in the fridge overnight. Once thawed, reheat it in the oven or microwave. Enjoy your delicious cinnamon roll casserole again! Yes, you can prepare this dish ahead of time. Simply follow the recipe steps up to the baking part. Cover the dish with plastic wrap and place it in the fridge. You can bake it the next morning. This makes it a great choice for busy days or special events. Cinnamon Roll Casserole pairs well with many sides. Here are some tasty options: - Fresh fruit, like strawberries or bananas - A side of yogurt for creaminess - Bacon or sausage for a savory touch - A drizzle of extra maple syrup for sweetness These sides add balance and enhance your meal. To check if your casserole is done, look for a golden brown top. You can also touch the center gently. If it feels set and not jiggly, it’s ready. Bake it for about 25-30 minutes, but keep an eye on it as ovens can vary. Cinnamon roll casserole combines easy ingredients and simple steps for a tasty treat. We explored essential and optional ingredients, steps to prepare, bake, and present it well. Tips helped you avoid common mistakes and enhance flavors. Variations let you try fruity or nutty twists. Lastly, proper storage keeps leftovers fresh. Remember, this dish is fun to make, share, and enjoy. Your kitchen will smell amazing, and people will love the result. Happy baking!

Cinnamon Roll Casserole Delightfully Easy Recipe

Are you craving a sweet treat that’s both easy and delicious? Look no further! This Cinnamon Roll Casserole recipe brings

To create a tasty Caprese Pasta Salad, you need simple, fresh ingredients. Here’s what you will need: - 8 oz fusilli or rotini pasta - 1 cup cherry tomatoes, halved - 1 cup fresh mozzarella balls (bocconcini), halved - 1/2 cup fresh basil leaves, torn into pieces - 1/4 cup extra virgin olive oil - 2 tablespoons balsamic glaze - Salt and freshly ground black pepper, to taste - Optional: 1/4 teaspoon red pepper flakes for added heat These ingredients combine to create a dish bursting with flavor. The pasta serves as a perfect base, while the tomatoes and mozzarella add freshness. The basil gives it a garden touch, and the dressing ties everything together. Using quality ingredients makes a big difference. I recommend a few brands to ensure your salad shines: - Pasta: Look for Barilla or De Cecco for good pasta options. - Mozzarella: Try BelGioioso or Galbani for fresh mozzarella. - Balsamic Glaze: Use Colavita or Pompeian for a smooth glaze. - Olive Oil: Extra virgin olive oil from California Olive Ranch delivers great flavor. These brands help you create a delicious meal with fresh tastes. If you have dietary needs, don’t worry! You can easily modify the salad. Here are some great substitutes: - Gluten-Free: Use gluten-free pasta like Tinkyada or Barilla. - Dairy-Free: Replace mozzarella with vegan cheese or avocado. - Low-Carb: Swap pasta for zucchini noodles or cauliflower. - Spice Level: Adjust or skip red pepper flakes if you prefer milder flavors. These swaps keep the dish enjoyable for everyone, no matter their diet. Start by boiling a large pot of salted water. Add the pasta and cook it for about 8 to 10 minutes. You want it al dente, or firm to the bite. Once done, drain the pasta in a colander. Rinse it under cold water to stop cooking. This keeps the pasta from getting mushy. In a big mixing bowl, combine the cooled pasta with cherry tomatoes and mozzarella. Halve the tomatoes and mozzarella balls for easy bites. Add the fresh basil leaves, torn into pieces. This adds a lovely green touch and fresh flavor to your salad. Gently mix everything together so it blends well. In a small bowl, whisk together olive oil and balsamic glaze. Add salt and black pepper. If you like heat, toss in red pepper flakes. Mix it until the dressing is smooth. This will give your salad a rich flavor. Drizzle the dressing over the pasta mixture. Use a spatula or large spoon to toss it all gently. Make sure everything is coated but be gentle with the mozzarella. Taste your salad and adjust the seasoning if needed. Let it sit at room temperature for 15-20 minutes. This helps the flavors blend nicely. Serve it in a big bowl or in individual servings. For a nice touch, garnish with extra basil and a drizzle of balsamic glaze. Enjoy your Caprese Pasta Salad Delight! To get the best pasta, cook it al dente. This means the pasta should be firm, not mushy. Follow the package instructions for timing. It usually takes about 8 to 10 minutes. After cooking, drain the pasta right away. Rinse it under cold water to stop cooking. This keeps the pasta from getting too soft. You want it to hold up in the salad. Season your pasta water well. Use a lot of salt; it should taste like the sea. This helps the pasta absorb flavor as it cooks. After mixing your salad, taste it. You may need more salt or pepper. If you like a kick, add red pepper flakes. The balsamic glaze adds sweetness, so balance it with salt. The right mix of flavors makes each bite exciting. When combining your ingredients, be gentle. Use a spatula or large spoon to toss. This keeps the mozzarella balls intact. If they break, the salad looks less pretty. Mix until everything is coated in dressing. Don’t rush this step; take your time. After tossing, let the salad sit for 15-20 minutes. This helps the flavors blend together. Trust me, it's worth the wait! {{image_4}} You can make Caprese pasta salad a full meal by adding proteins. Grilled chicken is a great option. It adds flavor and makes the dish heartier. Shrimp or salmon also work well. For a tasty twist, try adding diced salami. Each protein brings a new taste that pairs well with the fresh ingredients. If you want a vegetarian version, you can keep the recipe as is. Just skip the meat. For a vegan option, switch out the mozzarella for a plant-based cheese. Nutritional yeast can add a cheesy flavor without the dairy. Always check the labels on your ingredients to ensure they meet your dietary needs. Using seasonal ingredients can enhance your salad. In summer, add fresh corn or zucchini for crunch. In fall, try roasted butternut squash for warmth. You can also mix in arugula for a spicy kick. Seasonal swaps keep your dish fresh and exciting throughout the year. Enjoy the Full Recipe for more inspiration! To keep your Caprese pasta salad fresh, place it in an airtight container. Make sure to press out any air before sealing. This helps maintain the salad's freshness and flavor. If you have a large batch, divide it into smaller portions for easy access. Caprese pasta salad is best served cold or at room temperature. If you prefer it warm, heat it gently in a pan over low heat. Stir it often to prevent sticking. Avoid using a microwave, as it can make the pasta mushy and affect the fresh flavors. Stored properly, your Caprese pasta salad will last for about 3 days in the fridge. However, the tomatoes may release juices and the basil can wilt. To enjoy the best quality, try to eat it within the first couple of days. For the freshest taste, you may want to add fresh basil just before serving. You can use fusilli or rotini pasta. These shapes hold the dressing well. Their twists catch the cherry tomatoes and mozzarella nicely. They also provide a fun texture. If you prefer something different, try penne or farfalle. Just make sure the pasta is al dente for the best bite. Yes, you can! This salad tastes even better after sitting. Make it a few hours ahead to let the flavors blend. Just keep it in the fridge until you serve. If you make it too early, the basil might wilt. To avoid this, add the basil right before serving. Regular pasta is not gluten-free. However, you can use gluten-free pasta instead. Look for brands made from rice or quinoa. Their taste and texture work well in this salad. Just follow the cooking instructions on the package. For a complete guide, check out the Full Recipe. It gives you all the steps to make this fresh and tasty dish. In this blog post, we covered how to make Caprese Pasta Salad from start to finish. We explored the key ingredients, cooking steps, and tips for great texture and flavor. We also delved into variations and storage advice for your salad. Remember, you can customize this dish to fit your needs. Whether you want more protein or need a vegan option, there's something for everyone. Enjoy crafting your perfect Caprese Pasta Salad, and share it with others!

Caprese Pasta Salad Flavorful and Fresh Delight

If you crave a fresh, vibrant dish, then a Caprese Pasta Salad is for you! This meal combines juicy tomatoes,

- 4 large bell peppers (red, yellow, green, or orange) - 1 cup quinoa, rinsed under cold water - 2 cups vegetable broth or water - 1 can (15 oz) black beans, drained and rinsed - 1 cup corn kernels (fresh, frozen, or canned) - 1 cup diced tomatoes (fresh or canned) - 1 teaspoon ground cumin - 1 teaspoon smoked paprika - 1 teaspoon garlic powder - Salt and freshly ground black pepper to taste - 1 cup shredded cheese (cheddar or mozzarella) - Fresh herbs (cilantro or parsley, chopped) When I make stuffed bell peppers, I use fresh and colorful bell peppers for great flavor. You can pick your favorite colors. I love how they look and taste. Quinoa is my go-to grain here. It’s light, fluffy, and full of protein. Black beans add texture and fiber. They also make the dish hearty. Corn gives a sweet crunch, while diced tomatoes add juiciness. For spices, I choose cumin and smoked paprika. They bring warmth and depth to the filling. Garlic powder adds a nice kick. Don't forget to adjust salt and pepper to your taste. For a tasty finish, I sprinkle shredded cheese on top. It melts beautifully and adds a creamy texture. Fresh herbs like cilantro or parsley brighten the dish. They add a pop of color and a fresh taste. This mix of ingredients makes stuffed bell peppers a great meal prep choice. You can pack them with flavors that everyone loves. Check out the Full Recipe for all the steps! To start, rinse your quinoa under cold water. This step helps remove any bitter taste. Next, combine the rinsed quinoa with two cups of vegetable broth in a medium saucepan. Bring it to a boil over medium-high heat. Once it boils, reduce the heat to low and cover the pot. Let it simmer for about 15 minutes. The quinoa will be fluffy and the liquid will be gone when done. Now, let’s get the bell peppers ready. Cut the tops off each pepper and remove the seeds and membranes. This ensures they are clean and ready for stuffing. Place the hollowed peppers upright in a baking dish. Make sure they stand stable. You want them to hold all that good filling! In a large bowl, mix the cooked quinoa, black beans, corn, diced tomatoes, and spices. Use your spoon to stir until everything is combined well. This is where the flavors really come together! Next, take a pepper and start filling it with the mixture. Press down gently to pack it in well. A full pepper means more taste in every bite! Cover your baking dish tightly with foil. This keeps the steam in and helps the peppers cook evenly. Bake in your preheated oven for 25 minutes. After that, carefully remove the foil. Bake for an extra 10 to 15 minutes until the peppers are tender and the cheese is melted and bubbly. The cheese should have a nice golden brown color on top. Once done, let the dish cool for a few minutes before serving. This helps the filling settle. Enjoy your tasty stuffed bell peppers! Check [Full Recipe] for more details. When picking bell peppers, look for vibrant colors. Red, yellow, green, or orange all offer unique flavors. Choose peppers that feel firm and heavy for their size. A shiny skin means they are fresh. Avoid peppers with soft spots or wrinkles. These signs indicate they may be going bad. Store your bell peppers in the fridge. Keep them in a crisper drawer to help them last longer. They can stay fresh for about a week. If you cut them, wrap the pieces in plastic. Use them within a few days for the best taste. The size of your peppers matters. Large peppers need more time to cook than smaller ones. A good rule is to bake large peppers for about 35 to 40 minutes. Check for tenderness by poking with a fork. They should be soft but not falling apart. To ensure even cooking, place your peppers upright. If they wobble, trim the bottom slightly. This helps them stay stable while baking. Covering the dish with foil keeps moisture in, which helps cook the peppers evenly. Spices can make a big difference in your stuffed peppers. Try adding chili powder for heat or oregano for a fresh taste. You can even mix in fresh herbs like basil or thyme. These will brighten the flavor. Think about adding extra ingredients to your filling. Chopped onions or garlic can enhance the taste. If you want extra protein, mix in cooked ground meat or tofu. You can get creative with what you have on hand. Enjoy the process of making it your own! For the complete cooking experience, check out the Full Recipe. {{image_4}} When you think about stuffed bell peppers, you can get creative. There are many tasty variations. You can make them vegetarian, meat-filled, or inspired by global flavors. For a veggie-packed meal, try different grains. Instead of quinoa, use rice or farro. Both add great texture. You can also add more veggies. Chopped spinach, zucchini, or mushrooms work well. Mix them into your filling for extra nutrients. If you want a heartier dish, use meat. Ground beef, turkey, or chicken are great choices. Cook the meat first until it's browned. Then, mix it in with your veggies and grains. You may need to add more spices to balance the flavors. This will give your stuffed peppers a robust taste. You can take your taste buds on a trip. For Mexican-style peppers, add black beans, corn, and taco seasoning. Top them with cheese and serve with salsa. For a Mediterranean twist, use feta cheese, olives, and herbs like oregano. These flavors will make your stuffed peppers stand out. Feel free to explore these variations as you make your stuffed bell peppers. Each one offers a new and exciting way to enjoy this dish. For the complete recipe, check out the Full Recipe link. Store your leftover stuffed bell peppers in an airtight container. Make sure they cool down first. This helps keep them fresh. In the fridge, they can last up to 3-4 days. Just check for signs of spoilage before eating. You can freeze both unbaked and baked stuffed peppers. For unbaked peppers, wrap them tightly in plastic wrap. Place them in a freezer bag to avoid freezer burn. They can last for up to 3 months. For baked peppers, let them cool completely before freezing. Store them in an airtight container or freezer bag. When you want to eat them, you can reheat baked peppers right from the freezer. Just place them in a preheated oven at 350°F (175°C) for about 30-40 minutes. If they are thawed, they will need only 15-20 minutes. Unbaked peppers can be cooked straight from frozen, but they may need a little extra time. For more details on how to make these delicious peppers, check out the Full Recipe. Stuffed bell peppers usually take about 35 to 40 minutes to cook. First, you cover them with foil and bake for 25 minutes. Then, remove the foil and bake for another 10 to 15 minutes. This method helps the peppers soften and the cheese to melt nicely. Yes, you can use other grains! Brown rice, farro, or couscous are great choices. Each grain will give a different taste and texture. Just remember to adjust cooking times based on the grain you choose. Stuffed bell peppers are a healthy meal option. They are packed with vitamins from the bell peppers. The quinoa and beans add fiber and protein. This dish is low in fat and full of nutrients, making it a balanced choice. Many sides pair well with stuffed bell peppers. You can serve a fresh salad for crunch. A side of avocado slices adds creaminess. Greek yogurt also complements the dish nicely. For the complete recipe, check out the Full Recipe for vibrant veggie-stuffed bell peppers. Stuffed bell peppers are easy to make and taste great. You learned about their main ingredients, like quinoa, beans, and spices. After preparing and stuffing the peppers, you can bake them to perfection. There are many ways to customize your peppers, too. You can add different meats or grains for flavor. Don’t forget about storing your leftovers properly for later meals. Enjoy creating your perfect stuffed peppers!

Stuffed Bell Peppers Tasty Meal Prep Idea

Looking for a delicious meal prep idea? Stuffed bell peppers are the perfect choice! These colorful veggies are packed with

Here are the ingredients you need for classic peppermint bark: - 12 oz semi-sweet chocolate chips - 12 oz white chocolate chips - 1 tsp peppermint extract - 1 cup crushed peppermint candies (or crushed candy canes) - Pinch of sea salt (optional) This simple list makes it easy to gather what you need. Semi-sweet chocolate gives a rich flavor, while white chocolate adds sweetness. The peppermint extract brings fresh notes, perfect for the holidays. Crushed peppermint candies add crunch and a festive touch. If you love a sweet-salty mix, the sea salt will enhance the taste. Now you’re ready to create this delightful treat! {{ingredient_image_2}} First, grab a 9x9 inch baking dish. Line it with parchment paper. Make sure to leave some overhang on the sides. This helps you lift the bark out later. For the semi-sweet chocolate, put 12 oz of chocolate chips in a bowl. Microwave in 30-second bursts. Stir after each time until it is smooth. Next, for the white chocolate, take another bowl. Add 12 oz of white chocolate chips. Repeat the same melting process. After it’s melted, mix in 1 tsp of peppermint extract. Pour the melted semi-sweet chocolate into the lined dish. Use a spatula to spread it evenly. Place the dish in the fridge for about 15 minutes to set. Once the semi-sweet layer is set, pour the white chocolate over it. Spread it out evenly with a spatula. Now, sprinkle 1 cup of crushed peppermint candies over the white chocolate. Press down gently so they stick. You can also add a pinch of sea salt if you like the flavor contrast. Put the dish back in the fridge. Chill for about 30 minutes until it is firm. Once set, gently lift the bark out using the overhanging parchment paper. Break it into pieces as you like. Enjoy your peppermint bark! To avoid burning chocolate, use a microwave-safe bowl. Heat chocolate in 30-second bursts. Stir well after each burst. This ensures even melting without burning. If you prefer, use a double boiler. Fill a pot with water and bring it to a simmer. Place the chocolate in a heat-safe bowl above the pot. Stir until smooth. This method gives you great control over heat. Try different types of chocolate for unique flavors. Dark chocolate adds richness, while milk chocolate offers sweetness. You can also mix chocolates. For a twist, add a splash of orange zest or a dash of cinnamon. These flavors pair well with peppermint. They create a special holiday treat that surprises your taste buds. Arrange peppermint bark on a festive platter. Use colorful plates to brighten up the display. You can stack the pieces or lay them flat. For extra flair, garnish with whole peppermint candies or fresh mint sprigs. This adds a pop of color and makes your bark look professional. Your guests will love both the taste and the look! Pro Tips Use Quality Chocolate: The flavor of your peppermint bark largely depends on the quality of the chocolate you use. Opt for high-quality semi-sweet and white chocolate chips for the best results. Cool Between Layers: Make sure to chill the semi-sweet chocolate layer completely before adding the white chocolate. This helps create distinct layers and prevents the chocolates from blending together. Crush Peppermints Finely: For a better presentation and texture, crush your peppermint candies into smaller pieces. This will ensure that each bite has a nice crunch and a burst of peppermint flavor. Storage Tips: Store your peppermint bark in an airtight container at room temperature or in the refrigerator. This will keep it fresh and prevent it from becoming too soft or sticky. {{image_4}} You can use different types of chocolate for your bark. Dark chocolate adds a rich flavor. Milk chocolate gives a sweeter taste. Each option creates a unique treat. You can mix and match both for fun. Just remember, the melting method stays the same. Toppings can change the whole look and taste of peppermint bark. Besides crushed peppermint, try nuts like almonds or walnuts. Dried fruits like cranberries can add a chewy texture. For a fun twist, use crushed cookies instead. Oreos or ginger snaps pair well with chocolate. To make peppermint bark dairy-free, choose dairy-free chocolate. Many brands offer great options. For a sugar-free version, use sugar-free chocolate and candies. These swaps let everyone enjoy this treat, no matter their diet. Just make sure to check the labels for hidden sugars or dairy. To keep your peppermint bark fresh, store it in a cool, dry place. The ideal temperature is below 70°F (21°C). Avoid direct sunlight and humidity, as they can affect the texture and taste. For storage containers, use an airtight container. This keeps the bark from drying out or absorbing moisture. You can also wrap it tightly in plastic wrap. This method protects it from air and odors. Peppermint bark can last for about two weeks at room temperature. If you store it in the fridge, it can last up to a month. Watch for signs of spoilage. If the bark looks dull or has a white film, it may be stale. This happens when the chocolate fat separates. If it smells off, it’s best to discard it. Always trust your senses when checking for freshness. Peppermint bark is a sweet treat made of layers of chocolate. It usually has a bottom layer of semi-sweet chocolate. The top layer is white chocolate mixed with peppermint extract. It’s then sprinkled with crushed peppermint candies for a festive crunch. This treat is a holiday favorite, loved for its sweet and minty flavor. Making peppermint bark is quick! The prep time is about 15 minutes. You will need an extra 30 minutes for chilling. In total, it takes about 1 hour from start to finish. This makes it an easy recipe to whip up before holiday gatherings. Yes, you can make peppermint bark ahead of time! It stays fresh when stored properly. Make it a week in advance and store it in an airtight container. This way, you can enjoy it stress-free during the busy holiday days. You can find peppermint bark at many places. Local candy shops often have it during the holidays. Grocery stores may also sell it in their seasonal sections. For online options, check retailers like Amazon or specialty chocolate shops. You learned how to make peppermint bark from scratch. We covered the ingredients, steps, and tips. You can choose different chocolates or toppings to fit your taste. Don’t forget proper storage to keep it fresh! Experimenting with flavors adds fun. Making this holiday treat is simple and rewarding. Now you can impress friends and family with your homemade peppermint bark. Enjoy your creation and share it with joy!

Classic Peppermint Bark Delicious Holiday Treat Recipe

Get ready to indulge in a classic holiday favorite: peppermint bark! This sweet treat combines rich chocolate with refreshing peppermint,

- 1 pound Brussels sprouts - 2 tablespoons extra virgin olive oil - 3 tablespoons honey - 2 tablespoons Sriracha sauce - 1 garlic clove, minced - 1 teaspoon soy sauce - Sea salt and black pepper, to taste - Toasted sesame seeds, for garnish - Fresh cilantro, chopped, for garnish The main ingredients create a sweet and spicy mix. The Brussels sprouts are the stars here. They offer a great texture and taste. The olive oil helps them roast well. Honey adds sweetness, while Sriracha brings the heat. For the additional components, garlic gives depth to the sauce. Soy sauce adds umami. Sea salt and black pepper help balance the flavors. Toasted sesame seeds provide crunch, and fresh cilantro adds a bright touch. Together, these ingredients make a dish that is tasty and fun. You can mix and match as you like. If you want more heat, add more Sriracha. For sweetness, add extra honey. The beauty of this dish lies in its flexibility, allowing you to make it your own. {{ingredient_image_2}} First, you need to preheat your oven to 400°F (200°C). This heat helps the Brussels sprouts roast perfectly. Next, take 1 pound of Brussels sprouts and cut them in half. Put them in a bowl, and add 2 tablespoons of extra virgin olive oil. Then, sprinkle sea salt and freshly cracked black pepper to taste. Toss well to coat each sprout evenly. Now, line a baking sheet with parchment paper. This step helps prevent sticking and makes clean-up easier. Spread the halved Brussels sprouts on the sheet, cut sides down. Roast them in the oven for 20 to 25 minutes. Remember to turn them halfway through to ensure they cook evenly. You want them to be golden brown and crispy. While your Brussels sprouts roast, prepare the sauce. In a small bowl, whisk together 3 tablespoons of honey, 2 tablespoons of Sriracha sauce, 1 minced garlic clove, and 1 teaspoon of soy sauce. Mix it until smooth. This sauce adds a sweet and spicy kick to your sprouts. Once your Brussels sprouts are done roasting, take them out of the oven. Drizzle the honey-Sriracha sauce over the hot sprouts right away. Toss them gently to coat each piece well. Then, return the tray to the oven and roast for another 5 minutes. This final roasting helps the sauce stick and meld with the sprouts, creating a delicious flavor. To get the best flavor, place the cut sides of Brussels sprouts down. This helps them brown nicely and taste great. Keep an eye on the roasting time. I like to check them after 20 minutes. If they look golden and crispy, they are ready. If not, let them roast a bit longer. Make the sauce your own! If you like it spicy, add more Sriracha. For a sweeter taste, increase the honey. Mixing and matching the sauce will give you just the right kick or sweetness you love. A simple garnish can make your dish pop! Use toasted sesame seeds for crunch. Fresh cilantro adds color and taste. When serving, arrange the Brussels sprouts in a circle for a stunning look. Drizzle leftover sauce on top for extra flavor. This makes your dish not only tasty but also beautiful! Pro Tips Use Fresh Brussels Sprouts: Always opt for fresh Brussels sprouts for the best flavor and texture. Look for firm, bright green sprouts without any yellowing or blemishes. Adjust Heat Level: If you prefer a milder flavor, reduce the amount of Sriracha in the sauce. You can also add a splash of lime juice for extra brightness without the heat. Experiment with Garnishes: Feel free to try different garnishes like chopped green onions or crushed peanuts to add a unique twist to your dish. Make Ahead: You can prepare the Brussels sprouts and the sauce ahead of time. Simply roast them just before serving for a quick and delicious side dish. {{image_4}} - Use maple syrup instead of honey. This swap gives a rich, sweet flavor. - Choose gluten-free soy sauce options. This works for those with gluten allergies. - Add ginger for a spice kick. Fresh ginger gives a bold taste. - Incorporate citrus zest for brightness. Lemon or lime zest adds a refreshing touch. - Pair with proteins like chicken or tofu. This makes a complete meal. - Serve on a salad bed or as a side dish. This option is great for any meal. These variations let you customize your Honey Sriracha Brussels sprouts. You can find the perfect balance of flavors to match your taste. Try them out and enjoy the creativity in your dish! To keep your Honey Sriracha Brussels sprouts fresh, store them in an airtight container. Place them in the fridge within two hours after cooking. This helps prevent spoilage. You can enjoy them for up to three days. If they sit longer, they may lose flavor and texture. When reheating Brussels sprouts, the oven works best. Preheat to 350°F (175°C). Spread the sprouts on a baking sheet. Heat for about 10 to 15 minutes. This keeps them crispy. Avoid the microwave, as it can make them soggy. If you must use a microwave, cover them with a paper towel to help retain some texture. Yes, you can use frozen Brussels sprouts. However, fresh sprouts taste better. Frozen sprouts may not get as crispy. If you use frozen, thaw them first. This helps with even cooking. Sriracha sauce is made from chili peppers, vinegar, garlic, sugar, and salt. The blend gives it a sweet and spicy flavor. I love using it for a kick in dishes! You can make the honey Sriracha sauce ahead of time. Just mix honey, Sriracha, garlic, and soy sauce. Store it in the fridge for up to a week. This saves time on busy days! Yes, these Brussels sprouts are vegan! They contain no animal products. The honey can be swapped for maple syrup for a vegan option. This keeps the dish tasty and cruelty-free. To make your dish milder, use less Sriracha. You can also add more honey for sweetness. If you love heat, feel free to add more Sriracha. Adjust it to suit your taste! This blog post covered how to make delicious Honey Sriracha Brussels sprouts. We started with fresh ingredients and went through easy steps to prepare and roast them. I shared tips for perfecting caramelization and customizing the sauce to suit your taste. You learned ways to store and reheat leftovers for later enjoyment. In conclusion, these Brussels sprouts are a tasty side and easy to make. With a few tweaks, you can make them your own. Enjoy this fun dish and impress your friends and family!

Honey Sriracha Brussels Sprouts Savory Roasted Delight

Are you ready to elevate your Brussels sprouts game? In this post, I’ll show you how to make Honey Sriracha

- 12 lasagna noodles - 1 lb ground beef - 1 lb Italian sausage, casings removed - 2 cups ricotta cheese - 2 cups shredded mozzarella cheese - 1 cup grated Parmesan cheese - 1 large egg - 3 cups marinara sauce - 2 cloves garlic, minced - 1 teaspoon dried oregano - 1 teaspoon dried basil - Salt and pepper to taste - Fresh basil leaves for garnish Using fresh ingredients makes a big difference in flavor. Fresh herbs like basil and oregano add bright notes. Fresh cheeses bring creaminess that dried ones can't match. Quality marinara sauce enhances the overall taste. Go for local or in-season produce when you can. Fresh ingredients help create a dish that feels special. You can adapt this recipe for different diets. For a vegetarian option, skip the meat and add more veggies. Zucchini, mushrooms, or spinach work well. If you need gluten-free, use gluten-free lasagna noodles. For dairy-free, swap ricotta and mozzarella with nut-based cheeses. Always check labels to avoid allergens. Make it your own while keeping it delicious! {{ingredient_image_2}} First, set your oven to 375°F (190°C). This step gets your oven hot and ready for baking. A hot oven helps the lasagna cook evenly and develop a nice golden layer on top. Next, boil water in a large pot. Add a pinch of salt to the water. Once boiling, carefully place 12 lasagna noodles in the pot. Cook them until they are al dente, which means they should still have a bit of firmness. After cooking, drain the noodles and lay them flat. This prevents them from sticking together. Now, heat a skillet over medium heat. Add 1 pound of ground beef and 1 pound of Italian sausage. Use a spoon to break the meat apart as it cooks. Cook until the meat is nicely browned. Be sure to drain any fat from the skillet, so your sauce stays rich but not greasy. In a bowl, mix together 2 cups of ricotta cheese with 1 large egg, a pinch of salt, and some black pepper. Add half a cup of grated Parmesan cheese to this mix. Stir until the mixture is smooth and creamy. This blend adds a rich texture to your lasagna. Grab a 9x13 inch baking dish for this part. Start with a thin layer of marinara sauce at the bottom. Lay down three lasagna noodles across this sauce. Next, spread half of the ricotta mixture over the noodles. Follow this with half of your meat sauce and a sprinkle of mozzarella cheese. Repeat these layers until you run out of ingredients. For the top, finish with a final layer of noodles, marinara sauce, and the remaining mozzarella and Parmesan. Cover the dish tightly with aluminum foil. To prevent sticking, lightly spray the foil with cooking spray. Bake your lasagna for 25 minutes. After this, remove the foil and bake for another 15 to 20 minutes. You want the cheese on top to melt and bubble, becoming a beautiful golden color. Once done, let it cool for 10 to 15 minutes before slicing. This cooling time helps the layers set well. Garnish with fresh basil leaves for a lovely finish. To get the best flavor in your Maggiano lasagna, start with fresh ingredients. Use good quality ground beef and Italian sausage. This adds depth to your sauce. Don't skip the garlic; it boosts the taste. Dried herbs like oregano and basil also enhance flavor. Let your sauce simmer for ten minutes to allow the flavors to mix well. Sticking noodles can ruin your lasagna. To prevent this, add salt to your boiling water. This keeps the noodles from sticking together. After cooking, lay the noodles flat on a baking sheet. You can drizzle a little olive oil on them for extra protection. This step is key to easy layering later on. Layering is crucial for a great lasagna. Start with a thin layer of marinara sauce in your dish. This prevents sticking at the bottom. Place three noodles on top. Then, add half of your ricotta mixture. Spread it evenly to cover the noodles. Next, add half of your meat sauce, followed by mozzarella cheese. Repeat these layers until you run out of ingredients. End with noodles on top, then add marinara sauce and cheese. This creates a beautiful, tasty dish. Pro Tips Use Fresh Herbs: Incorporating fresh basil or oregano can elevate the flavor profile of your lasagna. Add them to the meat sauce or sprinkle on top before serving for a burst of freshness. Let it Rest: Allow your lasagna to cool for at least 10-15 minutes before slicing. This helps the layers set, making it easier to serve without falling apart. Mix Cheeses: For a richer flavor, consider mixing different cheeses like provolone or asiago with your mozzarella and ricotta. It adds complexity and depth to the dish. Layer Strategically: Ensure that each layer is evenly spread to prevent any one ingredient from overpowering the others. This creates a well-balanced bite every time. {{image_4}} You can make a tasty vegetarian lasagna. Skip the meat, and add veggies. Try using mushrooms, spinach, or zucchini. You can also use bell peppers for a sweet crunch. Mix the vegetables with your marinara sauce for more flavor. This gives you a healthy twist and keeps it filling. If you need gluten-free options, you have choices. Look for gluten-free lasagna noodles made from rice or corn. You can also use thin slices of eggplant or zucchini as layers. Just make sure to pat them dry to avoid sogginess. This way, everyone can enjoy a slice of your delicious lasagna. Cheese makes your lasagna creamy and rich. While ricotta, mozzarella, and Parmesan are classic choices, you can mix it up. Try adding goat cheese for a tangy kick or provolone for a smoky flavor. A bit of feta sprinkled on top can also add a nice touch. Experiment with different cheeses to find your perfect blend. To keep leftover lasagna fresh, let it cool first. Then, cover it with plastic wrap or aluminum foil. You can also use an airtight container. This will help keep moisture in and flavors strong. Store it in the fridge for up to four days. For longer storage, think about freezing it. When you're ready to enjoy your lasagna again, preheat your oven to 350°F (175°C). Place the lasagna in an oven-safe dish. If it seems dry, add a splash of marinara sauce on top. Cover it with foil to keep it moist. Heat it for about 25-30 minutes. Check if it's warm all the way through before serving. This keeps the cheese nice and gooey! If you want to freeze lasagna, it's best to do this before baking. Assemble the layers as you normally would. Instead of baking, cover the dish tightly with foil and plastic wrap. Label it with the date and freeze for up to three months. When you're ready to bake, let it thaw in the fridge overnight. Then, bake as usual, adding extra time if needed. Enjoy your delicious meal anytime! Yes, you can use no-boil lasagna noodles. They save time since you don’t need to cook them. Just layer them with sauce and cheese. The sauce will cook them as the lasagna bakes. This makes for an easy option without losing flavor. I recommend a good-quality marinara sauce. Look for one with simple ingredients and no added sugars. Homemade sauce is great too. You can add extra garlic or herbs for more flavor. This sauce will enhance the taste of your lasagna. You can tell the lasagna is done when the cheese is melted and bubbly. The top should be golden brown. Use a knife to check the center. It should be hot all the way through. If you see bubbling sauce, it’s ready! Absolutely! You can prepare it a day in advance. Just cover it tightly and refrigerate. When ready, bake it directly from the fridge. You might need to add a few extra minutes to the cooking time. This makes it perfect for meal prep! In this post, we covered how to make delicious lasagna. We discussed the importance of fresh ingredients and provided alternatives for dietary needs. I also shared step-by-step instructions to simplify the cooking process. You learned tips to enhance flavor and prevent sticking. We explored variations like vegetarian or gluten-free options. Lastly, we talked about storing and reheating your lasagna for future meals. Making lasagna can be fun and rewarding. Enjoy experimenting and creating your perfect version!

Restaurant-Style Maggiano Lasagna Flavorful and Easy

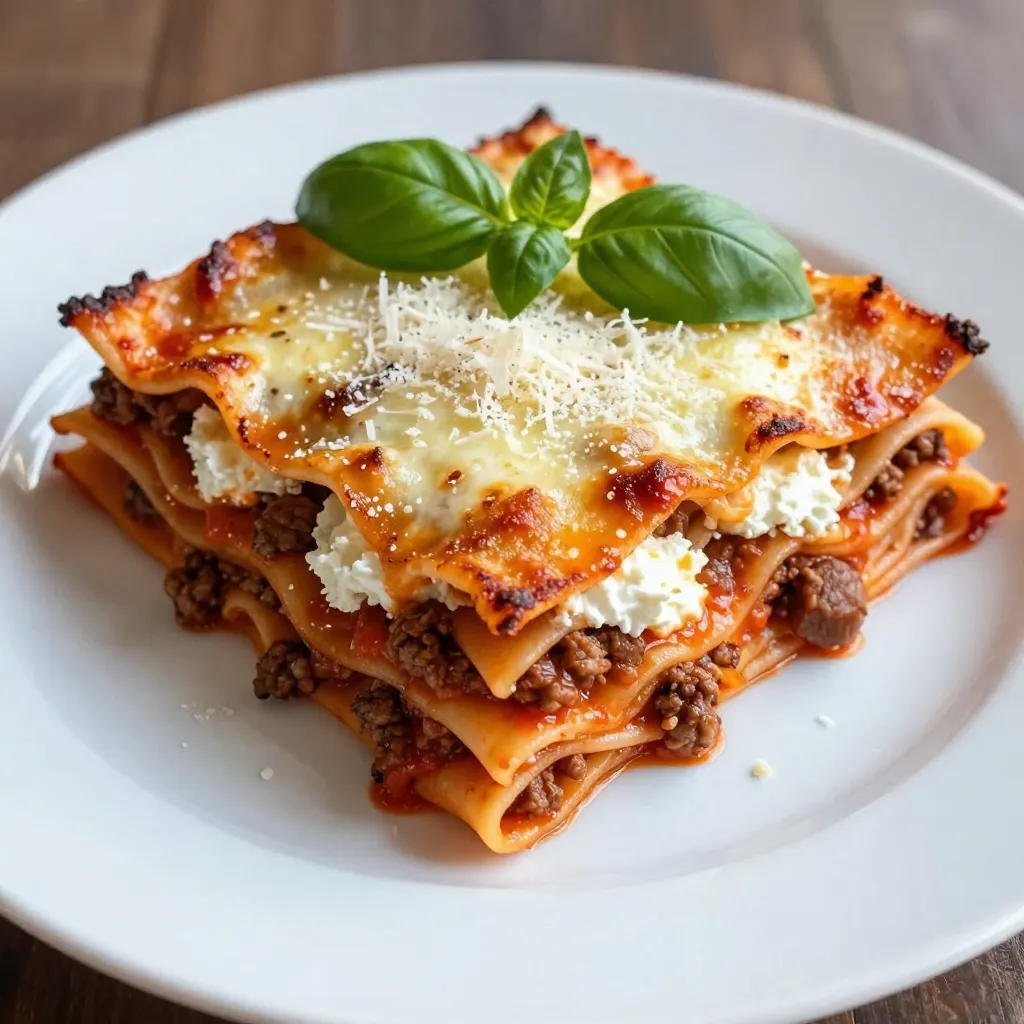
Are you craving a comforting dish that feels like a night out? Let’s dive into making Restaurant-Style Maggiano Lasagna! This

Older posts
Newer posts
← Previous Page1 … Page54 Page55 Page56 … Page86 Next →

dsad

© 2026 yumymoments • Built with GeneratePress

Our Policies

  • Copyright Policy
  • Cookie Policy
  • GDPR Policy
  • Privacy Policy
  • Disclaimer
  • Terms Of Use

More Information

  • Home
  • About
  • Contact
  • Appetizers
  • Dessert
  • Dinner
  • Drinks
©2026, yumymoments About Back To Top