Skip to content
DisclaimerTerms Of UseGDPR PolicyCookie Policy

yumymoments

  • Home
  • Drinks
  • Appetizers
  • Dinner
  • Dessert
  • About
  • Contact
  • Privacy Policy
DisclaimerTerms Of UseGDPR PolicyCookie Policy

NO-ING-IMG

- 2 cans (15 oz each) chickpeas, thoroughly drained and rinsed - Olive oil and spices: smoked paprika, ground cumin, garlic powder, onion powder - Salt and pepper to taste Chickpeas are the star of this dish. They bring protein and fiber to your meal. For the best flavor, use quality spices. Smoked paprika adds a warm, rich taste. Ground cumin gives a nice earthy note. Garlic and onion powders offer a hint of sweetness. Don’t forget to season with salt and pepper. This step is key for bringing all the flavors together. - Corn or flour tortillas - Shredded purple cabbage - Ripe avocado and fresh cilantro - Lime for garnish - Greek yogurt or dairy-free alternative for drizzling For the tacos, choose corn or flour tortillas based on your taste. I love using corn for their unique flavor. Shredded purple cabbage adds crunch and color. Sliced avocado contributes creaminess. Fresh cilantro brings a burst of freshness to each bite. Finally, a squeeze of lime brightens up the tacos. A drizzle of Greek yogurt or a dairy-free option ties everything together nicely. If you want the full recipe, check out the detailed steps below! First, preheat your oven to 400°F (200°C). This heat will make the chickpeas crispy. While the oven warms up, grab a mixing bowl. Add the drained and rinsed chickpeas to the bowl. Drizzle in two tablespoons of olive oil. Then, sprinkle in the spices: one teaspoon of smoked paprika, one teaspoon of ground cumin, half a teaspoon of garlic powder, and half a teaspoon of onion powder. Season with salt and freshly ground black pepper. Mix well until all the chickpeas are coated evenly. Next, spread the seasoned chickpeas on a baking sheet. Try to keep them in a single layer to cook evenly. Place them in the preheated oven and bake for 25 to 30 minutes. Make sure to shake the baking sheet halfway through. This helps the chickpeas crisp up nicely on all sides. While the chickpeas bake, you can warm the tortillas. Heat a dry skillet over medium heat. Warm each tortilla for about 30 seconds on each side. They should be soft and pliable. Keep them covered with a kitchen towel to stay warm. Once the chickpeas are crispy, take them out of the oven to cool for a few minutes. Now, it's time to assemble your tacos! Take a warm tortilla and add a generous portion of crispy chickpeas. Next, top with a handful of shredded purple cabbage, a few slices of ripe avocado, and a sprinkle of fresh cilantro. For finishing touches, drizzle Greek yogurt over the top and squeeze fresh lime juice for extra flavor. Enjoy your delicious crispy chickpea tacos! For the full recipe, refer to the ingredients and instructions above. - Properly drain and rinse chickpeas. This step is key. It removes excess liquid. Wet chickpeas will not crisp up well in the oven. Use a towel to pat them dry for the best results. - Use a high-quality olive oil. Good oil adds flavor and helps achieve that crunchy texture. A light drizzle will coat the chickpeas evenly. This helps them roast to a perfect golden brown. - Arrange on a vibrant platter with lime wedges. A colorful display makes the dish more inviting. The bright lime adds a fresh pop. It also encourages everyone to squeeze juice on their tacos. - Add extra toppings for customization. Think sliced jalapeños, diced tomatoes, or crumbled cheese. Each person can create their perfect bite. This makes the meal even more fun and interactive. You can find the full recipe above to guide your taco assembly. {{image_4}} You can use many types of tortillas for crispy chickpea tacos. Start with gluten-free tortillas if you want to avoid gluten. They taste great and hold up well with fillings. You can also try larger tortillas for a bigger bite. Smaller tortillas work well for bite-sized snacks. Feel free to mix and match to find your favorite. Adding feta cheese can give your tacos a salty kick. Crumbled feta pairs well with the chickpeas. You can also try different spices or sauces. Add chili powder for heat or cumin for extra depth. A drizzle of sriracha can spice things up too. Experiment with what you enjoy. Each change can make your tacos unique and exciting. For more ideas, check the Full Recipe for inspiration. Keep your baked chickpeas in an airtight container. This helps keep them fresh and crispy. You should consume them within 3-5 days for optimal freshness. If you leave them out too long, they may lose their crunch and flavor. Reheat your tacos in the oven for the best texture. This method helps restore the crispiness. Store ingredients separately to maintain quality. Keeping the chickpeas, tortillas, and toppings apart prevents sogginess and keeps everything fresh. Enjoying these tacos at their best is essential for the perfect meal! Yes, simply omit Greek yogurt or use a plant-based alternative. This switch keeps the dish tasty while ensuring it fits a vegan diet. Options like cashew cream or coconut yogurt work well. I enjoy using coconut yogurt for a creamy texture and hint of sweetness. Canned black beans or lentils can be used. Both options provide similar textures and flavors. Black beans offer a rich taste, while lentils bring a unique twist. Experiment with spices to match the original recipe. Both are great ways to keep the meal fresh and fun. Use corn tortillas or check the label on flour tortillas for gluten-free options. Many brands offer gluten-free varieties. Always read the label to ensure no hidden gluten. Corn tortillas are a delicious choice, adding a nice crunch. This way, everyone can enjoy the tacos! This blog post shared a simple, tasty chickpea taco recipe. You learned about the key ingredients, like chickpeas and spices, along with steps for making crispy tacos. The tips ensure a great texture and fun presentation. Variation ideas help you customize to your taste. Remember, you can store leftovers and enjoy later. These tacos are versatile, easy to make, and perfect for sharing. Get creative, have fun, and enjoy these delicious chickpea tacos any day!

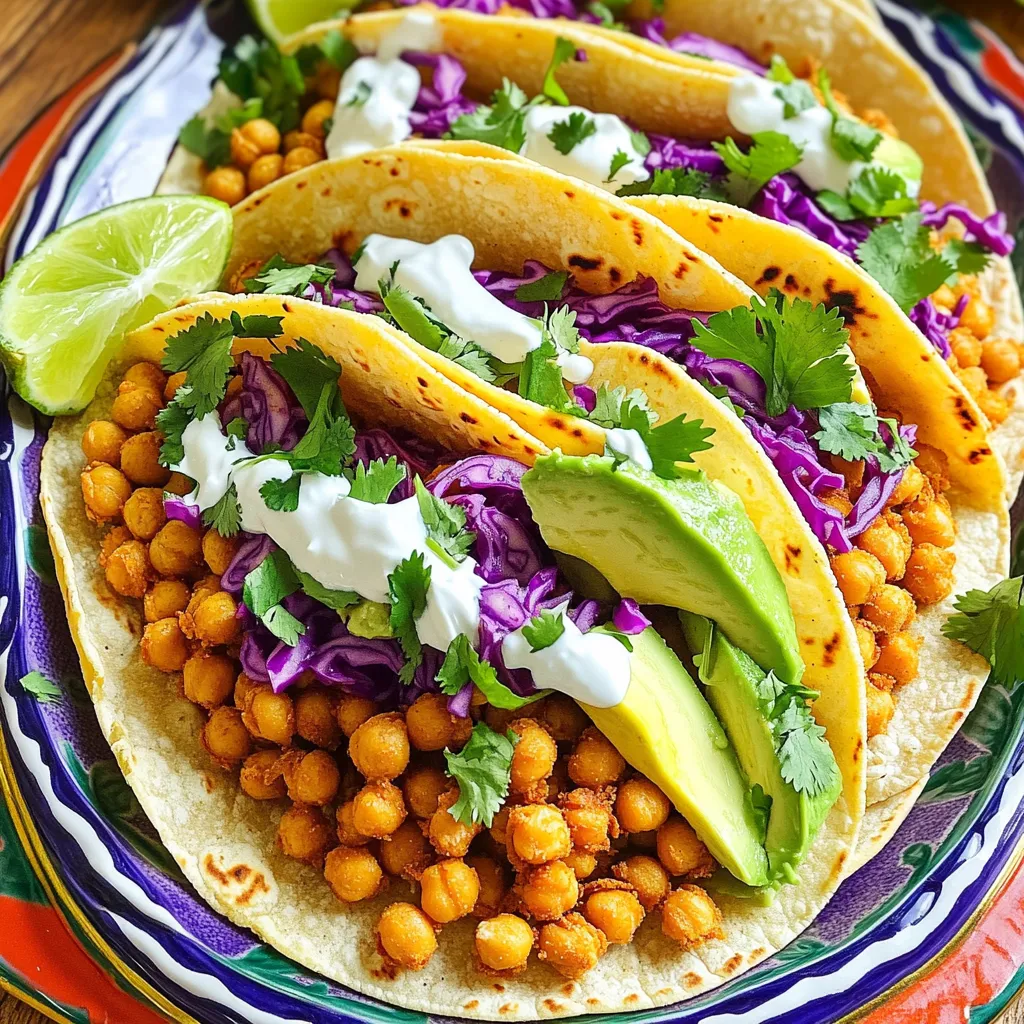
Crispy Chickpea Tacos Flavorful and Quick Meal

Looking for a quick, tasty meal? Let me introduce you to crispy chickpea tacos! They’re packed with flavor and simple

To make the Peanut Butter Banana Bliss Smoothie, gather these simple ingredients: - 2 ripe bananas, peeled and broken into chunks - 1/4 cup creamy natural peanut butter - 1 cup unsweetened almond milk (or your preferred milk) - 1 tablespoon honey or maple syrup (optional for sweetness) - 1 tablespoon chia seeds - 1/2 teaspoon ground cinnamon - A handful of ice cubes You can easily swap some ingredients if needed. Use any milk, like oat or soy, instead of almond milk. If you avoid honey, agave syrup works well too. For a nut-free option, choose sun butter in place of peanut butter. You can also skip chia seeds if you prefer, but they add a nice crunch and nutrients. This smoothie is a healthy treat! Each serving gives you energy and nutrients. Here’s a rough breakdown of what you get per serving: - Calories: Around 350 - Protein: About 10 grams - Fat: Roughly 15 grams - Carbs: Around 45 grams - Fiber: About 8 grams This smoothie is rich in fiber and protein. It keeps you full and gives you a boost. If you want to check the full recipe, click here: [Full Recipe]. To start, gather your ingredients. You will need two ripe bananas, creamy peanut butter, almond milk, honey or maple syrup, chia seeds, ground cinnamon, and ice cubes. 1. Peel the bananas and break them into chunks. Place them in your blender. 2. Next, add 1/4 cup of creamy peanut butter. This gives the smoothie its rich flavor. 3. Pour in 1 cup of unsweetened almond milk. Adjust this if you like a thicker or thinner smoothie. 4. If you want extra sweetness, add 1 tablespoon of honey or maple syrup. 5. Sprinkle in 1 tablespoon of chia seeds and 1/2 teaspoon of ground cinnamon. These boost the smoothie’s nutrition. Now it’s time to blend! 1. Add a handful of ice cubes to your blender. This will chill the smoothie and make it refreshing. 2. Blend on high speed for 1-2 minutes. Watch as the ingredients mix into a smooth, creamy drink. 3. Stop the blender and check the texture. If it's too thick, pour in a little more almond milk and blend again. Once blended, taste the smoothie. - If it needs more sweetness, add more honey or maple syrup. Blend again to mix it in. - If you want a creamier texture, add more peanut butter. Blend until you reach your perfect flavor. - Pour the smoothie into glasses and enjoy your delicious treat! For the full recipe, check out the details above. To make the best peanut butter banana smoothie, start with ripe bananas. Ripe bananas have more flavor and sweetness. Use creamy peanut butter for a smooth texture. Blend your ingredients in the right order: bananas first, then peanut butter, milk, and other items. This order helps them mix better. Always use a good blender for a creamy finish. You can easily boost the flavor of your smoothie. Add a scoop of vanilla or cocoa powder for extra taste. A tablespoon of Greek yogurt adds creaminess and protein. If you want more nutrition, include spinach or kale. Chia seeds add fiber and omega-3 fatty acids. Don't forget to adjust the sweetness with honey or maple syrup as needed. One common mistake is using unripe bananas. They can make your smoothie taste less sweet. Another mistake is not blending long enough. You want a smooth consistency without chunks. Using too much ice can make it watery. Start with a handful and add more as needed. Lastly, don’t skip the tasting step. Adjusting flavors is key to a great smoothie. For more details, check out the Full Recipe. {{image_4}} You can easily boost your smoothie by adding fruits and vegetables. Some great choices include: - Spinach - Kale - Berries (strawberries, blueberries, or raspberries) - Avocado - Mango These additions not only add flavor but also pack in extra nutrients. For instance, spinach is rich in iron and vitamins. A handful of berries adds sweetness and antioxidants. You can mix and match to find your perfect blend! While peanut butter shines in this smoothie, you can switch it out for other nut butters. Try: - Almond butter - Cashew butter - Sunflower seed butter Each nut butter brings a unique taste and texture. Almond butter is a bit sweeter, while cashew butter is creamier. Sunflower seed butter is a great choice for nut-free diets. Experiment to discover your favorite! Enhancing the flavor of your smoothie can be fun! Here are some tasty options: - A splash of vanilla extract - A spoonful of cocoa powder - A pinch of nutmeg Vanilla adds warmth, while cocoa gives a rich chocolate flavor. Nutmeg can add a cozy spice that complements the banana. Feel free to adjust the amounts according to your taste. These variations keep your Peanut Butter Banana Smoothie fresh and exciting. Check out the Full Recipe to see how to whip up this delicious treat! If you have extra smoothie, store it in an airtight container. This keeps it fresh. Place it in the fridge and use it within one day. The smoothie can separate, but that's normal. Just stir it well before drinking. You can freeze the smoothie for later. Pour it into ice cube trays or freezer-safe containers. This way, you can grab a portion whenever you want. To thaw, move it to the fridge overnight or blend it straight from the freezer. It will still taste great! Smoothies are best cold, so reheating is not common. If you want a warm drink, heat it gently on low. Stir it well to mix the texture. Be careful not to overheat it, as it can change the taste. Enjoy your Peanut Butter Banana Bliss Smoothie anytime! For the full recipe, refer to the earlier section. Yes, you can easily make this smoothie vegan. Simply swap the honey for maple syrup. Use plant-based milk like almond, soy, or oat milk. This way, you keep the creamy texture without any dairy. To create a thicker smoothie, add more frozen bananas. You can also use less liquid, like almond milk. Another great option is to add oats or Greek yogurt. Both choices boost thickness and add nutrition. This smoothie offers many health benefits. Bananas provide potassium, which supports heart health. Peanut butter adds healthy fats and protein, keeping you full longer. Chia seeds are rich in fiber and omega-3s, promoting good digestion. Yes, you can add protein powder to this smoothie. It enhances the protein content, making it great after workouts. Just mix in one scoop with the other ingredients in the blender. This will give you an extra boost and help you stay energized. For the full recipe, check out the Peanut Butter Banana Bliss Smoothie. This blog post covered everything you need for the perfect smoothie. We explored key ingredients and useful substitutes. You learned step-by-step preparation and blending tips. I shared ways to enhance flavor and nutrition. We also discussed how to store your smoothie and answered common questions. Remember, smoothies are fun and easy. Don’t fear trying new ingredients or flavors. Enjoy making your next smoothie!

Peanut Butter Banana Smoothie Simple and Healthy Treat

Looking for a simple and healthy treat to boost your day? This Peanut Butter Banana Smoothie is quick to make

- 1 pound beef flank steak, thinly sliced against the grain - 3 cups fresh broccoli florets - 1 red bell pepper, thinly sliced - 1/4 cup low-sodium soy sauce - 2 tablespoons oyster sauce - 1 tablespoon cornstarch - 1 tablespoon sesame oil - 2 tablespoons vegetable oil (divided) - Sesame seeds and sliced green onions for garnish - Cooked jasmine rice for serving This dish shines with its fresh colors and flavors. The beef flank steak brings tenderness, while broccoli adds crunch. The red bell pepper offers a sweet note. For the sauces, low-sodium soy sauce keeps it savory without too much salt. Oyster sauce adds a rich depth. Cornstarch ensures a smooth, thick sauce that clings to the beef and veggies. A splash of sesame oil at the end gives a nutty aroma. Don't forget the vegetable oil! It helps in cooking at high heat. Garnish with sesame seeds and green onions for a beautiful finish. Serve it all atop warm jasmine rice for a complete meal. Check the full recipe for details on preparation! To start, you need to marinate the beef. Take 1 pound of thinly sliced flank steak and place it in a medium bowl. Add 1 tablespoon of cornstarch, half of the low-sodium soy sauce, and 1 tablespoon of vegetable oil. Mix it well to coat the beef. Let it sit for 15 minutes. This step makes the beef tender and boosts flavor. Next, prepare the broccoli. Boil water in a pot and add 3 cups of fresh broccoli florets. Blanch them for 2 minutes. This cooks the broccoli just enough to keep it bright green and slightly tender. After that, quickly transfer the florets to a bowl of ice water. This cools them down and helps maintain their color and crispness. Once cooled, drain the broccoli and set it aside. Now it's time to cook. Heat 1 tablespoon of vegetable oil in a large skillet or wok over medium-high heat. Add the marinated beef in a single layer. Let it sear for the first minute without stirring. Stir-fry for about 3 to 4 minutes until the beef is browned and cooked through. Remove the beef and set it aside. In the same skillet, add 3 cloves of minced garlic, 1 inch of grated ginger, and 1 thinly sliced red bell pepper. Stir-fry for 2 to 3 minutes. The bell pepper should be tender but still crisp. You will smell the garlic and ginger as they cook. Now, return the beef to the skillet. Add the blanched broccoli, the remaining soy sauce, and 2 tablespoons of oyster sauce. Stir everything well and cook for an additional 2 to 3 minutes. This lets the flavors blend together beautifully. Finally, drizzle 1 tablespoon of sesame oil over the stir-fry. Toss gently to combine all the ingredients. Remove from heat, and your savory beef and broccoli stir fry is ready to enjoy! You can find the full recipe for more details. To get the best beef stir-fry, slice the beef against the grain. This means cutting across the fibers. This method makes the beef tender. Aim for thin slices, about 1/4 inch thick. Cook the beef at a high temperature. This seals in the juices and keeps it tender. A hot wok or skillet works great. Heat it until you see a little smoke before adding the beef. To boost flavor, consider adding spices like black pepper or a pinch of red pepper flakes. Fresh herbs like cilantro can also add a nice touch. Try different sauces too! Instead of oyster sauce, use teriyaki or hoisin sauce for a fresh twist. You can even add a splash of rice vinegar for some tang. For serving, place the stir-fry over cooked jasmine rice. This adds a fluffy base to your dish. Garnish with sesame seeds and sliced green onions. This not only adds color but also gives a nice crunch. Remember, a well-plated dish makes food more appealing. Arrange your stir-fry neatly on the plate. This makes your meal inviting and fun to eat! Check out the Full Recipe for more tips. {{image_4}} You can swap beef for other proteins. Chicken, tofu, or shrimp works well. Each choice adds a unique taste. Adjust the cooking time based on your protein: - Chicken: Cook for about 5-7 minutes. - Tofu: Use firm tofu, and pan-fry until golden. - Shrimp: Cook for about 3-4 minutes until pink. Adding more veggies boosts flavor and nutrition. Here are some great ideas: - Carrots: Slice thinly for quick cooking. - Snap peas: Add them for a sweet crunch. - Seasonal vegetables: Try bell peppers in summer or squash in fall. Use what’s fresh for the best taste. You can easily make this dish fit different diets. To make it gluten-free, use tamari instead of soy sauce. For vegetarian or vegan options, replace beef with tofu or tempeh. This keeps the dish hearty and satisfying. To store leftovers safely, place them in an airtight container. This keeps out air and moisture. You can enjoy your stir fry for up to three days in the fridge. Just let it cool to room temperature before sealing. If you want to keep your stir fry longer, freezing is a great option. Portion it into freezer-safe bags. Squeeze out any extra air before sealing. It will stay fresh for up to three months. To reheat, take it out of the freezer and let it thaw in the fridge overnight. This helps keep the taste intact. For reheating, you can use either the microwave or stovetop. The microwave is quick, but it may make the beef tough. If you choose the stovetop, heat a pan over medium heat and add a splash of water or broth. This keeps the meat moist and flavorful. Stir gently until everything is hot. This method helps maintain the texture and flavor of your delicious beef and broccoli stir fry. What cuts of beef are best for stir fry? For stir fry, I recommend flank steak or sirloin. These cuts are tender and easy to slice. They cook quickly, which helps keep the beef juicy. Plus, slicing against the grain makes the meat even more tender. Can I make this recipe ahead of time? Yes, you can prepare this dish ahead of time. Marinate the beef and chop the veggies a day before. Store them in the fridge until you’re ready to cook. Just note that stir-fry tastes best when fresh. How to make this dish spicier? To add heat, include crushed red pepper flakes or sliced chili peppers. You can also use a spicy sauce like Sriracha. Start with a small amount, then taste and adjust to your liking. What to do if the sauce is too thick? If your sauce is too thick, add a splash of water or broth. Stir it in slowly until you reach the desired consistency. This keeps the dish saucy and flavorful without losing the taste. What pairs well with beef and broccoli stir fry? This stir fry pairs well with jasmine rice or noodles. You can also serve it with a side of spring rolls for a complete meal. A fresh salad adds a nice crunch, too. Can I use brown rice instead of jasmine rice? Absolutely! Brown rice is a great alternative. It adds more fiber and has a nutty flavor. Just remember that brown rice takes longer to cook, so plan accordingly. For the full recipe, check out the Beef & Broccoli Delight section. This blog post shared a simple beef and broccoli stir fry recipe. You learned about key ingredients, cooking techniques, and storage tips. I provided tips to enhance flavor and presentation. You also found variations for proteins and vegetables to meet your needs. Always remember, cooking is about creativity and fun. Don’t be afraid to try new things. Enjoy making this dish your own!

Savory Beef and Broccoli Stir Fry Easy Recipe Guide

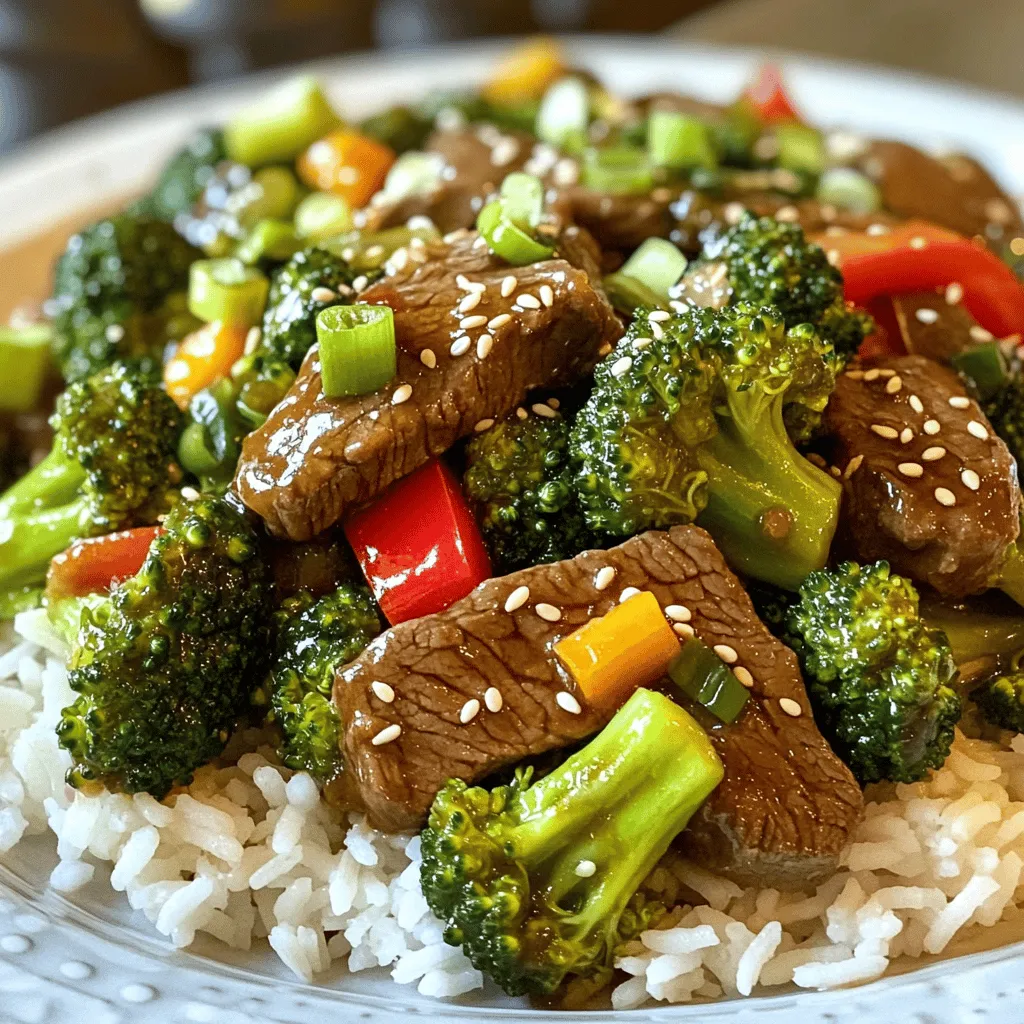
Ready to whip up a quick and tasty dinner? This Savory Beef and Broccoli Stir Fry is just what you

- 1 cup fresh spinach, finely chopped - 1 cup canned or jarred artichoke hearts, thoroughly drained and coarsely chopped - 1 cup cream cheese, softened to room temperature - 1 cup plain Greek yogurt - 1 cup shredded mozzarella cheese - 1/2 cup grated Parmesan cheese - 2 cloves garlic, finely minced - 1/2 teaspoon onion powder - 1/2 teaspoon red pepper flakes (optional) - Salt and freshly cracked black pepper, to taste - Fresh basil or parsley, chopped, for garnish - Tortilla chips or sliced French baguette, for serving Gather these ingredients before you start. Fresh spinach adds a nice touch, while artichokes bring a unique flavor. Cream cheese and Greek yogurt create that creamy base. Mozzarella and Parmesan give it a cheesy depth. Garlic adds aroma, and onion powder boosts the taste. Red pepper flakes can spice it up if you want a kick. Don’t forget salt and pepper for seasoning! Fresh herbs like basil or parsley will make your dip look pretty and taste fresh. Finally, grab some tortilla chips or a baguette for dipping. This mix of flavors and textures makes the dip creamy and rich. You can easily adjust the ingredients to match your taste. For the complete recipe, check out Creamy Spinach Artichoke Delight. - Preheat the oven to 375°F (190°C). - Combine cream cheese and Greek yogurt. Use a bowl to mix until smooth. - Fold in spinach, artichokes, and cheeses. Make sure everything is well mixed. - Add garlic, onion powder, red pepper flakes, salt, and pepper. Stir it all together. - Transfer the mixture to a baking dish. Bake for 25-30 minutes until golden and bubbly. - Allow to cool for a few minutes. Garnish with fresh basil or parsley before serving. Enjoy this creamy and flavorful dip with tortilla chips or sliced baguette. For the full recipe, check out Creamy Spinach Artichoke Delight. To get that creamy consistency in your spinach artichoke dip, you want to blend your ingredients well. Here are some tips: - Use softened cream cheese. This helps it mix smoothly with yogurt. - Whip the cream cheese and yogurt together first until it’s lump-free. - Fold in the spinach and artichokes gently to keep the dip light and airy. - If it’s too thick, add a splash of milk or more yogurt for creaminess. Adding spices can boost the flavor of your dip. Here are some suggestions: - Minced garlic adds depth. Fresh garlic gives the best taste. - Try onion powder for a sweet, savory kick. - Red pepper flakes give a nice touch of heat. Adjust according to your taste. - Fresh herbs like basil or parsley enhance flavor and freshness. How you serve your dip can make it even more inviting. Consider these ideas: - Serve it warm in the baking dish. This keeps it hot during your gathering. - Garnish with fresh herbs on top for color. - Add some chopped spinach or artichokes on the side as a fun touch. - Pair with tortilla chips or sliced baguette for easy dipping. {{image_4}} You can make this dip lighter without losing flavor. Here are some easy swaps: - Use low-fat cream cheese instead of regular. - Swap Greek yogurt for a dairy-free yogurt made from nuts. - Choose reduced-fat mozzarella cheese for a lighter option. - Add extra spinach to boost the nutrients without many calories. These changes keep the dip creamy and tasty while making it a healthier choice. Want to give your dip a new twist? Try these fun ideas: - Add chopped sun-dried tomatoes for a sweet, tangy flavor. - Mix in some cooked and crumbled bacon for a smoky touch. - Stir in a teaspoon of lemon juice for a bright kick. - Toss in diced jalapeños for some heat. These ingredients can spice up your dip and make it unique every time! There are many ways to serve your spinach artichoke dip. Here are some tasty ideas: - Serve with crunchy tortilla chips for a classic combo. - Offer sliced French baguette for a soft, chewy dipper. - Use fresh veggies like carrots and celery sticks for a healthy crunch. - Try pita chips for a different texture and flavor. These options will keep your guests happy and make dipping fun! For the full recipe, check out Creamy Spinach Artichoke Delight. After making your dip, let it cool down. Store leftovers in an airtight container. Place it in the fridge. This keeps it fresh for up to three days. Make sure to cover it tightly. This helps avoid drying out or absorbing odors. To reheat, place the dip in an oven-safe dish. Preheat your oven to 350°F (175°C). Bake for about 15 minutes. Stir it halfway through to heat evenly. You can also use a microwave. Heat it in short bursts of 30 seconds. Stir in between to avoid hot spots. You can freeze the dip for later use. Transfer it to a freezer-safe container. Leave some space at the top for expansion. Seal it tightly to prevent freezer burn. It can last up to two months. To defrost, move it to the fridge overnight. Reheat as mentioned above for the best taste. Spinach artichoke dip is a creamy blend of spinach and artichokes. This dip is warm, cheesy, and full of flavor. It comes from American cuisine and is a popular party dish. Many enjoy it at gatherings, game nights, or as an appetizer. You can serve it with chips, bread, or veggies for dipping. The combination of cream cheese and Greek yogurt makes it rich and smooth. Yes, you can prepare this dip ahead of time. Mix all the ingredients and place them in a baking dish. Cover it well and store it in the fridge for up to two days. When ready to serve, bake it directly from the fridge. Just add a few extra minutes to the cooking time. This method saves time and allows the flavors to meld. You can use many things for dipping into spinach artichoke dip. Here are some tasty options: - Tortilla chips - Sliced French baguette - Pita chips - Fresh vegetable sticks (like carrots, celery, or bell peppers) - Crackers - Breadsticks Feel free to mix and match your favorites for a fun snack platter! For the complete recipe, refer to Creamy Spinach Artichoke Delight. You now have all the steps to make a delicious spinach artichoke dip. We reviewed the key ingredients, preparation, and baking process. You can add your twist with flavor variations and health alternatives. Don't forget the tips for perfect texture and great presentation. Use leftovers wisely by following the storage and reheating guidelines. This dish is easy to make ahead and share with friends. Enjoy every creamy bite of your tasty dip!

Spinach Artichoke Dip Creamy and Flavorful Recipe

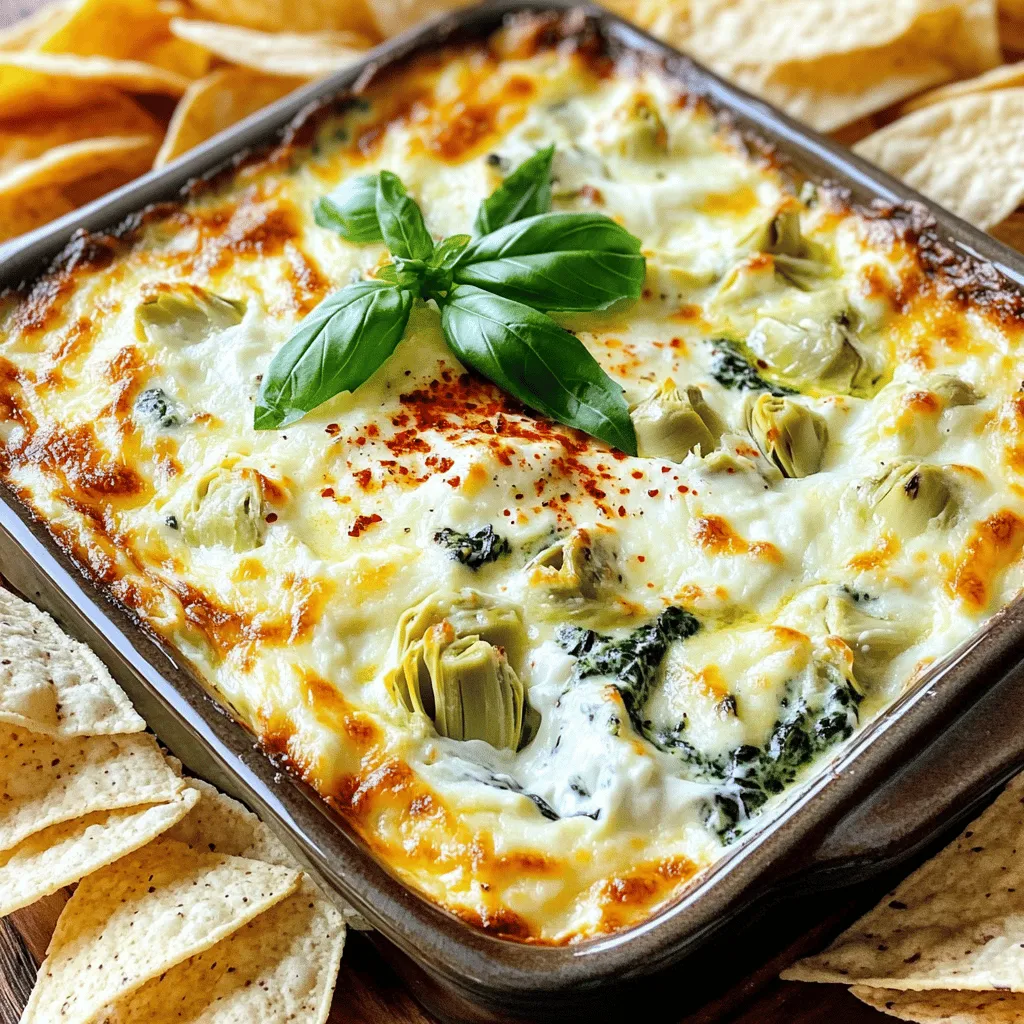
Are you ready to impress your friends at the next gathering? My Spinach Artichoke Dip Recipe is creamy, flavorful, and

For the best flavor, I love using fresh peaches. You need about 4 cups, sliced up. If fresh peaches are not available, you can use canned peaches. Just make sure to drain them well before using. This keeps the dish from being too watery. You can also use frozen peaches. Just thaw them out and drain before mixing. You will need some key items for this recipe. Here’s the list: - 4 cups sliced fresh peaches (or canned peaches, thoroughly drained) - 1 cup granulated sugar - 1 tablespoon fresh lemon juice - 1 teaspoon ground cinnamon - 1 box (15.25 oz) yellow cake mix - 1 cup unsalted butter, melted The sugar helps sweeten the peaches. The lemon juice adds a nice zing, while the cinnamon brings warmth. The yellow cake mix creates that lovely crust on top. Want to make your dump cake even better? Here are some tasty ideas: - 1 cup chopped pecans (optional, for added crunch) - Vanilla ice cream or whipped cream (for serving) The pecans add a nice crunch and nutty taste. When you serve it with ice cream or whipped cream, you create a perfect balance of flavors and textures. Enjoy the Peach Cobbler Dump Cake warm for the best experience! For the full recipe, check out the details above. Start by preheating your oven to 350°F (175°C). This step is key for even baking. While the oven heats, gather your ingredients. You need fresh peaches, sugar, lemon juice, cinnamon, cake mix, and butter. In a large bowl, mix the sliced peaches with sugar, lemon juice, and cinnamon. Toss gently. You want every peach slice to be coated well. This mix adds sweetness and spice to your cake. Once mixed, spread the peach filling evenly in a greased 9x13-inch baking dish. Now, sprinkle the dry cake mix over the peaches. Do not mix it in. This step forms a nice layer. Next, drizzle melted butter over the cake mix. This helps create a rich, golden crust. If you like, add chopped pecans for a crunchy touch. Place your dish in the preheated oven. Bake for 40-45 minutes. Watch for a golden brown top and bubbly edges. When it’s done, take it out and let it cool for about 10 minutes. This cooling time helps the layers set. Now, you’re ready to serve your delicious Peach Cobbler Dump Cake! For extra joy, top it with vanilla ice cream or whipped cream. Enjoy your creation! To enhance the flavor of your dump cake, use ripe, juicy peaches. Fresh peaches add a nice sweetness and texture. If you can't find fresh ones, canned peaches work well too. Just remember to drain them well. A splash of fresh lemon juice brightens the flavor. Ground cinnamon adds warmth and depth. If you like, try adding nutmeg for extra spice. Serve your warm peach cobbler dump cake in bowls. A scoop of vanilla ice cream on top is a must. The cold ice cream melts into the warm cake. This combination is pure bliss! For a twist, use whipped cream instead. You can also add a sprinkle of cinnamon or a fresh peach slice on top for a pretty touch. For this recipe, you need a few basic tools. A large mixing bowl helps you combine the ingredients easily. Use a 9x13-inch baking dish for even baking. A spatula is great for spreading the peach layer. Don't forget measuring cups for accuracy. An oven mitt is key for safely removing your hot cake from the oven. Check out the Full Recipe for more details on making this delightful treat! {{image_4}} You can switch out peaches for other fruits. Try using blueberries, cherries, or apples. Each fruit brings a new twist to the cake. You can mix fruits too! For example, you can combine peaches and blueberries for a tasty mix. To make this cake gluten-free, choose a gluten-free cake mix. Many brands offer great options. You can also use almond flour or coconut flour. Just keep in mind that the texture may change a bit but it will still taste good. To make a vegan version, use a plant-based butter instead of regular butter. Also, swap the sugar for coconut sugar. You can replace the cake mix with a vegan one, or make it from scratch using flour, baking powder, and almond milk. This way, you can enjoy this dessert without any animal products. If you want to try these variations, check the Full Recipe for more details! Store leftover peach cobbler dump cake in an airtight container. Let it cool first to keep the moisture in. Place it in the fridge if you plan to eat it within three days. For longer storage, consider freezing it. To enjoy your leftover dump cake, preheat your oven to 350°F. Place the cake in a baking dish. Cover it with foil to keep it moist while it warms. Heat for about 15-20 minutes. You can also use a microwave. Warm individual slices for 30-45 seconds. You can freeze peach cobbler dump cake for up to three months. Cut it into slices and wrap each piece tightly in plastic wrap. Then, place the wrapped slices in a freezer bag. When you're ready to eat, thaw the cake in the fridge overnight before reheating. This way, you can enjoy a peachy bliss dump cake anytime! To make Peach Cobbler Dump Cake from scratch, follow these steps: - Gather your ingredients: You need sliced fresh peaches, sugar, lemon juice, cinnamon, yellow cake mix, melted butter, and optional pecans. - Mix the peach filling: Combine the peaches, sugar, lemon juice, and cinnamon in a bowl. Toss until the peaches are coated. - Assemble the cake: Spread the peach mixture in a greased baking dish. Sprinkle the cake mix on top without mixing. Pour the melted butter over the cake mix. - Bake: Place it in a preheated oven at 350°F (175°C) for 40-45 minutes. The top should be golden brown. - Cool and serve: Let it cool for 10 minutes before serving. Yes, you can use frozen peaches for this recipe. Just make sure to thaw them first. Drain any excess liquid to keep the cake from becoming soggy. This will help maintain the right texture. The best way to serve Peach Cobbler Dump Cake is warm. Place a serving in a bowl and top it with vanilla ice cream or whipped cream. For extra flair, add a slice of fresh peach or a sprinkle of cinnamon on top. This adds a nice visual touch and enhances the flavor. Peach Cobbler Dump Cake lasts for about 3-4 days when stored in the fridge. Keep it in an airtight container to maintain freshness. You can also freeze it for up to three months. Just remember to let it cool completely before wrapping it for the freezer. For full details, check out the Full Recipe. This blog post covered all you need for a delicious Peach Cobbler Dump Cake. We explored fresh peaches and other fruit options. I shared key baking steps, tips to enhance flavors, and storing methods. You also learned how to adapt the recipe for gluten-free and vegan diets. Remember, this dessert is easy to make and fun to share. With these steps, you can create a treat everyone will enjoy. Try your own twist and savor every bite!

Peach Cobbler Dump Cake Simple and Tasty Delight

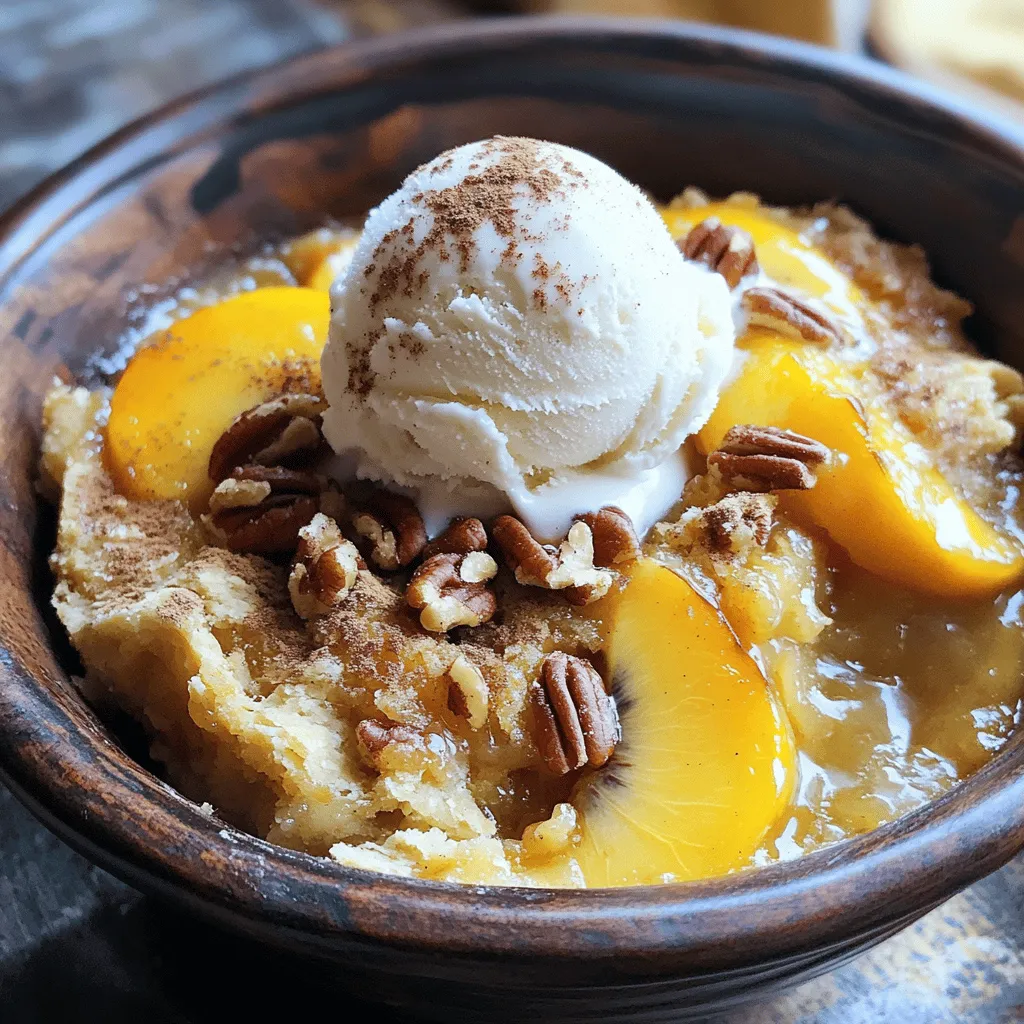
Are you craving a sweet and easy dessert? Look no further! This Peach Cobbler Dump Cake is simple, tasty, and

- 1 cup jasmine rice - 1 cup coconut milk - 1 cup water - 1 ½ tablespoons sugar - ½ teaspoon salt - 1 ripe mango, peeled and diced - 2 tablespoons shredded coconut (toasted for enhanced flavor) - Fresh mint leaves for garnish - Calories per serving: About 250 - Macronutrient breakdown: - Carbs: 45g - Fats: 9g - Proteins: 3g - Dietary considerations: Vegan and gluten-free Jasmine rice gives a lovely aroma and texture to this dish. Coconut milk adds creaminess, while the sugar brings sweetness. The ripe mango adds freshness and color. I often enjoy using fresh mint leaves as a garnish to enhance the flavors. Each serving is around 250 calories, making it a delightful treat for any meal. This recipe fits vegan and gluten-free diets well. For a detailed method, check the Full Recipe. Rinsing jasmine rice First, rinse 1 cup of jasmine rice under cold running water. This step is important because it removes excess starch. Continue until the water runs clear. Drain the rice well to get rid of any leftover water. Preparing ripe mango Next, grab 1 ripe mango. Carefully peel it and cut it into small cubes. Set the diced mango aside for later. Combining ingredients in the saucepan In a medium saucepan, combine the rinsed rice, 1 cup of coconut milk, 1 cup of water, 1 ½ tablespoons of sugar, and ½ teaspoon of salt. Stir gently with a spoon to mix everything well. Cooking time and tips Heat the saucepan over medium heat until it reaches a gentle boil. Once boiling, lower the heat to a simmer. Cover the pot with a lid to trap steam. Cook for about 15 to 18 minutes. The rice will absorb all the liquid and become soft. Steaming and fluffing the rice After cooking, remove the pot from the heat. Let it rest for another 5 minutes, still covered. This helps the rice finish steaming. Then, fluff the rice gently with a fork to separate the grains. Adding toppings While the rice is resting, you can prepare the mango. When ready to serve, place the warm coconut rice on plates or in a bowl. Top it with the diced mango. For extra flavor, sprinkle on some toasted shredded coconut. You can also add fresh mint leaves for a lovely touch. Now, you have a delicious dish ready to enjoy! For the full recipe, check out the complete instructions and details. To make your coconut rice pop, consider adding spices. Here are some ideas: - Cardamom: A pinch of this spice adds warmth. - Cinnamon: Just a dash can add sweetness. - Vanilla extract: A few drops can bring depth. Toasting shredded coconut also boosts the flavor. Place it in a dry pan over low heat. Stir it often until golden brown. The nutty aroma will fill your kitchen and excite your taste buds. For fluffy rice, rinse the jasmine rice until the water runs clear. This removes extra starch. It helps keep grains separate. Avoid overcooking your rice. This can make it mushy. Use a tight-fitting lid while cooking. This keeps steam inside, creating the perfect environment for the rice to cook evenly. If you see water still at the end of cooking, let it simmer a bit longer. Serving coconut rice with mango should be a feast for the eyes. Here are some fun ways to present it: - Use a bowl or a plate to serve the rice. A white dish makes the colors pop. - Arrange the diced mango on top in a fan shape. It looks beautiful and appetizing. - Sprinkle toasted coconut over the dish for a crunchy texture. - Add fresh mint leaves on top for a vibrant touch. This adds a pop of color and freshness. For more detailed instructions, check the Full Recipe for Coconut Dream Rice with Mango. {{image_4}} You can mix coconut rice with many fruits. While mango shines, you can add pineapple or banana for a twist. Pineapple adds a sweet, tangy taste. Bananas bring a soft texture. Both fruits complement coconut rice well. Try using them fresh or grilled for extra flavor. If you want to switch things up, consider using other grains. Quinoa is a great choice. It is packed with protein and has a nutty flavor. Brown rice is another option. It offers a chewy texture and is more fibrous. These alternatives still work well with coconut milk and mango. You can easily make this dish fit your diet. For a vegan option, use maple syrup instead of sugar. It gives a nice flavor and sweetness. If you want sugar-free, try stevia or monk fruit sweetener. These keep your coconut rice tasty without adding sugar. You can store coconut rice with mango in the fridge. Place it in an airtight container. This keeps it fresh and safe to eat. It lasts about three to four days in the fridge. When you want to reheat it, add a splash of water. This helps the rice regain moisture. Heat it in the microwave or on the stove. Stir it well to ensure even heating. For long-term storage, you can freeze coconut rice with mango. Use a freezer-safe container or a resealable bag. Make sure to remove as much air as possible. This prevents freezer burn. It can last up to three months in the freezer. When you're ready to eat it, take it out to defrost. Place it in the fridge overnight. If you're in a hurry, you can defrost it in the microwave. Just use the defrost setting to avoid cooking the rice. Coconut rice lasts well under different conditions. In the fridge, it stays fresh for three to four days. In the freezer, it can last up to three months. If left out at room temperature, eat it within two hours to ensure safety. Yes, you can use other rice types. Jasmine rice gives a great flavor, but you can try basmati or long-grain rice. These will change the taste slightly but will still work well. Brown rice is another option, but it needs more water and time to cook. If you want less sweetness, cut the sugar in half. You can also skip the sugar entirely if you prefer a more savory flavor. The coconut milk adds a natural sweetness. You can balance it with a pinch of salt or add lime juice for a tangy twist. Coconut rice with mango pairs well with grilled chicken or shrimp. You can also serve it as a side with salads. For a vegetarian option, try it with roasted vegetables. The flavors blend nicely and create a colorful meal. Yes, you can make coconut rice in advance. Cook it and let it cool before storing it in the fridge. When you’re ready to eat, reheat it gently on the stove or in the microwave. Add fresh mango just before serving to keep it fresh. Coconut rice with mango is a delightful dish that combines simple ingredients like jasmine rice, coconut milk, and ripe mango. You learned how to prepare and cook it, along with tips to enhance flavor and texture. I shared storage methods to keep your rice fresh and variations to cater to different tastes. This dish is easy to make and offers room for creativity. I hope you enjoy making it as much as I do. Happy cooking!

Coconut Rice with Mango Delightful Fresh Recipe

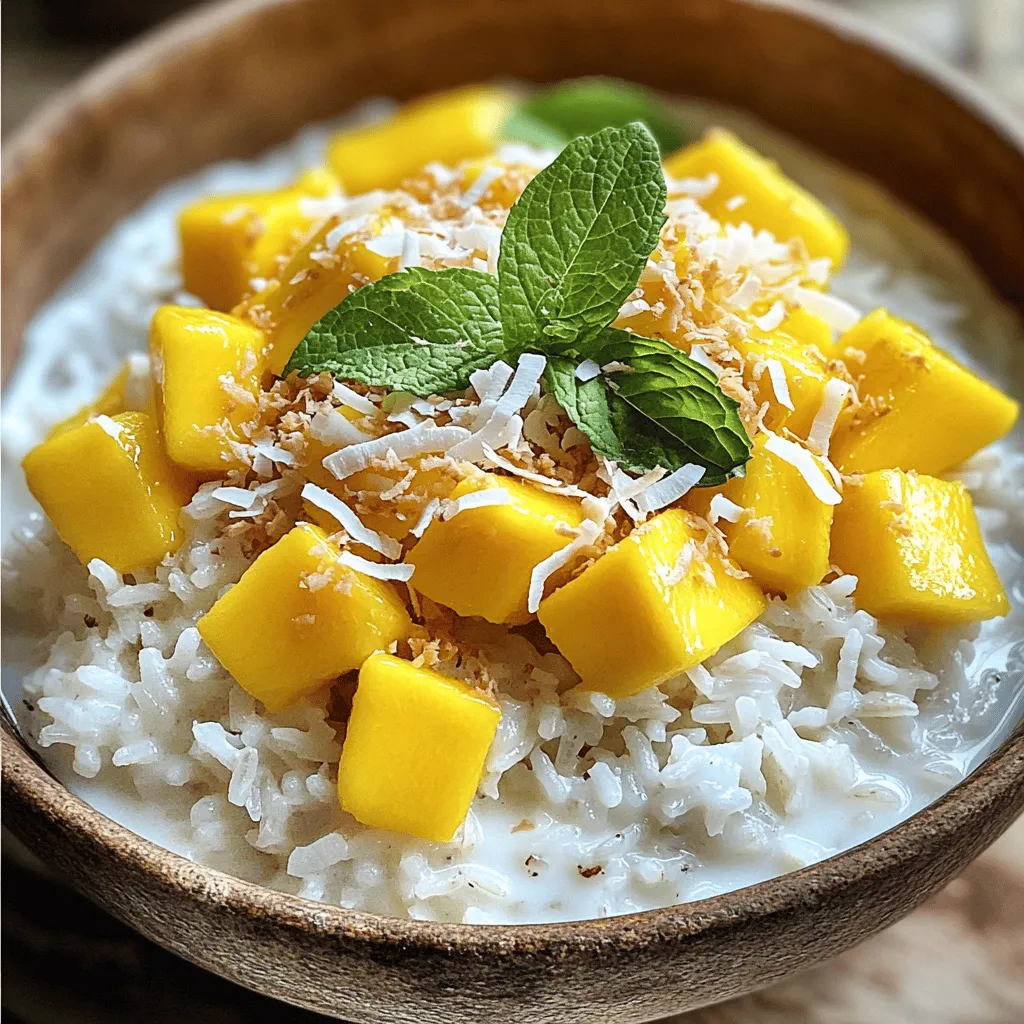
Are you ready to enjoy a delicious treat? Coconut Rice with Mango combines sweet and creamy flavors that will wow

To make your stuffed bell peppers, you will need: - 4 large bell peppers (choose a mix of colors for a vibrant presentation) - 1 cup quinoa, thoroughly rinsed - 2 cups vegetable broth (for added flavor) - 1 can (15 oz) black beans, drained and rinsed - 1 cup corn (either frozen or fresh) - 1 cup diced tomatoes (can be canned or fresh, depending on the season) - 1 teaspoon ground cumin - 1 teaspoon smoked paprika - Salt and black pepper, to taste - 1 avocado, diced for topping - 1/2 cup fresh cilantro, chopped, for garnish - 1/2 cup shredded cheese (optional, for a cheesy topping) - Olive oil, for drizzling When selecting bell peppers, consider these tips: - Color Variety: Red, yellow, and green peppers each have unique flavors. Red peppers are sweet, while green peppers are more bitter. Mixing colors makes the dish more appealing. - Freshness: Look for firm peppers with smooth skin. Avoid any with soft spots or wrinkles. - Quality Grains: Quinoa is a great choice. It’s high in protein and cooks quickly. You can also try brown rice or farro for a different texture. Each ingredient brings health benefits: - Bell Peppers: High in vitamins A and C. They help boost your immune system. - Quinoa: A complete protein. It has all nine essential amino acids and is gluten-free. - Black Beans: Packed with fiber and protein. They support heart health and digestion. - Corn: Adds natural sweetness and provides vitamins B and C. - Avocado: Rich in healthy fats and fiber. It promotes heart health and keeps you full. These ingredients work together to create a healthy and delicious meal. For the full recipe, follow the steps to make these stuffed bell peppers come to life! First, gather all your ingredients. You will need bell peppers, quinoa, black beans, corn, tomatoes, spices, and toppings. Choose vibrant bell peppers for a colorful dish. Preheat your oven to 375°F (190°C). This ensures it’s hot enough for baking. Next, slice the tops off the bell peppers and remove the seeds. Drizzle olive oil over the peppers to add flavor and help them bake nicely. Place the peppers upright in a baking dish. In a medium pot, bring vegetable broth to a boil. Add the rinsed quinoa, reduce heat, and cover. Let it simmer for about 15 minutes until it’s fluffy and the broth is absorbed. In a large bowl, mix the cooked quinoa with black beans, corn, and diced tomatoes. Add ground cumin, smoked paprika, salt, and pepper. Stir well to combine everything. Now, take each pepper and stuff it with the quinoa mixture. Press down to pack it tightly. If you love cheese, sprinkle some on top of each pepper. Cover the baking dish with foil and put it in your preheated oven. Bake for 25 minutes. Then, remove the foil and bake for another 10-15 minutes. Look for tender peppers and a nice golden top. Once done, take the dish out of the oven. Let the peppers cool for a few minutes. Just before serving, add diced avocado on top. Finish with a sprinkle of fresh cilantro for color and flavor. For a pretty presentation, serve the stuffed peppers on a bright platter. A drizzle of olive oil adds shine and looks great. You can find the Full Recipe for more details. Enjoy your healthy and tasty stuffed bell peppers! One common mistake is overcooking the quinoa. This can make it mushy. Rinse the quinoa well before cooking. Use the right amount of liquid, too. If you use too much broth, the filling can become wet. Another mistake is under-seasoning. Taste your filling before stuffing the peppers. Adjust with salt and pepper as needed. Lastly, don’t skip the olive oil on the peppers. It helps them roast nicely and adds flavor. To enhance flavors, use fresh herbs like cilantro. They brighten the dish. Add spices like cumin and paprika for warmth. For texture, mix in crunchy veggies like chopped bell pepper tops or onions. This adds a nice bite. Drizzle some olive oil on top before baking. It helps the peppers caramelize and develop a tasty crust. Remember, letting your dish cool slightly before serving can help the flavors settle. Using the right tools makes cooking easy. A sharp knife helps with cutting peppers. A sturdy cutting board keeps things safe. A medium saucepan is best for cooking quinoa. Make sure you have a large bowl for mixing. A baking dish that fits all your peppers snugly helps them stay upright while cooking. Lastly, use aluminum foil to cover the dish; this helps the peppers cook evenly, keeping them moist. For the full recipe, check out the Vibrant Quinoa-Stuffed Bell Peppers! {{image_4}} You can easily make stuffed peppers vegetarian or vegan. For a vegetarian dish, use cheese in your filling. If you want a vegan option, skip the cheese. Instead, add more beans or lentils for protein. You can also use tofu or tempeh to create a hearty base. Try mixing in veggies like spinach, mushrooms, or zucchini for extra flavor and nutrition. If you are on a keto or low-carb diet, swap out grains for meat or cheese. Ground beef, turkey, or chicken works great. You can also use cauliflower rice in place of quinoa. This option keeps the dish low in carbs while still being filling. Add spices like garlic powder and onion powder for a flavor boost. Get creative with your fillings! You can use various ingredients to make stuffed peppers unique. Here are some ideas: - Meat-Based Fillings: Ground meat, like beef, turkey, or pork, pairs well with spices and tomato sauce. - Grain-Based Fillings: Quinoa, rice, or farro mixed with beans and veggies adds texture. - Cheesy Fillings: Mix cream cheese or ricotta with herbs for a creamy touch. Each option brings a distinct taste and texture to your stuffed peppers. Remember, you can always adjust the flavors to suit your taste. For a complete guide on making stuffed bell peppers, check out the Full Recipe. After enjoying your stuffed bell peppers, store any leftovers in an airtight container. This helps keep them fresh. Make sure to let them cool down first. You can keep them in the fridge for about 3 to 5 days. If you want to save them for longer, consider freezing them. Reheating stuffed bell peppers is easy. You can use the oven or the microwave. - Oven: Preheat your oven to 350°F (175°C). Place the peppers in a baking dish and cover them with foil. Heat for about 20 minutes or until warm. - Microwave: Place the peppers on a microwave-safe plate. Heat for 2 to 3 minutes, checking if they are hot throughout. Freezing stuffed bell peppers is a great way to save time. To freeze, wrap each pepper tightly in plastic wrap, then place them in a freezer bag. They can last for up to 3 months. When you're ready to eat, thaw them overnight in the fridge. You can bake them straight from frozen, just add a few extra minutes to the cooking time. You can also make stuffed bell peppers ahead of time. Prepare them fully, but do not bake. Cover the dish with foil and keep it in the fridge for up to 24 hours. When you're ready, bake them as usual. This method keeps the flavors fresh and delicious. Yes, you can use many types of grains. Quinoa is popular for its nutty flavor and protein. Brown rice gives a chewy texture. Farro and bulgur are also great options. Each grain adds its unique taste. Experiment with what you like best! Cutting bell peppers for stuffing is simple. First, slice the top off the pepper. Remove the seeds and membranes inside. This creates space for your filling. Make sure to keep the pepper upright. This helps hold all the tasty ingredients. To add spice, use diced jalapeños or chili powder in your filling. You can also mix in hot sauce for extra heat. Consider using spicy sausage or ground meat as a filling base. Choose spices that excite your taste buds. Adjust the heat to your liking! For a full recipe, check the vibrant quinoa-stuffed bell peppers. In this article, we explored how to make delicious stuffed bell peppers. We covered key ingredients for tasty fillings, cooking tips, and variations for different diets. I shared how to avoid common mistakes and how to store leftovers. Remember, stuffed bell peppers are versatile and can fit your tastes. So, feel free to experiment with flavors. Enjoy your cooking journey and make the most of this nutritious dish!

Stuffed Bell Peppers Flavorful and Healthy Delight

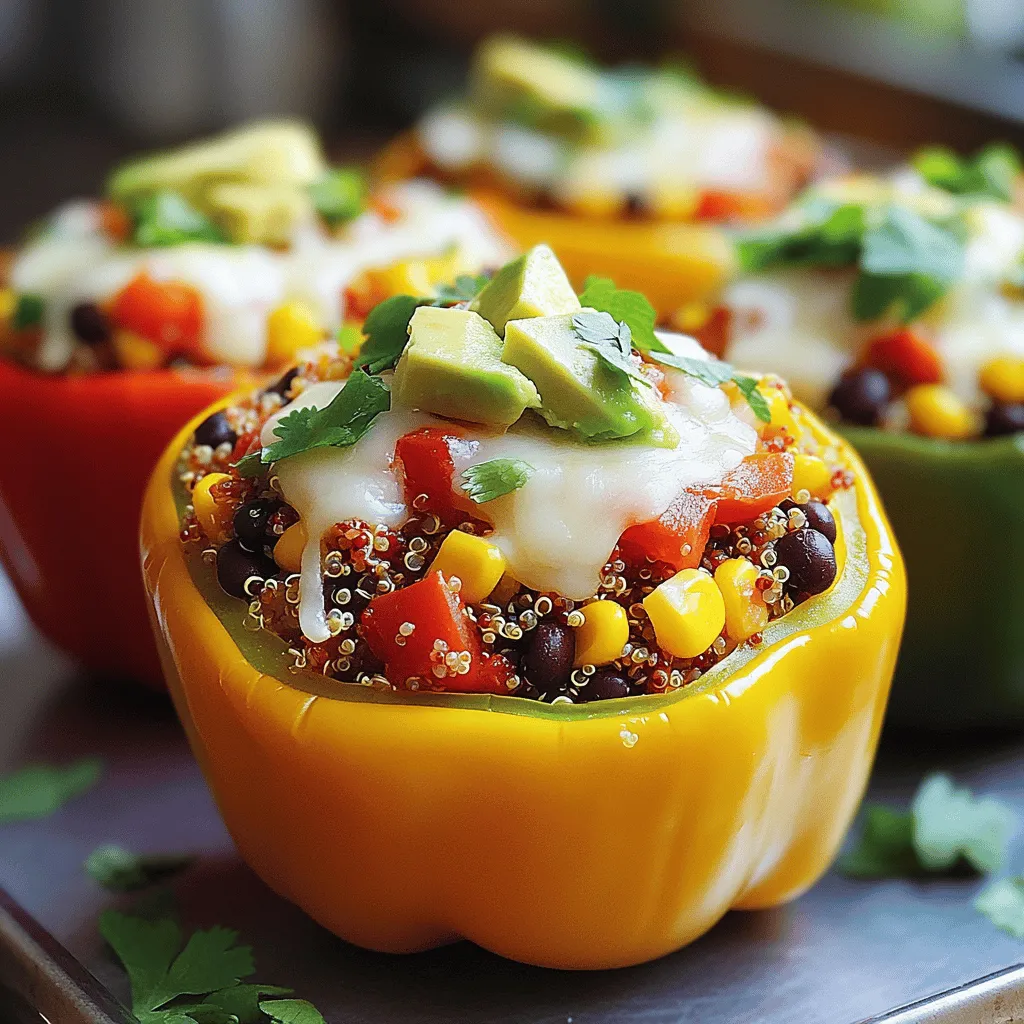
Stuffed bell peppers are a colorful and tasty way to eat healthy. You can fill them with your favorite meats,

- 2 boneless chicken breasts - 1/4 cup honey - 2 tablespoons Dijon mustard - 1 tablespoon olive oil - Salt and pepper, to taste - 4 whole wheat tortillas - 1 cup mixed greens (spinach, arugula, and kale) - 1/2 red bell pepper, thinly sliced - 1/2 cucumber, thinly sliced - 1/4 red onion, thinly sliced - 1 avocado, sliced - Optional: sesame seeds for garnish This recipe has a balance of protein, sweetness, and crunch. The honey adds a nice glaze to the chicken. Dijon mustard gives a tangy kick that makes each bite exciting. I love adding fresh vegetables to my wraps. They not only add color but also vital nutrients. Mixed greens bring a great texture. A sharp red onion and a crisp cucumber provide a refreshing bite. Sliced avocado adds creaminess that ties it all together. For the tortillas, I prefer whole wheat. They offer fiber and a hearty taste. If you want to try something different, use lettuce leaves. They make a fun, low-carb option. You can find the full recipe at the end of this article. Enjoy making these wraps! Preheat your grill or grill pan over medium-high heat. This helps the chicken cook evenly. If you want nice grill marks, make sure the grill is hot before adding the chicken. In a small bowl, mix together honey and Dijon mustard. Add olive oil, salt, and pepper to taste. Whisk it well until all the ingredients blend. This honey mustard marinade will bring great flavor to the chicken. Place the chicken breasts in a dish. Pour half of the honey mustard marinade over the chicken. Make sure it is well coated. Let the chicken marinate for at least 15 minutes. This step enhances the flavor and keeps the chicken juicy. Grill the marinated chicken for about 6-7 minutes per side. The chicken should reach an internal temperature of 165°F (75°C). After grilling, let it rest for 5 minutes before slicing into thin strips. Resting is key to keeping the chicken moist. Warm the whole wheat tortillas in a dry skillet for about 30 seconds on each side. This makes them soft and easy to roll. Lay a tortilla flat. Spread a tablespoon of reserved honey mustard sauce on it. In the center, add a handful of mixed greens. Then, place the sliced grilled chicken on top. Layer the red bell pepper, cucumber, red onion, and avocado for color and flavor. To wrap, fold in the sides of the tortilla. Then roll it tightly from the bottom to the top. This keeps all the fillings inside. Repeat with the remaining tortillas. For easy serving, you can slice each wrap in half diagonally. Enjoy your wraps as a tasty and healthy meal! For the full recipe, check out the details above. To ensure your chicken is perfectly grilled, start with even pieces. Cut the chicken breasts in half if they are too thick. This helps them cook evenly. Preheat your grill to medium-high heat. This step helps achieve nice grill marks and a juicy inside. Use a meat thermometer to check for doneness. The chicken should reach 165°F (75°C) to be safe. When selecting fresh ingredients, look for vibrant colors and firm textures. Choose greens that are crisp and bright. Pick bell peppers that feel heavy for their size. Avoid any that have soft spots or wrinkles. Fresh vegetables make your wraps more flavorful and appealing. Pair your Honey Mustard Chicken Wraps with dips for extra flavor. I love to serve them with a side of ranch or garlic sauce. You can also add hummus for a creamy touch. If you want some crunch, try serving with baked chips. For meal prep, these wraps are easy to pack. You can make them ahead for lunch or dinner. Just wrap them tightly in foil or parchment paper. This keeps them fresh and easy to grab on busy days. Add extra toppings to boost taste and texture. You can include crispy bacon bits or crunchy nuts for a fun twist. Try adding sliced jalapeños if you want heat. For a sweet touch, consider adding fruit like apple slices. Adjusting sweetness or spice levels is simple. If you like it sweeter, add more honey to the marinade. For a spicier kick, mix in some hot sauce. Taste as you go to find the perfect balance for your wraps. {{image_4}} You can switch things up by using different proteins. Grilled tofu brings a nice texture and flavor. It absorbs the honey mustard well. Shrimp is another great option. Just grill them for a few minutes until they turn pink. For a vegetarian option, you can fill the wraps with roasted veggies. This adds color and taste without meat. You can experiment with sauces too. Besides honey mustard, try barbecue sauce for a smoky flavor. A yogurt-based sauce can add creaminess. To make a spicy honey mustard, mix in some hot sauce. This kick will make your wraps exciting and bold. While whole wheat tortillas are popular, there are other choices. Try spinach or sun-dried tomato wraps for extra flavor. You can even use lettuce leaves for a low-carb option. Lettuce wraps are crunchy and refreshing. They let the fillings shine through. Consider using pita bread for a fun twist. Each option changes the taste and feel of the wrap. To keep your Honey Mustard Chicken Wraps fresh, follow these tips: - Wrap each wrap tightly in plastic wrap or foil. - Place the wrapped wraps in a sturdy container. - Use an airtight container to prevent air from getting in. Make sure to store them in the fridge. This keeps them fresh for up to three days. If you don't eat them right away, follow these guidelines. Reheating wraps can be tricky. You want them warm, not dry. Here’s how to do it: - Preheat your oven to 350°F (175°C). - Place the wraps on a baking sheet. - Cover them with foil to retain moisture. - Heat for 10-15 minutes until warm. This method keeps the wraps soft and tasty. You can also use a microwave. Just wrap them in a damp paper towel and heat for 30 seconds. Yes, you can freeze the wraps! Here’s how: - Wrap each one in plastic wrap. - Place them in a freezer bag or airtight container. - Label the bag with the date for easy tracking. To thaw and reheat, follow these steps: 1. Move the wraps from the freezer to the fridge. Let them thaw overnight. 2. Reheat in the oven or microwave as mentioned earlier. Using these tips, you can enjoy your Honey Mustard Chicken Wraps even later! Check out the Full Recipe for more details. You can store leftover Honey Mustard Chicken Wraps in the fridge for up to three days. Make sure to wrap them tightly to keep them fresh. Use foil or plastic wrap to prevent drying out. If you notice any strange smell or color, it's best to toss them. Yes, you can prepare these wraps ahead of time. Cook and cool the chicken first. Once cooled, slice it and store it in an airtight container. You can also chop the veggies and keep them in the fridge. Assemble the wraps when you're ready to eat. This keeps them fresh and crunchy. If you need a honey alternative, try maple syrup or agave nectar. Both provide sweetness without honey. For a sugar-free option, use a sugar substitute like stevia. Just remember, these substitutes may change the flavor a bit. Honey Mustard Chicken Wraps can be a healthy choice! They include lean protein, fresh veggies, and whole wheat tortillas. This meal is high in fiber and vitamins. You can also adjust the sauce for a lighter version. Plus, making them at home means you control the ingredients. In this blog, we explored the tasty Honey Mustard Chicken Wraps. We covered essential ingredients like chicken, honey, and fresh veggies. You learned how to grill the chicken and wrap it perfectly. We shared tips for choosing fresh items and meal prep ideas. To wrap it all up, these wraps are versatile and easy to make. They can fit into many diets and are packed with flavor. Enjoy creating your own unique versions and sharing them with others!

Honey Mustard Chicken Wraps Flavorful and Simple Meal

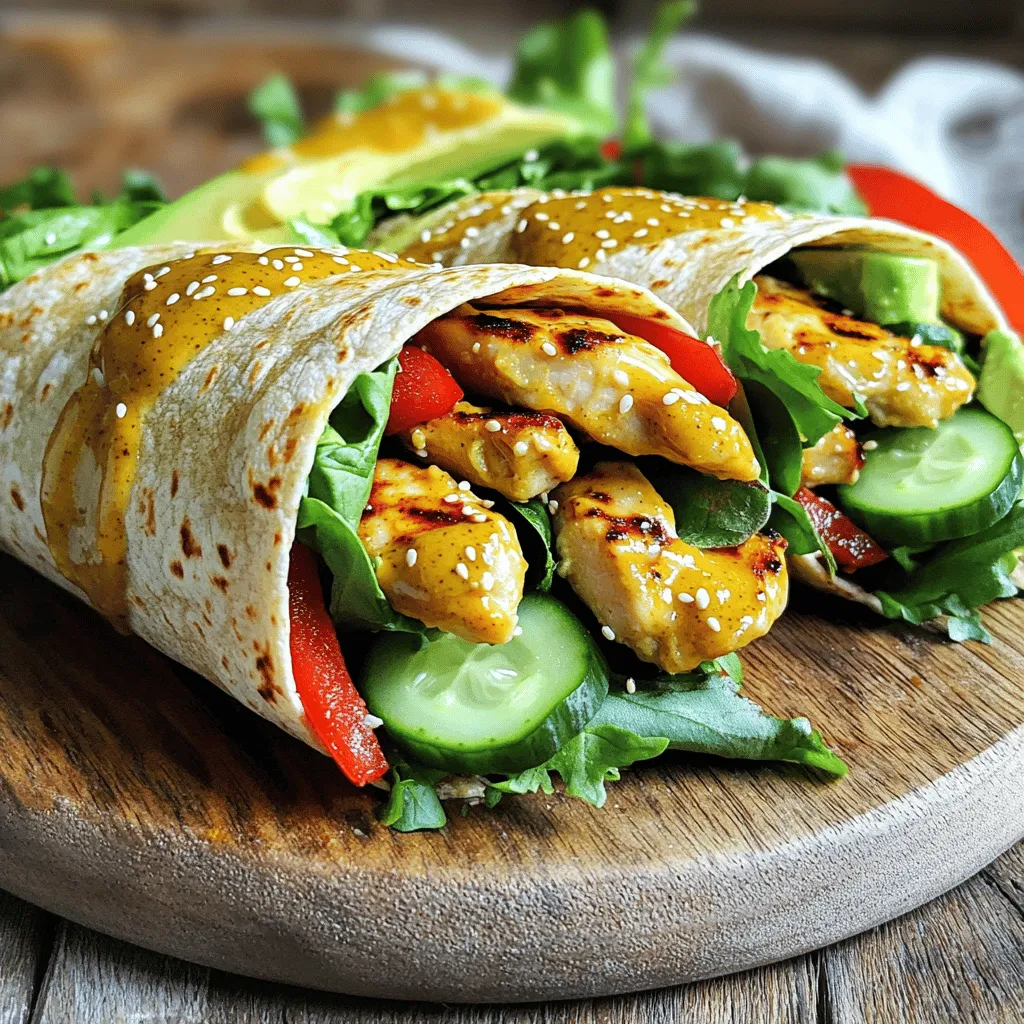
Looking for a tasty and easy meal? Honey Mustard Chicken Wraps are here to impress you! With juicy grilled chicken,

- Spaghetti: Use 400g of spaghetti for the perfect base. It cooks well and holds flavor. - Garlic: Six cloves of garlic, sliced thin, bring a rich, bold taste. - Extra virgin olive oil: A half cup of high-quality oil adds depth and smoothness. - Red pepper flakes: One teaspoon gives a nice kick. Adjust to your spice level. - Fresh parsley: A quarter cup of chopped parsley adds freshness and color. - Lemon zest: The zest of one lemon brightens the dish and adds a zing. - Grated Parmesan cheese: Adding this brings creaminess and umami. Use it if you like. - Salt: Season to taste. It enhances all the flavors in the dish. For the full recipe, check the detailed instructions and tips! 1. Start by boiling a large pot of water. 2. Add a generous amount of salt. It should taste like the sea. 3. Once the water is boiling, add the spaghetti. 4. Cook it according to the package instructions. 5. Aim for an al dente texture. This means it should be firm to the bite. 6. Before draining, save 1 cup of the pasta water. This will help later. 1. In a spacious skillet, pour in the extra virgin olive oil. 2. Heat it over medium heat until it shimmers. 3. Add the thinly sliced garlic carefully to the hot oil. 4. Sauté the garlic for about 2-3 minutes. Watch it closely. 5. You want it golden brown, not burnt. The smell will be amazing. 1. Once the garlic is ready, stir in the red pepper flakes. 2. Sauté for another 30 seconds. This adds a nice kick. 3. Now, add the drained spaghetti into the skillet. 4. Toss everything together well. Make sure the pasta gets coated in the oil. 5. If it feels dry, add some of the reserved pasta water slowly. 6. Remove from heat and mix in the fresh parsley and lemon zest. 7. Season with salt to taste and mix it all well. Now, your flavorful garlic pasta dish is ready to enjoy! Check the Full Recipe for more details. To make Spaghetti Aglio e Olio truly shine, you can adjust the spice level. If you want more heat, add extra red pepper flakes. For a milder dish, use less. Start small and taste as you go. This way, you find the perfect balance for your palate. Adding lemon zest can elevate the dish. It gives a fresh twist that brightens the garlic flavor. Just zest one lemon and mix it in at the end. This simple step makes a big difference. Always reserve some pasta water before draining your spaghetti. This starchy water helps the sauce stick to the pasta. Use it to adjust the sauce’s thickness as you mix everything together. It’s a key step to achieve a silky texture. When sautéing garlic, watch it closely. Cook it until it turns a golden brown. If it burns, the flavor turns bitter. Take your time with this step; it’s where the magic happens. For serving, twirl the spaghetti into a nest shape on each plate. This makes your dish look fancy and inviting. Use a fork or tongs to create neat spirals. Garnish with fresh parsley and a sprinkle of cheese. This adds color and flavor. You can also drizzle a little olive oil on top for shine. It makes your dish look even more appealing. Enjoy your meal! {{image_4}} You can make Spaghetti Aglio e Olio even better by adding protein. Shrimp and chicken work great. Both add a nice texture and flavor. Just sauté them in the olive oil before adding garlic. Another tasty option is bacon or pancetta. Their salty, smoky flavor adds depth. Cut them into small pieces and cook until crispy. Then, mix them into the pasta for a savory twist. For a vegetarian spin, use seasonal vegetables. Broccoli, zucchini, or bell peppers add color and nutrition. Sauté them with the garlic for a flavorful mix. If you're vegan, skip the cheese and use nutritional yeast instead. It gives a cheesy flavor without dairy. You can also add more herbs like basil or oregano to enhance the taste. To elevate the flavor, infuse your oil with different herbs. Try thyme, rosemary, or even a bay leaf. This adds a fresh, herbal note to your dish. Using flavored olive oil is another great idea. Chili oil or garlic-infused oil can boost the taste. Just be sure to adjust the amount of red pepper flakes if you choose spicy oil. For the full recipe, check out the Garlic-Lover's Spaghetti Aglio e Olio. After enjoying your Spaghetti Aglio e Olio, you may have some leftovers. To keep them fresh, store the pasta in an airtight container. This will help prevent the dish from drying out. Place it in the fridge as soon as it cools down. Proper storage can keep your pasta good for about 3 to 5 days. If you do not eat it within this time, consider freezing it. You can freeze Spaghetti Aglio e Olio if you want to save it for later. Place the cooled pasta in a freezer-safe container. Make sure to leave some space for expansion. It can last up to 2 months in the freezer. When you are ready to eat it, take it out and thaw it in the fridge overnight. To reheat frozen pasta, you can use a skillet. Add a splash of water or olive oil to help it heat evenly. Stir it often until it’s hot. This method keeps the flavors fresh and tasty. If you prefer, you can also microwave it, but be cautious to avoid drying it out. For the full recipe, check out the Garlic-Lover's Spaghetti Aglio e Olio section. In this guide, we explored how to make Spaghetti Aglio e Olio, a simple and tasty dish. We covered essential ingredients like spaghetti, olive oil, and garlic. You learned about cooking techniques for perfect pasta and ways to add flavor with spices and herbs. Remember these tips for great taste and presentation. With variations for protein and vegan options, you can customize this dish. Store leftovers wisely to keep them fresh. Enjoy your cooking!

Spaghetti Aglio e Olio Flavorful Garlic Pasta Dish

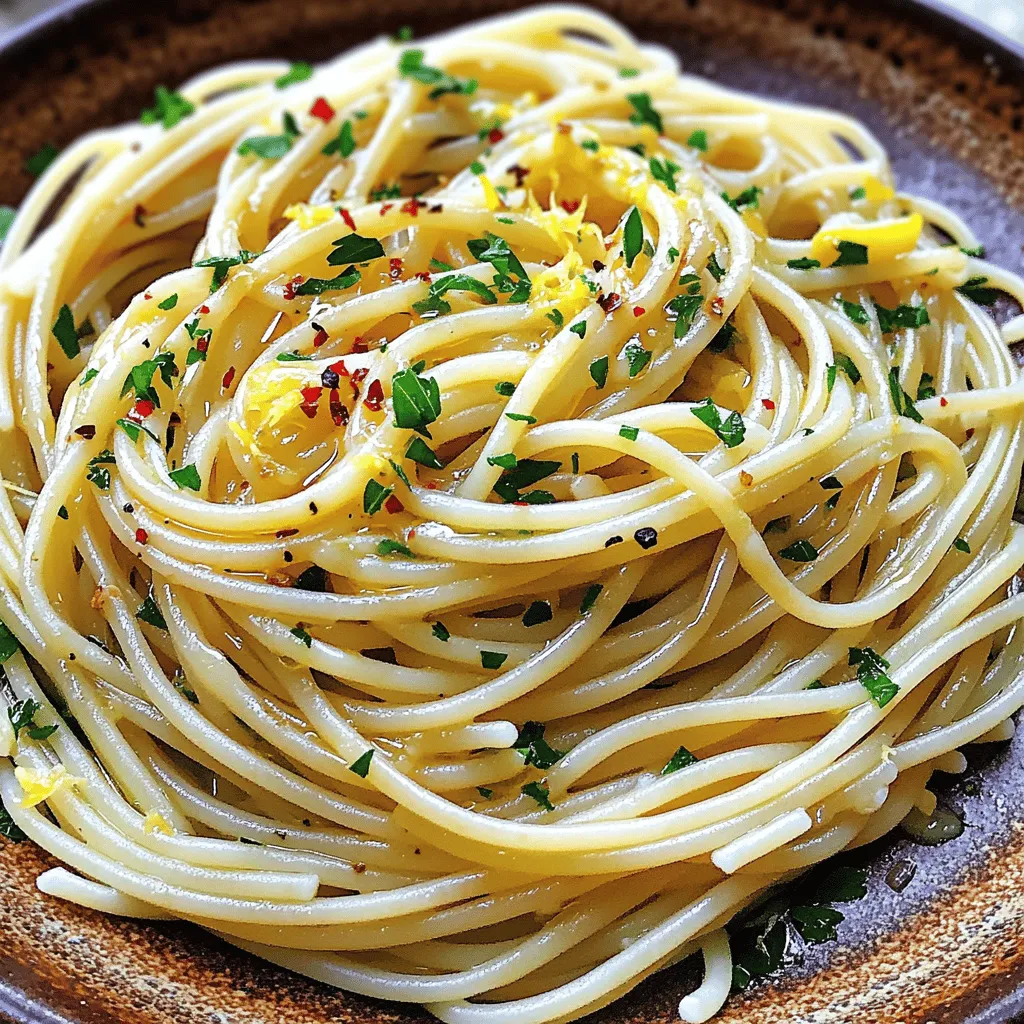
If you crave a quick, tasty meal, look no further than Spaghetti Aglio e Olio. This classic Italian dish combines

To make this tasty mango coconut chia pudding, gather these main ingredients: - 1 cup coconut milk (choose either canned or carton) - 1/2 cup almond milk (or your preferred milk variety) - 1/3 cup chia seeds - 1 ripe mango, diced into small cubes - 1 teaspoon pure vanilla extract - A pinch of salt These ingredients create a creamy base that is both rich and refreshing. The coconut milk gives a tropical flavor, while the almond milk adds a light touch. Chia seeds are the star here; they soak up the liquids and turn into a pudding-like texture. You can add these optional ingredients to enhance sweetness and presentation: - 2 tablespoons maple syrup (optional, adjust sweetness to taste) - Toasted coconut flakes, for a delightful garnish - Fresh mint leaves, for a refreshing touch Maple syrup can sweeten your pudding without refined sugar. Toasted coconut flakes add texture and flavor, while fresh mint leaves give it a pop of color. Each ingredient in this pudding offers unique health benefits: - Coconut milk: Rich in healthy fats that support heart health. - Almond milk: Low in calories and high in vitamin E. - Chia seeds: Packed with fiber, omega-3s, and protein. - Mango: High in vitamins A and C, boosting your immune system. - Vanilla extract: Adds flavor and may have antioxidant properties. - Maple syrup: Contains minerals like manganese and zinc. These ingredients combine to create a dish that is not only tasty but also healthy. Eating this pudding can help you feel full and satisfied while enjoying a tropical treat. For the full recipe, check out the details above. To start, gather your ingredients. You need coconut milk, almond milk, chia seeds, and some sweeteners. In a large bowl, pour in 1 cup of coconut milk and 1/2 cup of almond milk. Then, add 1/3 cup of chia seeds. You can include 2 tablespoons of maple syrup if you like it sweeter. Next, mix in 1 teaspoon of pure vanilla extract and a pinch of salt. Use a whisk or fork to blend well. Make sure there are no clumps of chia seeds; this step is key for a smooth pudding. Now that you mixed everything, cover the bowl. You can use plastic wrap or a lid. Place it in the fridge for at least 4 hours. For the best results, let it chill overnight. This time allows the chia seeds to absorb the liquid. As they soak, they will thicken and turn into a creamy pudding. Stir the mixture once or twice during the first hour. This helps the seeds spread evenly. After the chilling time, check the pudding. It should be thick and creamy. Stir it well to break any clumps. Now, divide the pudding into serving bowls or jars. The fun part is next! Top each serving with diced ripe mango. Spread it evenly for a nice look. Finally, sprinkle some toasted coconut flakes on top. Add fresh mint leaves for a touch of color and aroma. Serve your mango coconut chia pudding chilled and enjoy this tropical treat! You can find the full recipe at the start of the article. To get the best chia pudding, use the right balance of liquids and seeds. Start with one cup of coconut milk and half a cup of almond milk. This mix gives a nice creamy base. Next, add one-third cup of chia seeds. Stir well to break up any clumps. Cover the bowl and chill it for at least four hours. This waiting time lets the chia seeds soak up the milk. If you want a thicker pudding, add a bit more chia seeds. A little bit goes a long way! You can make your pudding even better with simple tweaks. Adding a teaspoon of pure vanilla extract brings out the flavors. If you like sweetness, include two tablespoons of maple syrup. For a fresh twist, try adding diced fruits like strawberries or blueberries on top. You can also mix in a sprinkle of toasted coconut flakes. These add crunch and enhance the tropical taste of your pudding. Many people make simple errors when making chia pudding. One common mistake is not mixing the seeds well. If you don’t stir enough, clumps form, and you won’t get that smooth texture. Another mistake is not letting it sit long enough. Remember, patience is key! Skipping the chilling time means your pudding will be runny. Finally, don’t forget to taste before serving. Adjust sweetness if needed. This way, you ensure that every bite is just right. {{image_4}} You can change up your mango coconut chia pudding by adding different fruits. Fresh berries like strawberries, blueberries, or raspberries bring a nice tang. Pineapple or kiwi adds a sweet and tart flavor. You can also try banana or peach for a creamy touch. Just chop the fruit small and place it on top. This gives each bite a burst of flavor and color. This pudding is easy to make dairy-free and vegan. Use coconut milk and almond milk, which I already mentioned in the recipe. You can also try oat milk or soy milk for a different taste. If you want a creamier texture, go for full-fat coconut milk. It makes the pudding rich and smooth. Keep your toppings plant-based to stay true to vegan values. Feel free to get creative with flavors in your mango coconut chia pudding! Add spices like cinnamon or nutmeg for warmth. You can also mix in cocoa powder for a chocolate twist. If you want more sweetness, try agave syrup or honey. Adding nut butter, like almond or peanut butter, gives extra creaminess and protein. Mix and match these ideas to find your favorite combo. The full recipe gives you a great base to explore these exciting options. To store leftover chia pudding, first, place it in an airtight container. This keeps the pudding fresh and safe from odors. You can use glass jars, plastic containers, or even a bowl with a lid. Make sure to store it in the fridge. This helps the pudding stay creamy and delicious. Meal prep makes life easier. To prep ahead, you can make a big batch of chia pudding. Follow the full recipe and divide it into individual portions. Store these portions in jars or containers. This way, you have a quick and healthy snack ready. You can top your pudding with fresh fruit or nuts right before you eat. Chia pudding lasts about 5 days in the fridge. After that, its texture and taste may change. If you want to keep it longer, freezing is an option. Pour the pudding into ice cube trays or freezer-safe jars. When you want to eat it, thaw it in the fridge overnight. This way, you still enjoy your tasty mango coconut chia pudding! Chia pudding stays fresh in the fridge for about 5 days. Store it in airtight containers. This keeps it from absorbing odors from other foods. If you see any change in texture or smell, toss it out. Always check before enjoying! Yes, you can. Use ripe mango for sweetness. You can also add mashed banana or unsweetened applesauce. These natural options bring flavor and keep the pudding healthy. Adjust the taste based on what you enjoy. Chia seeds pack a punch of nutrition. They are high in fiber, protein, and omega-3 fatty acids. One ounce (28 grams) has about 137 calories, 11 grams of fiber, and 4 grams of protein. They also offer calcium, magnesium, and antioxidants. This makes them a great addition to your diet. They help with digestion and provide energy. If you want to learn more, check out the full recipe for mango coconut chia pudding! Mango coconut chia pudding is simple and rewarding to make. We covered main ingredients and optional sweeteners. The step-by-step guide helps you prepare it with ease. I shared tips for the perfect texture and flavor boosts. You can enjoy different toppings and alternatives for a personal touch. Storing leftovers is easy, and taking care of your meal prep is key. With this knowledge, you can confidently create a delicious treat while maximizing its health benefits. Enjoy your tasty and nutritious pudding!

Mango Coconut Chia Pudding Simple and Healthy Delight

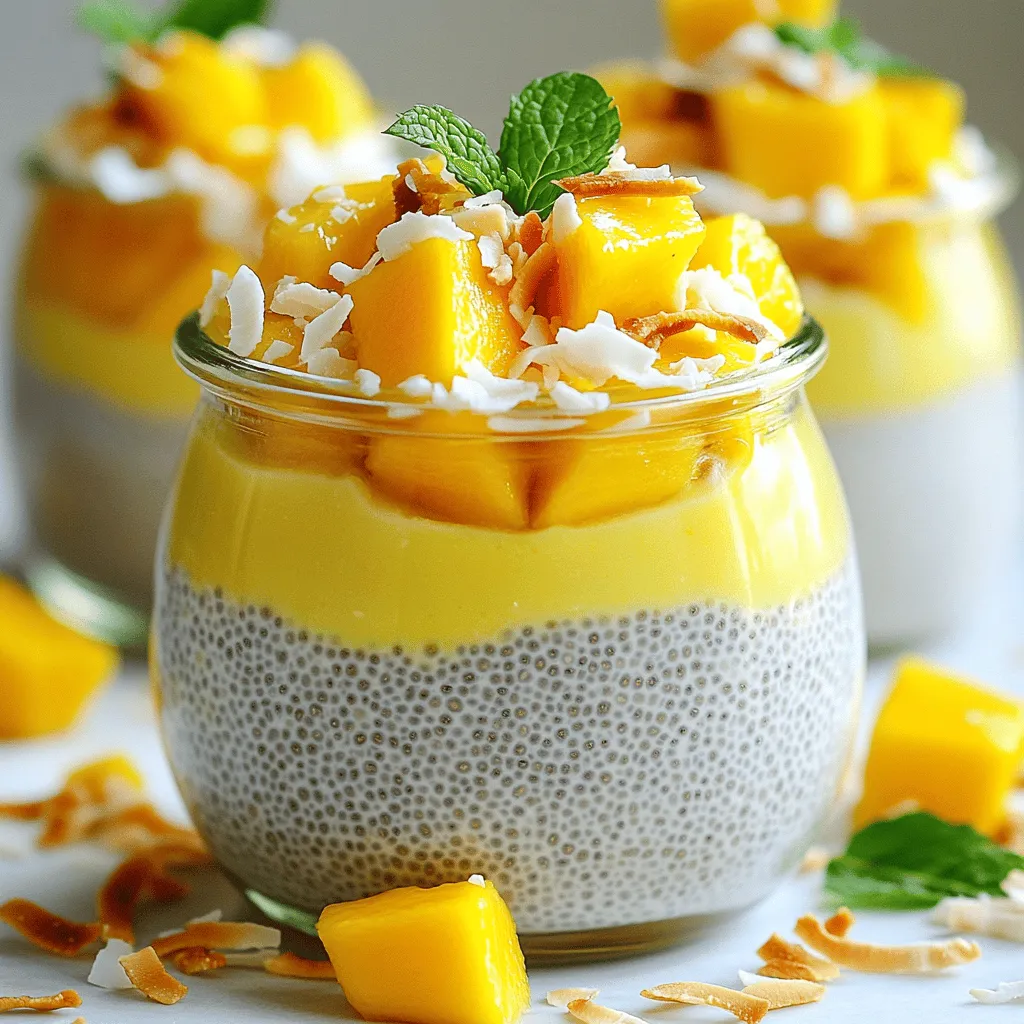
Looking for a quick and healthy treat? You’ve found it! Mango Coconut Chia Pudding is simple to make and oh-so-delicious.

Older posts
Newer posts
← Previous Page1 … Page58 Page59 Page60 … Page86 Next →

dsad

© 2026 yumymoments • Built with GeneratePress

Our Policies

  • Copyright Policy
  • Cookie Policy
  • GDPR Policy
  • Privacy Policy
  • Disclaimer
  • Terms Of Use

More Information

  • Home
  • About
  • Contact
  • Appetizers
  • Dessert
  • Dinner
  • Drinks
©2026, yumymoments About Back To Top