Skip to content
DisclaimerTerms Of UseGDPR PolicyCookie Policy

yumymoments

  • Home
  • Drinks
  • Appetizers
  • Dinner
  • Dessert
  • About
  • Contact
  • Privacy Policy
DisclaimerTerms Of UseGDPR PolicyCookie Policy

NO-ING-IMG

All-purpose flour is the base for these cookie dough bites. It gives the dough structure. Use fresh flour for the best taste. I recommend sifting it to remove lumps. This helps the dough mix smoothly. Always measure it correctly to avoid a dry texture. Sweeteners add flavor and texture. Brown sugar makes the bites chewy. It has molasses, which adds moisture. Granulated sugar gives sweetness and a little crunch. Combining both sugars creates the perfect balance in taste. For this recipe, I use 1/2 cup of brown sugar and 1/4 cup of granulated sugar. Butter is key for a creamy texture. Unsalted butter works best for controlling salt. Make sure it’s softened. This allows it to blend well with the sugars. Cold butter will not mix properly. I suggest leaving it out for about 30 minutes before starting. This helps create a rich flavor in your bites. For the complete recipe, check out the [Full Recipe]. To start, you need to treat the flour for safety. Raw flour can hold bacteria. To kill any germs, spread the flour on a baking sheet. Bake it at 350°F for about five minutes. This step is crucial, so do not skip it. After baking, let the flour cool completely before using it in your dough. Now, it’s time to mix the dough. In a large bowl, add softened butter, brown sugar, and granulated sugar. Use an electric mixer to beat this blend for two to three minutes. The mixture should look creamy and smooth. Then, pour in the vanilla extract and add the salt. Mix again until everything is well combined. Next, gradually add the cooled flour. Mix on low speed until it’s just combined. Finally, gently fold in the mini chocolate chips. Be careful not to overmix here; you want those chips to stay whole. Chilling the dough is a key step. After forming balls of dough, place them on a parchment-lined baking sheet. Space them out well. Then, put the sheet in the fridge for about 30 minutes. This chilling helps the dough firm up, making it easier to coat later. After chilling, dip each ball into melted dark chocolate. This will give your bites a rich coating. Once they are coated, chill them again for another 15 minutes. This sets the chocolate coating. You will love how nice they look and taste! For the full recipe, refer back to the beginning. To get the right dough, start with room temperature butter. It helps blend smoothly. Use a mixer on medium speed for about 2-3 minutes. This makes the butter and sugar creamy. When you add flour, mix slowly. You want it mixed but not too dry. If the dough feels too sticky, add a bit more flour. If it’s too dry, a splash of milk can help. For a smooth chocolate coating, melt dark chocolate gently. Use a microwave or a double boiler. Dipping each bite in the warm chocolate gives a nice shine. Use a fork to lift each ball out. This helps remove extra chocolate. Let any drips fall back into the bowl. This way, each bite stays neat and tasty. Serve these cookie dough bites on a nice plate. A decorative platter can impress your guests. You can also use small gift boxes for a fun touch. Before serving, sprinkle a bit of sea salt on top. It adds a nice contrast to the sweet chocolate. Enjoy presenting these bites as a treat for any occasion! {{image_4}} To make chocolate chip cookie dough bites vegan, swap butter for coconut oil or vegan butter. This change gives a rich taste while keeping it plant-based. Use brown sugar instead of granulated sugar, as it is often vegan. Make sure to check labels to avoid any hidden animal products. You can also use dairy-free chocolate chips for the coating, keeping everything delicious and ethical. If you need gluten-free bites, almond flour or oat flour works great. Almond flour adds a nutty flavor, while oat flour keeps it light. Both options are easy to find. You might need to adjust the amount slightly; start with a little less and add more as needed. Always check for gluten-free labels to avoid cross-contamination. Want to jazz up your cookie dough bites? Try adding nuts like walnuts or pecans for extra crunch. You can also mix in spices like cinnamon or nutmeg for warmth. Both options take your bites to the next level. A touch of sea salt on top adds a nice contrast to the sweet chocolate. These small changes can create a unique twist on the classic treat. For the full recipe, check out the section above. To keep your cookie dough bites fresh, store them in an airtight container. Place a sheet of parchment paper between layers to avoid sticking. You can keep them on the counter for up to three days. For longer storage, the fridge is perfect. Just remember to let them cool fully before sealing. Freezing is a great option for longer storage. Once your cookie dough bites are set, place them on a baking sheet. Make sure they are not touching. Freeze them for about an hour until firm. After that, transfer them to an airtight freezer bag. They will last up to three months in the freezer. When you want to enjoy them, let them thaw in the fridge for a few hours. Always check your cookie dough bites before enjoying them. If you see any mold or an off smell, toss them out. Also, if the chocolate coating looks dull or chalky, it may have gone bad. Trust your senses—it's better to be safe than sorry! Yes, you can eat cookie dough bites raw. However, raw flour can cause issues. To safely enjoy cookie dough, heat-treat the flour first. This process kills harmful bacteria. Once you follow this step, you can indulge in the creamy, sweet goodness without worry. Homemade cookie dough bites last about one week in the fridge. Store them in an airtight container. If you want to keep them longer, freeze the bites. They can last up to three months in the freezer. Just remember to thaw them before enjoying! You can find pre-made chocolate chip cookie dough bites in many grocery stores. Check the frozen dessert aisle or the snack section. Some stores also offer them in their bakery. Online retailers may have a wider selection as well. Some popular brands for store-bought cookie dough bites are Nestlé Toll House, Edoughble, and Doughp. These brands offer tasty options that are safe to eat raw. Check the labels for ingredients and flavors that suit your taste. In this blog post, we explored the key ingredients needed for perfect cookie dough bites. We discussed the importance of flour, sweeteners, and butter. I shared step-by-step instructions to mix and chill your dough properly. You learned tips to achieve the right consistency and creative ways to present your treats. We also looked at variations for vegan and gluten-free options and covered essential storage tips. Enjoy making your cookie dough bites, and remember to try new flavors! Happy baking!

Chocolate Chip Cookie Dough Bites Tasty Treats to Enjoy

Are you ready to indulge in one of the easiest and tastiest treats ever? Chocolate chip cookie dough bites are

- 1 lb large shrimp, peeled and deveined - 4 tablespoons unsalted butter - 4 cloves garlic, finely minced - 1 teaspoon red pepper flakes - 1 tablespoon freshly squeezed lemon juice - 2 tablespoons fresh parsley, chopped - Salt and pepper to taste - Lemon wedges for serving The key to great garlic butter shrimp is quality ingredients. I always choose large shrimp. They cook nicely and have a great texture. Fresh garlic adds a strong flavor that makes this dish pop. Butter is vital in this recipe. It gives the sauce a rich taste. I prefer unsalted butter. This way, I can control the saltiness of the dish. Red pepper flakes bring heat. You can adjust the amount based on your taste. If you want more spice, add more flakes! Fresh lemon juice brightens the dish. It cuts through the richness of the butter. Fresh parsley adds a pop of color and freshness. It makes the shrimp look appealing on the plate. - Additional herbs (basil, thyme) - White wine or chicken broth Optional ingredients can elevate your dish. Fresh herbs like basil or thyme add depth. They complement the garlic and shrimp beautifully. Using white wine or chicken broth can enhance the sauce. Add a splash while cooking for an extra layer of flavor. It’s a simple way to make your meal taste gourmet. For the full recipe, check out the detailed steps to create this dish. Enjoy your cooking adventure! 1. Start by heating a large skillet over medium heat. 2. Add 4 tablespoons of unsalted butter to the pan. 3. Let the butter melt until it foams gently. 4. Next, add 4 cloves of finely minced garlic. 5. Toss in 1 teaspoon of red pepper flakes. 6. Sauté the mix for 1 minute. 7. Stir constantly to keep the garlic from burning. 1. Increase the heat to medium-high. 2. Gently add 1 pound of peeled and deveined shrimp to the skillet. 3. Sprinkle a pinch of salt and freshly ground black pepper over the shrimp. 4. Cook the shrimp for about 2-3 minutes on each side. 5. They will turn pink and opaque when done. 6. Avoid overcooking, as shrimp can become rubbery. 1. Remove the skillet from heat once the shrimp are cooked. 2. Stir in 1 tablespoon of freshly squeezed lemon juice. 3. Add 2 tablespoons of chopped parsley for freshness. 4. Ensure all the shrimp are coated in the buttery sauce. 5. Serve the shrimp right away with lemon wedges on the side. For a full recipe, check out the [Full Recipe]. To avoid overcooking shrimp, watch the color closely. When shrimp turn pink and opaque, they are done. This usually takes about 2-3 minutes per side. Remove them from the heat right away. Overcooked shrimp become tough and rubbery, so keep an eye on them. For the best cooking surface, use a non-stick or cast-iron skillet. These materials help heat evenly. They also make it easy to release the shrimp without sticking. A good skillet can make a big difference in your cooking. To boost the flavor, try adding spices like paprika or smoked paprika. You can also use fresh herbs like basil or thyme. They add depth to the dish. A splash of white wine or chicken broth can add richness to the sauce. For sides, consider serving garlic butter shrimp with rice or pasta. A fresh salad can also balance the meal. You can even serve it with crusty bread to soak up the sauce. This makes every bite better! For an impressive look, plate the shrimp on a large white platter. This helps the colors pop. You can sprinkle extra parsley on top for a fresh touch. Thinly sliced lemon rounds add brightness and flair. They make the dish look beautiful and inviting. To garnish, use a few sprigs of fresh herbs. These tiny details make a big difference. Your garlic butter shrimp will be a feast for the eyes as well as the taste buds. Check out the Full Recipe to make this delicious meal come to life! {{image_4}} To make your shrimp spicy, use different types of peppers. You can swap red pepper flakes for cayenne pepper. This will add a bold heat. You can also add fresh chopped jalapeños. Adjust the amount to suit your taste. Start small, then add more if needed. This way, you control the spice level. The key is to balance the heat with the buttery garlic sauce. This variation keeps the dish exciting and full of flavor. For a creamy twist, add cream or a milk alternative. Heavy cream gives a rich texture. If you prefer a lighter option, use almond milk or coconut milk. Add it after cooking the shrimp. Stir it in right before serving to make it velvety. This adds a lush feel to the dish. You can also mix in some grated cheese for extra flavor. Creamy garlic butter shrimp pairs well with rice or bread. Want a complete meal? Toss in some pasta. Cook your favorite pasta according to package directions. While the shrimp cooks, drain the pasta and set it aside. Once the shrimp is ready, add the pasta to the skillet. Toss it all together with the garlic butter sauce. This makes a hearty and filling dish. You can garnish with more parsley or some grated cheese. Serve it warm, and enjoy a delicious meal that’s quick and satisfying. Check out the Full Recipe for more details. To keep your garlic butter shrimp fresh, store it in an airtight container. Place the shrimp in the fridge within two hours of cooking. This helps maintain its flavor and texture. Use the shrimp within two days for the best taste. Reheat leftover shrimp gently. The best way is to warm it in a skillet over low heat. Add a bit of butter to keep it moist. Stir often until heated through. Avoid using the microwave, as it can make the shrimp rubbery. You can freeze garlic butter shrimp for future meals. Place the shrimp in a freezer-safe container. Make sure to remove as much air as possible. The shrimp will stay good for up to three months. To thaw, place the container in the fridge overnight. Reheat gently as described above. For the complete cooking process, check out the Full Recipe. Cooking shrimp is quick and easy. Typically, it takes about 2-3 minutes on each side. When shrimp turn pink and opaque, they are done. Avoid cooking them longer. Overcooked shrimp can become rubbery and tough. Keep an eye on them while cooking for the best results. Yes, you can use frozen shrimp! Just make sure to thaw them first. Place the shrimp in a bowl of cold water for about 15-20 minutes. This method will help keep their texture. After thawing, pat them dry with paper towels. This step prevents excess water from splattering in the pan. Garlic butter shrimp pairs well with many sides. Here are some tasty options: - Steamed rice - Garlic bread - Fresh salad - Roasted vegetables - Pasta with olive oil These sides complement the rich flavors of the shrimp. Feel free to mix and match based on your taste. Enjoy your meal! This blog post covers all you need for making delicious garlic butter shrimp. You learned the key ingredients, cooking tips, and flavor enhancement methods. I shared variations to suit your taste and storage tips for leftovers. Garlic butter shrimp is easy and quick to prepare. Enjoy your meal with family or friends! Remember, good cooking is about experimenting and having fun. Now you have the tools, so make this dish your own!

Easy Garlic Butter Shrimp Flavorful and Quick Meal

Looking for a tasty meal that takes just minutes to prepare? Say hello to Easy Garlic Butter Shrimp! This dish

- Canned chickpeas - Extra-virgin olive oil - Spices and seasonings - Fresh vegetables Canned chickpeas are the star of this salad. They are quick and easy to use. Rinse them well to remove excess salt. Extra-virgin olive oil adds richness and helps crisp the chickpeas. Use spices like smoked paprika and garlic powder to give flavor. Fresh vegetables like mixed greens, cherry tomatoes, cucumber, and red onion bring color and crunch. Each adds a vibrant bite to your salad. - Avocado - Tahini dressing - Additional toppings Avocado is a creamy addition that enhances the salad's texture. You can also use tahini dressing for a nutty flavor. Feel free to add extra toppings like nuts or seeds for added crunch. These optional ingredients make the salad even better. - Caloric content - Macronutrient breakdown - Health benefits of chickpeas This salad is low in calories but high in nutrients. A serving has around 300 calories. Chickpeas offer protein and fiber, making you feel full. They also help with digestion. Plus, they are rich in vitamins and minerals, boosting your health. Enjoy this delicious and healthy salad knowing you are nourishing your body. For the full recipe, check out the Crispy Chickpea Delight Salad 🥗. 1. Preheating the oven Start by preheating your oven to 400°F (200°C). This step is key for achieving crispy chickpeas. 2. Drying the chickpeas Take your rinsed and drained chickpeas and spread them on a clean paper towel. Pat them dry gently. This helps remove moisture and makes them crispier. 3. Seasoning and roasting In a bowl, mix your dried chickpeas with olive oil, smoked paprika, garlic powder, sea salt, and pepper. Toss them well to coat. Spread the seasoned chickpeas on a baking sheet lined with parchment paper. Bake for 25-30 minutes. Shake the pan halfway through for even roasting. 1. Preparing fresh salad mix In a large bowl, combine mixed salad greens, halved cherry tomatoes, diced cucumber, and thinly sliced red onion. Toss them gently for a colorful base. 2. Making the tahini dressing In a small bowl, whisk tahini, lemon juice, and a splash of water until smooth. Adjust the water for your desired creaminess. 3. Combining all ingredients After the chickpeas bake to a golden brown, let them cool a bit. Add them to the salad bowl. Fold in the crispy chickpeas gently. Arrange avocado slices on top and drizzle with tahini dressing. Toss lightly to mix without mashing the avocado. - Presentation tips Serve the salad in a large, shallow bowl. This showcases the vibrant colors. Garnish with extra parsley or sesame seeds for a nice touch. - Best pairings with Crispy Chickpea Delight Salad Pair this salad with grilled chicken or quinoa for a hearty meal. It also goes well with a light soup or crusty bread. Enjoy the burst of flavors! To get the best crispy chickpeas, start by drying them well. Use a clean paper towel to pat them dry. This step is key! If they are wet, they will not crisp up in the oven. Next, roast them evenly. Spread the chickpeas in a single layer on your baking sheet. This helps them cook without steaming each other. Shake the pan halfway through cooking to ensure they roast evenly. Spices can change the whole dish! Try smoked paprika for warmth or cumin for a deeper taste. You can also mix in chili powder for some heat. Fresh herbs like parsley or cilantro add a bright touch. Chop them finely and sprinkle them in the salad. They will bring freshness and color to your meal. Want to make this salad more filling? Add protein! Grilled chicken, feta cheese, or boiled eggs work well. You can also add grains like quinoa or couscous for extra texture. These additions turn your salad from a side into a satisfying meal. Enjoy your Crisp Chickpea Delight Salad with these tips for a full experience. For the complete recipe, check the Full Recipe section. {{image_4}} You can add variety to your crispy chickpea salad with different dressings. Try a balsamic vinaigrette for a tangy kick. A lemon-olive oil mix adds brightness. You can also use a yogurt dressing for creaminess. Substituting vegetables can change the taste and texture. Try bell peppers for crunch and color. Shredded carrots add sweetness, while zucchini gives a fresh flair. You can mix and match to find your favorite combo. This salad is easy to make vegan. Just ensure your dressing is plant-based. For gluten-free options, use gluten-free grains like quinoa or rice. You can also skip the grains for a lighter dish. If you want lower-calorie substitutes, replace olive oil with a light spray of cooking oil. You can also use less tahini in the dressing. This keeps the flavor while cutting calories. In summer, use fresh corn and ripe tomatoes for sweetness. You can also add cucumbers for a refreshing crunch. In winter, roasted root vegetables like carrots or beets give warmth. Using fresh herbs makes a big difference. In summer, basil or cilantro adds brightness. In winter, try rosemary or thyme for a hearty flavor. These seasonal touches elevate your salad to new heights. For the full recipe, check out Crispy Chickpea Delight Salad. Store any leftover salad in an airtight container. This keeps it fresh longer. The salad stays good in the fridge for up to three days. However, the chickpeas may lose their crispiness over time. To reheat, use a toaster oven or regular oven. This helps keep the chickpeas crispy. Heat them at 350°F for about 5 to 10 minutes. If you don’t want to reheat, enjoy the salad cold. It still tastes great! You can freeze the salad, but it may change in texture. I recommend freezing only the chickpeas. For freezing cooked chickpeas, let them cool first. Spread them on a baking sheet and freeze until solid. Then, transfer them to a freezer bag. They will last up to three months in the freezer. Yes, you can use dried chickpeas. However, you must soak and cook them first. Soak them overnight in water. Then, boil them until tender, which may take 1-2 hours. Canned chickpeas save time and are ready to go! To add heat, mix in cayenne pepper or red chili flakes. You can also use spicy paprika instead of regular smoked paprika. Adjust the amount to your taste and enjoy the added kick in your salad! If you don’t have tahini, try peanut butter or almond butter. You can also use Greek yogurt for a creamy texture. Each option offers a different flavor but still pairs well with the salad. The salad stays fresh for about 2-3 days in the fridge. Keep the dressing separate until ready to eat. This way, the chickpeas remain crispy and the greens stay fresh. Yes, this salad is great for meal prep! Store the crispy chickpeas and salad separately in containers. This keeps everything fresh and tasty until you’re ready to enjoy your delicious meal. For the full recipe, visit the Crispy Chickpea Delight Salad section. In this blog post, we explored how to create a delightful crispy chickpea salad. We covered the main and optional ingredients, step-by-step instructions, tips for texture and flavor, and storage options. You can customize this salad to fit your tastes and dietary needs. Remember, chickpeas are not only tasty but also packed with nutrition. Enjoy experimenting with different flavors and toppings. With these tips, salad success is in your hands!

Crispy Chickpea Salad Fresh and Flavorful Delight

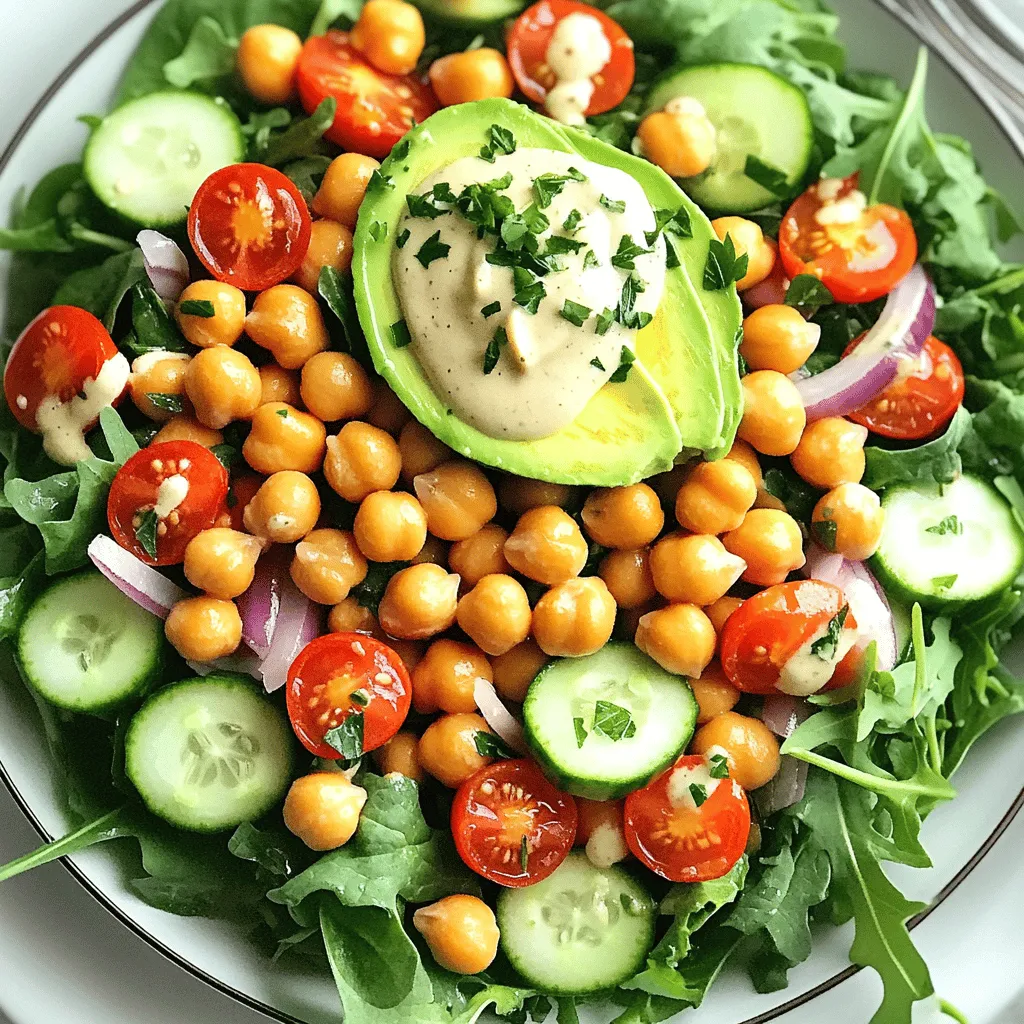
Looking for a fresh and tasty way to enjoy chickpeas? My Crispy Chickpea Salad is just the ticket! Packed with

- 2 medium acorn squashes - 1 cup quinoa, rinsed thoroughly - 2 cups vegetable broth - 1 cup black beans, drained and rinsed - 1 cup corn (fresh or frozen) - 1 red bell pepper, diced into small cubes - 1 small onion, finely chopped - 2 cloves garlic, minced - 1 teaspoon ground cumin - 1 teaspoon smoked paprika - Salt and freshly ground pepper to taste - 2 tablespoons extra virgin olive oil - Fresh cilantro leaves, for garnish - Crumbled feta or goat cheese for topping (optional) When I create stuffed acorn squash, each ingredient plays a key role. The acorn squash serves as a sweet and tender vessel. It holds all the flavors and nutrients. Quinoa adds a nutty taste and fluffy texture. I rinse it well to remove any bitter coating. Vegetable broth gives the quinoa great flavor. The black beans add protein and creaminess. Corn brings a sweet crunch. Diced red bell pepper and onion add color and taste. Garlic enhances the dish with its strong aroma. For spices, I keep it simple but flavorful. Ground cumin gives a warm, earthy touch. Smoked paprika adds depth and a hint of smokiness. I always season with salt and pepper to bring out the flavors. I suggest adding optional toppings. A drizzle of olive oil makes it rich. Fresh cilantro leaves brighten the dish. If you enjoy cheese, crumbled feta or goat cheese adds creaminess. For the full recipe, you can check out the detailed steps. - Preheat the oven to 400°F (200°C). - Cut acorn squashes in half and scoop out seeds. - Brush with olive oil and season with salt and pepper. First, you want to make sure your oven is nice and hot. This helps the squash roast evenly. Next, cutting the squash can be tricky. Use a sharp knife and cut from stem to base. Don't forget to scoop out the seeds well; they can be stringy and tough. Brushing the insides with olive oil gives them a nice flavor and helps them roast perfectly. - Combine rinsed quinoa and vegetable broth in a saucepan. - Bring to a boil, then reduce heat and simmer for 15 minutes. While the squash roasts, let’s cook the quinoa. Rinse the quinoa first. This removes the bitter coating. Then, combine it with vegetable broth in a saucepan. Bring it to a boil, then lower the heat and cover it. After about 15 minutes, you’ll see fluffy, fully cooked quinoa ready for mixing. - Warm olive oil in a skillet. - Sauté onion and garlic until translucent. - Add red bell pepper, corn, black beans, and spices; cook for an additional 5 minutes. In a skillet, warm some olive oil over medium heat. Add the onion and garlic first. You want them translucent and fragrant. After that, toss in the red bell pepper, corn, and black beans. Sprinkle the spices in, too. This mix will cook for about 5 minutes. Stir it often to blend the flavors. - Combine cooked quinoa with the vegetable mixture. - Fill roasted squash halves with the quinoa and vegetable filling. Now, it’s time to combine! Add the cooked quinoa to your sautéed veggies. Mix it well until everything is combined. Carefully remove the squash from the oven. Flip them cut-side up and fill each half with your delicious mixture. Press down gently to pack it in well. - Optionally sprinkle cheese on top. - Bake stuffed squashes for an additional 10 minutes. If you like cheese, now’s the time to sprinkle some on top. Feta or goat cheese works great here. Return the stuffed squash to the oven for another 10 minutes. This gives everything a chance to heat through and lets the cheese melt just right. - Garnish with fresh cilantro leaves before serving. Once they’re done, take them out of the oven. Garnish each squash with fresh cilantro leaves. This adds a burst of color and flavor. Now, you have a warm, tasty dish ready to enjoy! For more details, check the Full Recipe. To check if your acorn squash is done, poke it with a fork. If it goes in easily, it's ready. You want it tender but not mushy. Overcooking makes it too soft, while undercooking leaves it hard. Aim for that sweet spot where it's caramelized and fork-tender. To avoid mushy quinoa, rinse it well before cooking. Place quinoa in a fine mesh strainer and run it under cold water. This removes the bitter coating called saponin. After rinsing, use a 2:1 ratio of water to quinoa. Cook it until all the water is absorbed, about 15 minutes. Let it sit covered for 5 minutes after cooking to fluff it up. You can add more spices to elevate the flavor. Try chili powder for heat or fresh herbs like thyme for freshness. A splash of lime juice can also brighten the dish. For a full meal, serve the stuffed squash with a side salad or some crusty bread. This makes a lovely balance and adds more texture to your meal. {{image_4}} You can easily make this dish vegan and gluten-free. To do this, ensure you use vegetable broth and skip any cheese. You can also swap quinoa for lentils or chickpeas. These proteins add great texture and flavor. Feel free to play with seasonal veggies. In summer, add zucchini or tomatoes for freshness. In winter, try adding kale or roasted root vegetables for heartiness. Each season brings new tastes to enjoy. Experiment with different cheeses to top your squash. Go for cheddar for a sharp taste or mozzarella for a gooey finish. You can also add nuts or seeds, like pumpkin seeds or walnuts, for extra crunch. These toppings elevate the dish and add delightful textures. To store leftovers, place the stuffed acorn squash in an airtight container. Make sure it cools down first. This keeps the flavors fresh and prevents spoilage. You can store it in the refrigerator for up to three days. To freeze stuffed acorn squash, let it cool completely. Wrap each half tightly with plastic wrap, then place it in a freezer-safe bag. Remove as much air as possible to avoid freezer burn. You can store it in the freezer for up to three months. To reheat, take it out of the freezer and let it thaw overnight in the fridge. After thawing, place it in a preheated oven at 350°F (175°C) for about 20 minutes. This warms it through without drying it out. Stuffed acorn squash pairs well with many sides. Try serving it with a crisp green salad or some roasted vegetables. The fresh crunch complements the squash's creamy texture. For meal prep, consider making a large batch. You can stuff multiple squashes and store them in the fridge. This way, you have a quick and healthy meal ready to go any day of the week. Check out the full recipe for more tasty ideas! What should I do if my squash is hard to cut? If your squash is hard to cut, try microwaving it first. Place the whole squash in the microwave for 2-3 minutes. This softens it slightly and makes cutting easier. Always be careful while cutting, as the knife can slip. How can I tell when the acorn squash is done roasting? You can tell the squash is done when it is fork-tender. Stick a fork into the flesh. If it goes in easily, it is ready. The skin should look slightly caramelized, giving it a nice color. Can I use a different type of grain instead of quinoa? Yes, you can use rice or farro as alternatives. Both grains add a nice texture. Just make sure to adjust the cooking time and liquid as needed. Cook rice according to package directions for best results. What can I use instead of black beans? You can use kidney beans or pinto beans. Both work well in this recipe. They add protein and flavor. If you want something different, try lentils for a unique twist. How many servings does this recipe yield? This recipe yields four servings. Each half of the acorn squash makes a perfect portion. It’s great for a small family or for meal prep. Is stuffed acorn squash healthy? Yes, stuffed acorn squash is very healthy. It is packed with nutrients from the squash, quinoa, and veggies. This dish is high in fiber and provides protein, making it a balanced meal. To wrap up, this blog post guides you through making delicious stuffed acorn squash. We covered main ingredients, cooking tips, and options for variations. You learned how to prepare and cook each element simply and efficiently. Remember, you can customize this dish based on your taste and needs. With a few tweaks, it can fit various diets and seasons. Enjoy this tasty and healthy meal, and feel free to explore new flavors!

Savory Stuffed Acorn Squash with Quinoa Recipe

Are you looking for a healthy and tasty meal? This Savory Stuffed Acorn Squash with Quinoa recipe fits the bill

For my lemon poppy seed muffins, I use the following ingredients: - 1 ½ cups all-purpose flour - 1/2 cup granulated sugar - 2 teaspoons baking powder - 1/2 teaspoon baking soda - 1/4 teaspoon salt - 1/4 cup poppy seeds - 1 cup buttermilk - 1/4 cup vegetable oil - 2 large eggs - Zest of 1 lemon - Juice of 1 lemon - 1 teaspoon vanilla extract When selecting your ingredients, focus on freshness. Always pick bright lemons. Their zest and juice add a strong taste. Fresh buttermilk gives the muffins a nice rise. Check the expiration date on your buttermilk. For flour, choose a brand that feels smooth and free of lumps. Quality granulated sugar should be dry and free of clumps. For poppy seeds, ensure they are whole, not crushed, to keep their crunch. If you need substitutions, here are some ideas: - Gluten-Free: Use a gluten-free flour blend instead of all-purpose flour. - Dairy-Free: Replace buttermilk with almond milk mixed with a teaspoon of vinegar. - Egg-Free: Use flaxseed meal mixed with water as an egg replacer. One tablespoon of flaxseed meal plus two and a half tablespoons of water equals one egg. These swaps keep the muffins tasty and enjoyable for everyone! For the full recipe, check out the detailed instructions above. To start, preheat your oven to 375°F (190°C). Line your muffin tin with paper liners. You can also use non-stick spray for easy removal. In a large bowl, mix the dry ingredients. Combine 1 ½ cups all-purpose flour, 1/2 cup granulated sugar, 2 teaspoons baking powder, 1/2 teaspoon baking soda, 1/4 teaspoon salt, and 1/4 cup poppy seeds. Use a whisk to blend them well. Next, in another bowl, whisk the wet ingredients together. You’ll need 1 cup buttermilk, 1/4 cup vegetable oil, 2 large eggs, zest from 1 lemon, juice from 1 lemon, and 1 teaspoon vanilla extract. Mix until smooth. Now, pour the wet mixture into the dry ingredients. Use a spatula to fold them gently. Do not overmix! A few lumps are okay. Now, scoop the batter into the muffin cups. Fill each cup about two-thirds full. This gives them room to rise. Place the muffin tin in the preheated oven. Bake for 18-20 minutes. To check for doneness, insert a toothpick into the center of a muffin. If it comes out clean, they are ready. After baking, let the muffins cool in the tin for about 5 minutes. Then, move them to a wire rack. This helps them cool completely and prevents sogginess. If your muffins are too dry, try adding a bit more buttermilk next time. If they sink in the middle, it could be from overmixing. Always fold the batter gently. If they are too dense, check your baking powder's freshness. Expired baking powder won’t help them rise. For more details, check the Full Recipe for Lemon Poppy Seed Muffins. To boost the lemon taste, use fresh lemons. Fresh zest gives a bright flavor. You can also add a touch of almond extract for depth. It adds a lovely layer to the muffins. Honey or maple syrup can replace some sugar for a natural sweetness. This gives a unique twist to the muffins. For soft and fluffy muffins, avoid overmixing. Mix just until the wet and dry ingredients come together. A few lumps are fine. Using room-temperature eggs and buttermilk helps too. This ensures they mix well without cooling the batter down. Also, consider folding in some blueberries or raspberries for added moisture and flavor. One common mistake is overbaking. Keep an eye on the time and test with a toothpick. Another mistake is using cold ingredients. Cold eggs or buttermilk can make the batter tough. Lastly, don’t skip the lemon zest. It is key in giving that bright, fresh taste. For a full recipe, check the earlier section. {{image_4}} You can make gluten-free lemon poppy seed muffins using a gluten-free flour blend. This is an easy swap. Just choose a blend that works well for baking. Look for one that has xanthan gum for better texture. Follow the same steps from the full recipe. You will enjoy the same bright flavors without the gluten! To create vegan lemon poppy seed muffins, replace eggs with flaxseed meal or chia seeds. Mix one tablespoon of either with three tablespoons of water. Let it sit for a few minutes until it becomes thick. Use a plant-based milk, like almond or oat milk, instead of buttermilk. These changes keep the taste light and fresh while being plant-based. You can add more flavors to your muffins. Try mixing in blueberries or raspberries for a fruity twist. If you want a hint of spice, add a pinch of cinnamon or ginger. For an extra lemony kick, include lemon extract or more lemon zest. These little changes can turn a simple muffin into a delightful treat! To keep your lemon poppy seed muffins fresh, store them in an airtight container. Place a paper towel in the container to absorb moisture. This helps prevent sogginess. You can keep them at room temperature for about three days. For longer freshness, store them in the fridge for up to a week. To enjoy warm muffins again, preheat your oven to 350°F (175°C). Wrap each muffin in foil to keep them soft. Heat them for about 10 minutes. If you prefer the microwave, place the muffin on a microwave-safe plate. Heat for about 15-20 seconds. This method warms them nicely without drying them out. Freezing muffins is a smart way to save some for later. First, let the muffins cool completely. Then, wrap each muffin in plastic wrap tightly. Place the wrapped muffins in a freezer bag. You can freeze them for up to three months. When you're ready to eat, thaw them in the fridge overnight and reheat as needed. This method keeps the muffins tasting fresh and delicious. For the full recipe, refer back to the earlier section. Yes, you can use whole wheat flour. It will make the muffins denser. I suggest using half whole wheat and half all-purpose flour for the best results. This mix keeps the flavor light while adding some nutrition. Remember, this change may also affect the baking time slightly. To fix dry muffins, you can add more moisture. If the muffins come out dry, try using more buttermilk next time. You can also add a tablespoon of yogurt or applesauce to the batter. If you already baked them, brush the tops with a simple syrup. Just mix equal parts water and sugar until dissolved. This will add moisture back into the muffins. For extra sweetness, you can add chocolate chips or dried fruit. Blueberries or cranberries work well with lemon flavor. You could also sprinkle some sugar on top before baking for a sweet crust. Another option is to drizzle a lemon glaze over the muffins after they cool. This adds a nice touch and extra sweetness! For more ideas, check the Full Recipe to explore different ingredients. In this post, we explored the key ingredients and steps for making lemon poppy seed muffins. We looked at quality tips, potential allergens, and substitutions. I shared detailed prep steps and baking guidelines. I also covered how to enhance flavor and perfect texture. Remember, small tweaks can improve your baking. Lastly, proper storage methods ensure freshness. With these tips, you’ll create delicious muffins every time. Enjoy baking and making them your own!

Lemon Poppy Seed Muffins Delightful and Easy Recipe

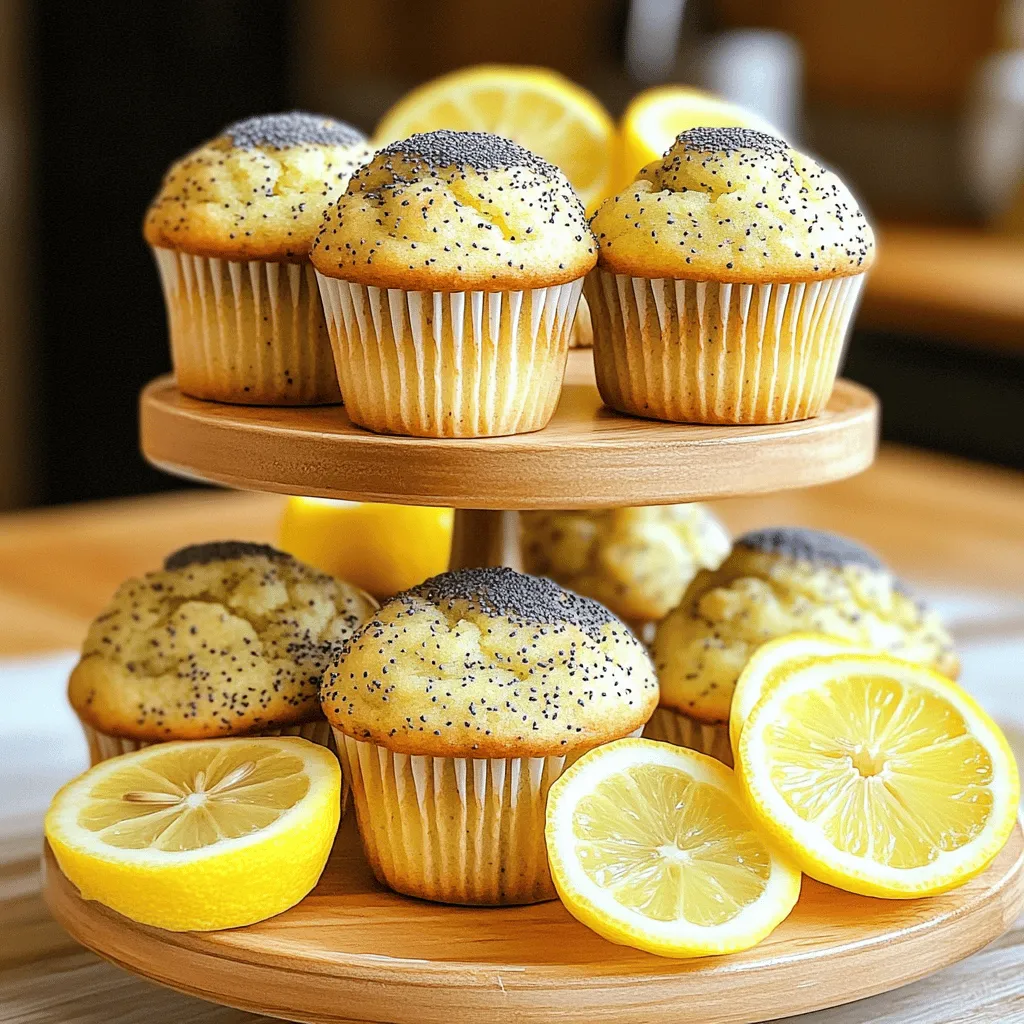
Looking for a bright and tasty treat? My Lemon Poppy Seed Muffins are just what you need! This easy recipe

- 1 cup rolled oats - 1 cup almond milk (or any milk of your preference) - ½ cup canned pumpkin puree To make pumpkin spice overnight oats, you need some basic items. Rolled oats form the base. They soak up the milk and pumpkin. Almond milk adds creaminess, but you can use any milk you like. Canned pumpkin puree gives the oats a rich flavor and nice color. - 1 tablespoon chia seeds - 1 tablespoon maple syrup (adjust to taste) - 1 teaspoon pumpkin spice mix (or blend of cinnamon, nutmeg, and ginger) Chia seeds help the oats thicken. They also add nutrition. Maple syrup sweetens the mix. You can change the amount based on how sweet you want it. Pumpkin spice mix gives that classic fall taste. If you don’t have it, use a blend of cinnamon, nutmeg, and ginger. - Chopped nuts - Dried cranberries - Yogurt - Extra maple syrup Toppings make your oats even better. Chopped nuts add crunch. Dried cranberries bring a bit of tartness. A dollop of yogurt can make it creamy. If you like more sweetness, drizzle on extra maple syrup. This recipe is simple and fun. You can find the full recipe above. Enjoy your tasty pumpkin spice overnight oats! To start, gather your ingredients. In a medium bowl, combine: - 1 cup rolled oats - 1 cup almond milk (or any milk of your preference) - ½ cup canned pumpkin puree - 1 tablespoon chia seeds - 1 tablespoon maple syrup - 1 teaspoon pumpkin spice mix - ¼ teaspoon vanilla extract - Pinch of salt Next, whisk everything together until the mixture is creamy and smooth. This step is key. It helps the oats soak up the flavors. Now, it’s time to store your mixture. Spoon the creamy oat mixture into jars or airtight containers. Make sure to leave some space at the top. This space is important for adding your favorite toppings later. Seal the jars tightly and place them in the refrigerator. Let them chill overnight, or for at least 4 hours. This soaking time allows the oats to absorb the milk and flavors. When you're ready to eat, simply give each jar a stir. Your tasty Pumpkin Spice Overnight Oats are ready! For the full recipe, check the earlier section. Overnight soaking is key for making tasty oats. It helps the oats absorb the liquid, making them soft. If you want thicker oats, use less milk. For creamier oats, add a little more milk. Adjusting the liquid lets you control the texture to match your taste. To make your oats pop with flavor, use fresh spices. Ground spices lose their strength over time. So, fresh pumpkin spice gives a richer taste. You can also mix in yogurt. This adds creaminess and makes the oats smooth. Choose your favorite yogurt for an extra flavor kick. You can enjoy your pumpkin spice overnight oats cold or warm. Cold oats are refreshing on hot days. For warm oats, just heat them in the microwave for about 30 seconds. They work great for meal prep. You can make a batch for the week and grab one each morning. Top with nuts or dried fruits for a fun twist. For more ideas, check the Full Recipe. {{image_4}} You can easily make pumpkin spice overnight oats dairy-free. Just swap almond milk for coconut or oat milk. Both options add a rich taste. Coconut milk gives a hint of sweetness, while oat milk has a smooth texture. This way, you can enjoy your oats without dairy. If you want to change the sweetness, use honey or agave syrup. Both options work well instead of maple syrup. Honey adds a floral note, while agave syrup keeps it mild. Adjust the amount to suit your taste. You can make your oats as sweet as you like! To add a holiday flair, try adding dried cranberries. They bring a tartness that balances the sweetness of pumpkin. You can also experiment with other spices, like cardamom. Cardamom adds a warm flavor that pairs well with pumpkin spice. These twists make your oats special for any season. For the full recipe, check out the detailed steps above! You can keep pumpkin spice overnight oats in the fridge for up to five days. Use airtight containers to keep them fresh. Glass jars work great, as they seal well and are easy to clean. If you use plastic, make sure it is BPA-free. Yes, you can freeze these oats! Just put them in freezer-safe containers. Leave some space at the top, as the oats will expand. To thaw, place the container in the fridge overnight. You can also use the microwave on low to gently heat them. If you want to reheat your oats, do it slowly. Add a splash of milk to keep them creamy. Heat them in the microwave for 30 seconds at a time, stirring in between. This way, they warm evenly and stay delicious. Enjoy your tasty treat! For the full recipe, check out the section above. Yes, you can use quick oats. However, they will change the texture. Quick oats cook faster and absorb liquid more quickly. This means your overnight oats may become mushy. Rolled oats give a chewy, hearty texture. I recommend sticking with rolled oats for the best result. Your pumpkin spice overnight oats can last up to five days in the fridge. Store them in airtight containers. This keeps them fresh and safe to eat. Always check for any off smells or changes in texture before eating. Absolutely! All the ingredients in this recipe can be vegan-friendly. Use almond milk, maple syrup, and chia seeds. These options are plant-based. You can enjoy delicious and creamy oats without any animal products. There are many great options to boost nutrition. You can add protein powder to increase protein. Chia seeds and flaxseeds also add healthy fats. Fresh fruits like berries or bananas can add vitamins and flavor. Nuts can give you extra crunch and healthy fats. Mix and match for your perfect bowl! This blog post walks you through making delicious overnight oats with pumpkin. We covered the basic ingredients, step-by-step instructions, and tips for the best texture and flavor. Remember, you can customize your oats with toppings and variations to suit your taste. Storing is easy, and you can enjoy them cold or warm. In the end, these oats are a healthy and quick breakfast option. Try making them your own, and enjoy the benefits of a balanced meal that fits your routine.

Pumpkin Spice Overnight Oats Simple and Tasty Recipe

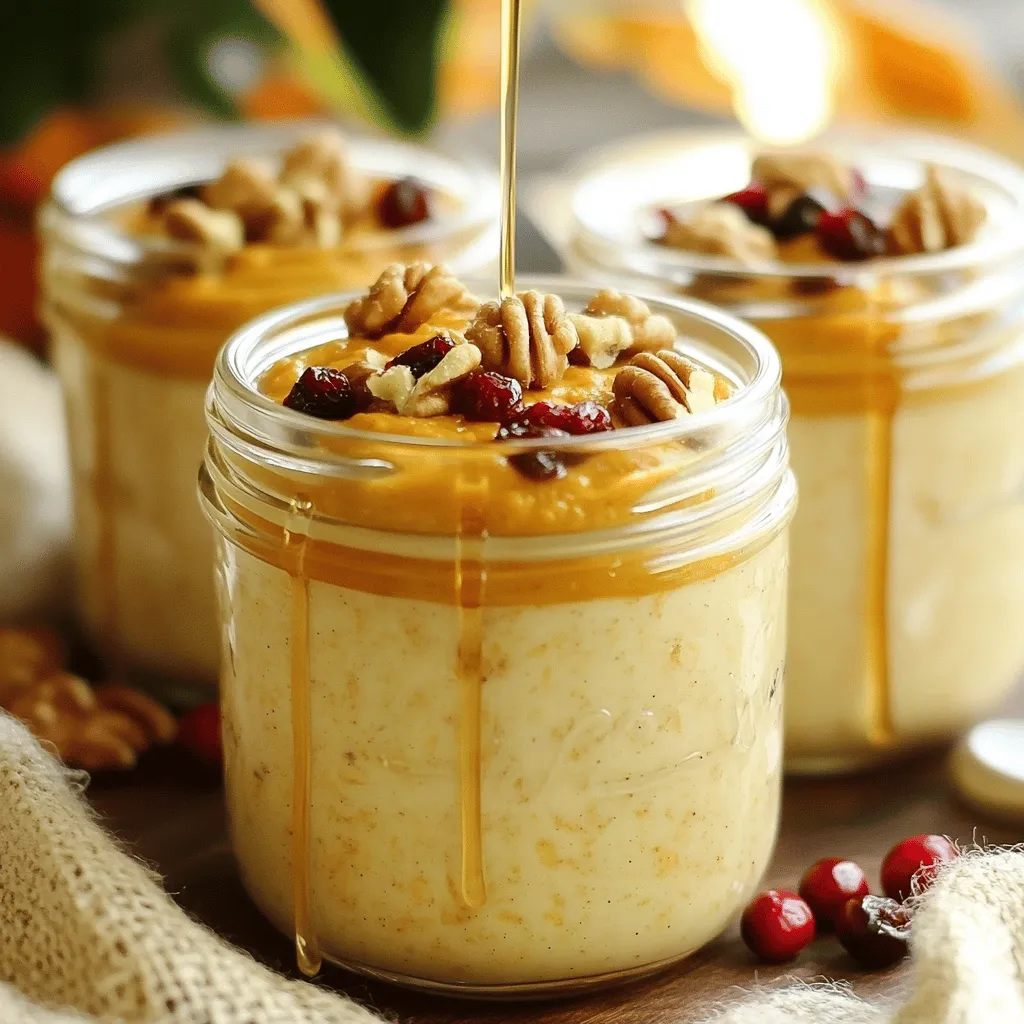
Wake up to fall flavors with my Pumpkin Spice Overnight Oats! This simple and tasty recipe brings the warmth of

To make a tasty Zucchini Noodle Stir Fry, gather these ingredients: - 2 medium zucchinis, spiralized into noodles - 1 red bell pepper, thinly sliced - 1 cup fresh snap peas - 1 large carrot, julienned - 1/2 medium onion, finely sliced - 3 cloves garlic, minced - 1 tablespoon fresh ginger, grated - 3 tablespoons soy sauce (or tamari for a gluten-free option) - 1 tablespoon sesame oil - 1 tablespoon olive oil - 1 tablespoon toasted sesame seeds - 2 green onions, chopped for garnish - Salt and pepper to taste I recommend using fresh vegetables for the best taste and texture. Fresh veggies retain their crunch and nutrients. Frozen vegetables can be used, but they may become mushy when cooked. If you use frozen, add them later in the cooking process. This keeps them firm. Zucchini is low in calories and high in fiber. It helps with digestion and keeps you full. The red bell pepper adds vitamin C, which boosts your immune system. Snap peas bring protein and fiber, while carrots add beta-carotene, good for your eyes. Garlic and ginger have anti-inflammatory properties, making this dish not just tasty but good for you too. Enjoy the Full Recipe to create this healthy meal! To make zucchini noodles, start with fresh zucchinis. Grab two medium zucchinis and wash them well. Use a spiralizer to create fun, long noodles. If you don’t have one, a vegetable peeler works too. Just slice the zucchinis into thin strips. You want them to look like pasta. Set these aside while you prepare the other veggies. Now it's time to cook! Heat a large skillet or wok over medium heat. Add one tablespoon of olive oil and let it warm up. Once hot, add 1/2 medium onion, finely sliced. Stir it for about 2 minutes until it becomes soft and sweet. Next, add 3 cloves of minced garlic and 1 tablespoon of grated ginger. Stir them for about 30 seconds to release their great smells. Then, toss in one sliced red bell pepper, 1 cup of fresh snap peas, and one julienned carrot. Stir-fry these veggies for about 3-4 minutes. You want them to be bright and crunchy. After that, gently add the zucchini noodles. Pour in 3 tablespoons of soy sauce and 1 tablespoon of sesame oil. Stir continuously for another 2-3 minutes. Be careful not to overcook. The noodles should stay firm. Finally, season your stir fry with salt and pepper to taste. For extra crunch, sprinkle on 1 tablespoon of toasted sesame seeds just before serving. For a lovely presentation, scoop the stir fry into shallow bowls. Garnish with chopped green onions and an extra sprinkle of toasted sesame seeds. For a pop of color, add a lime wedge on the side. This adds a bright touch and a refreshing taste. Enjoy the vibrant flavors from this dish! For the full recipe, check out the full recipe section above. When making stir fry, keep these tips in mind: - Overcrowding the pan: This leads to steaming instead of frying. Cook in batches for best results. - Skipping prep work: Chop all veggies before cooking. Stir frying happens fast, and you won’t have time to chop as you go. - Using low heat: A hot pan ensures a good sizzle. This helps caramelize the veggies and enhances their flavor. Getting the right texture for zucchini noodles is key. Here’s how: - Spiralize correctly: Use a good spiralizer for even noodles. Thin, even noodles cook better. - Don't overcook: Cook zucchini noodles for just a few minutes. They should remain firm and not mushy. - Salt them: After spiralizing, sprinkle with salt and let them sit for a few minutes. This removes excess water and helps keep them crisp. Boost the flavor of your stir fry with these tips: - Fresh herbs: Add basil, cilantro, or mint for a fresh taste. - Chili flakes: Sprinkle in some chili flakes for heat. Adjust the amount to your liking. - Acid: A squeeze of lime or lemon juice adds brightness. Just before serving, drizzle it over the top. - Nuts and seeds: Toasted sesame seeds or crushed peanuts add crunch and flavor. For the full recipe, check out the Zucchini Noodle Stir Fry. {{image_4}} You can easily add protein to your zucchini noodle stir fry. Chicken is a popular choice. Simply slice it thin and cook it first. Once it’s golden, remove it and set it aside. Then, cook the veggies as usual. Tofu works great too. Use firm tofu for the best texture. Cut it into cubes. Sauté it until golden. This gives a nice crunch. Add it back in with the zucchini noodles. Both options boost flavor and nutrition. This dish can easily fit gluten-free diets. Just swap regular soy sauce for tamari. Tamari offers the same great taste without gluten. For a vegan option, use vegetable broth instead of chicken broth if you want. It keeps the dish plant-based while adding depth. You can change the veggies based on the season. In spring, add asparagus or peas. In summer, try corn or bell peppers. Fall brings squash and mushrooms. Winter is perfect for hearty greens like kale or bok choy. Mixing in seasonal veggies makes your stir fry fresh and colorful. Experimenting with flavors keeps this dish fun. You can find more ways to play with this recipe in the Full Recipe. Store your leftover zucchini noodle stir fry in an airtight container. This keeps it fresh and tasty. Make sure to cool the dish to room temperature before sealing it. You can store it in the fridge for up to three days. If you want to keep it longer, consider freezing it. To reheat your stir fry, use a skillet over medium heat. Add a splash of water or broth to keep the noodles moist. Stir it gently to heat evenly. You can also use a microwave but cover the dish to avoid drying it out. Heat it for 1-2 minutes, checking every 30 seconds. Freezing zucchini noodles is easy but has some tricks. First, spiralize your zucchinis and blanch them in boiling water for 1-2 minutes. This helps keep their color and texture. After cooling, drain and pat them dry. Place them in a freezer bag, removing as much air as you can. They can stay in the freezer for up to three months. When you’re ready to use them, cook them straight from frozen in your stir fry. This keeps them from getting mushy. Check the Full Recipe for more details on making this healthy meal! Yes, you can make this stir fry ahead of time. Cook the veggies and keep them in the fridge. When you are ready to eat, just reheat them in a skillet. Then, add the zucchini noodles at the last minute. This helps them stay firm and fresh. To prevent soggy zucchini noodles, use a few tricks. First, spiralize the zucchini right before cooking. This keeps them fresh and firm. Second, cook them for a short time. Stir-fry them for only 2 to 3 minutes. Lastly, make sure to remove excess water from the zucchini before adding them to the pan. You can do this by patting them dry with a paper towel. If you need a substitute for soy sauce, try tamari or coconut aminos. Both options are great for a gluten-free choice. You can also mix water with a bit of balsamic vinegar or apple cider vinegar for a different flavor. Adjust the amount to your taste for a delicious alternative. For the full recipe, check out the delicious Zucchini Noodle Stir Fry. Zucchini noodle stir fry is simple and fun to make. We covered ingredients, like fresh veggies and their health perks. I shared tips to avoid common mistakes and achieve perfect noodles. We explored protein options, seasonal tweaks, and how to store leftovers. In closing, this dish is versatile and tasty. With a few simple steps, anyone can enjoy a healthy meal. So grab your veggies and get cooking!

Zucchini Noodle Stir Fry Flavorful and Healthy Meal

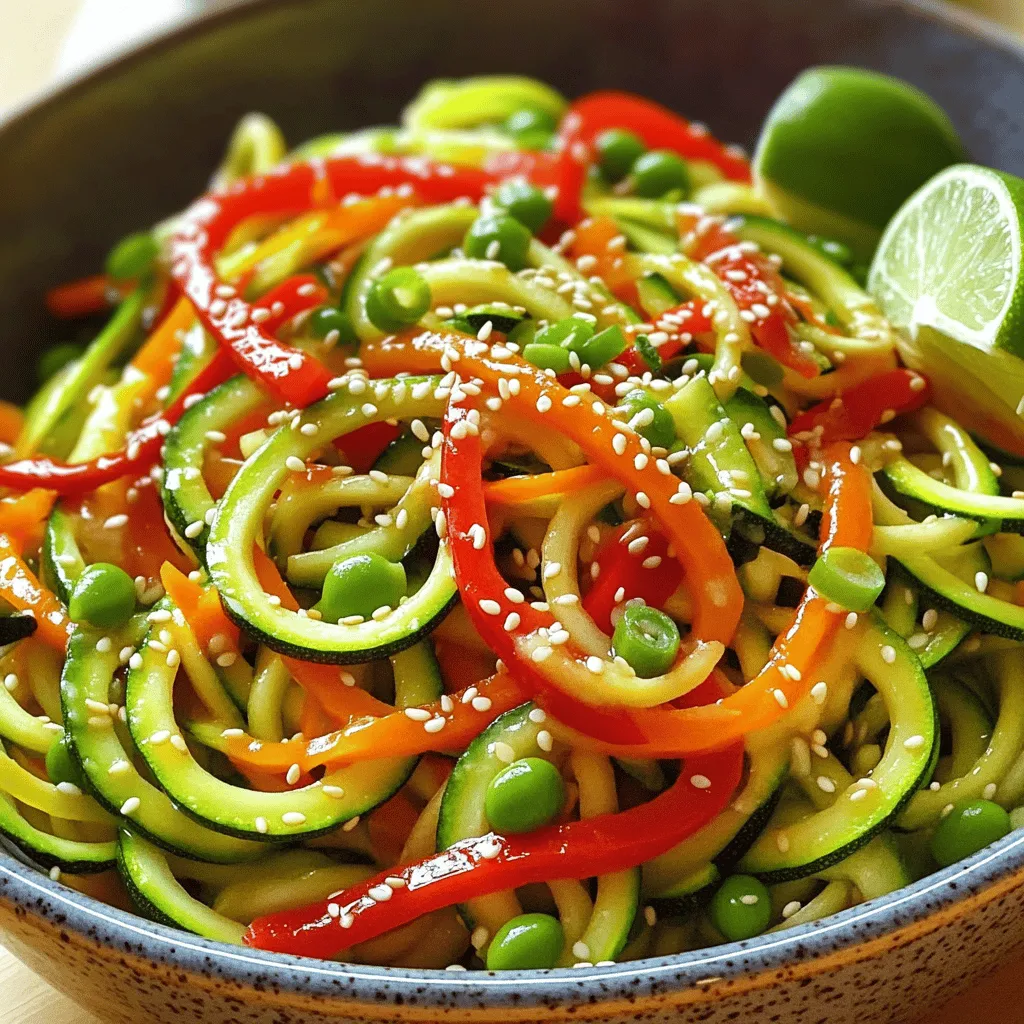
Looking for a tasty, healthy meal that’s quick to whip up? Zucchini noodle stir fry is your answer! Packed with

To make this easy spinach artichoke dip, gather these key ingredients: - 1 cup fresh spinach, finely chopped - 1 cup canned artichoke hearts, thoroughly drained and chopped - 1 cup cream cheese, softened to room temperature - 1/2 cup sour cream - 1/2 cup mayonnaise - 1 cup shredded mozzarella cheese, plus extra for topping - 1/4 cup grated Parmesan cheese - 1 teaspoon garlic powder - 1/2 teaspoon onion powder - Salt and freshly ground black pepper, to taste - Tortilla chips or an assortment of sliced vegetables (carrots, cucumbers, bell peppers) for serving These ingredients create a creamy base with rich flavors that everyone loves. The spinach and artichokes bring a nice texture, while the cheeses make it gooey and delightful. You can add more flavors to your dip. Here are some optional add-ins: - Chopped green onions for a fresh bite - A pinch of red pepper flakes for heat - Cooked bacon bits for a smoky flavor - A splash of lemon juice for brightness These options allow you to customize the dip to match your taste. Play around with these add-ins to find your favorite mix. If you need to change any ingredients, here are some substitutions: - Greek yogurt can replace sour cream for a tangy twist. - Cottage cheese can work in place of cream cheese for lower fat. - Nutritional yeast can replace Parmesan cheese for a vegan option. Using these substitutes can help you meet dietary needs without losing flavor. This dip is versatile and easy to adapt, so don't hesitate to try different options. For the full recipe, check out the link above. To make this dip, first preheat your oven to 350°F (175°C). This step ensures even cooking. Next, grab a large mixing bowl. In this bowl, mix one cup of softened cream cheese, half a cup of sour cream, and half a cup of mayonnaise. Use a hand mixer or whisk to blend until smooth. There should be no lumps left. Once the base is creamy, add one cup of finely chopped spinach and one cup of drained, chopped artichoke hearts. Stir gently to mix the veggies into the creamy base. After mixing, it is time to add flavor. Add one cup of shredded mozzarella cheese, a quarter cup of grated Parmesan cheese, one teaspoon of garlic powder, and half a teaspoon of onion powder. Season with salt and freshly ground black pepper to taste. Stir well to combine everything. Then, spoon the mixture into a medium-sized baking dish, spreading it evenly. For a cheesy finish, sprinkle a bit more mozzarella on top. Place the dish in your preheated oven and bake for about 20-25 minutes. You will know it’s ready when the dip is hot, bubbly, and slightly golden on top. To get the best texture, mix your ingredients well, ensuring no clumps remain. The cheese should melt evenly, and the vegetables should blend in. If the dip is too thick, you can add a splash of milk to loosen it up. Let it cool for a few minutes after baking. This cooling time helps the dip thicken slightly more, making it easier to scoop with chips or veggies. Enjoy your creamy spinach artichoke delight with your favorite dippers! For the full recipe, check the earlier section. You can prepare this dip a day ahead. Mix all the ingredients as directed. Transfer the mixture to your baking dish. Cover it with plastic wrap and store it in the fridge. When you’re ready, just bake it straight from the fridge. This saves you time and stress during your gathering. Serve the dip warm for the best taste. Pair it with crispy tortilla chips, pita bread, or fresh veggie sticks. Adding a sprinkle of extra Parmesan or fresh herbs on top makes it look fancy. You can also place it in a bread bowl for a fun twist. If your dip is too thick, add a splash of milk or cream. This helps make it creamier and smoother. If it tastes bland, a pinch of salt or extra garlic powder can boost the flavor. Always taste your dip before serving. Adjust the seasoning to your liking for the best taste. {{image_4}} You can switch up the cheese in your dip for fun. Use a mix of cheeses like cheddar or gouda for a richer taste. Cream cheese is great, but adding a bit of feta gives a nice tang. Try mozzarella for a gooey texture. Each cheese brings its own flavor to the dish. Want some heat? Add chopped jalapeños or red pepper flakes to your dip. This gives it a kick that pairs well with the creamy base. If you love spice, consider using pepper jack cheese instead of mozzarella. It adds flavor and heat that will please those who enjoy bold tastes. For a vegan version, swap cream cheese and sour cream for cashew cream or tofu. Use nutritional yeast to get that cheesy flavor. You can also add a splash of lemon juice for freshness. This version keeps the dip rich and creamy without any dairy. It's a great option for plant-based eaters. Whether you stick to the classic or try a twist, each variation is simple to make. Check out the Full Recipe for more details on preparing this dip. To keep your dip fresh, store it in an airtight container. Let it cool to room temperature first. This helps avoid moisture build-up inside. Once cooled, seal it tightly. Place the container in the fridge. It can last up to three days. If you notice any change in smell or texture, it's best to toss it. When you're ready to enjoy your leftover dip, reheat it gently. Preheat your oven to 350°F (175°C). Transfer the dip to an oven-safe dish. Cover it with foil to keep it moist. Heat for about 15 to 20 minutes. If you want a crispy top, remove the foil for the last five minutes. You can also reheat it in the microwave for about 1-2 minutes. Stir it halfway through for even warming. If you want to save some dip for later, freezing is a great option. Use a freezer-safe, airtight container. Scoop the dip into the container, leaving some space at the top for expansion. Seal it well to avoid freezer burn. You can freeze it for up to three months. When you're ready to enjoy it, thaw it in the fridge overnight. Reheat it as described above for the best taste. Yes, you can make this dip without mayonnaise. Use more sour cream or Greek yogurt instead. This swap keeps the dip creamy and tasty. You can also add an extra ounce of cream cheese for richness. You can serve spinach artichoke dip with many things! Here are some great options: - Tortilla chips - Pita bread - Fresh vegetable sticks (like carrots, cucumbers, and bell peppers) - Toasted baguette slices - Crackers These choices add crunch and flavor. They also help you scoop up that creamy dip! Spinach artichoke dip lasts about 3 to 4 days in the fridge. Store it in an airtight container to keep it fresh. Just remember to reheat it before serving. It tastes best warm and gooey! For the full recipe, check out the details above. Here are some cooking tips for beginners: - Always preheat your oven to ensure even cooking. - Mix your cream cheese, sour cream, and mayonnaise until smooth. This makes a great base. - Chop your spinach and artichokes finely. This helps the dip blend well. - Taste as you go! Adjust salt and pepper for the best flavor. Enjoy making your spinach artichoke dip! It's easy and fun. You now have all you need to make a great spinach artichoke dip. We covered the key ingredients, step-by-step instructions, and useful tips. You learned about optional add-ins and variations to try. Plus, storage info helps keep your dip fresh. Spinach artichoke dip is easy to make and share. Feel free to customize this dish to suit your taste. Enjoy every bite and impress your friends with your cooking skills!

Easy Spinach Artichoke Dip Delicious and Simple Recipe

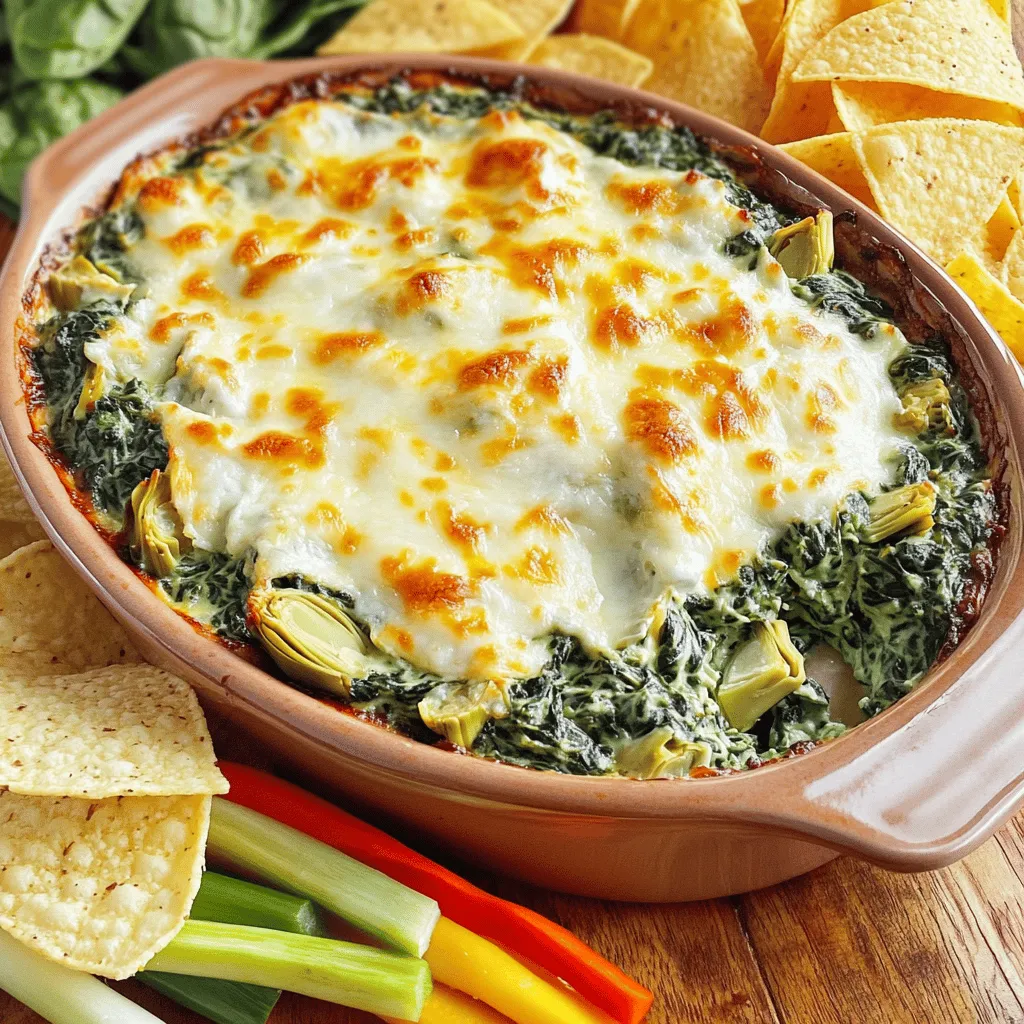
Are you ready to impress your friends and family with a tasty treat? My Easy Spinach Artichoke Dip recipe is

- 2 lbs boneless, skinless chicken thighs - 1 cup plain yogurt - 3 tablespoons tikka masala spice blend - 1 tablespoon ginger-garlic paste - 1 tablespoon olive oil - 1 medium onion, finely chopped - 1 can (14 oz) crushed tomatoes - 1 cup coconut milk - 1 teaspoon garam masala - Salt to taste The main ingredients make this dish rich and tasty. The chicken thighs stay juicy and soak up all the flavors. Yogurt makes the chicken tender, while the tikka masala spice blend gives it that classic taste. - Fresh cilantro - Sliced chili peppers Garnishes add a nice touch. Fresh cilantro brightens the dish, while sliced chili peppers bring heat. You can add these just before serving to make your meal look and taste even better. - Using chicken breast instead of thighs - Dairy-free yogurt options If you prefer chicken breast, that works too! Just remember, breasts cook faster, so check them to avoid dryness. For a dairy-free option, use coconut yogurt or almond yogurt instead of plain yogurt. These swaps keep the dish delicious while meeting your needs. For the full recipe, check out the complete guide. Start by making your chicken marinade. In a bowl, mix the plain yogurt, tikka masala spice blend, and ginger-garlic paste. This mix gives the chicken a rich flavor. Add the chicken pieces and stir until they are fully coated. Cover the bowl with plastic wrap. Let it marinate for at least 30 minutes. If you can, let it sit overnight in the fridge. This makes the chicken even tastier. Next, it's time to sauté. Turn on your Instant Pot and set it to Sauté mode. Pour in the olive oil and let it heat for about a minute. Add the finely chopped onion. Stir the onion until it becomes golden brown. This usually takes around 5-7 minutes. Stir it occasionally to avoid burning. Sautéing the onion adds a sweet flavor that makes your dish better. Now, we will cook the tikka masala. Once the onions are golden, add the marinated chicken. Pour in all the marinade from the bowl. Mix it well with the onions. Next, add the crushed tomatoes and coconut milk. Sprinkle in the garam masala and add salt to taste. Stir everything to coat the chicken evenly. Cancel the Sauté mode. Secure the lid on your Instant Pot. Set the valve to the sealing position. Cook on Manual or Pressure Cook mode for 10 minutes. After cooking, let the pressure release naturally for 10 minutes. Then, do a quick release to let out any extra steam. Carefully open the lid and stir the chicken tikka masala to mix the flavors. Taste it and adjust the salt if needed. Your delicious chicken tikka masala is now ready. Serve it hot, garnished with fresh cilantro. Enjoy it with fluffy basmati rice or warm naan bread for a complete meal. For the full recipe, check out the details above. To get tender chicken and a rich sauce, marinating is key. Use plain yogurt mixed with tikka masala spice blend and ginger-garlic paste. This mix helps the chicken soak up flavors and moisture. Aim to marinate the chicken for at least 30 minutes. For the best taste, let it sit overnight in the fridge. When sautéing onions in the Instant Pot, let them turn golden brown. This step builds flavor. If you rush, the dish may lack depth. Sometimes, the sauce can end up too thin or too thick. If it’s too thin, you can thicken it by adding a little cornstarch mixed with water. Stir this mix in and let it cook for a few more minutes. For a thick sauce, you can cook it longer with the lid off. This lets extra moisture escape. You can prepare this dish ahead of time. Marinate the chicken the night before for easy cooking. Store the marinated chicken in the fridge. On a busy weeknight, just toss it in the Instant Pot. You can also cook the dish and store it in the fridge. It tastes even better the next day! {{image_4}} For a tasty vegetarian version, use chickpeas and your favorite veggies. Chickpeas add protein, while vegetables like bell peppers and spinach bring color and crunch. Cook them just like you would the chicken, ensuring they soak up all the rich flavors of the sauce. This option is hearty and filling, and it suits meat-free diets well. You can adjust the heat based on your taste. For a milder dish, cut back on the tikka masala blend. You can also use less ginger-garlic paste for less spice. If you want more heat, add extra chili powder or fresh chilies. Just remember to taste as you go. This way, you can find the perfect balance for your meal. Feel free to swap the chicken for other proteins. Shrimp cooks quickly and pairs well with the sauce. Tofu is another great choice, soaking up the flavors nicely. If you use tofu, press it first to remove excess moisture. This helps it absorb the sauce better. Each protein brings its own twist to the dish, making it unique every time. To store chicken tikka masala in the fridge, let it cool first. Transfer it to an airtight container. This way, it keeps fresh for up to three days. Remember to label it with the date. If you want to enjoy it later, just take it out when ready. For long-term storage, you can freeze chicken tikka masala. Pour it into a freezer-safe container. Make sure to leave some space for expansion. It can last up to three months in the freezer. When you want to eat it, just thaw it overnight in the fridge before reheating. To reheat chicken tikka masala without losing flavor, use the stovetop method. Place it in a pan over medium heat. Stir often to heat evenly. You can add a bit of coconut milk if it seems thick. Another option is to use the microwave. Heat it in short bursts, stirring in between. This keeps it moist and tasty. You can serve Chicken Tikka Masala in many ways. Here are some ideas: - Serve it hot over fluffy basmati rice. - Pair it with warm naan bread for dipping. - Add a side of roasted vegetables for color and nutrition. - Top it with fresh cilantro for a burst of flavor. These options make your meal balanced and tasty. Yes, you can still enjoy Chicken Tikka Masala without an Instant Pot. Here are some ways: - Use a slow cooker. Cook on low for 6-8 hours. - Try the stovetop method. Cook on medium heat for about 30-40 minutes. Both methods let the flavors mix well, just like the Instant Pot does. You can make Chicken Tikka Masala healthier with a few simple swaps: - Use skinless chicken breast instead of thighs for less fat. - Replace coconut milk with low-fat yogurt for fewer calories. - Add more veggies like spinach or bell peppers for extra nutrients. These changes keep the dish tasty while making it lighter. Yes, Chicken Tikka Masala can be gluten-free. Here’s what to know: - Check the tikka masala spice blend for any gluten. - Use gluten-free flour to thicken the sauce if needed. - Serve with gluten-free naan or rice. With these tips, you can enjoy this dish without worry. This article covered everything you need for Chicken Tikka Masala. We explored the key ingredients, like chicken thighs and yogurt. You learned how to marinate, sauté, and cook using an Instant Pot. I shared helpful tips to master texture and troubleshoot issues. You can even adapt this dish for different diets. Remember, you can make this meal your own with variations. Whether you go vegetarian or adjust the spice, the options are vast. Now, it’s time to enjoy a delicious Chicken Tikka Masala tonight!

Instant Pot Chicken Tikka Masala Easy Meal Recipe

Are you ready to elevate your dinner game? With my Instant Pot Chicken Tikka Masala recipe, you can enjoy a

To make stuffed bell peppers with quinoa, you will need the following simple and fresh ingredients: - 4 large bell peppers - 1 cup quinoa - 2 cups vegetable broth - 1 can black beans - 1 cup corn - 1 small red onion - 2 cloves garlic - Spices: cumin, chili powder, smoked paprika - Salt and pepper - 1 cup diced tomatoes - 1 cup shredded cheese - Fresh herbs for garnish These ingredients create a flavorful, healthy meal that shines with color and taste. Choose bell peppers in your favorite colors. They add visual appeal and nutrition to your dish. Quinoa provides protein and a nice texture. Black beans and corn bring fiber and sweetness. The spices elevate the taste, making each bite a delight. When you gather these ingredients, you'll feel the excitement of cooking. Each item contributes to a delicious outcome. You can find the full recipe in the article to guide you through the process. - Preheat oven to 375°F (190°C) - Cut tops off and remove seeds from bell peppers Start by preheating your oven to 375°F (190°C). This step is key because it ensures even cooking. While the oven warms, grab your bell peppers. Cut off their tops and scoop out the seeds and membranes. This makes them ready for stuffing. Place them upside down in a baking dish. This lets any extra liquid drain out. - Boil vegetable broth - Add quinoa, simmer until liquid is absorbed Next, take a medium-sized pot and bring 2 cups of vegetable broth to a boil. The broth adds flavor to the quinoa. Once boiling, add 1 cup of rinsed quinoa. Lower the heat, cover the pot, and let it simmer for about 15 minutes. The liquid should absorb fully. After that, fluff the quinoa with a fork and set it aside. - Heat olive oil in skillet - Sauté onions and garlic until translucent Now, grab a large skillet. Heat a splash of olive oil over medium heat. Add the finely diced red onion and minced garlic. Sauté them for about 3-4 minutes. You want them translucent and fragrant. This step builds a great base for your filling. - Add black beans, corn, tomatoes, and spices - Mix with cooked quinoa and half the cheese In the same skillet, add the can of black beans and the cup of corn. Sprinkle in the diced tomatoes, ground cumin, chili powder, smoked paprika, salt, and pepper. Stir well and cook for another 5 minutes. This helps all the flavors blend together. Once done, combine this mixture with your cooked quinoa. Fold in half the shredded cheese, mixing thoroughly. - Fill bell peppers with mixture - Add water to baking dish and cover with foil Now it's time to stuff the peppers. Spoon the quinoa and vegetable mixture into each pepper. Pack the filling gently to fill them to the top. Then, add a small amount of water to the bottom of your baking dish. This creates steam while baking. Cover the dish tightly with aluminum foil. - Bake for 25-30 minutes - Uncover, add remaining cheese, and bake until bubbly Place the covered dish in the preheated oven. Bake for 25-30 minutes. After that, carefully remove the foil. Sprinkle the remaining cheese over the tops of the stuffed peppers. Return them to the oven for another 10 minutes. You want the cheese to melt and bubble. When done, let them cool for a few minutes before serving. Enjoy your delicious stuffed bell peppers with quinoa! For the full recipe, check out the details above. To make your stuffed peppers cook evenly, place them upside down in the baking dish. This trick helps excess liquid drain out. You can also adjust the spices to fit your taste. If you like heat, add more chili powder or cumin for a spicier kick. Rinsing your quinoa ahead of time can save you precious minutes. Quinoa can soak up dirt, so a quick rinse makes it cleaner and tastier. For even faster prep, consider using canned veggies. They cut down on chopping time and still taste great in the dish. Stuffed peppers are great on their own, but you can make them even better. Pair them with a fresh side salad or creamy avocado slices for a colorful plate. A dollop of sour cream or yogurt on top adds a nice touch. These ideas enhance the flavors and make your meal complete. For the full recipe, see above. {{image_4}} You can change the filling to fit your taste. Try these ideas: - Substitute quinoa with rice or couscous for a different texture. - Add extra veggies like zucchini or mushrooms for more flavor and color. These swaps keep the dish fresh and fun. You can even mix different grains for added taste. The key is to enjoy the process! Want to boost the protein? Here are some easy options: - Incorporate minced turkey or chicken for a heartier meal. - Use lentils to keep it plant-based while increasing protein content. These additions make the dish more filling and satisfying. You can adjust the spices based on what meat or lentils you use. If you have dietary needs, you can adjust the recipe: - Make it vegan by omitting cheese. Use a nut-based cheese if you still want creaminess. - Choose gluten-free grains and check all ingredients to ensure they are certified gluten-free. These changes allow everyone to enjoy stuffed peppers. You can easily adapt this recipe for any diet. For the full recipe, check the earlier sections. Store any leftovers in an airtight container. This keeps them fresh and tasty. It’s best to eat them within 3-4 days. This way, you enjoy the best flavor and texture. If you want to save them for later, wrap each stuffed pepper. You can use foil or plastic wrap. This helps prevent freezer burn. Freeze them for up to 3 months for the best quality. To reheat, you can use a microwave or an oven. Make sure to heat until they are warm all the way through. For added moisture, add a splash of water to the dish. This keeps your stuffed peppers juicy and delicious. Enjoy them again just like they were fresh from the oven! You can use rice, couscous, or a mix of grains. These options provide a similar texture and soak up flavors well. If you want a heartier dish, brown rice works great. It has a nutty taste that enhances the dish. Couscous cooks quicker and is light. It pairs nicely with the peppers. Yes, you can prepare the filling and stuff the peppers a day ahead. Store them in the fridge until you are ready to bake. This makes meal prep easier and saves time on busy days. When ready, just pop them in the oven. They will taste fresh and delicious. Baking covered with foil at first helps them cook through. This method traps steam, making the peppers soft. After about 25 minutes, you can remove the foil to brown the tops. This gives you that perfect mix of tenderness and a nice crust. Yes, you can cook them on low for 6-8 hours. Make sure to add extra liquid if needed. The slow cooker allows the flavors to blend beautifully. This method is great for busy days when you want a warm meal ready when you get home. Stuffed peppers are a fun and healthy dish. You learned how to prepare them, from ingredients to baking. Simple steps make it easy to create a meal full of flavor. You can customize them with different fillings and toppings. Plus, leftovers store well for future meals. Enjoy experimenting with your recipes and impressing others with tasty, stuffed peppers. They’re not just easy to make; they're also good for you! Dive in and make these peppers your own. Happy cooking!

Stuffed Bell Peppers with Quinoa Savory Flavor Boost

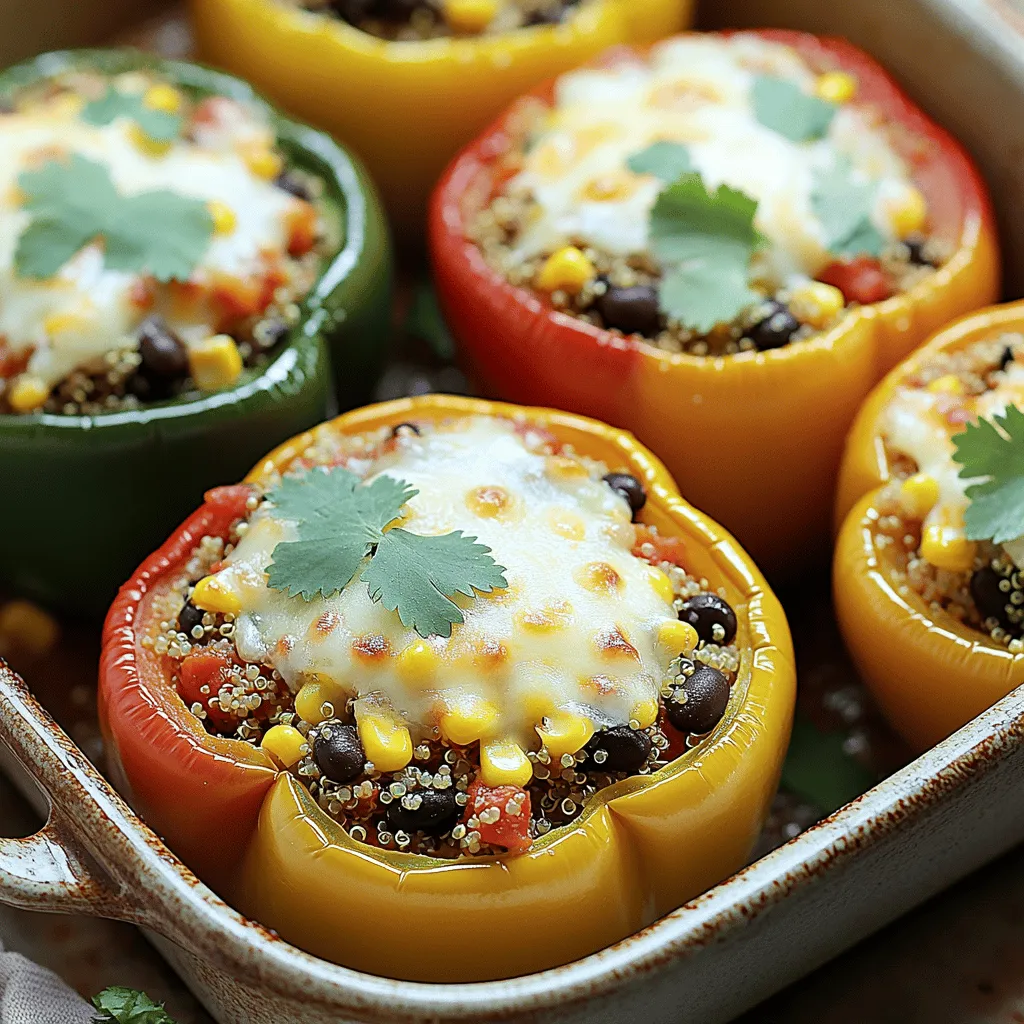
Looking for a tasty and healthy dish? You’ll love these stuffed bell peppers with quinoa! They’re easy to make and

Older posts
Newer posts
← Previous Page1 … Page59 Page60 Page61 … Page86 Next →

dsad

© 2026 yumymoments • Built with GeneratePress

Our Policies

  • Copyright Policy
  • Cookie Policy
  • GDPR Policy
  • Privacy Policy
  • Disclaimer
  • Terms Of Use

More Information

  • Home
  • About
  • Contact
  • Appetizers
  • Dessert
  • Dinner
  • Drinks
©2026, yumymoments About Back To Top