Skip to content
DisclaimerTerms Of UseGDPR PolicyCookie Policy

yumymoments

  • Home
  • Drinks
  • Appetizers
  • Dinner
  • Dessert
  • About
  • Contact
  • Privacy Policy
DisclaimerTerms Of UseGDPR PolicyCookie Policy

NO-ING-IMG

- 1 block (14 oz) firm tofu, well-drained and pressed - 1/4 cup cornstarch - 3 tablespoons vegetable oil - 1/4 cup honey - 2 tablespoons soy sauce - 1 tablespoon sesame oil - 1 tablespoon rice vinegar - 1 teaspoon garlic powder - 1 teaspoon ginger powder - 1 tablespoon toasted sesame seeds - 2 green onions, finely chopped - Salt and freshly ground black pepper Crispy Honey Sesame Tofu shines with its simple yet bold flavors. You start with firm tofu, which holds its shape well. Pressing the tofu removes extra water. This step is key for a crispy texture. Next, you coat the tofu in cornstarch. This makes the outside crunchy when fried. For flavor, I add honey and soy sauce. The honey gives sweetness, while the soy sauce adds a savory kick. Sesame oil and rice vinegar deepen the taste. Garlic powder and ginger powder bring warmth and spice. When it comes to garnishing, toasted sesame seeds add crunch. Green onions provide a fresh bite. You will want to season with salt and pepper for balance. Each ingredient plays a role in making this dish tasty. You can easily find them at any grocery store. {{ingredient_image_2}} To start, you need to drain and press the tofu. This step removes excess water. Place the tofu between two plates and add a weight on top. Let it sit for about 15 minutes. After pressing, cut the tofu into 1-inch cubes. I like to use a sharp knife for clean cuts. Next, we coat the tofu in cornstarch. Begin by seasoning the tofu cubes with salt and pepper. Then, put cornstarch in a shallow dish. Toss the tofu cubes in cornstarch until they are fully coated. This gives the tofu a nice crisp. Now it's time to fry the tofu. Heat vegetable oil in a large pan over medium heat. Wait until the oil shimmers before adding the tofu. Place the coated tofu cubes in a single layer. Fry for 3 to 4 minutes on each side. Use tongs to turn them gently. If your pan is small, fry in batches to avoid crowding. Once the tofu is golden and crispy, transfer it to a lined baking sheet. Preheat your oven to 400°F (200°C). Bake the tofu for 10 minutes. This step makes it even crispier. While the tofu bakes, prepare the honey sesame sauce. In a small saucepan, mix honey, soy sauce, sesame oil, rice vinegar, garlic powder, and ginger powder. Heat gently over low heat, stirring often. Do not let it boil. After 10 minutes, take the tofu out of the oven. Transfer it to a mixing bowl. Pour the warm honey sesame sauce over the tofu and toss to coat. Add toasted sesame seeds and chopped green onions for extra flavor. Enjoy your Crispy Honey Sesame Tofu over rice or greens! Coating the tofu with cornstarch is key for a crispy texture. Cornstarch creates a barrier that helps the tofu fry perfectly. Make sure each tofu cube is evenly coated. This step makes all the difference! The frying temperature should be just right. Heat your oil over medium heat until it shimmers. If it's too hot, the tofu will burn. If it's too cool, your tofu will soak up oil and become soggy. Serve your Crispy Honey Sesame Tofu over steamed rice. It pairs well with mixed greens or sautéed vegetables. For a stunning plate, arrange the tofu neatly. Drizzle some extra sauce over the top and sprinkle toasted sesame seeds and green onions for color. You can change the flavors by adding different sauces. Try teriyaki or sweet chili sauce. If you want a vegan option for honey, use agave nectar or maple syrup. Both give a sweet touch without using honey. Pro Tips Press the Tofu Well: Make sure to press the tofu for at least 30 minutes to remove excess moisture, which helps achieve a crispier texture when frying. Use a Non-Stick Skillet: If available, use a non-stick skillet for frying the tofu to reduce the amount of oil needed and prevent sticking. Adjust Sweetness: Feel free to adjust the amount of honey in the sauce according to your taste preferences, or substitute with maple syrup for a vegan option. Garnish Before Serving: Add the sesame seeds and green onions just before serving to keep them fresh and crunchy. {{image_4}} To store leftover tofu, first, let it cool down. Place the tofu in an airtight container. Add a little water to keep it moist. Seal the container tightly and store it in the fridge. Use it within 3 to 4 days for the best taste. If you want to freeze tofu, drain it well and cut it into cubes. Place the cubes in a freezer-safe bag. Remove as much air as possible before sealing. Frozen tofu can last for 3 months. To use, thaw it overnight in the fridge. To reheat your tofu while keeping it crispy, use an oven or an air fryer. Preheat the oven to 375°F (190°C). Place the tofu on a baking sheet for 10 to 15 minutes. Turn the pieces halfway for even heating. For the sauce, heat it gently in a small pan. Stir often over low heat. This method keeps the sauce smooth and tasty. Do not let it boil, as this can change the flavor. - Each serving contains about 250 calories. - Macronutrient composition includes: - Carbohydrates: 30 grams - Fats: 10 grams - Proteins: 12 grams Tofu is a great source of protein. It offers essential amino acids. It has low calories and high protein, making it perfect for a healthy diet. Honey adds natural sweetness and antioxidants. It can help with digestion and energy. The sesame oil in this recipe provides healthy fats. It also has anti-inflammatory properties. Using fresh garlic and ginger boosts flavor and health. They help support your immune system. This dish is not only tasty but also rich in nutrients. Enjoying it can help you feel full and satisfied. You can use soft tofu, but it may not hold its shape. Firm tofu stays crispier. Soft tofu will break apart easily during cooking. This could lead to a less appealing texture. To make this dish vegan, simply replace honey with maple syrup or agave nectar. Both options provide a sweet flavor without using animal products. That way, you can enjoy the same great taste while sticking to a vegan diet. As mentioned, maple syrup or agave nectar works great as honey substitutes. You can also try brown rice syrup. Each of these options will keep the sweet taste you crave in this recipe. To spice up the sauce, add red pepper flakes or sriracha. Start with a small amount and taste as you mix. You can always add more heat if you like it spicy! This will give your dish an exciting kick. Yes, you can prep certain parts ahead of time. Cut and press the tofu a day before. Store it in the fridge. You can also make the sauce ahead and keep it in the fridge. Just heat it up when you're ready to serve. This blog post covered how to make a tasty tofu dish from start to finish. We explored essential ingredients like firm tofu and soy sauce. I shared step-by-step directions for prepping, coating, frying, and baking for extra crispiness. Tips for storing leftovers and serving suggestions were included to make it easy for you. Tofu is healthy and filling, making it a great choice for meals. Try the recipe and enjoy customizing it with your favorite flavors!

Crispy Honey Sesame Tofu Flavorful and Easy Recipe

Are you ready to make a dish that makes your taste buds sing? My Crispy Honey Sesame Tofu recipe is

- 8 oz lo mein noodles - 2 tablespoons sesame oil, divided - 1 cup broccoli florets - 1 bell pepper, thinly sliced - 1 medium carrot, julienned - 1 cup sugar snap peas - 4 green onions, chopped - 3 cloves garlic, finely minced - 1-inch piece of fresh ginger, grated - 3 tablespoons soy sauce - 1 tablespoon vegetarian oyster sauce - 1 tablespoon hoisin sauce - Salt and pepper to taste - Sesame seeds for garnish - Other vegetables (mushrooms, bok choy, etc.) - Sriracha for added spice - Tofu or tempeh for protein In this recipe, lo mein noodles are the star. They soak up all the tasty sauce. I love using fresh veggies. They add crunch and color to the dish. You can mix in any veggies you like. Mushrooms or bok choy work great too. The sauces create a rich flavor. Soy sauce gives saltiness. Vegetarian oyster sauce adds sweetness. Hoisin sauce brings depth. You can adjust the salt and pepper to your taste. For added protein, try tofu or tempeh. They soak up the sauce well. Adding sriracha can spice things up. If you want to make it your own, feel free to switch it up! For the full recipe, check out the details above. Happy cooking! To cook lo mein noodles, follow the package instructions closely. Start by boiling water in a large pot. Once boiling, add the noodles and cook until tender, about 4-6 minutes. Make sure to stir them occasionally. - After cooking, drain the noodles in a colander. - To prevent sticking, drizzle a teaspoon of sesame oil over the noodles. - Toss them gently to coat each strand. For the best flavor, use fresh garlic and ginger. Start by heating sesame oil in a large skillet or wok over medium-high heat. Add minced garlic and grated ginger to the hot oil. Sauté for about 1 minute. - Stir constantly to release the aroma. Be careful not to burn them. Next, add your vegetables: broccoli, bell pepper, carrot, and sugar snap peas. Stir-fry for about 5-7 minutes. - You want them to be tender but still crisp. Once your veggies are ready, it's time to mix it all together. Add the cooked lo mein noodles and the white parts of the green onions to the skillet. Toss everything well to combine. - Pour in the soy sauce, vegetarian oyster sauce, and hoisin sauce. - Stir-fry for an additional 3-4 minutes to ensure an even coating. Taste your dish and adjust the seasoning with salt and pepper. Enjoy making your Veggie Delight Lo Mein with these steps from the Full Recipe! 1. Overcooking vegetables: This is a big mistake. When you overcook veggies, they lose their crunch and flavor. Keep an eye on them while stir-frying. You want them tender but still crisp. Aim for about 5-7 minutes of cooking time. 2. Skipping the oil for noodles: After cooking your noodles, don’t forget to add a little sesame oil. It stops them from sticking together. Just a teaspoon will do. Toss them gently to coat. 1. Adding seasonings at the right time: Timing is key. Add seasonings like soy sauce and oyster sauce when your veggies are almost done. This helps the flavors blend well without overpowering the dish. Stir-fry for a few more minutes to heat everything through. 2. Using fresh herbs for garnish: Fresh herbs can boost flavor. Try using chopped green onions or cilantro on top before serving. They add color and a fresh taste that makes your dish pop. 1. How to make it healthier: You can add more veggies to your lo mein. Try mushrooms, bell peppers, or spinach. They add nutrients and make the dish more colorful. You can also use whole grain noodles for extra fiber. 2. Suggestions for low-sodium alternatives: For those watching salt intake, use low-sodium soy sauce. You can also make a simple mix of garlic, ginger, and vinegar for flavor without added salt. This keeps your dish tasty and healthy. Check out the Full Recipe for more on making your Vegetable Lo Mein delicious! {{image_4}} You can easily change the protein in your Vegetable Lo Mein. Tofu is a great choice. It soaks up flavors well and adds a nice texture. To add tofu, press it first to remove excess water. Cut it into cubes and fry it until golden. Then, toss it in with the veggies and noodles. If you prefer chicken, use boneless, skinless pieces. Cut the chicken into thin strips. Cook it before adding the vegetables. This way, the chicken stays juicy and tender. Shrimp is another fun option. You can add peeled shrimp during the last few minutes of cooking. They cook quickly and bring a sweet flavor to the dish. Feel free to swap out vegetables based on your taste. Mushrooms, bok choy, or zucchini work well in this recipe. They add different flavors and textures. For a unique twist, try using seasonal produce. In summer, add fresh corn or bell peppers. In fall, consider using butternut squash. These choices keep your Lo Mein fresh and exciting. If you need a gluten-free meal, you can easily adjust the noodles. Look for gluten-free lo mein noodles made from rice or other gluten-free grains. They taste great and cook just like regular noodles. Another option is to make a rice-based dish. Use cooked jasmine or basmati rice instead of noodles. Stir-fry the rice with the veggies and sauces. This gives you a tasty and gluten-free alternative without losing flavor. Enjoy these variations to make the dish your own! To keep your Vegetable Lo Mein fresh, store it in the fridge. Use airtight containers. This helps prevent moisture loss and keeps flavors intact. Make sure to cool the dish before sealing it. It’s best to eat the leftovers within three days for the best taste. Reheat your lo mein by using the stovetop or microwave. If using the stovetop, add a splash of water or soy sauce. This will help keep the noodles moist. Heat on low until warm, stirring often. In the microwave, place it in a bowl and cover it with a damp paper towel. Heat in 30-second bursts until hot. You can freeze Vegetable Lo Mein for later use. First, let it cool completely. Then, place it in freezer-safe bags or containers. Remove as much air as possible to avoid freezer burn. For best results, eat it within two months. When you’re ready to eat, thaw it overnight in the fridge. Reheat as mentioned above. For a complete guide, check out the Full Recipe. Vegetable Lo Mein is a popular Chinese dish. It features soft noodles mixed with vegetables. This dish has roots in Chinese cuisine, where it became a favorite for its flavor and ease. Traditionally, it uses egg noodles, but we make it with lo mein noodles. The dish allows for many vegetable choices, making it flexible and fun to make. Yes, you can prepare Vegetable Lo Mein in advance. Cook the noodles and vegetables, then store them separately. When you're ready to serve, simply reheat them in a pan. This method keeps the noodles and veggies fresh. Just remember to add the sauces right before serving to keep the flavors bright. If you need a soy sauce alternative, there are options. You can use coconut aminos for a gluten-free choice. Tamari is another great option for those avoiding gluten. For a different flavor, try using teriyaki sauce. Each substitute brings its own taste, so choose what fits your needs best. To add spice to your Vegetable Lo Mein, use Sriracha or chili paste. Start with a small amount and taste as you go. You can also add crushed red pepper flakes for a nice kick. For an even spicier dish, consider using fresh chopped chili peppers. Adjust the heat level to match your preference. Boost the nutrition of your Vegetable Lo Mein by adding more veggies. Try adding spinach, bok choy, or bell peppers. You can also mix in whole grains like brown rice noodles. Adding tofu or edamame increases protein, making the dish more filling. These tweaks make your meal both healthy and tasty. In summary, we've explored how to create a delicious Vegetable Lo Mein. You learned about the key ingredients, cooking steps, and helpful tips. Always remember to avoid overcooking your veggies and use fresh ingredients for the best taste. Whether you opt for tofu, shrimp, or seasonal veggies, the choices are endless. Enjoy your meal and share it with family and friends. With these tips, you can master this dish with ease. Happy cooking!

Vegetable Lo Mein Flavorful and Simple Recipe Guide

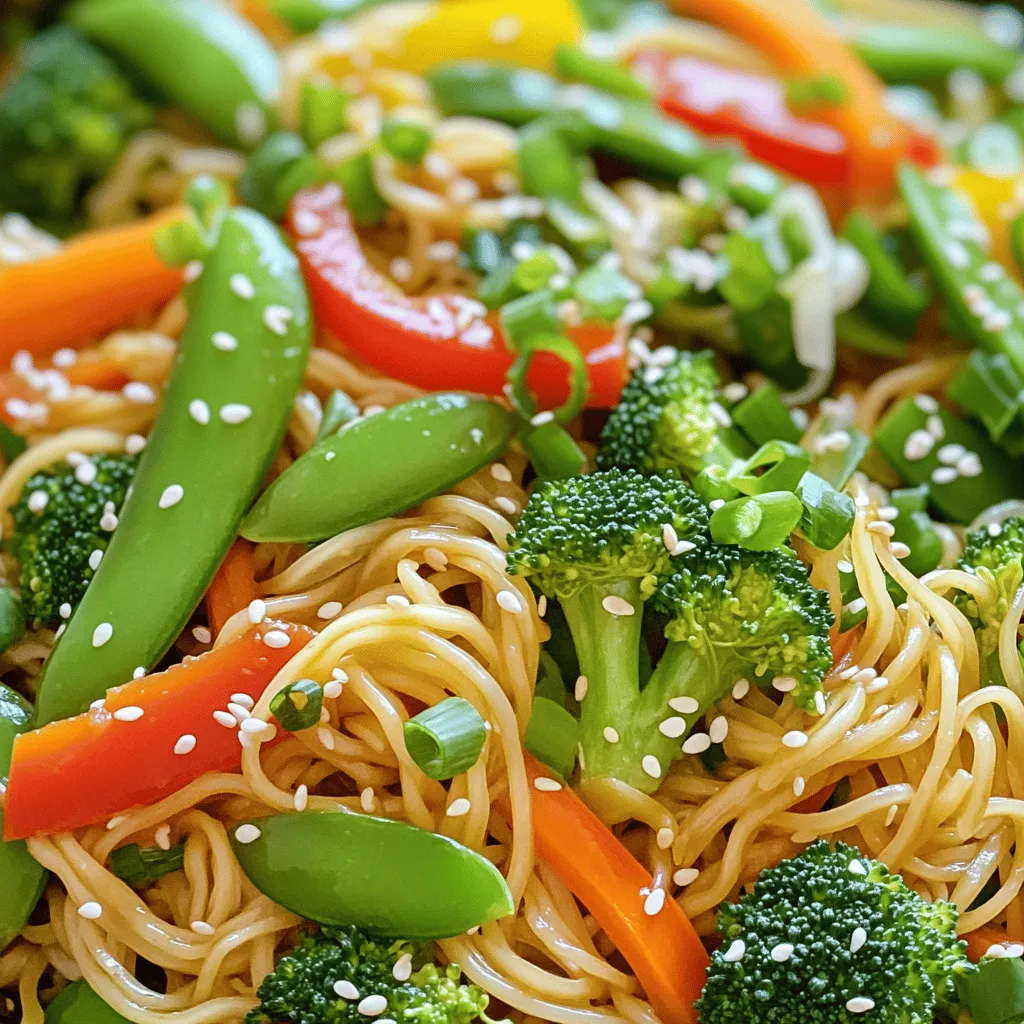
Vegetable Lo Mein is a tasty and easy dish you can whip up in no time. With vibrant veggies and

- 2 pounds russet potatoes - 4 cloves of garlic - 1/2 cup unsalted butter - 1 cup heavy cream - 1/2 cup sour cream - Salt and pepper to taste - 1/4 cup fresh chives for garnish Choosing the right type of potato is key. I recommend russet potatoes for their light and fluffy texture. They mash well and soak up flavors nicely. The right potato makes a big difference in your dish. Using fresh garlic is also crucial. Fresh garlic gives a stronger and sweeter flavor than dried. For the best taste, always choose whole cloves over pre-minced options. When you smash the garlic, it releases more oils, adding depth to your mashed potatoes. You can play with the creamy base. Cream cheese adds a tangy twist to the dish. You might also try adding roasted garlic for a sweeter taste. Fresh herbs like rosemary or thyme can elevate the flavor too. These options let you personalize the creamy garlic mashed potatoes to your liking. For the full recipe, check out the link to create this rich and flavorful dish! Start by peeling the russet potatoes. I like to use a sturdy peeler for this task. Cut the potatoes into 1-inch cubes. This size helps them cook evenly. Next, take the garlic cloves and smash them gently with the flat side of a knife. This technique releases the garlic's flavor without making it too fine. In a large pot, add the cubed potatoes and the smashed garlic. Cover them with cold water, ensuring there's about an inch above the ingredients. Add a pinch of salt to the water. Place the pot over medium-high heat and bring it to a vigorous boil. Once boiling, reduce the heat. Let it simmer gently for 15 to 20 minutes. The potatoes should be fork-tender when done. This simmering method keeps the potatoes creamy and avoids breaking them apart. Drain the potatoes and garlic in a colander, then return them to the pot. Let them sit for a couple of minutes. This step helps any extra moisture evaporate. For mashing, you can use a potato masher or a ricer. I prefer a ricer because it gives a fluffier texture. Whichever tool you choose, mash until you reach your desired smoothness. Now, slowly drizzle in the warm butter and cream mixture. Stir continuously until everything is creamy and fluffy. This process is key to achieving the right texture. Finally, gently fold in sour cream. Season with salt and freshly ground black pepper to taste. For the complete preparation, refer to the Full Recipe. To get creamy garlic mashed potatoes, start with steam drying the potatoes. After boiling, let them sit in the pot for a couple of minutes. This step removes excess water. Next, gradually add the warm butter and cream mixture. This helps the potatoes absorb the fat and liquid. The result? A smooth and fluffy texture that melts in your mouth. Roasted garlic adds a deeper flavor to your mashed potatoes. You can roast garlic by wrapping it in foil and baking it until soft. This gives a sweet taste that brightens the dish. When seasoning, remember to taste as you go. Add salt and pepper little by little. This ensures the perfect taste without overwhelming the potatoes. For an elegant look, serve your creamy garlic mashed potatoes in a nice bowl. Create a slight well in the center. Place a small pat of butter here; it will melt beautifully. Finally, sprinkle fresh chives on top. They add color and a fresh taste that elevates the dish. For the full recipe, check out the Creamy Garlic Mashed Potatoes Delight. {{image_4}} You can change the taste of creamy garlic mashed potatoes easily. Adding cheese makes them even richer. Try using Parmesan for a nutty kick or Gouda for a smoky flavor. Both choices melt well and blend smoothly into the potatoes. Herbs also add great flavor. Infuse your mashed potatoes with rosemary or thyme. These herbs bring a fresh taste and a lovely aroma. Just chop them finely and mix them in. You can even roast the garlic for a deeper, sweeter flavor. If you're looking for vegan options, you can swap out a few ingredients. Use plant-based butter and creams to keep it creamy without dairy. This option tastes just as good and is great for vegan friends. For those watching carbs, consider using cauliflower instead of potatoes. Cauliflower mash is light and fluffy. It absorbs garlic and cream well. You can follow the same steps in the recipe to create a delicious low-carb version. Creamy garlic mashed potatoes pair well with many dishes. They go great with grilled meats, roasted chicken, or even a hearty vegetable stew. The creamy texture balances well with savory and rich flavors. To make a complete meal, serve them with a green salad or steamed veggies. This adds color and nutrition to your plate. You can also top the potatoes with sautéed mushrooms or crispy bacon bits for added flair. For the full recipe, check out the details above and enjoy making this classic dish your own! Store your creamy garlic mashed potatoes in the fridge. Use airtight containers to keep them fresh. This helps avoid any weird smells and keeps the flavor intact. Let the potatoes cool to room temperature before sealing them up. This step prevents extra moisture from making them soggy. When you want to enjoy your leftovers, you can reheat them in a few ways. The best method is using the stovetop. Place the mashed potatoes in a pot over low heat. Add a splash of milk or cream to bring back their creaminess. Stir often to avoid sticking. If they are too dry, add a bit more liquid for a smooth texture. You can also use a microwave, but check every 30 seconds to stir and prevent hot spots. If you need to store your mashed potatoes for longer, freezing is an option. Scoop the mashed potatoes into freezer-safe bags. Press out the air before sealing to avoid freezer burn. Label the bags with the date. For the best taste, eat them within a month. When ready to eat, thaw them overnight in the fridge. Reheat on the stovetop or microwave, adding a little cream for the best results. Try using these tips for the perfect creamy garlic mashed potatoes next time you enjoy them from your freezer. For the full recipe, check out the recipe section above. To make mashed potatoes fluffier, start with steaming them. Steaming helps keep moisture out. After boiling, let them sit in the pot for a few minutes. This step allows steam to escape. Use a potato ricer instead of a masher. A ricer gives a lighter, airier texture. Gradually mix in warm butter and cream. This keeps the potatoes fluffy rather than dense. Yes, you can use other types of potatoes. Yukon Gold potatoes are great for a creamy mash. They have a buttery flavor and smooth texture. Russet potatoes are also popular. They are light and fluffy but can be starchy. Avoid using waxy potatoes like red or new potatoes. They can yield a gummy texture. To enhance flavor, consider adding roasted garlic. It gives a sweet, rich taste. Fresh herbs like thyme or rosemary can also work well. For a kick, add a pinch of cayenne pepper. You can mix in cheese like Parmesan or cheddar for a savory twist. A splash of buttermilk adds tanginess and creaminess. To prevent gummy mashed potatoes, don’t overmix them. Mix just until combined after adding cream and butter. Make sure to drain the potatoes well. Extra water can lead to a gummy texture. Use warm ingredients when mixing in butter and cream. This helps keep the potatoes light and fluffy. In this blog post, we explored how to make creamy garlic mashed potatoes. We discussed important ingredients, preparation steps, and tips for perfect flavor and texture. Remember to choose the right potatoes and fresh garlic for the best results. You can also try creative variations to suit your taste. Proper storage and reheating methods ensure your leftovers stay delicious. Enjoy these mashed potatoes as a side dish for any meal, and impress your guests with your cooking skills. Happy mashing!

Creamy Garlic Mashed Potatoes Rich and Flavorful Dish

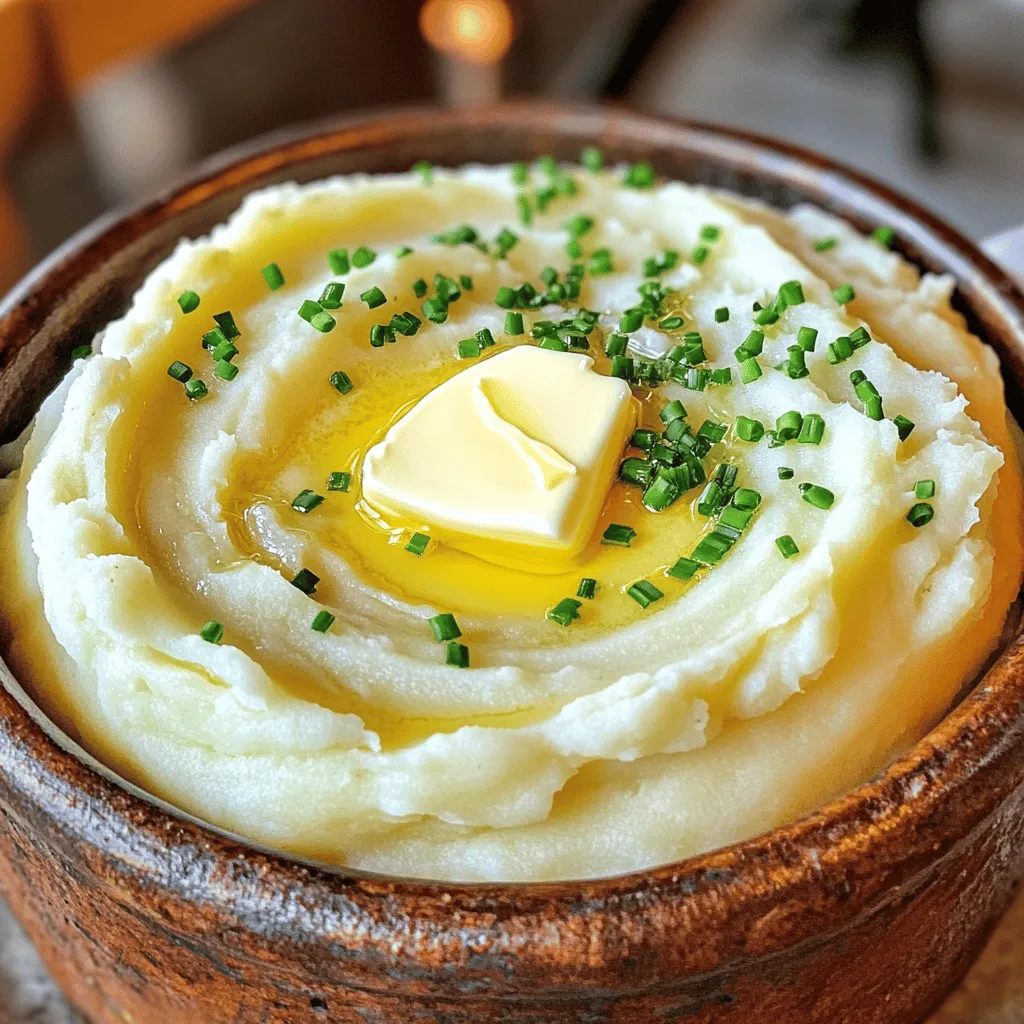
If you’re craving a dish that’s both rich and savory, creamy garlic mashed potatoes are the answer. I’ll show you

To make this simple dessert, gather these ingredients: - 1 can (29 oz) sliced peaches in syrup - 1 box yellow cake mix - 1 cup unsalted butter, melted - 1 teaspoon ground cinnamon - 1 cup packed brown sugar - 1 cup rolled oats - 1 teaspoon vanilla extract - A pinch of salt These ingredients make the base of your Peach Cobbler Dump Cake. Each one plays a vital role in creating that sweet and comforting flavor. You can tweak some ingredients if you need to. Here are a few swaps you might try: - Use fresh peaches instead of canned for a brighter taste. - Swap yellow cake mix for a gluten-free version if needed. - Replace unsalted butter with coconut oil for a dairy-free option. - Use maple syrup instead of brown sugar for a different sweetness. These substitutions keep the spirit of the recipe but allow you to customize it to your taste or dietary needs. Using fresh ingredients can elevate your dessert. Fresh peaches give a burst of flavor and juicy texture. They add a lovely brightness to the dish. If you use fresh fruits, make sure they are ripe for the best taste. When you use high-quality ingredients, you create a dessert that stands out. This care shows in every bite. The Peach Cobbler Dump Cake becomes not just a dish, but a delicious experience. Start by gathering your baking dish. Use a 9x13-inch dish for this recipe. Make sure it is clean and dry. No need to grease it since the peaches will add moisture. This will help the cake bake nicely and not stick. Now it’s time to layer the ingredients. Pour the can of sliced peaches, syrup included, into the dish. Spread them out evenly. Next, mix the dry ingredients in a bowl. Combine the yellow cake mix, ground cinnamon, brown sugar, rolled oats, and a pinch of salt. Stir until everything is mixed well. Sprinkle this dry mix over the peaches. Make sure to cover them fully. This will create a nice crust as it bakes. Then, take the melted butter and drizzle it over the dry mix. This step is key for a moist cake. Add a teaspoon of vanilla extract on top to enhance the flavor. Preheat your oven to 350°F (175°C) before you start baking. Once your layers are ready, place the dish in the oven. Bake for 40-45 minutes. Watch for the top to turn golden brown and bubbly. This shows the cake is done. When it's ready, take it out and let it cool for 10-15 minutes. This cooling time helps the cake set and makes it easier to serve. You can find the full recipe above for all the details. Enjoy! To get the best texture in your peach cobbler dump cake, follow these tips. First, use a light hand when mixing. Over-mixing can make it tough. You want a nice crumb. Second, ensure your butter is melted but not too hot. Hot butter can cook the cake mix too fast. Aim for a golden brown top. It should feel soft and slightly springy when done. You can boost the flavor with simple additions. Adding ground cinnamon gives warmth. You can also try nutmeg for a cozy touch. A splash of vanilla extract enhances the sweetness. For a twist, consider almond extract. It pairs well with peaches. These small changes can make your cake stand out. Watch out for a few common mistakes. First, don’t skip the syrup from the peaches. It adds moisture and sweetness. Second, avoid using cold butter. It won’t mix well and can lead to uneven baking. Lastly, don’t rush the cooling time. Letting it cool for 10-15 minutes helps the flavors blend and makes it easier to serve. Following these tips will lead you to a delicious peach cobbler dump cake. For more details, check the Full Recipe. {{image_4}} You can change the fruit in this dump cake. Try using blueberries, cherries, or apples. Each fruit gives a new taste. For a fun twist, mix fruits together. You can also use fresh fruit if you have it. Just make sure to add a bit of sugar if the fruit is not sweet. If you need a gluten-free version, swap the yellow cake mix. Look for a gluten-free cake mix in stores. This makes it easy to enjoy the dessert. You can also make your own mix from gluten-free flour. Add some baking powder and a pinch of salt to it. Serving your dump cake is part of the fun. Serve it warm in bowls. Add a scoop of vanilla ice cream on top. It melts and makes the cake extra nice. You can also add whipped cream for more creaminess. A sprinkle of cinnamon or nuts can add a nice touch too. For a fruity flavor, drizzle some peach syrup on top. This enhances the peachy taste. Enjoy your delicious creation! For the full recipe, check the details above. After enjoying your Peach Cobbler Dump Cake, store leftovers in a sealed container. Make sure it cools down first. Keep it in the fridge for up to four days. This keeps it fresh and tasty. If you want to save some longer, consider freezing it. To reheat, take out a slice from the fridge. Place it in a microwave-safe dish. Heat it for about 30 seconds to one minute. Check if it's warm enough. You can also reheat it in the oven. Set the oven to 350°F (175°C) and bake for 10-15 minutes. This method keeps the crust nice and crisp. You can freeze your Peach Cobbler Dump Cake for up to three months. Cut it into slices and wrap each piece tightly in plastic wrap. Then, place the wrapped slices in a freezer-safe bag. When you’re ready to eat, let it thaw in the fridge overnight before reheating. This way, you can enjoy a sweet treat anytime! For the full recipe, check back to ensure you have everything you need for your next bake. To store Peach Cobbler Dump Cake, let it cool completely. After it cools, cover it with plastic wrap or aluminum foil. You can also use an airtight container. Keep it in the fridge for up to four days. If you want to keep it longer, you can freeze it. Just make sure to wrap it well to prevent freezer burn. Yes, you can make Peach Cobbler Dump Cake ahead of time. You can prepare it the day before and store it in the fridge. Just bake it when you're ready to serve. This dessert tastes great warm or at room temperature. If you bake it in advance, reheat it in the oven for about 15 minutes at 350°F (175°C). Peach Cobbler Dump Cake pairs well with several side dishes. Here are some great options: - Vanilla ice cream - Whipped cream - Fresh fruit salad - A scoop of yogurt - Sweetened condensed milk These sides enhance the flavors, making your dessert even more enjoyable. You can find the full recipe to get started on your delicious Peach Cobbler Dump Cake! You’ve learned how to make a great Peach Cobbler Dump Cake. We covered all the key ingredients, step-by-step directions, and helpful tips. Using fresh ingredients will enhance your cake's taste. Don't forget the fun variations and perfect serving ideas. Store any leftovers properly to keep them tasty. Make sure you avoid common mistakes for the best results. Enjoy your baking and share it with others. Now go out there and create a delicious peach cobbler dump cake for everyone to enjoy!

Peach Cobbler Dump Cake Simple and Tasty Dessert

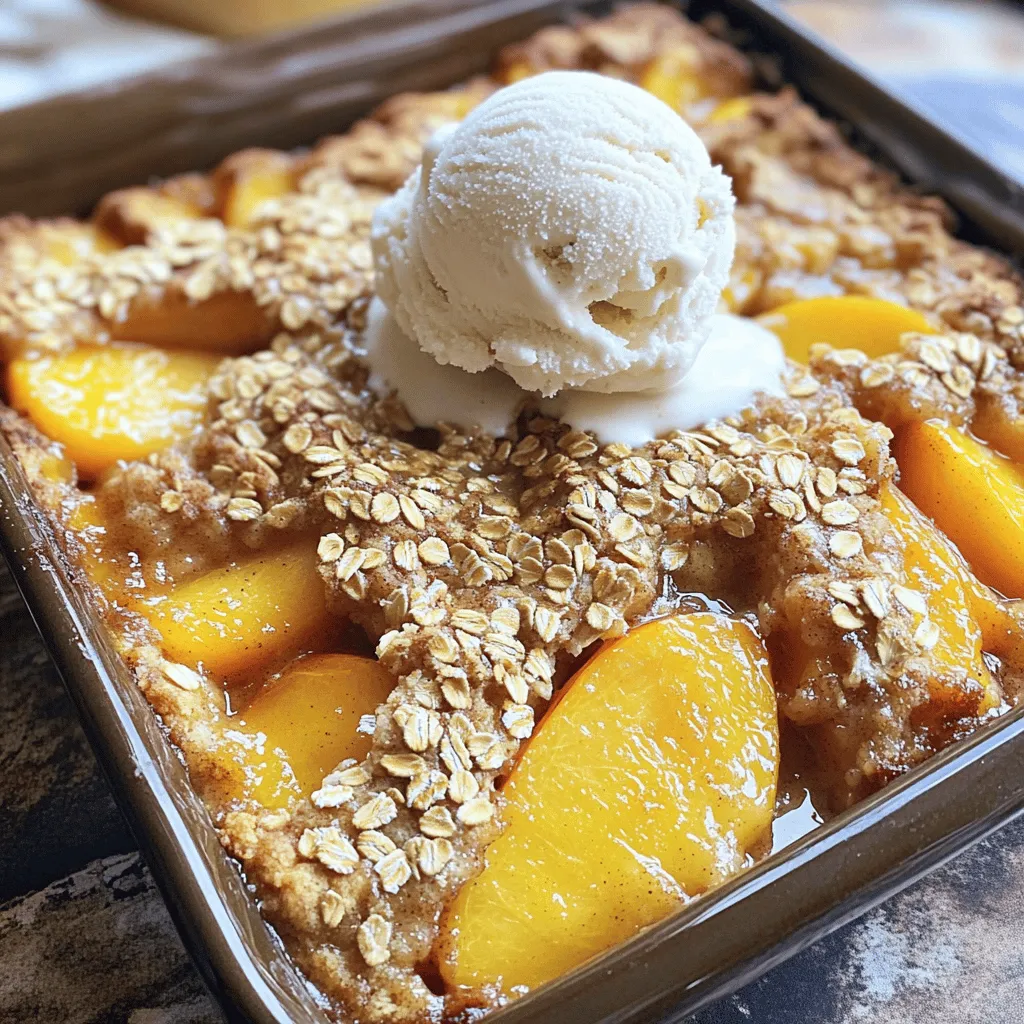
Are you craving a sweet treat that’s both simple and delicious? Look no further! Peach Cobbler Dump Cake is the

To make guacamole deviled eggs, you will need the following ingredients: - 6 large eggs - 1 ripe avocado, halved and pitted - 1 tablespoon fresh lime juice - 2 tablespoons red onion, finely chopped - 1 small jalapeño, deseeded and minced - 1 tablespoon fresh cilantro, chopped - Salt and freshly ground black pepper, to taste - Sliced radishes and additional cilantro leaves for garnish These ingredients bring together a lovely mix of flavors. The eggs provide a creamy base, while the avocado adds richness. Lime juice gives a bright note, and jalapeño adds a bit of heat. The red onion and cilantro round out the taste and add freshness. You can easily adjust the salt and pepper to your liking. Don't forget the sliced radishes and cilantro leaves for garnish; they make the dish pop visually! For the complete recipe, check out the Full Recipe. It guides you through each step, ensuring you create these delightful bites with ease. - Hard-Boil the Eggs Start by placing 6 large eggs in a medium saucepan. Cover them with cold water, about an inch above the eggs. Bring the water to a boil over medium-high heat. Once boiling, cover the pan with a lid, remove it from the heat, and let it sit for 12 minutes. - Cool the Eggs After 12 minutes, move the eggs to a bowl filled with ice water. Let them cool for 5 to 10 minutes. This makes peeling easier. Once cooled, tap each egg on a hard surface to crack the shell. Peel them under running water if needed. Finally, slice each egg in half lengthwise. - Scoop and Combine Ingredients In a mixing bowl, scoop out the yolks from the hard-boiled eggs. Add the flesh of 1 ripe avocado, 1 tablespoon of fresh lime juice, 2 tablespoons of finely chopped red onion, 1 small minced jalapeño, and 1 tablespoon of chopped cilantro. Season the mix with salt and pepper. - Mash and Mix Use a fork to mash the yolks and avocado together. Mix until creamy and smooth. Make sure all ingredients are well combined. Taste it and adjust any seasonings you like. - Fill the Egg Whites With a spoon or piping bag, fill each egg white half with the guacamole mixture. This adds a fun look and a tasty bite. - Garnish and Serve For a final touch, place a slice of radish on each filled egg and add a sprig of cilantro. Arrange the guacamole deviled eggs on a platter to impress your guests. You can find the complete instructions in the Full Recipe. Enjoy your delicious creation! Choosing the Right Avocado Select a ripe avocado for a creamy texture. It should feel soft but not mushy. A good avocado will have a rich, buttery flavor that shines in this dish. Check the color too; a darker skin often means ripeness. If you buy unripe avocados, leave them on the counter for a few days until they soften. Adjusting Seasonings Taste your guacamole mix before filling the eggs. Lime juice adds zing, while salt enhances flavor. If you want heat, add more jalapeño. Remember, you can always add more, but you can't take it out. Mixing in fresh cilantro gives a bright finish. Adjust to your taste for the best results. Cooling Techniques After boiling your eggs, cool them quickly. Ice water is the best method. This stops the cooking process and makes peeling easier. Let them soak for 5 to 10 minutes. The cold water helps the shells separate from the egg white. Peeling Under Running Water When peeling, try doing it under running water. This helps remove stubborn bits of shell. Start at the wider end where there’s an air pocket. Gently roll the egg on the counter to crack it. The water will help wash away any shell fragments, leaving a smooth egg. Using a Piping Bag For a fancy look, use a piping bag to fill your egg whites. This method makes your guacamole filling look professional. If you don’t have a piping bag, a zip-top bag works too. Just cut a corner off to create a makeshift piping tool. Garnishing Ideas Garnish with sliced radishes and cilantro leaves for color and flavor. The radish adds crunch while cilantro brightens the dish. You can even sprinkle chili powder for a pop of color and taste. Arrange them on a platter for an inviting presentation that everyone will love. For the full recipe, check out the [Full Recipe]. {{image_4}} Guacamole deviled eggs are fun to make, and you can easily switch things up! Here are some tasty variations to explore. - Adding More Jalapeño: If you love heat, add more jalapeño. It brings a nice kick. Just remember to deseed and mince it well. Start with half a jalapeño and add more if you like it spicier. - Incorporating Hot Sauce: A few drops of your favorite hot sauce can spice things up too. It adds flavor and heat without changing the texture of the deviled eggs. Try adding a dash of sriracha or Tabasco for a zesty twist. - Adding Diced Tomatoes: For a fresh taste, stir in some diced tomatoes. They add color and a juicy burst. Use small cherry tomatoes for a sweeter flavor. Just make sure to drain any excess juice. - Including Edible Flowers: For a beautiful touch, top your eggs with edible flowers. They add a pop of color and look stunning on the table. Choose flowers like nasturtiums or pansies to make your dish stand out. - Serving on Crackers: For a fun twist, spoon the mixture onto your favorite crackers. This adds crunch and makes a great appetizer. Choose sturdy crackers that can hold the guacamole well. - Pairing with Salads: You can serve these eggs with a fresh salad too. A simple green salad or a zesty slaw pairs nicely. The creamy filling complements the crisp veggies for a balanced bite. Explore these variations to make your guacamole deviled eggs unique. For the complete recipe, check out the [Full Recipe]. Store any leftover guacamole deviled eggs in an airtight container. This keeps them fresh and tasty. Place a piece of plastic wrap directly on the eggs to reduce air exposure. They last in the fridge for up to two days. After that, the avocado may brown and lose flavor. Reheating guacamole deviled eggs isn't common, but you can do it if needed. The best method is using a microwave. Heat them on low power for short bursts, about 10-15 seconds. This keeps the texture nice. Avoid heating them too long, or they may get soggy. Freezing is a great way to save time. However, do not freeze the filled eggs. Instead, freeze the egg whites and the guacamole filling separately. Wrap the egg whites in plastic wrap. Store the filling in a freezer-safe bag. To defrost, place them in the fridge overnight. Use them within a month for the best taste. To make guacamole deviled eggs, start with hard-boiled eggs. After boiling, cool and peel the eggs. Slice them in half lengthwise and scoop out the yolks. In a bowl, mix the yolks with ripe avocado, lime juice, red onion, jalapeño, and cilantro. Season with salt and pepper. Finally, fill the egg whites with this creamy mixture. Key ingredients include: - 6 large eggs - 1 ripe avocado - 1 tablespoon fresh lime juice - 2 tablespoons red onion - 1 small jalapeño - 1 tablespoon fresh cilantro Yes, you can make guacamole deviled eggs ahead of time. They taste great when chilled. Store them in the fridge. Use an airtight container to keep them fresh. They last about two days in the fridge. To prep in advance, boil the eggs and make the filling. You can fill the eggs right before serving. This keeps them looking nice and fresh. If you need a substitute for avocado, there are a few options. You can use hummus for a creamy texture. Greek yogurt also works well. Another option is mashed banana, which adds a sweet twist. Other healthy fats to consider are nut butters or tahini. These will change the flavor but can still provide a tasty filling. This blog post covered how to make tasty guacamole deviled eggs step by step. You learned about key ingredients, cooking methods, and helpful tips. Remember to pick the best avocado for great flavor. Don’t forget to experiment with spices and toppings to make your dish unique. These eggs can also be stored or frozen for later use. Enjoy making this fun dish, and impress your friends with your cooking skills!

Guacamole Deviled Eggs Deliciously Easy Recipe

If you want a fun twist on a classic snack, you’ve got to try Guacamole Deviled Eggs! This easy recipe

- 1 large head of cauliflower, cut into bite-sized florets - 1 cup sharp cheddar cheese, freshly shredded - 1/2 cup mozzarella cheese, freshly shredded - 1/2 cup cream cheese, softened at room temperature - 1/2 cup sour cream - 1/4 cup grated Parmesan cheese - 1 teaspoon garlic powder - 1 teaspoon onion powder - 1/4 teaspoon smoked paprika - Salt and black pepper to taste - 1/2 cup breadcrumbs (optional) - 2 tablespoons fresh parsley, finely chopped Each ingredient plays a key role in making the casserole rich and cheesy. The cauliflower is the star, giving it that wonderful texture. The sharp cheddar and mozzarella create a gooey, melty layer that everyone loves. Cream cheese and sour cream add creaminess, while Parmesan brings a salty kick. Garlic and onion powder give depth, and smoked paprika adds a hint of warmth. Adjust salt and pepper to suit your taste. Breadcrumbs are optional but can add crunch. If you need a dairy-free option, use vegan cream cheese and sour cream. For cheese, try a dairy-free blend. You can swap cauliflower for broccoli. If you want more spice, add red pepper flakes. For a lighter version, use Greek yogurt instead of sour cream. Be creative! Each change can lead to new flavors. Remember, cooking is all about personal taste. For the full recipe, check out the details above. Start by preheating your oven to 375°F (190°C). This step is key. A hot oven helps the cheese melt and bubble nicely. Next, we need to steam the cauliflower. Cut one large head into bite-sized florets. You can use a pot with a steaming basket or a microwave-safe bowl. Steam for 5-7 minutes on the stove or 4-5 minutes in the microwave. The goal is to make them tender but not mushy. In a large bowl, mix the softened cream cheese and sour cream. Add the garlic powder, onion powder, smoked paprika, salt, and black pepper. Use a whisk or spoon to blend until smooth. This is your creamy base. Gently fold in the steamed cauliflower. Add half of the shredded cheddar and mozzarella cheeses, mixing well. Pour this mixture into a greased 9x13 inch baking dish. Spread it out evenly. Top with the rest of the cheddar and mozzarella cheeses. Dust with grated Parmesan cheese. If you want a crunchy top, add breadcrumbs now. Place the dish in the oven. Bake for 25-30 minutes. Look for bubbling cheese and a golden top. When done, take it out and let it cool for 5-10 minutes. This makes it easier to serve. Before enjoying, sprinkle with fresh parsley for a nice touch. For the full recipe, refer to the detailed instructions above. To get the best texture in your casserole, steam the cauliflower just right. Steam it until it is tender but not mushy. If you overcook it, the cauliflower will break apart and become watery. Aim for about 5-7 minutes of steaming. This keeps the florets firm, giving you that nice bite. Want to boost the flavor? Add some chopped green onions or sautéed mushrooms to the mix. These will bring a fresh taste to the dish. You can also swap in different cheeses like gouda or pepper jack for a fun twist. A sprinkle of fresh herbs like thyme or basil before serving adds a nice pop of flavor. One common mistake is not seasoning the mixture enough. Make sure to taste and adjust salt and pepper as needed. Another mistake is skipping the breadcrumbs if you want a crispy topping. They add nice texture. Lastly, don’t rush the cooling time after baking. Let it cool for a few minutes to help it set. For more tips, check out the Full Recipe. {{image_4}} You can make this dish lighter by swapping some ingredients. Use Greek yogurt instead of sour cream. This change adds protein and cuts calories. For cheese, try using low-fat options. They melt well and keep the flavor. You can also reduce the amount of cheese by a half-cup. This way, you still keep the flavor without all the fat. To boost the protein in your casserole, add cooked chicken, turkey, or tofu. Shredded rotisserie chicken works great. Just mix it with the cauliflower before baking. If you prefer plant-based protein, chickpeas or lentils are good options. They add texture and fill you up. For a vegetarian version, ensure all cheeses used are rennet-free. You can also use almond or cashew cream to replace cream cheese. To make it vegan, skip the cheese. Instead, use nutritional yeast for a cheesy flavor. Combine it with a vegan cream substitute. This keeps the dish creamy and delicious while being plant-based. Explore these variations to find your favorite twist on the cheesy cauliflower casserole. For the full recipe, check out the details above. After enjoying your cheesy cauliflower casserole, store leftovers in an airtight container. This keeps the flavors fresh. Make sure to cool the casserole to room temperature first. It will last in the fridge for up to three days. Label your container with the date. For the best taste, reheat your casserole in the oven. Set it to 350°F (175°C). Cover the dish with foil to keep moisture. Heat for about 20 minutes or until warm. You can also use the microwave. Heat a single serving for 1-2 minutes. Stir halfway for even warmth. Want to save some for later? You can freeze it! First, let the casserole cool completely. Then, place it in a freezer-safe container. It will last for about three months. When ready to eat, thaw it in the fridge overnight. Reheat as mentioned above for a tasty meal. Cheesy Cauliflower Casserole is a creamy dish made with cauliflower and cheese. It combines steamed cauliflower with a rich cheese mixture. You can taste sharp cheddar, mozzarella, and cream cheese in each bite. This dish is warm and comforting, perfect for family dinners or cozy nights in. You can find the full recipe [here](#). To add some heat, you can mix in crushed red pepper flakes. Start with a small amount, about 1/4 teaspoon, and taste as you go. You can also add diced jalapeños or a dash of hot sauce. These ingredients will give the casserole a nice kick without overpowering the cheese flavor. Yes, you can use frozen cauliflower! It’s a great time-saver. Just steam it according to the package directions. Make sure to drain any excess water before mixing it with the cheese mixture. This will keep your casserole from becoming too watery. This casserole pairs well with many dishes. You can serve it with grilled chicken, steak, or fish. It also goes great with a fresh salad. For a full meal, consider serving it alongside rice or quinoa to balance the flavors. The casserole is done when the cheese is bubbly and golden brown on top. You can check it after 25 minutes in the oven. If the cheese looks too pale, let it bake for a few more minutes. Just keep an eye on it to avoid burning. Cheesy Cauliflower Casserole is a warm dish that brings comfort. It has rich flavors, and it’s easy to make. You will need simple ingredients to create this tasty meal. Ingredients: - 1 large head of cauliflower, cut into bite-sized florets - 1 cup sharp cheddar cheese, freshly shredded - 1/2 cup mozzarella cheese, freshly shredded - 1/2 cup cream cheese, softened at room temperature - 1/2 cup sour cream - 1/4 cup grated Parmesan cheese - 1 teaspoon garlic powder - 1 teaspoon onion powder - 1/4 teaspoon smoked paprika - Salt and black pepper to taste - 1/2 cup breadcrumbs (optional) - 2 tablespoons fresh parsley, finely chopped This dish is good for family dinners or potlucks. You can prep it in about 15 minutes, and it bakes in 25-30 minutes. I like to steam the cauliflower until it's tender but still holds its shape. This keeps the texture nice. You can use a pot or even a microwave for this step. Next, mix the cream cheese and sour cream with the spices. This creamy mix is what makes the casserole so rich. Be sure to blend it well for a smooth texture. Then, fold the cauliflower into the creamy mixture. Add half of the cheeses here. This step coats each floret in cheesy goodness. When you place the mix in your baking dish, spread it evenly. Top it with the rest of the cheese and Parmesan. If you want a crunchy top, sprinkle some breadcrumbs. Bake until the cheese bubbles and turns golden. The smell will fill your kitchen! Let it cool for a few minutes before serving. Sprinkle parsley for color. This dish is not just tasty; it’s also a great way to enjoy veggies. You can find the full recipe above to try it yourself! This blog post shared how to make Cheesy Cauliflower Casserole. We covered ingredients, measurements, and substitution notes. The step-by-step guide made it simple to prepare and bake. I also shared tips, variations, and storage options. Remember, this dish can fit many diets and tastes. Enjoy trying new flavors and textures. You now have all the tools to make a great casserole that you can share with others. Happy cooking!

Cheesy Cauliflower Casserole Flavorful and Comforting

If you crave a dish that brings comfort and joy, try my Cheesy Cauliflower Casserole! This melting pot of flavors

- 1 pound fresh asparagus, trimmed - 3 tablespoons extra virgin olive oil - 4 cloves garlic, finely minced - Zest of 1 medium lemon - Juice of 1 medium lemon - 1 teaspoon fine sea salt - 1/2 teaspoon freshly ground black pepper - 1/4 teaspoon crushed red pepper flakes (optional for heat) - 2 tablespoons freshly grated Parmesan cheese (optional for a savory finish) Fresh asparagus is the star here. It should be firm and bright green. Olive oil gives the dish richness. Garlic adds a punch of flavor. Lemon zest and juice bring a bright, fresh taste. Sea salt enhances all these flavors and black pepper adds warmth. Crushed red pepper flakes can add heat if you like. You can finish with Parmesan cheese for a savory touch. For the full recipe, check the complete cooking instructions. This dish is quick and easy, making it perfect for any meal. Enjoy your cooking! To start, you need to trim the asparagus. Hold each spear and snap off the tough ends. This will help you get the best texture. You can also use a knife if you prefer. Next, preheat your oven to 425°F (220°C). This step is key for roasting. A hot oven helps the asparagus become tender and slightly crispy. In a large mixing bowl, add 3 tablespoons of olive oil. Then, toss in 4 minced garlic cloves and the zest of one lemon. Squeeze in the juice of that lemon too. Now, season the mixture with 1 teaspoon of sea salt and 1/2 teaspoon of black pepper. If you like a bit of heat, add 1/4 teaspoon of crushed red pepper flakes. Whisk everything together until it becomes fragrant and well blended. Add the trimmed asparagus to the bowl. Use your hands or a spatula to toss each spear in the lemon garlic sauce. Make sure every piece is well coated. Prepare a baking sheet by lining it with parchment paper. Spread the asparagus in a single layer. Avoid crowding them, so they roast evenly. Now, place the baking sheet in the preheated oven. Roast the asparagus for 12 to 15 minutes. Halfway through, give them a gentle toss to promote even cooking. If you want, sprinkle 2 tablespoons of Parmesan cheese on top during the last 2 minutes. This will melt into a savory finish. Once roasted, take the asparagus out of the oven. Let them cool for a minute before serving. You can find the full recipe [here](#). To change the texture of your asparagus, adjust the cooking time. For tender and soft asparagus, roast for about 15 minutes. For a crisper bite, try 12 minutes. The key is to check them at 10 minutes. Use 425°F (220°C) for the best results. This temperature helps the asparagus roast evenly, giving you that lovely golden color. You can make this dish even tastier by adding herbs. Fresh thyme or rosemary works great. Just toss them in with the asparagus. If you want a twist, sprinkle in some smoked paprika for a warm flavor. If you want to change the cheese, go for feta or goat cheese. Both add a nice tang that pairs well with lemon. For serving, lay the asparagus on a big platter. Drizzle any leftover juices from the pan on top. This adds flavor and makes it look nice. Garnish with lemon wedges and a bit of lemon zest. This brightens the dish and catches the eye. For leftovers, store them in an airtight container. They keep well in the fridge for up to three days. To reheat, use an oven for the best texture. A few minutes at 350°F (175°C) will do. You can also use a microwave, but it may make the asparagus a bit soft. For the full recipe, check out the link provided above! {{image_4}} You can make this dish vegan by skipping the Parmesan cheese. Try using nutritional yeast instead. It adds a cheesy flavor without dairy. You can also use cashew cheese for creaminess. For extra taste, mix in some chopped nuts like almonds or walnuts. They give a nice crunch. If you like heat, add crushed red pepper flakes for spice. You can adjust the amount based on your taste. For a different kick, consider using jalapeño or chili powder. These options add a nice zing to the dish. Just remember to balance the heat with the lemon flavor. Asparagus pairs well with many veggies. You can add bell peppers for sweetness. Cherry tomatoes also add a burst of flavor. If you want to use seasonal vegetables, consider zucchini or summer squash. These choices keep your dish fresh and colorful. They also enhance the taste and nutrients. To keep your lemon garlic roasted asparagus fresh, store it in the fridge. Place the cooled asparagus in an airtight container. This helps maintain its flavor and texture. You can enjoy leftovers for up to three days. If you want to store it longer, consider freezing. To freeze, lay the asparagus in a single layer on a baking sheet. Freeze it for about an hour, then transfer the spears to a freezer-safe bag. This method helps keep them from sticking together. You can freeze them for up to three months. When reheating, you want the asparagus to stay crisp. The best method is to use the oven. Preheat the oven to 350°F (175°C). Place the asparagus on a baking sheet and warm it for about 10 minutes. This keeps it from getting soggy. You can also use the microwave if you’re in a hurry. Place the asparagus on a microwave-safe plate. Heat it in short bursts of 30 seconds, checking often. This method is quick but may not keep the same texture as the oven. For the full recipe, check the earlier section. Roasting asparagus takes about 12 to 15 minutes at 425°F (220°C). Thicker spears may need a minute or two more. Keep an eye on them as they cook. You want them tender but still slightly crisp. Yes, you can use frozen asparagus. Just make sure to thaw it before cooking. Pat it dry to remove excess moisture. This helps it roast evenly and avoid steaming. Lemon garlic roasted asparagus pairs well with many dishes. Try serving it with grilled chicken, fish, or steak. It also complements pasta, rice, or a hearty salad. The bright flavors enhance any meal. You know asparagus is done when it turns bright green and is tender. A fork should easily pierce through the thickest part. You can also taste a spear to check for doneness. It should be crisp but not hard. For the full recipe, check out the details above. In this post, we explored how to make delicious lemon garlic roasted asparagus. We covered the key ingredients, preparation steps, and roasting tips. You learned how to enhance flavors and present the dish beautifully. Remember, cooking time and texture can be adjusted to fit your taste. Enjoy trying different variations, like vegan options or spicy twists. With these tips, you can create a tasty side dish that everyone will love. Enjoy your cooking!

Lemon Garlic Roasted Asparagus Simple and Tasty Dish

Looking for a side dish that’s both simple and bursting with flavor? Try Lemon Garlic Roasted Asparagus! This easy recipe

- 16 ripe cherry tomatoes - 16 small fresh mozzarella balls (bocconcini) - 16 vibrant fresh basil leaves - 2 tablespoons rich balsamic glaze - 1 tablespoon high-quality extra virgin olive oil - Sea salt and freshly cracked black pepper to taste - 16 wooden or metal skewers To create these delightful bites, you need fresh ingredients. The tomatoes should be ripe and juicy. Look for mozzarella balls that are soft and creamy. Fresh basil adds that nice burst of flavor and aroma. You can enhance the taste with a drizzle of balsamic glaze and extra virgin olive oil. A sprinkle of sea salt and freshly cracked black pepper will make the flavors pop. Gather your skewers; wooden works well, but metal is great too. Each skewer should hold a perfect balance of cherry tomato, basil, and mozzarella. Check out the Full Recipe for the detailed steps to assemble and serve these delicious Caprese Salad Skewers. Enjoy every fresh and tasty bite! Start by rinsing the cherry tomatoes and fresh basil leaves under cold water. This step cleans off any dirt or debris. Next, take a paper towel and gently pat them dry. Make sure they are completely moisture-free. This helps the skewer hold up better. Grab a skewer and begin by threading on one cherry tomato. Follow this with a fresh basil leaf, then add a mozzarella ball. Repeat this pattern until you have four sets on the skewer. If your skewers are longer, adjust the number of ingredients. This keeps the skewers looking full and delicious. After you assemble the skewers, drizzle them with high-quality extra virgin olive oil. Next, add the balsamic glaze. This step enhances the flavors and makes the skewers shine. Lightly season each skewer with a pinch of sea salt and a dash of black pepper. You can adjust the seasoning to fit your taste. Finally, arrange the skewers on a serving platter. For a nice touch, drizzle a bit more balsamic glaze on top. For the full recipe, check out the section above. To make your Caprese Salad Skewers shine, choose high-quality ingredients. Look for ripe cherry tomatoes. They should be sweet and firm. Pick fresh mozzarella balls, also known as bocconcini. They should be creamy and soft. Fresh basil is a must. The leaves should smell fragrant and look vibrant. For seasoning, I suggest a light touch. Use sea salt and freshly cracked black pepper. You can adjust these to your taste. If you want a kick, add a touch of crushed red pepper flakes. This will give your skewers a nice flavor boost. Serve your skewers in a tall glass or vase. This makes them look stunning and easy to grab. You can also add extra basil leaves around the glass. This adds aroma and a pop of green. Consider drizzling more balsamic glaze over the top. This enhances the look and taste. Caprese Salad Skewers are perfect for many occasions. Serve them at parties, picnics, or family dinners. They are fun to eat and easy to share. They pair well with light drinks like white wine or sparkling water. For a twist, try them with a refreshing lemonade. For the full recipe, check out [Full Recipe]. {{image_4}} You can swap cherry tomatoes for heirloom tomatoes. Heirloom tomatoes bring unique colors and flavors. They make every bite special. For cheese, try burrata or feta instead of mozzarella. These add creaminess and a tangy taste that pairs well with basil. You can also switch herbs. Instead of basil, use mint or arugula for fresh flavors. Both herbs add a new twist to this classic dish. Mint brings a hint of sweetness, while arugula adds a peppery bite. To make your skewers even tastier, add prosciutto or salami. These meats add a savory twist that complements the fresh flavors. You can layer these slices between the mozzarella and tomatoes. Another fun twist is drizzling pesto. Instead of balsamic glaze, try pesto for a herby kick. You can use both together for an extra flavor boost. The mix of basil and garlic in pesto pairs perfectly with the fresh ingredients. You can easily make Caprese Salad Skewers gluten-free. Just ensure your balsamic glaze and any meats are gluten-free. If you want a vegetarian option, skip the meat and keep the rest. For a vegan version, use vegan cheese or skip it altogether. Replace mozzarella with marinated tofu or avocado for creaminess. These options keep the dish fresh and tasty for everyone. For a full recipe, check out the Caprese Salad Skewers, Italian Style. To keep your Caprese salad skewers fresh, store them in the fridge. Use an airtight container to avoid any moisture. This will help keep the ingredients crisp and tasty. Keep the skewers away from strong-smelling foods. The fresh basil can soak up those odors and lose its nice flavor. To keep the tomatoes and mozzarella fresh longer, store them separately. Tomatoes do best at room temperature. The mozzarella should stay cool in the fridge. You can prepare the ingredients a day ahead. Wash the cherry tomatoes and basil leaves, and store them in the fridge. Keep the mozzarella balls sealed to keep them fresh. Assemble the skewers shortly before serving. This way, they stay fresh and look great. If you make them too early, the basil may wilt, and the flavors won't be as bright. Caprese salad skewers last up to two days in the fridge. After that, the ingredients can start to spoil. Check for any signs of spoilage before eating. Look for mushy tomatoes or slimy mozzarella. If you see these signs, it's best to toss them. Enjoy your skewers fresh for the best taste! For the full recipe, check out the recipe section above. To make Caprese Salad Skewers, follow these simple steps. First, rinse 16 cherry tomatoes and 16 fresh basil leaves under water. Pat them dry with a paper towel. Next, take a skewer and thread one cherry tomato, one basil leaf, and one mozzarella ball. Repeat this until you add four sets to each skewer. Drizzle the skewers with olive oil and balsamic glaze. Season with sea salt and black pepper. Arrange them on a platter, and enjoy these vibrant bites. You can find the full recipe above. Yes, you can prepare Caprese Salad Skewers ahead of time. Assemble the skewers a few hours before serving. Keep them in the fridge to stay fresh. Avoid drizzling with balsamic glaze until right before serving. This keeps the flavors bright and fresh. Caprese Salad Skewers pair well with many dishes. Serve them with crusty bread or a fresh green salad. They also make a great appetizer with grilled meats. A light white wine complements their flavors beautifully. Consider a sparkling drink to add a festive touch. Yes, many tasty variations exist for Caprese Salad Skewers. You can use heirloom tomatoes for different colors and flavors. Try adding prosciutto or salami for a savory twist. You might also drizzle pesto for a unique taste. Fresh herbs like mint can add a refreshing kick. To store leftovers, keep the skewers in an airtight container. Place them in the fridge to maintain freshness. They should last about 2 days. If the tomatoes or mozzarella look soft, it's time to discard them. Always check for any signs of spoilage before eating. Caprese Salad Skewers are easy and fun to make. You need fresh tomatoes, mozzarella, and basil. Seasoning with olive oil and balsamic glaze adds more flavor. You can switch ingredients or serve them in unique ways. Remember, these skewers stay fresh in the fridge. Serve them at parties or as a snack. They make a healthy choice for everyone. Enjoy making these attractive and tasty skewers.

Caprese Salad Skewers Delightful Fresh Flavor Bites

Are you ready to elevate your appetizer game? Caprese Salad Skewers are the perfect bite-sized treat. Bursting with fresh tomatoes,

- 2 medium sweet potatoes, peeled and cut into ½-inch cubes - 1 can (15 oz) black beans, thoroughly drained and rinsed - 6-8 corn tortillas (small size for tacos) Sweet potatoes bring a sweet and earthy taste. Black beans add protein and fiber. Corn tortillas are soft and hold everything together well. - 1 tablespoon extra virgin olive oil - 1 teaspoon ground cumin - 1 teaspoon smoked paprika - ½ teaspoon chili powder - ½ teaspoon garlic powder - Sea salt and freshly ground black pepper, to taste These spices give the dish warmth and depth. Cumin adds a nutty flavor. Smoked paprika gives a hint of smoke. Chili powder brings some heat. Garlic powder enhances the overall taste. - 1 ripe avocado, sliced - 1 cup red cabbage, finely shredded - ½ cup fresh cilantro, roughly chopped - Lime wedges, for garnish - Optional: Your favorite salsa or a dash of hot sauce Toppings add freshness and crunch. Avocado adds creaminess. Red cabbage gives a crispy texture. Cilantro adds a pop of flavor. A squeeze of lime brightens the dish. For the full recipe, check out the detailed instructions to create these delicious Sweet Potato and Black Bean Tacos! First, you need to preheat your oven to 425°F. This step helps the sweet potatoes roast perfectly. Next, peel and cut the sweet potatoes into ½-inch cubes. Place them in a mixing bowl. Add one tablespoon of olive oil, one teaspoon of ground cumin, one teaspoon of smoked paprika, half a teaspoon of chili powder, half a teaspoon of garlic powder, and salt and pepper. Mix all the ingredients well until the sweet potatoes are coated in the spices. Spread the seasoned sweet potatoes in a single layer on a baking sheet lined with parchment paper. This keeps them from sticking. Roast them for 25 to 30 minutes. Stir them halfway through cooking so they brown evenly. You want them tender and a lovely golden-brown color. While the sweet potatoes roast, take a small saucepan. Over medium heat, add the drained and rinsed black beans. Sprinkle in a pinch of salt. Heat the beans for 5 to 7 minutes. Stir them now and then. They should be warm and tasty. For the tortillas, use a dry skillet over medium heat. Warm each tortilla for about 30 seconds on each side. They should be soft and pliable. Now it’s time to assemble your tacos. On each warm tortilla, layer the roasted sweet potatoes and black beans. Add slices of avocado for creaminess. Top with shredded red cabbage for crunch. Finally, sprinkle fresh cilantro on top. For an extra zing, serve with lime wedges and your favorite salsa on the side. This makes a colorful and tasty meal. To ensure even roasting, cut sweet potatoes into equal-sized cubes. This helps them cook at the same rate. I recommend using a baking sheet lined with parchment paper. It prevents sticking and makes cleanup easy. Try using a convection oven if you have one. It cooks food evenly and can make your sweet potatoes crispier. Spice up your tacos with extra flavors. You can add a pinch of cayenne pepper for heat. A squeeze of lime juice adds brightness. Try using smoked chipotle powder for a deeper flavor. If you like sauces, drizzle some cilantro lime dressing over the tacos. It pairs well with the creamy avocado. Pair your tacos with fresh sides for a complete meal. A simple corn salad is a great choice. You could also serve them with a side of black bean soup for extra protein. For drinks, try a refreshing lemonade or a light beer. Both complement the flavors in the tacos well. For the full recipe, check out the detailed instructions above. Enjoy your cooking! {{image_4}} You can easily swap ingredients in sweet potato and black bean tacos. If you want a different bean, try pinto or kidney beans. Both work well and add unique flavors. For more veggies, use roasted zucchini or bell peppers. They add color and crunch. If you're looking for gluten-free options, use corn tortillas. They are naturally gluten-free and perfect for tacos. You can also make your own tortillas using masa harina and water. This way, you control the ingredients. Adjusting spice levels can make these tacos fit your taste. If you like it spicy, add cayenne pepper or jalapeños. For a milder flavor, skip the chili powder or use less. Experiment with spices to find what you love. Different toppings can also change the flavor. Try adding pickled onions for tang or crumbled feta for creaminess. Fresh lime juice brightens up the dish. You can even add a dollop of Greek yogurt for added creaminess. You can grill or bake your sweet potato and black bean tacos. Grilling gives a smoky flavor and crispy texture. To grill, place the taco ingredients in a grill basket. Cook them over medium heat for about 10 minutes. Baking, on the other hand, is easy and hands-off. Simply follow the baking instructions from the full recipe. The sweet potatoes get caramelized and soft. Both methods are tasty, so choose based on your mood! To keep your tacos fresh, store them in the fridge. Place the sweet potato and black bean mixture in an airtight container. Wrap the tortillas separately to avoid sogginess. This way, you can enjoy them again without losing flavor or texture. When you’re ready to eat, the best way to reheat is to use a skillet. Heat it over medium heat. Add the taco filling to the skillet and stir until warm. For tortillas, warm them in a dry skillet for about 30 seconds on each side. This keeps them soft and tasty. If you want to save time, prepare your ingredients ahead of time. Cube the sweet potatoes and store them in the fridge. You can also rinse and drain the black beans in advance. This makes it easier to whip up the tacos on busy nights. Just remember to store everything in separate containers to keep them fresh. For the full recipe, check out the detailed instructions above. Yes, these tacos are vegan! All the ingredients are plant-based. You can enjoy the sweet potatoes, black beans, and fresh toppings without any animal products. To get crispy sweet potatoes, cut them into small cubes. Toss them well with olive oil and spices. Spread them in a single layer on a baking sheet. Roast them at 425°F (220°C) until they turn golden brown. Stir them halfway through cooking to help with even crispiness. These tacos go great with many sides. You can serve them with a fresh salad or some guacamole. A side of rice or corn can also work well. For drinks, try a light beer or a refreshing lemonade to balance the flavors. You can easily adapt the tacos to fit different diets. For gluten-free, use corn tortillas, which are naturally gluten-free. If you need dairy-free options, skip the cheese or use a dairy-free alternative. For a vegetarian twist, add extra veggies or beans for a heartier meal. Check the Full Recipe for more ideas! This blog post covered how to make delicious sweet potato and black bean tacos. We explored the main ingredients like sweet potatoes and black beans, and how to spice things up. I shared how to prep and roast sweet potatoes while heating beans and tortillas. You learned assembly tips, variations, and storage info. These tacos are not only tasty but also easy to adapt. Get creative and enjoy your delicious meal!

Sweet Potato and Black Bean Tacos Tasty Healthy Meal

Looking for a tasty and healthy meal? Sweet potato and black bean tacos are your answer! Packed with flavor and

- 1 medium head of cauliflower - 1 cup all-purpose flour - 1 cup hot sauce - Fresh parsley for garnish - 1 teaspoon garlic powder - 1 teaspoon onion powder - 1 teaspoon smoked paprika - 1/2 teaspoon cayenne pepper - 1 tablespoon melted vegan butter - 1 cup water or plant-based milk - Salt and freshly ground black pepper To make Buffalo cauliflower bites, start with these simple ingredients. The cauliflower gives a great texture and absorbs the sauce well. The all-purpose flour helps create a crispy coating. Hot sauce adds the classic Buffalo flavor. For garnish, fresh parsley is a nice touch. In the seasoning mix, garlic powder and onion powder add flavor. Smoked paprika gives a hint of smoke. Cayenne pepper adds heat, so adjust it to your taste. You can also add melted vegan butter for richness. Using water or plant-based milk in the batter creates a smooth coating. Setting up your ingredients this way makes it easy to follow the Full Recipe. You will enjoy making these bites and sharing them with friends and family! - Preheat the oven to 450°F (230°C). - Line a baking sheet with parchment paper. - In a mixing bowl, combine 1 cup of all-purpose flour, 1 teaspoon garlic powder, 1 teaspoon onion powder, 1 teaspoon smoked paprika, and 1/2 teaspoon cayenne pepper. - Gradually add 1 cup of water or plant-based milk. Whisk until smooth. - Dip cauliflower florets into the batter, ensuring they are well coated. - Place the coated florets on the baking sheet in a single layer. - Bake for 20-25 minutes, flipping halfway to ensure even cooking. - In a medium bowl, mix 1 cup of hot sauce with 1 tablespoon of melted vegan butter, if desired. Stir until blended. - Once the cauliflower is golden, remove it from the oven. - Drizzle the buffalo sauce over the baked florets. Toss gently for even coating. - Return the cauliflower to the oven. Bake for an additional 10 minutes to set the sauce. This simple process creates flavorful Buffalo Cauliflower Bites. Enjoy the crispy, spicy goodness! For the complete recipe, check out the Full Recipe section. To get those perfect crispy bites, follow these steps: - Use a single layer on the baking sheet: This helps the heat reach each floret evenly. If they touch, they can steam instead of crisping up. - Flip cauliflower halfway through baking: This ensures that both sides get that golden, crunchy texture. Want more control over the heat? You can easily adjust the spice level: - Modify cayenne pepper according to preference: If you like it milder, use less. For more kick, add extra. - Experiment with different hot sauces: Not all hot sauces are the same. Try different brands to find your favorite. These bites are great on their own, but you can make them even better: - Best served with vegan ranch or blue cheese dressing: Both dips complement the spicy flavor. - Pair with fresh vegetable sticks: Carrots, celery, or cucumber add a refreshing crunch and balance the heat. For a full recipe, check out the detailed instructions to make these tasty snacks. {{image_4}} If you want a gluten-free version, it's easy! Simply swap the all-purpose flour with a gluten-free flour blend. Many blends work well, so choose one you like. This keeps the bites crispy while making them safe for those with gluten sensitivities. Looking for more heat? Add extra spices! You can mix in paprika, chili powder, or even cayenne pepper for a bolder flavor. Adjust the amount to suit your taste. This way, you can craft the perfect level of spice for your palate. Get creative with flavors! Try teriyaki for a sweet twist or garlic parmesan for a savory kick. These options can change the whole vibe of your bites. Mixing and matching helps you find your favorite flavor. Don’t be afraid to experiment; the sky's the limit! Store leftovers in an airtight container for up to 3 days. This keeps them fresh and tasty. Make sure they're cooled before sealing. If you don’t have an airtight container, use plastic wrap instead. Just ensure it’s tight to avoid moisture. The best way to reheat them is in the oven. Set it to 350°F (175°C) and bake for about 10 minutes. This will make them crispy again. You can use a microwave for a quick fix. Just note that they won’t be as crispy. Place them on a plate and cover with a paper towel. Heat in 30-second bursts until warm. If you want to store them longer, freezing is a great option. First, let them cool completely. Then, place them in a freezer bag. Remove as much air as possible before sealing. They can last for up to 3 months in the freezer. When ready to eat, thaw them overnight in the fridge. Reheat in the oven for the best results. For a complete guide, check the Full Recipe. Yes, you can prepare the Buffalo Cauliflower Bites ahead. Start by making the batter and coating the florets. Place them on a baking sheet and cover with plastic wrap. Keep them in the fridge for up to a day. When you're ready, bake them straight from the fridge. Just add a few extra minutes to the baking time for a perfect crunch. Yes, Buffalo Cauliflower Bites are vegan! The main ingredients include cauliflower, flour, and hot sauce. If you use plant-based milk and skip dairy butter, they remain completely plant-based. This makes them a great snack for everyone, even those who avoid animal products. Buffalo Cauliflower Bites pair well with many sides. Try serving them with creamy vegan ranch or blue cheese dressing for dipping. Fresh veggie sticks like carrots and celery also add a nice crunch. You can even add a side of sweet potato fries for a heartier meal. To make your Buffalo Cauliflower Bites super crispy, follow these tips. First, ensure you coat the florets evenly in the batter. Place them in a single layer on the baking sheet. Flip them halfway through baking. For an extra crunch, bake them a bit longer. You can even use a broiler for the last minute to get that perfect crisp! Buffalo Cauliflower Bites are a fun and tasty dish you can make at home. You start with cauliflower, mix it with flour and hot sauce, then bake for that perfect crunch. Adding seasonings boosts the flavor, and you can adjust the heat to your liking. Serving with a tasty dip makes it even better. Remember, leftovers can be stored easily, too. This dish fits any meal or snack time, so enjoy trying these ideas with friends or family!

Buffalo Cauliflower Bites Tasty and Simple Snack

Looking for a tasty snack that’s easy to make? Buffalo Cauliflower Bites are your answer! Perfect as a fun appetizer

Older posts
Newer posts
← Previous Page1 … Page60 Page61 Page62 … Page86 Next →

dsad

© 2026 yumymoments • Built with GeneratePress

Our Policies

  • Copyright Policy
  • Cookie Policy
  • GDPR Policy
  • Privacy Policy
  • Disclaimer
  • Terms Of Use

More Information

  • Home
  • About
  • Contact
  • Appetizers
  • Dessert
  • Dinner
  • Drinks
©2026, yumymoments About Back To Top