Skip to content
DisclaimerTerms Of UseGDPR PolicyCookie Policy

yumymoments

  • Home
  • Drinks
  • Appetizers
  • Dinner
  • Dessert
  • About
  • Contact
  • Privacy Policy
DisclaimerTerms Of UseGDPR PolicyCookie Policy

NO-ING-IMG

- 1 lb boneless, skinless chicken thighs - 1 cup cooked jasmine rice - 1 bell pepper (red or yellow) - 1 cup broccoli florets - 1 medium carrot - 3 green onions - 1 tablespoon sesame oil - 2 tablespoons low-sodium soy sauce - 3 tablespoons teriyaki sauce - 1 tablespoon fresh ginger - 2 cloves garlic - Sesame seeds The ingredients for teriyaki chicken bowls are simple yet flavorful. I choose boneless, skinless chicken thighs because they stay juicy and tender. You can use jasmine rice for a fragrant base that pairs well with the dish. For veggies, I love using bell peppers, broccoli, and carrots. They add color and crunch. Fresh green onions and sesame seeds make the dish look great and add extra taste. - Calories per serving: About 400 calories - Carbohydrates: 45g - Protein: 27g - Fat: 12g These bowls are packed with nutrients. The chicken provides protein, while the veggies offer vitamins and fiber. Eating colorful vegetables boosts your health and keeps meals exciting. For a balanced meal, this dish covers protein, carbs, and healthy fats. You can enjoy teriyaki chicken bowls guilt-free. If you'd like to dive deeper into the preparation, check out the Full Recipe for all the details. To start, you need to marinate the chicken. In a bowl, combine chopped chicken thighs, minced ginger, minced garlic, soy sauce, and teriyaki sauce. Mix it well so the chicken is coated. Let it marinate for at least 15 minutes. This time allows the flavors to blend and enrich the chicken. Next, heat sesame oil in a large skillet over medium heat. Once hot, add the marinated chicken along with all the marinade. Cook the chicken for about 7-10 minutes. Stir occasionally to ensure even cooking. Check for doneness by making sure the chicken reaches 165°F or 74°C internally. After the chicken is cooked, it’s time for the vegetables. Add sliced bell pepper, broccoli florets, and julienned carrot to the skillet. Stir-fry them for about 5 minutes. You want the vegetables to be bright and tender, but still crisp. This keeps them full of flavor and nutrients. Now, it’s time to put everything together. Start by dividing the warm jasmine rice into four bowls. Spread the rice to create a nice base. Then, top each bowl with the teriyaki chicken and vegetable stir-fry. This layering makes each bowl look inviting and tasty. For the finishing touch, sprinkle chopped green onions and sesame seeds on top of the bowls. This adds flavor and makes the dish more appealing. You can also drizzle extra teriyaki sauce if you like. Enjoy your beautiful teriyaki chicken bowls! For the best results, use a non-stick skillet or wok. This makes cooking easy and helps avoid sticking. To avoid overcooking the chicken, cook it until it turns golden brown. Use a meat thermometer to check that the inside reaches 165°F. This way, your chicken stays juicy and tender. Want more flavor? Try adding a pinch of red pepper flakes for some heat. You can also mix in a little honey for a sweet touch. If you like it spicy, try sriracha or chili garlic sauce. These will elevate your teriyaki bowl. Make your bowls pop with color! Use vibrant bowls and arrange the rice, chicken, and veggies neatly. Add lime wedges on the side for a fresh kick. You can also serve with green tea or sparkling water, which pairs well with this dish. For a final touch, sprinkle extra sesame seeds on top for that gourmet finish. For the full recipe, check out the Full Recipe section. {{image_4}} If you want a vegetarian or vegan teriyaki bowl, there are great substitutes for chicken. You can use tofu, tempeh, or even seitan. These options absorb flavor well and cook nicely. For sauces, swap teriyaki sauce with a mix of soy sauce, maple syrup, and rice vinegar. This blend gives a sweet and savory taste, just like traditional teriyaki. For those needing gluten-free options, look for gluten-free soy sauce. Brands like Tamari work well and still keep the umami flavor. You can also replace regular rice with quinoa or cauliflower rice. These choices are tasty and fit well in the bowl. Teriyaki bowls have many styles worldwide. In Japan, you might find them topped with grilled veggies and served over sushi rice. In Hawaii, people add pineapple for a sweet twist. You can also explore Korean flavors by adding kimchi. Each style adds a unique touch, so feel free to experiment! If you want the full recipe, check out the Teriyaki Chicken Bowls section above. To keep your teriyaki chicken bowls fresh, use airtight containers. Glass containers work great for this purpose. Aim to store your leftovers within two hours of cooking. This will help keep the chicken safe to eat. The dish lasts for about three to four days in the fridge. If you want to freeze your teriyaki chicken bowls, first let them cool completely. Use freezer-safe bags or containers for storage. Make sure to remove as much air as possible. You can freeze the bowls for up to three months. To reheat, thaw in the fridge overnight. Then, heat gently on the stove or in the microwave. Stir well to ensure even heating. Meal prep can save you time during busy weeks. Chop your vegetables and chicken ahead of time. Store them in separate containers. You can also cook the rice in advance and keep it in the fridge. When ready to eat, assemble your bowls quickly. Just combine the rice, chicken, and veggies for a delicious meal in minutes. To make teriyaki chicken, you need a few basic ingredients. You will need chicken thighs, soy sauce, and teriyaki sauce. Here’s how to make it: - Combine chicken with minced ginger, garlic, soy sauce, and teriyaki sauce. - Let it marinate for at least 15 minutes. - Cook the chicken in sesame oil until browned. This simple method brings out the rich flavors of the chicken. You can pair teriyaki chicken bowls with different side dishes. Here are some tasty options: - Steamed edamame for added protein. - Cucumber salad for a refreshing crunch. - Miso soup for a warm, savory touch. These sides balance the flavors and add variety to your meal. Yes, teriyaki chicken bowls can be made ahead of time. Here are some tips for prepping in advance: - Cook the chicken and vegetables, then store them in the fridge. - Prepare the rice separately to keep it fresh. - Assemble the bowls right before serving to maintain texture. This makes meal time quick and easy. The best rice for teriyaki chicken bowls is jasmine rice. It has a fragrant flavor and fluffy texture. Here are some rice options to consider: - Jasmine rice: Soft and aromatic, perfect for soaking up sauce. - Brown rice: A healthier option, with more fiber and nutrients. - Sushi rice: Sticky and holds together well, great for bowls. Each rice type brings a unique taste to the dish. Teriyaki chicken is not very spicy. It has a sweet and savory flavor profile. If you want to adjust the spice level, you can: - Add red pepper flakes for heat. - Use spicy teriyaki sauce if you like it hot. - Serve with sliced jalapeños for an extra kick. This way, you can customize your meal to fit your taste. In this post, we explored making delicious teriyaki chicken bowls with easy steps. We covered key ingredients, cooking tips, and meal prep ideas. This dish is healthy and tasty, packed with veggies and protein. You can customize it to suit your diet, whether vegetarian, gluten-free, or different flavors. Storing leftovers is easy for quick meals next time. Enjoy this dish and get creative with your variations!

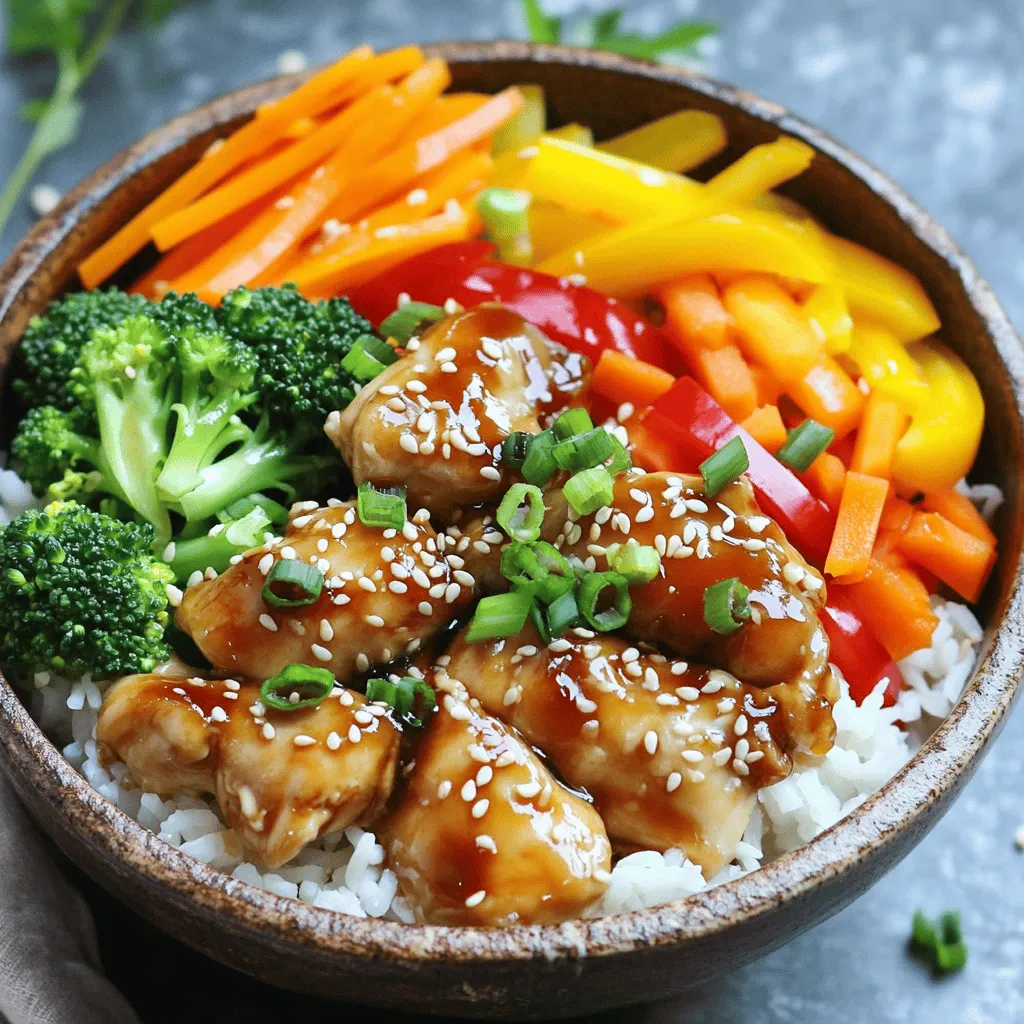
Teriyaki Chicken Bowls Flavorful and Easy Recipe Guide

Are you craving a delicious meal that’s both simple and satisfying? Look no further! In this guide, I’ll share my

To make pumpkin spice overnight oats, you need these ingredients: - 1 cup rolled oats - 1 cup milk (your choice of dairy or plant-based) - 1/2 cup canned pumpkin puree - 1/2 teaspoon pumpkin pie spice - 1 tablespoon maple syrup (adjust to your sweetness preference) - 1/4 teaspoon pure vanilla extract - 1/4 cup Greek yogurt (optional, for a creamy texture) - A pinch of sea salt - Chopped nuts and seeds for topping (e.g., walnuts, pumpkin seeds) - Optional: A handful of dried cranberries or raisins You can mix things up! Here are some ideas: - Use almond milk or oat milk for a plant-based option. - Swap canned pumpkin for fresh pumpkin or sweet potato puree. - Instead of maple syrup, try honey or agave syrup for sweetness. - For extra flavor, add a dash of cinnamon or nutmeg. - Use dairy-free yogurt if you want to skip Greek yogurt. Each ingredient brings its own health perks: - Rolled oats: Full of fiber, they help keep you full. - Milk: Offers calcium and protein, great for bones. - Pumpkin puree: Rich in vitamins A and C, it supports vision and skin health. - Pumpkin pie spice: Contains antioxidants and adds flavor without calories. - Maple syrup: Provides natural sweetness and some minerals. - Vanilla extract: Adds flavor and can improve mood. - Greek yogurt: Packed with protein and probiotics for gut health. - Sea salt: Balances flavors and provides essential minerals. - Nuts and seeds: Offer healthy fats and protein for energy. - Dried fruits: Add natural sweetness and vitamins. These ingredients not only taste great but also support a healthy diet! To make pumpkin spice overnight oats, start with a clear plan. Gather your ingredients first. Use these amounts for a perfect mix: - 1 cup rolled oats - 1 cup milk (dairy or plant-based) - 1/2 cup canned pumpkin puree - 1/2 teaspoon pumpkin pie spice - 1 tablespoon maple syrup - 1/4 teaspoon pure vanilla extract - 1/4 cup Greek yogurt (optional) - A pinch of sea salt - Toppings like chopped nuts and seeds Measuring accurately helps each bite taste just right. Use measuring cups and spoons for best results. Now, let's get cooking! Start by taking a medium bowl. Add the rolled oats and the milk. Mix well until the oats soak up the milk. Next, add the pumpkin puree, pumpkin pie spice, maple syrup, vanilla extract, and sea salt. Stir everything until it's all combined. If you want creamier oats, mix in the Greek yogurt. Once mixed, divide the oats into two jars or containers. Make sure the mixture is even in both jars. Seal them tightly with lids. Place them in the fridge for at least 4 hours, or overnight if you can wait! This helps the oats soften and absorb flavors. When your oats are ready, take them out of the fridge. Give them a good stir. If they seem too thick, add a splash of milk to loosen them up. You can eat them cold or warm them gently in the microwave. If you have leftovers, store them in the fridge. They stay fresh for up to three days. Just remember to cover them well to keep them tasty. Enjoy your delicious pumpkin spice overnight oats! For the complete recipe, check out the Full Recipe. To get the right creaminess in your pumpkin spice overnight oats, start with rolled oats. They soak up the liquid well and create a satisfying texture. Use one cup of milk, but feel free to choose any type you like, such as almond or oat milk. If you want extra creaminess, add Greek yogurt. It makes the oats rich and smooth. Mix all the ingredients well to combine them fully. If they are too thick in the morning, just add a splash of milk. Layering is key to making your oats look great. Start by mixing your oats and liquids in a bowl. Then, fill your jars or containers halfway with this mixture. Next, add a layer of pumpkin puree, followed by a sprinkle of pumpkin pie spice. This way, you get bursts of flavor in each bite. Repeat the layers until your jars are full. This also helps keep the flavors distinct. Top it off with nuts or seeds for crunch. Making pumpkin spice overnight oats is perfect for busy mornings. Prep them the night before and forget about them until breakfast. This recipe only takes about 10 minutes to prepare. Once you mix everything, seal the jars and place them in the fridge. They stay fresh for up to three days. You can grab one on your way out the door. This simple method gives you a tasty, healthy meal without the fuss. For the full recipe, check out the details above. {{image_4}} You can boost the flavor of your pumpkin spice overnight oats easily. Try adding a dash of cinnamon or nutmeg. These spices pair well with pumpkin and give your oats a warm, cozy taste. If you like a bit of heat, a pinch of ginger adds a unique kick. Experiment with these spices to find your favorite mix. If you have dietary needs, the recipe can change to fit them. For a dairy-free option, use almond milk or coconut milk. If you want a gluten-free version, make sure your oats are certified gluten-free. You can also swap Greek yogurt for a dairy-free yogurt. These simple changes keep the dish tasty and friendly for many diets. Toppings can make your overnight oats even more fun. Try fresh fruit like bananas or berries for a burst of color and flavor. A drizzle of honey or agave can add extra sweetness if you prefer. For crunch, use nuts like almonds or seeds like chia. Dried fruits like cranberries or raisins can also give a chewy texture. Mix and match these toppings to create new flavors every time. For the full recipe, check out the detailed directions above. To keep your pumpkin spice overnight oats fresh, use airtight containers. Glass jars work great. Make sure the lids are tightly sealed. This helps prevent air and moisture from spoiling your oats. When stored properly, these oats last up to five days in the fridge. The flavors deepen over time, making them even tastier. If you notice any signs of spoilage, such as a sour smell or unusual texture, discard them. You can enjoy your pumpkin spice overnight oats cold straight from the fridge. If you prefer them warm, just heat them in the microwave for about 30 seconds. Stir and check the temperature before eating. Add a splash of milk if they feel too thick. Enjoy your tasty treat! Yes, you can prepare pumpkin spice overnight oats in advance. I often make a batch on Sunday night. They last well in the fridge for up to five days. Just store them in airtight containers. This way, you have a quick breakfast ready each morning. If you don’t have Greek yogurt, there are many options. You can use regular yogurt or a plant-based yogurt. Silken tofu is also a great choice. It gives a creamy texture and adds protein. Just blend it smooth before mixing with the oats. To make this recipe vegan, replace the milk with a plant-based milk. Almond, oat, or soy milk works great. For the yogurt, use a vegan option or skip it entirely. The oats will still taste delicious and creamy without it. Pumpkin is packed with nutrients. It is high in fiber, which aids digestion. It also has many vitamins, like vitamin A, which is good for your eyes. Plus, pumpkin contains antioxidants that help fight free radicals. Adding pumpkin to your diet is a tasty way to boost your health. In this article, we covered the key ingredients for pumpkin spice overnight oats and their health benefits. I shared step-by-step instructions to help you make them right. You learned tips for perfect creaminess and how to customize your oats. We also explored storage options and answered common questions. Remember, you can make these oats your own. Have fun with flavors and toppings. Enjoy a healthy breakfast that’s quick and easy to prepare!

Pumpkin Spice Overnight Oats Tasty and Simple Recipe

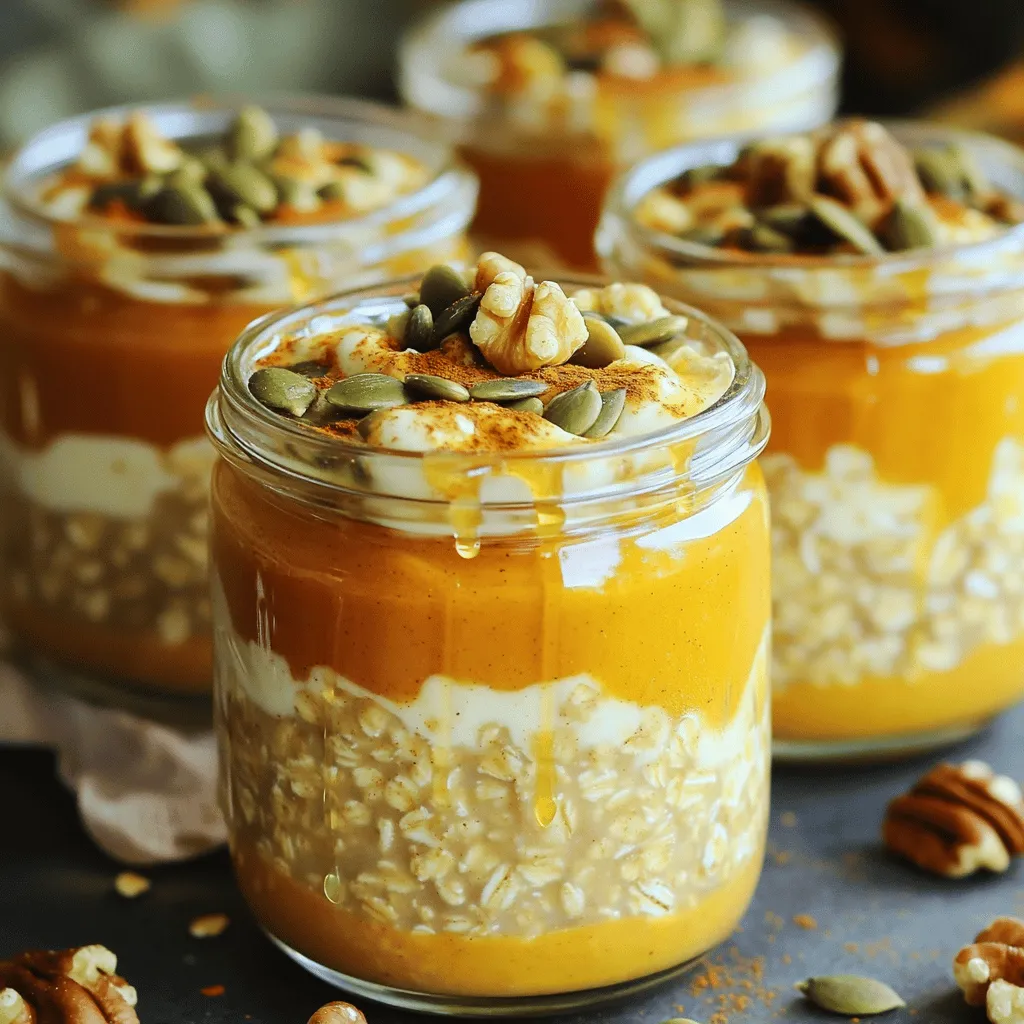
Are you ready to enjoy a tasty and easy breakfast? Pumpkin Spice Overnight Oats are the perfect way to kick-start

- 200g digestive biscuits, finely crushed - 100g unsalted butter, melted - 300g cream cheese, at room temperature - 200g Nutella - 100g powdered sugar - 200ml heavy whipping cream - 1 teaspoon pure vanilla extract - A pinch of salt - Extra Nutella - Crushed hazelnuts To make a No-Bake Nutella Cheesecake, you need simple, delicious ingredients. First, the digestive biscuits create a crunchy base. They add texture and flavor. You mix them with melted unsalted butter to form the crust. This crust must be tightly packed in your springform pan. Next, you'll need cream cheese at room temperature. This helps it mix smoothly. Nutella is the star of this recipe. It gives the cheesecake its rich, chocolatey taste. Powdered sugar adds sweetness and balances the flavors. Heavy whipping cream is essential. It makes the cheesecake light and fluffy. Make sure to whip it until stiff peaks form. This step is key for a nice texture. Pure vanilla extract enhances the flavors, and a pinch of salt brings it all together. For garnishing, extra Nutella adds a lovely drizzle on top. Crushed hazelnuts provide a nice crunch and visual appeal. Use these garnishes to make your cheesecake look even more tempting. {{ingredient_image_2}} - Combine 200g of finely crushed digestive biscuits and 100g of melted unsalted butter in a bowl. - Stir well until all crumbs are coated. - Transfer the mixture into a 9-inch springform pan. - Use a measuring cup or spatula to pack the mixture tightly. - In a large bowl, mix 300g of cream cheese, 200g of Nutella, 100g of powdered sugar, and 1 teaspoon of pure vanilla extract. - Add a pinch of salt. Beat with an electric mixer until smooth. - In another bowl, pour 200ml of heavy whipping cream. Whip the cream until stiff peaks form. - Fold the whipped cream into the Nutella mixture gently with a spatula. - Start with a small amount to lighten the mix, then fold in the rest. - Carefully pour the filling over the crust in the springform pan. - Use an offset spatula to smooth the top. - Cover and refrigerate for at least 4 hours, or overnight for best results. - Ensure cream cheese is at room temperature: This step makes mixing much easier. Cold cream cheese clumps and can ruin the smooth texture you want. Leave it out for about 30 minutes before starting. - Avoid overwhipping the cream: Whipping cream is fun, but too much can turn it into butter. Stop when you see stiff peaks form. This keeps your cheesecake light and fluffy. - How to serve elegantly: For a fancy touch, slice the cheesecake into neat pieces. Place each slice on a plate. Drizzle a bit of extra Nutella on top. Add a dollop of whipped cream and some crushed hazelnuts for flair. - Pairing ideas for desserts: This cheesecake pairs well with fresh fruit. Strawberries or raspberries add a nice tartness. A cup of coffee or tea also complements the rich flavors. Pro Tips Chill the Ingredients: Ensure your cream cheese and heavy cream are at room temperature before mixing. This will help create a smoother filling without lumps. Use a Quality Nutella: The flavor of your cheesecake heavily relies on the quality of Nutella used. Choose a premium brand for the best taste. Don't Overwhip the Cream: Pay attention while whipping the cream; stopping at stiff peaks ensures a light and airy texture in the cheesecake. Let it Set Overnight: For the best texture and flavor, allow the cheesecake to set in the refrigerator overnight. This will enhance the taste and make it easier to slice. {{image_4}} You can easily switch up the flavor of your no-bake Nutella cheesecake. If you love coffee, try adding a bit of espresso. This will give your cheesecake a rich mocha flavor. You can mix in one or two teaspoons of instant coffee or espresso powder. Just make sure to blend it well into the Nutella mixture. Another option is to swap out Nutella for other chocolate spreads. Brands like Biscoff or peanut butter chocolate spreads work great too. Each spread brings a unique taste, making your dessert fun and different every time. If you need a gluten-free option, you can use gluten-free biscuits instead of regular digestive biscuits. Many stores sell gluten-free digestive biscuits. Just crush them and follow the same steps for the crust. For a vegan version, swap out the cream cheese and heavy cream for plant-based alternatives. Look for vegan cream cheese and whipping cream at your local store. These swaps still make a creamy and delicious cheesecake without any animal products. To keep your no-bake Nutella cheesecake fresh, cover it well. Use plastic wrap or a lid. This prevents it from absorbing other smells in the fridge. Store it in the fridge for up to five days. The cheesecake tastes best when enjoyed within the first three days. After that, the texture may change slightly. You can freeze slices of the cheesecake for later enjoyment. Wrap each slice in plastic wrap. Then, place them in an airtight container. This keeps them fresh for up to three months. When you want to enjoy a slice, move it to the fridge. Let it thaw overnight. If you’re in a hurry, you can leave it at room temperature for about an hour. Yes, you can make this cheesecake ahead of time. It is great for parties or gatherings. Just prepare it and chill it in the fridge. It tastes even better after resting overnight. If you don't have digestive biscuits, try graham crackers or Oreos. You can crush them the same way. Each will give a unique taste to your crust. The cheesecake will last about 5 days in the fridge. Make sure to cover it well to keep it fresh. It may lose some fluffiness over time, but it will still taste great. Yes, you can use a different chocolate spread. Brands like Hershey's or Jif work well. Just note that the taste will change slightly based on what you choose. Heavy whipping cream is key for a light and fluffy texture. It helps the cheesecake set well. If you want a lighter option, you can use whipped topping instead, but the result will differ. This cheesecake is simple to make with just a few key ingredients. You blend biscuits with butter for a tasty crust, then whip together cream cheese and Nutella for a rich filling. Remember, let your cream cheese warm up before mixing. You can add flavors or keep it classic. Store it well and enjoy it fresh. This cheesecake is perfect for any celebration or a sweet night in. Get creative with toppings, and make it your own. Enjoy every creamy, delicious bite!

No-Bake Nutella Cheesecake Decadent and Easy Dessert

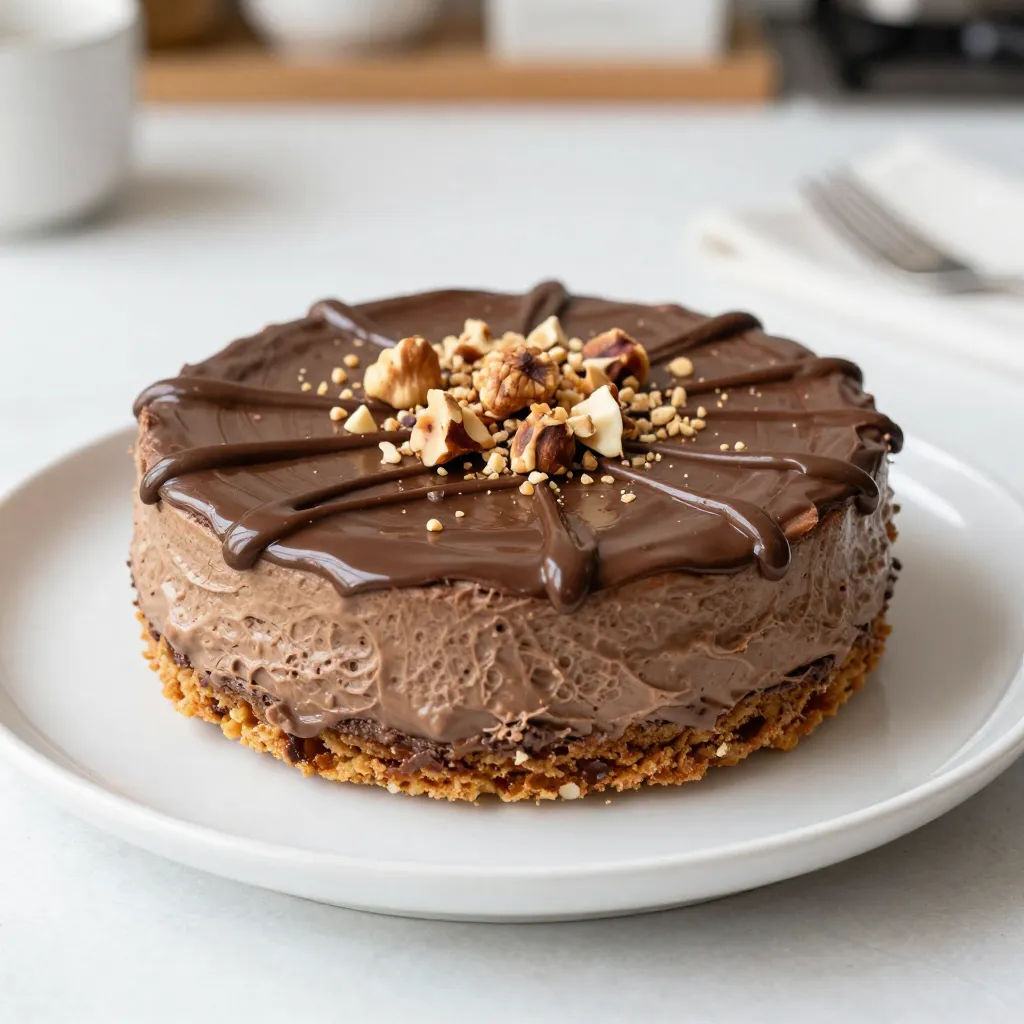
Craving a dessert that’s both easy and delicious? Look no further than this No-Bake Nutella Cheesecake! With just a few

- 1.5 lbs boneless, skinless chicken breasts - 2 red bell peppers - 2 yellow bell peppers - 1 large red onion The main ingredients make this dish colorful and tasty. Chicken breasts are lean and cook well. Red and yellow bell peppers add sweetness. The red onion gives a nice bite. - 3 tablespoons extra virgin olive oil - 2 teaspoons ground cumin - 2 teaspoons smoked paprika - 1 teaspoon chili powder - 1 teaspoon garlic powder - 1 teaspoon onion powder - Juice of 2 fresh limes - Salt and freshly ground black pepper These seasonings create a zesty and bold flavor. Olive oil helps the spices stick to the chicken. Cumin and smoked paprika add depth. Chili powder gives it a little heat. Lime juice brightens everything up. - A handful of fresh cilantro, chopped - Soft tortillas - Optional toppings like avocado, sour cream, or salsa Fresh cilantro adds a burst of flavor. Warm soft tortillas make it easy to wrap. You can add toppings for extra taste and texture. This dish is perfect for sharing with family or friends. {{ingredient_image_2}} 1. Preheat the oven to 425°F (220°C). This heat helps the chicken and veggies to char nicely. 2. Prepare the chicken and vegetables by slicing 1.5 lbs of boneless, skinless chicken breasts into thin strips. Next, slice 2 red and 2 yellow bell peppers into thin strips. Finally, cut 1 large red onion into wedges. This mix brings great color and taste. 1. Combine olive oil and spices in a small bowl. Use 3 tablespoons of olive oil. Add 2 teaspoons of ground cumin, 2 teaspoons of smoked paprika, 1 teaspoon of chili powder, 1 teaspoon of garlic powder, and 1 teaspoon of onion powder. Don’t forget a pinch of salt and black pepper! 2. Toss chicken and vegetables in a large mixing bowl. Pour the spice mix over the chicken and veggies. Use your hands or a spoon to mix everything together well. Make sure each piece gets coated in that tasty marinade. 1. Arrange on the sheet pan by spreading the chicken and veggie mix in a single layer. This helps them cook evenly. 2. Baking time and stirring instructions: Place the pan in the oven and bake for about 20-25 minutes. Stir halfway through to ensure even cooking. Check for doneness when the chicken is cooked through and the veggies show a nice char. To get the best results, lay the chicken and veggies in a single layer. This helps them cook evenly. If you stack them, some pieces may burn while others stay raw. Check for doneness by cutting a piece of chicken. If it's white inside and the juices run clear, it’s done. You can also use a meat thermometer. The chicken should reach 165°F (75°C). Want to kick up the flavor? Try adding extra spices like cayenne pepper for heat or oregano for depth. You can also experiment with marinades. A mix of yogurt and lime juice can add a nice tang. Another great option is to use a store-bought fajita marinade. This can save time and add great taste to your dish. Cilantro adds a fresh touch to your fajitas. Chop a handful and sprinkle it on right before serving. This will brighten up the dish. For toppings, set out creamy avocado slices, rich sour cream, and zesty salsa. You can also include shredded cheese or diced tomatoes for more color and flavor. Pro Tips Marinate for More Flavor: For an even more flavorful dish, let the chicken and vegetables marinate in the spice mixture for at least 30 minutes or up to overnight in the refrigerator. Use Fresh Ingredients: Fresh vegetables not only add vibrant colors to your dish but also enhance the overall flavor. Opt for in-season produce whenever possible. Customize Your Heat: Adjust the level of spiciness by adding fresh jalapeños or red pepper flakes if you prefer a spicier fajita mix. Rest Your Chicken: Allow the cooked chicken to rest for a few minutes before serving. This helps retain its juices, making it more tender and flavorful. {{image_4}} You can switch out the chicken for different proteins. Shrimp works great. It cooks fast and absorbs flavors well. Tofu is another excellent choice for a plant-based meal. Press the tofu to remove water. Then cut it into cubes and marinate it like the chicken. If you’re in the mood for other meats, try beef or pork. Thin strips of flank steak or pork tenderloin add nice flavors and textures. Adding seasonal veggies can elevate your dish. Try zucchini, corn, or asparagus. They add color and taste. You can also include black beans for protein and fiber. Mix them in with the chicken and veggies. They add a creamy texture when cooked and pair well with spices. You can serve this dish in many fun ways. One option is a salad bowl. Start with a bed of greens, then add the fajita mix on top. Drizzle with lime juice for freshness. Another idea is to make fajita-style burritos. Grab a large tortilla, fill it with the mixture, and roll it up. This makes for a tasty, on-the-go meal. After you enjoy your sheet pan fajita chicken, let it cool down. Place leftovers in a container with a tight lid. This helps keep your dish fresh. You can store it in the fridge for up to three days. To avoid soggy fajitas, keep the chicken and veggies separate from the tortillas. If you want to keep your fajitas longer, freezing is a great option. First, let the leftovers cool completely. Then, place them in a freezer-safe bag or container. Squeeze out as much air as you can before sealing. This helps prevent freezer burn. You can freeze the fajitas for up to three months. To reheat, thaw the fajitas in the fridge overnight. Then, heat them in the oven at 350°F (175°C) until warmed through. In the fridge, your sheet pan fajita chicken lasts about three days. If you freeze it, it will stay good for about three months. Always check for any off smells or changes in texture before eating. When stored properly, you can enjoy this tasty dish again and again! To make this dish gluten-free, choose corn tortillas instead of wheat ones. For seasonings, check labels on spices. Some brands may add gluten. You can use fresh spices and herbs for safe options. This way, you keep the flavors while avoiding gluten. Yes, you can use frozen chicken. First, thaw the chicken in the fridge overnight or use the microwave. Once thawed, cut it into strips. You may need to bake it a bit longer. Always ensure the chicken reaches 165°F. This keeps your meal safe and delicious. You can serve it with many sides. Mexican rice or black beans pair well. Fresh guacamole or salsa adds a tasty twist. For drinks, try lemonade or a light beer. Lime wedges also give a nice zing. Each option enhances the meal's fun and flavor. This blog post covered how to make delicious sheet pan fajitas. We discussed key ingredients, seasonings, and easy preparation steps. I shared tips to enhance flavor and serve specials. Don’t forget to try variations like tofu or shrimp, and explore different serving styles. Finally, proper storage can keep leftovers fresh for longer. With these insights, you can enjoy your fajitas anytime. Happy cooking, and enjoy every bite!

Sheet Pan Fajita Chicken Flavor-Packed Easy Recipe

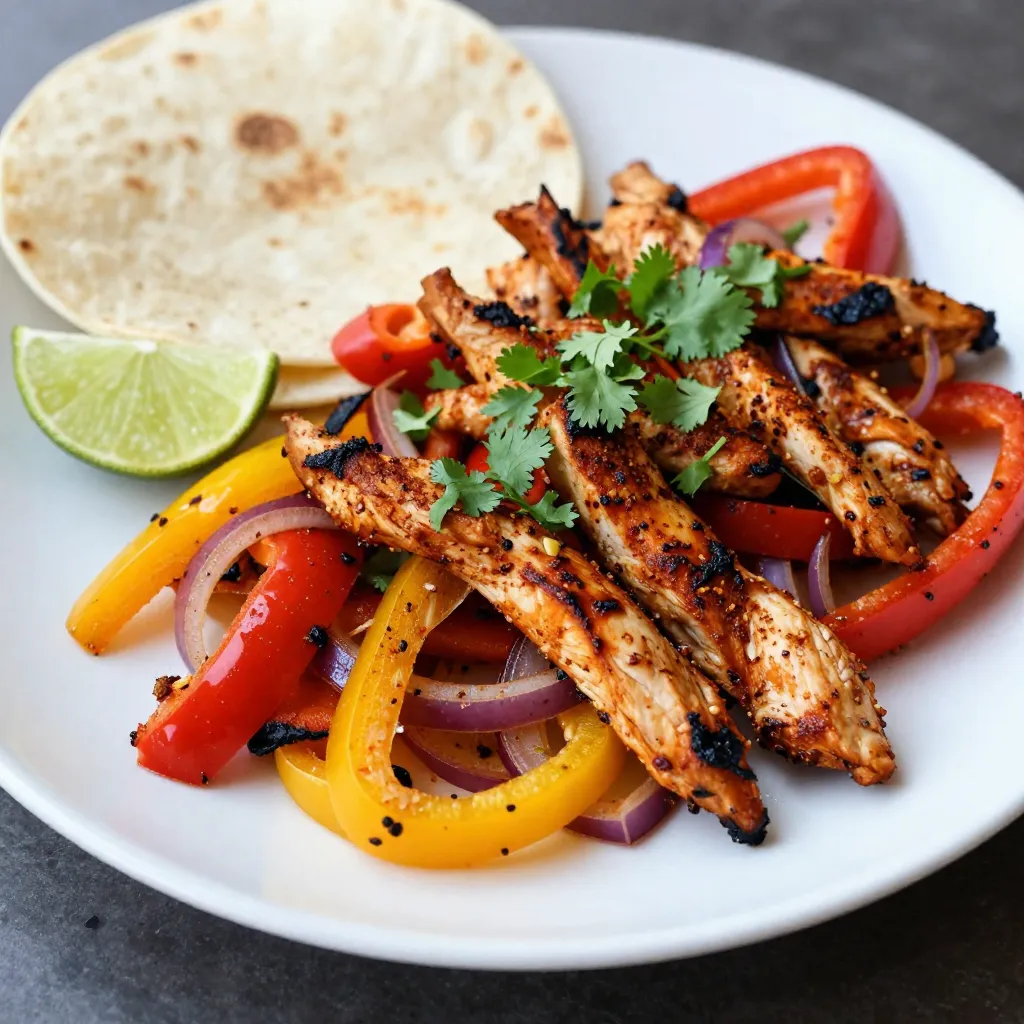
Are you ready for a quick and tasty meal that will wow your family? This Sheet Pan Fajita Chicken recipe

- 1 cup orzo pasta - 6 cups low-sodium chicken or vegetable broth - 1 small onion, finely chopped - 2 cloves garlic, minced - 2 stalks celery, diced - 2 large carrots, diced - 1 cup fresh spinach, roughly chopped - 1 lemon (zest and juice separated) - 1 teaspoon dried oregano - Salt and pepper to taste - 2 tablespoons olive oil - Fresh dill or parsley for garnish I love the fresh flavors in Greek lemon orzo soup. It starts with simple, wholesome ingredients that offer a bright taste. The orzo pasta adds a nice texture, while the broth gives the soup depth. Using low-sodium broth keeps it healthy and tasty. Chop the onion, garlic, celery, and carrots finely. This helps them cook evenly. Fresh spinach adds color and nutrients. The lemon zest and juice give the soup a zesty kick. You can adjust the salt and pepper to your liking. I recommend using fresh herbs like dill or parsley for garnish. They improve the look and taste of the soup. The mix of flavors from these ingredients makes every spoonful comforting and satisfying. {{ingredient_image_2}} - First, heat 2 tablespoons of olive oil in a large pot over medium heat. - Add 1 small, finely chopped onion, 2 diced stalks of celery, and 2 diced large carrots. - Sauté these veggies for about 5 minutes. They should soften and turn a bit clear. - Next, add 2 minced garlic cloves. Cook for another minute. The smell will be great! - Now, pour in 6 cups of low-sodium chicken or vegetable broth. - Turn up the heat and bring this mix to a rolling boil. - Once boiling, add 1 cup of orzo pasta. - Lower the heat to a gentle simmer. Cook the orzo for about 8 to 10 minutes. It should be al dente. - Stir in 1 cup of roughly chopped fresh spinach. - Add the zest and juice from 1 lemon. - Sprinkle in 1 teaspoon of dried oregano, along with salt and pepper to taste. - Let the soup simmer for 2 to 3 minutes. This helps the flavors blend well. - Taste the soup and adjust the seasonings as needed. - Serve it warm with fresh dill or parsley on top for a lovely finish. Using fresh ingredients makes this soup shine. Fresh veggies boost flavor and nutrition. Choose bright, crisp greens and ripe lemons for the best taste. Cooking the orzo to al dente is key. This means it should be firm but not hard. If you overcook orzo, it will become mushy. Follow the package instructions closely for perfect pasta. One big mistake is overcooking the orzo. This can change the soup's texture. Check it a minute or two before the time is up. Another mistake is skipping lemon zest. This zest adds a bright flavor that makes the soup special. Always zest your lemon before juicing it. Garnishing with fresh herbs adds color and flavor. Dill or parsley works well for this soup. Sprinkle them on top just before serving. Serving suggestions include adding a slice of lemon on the side. This adds a pop of color and allows guests to add more lemon if they want. A drizzle of good olive oil also enhances the look and taste. Pro Tips Use Fresh Ingredients: For the best flavor, opt for fresh vegetables and herbs. The freshness will enhance the soup’s overall taste. Adjust the Lemon: Depending on your preference, you can increase or decrease the amount of lemon juice and zest to customize the soup’s brightness. Storage Tips: This soup can be stored in the refrigerator for up to 3 days. However, the orzo may absorb too much broth over time, so consider cooking the pasta separately if you plan to reheat leftovers. Garnish Wisely: Fresh dill or parsley not only adds color but also enhances the flavor. Consider adding a dollop of yogurt for creaminess and extra tang. {{image_4}} You can make Greek lemon orzo soup heartier with protein. Chicken is a great choice. Simply add cooked, shredded chicken to the soup after the orzo cooks. This adds flavor and makes the soup filling. Shrimp is another tasty option. Just add it during the last minutes of cooking. The shrimp cooks quickly and adds a nice touch. For a vegetarian option, use chickpeas instead of meat. They add protein and texture. You can also toss in some cubes of firm tofu. This will give your soup a nice twist while keeping it plant-based. You can boost the flavor by adding more herbs and spices. Fresh thyme or basil works well with the lemon. You can also try adding a pinch of cumin for warmth. This gives your soup a unique taste. Adding more veggies is another great idea. You can include bell peppers or zucchini for extra nutrients. Just chop them up and add them with the carrots. This makes the soup even more colorful and healthy. If you need a gluten-free option, swap the orzo for gluten-free pasta. Many brands offer great pasta that cooks well and holds its shape. Just check the package for the cooking time. This way, you can enjoy the soup without worrying about gluten. To keep your Greek Lemon Orzo Soup fresh, store it in the fridge. Use a sealed container to avoid spills. The soup stays good for up to three days. If you want to save it longer, freezing is a great option. Pour the cooled soup into freezer-safe bags or containers. Leave some space at the top, as the soup will expand when it freezes. You can freeze it for up to three months. When it's time to enjoy your soup again, reheating is easy. The best method is on the stove. Pour the soup into a pot and heat it over medium-low heat. Stir often to keep it from sticking. If the soup seems too thick, add a splash of broth or water. You can also use a microwave. Place the soup in a microwave-safe bowl and heat it in short bursts, stirring in between. To keep the flavors vibrant, add a dash of fresh lemon juice before serving. Enjoy your comforting bowl of soup just like the first time! Greek Lemon Orzo Soup is a bright, flavorful dish. It blends tender orzo pasta with fresh veggies and lemon. This soup has roots in Greek cuisine, where lemon adds a fresh touch. It’s often enjoyed for lunch or dinner. The warm broth comforts you on chilly days. Yes, you can easily make this soup vegetarian. Simply swap chicken broth for vegetable broth. You can also skip any meat and add more veggies. Try chickpeas or beans for protein. This keeps the soup hearty and filling while keeping it plant-based. This soup lasts about 3 to 5 days in the fridge. Store it in an airtight container to keep it fresh. If you want to keep it longer, freeze it. The soup can stay in the freezer for 2 to 3 months. Just reheat it on the stove when you’re ready to enjoy it again. This blog post covered the key steps to make Greek Lemon Orzo Soup. We discussed ingredients, preparation, and tips for the best flavors. Fresh ingredients and proper cooking help create a tasty dish. Remember to avoid overcooking the pasta and don't skip lemon zest. You can customize the soup with protein or different veggies too. This hearty soup is easy to store and reheat. Enjoy making it at home, and savor each warm bowlful!

Greek Lemon Orzo Soup Wholesome and Comforting Dish

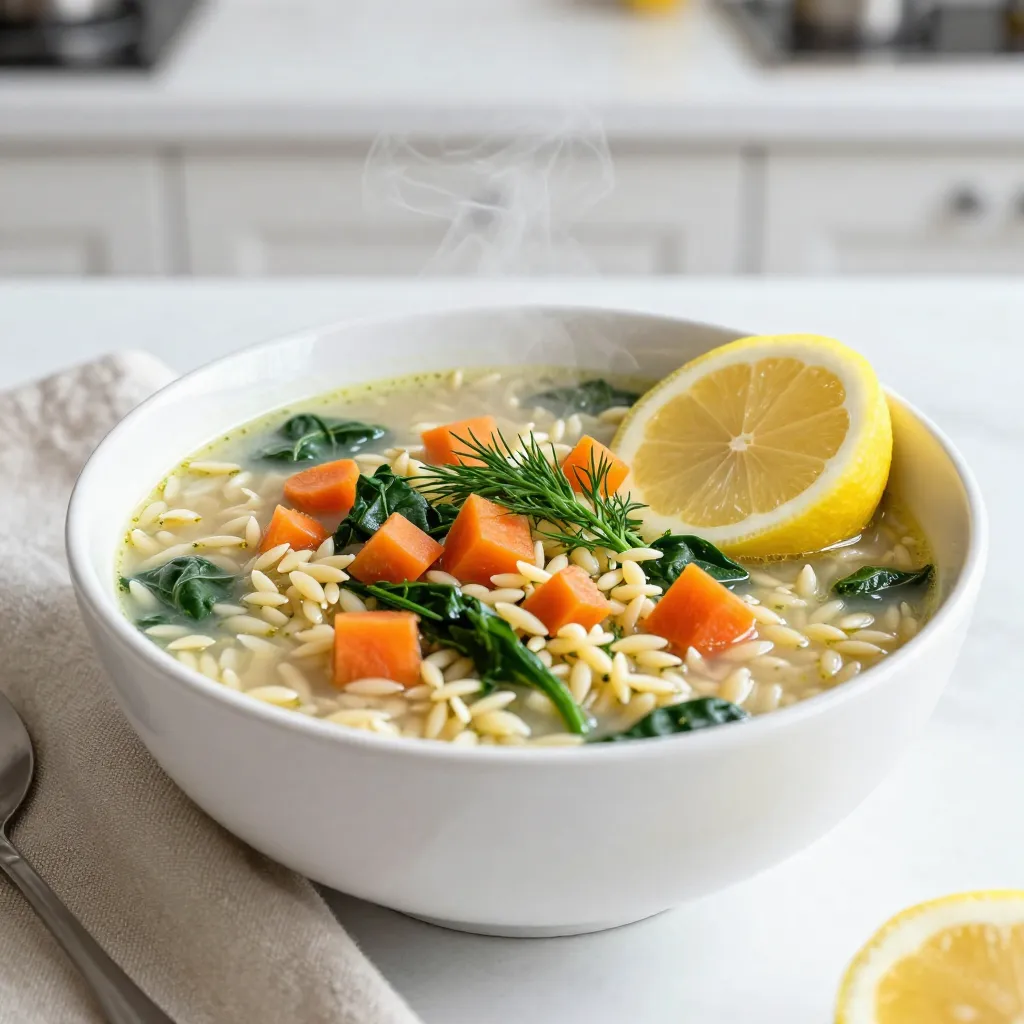
Welcome to your new favorite comfort food: Greek Lemon Orzo Soup! This dish is a tasty mix of fresh veggies,

Using fresh peaches gives your cobbler a bright taste. Their natural sweetness shines through. If fresh peaches are not available, canned peaches work well too. Just make sure they are well-drained to avoid excess moisture. Unsalted butter is key in this recipe. It lets you control the salt level. This way, the sweet flavors of the peaches come out more. If you don’t have Bisquick, there are substitutes. You can make your own mix by combining flour, baking powder, and salt. This will give you a similar texture. You can also try other baking mixes like Jiffy or homemade alternatives. Here’s a quick list of what you need for the recipe: - 4 cups fresh peaches, sliced (or use canned peaches, well-drained) - 1 cup granulated sugar, divided - 1 tablespoon fresh lemon juice - 1 teaspoon ground cinnamon - 2 cups Bisquick baking mix - 1 cup milk - 1/2 cup unsalted butter, melted - 1 teaspoon pure vanilla extract This list ensures you have all the essentials to make a delicious peach cobbler. For the full recipe, check the section above. To start, grab your fresh peaches. Slice them into thin pieces. Place the peaches in a big bowl. Add 1/2 cup of sugar, lemon juice, and cinnamon. Stir gently until all the peaches are coated. The sugar helps to bring out the sweet juices. Once mixed, pour the peach mixture into a greased 9x13 inch baking dish. Spread it out evenly to cover the bottom. Next, let’s make the Bisquick batter. In another bowl, combine Bisquick, milk, melted butter, and vanilla. Add the remaining 1/2 cup of sugar here. Whisk all the ingredients together until the batter is smooth. If you notice lumps, keep whisking until they disappear. A smooth batter helps the cobbler rise nicely. Now it’s time to bake! Preheat your oven to 375°F (190°C). This step is key for even baking. Pour the Bisquick batter over the peach filling. Do this carefully to keep the layers separate. Bake in the oven for 35-40 minutes. To check for doneness, insert a toothpick into the center. If it comes out clean, it’s ready. Let the cobbler cool for about 10 minutes before serving. This cooling time helps the flavors come together. For the full recipe, check out the complete instructions. Enjoy making your peach cobbler! To make the best peach cobbler, pay attention to some key points. First, avoid common mistakes. Do not skip the lemon juice. It adds needed brightness. Too much sugar can make it overly sweet. Balance is key. Next, enhance the flavor. A pinch of nutmeg can really elevate the dish. Ground ginger also works well with peaches. Experiment with these spices to find your favorite mix. Now, let’s talk about serving. The best pairing with peach cobbler is vanilla ice cream. The cold ice cream melts beautifully on the warm cobbler. You can also try whipped cream for a lighter option. For creative serving styles, consider individual ramekins. They look lovely and are easy to serve. Another idea is to serve it in a mason jar for a fun twist. You can also add fresh mint on top for color and flavor. Enjoy your peach cobbler with these tips to make it even better. For the complete recipe, check out the Full Recipe section! {{image_4}} You can switch up the fruit in this peach cobbler recipe. Try using blueberries, cherries, or even apples. Each fruit gives a new twist to the dish. Seasonal fruits can also work great. In summer, fresh berries shine. In winter, you might choose sweet pears or tart cranberries. Each season brings its own flavor, making this recipe versatile and fun. If you need a gluten-free option, use a gluten-free baking mix instead of Bisquick. Many brands offer great substitutes that work well. Just check the package for the right measurements. You may want to adjust the sugar, too. Some gluten-free mixes can be sweeter, so taste as you mix. This way, you keep the flavor and enjoy a delightful dessert without gluten. To keep your peach cobbler fresh, follow these simple steps. First, let the cobbler cool completely. This helps prevent moisture buildup. Once it’s cool, cover it with plastic wrap or aluminum foil. Store it in the fridge for up to three days. If you want to keep it longer, freezing is a great option. - Best practices for refrigeration: Place leftover cobbler in an airtight container. Always keep it covered to avoid drying out. - Freezing your peach cobbler: Slice the cobbler into portions. Wrap each piece tightly in plastic wrap. Then, place them in a freezer bag or container. This way, you can enjoy it later! When you’re ready to enjoy your cobbler again, reheating it properly is key. You can use either an oven or a microwave, depending on your time and preference. - Oven vs. microwave methods: For the oven, preheat it to 350°F (175°C). Place the cobbler in an oven-safe dish. Cover it with foil to keep it moist. Heat for about 15-20 minutes or until warm. The microwave is faster. Heat on medium power for 30 seconds or until hot. Check it often to avoid overheating. - Maintaining texture and flavor: The oven keeps the topping crisp, while the microwave can make it soft. If you use the microwave, consider adding a scoop of ice cream right before serving. This adds creaminess and flavor! To keep your peach cobbler from getting soggy, layer the ingredients right. Start with the peach filling. Make sure the peaches are not too juicy. If you use canned peaches, drain them well. Then, pour the Bisquick batter over the peaches without mixing. This keeps the batter on top and allows it to rise while baking. Yes, you can use frozen peaches. Just thaw them first and drain excess water. This ensures your cobbler stays moist but not soggy. Frozen peaches work well and save time. They are also great for when fresh peaches are not in season. Peach cobbler tastes amazing with various toppings. Here are some popular options: - Vanilla ice cream - Whipped cream - Fresh mint leaves - A drizzle of caramel sauce These add flavor and make your dessert even more special. You can try other baking mixes if you like. Brands like Jiffy or any all-purpose mix can work. Just check the package for the right amount of liquid to add. Each mix may have different flavors, so choose one that fits your taste. Making peach cobbler is simple and fun. We discussed fresh versus canned peaches, the need for unsalted butter, and Bisquick substitutes. Following detailed steps for the peach filling, batter creation, and baking ensures success. Our tips helped avoid common mistakes and suggested delicious pairings. You can even try different fruits or a gluten-free version. Proper storage and reheating keep it tasty. With these insights, your peach cobbler will impress everyone. Enjoy the process and have fun experimenting with flavors!

Peach Cobbler with Bisquick Easy and Tasty Recipe

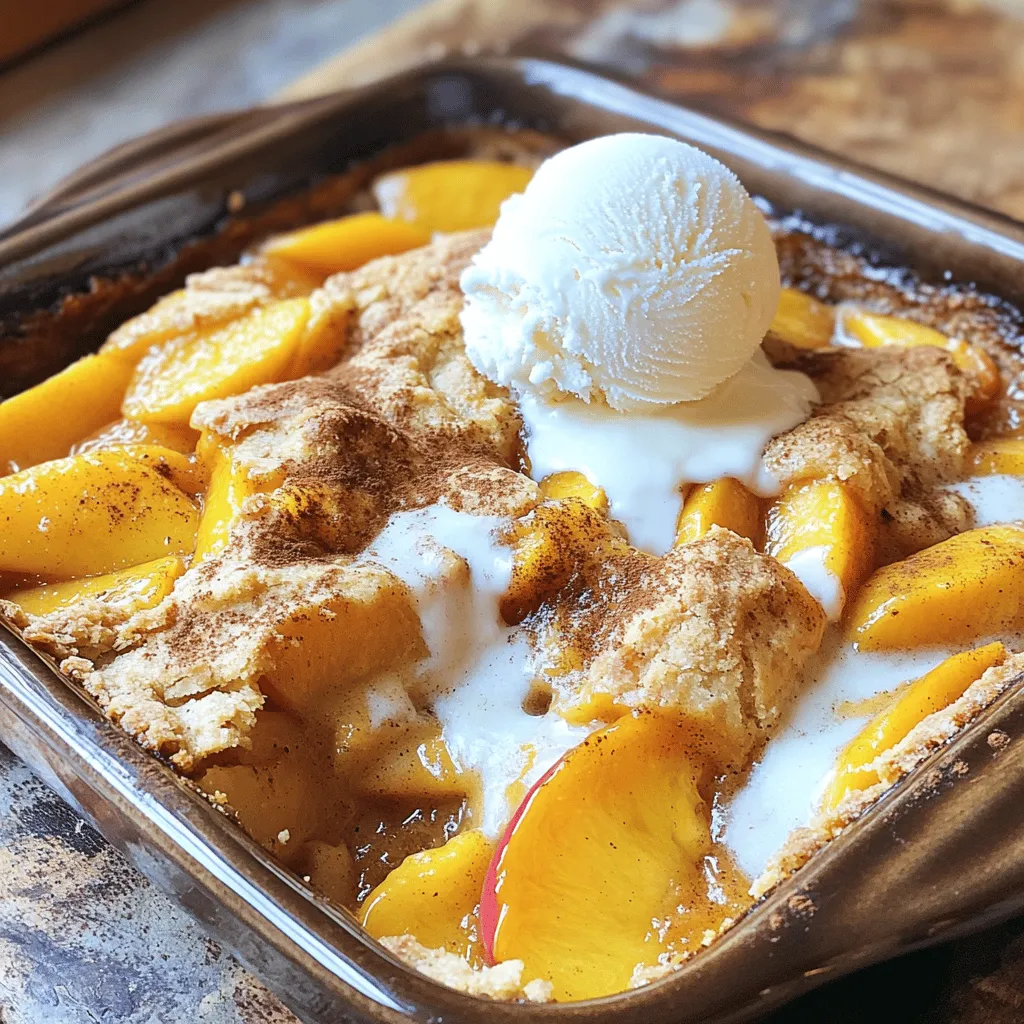
Are you ready to whip up a warm and comforting dessert? This Peach Cobbler with Bisquick recipe is not just

- 1 ripe mango, peeled and diced into small cubes - 2 ripe avocados, diced into bite-sized pieces - 1 small red onion, finely chopped for a mild flavor - 1 jalapeño, deseeded and minced for a hint of heat - 1/4 cup fresh cilantro, finely chopped for freshness - Juice of 2 juicy limes for acidity - Salt, to taste for seasoning - 1 tablespoon honey (optional, for a touch of sweetness) - Diced bell peppers for crunch - Corn for sweetness and texture - Black beans for added protein When making this salsa, use the main ingredients as a base. Adjust the optional ingredients based on your taste. For example, if you love spice, add more jalapeño. If you want sweetness, use more honey. Always taste as you go! You can make this salsa your own by mixing in flavors you enjoy. Just remember to keep the balance of fresh, sweet, and spicy. This way, you create a salsa that is not only tasty, but also fun to eat! Check out the Full Recipe for more tips. Start by gathering all your fresh ingredients. You need ripe mango, avocados, red onion, jalapeño, cilantro, and limes. Peel the mango and cut it into small cubes. Dice the avocados into bite-sized pieces, making sure not to mash them. Chop the red onion finely for a mild taste. Remove the seeds from the jalapeño and mince it for a touch of heat. Finally, chop the cilantro for freshness. In a medium-sized mixing bowl, gently combine the diced mango and avocado. Be careful to fold them together softly. Next, add in the finely chopped red onion and minced jalapeño. This ensures each bite has a burst of flavor. Stir in the fresh cilantro, adding a bright note. Squeeze the juice of two limes over the mix to bring out the flavors. If you like, drizzle in honey for sweetness. Toss everything lightly to combine without mashing the avocados. Season your salsa with salt to taste. Give it a light toss to blend everything well. Let the salsa sit for about 10-15 minutes at room temperature. This allows the flavors to meld beautifully. When ready to serve, use a colorful bowl. Garnish with whole cilantro leaves for an attractive finish. This salsa pairs wonderfully with tortilla chips or grilled chicken. Enjoy every refreshing bite! For the full recipe, check out the details above. To pick ripe mangoes, look for a smooth, slightly soft skin. The color should be vibrant, often yellow or red, depending on the variety. Gently press the mango; if it yields slightly, it’s ready to eat. For avocados, aim for ones that feel soft but not mushy. A dark green skin usually means it's ripe. You can also check the stem; if it comes off easily and is green underneath, the avocado is good. You can boost your mango avocado salsa with a few extras. A splash of orange juice adds sweetness and brightness. Try adding diced tomatoes for more color and texture. Fresh garlic or ginger can also bring depth to the flavor. If you enjoy heat, consider adding more jalapeños or even a dash of hot sauce. Experimenting with these options can lead to exciting new tastes in your salsa. One common mistake is over-mixing the salsa. Gentle folding keeps the avocado from turning mushy. Be careful not to add too much lime juice; it can overpower the other flavors. Always taste your salsa before serving. Adjust the salt and sweetness to your liking. Finally, remember to let it sit for a bit. This resting time allows the flavors to blend nicely. For the full recipe, check out the complete instructions above. {{image_4}} To add some heat, try spicy mango avocado salsa. Start with the base recipe. Then, increase the amount of jalapeño. You can also add chopped serrano peppers for extra spice. Mix in a pinch of cayenne pepper for a kick. This spicy version is great for those who love bold flavors. It pairs well with tacos or grilled meats. For a fun twist, create a tropical fruit salsa. Replace some of the mango with pineapple or kiwi. You can also add diced papaya or fresh coconut flakes. These fruits bring a sweet and tangy flavor. This version works well as a topping for fish or shrimp. It’s bright and full of sunshine! Feel free to customize your salsa with extra ingredients. Try adding black beans for protein and fiber. Chopped bell peppers can give a nice crunch and color. You can also toss in corn for sweetness and texture. If you love cheese, crumbled feta or cotija adds creaminess. Mix and match to find your perfect blend. For the full recipe, check out Mango Avocado Salsa Delight. To keep your mango avocado salsa fresh, store it in an airtight container. Make sure to press plastic wrap directly onto the salsa's surface. This step will reduce air exposure and help prevent browning. Place the container in the fridge. It stays fresh for a few days. I do not recommend freezing mango avocado salsa. The avocado will turn brown, and the texture will change. If you want to freeze it, leave out the avocado. You can add it later when you thaw the salsa. The shelf life of the salsa depends on its ingredients. Fresh mango and avocado last about 3 days in the fridge. Lime juice helps keep the salsa fresh longer. Red onion and cilantro can last up to a week. If you notice any browning or spoilage, it's best to toss it. You can serve Mango Avocado Salsa with many dishes. It pairs well with tortilla chips. The crunchy texture of chips contrasts with the soft salsa. You can also use it as a topping for grilled chicken or fish. This adds a fresh and vibrant flavor to your meal. Tacos and burritos also benefit from this salsa. It brightens up the dish and adds a tropical note. You can even use it in wraps for lunch. Its versatility makes it a fun addition to many meals. Yes, you can make Mango Avocado Salsa ahead of time. It tastes even better after sitting a while. Letting it rest allows the flavors to mix well. However, I recommend making it no more than a few hours in advance. If you make it too early, the avocados may turn brown. To keep it fresh, store it in an airtight container. Keep it in the fridge until you are ready to serve. This way, it stays cool and tasty. To prevent avocados from browning, lime juice is your best friend. The acid in lime juice slows down the browning process. Squeeze lime juice over the diced avocado right away. Mix it gently to coat all pieces. Another trick is to store the salsa in an airtight container. Press plastic wrap directly onto the surface of the salsa. This minimizes air contact and helps keep it fresh. If you follow these tips, your salsa will look great and taste fresh. You can enjoy your Mango Avocado Salsa from the Full Recipe without worry! This Mango Avocado Salsa is bright and fresh. It uses simple ingredients that pack a punch. Here’s how to make it. - 1 ripe mango, peeled and diced into small cubes - 2 ripe avocados, diced into bite-sized pieces - 1 small red onion, finely chopped for a mild flavor - 1 jalapeño, deseeded and minced for a hint of heat - 1/4 cup fresh cilantro, finely chopped for freshness - Juice of 2 juicy limes for acidity - Salt, to taste for seasoning - 1 tablespoon honey (optional, for a touch of sweetness) Each ingredient plays a key role. The ripe mango brings sweetness, while avocados add creaminess. Red onion gives a mild crunch. Jalapeño brings just the right amount of heat. Fresh cilantro gives a burst of herbal taste. Lime juice keeps everything bright and fresh. Salt brings all the flavors together. Pair this salsa with crispy tortilla chips. It also works well as a topping for grilled chicken or fish. The colors look great on any table. Plus, the taste is a treat for your taste buds. For the full recipe, check out the instructions above. Enjoy making this delightful salsa! This blog post covered how to make Mango Avocado Salsa Delight. We discussed key ingredients, preparation steps, and tips to enhance flavor. I shared variations to keep things exciting and best storage methods to maintain freshness. Remember, fresh ingredients make all the difference. Enjoy experimenting in the kitchen! Your salsa can impress any palate. With practice, you’ll create a recipe that’s all your own.

Mango Avocado Salsa Flavorful and Fresh Recipe

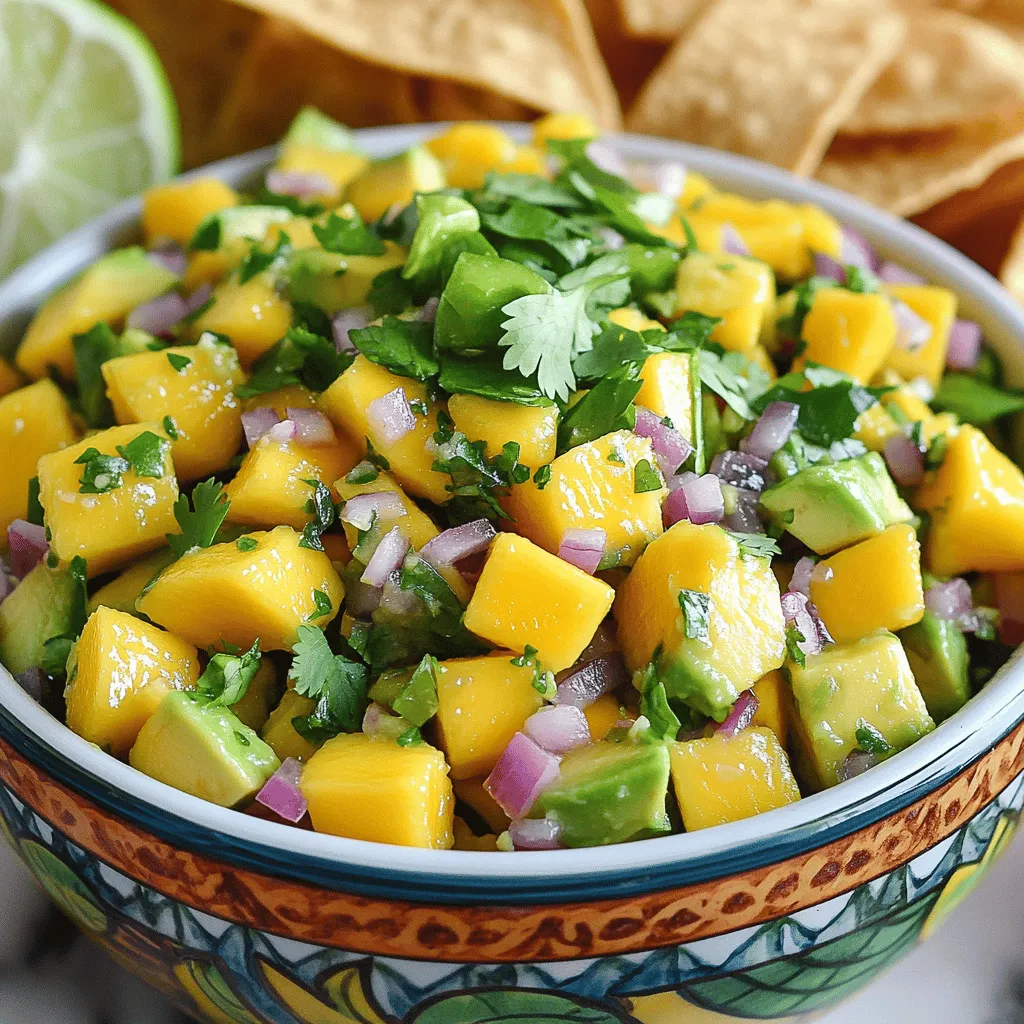
Are you ready to brighten up your next meal? Mango Avocado Salsa is the perfect blend of sweet, creamy, and

To make a delightful Chocolate Chip Cookie Dough Dip, you need some key ingredients. Here’s what you’ll need: - 1 cup cream cheese, softened to room temperature - 1/2 cup unsalted butter, softened - 3/4 cup packed brown sugar - 1/4 cup granulated sugar - 1 teaspoon pure vanilla extract - 1 cup all-purpose flour (heat-treated for safety) - 1/2 cup mini chocolate chips These ingredients create a creamy and sweet dip that tastes like cookie dough. The butter and cream cheese blend together for a smooth base. The sugars add sweetness, while the flour gives it that cookie dough feel. You can also enhance your dip with these optional ingredients: - 1/4 cup chopped pecans or walnuts Adding nuts gives a nice crunch and adds a layer of flavor. If you prefer a nut-free version, you can skip this step. Now, let's talk about what to dip in this tasty mix. Here are some great options: - Graham crackers - Apple slices - Pretzels - Mini cookies Each of these dippers adds a unique taste and texture. Graham crackers provide sweetness, while apple slices add freshness. Pretzels offer a salty crunch, and mini cookies make it even more fun! For the full recipe, check out the detailed instructions. You'll have a fantastic treat ready to share! Start with a medium mixing bowl. Add 1 cup of softened cream cheese and 1/2 cup of softened unsalted butter. Use an electric mixer on medium speed. Beat them together until you get a creamy and fluffy mixture. This should take about 2-3 minutes. Make sure it is smooth without any lumps. Next, slowly add in the sugars. You need 3/4 cup of packed brown sugar and 1/4 cup of granulated sugar. Keep mixing until both sugars blend well with the cream mix. Then, pour in 1 teaspoon of pure vanilla extract. Mix again until everything is well combined. Now, it's time to add the flour. Use 1 cup of heat-treated all-purpose flour. To heat-treat your flour, spread it on a baking sheet and bake it at 350°F for 5-7 minutes. Stir halfway through, then let it cool. Carefully mix the flour into your dip until it is uniform and creamy. Once the flour is in, gently fold in 1/2 cup of mini chocolate chips. If you like nuts, add 1/4 cup of chopped pecans or walnuts. Use a spatula to keep the nice texture. Transfer the dip to a serving bowl. Smooth the top with the spatula. For the best taste, chill the dip in the fridge for at least 30 minutes. This helps the flavors mix well and makes the dip firmer. While you wait, you can prepare your dippers. Enjoy this tasty treat with an array of snacks! When you make Chocolate Chip Cookie Dough Dip, mixing is key. Start with soft cream cheese and butter. This makes it easy to blend. Use an electric mixer on medium speed. Beat for about 2-3 minutes. You want it creamy and fluffy. Gradually add the sugars. Mix until there are no lumps. This step is very important for a smooth dip. You must heat-treat the flour for safety. Raw flour can carry germs. To do this, spread flour on a baking sheet. Bake it at 350°F for about 5-7 minutes. Stir it halfway through. Let it cool before mixing it into your dip. This simple step keeps your dip safe to eat. Add your favorite extras to bring more flavor. Mini chocolate chips are a must for sweetness. If you like nuts, fold in chopped pecans or walnuts. This adds crunch and depth. For a fun touch, serve with colorful dippers. Try graham crackers, apple slices, or pretzels. Each bite will be a tasty surprise! For the full recipe, check out the details above. {{image_4}} You can change the type of chocolate chips in the dip. Try dark chocolate chips for a rich taste. Milk chocolate brings a sweeter flavor. For a fun twist, use white chocolate chips. Each chocolate choice gives a unique flavor. Feel free to mix and match! Adding flavors can make this dip even better. You can mix in a tablespoon of peanut butter for a nutty taste. A splash of almond extract adds a nice touch. You could even toss in some crushed Oreos for a cookie crunch. These flavor add-ins make your dip special and fun. If you want a healthier version, use Greek yogurt instead of cream cheese. This keeps the dip creamy but lowers fat. For sugars, try using coconut sugar or maple syrup. You can also swap all-purpose flour for almond flour for a gluten-free option. These swaps let you enjoy the dip with fewer calories. Store leftover Chocolate Chip Cookie Dough Dip in an airtight container. It keeps well in the fridge for up to five days. Make sure to seal it tightly to keep it fresh. Before serving again, give it a quick stir. This helps revive its creamy texture. You can freeze this dip for longer storage. Use a freezer-safe container and leave some space at the top. The dip can last up to three months in the freezer. When you're ready to enjoy it, move it to the fridge overnight to thaw. Avoid refreezing after it has thawed for best quality. Reheat the dip gently if you prefer it warm. Use the microwave in short bursts. Stir in between to avoid hot spots. If you like it cold, serve it straight from the fridge. Pair it with your favorite dippers like graham crackers or apple slices. For the full recipe, check the detailed instructions above. Yes, you can make this dip ahead of time. I often prepare it a day in advance. Just store it in the fridge. This helps the flavors blend well. Remember to cover it tightly to keep it fresh. This dip lasts about 3 to 5 days in the fridge. Make sure to keep it sealed in an airtight container. If you notice any changes in smell or texture, it’s best to toss it out. Yes, you can use other flours like almond or oat flour. Just make sure they are safe to eat raw. Remember, the texture may change a bit, but it can still taste great! Some great dippers are: - Graham crackers - Apple slices - Pretzels - Mini cookies Feel free to get creative with your dippers. The dip pairs well with many snacks! You can use this dip with brownies, pancakes, or even ice cream. It adds a fun twist to many treats. You can also spread it on toast for a sweet breakfast. Enjoy mixing and matching! This blog post covered the fun world of Chocolate Chip Cookie Dough Dip. We explored key ingredients and tasty dippers. I outlined easy steps for preparing and mixing everything. Tips helped improve your dip while offering safe methods. You learned ways to switch things up and store your dip. In conclusion, follow these steps for a fun treat. Enjoy tasty variations and share with friends. Make this dip your own and have fun!

Chocolate Chip Cookie Dough Dip Tasty and Fun Snack

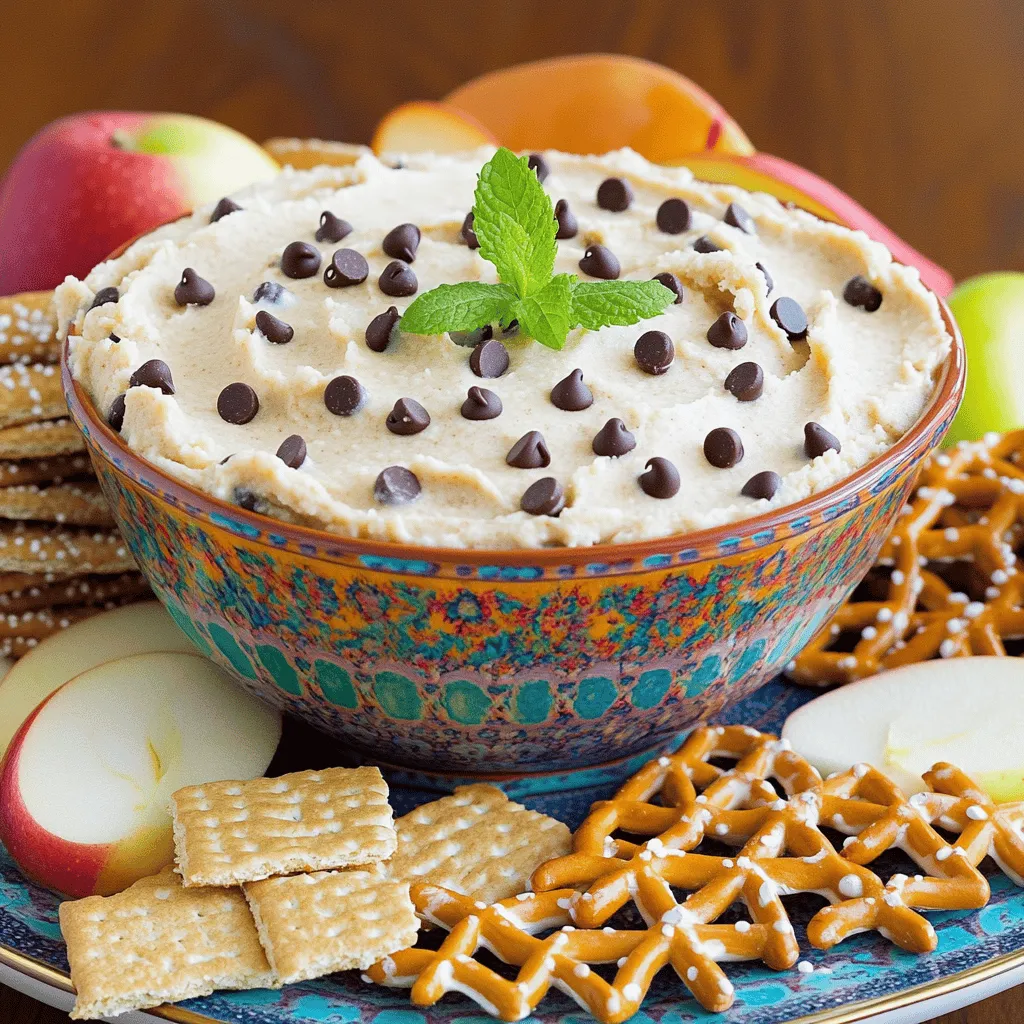
Are you ready to indulge in a fun treat? Chocolate Chip Cookie Dough Dip is the perfect snack for any

To make baked sweet potato fries, you need a few simple items. Here is what you will need: - 2 large sweet potatoes - 2 tablespoons olive oil - 1 teaspoon garlic powder - 1 teaspoon smoked paprika - ½ teaspoon cayenne pepper (optional) - Salt and freshly ground black pepper, to taste - Fresh parsley, chopped (for garnish) These ingredients come together to create fries that are crispy and packed with flavor. Sweet potatoes give a natural sweetness that pairs well with spices. If you want to amp up the taste, consider adding more seasonings. Here are some ideas: - Cumin for a warm, earthy flavor - Chili powder for some heat - Italian herbs like oregano or basil for a fresh twist - Parmesan cheese for a savory finish Feel free to mix and match these seasonings to create your own unique flavor profile. Experimenting with spices can lead to delightful surprises! To enjoy your baked sweet potato fries, serving them with dips can elevate the experience. Here are a few tasty options: - Homemade garlic aioli for a creamy, garlicky kick - Spicy ketchup for a classic yet zesty flavor - Avocado dip for a fresh, healthy choice - Ranch dressing for a cool, tangy dip For a fun presentation, you can serve the fries in a rustic basket. Line it with parchment paper, and add a small bowl of dip on the side. This adds a nice touch to your snack or meal. For the full recipe, check out the detailed instructions above. Start by preheating your oven to 425°F (220°C). This helps the fries cook evenly and become crispy. Wash and peel your sweet potatoes well. Next, slice them into thin fries, about ¼ inch thick. Thin fries cook better and get crispier. Make sure the cuts are uniform to ensure even cooking. In a large bowl, place the sweet potato fries. Drizzle 2 tablespoons of olive oil over them. Toss the fries gently with your hands or a spatula. This step helps coat each fry in oil, which is key for crispiness. Now, add 1 teaspoon of garlic powder, 1 teaspoon of smoked paprika, and ½ teaspoon of cayenne pepper if you like some heat. Season with salt and fresh black pepper to taste. Toss the fries again so every fry is well-coated with the spices. Spread the seasoned fries in a single layer on a lined baking sheet. Avoid crowding them; this allows hot air to flow and makes them crispy. Bake the fries for 25-30 minutes. Flip them halfway through to ensure they brown evenly on all sides. When they look golden and crispy, take them out. Let them cool for a few minutes before serving. This helps them firm up even more. You can find the full recipe for these delicious fries in the earlier section. To get crispy sweet potato fries, start by using high heat. Preheat your oven to 425°F (220°C). Next, use enough olive oil to coat each fry evenly. This helps them crisp up nicely. Spread the fries in a single layer on the baking sheet. Overcrowding can lead to soggy fries. Flip them halfway through cooking for even crisping. Cutting the sweet potatoes into uniform pieces is very important. Aim for about ¼ inch thick. This ensures all fries cook at the same rate. If some are thick and others are thin, you will end up with a mix of soggy and burnt fries. Consistent sizes mean perfect fries every time. A few common mistakes can ruin your fries. First, don’t skip the oil. It’s key to achieving that crunchy texture. Second, avoid using wet or unpeeled sweet potatoes. Moisture can lead to steaming instead of baking. Lastly, remember to season well. A simple mix of garlic powder and paprika enhances flavor greatly. Check the Full Recipe for more tips on making the best baked sweet potato fries! {{image_4}} You can change the flavor of your sweet potato fries easily. Try different spices to find your favorite. For a zesty twist, mix lime zest with chili powder. For a savory touch, use rosemary and thyme. You can also try curry powder for a warm, exotic flavor. Mixing flavors adds fun and keeps things interesting! Sweet potatoes are great, but other veggies work too! You can use carrots, zucchini, or even beets. Cut them into fry shapes like the sweet potatoes. Season them the same way or try new spices for each. This way, you can have a colorful veggie platter. Each type adds its own taste and nutrition. Dips make your fries even better! A spicy dip is great for those who love heat. Mix Greek yogurt with hot sauce for a creamy kick. For something sweet, try honey mustard. Just mix honey with Dijon mustard for a quick dip. You can also blend peanut butter with soy sauce for a nutty flavor. Dips add a new layer of fun and flavor! To keep your leftover baked sweet potato fries fresh, place them in an airtight container. Make sure the fries are cool before sealing them. This helps prevent moisture buildup, which can make them soggy. Store the container in the fridge for up to three days. When you’re ready to enjoy the fries again, reheating them properly is key. Preheat your oven to 400°F (200°C). Spread the fries on a baking sheet in one layer. Bake for about 10-15 minutes until they are hot and crispy. This method helps restore their original crunch. If you want to store your fries for longer, freezing is a great option. First, let the fries cool completely. Then, spread them out on a baking sheet and freeze until firm. Once frozen, transfer the fries to a freezer-safe bag. They can stay in the freezer for up to three months. When you are ready to eat, bake them directly from the freezer without thawing. For best results, follow the full recipe for seasoning and baking times. Yes, you can use other potatoes. Regular potatoes, like Russets, work well. They may not have the same sweetness, but they bake nicely. You can also try Yukon Golds for a creamy texture. Just remember to adjust the cooking time as needed. To make baked sweet potato fries healthier, use less oil. You can reduce olive oil to one tablespoon. You can also skip the cayenne for a milder flavor. Adding herbs like rosemary or thyme can boost flavor without adding calories. For a crunch, try air frying instead of baking. I recommend baking sweet potato fries at 425°F (220°C). This high temperature helps them crisp up nicely. Make sure to flip them halfway for even browning. The key to great fries is the right heat and space on the baking sheet. For the full recipe, check out the details above. Baked sweet potato fries are easy to make and taste great. We covered essential ingredients, seasonings, and serving ideas. The step-by-step guide helps you prep, season, and bake fries for a crispy finish. I shared tips for achieving perfect fries and explored fun variations and dips. Don't forget how to store leftovers properly. With these insights, you can enjoy tasty fries anytime. Now, grab those sweet potatoes and start baking your own delicious fries!

Baked Sweet Potato Fries Crispy and Flavorful Snack

Looking for a tasty snack that’s both healthy and easy to make? Baked sweet potato fries are your answer! These

To make a tasty Savory Quinoa Salad with Avocado, you'll need some key items. Here's what you need: - 1 cup quinoa, thoroughly rinsed - 2 cups vegetable broth (or water) - 1 ripe avocado, diced - 1 cup cherry tomatoes, halved - 1 cucumber, diced into bite-sized pieces - 1/2 red onion, finely chopped - 1/4 cup fresh cilantro, roughly chopped - Juice of 1 lime - 2 tablespoons extra virgin olive oil - 1 teaspoon ground cumin - Salt and freshly cracked black pepper, to taste These ingredients work together to create a salad that is fresh and full of flavor. Quinoa serves as a great base, while the avocado adds creaminess. You can customize this salad with optional add-ons. Some great choices include: - Feta cheese for a salty kick - Black beans for extra protein - Bell peppers for crunch and color - Corn for sweetness - Sliced jalapeños for heat Mix and match these add-ons to make the salad your own. They will elevate your dish, making it even more satisfying. This salad is not only delicious but also packed with nutrition. Here’s what you typically get per serving: - Protein: Quinoa and beans provide good protein levels. - Healthy fats: Avocado brings in healthy fats that are great for your heart. - Fiber: Vegetables and quinoa are high in fiber, aiding digestion. - Vitamins: Fresh veggies supply vitamins A, C, and K. - Minerals: Ingredients like quinoa provide iron and magnesium. This Savory Quinoa Salad with Avocado is a smart choice for a healthy meal. It’s filling and good for your body. If you want to see how to make it, check the Full Recipe. To cook quinoa, start with a medium saucepan. Pour in 2 cups of vegetable broth. Bring it to a strong boil over medium-high heat. Once it boils, add 1 cup of rinsed quinoa. Lower the heat to a gentle simmer. Cover the pot with a lid and let it cook for about 15 minutes. The quinoa is done when all the liquid is absorbed. Use a fork to fluff the quinoa gently. Then, let it cool completely before adding it to your salad. While the quinoa cools, you can prep the vegetables. Start with the avocado. Carefully slice it in half, remove the pit, and dice it into small cubes. Next, halve the cherry tomatoes. Then, dice the cucumber into bite-sized pieces. Finally, finely chop the red onion. Place all these fresh veggies aside until you're ready to mix them with the quinoa. Now, let’s make the dressing. In a small bowl, squeeze the juice of one lime. Add 2 tablespoons of extra virgin olive oil. Sprinkle in 1 teaspoon of ground cumin and a generous pinch of salt and freshly cracked black pepper. Whisk it all together until it’s well mixed. In a large bowl, combine the cooled quinoa and all the prepared vegetables. Pour the dressing over the salad. Gently toss everything together without mashing the avocado. Taste the salad and adjust the seasoning if needed. Allow it to sit for a few minutes to let the flavors meld. For the full recipe, check out the detailed instructions above. To keep your avocado fresh, use lemon or lime juice. The acid slows browning. After cutting, brush the flesh with juice. If you want, you can also store the avocado with the pit. This can help reduce air exposure. Wrap it tightly in plastic wrap. Place it in the fridge right away. Store any leftover quinoa salad in an airtight container. This helps keep it fresh. Make sure to eat it within three days for the best taste. If you see any browning on the avocado, just scoop it off. The rest of the salad will still be tasty and safe to eat. You can easily make this salad ahead of time. Just cook the quinoa and chop the veggies. Store them separately in the fridge. When you're ready to eat, mix them together. This keeps everything fresh and crunchy. You can also add the dressing right before serving for the best flavor. This makes a great lunch or dinner option! For the full recipe, check out the Savory Quinoa Salad with Avocado. {{image_4}} You can boost the protein in your savory quinoa salad easily. Adding cooked chicken, shrimp, or chickpeas gives it more substance. For a plant-based option, try black beans or lentils. Each adds a different taste and texture, making your salad even more filling. - Cooked chicken, shredded or diced - Cooked shrimp, peeled and deveined - Canned chickpeas, drained and rinsed - Black beans, drained and rinsed - Cooked lentils, any variety Switching up the dressing can change the whole dish. A tangy vinaigrette or a creamy yogurt sauce adds new flavors. You might enjoy mixing balsamic vinegar with olive oil. A tahini dressing can also bring a nutty twist. Each option can refresh your quinoa salad. - Balsamic vinegar and olive oil - Creamy yogurt dressing with herbs - Tahini mixed with lemon juice - Spicy sriracha and lime dressing Using seasonal ingredients keeps your salad fresh and exciting. In summer, add fresh corn or bell peppers. In the fall, roasted sweet potatoes or beets work well. Using what’s in season can also make your salad more nutritious and flavorful. - Fresh corn or bell peppers in summer - Roasted sweet potatoes or beets in fall - Spinach or arugula in spring - Winter squash for a hearty touch Feel free to explore these variations in the full recipe for a delicious twist! To keep your savory quinoa salad fresh, use an airtight container. Make sure the salad cools to room temperature before sealing it. This helps prevent moisture buildup. If you use avocado, I suggest adding it just before serving. This keeps it fresh and green. Your quinoa salad can last about 3 to 5 days in the fridge. If stored properly, the flavors blend well over time. However, the avocado may brown, so watch for that. If you notice any strange smells or textures, it’s best to toss it out. You can freeze quinoa salad, but it’s not ideal. The avocado may change texture when thawed. If you want to freeze it, leave out the avocado. Store the salad in a freezer-safe container. It can last about 2 to 3 months. When ready to eat, thaw it overnight in the fridge. Then, add fresh avocado before serving. For the full recipe, check out the earlier section. Enjoy your delicious and nutritious meal! If you don’t have quinoa, try using brown rice or farro. Both grains offer a nutty taste and chewy texture. You can also use couscous for a quicker option. Just remember to adjust the cooking time based on the grain you choose. Cook according to package directions for the best results. Yes, this salad is gluten-free. Quinoa is a gluten-free grain, making it a great choice for those with gluten allergies. All the other ingredients, like vegetables and lime juice, are also gluten-free. Enjoy this dish without worry! Absolutely! This salad is already vegan. It contains no animal products. The creamy avocado adds richness without dairy. You can enjoy this salad as a healthy vegan meal. For more flavor, try adding extra herbs or spices. Check out the Full Recipe for all the details! This blog post covered how to make a tasty quinoa salad. You learned the key ingredients, optional add-ons, and their health benefits. I shared step-by-step cooking tips, along with ways to keep ingredients fresh. You can also try different dressings and protein sources for variety. Remember, this salad is easy to store, and I answered common questions about it. Enjoy making this salad your own while keeping it healthy and fun!

Savory Quinoa Salad with Avocado Fresh and Nutritious

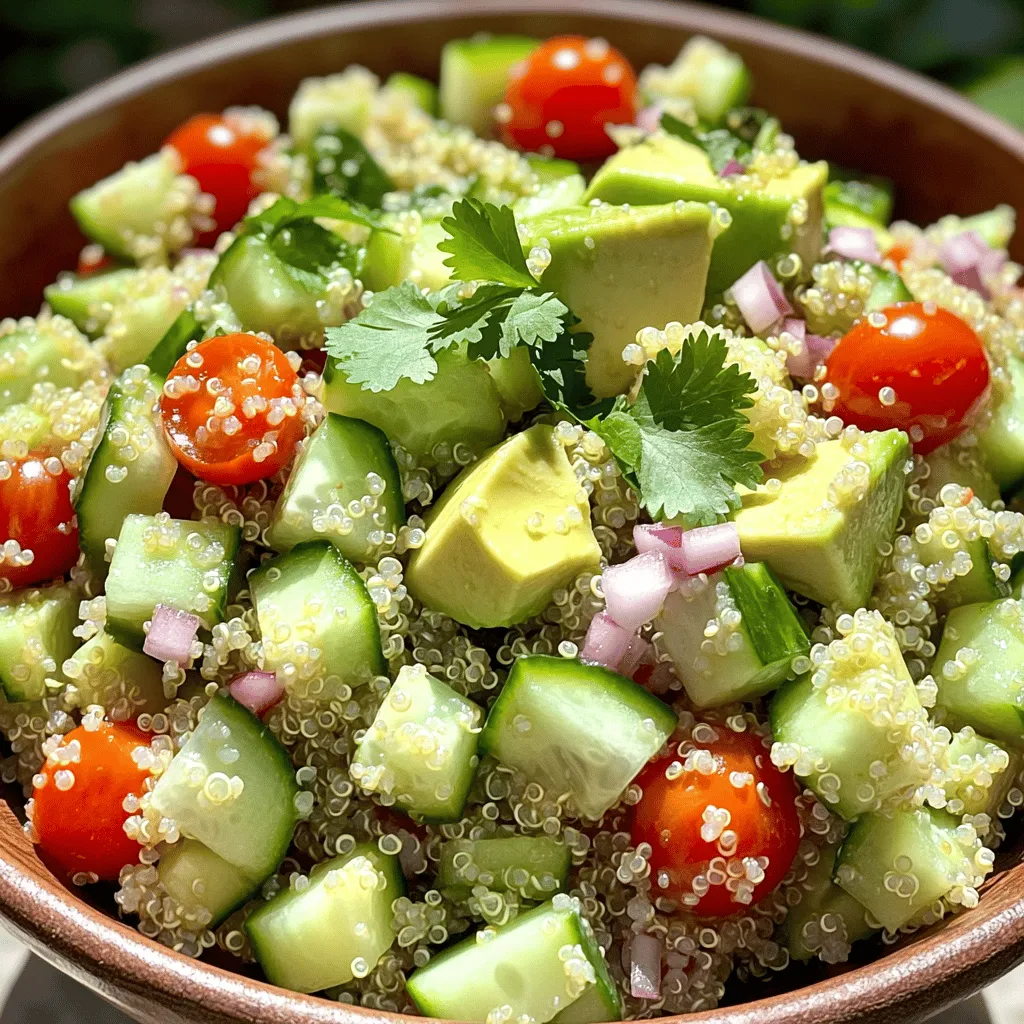
Are you ready to discover a meal that is both tasty and healthy? My Savory Quinoa Salad with Avocado is

Older posts
Newer posts
← Previous Page1 … Page61 Page62 Page63 … Page86 Next →

dsad

© 2026 yumymoments • Built with GeneratePress

Our Policies

  • Copyright Policy
  • Cookie Policy
  • GDPR Policy
  • Privacy Policy
  • Disclaimer
  • Terms Of Use

More Information

  • Home
  • About
  • Contact
  • Appetizers
  • Dessert
  • Dinner
  • Drinks
©2026, yumymoments About Back To Top