 - Suggested reading on muffin-making techniques In this post, we explored how to make delicious cinnamon sugar donut muffins. We discussed essential and optional ingredients that enhance flavor. The step-by-step instructions guided you through preparing your muffin tin, mixing ingredients, and achieving perfect texture. I shared tips for an even cinnamon sugar coating and creative serving ideas. Remember, you can tweak the recipe with different flavors or dietary adjustments. With the right storage, your muffins will stay fresh and tasty. Enjoy baking and savoring these treats!](https://yumymoments.com/wp-content/uploads/2025/05/30e53543-1d86-4d00-80c9-134eded63095.webp)
Cinnamon Sugar Donut Muffins Tasty and Simple Treat
Craving something sweet and simple? These Cinnamon Sugar Donut Muffins are your answer! They bring you that warm, cozy flavor
Craving something sweet and simple? These Cinnamon Sugar Donut Muffins are your answer! They bring you that warm, cozy flavor

Craving a sweet treat that combines two classic desserts? Look no further! My Chocolate Chip Cookie Dough Brownies are the
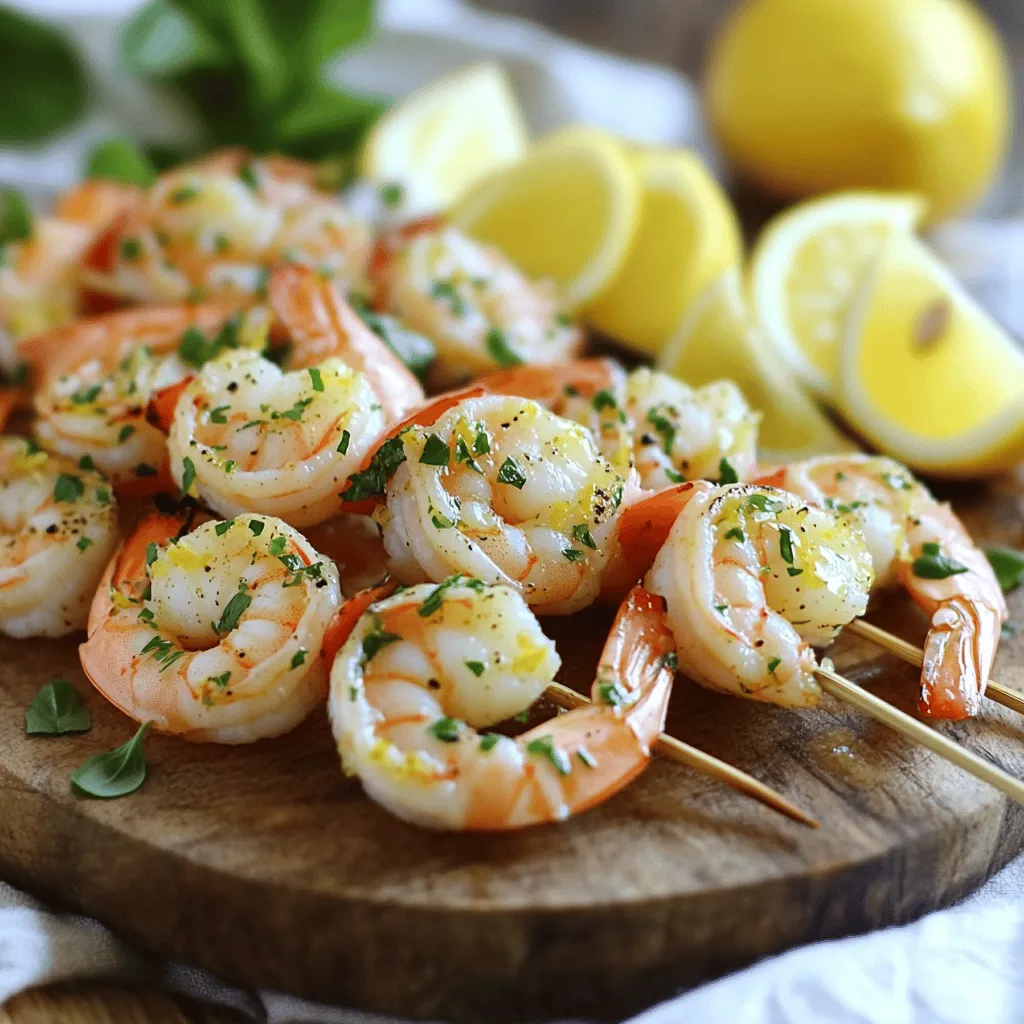
If you crave a dish that bursts with flavor yet is easy to whip up, look no further! My Lemon
![- Ripe bananas - Rolled oats - Almond flour Banana oatmeal cookies start with ripe bananas. Choose bananas that are soft and brown. They add natural sweetness. Rolled oats provide a hearty texture. They help the cookies hold together. Almond flour makes the cookies moist and nutty. - Dark chocolate chips - Walnuts or pecans You can add dark chocolate chips for a sweet touch. They melt and create gooey pockets of chocolate. Walnuts or pecans add crunch and flavor. These nuts also offer healthy fats. - Measuring cups and spoons - Alternatives like gluten-free oats or honey substitutes Use measuring cups and spoons for accuracy. This ensures your cookies turn out just right. If you want gluten-free options, use certified gluten-free oats. For sweetening, honey or maple syrup works well. You can also use agave syrup as a substitute. 1. Preheat the oven: Set your oven to 350°F (175°C). This step is key for baking your cookies evenly. 2. Prepare the baking sheet: Line a baking sheet with parchment paper. This makes it easier to take the cookies off later. 3. Mix wet ingredients: In a big bowl, mash the ripe bananas. Mix in the honey or maple syrup until it is smooth. 4. Add vanilla: Stir in the vanilla extract. This adds a wonderful flavor to the cookies. 1. Mix dry ingredients: In another bowl, whisk together the rolled oats, almond flour, baking powder, ground cinnamon, and sea salt. This helps the cookies rise and taste good. 2. Merge wet and dry mixtures: Slowly add the dry mix into the wet banana blend. Stir until everything is combined. Make sure there are no dry spots left in the dough. If you want, add in chocolate chips and nuts at this point. 1. Scoop and shape: Use a tablespoon to scoop out cookie dough. Place the dough on the baking sheet, leaving about 2 inches between each scoop. 2. Flatten the cookies: Slightly press down on each cookie with a spoon. This helps them bake evenly. 3. Bake: Put the baking sheet in the preheated oven. Bake for about 12-15 minutes. The cookies should look golden brown on the edges and feel firm when you touch them. For the complete recipe, check [Full Recipe]. To get the right texture, you can adjust the baking time. For chewy cookies, bake them for about 12 minutes. If you want a crunchy texture, add a few extra minutes. Keep an eye on the cookies as they bake. You want them golden on the edges. Using ripe bananas is key for flavor and texture. They should be soft and spotty. The riper the banana, the sweeter and moister your cookies will be. This makes a big difference in the final taste. You can boost the flavor of your cookies by adding spices. A touch of nutmeg or a hint of vanilla bean makes them special. Just sprinkle a little in your dough. Dried fruits or coconut flakes can also add a fun twist. Try adding raisins, cranberries, or chopped dates. Coconut flakes give a nice chewiness and tropical taste. If you want to make these cookies a bit healthier, reduce the sugar. You can use less honey or maple syrup. The bananas add natural sweetness, so you don’t need too much added sugar. Nut butters are another great option. Using almond or peanut butter adds protein and flavor. Just swap out some of the wet ingredients for nut butter. It will keep your cookies moist and tasty. For the full recipe, check out the earlier section. {{image_4}} You can play with flavors in banana oatmeal cookies. Try peanut butter for a nutty twist. Just add 1/2 cup of creamy peanut butter to the wet mix. The rich taste pairs well with bananas. Chocolate chip banana oatmeal cookies are another favorite. Simply fold in 1/3 cup of dark chocolate chips to the dough. The chocolate adds sweetness and a fun texture. If you want vegan cookies, use flaxseed instead of eggs. Mix 1 tablespoon of ground flaxseed with 3 tablespoons of water. Let it sit for a few minutes until it thickens. This will replace the egg and bind the cookies. For gluten-free options, swap almond flour with gluten-free flour. This will keep the taste similar while making it safe for those with gluten issues. Seasonal flavors can add fun to your cookies. In fall, mix in pumpkin spice for a cozy taste. Just add 1 teaspoon of pumpkin spice to the dry ingredients. During the holidays, try adding dried fruits like cranberries or raisins. This adds a festive touch and a chewy texture. You can mix in about 1/2 cup of your favorite dried fruits. For the complete recipe, check the Full Recipe section. Enjoy the variety! You can store your banana oatmeal cookies at room temperature or in the fridge. If you keep them at room temperature, place them in an airtight container. This helps keep them fresh for about a week. In the fridge, they can last a bit longer, up to ten days. Freezing cookie dough is easy and great for later use. Form the dough into balls, then place them on a baking sheet. Freeze them for a few hours until solid. After that, transfer the balls to a freezer-safe bag. When you're ready to bake, just thaw them in the fridge overnight and bake as usual. For long-term storage, keep your cookies in an airtight container. They can last up to three months in the freezer. Always check for signs of spoilage, like an off smell or mold. If they seem dry or hard, it’s best to toss them. Enjoy your tasty banana oatmeal cookies fresh and delicious! Yes, you can use different flours. If you want to replace almond flour, try oat flour or whole wheat flour. Each type affects cookie texture. Oat flour makes cookies softer, while whole wheat adds a hearty feel. You might need to adjust liquid ingredients when changing flour types. Always test in small batches to find what you like best. To skip refined sugar, use natural sweeteners. Honey or pure maple syrup works well in this recipe. You can also try mashed dates or applesauce for sweetness. These options add flavor and moisture. They can slightly change the texture, so keep that in mind. Just remember to adjust the amount to your taste. Banana oatmeal cookies pair nicely with many things. A glass of cold milk is classic. You could also enjoy them with yogurt for extra creaminess. Serve with fresh fruit like berries or sliced apples for a refreshing snack. For a cozy treat, try them with hot tea or coffee. They can also be a tasty base for ice cream sandwiches! In this blog post, we explored how to create tasty banana oatmeal cookies. We discussed the key ingredients, including ripe bananas and oats, and shared tips for perfect texture. You learned about flavor variations and health-conscious options too. Remember, the right measurements and fresh ingredients make a big difference. Experiment with flavors and adaptations to suit your taste. Enjoy baking your delicious cookies, and don’t forget to share them with friends!](https://yumymoments.com/wp-content/uploads/2025/05/f9839cf8-6fe9-442b-9498-aacc7197d143.webp)
Looking for a delicious and easy snack? Banana oatmeal cookies are your answer! They pack nutrition and flavor, making them
![- 1 can (15 oz) chickpeas, drained and rinsed - 2 tablespoons extra virgin olive oil - 1 teaspoon smoked paprika - 1 teaspoon garlic powder - Salt and freshly ground black pepper to taste - 1 cup cherry tomatoes, halved - 1 cucumber, diced - 1 bell pepper, diced - ¼ red onion, finely chopped - 1 ripe avocado, diced - ¼ cup fresh cilantro or parsley, finely chopped - Juice of 1 lime You need just a few simple ingredients to make this crispy chickpea salad. First, grab a can of chickpeas. These are the stars of the show! They give this salad a great crunch. Use extra virgin olive oil to roast them. It adds flavor and helps them crisp up. Next, season with smoked paprika and garlic powder. These spices bring warmth and depth to your salad. Don't forget salt and black pepper to taste. They enhance every bite. For the fresh part, gather cherry tomatoes, cucumber, and bell pepper. These add sweetness, crunch, and color. A bit of red onion gives a mild kick. The creamy avocado adds richness and balances the dish. Fresh herbs like cilantro or parsley brighten the salad. Finally, a squeeze of lime juice ties all the flavors together. This combination makes a fresh and flavorful delight. For the detailed process, check the Full Recipe. - Step 1: Preheat your oven to 400°F (200°C). This helps the chickpeas get nice and crispy. - Step 2: Pat the chickpeas dry with a paper towel. This step removes excess water. Spread them evenly on a baking sheet. - Step 3: Drizzle two tablespoons of olive oil over the chickpeas. Then, add one teaspoon of smoked paprika, one teaspoon of garlic powder, and salt to taste. Toss the chickpeas to coat them well. - Step 4: Place the baking sheet in the oven and roast the chickpeas for 25-30 minutes. You want them golden and crunchy. - Step 5: Halfway through roasting, shake the pan. This helps cook the chickpeas evenly. - Step 6: In a large mixing bowl, combine one cup of halved cherry tomatoes, one diced cucumber, one diced bell pepper, and a quarter cup of finely chopped red onion. - Step 7: When the chickpeas are done, let them cool for a few minutes. Then, add them to the bowl. Squeeze the juice of one lime over everything. Toss in a quarter cup of chopped cilantro or parsley. - Step 8: Gently mix all the ingredients. Be careful not to smash the avocado. Taste and adjust the seasoning if needed. Serve immediately for the best taste. For the complete recipe, check out the Full Recipe section! To get crispy chickpeas, start by drying them well. Wet chickpeas will not crisp up. Use a paper towel to pat them dry after rinsing. This step is key. For the best flavor, use extra virgin olive oil. Combine it with smoked paprika and garlic powder. These spices add a great taste. Don’t forget salt and pepper for seasoning. When roasting, spread the chickpeas in a single layer. This helps them cook evenly. Shake the pan halfway through to avoid burning. Roast them for 25 to 30 minutes. Keep an eye on their color. This crispy chickpea salad pairs well with many dishes. Serve it with grilled chicken or fish for a complete meal. It also works well as a side with soups or wraps. For dressings, try a simple lime vinaigrette. Just mix lime juice with olive oil. You can also add a dash of honey for sweetness. Other toppings like feta or nuts can add more texture. Want to spice things up? Try adding cumin or chili powder to the chickpeas before roasting. These spices can elevate the flavor. Serve your salad slightly warm or at room temperature. This enhances the taste of the crispy chickpeas and fresh veggies. Enjoy your delightful, crunchy salad! For the full recipe, check the previous section. {{image_4}} You can add proteins to your crispy chickpea salad. Grilled chicken or fish makes a nice addition. It brings a savory flavor and helps keep you full. For a vegan option, try chickpea patties or lentils. Both options enhance the dish while keeping it plant-based. Switching up the veggies keeps this salad fresh. In summer, add zucchini or corn for a sweet crunch. In fall, roasted sweet potatoes or Brussels sprouts add warmth. You can also try radishes for a peppery bite or spinach for a leafy touch. This way, you can enjoy different flavors with each season. Dressing can change the whole flavor of your salad. A classic lemon vinaigrette works great. Just mix lemon juice, olive oil, salt, and pepper. You can also try tahini or yogurt-based dressings for creaminess. For a spicy kick, add some sriracha to your vinaigrette. Each dressing brings a new taste experience to your crispy chickpea salad. For the full recipe, check out the [Full Recipe]. To keep your crispy chickpea salad fresh, refrigerate it right away. Use an airtight container to prevent moisture. If you have extra chickpeas, store them separately. This keeps them crunchy. I recommend using glass containers. They help you see what's inside and keep flavors intact. If you want to reheat the chickpeas, do it in the oven. Preheat it to 350°F (175°C). Spread the chickpeas on a baking sheet. Heat for about 10 minutes until warm. Avoid using the microwave. It can make the chickpeas soft. If you stored the salad, it’s best to eat it cold. This keeps the veggies crisp. Your salad will last about 3 to 4 days in the fridge. Look for signs like a bad smell or soggy veggies. If the colors fade or the chickpeas lose their crunch, it’s time to toss it. Always check before eating to stay safe. Enjoy every bite while it’s fresh! You can find the full recipe above for easy reference. Yes, you can make this salad ahead of time. To keep it fresh, store the chickpeas and vegetables separately. This way, the chickpeas stay crispy. Mix them together just before serving. If you want to prep the salad, chop the veggies a day before. Just make sure to keep them in the fridge to stay fresh. You can also squeeze the lime juice on top right before serving. This will keep everything tasting bright and fresh. If you want an alternative to chickpeas, you have options! You can use black beans or kidney beans. Both add great flavor and protein. Lentils are another good choice. They cook quickly and add a nice texture. Try using cooked quinoa for a different twist. Each option brings its own taste and texture, making the salad fun and new. Yes, this salad is gluten-free! All the ingredients used are safe for a gluten-free diet. Chickpeas, veggies, and lime juice contain no gluten. Always check the labels of your packaged items, like spices. Some brands may add gluten ingredients. But if you stick to whole foods, you're good to go! Enjoy this salad without worry. This salad combines tasty ingredients and easy steps. We started with chickpeas, roasted them to perfection, and added fresh veggies. I shared tips for crispy chickpeas and ideas for variations and storage. You can enjoy this dish any time. Whether you follow the recipe or switch it up, it’s always a hit. Try it today and discover a new favorite!](https://yumymoments.com/wp-content/uploads/2025/05/56841efb-4d0e-486e-98ef-61d88ee81bfd.webp)
Looking for a vibrant and satisfying dish? Try my Crispy Chickpea Salad! This recipe transforms basic ingredients into a fresh,
![- 1 cup rolled oats - 1/2 cup pumpkin puree - 1/4 cup almond butter (or any nut butter of your choice) - 1/4 cup honey or maple syrup - 1 teaspoon pumpkin pie spice - 1/2 teaspoon vanilla extract - A pinch of salt - 1/4 cup chopped nuts (such as pecans or walnuts) - 1/4 cup mini chocolate chips This recipe gives you a great way to enjoy a healthy snack. The rolled oats provide fiber and energy. Pumpkin puree adds moisture and rich flavor. Almond butter offers healthy fats and protein. Honey or maple syrup sweetens the mix naturally. Flavor enhancers make these energy balls special. Pumpkin pie spice brings warmth and comfort. Vanilla extract adds depth, while a pinch of salt balances the sweetness. You can add extras for fun. Chopped nuts give crunch and nutrients. Mini chocolate chips add a sweet surprise. For the full recipe, check the section above. It’s simple to make, and you will love every bite! - Combine dry and wet ingredients into a large mixing bowl. - Mix until smooth and homogenous. To start, take a large mixing bowl and add all your ingredients. This includes rolled oats, pumpkin puree, almond butter, and honey or maple syrup. Make sure you also add the pumpkin pie spice, vanilla extract, and a pinch of salt. I like to mix everything with my hands to ensure it's well blended. You want a smooth texture without any lumps. - Fold in chopped nuts and chocolate chips. - Ensure even distribution throughout the mixture. Once your base mixture is ready, gently fold in your chopped nuts and optional mini chocolate chips. This adds a nice crunch and burst of flavor. Make sure these add-ins spread evenly throughout the mixture. You don’t want one energy ball to have all the nuts while another has none. - Refrigerate the mixture for 30 minutes. - Roll into small balls and place on parchment-lined baking sheet. Now, cover your bowl with plastic wrap and pop it in the fridge for about 30 minutes. This chilling step helps the mixture firm up, making it easier to shape. After chilling, scoop out portions with a tablespoon. Roll them into small balls using your palms. Place each ball on a baking sheet lined with parchment paper. For a fun twist, you can roll them in extra pumpkin pie spice or shredded coconut before serving. This process is quick and fun, and the energy balls are a wonderful snack. You can find the [Full Recipe] to guide you, but these steps will lead you to a tasty treat in no time! To get the best texture, mix all the ingredients well. You want a thick and sticky dough. If your mixture is too dry, add a bit more pumpkin puree or nut butter. Chilling the mixture is key, too. When you let it sit in the fridge, it firms up nicely. This makes it easier to roll into balls. Serving your energy balls can be fun! Place them on a pretty plate for a nice look. You can sprinkle more pumpkin pie spice on top for a festive touch. Another great idea is to roll the balls in shredded coconut or chopped nuts for extra flavor. This adds a nice crunch and taste. Pumpkin spice energy balls pack a punch of nutrition. Pumpkin is rich in vitamins like A and C. It helps your immune system and keeps your skin healthy. The oats provide fiber, which aids digestion and keeps you full longer. The nuts offer protein and healthy fats for energy. These snacks keep you fueled and satisfied throughout your day. {{image_4}} For autumn, I love adding extra spices to my pumpkin spice energy balls. You can easily switch up the flavor by using cinnamon or ginger. Both spices add warmth and a cozy feel. Just replace the pumpkin pie spice with one teaspoon of cinnamon or ginger. Your energy balls will taste like fall in every bite! You can also change the base ingredients to suit your taste. Try using different nut butters, like peanut or cashew butter. They each bring a unique flavor. You can swap honey for agave syrup or brown rice syrup for a different sweetness. For add-ins, consider adding dried fruits like cranberries or raisins. Seeds like chia or flaxseed can boost nutrition. Mixing in different flavors keeps things exciting! If you love chocolate, add mini chocolate chips or cocoa powder. Coconut can also add a tropical twist; just fold in shredded coconut. For a fruity touch, try adding pureed banana or dried apricots. Each combination makes your energy balls a new treat! For the full recipe, check out the details above. To keep your pumpkin spice energy balls fresh, store them in the refrigerator. Use an airtight container to prevent them from drying out. They will stay good for up to a week in the fridge. If you want to keep them longer, freeze the energy balls. Place them in a single layer on a baking sheet first. Once frozen, transfer them to a freezer-safe bag. They can last for about three months in the freezer. The recommended serving size is about one or two energy balls. This size gives a great boost without overdoing it. When stored properly, energy balls stay fresh for a week in the fridge. If frozen, just thaw them overnight in the fridge before enjoying. Gifting these energy balls can be fun. Use mason jars to make a charming gift. You can also use decorative containers for a personal touch. Tie a ribbon around the jar for an extra flair. These make great snacks for friends or family. Sharing healthy treats is always a good idea! You can make these energy balls without nuts by using seeds instead. Try sunflower seeds or pumpkin seeds as a great option. You can also use nut-free butters like sunflower seed butter or tahini. These will help bind the mixture and keep it tasty. Yes, you can easily make these energy balls vegan. Instead of honey, use maple syrup or agave nectar as a sweetener. Both options work well and keep the energy balls sweet and delicious. Make sure to use a vegan nut butter too. If you can't find pumpkin puree, you can use mashed sweet potatoes or applesauce. Both will add moisture and flavor. You can also try pureed butternut squash for a similar taste. Just ensure the texture is smooth for the best results. This blog post gave you a clear guide to making tasty pumpkin spice energy balls. You learned about the key ingredients, step-by-step instructions, tips for great texture, and variations to try. These snacks are simple, healthy, and fun to make. With your new skills, you can enjoy delicious bites anytime. Remember, these energy balls are perfect for sharing or storing for later. Have fun creating your perfect batch and enjoy the sweet flavors!](https://yumymoments.com/wp-content/uploads/2025/05/e62f2358-84b0-4f78-a0f1-793c241400cb.webp)
Craving a tasty snack that’s healthy and easy to make? Look no further! These Pumpkin Spice Energy Balls are your
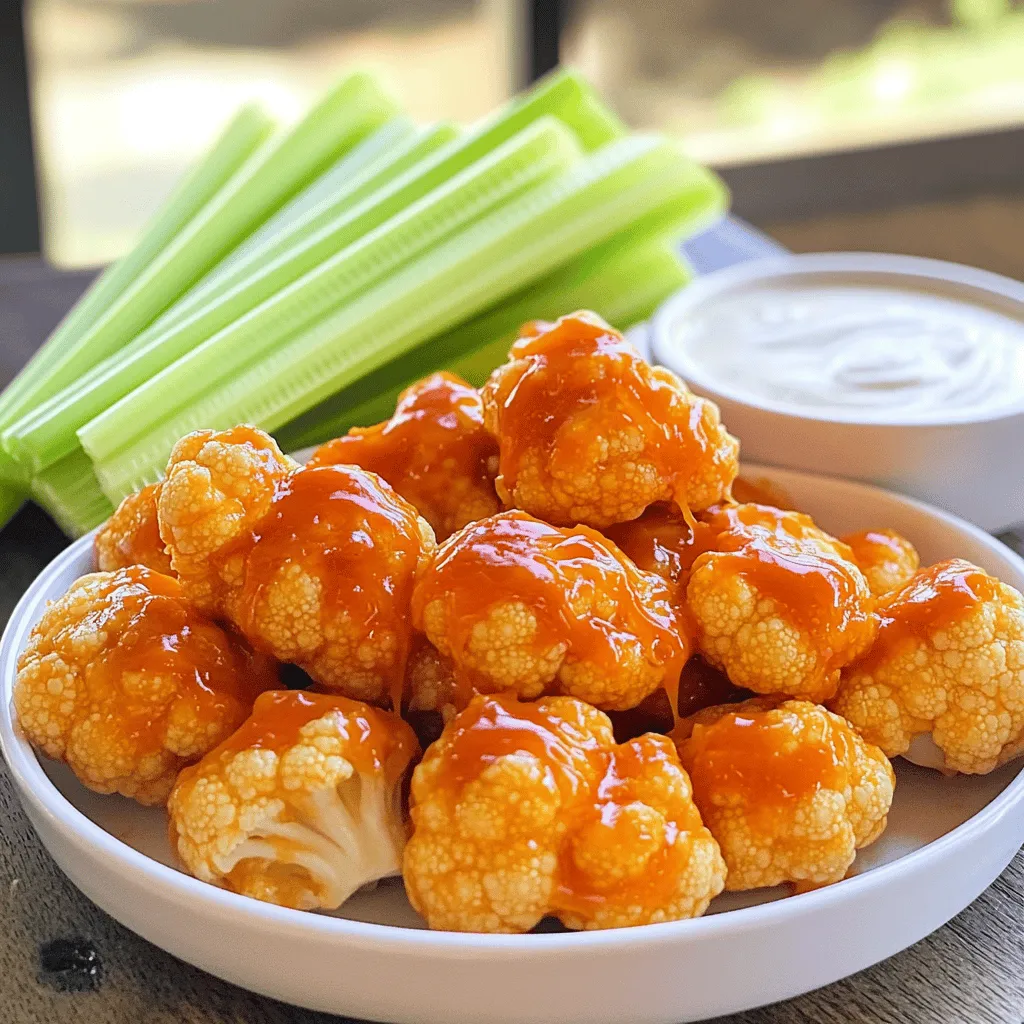
Looking for a new snack that’s easy and delicious? You’ll love these Savory Buffalo Cauliflower Bites! They pack bold flavors
. {{image_4}} You can boost the nutrition of coconut curry lentil soup easily. Here are some great add-ins: - Zucchini: Slice it thin and add during cooking. It cooks fast and adds a nice texture. - Mushrooms: Use your favorite type, like button or shiitake. They add umami and depth. - Chickpeas: For extra protein, toss in a can of rinsed chickpeas. They pair well with lentils. By mixing these vegetables, you can create a richer flavor and more variety in texture. Switching up flavors can make this soup fun. You can try different curry pastes. Here are some ideas: - Green curry paste: It has a fresh taste and a higher heat level. - Massaman curry paste: This one is milder with sweet notes. It’s great if you like a less spicy soup. You can also explore broth types. Instead of vegetable broth, you can use: - Chicken broth: It adds a savory depth. - Mushroom broth: This gives an earthier flavor, enhancing the soup's richness. Coconut curry lentil soup can fit many diets. Here are some easy changes: - Gluten-free: This soup is naturally gluten-free. Just ensure any curry paste or broth you use is free from gluten. - Low-carb: Skip the lentils and use cauliflower rice instead. It keeps the soup light and tasty. - High-protein: Add shredded chicken or turkey. This makes the soup heartier and more filling. These variations make the dish versatile and fun to enjoy! For the complete recipe, check the [Full Recipe]. To keep your coconut curry lentil soup fresh, store it in the fridge. Use airtight containers to avoid spills and keep out air. Glass or BPA-free plastic containers work best. Make sure the soup cools before sealing. This helps to avoid moisture build-up. You can freeze this soup for later enjoyment. First, let it cool completely. Then, pour it into freezer-safe containers or heavy-duty bags. Leave some space at the top for expansion. When you want to eat it, simply thaw it in the fridge overnight. To reheat, warm it on the stove or in the microwave. Stir well to ensure even heating. In the fridge, the soup lasts about 4-5 days. Always check for signs of spoilage before eating. Look for changes in color or odor. If it smells sour or looks off, it’s best to toss it. Keeping track of how long it has been stored helps to ensure you enjoy it at its best! For the full recipe, refer to the earlier sections. How do I make the soup spicier? To make your soup spicier, add more red curry paste. You can also add sliced fresh chili or a dash of cayenne pepper. Adjust slowly to avoid overpowering the dish. Can I use other types of lentils? Yes, you can use other lentils like green or brown. Note that they may require different cooking times. Red lentils cook faster and break down, giving the soup a creamy texture. How long does it take to cook lentils? Red lentils cook in about 20 minutes. Green or brown lentils take longer, around 30 to 40 minutes. Always check the package for specific times. Can I prepare this soup in advance? Yes, you can prepare the soup in advance. It tastes even better the next day as flavors meld. Store it in the fridge for up to three days. Is coconut curry lentil soup vegan-friendly? Yes, this soup is vegan-friendly. It uses coconut milk and vegetable broth, making it perfect for plant-based diets. What are the health benefits of lentils? Lentils are high in protein and fiber. They help with digestion and can lower cholesterol. They also provide iron, which is great for energy. This makes them a healthy choice for many diets. This blog post covered every detail needed to make coconut curry lentil soup. From the ingredients to potential substitutes, you have many options. I explained simple steps for cooking, tips for better flavor, and ways to adapt the dish to fit your needs. Storing leftovers is easy; just follow my guidelines. Remember, this soup is versatile and can cater to many diets. It’s tasty, healthy, and packed with nutrients. Enjoy your cooking adventure and make this recipe your own!](https://yumymoments.com/wp-content/uploads/2025/05/43ffe0bf-5838-45ae-be9d-c5db2037f8f0.webp)
Looking for a dish that’s both flavorful and packed with nutrition? You’ve landed in the right spot! Coconut curry lentil
![To make a classic Chicken Alfredo, you will need the following ingredients: - 2 boneless, skinless chicken breasts - Salt and freshly ground black pepper, to taste - 2 tablespoons extra-virgin olive oil - 10 ounces fettuccine pasta - 1 cup heavy cream (or half-and-half for a lighter option) - 1 cup freshly grated Parmesan cheese - 3 cloves garlic, finely minced - 1 tablespoon unsalted butter - 1/2 teaspoon Italian seasoning blend - Fresh parsley, chopped (for garnish) Gathering fresh ingredients makes a big difference in flavor. Choose good quality Parmesan cheese; it melts better. Season your chicken well for a tasty bite. The olive oil adds richness, while the garlic gives a nice aroma to the sauce. Using heavy cream will create a rich and creamy texture. You can find the full recipe for this dish in the article. This will guide you through each step to create your delightful meal. Enjoy the process and the delicious results! To make your chicken taste great, season both sides well with salt and pepper. This simple step adds a lot of flavor. Cook the chicken in a hot skillet with olive oil. Aim for medium heat. Cook each side for about 6-7 minutes. The chicken should reach 165°F inside. This ensures it is safe to eat. After cooking, let the chicken rest for 5 minutes. This keeps it juicy. Slice it into strips before adding it to your dish. Bring a large pot of water to a boil. It should be rolling and bubbling. When it boils, add a generous amount of salt. This will season the pasta. Now, add the fettuccine. Cook according to the package instructions until it is al dente. This means it should still be firm when you bite it. Drain the pasta, but save a little water. This water can help if your sauce is too thick. Use the same skillet from the chicken for your sauce. Lower the heat to medium and add butter. Once it melts, add minced garlic. Stir it for 1-2 minutes. Be careful not to burn it; burnt garlic tastes bitter. After the garlic is fragrant, slowly pour in the heavy cream. Bring it to a gentle simmer. Whisk in the Parmesan cheese until it melts smoothly. The sauce should be creamy. Add Italian seasoning and taste it. You can add more salt or pepper if needed. Now, add the cooked fettuccine and sliced chicken to the skillet with the sauce. Toss everything gently. Make sure all the pasta and chicken are well-coated in the sauce. If the sauce is too thick, add a splash of the reserved pasta water. This helps to get the right consistency. Before serving, garnish with chopped parsley for a fresh touch. It adds color and flavor to your plate. You can find the full recipe for this dish to guide you through the steps. To make great chicken for your Alfredo, focus on the internal temperature. Cook the chicken until it hits 165°F. This ensures it is safe to eat. After cooking, let the chicken rest for five minutes. Resting helps the juices stay inside the meat. This makes each bite juicy and tender. You can boost the flavor of your Alfredo sauce. Consider adding a pinch of nutmeg or red pepper flakes. These spices add warmth and depth. You can also try different cheeses. Besides Parmesan, use Pecorino Romano or Grana Padano for variety. Each cheese brings a unique taste to the sauce. Pair your Chicken Alfredo with a glass of white wine. A light Pinot Grigio complements the creamy sauce well. For side dishes, serve a simple green salad or garlic bread. These sides balance the richness of the dish. When plating, use warm bowls and sprinkle extra parsley on top. You can also add more grated cheese for a stunning finish. For the full recipe, click here: [Full Recipe]. {{image_4}} You can boost nutrition by adding vegetables to your chicken Alfredo. Good choices are broccoli, spinach, or bell peppers. These veggies add color and texture. To cook them, steam or sauté the veggies before mixing them with the pasta. You can toss them in the skillet with the cooked chicken. This way, they soak up the flavor of the sauce. If you need gluten-free options, swap fettuccine for rice noodles or zucchini noodles. Both alternatives work well with the creamy sauce. For sauces, look for gluten-free brands of Alfredo sauce. These sauces keep the classic taste without the gluten. Always check labels to ensure they fit your needs. You can use shrimp or other meats in place of chicken. Shrimp cooks quickly, so add it to the pan just until it turns pink. If you choose beef or pork, adjust the cooking time. These meats take longer to cook. Use a meat thermometer to ensure they reach the right temperature for safety. Explore these variations to make your chicken Alfredo unique! You can find the Full Recipe [here](#). To keep your Classic Chicken Alfredo fresh, store leftovers in the fridge. Use airtight containers for best results. Make sure the dish cools down before sealing it. This helps prevent moisture buildup inside the container. Enjoy it within three to four days for the best taste. When reheating, aim for low heat. You can use a skillet or microwave. If using a skillet, add a splash of cream or milk. This keeps the sauce creamy and smooth. Stir gently to avoid burning the sauce. In the microwave, heat in short bursts of 30 seconds. Stir in between to check the temperature. You can freeze Classic Chicken Alfredo if needed. First, let it cool completely. Then, place it in freezer-safe containers. Be sure to leave some space at the top for expansion. This helps maintain the quality. To thaw, move it to the fridge overnight. To reheat, follow the tips above to keep the creaminess intact. Chicken Alfredo comes from Rome, Italy. The dish started as Fettuccine Alfredo. An Italian chef named Alfredo di Lelio created it in the early 1900s. He made it for his wife when she was sick. The dish uses simple ingredients: fettuccine, butter, and Parmesan cheese. Over time, it gained popularity and chefs added chicken. Now, Chicken Alfredo is loved worldwide. Yes, you can make Chicken Alfredo ahead of time. Prepare the chicken and sauce separately. Store them in airtight containers in the fridge. Keep the pasta in a separate container to avoid sogginess. When ready to eat, reheat both in a skillet. Add a bit of water if needed to keep the sauce creamy. This helps you save time on busy nights. You can make Chicken Alfredo healthier with simple swaps. Use whole wheat pasta instead of regular fettuccine. This adds fiber and nutrients. You can also replace heavy cream with a mix of Greek yogurt and low-fat milk. Add vegetables like broccoli or spinach for extra vitamins. These changes keep the dish tasty while boosting its nutrition. Chicken Alfredo pairs well with many sides. A fresh garden salad with light dressing is a great choice. You can also serve garlic bread for a crunchy bite. Roasted vegetables, like asparagus or zucchini, add color and flavor. For a fun twist, try serving it with a side of steamed green beans. Each option complements the creamy dish nicely. This blog post covers how to make classic Chicken Alfredo deliciously. We walked through the key ingredients, from chicken to creamy sauce. You learned step-by-step instructions for cooking and combining flavors. Tips for perfecting your dish and creative variations also help you customize your meal. For a satisfying dinner, remember to pair your Alfredo right. Enjoy experimenting with flavors and ingredients. You can impress everyone with this simple yet tasty dish. Happy cooking!](https://yumymoments.com/wp-content/uploads/2025/05/4cfecf1b-e94b-4b61-8e8d-7d28116fca03.webp)
Are you ready to indulge in the creamy, rich world of Classic Chicken Alfredo? This dish is not just a
![To make the best lemon blueberry muffins, you need these ingredients: - 2 cups all-purpose flour - 1 cup granulated sugar - 2 teaspoons baking powder - 1/2 teaspoon baking soda - 1/2 teaspoon salt - 1/2 cup unsalted butter, melted - 2 large eggs - 1/2 cup plain Greek yogurt - 1/4 cup lemon juice - 1 teaspoon vanilla extract - Zest of 1 medium lemon - 1 1/2 cups fresh blueberries Gather these items before you start. Each ingredient plays a key role. The flour gives structure. The sugar adds sweetness. Baking powder and soda help the muffins rise. Salt enhances flavor. Butter makes them rich and moist. Eggs bind the mix. Greek yogurt adds a nice texture and tang. Fresh lemon juice and zest give that bright, fresh flavor. Finally, blueberries burst with sweetness in every bite. For the full recipe, check out the detailed instructions in the [Full Recipe]. Enjoy baking! Preheat your oven to 375°F (190°C). I like to use paper liners in my muffin tin. They keep the muffins from sticking and make cleanup easy. If you prefer, you can lightly grease each muffin cup with butter or oil. In a large bowl, mix the dry ingredients. Combine 2 cups of all-purpose flour, 1 cup of granulated sugar, 2 teaspoons of baking powder, 1/2 teaspoon of baking soda, and 1/2 teaspoon of salt. Whisk these together well. This step is key to making sure your muffins rise nicely. In a separate bowl, whisk together the wet ingredients. Use 1/2 cup of melted butter, 2 large eggs, 1/2 cup of plain Greek yogurt, 1/4 cup of freshly squeezed lemon juice, and the zest of 1 lemon. Lastly, add 1 teaspoon of vanilla extract. Mix until it’s smooth. Make sure the butter is not too hot to avoid cooking the eggs. Gently pour the wet mixture into the bowl with the dry ingredients. Use a spatula or wooden spoon to stir. Make sure you mix until just combined. It’s okay if the batter is a bit lumpy. Overmixing can make your muffins tough. Now for the star of the show! Carefully fold in 1 1/2 cups of fresh blueberries. Use a spatula and be gentle. You want to keep the blueberries whole. This adds great flavor and color to your muffins. Spoon the muffin batter into your prepared muffin cups. Fill each cup about two-thirds full. This allows room for rising. Place the muffin tin in your preheated oven. Bake for 18 to 20 minutes. The muffins will be golden brown. A toothpick should come out clean when inserted in the center. After baking, remove the muffins from the oven. Let them cool in the tin for about 5 minutes. Then, transfer them to a wire rack to cool completely. For a nice touch, you can dust them with powdered sugar before serving. Place them on a colorful platter. This makes your muffins look even more inviting. For more details, check out the Full Recipe. To get soft and fluffy muffins, mix the dry and wet ingredients gently. Overmixing makes muffins dense. You want a lumpy batter. This keeps them light. Use room temperature eggs and yogurt. They help the muffins rise better. Lastly, fill each muffin cup about two-thirds full. This allows space for them to grow. Sinking blueberries can spoil your muffin look. To stop this, toss the blueberries in a bit of flour before adding them to the batter. This helps them stay suspended. Fold them in gently. This way, they keep their shape and flavor. You want bursts of blueberry goodness in each bite! To keep your lemon blueberry muffins fresh, store them in an airtight container. Place a piece of paper towel inside. This absorbs excess moisture. They stay tasty for up to 3 days at room temperature. You can also freeze them. Wrap each muffin in plastic wrap and place in a freezer bag. They last for 2 to 3 months. Just thaw them overnight before enjoying! You can find the full recipe above for more details. {{image_4}} Want to make your muffins even more special? You can add nuts or seeds. Chopped walnuts or pecans work great. They add a nice crunch and flavor. Sunflower seeds or chia seeds are also good choices. Add about 1/2 cup of your chosen nuts or seeds to the batter. Mix them in gently with the blueberries. This makes your lemon blueberry muffins even more delicious and nutritious. You can easily swap some ingredients in this recipe. If you want a bit less sugar, use 3/4 cup of honey instead of the granulated sugar. For a dairy-free option, try almond milk instead of Greek yogurt. You can use coconut oil instead of butter. These changes keep the muffins tasty while catering to your needs. Just remember, the texture might change a little. If you want gluten-free muffins, it’s simple! Just replace the all-purpose flour with a gluten-free blend. Make sure the blend includes xanthan gum. This helps the muffins rise and stay fluffy. Follow the same steps in the [Full Recipe]. Your gluten-free lemon blueberry muffins will still taste amazing, with that zesty lemon flavor and juicy blueberries. Enjoy your baking! Each Lemon Blueberry Muffin has about 180 calories. This number can change based on how you make them. For example, using less sugar or butter can lower the calories. These muffins are packed with nutrients. Here are some important ones: - Carbohydrates: About 28 grams, great for energy. - Protein: Around 4 grams, good for muscle health. - Fat: About 7 grams, mostly from butter and yogurt. - Fiber: Roughly 1 gram, which helps digestion. - Vitamin C: Thanks to the lemon, these muffins boost your immune system. Each ingredient in these muffins brings health perks: - Blueberries: These tiny fruits are full of antioxidants. They help fight free radicals. - Lemon Juice: This adds flavor and vitamin C. It may support skin health and hydration. - Greek Yogurt: It has probiotics, which aid gut health and digestion. - Whole Wheat Flour (if used): This adds fiber, which can help you feel full. Enjoy these muffins as a tasty treat that also offers good nutrition. For the full recipe, check out the [Full Recipe]. To make these muffins vegan, replace the eggs with flax eggs. Mix 1 tablespoon of ground flaxseed with 2.5 tablespoons of water for each egg. Use a plant-based yogurt in place of Greek yogurt. You can also swap melted butter for coconut oil or vegan butter. Yes, you can freeze these muffins. Allow them to cool completely, then wrap each muffin in plastic wrap. Place them in a freezer bag or container. They can stay fresh in the freezer for up to three months. When you want one, just thaw it at room temperature. If you don't have Greek yogurt, you can use regular yogurt or a dairy-free yogurt. Sour cream also works well. If you need a non-dairy option, try silken tofu blended until smooth. This keeps the muffins moist and fluffy. These muffins stay fresh for about three days at room temperature. Store them in an airtight container. If you want them to last longer, keep them in the fridge for up to a week. Just be sure to warm them in the microwave before serving. Yes, frozen blueberries work great in this recipe. They can add a nice burst of flavor. Just make sure to fold them in gently to avoid smashing them. You can use frozen blueberries without thawing them. This keeps the batter cool and helps the muffins rise better. For the full recipe, check the detailed instructions above. To make these delightful lemon blueberry muffins, gather the following ingredients: - 2 cups all-purpose flour - 1 cup granulated sugar - 2 teaspoons baking powder - 1/2 teaspoon baking soda - 1/2 teaspoon salt - 1/2 cup unsalted butter, melted and slightly cooled - 2 large eggs, at room temperature - 1/2 cup plain Greek yogurt - 1/4 cup freshly squeezed lemon juice - Zest of 1 medium lemon - 1 teaspoon pure vanilla extract - 1 1/2 cups fresh blueberries These simple ingredients make a big difference in flavor. The mix of lemon and blueberries brings a fresh taste. When you use fresh blueberries, you'll get juicy bursts in every muffin. The Greek yogurt adds moisture and a nice texture. Don't forget the lemon zest! It packs in that bright flavor. If you want to see how to use these ingredients, check out the [Full Recipe]. Now you have all the steps to make Lemon Blueberry Muffins. You learned the ingredients, how to mix them, and tips for the best texture. Plus, I shared fun ways to change the recipe. Remember, these muffins are tasty, fun, and full of healthy benefits. Enjoy baking them for yourself or to share. Your loved ones will love this treat! Happy baking!](https://yumymoments.com/wp-content/uploads/2025/05/1e4c04ca-8c86-4414-9f5a-49dc69671ad0.webp)
If you crave a sweet and tangy treat, you’re in the right place! My Lemon Blueberry Muffins blend fresh blueberries
