Skip to content
DisclaimerTerms Of UseGDPR PolicyCookie Policy

yumymoments

  • Home
  • Drinks
  • Appetizers
  • Dinner
  • Dessert
  • About
  • Contact
  • Privacy Policy
DisclaimerTerms Of UseGDPR PolicyCookie Policy

NO-ING-IMG

- 4 bone-in, skin-on chicken thighs - 1/2 cup honey - 4 cloves garlic, minced - 2 tablespoons low-sodium soy sauce - 1 tablespoon apple cider vinegar - 1 teaspoon freshly grated ginger - Salt and pepper, to taste - 2 tablespoons sesame oil - Fresh parsley, chopped (for garnish) - Toasted sesame seeds (for garnish) The key to great honey garlic chicken thighs lies in the balance of these ingredients. The chicken thighs, with their skin, are juicy and flavorful. The honey adds sweetness, while the garlic gives depth. Soy sauce brings a rich umami flavor, and the apple cider vinegar adds a nice tang. Ginger gives a slight warmth that brightens the dish. For garnishing, fresh parsley adds color and a refreshing taste. Toasted sesame seeds add a nutty crunch. Each ingredient plays a role in creating a dish that feels fancy yet is easy to make. You can find the full recipe above for all the steps to make this dish shine. To start, I make the marinade. In a bowl, I whisk together honey, minced garlic, soy sauce, apple cider vinegar, grated ginger, salt, and pepper. This mix creates a sweet and savory flavor. Next, I place the chicken thighs in a large resealable bag. I pour the marinade over the chicken, making sure each piece is coated well. After sealing the bag, I refrigerate it for at least one hour. If I want more flavor, I let it marinate for up to four hours. Now, I preheat my oven to 400°F (200°C). I heat sesame oil in a large, oven-safe skillet over medium-high heat. When the oil starts to shimmer, I take the chicken out of the marinade, saving the marinade for later. I carefully place the chicken thighs skin-side down in the hot skillet. I sear the chicken for about five to six minutes until the skin turns golden brown. Once the skin is crispy, I flip the chicken thighs over. I pour the reserved marinade over the top, allowing it to coat the chicken. Then, I transfer the skillet to the preheated oven. I bake the chicken for 25 to 30 minutes, checking that it reaches an internal temperature of 165°F (75°C). If I want an extra caramelized finish, I switch the oven to broil for an additional two to three minutes. I keep a close eye on it to prevent burning. After cooking, I let the chicken rest for five minutes. Before serving, I garnish it with fresh parsley and a sprinkle of toasted sesame seeds. For the full recipe, check out the detailed steps! For the best flavor, marinate your chicken thighs for at least one hour. If you have time, let them soak for four hours. This helps the chicken absorb all the sweet and savory flavors. Use a resealable bag or a glass container. Make sure each thigh gets coated well in the marinade. This ensures they are flavorful and juicy. To get crispy skin on chicken thighs, start by searing them skin-side down in hot sesame oil. This takes about five to six minutes. Watch them closely so they don’t burn. After flipping, pour the reserved marinade on top. Then, bake in a preheated oven at 400°F (200°C) until the internal temperature reaches 165°F (75°C). This guarantees perfect doneness. For sides, pair the chicken with jasmine rice or a fresh green salad. The rice soaks up the sticky sauce, while the salad adds crunch. For presentation, serve the chicken on a large platter. Drizzle extra sauce over the top and garnish with parsley and sesame seeds. This makes your dish look beautiful and appetizing. Check out the Full Recipe for more details on how to make this meal shine! {{image_4}} You can switch up the honey in this recipe. Try using agave syrup or maple syrup. Both will add sweetness, but with a unique twist. You can also change the vinegar. Instead of apple cider vinegar, use rice vinegar or balsamic vinegar for different flavors. To make the dish more exciting, consider adding spices or herbs. A pinch of chili flakes can add heat. Fresh thyme or rosemary can give a nice herbal touch. For a one-pan meal, toss in vegetables like broccoli or bell peppers. They cook well with the chicken and soak up the tasty sauce. If you need a gluten-free option, use tamari instead of soy sauce. This swap keeps the flavor while making it safe for gluten-free diets. For a lower-calorie version, reduce the honey or use less oil. You can also bake the chicken without skin for fewer calories. To keep your honey garlic chicken thighs fresh, refrigerate leftovers. Place the chicken in an airtight container. You can use a glass or plastic container with a tight lid. Make sure to store it within two hours of cooking to avoid bacteria. This dish stays tasty for up to three days in the fridge. When reheating chicken thighs, do it slowly. Use a microwave or an oven for best results. If using the microwave, place the chicken on a microwave-safe plate. Cover it with a damp paper towel to keep it moist. Heat in short bursts, checking often. If using an oven, set it to 350°F (175°C). Bake for about 15-20 minutes or until heated through. This keeps the chicken juicy and flavorful. To freeze cooked chicken, let it cool completely first. Wrap each thigh tightly in plastic wrap, then place them in a freezer bag. Squeeze out as much air as you can before sealing. This helps prevent freezer burn. You can freeze the chicken for up to three months. When ready to eat, thaw it in the fridge overnight. Reheat it as mentioned above for the best taste. The total time to make honey garlic chicken thighs is about 1 hour and 5 minutes. This includes 10 minutes of prep time. You will then need to marinate the chicken for at least 1 hour. Cooking takes about 25 to 30 minutes in the oven. Yes, you can use boneless chicken thighs. They cook faster than bone-in thighs. Reduce the baking time to about 20 minutes. Always check if the chicken is cooked through, reaching 165°F. Honey garlic chicken thighs pair well with many sides. Here are some great options: - Steamed jasmine rice - Crisp green salad - Roasted vegetables - Mashed potatoes - Garlic bread These sides complement the sweet and savory flavors of the chicken. To add heat, mix in some chili flakes or hot sauce to the marinade. You can also add sliced fresh jalapeños or a dash of sriracha. Adjust the amount to suit your taste. Spiciness can enhance the flavor of the sweet honey sauce. Yes, honey garlic chicken is great for meal prep. It stores well in the fridge for 3 to 4 days. You can also freeze it for up to 3 months. Just reheat it gently, and it will be delicious again. This makes it a smart choice for quick weeknight meals. For the full recipe, check out the cooking instructions above. This recipe for honey garlic chicken thighs combines simple ingredients for a tasty dish. Marinate the chicken for deep flavor, cook it to golden perfection, and enjoy it with great sides. Remember, you can adapt this recipe to fit your needs and preferences. Whether you prefer different sweeteners or additional spices, the sky is the limit. Store leftovers well and enjoy them later. This dish is great for meal prep and sure to please!

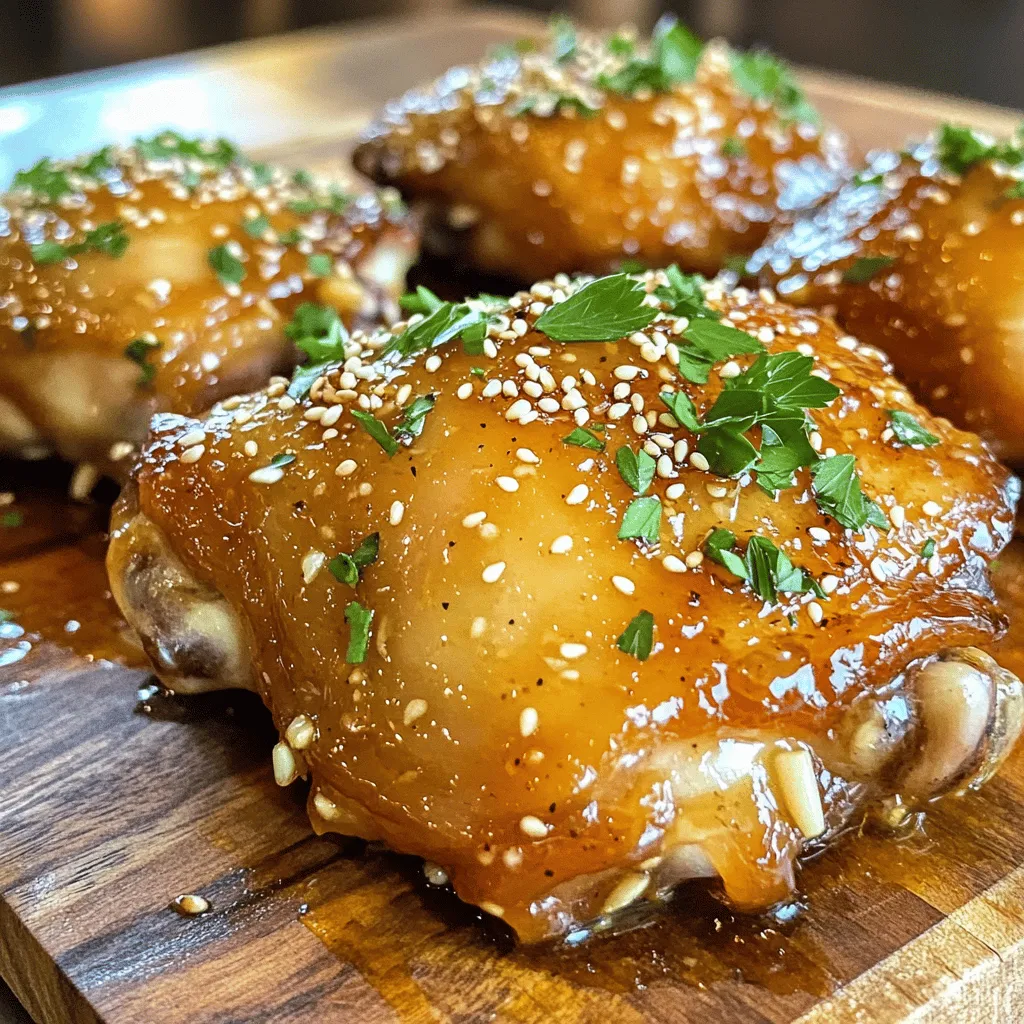
Honey Garlic Chicken Thighs Flavorful Weeknight Meal

Looking for a quick and tasty weeknight dinner? Honey Garlic Chicken Thighs are your answer! In just a few simple

- Olive oil, onion, garlic, carrot - Crushed tomatoes and vegetable broth - Heavy cream or coconut cream and basil For this creamy tomato basil soup, I focus on fresh, simple ingredients. Each one plays a key role in building flavor. - Sugar, balsamic vinegar, salt, and pepper - Croutons and additional basil for garnish These optional ingredients add depth and balance. A little sugar can cut the acidity of the tomatoes. Balsamic vinegar gives a nice, sweet-tart kick. Croutons add crunch and extra flavor. - Choosing the best tomatoes - Using fresh versus dried basil For tomatoes, I recommend San Marzano. They are sweet and rich. If you can, use fresh basil instead of dried. Fresh basil offers a bright, vibrant flavor that transforms the soup. When you gather these ingredients, think about quality. Good ingredients lead to a tasty dish. If you want to dive deeper into creating this soup, check the Full Recipe. 1. Start by heating 2 tablespoons of extra virgin olive oil in a large pot over medium heat. 2. Add 1 medium onion, finely diced, and sauté for about 5 minutes. The onion should turn soft and clear. 3. Stir in 3 cloves of minced garlic and 1 medium carrot, peeled and chopped. Cook for another 3 minutes. Stir often to enjoy the lovely smell. 4. Pour in 1 can of crushed tomatoes and 2 cups of low-sodium vegetable broth. Stir well. 5. Turn the heat up until it gently simmers. Let it cook uncovered for about 15 minutes. This lets the flavors come together. 1. After simmering, use an immersion blender to purée the soup until smooth. You can also use a countertop blender for this step. 2. Once puréed, return the soup to the pot. Lower the heat to a gentle simmer. 3. Stir in 1 cup of heavy cream or coconut cream, 1 teaspoon of granulated sugar, and 1 tablespoon of balsamic vinegar. Let this mix simmer for another 5 minutes, stirring now and then. 4. Finally, add 1 cup of roughly chopped fresh basil. Season with sea salt and freshly cracked black pepper to taste. Stir it all well. 1. To serve, ladle the soup into warm bowls. 2. Top each bowl with croutons and extra basil leaves. This adds a nice touch to your dish. 3. Enjoy your creamy tomato basil soup hot. It’s perfect for a cozy meal! For the complete preparation, refer to the Full Recipe. To make your soup taste great, balance the acidity with sugar and vinegar. A teaspoon of sugar helps cut the tang of the tomatoes. Adding balsamic vinegar brings depth and a hint of sweetness. Adjust creaminess by using less cream or adding more if you want a richer taste. When blending the soup, I prefer an immersion blender. It makes for easy cleanup and keeps the soup in the pot. If you use a countertop blender, work in batches. Always blend until smooth. For the perfect simmer, keep the heat low. This allows the flavors to meld well without boiling. Serve your soup hot for the best experience. Preheat your bowls to keep the soup warm longer. Ladle the soup in and add croutons for crunch and extra basil for color. Enjoy this warm, comforting dish straight away for the best flavor and texture. {{image_4}} For those who want a dairy-free soup, coconut cream works great. It adds a rich, creamy texture without milk. You can swap heavy cream with one cup of coconut cream. This change makes the soup lighter and still tasty. If you're gluten-free, you can thicken the soup with cornstarch. Mix one tablespoon of cornstarch with a bit of cold water. Stir this mix into the soup when it's simmering. This will help achieve that perfect thickness. To spice things up, add red pepper flakes. A pinch or two will enhance the heat without overpowering the soup. Just remember to taste as you go! You can also add proteins like cooked chicken or beans. This will make the soup more filling. Shredded chicken adds a nice texture, while beans add protein and fiber. Using roasted tomatoes gives the soup a sweet, smoky flavor. You can roast fresh tomatoes at 400°F for about 30 minutes before adding them to the soup. This step adds depth to your dish. If you prefer fresh tomatoes, use about two pounds. Chop them up and add them with the broth. This creates a lighter taste, perfect for a warm day. For even more ideas, check out the Full Recipe for Creamy Tomato Basil Bliss. To keep your creamy tomato basil soup fresh, store it in an airtight container. Make sure it cools down first before sealing. Place the container in the fridge. It will stay good for about three to four days. If you want to keep it longer, freezing is a great option. Pour the soup into freezer-safe bags or containers. Leave some space at the top, as soup expands when frozen. Label the bags with the date. When you are ready to enjoy your soup again, reheating is simple. You can use a pot on the stove or the microwave. If using the stove, heat it over low to medium heat. Stir often to keep it creamy. For microwave reheating, use a microwave-safe bowl. Heat in short bursts, stirring in between. If you freeze it, thaw it overnight in the fridge before reheating. This helps restore its creamy texture. If it seems a bit thick, add a splash of water or broth while heating. In the fridge, your soup lasts about three to four days. If it has been in the freezer, it can last up to three months. Always check for odd smells or changes in color before eating. If anything seems off, it’s best to toss it out. Trust your senses—better safe than sorry! Yes, you can make this soup ahead of time. It tastes even better the next day! To prep, cook the soup fully and cool it down. Store it in an airtight container in the fridge. When ready to eat, just reheat it on the stove. Stir well to keep the texture creamy. If it thickens too much, add a little broth or water to thin it out. This soup pairs well with many dishes. Here are some tasty options: - Grilled cheese sandwiches - Crusty bread or baguette - A fresh green salad - A side of garlic bread These sides add texture and flavor, making your meal even better. Yes, you can create a vegan version easily. Simply replace the heavy cream with coconut cream or cashew cream. Use vegetable broth as your base, and stick with fresh veggies. These swaps keep the soup rich and flavorful without any dairy. To change the spice level, you have a few options. For more heat, add red pepper flakes or a dash of hot sauce. If you prefer it milder, skip the spices or add a little extra cream. You can also balance flavors with a bit of sugar if it gets too spicy. You now have a solid understanding of Creamy Tomato Basil Soup. We covered key ingredients, cooking steps, and ways to enhance the flavor. Remember, using fresh ingredients really matters. Try different variations to find what you love best. Store it right for later meals or impress guests with the perfect serving. Enjoy experimenting with flavors, textures, and dietary options. Your journey to mastering this dish starts today!

Creamy Tomato Basil Soup Tasty and Simple Recipe

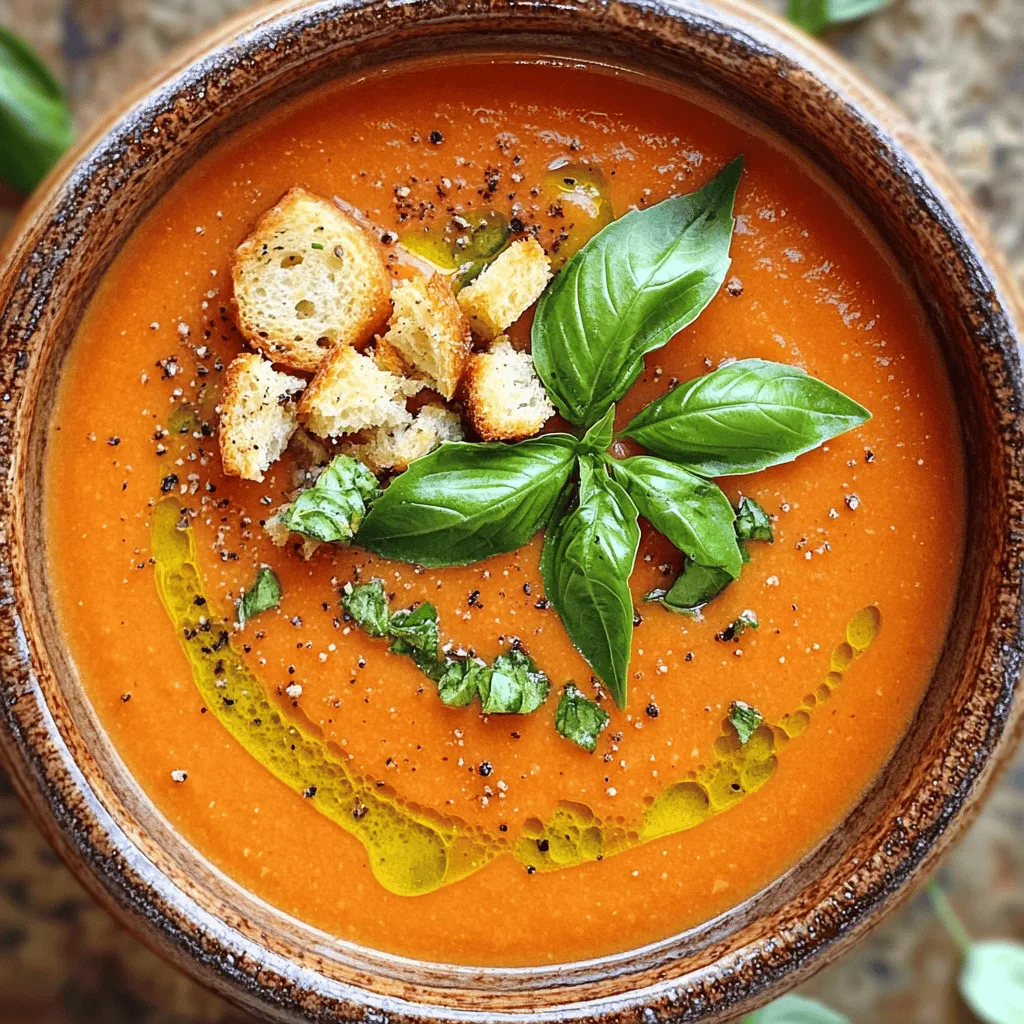
Looking for a comforting dish that’s easy to make? This Creamy Tomato Basil Soup recipe is both tasty and simple!

- 4 cups fresh peaches - 1/2 cup granulated sugar (plus 2 tablespoons) - 1 tablespoon lemon juice - 1 teaspoon vanilla extract - 1/4 teaspoon ground cinnamon - 1/4 teaspoon ground nutmeg - 1 cup all-purpose flour - 1 1/2 teaspoons baking powder - 1/2 teaspoon salt - 1/4 cup unsalted butter - 3/4 cup milk - 1/4 cup packed brown sugar For peach cobbler, fresh ingredients matter. I love using ripe peaches. They add real flavor. Start with 4 cups of fresh peaches. Peel and slice them. This gives a juicy base for the cobbler. Adding 1/2 cup of granulated sugar helps bring out the peach flavor. You also need 2 tablespoons for marinating. Next, add 1 tablespoon of lemon juice. This adds a nice zing and balances the sweetness. 1 teaspoon of vanilla extract gives it warmth. For spice, include 1/4 teaspoon of ground cinnamon and 1/4 teaspoon of ground nutmeg. These spices make it cozy and inviting. Now, let’s move to the dry ingredients. Mix 1 cup of all-purpose flour with 1 1/2 teaspoons of baking powder. The baking powder makes the biscuit topping rise. Don’t forget 1/2 teaspoon of salt. This enhances all the flavors. You will also need some essentials. Melt 1/4 cup of unsalted butter. Let it cool slightly before mixing. You need 3/4 cup of milk at room temperature to combine with the dry mix. Finally, 1/4 cup of packed brown sugar adds a lovely caramel note to the cobbler. These ingredients create a delicious peach cobbler with biscuit topping. For the full recipe, check out the details above. Enjoy creating this sweet treat! - Preheat oven to 350°F (175°C). - Marinate the peaches with 2 tablespoons of sugar, lemon juice, vanilla, cinnamon, and nutmeg. Toss gently and let it sit for 10 minutes. This helps the peaches release their juices and become sweet. - In a bowl, combine 1 cup of flour, 1 1/2 teaspoons of baking powder, 1/2 teaspoon of salt, and 1/2 cup of sugar. Mix it well. - Pour in 1/4 cup of melted butter and 3/4 cup of room-temperature milk. Stir until just combined. Be careful not to overmix the batter. This keeps it light. - Spread the marinated peaches evenly in a greased 9x13 inch baking dish. Make sure they are well distributed. - Pour the biscuit batter over the peaches. Use a spatula to spread it evenly. This ensures that every bite has that delicious topping. - Bake for 35-40 minutes until the topping is golden brown. The edges should be crisp. - Allow it to cool for a few minutes before serving. This helps the flavors meld together. Enjoy your Peach Cobbler with a scoop of vanilla ice cream! For the full recipe, please refer to the earlier sections. To make your peach cobbler shine, use ripe, fresh peaches. They add a sweet and juicy taste. You can also try adding spices like nutmeg or allspice. These spices bring warmth and depth to the dish. Just a pinch can change the whole flavor! For the biscuit topping, don’t overmix the batter. Overmixing can make it tough. Mix just until combined for a light and fluffy texture. This keeps your topping nice and airy, which is what we want! Serve the cobbler warm, and don’t forget the vanilla ice cream. The cold ice cream melts into the warm cobbler, creating a tasty treat. You can also garnish with fresh mint. It adds a pop of color and a refreshing taste that pairs well with the peaches. For a complete guide on making this delightful dessert, check out the Full Recipe! {{image_4}} There are many ways to make peach cobbler exciting. You can easily swap out the fruit or change the topping. Let’s dive into some fun ideas. You can use other fruits instead of peaches. Nectarines are a great choice. They have a similar taste and texture. Berries also work well. You can mix fruits together for a fun twist. Try combining peaches with blueberries or raspberries for a vibrant cobbler. This mix gives you a sweet and tart flavor. If you want to switch things up, try a crumble topping. A mix of oats, flour, and butter creates a crunchy layer. You can also add nuts to your topping. Walnuts or pecans add a nice crunch. This change can make your cobbler feel unique and special. For those who need it, you can make healthy swaps. Use gluten-free flour if you want a gluten-free option. This keeps the taste while making it easier on some diets. If you want to cut back on sugar, try sweeteners like honey or maple syrup. These options can help you enjoy your dessert without the extra sugar. For the full recipe, check out the complete guide to making this delicious peach cobbler! You can keep your peach cobbler covered at room temperature for 2-3 days. This works well if you plan to eat it soon. Just make sure it stays covered to keep it fresh. For longer storage, place the cobbler in the refrigerator. It will last up to a week. If you want to save it for later, freeze individual portions. This way, you can enjoy a sweet treat anytime. To reheat, the oven is your best friend. It keeps the biscuit topping nice and crisp. Preheat your oven to 350°F (175°C) and warm it for about 10-15 minutes. If you're in a hurry, the microwave works too. Just heat it in short bursts until warm. Enjoy your Peach Cobbler with Biscuit Topping, even on day three! For the full recipe, check out the section earlier in the article. Yes, you can use canned peaches. However, fresh peaches give better flavor and texture. Canned peaches often have added sugar and syrup, which can make the cobbler too sweet. If using canned peaches, drain them well to reduce extra liquid. This helps keep your cobbler from getting soggy. You can check if the cobbler is done by using a toothpick. Insert a toothpick into the center of the biscuit topping. If it comes out clean, your cobbler is ready. The topping should be golden brown, too. If it’s not brown yet, give it a few more minutes in the oven. Yes, you can make the cobbler ahead of time. Prepare the peach filling and biscuit topping separately. You can assemble them and store the dish in the fridge for a day. When you're ready to bake, just pop it in the oven. This keeps the topping fresh and fluffy. Peach cobbler tastes great with several toppings. A scoop of vanilla ice cream adds creaminess and chill. Whipped topping is another light option. You can also drizzle caramel sauce for extra sweetness. Fresh mint leaves on top add a nice touch and flavor. You now have a delicious peach cobbler recipe that is easy to follow. We covered fresh and dry ingredients, preparation steps, and baking tips. You learned how to store your cobbler and variations to try. Remember, using fresh peaches will boost the flavor. Don’t hesitate to experiment with different fruits and toppings. This recipe is perfect for family gatherings or a sweet treat at home. Enjoy your baking, and delight in sharing this tasty dessert with others!

Peach Cobbler with Biscuit Topping Simple and Delicious

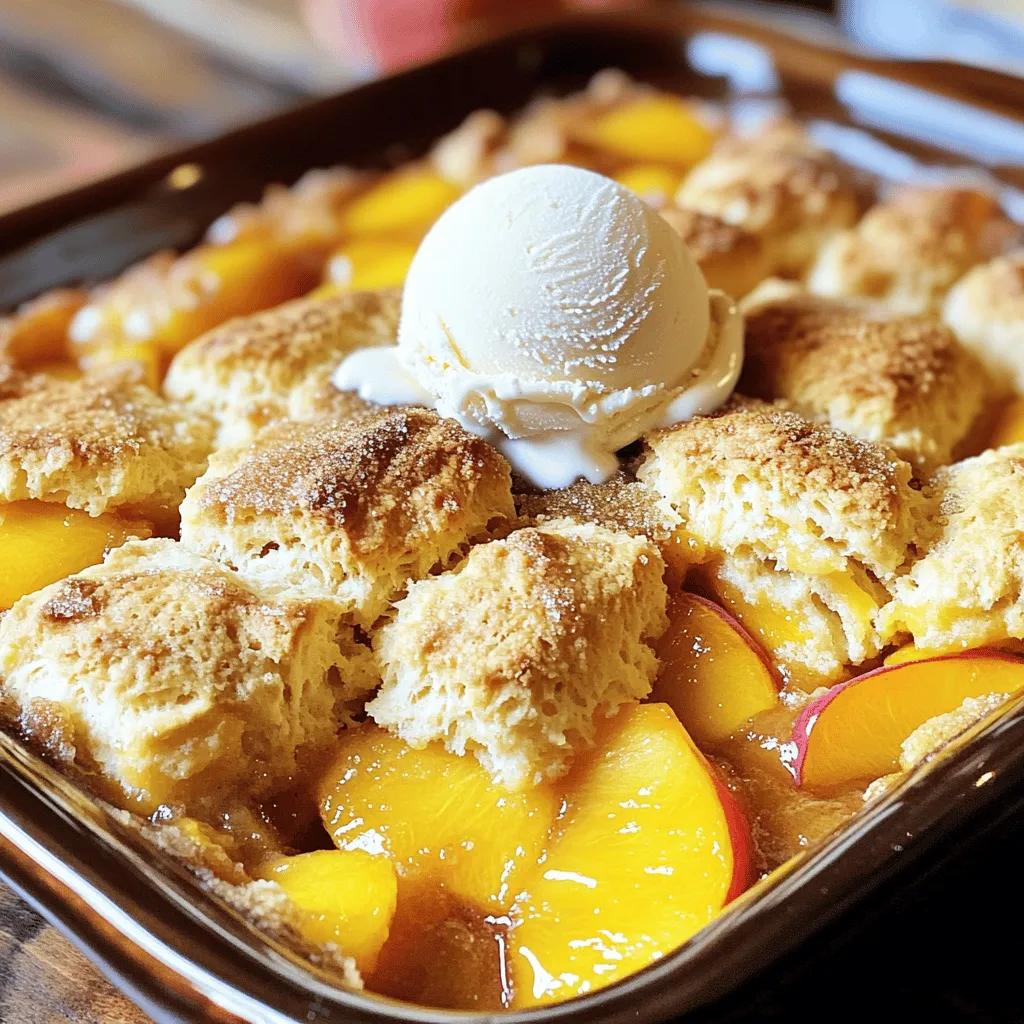
Are you craving something sweet and comforting? Look no further! This Peach Cobbler with Biscuit Topping is the perfect treat

When making a Savory Quinoa and Black Bean Bowl, you need simple and fresh ingredients. Here’s what you'll need: - 1 cup quinoa, thoroughly rinsed - 2 cups vegetable broth (preferably low-sodium) - 1 can (15 oz) black beans, rinsed and drained - 1 red bell pepper, finely diced - 1 small red onion, finely chopped - 2 cloves garlic, minced - 1 teaspoon ground cumin - 1 teaspoon smoked paprika - 1 tablespoon olive oil - Juice of 1 lime (freshly squeezed) - Salt and freshly ground black pepper, to taste - Optional toppings: - 1 ripe avocado, sliced - 1 cup fresh cilantro, coarsely chopped These ingredients bring together a delightful mix of taste and nutrition. The quinoa serves as a great base. It is rich in protein and gluten-free. Black beans add fiber and depth of flavor. Fresh vegetables like bell pepper, onion, and garlic lend crunch and aroma. Using spices like cumin and smoked paprika gives your bowl a warm, earthy flavor. Olive oil and lime juice bring freshness and richness. You can also customize your bowl with avocado and cilantro for extra creaminess and brightness. For the full recipe, refer to the cooking section where you’ll find step-by-step instructions to create this delicious meal. Enjoy the balanced flavors and textures in each bite! 1. Start by boiling the vegetable broth in a medium saucepan over medium-high heat. 2. Once it boils, add the rinsed quinoa. 3. Lower the heat to low and cover the pot. 4. Let it simmer for about 15 minutes. 5. After 15 minutes, check if the liquid is absorbed. 6. Remove from heat and let it rest, covered, for 5 minutes. 1. While the quinoa cooks, heat olive oil in a large skillet over medium heat. 2. Add the chopped onion and sauté for 3-4 minutes until it turns soft and clear. 3. Stir in the minced garlic and diced red bell pepper. 4. Sprinkle in the ground cumin and smoked paprika. 5. Cook for another 3-4 minutes, stirring often until the bell pepper is tender. 6. Gently mix in the black beans. 7. Heat the mixture for 2-3 minutes, stirring occasionally. 8. Add salt and black pepper to taste. 1. Once the quinoa has rested, fluff it with a fork. 2. Divide the quinoa into serving bowls as a base. 3. Spoon the vegetable and black bean mixture on top. 4. Add slices of avocado and a sprinkle of fresh cilantro. 5. Finish by drizzling fresh lime juice over the top. For the full recipe, check the details above. Enjoy every bite of this healthy delight! - Rinsing quinoa properly: Rinse your quinoa well before cooking. This step removes saponins, which can make quinoa taste bitter. Use a fine-mesh strainer and cold water. Swirl the quinoa around a bit for the best results. - Ensuring flavor balance: Balancing flavors is key. Use low-sodium vegetable broth for cooking quinoa. This adds flavor without too much salt. When sautéing vegetables, mix in spices early. This helps release their full aroma and flavor. - Colorful serving bowls: Choose vibrant bowls to serve your dish. Bright colors like turquoise or sunny yellow make the meal pop. This adds fun and excitement to your dining experience. - Optimal garnishing techniques: Garnish your bowl with fresh cilantro and lime wedges. This not only adds color but also freshness. Arrange the toppings carefully for a beautiful look. A well-presented dish is more appetizing. - Alternatives for fresh vegetables: If you lack fresh veggies, use frozen ones. They are quick and easy. You can also swap red bell pepper for zucchini or corn for a different taste. - Adjustments for dietary preferences: For a protein boost, add grilled chicken or tofu. If you prefer a different bean, try pinto or kidney beans. This recipe is flexible to fit your needs and tastes. For the full recipe, check out the Savory Quinoa and Black Bean Bowl. {{image_4}} You can boost the protein in your savory quinoa and black bean bowl easily. Grilled chicken adds a hearty touch. Just slice it and place it on top. If you prefer a plant-based option, tofu works great. Cube it and grill or sauté it until golden. For an extra protein punch, consider using different beans, like pinto or kidney beans. Mixing beans adds flavor and texture to the dish. Want to spice things up? Adding jalapeños gives a nice kick. You can also drizzle some hot sauce over the top for heat. Don't forget fresh herbs! Cilantro and parsley brighten the bowl. Other seasonings, like chili powder or oregano, can deepen the taste. Experiment with what you love. Your bowl can be a burst of flavor! How you serve this dish can change the experience. You can wrap the quinoa and beans in a tortilla for a tasty burrito. It’s a fun way to eat it on the go! Alternatively, serve it as a cold salad. Just let the bowl cool and add fresh greens. This makes it a refreshing meal, perfect for warm days. Each style offers a unique twist to enjoy your savory quinoa and black bean bowl! To keep your Savory Quinoa and Black Bean Bowl fresh, store leftovers in an airtight container. This helps maintain the flavors and texture. You can keep it in the fridge for up to three days. After that, the taste and quality may decline. When reheating, avoid the microwave if you can. Instead, use a stove. Heat it in a pan over low heat. Add a splash of water or broth to keep it moist. Aim to heat it to around 165°F for the best flavor and safety. This method helps keep the quinoa fluffy and the beans tender. To make busy days easier, you can prep this meal ahead of time. Cook a big batch of quinoa and the vegetable mixture at the start of the week. Divide them into portions for easy meals. Store them in separate containers. This way, you can mix and match as you like. You can also add toppings like avocado just before eating. This keeps everything fresh and tasty. For the full recipe, check out the complete guide I shared. Cooking quinoa takes about 20 minutes in total. First, boil the vegetable broth. Once boiling, add the rinsed quinoa. Lower the heat and cover it. Let it simmer for 15 minutes. After that, let it sit for 5 more minutes off the heat. The quinoa is ready when it is fluffy. Yes, this recipe is naturally vegan! The main ingredients are quinoa and black beans. Both are plant-based. You can add more veggies if you like. Try using different beans or grains. This bowl is flexible for your taste. To store leftovers, put them in an airtight container. Refrigerate the bowl within two hours of making it. It will last for about 3-5 days in the fridge. When ready to eat, reheat the bowl in the microwave or on the stove. Be sure to stir well to warm it evenly. This blog post covered a tasty and nutritious Savory Quinoa and Black Bean Bowl. You learned about key ingredients, step-by-step cooking methods, and helpful tips. I shared how to store leftovers and offered variations to fit your taste. This dish is easy to make and perfect for meal prep. With various options, you can adapt it to suit your needs. Enjoy this healthy meal for lunch or dinner, knowing it’s packed with flavor and nutrition.

Savory Quinoa and Black Bean Bowl Healthy Delight

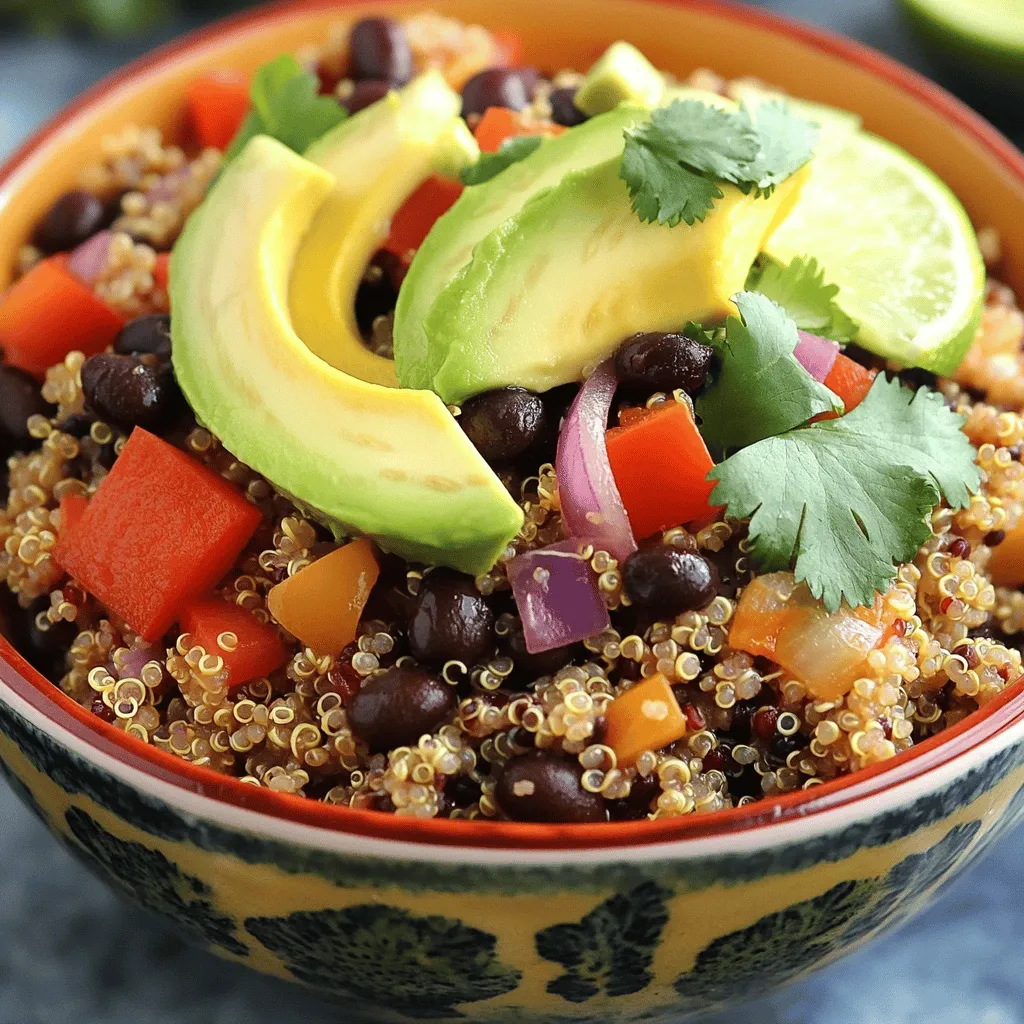
Are you ready to enjoy a bowl packed with flavor and nutrition? My Savory Quinoa and Black Bean Bowl is

- Chicken and Marinade Essentials - 1 lb chicken breast, cut into 1-inch cubes - 2 tablespoons olive oil - 1 tablespoon fresh lime juice - 1 tablespoon soy sauce - 2 teaspoons packed brown sugar - Optional Vegetables for Skewering - 1 bell pepper, cut into 1-inch cubes (optional) - 1 red onion, cut into 1-inch cubes (optional) - Seasoning and Spice Mix - 1 teaspoon ground allspice - 1 teaspoon dried thyme - 1 teaspoon ground cinnamon - 1 teaspoon garlic powder - 1 teaspoon onion powder - 1/2 teaspoon cayenne pepper (adjust to taste) - Salt and freshly ground black pepper, to taste For this recipe, I recommend using fresh ingredients. Fresh lime juice adds brightness. The chicken should be cut into uniform pieces, so they cook evenly. If you want to add color, the bell pepper and onion work great. They not only look good but also taste great with the chicken. For seasoning, the mix of spices gives jerk chicken its unique flavor. The cayenne pepper can be adjusted based on your heat preference. This list of ingredients sets the stage for a flavorful meal. Check the full recipe for more details on preparing these savory Caribbean jerk chicken skewers. Start by gathering your ingredients. In a medium bowl, mix the olive oil, lime juice, soy sauce, and brown sugar. Whisk until the sugar dissolves. Add the allspice, thyme, cinnamon, garlic powder, onion powder, cayenne, salt, and pepper. Stir until you have a smooth marinade. This blend gives the chicken its bold flavor. Cut the chicken breast into 1-inch cubes. Place the cubes in the marinade. Make sure each piece gets well coated. Cover the bowl with plastic wrap or use a resealable bag. Refrigerate for at least one hour. For the best taste, marinate overnight. This allows the flavors to soak in deeply. Preheat your grill or grill pan to medium-high heat. While it heats, thread the marinated chicken onto soaked bamboo skewers. If you want, add bell pepper and red onion for extra color and taste. Once the grill is hot, place the skewers on it. Cook for 12-15 minutes, turning often to get even marks. Make sure the chicken reaches an internal temperature of 165°F. After grilling, let the skewers rest for a few minutes before serving. This helps keep the juices in! For the full recipe, check the detailed instructions above. To get the best flavor, marinate your chicken for at least one hour. I recommend marinating overnight for the richest taste. Use a bowl or a resealable bag to coat the chicken well. Make sure every piece gets covered in the marinade. This step is key to tender, juicy chicken. For those beautiful grill marks, heat your grill to medium-high. Place the skewers on the grill and don’t move them right away. Let them sear for about 4-5 minutes before flipping. This helps create those lovely charred lines. Flip the skewers only when they easily lift off the grill. Always cook chicken to an internal temperature of 165°F for safety. Use a meat thermometer for accuracy. If you don’t have one, cut into a piece to check for no pink inside. Keep an eye on cooking time. It usually takes about 12-15 minutes, but varies with grill type and heat. Enjoy the deliciousness of your Caribbean jerk chicken skewers! For the full recipe, check out the recipe section above. {{image_4}} You can switch things up by using different proteins. Shrimp works great with jerk flavors. It cooks fast and absorbs the marinade well. You can also try firm fish like salmon or swordfish. These choices add a nice twist to the classic dish. Just ensure they marinate for the right time to soak in all those spicy flavors. For a vegetarian option, try using hearty veggies. Zucchini, mushrooms, and eggplant are perfect. Cut them into bite-sized pieces and soak them in the same marinade. Tofu is another excellent choice. It’s a great protein source and takes on the marinade's flavors wonderfully. Just make sure to press it first to remove excess water. You can create many unique flavors by changing the marinade. For a citrus twist, add orange juice along with lime. Want something sweeter? Try adding pineapple juice or mango puree. If you like heat, mix in some extra cayenne or chili powder. Experimenting with your marinades can lead to exciting new tastes. Enjoy the adventure in your cooking! For the full recipe, check out the complete guide. To keep your leftover skewers fresh, place them in an airtight container. You can refrigerate them for up to three days. Make sure they cool down before storing. This helps keep the chicken juicy and tasty. Want to store them longer? You can freeze the skewers! Wrap them tightly in plastic wrap or foil. Place the wrapped skewers in a freezer-safe bag. They can last up to three months in the freezer. When you're ready to eat, just thaw them in the fridge overnight. To reheat, you can use the oven or a grill. For the oven, preheat to 350°F. Place the skewers on a baking sheet and heat for about 10-15 minutes. If using a grill, cook for about 5-7 minutes, turning often. This keeps them moist and adds flavor. Enjoy your delicious Caribbean jerk chicken skewers again! For the full recipe, check the section above. The best way to cut chicken for skewers is to use a sharp knife. Cut the chicken breast into 1-inch cubes. This size allows for even cooking. Make sure to remove any excess fat or sinew for the best taste. Uniform pieces help the chicken cook at the same rate. Yes, you can make Caribbean jerk chicken skewers ahead of time. Marinate the chicken for at least one hour. For more flavor, let it marinate overnight. After marinating, you can thread the chicken onto skewers and store them in the fridge. Just remember to grill them fresh for the best taste. Caribbean jerk chicken skewers pair well with many sides. Here are some great options: - Coconut rice - Grilled corn on the cob - Fresh mango salsa - Coleslaw with lime dressing - Mixed green salad These sides add freshness and balance to the spicy skewers. Enjoy your meal with a tropical vibe! You can find the Full Recipe for further details. In this post, we covered key points about making Caribbean jerk chicken skewers. We discussed essential ingredients, marinating steps, and grilling tips. I shared variations for different proteins and storage methods to keep your skewers fresh. Using these tips will help you create tasty and fun meals. Enjoy experimenting with flavors and sharing these skewers with friends and family. Happy cooking!

Savory Caribbean Jerk Chicken Skewers Easy Recipe

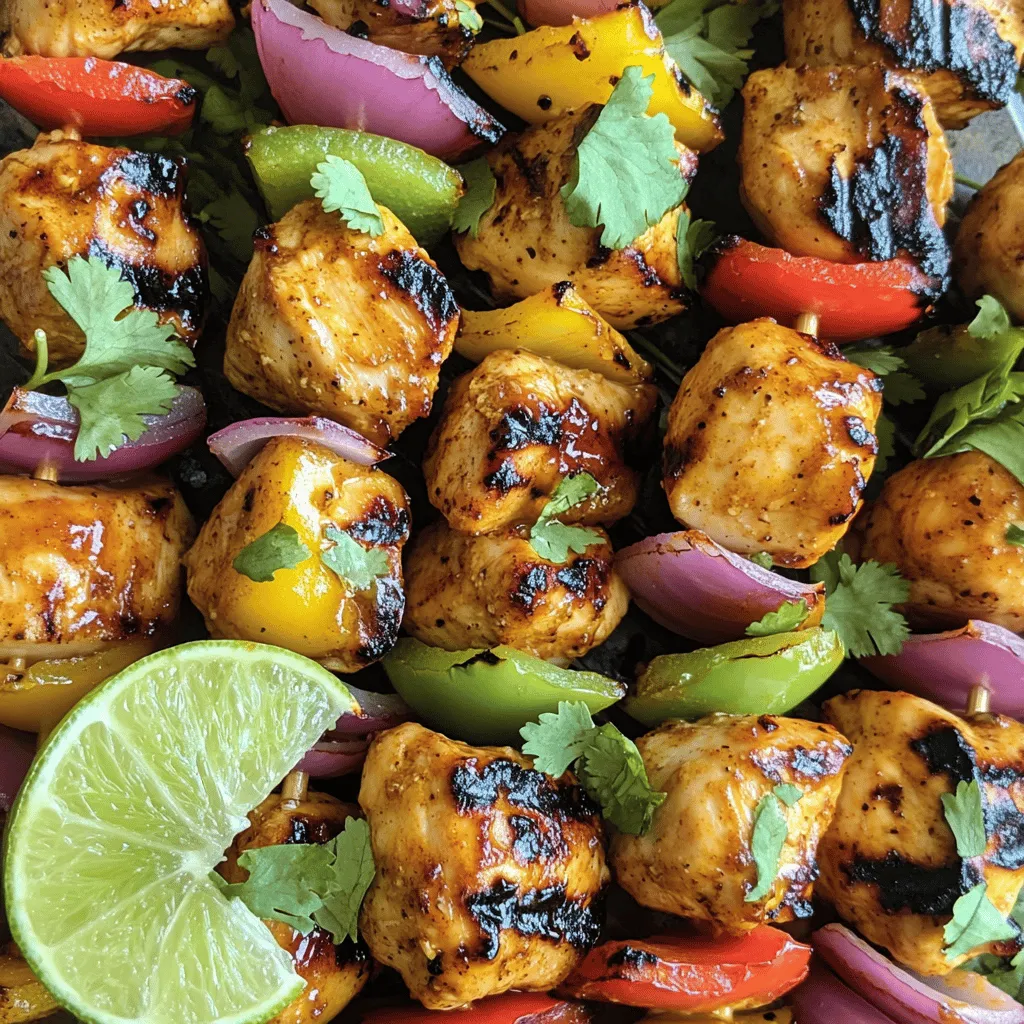
Are you ready to bring the bold flavors of the Caribbean to your grill? My easy recipe for Caribbean Jerk

- 1 medium head of cauliflower - 8 oz elbow macaroni (or gluten-free option) - 2 cups shredded sharp cheddar cheese - 1 cup cream cheese - 1 cup milk (dairy or non-dairy) - 1 teaspoon garlic powder - 1 teaspoon onion powder - 1/2 teaspoon smoked paprika - Salt and freshly ground black pepper - 1/2 cup breadcrumbs - 2 tablespoons olive oil or melted butter I love using fresh ingredients in this dish because they make it taste amazing. The cauliflower gives a nice texture and a subtle flavor. The elbow macaroni adds a comforting bite. Sharp cheddar cheese is my favorite for its rich taste. Cream cheese makes the sauce super creamy, while milk keeps everything smooth and luscious. For flavor, I use garlic powder and onion powder. They add depth without being too strong. Smoked paprika gives a lovely hint of smoke that warms the dish. You can adjust the salt and pepper to your taste. If you want a crunchy topping, breadcrumbs mixed with olive oil or butter are perfect. They add a nice contrast to the creamy base. You can find the full recipe at the top of this article. It’s easy to follow and perfect for a cozy meal. Enjoy cooking! - Bring salted water to a boil and add elbow macaroni. - Cook until al dente, then drain the pasta and set aside. - In a pot, boil salted water and add cauliflower florets. - Blanch for 3-4 minutes until tender but still crisp. Drain and set aside. - In the same pot, reduce heat to low. - Combine softened cream cheese and milk, stirring until smooth. - Gradually mix in shredded cheddar cheese, garlic powder, onion powder, smoked paprika, salt, and pepper. Stir until cheese melts and sauce is creamy. - Gently fold macaroni and blanched cauliflower into the cheese sauce. - Ensure everything is evenly coated and mixed well. - If using, prepare the breadcrumb topping by mixing breadcrumbs with olive oil or melted butter. - Pour the creamy mixture into a greased baking dish. Sprinkle the breadcrumb mixture on top. - Preheat your oven to 350°F (175°C) and bake for 20-25 minutes until the top is golden brown. - Broil for an additional 2-3 minutes for extra crunch. - Watch closely to avoid burning. This creamy comfort dish is now ready to serve. For the full recipe, check out the complete details. To get a smooth cheese sauce, start with cream cheese. Make sure it is at room temperature. Cold cream cheese will clump and not blend well. Stir the mixture continuously. This keeps it from sticking to the pot. Play with different cheeses to find your favorite taste. Gouda adds a nice smoky flavor, while mozzarella brings creaminess. You can also add spices to boost the flavor. Try a pinch of cayenne for heat or a dash of nutmeg for warmth. Serve this dish with fresh salad or steamed veggies. The crunch of fresh greens pairs well with creamy mac and cheese. You can also garnish with fresh herbs. Chopped parsley or chives give a pop of color and flavor. For the full recipe, check the original. {{image_4}} You can make this dish lighter. Try using whole grain or legume-based pasta. This change adds fiber and nutrients. Low-fat cheeses or dairy-free cheese can also help. These swaps keep the creamy taste while cutting calories. Want to add some fun? Cooked bacon or pancetta gives a savory twist. The salty crunch pairs well with the creamy sauce. You can also toss in broccoli florets. This adds color, nutrition, and texture to your meal. For a gluten-free version, use gluten-free pasta and breadcrumbs. This keeps the dish tasty for those with gluten sensitivities. If you follow a vegan diet, swap the cheese for plant-based options. These changes make the dish suitable for everyone. For the full recipe, check out the detailed guide. Store any leftover cauliflower mac and cheese in an airtight container. It will stay fresh for up to 4 days in the fridge. Make sure it cools completely before sealing it up. You can freeze portions of this dish for up to 3 months. To do this, let it cool, then place it in freezer-safe containers. When you want to eat it, just reheat it in the oven for the best taste and texture. For the best results, reheat in the oven. Set the temperature to 350°F (175°C). Cover with foil to keep it moist. If you need to heat it quickly, the microwave works too. Just remember to stir it partway through heating for even warmth. If you want to try making this dish, check out the Full Recipe for all the details! Yes, you can prepare the dish in advance. Just put the mixed ingredients in a baking dish and refrigerate before baking. When you're ready, bake it straight from the fridge. This saves time and makes meal prep easier. To add some heat, add crushed red pepper flakes or more smoked paprika. You can also try a dash of hot sauce in the cheese sauce. Adjust the spice to suit your taste. Absolutely! Kids often enjoy this dish because it has a creamy texture and cheesy flavor. The cauliflower adds nutrition without being too strong in taste. You can even let the kids help in the kitchen for more fun. Cauliflower is low in calories, making it a great substitute for pasta. It is high in fiber, which helps with digestion. Plus, it is packed with vitamins C and K, and provides essential minerals. This makes every serving a healthy choice while still being delicious. Cauliflower mac and cheese combines fresh ingredients like sharp cheddar and cream cheese with tasty seasonings. You learned cooking steps, tips, and ways to adapt the dish. Remember, cauliflower gives this meal a healthy twist. It’s easy to make and fun to share. Whether you want a comforting dinner or a nutritious option for kids, this dish fits the bill. Keep experimenting with flavors and ingredients to make it your own! Enjoy your delicious and creamy meal!

Cauliflower Mac and Cheese Creamy Comfort Dish

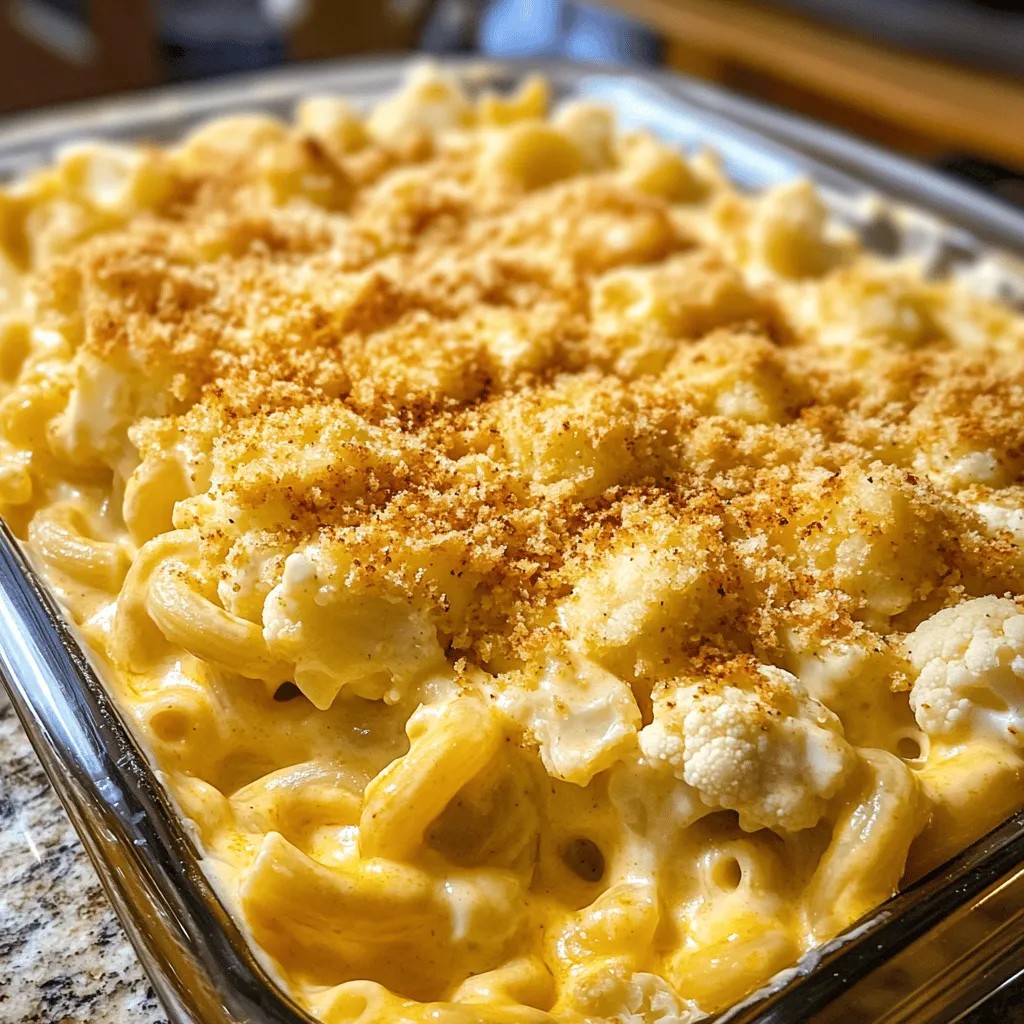
Are you ready to enjoy a warm, creamy comfort dish? My Cauliflower Mac and Cheese blends the indulgence of cheese

To make honey mustard chicken thighs, gather these simple ingredients: - 4 bone-in, skin-on chicken thighs - 1/4 cup honey - 1/4 cup Dijon mustard - 2 tablespoons olive oil - 2 cloves garlic, finely minced - 1 teaspoon smoked paprika - 1 teaspoon dried thyme - Salt and black pepper, to taste - Fresh parsley, chopped (for garnish) These ingredients blend to create a tasty marinade. The honey adds sweetness, while the Dijon mustard gives a nice tang. Garlic and smoked paprika add depth. Dried thyme adds earthiness, and the chicken thighs bring a rich flavor that pairs well with the sauce. Using bone-in, skin-on chicken thighs keeps the meat juicy. The skin crisps up nicely when baked, giving a great texture. You can adjust the amount of honey and mustard based on your taste. If you like it sweeter, add more honey. For a tangy kick, increase the mustard. This recipe is easy. You can prep it quickly. Make sure to have everything ready before you start cooking. Check out the Full Recipe for all the details. Preheat your oven to 400°F (200°C). This step is key for cooking chicken thighs evenly. If you skip this, your chicken may not cook right. Preheating helps lock in juices and gives a nice, crispy skin. In a medium bowl, mix together the honey, Dijon mustard, olive oil, minced garlic, smoked paprika, dried thyme, salt, and black pepper. Whisk until smooth. A good marinade is the heart of this dish. It coats the chicken well and adds tons of flavor. Next, take your chicken thighs and place them in a large zip-top bag. Pour the marinade over the chicken and seal the bag. Massage the bag gently to coat each piece. Let the chicken marinate in the fridge for at least 30 minutes. For even better taste, leave it for up to 4 hours. This allows the flavors to soak in deep. After marinating, take the chicken thighs out. Let any extra marinade drip off. Arrange them skin-side up in a greased baking dish. Make sure they have space so they cook evenly. Pour any leftover marinade on top. Bake in the preheated oven for about 35-40 minutes. The chicken is ready when it reaches an internal temperature of 165°F (75°C) and the skin is golden brown. For more details, refer to the Full Recipe. To achieve a crispy skin on your chicken thighs, dry the skin with paper towels. This helps remove moisture. Apply the marinade evenly, but don’t let it pool on the skin. When baking, place the thighs skin-side up, ensuring good air circulation. Bake at 400°F (200°C) for the best results. To check for doneness, use a meat thermometer. The internal temperature should reach 165°F (75°C). This ensures the chicken is safe to eat. If you don't have a thermometer, cut into the thickest part. The juices should run clear, not pink. Pair your honey mustard chicken thighs with a simple green salad or roasted veggies. You can also serve them with rice or mashed potatoes. For drinks, a chilled white wine or sparkling water complements the meal well. For presentation, serve the chicken on a rustic platter. Drizzle the remaining juices over the chicken. Sprinkle fresh parsley on top for color. This adds a nice touch and makes the dish look great. One common mistake is overcooking the chicken. This results in dry meat. Watch the cooking time closely. Remove the chicken when it reaches the right temperature. Another mistake is under-seasoning. The marinade adds flavor, but ensure you season the chicken well. Don’t be afraid to adjust the salt and pepper to your taste. This will elevate the dish and make it more enjoyable. For the Full Recipe, refer back to the main section. {{image_4}} You can change the honey mustard flavor by using different mustards. Try whole grain, spicy, or honey garlic mustard for a twist. Adding spices can also enhance the taste. Consider using herbs like rosemary or oregano, or even a splash of apple cider vinegar for extra zing. You have choices for cooking these chicken thighs. Baking gives a nice, even cook and a crisp skin. Grilling adds a smoky flavor and can make the skin extra crispy. You can also use a slow cooker for a tender, juicy result. Just adjust the cooking time to about 4-6 hours on low. If you need gluten-free options, make sure to select gluten-free mustard and check other ingredients. You can also lower sodium by using low-sodium mustard and reducing salt. This keeps the dish healthier without losing flavor. For the Full Recipe, visit the main recipe section. To store leftover honey mustard chicken thighs, place them in an airtight container. This keeps the chicken fresh and flavorful. You can also wrap them tightly in plastic wrap. In the fridge, the chicken will last for about 3 to 4 days. Make sure it cools down before storing it. This helps keep the texture and taste. For longer storage, you can freeze the chicken. First, let it cool completely. Then, wrap each thigh in plastic wrap. Place them in a freezer bag or container. Label the bag with the date. The chicken can stay in the freezer for up to 3 months. To reheat, take the chicken out of the freezer and thaw it overnight in the fridge. You can then bake it at 350°F (175°C) until hot. This usually takes about 20-25 minutes. You can also microwave it for a quick meal, but be careful to heat it evenly. Following these tips ensures your honey mustard chicken stays tasty, whether you eat it fresh or later. For complete details, refer to the Full Recipe. The best way to check is by using a meat thermometer. You want the internal temperature to reach 165°F (75°C). This ensures the chicken is safe to eat. Always check the thickest part of the thigh. The juices should run clear and not be pink. Yes, you can use boneless chicken thighs. They cook faster, so reduce the baking time by about 5-10 minutes. Check the internal temperature to ensure they reach 165°F (75°C) as well. This way, you still enjoy the same delicious flavor. Some great sides include: - Roasted vegetables - Mashed potatoes - Rice pilaf - Green salad - Steamed broccoli These pair well and balance the sweetness of the chicken. Absolutely! You can mix the marinade and store it in the fridge for up to 3 days. This is a great tip for meal prep. Marinating the chicken overnight will deepen the flavors. Just remember to let the chicken sit at room temperature for 10-15 minutes before cooking. This helps it cook evenly. For the full recipe, check out the details above. In this post, I covered how to make honey mustard chicken thighs. We explored the ingredients, from chicken thighs to garlic and spices. I shared step-by-step instructions for marinating and baking. You learned tips for perfecting your chicken, serving ideas, and common mistakes to avoid. As you try this recipe, remember to have fun in the kitchen. Feel free to experiment with marinades and cooking methods. Enjoy your delicious honey mustard chicken!

Honey Mustard Chicken Thighs Simple Dinner Recipe

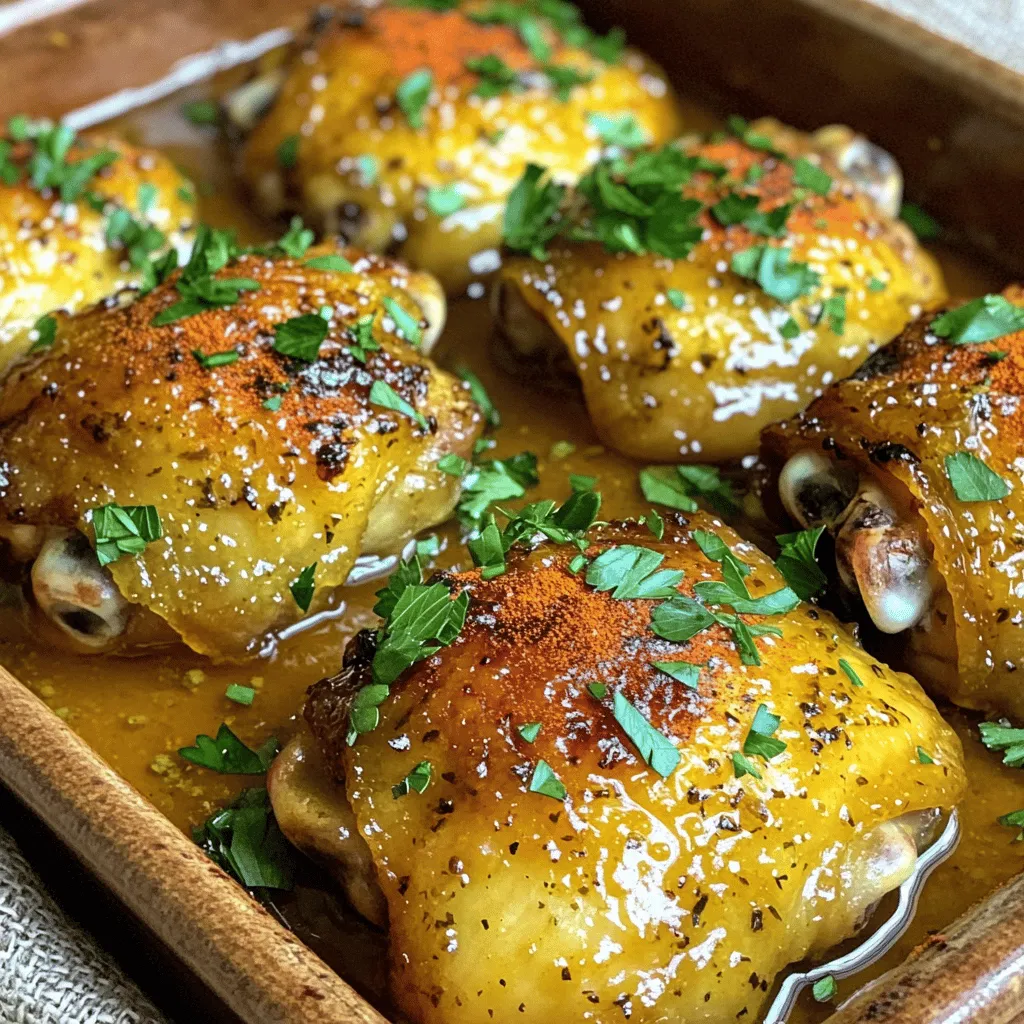
Feeling stuck on what to make for dinner? Let me share a quick and tasty dish: Honey Mustard Chicken Thighs!

To create a scrumptious vegan chocolate mug cake, you need just a few simple ingredients. Here’s what you’ll need: - 4 tablespoons all-purpose flour - 4 tablespoons unsweetened cocoa powder - 4 tablespoons coconut sugar (or your preferred sweetener) - 1/8 teaspoon baking powder - 1/8 teaspoon fine sea salt - 3 tablespoons almond milk (or any plant-based milk of your choice) - 2 tablespoons vegetable oil (or melted coconut oil) - 1/4 teaspoon pure vanilla extract - 2 tablespoons dairy-free chocolate chips (optional) Each ingredient plays a big role. The flour gives structure, while the cocoa powder adds rich flavor. Coconut sugar sweetens without being too intense. Baking powder helps the cake rise, and salt enhances the taste. Almond milk keeps it moist, and oil adds a soft texture. Vanilla brings warmth, and chocolate chips make it extra special. Gathering these ingredients is easy. You can find most in your kitchen or local store. This recipe is perfect for a quick dessert fix. Plus, it’s fun to make! For the full steps, check out the Full Recipe. Enjoy the process and get ready for a tasty treat. - Gather all ingredients and tools. You need a microwave-safe mug and a fork or whisk. - Combine dry ingredients in the mug. Add flour, cocoa powder, coconut sugar, baking powder, and salt. Mix well until there are no lumps. - Mix in wet ingredients thoroughly. Pour in almond milk, vegetable oil, and vanilla extract. Stir until the batter is smooth and silky. - Microwave the mug cake. Place the mug in the microwave and heat it on high for 60 seconds. - Check for doneness and adjust cooking time. The cake should look puffed and slightly moist in the center. If it’s not done, microwave in 10-second bursts until fully cooked. - Let it cool slightly before serving. Wait about 2-3 minutes to avoid burning your mouth. - Recommendations for toppings or add-ins. Top with dairy-free ice cream or drizzle with almond butter. You can also fold in chocolate chips for extra richness. Enjoy your Vegan Chocolate Mug Cake! For the complete recipe, check the [Full Recipe]. For a great mug cake, measuring ingredients is key. Use a tablespoon for accuracy. Too much flour makes the cake dense. Too little will make it too runny. Mix your dry ingredients well to avoid lumps. I like using a small whisk. It helps blend everything smoothly. When you add wet ingredients, stir them gently. This keeps the batter light. Aim for a smooth, uniform mix. If you see any lumps, keep mixing until they vanish. You can swap coconut sugar for other sweeteners, like maple syrup or agave. Each sweetener adds a different taste. If you want a creamier cake, try using oat milk instead of almond milk. You can also add a spoon of nut butter for richness. If you love chocolate, add more dairy-free chocolate chips. They melt and create pockets of gooey goodness. One common mistake is over-microwaving the batter. Start with 60 seconds, then check. If it looks wet, add 10 more seconds. Keep an eye on it. Another mistake is using a small mug. A 12 oz mug is best. If the mug is too small, the cake can overflow. This can create a mess in your microwave. Always choose a larger mug to avoid this. {{image_4}} If you want a gluten-free vegan chocolate mug cake, simply swap the all-purpose flour with gluten-free flour. You can use a blend that fits your taste. When you do this, slightly change the baking powder and liquids. Start with a little less liquid, as gluten-free flour can absorb more moisture. This will help you get that soft and fluffy texture you crave. Adding flavors can make your mug cake unique. You can sprinkle in cinnamon, nutmeg, or even a dash of espresso powder to amplify the chocolate taste. If you love nuts, try adding chopped walnuts or almonds for a crunchy bite. Dried fruits like cherries or cranberries can also add a sweet twist. Mix these into the batter before microwaving for extra flavor. You can enjoy your mug cake in fun ways. Try layering it with dairy-free yogurt to make a mug cake parfait. Just add a layer of yogurt, then a layer of cake, and repeat. It looks fancy and tastes great! You can also serve the cake with a fruit compote or a drizzle of vegan cream. This adds freshness and a creamy touch to each bite. Enjoy experimenting with these ideas! To keep your vegan chocolate mug cake fresh, store it in the fridge. Place it in an airtight container. It will stay good for up to three days. When you're ready to enjoy it again, just reheat it in the microwave. Heat for 10-15 seconds at a time until warm. This keeps the texture soft and delicious. If you want to save your mug cake for later, freezing is a great option. Wrap the cooled cake in plastic wrap, then place it in a freezer bag. It can last up to three months in the freezer. When you’re ready to eat it, take it out and let it thaw in the fridge overnight. For a quick option, you can microwave it straight from the freezer. Just add a few extra seconds to the cooking time. Don't let leftover cake go to waste! You can get creative. Crumble the mug cake over dairy-free yogurt for a tasty parfait. You can also use it as a base for a trifle. Layer it with fresh fruit and a drizzle of vegan chocolate sauce. Another fun idea is to mix it with plant-based ice cream for a decadent dessert. Enjoy experimenting with these ideas! Yes, you can use a microwave. This mug cake cooks quickly, taking only about 60 seconds. The microwave makes it easy and fast. Just mix the ingredients in a microwave-safe mug, and you’re good to go. The heat cooks the cake, making it fluffy and warm. This method is perfect for a quick treat. To make this mug cake healthier, consider these tips: - Reduce sugar: Use less coconut sugar or a natural sweetener like stevia. - Use less oil: Cut down the oil to one tablespoon or replace it with unsweetened applesauce. - Add whole grains: Try whole wheat flour instead of all-purpose flour for more fiber. - Include fruits: Mix in mashed bananas or apples for natural sweetness. You can use several alternatives for almond milk in this recipe: - Soy milk: This is creamy and adds a nice texture. - Oat milk: It’s slightly sweet and works well in baked goods. - Coconut milk: This adds a rich flavor but can make the cake denser. Each option will change the taste a bit, but they all keep it vegan. Enjoy experimenting! This blog covered how to make a delicious mug cake. We explored the ingredients, step-by-step instructions, and tips for the best results. I shared variations, storage options, and common mistakes to avoid. Now, you can enjoy a quick and tasty treat anytime. Experiment with flavors and toppings to make it your own. Baking is fun, and this mug cake is a great start! Enjoy every bite!

Vegan Chocolate Mug Cake Simple and Decadent Treat

Craving something sweet but need it quick and easy? You’re in the right place! In this post, I’ll show you

- 1 cup all-purpose flour - 2 tablespoons granulated sugar - 1 tablespoon baking powder - 1/2 teaspoon fine salt - 1 cup milk (or dairy-free alternative) - 1 large egg, at room temperature - 2 tablespoons unsalted butter (or coconut oil) - 1/2 cup creamy chocolate hazelnut spread - 1/2 cup chopped hazelnuts - Fresh berries (strawberries or raspberries) You need these simple ingredients to make your pancakes great. Start with the dry ingredients. They form the base of your batter. Use all-purpose flour for the best results. Sugar adds sweetness, while baking powder helps them rise. Salt balances the flavors. Next, we have the wet ingredients. Milk gives moisture. You can use dairy-free options if you prefer. The egg helps bind everything together and adds fluff. Melted butter or coconut oil adds richness. Finally, the chocolate hazelnut spread is your secret star. It brings that creamy, sweet flavor that everyone loves. For toppings, we have chopped hazelnuts for crunch. They add texture and a nice nutty taste. Fresh berries, like strawberries or raspberries, add brightness and a touch of tartness. You can use any of your favorite toppings or even mix and match! For the full recipe, check out the details above. Enjoy your cooking! Start by taking a large mixing bowl. Add 1 cup of all-purpose flour, 2 tablespoons of granulated sugar, 1 tablespoon of baking powder, and 1/2 teaspoon of fine salt. Use a whisk to mix these dry ingredients until they are well combined. This step is key for fluffy pancakes. In another bowl, beat 1 large egg until it looks smooth. Next, pour in 1 cup of milk. You can use dairy or a dairy-free alternative. Then, add 2 tablespoons of melted unsalted butter or coconut oil. Whisk until this mixture is blended and creamy. Now, it's time to mix the wet and dry ingredients. Gradually pour the wet mixture into the dry bowl. Use a spatula or a spoon to blend them together. Remember not to overmix! It’s okay if your batter has a few lumps. This will help keep your pancakes fluffy. Preheat a non-stick skillet over medium heat. If needed, lightly grease it with butter or oil. For each pancake, pour about 1/4 cup of batter onto the skillet. Cook for 2 to 3 minutes, watching for bubbles on the surface. While they cook, add about 1 tablespoon of chocolate hazelnut spread on top of each pancake. This will melt into a gooey center. Carefully flip each pancake with a spatula. Cook for another 1 to 2 minutes, until the bottoms turn golden brown. Once done, move the pancakes to a warm plate. Cover them lightly with a kitchen towel while you cook the rest. To serve, stack the pancakes on a plate. Top them with chopped hazelnuts and fresh berries like strawberries or raspberries. For an added treat, drizzle more chocolate hazelnut spread over the top. Enjoy your delicious breakfast! Check out the Full Recipe for more details. To make your pancakes fluffy, avoid overmixing the batter. Mix just until the wet and dry ingredients combine. You want a few lumps to stay in the batter. This helps create air pockets that make your pancakes light and airy. Also, use room temperature ingredients. Cold eggs or milk can lead to denser pancakes. When you take them out of the fridge, let them sit for a few minutes. Cook your pancakes on medium heat. If the heat is too low, they will cook slowly and turn out flat. If it's too high, the outside will burn while the inside stays raw. Grease your skillet lightly with butter or oil to keep pancakes from sticking. A non-stick skillet is also a great choice. Make your pancakes look great by stacking them attractively on a plate. Start with one pancake, then add another on top. Sprinkle chopped hazelnuts over the stack for a nice crunch. Add fresh berries like strawberries or raspberries for color and freshness. For a gourmet touch, drizzle extra chocolate hazelnut spread on top. This makes your pancakes not only tasty but also beautiful! {{image_4}} You can make these pancakes gluten-free. Just swap the all-purpose flour for a gluten-free flour blend. This choice keeps the texture light and fluffy while catering to gluten sensitivities. Want to mix it up? Try adding a splash of vanilla extract. A pinch of cinnamon also works great. These small changes add warmth and depth to the flavor without being overpowering. Get creative with your toppings! You can use different nuts like almonds or walnuts. Seeds like chia or pumpkin seeds make good options too. Fresh fruits like bananas or blueberries add a burst of flavor and color. Each topping choice offers a unique twist to your delicious stack. For the full recipe, refer to the Chocolate Hazelnut Delight Pancakes. Enjoy experimenting with these variations! To keep your pancakes fresh, store them in an airtight container in the fridge. This will help prevent them from drying out. They stay good for up to three days. When you're ready to eat them, just take them out and reheat. If you want to save some for later, you can freeze pancakes. First, let them cool completely. Then, stack them with parchment paper in between each one. Place the stack in a freezer bag and seal it tightly. These pancakes can last for up to two months in the freezer. To reheat pancakes, you have a few great options. You can use a microwave for quick heating. Place one pancake on a plate and heat for about 20-30 seconds. For a crispier texture, use a skillet. Just warm it up on medium heat for about one minute on each side. This way, your pancakes will taste fresh and fluffy. To make pancakes fluffy, start by mixing the dry ingredients well. Use a whisk to combine the flour, sugar, baking powder, and salt. This helps air get into the mix. Next, when you mix the wet ingredients, beat the egg until smooth. Add milk and melted butter. Ensure these are at room temperature. When combining wet and dry ingredients, be gentle. Stir until just mixed; lumps are okay. Overmixing can lead to tough pancakes. Keep the batter thick yet pourable. This will help create that light, fluffy texture we all love. Yes, you can substitute chocolate hazelnut spread with other options. A great choice is almond butter or peanut butter. These spreads offer similar creamy textures. You can also try Nutella's other flavors, like white chocolate or vanilla. For a healthier twist, use a banana puree or homemade chocolate spread. Simply mash ripe bananas and mix with cocoa powder. This creates a tasty and nutritious option. There are many delicious options to serve with your pancakes. Fresh berries, like strawberries or raspberries, add brightness. You can also use sliced bananas for extra sweetness. For a crunchy touch, sprinkle chopped hazelnuts on top. A drizzle of maple syrup or honey enhances the flavor. Pair your pancakes with a warm cup of coffee or hot chocolate for a cozy breakfast experience. Enjoy! We covered the ingredients and steps for making tasty pancakes. You learned how to prepare both dry and wet mixtures. Then, we mixed them to cook fluffy pancakes topped with chocolate hazelnut spread, hazelnuts, and berries. Remember to avoid overmixing and control the heat for best results. Try different flavors and toppings to make these pancakes your own. Enjoy creating your perfect pancake stack!

Chocolate Hazelnut Spread Pancakes Fluffy and Delicious

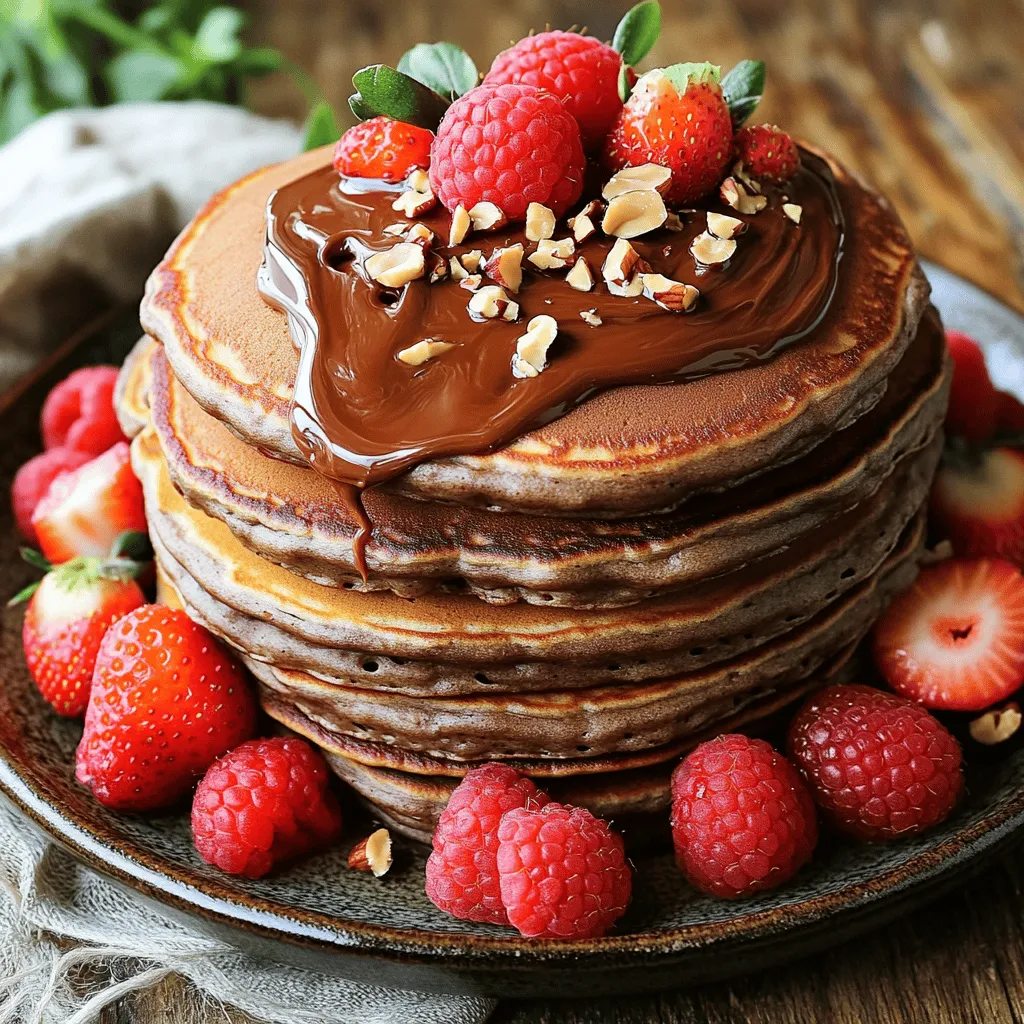
Start your morning right with these Chocolate Hazelnut Spread Pancakes, fluffy and delicious! Imagine biting into a warm stack, rich

- Fresh Peach Requirements - Use 2 large ripe peaches. They should be juicy and fragrant. Choose peaches that yield slightly to gentle pressure. This ensures they are ripe enough for a sweet filling. - Almond Flour vs. All-Purpose Flour - Almond flour gives a nutty flavor and a tender crust. It also adds protein and healthy fats. All-purpose flour, however, helps with structure. A mix of both works best for the perfect texture. - Essential Baking Tools - Have a large mixing bowl for the crust. A rolling pin is key to flatten the dough. Use a pastry brush for the egg wash and a baking sheet lined with parchment paper for easy cleanup. A sharp knife helps slice the galette beautifully. Make sure to gather all these ingredients before you start. This will help your cooking process flow smoothly. You can find the full recipe with step-by-step instructions to make this peach galette with almond crust. Mixing the Dry Ingredients Start by taking a large bowl. Add 1 cup of almond flour and 1/2 cup of all-purpose flour. Sprinkle in 1/4 teaspoon of sea salt. Whisk these together until they blend well. Incorporating Butter Next, cut 1/4 cup of cold unsalted butter into small cubes. Add them to the flour mix. Use your fingertips or a pastry cutter to mix until it looks like coarse crumbs. Chilling the Dough Now, add 2 tablespoons of ice water, mixing gently with a fork. Keep adding water until the dough starts to hold together. Form it into a ball, then flatten it into a disk. Wrap it in plastic wrap and chill in the fridge for at least 30 minutes. Preparing the Peaches Take 2 large, ripe peaches. Slice them into thin wedges. Place the slices in a bowl. Flavoring the Filling Add 1 tablespoon of fresh lemon juice, 2 tablespoons of light brown sugar, and 1 teaspoon of ground cinnamon to the peaches. Stir gently. Let this sit for about 15 minutes. This allows the flavors to mix and the peaches to soften. Rolling Out the Dough Once your dough is chilled, take it out of the fridge. On a lightly floured surface, roll the dough into a 12-inch circle. Aim for about 1/8 inch thick. Carefully move it to a parchment-lined baking sheet. Filling and Folding Techniques Scoop the peach mixture into the center of the dough. Leave a 2-inch border around the edges. Fold the dough over the peaches, creating pleats as you go. This gives it a lovely rustic look. Egg Wash Application and Sugar Topping In a small bowl, beat 1 egg. Use a pastry brush to apply a thin layer to the exposed crust. Then, sprinkle 1 tablespoon of coarse sugar on top for extra crunch. Bake Preheat your oven to 400°F (200°C). Bake the galette for 25-30 minutes. Look for a golden brown crust and bubbling peaches. Once baked, let it cool on the baking sheet for about 10 minutes. You can cut it into wedges and serve warm or at room temperature. Enjoy it as is or with a scoop of vanilla ice cream for a treat! For the full recipe, please refer to the [Full Recipe]. Ensuring the Right Texture To make a great almond crust, you need the right feel. Use cold butter. It helps keep the crust flaky. Mix the butter into the flour until it looks like crumbs. This step is key for texture. Avoiding a Soggy Bottom A soggy crust can ruin your galette. To prevent this, sprinkle a light layer of almond flour on the dough before adding the peach filling. This layer will soak up extra juice and keep the bottom crispy. Pairing with Ice Cream A warm slice of peach galette pairs perfectly with ice cream. Vanilla works best, but feel free to try other flavors. The creaminess balances the sweet peaches and crunchy crust. Best Beverage Choices For drinks, I love a nice cup of tea or a glass of sparkling water. Both refresh the palate after each bite. If you want something stronger, a glass of sweet white wine also complements the dessert well. {{image_4}} You can change the peaches to other fruits. Seasonal fruits work great! Try using: - Ripe nectarines - Juicy plums - Sweet cherries - Tart apples These fruits add different flavors and textures to your galette. You can also mix fruits for a unique taste. For example, combine peaches and blueberries. This mix creates a fun flavor surprise! Adding nuts or spices can make your galette even better. Chopped almonds or pecans give a nice crunch. You can sprinkle in spices like nutmeg or cardamom for warmth. They add a cozy feel to your dessert. If you need a gluten-free galette, it's simple! Swap the all-purpose flour for a gluten-free blend. Look for a mix that works well for baking. Many mixes have a good balance of flours and starches. You can also make it dairy-free. Replace the butter with coconut oil or a vegan butter. This keeps the crust flaky and tasty. Be sure to chill the oil before adding it to the flour. This helps keep the right texture. For the full recipe, check the section above! Storing Leftovers After enjoying your peach galette, let it cool completely. Place it in an airtight container. You can keep it in the fridge for up to three days. This helps maintain the crust's texture and flavor. If you have leftover slices, use parchment paper between them. This prevents sticking. Freezing the Galette Want to save some for later? You can freeze the galette! Wrap it tightly in plastic wrap and then cover it with aluminum foil. This keeps out air and moisture. You can freeze it for up to two months. When you're ready to eat it, just thaw it in the fridge overnight. Oven vs. Microwave To reheat, I recommend using the oven. Preheat it to 350°F (175°C). Place the galette on a baking sheet and heat for about 10-15 minutes. This keeps the crust crispy. If you use a microwave, heat it in short bursts of 20-30 seconds. The crust may become soft, but it’s still tasty! The galette is done when the crust is golden brown. You should see the peaches bubbling slightly. This usually takes about 25 to 30 minutes in the oven. The edges should be crisp, and the center should look set. If you follow these signs, you’ll have a perfect galette. Yes, you can make the dough ahead of time. Just wrap it tightly in plastic wrap. Store it in the fridge for up to two days. This helps the flavors blend and makes it easier to roll out. If you need more time, you can freeze it for up to a month. Just remember to thaw it in the fridge overnight before using. If you don’t have almond flour, you can use other flours. Hazelnut flour is a great choice for a nutty flavor. You can also use oat flour for a gluten-free option. Just keep in mind that each flour will change the taste and texture a bit. Experiment to find what you like best! For more detailed instructions on making the peach galette, check out the Full Recipe. To make a delicious peach galette, start with quality ingredients like fresh peaches and almond flour. Follow simple steps for the crust, filling, and assembly. With tips for perfecting your crust and serving suggestions, you can impress anyone. Don’t forget about variations for different fruits and dietary needs. Store your galette properly to enjoy it later. This dessert is easy to make and so rewarding. Dive in and let your creativity shine in the kitchen!

Peach Galette with Almond Crust Delightful Recipe

Do you love the sweet taste of fresh peaches? Then, you’ll adore this Peach Galette with Almond Crust recipe! I’ll

Older posts
Newer posts
← Previous Page1 … Page64 Page65 Page66 … Page86 Next →

dsad

© 2026 yumymoments • Built with GeneratePress

Our Policies

  • Copyright Policy
  • Cookie Policy
  • GDPR Policy
  • Privacy Policy
  • Disclaimer
  • Terms Of Use

More Information

  • Home
  • About
  • Contact
  • Appetizers
  • Dessert
  • Dinner
  • Drinks
©2026, yumymoments About Back To Top