Skip to content
DisclaimerTerms Of UseGDPR PolicyCookie Policy

yumymoments

  • Home
  • Drinks
  • Appetizers
  • Dinner
  • Dessert
  • About
  • Contact
  • Privacy Policy
DisclaimerTerms Of UseGDPR PolicyCookie Policy

NO-ING-IMG

To make a great Eggplant Parmesan Bake, you need these key ingredients: - 2 large eggplants, sliced into 1/2-inch rounds - 3 cups marinara sauce - 2 cups shredded mozzarella cheese - 1 cup grated Parmesan cheese - 1 cup all-purpose flour - 3 large eggs, beaten - 2 cups breadcrumbs (preferably Italian-style for extra flavor) - 1 teaspoon garlic powder - 1 teaspoon dried oregano - 1 teaspoon salt - 1/2 teaspoon black pepper - Olive oil spray These ingredients combine to create layers of flavor, making each bite a delight. You can add some optional ingredients to make your Eggplant Parmesan Bake unique: - Fresh spinach for added nutrients - Roasted red peppers for a sweet twist - Sliced mushrooms for an earthy flavor - Extra herbs like thyme or rosemary for more aroma Feel free to mix and match these ingredients to fit your taste! To prepare your Eggplant Parmesan Bake, gather these tools: - Baking dish (9x13 inches works best) - Large mixing bowls for coating - Whisk for mixing eggs and dry ingredients - Baking sheet for roasting eggplant slices - Aluminum foil for covering the dish while baking Having these tools ready will make your cooking process smooth and fun. First, slice the eggplants into 1/2-inch rounds. This size helps them cook well. Next, sprinkle salt over the slices. Let them sit for about 30 minutes. This step draws out excess moisture. It also reduces any bitterness. After 30 minutes, rinse the slices in water. Pat them dry with a clean towel. This makes them ready for coating. Now, it's time to coat the eggplant. Set up your three bowls: one for flour, one for beaten eggs, and one for breadcrumbs. Mix garlic powder, salt, and black pepper into the flour. Dip each eggplant slice into the flour first, then into the eggs, and finally into the breadcrumbs. Make sure each slice is well-coated. Place them on a baking sheet in a single layer. Spray the tops lightly with olive oil. Bake at 375°F (190°C) for 25-30 minutes. Flip the slices halfway through for even crispiness. While the eggplants bake, prepare the baking dish. Spread 1 cup of marinara sauce evenly on the bottom. Once the eggplants are done, add half of the slices over the sauce. Pour half of the remaining marinara on top. Then, sprinkle 1 cup of mozzarella cheese and half of the Parmesan cheese. Repeat this layering with the rest of the eggplant, sauce, and cheese. Cover the baking dish with aluminum foil. This keeps the moisture inside. Bake it for 30 minutes. After that, remove the foil and bake for an extra 15 minutes. This will make the cheese bubbly and golden. Let the dish cool for 10 minutes before slicing. Garnish with fresh basil leaves for a nice touch. Serve hot and enjoy this savory delight! For complete details, check the Full Recipe. When cooking eggplants, it’s key to choose fresh ones. Look for firm, shiny skin. The color should be deep purple, and the stem should be green. Avoid any with soft spots or blemishes. To remove bitterness, slice the eggplant and sprinkle salt on both sides. Let it sit for 30 minutes, then rinse and pat dry. This step helps improve flavor and texture. To get crispy layers, proper breading is essential. Use the three-step method: coat in flour, dip in beaten eggs, and roll in breadcrumbs. Make sure to press the breadcrumbs onto the eggplant. This helps them stick better. Bake the slices on a baking sheet in a single layer. Lightly spray them with olive oil. This adds crunch and keeps them from drying out. Enhance your Eggplant Parmesan Bake by adding herbs and spices. Use dried oregano and garlic powder in the breadcrumb mix. Fresh basil adds a bright, fresh taste, so don’t skip it! You can also add a pinch of crushed red pepper flakes for a little heat. A hint of Italian herbs will elevate the dish even more. For the full recipe, check the details provided earlier. {{image_4}} For a vegetarian twist, eggplant parmesan already shines. You can keep it classic or go vegan. To make it vegan, swap the eggs with a mix of flaxseed meal and water. Use 1 tablespoon of flaxseed meal mixed with 2.5 tablespoons of water per egg. Choose vegan cheese or skip cheese altogether. The marinara sauce adds plenty of flavor. Gluten-free eaters can enjoy this dish too. Replace the all-purpose flour with almond flour or rice flour. For breadcrumbs, use gluten-free breadcrumbs or crushed nuts. This keeps the dish tasty and safe for those with gluten sensitivities. Get creative with your eggplant parmesan! You can add spinach for a fresh twist. Just sauté it lightly before layering. Roasted red peppers also bring a sweet touch. Chop them finely and mix them in with the marinara sauce. You can also use fresh herbs like basil or oregano for more depth. Each addition can change the dish, making it unique every time you cook. For a full recipe, check out Eggplant Parmesan Bake. To keep your Eggplant Parmesan Bake fresh, allow it to cool first. Then, place it in an airtight container. This helps prevent moisture loss. Store it in the fridge for up to four days. If you have a lot left, slice it into portions. This makes it easier to grab when you're hungry. When you're ready to enjoy leftovers, preheat your oven to 350°F (175°C). Place the slices in a baking dish. Cover it with foil to keep moisture in. Bake for about 20 minutes or until heated through. If you want a crispy top, remove the foil for the last five minutes. You can also use a microwave, but it may not keep the layers as crispy. If you want to save your Eggplant Parmesan Bake for later, freezing is a great option. Allow it to cool completely. Then, wrap the dish tightly with plastic wrap and aluminum foil. You can also place it in a freezer-safe container. It will stay good for three months. When you're ready to eat, thaw it overnight in the fridge. Then, reheat it in the oven for the best texture. You can serve Eggplant Parmesan Bake with a simple green salad. A side of garlic bread also works well. For a heartier meal, pair it with pasta tossed in olive oil and garlic. You might also enjoy a glass of Chianti or a light white wine. Eggplant Parmesan Bake will last about 3 to 5 days in the fridge. Make sure to cover it well. Use an airtight container or wrap it tightly in foil. This helps keep it fresh and tasty for your next meal. Yes, you can prepare it ahead of time! Assemble the layers and cover the dish. Store it in the fridge for up to 24 hours. When you’re ready to bake, just take it out and pop it in the oven. You may need to add a few extra minutes to the cooking time. Absolutely! Eggplant Parmesan Bake is great for meal prep. You can divide it into individual servings. Store each portion in a container for easy lunches or dinners. Just reheat in the oven or microwave when you’re ready to enjoy. You’ll love having a tasty meal ready to go! For the full recipe, check out the Eggplant Parmesan Bake section. In this post, we explored how to make a delicious Eggplant Parmesan Bake. You learned about essential and optional ingredients, cooking tools, and step-by-step instructions. I also shared tips for perfecting the dish, various healthy alternatives, and best storage practices. In closing, preparing this dish can be fun and rewarding. Enjoy making your own Eggplant Parmesan Bake and share it with loved ones. You'll find it easy to customize and savor every bite. Happy cooking!

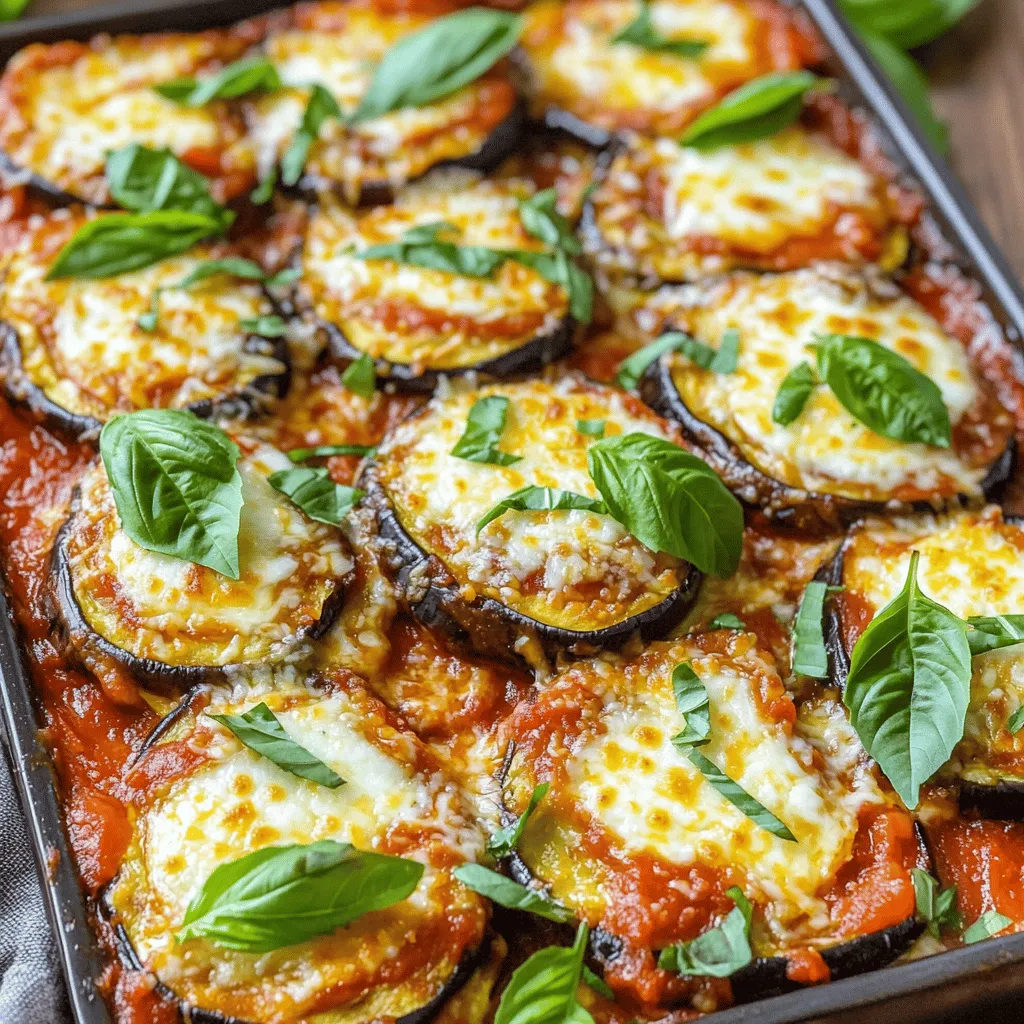
Eggplant Parmesan Bake Savory and Simple Delight

If you crave a hearty meal that’s easy to make, try my Eggplant Parmesan Bake. This dish is a flavorful

- 1 cup red lentils - 1 can full-fat coconut milk - 1 medium onion - 3 cloves garlic - 1-inch piece of ginger - 1 tablespoon curry powder - 1 teaspoon turmeric powder - 1 teaspoon ground cumin - Sea salt and freshly ground black pepper - 1 carrot - 1 bell pepper - Optional garnishes: Fresh cilantro, lime juice Gathering the right ingredients is key for the best coconut curry lentil soup. You need red lentils because they cook quickly. Full-fat coconut milk adds creaminess and rich flavor. Choose a medium onion for sweetness, and use fresh garlic and ginger for a strong base. Next, spices are crucial. Curry powder brings warmth and depth. Turmeric adds a golden hue and health benefits. Ground cumin gives it an earthy taste. Don’t forget sea salt and black pepper to enhance all these flavors. For vegetables, a diced carrot adds color and sweetness. A bell pepper, any color, brings crunch and vibrancy. For a final touch, you can use fresh cilantro and a squeeze of lime juice. These garnishes will brighten the dish and make it pop. You can find the full recipe for this comforting dish to guide you through the cooking process. First, heat the olive oil in a large pot over medium heat. Once the oil shimmers, add the finely chopped onion. Sauté the onions for about 5 minutes until they are soft and clear. This step builds the flavor base. Next, add the minced garlic and grated ginger. Stir them for one minute. You want to release their lovely scents into the air. Now, toss in the diced carrot and bell pepper. Continue to sauté for another 3-4 minutes. This helps the veggies soften and blend in well. After the vegetables soften, sprinkle in the curry powder, turmeric, and cumin. Stir well to coat the veggies in the spices. Toast the spices for about one minute. This step brings out their best flavors. Then, add the rinsed red lentils and pour in the vegetable broth. Increase the heat to bring the mixture to a boil. Once it boils, lower the heat and let it simmer. Cook uncovered for about 20 minutes, until the lentils become tender. They should absorb some broth during this time. Now, gently stir in the coconut milk. Allow the soup to simmer for an extra 5 minutes. If the soup looks too thick, add more broth until it reaches your desired consistency. Season the soup with sea salt, black pepper, and the juice of one lime. Taste it to fine-tune the flavors. Adjust the spices as needed to make it just right. After that, remove the pot from heat. Let it cool slightly before serving. Ladle the soup into bowls and garnish with fresh cilantro. This adds color and freshness to your dish. For the full recipe, check the complete Coconut Curry Lentil Soup guide. - Adjust salt and spices to taste. Start with a little salt. Taste as you go. Add more if needed. Spices can change with cooking time, so check often. - Use homemade vegetable broth for richness. Homemade broth gives a deeper flavor. You can make it with veggie scraps. It adds warmth to the soup. - Add broth for desired consistency. If the soup is too thick, add more broth. Stir it in slowly to find your perfect texture. - Puree for a smoother soup. For a creamy finish, use an immersion blender. Just blend until smooth. You can also use a regular blender in batches. - Serve with extra cilantro. Garnish each bowl with fresh cilantro. It adds color and a fresh taste. - Suggested accompaniments for serving. Pair the soup with crusty bread. Serve with lime wedges for a zesty kick. Enjoy it warm for the best experience. {{image_4}} You can easily swap lentils in this recipe. Use green or brown lentils if you prefer. They add a different texture but still taste great. For those who need dairy-free options, try using coconut yogurt instead of cream. It keeps the creamy flavor without the dairy. Want to boost the nutrition? Add some greens like spinach or kale. These will blend in well and add color. Caramelized onions or roasted garlic can also enhance the flavor. They bring a rich depth that makes each bite special. If you like heat, make it spicier. Add chili powder or fresh peppers to the mix. This kick can make the soup exciting. If you prefer a milder soup, cut down on the spices. Adjusting the spice level lets you control the heat to suit your taste. To store your coconut curry lentil soup, let it cool first. Use an airtight container for storage. Glass or plastic containers work well. Place the soup in the fridge. It stays fresh for up to five days. Always label the container with the date. You can freeze this soup for later. Just make sure it cools completely. Pour it into freezer-safe containers or bags. Leave some space at the top, as soup expands when frozen. To thaw, move the soup to the fridge overnight. Reheat it on the stove or in the microwave. Stir it often to heat evenly. For best taste, eat the soup within five days when stored in the fridge. If you freeze it, enjoy it within three months. Check for signs of spoilage. Look for off smells, mold, or changes in texture. If you see any of these signs, it’s best to toss it. Coconut curry lentil soup lasts about 4 to 5 days in the fridge. Store it in an airtight container. It may separate slightly, so stir well before serving. Always check for any strange smells or changes in texture. Yes, you can make this soup in advance. It actually tastes better the next day. Just cool it down before storing. Reheat it gently on the stove or in the microwave. You can serve this soup with crusty bread or rice. A fresh salad pairs well too. For a special touch, add a dollop of yogurt or a sprinkle of fresh herbs on top. Yes, this recipe is great for meal prepping. Portion it into containers for easy lunches or dinners. It reheats well and saves time during busy weeks. You can use other lentils, but cooking times may vary. Green or brown lentils work, but they take longer to cook. Red lentils break down and make the soup creamy, which is ideal for this dish. For a detailed guide on making this delightful dish, check out the [Coconut Curry Lentil Soup Full Recipe](insert-link-here). You'll find all the ingredients and steps needed to create this warm, comforting meal. This soup is packed with flavor, nutrients, and a touch of spice. It features red lentils that cook quickly and become soft. The creamy coconut milk adds richness, making every bite delightful. I love how the mix of spices transforms simple ingredients into something special. Each bowl brings warmth and comfort, perfect for chilly days or when you need a pick-me-up. Don't forget to garnish with fresh cilantro and a squeeze of lime! It brightens the dish and adds a fresh twist. Enjoy this as a meal on its own or with a crusty piece of bread. You will love how easy and satisfying it is to make! This blog post provides a simple guide for making Coconut Curry Lentil Soup. You learned about the key ingredients, the steps to prepare and cook, and tips for improving flavor. We also discussed ways to store and freeze your soup. With all these insights, you can easily create a warm, healthy meal. Enjoy the process and feel free to make it your own. Your kitchen adventures await!

Coconut Curry Lentil Soup Savory and Comforting Dish

Looking for a warm and easy meal? Coconut Curry Lentil Soup is the perfect choice! It combines creamy coconut milk,

- 4 ears of fresh corn, husked - 3 tablespoons unsalted butter, melted - 1 teaspoon chili powder - 1 teaspoon garlic powder - 1 teaspoon ground cumin - Juice of 2 limes (freshly squeezed) - Salt, to taste - Crumbled cotija cheese (optional, for garnish) - Fresh cilantro, chopped (for garnish) For this chili lime grilled corn, I always choose fresh corn. Fresh corn tastes sweet and juicy. Husk the corn and remove the silky threads. This step ensures your corn is clean and ready for grilling. Next, I melt unsalted butter. This adds a rich flavor. I mix it with chili powder, garlic powder, and ground cumin. These spices give the corn a zesty kick. The juice of fresh limes adds brightness. It brings all the flavors together. Don’t forget salt! It enhances every bite. If you're feeling fancy, sprinkle crumbled cotija cheese on top. It adds a creamy, salty touch. Lastly, I like to garnish with fresh cilantro. It gives a fresh finish to the dish. You can find the full recipe above if you’d like to dive deeper into the cooking process! Start by preheating your grill to medium-high heat. This helps create a great char on the corn. A hot grill also cooks the corn faster. Give it about 10 minutes to heat up well. Next, prepare the corn. Remove the husks and silky threads from each ear. This step is key for even cooking. Pat the corn dry with a paper towel. This helps the butter mix stick better. In a small bowl, mix melted butter, chili powder, garlic powder, cumin, and lime juice. Whisk well to combine. Now, use a basting brush to coat each ear of corn. Make sure to cover all sides. This will add amazing flavor to your corn. Place the coated corn directly on the grill grates. Close the grill lid. Grill the corn for about 10-12 minutes. Rotate the corn every few minutes for even cooking. You want it tender and slightly charred. Once cooked, remove the corn from the grill. Let it cool for a minute. Then, add salt to taste. If you like, sprinkle crumbled cotija cheese on top. Finish with chopped fresh cilantro for a pop of color. Serve it hot and enjoy this fresh and zesty delight! For the full recipe, refer to the earlier section. To get great grill marks, start with a hot grill. Heat your grill to medium-high. Clean the grates well to prevent sticking. Place your corn at a 45-degree angle on the grill. Don't move it for a few minutes; this helps form those nice marks. Rotate the corn every few minutes for even cooking and marks. The goal is to have a charred look without burning the corn. You can spice up your chili lime grilled corn with other seasonings. Try adding smoked paprika for a deeper flavor. A pinch of cayenne pepper gives it a nice kick. You can also mix in some cumin for warmth. If you like it sweeter, consider a touch of brown sugar. Just remember to keep it balanced; you want the lime and chili to shine through. Serve your chili lime grilled corn fresh off the grill. I love to place it on a wooden platter for a rustic touch. Drizzle any leftover chili lime butter over the top. Adding lime wedges on the side lets guests squeeze more lime juice as they like. You can also pair it with a light salad or grilled meats. For an extra treat, top with crumbled cotija cheese and chopped cilantro. This adds flavor and a beautiful look. For the full recipe and more ideas, check out the complete guide. {{image_4}} You can mix up the flavors of your chili lime grilled corn. Try adding smoked paprika for a deeper taste. You might also use cayenne pepper if you want more heat. For a sweeter twist, sprinkle some brown sugar. This will balance the spice and lime. You can also use fresh herbs, like oregano or thyme, for added freshness. These simple swaps keep the dish exciting and fun. Grilling corn on the cob is a classic method. It gives you that perfect char and smoky flavor. The kernels stay juicy and tender. If you prefer, you can cut the corn off the cob after grilling. This method is great for salads or salsas. It makes for easier eating, especially at parties. Just remember to use a sharp knife and a steady hand to avoid spills! Chili lime grilled corn is already a great choice for vegetarians. To make it vegan, simply swap the butter for olive oil or vegan butter. This keeps the flavor while making it plant-based. You can also skip the cotija cheese or use a dairy-free cheese alternative. This way, everyone can enjoy this zesty dish. Don't forget to add extra lime juice for that fresh taste! Try these variations to suit your taste buds. For the full recipe, click here: [Full Recipe]. To store leftover grilled corn, let it cool first. Wrap each ear tightly in plastic wrap. You can also place them in an airtight container. This helps keep the corn fresh. Store it in the fridge and enjoy it within three days. Reheating grilled corn is simple. You can use the microwave or grill. For the microwave, place the corn on a plate and cover it with a damp paper towel. Heat for about one minute. For the grill, preheat it to medium heat. Place the corn on the grill for about five minutes, turning occasionally. This will give it a nice warmth and a bit of char. Freezing grilled corn is a great option for later meals. First, let the corn cool completely. Then, remove the kernels from the cob using a sharp knife. Store the kernels in a freezer bag. Be sure to remove as much air as possible before sealing. You can freeze the corn for up to six months. When you’re ready to use it, thaw it in the fridge overnight or use it straight from the freezer in soups or salads. For the full recipe, check out the Chili Lime Grilled Corn section above. Yes, you can use frozen corn. However, fresh corn gives the best flavor. Frozen corn needs to thaw and drain well. This helps prevent excess water from affecting the grill. Use sweet corn for grilling. Varieties like Silver Queen or Sweet Jubilee work well. These types have juicy kernels that caramelize nicely when grilled. Chili Lime Grilled Corn has a mild spice. The chili powder adds flavor, not heat. You can adjust the spice level by adding more chili powder if desired. To make it dairy-free, skip the butter and cotija cheese. Use olive oil or a dairy-free butter substitute. This keeps the corn tasty without dairy. Serve Chili Lime Grilled Corn with tacos or grilled chicken. It pairs well with fresh salads too. For a fun twist, add it to your favorite salsa recipe. Chili lime grilled corn is a tasty dish with fresh ingredients and simple steps. We covered everything from prepping the corn to grilling it just right. I included tips for standout grill marks and flavor boosts. You can even customize it with different spices and storage methods. Enjoy this dish for your next cookout. It’s easier than you think and sure to impress! Your next meal will be full of flavor and easy fun. Get grilling and enjoy your chili lime corn!

Chili Lime Grilled Corn Fresh and Zesty Delight

Are you ready to elevate your summer cookouts? Chili Lime Grilled Corn is bursting with flavor and easy to make.

To make delicious maple glazed Brussels sprouts, you need just a few key items. Here’s what you’ll need: - 1 lb Brussels sprouts, trimmed and halved - 3 tablespoons pure maple syrup - 2 tablespoons extra virgin olive oil - 1 teaspoon sea salt - ½ teaspoon freshly ground black pepper - ½ teaspoon garlic powder - ¼ teaspoon chili flakes (optional for a bit of heat) These ingredients create a sweet and savory glaze that brings out the best in the Brussels sprouts. To take your Brussels sprouts to the next level, consider these optional ingredients: - ¼ cup walnuts, roughly chopped (for added crunch) - Fresh parsley, finely chopped (for garnish) These add-ins add texture and freshness, making your dish even more enjoyable. To prepare your maple glazed Brussels sprouts, you will need a few basic tools: - Large mixing bowl - Baking sheet - Parchment paper (for easy cleanup) - Spatula or your hands (to toss the sprouts) Having these tools on hand makes the cooking process quick and easy. You can find the full recipe [here](#). To start, gather your ingredients. You need 1 pound of Brussels sprouts, trimmed and halved. These small, green veggies pack a punch of flavor. You also need olive oil, maple syrup, sea salt, black pepper, garlic powder, and chili flakes for extra heat. 1. Preheat your oven to 400°F (200°C). This heat helps the Brussels sprouts roast properly. 2. In a large bowl, mix the halved Brussels sprouts with olive oil, salt, pepper, garlic powder, and chili flakes. Toss them well to coat every sprout. Roasting gives Brussels sprouts a crispy outside and soft inside. Here’s how to do it: 1. Line a baking sheet with parchment paper. This makes for easy cleanup. 2. Spread the seasoned Brussels sprouts in a single layer on the sheet. Give them space to roast evenly. 3. Drizzle maple syrup over the sprouts. This creates a sweet glaze that enhances the flavor. 4. Roast in the oven for 20-25 minutes. Stir the sprouts halfway through for even browning. If you like a crunchy texture, add walnuts for the last five minutes. They’ll toast up nicely and add a great bite. Once the Brussels sprouts are golden and tender, take them out of the oven. Let them cool for a few minutes. Transfer them to a serving dish. Sprinkle freshly chopped parsley on top. This adds a pop of color and freshness. For an extra touch, you can add a few more walnuts on top. This dish looks beautiful and tastes even better. For the full recipe, check the complete details above. Enjoy these flavorful bites! When picking Brussels sprouts, look for bright green ones. They should feel firm and tight. Avoid any that are yellow or have brown spots. Smaller sprouts often taste sweeter. Check the stems too; they should be fresh and moist. You can change the sweetness by adding more or less maple syrup. If you want a kick, add more chili flakes. For a milder flavor, skip the heat completely. Taste the mixture before roasting. This way, you can find the perfect balance for your taste buds. If your sprouts are soggy, they might be too crowded on the baking sheet. Give them space to roast well. If they burn, reduce the oven temperature slightly. For undercooked sprouts, extend the roasting time by a few minutes. Don't forget to toss them halfway for even cooking. For the full recipe, check out the Maple Glazed Brussels Sprouts 🥦. {{image_4}} Adding bacon brings a savory twist to maple glazed Brussels sprouts. The crispy bacon enhances the sweet glaze with its salty crunch. To make this version, cook your bacon first. Chop it into small pieces and fry until crisp. After you prepare the Brussels sprouts as usual, mix in the bacon before roasting. You can even sprinkle some on top before serving for added flavor. For a vegan option, we can easily swap out the honey or any animal products. Use pure maple syrup, which you already have in the recipe. It adds the same rich sweetness without using animal ingredients. You can also combine the maple syrup with a bit of balsamic vinegar. This adds a nice tang that balances the sweet. Toss this mixture with the Brussels sprouts before roasting for a full flavor. Mixing in seasonal vegetables makes this dish even more colorful and tasty. Carrots, sweet potatoes, or even squash can add lovely textures. Just chop them into similar sizes as the Brussels sprouts, so they cook evenly. Toss them with the same maple glaze and roast them together. This not only enhances the dish but also makes it more filling. Enjoy the variety and the burst of flavors! After enjoying your maple glazed Brussels sprouts, store any leftovers in an airtight container. This keeps them fresh and tasty. Make sure they cool down first. You can keep them in the fridge for up to three days. If you notice any excess moisture, use a paper towel to absorb it. This step helps prevent sogginess. When reheating, the goal is to keep your Brussels sprouts crispy. The best method is to use an oven. Preheat it to 350°F (175°C). Spread the sprouts on a baking sheet and heat for about 10 minutes. This method helps revive their crunch and flavor. You can also use a skillet on medium heat. Just stir them gently until warmed through. Avoid microwaving, as it can make them soft. If you want to store them longer, freezing is a great option. First, blanch the sprouts in boiling water for two minutes. This helps lock in flavor and color. Next, cool them in ice water. Once cooled, drain and dry them well. Place the sprouts in a freezer-safe bag or container. Remove as much air as possible to prevent freezer burn. They can last up to three months in the freezer. When ready to eat, thaw in the fridge overnight before reheating. For the full recipe, visit the original article. To make Maple Glazed Brussels Sprouts, you need just a few simple steps. First, preheat your oven to 400°F (200°C). Then, trim and halve 1 pound of Brussels sprouts. In a bowl, mix the sprouts with 2 tablespoons of olive oil, 1 teaspoon of salt, ½ teaspoon of black pepper, and ½ teaspoon of garlic powder. Toss until they are well coated. Next, spread the sprouts on a lined baking sheet in a single layer. Drizzle 3 tablespoons of pure maple syrup over them. Roast for 20-25 minutes, stirring halfway for even cooking. If you want extra crunch, add ¼ cup of chopped walnuts during the last 5 minutes. Finally, garnish with parsley before serving. You can find the Full Recipe above for more details. Yes, you can add other vegetables to your Maple Glazed Brussels Sprouts. Carrots, sweet potatoes, or even parsnips work well. Cut them into similar sizes as the Brussels sprouts. This helps them cook evenly. Toss them in the same seasonings for a tasty mix. Just keep in mind that cooking times may change slightly. Brussels sprouts are packed with nutrients. They are high in vitamins C and K, which are important for your immune system and bone health. They also contain fiber, which helps with digestion. Plus, Brussels sprouts are low in calories, making them a great choice for a healthy side dish. Eating them can support heart health due to their antioxidants and anti-inflammatory properties. To sum up, we've explored how to make delicious maple glazed Brussels sprouts. You learned about essential ingredients, step-by-step cooking tips, and creative variations. Remember to choose fresh sprouts and adjust flavors to your taste. Don't hesitate to try new add-ins or methods to make this dish your own. With these tips, you'll cook up a tasty side that everyone will enjoy. Happy cooking!

Maple Glazed Brussels Sprouts Flavorful Side Dish

Looking for a side dish that adds a burst of flavor to any meal? Maple Glazed Brussels Sprouts are your

To make zesty shrimp and grits, you need the following: - 1 cup stone-ground grits - 4 cups water or chicken broth - 1 lb medium shrimp, peeled and deveined - 1/2 cup yellow bell pepper, diced - 1/2 cup red bell pepper, diced - 1/4 cup green onion, sliced (reserve some for garnish) - 3 cloves garlic, minced - 1 teaspoon smoked paprika - 1/2 teaspoon cayenne pepper (adjust to your spice preference) - 1/2 teaspoon black pepper - 1 tablespoon olive oil - 2 tablespoons butter - 1 tablespoon fresh lemon juice - Salt, to taste - 1/4 cup shredded cheddar cheese (optional) The key ingredients make this dish special. The stone-ground grits add a rich, creamy base. They have a wonderful texture that you won't find in instant grits. Shrimp brings a sweet and savory taste. The fresh lemon juice brightens the dish, balancing the flavors. Smoked paprika gives a warm, smoky depth, while cayenne pepper adds a spicy kick. The bell peppers add color and crunch, making every bite exciting. For extra richness, you can add shredded cheddar cheese. It melts beautifully into the grits, making them even creamier. You might also consider using chicken broth instead of water for more flavor. If you want to elevate the dish, try adding some fresh herbs, like parsley or cilantro. They will enhance the overall taste and add freshness. Check out the Full Recipe for more ideas to customize your dish! Start by boiling water or chicken broth in a medium pot. Add a pinch of salt for taste. Gradually whisk in the stone-ground grits to prevent lumps. Lower the heat and let it simmer. Stir often for about 15 to 20 minutes. The grits should become creamy and tender. If you want extra richness, add shredded cheddar cheese in the last few minutes. While the grits cook, heat olive oil and one tablespoon of butter in a large skillet. Use medium-high heat to get it hot. Once ready, toss in the minced garlic. Sauté it for about 30 seconds until you smell the aroma. Then, add the diced yellow and red bell peppers. Cook them for 3 to 4 minutes. They should soften and look bright. Now, it’s time for the shrimp. Add the peeled and deveined shrimp to the skillet. Sprinkle in smoked paprika, cayenne pepper, black pepper, and a little salt. Sauté everything for 3 to 5 minutes. The shrimp should turn pink and opaque when done. Once cooked, remove the skillet from heat. Stir in the last tablespoon of butter and fresh lemon juice. This will add extra flavor and richness. For the full recipe, you can check the details above. To get the best texture for your grits, use stone-ground grits. Start by boiling water or chicken broth. Add a pinch of salt. Slowly whisk in the grits to avoid lumps. Cook on low heat for about 15 to 20 minutes. Stir often until they are creamy. If you want, mix in cheddar cheese for extra flavor and richness. Adjusting the spice level is easy. Start with the recipe's cayenne pepper. Use half a teaspoon if you like some heat. If you want more, add a pinch more. If you prefer milder flavors, skip the cayenne. You can also add fresh lemon juice to balance the spice. Serve your zesty shrimp and grits in shallow bowls. This gives a rustic feel to the dish. For a pop of color, sprinkle extra smoked paprika on top. Add sliced green onions for brightness. You can also serve lemon wedges on the side. This allows guests to add more zest as they like. For added richness, try including crispy bacon bits or sautéed spinach on top. For the complete recipe, check out the Full Recipe section! {{image_4}} If you want a twist on classic grits, try using polenta instead. Polenta has a similar texture and can give a new flavor. Another choice is cauliflower grits. Simply steam and blend cauliflower until smooth. This option is low in carbs and very creamy. You can switch shrimp for other proteins. Chicken breast or sausage works well. Just make sure to adjust the cooking time. For a more gourmet touch, use scallops. They cook quickly and add a nice flavor. To make this dish vegan, skip the shrimp and use mushrooms instead. Mushrooms provide a hearty texture. Add in some cooked lentils for extra protein. You can also use vegetable broth when making the grits. This keeps the dish rich and full of flavor. For the full recipe, check out the complete guide. After enjoying your zesty shrimp and grits, let any leftovers cool. Place them in an airtight container. Store the container in the fridge for up to three days. This keeps the flavors fresh and the shrimp safe to eat later. To reheat, you can use the microwave or the stove. For the microwave, place your serving in a bowl. Heat in short bursts, stirring in between. This helps to heat evenly. If using the stove, add a splash of water or broth in a pan. Heat over low heat, stirring gently, until warm. This keeps the grits creamy. If you want to save your zesty shrimp and grits for later, freezing is an option. First, let the dish cool completely. Then, place it in a freezer-safe container. You can freeze it for up to three months. When ready to eat, thaw it in the fridge overnight before reheating. Keep in mind that the texture may change a bit. The shrimp can become a little rubbery, but the flavors will still be great. Shrimp and grits come from the Southern United States. The dish started in South Carolina. It began as a simple meal for fishermen. They used local shrimp and ground corn. Over time, it grew into a dish served in homes and restaurants. It now has many tasty variations. The zesty kick in my recipe adds a modern twist. Yes, you can prepare shrimp and grits ahead of time. Cook the grits and shrimp separately. Store them in airtight containers in the fridge. When ready to eat, reheat both. Add a splash of water or broth to the grits. This keeps them creamy. Combine them just before serving for the best flavor. Zesty shrimp and grits pair well with many sides. Here are some tasty options: - Collard greens: Their earthy flavor complements the dish. - Fried green tomatoes: They add a crisp texture. - Cornbread: This sweet, fluffy bread balances the spices. - Caesar salad: The crisp greens cut through the richness. Feel free to mix and match your favorites! For the full recipe, check out the detailed steps above. This article covered everything you need for shrimp and grits. We explored key ingredients that boost flavor and optional additions for richness. I shared step-by-step cooking instructions and valuable tips to perfect texture and spice levels. Variations, like creamy alternatives and protein swaps, give you flexibility. Plus, I provided storage and reheating tips to keep your dish fresh. Now, you are all set to create a tasty shrimp and grits dish that you can enjoy anytime. Happy cooking!

Zesty Shrimp and Grits Flavorful Southern Delight

Get ready to experience a burst of flavor with my Zesty Shrimp and Grits recipe! This Southern classic combines juicy

- Firm tofu - Cornstarch - Vegetable oil - Cooked quinoa - Kale - Cherry tomatoes - Avocado - Cucumber - Shredded carrots - Tahini - Fresh lemon juice - Pure maple syrup - Salt and pepper - Sesame seeds To create a Crispy Tofu Buddha Bowl, you'll want to gather key ingredients. Firm tofu is the star here. It gives the bowl its protein and texture. Cornstarch helps the tofu become crisp during cooking. Vegetable oil is perfect for frying the tofu until golden brown. You’ll also need cooked quinoa as the base. It’s filling and nutritious. Fresh kale adds color and flavor. Cherry tomatoes provide a juicy pop. Sliced avocado brings creaminess, while cucumber gives a nice crunch. Shredded carrots add a hint of sweetness. For the dressing, tahini is a must. It adds richness and depth. Fresh lemon juice brightens the flavor. Pure maple syrup gives a touch of sweetness. Remember to season with salt and pepper to enhance all those great tastes. Finally, a sprinkle of sesame seeds will add a delightful finish. - Other vegetables (bell peppers, radishes) - Proteins (chickpeas, edamame) - Additional dressings (ginger dressing, soy sauce) You can customize your Buddha bowl with optional add-ins. Try other vegetables like bell peppers or radishes for extra crunch. If you want more protein, add chickpeas or edamame. You can also switch up the dressing. Ginger dressing or soy sauce can give a fun twist. For the full experience, check the Full Recipe. It guides you step-by-step through this delicious dish. First, you need to press the tofu. Pressing helps remove water. This step is key to making crispy tofu. Wrap the tofu in a clean towel and place a heavy object on it. Let it sit for about 15 minutes. Next, cut the pressed tofu into cubes. Aim for bite-sized pieces. This will help them cook evenly and be easy to eat. Now, it's time to coat the tofu. In a bowl, sprinkle the cornstarch over the tofu cubes. Toss gently to coat each piece evenly. This coating gives the tofu its crispy texture. Heat the vegetable oil in a non-stick skillet on medium heat. When the oil is hot, add the cornstarch-coated tofu. Cook for 5-7 minutes. Turn the cubes often. You want them golden brown and crispy. Once done, take them out of the skillet and set aside. Let's sauté the kale next. In the same skillet, add the chopped kale. Cook for 2-3 minutes until it wilts. Add a pinch of salt and pepper for flavor. Next, create the tahini dressing. In a small bowl, whisk together tahini, lemon juice, maple syrup, and a splash of water. Mix until it's smooth. Adjust the thickness by adding more water if needed. Now, it's time to assemble the Buddha bowl. Start with a scoop of cooked quinoa at the bottom of each bowl. Layer the ingredients on top. Add the sautéed kale, crispy tofu, cherry tomatoes, avocado, cucumber, and shredded carrots. Make it look colorful and inviting. Finally, drizzle the tahini dressing on top. Sprinkle with sesame seeds for that perfect finish. Enjoy your vibrant and tasty Buddha bowl right away! For more details, check the Full Recipe. To get the best crispy tofu, start with a good pressing technique. This means removing excess moisture. Wrap your tofu in a towel and place something heavy on top. Let it sit for about 15 minutes. This step is key for crispiness. Next, choose the right cooking temperature. Heat your skillet over medium heat. If the oil sizzles when you add the tofu, it's ready. Cook the tofu for 5-7 minutes. Turn it often to brown all sides. Golden and crunchy is your goal. You can easily customize your Buddha bowl to suit your taste. Swap out ingredients based on what you have. For example, try bell peppers or radishes in place of cherry tomatoes. You can also add chickpeas or edamame for extra protein. To enhance flavors, consider adding spices. A sprinkle of smoked paprika or chili flakes can add a nice kick. Fresh herbs like cilantro or basil can brighten the dish. Use what you love to make it your own. When serving your Buddha bowl, think about sides. Pair it with a light salad or crusty bread. A refreshing drink, like iced tea or lemonade, complements it well. This dish is great for lunch or dinner. Enjoy it right after you make it for the best taste. You can also prepare it in advance for a meal later. Just store it in the fridge. For the full recipe, check the Crispy Tofu Buddha Bowl. {{image_4}} You can switch up your Buddha bowl by changing its theme. - Mediterranean Buddha Bowl: Use ingredients like roasted red peppers, olives, and feta cheese. Swap quinoa for couscous. Add a lemon-olive oil dressing for a fresh touch. - Asian-inspired Buddha Bowl: Try using edamame, seaweed, and sesame seeds. Substitute quinoa with brown rice or soba noodles. Drizzle with a soy-ginger dressing for extra flavor. This bowl fits many diets with easy swaps. - Ingredient Swaps for Dietary Needs: Use chickpeas instead of tofu for plant-based protein. If you're gluten-free, ensure your soy sauce is gluten-free. Substitute tahini with sunflower seed butter if you have nut allergies. - Homemade Dressings for Variety: Make a creamy avocado dressing or a spicy peanut sauce. These add unique flavors and keep meals exciting. Adjust your ingredients with the seasons. - Adjusting Ingredients for Each Season: In spring, add asparagus or peas. Use squash and sweet potatoes in fall. This keeps your bowl fresh and vibrant year-round. - Utilizing Local Produce: Visit local farmers' markets for fresh vegetables. This not only supports farmers but also ensures the best flavor. Fresh ingredients elevate your Buddha bowl every time. For the full recipe, check out the Crispy Tofu Buddha Bowl. To keep your Crispy Tofu Buddha Bowl fresh, store it in the fridge. Use an airtight container to prevent moisture loss. You can keep it for up to three days. If you want to store it longer, consider freezing. For freezing, separate the tofu and vegetables. Store each in a freezer-safe bag or container. This way, they will hold their texture better. When reheating, use a skillet or the oven. This helps keep the tofu crispy. If you use a microwave, place a damp paper towel over the bowl. This keeps moisture in and prevents dryness. Heat in short intervals, stirring often to warm it evenly. Typically, the Buddha bowl lasts about three days in the fridge. Signs of spoilage include a sour smell or a change in color. If the tofu becomes slimy or the veggies wilt, it’s time to toss it. Always trust your senses when checking food freshness. Enjoy your meal, but stay safe! To make crispy tofu, you need to start with firm tofu. First, press the tofu to remove excess water. This step is key for crispiness. Next, cut the tofu into cubes. Coat these cubes with cornstarch evenly. This coating creates a crunchy texture when fried. Heat vegetable oil in a skillet over medium heat. Add the tofu cubes, cooking until golden brown, about 5-7 minutes. Flip them as needed for even cooking. You will love the crispy results! Yes, you can prepare parts of this recipe ahead of time. Cooked quinoa can be stored in the fridge for up to five days. You can also make the tahini dressing and keep it in an airtight container. However, I recommend cooking the tofu fresh for the best texture. If you want to save time, you can chop the veggies in advance. Just store them in the fridge, and you’ll have a quick meal ready! If you want to switch up your grains, several options work well. You can use brown rice, farro, or barley as tasty substitutes. Each grain brings its own flavor and texture. If you're looking for gluten-free options, try millet or cauliflower rice. These alternatives will still give you a hearty base for your Buddha bowl. Yes, you can substitute tahini if needed. Sunflower seed butter or almond butter can work great. They will give a similar creamy texture. If you want a lighter option, use Greek yogurt or a vegan yogurt. Just remember that the flavor will change, so adjust your seasonings. Each option will still make a delicious dressing for your bowl. This recipe yields two generous servings. If you need to feed more people, simply double the ingredients. You can easily scale up the recipe to serve a crowd. Just keep the cooking times in mind, especially for the tofu. Enjoy sharing this fresh and flavorful meal with others! In this blog post, we explored how to create a delicious Buddha bowl. You learned about essential ingredients like firm tofu, cooked quinoa, and kale. I shared step-by-step instructions for preparing and cooking tofu, along with tips for perfecting your dish. Remember, you can customize it with add-ins and variations to suit your taste. Whether you opt for a Mediterranean or Asian-inspired bowl, the possibilities are endless. Enjoy this healthy, satisfying meal that you can easily adapt to your needs!

Crispy Tofu Buddha Bowl Fresh and Flavorful Delight

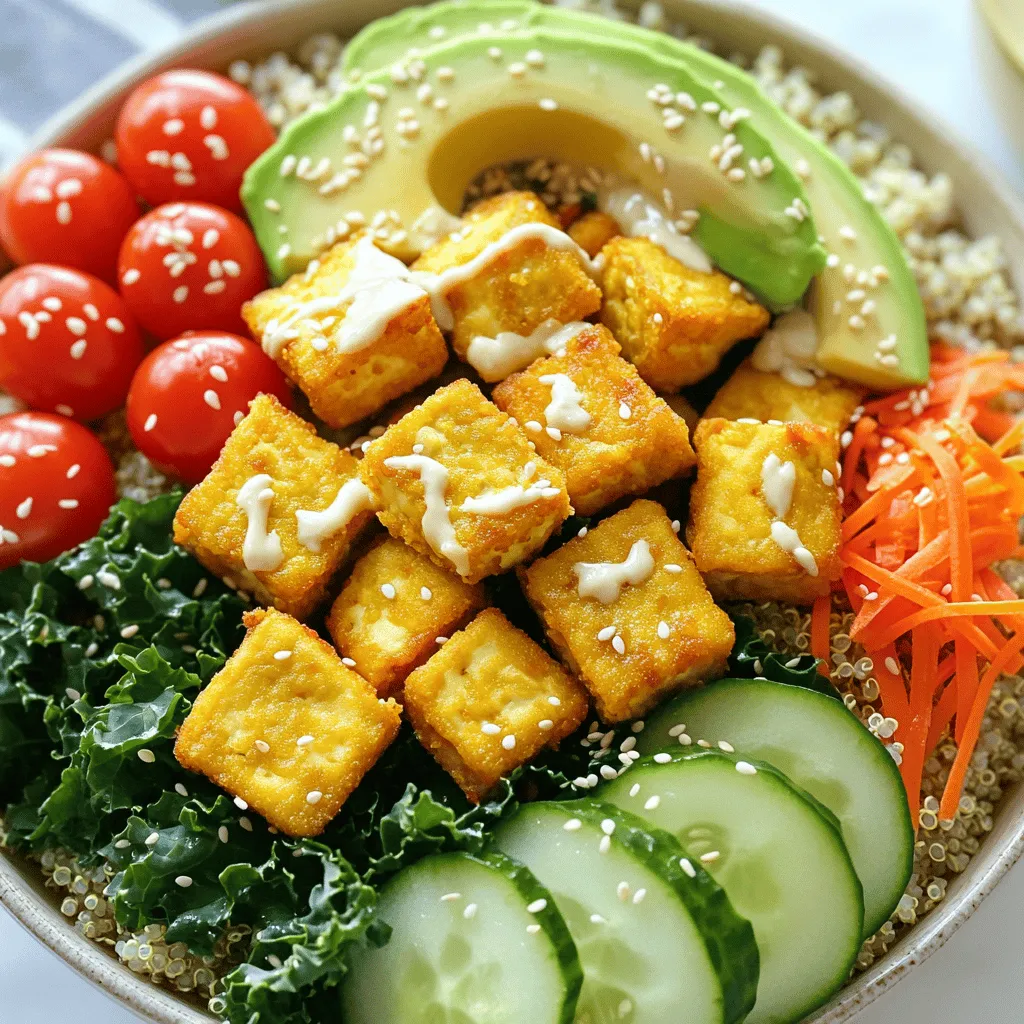
If you’re craving a fresh, healthy meal that’s packed with flavor, look no further! My Crispy Tofu Buddha Bowl combines

- 1 lb boneless chicken thighs, sliced into strips - 2 tablespoons corn starch - 2 tablespoons vegetable oil (divided) - 1 red bell pepper, sliced into thin strips - 1 green bell pepper, sliced into thin strips - 1 cup snap peas, trimmed and cleaned - 3 cloves garlic, minced - 1/4 cup honey - 3 tablespoons soy sauce (low sodium preferred) - 1 tablespoon rice vinegar - 1 teaspoon fresh ginger, grated - Salt and black pepper to taste - Sesame seeds (for garnish) - Chopped green onions (for garnish) - Fresh garlic and ginger - Corn starch for crispiness - Sesame seeds and green onions for topping When I make this dish, I always use fresh ingredients. The chicken thighs give a rich flavor. Bell peppers add color and crunch. Snap peas make it bright and fresh. The honey, soy sauce, and rice vinegar create a sweet and savory sauce. I love using garlic and ginger for that extra kick. Corn starch helps the chicken get that nice crisp. Finally, sesame seeds and green onions make it look great and taste even better. For the full recipe, check out the complete directions. This meal is quick and fun to make, perfect for busy nights! - Prepare chicken with corn starch: In a medium bowl, place the sliced chicken thighs. Sprinkle corn starch over the chicken. Toss until each piece is well coated. This helps the chicken get crispy when cooked. - Whisk together sauce ingredients: In a small bowl, combine honey, soy sauce, and rice vinegar. Use a whisk to mix until smooth. This sauce adds a sweet and savory flavor to your stir-fry. - Sauté chicken until golden: Heat 1 tablespoon of vegetable oil in a large pan over medium-high heat. Once the oil shimmers, add the coated chicken to the pan. Season with salt and black pepper. Cook for 5-7 minutes, stirring until the chicken is golden and cooked through. Remove the chicken and set it aside. - Stir-fry vegetables and aromatics: In the same pan, add the remaining tablespoon of vegetable oil. When hot, add minced garlic and grated ginger. Sauté for about 30 seconds until fragrant. Be cautious not to let the garlic burn. Then, add sliced red and green bell peppers and snap peas. Stir-fry for 3-4 minutes until the veggies are bright and tender but still crunchy. - Pour sauce over the stir-fry: Return the cooked chicken to the pan with the veggies. Pour the honey-soy sauce mixture evenly over everything. Stir gently to combine. Cook for another 2-3 minutes until the sauce thickens and coats the chicken and vegetables. - Adjust seasoning to taste: Taste the stir-fry before serving. If you want it sweeter, add more honey. If you prefer it savory, adjust with more soy sauce, salt, or pepper. This step lets you customize the dish to your liking. For the full recipe, check the details provided earlier. Enjoy your cooking! Corn starch makes the chicken crispy. It forms a light coating that fries well. Start by tossing the chicken in corn starch before cooking. This step is key for a great texture. Balancing sweetness and savoriness is important. Honey adds sweetness, while soy sauce adds saltiness. Mix these well for a tasty sauce. You can taste and adjust as you cook. If you want it sweeter, add more honey. For more saltiness, add soy sauce. Serve this dish with white rice or noodles. Both options soak up the sauce well. You can also add a side salad for freshness. Try serving with steamed broccoli for more color and nutrition. For a twist, pair it with fried rice. {{image_4}} You can swap chicken for shrimp or tofu. Shrimp cooks quickly and adds a nice texture. Simply sauté shrimp for about 3-4 minutes until they turn pink. For tofu, choose firm or extra-firm. Cut it into cubes and press out excess water. Then, sauté until golden brown. Both options work well with the honey garlic sauce. Feel free to use seasonal veggies. Broccoli, carrots, or zucchini add color and flavor. You can also try baby corn or mushrooms. Just remember to cut them into bite-sized pieces so they cook evenly. Each veggie brings its own taste, enhancing your dish. Want some heat? Add sliced chili peppers or a dash of chili sauce. This gives a nice kick to the dish. If you like crunch, toss in some chopped nuts like cashews or peanuts. They add texture and a nutty flavor to your stir-fry. Enjoy these fun twists to make your meal even better! For the full recipe, check out the Full Recipe section. After you make Honey Garlic Chicken Stir-Fry, let it cool first. Store leftovers in an airtight container. Place the container in the fridge for up to three days. This keeps the chicken and veggies fresh. Make sure to label the container with the date. That way, you can track how long it has been there. If you want to save it for later, you can freeze the stir-fry. Use a freezer-safe container or bag. Squeeze out as much air as you can to avoid freezer burn. You can freeze it for up to three months. Make sure to label it with the date and name. This helps you remember what’s inside. When you're ready to eat, you can reheat it in a few ways. The microwave is quick. Just put it in a bowl, cover it, and heat for 2-3 minutes. Stir halfway through. You can also use a pan. Heat it on medium, stirring until warm. This helps keep the texture nice. Avoid cooking it too long, or the chicken may become tough. Enjoy your meal! It takes just 25 minutes to make this dish. You will spend 15 minutes prepping and 10 minutes cooking. This quick time makes it great for busy nights. You can have a delicious meal ready in no time. Yes, you can prepare some parts in advance. You can slice the chicken and veggies ahead of time. Just store them in the fridge until you are ready to cook. The sauce can also be made earlier. This way, you save time during cooking. You can swap chicken thighs for chicken breasts for less fat. Adding more veggies, like broccoli or carrots, boosts nutrition. Using brown rice or quinoa instead of white rice adds more fiber. You can also reduce honey for less sugar. Yes, you can use tamari instead of regular soy sauce. Tamari is a gluten-free option that tastes great. Make sure to check your rice vinegar, as some brands may contain gluten. With these swaps, you can enjoy a gluten-free honey garlic chicken stir-fry. For the full recipe, check out the section above. This blog post covered a tasty Honey Garlic Chicken Stir-Fry. We explored key ingredients like chicken, bell peppers, and honey. You learned step-by-step instructions, from prepping to cooking. I shared tips on achieving crispiness and balancing flavors. You also saw variations with alternative proteins and veggies. Remember, cooking is fun! Try new flavors and enjoy this dish with your favorite sides.

Honey Garlic Chicken Stir-Fry Quick and Tasty Meal

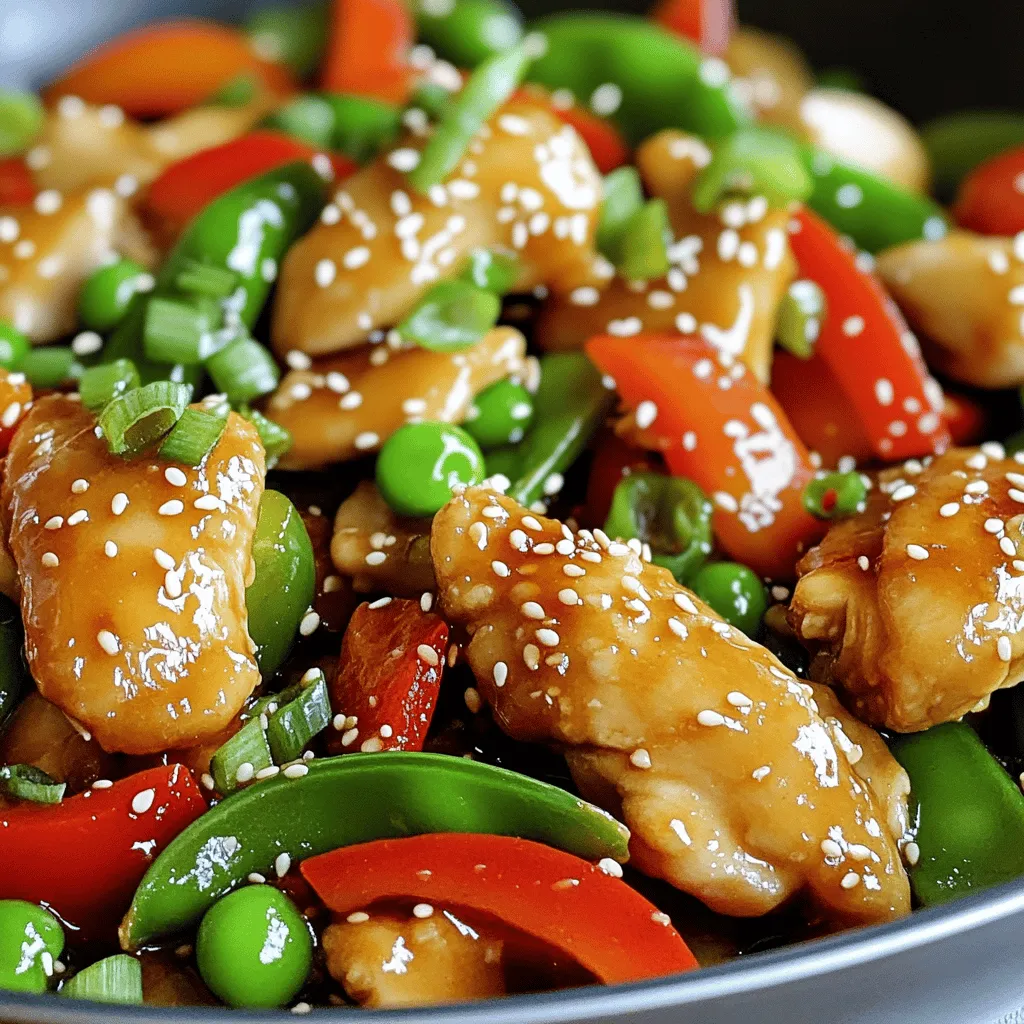
If you’re looking for a quick and tasty meal that delights your taste buds, you’ve found it! This Honey Garlic

- 2 cans (16 oz each) refrigerated biscuit dough - 3 medium Granny Smith apples, peeled and diced - 1 cup caramel sauce (store-bought or homemade) - 1 cup packed brown sugar - 1 teaspoon ground cinnamon - 1/2 cup unsalted butter, melted - 1 cup chopped pecans (optional) - 1/2 teaspoon pure vanilla extract Gathering these ingredients is the first step to making your caramel apple monkey bread. I love using Granny Smith apples for their tartness. It balances well with the sweet caramel and brown sugar. The biscuit dough serves as a fluffy base, making it easy to pull apart. You can choose store-bought caramel sauce for speed or make your own for a special touch. If you like nuts, consider adding pecans for a crunchy bite. The melted butter brings richness, while the cinnamon adds warmth and spice. Make sure you have everything on hand before you start. This will help you feel organized and ready to create a delicious treat. If you want the full recipe, it’s yours to explore! - Preheat your oven to 350°F (175°C). - Grease the bundt pan thoroughly. This will help the monkey bread come out easily. - Combine diced apples, brown sugar, and cinnamon. - Toss well until apples are coated. This mix adds a sweet and spicy flavor. - Open and cut each biscuit into quarters. - Roll each piece into a ball and dip in melted butter. The butter helps the dough stay moist. - Alternate layers of biscuit balls and apple mixture. - Drizzle caramel sauce on top. This creates a delicious, gooey center. - Place in the oven and bake for 30-35 minutes. - Check for doneness with a toothpick. It should come out clean when done. - Invert onto a serving platter and drizzle with more caramel sauce. - Serve warm to enjoy the melty goodness. For more detailed steps, check the Full Recipe. For easy peeling, use a sharp peeler. Start at the top and make a long, smooth stroke. Turn the apple as you go. This helps keep the peel in one piece. If you want even dicing, cut the apple in half first. Then, slice each half into wedges. Finally, chop the wedges into small cubes. To make a simple caramel sauce, follow this easy recipe. In a saucepan, heat 1 cup of sugar over medium heat. Stir until it melts and turns golden brown. Add 1/2 cup of heavy cream slowly. Be careful, as it will bubble up. Stir until smooth. For storage, let it cool and pour it into a jar. Keep it in the fridge for up to two weeks. Watch for signs that your monkey bread is done. It should be golden brown and puffed up. Insert a toothpick into the center. If it comes out clean, it's ready. Every oven is different, so you may need to adjust baking time. If your monkey bread browns too fast, cover it with foil. This will help it bake evenly. {{image_4}} You can easily change the taste of your caramel apple monkey bread. Try adding spices like nutmeg or allspice. These spices pair well with the sweet apples and caramel. You can also use different types of apples. Honeycrisp or Fuji apples bring a sweeter flavor. If you prefer tartness, stick with Granny Smith apples. Each type of apple adds its own unique twist to the dish. If you need gluten-free options, look for gluten-free biscuit dough. Many brands now offer great alternatives that taste fantastic. For those on a vegan diet, you can swap out butter with coconut oil or a vegan butter. You can also use a vegan caramel sauce. Just make sure to check the labels to ensure they fit your needs. Get creative with add-ins and toppings! You can incorporate chocolate chips or dried fruit like raisins or cranberries. These add a fun texture and flavor contrast. For toppings, consider using chopped nuts for a crunchy finish. Whipped cream also makes a delightful topping. It adds a creamy element that complements the sweet flavors perfectly. To keep your Caramel Apple Monkey Bread fresh, place it in an airtight container. You can also wrap it tightly in plastic wrap. This keeps it moist and tasty. Store it in the fridge for up to three days. If you notice any signs of spoilage, it’s best to toss it out. When reheating monkey bread, the best method is using the oven. Preheat the oven to 350°F (175°C). Place the bread on a baking sheet and cover it with foil. Heat for about 10-15 minutes. This method helps keep the texture soft and warm. You can also use a microwave, but it may turn the bread a bit chewy. Heat in short bursts of 10-15 seconds until warm, checking often. To freeze prepared monkey bread, let it cool completely first. Then, wrap it tightly in plastic wrap and aluminum foil. This helps prevent freezer burn. You can freeze it for up to three months. When you're ready to enjoy it, move it to the fridge to thaw overnight. Reheat it in the oven as mentioned above for best results. Enjoy your sweet treat later! For the complete recipe, check out the Full Recipe section. Yes, you can prepare the apple mixture and biscuit balls ahead of time. Store them in the fridge for up to a day. On the day of baking, layer them in the bundt pan and bake. This way, you save time and still enjoy fresh monkey bread. If you want to swap biscuit dough, you can use croissant dough or pizza dough. Both options work well. Croissant dough gives a flaky texture, while pizza dough adds a bit of chewiness. You can also try homemade dough if you prefer. When stored properly in an airtight container, it can last for about 2-3 days. Factors like humidity and temperature can affect its freshness. Always check for any changes in smell or texture before eating. Absolutely! You can use a 9x13-inch baking dish or a round cake pan. Just adjust the baking time. If using a cake pan, it may need a few more minutes to bake through. Keep an eye on it to ensure it doesn’t over-bake. This blog post covers making delicious Caramel Apple Monkey Bread. We looked at ingredients, tools, and step-by-step instructions for baking. We also explored tips, variations, and how to store leftovers. This dessert is fun to make, share, and enjoy. You can easily customize it to fit your taste. Try different apples or toppings to surprise your family. Enjoy this sweet treat!

Caramel Apple Monkey Bread Delightful Fall Treat

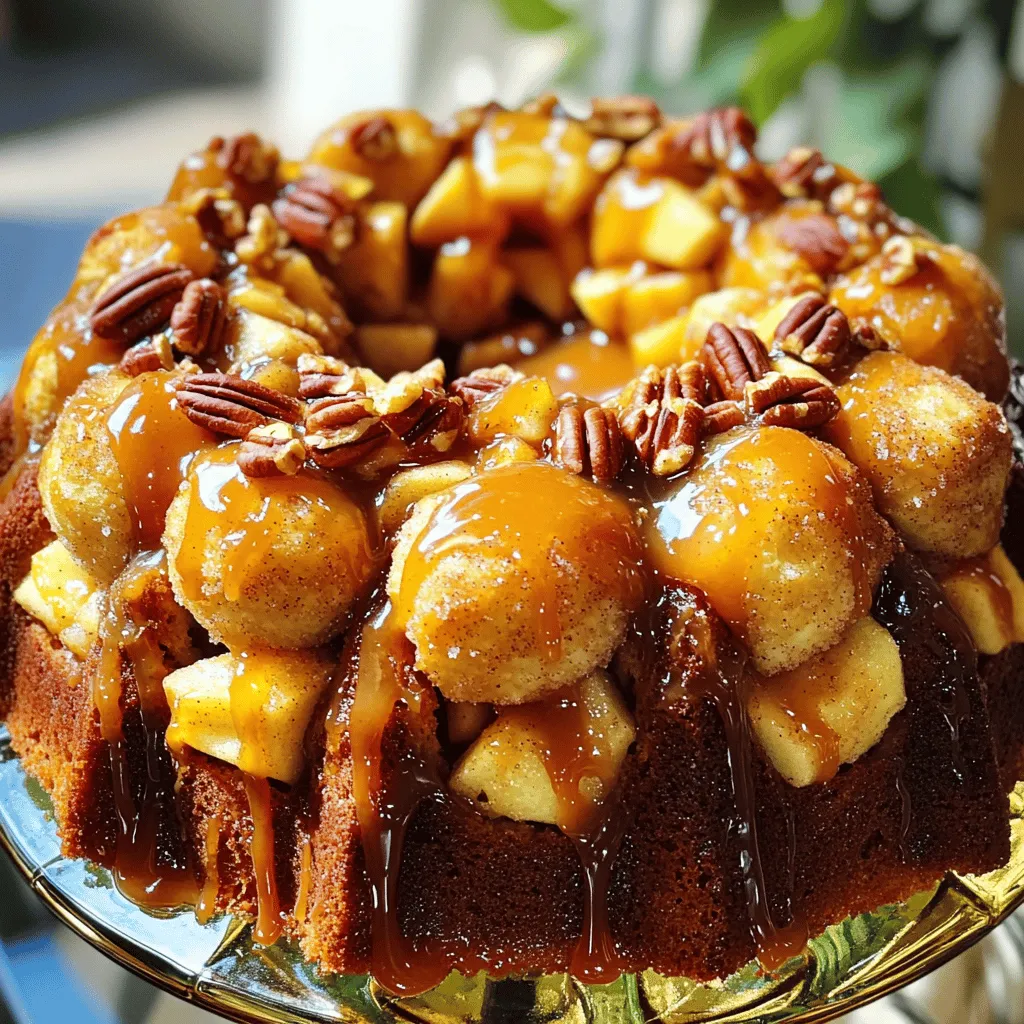
Fall is here, and that means it’s time for cozy treats! Caramel Apple Monkey Bread is a perfect mix of

- Cauliflower and Vegetables - 1 medium head of cauliflower, grated to create rice-like pieces - 1 cup broccoli florets, cut into bite-sized pieces - 1 bell pepper (red or yellow), diced for vibrant color - 1 small carrot, julienned for a sweet crunch - 1 cup snap peas, trimmed and ready to crisp - Aromatics and Seasonings - 2 cloves garlic, minced to release aroma - 1 tablespoon fresh ginger, minced for warmth - 3 tablespoons soy sauce or tamari (for gluten-free option) - 1 tablespoon sesame oil for nutty depth - Oils and Garnishes - 1 tablespoon olive oil for sautéing - 2 green onions, finely chopped for garnish - Sesame seeds for an elegant finish - Salt and pepper, to taste Gathering these ingredients is key to a tasty meal. Each veggie adds color and crunch. The garlic and ginger give a warm, spicy note. Soy sauce and sesame oil make the dish savory. Don’t forget the sesame seeds; they add a nice touch! For the full recipe, check out the details provided earlier. To start, I take a medium head of cauliflower. I remove the leaves and stem first. Then, I cut it into quarters. Next, I grab either a grater or a food processor. I grate the cauliflower until it looks like rice grains. This process makes the perfect base for my stir-fry. Once done, I set the cauliflower rice aside to use later. Now, I heat a large skillet or wok over medium-high heat. I add one tablespoon of olive oil to the pan. After the oil warms, I toss in two cloves of minced garlic and one tablespoon of fresh minced ginger. I sauté these for about 30 seconds. I want them fragrant, but not burnt. The aroma fills my kitchen and signals that it’s time for the next step. Next, I introduce my colorful veggies. I add one diced bell pepper, one small julienned carrot, one cup of broccoli florets, and one cup of snap peas. I stir-fry this mix for about 3-5 minutes. I watch closely as they cook, ensuring they stay tender yet crisp. This step adds color and nutrition to my dish. After the vegetables are cooked, I add the cauliflower rice to the skillet. I mix everything together well. This is key to blending the flavors. I let it cook for an extra 4-5 minutes. I stir regularly to avoid sticking and ensure even cooking. This helps achieve a nice texture in my stir-fry. I then drizzle three tablespoons of soy sauce and one tablespoon of sesame oil over the stir-fry. I toss everything to combine. This step ensures that every bite bursts with flavor. I let it cook for 1-2 more minutes. I then season with salt and pepper to taste. To finish, I add two finely chopped green onions and stir again. I then transfer the stir-fry to a serving dish. I sprinkle sesame seeds on top for a nice crunch and visual appeal. This simple yet flavorful dish always impresses my family and friends. For the full recipe, check out the details above. Using fresh ingredients is key. Fresh veggies bring life to your dish. Look for bright colors and firm textures. They make your stir-fry tasty and eye-catching. Try to pick seasonal produce for the best flavor. Adjusting seasonings can elevate your stir-fry. Start with soy sauce for umami. You can modify the amount to fit your taste. If you like it spicy, add chili flakes. A splash of lime juice can add brightness. Always taste as you go to find your perfect blend. Stir-frying is quick and keeps veggies crisp. Use high heat and constant movement. This method locks in flavors and nutrients. Sautéing, while slower, can achieve great results too. Both methods have their place in the kitchen. Avoiding overcooking is essential. Keep an eye on your veggies. They should be tender yet still have a nice crunch. Overcooking can lead to mushy textures. Remember, you want each bite to be delightful. Serving suggestions matter. Arrange the stir-fry on a large dish for sharing. For individual bowls, add a scoop of rice on the side. This makes for a complete meal. Decorative garnishing tips include adding green onions and sesame seeds. A sprinkle of seeds adds a nice texture. A few extra slices of green onion can brighten up the dish. Use these touches to make your meal visually appealing. For the full recipe, check out the details above. {{image_4}} You can easily add protein to your cauliflower rice stir-fry. Tofu is a great choice if you want a vegetarian option. Just press it to remove excess water, then cut it into cubes. Sauté the tofu until it is golden and crispy before adding it to the stir-fry. This adds a nice texture and flavor. If you prefer meat, chicken works well too. Cut the chicken into small pieces and cook it in the skillet before adding the veggies. This way, the chicken absorbs the flavors of the garlic and ginger. You can also try shrimp instead of chicken. Shrimp cooks quickly and brings a tasty twist. Just toss in the shrimp once your veggies are nearly done. Cook until they’re pink and opaque, and you are all set! Feel free to get creative with your veggies. You can add greens like spinach or kale. Just toss them in during the last few minutes of cooking. This keeps them bright and adds extra nutrients. Using seasonal produce is another fun idea. In summer, zucchini or bell peppers are great. In fall, you might add sliced mushrooms or carrots. The more colors you use, the more appealing your dish will look. Changing your sauces or oils can transform your dish. If you want something different, try using coconut aminos instead of soy sauce. It gives a sweeter taste and is soy-free. You can also switch up the oils. Use chili oil for a kick or avocado oil for a milder flavor. If you like spice, add red pepper flakes or sriracha for heat. For sweetness, try a touch of honey or maple syrup. Mixing sweet and spicy gives your dish a unique flavor that will surprise your taste buds! To keep your leftover stir-fry fresh, start by cooling it properly. Leave it at room temperature for about 30 minutes. This helps reduce moisture build-up. After cooling, store it in an airtight container. This keeps out air and prevents sogginess. When you're ready to eat, reheating is key. Use a skillet over medium heat for best results. Add a splash of water to keep it moist. Stir gently until heated through. This method helps maintain the texture and flavor of the veggies. If you want to freeze the stir-fry, choose a freezer-safe container. A heavy-duty freezer bag works well too. Ensure you remove as much air as possible. To thaw, place it in the fridge overnight. Then, reheat in a skillet to bring back the delicious taste. To make cauliflower rice, start with a medium head of cauliflower. First, remove the leaves and stem. Cut the head into quarters. Use a box grater or food processor to grate the cauliflower. Keep grating until it looks like rice grains. This process takes about 5 to 10 minutes. Cauliflower rice is low in calories and high in nutrients. It contains fiber, vitamins C, K, and B6. Cauliflower rice helps with digestion and may aid in weight loss. It is also gluten-free and low-carb. This makes it a great option for many diets. Yes, you can prepare this stir-fry ahead of time. Cook the veggies and cauliflower rice as usual. After cooking, let it cool completely. Store it in an airtight container in the fridge. It will stay fresh for up to three days. When ready to eat, just reheat in a pan or microwave. This saves time on busy days and keeps meals quick and easy. For the full recipe, check out the earlier section. This blog post covered how to create a delicious cauliflower stir-fry. We discussed ingredients, preparation, and cooking steps to enhance flavors. I shared tips on improving taste and various ways to customize your dish. We wrapped up with storage advice to keep leftovers fresh. Stir-frying with cauliflower rice is a fun and healthy choice. You can easily adjust the recipe to fit your tastes. I hope you enjoy trying these ideas in your kitchen!

Cauliflower Rice Stir-Fry Simple and Flavorful Meal

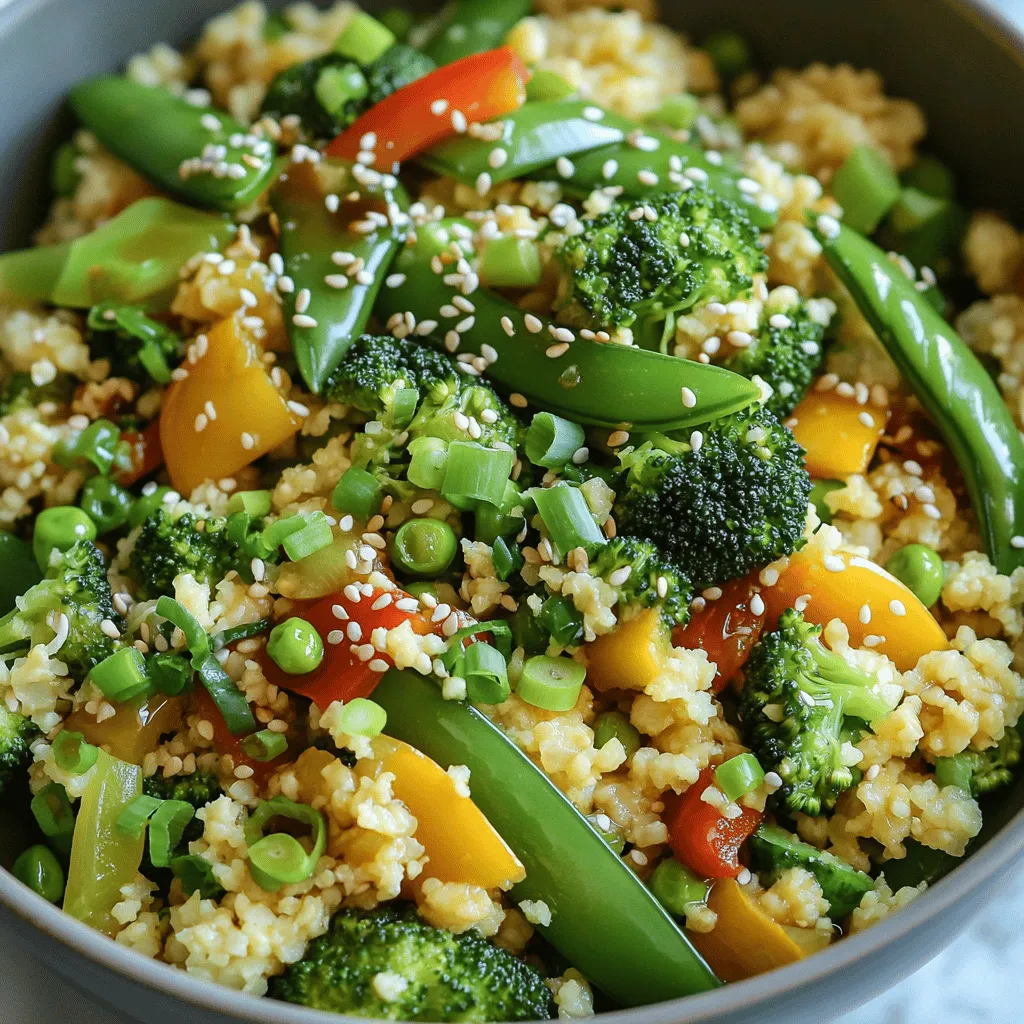
Looking for a quick and tasty meal? My Cauliflower Rice Stir-Fry is the answer! This dish is bright, healthy, and

To make cheesy spinach stuffed shells, you need a few simple ingredients. Each one adds flavor and texture to this dish. Here’s what you'll need: - 20 jumbo pasta shells - 2 cups ricotta cheese - 1 cup shredded mozzarella cheese (plus extra for topping) - 1 cup grated Parmesan cheese (divided) - 2 cups fresh spinach, chopped - 1 large egg - 2 cloves garlic, minced - 1 teaspoon Italian seasoning - Salt and freshly ground black pepper, to taste - 2 cups marinara sauce - Fresh basil leaves for garnish (optional) These ingredients work together to create a rich and creamy filling. The spinach adds a nice touch of color and nutrition. The cheeses provide that delicious cheesiness we all love. When combined, they make a comforting meal that is perfect for any occasion. For the full recipe, check out the instructions in the next section! - Preheat the oven and prepare the pasta shells First, preheat your oven to 375°F (190°C). This step is key for a perfect bake. Meanwhile, bring a large pot of salted water to a boil. Add 20 jumbo pasta shells and cook them according to the package instructions until they are al dente. Once cooked, drain the shells and set them aside to cool slightly. - Sauté spinach and garlic mixture In a skillet over medium heat, add a drizzle of olive oil. Toss in 2 cloves of minced garlic and 2 cups of chopped fresh spinach. Sauté this mix for about 3-4 minutes. You want the spinach to wilt and become aromatic. Once done, remove the skillet from heat and let it cool for a few minutes. - Combine cheese and spinach fillings In a mixing bowl, combine 2 cups of ricotta cheese, half of the 1 cup of shredded mozzarella cheese, and half of the 1 cup of grated Parmesan cheese. Add in the wilted spinach mixture, 1 large egg, 1 teaspoon of Italian seasoning, and a pinch of salt and pepper. Stir this mixture until it's creamy and well combined. - Stuffing the shells and layering the marinara Spread about 1/2 cup of marinara sauce evenly across the bottom of a 9x13 inch baking dish. This helps prevent sticking. Take each cooked pasta shell and stuff it generously with the cheese and spinach mixture. Place the filled shells seam-side up in the baking dish. - Baking process and final touches Once all the shells are filled, pour the remaining marinara sauce over the top. Sprinkle the remaining mozzarella and Parmesan cheese generously over this sauce. Cover the baking dish tightly with aluminum foil. Bake in the preheated oven for 25 minutes. After this, remove the foil and bake for an additional 10 minutes until the cheese is bubbly and golden. Let the dish cool for about 5 minutes before serving. If you like, garnish with fresh basil leaves for a nice touch. For more details, check out the full recipe. To make great stuffed shells, start with the pasta. Cook the jumbo shells until they are al dente. This means they should be firm but cooked. Follow the package instructions for timing. After cooking, drain the shells and let them cool. This helps prevent them from sticking together. To stop sticking, spread a bit of olive oil on the shells after boiling. You can also place them on a baking sheet in a single layer. Avoid piling them up, as this can cause them to stick. Pair your cheesy spinach stuffed shells with a fresh salad. A simple green salad works well. You can also serve garlic bread on the side for extra flavor. For garnishing, sprinkle fresh basil leaves on top. This adds color and taste to your dish. You can also add a bit of extra Parmesan cheese for an appealing look. These small touches make the dish inviting and tasty. If you want to explore more ideas, check the full recipe for additional tips! {{image_4}} For those who need gluten-free options, use gluten-free pasta shells. Many brands offer tasty choices that hold up well during cooking. You can enjoy the same cheesy goodness without worry. If you want a vegan version, swap out the cheese. Use plant-based ricotta made from nuts or tofu. Nutritional yeast can add a cheesy flavor to your dish. Choose a vegan mozzarella that melts well for topping. Adding protein can make your dish heartier. Cooked chicken or sausage blends well with the cheese and spinach. Just chop it up and mix it in with the filling. It adds great taste and makes the meal even more filling. Don't be afraid to experiment with herbs and spices. Italian seasoning is a classic, but why not try fresh basil or oregano? A dash of red pepper flakes can add some heat. Try different combinations to find your favorite flavor twist. By mixing these variations, you can make cheesy spinach stuffed shells fit your taste and dietary needs. For the complete experience, check out the Full Recipe. To keep your cheesy spinach stuffed shells fresh, store them in the fridge. Use an airtight container to seal in the flavors. They can last for up to three days. After that, they might lose taste and texture. When ready to eat, simply reheat the shells in the oven or microwave. If you want to save some for later, freezing is a great option. First, let the stuffed shells cool completely. Then, place them in a single layer on a baking sheet. Freeze them for about an hour. Once frozen, transfer the shells to a freezer bag or container. They can last up to three months in the freezer. When you want to enjoy them, thaw the shells overnight in the fridge. To reheat, place them in a baking dish with some marinara sauce and cover with foil. Bake at 350°F (175°C) for about 25 minutes, or until heated through. Enjoy your cheesy goodness! For the complete recipe, check out the Full Recipe. Can I make cheesy spinach stuffed shells ahead of time? Yes, you can prepare these shells ahead of time. Stuff the shells and place them in your baking dish. Cover and store them in the fridge for up to 24 hours. When ready, just add the marinara sauce and bake as directed. What can I use instead of ricotta cheese? If you need a substitute for ricotta cheese, try cottage cheese or cream cheese. Both give a creamy texture. You can blend them for a smoother consistency. Can I use jarred marinara sauce instead of homemade? Absolutely! Jarred marinara sauce saves time and works well. Choose a brand you like for the best taste. How do I know when the cheese is properly melted? Check for a bubbly, golden surface. If the cheese looks melted and has a slight crisp, it's done. What is the best way to reheat leftovers without drying them out? Reheat leftovers in the oven. Cover them with foil and heat at 350°F (175°C). This keeps the cheese moist and tasty. Enjoy your cheesy spinach stuffed shells! Cheesy spinach stuffed shells are easy to make and full of flavor. We discussed the key ingredients, step-by-step preparation, and how to bake them perfectly. I shared tips for cooking, serving, and storing leftovers. You can even adjust the recipe for dietary needs or personal taste. Now, it’s time to enjoy your creation! With a little practice, you’ll impress everyone with this dish. Keep experimenting and have fun in the kitchen.

Cheesy Spinach Stuffed Shells Flavorful Comfort Food

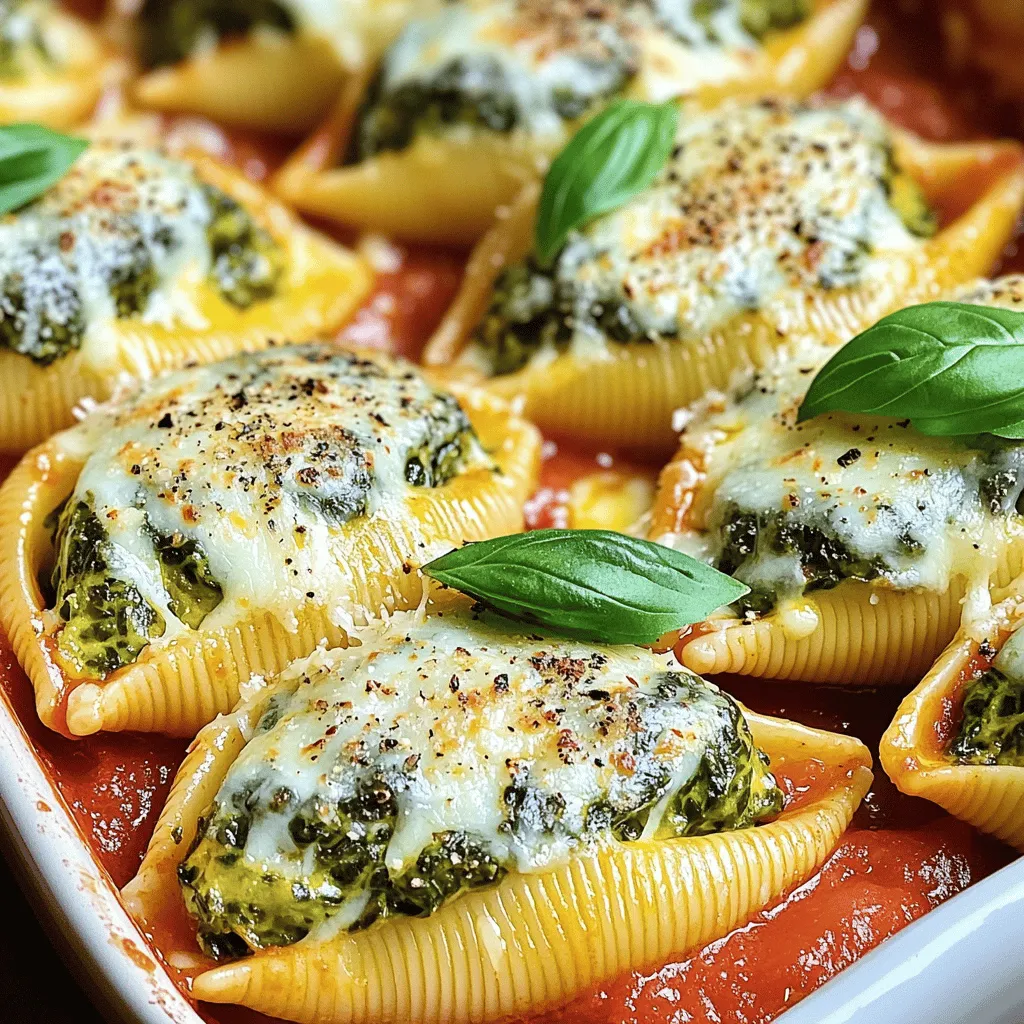
If you’re looking for a dish that combines comfort and flavor, look no further! Cheesy spinach stuffed shells offer a

Older posts
Newer posts
← Previous Page1 … Page65 Page66 Page67 … Page86 Next →

dsad

© 2026 yumymoments • Built with GeneratePress

Our Policies

  • Copyright Policy
  • Cookie Policy
  • GDPR Policy
  • Privacy Policy
  • Disclaimer
  • Terms Of Use

More Information

  • Home
  • About
  • Contact
  • Appetizers
  • Dessert
  • Dinner
  • Drinks
©2026, yumymoments About Back To Top